从PPT到PNG:Python实现的高效PPT转图工具
从PPT到PNG:Python实现的高效PPT转图工具
在日常工作中,PPT(PowerPoint)文件是我们常用的演示工具。然而,有时候我们需要将PPT的内容提取为图片格式(如PNG)以便于展示或保存。手动将每一页PPT保存为图片不仅繁琐且容易出错。为了提高工作效率,我们可以通过编程自动化这一过程。本篇文章将详细介绍如何使用Python语言开发一款PPT转PNG工具,基于Tkinter图形界面和win32com库,支持批量PPT转图片及图像网格拼接功能。
1. 概述
本工具的目标是将PPT文件的每一页转换为高质量的PNG图片,并提供一个图形化界面,帮助用户快速选择PPT文件并完成转换操作。该工具的实现基于以下几个核心技术:
- Tkinter:Python标准库中的GUI工具,用于构建用户界面。
- win32com:通过调用PowerPoint的COM接口来操作PPT文件,实现文件转换。
- PIL(Pillow):Python Imaging Library,用于处理图像,包括图像的读取、修改和保存。
- psutil:用于检查并确保PowerPoint进程的安全退出,避免进程残留导致的错误。
核心功能
- PPT转PNG:将PPT中的每一页转换为PNG格式的图片。
- 图像网格拼接:将转换后的PNG图片按特定规则排列为一张大图,尽量保证输出图像的比例接近4:3。
- 图形界面:提供简洁直观的用户界面,支持文件选择、转换进度显示及转换状态提示。
2. 功能使用
2.1 安装依赖
首先,需要安装一些必要的Python库。在命令行中运行以下命令:
pip install pillow psutil pywin32
2.2 使用步骤
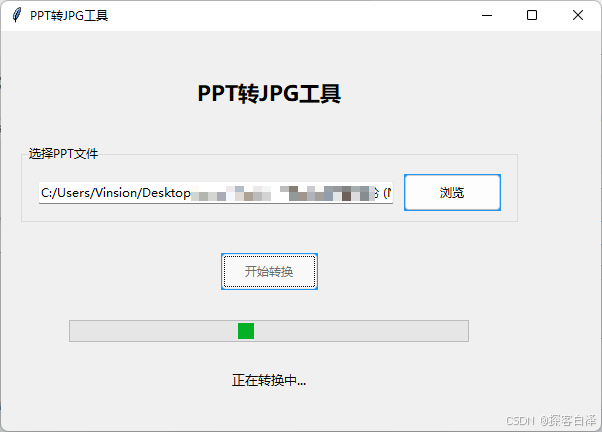
- 启动工具:运行程序后,打开的GUI界面包含了文件选择、进度条以及状态提示区域。
- 选择PPT文件:点击“浏览”按钮选择需要转换的PPT文件。只支持
.ppt和.pptx文件格式。 - 开始转换:选择文件后,点击“开始转换”按钮,程序会自动将PPT的每一页转换为PNG图片并保存到临时目录中。
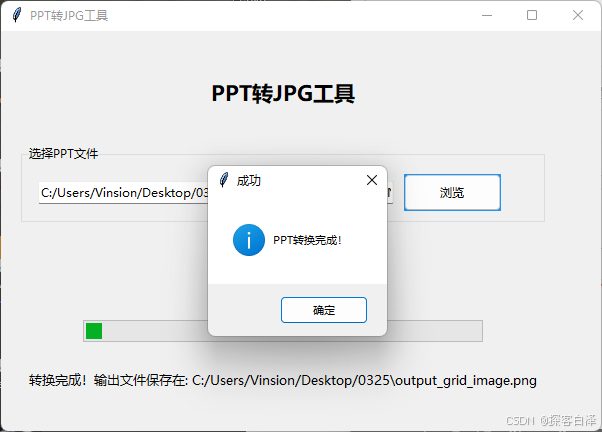
- 创建网格图:转换完成后,程序会根据指定的列数将所有图片拼接为一张大图。最终输出图像的比例尽量接近4:3。
- 查看结果:转换完成后,程序会显示输出文件的保存路径,并提供成功提示。
2.3 代码实现
2.3.1 PPT转换为PNG
PPT文件的转换操作依赖于PowerPoint的COM接口。通过win32com.client.DispatchEx我们可以启动PowerPoint应用,加载PPT文件并提取每一页为PNG图片。
def ppt_to_images(ppt_path, output_dir):"""将PPT转换为图片"""if not os.path.exists(output_dir):os.makedirs(output_dir)ppt_path = os.path.abspath(ppt_path)try:for proc in psutil.process_iter(['name']):if proc.info['name'] and 'powerpnt' in proc.info['name'].lower():proc.kill()except:passtime.sleep(1)max_retries = 3retry_count = 0last_error = Nonepowerpoint = Nonewhile retry_count < max_retries:try:powerpoint = win32com.client.DispatchEx("PowerPoint.Application")powerpoint.Visible = 1powerpoint.DisplayAlerts = 0presentation = powerpoint.Presentations.Open(ppt_path, WithWindow=False)total_slides = presentation.Slides.Countfor i in range(1, total_slides + 1):image_path = os.path.join(output_dir, f'slide_{i:03d}.png')slide = presentation.Slides(i)slide.Export(image_path, "PNG", 1920, 1080)time.sleep(0.5)presentation.Close()returnexcept Exception as e:retry_count += 1last_error = eif retry_count >= max_retries:raise Exception(f"PowerPoint转换失败,已重试{max_retries}次。错误信息: {str(last_error)}")time.sleep(2)
2.3.2 图像网格拼接
对于转换后的每一张PNG图片,程序将尝试按不同的列数排列,以获得接近4:3的图像比例。
def create_grid_image(image_dir, output_path, target_width=1920):"""将图片紧凑排列,并使最终图片比例接近4:3"""image_files = sorted([f for f in os.listdir(image_dir) if f.endswith('.png')])if not image_files:raise Exception("没有找到转换后的图片文件!")images = [Image.open(os.path.join(image_dir, img_file)) for img_file in image_files]best_cols = 1best_ratio_diff = float('inf')best_layout = Nonefor num_cols in range(1, 6):layout, row_heights = [], []current_row, max_row_height = [], 0for img in images:scale = (target_width / num_cols) / img.widthnew_width = int(img.width * scale)new_height = int(img.height * scale)current_row.append((new_width, new_height))max_row_height = max(max_row_height, new_height)if len(current_row) == num_cols:layout.append(current_row)row_heights.append(max_row_height)current_row, max_row_height = [], 0if current_row:layout.append(current_row)row_heights.append(max_row_height)total_width = target_widthtotal_height = sum(row_heights)target_ratio = 4/3actual_ratio = total_width / total_heightratio_diff = abs(target_ratio - actual_ratio)if ratio_diff < best_ratio_diff:best_ratio_diff = ratio_diffbest_cols = num_colsbest_layout = (layout, row_heights)layout, row_heights = best_layoutcanvas = Image.new('RGB', (target_width, sum(row_heights)), 'white')y = 0img_index = 0for row, row_height in zip(layout, row_heights):x = 0for width, height in row:if img_index < len(images):img = images[img_index].resize((width, height), Image.Resampling.LANCZOS)canvas.paste(img, (x, y))x += widthimg_index += 1y += row_heightcanvas.save(output_path, quality=95)
2.4 GUI界面
GUI使用Tkinter构建,包含了文件选择框、转换进度条、状态标签和按钮,确保用户能够直观地使用该工具进行PPT转换。
class PPTConverterGUI:def __init__(self, root):self.root = rootself.root.title("PPT转JPG工具")self.root.geometry("600x400")...def browse_file(self):file_path = filedialog.askopenfilename(filetypes=[("PowerPoint文件", "*.ppt;*.pptx")])if file_path:self.file_path.set(file_path)logging.info(f"选择了文件: {file_path}")def start_conversion(self):ppt_path = self.file_path.get()...thread = threading.Thread(target=self.convert_ppt, args=(ppt_path,))thread.start()
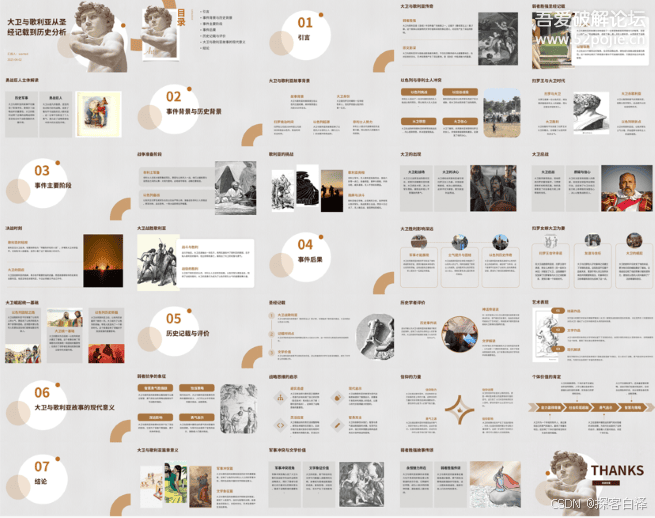
3.效果展示

生成jpg图片效果图:
4.相关源码
import os
from PIL import Image
import tempfile
import win32com.client
import time
import math
import tkinter as tk
from tkinter import filedialog, ttk, messagebox
import threading
import traceback
import logging
import psutil# 配置日志
logging.basicConfig(filename='ppt_converter.log',level=logging.DEBUG,format='%(asctime)s - %(levelname)s - %(message)s'
)def ppt_to_images(ppt_path, output_dir):"""将PPT转换为图片"""# 创建临时目录if not os.path.exists(output_dir):os.makedirs(output_dir)# 确保使用绝对路径ppt_path = os.path.abspath(ppt_path)# 确保PowerPoint进程已完全退出try:for proc in psutil.process_iter(['name']):if proc.info['name'] and 'powerpnt' in proc.info['name'].lower():proc.kill()except:passtime.sleep(1)  # 等待进程完全退出max_retries = 3retry_count = 0last_error = Nonepowerpoint = Nonewhile retry_count < max_retries:try:# 使用PowerPoint COM对象powerpoint = win32com.client.DispatchEx("PowerPoint.Application")try:# 设置PowerPoint为可见(有些系统必须设置为可见才能工作)powerpoint.Visible = 1powerpoint.DisplayAlerts = 0# 打开演示文稿presentation = powerpoint.Presentations.Open(ppt_path,WithWindow=False  # 尝试不显示窗口)# 遍历每一页并保存为图片total_slides = presentation.Slides.Countfor i in range(1, total_slides + 1):image_path = os.path.join(output_dir, f'slide_{i:03d}.png')slide = presentation.Slides(i)slide.Export(image_path, "PNG", 1920, 1080)  # 指定分辨率time.sleep(0.5)  # 给PowerPoint一些时间来处理# 正常关闭presentation.Close()return  # 成功完成,退出函数finally:# 确保清理资源if powerpoint:try:powerpoint.Quit()except:passfinally:powerpoint = Noneexcept Exception as e:retry_count += 1last_error = e# 确保PowerPoint被关闭if powerpoint:try:powerpoint.Quit()except:passfinally:powerpoint = Noneif retry_count >= max_retries:error_msg = f"PowerPoint转换失败,已重试{max_retries}次。错误信息: {str(last_error)}"logging.error(error_msg)raise Exception(error_msg)logging.info(f"第{retry_count}次尝试失败,等待后重试...")time.sleep(2)  # 等待一段时间后重试raise Exception("PowerPoint转换失败,超过最大重试次数")def create_grid_image(image_dir, output_path, target_width=1920):"""将图片紧凑排列,并使最终图片比例接近4:3"""# 获取所有图片文件image_files = sorted([f for f in os.listdir(image_dir) if f.endswith('.png')])if not image_files:raise Exception("没有找到转换后的图片文件!")# 读取所有图片images = []for img_file in image_files:img = Image.open(os.path.join(image_dir, img_file))images.append(img)# 找到最佳的列数,使最终图片比例最接近4:3best_cols = 1best_ratio_diff = float('inf')best_layout = None# 尝试不同的列数(1到5列)for num_cols in range(1, 6):# 计算这个列数下的布局layout = []current_row = []row_heights = []max_row_height = 0for img in images:# 计算缩放后的尺寸scale = (target_width / num_cols) / img.widthnew_width = int(img.width * scale)new_height = int(img.height * scale)current_row.append((new_width, new_height))max_row_height = max(max_row_height, new_height)if len(current_row) == num_cols:layout.append(current_row)row_heights.append(max_row_height)current_row = []max_row_height = 0# 处理最后一行if current_row:layout.append(current_row)row_heights.append(max_row_height)# 计算总宽度和高度total_width = target_widthtotal_height = sum(row_heights)# 计算与4:3比例的差异target_ratio = 4/3actual_ratio = total_width / total_heightratio_diff = abs(target_ratio - actual_ratio)# 更新最佳列数if ratio_diff < best_ratio_diff:best_ratio_diff = ratio_diffbest_cols = num_colsbest_layout = (layout, row_heights)# 使用最佳列数创建最终图片layout, row_heights = best_layoutcanvas_width = target_widthcanvas_height = sum(row_heights)canvas = Image.new('RGB', (canvas_width, canvas_height), 'white')# 拼接图片y = 0img_index = 0for row, row_height in zip(layout, row_heights):x = 0for width, height in row:if img_index < len(images):img = images[img_index]img = img.resize((width, height), Image.Resampling.LANCZOS)canvas.paste(img, (x, y))x += widthimg_index += 1y += row_height# 裁剪掉多余的空白部分bbox = canvas.getbbox()if bbox:canvas = canvas.crop(bbox)# 保存最终图片canvas.save(output_path, quality=95)class PPTConverterGUI:def __init__(self, root):self.root = rootself.root.title("PPT转JPG工具")self.root.geometry("600x400")# 设置主题样式style = ttk.Style()style.configure("TButton", padding=6, relief="flat", background="#2196F3")style.configure("TLabel", padding=6, font=('微软雅黑', 10))# 创建主框架main_frame = ttk.Frame(root, padding="20")main_frame.grid(row=0, column=0, sticky=(tk.W, tk.E, tk.N, tk.S))# 标题title_label = ttk.Label(main_frame, text="PPT转JPG工具", font=('微软雅黑', 16, 'bold'))title_label.grid(row=0, column=0, columnspan=2, pady=20)# 文件选择区域file_frame = ttk.LabelFrame(main_frame, text="选择PPT文件", padding="10")file_frame.grid(row=1, column=0, columnspan=2, sticky=(tk.W, tk.E), pady=10)self.file_path = tk.StringVar()self.file_entry = ttk.Entry(file_frame, textvariable=self.file_path, width=50)self.file_entry.grid(row=0, column=0, padx=5)browse_button = ttk.Button(file_frame, text="浏览", command=self.browse_file)browse_button.grid(row=0, column=1, padx=5)# 转换按钮self.convert_button = ttk.Button(main_frame, text="开始转换", command=self.start_conversion)self.convert_button.grid(row=2, column=0, columnspan=2, pady=20)# 进度条self.progress = ttk.Progressbar(main_frame, length=400, mode='indeterminate')self.progress.grid(row=3, column=0, columnspan=2, pady=10)# 状态标签self.status_label = ttk.Label(main_frame, text="")self.status_label.grid(row=4, column=0, columnspan=2, pady=10)# 配置网格权重main_frame.columnconfigure(0, weight=1)main_frame.columnconfigure(1, weight=1)def browse_file(self):file_path = filedialog.askopenfilename(filetypes=[("PowerPoint文件", "*.ppt;*.pptx")])if file_path:self.file_path.set(file_path)logging.info(f"选择了文件: {file_path}")def start_conversion(self):ppt_path = self.file_path.get()if not ppt_path:messagebox.showerror("错误", "请先选择PPT文件!")returnif not os.path.exists(ppt_path):messagebox.showerror("错误", "文件不存在!")return# 禁用按钮并显示进度条self.convert_button.state(['disabled'])self.progress.start()self.status_label.config(text="正在转换中...")# 在新线程中执行转换thread = threading.Thread(target=self.convert_ppt, args=(ppt_path,))thread.start()def convert_ppt(self, ppt_path):temp_dir = Nonetry:logging.info(f"开始转换PPT文件: {ppt_path}")# 创建临时目录temp_dir = tempfile.mkdtemp()logging.info(f"创建临时目录: {temp_dir}")output_path = os.path.join(os.path.dirname(ppt_path), "output_grid_image.png")logging.info(f"输出路径: {output_path}")# 转换PPT为图片logging.info("开始转换PPT为图片...")ppt_to_images(ppt_path, temp_dir)logging.info("PPT转图片完成")# 创建网格图logging.info("开始创建网格图...")create_grid_image(temp_dir, output_path)logging.info("网格图创建完成")# 清理临时文件logging.info("清理临时文件...")for file in os.listdir(temp_dir):os.remove(os.path.join(temp_dir, file))os.rmdir(temp_dir)logging.info("临时文件清理完成")# 更新UIself.root.after(0, self.conversion_complete, output_path)except Exception as e:error_msg = f"转换失败: {str(e)}\n{traceback.format_exc()}"logging.error(error_msg)self.root.after(0, self.conversion_error, error_msg)finally:# 确保清理临时文件if temp_dir and os.path.exists(temp_dir):try:for file in os.listdir(temp_dir):os.remove(os.path.join(temp_dir, file))os.rmdir(temp_dir)except Exception as e:logging.error(f"清理临时文件失败: {str(e)}")def conversion_complete(self, output_path):self.progress.stop()self.convert_button.state(['!disabled'])self.status_label.config(text=f"转换完成!输出文件保存在: {output_path}")messagebox.showinfo("成功", "PPT转换完成!")def conversion_error(self, error_msg):self.progress.stop()self.convert_button.state(['!disabled'])self.status_label.config(text="转换失败!")messagebox.showerror("错误", f"转换过程中出现错误: {error_msg}")def main():root = tk.Tk()app = PPTConverterGUI(root)root.mainloop()if __name__ == "__main__":main()
5. 总结
通过本篇文章,您已经了解了如何使用Python编写一款PPT转图片的工具。我们通过Tkinter构建了一个简洁的GUI界面,通过win32com调用PowerPoint的COM接口进行文件转换,并通过Pillow处理图像拼接。无论是用于日常的文件转换,还是处理多个PPT文件,本工具都能大大提高工作效率。
此工具的扩展性也很强,您可以根据需要进一步优化图像的处理过程,或者增加更多的自定义功能,例如支持更多格式的转换,添加批量处理功能等。希望本教程能帮助您更好地实现PPT转图片的自动化,提升工作效率。
相关文章:
从PPT到PNG:Python实现的高效PPT转图工具
从PPT到PNG:Python实现的高效PPT转图工具 在日常工作中,PPT(PowerPoint)文件是我们常用的演示工具。然而,有时候我们需要将PPT的内容提取为图片格式(如PNG)以便于展示或保存。手动将每一页PPT保…...

使用 Java 8 Stream实现List重复数据判断
import java.util.*; import java.util.stream.Collectors;public class DeduplicateStreamExample {static class ArchiveItem {// 字段定义与Getter/Setter省略(需根据实际补充)private String mATNR;private String lIFNR;private String suppSpecMod…...
)
状态模式详解与真实场景案例(Java实现)
模式定义 状态模式(State Pattern) 允许对象在其内部状态改变时改变它的行为,使对象看起来像是修改了它的类。属于行为型设计模式,核心思想是将状态抽象为独立对象,不同状态下行为封装在不同状态类中。 解决的问题 …...

BitMap和RoaringBitmap:极致高效的大数据结构
目录 1、引言 2、BitMap:基础 2.1、核心原理 2.2、BitMap的优势 2.3、BitMap的局限性 3、RoaringBitmap:进化 3.1、分段策略 3.2、三种容器类型 3.2.1. ArrayContainer(数组容器) 3.2.2. BitMapContainer(位图容器) 3.2.3. RunContainer(行程容器) 3.3、行…...

【Java基础】Java集合遍历方式
前言 在Java编程中,集合(Collection)是存储和操作对象的核心工具。遍历集合是开发者最频繁的操作之一,但不同场景下选择合适的遍历方式至关重要。 一、基础遍历方式 1. 基本for循环 适用场景:仅适用于List等有序集…...

Rust-引用借用规则
目录 一、概述 二、借用规则 三、详细解释 3.1 第一条规则 3.2 第二条规则 3.3 第三条规则 四、总结 Welcome to Code Blocks blog 本篇文章主要介绍了 [Rust-引用借用规则] ❤博主广交技术好友,喜欢文章的可以关注一下❤ 一、概述 Rust为确保程序在运行时不…...
如何保障企业数据的安全?软件开发中的数据安全防护措施
引言 随着数字化转型的推进,数据已经成为企业最重要的资产之一。然而,随着数据量的增长,数据泄露、丢失和滥用的风险也不断增加。如何保障企业数据的安全,成为企业在进行软件开发时必须重点关注的问题。本文将介绍软件开发中的一些…...
Linux安装开源版MQTT Broker——EMQX服务器环境从零到一的详细搭建教程
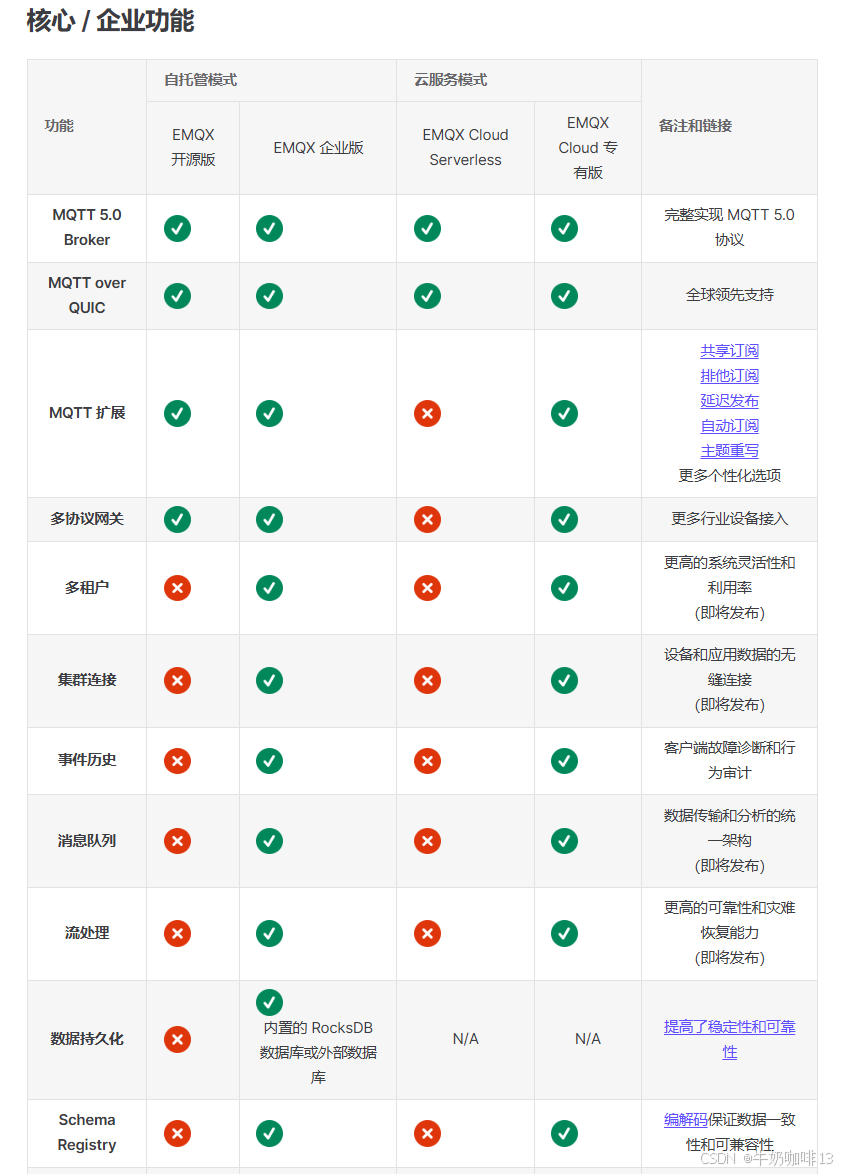
零、EMQX各个版本的区别 EMQX各个版本的功能对比详情https://docs.emqx.com/zh/emqx/latest/getting-started/feature-comparison.html...

【软件工程大系】净室软件工程
净室软件工程(Cleanroom Software Engineering)是一种以缺陷预防(正确性验证)为核心的软件开发方法,旨在通过严格的工程规范和数学验证,在开发过程中避免缺陷的产生,而非依赖后期的测试和调试。…...

软考 系统架构设计师系列知识点之杂项集萃(49)
接前一篇文章:软考 系统架构设计师系列知识点之杂项集萃(48) 第76题 某文件管理系统在磁盘上建立了位视图(bitmap),记录磁盘的使用情况。若磁盘上物理块的编号依次为:0、1、2、……;…...
--网络编程)
Day(21)--网络编程
网络编程 在网络通信协议下,不同计算机上运行的程序,进行的数据传输 应用场景:即使通信、网友对战、金融证券等等,不管是什么场景,都是计算机和计算机之间通过网络进行的数据传输 java.net 常见的软件架构 C/S&am…...

JVM 调优不再难:AI 工具自动生成内存优化方案
在 Java 应用程序的开发与运行过程中,Java 虚拟机(JVM)的性能调优一直是一项极具挑战性的任务,尤其是内存优化方面。不合适的 JVM 内存配置可能会导致应用程序出现性能瓶颈,甚至频繁抛出内存溢出异常,影响业…...

封装Tcp Socket
封装Tcp Socket 0. 前言1. Socket.hpp2. 简单的使用介绍 0. 前言 本文中用到的Log.hpp在笔者的历史文章中都有涉及,这里就不再粘贴源码了,学习地址如下:https://blog.csdn.net/weixin_73870552/article/details/145434855?spm1001.2014.3001…...

5.1 GitHub订阅监控系统实战:FastAPI+SQLAlchemy高效架构设计与核心源码揭秘
GitHub Sentinel Agent 分析报告功能设计与实现 关键词:订阅管理 API 设计、GitHub API 集成、SQLAlchemy ORM、JWT 认证、单元测试框架 1. 订阅管理功能架构设计 订阅管理模块采用分层架构设计,通过 FastAPI 构建 RESTful 接口,结合 SQLAlchemy ORM 实现数据持久化: #me…...

2025年推荐使用的开源大语言模型top20:核心特性、选择指标和开源优势
李升伟 编译 随着人工智能技术的持续发展,开源大型语言模型(LLMs)正变得愈发强大,使最先进的AI能力得以普及。到2025年,开源生态系统中涌现出多个关键模型,它们在各类应用场景中展现出独特优势。 大型语言…...
Linux 入门九:Linux 进程间通信
概述 进程间通信(IPC,Inter-Process Communication)是指在不同进程之间传递数据和信息的机制。Linux 提供了多种 IPC 方式,包括管道、信号、信号量、消息队列、共享内存和套接字等。 方式 一、管道(Pipe)…...

Spark-SQL核心编程实战:自定义函数与聚合函数详解
在大数据处理领域,Spark-SQL是极为重要的工具。今天和大家分享一下在Spark-SQL开发中的自定义函数和聚合函数的使用,这些都是基于实际项目开发经验的总结。 在Spark-SQL开发时,第一步是搭建开发环境。在IDEA中创建Spark-SQL子模块,…...

[Mysql][Mybatis][Spring]配置文件未能正确给驱动赋值,.properties文件username值被替换
这是最初的.properties配置文件: drivercom.mysql.cj.jdbc.Driver urljdbc:mysql://localhost:3306/qykf usernameroot password123456 在Mybatis中引入后进行赋值: <environments default"development"><environment id"deve…...

go 指针接收者和值接收者的区别
go 指针接收者和值接收者的区别 指针接收者和值接收者的区别主要有两点: Go 中函数传参是传值,因此指针接收者传递的是接收者的指针拷贝,值接收者传递的是接收者的拷贝---在方法中指针接收者的变量会被修改,而值接收者的成员变量…...

Redis之缓存更新策略
缓存更新策略 文章目录 缓存更新策略一、策略对比二、常见的缓存更新策略三、如何选择策略四、实际应用示例五、使用 Cache-Aside TTL 的方式,实现缓存商铺信息详情1.引入StringRedisTemplate2.将查询商铺信息加入缓存3.更新商铺信息时移除缓存总结 六、注意事项 一…...
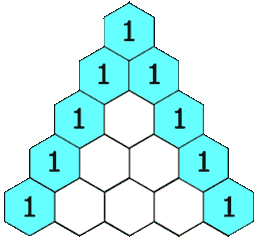
【leetcode100】杨辉三角
1、题目描述 给定一个非负整数 numRows,生成「杨辉三角」的前 numRows 行。 在「杨辉三角」中,每个数是它左上方和右上方的数的和。 示例 1: 输入: numRows 5 输出: [[1],[1,1],[1,2,1],[1,3,3,1],[1,4,6,4,1]]示例 2: 输入: numRows 1 输出: [[1]…...

git reset详解
一、git reset 的核心作用 用于 移动当前分支的 HEAD 指针 到指定的提交,并可选择是否修改工作区和暂存区。 ⚠️ 注意:若提交已被推送到远程仓库,强制重置(--hard)后需谨慎操作,避免影响协作。 二、三种模…...

Selenium2+Python自动化:利用JS解决click失效问题
文章目录 前言一、遇到的问题二、点击父元素问题分析解决办法实现思路 三、使用JS直接点击四、参考代码 前言 在使用Selenium2和Python进行自动化测试时,我们有时会遇到这样的情况:元素明明已经被成功定位,代码运行也没有报错,但…...
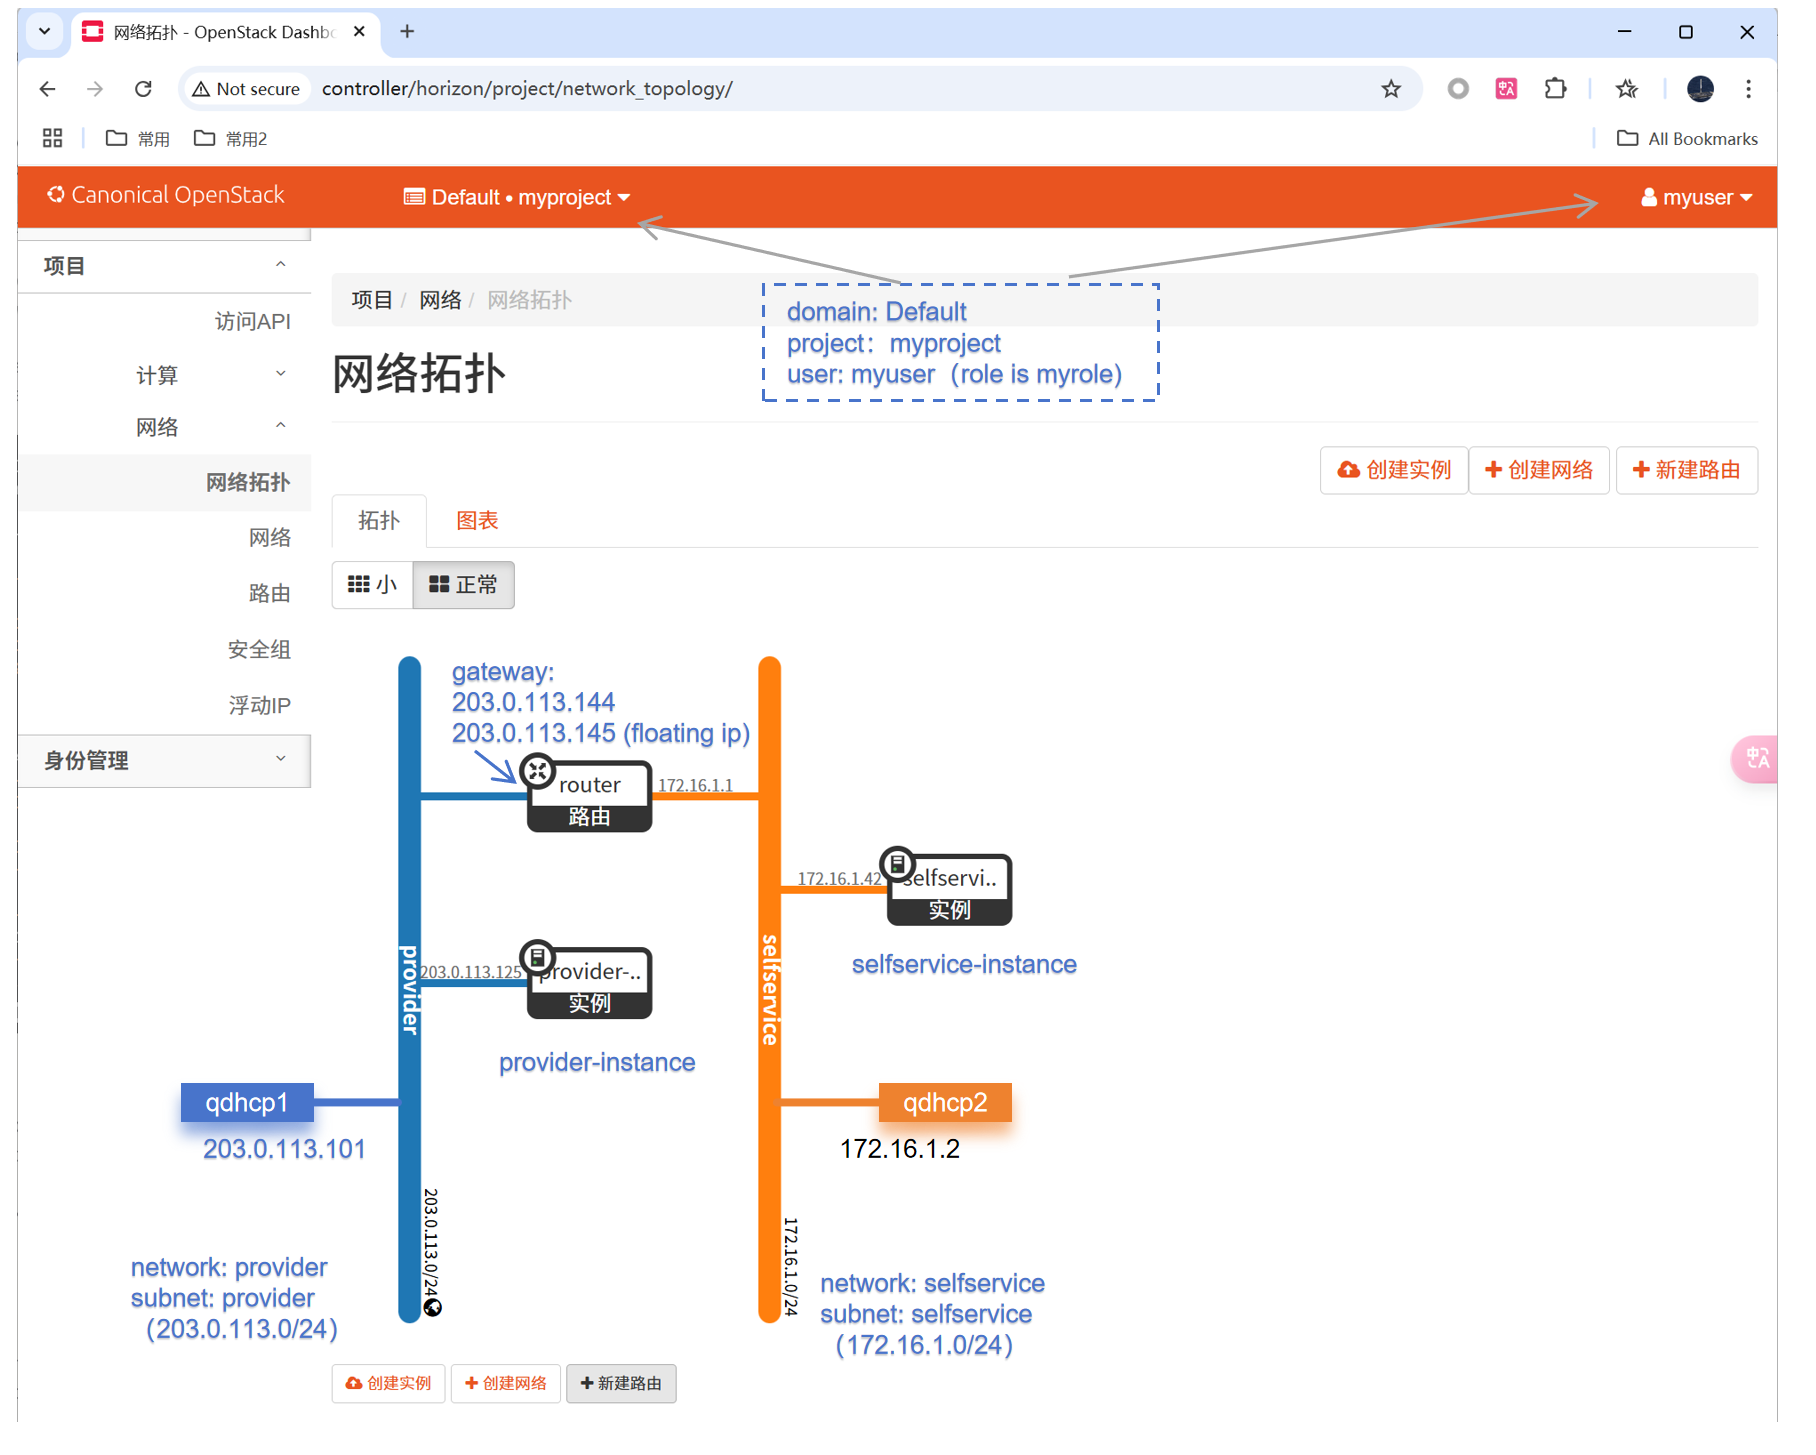
OpenStack Yoga版安装笔记(十九)启动一个实例(Self-service networks)
1、概述 1.1 官方文档 Launch an instancehttps://docs.openstack.org/install-guide/launch-instance.html 《OpenStack Yoga版安装笔记(十四)启动一个实例》文档中,已经按照Option1: Provider networks创建网络。 本文按照Option2&#…...
栈与队列)
数据结构(java)栈与队列
栈:(先进后出) 入栈: 1.普通栈一定要放、最小栈放的原则是: *如果最小栈是空的,那么放 *如果最小栈的栈顶元素没有当前的元素小,则放 2.如果要放的的元素小于等于最小栈栈顶元素可以放吗?放 出栈: 需要…...

Flask+Plotly结合动态加载图形页面实践
1. DeepSeek帮我实践 1.1. 我的提问既设计方案 原有如下主页:dashboard.html,现增加“预测模型学习”,对感知机神经网络描述如下: 1、输入与输出为固定值,例如输入层215,输出层48; 2、模型为回归神经网络; 3、中层是可动态调整的,例如定义如下:第二层,200,第三层…...
数学教学通讯杂志数学教学通讯杂志社数学教学通讯编辑部2025年第6期目录
课程教材教法 “课程思政”视域下的高中数学教学探索与实践——以“函数概念的发展历程”为例 赵文博; 3-617 PBL教学模式下高中统计教学的探索与实践——以“随机抽样(第一课时)”为例 陈沛余; 7-10 “三新”背景下的高中数学教学困境与应对…...

整活 kotlin + springboot3 + sqlite 配置一个 SQLiteCache
要实现一个 SQLiteCache 也是很简单的只需要创建一个 cacheManager Bean 即可 // 如果配置文件中 spring.cache.sqlite.enable false 则不启用 Bean("cacheManager") ConditionalOnProperty(name ["spring.cache.sqlite.enable"], havingValue "t…...
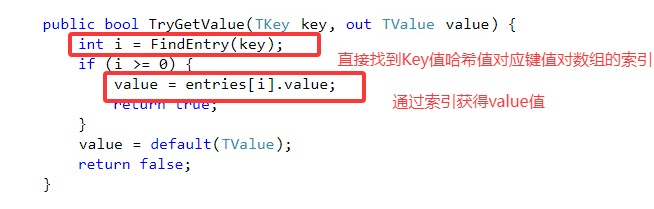
C#容器源码分析 --- Dictionary<TKey,TValue>
Dictionary<TKey, TValue> 是 System.Collections.Generic 命名空间下的高性能键值对集合,其核心实现基于哈希表和链地址法(Separate Chaining)。 .Net4.8 Dictionary<TKey,TValue>源码地址: dictionary…...
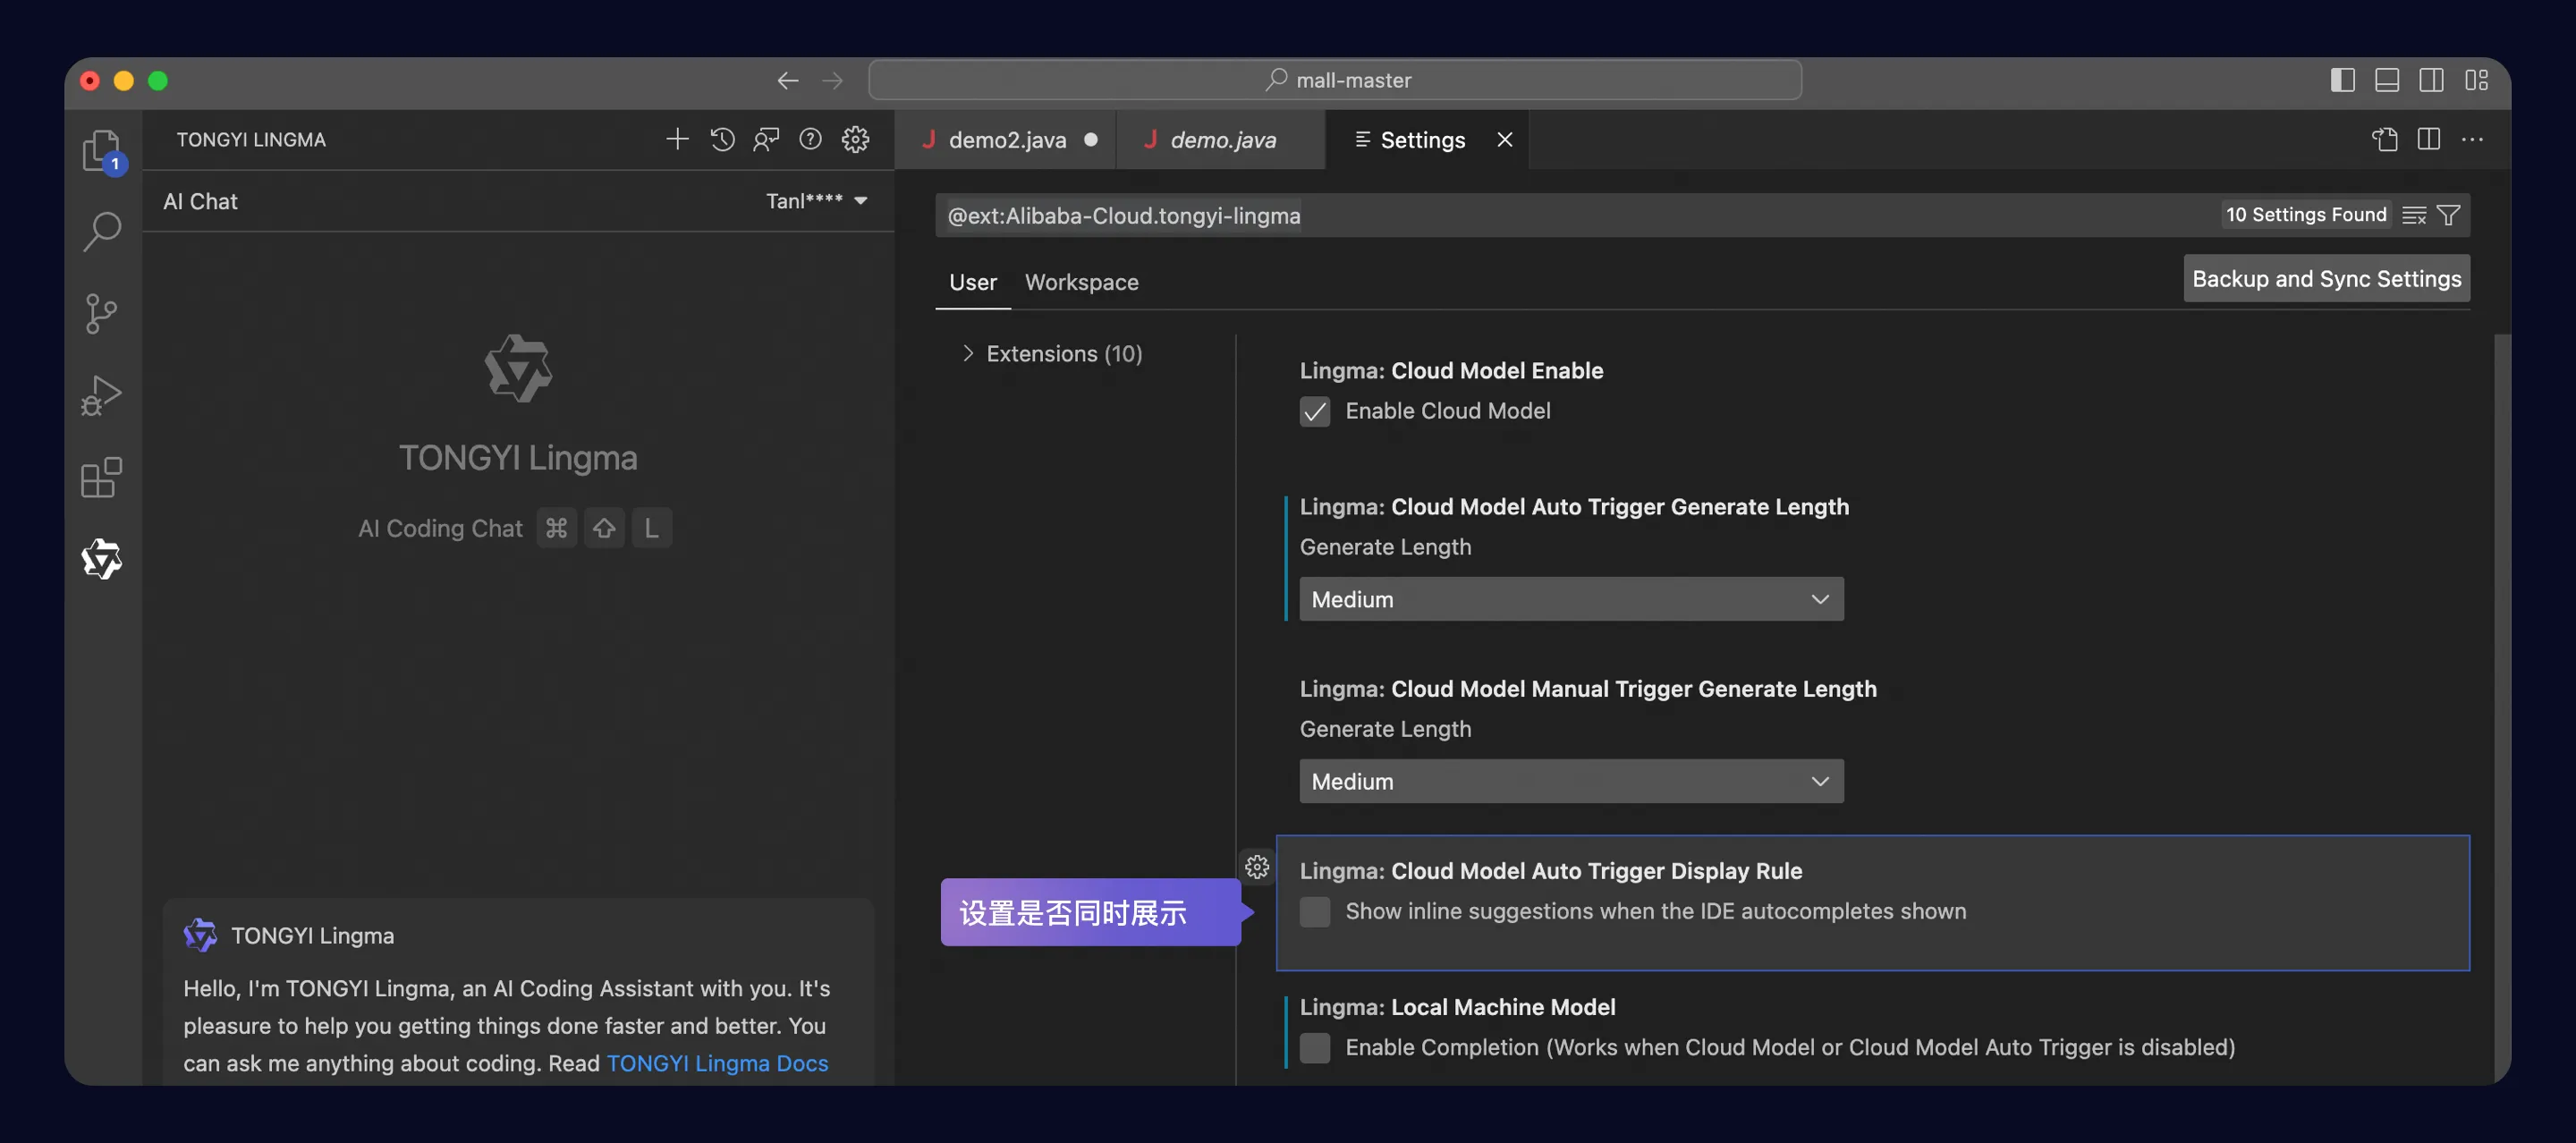
在 Visual Studio Code 中安装通义灵码 - 智能编码助手
高效的编码工具对于提升开发效率和代码质量至关重要。 通义灵码作为一款智能编码助手,为开发者提供了全方位的支持。 本文将详细介绍如何在 Visual Studio Code(简称 VSCode)中安装通义灵码,以及如何进行相关配置以开启智能编码…...