在极狐GitLab 身份验证中如何使用 OIDC?
极狐GitLab 是 GitLab 在中国的发行版,关于中文参考文档和资料有:
- 极狐GitLab 中文文档
- 极狐GitLab 中文论坛
- 极狐GitLab 官网
使用 OpenID Connect 作为认证提供者 (BASIC SELF)
您可以使用极狐GitLab 作为客户端应用程序,与 OpenID Connect 作为 OmniAuth 提供者一起使用。
要启用 OpenID Connect OmniAuth 提供者,您必须在 OpenID Connect 提供者处注册您的应用程序。OpenID Connect 提供者会向您提供客户端的详细信息和秘密供您使用。
1.在您的极狐GitLab 服务器上,打开配置文件。
对于 Linux 软件包安装:
sudo editor /etc/gitlab/gitlab.rb
对于自编译安装:
cd /home/git/gitlab
sudo -u git -H editor config/gitlab.yml
2.配置通用设置以添加 openid_connect 作为单点登录提供者。这为没有现有极狐GitLab 帐户的用户启用即时账户配置。
3.添加提供者配置。
对于 Linux 软件包安装:
gitlab_rails['omniauth_providers'] = [{name: "openid_connect", # do not change this parameterlabel: "Provider name", # optional label for login button, defaults to "Openid Connect"icon: "<custom_provider_icon>",args: {name: "openid_connect",scope: ["openid","profile","email"],response_type: "code",issuer: "<your_oidc_url>",discovery: true,client_auth_method: "query",uid_field: "<uid_field>",send_scope_to_token_endpoint: "false",pkce: true,client_options: {identifier: "<your_oidc_client_id>",secret: "<your_oidc_client_secret>",redirect_uri: "<your_gitlab_url>/users/auth/openid_connect/callback"}}}
]
对于具有多个身份提供者的 Linux 软件包安装:
{ 'name' => 'openid_connect','label' => '...','icon' => '...','args' => {'name' => 'openid_connect','strategy_class': 'OmniAuth::Strategies::OpenIDConnect','scope' => ['openid', 'profile', 'email'],'discovery' => true,'response_type' => 'code','issuer' => 'https://...','client_auth_method' => 'query','uid_field' => '...','client_options' => {`identifier`: "<your_oidc_client_id>",`secret`: "<your_oidc_client_secret>",'redirect_uri' => 'https://.../users/auth/openid_connect/callback'}}
},
{ 'name' => 'openid_connect_2fa','label' => '...','icon' => '...','args' => {'name' => 'openid_connect_2fa','strategy_class': 'OmniAuth::Strategies::OpenIDConnect','scope' => ['openid', 'profile', 'email'],'discovery' => true,'response_type' => 'code','issuer' => 'https://...','client_auth_method' => 'query','uid_field' => '...','client_options' => {...'redirect_uri' => 'https://.../users/auth/openid_connect_2fa/callback'}}
}
对于自编译安装:
- { name: 'openid_connect', # do not change this parameterlabel: 'Provider name', # optional label for login button, defaults to "Openid Connect"icon: '<custom_provider_icon>',args: {name: 'openid_connect',scope: ['openid','profile','email'],response_type: 'code',issuer: '<your_oidc_url>',discovery: true,client_auth_method: 'query',uid_field: '<uid_field>',send_scope_to_token_endpoint: false,pkce: true,client_options: {identifier: '<your_oidc_client_id>',secret: '<your_oidc_client_secret>',redirect_uri: '<your_gitlab_url>/users/auth/openid_connect/callback'}}}
4.对于提供者配置,更改提供者的值以匹配您的 OpenID Connect 客户端设置。使用以下作为指南:
-
<your_oidc_label> 是登录页面上显示的标签。
-
<custom_provider_icon> (可选)是登录页面上显示的图标。极狐GitLab 内置了主要社交登录平台的图标,但您可以通过指定此参数来覆盖这些图标。极狐GitLab 接受本地路径和绝对 URL。
-
<your_oidc_url> (可选)是指向 OpenID Connect 提供者的 URL(例如,https://example.com/auth/realms/your-realm)。如果未提供此值,则 URL 是从 client_options 构建的,格式为:<client_options.scheme>://<client_options.host>:<client_options.port>。
-
如果 discovery 设置为 true,OpenID Connect 提供者会尝试使用 <your_oidc_url>/.well-known/openid-configuration 自动发现客户端选项。默认值为 false。
-
client_auth_method (可选)指定用于与 OpenID Connect 提供者认证客户端的方法。
-
支持的值包括:
-
basic - HTTP 基本认证。
-
jwt_bearer - 基于 JWT 的认证(私钥和客户端秘密签名)。
-
mtls - 互相 TLS 或 X.509 证书验证。
-
任何其他值都会在请求体中发布客户端 ID 和秘密。
-
-
如果未指定,此值默认为 basic。
-
-
<uid_field> (可选)是 user_info.raw_attributes 中定义 uid 值的字段名称(例如,preferred_username)。如果您未提供此值,或者配置的值的字段在 user_info.raw_attributes 详细信息中缺失,则 uid 使用 sub 字段。
-
send_scope_to_token_endpoint 默认为 true,因此 scope 参数通常会包含在对令牌端点的请求中。但是,如果您的 OpenID Connect 提供者不接受此类请求中的 scope 参数,请将其设置为 false。
-
pkce (可选):启用 代码交换的证明密钥。可用于极狐GitLab 15.9。
-
client_options 是 OpenID Connect 客户端特定选项。具体来说:
-
identifier 是在 OpenID Connect 服务提供者中配置的客户端标识符。
-
secret 是在 OpenID Connect 服务提供者中配置的客户端密钥。如果服务提供者不需要密钥,请提供任何值并忽略它。
-
redirect_uri 是极狐GitLab URL,用于在成功登录后重定向用户(例如,http://example.com/users/auth/openid_connect/callback)。
-
end_session_endpoint (可选)是结束会话的端点 URL。如果自动发现失败或未成功,您可以提供此 URL。
以下 client_options 是可选的,除非自动发现失败或未成功:-
authorization_endpoint 是授权最终用户的端点 URL。
-
token_endpoint 是提供访问令牌的端点 URL。
-
userinfo_endpoint 是提供用户信息的端点 URL。
-
jwks_uri 是令牌签名者发布其密钥的端点 URL。
-
-
5.保存配置文件。
6.要使更改生效,如果您:
- 使用 Linux 软件包安装极狐GitLab,重新配置极狐GitLab。
- 自编译了您的极狐GitLab 安装,重启极狐GitLab。
在登录页面上,您在常规登录表单下方有一个 OpenID Connect 选项。选择此选项开始认证过程。如果客户端要求确认,OpenID Connect 提供者会要求您登录并授权极狐GitLab 应用程序。您将被重定向到极狐GitLab 并登录。
示例配置
以下配置说明如何在使用 Linux 软件包安装时与不同提供者一起设置 OpenID。
配置 Microsoft Azure
Microsoft Azure 的 OpenID Connect (OIDC) 协议使用 Microsoft identity platform (v2) endpoints。要开始,请登录 Azure Portal。对于您的应用,您需要以下信息:
- 一个租户 ID。您可能已经有一个。
- 一个客户端 ID 和一个客户端秘密。获取您的应用的租户 ID、客户端 ID 和客户端秘密。
Linux 软件包安装的示例配置块:
gitlab_rails['omniauth_providers'] = [{name: "openid_connect", # do not change this parameterlabel: "Azure OIDC", # optional label for login button, defaults to "Openid Connect"args: {name: "openid_connect",scope: ["openid", "profile", "email"],response_type: "code",issuer:  "https://login.microsoftonline.com/<YOUR-TENANT-ID>/v2.0",client_auth_method: "query",discovery: true,uid_field: "preferred_username",pkce: true,client_options: {identifier: "<YOUR APP CLIENT ID>",secret: "<YOUR APP CLIENT SECRET>",redirect_uri: "https://gitlab.example.com/users/auth/openid_connect/callback"}}}
]
Microsoft Entra 自定义签名密钥
如果您的应用程序有自定义签名密钥,因为您使用了 SAML claims-mapping feature,则必须以以下方式配置 OpenID 提供者:
-
通过省略 args.discovery 或将其设置为 false 来禁用 OpenID Connect 发现。
-
在 client_options 中,指定以下内容:
-
使用 appid 查询参数的 jwks_uri: https://login.microsoftonline.com//discovery/v2.0/keys?appid=。
-
end_session_endpoint。
-
authorization_endpoint。
-
userinfo_endpoint。
-
Linux 软件包安装的示例配置:
gitlab_rails['omniauth_providers'] = [{name: "openid_connect", # do not change this parameterlabel: "Azure OIDC", # optional label for login button, defaults to "Openid Connect"args: {name: "openid_connect",scope: ["openid", "profile", "email"],response_type: "code",issuer:  "https://login.microsoftonline.com/<YOUR-TENANT-ID>/v2.0",client_auth_method: "basic",discovery: false,uid_field: "preferred_username",pkce: true,client_options: {identifier: "<YOUR APP CLIENT ID>",secret: "<YOUR APP CLIENT SECRET>",redirect_uri: "https://gitlab.example.com/users/auth/openid_connect/callback",end_session_endpoint: "https://login.microsoftonline.com/<YOUR-TENANT-ID>/oauth2/v2.0/logout",authorization_endpoint: "https://login.microsoftonline.com/<YOUR-TENANT-ID>/oauth2/v2.0/authorize",token_endpoint: "https://login.microsoftonline.com/<YOUR-TENANT-ID>/oauth2/v2.0/token",userinfo_endpoint: "https://graph.microsoft.com/oidc/userinfo",jwks_uri: "https://login.microsoftonline.com/<YOUR-TENANT-ID>/discovery/v2.0/keys?appid=<YOUR APP CLIENT ID>"}}}
]
如果您看到带有 KidNotFound 消息的认证失败,这可能是因为缺少或错误的 appid 查询参数。当 Microsoft 返回的 ID 令牌无法通过 jwks_uri 端点提供的密钥进行验证时,极狐GitLab 会引发该错误。
迁移到通用 OpenID Connect 配置
您可以从 azure_activedirectory_v2 和 azure_oauth2 迁移到通用 OpenID Connect 配置。
首先,设置 uid_field。uid_field 和您可以选择作为 uid_field 的 sub 声明因提供者而异。未设置 uid_field 的情况下登录会导致在极狐GitLab 中创建额外的身份,这些身份必须手动修改:
| 提供商 | uid_field | 支持信息 |
|---|---|---|
| omniauth-azure-oauth2 | sub | 在 info 对象内会提供额外的属性 oid 和 tid。 |
| omniauth-azure-activedirectory-v2 | oid | 当迁移的时候,您必须将 oid 配置为 uid_field。 |
| omniauth_openid_connect | sub | 指定 uid_field 使用其他字段。 |
要迁移到通用 OpenID Connect 配置,您必须更新配置。
对于 Linux 软件包安装,请按以下方式更新配置:
::Tabs
:::TabTitle Azure OAuth 2.0
gitlab_rails['omniauth_providers'] = [{name: "azure_oauth2",label: "Azure OIDC", # optional label for login button, defaults to "Openid Connect"args: {name: "azure_oauth2", # this matches the existing azure_oauth2 provider name, and only the strategy_class immediately below configures OpenID Connectstrategy_class: "OmniAuth::Strategies::OpenIDConnect",scope: ["openid", "profile", "email"],response_type: "code",issuer:  "https://login.microsoftonline.com/<YOUR-TENANT-ID>/v2.0",client_auth_method: "query",discovery: true,uid_field: "sub",send_scope_to_token_endpoint: "false",client_options: {identifier: "<YOUR APP CLIENT ID>",secret: "<YOUR APP CLIENT SECRET>",redirect_uri: "https://gitlab.example.com/users/auth/azure_oauth2/callback"}}}
]
:::TabTitle Azure Active Directory v2
gitlab_rails['omniauth_providers'] = [{name: "azure_activedirectory_v2",label: "Azure OIDC", # optional label for login button, defaults to "Openid Connect"args: {name: "azure_activedirectory_v2",strategy_class: "OmniAuth::Strategies::OpenIDConnect",scope: ["openid", "profile", "email"],response_type: "code",issuer:  "https://login.microsoftonline.com/<YOUR-TENANT-ID>/v2.0",client_auth_method: "query",discovery: true,uid_field: "oid",send_scope_to_token_endpoint: "false",client_options: {identifier: "<YOUR APP CLIENT ID>",secret: "<YOUR APP CLIENT SECRET>",redirect_uri: "https://gitlab.example.com/users/auth/azure_activedirectory_v2/callback"}}}
]
::EndTabs
对于 Helm 安装:
在 YAML 文件(例如,provider.yaml)中添加提供者的配置:
::Tabs
:::TabTitle Azure OAuth 2.0
{"name": "azure_oauth2","args": {"name": "azure_oauth2","strategy_class": "OmniAuth::Strategies::OpenIDConnect","scope": ["openid","profile","email"],"response_type": "code","issuer": "https://login.microsoftonline.com/<YOUR-TENANT-ID>/v2.0","client_auth_method": "query","discovery": true,"uid_field": "sub","send_scope_to_token_endpoint": false,"client_options": {"identifier": "<YOUR APP CLIENT ID>","secret": "<YOUR APP CLIENT SECRET>","redirect_uri": "https://gitlab.example.com/users/auth/azure_oauth2/callback"}}
}
:::TabTitle Azure Active Directory v2
{"name": "azure_activedirectory_v2","args": {"name": "azure_activedirectory_v2","strategy_class": "OmniAuth::Strategies::OpenIDConnect","scope": ["openid","profile","email"],"response_type": "code","issuer": "https://login.microsoftonline.com/<YOUR-TENANT-ID>/v2.0","client_auth_method": "query","discovery": true,"uid_field": "sub","send_scope_to_token_endpoint": false,"client_options": {"identifier": "<YOUR APP CLIENT ID>","secret": "<YOUR APP CLIENT SECRET>","redirect_uri": "https://gitlab.example.com/users/auth/activedirectory_v2/callback"}}
}
::EndTabs
当您迁移到 omniauth_openid_connect 作为极狐GitLab 17.0 或以上版本升级的一部分时,为您的组织设置的 sub 声明值可能会有所不同。azure_oauth2 使用 Microsoft V1 端点,而 azure_activedirectory_v2 和 omniauth_openid_connect 都使用具有通用 sub 值的 Microsoft V2 端点。
-
对于在 Entra ID 中有电子邮件地址的用户,为了允许回退到电子邮件地址并更新用户身份,请配置以下内容:
- 在 Linux 软件包安装中,omniauth_auto_link_user。
- 在 Helm 安装中,autoLinkUser。
-
对于没有电子邮件地址的用户,管理员必须采取以下行动之一:
- 设置另一种认证方法或启用使用极狐GitLab 用户名和密码登录。然后,用户可以登录并使用其个人资料手动链接其 Azure 身份。
- 实施 OpenID Connect 作为现有 azure_oauth2 的新提供者,以便用户可以通过 OAuth2 登录,并链接其 OpenID Connect 身份(类似于前一种方法)。此方法也适用于有电子邮件地址的用户,只要启用了 auto_link_user。
- 手动更新 extern_uid。为此,请使用 API 或 Rails 控制台 更新每个用户的 extern_uid。如果实例已升级到 17.0 或更高版本,且用户已尝试登录,则可能需要此方法。
NOTE:
如果在配置极狐GitLab 帐户时缺少或为空,azure_oauth2 可能已使用 Entra ID 的 upn 声明作为电子邮件地址。
配置 Microsoft Azure Active Directory B2C
极狐GitLab 需要特殊配置才能与 Azure Active Directory B2C协同工作。首先,请登录 Azure Portal。对于您的应用,您需要从 Azure 获得以下信息:
- 租户 ID。
- 客户端 ID 和客户端密钥。
- 用户流或策略名称。
配置应用:
1.设置应用 Redirect URI。例如,如果您的极狐GitLab 域名是 gitlab.example.com,则将应用 Redirect URI 设置为 https://gitlab.example.com/users/auth/openid_connect/callback。
2.启用 ID 令牌。
3.向应用添加以下 API 权限:
- openid
- offline_access
配置自定义策略
Azure B2C 提供两种定义用户登录业务逻辑的方法:
- 用户流
- 自定义策略
需要自定义策略,因为标准 Azure B2C 用户流不发送 OpenID email 声明。因此,标准用户流无法与 allow_single_sign_on 或 auto_link_user 参数 一起使用。使用标准 Azure B2C 策略时,极狐GitLab 无法创建新账户或链接到具有电子邮件地址的现有账户。
首先,创建自定义策略。
Microsoft 指南在 custom policy starter pack 中使用 SocialAndLocalAccounts,但 LocalAccounts 是针对本地 Active Directory 账户进行身份验证。在您上传策略之前,请执行以下操作:
1.要导出 email 声明,修改 SignUpOrSignin.xml。替换以下行:
<OutputClaim ClaimTypeReferenceId="email" />
替换为:
<OutputClaim ClaimTypeReferenceId="signInNames.emailAddress" PartnerClaimType="email" />
2.为使 OIDC 发现与 B2C 一起工作,请使用与 OIDC 规范 兼容的发行者配置策略。在 TrustFrameworkBase.xml 中的 JwtIssuer 下,将 IssuanceClaimPattern 设置为 AuthorityWithTfp:
<ClaimsProvider><DisplayName>Token Issuer</DisplayName><TechnicalProfiles><TechnicalProfile Id="JwtIssuer"><DisplayName>JWT Issuer</DisplayName><Protocol Name="None" /><OutputTokenFormat>JWT</OutputTokenFormat><Metadata><Item Key="IssuanceClaimPattern">AuthorityWithTfp</Item>...
3.上传策略。如果您正在更新现有策略,请覆盖现有文件。
4.要确定发行者 URL,请使用登录策略。发行者 URL 的格式为:
https://<YOUR-DOMAIN>/tfp/<YOUR-TENANT-ID>/<YOUR-SIGN-IN-POLICY-NAME>/v2.0/
URL 中的策略名称是小写的。例如,B2C_1A_signup_signin 策略显示为 b2c_1a_signup_sigin。
确保您包括尾部斜杠。
5.验证 OIDC 发现 URL 和发行者 URL 的操作,并在发行者 URL 后附加 .well-known/openid-configuration:
https://<YOUR-DOMAIN>/tfp/<YOUR-TENANT-ID>/<YOUR-SIGN-IN-POLICY-NAME>/v2.0/.well-known/openid-configuration
例如,如果 domain 是 example.b2clogin.com,租户 ID 是 fc40c736-476c-4da1-b489-ee48cee84386,您可以使用 curl 和 jq 提取发行者:
$ curl --silent "https://example.b2clogin.com/tfp/fc40c736-476c-4da1-b489-ee48cee84386/b2c_1a_signup_signin/v2.0/.well-known/openid-configuration" | jq .issuer
"https://example.b2clogin.com/tfp/fc40c736-476c-4da1-b489-ee48cee84386/b2c_1a_signup_signin/v2.0/"
6.使用 signup_signin 的自定义策略配置发行者 URL。例如,这是 Linux 软件包安装的 b2c_1a_signup_signin 自定义策略配置:
gitlab_rails['omniauth_providers'] = [
{name: "openid_connect", # do not change this parameterlabel: "Azure B2C OIDC", # optional label for login button, defaults to "Openid Connect"args: {name: "openid_connect",scope: ["openid"],response_mode: "query",response_type: "id_token",issuer:  "https://<YOUR-DOMAIN>/tfp/<YOUR-TENANT-ID>/b2c_1a_signup_signin/v2.0/",client_auth_method: "query",discovery: true,send_scope_to_token_endpoint: true,pkce: true,client_options: {identifier: "<YOUR APP CLIENT ID>",secret: "<YOUR APP CLIENT SECRET>",redirect_uri: "https://gitlab.example.com/users/auth/openid_connect/callback"}}
}]
Azure B2C 故障排除
-
确保所有 yourtenant.onmicrosoft.com、ProxyIdentityExperienceFrameworkAppId 和 IdentityExperienceFrameworkAppId 匹配您的 B2C 租户主机名以及 XML 策略文件中的相应客户端 ID。
-
将 https://jwt.ms 添加为应用的重定向 URI,并使用 custom policy tester。确保有效负载包含与用户电子邮件访问匹配的 email。
-
启用自定义策略后,用户可能会在尝试登录后看到 Invalid username or password。这可能是 IdentityExperienceFramework 应用的配置问题。建议您检查应用清单包含以下设置:
- “accessTokenAcceptedVersion”: null
- “signInAudience”: “AzureADMyOrg”
此配置与创建 IdentityExperienceFramework 应用时使用的 Supported account types 设置相对应。
配置 Keycloak
极狐GitLab 可与使用 HTTPS 的 OpenID 提供者一起工作。虽然您可以设置使用 HTTP 的 Keycloak 服务器,但极狐GitLab 只能与使用 HTTPS 的 Keycloak 服务器通信。
配置 Keycloak 以使用公钥加密算法(例如,RSA256 或 RSA512)而不是对称密钥加密算法(例如,HS256 或 HS358)来签署令牌。公钥加密算法更容易配置,并且更安全,因为泄露私钥会带来严重的安全后果。
- 打开 Keycloak 管理控制台。
- 选择 Realm Settings > Tokens > Default Signature Algorithm。
- 配置签名算法。
Linux 软件包安装示例配置块:
gitlab_rails['omniauth_providers'] = [{name: "openid_connect", # do not change this parameterlabel: "Keycloak", # optional label for login button, defaults to "Openid Connect"args: {name: "openid_connect",scope: ["openid", "profile", "email"],response_type: "code",issuer:  "https://keycloak.example.com/realms/myrealm",client_auth_method: "query",discovery: true,uid_field: "preferred_username",pkce: true,client_options: {identifier: "<YOUR CLIENT ID>",secret: "<YOUR CLIENT SECRET>",redirect_uri: "https://gitlab.example.com/users/auth/openid_connect/callback"}}}
]
使用对称密钥算法配置 Keycloak
WARNING:以下说明仅为完整性而包含,但仅在绝对必要时使用对称密钥加密。
要使用对称密钥加密:
1.从 Keycloak 数据库中提取密钥。Keycloak 不在网络界面中公开该值。网络界面中看到的客户端密钥是 OAuth 2.0 客户端密钥,与用于签署 JSON Web Tokens 的密钥不同。
例如,如果您使用 PostgreSQL 作为 Keycloak 的后端数据库:
-
登录数据库控制台。
-
运行以下 SQL 查询以提取密钥:
$ psql -U keycloak
psql (13.3 (Debian 13.3-1.pgdg100+1))
Type "help" for help.keycloak=# SELECT c.name, value FROM component_config CC INNER JOIN component C ON(CC.component_id = C.id) WHERE C.realm_id = 'master' and provider_id = 'hmac-generated' AND CC.name = 'secret';
-[ RECORD 1 ]---------------------------------------------------------------------------------
name  | hmac-generated
value | lo6cqjD6Ika8pk7qc3fpFx9ysrhf7E62-sqGc8drp3XW-wr93zru8PFsQokHZZuJJbaUXvmiOftCZM3C4KW3-g
-[ RECORD 2 ]---------------------------------------------------------------------------------
name  | fallback-HS384
value | UfVqmIs--U61UYsRH-NYBH3_mlluLONpg_zN7CXEwkJcO9xdRNlzZfmfDLPtf2xSTMvqu08R2VhLr-8G-oZ47A
在此示例中,有两个私钥:一个用于 HS256 (hmac-generated) 和另一个用于 HS384 (fallback-HS384)。我们使用第一个 value 来配置极狐GitLab。
2.将 value 转换为标准 base64。如 Invalid signature with HS256 token post 中所述,value 是根据 Base 64 Encoding with URL and Filename Safe Alphabet section 的 RFC 4648 编码的。必须将其转换为 RFC 2045 中定义的标准 base64。以下 Ruby 脚本执行此操作:
require 'base64'value = "lo6cqjD6Ika8pk7qc3fpFx9ysrhf7E62-sqGc8drp3XW-wr93zru8PFsQokHZZuJJbaUXvmiOftCZM3C4KW3-g"
Base64.encode64(Base64.urlsafe_decode64(value))
结果为以下值:
lo6cqjD6Ika8pk7qc3fpFx9ysrhf7E62+sqGc8drp3XW+wr93zru8PFsQokH\nZZuJJbaUXvmiOftCZM3C4KW3+g==\n
3.在 jwt_secret_base64 中指定此 base64 编码的密钥。例如:
gitlab_rails['omniauth_providers'] = [{name: "openid_connect", # do not change this parameterlabel: "Keycloak", # optional label for login button, defaults to "Openid Connect"args: {name: "openid_connect",scope: ["openid", "profile", "email"],response_type: "code",issuer:  "https://keycloak.example.com/auth/realms/myrealm",client_auth_method: "query",discovery: true,uid_field: "preferred_username",jwt_secret_base64: "<YOUR BASE64-ENCODED SECRET>",pkce: true,client_options: {identifier: "<YOUR CLIENT ID>",secret: "<YOUR CLIENT SECRET>",redirect_uri: "https://gitlab.example.com/users/auth/openid_connect/callback"}}}
]
如果您看到 JSON::JWS::VerificationFailed 错误,您指定了错误的密钥。
Casdoor
极狐GitLab 可与使用 HTTPS 的 OpenID 提供者一起工作。使用 HTTPS 通过 OpenID 与 Casdoor 连接到极狐GitLab。
对于您的应用,请在 Casdoor 上完成以下步骤:
-
获取客户端 ID 和客户端密钥。
-
添加您的极狐GitLab 重定向 URL。例如,如果您的极狐GitLab 域名是 gitlab.example.com,确保 Casdoor 应用具有以下 Redirect URI:https://gitlab.example.com/users/auth/openid_connect/callback。
Linux 软件包安装示例配置(文件路径:/etc/gitlab/gitlab.rb):
gitlab_rails['omniauth_providers'] = [{name: "openid_connect", # do not change this parameterlabel: "Casdoor", # optional label for login button, defaults to "Openid Connect"args: {name: "openid_connect",scope: ["openid", "profile", "email"],response_type: "code",issuer:  "https://<CASDOOR_HOSTNAME>",client_auth_method: "query",discovery: true,uid_field: "sub",client_options: {identifier: "<YOUR CLIENT ID>",secret: "<YOUR CLIENT SECRET>",redirect_uri: "https://gitlab.example.com/users/auth/openid_connect/callback"}}}
]
自编译安装示例配置(文件路径:config/gitlab.yml):
- { name: 'openid_connect', # do not change this parameterlabel: 'Casdoor', # optional label for login button, defaults to "Openid Connect"args: {name: 'openid_connect',scope: ['openid','profile','email'],response_type: 'code',issuer: 'https://<CASDOOR_HOSTNAME>',discovery: true,client_auth_method: 'query',uid_field: 'sub',client_options: {identifier: '<YOUR CLIENT ID>',secret: '<YOUR CLIENT SECRET>',redirect_uri: 'https://gitlab.example.com/users/auth/openid_connect/callback'}}}
配置多个 OpenID Connect 提供商
您可以配置您的应用程序以使用多个 OpenID Connect (OIDC) 提供商。您可以通过在配置文件中显式设置 strategy_class 来实现这一点。
您应该在以下任一场景中执行此操作:
- 迁移到 OpenID Connect 协议。
- 提供不同级别的身份验证。
NOTE:这与 基于 OIDC 组成员身份配置用户 不兼容。
以下示例配置展示了如何提供不同级别的身份验证,一个选项使用 2FA,一个不使用 2FA。
对于 Linux 软件包安装:
gitlab_rails['omniauth_providers'] = [{name: "openid_connect",label: "Provider name", # optional label for login button, defaults to "Openid Connect"icon: "<custom_provider_icon>",args: {name: "openid_connect",strategy_class: "OmniAuth::Strategies::OpenIDConnect",scope: ["openid","profile","email"],response_type: "code",issuer: "<your_oidc_url>",discovery: true,client_auth_method: "query",uid_field: "<uid_field>",send_scope_to_token_endpoint: "false",pkce: true,client_options: {identifier: "<your_oidc_client_id>",secret: "<your_oidc_client_secret>",redirect_uri: "<your_gitlab_url>/users/auth/openid_connect/callback"}}},{name: "openid_connect_2fa",label: "Provider name 2FA", # optional label for login button, defaults to "Openid Connect"icon: "<custom_provider_icon>",args: {name: "openid_connect_2fa",strategy_class: "OmniAuth::Strategies::OpenIDConnect",scope: ["openid","profile","email"],response_type: "code",issuer: "<your_oidc_url>",discovery: true,client_auth_method: "query",uid_field: "<uid_field>",send_scope_to_token_endpoint: "false",pkce: true,client_options: {identifier: "<your_oidc_client_id>",secret: "<your_oidc_client_secret>",redirect_uri: "<your_gitlab_url>/users/auth/openid_connect_2fa/callback"}}}
]
对于私有化部署安装:
- { name: 'openid_connect',label: 'Provider name', # optional label for login button, defaults to "Openid Connect"icon: '<custom_provider_icon>',args: {name: 'openid_connect',strategy_class: "OmniAuth::Strategies::OpenIDConnect",scope: ['openid','profile','email'],response_type: 'code',issuer: '<your_oidc_url>',discovery: true,client_auth_method: 'query',uid_field: '<uid_field>',send_scope_to_token_endpoint: false,pkce: true,client_options: {identifier: '<your_oidc_client_id>',secret: '<your_oidc_client_secret>',redirect_uri: '<your_gitlab_url>/users/auth/openid_connect/callback'}}}- { name: 'openid_connect_2fa',label: 'Provider name 2FA', # optional label for login button, defaults to "Openid Connect"icon: '<custom_provider_icon>',args: {name: 'openid_connect_2fa',strategy_class: "OmniAuth::Strategies::OpenIDConnect",scope: ['openid','profile','email'],response_type: 'code',issuer: '<your_oidc_url>',discovery: true,client_auth_method: 'query',uid_field: '<uid_field>',send_scope_to_token_endpoint: false,pkce: true,client_options: {identifier: '<your_oidc_client_id>',secret: '<your_oidc_client_secret>',redirect_uri: '<your_gitlab_url>/users/auth/openid_connect_2fa/callback'}}}
在这种用例中,您可能希望根据现有的已知标识符在您的企业目录中同步不同提供商之间的 extern_uid。
为此,您需要设置 uid_field。以下示例代码展示了如何执行此操作:
def sync_missing_provider(self, user: User, extern_uid: str)existing_identities = []for identity in user.identities:existing_identities.append(identity.get("provider"))local_extern_uid = extern_uid.lower()for provider in ("openid_connect_2fa", "openid_connect"):identity = [identityfor identity in user.identitiesif identity.get("provider") == providerand identity.get("extern_uid").lower() != local_extern_uid]if provider not in existing_identities or identity:if identity and identity[0].get("extern_uid") != "":logger.error(f"Found different identity for provider {provider} for user {user.id}")continueelse:logger.info(f"Add identity 'provider': {provider}, 'extern_uid': {extern_uid} for user {user.id}")user.provider = provideruser.extern_uid = extern_uiduser = self.save_user(user)return user
有关更多信息,请参阅 极狐 GitLab API 用户方法文档。
基于 OIDC 组成员身份配置用户 (PREMIUM ALL)
- 在极狐 GitLab 15.10 中引入。
您可以配置 OIDC 组成员身份来:
- 要求用户是某个特定组的成员。
- 根据组成员身份分配用户 外部、管理员或 审计员 角色。
极狐 GitLab 在每次登录时检查这些组并根据需要更新用户属性。此功能不允许您自动将用户添加到极狐 GitLab 组中。
必需组
您的身份提供商 (IdP) 必须在 OIDC 响应中传递组信息给极狐 GitLab。要使用此响应来要求用户成为某个特定组的成员,请配置极狐 GitLab 识别:
- 在 OIDC 响应中查找组的位置,使用 groups_attribute 设置。
- 登录所需的组成员身份,使用 required_groups 设置。
如果您未设置 required_groups 或将设置留空,任何通过 IdP 通过 OIDC 认证的用户都可以使用极狐 GitLab。
::Tabs
:::TabTitle Linux 软件包 (Omnibus)
1.编辑 /etc/gitlab/gitlab.rb:
gitlab_rails['omniauth_providers'] = [{name: "openid_connect",label: "Provider name",args: {name: "openid_connect",scope: ["openid","profile","email"],response_type: "code",issuer: "<your_oidc_url>",discovery: true,client_auth_method: "query",uid_field: "<uid_field>",client_options: {identifier: "<your_oidc_client_id>",secret: "<your_oidc_client_secret>",redirect_uri: "<your_gitlab_url>/users/auth/openid_connect/callback",gitlab: {groups_attribute: "groups",required_groups: ["Developer"]}}}}
]
2.保存文件并 重新配置极狐 GitLab 以使更改生效。
:::TabTitle 私有化部署 (source)
1.编辑 /home/git/gitlab/config/gitlab.yml:
production: &baseomniauth:providers:- { name: 'openid_connect',label: 'Provider name',args: {name: 'openid_connect',scope: ['openid','profile','email'],response_type: 'code',issuer: '<your_oidc_url>',discovery: true,client_auth_method: 'query',uid_field: '<uid_field>',client_options: {identifier: '<your_oidc_client_id>',secret: '<your_oidc_client_secret>',redirect_uri: '<your_gitlab_url>/users/auth/openid_connect/callback',gitlab: {groups_attribute: "groups",required_groups: ["Developer"]}}}}
2.保存文件并 重新配置极狐 GitLab 以使更改生效。
::EndTabs
外部组
您的 IdP 必须在 OIDC 响应中传递组信息给极狐 GitLab。要使用此响应根据组成员身份识别用户为 外部用户,请配置极狐 GitLab 识别:
- 在 OIDC 响应中查找组的位置,使用 groups_attribute 设置。
- 哪些组成员身份应识别用户为 外部用户,使用 external_groups 设置。
::Tabs
:::TabTitle Linux 软件包 (Omnibus)
1.编辑 /etc/gitlab/gitlab.rb:
gitlab_rails['omniauth_providers'] = [{name: "openid_connect",label: "Provider name",args: {name: "openid_connect",scope: ["openid","profile","email"],response_type: "code",issuer: "<your_oidc_url>",discovery: true,client_auth_method: "query",uid_field: "<uid_field>",client_options: {identifier: "<your_oidc_client_id>",secret: "<your_oidc_client_secret>",redirect_uri: "<your_gitlab_url>/users/auth/openid_connect/callback",gitlab: {groups_attribute: "groups",external_groups: ["Freelancer"]}}}}
]
保存文件并 重新配置极狐 GitLab 以使更改生效。
:::TabTitle 私有化部署 (source)
1.编辑 /home/git/gitlab/config/gitlab.yml:
production: &baseomniauth:providers:- { name: 'openid_connect',label: 'Provider name',args: {name: 'openid_connect',scope: ['openid','profile','email'],response_type: 'code',issuer: '<your_oidc_url>',discovery: true,client_auth_method: 'query',uid_field: '<uid_field>',client_options: {identifier: '<your_oidc_client_id>',secret: '<your_oidc_client_secret>',redirect_uri: '<your_gitlab_url>/users/auth/openid_connect/callback',gitlab: {groups_attribute: "groups",external_groups: ["Freelancer"]}}}}
2.保存文件并 重新配置极狐 GitLab 以使更改生效。
::EndTabs
审计员组 (PREMIUM SELF)
您的 IdP 必须在 OIDC 响应中传递组信息给极狐 GitLab。要使用此响应根据组成员身份分配用户为审计员,请配置极狐 GitLab 识别:
在 OIDC 响应中查找组的位置,使用 groups_attribute 设置。
哪些组成员身份授予用户审计员访问权限,使用 auditor_groups 设置。
::Tabs
:::TabTitle Linux 软件包 (Omnibus)
1.编辑 /etc/gitlab/gitlab.rb:
gitlab_rails['omniauth_providers'] = [{name: "openid_connect",label: "Provider name",args: {name: "openid_connect",scope: ["openid","profile","email","groups"],response_type: "code",issuer: "<your_oidc_url>",discovery: true,client_auth_method: "query",uid_field: "<uid_field>",client_options: {identifier: "<your_oidc_client_id>",secret: "<your_oidc_client_secret>",redirect_uri: "<your_gitlab_url>/users/auth/openid_connect/callback",gitlab: {groups_attribute: "groups",auditor_groups: ["Auditor"]}}}}
]
2.保存文件并 重新配置极狐 GitLab 以使更改生效。
:::TabTitle 私有化部署 (source)
1.编辑 /home/git/gitlab/config/gitlab.yml:
production: &baseomniauth:providers:- { name: 'openid_connect',label: 'Provider name',args: {name: 'openid_connect',scope: ['openid','profile','email','groups'],response_type: 'code',issuer: '<your_oidc_url>',discovery: true,client_auth_method: 'query',uid_field: '<uid_field>',client_options: {identifier: '<your_oidc_client_id>',secret: '<your_oidc_client_secret>',redirect_uri: '<your_gitlab_url>/users/auth/openid_connect/callback',gitlab: {groups_attribute: "groups",auditor_groups: ["Auditor"]}}}}
2.保存文件并 重新配置极狐 GitLab 以使更改生效。
::EndTabs
管理员组
您的 IdP 必须在 OIDC 响应中传递组信息给极狐 GitLab。要使用此响应根据组成员身份分配用户为管理员,请配置极狐 GitLab 识别:
- 在 OIDC 响应中查找组的位置,使用 groups_attribute 设置。
- 哪些组成员身份授予用户管理员访问权限,使用 admin_groups 设置。
::Tabs
:::TabTitle Linux 软件包 (Omnibus)
1.编辑 /etc/gitlab/gitlab.rb:
gitlab_rails['omniauth_providers'] = [{name: "openid_connect",label: "Provider name",args: {name: "openid_connect",scope: ["openid","profile","email"],response_type: "code",issuer: "<your_oidc_url>",discovery: true,client_auth_method: "query",uid_field: "<uid_field>",client_options: {identifier: "<your_oidc_client_id>",secret: "<your_oidc_client_secret>",redirect_uri: "<your_gitlab_url>/users/auth/openid_connect/callback",gitlab: {groups_attribute: "groups",admin_groups: ["Admin"]}}}}
]
2.保存文件并 重新配置极狐 GitLab 以使更改生效。
:::TabTitle 私有化部署 (source)
1.编辑 /home/git/gitlab/config/gitlab.yml:
production: &baseomniauth:providers:- { name: 'openid_connect',label: 'Provider name',args: {name: 'openid_connect',scope: ['openid','profile','email'],response_type: 'code',issuer: '<your_oidc_url>',discovery: true,client_auth_method: 'query',uid_field: '<uid_field>',client_options: {identifier: '<your_oidc_client_id>',secret: '<your_oidc_client_secret>',redirect_uri: '<your_gitlab_url>/users/auth/openid_connect/callback',gitlab: {groups_attribute: "groups",admin_groups: ["Admin"]}}}}
2.保存文件并 重新配置极狐 GitLab 以使更改生效。
::EndTabs
故障排除
1.确保 discovery 设置为 true。如果设置为 false,则必须指定所有用于使 OpenID 工作的 URL 和密钥。
2.检查您的系统时钟以确保时间同步正确。
3.如在 OmniAuth OpenID Connect 文档中所述,确保 issuer 对应于 Discovery URL 的基本 URL。例如,https://accounts.example.com 用于 URL https://accounts.example.com/.well-known/openid-configuration。
4.如果未定义 client_auth_method 或将其设置为 basic,则 OpenID Connect 客户端使用 HTTP Basic Authentication 发送 OAuth 2.0 访问令牌。如果在检索 userinfo 端点时看到 401 错误,请检查您的 OpenID Web 服务器配置。例如,对于 oauth2-server-php,您可能需要向 Apache 添加配置参数。
相关文章:

在极狐GitLab 身份验证中如何使用 OIDC?
极狐GitLab 是 GitLab 在中国的发行版,关于中文参考文档和资料有: 极狐GitLab 中文文档极狐GitLab 中文论坛极狐GitLab 官网 使用 OpenID Connect 作为认证提供者 (BASIC SELF) 您可以使用极狐GitLab 作为客户端应用程序,与 OpenID Connec…...
)
计算机视觉与深度学习 | 基于YOLOv8与光流法的目标检测与跟踪(Python代码)
===================================================== github:https://github.com/MichaelBeechan CSDN:https://blog.csdn.net/u011344545 ===================================================== 目标检测与跟踪 关键实现逻辑检测-跟踪协作机制特征点选择策略运动…...

解决 VSCode 中 NVM 配置后无法识别 Node 和 NPM 的问题
在开发中,我们经常需要使用 Node.js 和 NPM 来管理 JavaScript 项目依赖,而 NVM(Node Version Manager)是开发者在本地环境中管理多个 Node.js 版本的得力工具。不过,有时候在 VSCode 中配置完 NVM 后,可能…...
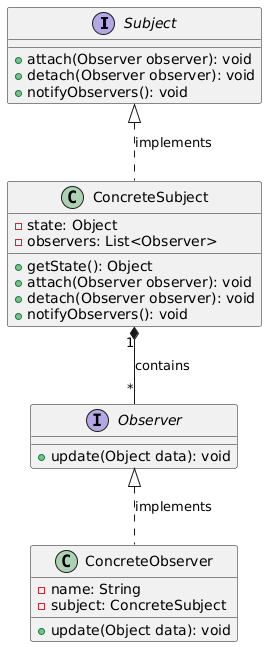
观察者模式:从博客订阅到消息队列的解耦实践
观察者模式:从博客订阅到消息队列的解耦实践 一、模式核心:用事件驱动实现对象间松耦合 在新闻 APP 中,当热点事件发生时需要实时通知所有订阅用户;在电商系统中,库存变化需触发价格监控模块重新计算。这类场景的核心…...

ReportLab 导出 PDF(页面布局)
ReportLab 导出 PDF(文档创建) ReportLab 导出 PDF(页面布局) ReportLab 导出 PDF(图文表格) PLATYPUS - 页面布局和排版 1. 设计目标2. 开始3. Flowables3.1. Flowable.draw()3.2. Flowable.drawOn(canvas,x,y)3.3. F…...

qt与html通信
**Cef视图(CefView)**是指在使用Chromium Embedded Framework(CEF)时,嵌入到应用程序中的浏览器视图。CEF是一个开源项目,它基于Google的Chromium浏览器,允许开发者将Web浏览器功能嵌入到自己的…...

git 根据http url设置账号密码
1. 原因 场景:有一种情况,比如在github上面有多个账号,并且每个账号都有些仓库的内容需要修改,并且这些账号自己,不是协作者的关系。这个时候需要针对每个仓库的url设置用户名密码, 2. 设置 2.1 第一步:…...

【CVE-2024-10929】ARM CPU漏洞安全通告
安全之安全(security)博客目录导读 目录 一、概述 二、CVE详情 三、受影响产品 四、建议措施 五、致谢 六、版本历史 一、概述 在部分基于Arm架构的CPU中发现了一个潜在安全问题,称为Spectre-BSE(Branch Status Eviction,分支状态驱逐…...

OpenCV 图形API(33)图像滤波-----高斯模糊函数gaussianBlur()
操作系统:ubuntu22.04 OpenCV版本:OpenCV4.9 IDE:Visual Studio Code 编程语言:C11 算法描述 使用高斯滤波器对图像进行模糊处理。 该函数使用指定的高斯核对源图像进行滤波。输出图像必须与输入图像具有相同的类型和通道数。 cv::gapi::g…...
)
【Android】 如何将 APK 内置为系统应用(适用于编辑设置属性)
如何将 APK 内置为系统应用(适用于编辑设置属性) 在 Android 中,将 APK 文件内置为系统应用涉及到一系列的命令和步骤。以下是详细的操作流程,帮助您解决常见问题,如 /system not in /proc/mounts 的错误。 挂载system/app获取可读写权限 …...
【2025最新版】火鸟门户v8.5系统源码+PC、H5、小程序 +数据化大屏插件
一.介绍 火鸟地方门户系统V8.5源码 系统包含4端: PCH5小程序APP 二.搭建环境 系统环境:CentOS、 运行环境:宝塔 Linux 网站环境:Nginx 1.2.22 MySQL 5.6 PHP-7.4 常见插件:fileinfo ; redis 三.测…...

关于 传感器 的详细解析,涵盖定义、分类、工作原理、常见类型、应用领域、技术挑战及未来趋势,结合实例帮助理解其核心概念
以下是关于 传感器 的详细解析,涵盖定义、分类、工作原理、常见类型、应用领域、技术挑战及未来趋势,结合实例帮助理解其核心概念: 一、传感器的定义与核心功能 1. 定义 传感器(Sensor)是一种能够将物理量ÿ…...

EtherCAT转ProfiNet边缘计算网关配置优化:汽车制造场景下PLC与机器人协同作业案例
1.行业背景与需求分析 智能汽车焊装车间是汽车制造的核心工艺环节,某德国豪华品牌在其上海MEB工厂新建的焊装车间中,采用西门子S7-1500PLC作为ProfiNet主站,负责整线协调与质量追溯;同时部署KUKAKR1500Titan机器人(Eth…...

极狐GitLab CI/CD 流水线计算分钟数如何管理?
极狐GitLab 是 GitLab 在中国的发行版,关于中文参考文档和资料有: 极狐GitLab 中文文档极狐GitLab 中文论坛极狐GitLab 官网 计算分钟管理 (PREMIUM SELF) 在极狐GitLab 16.1 中,从 CI/CD 分钟数重命名为计算配额或计算分钟数。 管理员可…...
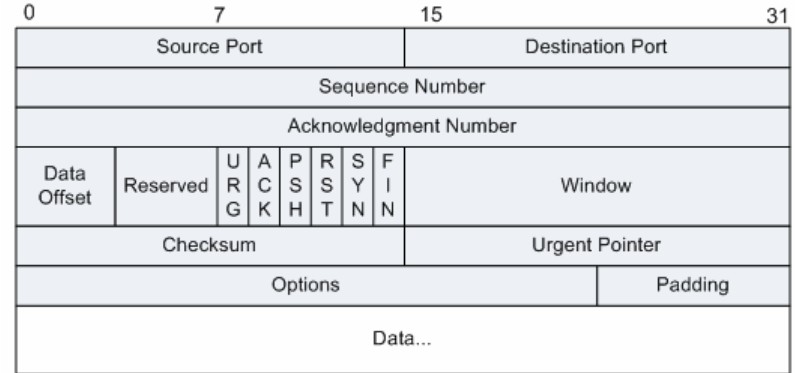
HTTP协议 --- 超文本传输协议 和 TCP --- 传输控制协议
是基于 TCP 协议的 80 端口的一种 C/S 架构协议。 特点:无状态 --- 数据传输完成后,会断开 TCP 连接,哪怕浏览器还正常运行。 请求报文 --- 方法 响应报文 --- 状态码 是一种面向连接的可靠传输协议 。 面向连接 --- 在传输数据之前&am…...
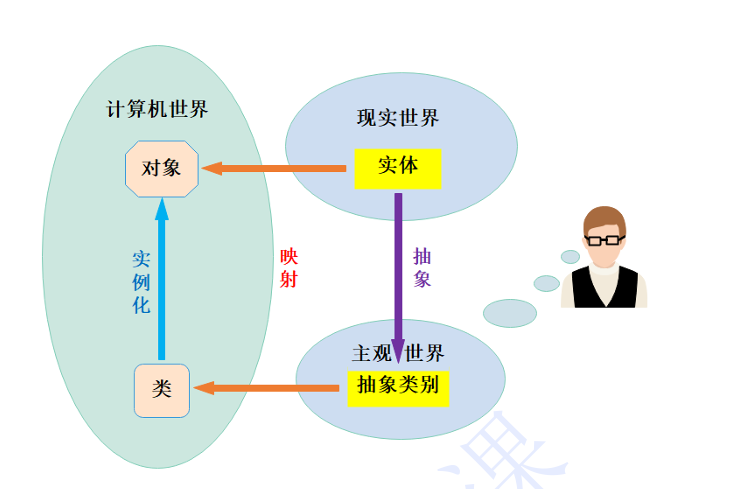
类和对象(下篇)(详解)
【本节目标】 1. 再谈构造函数 2. Static成员 3. 友元 4. 内部类 5. 再次理解封装 1. 再谈构造函数 1.1 构造函数体赋值 在创建对象时,编译器通过调用构造函数,给对象中各个成员变量一个合适的初始值。 #include <iostream> using name…...

Uniapp:获取当前定位坐标
目录 一、出现场景二、具体使用 一、出现场景 在项目的开发中,会出现打卡、定位当前位置的功能,那我们如何获取当前位置呢?这就需要使用getLocation来获取当前位置坐标 二、具体使用 uni.getLocation({type: wgs84, // 返回可以用于uni.op…...

最大子序和问题——动态规划/贪心算法解决
目录 一:问题描述 二:解决思路1——动态规划思想 三:C 语言代码实现 四:复杂度分析 五:解决思路2——贪心算法思想 六:具体步骤 七: C语言代码实现 八:复杂度分析 一:问题描述 …...

【Unity】JSON数据的存取
这段代码的结构是为了实现 数据的封装和管理,特别是在 Unity 中保存和加载玩家数据时。以下是对代码设计的逐步解释: 1. PlayerCoin 类 PlayerCoin 是一个简单的数据类,用于表示单个玩家的硬币信息。它包含以下字段: count&…...

LeetCode【剑指offer】系列(位运算篇)
剑指offer15.二进制中1的个数 题目链接 题目:编写一个函数,输入是一个无符号整数(以二进制串的形式),返回其二进制表达式中数字位数为 ‘1’ 的个数(也被称为 汉明重量).)。 思路一ÿ…...

unity socket 客户端和c#服务器通信
服务器 using BarrageGrab; using System; using System.Collections.Concurrent; using System.Linq; using System.Net; using System.Net.Sockets; using System.Text; using System.Threading;namespace Lyx {class Server{private TcpListener listener;private Concurre…...

如何在Vue中实现取消聚焦el-select——从零到部署的完整指南
如何在Vue中实现取消聚焦el-select——从零到部署的完整指南 在开发Vue项目时,经常会遇到需要处理用户交互和组件状态管理的情况。特别是在使用Element UI组件库时,如何优雅地管理组件的状态显得尤为重要。本文将详细介绍如何在取消对话框时自动取消el-s…...

网络安全领域的AI战略准备:从概念到实践
网络安全领域的AI准备不仅涉及最新工具和技术的应用,更是一项战略必需。许多企业若因目标不明确、数据准备不足或与业务重点脱节而未能有效利用AI技术,可能面临严重后果,包括高级网络威胁数量的激增。 AI准备的核心要素 构建稳健的网络安全…...

《重构全球贸易体系用户指南》解读
文章目录 背景核心矛盾与理论框架美元的“特里芬难题”核心矛盾目标理论框架 政策工具箱的协同运作机制关税体系的精准打击汇率政策的混合干预安全工具的复合运用 实施路径与全球秩序重构阶段性目标 风险传导与反制效应内部失衡加剧外部反制升级系统性风险 范式突破与理论再思考…...
MacOs下解决远程终端内容复制并到本地粘贴板
常常需要在服务器上捣鼓东西,同时需要将内容复制到本地的需求。 1-内容是在远程终端用vim打开,如何用vim的类似指令达到快速复制到本地呢? 假设待复制的内容: #include <iostream> #include <cstring> using names…...

基于PAI+专属网关+私网连接:构建全链路 Deepseek 云上私有化部署与模型调用架构
DeepSeek - R1 是由深度求索公司推出的首款推理模型,该模型在数学、代码和推理任务上的表现优异,市场反馈火爆。在大模型技术商业化进程中,企业级用户普遍面临四大核心挑战: 算力投入成本高昂:构建千亿参数级模型的训…...
【cocos creator 3.x】cocos creator2.x项目升级3.x项目改动点
1、基本改动 基本改动:去掉了cc.,改成在顶部添加导入 项目升级时候直接将cc.去掉,根据提示添加引用 node只保留position,scale,rotation,layer 其余属性如opacity,如果需要使用需要在节点手动添加UIOpacity组件 3d层和ui层分开…...

eBay东南亚爆单密码:72小时交付计划如何重构厦门仓+东南亚供应链?
2024年东南亚电商市场规模预计突破2340亿美元,年复合增长率达18%。eBay最新战略将厦门纳入海外仓核心节点,推出“72小时交付计划”,通过“仓配转”一体化链路,助力中国卖家实现东南亚市场订单履约率提升10%,退货成本降…...
List基础与难度题
1. 向 ArrayList 中添加元素并打印 功能描述: 程序创建一个空的 ArrayList 集合,用于存储字符串类型的元素。向该 ArrayList 中依次添加指定的字符串元素。使用增强型 for 循环遍历 ArrayList 中的所有元素,并将每个元素打印输出到控制台。 …...
Oracle19C低版本一天遭遇两BUG(ORA-04031/ORA-600)
昨天帮朋友看一个系统异常卡顿的案例,在这里分享给大家 环境:Exadata X8M 数据库版本19.11 1.系统报错信息 表象为系统卡顿,页面无法刷出,登陆到主机上看到节点1 系统等待存在大量的 cursor: pin S wait on X等待 查看两个节…...