C++学习:六个月从基础到就业——STL:分配器与设计原理
C++学习:六个月从基础到就业——STL:分配器与设计原理
本文是我C++学习之旅系列的第三十篇技术文章,也是第二阶段"C++进阶特性"的第九篇,主要介绍C++ STL中的分配器设计原理与实现。查看完整系列目录了解更多内容。
引言
在之前的STL系列文章中,我们已经讨论了STL的三个主要组件:容器、迭代器和算法,以及函数对象与适配器。本文将探讨STL设计中另一个不太引人注目但至关重要的组件——分配器(Allocator)。
分配器是STL的核心组件之一,负责容器的内存管理。虽然它通常被隐藏在容器实现的背后,但了解其工作原理对深入理解STL的设计思想、优化程序性能、处理特殊内存需求都有很大帮助。特别是在资源受限的环境、高性能计算或特定硬件平台上,自定义分配器可以显著提升应用程序的性能和稳定性。
本文将详细介绍STL分配器的设计原理、接口规范、标准实现以及如何创建自定义分配器。我们还将讨论一些现代C++中关于分配器的发展和最佳实践。
分配器的基本概念
什么是分配器?
分配器是一个封装了内存分配和释放策略的类,它为STL容器提供了统一的内存管理接口。简单来说,分配器负责以下两个主要工作:
- 内存分配:为容器中的元素分配内存
- 内存释放:释放不再需要的内存
分配器使得容器的内存管理与其算法逻辑分离,符合单一职责原则,同时提供了灵活性,允许用户根据需要替换默认的内存管理策略。
分配器在STL中的位置
STL的基本架构可以概括为以下组件:
- 容器(Containers):存储和管理数据的对象
- 迭代器(Iterators):提供访问容器元素的接口
- 算法(Algorithms):操作容器中数据的函数
- 函数对象(Functors):封装可调用的对象
- 适配器(Adapters):转换接口以适应不同需求
- 分配器(Allocators):管理容器的内存分配
分配器是容器与底层内存管理之间的桥梁,所有STL容器都接受一个分配器类型参数,默认使用std::allocator<T>:
template <class T, class Allocator = std::allocator<T>>
class vector;template <class T, class Allocator = std::allocator<T>>
class list;template <class T, class Allocator = std::allocator<T>>
class deque;
为什么需要分配器?
分配器的存在有以下几个重要理由:
- 抽象内存管理:隐藏底层内存管理细节,使容器实现更加清晰
- 提供定制能力:允许用户根据特定需求定制内存分配策略
- 适应不同环境:使STL可以在不同的内存模型和平台上工作
- 性能优化:通过专用分配器提高特定场景下的内存分配性能
- 特殊内存需求:支持对齐内存、共享内存、内存池等特殊需求
分配器的接口规范
C++17之前的分配器接口
在C++17之前,一个符合标准的分配器需要实现以下接口:
template <class T>
class SimpleAllocator {
public:// 类型定义typedef T value_type;typedef T* pointer;typedef const T* const_pointer;typedef T& reference;typedef const T& const_reference;typedef std::size_t size_type;typedef std::ptrdiff_t difference_type;// rebind结构,允许容器为不同类型分配内存template <class U>struct rebind {typedef SimpleAllocator<U> other;};// 构造函数SimpleAllocator() noexcept;// 复制构造函数SimpleAllocator(const SimpleAllocator&) noexcept;// 从其他类型分配器构造template <class U>SimpleAllocator(const SimpleAllocator<U>&) noexcept;// 析构函数~SimpleAllocator();// 分配内存pointer allocate(size_type n, const void* hint = nullptr);// 释放内存void deallocate(pointer p, size_type n);// 构造对象void construct(pointer p, const_reference val);// 析构对象void destroy(pointer p);// 获取可寻址的最大对象大小size_type max_size() const noexcept;// 比较两个分配器是否相等bool operator==(const SimpleAllocator& other) const noexcept;// 比较两个分配器是否不等bool operator!=(const SimpleAllocator& other) const noexcept;
};
C++17及以后的分配器接口
C++17简化了分配器的要求,移除了一些冗余的成员,现在的分配器最低要求是:
template <class T>
class ModernAllocator {
public:// 类型定义using value_type = T;// 构造函数ModernAllocator() noexcept = default;// 析构函数~ModernAllocator() = default;// 从其他类型分配器构造template <class U>ModernAllocator(const ModernAllocator<U>&) noexcept;// 分配未初始化的存储T* allocate(std::size_t n);// 释放存储void deallocate(T* p, std::size_t n);// C++17移除了construct和destroy方法,使用std::allocator_traits代替
};
C++17引入了std::allocator_traits来简化分配器的使用并提供默认行为,这让自定义分配器的实现变得更加简单。
std::allocator_traits
std::allocator_traits是一个用于完成分配器接口的模板类,它为分配器提供了标准化的接口和默认实现:
namespace std {template <class Alloc>struct allocator_traits {// 各种类型定义using allocator_type = Alloc;using value_type = typename Alloc::value_type;using pointer = /* 取决于Alloc是否定义了pointer */;using const_pointer = /* 取决于Alloc是否定义了const_pointer */;using void_pointer = /* ... */;using const_void_pointer = /* ... */;using difference_type = /* ... */;using size_type = /* ... */;// rebind结构template <class T>using rebind_alloc = /* 取决于Alloc是否定义了rebind */;template <class T>using rebind_traits = allocator_traits<rebind_alloc<T>>;// 分配和释放方法static pointer allocate(Alloc& a, size_type n);static pointer allocate(Alloc& a, size_type n, const_void_pointer hint);static void deallocate(Alloc& a, pointer p, size_type n);// 构造和析构对象template <class T, class... Args>static void construct(Alloc& a, T* p, Args&&... args);template <class T>static void destroy(Alloc& a, T* p);// 其他成员函数static size_type max_size(const Alloc& a) noexcept;static Alloc select_on_container_copy_construction(const Alloc& a);// 类型特征static constexpr bool propagate_on_container_copy_assignment = /* ... */;static constexpr bool propagate_on_container_move_assignment = /* ... */;static constexpr bool propagate_on_container_swap = /* ... */;static constexpr bool is_always_equal = /* ... */;};
}
allocator_traits通过SFINAE(替换失败不是错误)机制,会检查分配器是否提供了特定的方法或类型,如果没有则提供一个默认实现。
标准分配器 std::allocator
STL的默认分配器是std::allocator,它是一个相对简单的封装,直接使用操作系统的堆内存管理:
#include <iostream>
#include <memory>
#include <vector>
#include <string>void exploreStdAllocator() {// 创建一个int类型的分配器std::allocator<int> intAlloc;// 分配5个int的空间int* ints = intAlloc.allocate(5);// 在分配的空间中构造对象for (int i = 0; i < 5; ++i) {intAlloc.construct(ints + i, i * 10);}// 使用分配的内存std::cout << "Allocated integers: ";for (int i = 0; i < 5; ++i) {std::cout << ints[i] << " ";}std::cout << std::endl;// 析构对象for (int i = 0; i < 5; ++i) {intAlloc.destroy(ints + i);}// 释放内存intAlloc.deallocate(ints, 5);// 使用allocator_traitsstd::allocator<std::string> strAlloc;auto traits = std::allocator_traits<std::allocator<std::string>>();// 分配一个string的空间std::string* str = traits.allocate(strAlloc, 1);// 使用traits构造对象traits.construct(strAlloc, str, "Hello, allocator!");std::cout << "Allocated string: " << *str << std::endl;// 析构并释放traits.destroy(strAlloc, str);traits.deallocate(strAlloc, str, 1);
}int main() {exploreStdAllocator();return 0;
}
std::allocator的内部实现
虽然具体实现因标准库而异,但一般来说,std::allocator内部直接使用operator new和operator delete进行内存分配和释放:
template <class T>
T* allocate(std::size_t n) {if (n > std::numeric_limits<std::size_t>::max() / sizeof(T))throw std::bad_alloc();if (auto p = static_cast<T*>(::operator new(n * sizeof(T))))return p;throw std::bad_alloc();
}void deallocate(T* p, std::size_t n) noexcept {::operator delete(p);
}
std::allocator的优点是简单直接,它将内存管理委托给底层的系统分配器,而不添加额外的开销或优化。
std::allocator的局限性
标准分配器有以下局限性:
- 性能开销:每次分配都会调用系统内存分配函数,有一定开销
- 内存碎片:频繁的小块内存分配可能导致内存碎片
- 缺乏定制能力:无法针对特定容器或使用场景进行优化
- 不支持特殊内存:不直接支持共享内存、内存映射文件等
- 缓存不友好:没有考虑CPU缓存的影响
这些局限性也正是为什么STL允许自定义分配器的原因。
分配器的设计原理
设计目标
STL分配器的设计遵循以下原则:
- 效率:最小化内存分配和管理的开销
- 通用性:能够适应不同类型的容器需求
- 可扩展性:允许用户定义符合特定需求的自定义分配器
- 透明性:对容器的使用者隐藏内存管理的复杂性
分配策略
分配器可以采用多种内存分配策略:
- 直接分配:直接使用系统的内存分配函数(如
malloc/free或new/delete) - 内存池:预先分配大块内存,然后分割成小块按需分配
- 固定大小分配:为特定大小的对象优化的分配器
- 区域分配:从预定义的内存区域分配内存
- 栈分配:从栈上分配内存(适用于小型、生命周期有限的容器)
内存布局
分配器处理的内存布局通常包括:
- 原始存储:未构造对象的内存
- 构造存储:已经构造了对象的内存
- 内存对齐:确保内存按照类型要求对齐
- 内存边界:标记内存块的边界,以便正确释放
状态管理
分配器可以是有状态的或无状态的:
- 无状态分配器:不保存状态,相同类型的分配器实例完全等价
- 有状态分配器:保存状态(如内存池指针),不同实例可能有不同行为
C++17引入的is_always_equal特性用于区分这两种情况,告诉容器两个分配器实例是否可以互换使用。
自定义分配器的实现
基本实现框架
以下是一个简单的自定义分配器框架:
#include <iostream>
#include <memory>
#include <vector>
#include <cstdlib>
#include <new>// 一个简单的自定义分配器示例
template <class T>
class SimpleAllocator {
public:// 类型定义(C++17以及之后)using value_type = T;// 构造函数和析构函数SimpleAllocator() noexcept { std::cout << "SimpleAllocator created\n"; }~SimpleAllocator() { std::cout << "SimpleAllocator destroyed\n"; }// 复制构造函数template <class U>SimpleAllocator(const SimpleAllocator<U>&) noexcept { std::cout << "SimpleAllocator copied\n"; }// 分配内存T* allocate(std::size_t n) {std::cout << "Allocating " << n << " objects of size " << sizeof(T) << std::endl;if (n > std::size_t(-1) / sizeof(T))throw std::bad_alloc();if (auto p = static_cast<T*>(std::malloc(n * sizeof(T))))return p;throw std::bad_alloc();}// 释放内存void deallocate(T* p, std::size_t n) noexcept {std::cout << "Deallocating " << n << " objects of size " << sizeof(T) << std::endl;std::free(p);}// C++17之前的构造和析构函数(现在通过allocator_traits处理)template <class U, class... Args>void construct(U* p, Args&&... args) {::new((void*)p) U(std::forward<Args>(args)...);}template <class U>void destroy(U* p) {p->~U();}
};// 两个分配器相等的条件
template <class T, class U>
bool operator==(const SimpleAllocator<T>&, const SimpleAllocator<U>&) {return true;
}template <class T, class U>
bool operator!=(const SimpleAllocator<T>&, const SimpleAllocator<U>&) {return false;
}// 测试自定义分配器
void testSimpleAllocator() {// 使用自定义分配器的vectorstd::vector<int, SimpleAllocator<int>> v;// 添加元素std::cout << "Adding elements to vector...\n";for (int i = 0; i < 5; ++i) {v.push_back(i);}// 访问元素std::cout << "Vector elements: ";for (int i : v) {std::cout << i << " ";}std::cout << std::endl;// vector析构时会自动释放内存std::cout << "Vector going out of scope...\n";
}int main() {testSimpleAllocator();return 0;
}
内存池分配器
下面是一个更复杂的内存池分配器实现:
#include <iostream>
#include <memory>
#include <vector>
#include <list>
#include <set>
#include <cstddef>// 内存池实现
template <std::size_t BlockSize = 4096>
class MemoryPool {
private:// 内存块结构struct Block {char data[BlockSize];Block* next;};struct Chunk {Chunk* next;};Block* currentBlock;Chunk* freeChunks;std::size_t chunkSize;std::size_t chunksPerBlock;public:// 构造函数MemoryPool(std::size_t chunkSz) : currentBlock(nullptr),freeChunks(nullptr),chunkSize(chunkSz) {// 确保chunk大小至少能存放一个指针,并且是8的倍数(对齐)chunkSize = std::max(chunkSize, sizeof(Chunk));chunkSize = (chunkSize + 7) & ~7;// 计算每个块可以容纳的chunk数量chunksPerBlock = (BlockSize - sizeof(Block*)) / chunkSize;}// 析构函数~MemoryPool() {// 释放所有分配的块while (currentBlock) {Block* temp = currentBlock->next;operator delete(currentBlock);currentBlock = temp;}}// 分配内存void* allocate() {if (!freeChunks) { // 如果没有空闲的chunk,分配新块// 分配新的内存块Block* newBlock = static_cast<Block*>(operator new(sizeof(Block)));newBlock->next = currentBlock;currentBlock = newBlock;// 将新块分割成chunks并添加到freeChunks链表char* start = currentBlock->data;std::size_t i = 0;// 为每个chunk设置一个指向下一个chunk的指针for (; i < chunksPerBlock - 1; ++i) {Chunk* chunk = reinterpret_cast<Chunk*>(start + i * chunkSize);chunk->next = reinterpret_cast<Chunk*>(start + (i + 1) * chunkSize);}// 设置最后一个chunkChunk* lastChunk = reinterpret_cast<Chunk*>(start + i * chunkSize);lastChunk->next = nullptr;// 将第一个chunk设为空闲链表的头freeChunks = reinterpret_cast<Chunk*>(start);}// 从空闲链表中取出一个chunkChunk* chunk = freeChunks;freeChunks = chunk->next;return chunk;}// 释放内存void deallocate(void* p) {if (!p) return;// 将回收的chunk添加到空闲链表的头部Chunk* chunk = static_cast<Chunk*>(p);chunk->next = freeChunks;freeChunks = chunk;}
};// 基于内存池的分配器
template <class T, std::size_t BlockSize = 4096>
class PoolAllocator {
private:// 类型特定的内存池static MemoryPool<BlockSize>& getPool() {static MemoryPool<BlockSize> pool(sizeof(T));return pool;}public:// 类型定义using value_type = T;// 构造函数和析构函数PoolAllocator() noexcept = default;~PoolAllocator() = default;// 复制构造函数template <class U>PoolAllocator(const PoolAllocator<U, BlockSize>&) noexcept {}// 内存分配T* allocate(std::size_t n) {if (n != 1) {// 对于多个对象,使用标准分配器return static_cast<T*>(operator new(n * sizeof(T)));}// 对于单个对象,使用内存池return static_cast<T*>(getPool().allocate());}// 内存释放void deallocate(T* p, std::size_t n) noexcept {if (n != 1) {// 对于多个对象,使用标准释放operator delete(p);} else {// 对于单个对象,使用内存池getPool().deallocate(p);}}// 相等比较(所有同类型的池分配器都相等)template <class U>bool operator==(const PoolAllocator<U, BlockSize>&) const noexcept {return true;}template <class U>bool operator!=(const PoolAllocator<U, BlockSize>&) const noexcept {return false;}
};// 测试池分配器
void testPoolAllocator() {std::cout << "=== Testing Pool Allocator ===\n";// 使用池分配器的容器std::vector<int, PoolAllocator<int>> v;std::list<double, PoolAllocator<double>> l;std::set<char, std::less<char>, PoolAllocator<char>> s;// 添加元素std::cout << "Adding elements to vector...\n";for (int i = 0; i < 10000; ++i) {v.push_back(i);}std::cout << "Adding elements to list...\n";for (int i = 0; i < 10000; ++i) {l.push_back(i * 1.1);}std::cout << "Adding elements to set...\n";for (char c = 'a'; c <= 'z'; ++c) {s.insert(c);}// 访问元素std::cout << "Vector size: " << v.size() << std::endl;std::cout << "List size: " << l.size() << std::endl;std::cout << "Set size: " << s.size() << std::endl;std::cout << "First few vector elements: ";for (int i = 0; i < 5 && i < v.size(); ++i) {std::cout << v[i] << " ";}std::cout << std::endl;std::cout << "First few list elements: ";auto it = l.begin();for (int i = 0; i < 5 && it != l.end(); ++i, ++it) {std::cout << *it << " ";}std::cout << std::endl;std::cout << "Set elements: ";for (char c : s) {std::cout << c << " ";}std::cout << std::endl;// 容器析构时会自动释放内存std::cout << "Containers going out of scope...\n";
}int main() {testPoolAllocator();return 0;
}
这个内存池分配器更加高效,特别是对于频繁分配和释放单个对象的情况。
跟踪和调试分配器
用于调试内存问题的跟踪分配器:
#include <iostream>
#include <memory>
#include <vector>
#include <map>
#include <string>
#include <sstream>
#include <mutex>// 跟踪内存分配的分配器
template <class T>
class TracingAllocator {
private:// 全局分配跟踪(线程安全)struct AllocationTracker {std::map<void*, std::size_t> allocations; // 指针 -> 大小std::size_t totalAllocated = 0;std::size_t currentAllocated = 0;std::size_t allocationCount = 0;std::mutex mutex;void recordAllocation(void* p, std::size_t n) {std::lock_guard<std::mutex> lock(mutex);allocations[p] = n;totalAllocated += n * sizeof(T);currentAllocated += n * sizeof(T);allocationCount++;}void recordDeallocation(void* p) {std::lock_guard<std::mutex> lock(mutex);if (allocations.count(p) > 0) {std::size_t n = allocations[p];currentAllocated -= n * sizeof(T);allocations.erase(p);}}std::string getReport() const {std::ostringstream ss;ss << "Memory Allocation Report for " << typeid(T).name() << ":\n"<< "Total allocated: " << totalAllocated << " bytes\n"<< "Currently allocated: " << currentAllocated << " bytes\n"<< "Allocation count: " << allocationCount << "\n"<< "Outstanding allocations: " << allocations.size();return ss.str();}void checkLeaks() const {if (!allocations.empty()) {std::cerr << "WARNING: Memory leaks detected!\n";std::cerr << "Outstanding allocations: " << allocations.size() << "\n";for (const auto& [ptr, size] : allocations) {std::cerr << "  " << ptr << ": " << size << " elements (" << size * sizeof(T) << " bytes)\n";}}}};static AllocationTracker& getTracker() {static AllocationTracker tracker;return tracker;}// 分配标签(用于区分不同实例)std::string tag;public:// 类型定义using value_type = T;// 构造函数TracingAllocator(std::string t = "Default") : tag(std::move(t)) {}// 复制构造函数template <class U>TracingAllocator(const TracingAllocator<U>& other) : tag(other.getTag()) {}// 分配内存T* allocate(std::size_t n) {T* p = static_cast<T*>(::operator new(n * sizeof(T)));std::cout << "[" << tag << "] Allocating " << n << " elements of type " << typeid(T).name() << " (" << n * sizeof(T) << " bytes) at " << p << std::endl;getTracker().recordAllocation(p, n);return p;}// 释放内存void deallocate(T* p, std::size_t n) noexcept {std::cout << "[" << tag << "] Deallocating " << n << " elements at " << p << std::endl;getTracker().recordDeallocation(p);::operator delete(p);}// 获取标签const std::string& getTag() const { return tag; }// 生成报告static std::string generateReport() {return getTracker().getReport();}// 检查内存泄漏static void checkForLeaks() {getTracker().checkLeaks();}// 相等比较template <class U>bool operator==(const TracingAllocator<U>& other) const noexcept {return tag == other.getTag();}template <class U>bool operator!=(const TracingAllocator<U>& other) const noexcept {return !(*this == other);}
};// 测试跟踪分配器
void testTracingAllocator() {std::cout << "=== Testing Tracing Allocator ===\n";// 创建使用跟踪分配器的容器std::vector<int, TracingAllocator<int>> v(TracingAllocator<int>("Vector"));// 添加和删除元素std::cout << "Adding elements...\n";for (int i = 0; i < 10; ++i) {v.push_back(i);}std::cout << "Removing some elements...\n";v.pop_back();v.pop_back();// 检查内存状态std::cout << "\nMemory allocation report:\n";std::cout << TracingAllocator<int>::generateReport() << std::endl;// 清空容器v.clear();v.shrink_to_fit();std::cout << "\nAfter clearing vector:\n";std::cout << TracingAllocator<int>::generateReport() << std::endl;// 检查内存泄漏std::cout << "\nChecking for memory leaks...\n";TracingAllocator<int>::checkForLeaks();std::cout << "\nVector going out of scope...\n";
}int main() {testTracingAllocator();std::cout << "\nFinal memory check:\n";TracingAllocator<int>::checkForLeaks();return 0;
}
这种跟踪分配器对于调试内存泄漏和分析内存使用模式非常有用。
分配器的高级应用
多级分配策略
在实际应用中,可能需要结合多种分配策略:
#include <iostream>
#include <memory>
#include <vector>// 多级分配器:小对象使用内存池,大对象直接分配
template <class T, std::size_t Threshold = 1024, std::size_t BlockSize = 4096>
class TieredAllocator {
private:// 内存池实现(简化版)class Pool {public:void* allocate(std::size_t bytes) {// 简化实现std::cout << "Pool allocating " << bytes << " bytes\n";return ::operator new(bytes);}void deallocate(void* p, std::size_t bytes) {std::cout << "Pool deallocating " << bytes << " bytes\n";::operator delete(p);}};static Pool& getPool() {static Pool pool;return pool;}public:using value_type = T;TieredAllocator() noexcept = default;template <class U>TieredAllocator(const TieredAllocator<U, Threshold, BlockSize>&) noexcept {}// 分配内存T* allocate(std::size_t n) {std::size_t totalBytes = n * sizeof(T);if (totalBytes <= Threshold) {// 小型分配使用内存池return static_cast<T*>(getPool().allocate(totalBytes));} else {// 大型分配直接使用系统分配器std::cout << "Direct allocating " << totalBytes << " bytes\n";return static_cast<T*>(::operator new(totalBytes));}}// 释放内存void deallocate(T* p, std::size_t n) noexcept {std::size_t totalBytes = n * sizeof(T);if (totalBytes <= Threshold) {getPool().deallocate(p, totalBytes);} else {std::cout << "Direct deallocating " << totalBytes << " bytes\n";::operator delete(p);}}
};// 测试多级分配器
void testTieredAllocator() {std::cout << "=== Testing Tiered Allocator ===\n";// 使用多级分配器的向量std::vector<int, TieredAllocator<int>> v;// 小型分配std::cout << "Small allocations:\n";for (int i = 0; i < 10; ++i) {v.push_back(i);}// 大型分配std::cout << "\nLarge allocation:\n";v.reserve(10000);  // 应该触发大型分配std::cout << "\nVector going out of scope...\n";
}
对齐内存分配器
专门处理对齐内存需求的分配器:
#include <iostream>
#include <memory>
#include <vector>
#include <cstddef>// 对齐内存分配器
template <class T, std::size_t Alignment = 64> // 默认缓存行大小对齐
class AlignedAllocator {
public:// 类型定义using value_type = T;using pointer = T*;using const_pointer = const T*;using size_type = std::size_t;static constexpr size_type alignment = Alignment;// 默认构造函数AlignedAllocator() noexcept = default;// 复制构造函数template <class U>AlignedAllocator(const AlignedAllocator<U, Alignment>&) noexcept {}// 分配对齐的内存T* allocate(std::size_t n) {if (n == 0) return nullptr;std::size_t totalSize = n * sizeof(T);void* ptr = nullptr;#ifdef _WIN32// Windowsptr = _aligned_malloc(totalSize, Alignment);if (!ptr) throw std::bad_alloc();
#else// POSIXint result = posix_memalign(&ptr, Alignment, totalSize);if (result != 0) throw std::bad_alloc();
#endifstd::cout << "Allocated " << totalSize << " bytes aligned to " << Alignment << " at " << ptr << std::endl;return static_cast<T*>(ptr);}// 释放对齐的内存void deallocate(T* p, std::size_t n) noexcept {if (!p) return;std::cout << "Deallocating aligned memory at " << p << std::endl;#ifdef _WIN32// Windows_aligned_free(p);
#else// POSIXfree(p);
#endif}
};// 测试对齐分配器
void testAlignedAllocator() {std::cout << "=== Testing Aligned Allocator ===\n";// 使用对齐分配器的向量std::vector<double, AlignedAllocator<double>> v;// 添加元素for (int i = 0; i < 10; ++i) {v.push_back(i * 1.1);}// 检查对齐std::cout << "Vector data address: " << &v[0] << std::endl;std::cout << "Address alignment check: " << (reinterpret_cast<std::uintptr_t>(&v[0]) % AlignedAllocator<double>::alignment == 0 ? "Properly aligned" : "Not aligned") << std::endl;// 访问元素std::cout << "Vector elements: ";for (auto val : v) {std::cout << val << " ";}std::cout << std::endl;
}
分配器的适配器模式
为现有分配器添加额外功能的适配器:
#include <iostream>
#include <memory>
#include <vector>
#include <chrono>// 计时分配器适配器
template <class Allocator>
class TimingAllocator {
private:Allocator allocator;// 获取当前时间戳auto now() const {return std::chrono::high_resolution_clock::now();}// 计算时间差(微秒)template <class TimePoint>long long microseconds(const TimePoint& start, const TimePoint& end) const {return std::chrono::duration_cast<std::chrono::microseconds>(end - start).count();}public:// 类型定义using value_type = typename Allocator::value_type;// 构造函数TimingAllocator() = default;template <class U>TimingAllocator(const TimingAllocator<U>& other) : allocator(other.getAllocator()) {}// 获取底层分配器const Allocator& getAllocator() const { return allocator; }// 分配内存并计时value_type* allocate(std::size_t n) {auto start = now();value_type* p = allocator.allocate(n);auto end = now();std::cout << "Allocation of " << n << " elements took "<< microseconds(start, end) << " microseconds" << std::endl;return p;}// 释放内存并计时void deallocate(value_type* p, std::size_t n) {auto start = now();allocator.deallocate(p, n);auto end = now();std::cout << "Deallocation of " << n << " elements took "<< microseconds(start, end) << " microseconds" << std::endl;}// 使用allocator_traits处理其它操作
};// 测试计时分配器适配器
void testTimingAllocator() {std::cout << "=== Testing Timing Allocator ===\n";// 使用计时分配器的向量std::vector<int, TimingAllocator<std::allocator<int>>> v;// 预留空间std::cout << "Reserving space...\n";v.reserve(1000);// 添加元素std::cout << "Adding elements...\n";for (int i = 0; i < 1000; ++i) {v.push_back(i);}// 调整大小std::cout << "Resizing...\n";v.resize(500);// 释放未使用内存std::cout << "Shrinking to fit...\n";v.shrink_to_fit();
}
分配器的性能考量
性能比较
不同分配器在不同场景下的性能可能有显著差异:
#include <iostream>
#include <vector>
#include <chrono>
#include <memory>
#include <random>// 测试不同分配器的性能
template <template <typename> class Allocator>
void benchmarkAllocator(const std::string& name, int iterations, int elementsPerIteration) {auto start = std::chrono::high_resolution_clock::now();for (int i = 0; i < iterations; ++i) {// 创建和销毁带有分配器的向量{std::vector<int, Allocator<int>> v;// 添加元素for (int j = 0; j < elementsPerIteration; ++j) {v.push_back(j);}// 执行一些操作int sum = 0;for (int val : v) {sum += val;}} // 向量在这里被销毁}auto end = std::chrono::high_resolution_clock::now();auto duration = std::chrono::duration_cast<std::chrono::milliseconds>(end - start).count();std::cout << name << ": " << duration << " ms" << std::endl;
}// 运行基准测试
void runAllocationBenchmarks() {std::cout << "=== Allocator Performance Benchmarks ===\n";const int iterations = 100;const int elementsPerIteration = 10000;// 测试标准分配器benchmarkAllocator<std::allocator>("Standard Allocator", iterations, elementsPerIteration);// 测试池分配器benchmarkAllocator<PoolAllocator>("Pool Allocator", iterations, elementsPerIteration);
}
内存使用分析
分析内存使用情况:
#include <iostream>
#include <iomanip>
#include <vector>
#include <list>
#include <map>
#include <set>
#include <memory>// 内存使用分析
void analyzeMemoryUsage() {std::cout << "=== Memory Usage Analysis ===\n";// 分析不同容器的内存开销std::cout << std::left << std::setw(15) << "Container"<< std::setw(15) << "Element Size"<< std::setw(20) << "Container Size"<< std::setw(20) << "Memory Usage"<< std::setw(15) << "Overhead"<< std::endl;std::cout << std::string(85, '-') << std::endl;// 分析vector的内存使用{const size_t count = 1000;std::vector<int> v(count);size_t elementSize = sizeof(int);size_t containerSize = sizeof(v);size_t dataSize = count * elementSize;size_t capacity = v.capacity() * elementSize;size_t overhead = containerSize + capacity - dataSize;std::cout << std::setw(15) << "vector<int>"<< std::setw(15) << elementSize<< std::setw(20) << containerSize<< std::setw(20) << (containerSize + capacity)<< std::setw(15) << overhead<< std::endl;}// 分析list的内存使用{const size_t count = 1000;std::list<int> l(count);size_t elementSize = sizeof(int);size_t nodeSize = elementSize + 2 * sizeof(void*);  // 近似节点大小size_t containerSize = sizeof(l);size_t dataSize = count * elementSize;size_t totalSize = containerSize + count * nodeSize;size_t overhead = totalSize - dataSize;std::cout << std::setw(15) << "list<int>"<< std::setw(15) << elementSize<< std::setw(20) << containerSize<< std::setw(20) << totalSize<< std::setw(15) << overhead<< std::endl;}// 分析其他容器...
}
大小和对齐问题
处理特殊大小和对齐要求:
#include <iostream>
#include <memory>
#include <type_traits>// 打印类型的大小和对齐要求
template <typename T>
void printTypeInfo() {std::cout << "Type: " << typeid(T).name() << std::endl;std::cout << "Size: " << sizeof(T) << " bytes" << std::endl;std::cout << "Alignment: " << alignof(T) << " bytes" << std::endl;
}// 分析不同类型的大小和对齐
void analyzeSizeAlignment() {std::cout << "=== Size and Alignment Analysis ===\n";printTypeInfo<char>();std::cout << std::endl;printTypeInfo<int>();std::cout << std::endl;printTypeInfo<double>();std::cout << std::endl;struct Aligned {char c;         // 1 byteint i;          // 4 bytesalignas(16) double d;  // 8 bytes, aligned to 16};printTypeInfo<Aligned>();// 检查对齐内存分配器AlignedAllocator<double, 64> alignedAlloc;double* p = alignedAlloc.allocate(1);std::cout << "Allocated address: " << p << std::endl;std::cout << "Address aligned to 64 bytes: " << (reinterpret_cast<std::uintptr_t>(p) % 64 == 0 ? "Yes" : "No") << std::endl;alignedAlloc.deallocate(p, 1);
}
分配器的最佳实践
何时使用自定义分配器
以下场景适合使用自定义分配器:
- 性能关键应用:需要最小化内存分配开销
- 特定内存分配模式:容器有可预测的内存分配模式
- 内存受限环境:嵌入式系统或资源受限设备
- 特殊内存需求:SIMD算法需要对齐内存,或使用特殊内存区域
- 调试内存问题:需要跟踪内存分配和泄漏
分配器设计准则
设计高效分配器的准则:
- 简单性:除非有明显的性能增益,否则保持简单
- 避免虚函数:使用模板而非虚函数,减少运行时开销
- 减少同步:在可能的情况下避免互斥锁或原子操作
- 缓存友好:考虑CPU缓存效应,尤其是对小对象
- 避免碎片:使用固定大小或合并策略减少碎片
- 批量操作:尽可能批量分配和释放内存
- 异常安全:确保在异常情况下不会泄漏内存
现代C++中的分配器改进
C++17和C++20对分配器模型做了一些改进:
- PMR(多态内存资源):C++17引入了
std::pmr命名空间,提供多态分配器 - 分配器感知智能指针:如
std::pmr::polymorphic_allocator支持的智能指针 - 内存资源抽象:
std::pmr::memory_resource提供的内存管理抽象 - 标准内存池:
std::pmr::unsynchronized_pool_resource和std::pmr::synchronized_pool_resource
#include <iostream>
#include <vector>
#include <memory_resource>
#include <string>// 使用PMR示例
void pmrExample() {std::cout << "=== PMR Example ===\n";// 创建一个缓冲区来存储内存char buffer[4096];// 创建一个使用缓冲区的内存资源std::pmr::monotonic_buffer_resource pool(buffer, sizeof(buffer));// 使用内存池创建一个分配器std::pmr::vector<int> v(&pool);// 使用这个容器std::cout << "Adding elements to pmr::vector...\n";for (int i = 0; i < 100; ++i) {v.push_back(i);}// 检查元素std::cout << "First few elements: ";for (int i = 0; i < 5; ++i) {std::cout << v[i] << " ";}std::cout << std::endl;// 使用不同类型的内存资源{// 使用池资源std::pmr::synchronized_pool_resource poolResource;// 使用池资源创建字符串std::pmr::string str1("Hello", &poolResource);std::pmr::string str2("World", &poolResource);// 连接字符串std::cout << "Concatenated strings: " << (str1 + " " + str2) << std::endl;} // 内存资源在这里被释放std::cout << "PMR resources going out of scope...\n";
}
总结
STL分配器是C++标准库中一个强大但通常被忽视的组件。它们为容器提供内存管理功能,并允许通过自定义实现来满足特定需求。本文详细介绍了分配器的设计原理、接口规范、标准实现以及如何创建和使用自定义分配器。
主要关键点回顾:
- 分配器的基本概念:分配器负责内存分配和释放,使容器的算法逻辑与内存管理分离
- 分配器接口规范:C++17之前需要很多类型定义和方法,C++17之后通过
allocator_traits简化了要求 - 标准分配器:
std::allocator是STL容器使用的默认分配器,直接使用系统内存管理 - 自定义分配器:可以根据需要实现专用分配器,如跟踪分配器、内存池分配器和对齐分配器
- 高级应用:多级策略、内存对齐和分配器适配器等高级应用场景
- 性能考量:不同分配器在不同场景下的性能差异和内存使用分析
- 最佳实践:何时使用自定义分配器及其设计准则
- 现代改进:C++17和C++20对分配器模型的改进,特别是多态内存资源(PMR)
了解并掌握分配器的原理和实现,可以帮助你开发出更高效、更灵活的C++应用程序,特别是在性能关键或资源受限的环境中。
参考资源
- C++参考手册 - 分配器
- 《Effective STL》by Scott Meyers
- 《The C++ Standard Library》by Nicolai M. Josuttis
- 《Modern C++ Design》by Andrei Alexandrescu
- CppCon 2017: Pablo Halpern “Allocators: The Good Parts”
- CppCon 2015: Alisdair Meredith “Allocator Is to Allocation what vector Is to vexation”
- ISO C++ Committee Paper P0339R4: polymorphic_allocator<> as a vocabulary type
这是我C++学习之旅系列的第三十篇技术文章。查看完整系列目录了解更多内容。
如有任何问题或建议,欢迎在评论区留言交流!
相关文章:

C++学习:六个月从基础到就业——STL:分配器与设计原理
C学习:六个月从基础到就业——STL:分配器与设计原理 本文是我C学习之旅系列的第三十篇技术文章,也是第二阶段"C进阶特性"的第九篇,主要介绍C STL中的分配器设计原理与实现。查看完整系列目录了解更多内容。 引言 在之前…...
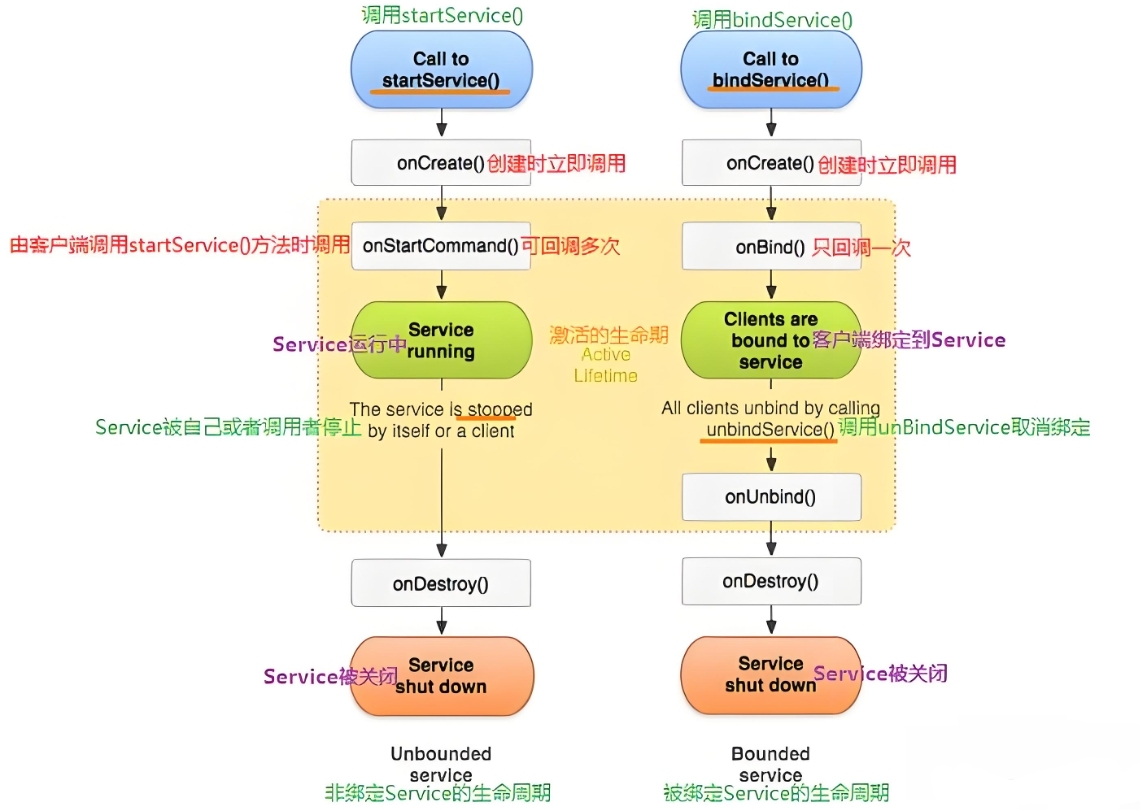
【Android】四大组件之Service
目录 一、什么是Service 二、启停 Service 三、绑定 Service 四、前台服务 五、远程服务扩展 六、服务保活 七、服务启动方法混用 你可以把Service想象成一个“后台默默打工的工人”。它没有UI界面,默默地在后台干活,比如播放音乐、下载文件、处理…...

TRO再添新案 TME再拿下一热门IP,涉及Paddington多个商标
4月2日和4月8日,TME律所代理Paddington & Company Ltd.对热门IP Paddington Bear帕丁顿熊的多类商标发起维权,覆盖文具、家居用品、毛绒玩具、纺织用品、游戏、电影、咖啡、填充玩具等领域。跨境卖家需立即排查店铺内的相关产品! 案件基…...

spring-session-data-redis使用
spring-session-data-redis是spring session项目中的一个子模块,,他允许你使用Redis来存储http session,,从而支持多个应用实例之间共享session,,,即分布式session 原理: EnableRed…...
)
图论---LCA(倍增法)
预处理 O( n logn ),查询O( log n ) #include<bits/stdc.h> using namespace std; typedef pair<int,int> pii; const int N40010,M2*N;//是无向边,边需要见两边int n,m; vector<int> g[N]; //2的幂次范围 0~15 int depth[N],fa[N][1…...

WPF实现类似Microsoft Visual Studio2022界面效果及动态生成界面技术
WPF实现类似VS2022界面效果及动态生成界面技术 一、实现类似VS2022界面效果 1. 主窗口布局与主题 <!-- MainWindow.xaml --> <Window x:Class"VsStyleApp.MainWindow"xmlns"http://schemas.microsoft.com/winfx/2006/xaml/presentation"xmlns:x…...

【安全扫描器原理】网络扫描算法
【安全扫描器原理】网络扫描算法 1.非顺序扫描2.高速扫描 & 分布式扫描3.服务扫描 & 指纹扫描 1.非顺序扫描 参考已有的扫描器,会发现几乎所有的扫描器都无一例外地使用增序扫描,即对所扫描的端口自小到大依次扫描,殊不知࿰…...
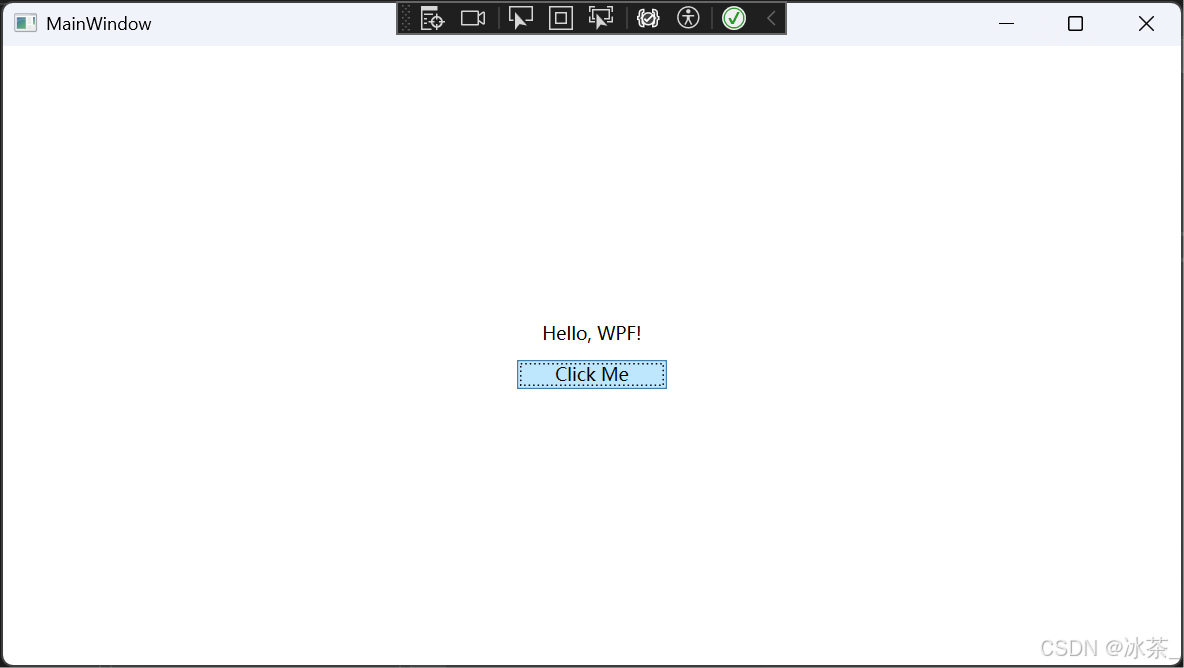
WPF之项目创建
文章目录 引言先决条件创建 WPF 项目步骤理解项目结构XAML 与 C# 代码隐藏第一个 "Hello, WPF!" 示例构建和运行应用程序总结相关学习资源 引言 Windows Presentation Foundation (WPF) 是 Microsoft 用于构建具有丰富用户界面的 Windows 桌面应用程序的现代框架。它…...

Unity中数据储存
在Unity项目开发中,会有很多数据,有需要保存到本地的数据,也有直接保存在缓存中的临时数据,一般为了方便整个项目框架中各个地方能调用需要的数据,因此都会实现一个数据工具或者叫数据管理类,用来管理项目中所有的数据。 首先保存在缓存中的数据,比如用户信息,我们只需…...
 成就系统(Steam/本地) 多语言支持)
第十一天 主菜单/设置界面 过场动画(Timeline) 成就系统(Steam/本地) 多语言支持
前言 对于刚接触Unity的新手开发者来说,构建完整的游戏系统往往充满挑战。本文将手把手教你实现游戏开发中最常见的四大核心系统:主菜单界面、过场动画、成就系统和多语言支持。每个模块都将结合完整代码示例,使用Unity 2022 LTS版本进行演示…...

AI数字人:未来职业的重塑(9/10)
摘要:AI 数字人凭借计算机视觉、自然语言处理与深度学习技术,从虚拟形象进化为智能交互个体,广泛渗透金融、教育、电商等多领域,重构职业生态。其通过降本提效、场景拓展与体验升级机制,替代重复岗位工作,催…...

Android插拔U盘导致黑屏问题排查
问题现象: 车机大屏偶先插拔带音乐的U盘,导致车机系统短暂黑屏的情况。 日志中可以看到vold进程unmount了两次分区,一次是U盘分区,一次是/storage/emulated/0分区: I vold : Start killProcesses: /mnt/media_rw/…...
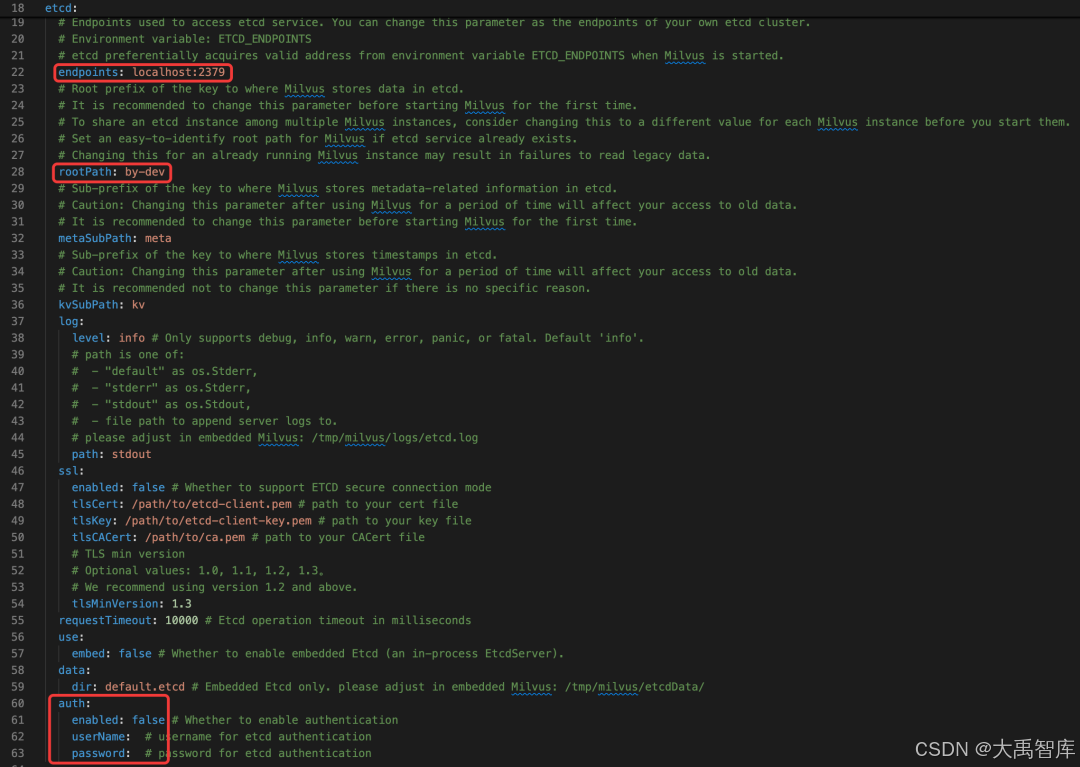
深入解析Mlivus Cloud中的etcd配置:最佳实践与高级调优指南
作为大禹智库的向量数据库高级研究员,我在《向量数据库指南》一书中详细阐述了向量数据库的核心组件及其优化策略。今天,我将基于30余年的实战经验,深入剖析Mlivus Cloud中etcd这一关键依赖的配置细节与优化方法。对于希望深入掌握Mlivus Cloud的读者,我强烈建议参考《向量…...

分享一个可以批量巡检GET和POST接口的Shell脚本
一、场景痛点与需求分析 在分布式系统架构中,服务接口的可用性和稳定性直接影响业务连续性。当面临以下场景时,需批量巡检GET和POST接口: 上线验证:新版本发布后批量验证核心接口 故障恢复:异常数据修复后的批量重试…...
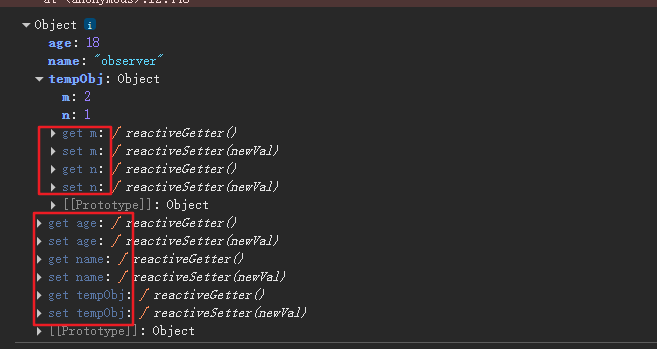
前端面试宝典---vue原理
vue的Observer简化版 class Observer {constructor(value) {if (!value || typeof value ! object) returnthis.walk(value) // 对对象的所有属性进行遍历并定义响应式}walk (obj) {Object.keys(obj).forEach(key > defineReactive(obj, key, obj[key]))} } // 定义核心方法…...
PyTorch卷积层填充(Padding)与步幅(Stride)详解及代码示例
本文通过具体代码示例讲解PyTorch中卷积操作的填充(Padding)和步幅(Stride)对输出形状的影响,帮助读者掌握卷积层的参数配置技巧。 一、填充与步幅基础 填充(Padding):在输入数据边缘…...

2025年Redis分片存储性能优化指南
一、分片规则与负载均衡 动态哈希分片 采用CRC16算法计算键哈希值,通过hash_slot CRC16(key) % 16384确定槽位分布,结合Redis Cluster自动管理槽位迁移。 总分片数按需动态调整,例如从16节点扩容至32节点时,触发槽位重分配以…...

【概念】什么是 JWT Token?
—什么是 JWT Token? JWT Token(JSON Web Token) 就是一张后端发给前端的小票,里面包含用户身份信息,用于做无状态认证(Stateless Authentication)。 每次前端访问后端接口,都拿着…...

部署大模型需要多少GPU显存?以DeepSeek R1部署为例
引言 部署大型语言模型(LLM)时究竟需要多少GPU显存?本文将进行一次简单测算。 如何计算 算法1 可以用一个简单的公式来计算显存占用(单位GB): 参数说明如下: 符号 含义 M 所需的 GPU 显存…...
用go从零构建写一个RPC(仿gRPC,tRPC)--- 版本1
希望借助手写这个go的中间件项目,能够理解go语言的特性以及用go写中间件的优势之处,同时也是为了更好的使用和优化公司用到的trpc,并且作者之前也使用过grpc并有一定的兴趣,所以打算从0构建一个rpc系统,对于生产环境已…...

Fedora 43 计划移除所有 GNOME X11 相关软件包
Fedora 43 计划移除所有 GNOME X11 相关软件包,这是 Fedora 项目团队为全面拥抱 Wayland 所做的重要决策。以下是关于此计划的详细介绍: 提案内容:4 月 23 日,Neal Gompa 提交提案,建议从 Fedora 软件仓库中移除所有 G…...
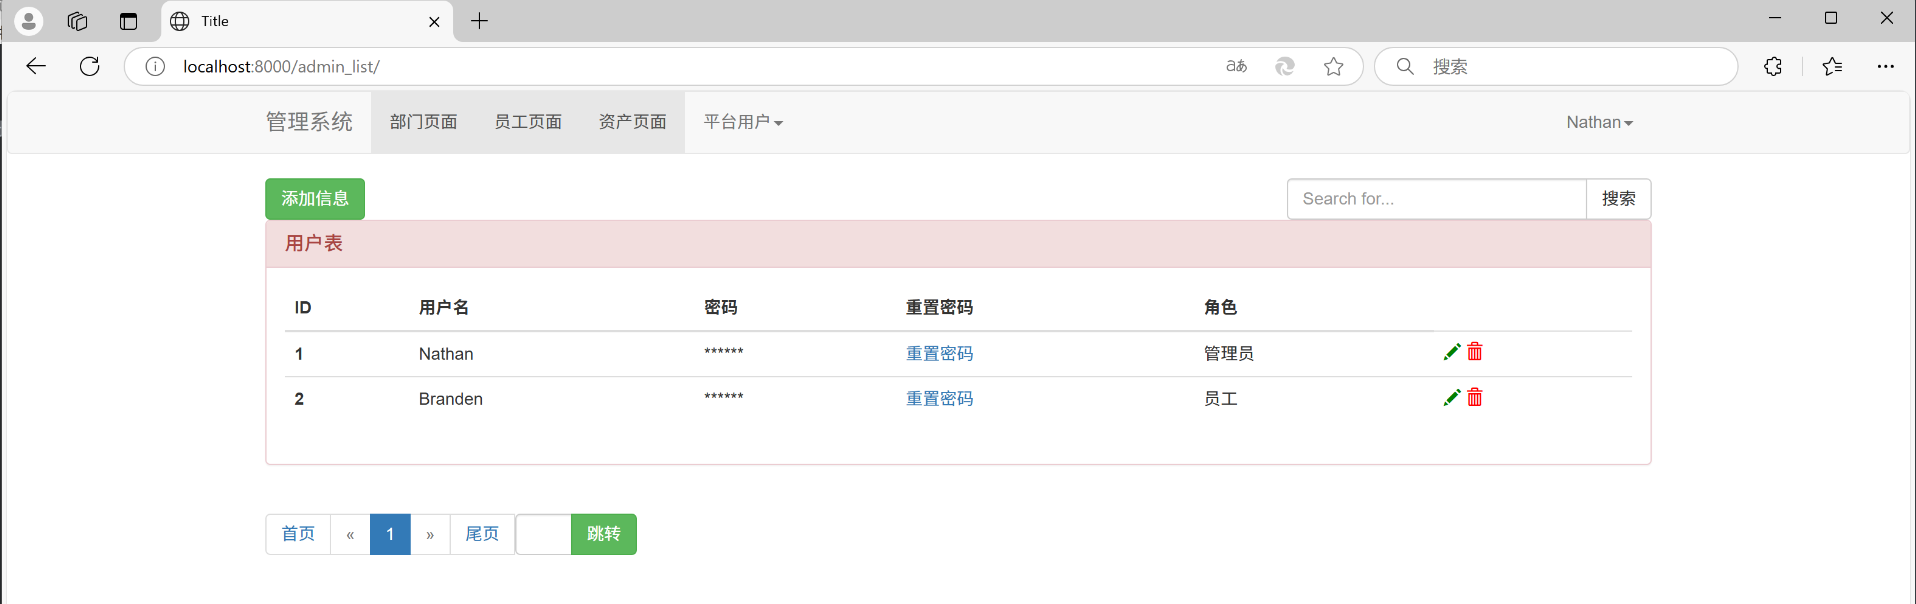
django之账号管理功能
账号管理功能 目录 1.账号管理页面 2.新增账号 3.修改账号 4.账号重置密码 5.删除账号功能 6.所有代码展示集合 7.运行结果 这一片文章, 我们需要新增账号管理功能, 今天我们写到的代码, 基本上都是用到以前所过的知识, 不过也有需要注意的细节。 一、账号管理界面 …...

搭建spark-local模式
要搭建Spark的local模式,你可以按照以下步骤进行操作(以在Linux系统上安装为例,假设你已经安装了Java环境): 1. 下载Spark安装包:访问Spark官方网站(https://spark.apache.org/downloads.html&a…...
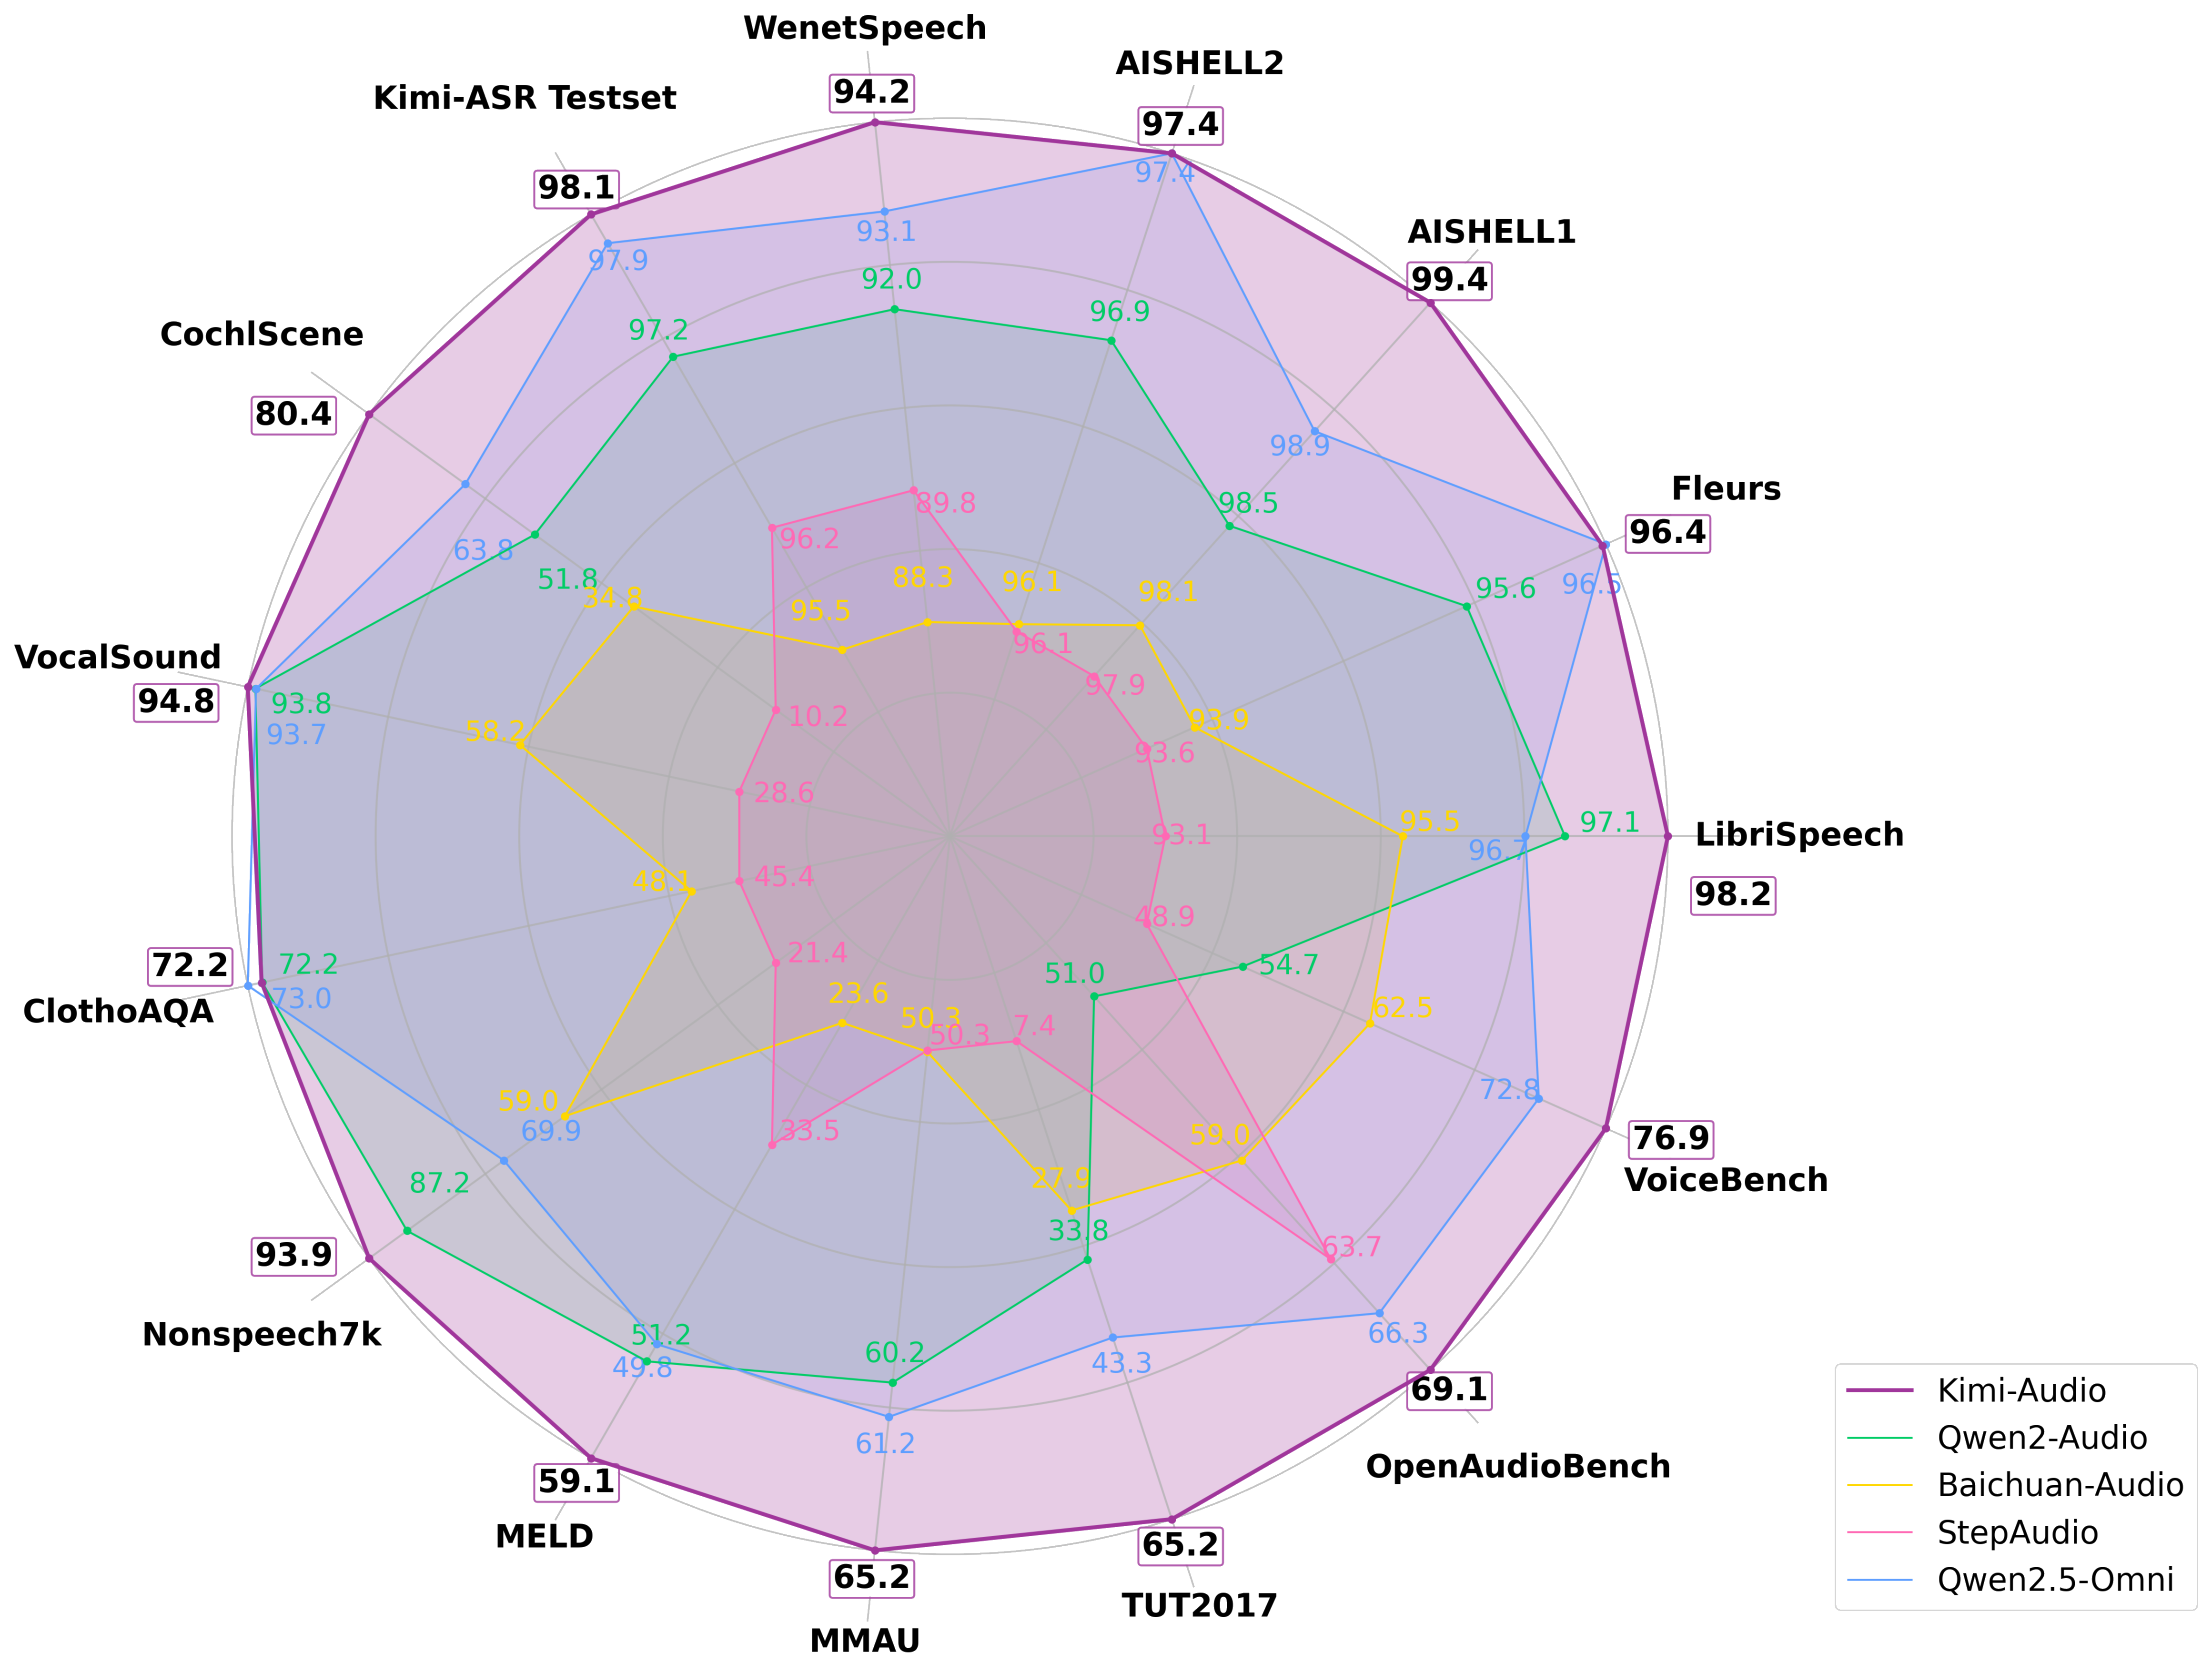
月之暗面开源 Kimi-Audio-7B-Instruct,同时支持语音识别和语音生成
我们向您介绍在音频理解、生成和对话方面表现出色的开源音频基础模型–Kimi-Audio。该资源库托管了 Kimi-Audio-7B-Instruct 的模型检查点。 Kimi-Audio 被设计为通用的音频基础模型,能够在单一的统一框架内处理各种音频处理任务。主要功能包括: 通用功…...
IDEA配置将Servlet真正布署到Tomcat
刚开始只能IDEA运行完Servlet web application 并保持IDEA运行才能通过浏览器访问到我的Servlet,跟想象中的不一样,不应该是IDEA运行完项目以后只要打开Tomcat就能访问吗?事实时运行完项目只要关掉IDEA就不能再访问到应用了,而且T…...

删除新安装IBM Guardium Data Protection 12.1的baltimorecybertrustroot证书
登录web console,会显示 baltimorecybertrustroot证书过期警告。 采用下面的命令删除过期证书就可消除警告。 collector02.cpd.com> delete certificate keystore Select an alias from the list below to delete the corresponding certificate. Alias List:…...

【蓝桥杯】画展布置
画展布置 题目描述 画展策展人小蓝和助理小桥为即将举办的画展准备了 N N N 幅画作,其艺术价值分别为 A 1 , A 2 , … , A N A_1, A_2, \dots , A_N A1,A2,…,AN。他们需要从这 N N N 幅画中挑选 M M M 幅,并按照一定顺序布置在展厅的 M M …...

请求参数、路径参数、查询参数、Spring MVC/FeignClient请求相关注解梳理
目录 1 请求分类1.1 URL参数--查询参数1.2 URL参数--路径参数 2 请求相关注解2.1 RequestParam--查询参数2.2 PathVariable--路径参数2.3 RequestBody2.4 Param & RequestLine2.5 SpringMVC请求参数注解用在FeignClient里 使用SpringMVC处理http请求或使用FeignClient进行请…...

MySQL 详解之复制与集群:构建高可用与可扩展数据库架构
随着业务的发展,单一的数据库实例往往难以满足需求: 性能瓶颈: 读写请求量不断增加,单个服务器的 CPU、内存、磁盘、网络资源达到上限,尤其是读请求远大于写请求的场景。高可用性: 单个服务器一旦发生故障(硬件故障、操作系统问题、机房断电等),数据库服务将完全中断,…...

刚体运动 (位置向量 - 旋转矩阵) 笔记 1.1~1.3 (台大机器人学-林沛群)
目录 1. 理解刚体的“自由度”(Degrees of Freedom, DOF) 1.1 平面运动 (2D) 1.2 空间运动 (3D) 2. 统一描述:引入“体坐标系”(Body Frame) 3. 从“状态”到“运动”:引入微分 3.1 补充:…...