qml中的TextArea使用QSyntaxHighlighter显示高亮语法
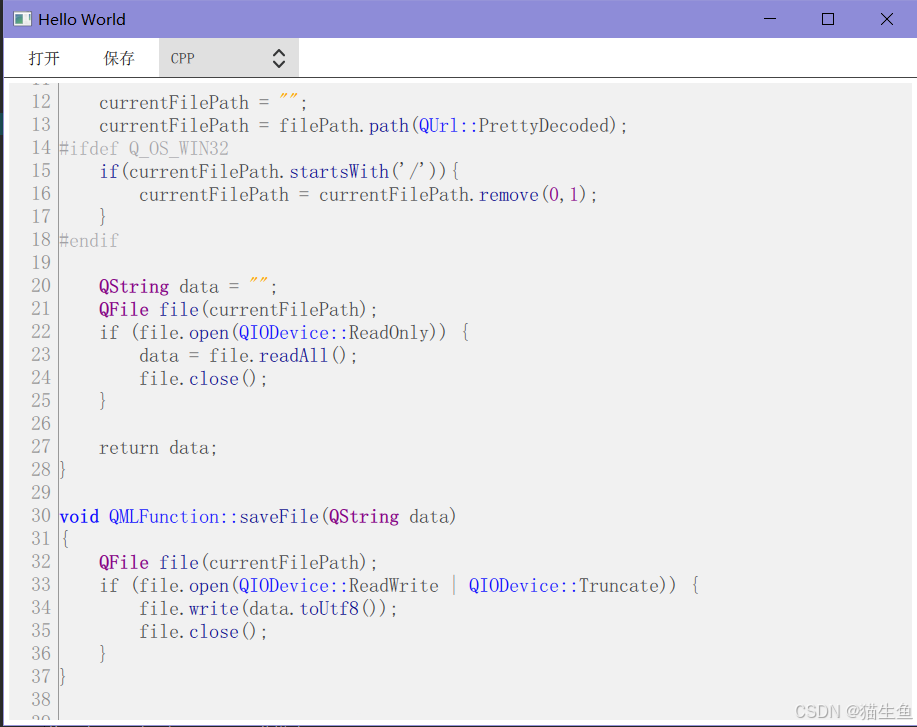
效果图,左侧显示行号,右侧用TextArea显示文本内容,并且语法高亮。
2025年5月8号更新
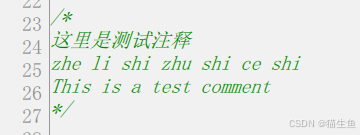
1、多行文本注释
多行文本注释跟普通的高亮规则代码不太一样,代码需要修改,这里以JavaScript举例。
先制定多行文本注释规则:
QVector<QPair<QRegularExpression, QTextCharFormat>> getJSMultiLineRules()
{QTextCharFormat multiLineCommentFormat;multiLineCommentFormat.setForeground(Qt::darkGreen);multiLineCommentFormat.setFontItalic(true);QVector<QPair<QRegularExpression, QTextCharFormat>> m_rules;m_rules << qMakePair(QRegularExpression("/\\*"), multiLineCommentFormat); // startm_rules << qMakePair(QRegularExpression("\\*/"), multiLineCommentFormat); // endreturn m_rules;
}
然后我们设置规则的时候,需要先设置完普通的规则,再设置多行文本规则:
void SyntaxHighlighter::highlightBlock(const QString &text)
{for (const auto &rule : m_rules) {QRegularExpressionMatchIterator it = rule.first.globalMatch(text);while (it.hasNext()) {QRegularExpressionMatch match = it.next();setFormat(match.capturedStart(), match.capturedLength(), rule.second);}}// 再设置多行规则setCurrentBlockState(0);if (m_language == JavaScript) {QVector<QPair<QRegularExpression, QTextCharFormat>> rules = getJSMultiLineRules();for (int i = 0; i < rules.size(); i+=2) { // +=2是因为多行的开头和结尾是一个配对,有两条规则QPair<QRegularExpression, QTextCharFormat> startRules = rules[i];QPair<QRegularExpression, QTextCharFormat> endRules = rules[i+1];int startIndex = 0;if (previousBlockState() != 1)startIndex = text.indexOf(startRules.first);while (startIndex >= 0) {QRegularExpressionMatch match = endRules.first.match(text, startIndex);int endIndex = match.capturedStart();int commentLength = 0;if (endIndex == -1) {setCurrentBlockState(1);commentLength = text.length() - startIndex;} else {commentLength = endIndex - startIndex + match.capturedLength();}setFormat(startIndex, commentLength, startRules.second);startIndex = text.indexOf(startRules.first, startIndex + commentLength);}}}
}
最后实现结果:
2、单行文本注释
单行文本注释,需要放在所有普通注释的规则之后,以免被覆盖。
否则就会出现这种情况,举个例子:

以下是正文
需要实现的功能:
1、左侧显示行号
2、右侧TextArea
3、可显示语法高亮
1、左侧显示行号
这里我用了一个ListView,让它跟TextView的行数对应起来,并且可以一起滚动。
简单的做法是,将ListView和TextView都放在一个ScrollView中,这样滚动的时候就可以让TextView和ListView一起滚动了。
我之前就是这么做的,但是后面发现TextView中有过长的内容时,横向滚动会把ListView滚走,这不是我想要的……
所以,我把ListView放在ScrollView的外面,看代码:
import QtQuick 2.15
import QtQuick.Controls 2.15
import QtQuick.Layouts 1.15Rectangle {id: breakListRecx: 5width: 50height: textArea.heightanchors.verticalCenter: textArea.verticalCentercolor: "#F1F1F1"clip: trueListView {id: breakListViewanchors.fill: parentmodel: textArea.lineCountclip: truecontentY: textArea.contentYinteractive: falsedelegate: Item {width: breakListView.widthheight: index === 0 ?  (textArea.lineHeight + textArea.topPadding/2) : textArea.lineHeightRectangle {width: 1height: parent.heightcolor: "#999999"anchors.right: parent.right}Text {text: qsTr(String(index+1))anchors.verticalCenter: parent.verticalCenteranchors.right: parent.rightanchors.rightMargin: 8font.pixelSize: 20color: "#888888"}}}}
这里的几个重点:
1、ListView的model为textArea的lineCount;
2、ListView的contentY绑定到TextArea的contentY属性上,当然TextArea本身是没有这个属性的,这是我自己自定义算出来的;
3、ListView中的delegate的height,如果是第一行的话,需要注意的是TextArea本身有一个topPadding,所以要把这个也带上,然后TextArea本身也是没有lineHeight属性的,这个也是我自定义算出来的;
2、右侧TextArea
再看看右侧的TextArea怎么实现的,首先它肯定是放在一个ScrollView中的,其次我们需要实现行号需要的那几个属性值,看代码:
Item {anchors.right: parent.rightanchors.rightMargin: 5anchors.left: breakListRec.rightanchors.top: header.bottomanchors.topMargin: 5anchors.bottom: parent.bottomanchors.bottomMargin: 5property int lineCount: textArea.lineCountproperty int lineHeight: textArea.cursorRectangle.heightproperty real contentY: textAreaScroll.contentHeight * textAreaScroll.ScrollBar.vertical.positionproperty int topPadding: textArea.topPaddingScrollView {id: textAreaScrollanchors.fill: parentclip: truebackground: Rectangle { color: "#F1F1F1" }TextArea {id: textAreabackground: Rectangle { color: "#F1F1F1" }font.pixelSize: 20selectByMouse: trueselectionColor: "#87cefa"leftPadding: 0}}
}
textArea.cursorRectangle.height可以获取到TextArea中一行的真实高度;
contentY需要用到滚动条的position来进行计算;
3、可显示语法高亮
这是本文的重点,这里采用了cpp中的QSyntaxHighlighter类,能更方便地定制高亮规则。
我这里简单定制了JSON, CPP, Python, JavaScript四种规则,可以相互切换;
首先我们先定义一个类SyntaxHighlighter,来继承QSyntaxHighlighter;
class SyntaxHighlighter : public QSyntaxHighlighter {}
其次,我们需要在类SyntaxHighlighter中重新实现函数highlightBlock;highlightBlock函数就是能让TextArea应用高亮的函数,在更改完高亮风格后,都必须要重新调用这个函数,以让TextArea刷新高亮风格;
void highlightBlock(const QString &text) override;
然后我们还需要将属性document和language暴露出来,给到qml使用;
Q_PROPERTY(QQuickTextDocument* document READ document WRITE setDocument NOTIFY documentChanged)
Q_PROPERTY(Language language READ language WRITE setLanguage NOTIFY languageChanged)public:enum Language { JSON, CPP, Python, JavaScript };// 设置语法格式Language language() const;void setLanguage(Language lang);// 设置文本内容QQuickTextDocument* document() const { return m_quickDocument; }void setDocument(QQuickTextDocument* doc);signals:void documentChanged();void languageChanged();
另外,我们还需要学习两个类,QRegularExpression和QTextCharFormat。
QRegularExpression是用来定制语法识别规则的,比如这样可以识别到单行注释:
QRegularExpression("//[^\n]*")
QTextCharFormat则是用来制定高亮风格的,比如这样可以制定高亮为加粗、蓝色:
QTextCharFormat keywordFormat;
keywordFormat.setForeground(Qt::blue);
keywordFormat.setFontWeight(QFont::Bold);
最后,我们还需要在main中注册这个类,这样qml才能使用:
qmlRegisterType<SyntaxHighlighter>("CustomHighlighter", 1, 0, "SyntaxHighlighter");
我们看看qml怎么使用这个类:
TextArea {id: textAreabackground: Rectangle { color: "#F1F1F1" }font.pixelSize: 20selectByMouse: trueselectionColor: "#87cefa"leftPadding: 0SyntaxHighlighter {id: highlighterdocument: textArea.textDocumentlanguage: SyntaxHighlighter.CPPonLanguageChanged: {var data = textArea.texttextArea.text = ""textArea.text = data}}}
☆☆ 好了,现在来看完整代码
先制定四种语法规则:
CPPRules.h
#ifndef CPPRULES_H
#define CPPRULES_H#include <QObject>
#include <QTextCharFormat>
#include <QRegularExpression>QVector<QPair<QRegularExpression, QTextCharFormat>> getCPPRules()
{QVector<QPair<QRegularExpression, QTextCharFormat> > m_rules;// 1. 关键字(蓝色加粗)QTextCharFormat keywordFormat;keywordFormat.setForeground(Qt::blue);keywordFormat.setFontWeight(QFont::Bold);QStringList keywords = {"char", "class", "const","double", "enum", "explicit","friend", "inline", "int","long", "namespace", "operator","private", "protected", "public","short", "signals", "signed","slots", "static", "struct","template", "typedef", "typename","union", "unsigned", "virtual","void", "volatile", "bool"};for (const QString &kw : keywords) {m_rules << qMakePair(QRegularExpression("\\b" + kw + "\\b"), keywordFormat);}// 2.类名QTextCharFormat classFormat;classFormat.setFontWeight(QFont::Bold);classFormat.setForeground(Qt::darkMagenta);m_rules << qMakePair(QRegularExpression("\\bQ[A-Za-z]+\\b"), classFormat);// 3. 单行注释(绿色)QTextCharFormat singleLineCommentFormat;singleLineCommentFormat.setForeground(Qt::darkGreen);m_rules << qMakePair(QRegularExpression("//[^\n]*"), singleLineCommentFormat);// 4. 多行注释(绿色斜体)QTextCharFormat multiLineCommentFormat;multiLineCommentFormat.setForeground(Qt::darkGreen);multiLineCommentFormat.setFontItalic(true);m_rules << qMakePair(QRegularExpression("/\\*.*?\\*/"), multiLineCommentFormat);// 5. 字符串(橙色)QTextCharFormat stringFormat;stringFormat.setForeground(QColor(255, 165, 0)); // 橙色m_rules << qMakePair(QRegularExpression("\".*\""), stringFormat);// 6. 数字(紫色)QTextCharFormat numberFormat;numberFormat.setForeground(Qt::darkMagenta);m_rules << qMakePair(QRegularExpression("\\b\\d+\\b"), numberFormat);// 7. 预处理指令(灰色)QTextCharFormat preprocessorFormat;preprocessorFormat.setForeground(Qt::gray);m_rules << qMakePair(QRegularExpression("#.*"), preprocessorFormat);// 8.函数名QTextCharFormat functionFormat;functionFormat.setForeground(Qt::blue);m_rules << qMakePair(QRegularExpression("(\\w+)::"), functionFormat);// 9.被引用,如A::Test中的TestQTextCharFormat functionTwoFormat;functionTwoFormat.setForeground(Qt::darkBlue);m_rules << qMakePair(QRegularExpression("\\b[A-Za-z0-9_]+(?=\\()"), functionTwoFormat);return m_rules;
}#endif // CPPRULES_H
JavaScriptRules.h
#ifndef JAVASCRIPTRULES_H
#define JAVASCRIPTRULES_H#include <QObject>
#include <QTextCharFormat>
#include <QRegularExpression>QVector<QPair<QRegularExpression, QTextCharFormat>> getJavaScriptRules() {QVector<QPair<QRegularExpression, QTextCharFormat> > m_rules;// 1. 关键字(蓝色加粗)QTextCharFormat keywordFormat;keywordFormat.setForeground(Qt::blue);keywordFormat.setFontWeight(QFont::Bold);QStringList keywords = {"function", "if", "else", "for", "while", "do", "switch", "case", "break","return", "var", "let", "const", "new", "this", "true", "false", "null","undefined", "try", "catch", "finally", "throw", "class", "extends", "import","export", "async", "await", "yield"};for (const QString &kw : keywords) {m_rules << qMakePair(QRegularExpression("\\b" + kw + "\\b"), keywordFormat);}// 2. 内置对象和方法(深蓝色)QTextCharFormat builtinFormat;builtinFormat.setForeground(QColor(0, 0, 139)); // 深蓝色QStringList builtins = {"console", "Object", "Array", "String", "Number", "Math", "JSON", "Promise","setTimeout", "fetch", "document", "window", "require"};for (const QString &bn : builtins) {m_rules << qMakePair(QRegularExpression("\\b" + bn + "\\b"), builtinFormat);}// 3. 单行注释(绿色)QTextCharFormat singleLineCommentFormat;singleLineCommentFormat.setForeground(Qt::darkGreen);m_rules << qMakePair(QRegularExpression("//[^\n]*"), singleLineCommentFormat);// 4. 多行注释(绿色斜体)QTextCharFormat multiLineCommentFormat;multiLineCommentFormat.setForeground(Qt::darkGreen);multiLineCommentFormat.setFontItalic(true);m_rules << qMakePair(QRegularExpression("/\\*.*?\\*/"), multiLineCommentFormat);// 5. 字符串(橙色)QTextCharFormat stringFormat;stringFormat.setForeground(QColor(255, 165, 0)); // 橙色// 匹配单引号、双引号、模板字符串m_rules << qMakePair(QRegularExpression("\".*?\""), stringFormat);m_rules << qMakePair(QRegularExpression("'.*?'"), stringFormat);m_rules << qMakePair(QRegularExpression("`.*?`"), stringFormat);// 6. 正则表达式(紫色)QTextCharFormat regexFormat;regexFormat.setForeground(Qt::darkMagenta);m_rules << qMakePair(QRegularExpression("/.+?/[gimuy]*"), regexFormat);// 7. 数字(紫色)QTextCharFormat numberFormat;numberFormat.setForeground(Qt::darkMagenta);m_rules << qMakePair(QRegularExpression("\\b\\d+\\.?\\d*\\b"), numberFormat);// 8. 函数定义(深红色)QTextCharFormat functionDefFormat;functionDefFormat.setForeground(QColor(139, 0, 0)); // 深红色m_rules << qMakePair(QRegularExpression("\\bfunction\\s+(\\w+)"), functionDefFormat);m_rules << qMakePair(QRegularExpression("\\b(\\w+)\\s*=\\s*function\\b"), functionDefFormat);// 9. 箭头函数(深青色)QTextCharFormat arrowFunctionFormat;arrowFunctionFormat.setForeground(QColor(0, 139, 139)); // 深青色m_rules << qMakePair(QRegularExpression("\\b(\\w+)\\s*=>"), arrowFunctionFormat);return m_rules;
}#endif // JAVASCRIPTRULES_H
JsonRules.h
#ifndef JSONRULES_H
#define JSONRULES_H#include <QObject>
#include <QTextCharFormat>
#include <QRegularExpression>QVector<QPair<QRegularExpression, QTextCharFormat>> getJsonRules() {QVector<QPair<QRegularExpression, QTextCharFormat> > m_rules;// 1. JSON Key(深蓝色加粗)QTextCharFormat keyFormat;keyFormat.setForeground(Qt::darkBlue);keyFormat.setFontWeight(QFont::Bold);m_rules << qMakePair(QRegularExpression("\"(\\w+)\"\\s*:"), keyFormat);// 2. JSON String Value(绿色)QTextCharFormat stringValueFormat;stringValueFormat.setForeground(Qt::darkGreen);m_rules << qMakePair(QRegularExpression("\".*\""), stringValueFormat);// 3. JSON Number(紫色)QTextCharFormat numberFormat;numberFormat.setForeground(Qt::darkMagenta);m_rules << qMakePair(QRegularExpression("\\b\\d+\\b"), numberFormat);return m_rules;
}#endif // JSONRULES_H
PythonRules.h
#ifndef PYTHONRULES_H
#define PYTHONRULES_H#include <QObject>
#include <QTextCharFormat>
#include <QRegularExpression>QVector<QPair<QRegularExpression, QTextCharFormat>> getPythonRules() {QVector<QPair<QRegularExpression, QTextCharFormat> > m_rules;// 1. 关键字(蓝色加粗)QTextCharFormat keywordFormat;keywordFormat.setForeground(Qt::blue);keywordFormat.setFontWeight(QFont::Bold);QStringList keywords = {"def", "class", "if", "elif", "else", "for", "while","try", "except", "finally", "with", "import", "from","as", "return", "yield", "lambda", "nonlocal", "global"};for (const QString &kw : keywords) {m_rules << qMakePair(QRegularExpression("\\b" + kw + "\\b"), keywordFormat);}// 2. 内置函数和类型(深蓝色)QTextCharFormat builtinFormat;builtinFormat.setForeground(QColor(0, 0, 139)); // 深蓝色QStringList builtins = {"print", "len", "range", "list", "dict", "str", "int","float", "True", "False", "None", "self"};for (const QString &bn : builtins) {m_rules << qMakePair(QRegularExpression("\\b" + bn + "\\b"), builtinFormat);}// 3. 单行注释(绿色)QTextCharFormat commentFormat;commentFormat.setForeground(Qt::darkGreen);m_rules << qMakePair(QRegularExpression("#[^\n]*"), commentFormat);// 4. 字符串(橙色)QTextCharFormat stringFormat;stringFormat.setForeground(QColor(255, 165, 0)); // 橙色// 匹配单引号、双引号、三引号字符串m_rules << qMakePair(QRegularExpression("\"\"\".*?\"\"\""), stringFormat);m_rules << qMakePair(QRegularExpression("'''.*?'''"), stringFormat);m_rules << qMakePair(QRegularExpression("\".*?\""), stringFormat);m_rules << qMakePair(QRegularExpression("'.*?'"), stringFormat);// 5. 装饰器(紫色)QTextCharFormat decoratorFormat;decoratorFormat.setForeground(Qt::darkMagenta);m_rules << qMakePair(QRegularExpression("@\\w+"), decoratorFormat);// 6. 数字(紫色)QTextCharFormat numberFormat;numberFormat.setForeground(Qt::darkMagenta);m_rules << qMakePair(QRegularExpression("\\b\\d+\\.?\\d*\\b"), numberFormat);// 7. 函数定义(深红色)QTextCharFormat functionDefFormat;functionDefFormat.setForeground(QColor(139, 0, 0)); // 深红色m_rules << qMakePair(QRegularExpression("\\bdef\\s+(\\w+)"), functionDefFormat);return m_rules;
}#endif // PYTHONRULES_H
再写一个QMLFunction类,用来给qml读取文件等信息
QMLFunction.h
#ifndef QMLFUNCTION_H
#define QMLFUNCTION_H#include <QUrl>
#include <QFile>
#include <QObject>
#include <QFileInfo>class QMLFunction : public QObject
{Q_OBJECT
public:explicit QMLFunction(QObject *parent = nullptr);Q_INVOKABLE QString readFile(QUrl filePath);Q_INVOKABLE void saveFile(QString data);Q_INVOKABLE int fileLanguage();private:QString currentFilePath;signals:};#endif // QMLFUNCTION_H
QMLFunction.cpp
#include "QMLFunction.h"
#include "SyntaxHighlighter.h"QMLFunction::QMLFunction(QObject *parent): QObject{parent}
{}QString QMLFunction::readFile(QUrl filePath)
{currentFilePath = "";currentFilePath = filePath.path(QUrl::PrettyDecoded);
#ifdef Q_OS_WIN32if(currentFilePath.startsWith('/')){currentFilePath = currentFilePath.remove(0,1);}
#endifQString data = "";QFile file(currentFilePath);if (file.open(QIODevice::ReadOnly)) {data = file.readAll();file.close();}return data;
}void QMLFunction::saveFile(QString data)
{QFile file(currentFilePath);if (file.open(QIODevice::ReadWrite | QIODevice::Truncate)) {file.write(data.toUtf8());file.close();}
}int QMLFunction::fileLanguage()
{QFileInfo info(currentFilePath);QString suffix = info.suffix();if (suffix == "CPP") {return SyntaxHighlighter::CPP;} else if (suffix == "json") {return SyntaxHighlighter::JSON;} else if (suffix == "h") {return SyntaxHighlighter::CPP;} else if (suffix == "js") {return SyntaxHighlighter::JavaScript;} else if (suffix == "py") {return SyntaxHighlighter::Python;} else {return SyntaxHighlighter::CPP;}
}
再写高亮的主要类SyntaxHighlighter
SyntaxHighlighter.h
#ifndef SYNTAXHIGHLIGHTER_H
#define SYNTAXHIGHLIGHTER_H#include <QObject>
#include <QQuickTextDocument>
#include <QSyntaxHighlighter>
#include <QRegularExpression>class SyntaxHighlighter : public QSyntaxHighlighter
{Q_OBJECTQ_PROPERTY(QQuickTextDocument* document READ document WRITE setDocument NOTIFY documentChanged)Q_PROPERTY(Language language READ language WRITE setLanguage NOTIFY languageChanged)
public:enum Language { JSON, CPP, Python, JavaScript };Q_ENUM(Language)SyntaxHighlighter(QTextDocument *parent = nullptr);// 设置语法格式Language language() const;void setLanguage(Language lang);// 设置文本内容QQuickTextDocument* document() const { return m_quickDocument; }void setDocument(QQuickTextDocument* doc);protected:void highlightBlock(const QString &text) override;private:QQuickTextDocument* m_quickDocument = nullptr;Language m_language;QVector<QPair<QRegularExpression, QTextCharFormat>> m_rules;signals:void documentChanged();void languageChanged();};#endif // SYNTAXHIGHLIGHTER_H
SyntaxHighlighter.cpp
#include "SyntaxHighlighter.h"
#include "CPPRules.h"
#include "JavaScriptRules.h"
#include "PythonRules.h"
#include "JsonRules.h"// SyntaxHighlighter.cpp
SyntaxHighlighter::SyntaxHighlighter(QTextDocument *parent) : QSyntaxHighlighter(parent) {
}SyntaxHighlighter::Language SyntaxHighlighter::language() const
{return m_language;
}void SyntaxHighlighter::setLanguage(Language lang)
{if (m_language == lang) return ;m_language = lang;m_rules.clear();switch (lang) {case JSON: {m_rules = getJsonRules();break;}case CPP: {m_rules = getCPPRules();break;}case Python: {m_rules = getPythonRules();break;}case JavaScript:{m_rules = getJavaScriptRules();break;}}rehighlight(); // 重新应用高亮emit languageChanged(); // 触发信号
}void SyntaxHighlighter::setDocument(QQuickTextDocument *doc)
{if (doc != m_quickDocument) {m_quickDocument = doc;QSyntaxHighlighter::setDocument(doc->textDocument()); // 关键转换emit documentChanged();}
}void SyntaxHighlighter::highlightBlock(const QString &text)
{for (const auto &rule : m_rules) {QRegularExpressionMatchIterator it = rule.first.globalMatch(text);while (it.hasNext()) {QRegularExpressionMatch match = it.next();setFormat(match.capturedStart(), match.capturedLength(), rule.second);}}
}
main.cpp
#include <QQmlContext>
#include <QGuiApplication>
#include <QQmlApplicationEngine>
#include "QMLFunction.h"
#include "SyntaxHighlighter.h"int main(int argc, char *argv[])
{
#if QT_VERSION < QT_VERSION_CHECK(6, 0, 0)QCoreApplication::setAttribute(Qt::AA_EnableHighDpiScaling);
#endifQGuiApplication app(argc, argv);qmlRegisterType<SyntaxHighlighter>("CustomHighlighter", 1, 0, "SyntaxHighlighter");QQmlApplicationEngine engine;QMLFunction qmlFunction;engine.rootContext()->setContextProperty("QMLFunc", &qmlFunction);qmlRegisterType<QMLFunction>("QMLEnum",1,0,"QMLEnum");const QUrl url(QStringLiteral("qrc:/main.qml"));QObject::connect(&engine, &QQmlApplicationEngine::objectCreated,&app, [url](QObject *obj, const QUrl &objUrl) {if (!obj && url == objUrl)QCoreApplication::exit(-1);}, Qt::QueuedConnection);engine.load(url);return app.exec();
}
再看一下qml的文件代码
main.qml
import QtQuick 2.15
import QtQuick.Window 2.15Window {id: window_width: 640height: 480visible: truetitle: qsTr("Hello World")Item {anchors.fill: parentHeader{id: header}LineCountList {id: breakListRec}MyTextArea {id: textArea}}
}
Header.qml
import QtQuick 2.15
import QtQuick.Dialogs 1.3
import QtQuick.Controls 2.15Item {id: headerwidth: parent.widthheight: 40Row {height: parent.heightwidth: parent.width - 10anchors.horizontalCenter: parent.horizontalCenterspacing: 5Rectangle {id: fileOpenwidth: 70height: 30color: fileOpenMouse.pressed ? "#dcdcdc" : "transparent"border.width: fileOpenMouse.pressed ? 1 : 0border.color: "#bcbcbc"anchors.verticalCenter: parent.verticalCenterToolTip.visible: fileOpenMouse.entered_ToolTip.text: qsTr("快捷键 Ctrl+O")Text {text: qsTr("打开")anchors.centerIn: parentfont.pixelSize: 16}MouseArea {id: fileOpenMouseanchors.fill: parenthoverEnabled: trueproperty bool entered_: falseonClicked: {fileDialog.open()}onEntered: {entered_ = true}onExited: {entered_ = false}}}Rectangle {id: fileSavewidth: 70height: 30color: fileSaveMouse.pressed ? "#dcdcdc" : "transparent"border.width: fileSaveMouse.pressed ? 1 : 0border.color: "#bcbcbc"anchors.verticalCenter: parent.verticalCenterToolTip.visible: fileSaveMouse.entered_ToolTip.text: qsTr("快捷键 Ctrl+O")Text {text: qsTr("保存")anchors.centerIn: parentfont.pixelSize: 16}MouseArea {id: fileSaveMouseanchors.fill: parenthoverEnabled: trueproperty bool entered_: falseonClicked: {QMLFunc.saveFile(textArea.getText())}onEntered: {entered_ = true}onExited: {entered_ = false}}}Item {id: languageItemwidth: 150height: 35Text {id: languageTitletext: qsTr("语法选择")anchors.verticalCenter: parent.verticalCenterfont.pixelSize: 16}ComboBox {id: languageSelectmodel: ["JSON", "CPP", "Python", "JavaScript"]onCurrentIndexChanged: {if (currentIndex !== textArea.getLanguage()) {textArea.setLanguage(currentIndex)}}}}}Rectangle {width: parent.widthheight: 1color: "#444444"anchors.bottom: parent.bottom}FileDialog {id: fileDialogonAccepted: {var data = QMLFunc.readFile(fileUrl)textArea.setText(data)textArea.setLanguage(QMLFunc.fileLanguage())languageSelect.currentIndex = QMLFunc.fileLanguage()}}Shortcut {sequence: "Ctrl+O"onActivated: {fileDialog.open()}}Shortcut {sequence: "Ctrl+S"onActivated: {QMLFunc.saveFile(textArea.getText())}}}
LineCountList.qml
import QtQuick 2.15
import QtQuick.Controls 2.15
import QtQuick.Layouts 1.15Rectangle {id: breakListRecx: 5width: 50height: textArea.heightanchors.verticalCenter: textArea.verticalCentercolor: "#F1F1F1"clip: trueListView {id: breakListViewanchors.fill: parentmodel: textArea.lineCountclip: truecontentY: textArea.contentYinteractive: falsedelegate: Item {width: breakListView.widthheight: index === 0 ?  (textArea.lineHeight + textArea.topPadding/2) : textArea.lineHeightRectangle {width: 1height: parent.heightcolor: "#999999"anchors.right: parent.right}Text {text: qsTr(String(index+1))anchors.verticalCenter: parent.verticalCenteranchors.right: parent.rightanchors.rightMargin: 8font.pixelSize: 20color: "#888888"}MouseArea {anchors.fill: parentonClicked: {textArea.selectLine(index)}}}}}
MyTextArea.qml
import QtQuick 2.15
import QtQuick.Controls 2.15
import QtQuick.Layouts 1.15
import CustomHighlighter 1.0Item {anchors.right: parent.rightanchors.rightMargin: 5anchors.left: breakListRec.rightanchors.top: header.bottomanchors.topMargin: 5anchors.bottom: parent.bottomanchors.bottomMargin: 5property int lineCount: textArea.lineCountproperty int lineHeight: textArea.cursorRectangle.heightproperty real contentY: textAreaScroll.contentHeight * textAreaScroll.ScrollBar.vertical.positionproperty int topPadding: textArea.topPaddingScrollView {id: textAreaScrollanchors.fill: parentclip: truebackground: Rectangle { color: "#F1F1F1" }TextArea {id: textAreabackground: Rectangle { color: "#F1F1F1" }font.pixelSize: 20selectByMouse: trueselectionColor: "#87cefa"leftPadding: 0SyntaxHighlighter {id: highlighterdocument: textArea.textDocumentlanguage: SyntaxHighlighter.CPPonLanguageChanged: {var data = textArea.texttextArea.text = ""textArea.text = data}}}}function setText(text) {textArea.text = text}function getText() {return textArea.text}// 选中指定行的函数function selectLine(lineIndex) {var lines = textArea.text.split("\n");if (lineIndex < 0 || lineIndex >= lines.length) return;// 计算行首位置var startPos = 0;for (var i = 0; i < lineIndex; i++) {startPos += lines[i].length + 1; // +1 是换行符}// 计算行尾位置var endPos = startPos + lines[lineIndex].length+1;// 选中行并更新当前行textArea.select(startPos, endPos);forceActiveFocus();}function setLanguage(type) {highlighter.language = type}function getLanguage() {return highlighter.language;}}
相关文章:
qml中的TextArea使用QSyntaxHighlighter显示高亮语法
效果图,左侧显示行号,右侧用TextArea显示文本内容,并且语法高亮。 2025年5月8号更新 1、多行文本注释 多行文本注释跟普通的高亮规则代码不太一样,代码需要修改,这里以JavaScript举例。 先制定多行文本注释规则&…...

QuecPython+腾讯云:快速连接腾讯云l0T平台
该模块提供腾讯 IoT 平台物联网套件客户端功能,目前的产品节点类型仅支持“设备”,设备认证方式支持“一机一密”和“动态注册认证”。 BC25PA系列不支持该功能。 初始化腾讯 IoT 平台 TXyun TXyun(productID, devicename, devicePsk, ProductSecret)配置腾讯 IoT…...

RocketMQ 深度解析:架构设计与最佳实践
在分布式系统架构日益复杂的今天,消息中间件作为系统间通信的桥梁,扮演着至关重要的角色。RocketMQ 作为阿里开源的高性能分布式消息中间件,凭借其卓越的性能、丰富的功能以及高可用性,在电商、金融、互联网等众多领域得到广泛应用…...
Transformer编码器+SHAP分析,模型可解释创新表达!
目录 效果一览基本介绍程序设计参考资料 效果一览 基本介绍 基本介绍 基于SHAP分析的特征选择和贡献度计算,Matlab2023b代码实现;基于MATLAB的SHAP可解释Transformer编码器回归模型,敏感性分析方法。 详细介绍 引言 在正向渗透(…...
[特殊字符]适合母亲节的SVG模版[特殊字符]
宝藏模版 往期推荐(点击阅读): 趣味效果|高大上|可爱风|年终总结I|年终总结II|循环特效|情人节I|情人节II|情人节IIII|妇女节I&…...

浅蓝色调风格人像自拍Lr调色预设,手机滤镜PS+Lightroom预设下载!
调色教程 浅蓝色调风格人像自拍 Lr 调色是利用 Adobe Lightroom 软件针对人像自拍照进行后期处理的一种调色方式。它通过对照片的色彩、对比度、亮度等参数进行精细调整,将画面的主色调打造为清新、柔和的浅蓝色系,赋予人像自拍独特的清新、文艺风格&…...

isp流程介绍(yuv格式阶段)
一、前言介绍 前面两章里面,已经分别讲解了在Raw和Rgb域里面,ISP的相关算法流程,从前面文章里面可以看到,在Raw和Rgb域里面,很多ISP算法操作,更像是属于sensor矫正或者说sensor标定操作。本质上来说&#x…...

数巅智能携手北京昇腾创新中心深耕行业大模型应用
当前,AI技术正在加速向各行业深度渗透,成为驱动产业转型和社会经济发展的重要引擎。构建开放协作的AI应用生态体系、推动技术和应用深度融合,已成为行业发展的重要趋势。 近日,数巅智能与北京昇腾人工智能计算中心(北京昇腾创新中…...
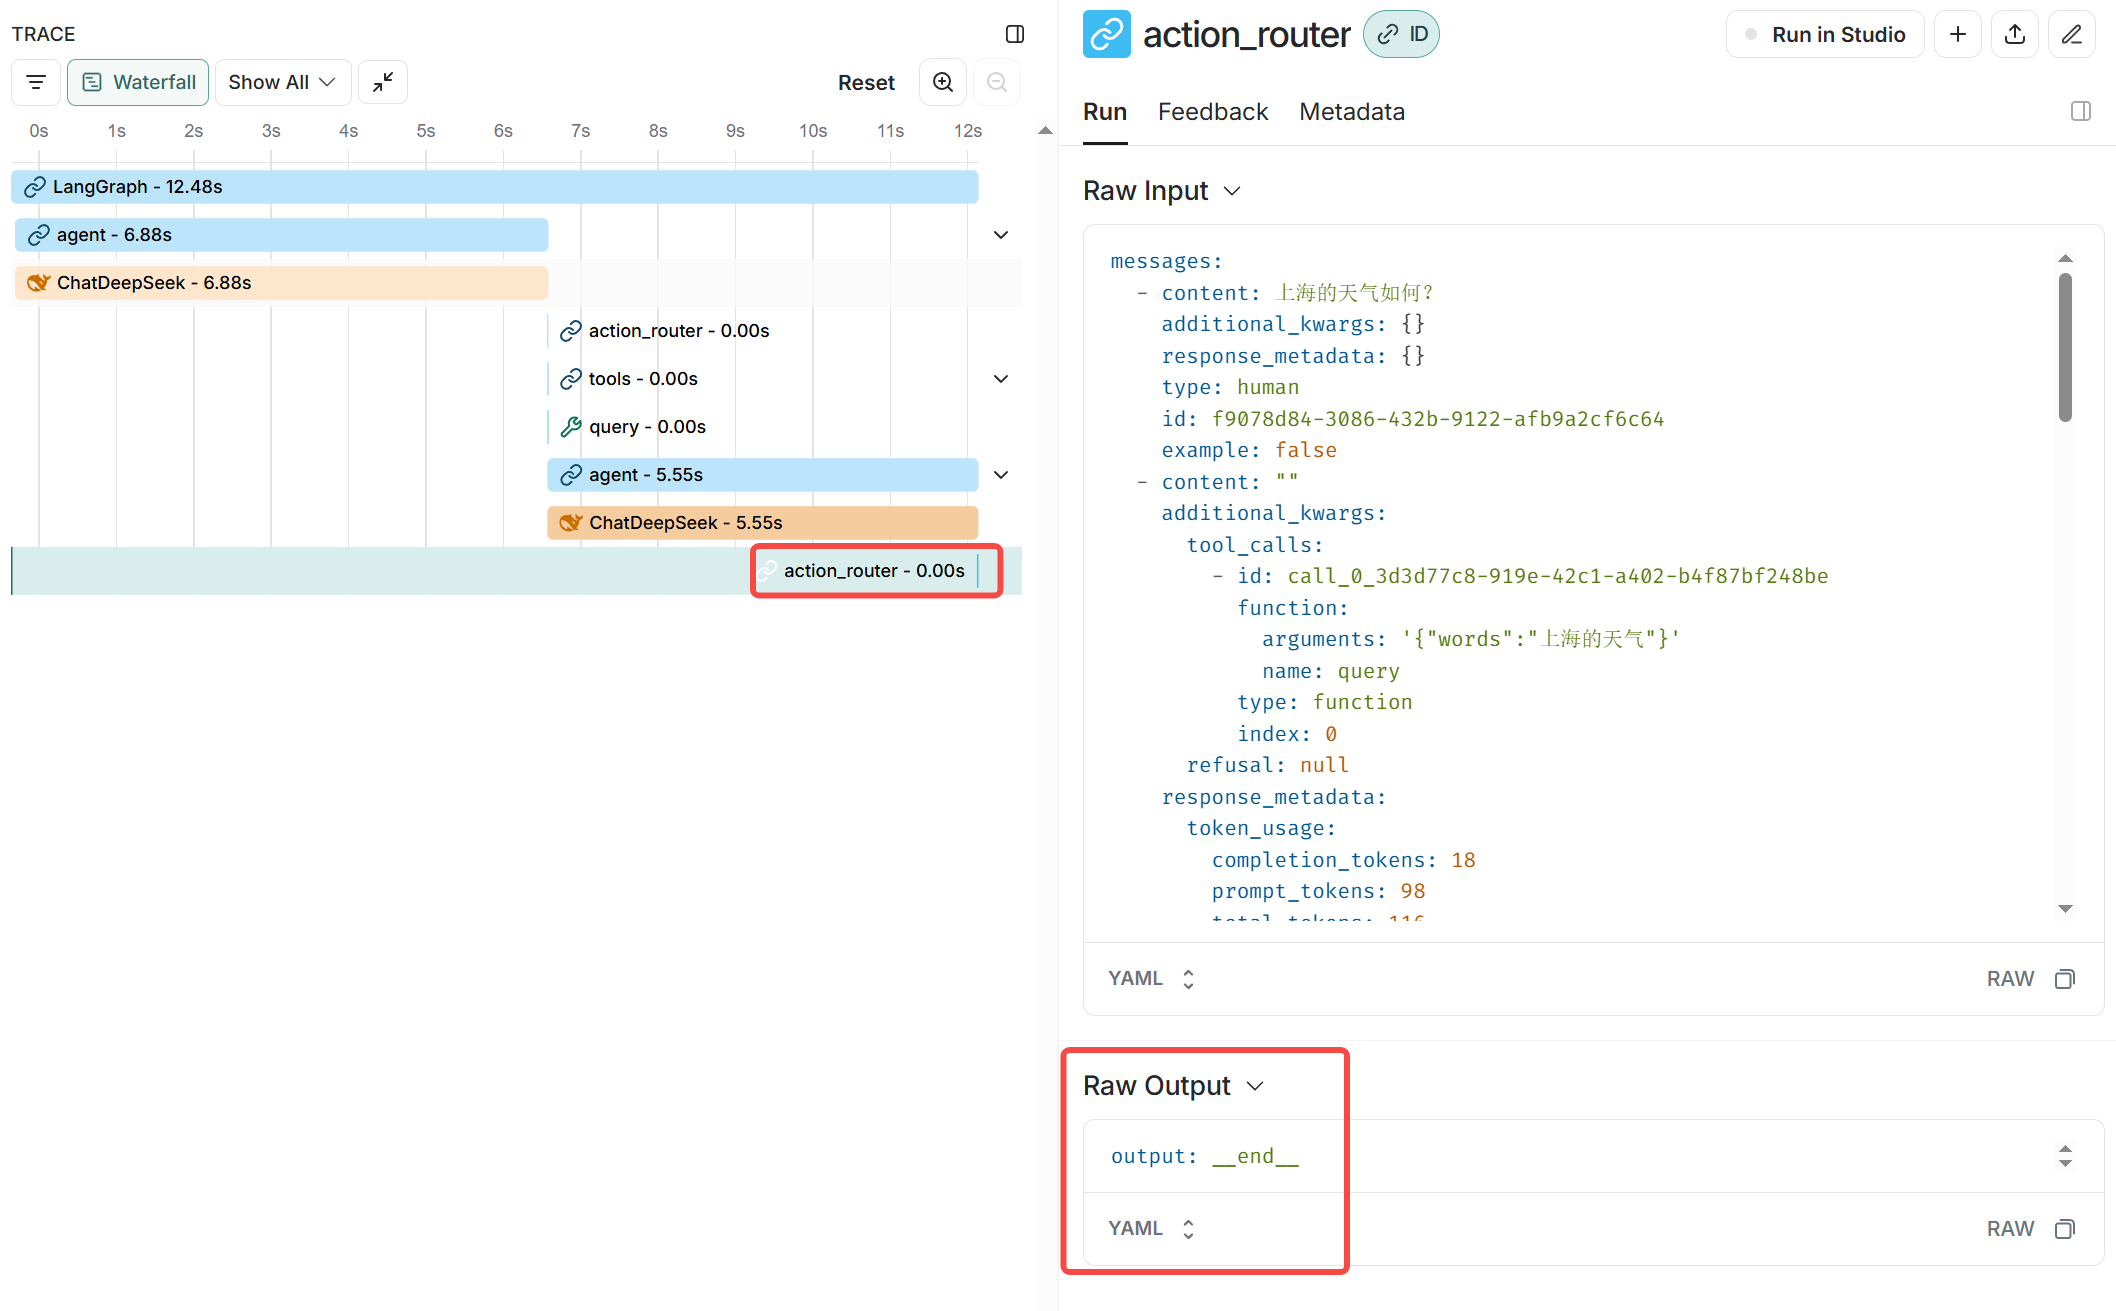
【LangChain高级系列】LangGraph第一课
前言 我们今天直接通过一个langgraph的基础案例,来深入探索langgraph的核心概念和工作原理。 基本认识 LangGraph是一个用于构建具有LLMs的有状态、多角色应用程序的库,用于创建代理和多代理工作流。与其他LLM框架相比,它提供了以下核心优…...
简介)
增强学习(Reinforcement Learning)简介
增强学习(Reinforcement Learning)简介 增强学习是机器学习的一种范式,其核心目标是让智能体(Agent)通过与环境的交互,基于试错机制和延迟奖励反馈,学习如何选择最优动作以最大化长期累积回报。…...
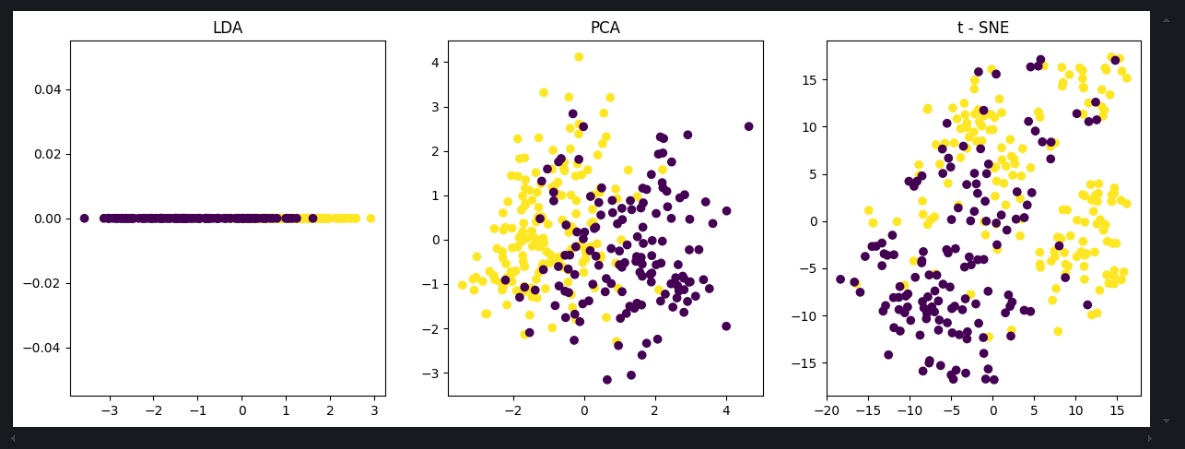
常见降维算法分析
一、常见的降维算法 LDA线性判别PCA主成分分析t-sne降维 二、降维算法原理 2.1 LDA 线性判别 原理 :LDA(Linear Discriminant Analysis)线性判别分析是一种有监督的降维方法。它的目标是找到一个投影方向,使得不同类别的数据在…...

计算机二级(C语言)已过
非线性结构:树、图 链表和队列的结构特性不一样,链表可以在任何位置插入、删除,而队列只能在队尾入队、队头出队 对长度为n的线性表排序、在最坏情况下时间复杂度,二分查找为O(log2n),顺序查找为O(n),哈希查…...

2025年3月,韩先超对国网宁夏进行Python线下培训
大家好,我是韩先超!在2025年3月3号和4号,为 宁夏国网 的运维团队进行了一场两天的 Python培训 ,培训目标不仅是让大家学会Python编程,更是希望大家能够通过这门技术解决实际工作中的问题,提升工作效率。 对…...

ATH12K驱动框架架构图
ATH12K驱动框架架构图 ATH12K驱动框架架构图(分层描述)I. 顶层架构II. 核心数据结构层次关系III. 主要模块详解1. 核心模块 (Core)2. 硬件抽象层 (HAL)3. 无线管理接口 (WMI)4. 主机目标通信 (HTC)5. 复制引擎 (CE)6. MAC层7. 数据路径 (DP)IV. 关键数据流路径1. 发送数据流 …...

pcb样板打样厂家哪家好?
国内在PCB样板加工领域具有较强竞争力的企业主要包括以下几家,综合技术实力、市场份额、客户评价及行业认可度进行推荐: 1. 兴森科技 行业地位:国内最大的PCB样板生产商,细分领域龙头企业,月订单品种数可达25,000种&…...
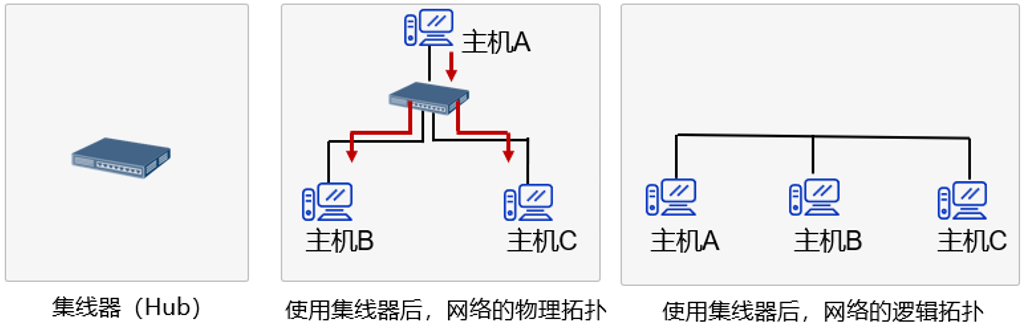
[计算机网络]物理层
文章目录 物理层的概述与功能传输介质双绞线:分类:应用领域: 同轴电缆:分类: 光纤:分类: 无线传输介质:无线电波微波:红外线:激光: 物理层设备中继器(Repeater):放大器:集线器(Hub)&…...
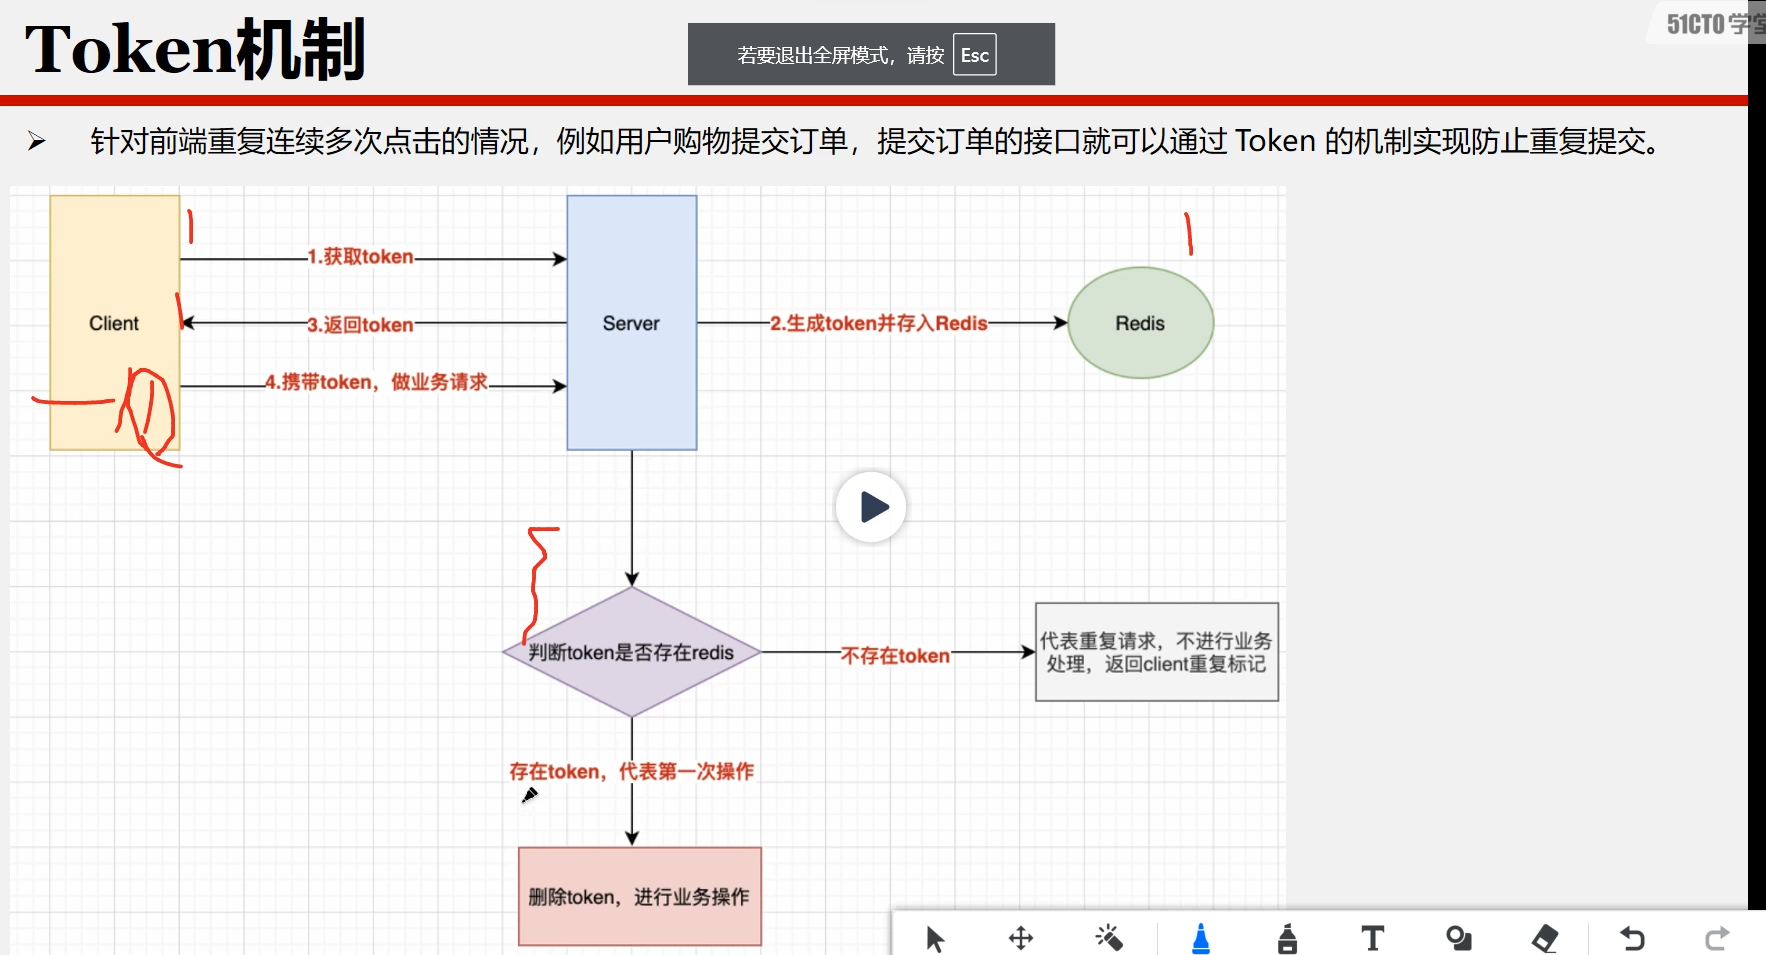
幂等操作及处理措施
利用token模式去避免幂等操作 按以上图所示,除了token,应该也可以把传入的参数用MD5加密,当成key放入redis里面,业务执行完后再删除这个key.如还没有执行完,则请不要重复操作。纯属个人理解...
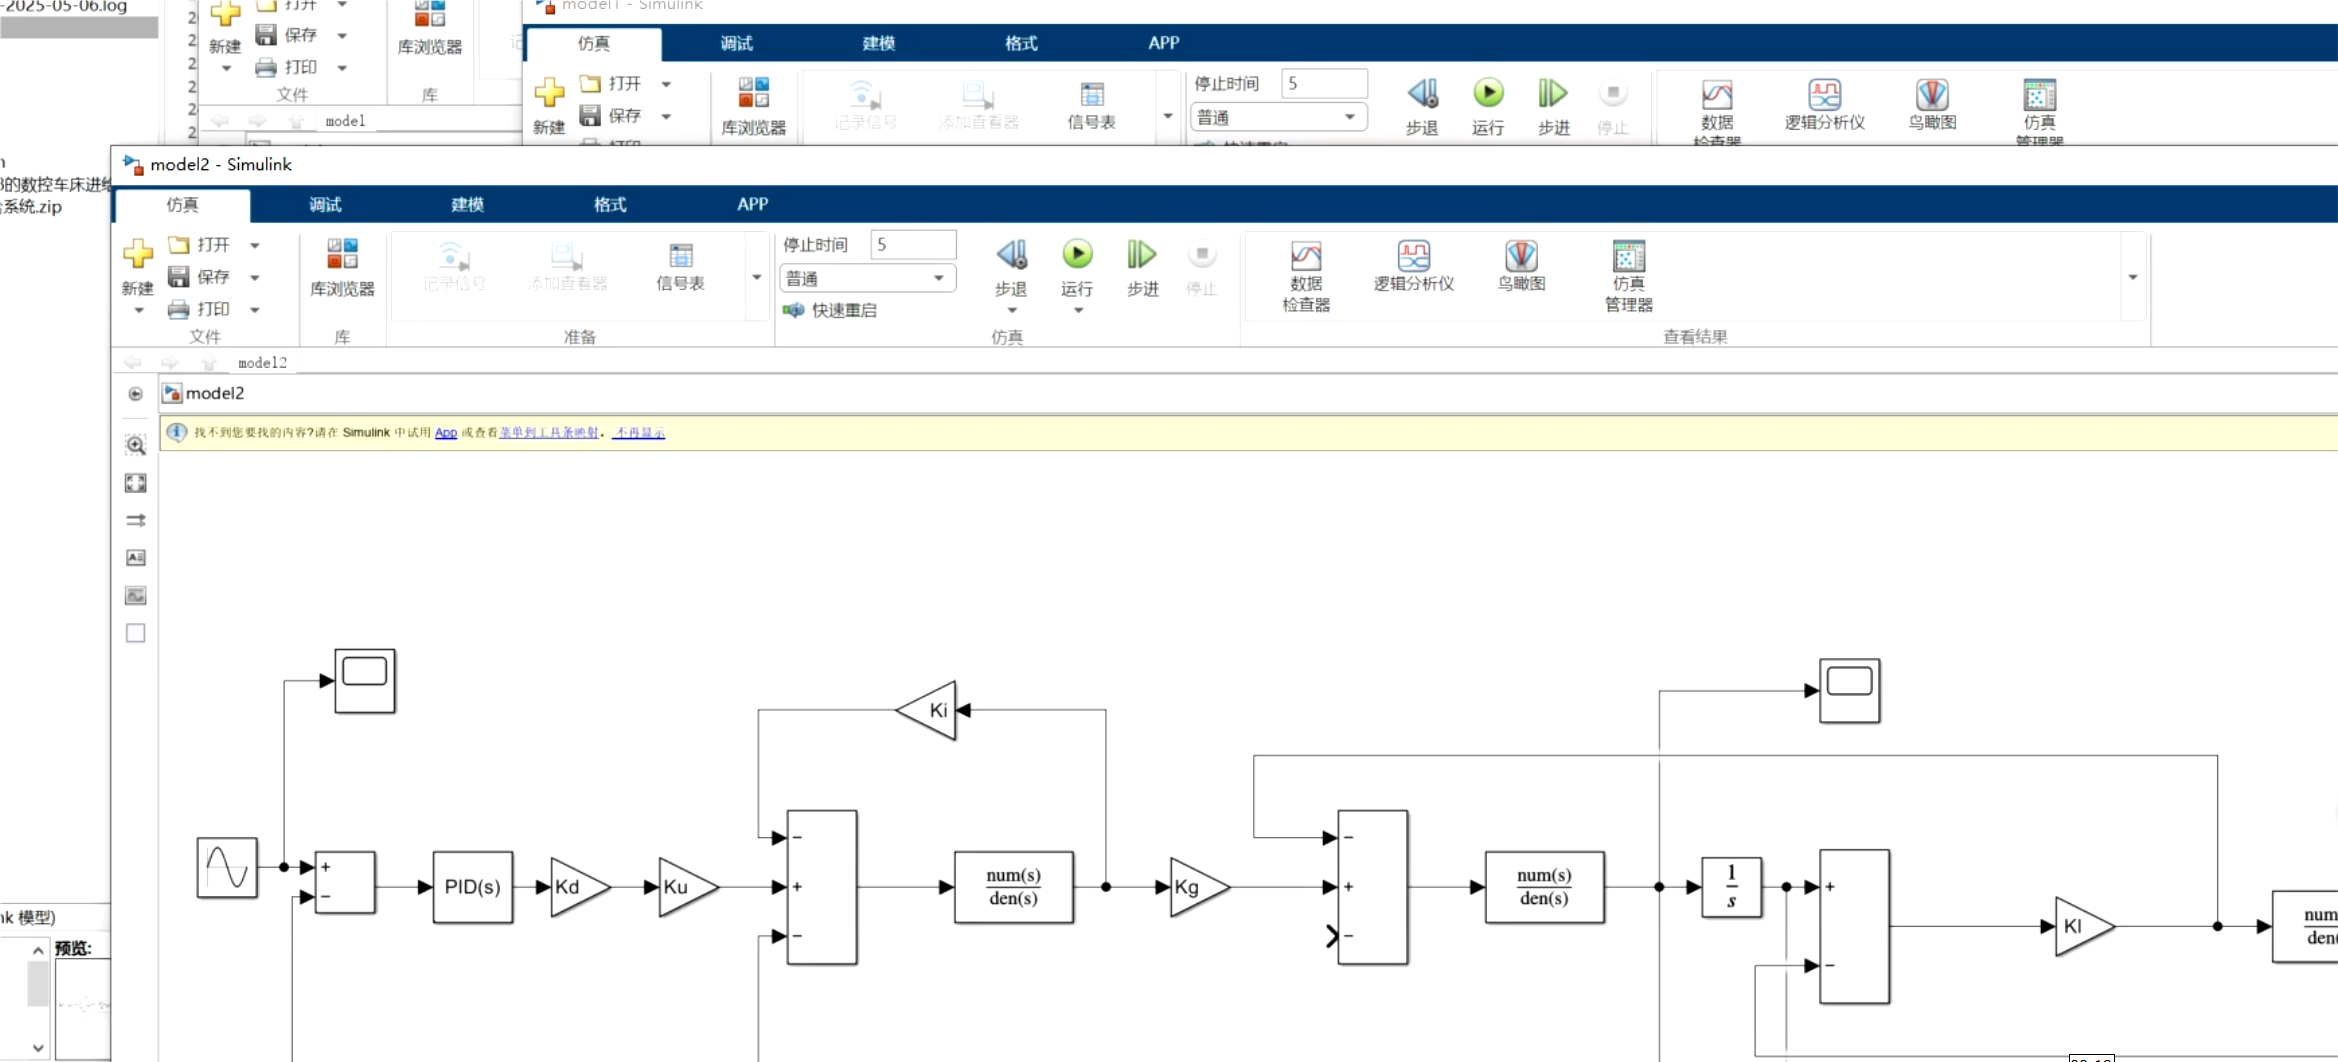
Matlab 数控车床进给系统的建模与仿真
1、内容简介 Matlab217-数控车床进给系统的建模与仿真 可以交流、咨询、答疑 2、内容说明 略 摘 要:为提高数控车床的加工精度,对数控 车床进给系统中影响加工精度的主要因素进行了仿真分析研 动系统的数学模型,利用MATLAB软件中的动态仿真工具 究:依据机械动力学原理建立了…...
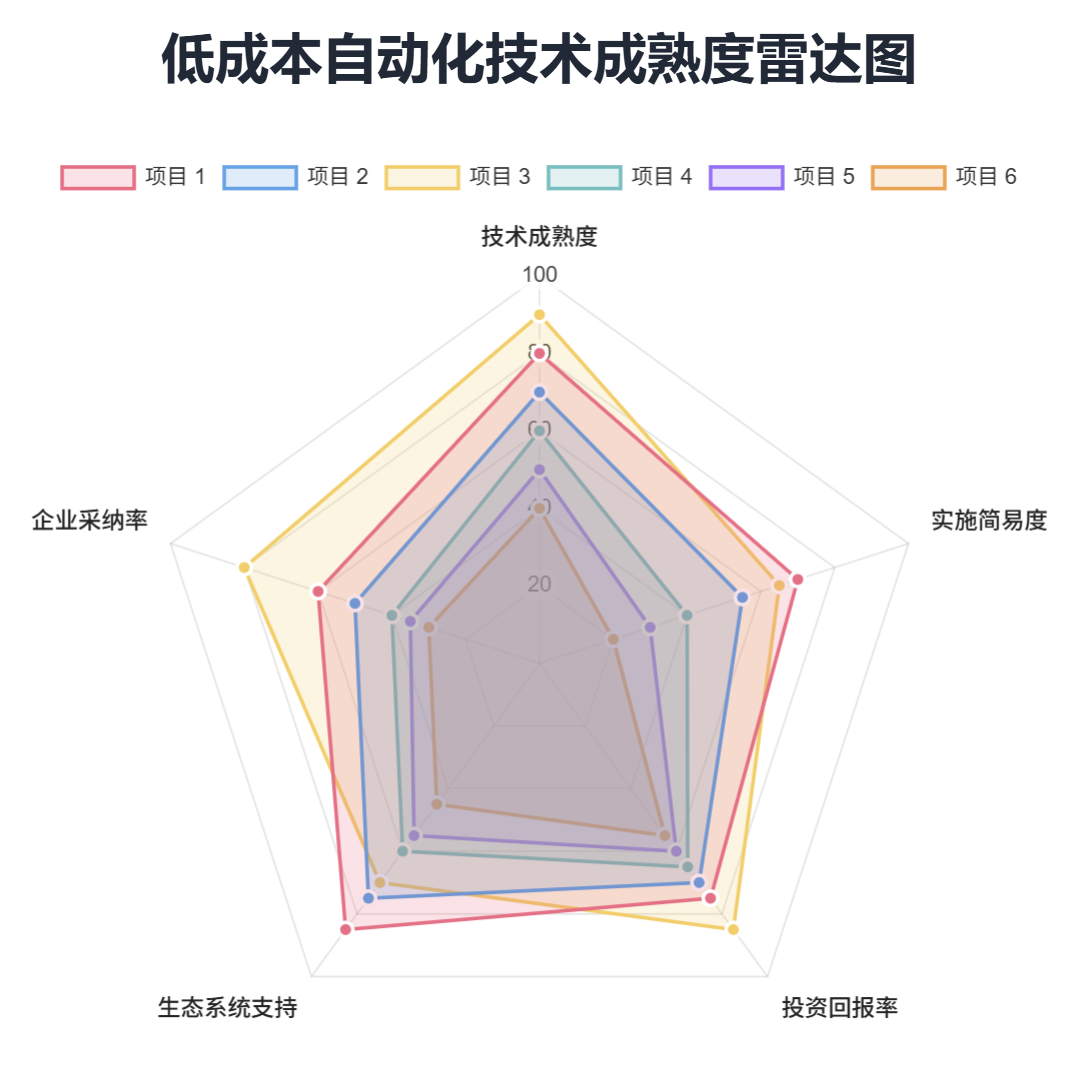
低成本自动化改造的18个技术锚点深度解析
执行摘要 本文旨在深入剖析四项关键的低成本自动化技术,这些技术为工业转型提供了显著的运营和经济效益。文章将提供实用且深入的指导,涵盖老旧设备联网、AGV车队优化、空压机系统智能能耗管控以及此类项目投资回报率(ROI)的严谨…...

【大数据】服务器上部署Apache Paimon
1. 环境准备 在开始部署之前,请确保服务器满足以下基本要求: 操作系统: 推荐使用 Linux(如 Ubuntu、CentOS)。 Java 环境: Paimon 依赖 Java,推荐安装 JDK 8 或更高版本。 Flink 环境: Paimon 是基于 Apache Flink 的…...

我国脑机接口市场规模将破38亿元,医疗领域成关键突破口
当人类仅凭"意念"就能操控无人机编队飞行,当瘫痪患者通过"脑控"重新站立行走,这些曾只存在于科幻电影的场景,如今正通过脑机接口技术变为现实。作为"十四五"规划中重点发展的前沿科技,我国脑机接口…...
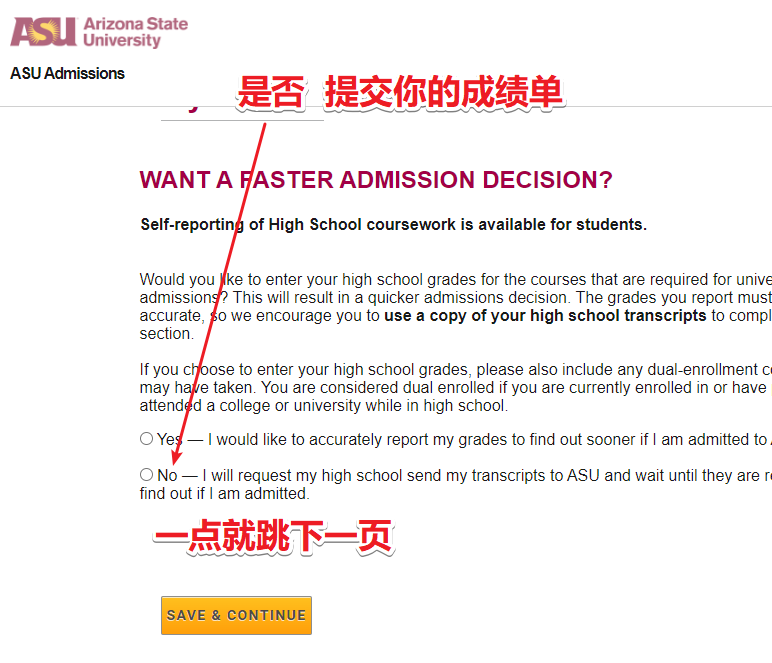
Edu教育邮箱申请成功下号
这里是第2部分 如你所见,我根本就没有考虑流量的问题, 如果你有幸看到前面的内容,相信你能自己找到这个后续。...

kotlin中枚举带参数和不带参数的区别
一 ✅ 代码对比总结 第一段(带参数 工具方法) enum class SeatPosition(val position: Int) {DRIVER_LEFT(0),DRIVER_RIGHT(1),SECOND_LEFT(2),SECOND_RIGHT(3);companion object {fun fromPosition(position: Int): SeatPosition? {return SeatPosi…...
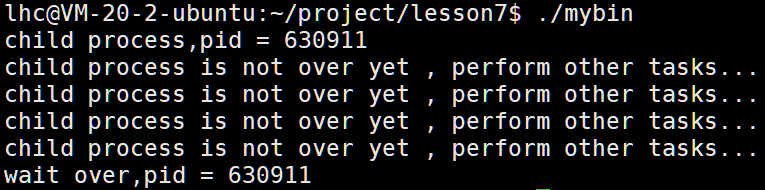
【Linux进程控制一】进程的终止和等待
【Linux进程控制一】进程的终止和等待 一、进程终止1.main函数的return2.strerror函数3.库函数exit4.系统调用_exit和库函数exit的区别5.异常信号6.变量errno 二、进程等待1.什么是进程等待?2.wait接口3.status4.waitpid接口 一、进程终止 1.main函数的return 写C…...

修改docker为国内源
一、编辑docker配置文件 vi /etc/docker/daemon.json二、配置国内源和修改docker数据目录 {"registry-mirrors":["http://hub-mirror.c.163.com","https://mirrors.tuna.tsinghua.edu.cn","http://mirrors.sohu.com","https://u…...

Java反射 八股版
目录 一、核心概念阐释 1. Class类 2. Constructor类 3. Method类 4. Field类 二、典型应用场景 1. 框架开发 2. 单元测试 3. JSON序列化/反序列化 三、性能考量 四、安全与访问控制 1. 安全管理器限制 2. 打破封装性 3. 安全风险 五、版本兼容性问题 六、最佳…...
今日行情明日机会——20250509
上证指数今天缩量,整体跌多涨少,走势处于日线短期的高位~ 深证指数今天缩量小级别震荡,大盘股表现更好~ 2025年5月9日涨停股主要行业方向分析 一、核心主线方向 服装家纺(消费复苏出口链驱动) • 涨停家数…...
单片机-STM32部分:10、串口UART
飞书文档https://x509p6c8to.feishu.cn/wiki/W7ZGwKJCeiGjqmkvTpJcjT2HnNf 串口说明 电平标准是数据1和数据0的表达方式,是传输线缆中人为规定的电压与数据的对应关系,串口常用的电平标准有如下三种: TTL电平:3.3V或5V表示1&am…...
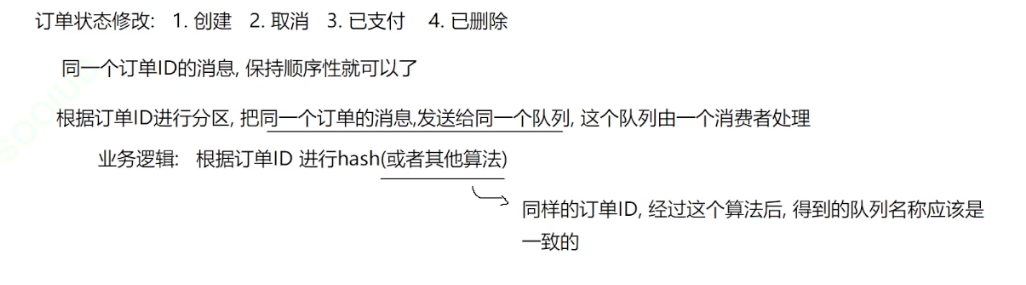
RabittMQ-高级特性2-应用问题
文章目录 前言延迟队列介绍ttl死信队列存在问题延迟队列插件安装延迟插件使用事务消息分发概念介绍限流非公平分发(负载均衡) 限流负载均衡RabbitMQ应用问题-幂等性保障顺序性保障介绍1顺序性保障介绍2消息积压总结 前言 延迟队列介绍 延迟队列(Delaye…...
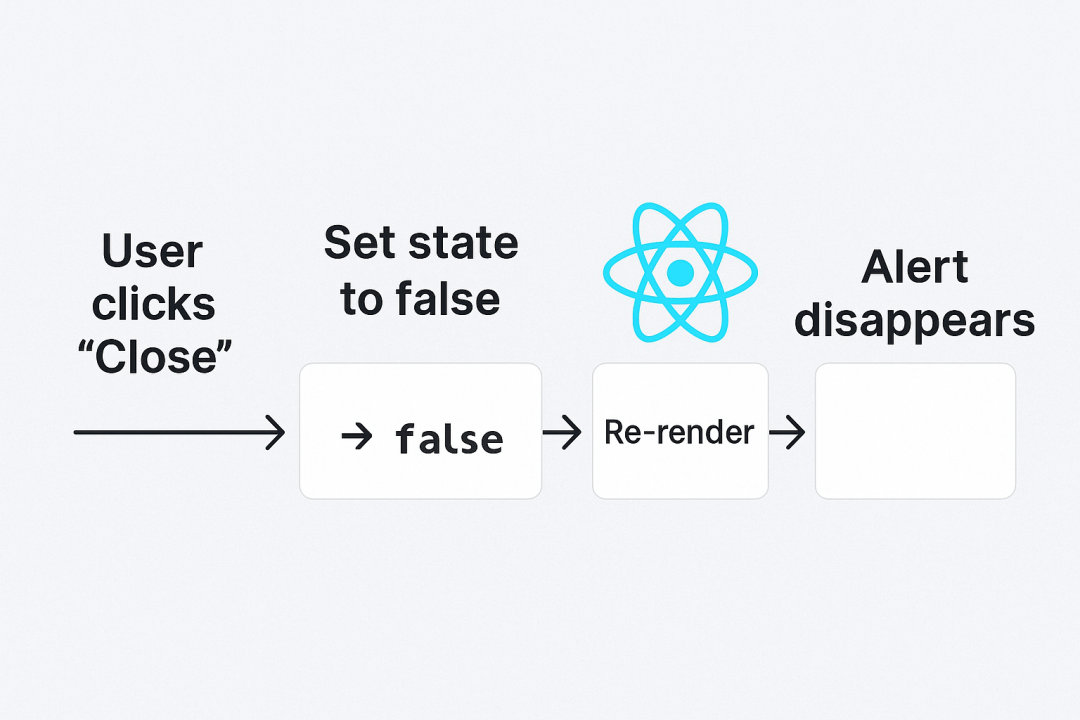
React 播客专栏 Vol.5|从“显示”到“消失”:打造你的第一个交互式 Alert 组件!
👋 欢迎回到《前端达人 播客书单》第 5 期(正文内容为学习笔记摘要,音频内容是详细的解读,方便你理解),请点击下方收听 📌 今天我们不再停留在看代码,而是动手实现一个真正的 React…...