Spring Boot配置文件详解:从入门到精通
一、Spring Boot配置文件概述
Spring Boot配置文件是应用程序的核心配置管理工具,它允许开发者在不修改代码的情况下调整应用行为。配置文件主要有两种格式:
| 文件类型 | 优点 | 缺点 | 适用场景 |
|---|---|---|---|
| application.properties | 简单直观,键值对形式 | 不支持复杂数据结构 | 简单配置 |
| application.yml | 层次清晰,支持复杂结构 | 缩进敏感,格式要求严格 | 复杂配置 |
1.1 配置文件加载顺序
Spring Boot会按照以下顺序加载配置,后加载的会覆盖前面的:
- 项目根目录下的
/config子目录 - 项目根目录
- classpath下的
/config包 - classpath根目录
日常类比:就像你每天穿衣服,会按照内衣→衬衫→外套的顺序穿,但如果有更重要的场合(比如在/config目录下的配置),你会选择更正式的外套覆盖日常穿着。
二、基础配置详解
2.1 常见基础配置示例
# application.properties示例# 服务器配置
server.port=8080
server.servlet.context-path=/myapp# 数据库配置
spring.datasource.url=jdbc:mysql://localhost:3306/mydb
spring.datasource.username=root
spring.datasource.password=123456
spring.datasource.driver-class-name=com.mysql.cj.jdbc.Driver# JPA配置
spring.jpa.show-sql=true
spring.jpa.hibernate.ddl-auto=update
spring.jpa.properties.hibernate.format_sql=true
对应的YAML格式:
# application.yml示例
server:port: 8080servlet:context-path: /myappspring:datasource:url: jdbc:mysql://localhost:3306/mydbusername: rootpassword: 123456driver-class-name: com.mysql.cj.jdbc.Driverjpa:show-sql: truehibernate:ddl-auto: updateproperties:hibernate:format_sql: true
2.2 配置项分类解析
2.2.1 服务器配置
| 属性 | 默认值 | 说明 | 示例 |
|---|---|---|---|
| server.port | 8080 | 应用监听端口 | server.port=9090 |
| server.address | 绑定特定网络地址 | server.address=192.168.1.100 | |
| server.servlet.context-path | 应用上下文路径 | server.servlet.context-path=/api | |
| server.tomcat.max-threads | 200 | 最大工作线程数 | server.tomcat.max-threads=500 |
| server.tomcat.min-spare-threads | 10 | 最小空闲线程数 | server.tomcat.min-spare-threads=20 |
| server.tomcat.connection-timeout | 连接超时时间(ms) | server.tomcat.connection-timeout=5000 | |
| server.tomcat.max-connections | 8192 | 最大连接数 | server.tomcat.max-connections=10000 |
| server.tomcat.accept-count | 100 | 等待队列长度 | server.tomcat.accept-count=200 |
| server.tomcat.accesslog.enabled | false | 启用访问日志 | server.tomcat.accesslog.enabled=true |
| server.tomcat.accesslog.pattern | 访问日志格式 | server.tomcat.accesslog.pattern=%h %l %u %t “%r” %s %b %D |
深度解析:
max-threads设置过高会导致线程上下文切换开销增加,建议根据CPU核心数设置(公式:线程数 = CPU核心数 * (1 + 平均等待时间/平均计算时间))accept-count当所有工作线程都忙碌时,新连接会进入等待队列,队列满后才会拒绝连接
理解分析:就像一家餐厅,port是门牌号,context-path是餐厅入口的位置,max-threads是同时能服务的顾客数量。
2.2.2 数据库配置
| 属性 | 默认值 | 说明 | 示例 |
|---|---|---|---|
| spring.datasource.url | JDBC URL | jdbc:mysql://localhost:3306/db | |
| spring.datasource.username | 数据库用户名 | root | |
| spring.datasource.password | 数据库密码 | 123456 | |
| spring.datasource.driver-class-name | 驱动类名 | com.mysql.cj.jdbc.Driver | |
| spring.datasource.type | 数据源类型 | com.zaxxer.hikari.HikariDataSource | |
| spring.datasource.platform | 数据库平台 | mysql |
- HikariCP 连接池配置(Spring Boot 2.x 默认)
# 连接池大小配置
spring.datasource.hikari.maximum-pool-size=10
spring.datasource.hikari.minimum-idle=5
spring.datasource.hikari.pool-name=MyHikariPool# 超时设置
spring.datasource.hikari.connection-timeout=30000
spring.datasource.hikari.idle-timeout=600000
spring.datasource.hikari.max-lifetime=1800000# 其他优化配置
spring.datasource.hikari.auto-commit=true
spring.datasource.hikari.connection-test-query=SELECT 1
spring.datasource.hikari.leak-detection-threshold=5000
关键参数解析:
-
leak-detection-threshold:检测连接泄漏的阈值(ms),超过该时间未关闭连接会被标记为泄漏 -
max-lifetime:连接最大存活时间,应小于数据库的wait_timeout -
Druid 连接池配置
# 基本配置
spring.datasource.type=com.alibaba.druid.pool.DruidDataSource
spring.datasource.druid.initial-size=5
spring.datasource.druid.min-idle=5
spring.datasource.druid.max-active=20# 监控配置
spring.datasource.druid.stat-view-servlet.enabled=true
spring.datasource.druid.stat-view-servlet.url-pattern=/druid/*
spring.datasource.druid.web-stat-filter.enabled=true
spring.datasource.druid.filter.stat.log-slow-sql=true
spring.datasource.druid.filter.stat.slow-sql-millis=2000
三、高级配置技巧
3.1 多环境配置
Spring Boot支持通过spring.profiles.active指定激活的环境。
多环境配置示例:
application-dev.properties  # 开发环境
application-test.properties # 测试环境
application-prod.properties # 生产环境
激活方式:
# 在application.properties中指定
spring.profiles.active=dev
或者运行时指定:
java -jar myapp.jar --spring.profiles.active=prod
YAML多环境配置:
# application.yml
spring:profiles:active: dev---
# 开发环境配置
spring:profiles: dev
server:port: 8080---
# 生产环境配置
spring:profiles: prod
server:port: 80
3.2 自定义配置与使用
3.2.1 定义自定义配置
# 自定义配置
app.name=My Spring Boot App
app.description=A demo application for Spring Boot
app.version=1.0.0
app.api-timeout=5000
3.2.2 使用@Value注入
import org.springframework.beans.factory.annotation.Value;
import org.springframework.stereotype.Component;@Component
public class AppInfo {@Value("${app.name}")private String appName;@Value("${app.description}")private String appDescription;@Value("${app.version}")private String appVersion;@Value("${app.api-timeout:3000}")  // 默认值3000private int apiTimeout;// getters and setters
}
3.2.3 使用@ConfigurationProperties
更结构化的配置方式:
import org.springframework.boot.context.properties.ConfigurationProperties;
import org.springframework.stereotype.Component;@Component
@ConfigurationProperties(prefix = "app")
public class AppProperties {private String name;private String description;private String version;private int apiTimeout = 3000; // 默认值// getters and setters
}
对应的配置:
app.name=My App
app.description=My Description
app.version=2.0.0
app.api-timeout=5000
3.3 配置加密
使用Jasypt进行配置加密:
- 添加依赖:
<dependency><groupId>com.github.ulisesbocchio</groupId><artifactId>jasypt-spring-boot-starter</artifactId><version>3.0.4</version>
</dependency>
- 加密密码(使用Jasypt提供的工具):
import org.jasypt.encryption.pbe.StandardPBEStringEncryptor;public class JasyptEncryptor {public static void main(String[] args) {StandardPBEStringEncryptor encryptor = new StandardPBEStringEncryptor();encryptor.setPassword("my-secret-key"); // 加密密钥String encrypted = encryptor.encrypt("my-db-password");System.out.println("Encrypted: " + encrypted);}
}
- 在配置中使用加密值:
spring.datasource.password=ENC(加密后的字符串)
- 指定加密密钥:
jasypt.encryptor.password=my-secret-key
四、配置进阶技巧
4.1 条件配置
Spring Boot提供了丰富的条件注解:
| 注解 | 说明 | 示例 |
|---|---|---|
| @ConditionalOnProperty | 当配置属性存在且为特定值时生效 | @ConditionalOnProperty(name=“feature.enabled”, havingValue=“true”) |
| @ConditionalOnExpression | 基于SpEL表达式的条件 | @ConditionalOnExpression(“${feature.enabled:false} and ${feature.type} == ‘advanced’”) |
| @ConditionalOnBean | 当指定Bean存在时生效 | @ConditionalOnBean(DataSource.class) |
| @ConditionalOnMissingBean | 当指定Bean不存在时生效 | @ConditionalOnMissingBean(DataSource.class) |
示例代码:
@Configuration
@ConditionalOnProperty(prefix = "cache", name = "enabled", havingValue = "true")
public class CacheConfig {@Bean@ConditionalOnMissingBeanpublic CacheManager cacheManager() {return new ConcurrentMapCacheManager();}
}
4.2 配置元数据
在自定义starter时,可以为配置属性添加元数据,提供IDE支持:
- 创建
additional-spring-configuration-metadata.json文件:
{"properties": [{"name": "app.name","type": "java.lang.String","description": "The name of the application.","defaultValue": "My App"},{"name": "app.api-timeout","type": "java.lang.Integer","description": "Timeout for API calls in milliseconds.","defaultValue": 3000}]
}
4.3 动态配置刷新
使用Spring Cloud Config实现配置动态刷新:
- 添加依赖:
<dependency><groupId>org.springframework.cloud</groupId><artifactId>spring-cloud-starter-config</artifactId>
</dependency>
<dependency><groupId>org.springframework.boot</groupId><artifactId>spring-boot-starter-actuator</artifactId>
</dependency>
- 添加配置:
# 启用配置刷新端点
management.endpoints.web.exposure.include=refresh
- 在需要刷亮的Bean上添加
@RefreshScope:
@RefreshScope
@RestController
public class MessageController {@Value("${message:Hello default}")private String message;@GetMapping("/message")public String getMessage() {return this.message;}
}
- 刷新配置:
curl -X POST http://localhost:8080/actuator/refresh
4.4 配置占位符与默认值
# 使用环境变量和默认值
app.api.url=${API_URL:http://localhost:8080/api}# 嵌套属性引用
app.db.url=jdbc:mysql://${DB_HOST:localhost}:${DB_PORT:3306}/${DB_NAME:mydb}
app.db.username=${DB_USER:root}
app.db.password=${DB_PASSWORD:}
4.5 配置导入
# 导入其他配置文件
spring.config.import=optional:classpath:additional.properties,optional:file:./external.properties,optional:configtree:/etc/config/
五、最佳实践与常见问题
5.1 配置最佳实践
- 环境分离:严格区分dev/test/prod环境配置
- 敏感信息保护:不要将密码等敏感信息直接写在配置文件中
- 合理分组:相关配置项放在一起,使用统一前缀
- 文档化:为自定义配置添加详细注释和说明
- 版本控制:生产环境配置不应提交到公开版本库
5.2 常见问题解决方案
问题1:配置项冲突或覆盖
解决方案:
- 使用
spring.config.location指定明确的配置文件位置 - 检查配置加载顺序,确保优先级正确
问题2:配置值注入失败
解决方案:
- 检查属性名称拼写
- 确保配置类有
@Component或@Configuration注解 - 对于
@ConfigurationProperties,确保添加了@EnableConfigurationProperties
问题3:多环境配置混乱
解决方案:
- 使用
spring.profiles.include包含基础配置 - 创建清晰的配置文件命名规范
- 使用
spring.config.activate.on-profile明确指定配置适用的环境
六、实战案例:电商应用配置示例
6.1 完整配置示例
# application.yml
spring:application:name: e-commerce-serviceprofiles:active: dev---
# 基础配置
spring:config:activate:on-profile: basedatasource:type: com.zaxxer.hikari.HikariDataSourcehikari:connection-timeout: 30000maximum-pool-size: 20minimum-idle: 5idle-timeout: 600000max-lifetime: 1800000redis:host: localhostport: 6379timeout: 5000jackson:date-format: yyyy-MM-dd HH:mm:sstime-zone: GMT+8---
# 开发环境
spring:config:activate:on-profile: dev
server:port: 8080servlet:context-path: /ecom-dev
logging:level:root: infocom.example.ecommerce: debug
app:features:cache-enabled: truepayment-mock: trueexternal:inventory-service-url: http://localhost:8081/inventorypayment-service-url: http://localhost:8082/payment---
# 生产环境
spring:config:activate:on-profile: prod
server:port: 80servlet:context-path: /ecom
logging:level:root: warncom.example.ecommerce: info
app:features:cache-enabled: truepayment-mock: falseexternal:inventory-service-url: http://inventory-service.prod/inventorypayment-service-url: http://payment-service.prod/payment
6.2 配置使用示例
@Configuration
@EnableConfigurationProperties(EcommerceProperties.class)
public class AppConfig {@Bean@ConditionalOnProperty(name = "app.features.cache-enabled", havingValue = "true")public CacheManager cacheManager() {return new RedisCacheManager(redisConnectionFactory());}@Beanpublic RestTemplate restTemplate(RestTemplateBuilder builder) {return builder.setConnectTimeout(Duration.ofMillis(appProperties.getExternal().getConnectionTimeout())).setReadTimeout(Duration.ofMillis(appProperties.getExternal().getReadTimeout())).build();}
}@ConfigurationProperties(prefix = "app")
public class EcommerceProperties {private Features features;private External external;// getters and setterspublic static class Features {private boolean cacheEnabled;private boolean paymentMock;// getters and setters}public static class External {private String inventoryServiceUrl;private String paymentServiceUrl;private int connectionTimeout = 5000;private int readTimeout = 10000;// getters and setters}
}@Service
public class InventoryService {private final RestTemplate restTemplate;private final EcommerceProperties properties;public InventoryService(RestTemplate restTemplate, EcommerceProperties properties) {this.restTemplate = restTemplate;this.properties = properties;}public Inventory checkInventory(String productId) {String url = properties.getExternal().getInventoryServiceUrl() + "/" + productId;return restTemplate.getForObject(url, Inventory.class);}
}
七、配置可视化与管理
7.1 Spring Boot Actuator端点
| 端点 | 描述 | 默认启用 |
|---|---|---|
| /actuator/configprops | 显示所有@ConfigurationProperties | 是 |
| /actuator/env | 显示所有环境属性 | 是 |
| /actuator/beans | 显示所有Spring Beans | 否 |
| /actuator/mappings | 显示所有@RequestMapping路径 | 否 |
启用所有端点:
management.endpoints.web.exposure.include=*
7.2 Spring Boot Admin
- 添加依赖:
<dependency><groupId>de.codecentric</groupId><artifactId>spring-boot-admin-starter-server</artifactId><version>2.6.2</version>
</dependency>
- 启用Admin Server:
@SpringBootApplication
@EnableAdminServer
public class AdminServerApplication {public static void main(String[] args) {SpringApplication.run(AdminServerApplication.class, args);}
}
- 客户端配置:
spring.boot.admin.client.url=http://localhost:8080
management.endpoints.web.exposure.include=*
八、总结
Spring Boot的配置文件系统提供了强大而灵活的配置管理能力。通过本文的详细讲解,你应该已经掌握了:
- 基础配置的使用方法
- 多环境配置的实现
- 自定义配置的定义和使用
- 高级配置技巧如条件配置、配置加密
- 配置最佳实践和常见问题解决方案
- 实战案例和配置可视化工具
关键点记忆表格:
| 概念 | 关键点 | 示例 |
|---|---|---|
| 多环境配置 | 使用spring.profiles.active激活 | spring.profiles.active=prod |
| 配置注入 | @Value或@ConfigurationProperties | @Value("${app.name}") |
| 条件配置 | 各种@ConditionalOn*注解 | @ConditionalOnProperty |
| 配置加密 | 使用Jasypt | ENC(加密字符串) |
| 动态刷新 | @RefreshScope+Actuator | /actuator/refresh |
通过合理使用Spring Boot的配置文件,你可以构建出更加灵活、易于维护的应用程序,轻松应对各种环境需求和配置变更。
感谢阅读,虽然我知道你只是冲着表情包来的…**
相关文章:

Spring Boot配置文件详解:从入门到精通
一、Spring Boot配置文件概述 Spring Boot配置文件是应用程序的核心配置管理工具,它允许开发者在不修改代码的情况下调整应用行为。配置文件主要有两种格式: 文件类型优点缺点适用场景application.properties简单直观,键值对形式不支持复杂…...
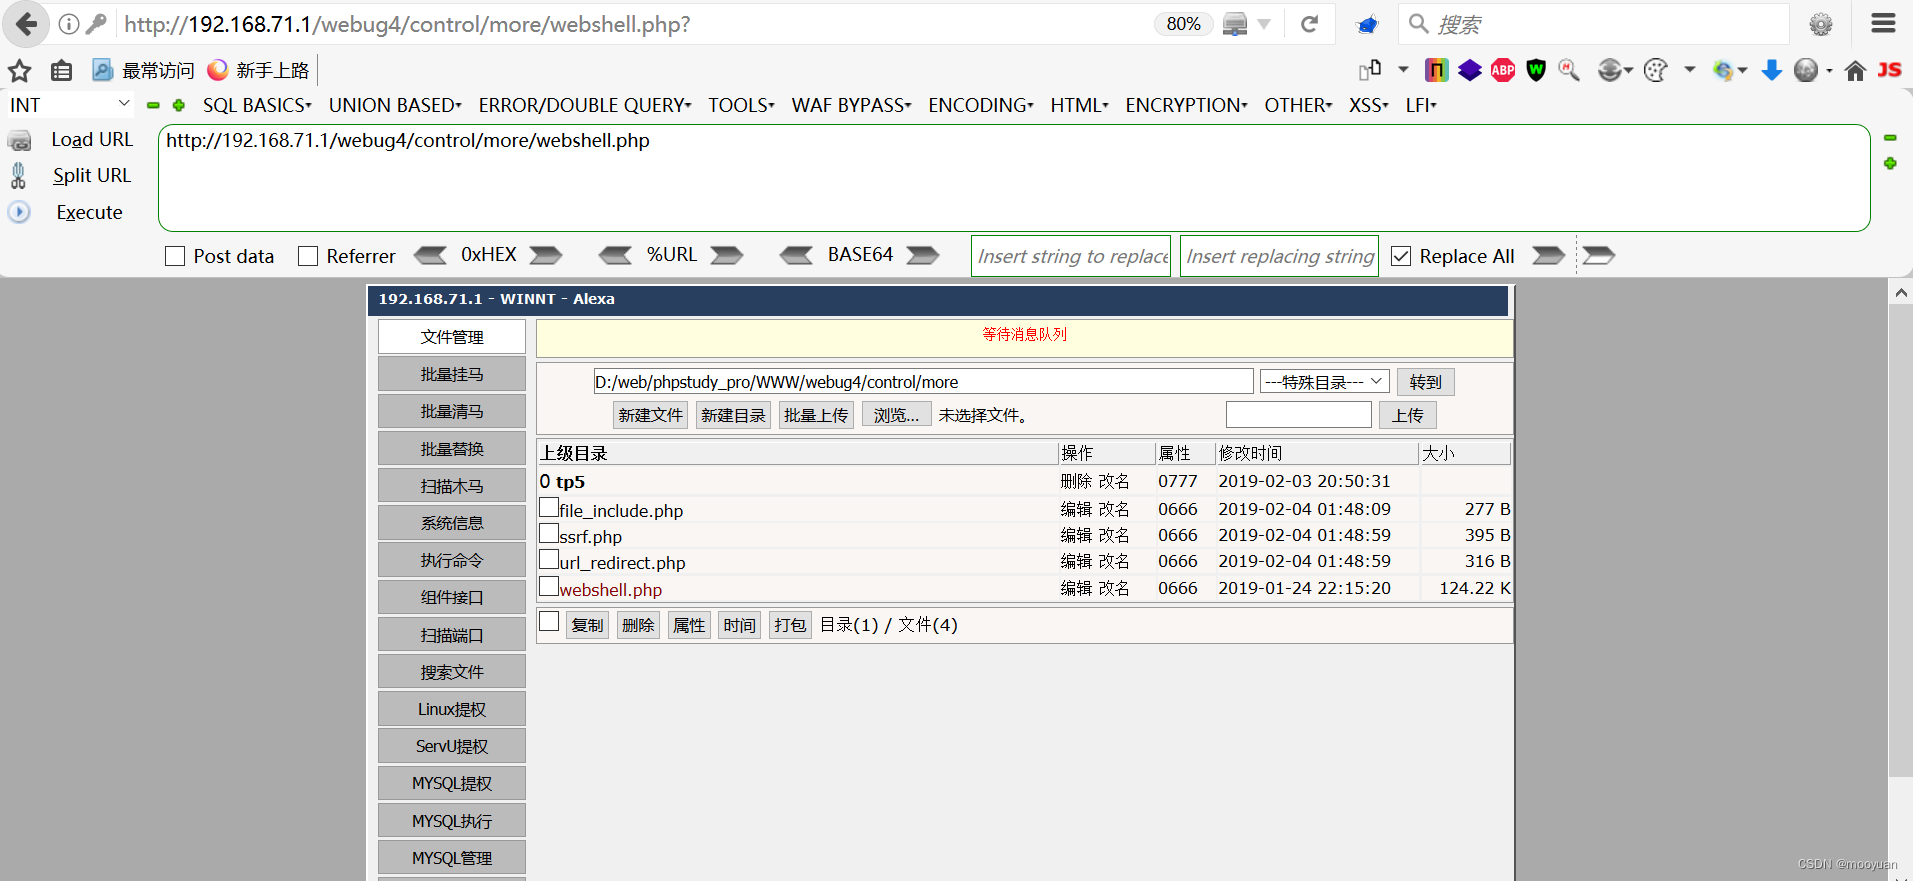
Webug4.0靶场通关笔记24- 第29关Webshell爆破
目录 一、Webshell爆破原理分析 二、第29关webshell爆破渗透实战 1.环境搭建 2.打开靶场 3.暴力破解 (1)bp开启抓包模式 (2)输入密码12并抓包 (3)配置position (4)配置payl…...

CMA认证对象?CMA评审依据,CMA认证好处
CMA认证对象 CMA(中国计量认证,China Metrology Accreditation)的认证对象主要是第三方检测机构和实验室,包括: 独立检测机构:如环境监测站、产品质量检验所、食品药品检测机构等。 企业内部实验室&#…...

在 MyBatis 中实现控制台输出 SQL 参数
在 MyBatis 中实现控制台输出 SQL 参数,可通过以下方案实现: # 一、使用 MyBatis-Plus 的 SqlLogInterceptor(推荐) 适用场景:项目已集成 MyBatis-Plus(3.5.3版本) 配置步骤ÿ…...
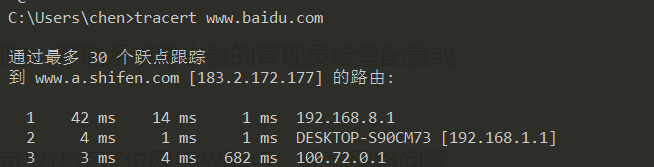
深入解析网络联通性检测:ping 与 tracert 的原理、用法及实战应用
深入解析网络联通性检测:ping 与 tracert 的原理、用法及实战应用 在网络世界中,确保设备之间的联通性是一切网络服务正常运行的基础。无论是网络工程师排查故障,还是普通用户检查网络连接,ping和tracert(在 Windows …...
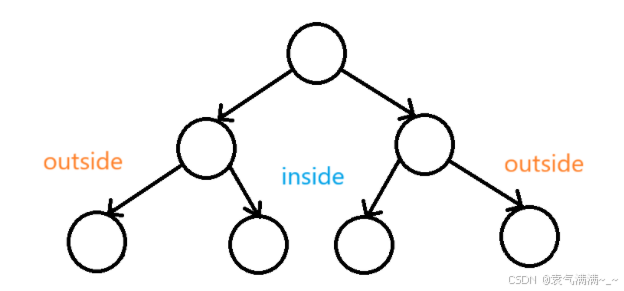
LeetCode:101、对称二叉树
递归法: /*** Definition for a binary tree node.* public class TreeNode {* int val;* TreeNode left;* TreeNode right;* TreeNode() {}* TreeNode(int val) { this.val val; }* TreeNode(int val, TreeNode left, TreeNode right) {…...

从生产事故看软件质量保障:开发规范落实与时间资源矛盾的深度探讨
“穷则变,变则通,通则久。” —— 《周易系辞下》。在困境中要勇于变革,正如软件团队在遇到生产事故后,需要改变现有的开发方式和流程,以适应新的挑战。 在项目推进过程中,一场生产事故如晴天霹雳般袭来&am…...

Redis 常见数据类型
Redis 常见数据类型 一、基本全局命令详解与实操 1. KEYS 命令 功能:按模式匹配返回所有符合条件的键(生产环境慎用,可能导致阻塞)。 语法: KEYS pattern 模式规则: h?llo:匹配 hello, ha…...

TextRNN 模型实现微博文本情感分类
在自然语言处理(NLP)领域,文本情感分类是一项极具应用价值的任务。它能帮助企业分析用户反馈、社交媒体舆情监测等。本文将通过一段实际代码,带大家了解如何利用 PyTorch 框架和 TextRNN 模型,完成微博文本的情感分类工…...
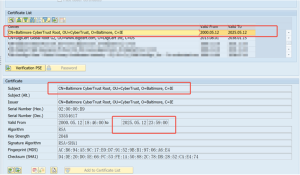
SAP note 3565626 : Baltimore CyberTrust 根证书即将过期
SAP note 3565626 : Baltimore CyberTrust 根证书即将过期 20250512 2025年5月9日 症状 您已收到来⾃ SAP Integration Suite/Cloud Integration 服务的通知邮件, 建议 Baltimore CyberTrust 根证书将于 2025 年 5 ⽉ 12 ⽇ 过期,其中 Balt…...

4.3 Thymeleaf案例演示:图书管理
本项目通过整合 Thymeleaf 实现了一个简单的图书管理系统。系统功能包括查询所有图书、按条件查询图书、根据用户角色显示按钮以及借阅图书。通过 Spring Boot 框架搭建项目,创建了用户和图书的实体类,以及图书的数据访问类和控制器。在 Thymeleaf 模板中…...
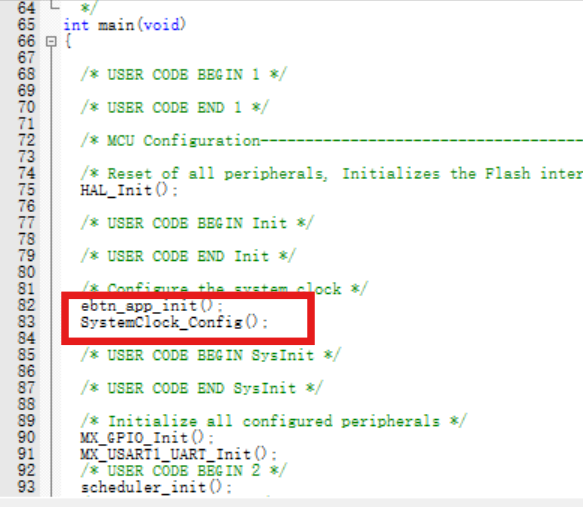
STM32GPIO输入实战-key按键easy_button库移植
STM32GPIO输入实战-key按键easy_button库移植 一,ebtn介绍二,ebtn移植三,组件库的思想组成1. 事件驱动 (Event-Driven) 🛎️ —— 像按门铃2. 状态机 (State Machine) 🚦 —— 像红绿灯3. 回调函数 (Callback Function…...
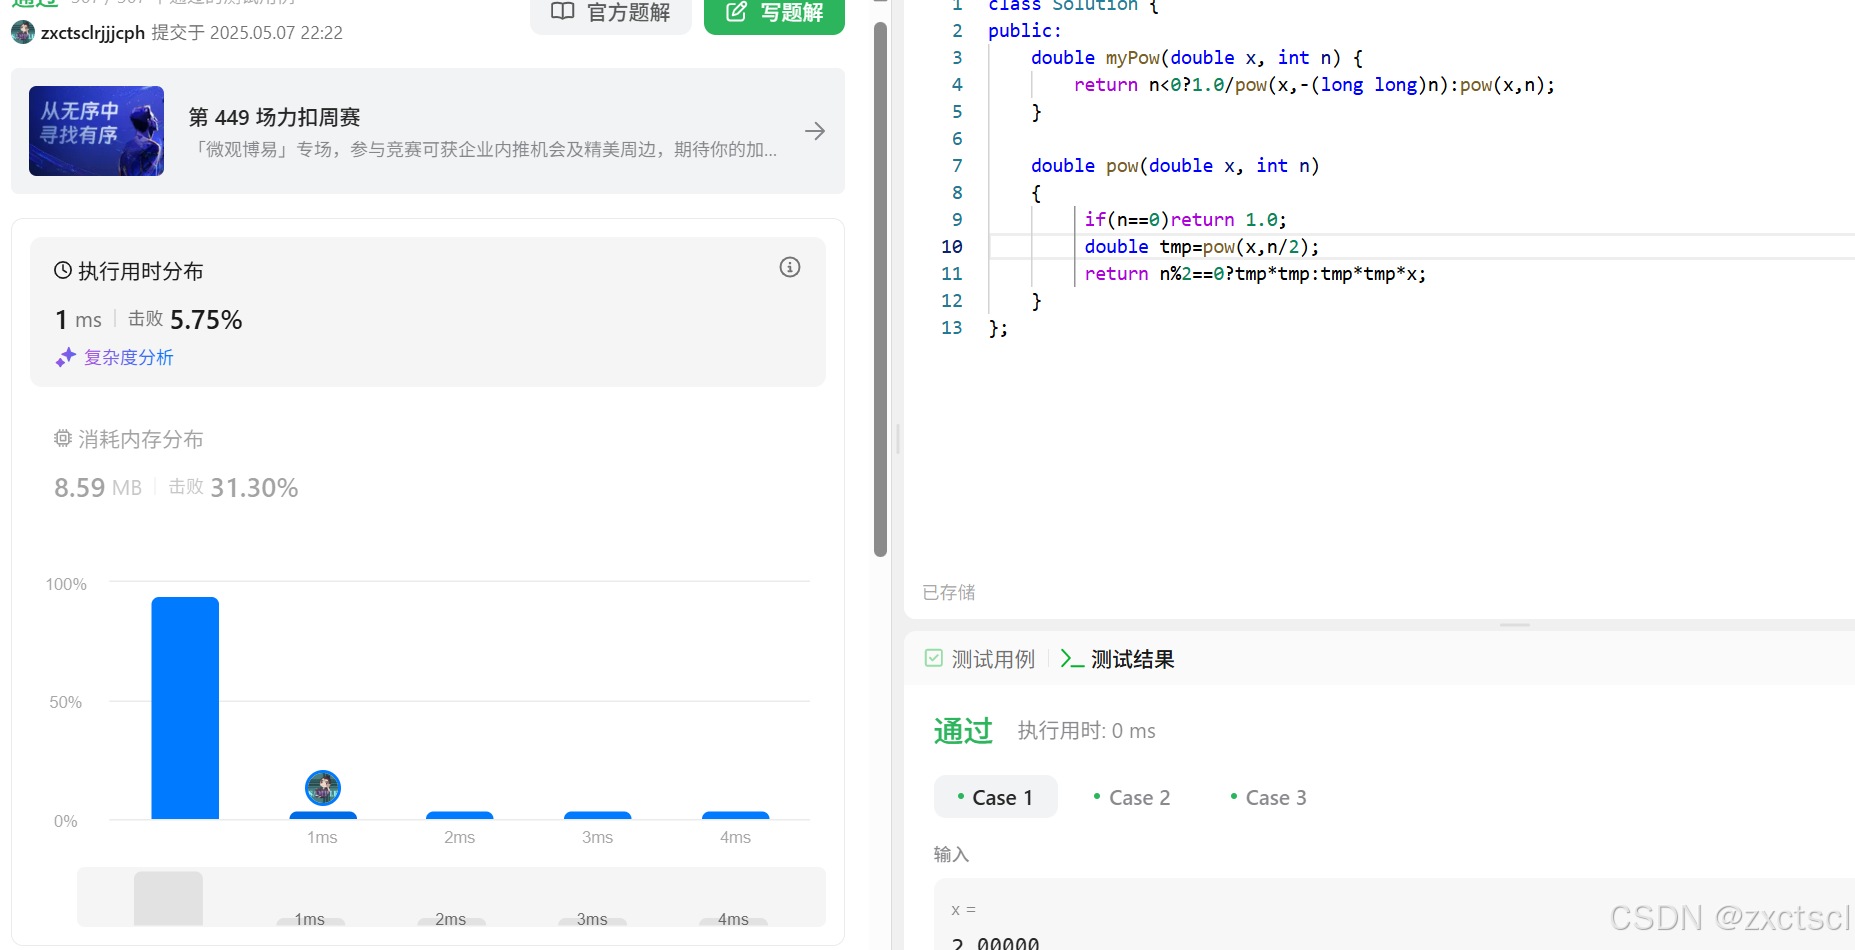
【递归、搜索和回溯】递归、搜索和回溯介绍及递归类算法例题
个人主页 : zxctscl 专栏 【C】、 【C语言】、 【Linux】、 【数据结构】、 【算法】 如有转载请先通知 文章目录 递归、搜索和回溯递归搜索VS 深度优先遍历 VS 深度优先搜索 VS 宽度优先遍历 VS 宽度优先搜索 VS 暴搜回溯与剪枝 1 面试题 08.06. 汉诺塔问题1.1 分析…...

JDK8 HashMap红黑树退化为链表的机制解析
目录 1、数据结构: 2、Fail-Fast机制 2.1、核心作用 2.2、实现原理 2.3、触发场景 2.4、实现细节 2.5、对比 2.6、注意事项 3、核心结论 4、转化安全机制 4.1. 触发场景 4.2. 转换过程 4.3. 并发安全机制 5、设计原因 5.1. 性能权衡 5.2. 空间局部性…...
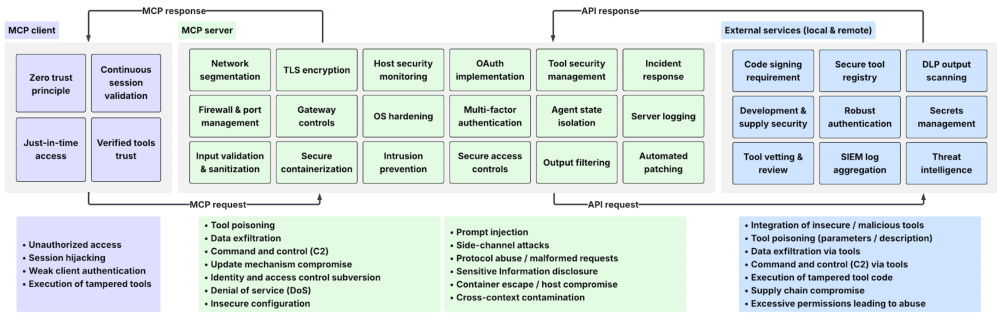
【基础】模型上下文协议(Model Context Protocol, MCP)根本原理与工作机制详解
一、MCP的根本原理 模型上下文协议(MCP)是一种标准化接口协议,旨在解决AI系统(尤其是大型语言模型,LLM)与外部工具、数据源之间的交互碎片化问题。其核心原理可以概括为以下三点: 统一接口抽象…...

霸王茶姬微信小程序自动化签到系统完整实现解析
霸王茶姬微信小程序自动化签到系统完整实现解析 技术栈:Node.js 微信小程序API MD5动态签名 一、脚本全景架构 功能模块图 #mermaid-svg-0vx5W2xo0IZWn6mH {font-family:"trebuchet ms",verdana,arial,sans-serif;font-size:16px;fill:#333;}#mermaid-s…...

北斗导航 | RTKLib中重难点技术,公式,代码
Rtklib 一、抗差自适应卡尔曼滤波1. **核心难点**2. **公式与代码实现**二、模糊度固定与LAMBDA算法1. **核心难点**2. **LAMBDA算法实现**3. **部分模糊度固定技术**三、伪距单点定位与误差修正1. **多系统多频点修正**2. **接收机钟差与系统间偏差**四、动态模型与周跳处理1.…...
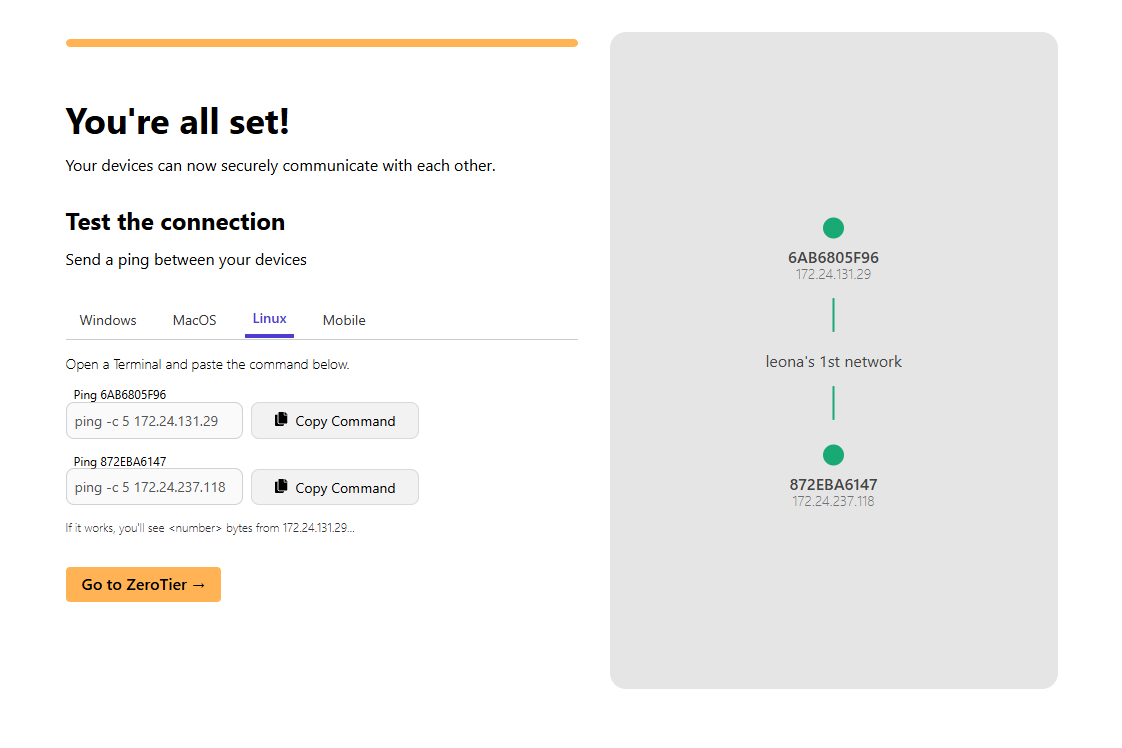
p2p虚拟服务器
ZeroTier Central ✅ 推荐工具:ZeroTier(免费、稳定、跨平台) ZeroTier 可以帮你把多台设备(无论是否跨网)加入一个虚拟局域网,彼此间可以像在同一个 LAN 中通信,UDP 视频、文件传输、SSH 等都…...
)
Python 爬虫基础入门教程(超详细)
一、什么是爬虫? 网络爬虫(Web Crawler),又称网页蜘蛛,是一种自动抓取互联网信息的程序。爬虫会模拟人的浏览行为,向网站发送请求,然后获取网页内容并提取有用的数据。 二、Python爬虫的基本原…...
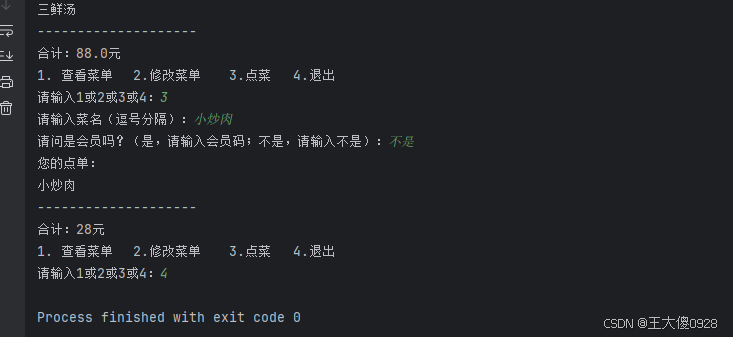
python实现点餐系统
使用python实现点餐系统的增加菜品及价格,删除菜品,查询菜单,点菜以及会员折扣价等功能。 代码: 下面展示一些 内联代码片。 # coding utf-8menu {拍黄瓜: 6, 小炒肉: 28, 西红柿炒蛋: 18, 烤鱼: 30, 红烧肉: 38, 手撕鸡: 45,…...
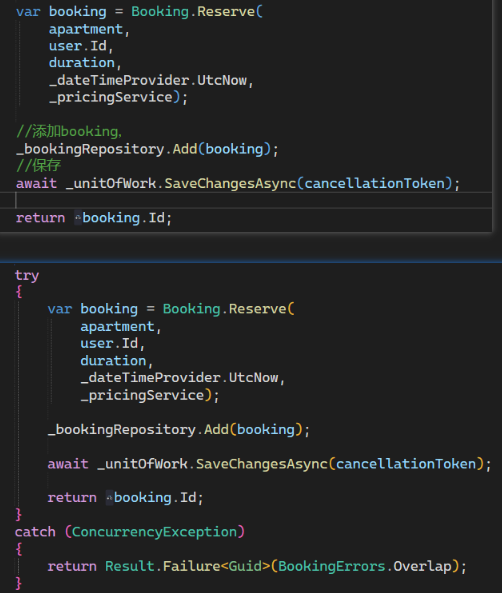
(三)毛子整洁架构(Infrastructure层/DapperHelper/乐观锁)
文章目录 项目地址一、Infrastructure Layer1.1 创建Application层需要的服务1. Clock服务2. Email 服务3. 注册服务 1.2 数据库服务1. 表配置Configurations2. Respository实现3. 数据库链接Factory实现4. Dapper的DataOnly服务实现5. 所有数据库服务注册 1.3 基于RowVersion的…...
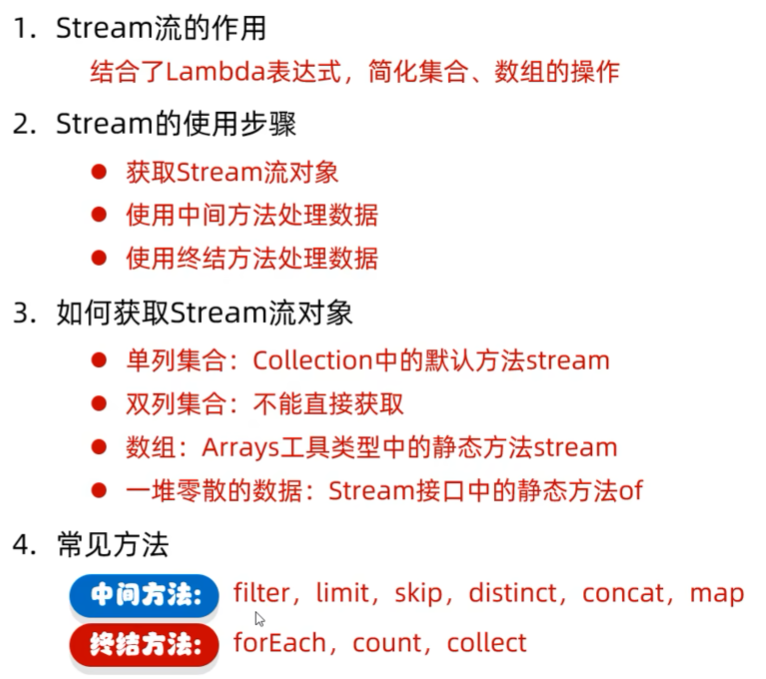
探索Stream流:高效数据处理的秘密武器
不可变集合 stream流 Stream流的使用步骤: 先得到一条Stream流(流水线),并把数据放上去 使用中间方法对流水线上的数据进行操作 使用终结方法对流水线上的数据进行操作 Stream流的中间方法 注意1:中间方法࿰…...

git高效杀器——cz-customizable 搭配 commitlint
What is cz-customizable and commitlint? cz-customizable 一款可定制化的Commitizen插件(也可作为独立工具),旨在帮助创建如约定式提交规范的一致性提交消息。commitlint commitlint 是一个用于检查 Git 提交信息的工具,它可以帮助开发者保持提交信息的规范性和一致性。…...
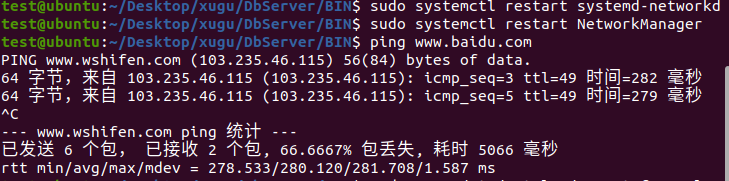
虚拟机ubantu20.04系统桥接模式下无法ping通外网,但可以ping通本机的解决方案
1.出现的问题: 虚拟机ubantu20.04系统桥接模式下无法ping通外网,但可以ping通本机。 2.解决方案: 如果 DHCP 未分配 IP 地址,可以手动配置静态 IP: 1.编辑网络配置文件: sudo nano /etc/netplan/01-netcfg.yaml 2…...

日常知识点之随手问题整理(思考单播,组播,广播哪个更省带宽)
新入职的公司在某些场景下无脑使用组播技术,自己突然就意识到一个问题:单播,组播,广播,哪个更省带宽? 有所收获,做点笔记,仅仅是个人理解~ 1:简单理解 单播࿱…...

qtcreater配置opencv
我配置opencv不管是按照网上的教程还是deep seek发现都有些问题,下面是我的配置方法以及实践成功的心得 电脑环境 windows平台qt6 下载 我这里直接提供官网下载地址:https://opencv.org/releases/ 我下载的是最新版,下载后是一个.exe文件…...

详解 c++17 重载类 overload的每一条语句,附实例.
author: hjjdebug date: 2025年 05月 09日 星期五 16:21:03 CST description: 详解 c17 重载类 overload的每一条语句 文章目录 1. template 模板类.2. class... Ts 是什么意思?3. template<class... Ts> 是什么意思?4. overload 是什么?5. Ts...…...

机器学习-数据集划分和特征工程
一.数据集划分 API函数: sklearn.model_selection.train_test_split(*arrays,**options) 参数: - arrays:多个数组,可以是列表,numpy数组,也可以是dataframe数据框等 - options:&…...
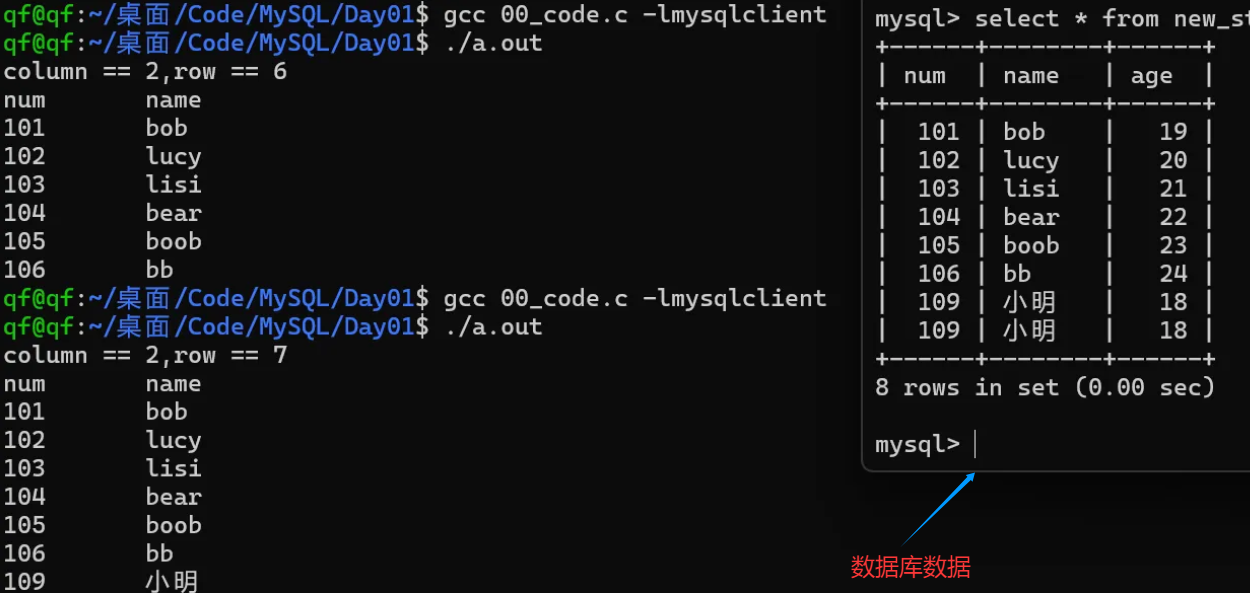
MySQL C API高效编程:C语言实现数据库操作的深入解析
知识点【MySQL C API】 1、头文件及MYSQL * 句柄 //头文件 #include <mysql/mysql.h>1、MYSQL MYSQL是一个结构体,封装了与数据库连接相关的所有状态,配置和数据。 2、MYSQL *的本质 类似于 FILE*,代表一个与数据库连接的通道&…...
MySQL初阶:数据库约束和表的设计
数据库约束 数据库约束是针对数据库中的表中的数据进行施加规则和条件,用于确保数据的准确性和可靠性。 数据库约束类型 1)not null 非空类型 :指定非空类型的列不能存储null,如果插入的数据是null便会报错。 2)de…...