list类的详细讲解
1. list的介绍及使用
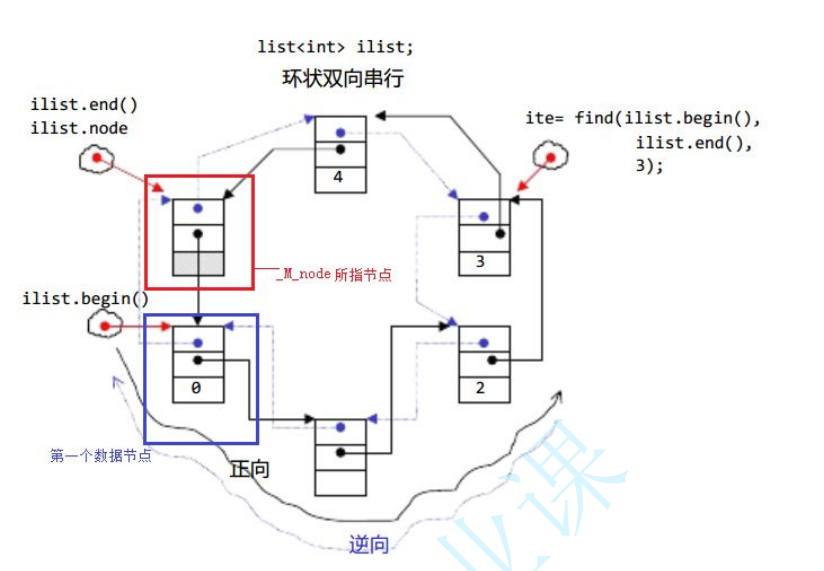
1.1 list的介绍
1.2 list的使用
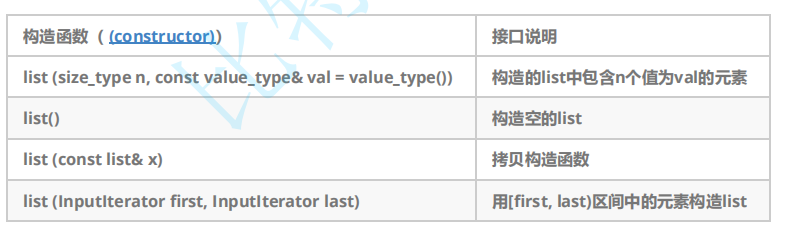
1.2.1 list的构造
#define _CRT_SECURE_NO_WARNINGS#include <iostream>
using namespace std;
#include <list>
#include <vector>// list的构造
void TestList1()
{list<int> l1;                         // 构造空的l1list<int> l2(4, 100);                 // l2中放4个值为100的元素list<int> l3(l2.begin(), l2.end());  // 用l2的[begin(), end())左闭右开的区间构造l3list<int> l4(l3);                    // 用l3拷贝构造l4// 以数组为迭代器区间构造l5int array[] = { 16,2,77,29 };list<int> l5(array, array + sizeof(array) / sizeof(int));// 列表格式初始化C++11list<int> l6{ 1,2,3,4,5 };// 用迭代器方式打印l5中的元素list<int>::iterator it = l5.begin();while (it != l5.end()){cout << *it << " ";++it;}       cout << endl;// C++11范围for的方式遍历for (auto& e : l5)cout << e << " ";cout << endl;
}
1.2.2 list iterator的使用
// list迭代器的使用
// 注意:遍历链表只能用迭代器和范围for
void PrintList(const list<int>& l)
{// 注意这里调用的是list的 begin() const,返回list的const_iterator对象for (list<int>::const_iterator it = l.begin(); it != l.end(); ++it){cout << *it << " ";// *it = 10; 编译不通过}cout << endl;
}void TestList2()
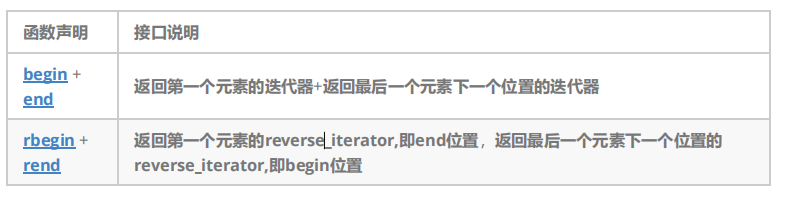
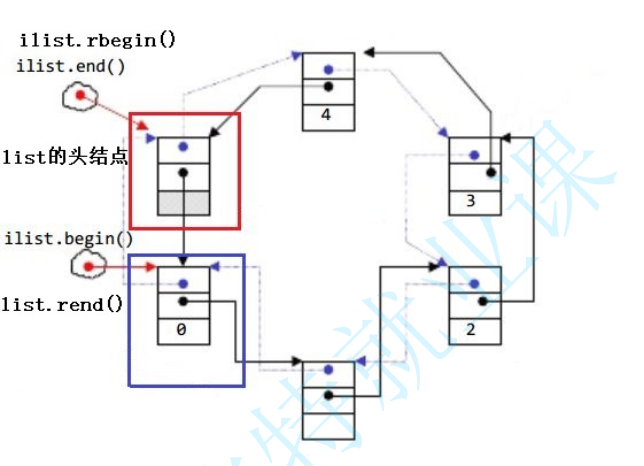
{int array[] = { 1, 2, 3, 4, 5, 6, 7, 8, 9, 0 };list<int> l(array, array + sizeof(array) / sizeof(array[0]));// 使用正向迭代器正向list中的元素// list<int>::iterator it = l.begin(); // C++98中语法auto it = l.begin(); // C++11之后推荐写法while (it != l.end()){cout << *it << " ";++it;}cout << endl;// 使用反向迭代器逆向打印list中的元素// list<int>::reverse_iterator rit = l.rbegin();auto rit = l.rbegin();while (rit != l.rend()){cout << *rit << " ";++rit;}cout << endl;
}1.2.3 list capacity

1.2.4 list element access

1.2.5 list modifiers
// list插入和删除
// push_back/pop_back/push_front/pop_front
void TestList3()
{int array[] = { 1, 2, 3 };list<int> L(array, array + sizeof(array) / sizeof(array[0]));// 在list的尾部插入4,头部插入0L.push_back(4);L.push_front(0);PrintList(L);// 删除list尾部节点和头部节点L.pop_back();L.pop_front();PrintList(L);
}// insert /erase
void TestList4()
{int array1[] = { 1, 2, 3 };list<int> L(array1, array1 + sizeof(array1) / sizeof(array1[0]));// 获取链表中第二个节点auto pos = ++L.begin();cout << *pos << endl;// 在pos前插入值为4的元素L.insert(pos, 4);PrintList(L);// 在pos前插入5个值为5的元素L.insert(pos, 5, 5);PrintList(L);// 在pos前插入[v.begin(), v.end)区间中的元素vector<int> v{ 7, 8, 9 };L.insert(pos, v.begin(), v.end());PrintList(L);// 删除pos位置上的元素L.erase(pos);PrintList(L);// 删除list中[begin, end)区间中的元素,即删除list中的所有元素L.erase(L.begin(), L.end());PrintList(L);
}
// resize/swap/clear
void TestList5()
{// 用数组来构造listint array1[] = { 1, 2, 3 };list<int> l1(array1, array1 + sizeof(array1) / sizeof(array1[0]));PrintList(l1);// 交换l1和l2中的元素list<int> l2;l1.swap(l2);PrintList(l1);PrintList(l2);// 将l2中的元素清空l2.clear();cout << l2.size() << endl;
}1.2.6 list的迭代器失效
void TestListIterator1()
{int array[] = { 1, 2, 3, 4, 5, 6, 7, 8, 9, 0 };list<int> l(array, array + sizeof(array) / sizeof(array[0]));auto it = l.begin();while (it != l.end()){// erase()函数执行后,it所指向的节点已被删除,因此it无效,在下一次使用it时,必须先给其赋值l.erase(it);++it;}
}
// 改正
void TestListIterator()
{int array[] = { 1, 2, 3, 4, 5, 6, 7, 8, 9, 0 };list<int> l(array, array + sizeof(array) / sizeof(array[0]));auto it = l.begin();while (it != l.end()){l.erase(it++); // it = l.erase(it);}
}
2. list的模拟实现
2.1 模拟实现list
#pragma once
#include <assert.h>
#include <iostream>namespace xyl
{template<class T>//list节点类struct ListNode{ListNode(const T& val = T()):_pPrev(nullptr), _pNext(nullptr),_val(val){}ListNode<T>* _pPrev;ListNode<T>* _pNext;T _val;};//List迭代器类template<class T,class Ref,class Ptr>struct ListIterator{typedef ListNode<T>* PNode;typedef ListIterator<T, Ref, Ptr> Self;ListIterator(PNode pNode = nullptr):_pNode(pNode){}ListIterator(const Self & l):_pNode(l._pNode){}T& operator*(){return _pNode->_val;}T* operator->(){return &(_pNode->_val);}Self& operator++(){_pNode = _pNode->_pNext;return *this;}Self operator++(int){Self tmp(*this);_pNode = _pNode->_pNext;return tmp;}Self& operator--(){_pNode = _pNode->_pPrev;return *this;}Self& operator--(int){Self tmp(*this);_pNode = _pNode->_pPrev;return tmp;}bool operator==(const Self& l){return _pNode == l._pNode;}bool operator!=(const Self& l){return _pNode != l._pNode;}PNode _pNode;};//list类template< class T >class list{typedef ListNode<T> Node;typedef Node* PNode;public:typedef ListIterator<T, T&,  T*> iterator;typedef ListIterator<T,const T&, const T*> const_iterator;public:void init_empty(){_head = new Node;_head->_pPrev = _head;_head->_pNext = _head;size = 0;}list(){init_empty();}list(int n, const T& val = T()){init_empty();for (int i = 0;i < n;i++){push_back(val);}}template <class Iterator>list(Iterator first, Iterator last){init_empty();while (first != last){push_back(*first);first++;}}list(const list<T>& l){init_empty();const_iterator it = l.begin();while (it != l.end()){push_back(*it);it++;}}~list(){clean();delete _head;_head = nullptr;}void clean(){iterator it = begin();while (it != end()){it=erase(it);}_head->_pNext = _head;_head->_pPrev = _head;}list<T>& operator=(const list<T>& l){list<T> tmp(l);swap(tmp);return *this;}size_t _size(){return size;}bool empty(){return size == 0;}T& front(){return _head->_pNext->_val;}T& back(){return _head->_pPrev->_val;}const T& front() const{return _head->_pNext->_val;}const T& back() const{return _head->_pPrev->_val;}void push_back(const T& val){/*PNode cur= new Node(val);PNode tail = _head->_pPrev;cur->_pPrev = tail;cur->_pNext = _head;tail->_pNext = cur;_head->_pPrev = cur;size++;*/insert(end(), val);}void push_front(const T& val){insert(begin(), val);}void pop_back(){erase(--end());}void pop_front(){erase(begin());}iterator insert(iterator pos, const T& val){PNode newnode = new Node(val);PNode cur = pos._pNode;PNode prev = cur->_pPrev;prev->_pNext = newnode;newnode->_pPrev = prev;newnode->_pNext = cur;cur->_pPrev = newnode;size++;return iterator(newnode);}iterator erase(iterator pos){//找到删除节点PNode del = pos._pNode;//存储删除节点的下一位当返回值PNode tmp = del->_pNext;PNode next = del->_pNext;PNode prev = del->_pPrev;prev->_pNext = next;next->_pPrev = prev;delete del;size--;return iterator(tmp);}iterator begin() {return (_head->_pNext);}iterator end() {return (_head);}const_iterator begin() const{return (_head->_pNext);}const_iterator end() const{return (_head);}void swap(list<T>& l){std::swap(_head, l._head);std::swap(size, l.size);}PNode _head;size_t size;};
}
#include <iostream>#include "list.h"using namespace std;void test_list1()
{xyl::list<int> list1;list1.push_back(1);list1.push_back(2);list1.push_back(3);list1.push_back(4);xyl::list<int>:: iterator it1 = list1.begin();while (it1 != list1.end()){cout << (*it1) << ' ';++it1;}cout << endl;cout << list1.size;cout << endl;xyl::list<int> list2(10,1);xyl::list<int>::iterator it2 = list2.begin();while (it2 != list2.end()){cout << (*it2) << ' ';++it2;}cout << endl;}void test_list2()
{xyl::list<int> list1;list1.push_back(1);list1.push_back(2);list1.push_back(3);list1.push_back(4);xyl::list<int>::iterator it1 = list1.begin();while (it1 != list1.end()){cout << (*it1) << ' ';++it1;}cout << endl;xyl::list<int> list2(++list1.begin(),list1.end());xyl::list<int>::iterator it2 = list2.begin();while (it2 != list2.end()){cout << (*it2) << ' ';++it2;}cout << endl;xyl::list<int> list3(list2);xyl::list<int>::iterator it3 = list3.begin();while (it3 != list3.end()){cout << (*it3) << ' ';++it3;}cout << endl;
}void test_list3()
{xyl::list<int> list1;list1.push_back(1);list1.push_back(2);list1.push_back(3);list1.push_back(4);xyl::list<int>::iterator it1 = list1.begin();while (it1 != list1.end()){cout << (*it1) << ' ';++it1;}cout << endl;xyl::list<int> list2;list2 = list1;xyl::list<int>::iterator it2 = list2.begin();while (it2 != list2.end()){cout << (*it2) << ' ';++it2;}cout << endl;cout << list2.front() << endl;cout << list2.back() << endl;
}void test_list4()
{xyl::list<int> list1;list1.push_back(1);list1.push_back(2);list1.push_back(3);list1.push_back(4);list1.erase(list1.begin());xyl::list<int>::iterator it1 = list1.begin();while (it1 != list1.end()){cout << (*it1) << ' ';++it1;}list1.clean();while (it1 != list1.end()){cout << (*it1) << ' ';++it1;}}void test_list5()
{xyl::list<int> list1;list1.push_back(1);list1.push_back(2);list1.push_back(3);list1.push_back(4);list1.insert(list1.begin(), 3);xyl::list<int>::iterator it1 = list1.begin();while (it1 != list1.end()){cout << (*it1) << ' ';++it1;}cout << endl;list1.pop_back();it1 = list1.begin();while (it1 != list1.end()){cout << (*it1) << ' ';++it1;}cout << endl;list1.pop_front();it1 = list1.begin();while (it1 != list1.end()){cout << (*it1) << ' ';++it1;}cout << endl;list1.push_front(5);it1 = list1.begin();while (it1 != list1.end()){cout << (*it1) << ' ';++it1;}cout << endl;
}int main()
{test_list5();return 0;
}2.2 list的反向迭代器
template<class Iterator>
class ReverseListIterator
{// 注意:此处typename的作用是明确告诉编译器,Ref是Iterator类中的类型,而不是静态成员变量// 否则编译器编译时就不知道Ref是Iterator中的类型还是静态成员变量// 因为静态成员变量也是按照 类名::静态成员变量名 的方式访问的
public:typedef typename Iterator::Ref Ref;typedef typename Iterator::Ptr Ptr;typedef ReverseListIterator<Iterator> Self;
public://// 构造ReverseListIterator(Iterator it) : _it(it) {}//// 具有指针类似行为Ref operator*() {Iterator temp(_it);--temp;return *temp;}Ptr operator->() { return &(operator*()); }//// 迭代器支持移动Self& operator++() {--_it;return *this;}Self operator++(int) {Self temp(*this);--_it;return temp;}Self& operator--() {++_it;return *this;}Self operator--(int){Self temp(*this);++_it;return temp;}//// 迭代器支持比较bool operator!=(const Self& l)const { return _it != l._it; }bool operator==(const Self& l)const { return _it != l._it; }Iterator _it;
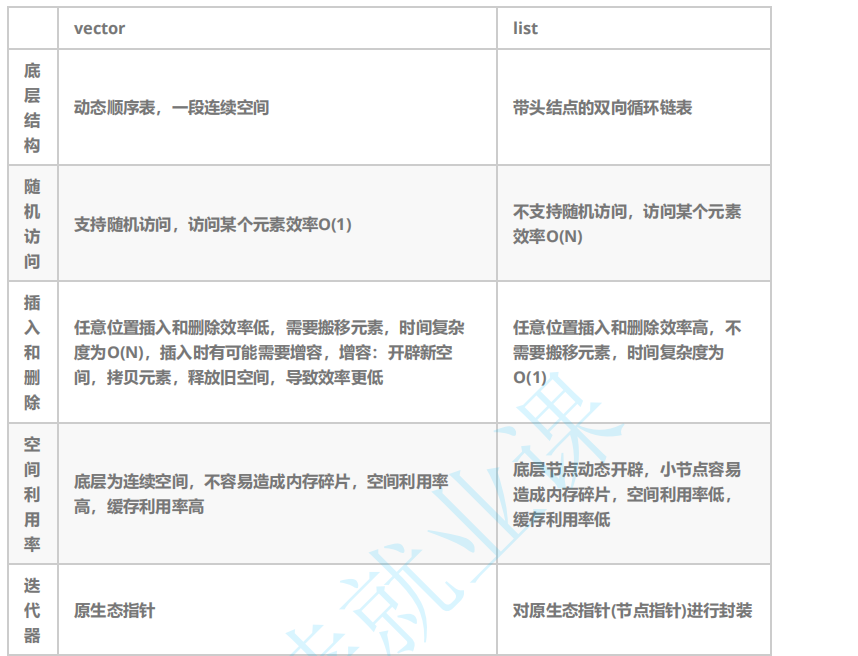
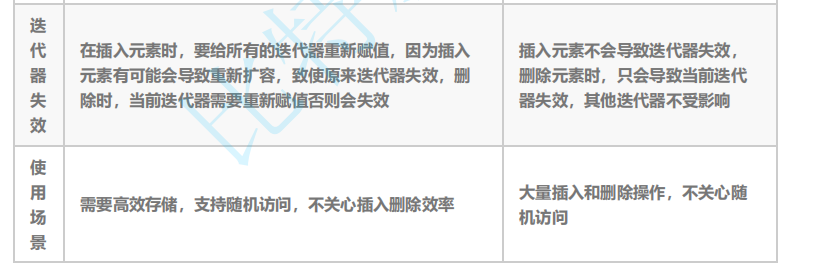
};3. list与vector的对比
相关文章:
list类的详细讲解
【本节目标】 1. list的介绍及使用 2. list的深度剖析及模拟实现 3. list与vector的对比 1. list的介绍及使用 1.1 list的介绍 1. list 是可以在常数范围内在任意位置进行插入和删除的序列式容器,并且该容器可以前后双向迭代。 2. list 的底层是双向链表结构&a…...
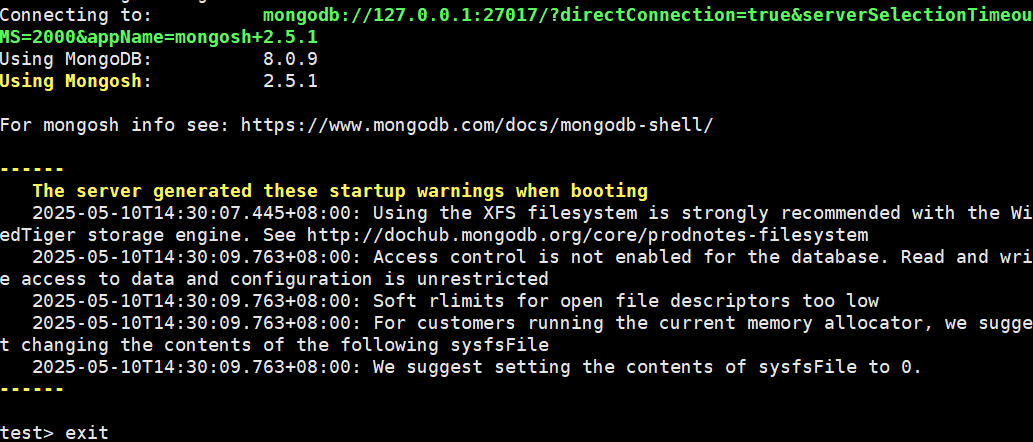
Linux系统下安装mongodb
1. 配置MongoDB的yum仓库 创建仓库文件 sudo vi /etc/yum.repos.d/mongodb-org.repo添加仓库配置 根据系统版本选择配置(以下示例为CentOS 7和CentOS 9的配置): CentOS 7(安装MongoDB 5.0/4.2等旧版本): In…...
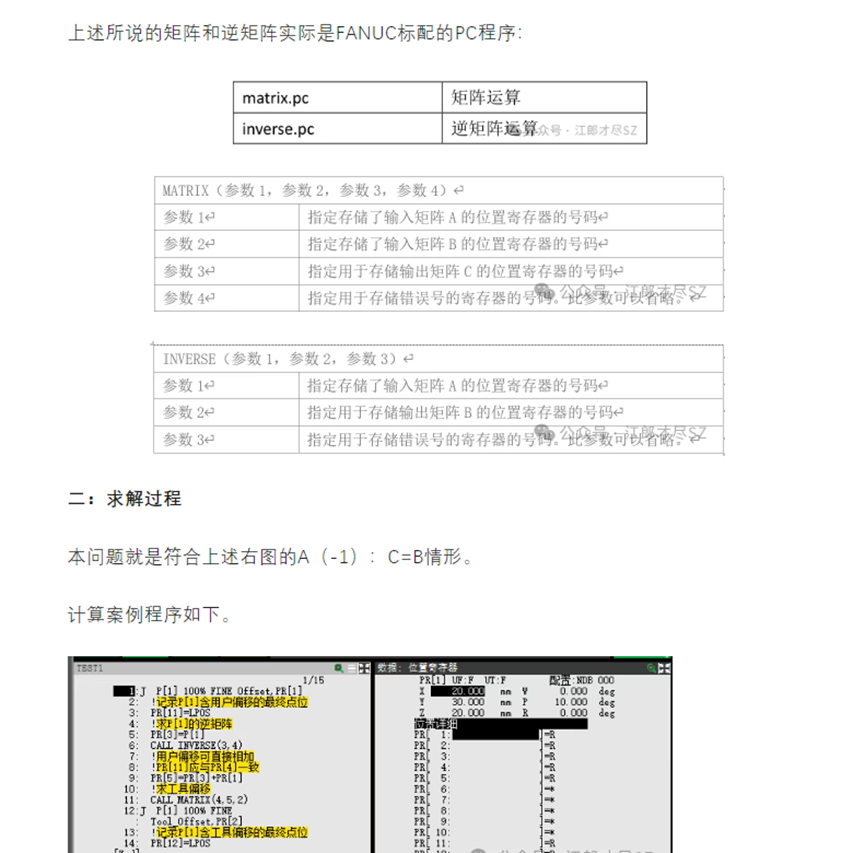
kuka, fanuc, abb机器人和移动相机的标定
基础知识 : 一, 9点标定之固定相机标定: 图1: 固定位置相机拍照 因为相机和机器人的基坐标系是固定的, 所以在海康威视相机的9点标定功能栏中, 填上海康使用“圆查找”捕捉到的坐标值, 再将机器人显示的工具坐标系在基坐标系的实时位置pos_act值填入物理坐标X, Y中即可 图2:…...
Android Framework学习四:init进程实现
文章目录 init流程简介init源码执行顺序执行顺序 init进程的具体工作事项挂载文件系统设置 SELinuxSecondStageMaininit.rc启动zygote和serviceManager进程的重要性serviceManager工作原理 Framework学习之系列文章 init流程简介 下面图片主要围绕 Android 系统中init进程的运…...

Linux计划任务与进程
at 命令使用方法 at 命令可在指定时间执行任务,适用于一次性任务调度。以下是基本用法: 安装 atd 服务(如未安装) # Debian/Ubuntu sudo apt-get install at# CentOS/RHEL sudo yum install at启动服务 sudo systemctl start atd…...
Java引用RabbitMQ快速入门
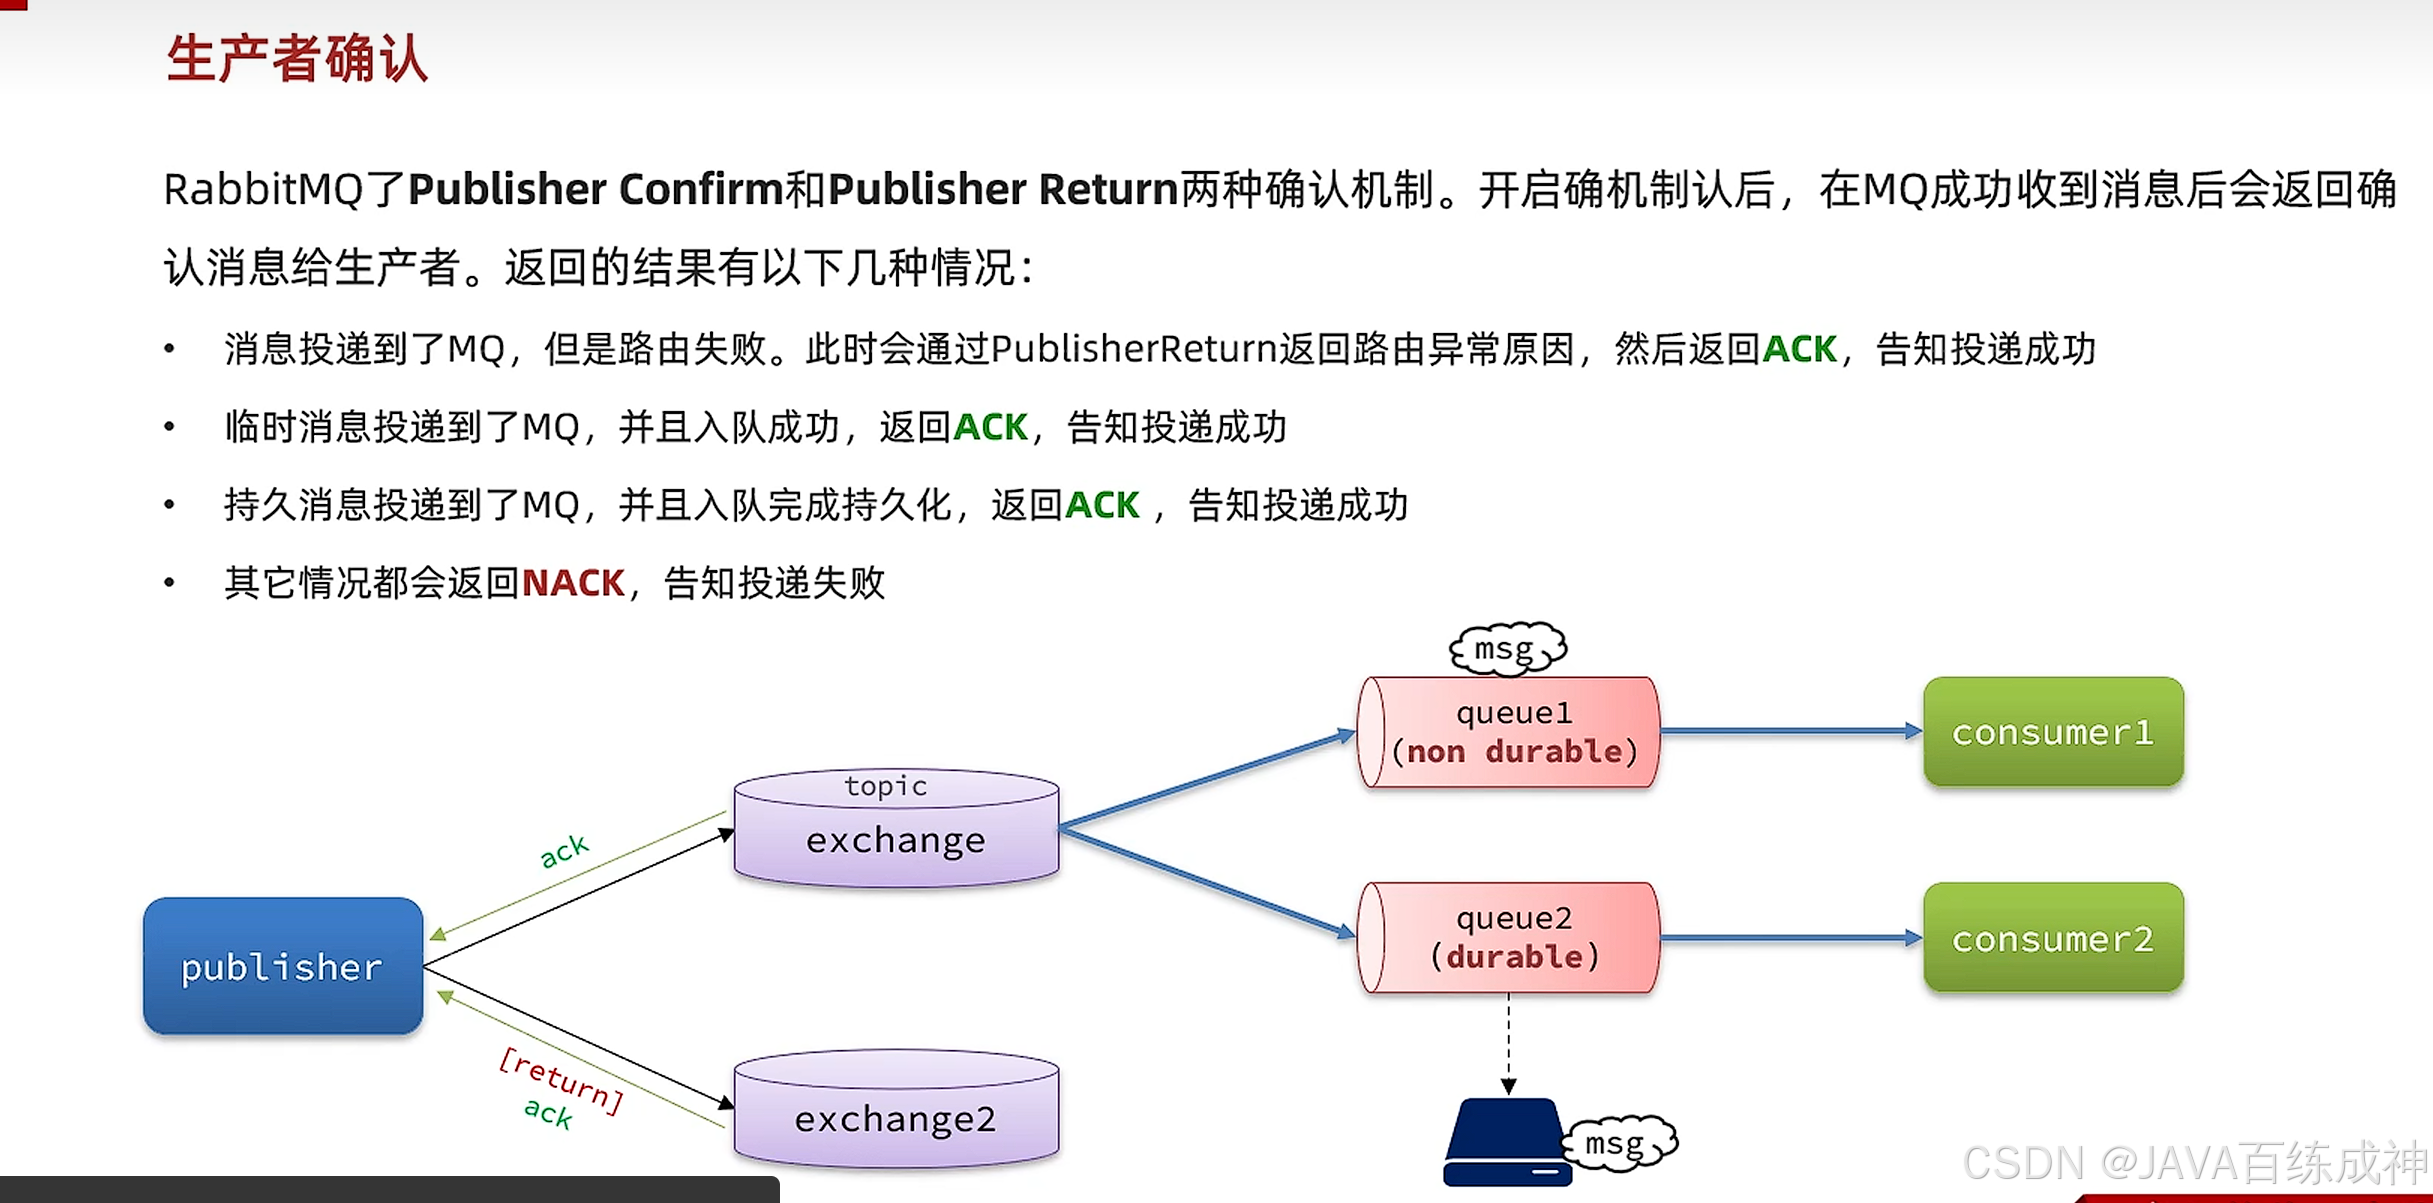
这里写目录 Java发送消息给MQ消费者接收消息实现一个队列绑定多个消费者消息推送限制 Fanout交换机路由的作用Direct交换机使用案例 Topic交换机声明队列和交换机的方式MQ消息转换器业务改造生产者可靠性设置重连 系统可靠性 Java发送消息给MQ public void testSendMessage() t…...
用R语言+随机森林玩转遥感空间预测-基于R语言机器学习遥感数据处理与模型空间预测技术及实际项目案例分析
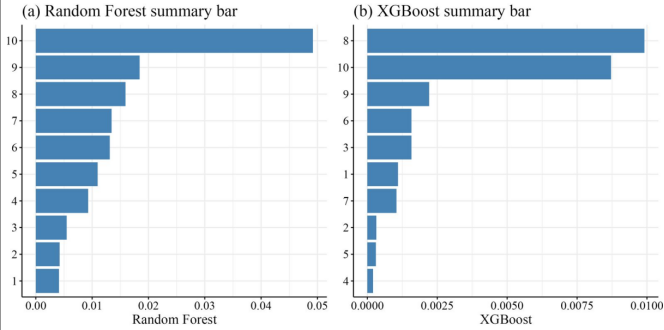
遥感数据具有高维度、非线性及空间异质性等特点,传统分析方法往往难以充分挖掘其信息价值。机器学习技术的引入为遥感数据处理与模型预测提供了新的解决方案,其中随机森林(Random Forest)以其优异的性能和灵活性成为研究者的首选工…...

【许可证】Open Source Licenses
长期更新 扩展:shield.io装饰 开源许可证(Open Source Licenses)有很多种,每种都有不同的授权和限制,适用于不同目的。 默认的ISC🟰MIT License是否可商用是否要求开源衍生项目是否必须署名是否有专利授权…...
Spring Boot 文件上传实现详解
在项目开发过程中,文件上传是极为常见的功能需求。对于熟悉 Spring MVC 文件上传操作的开发者而言,Spring Boot 中的文件上传与之原理基本相通,只是在依赖管理和配置方式上更为简化。接下来,将详细阐述 Spring Boot 项目中文件上传…...
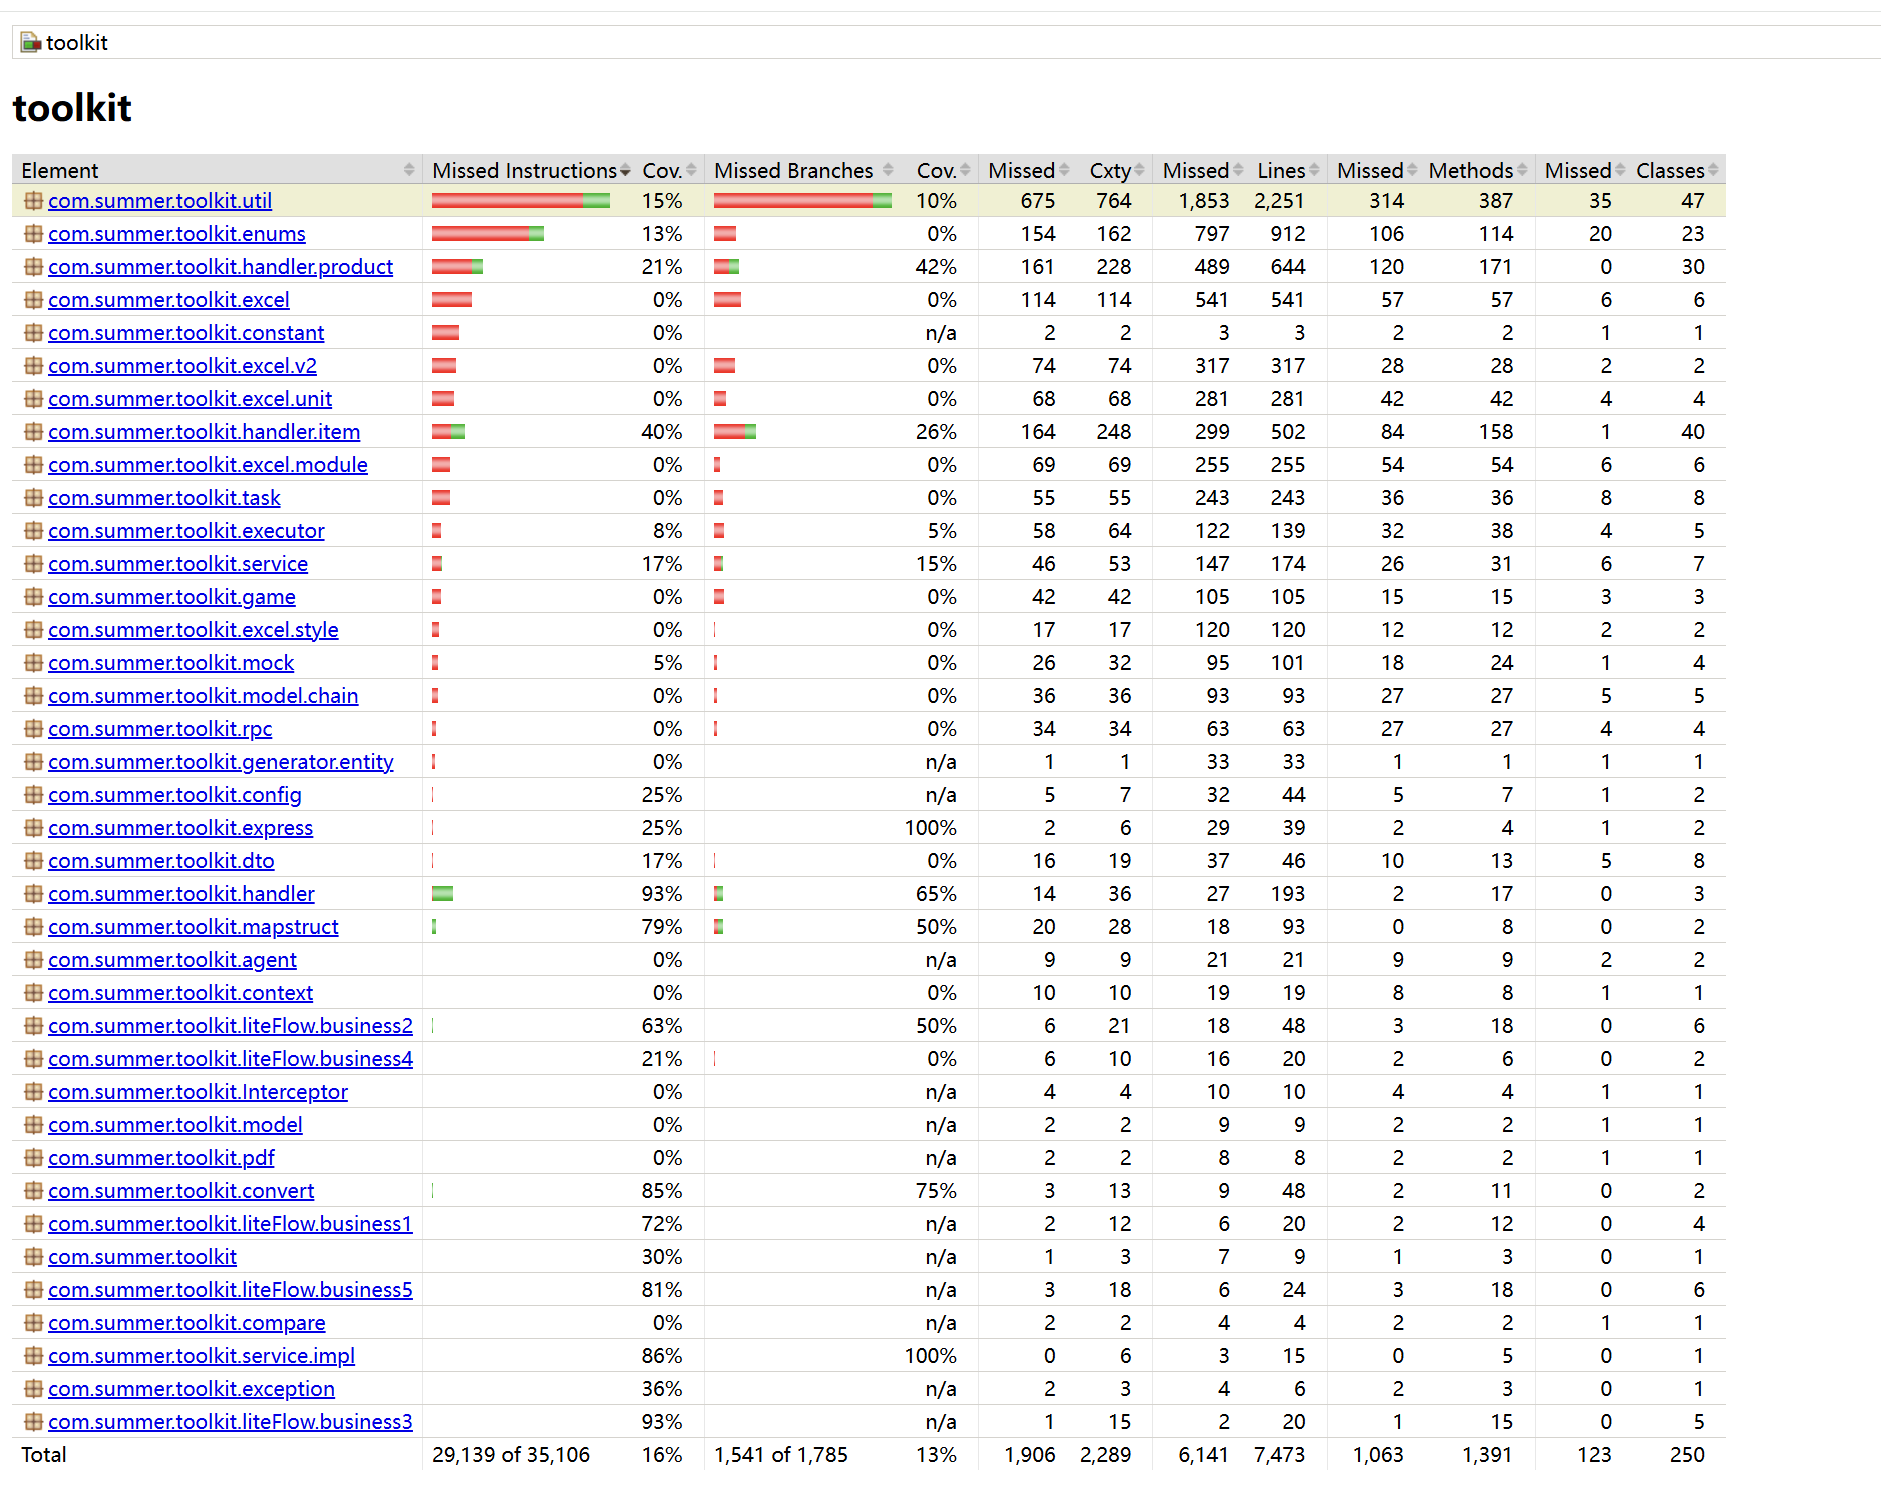
查看单元测试覆盖率
文章目录 1、POM文件配置2、编写单元测试3、执行单元测试4、查看单元测试覆盖率 1、POM文件配置 pom文件配置jacoco插件 <!-- 生成JaCoCo覆盖率数据插件 --> <plugin><groupId>org.jacoco</groupId><artifactId>jacoco-maven-plugin</artif…...
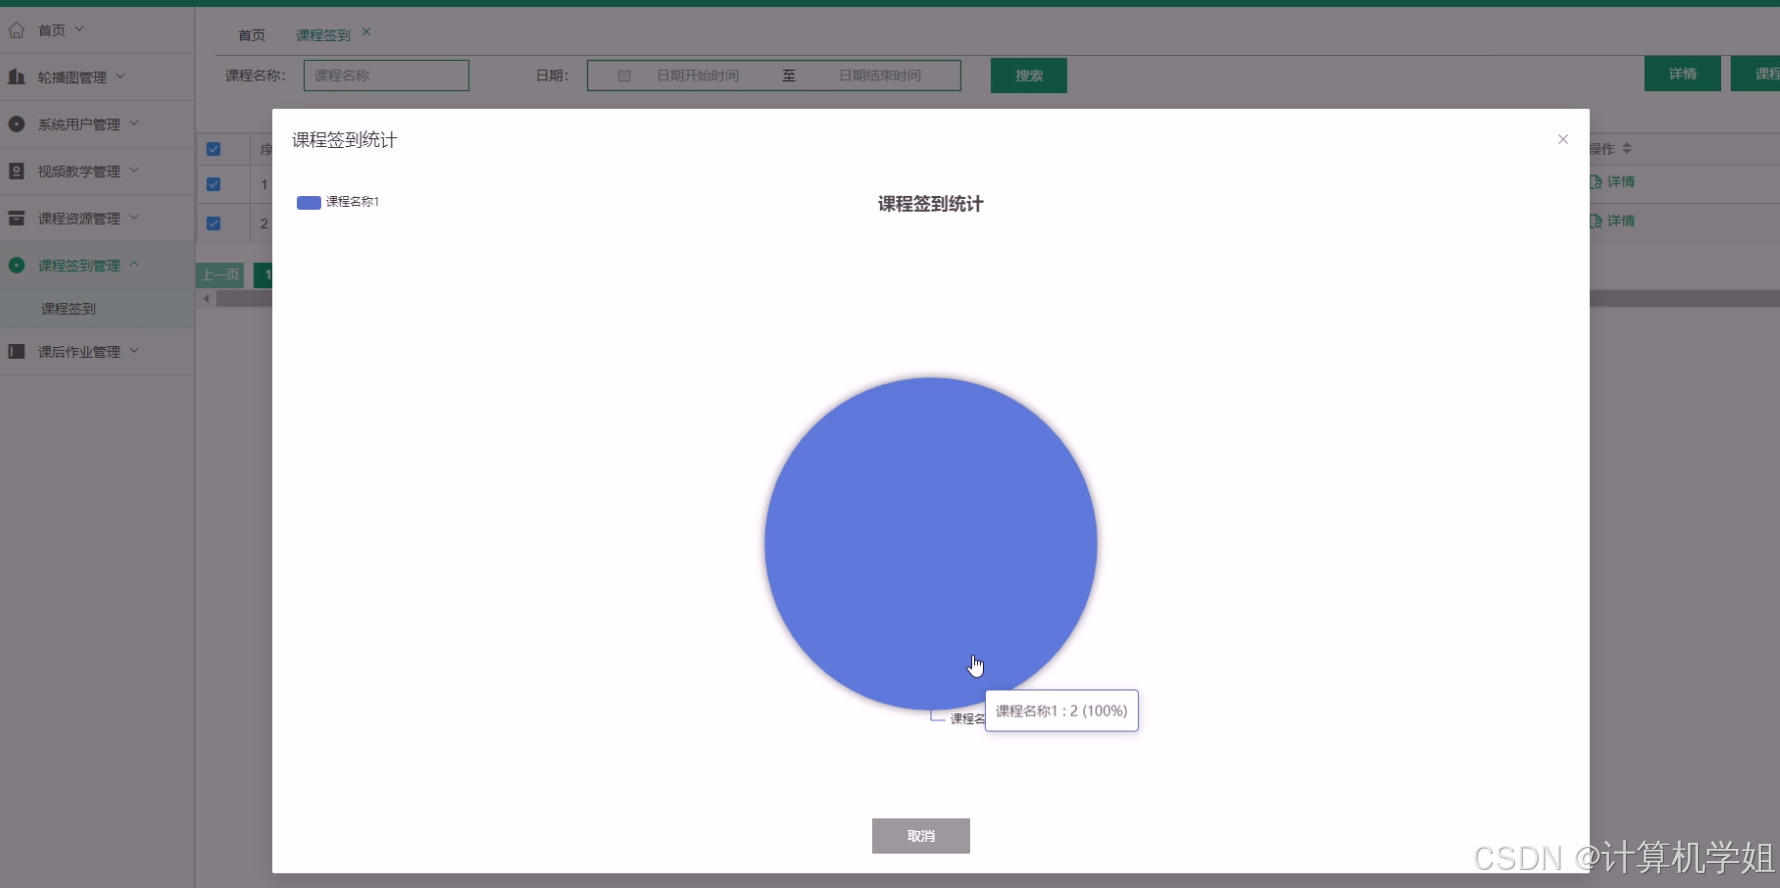
基于SpringBoot的在线教育管理系统
作者:计算机学姐 开发技术:SpringBoot、SSM、Vue、MySQL、JSP、ElementUI、Python、小程序等,“文末源码”。 专栏推荐:前后端分离项目源码、SpringBoot项目源码、Vue项目源码、SSM项目源码、微信小程序源码 精品专栏:…...

交叉编译 opencv-4.10
编译说明 opencv 下包含很多模块,各个模块的作用可以参考Opencv—模块概览. 嵌入式考虑有限存储等因素会对模块进行裁剪,我这里主要保留图像拼接(stitching)图片编解码(imgcodecs)与特征点匹配(…...
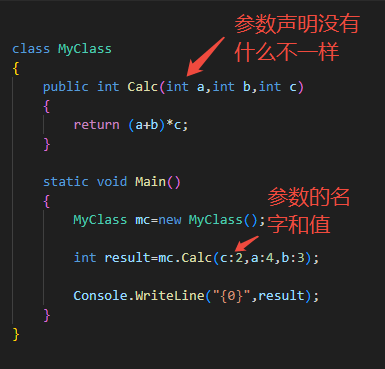
C# 方法(方法重载)
本章内容: 方法的结构 方法体内部的代码执行 局部变量 局部常量 控制流 方法调用 返回值 返回语句和void方法 局部函数 参数 值参数 引用参数 引用类型作为值参数和引用参数 输出参数 参数数组 参数类型总结 方法重载 命名参数 可选参数 栈帧 递归 方法重载 一个类中可以有多个…...
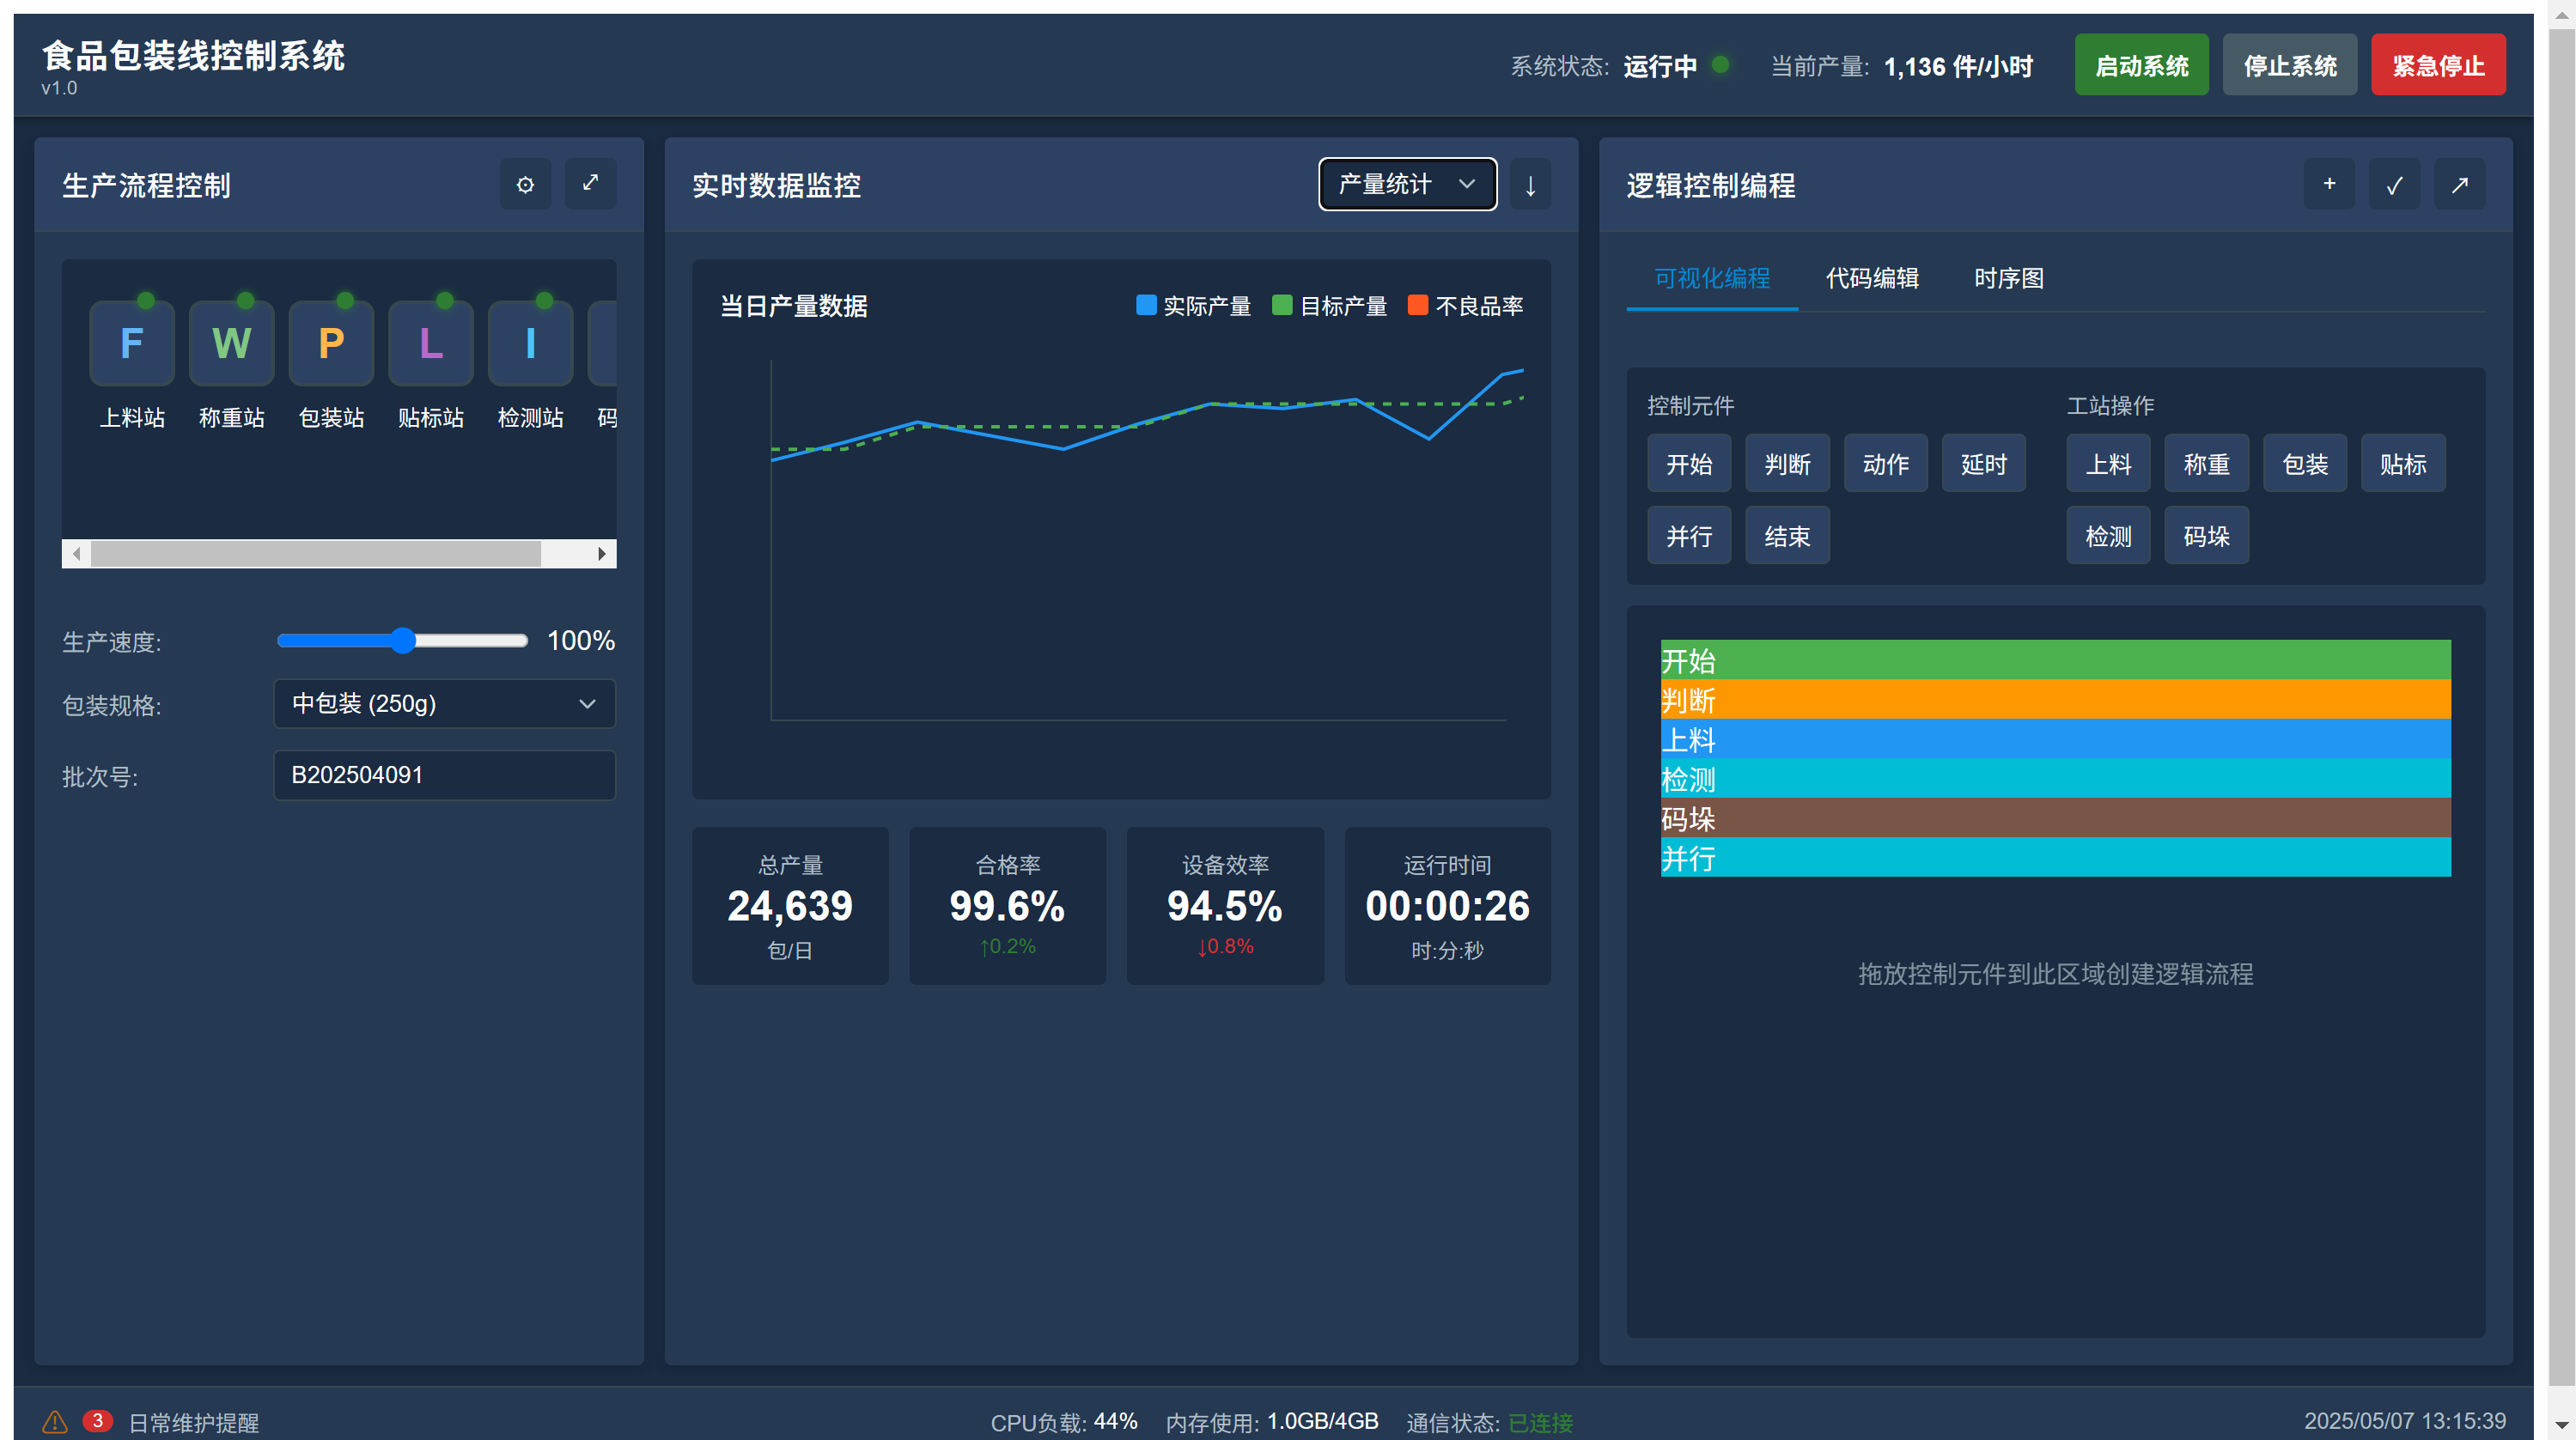
3、食品包装控制系统 - /自动化与控制组件/food-packaging-control
76个工业组件库示例汇总 食品包装线控制系统 这是一个用于食品包装线控制系统的自定义组件,提供了食品包装生产线的可视化监控与控制界面。组件采用工业风格设计,包含生产流程控制、实时数据监控和逻辑编程三个主要功能区域。 功能特点 工业风格UI设…...
初始图形学(7)
上一章完成了相机类的实现,对之前所学的内容进行了封装与整理,现在要学习新的内容。 抗锯齿 我们放大之前渲染的图片,往往会发现我们渲染的图像边缘有尖锐的"阶梯"性质。这种阶梯状被称为"锯齿"。当真实的相机拍照时&a…...
)
Linux NVIDIA 显卡驱动安装指南(适用于 RHEL/CentOS)
📌 一、禁用 Nouveau 开源驱动 NVIDIA 闭源驱动与开源的 nouveau 驱动冲突,需先禁用: if [ ! -f /etc/modprobe.d/blacklist-nouveau.conf ]; thenecho -e "blacklist nouveau\noptions nouveau modeset0" | sudo tee /etc/modpr…...
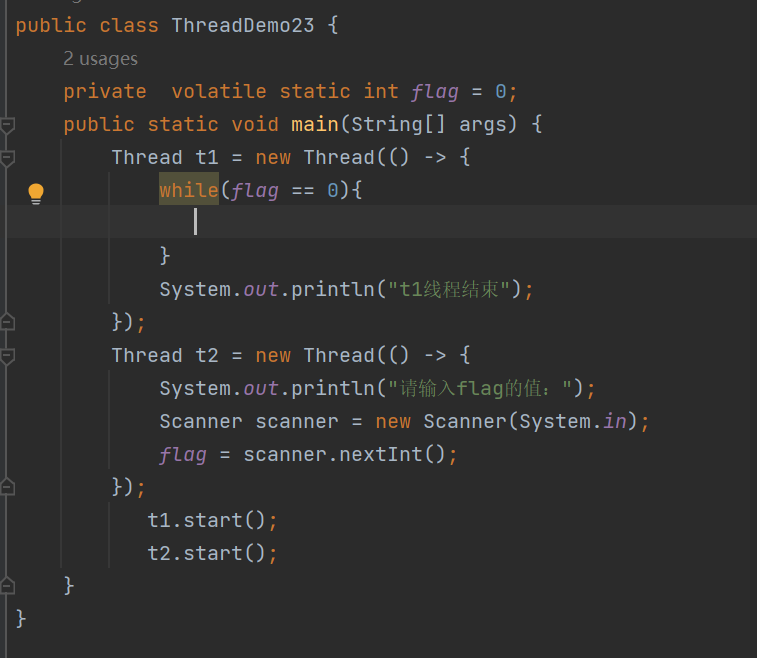
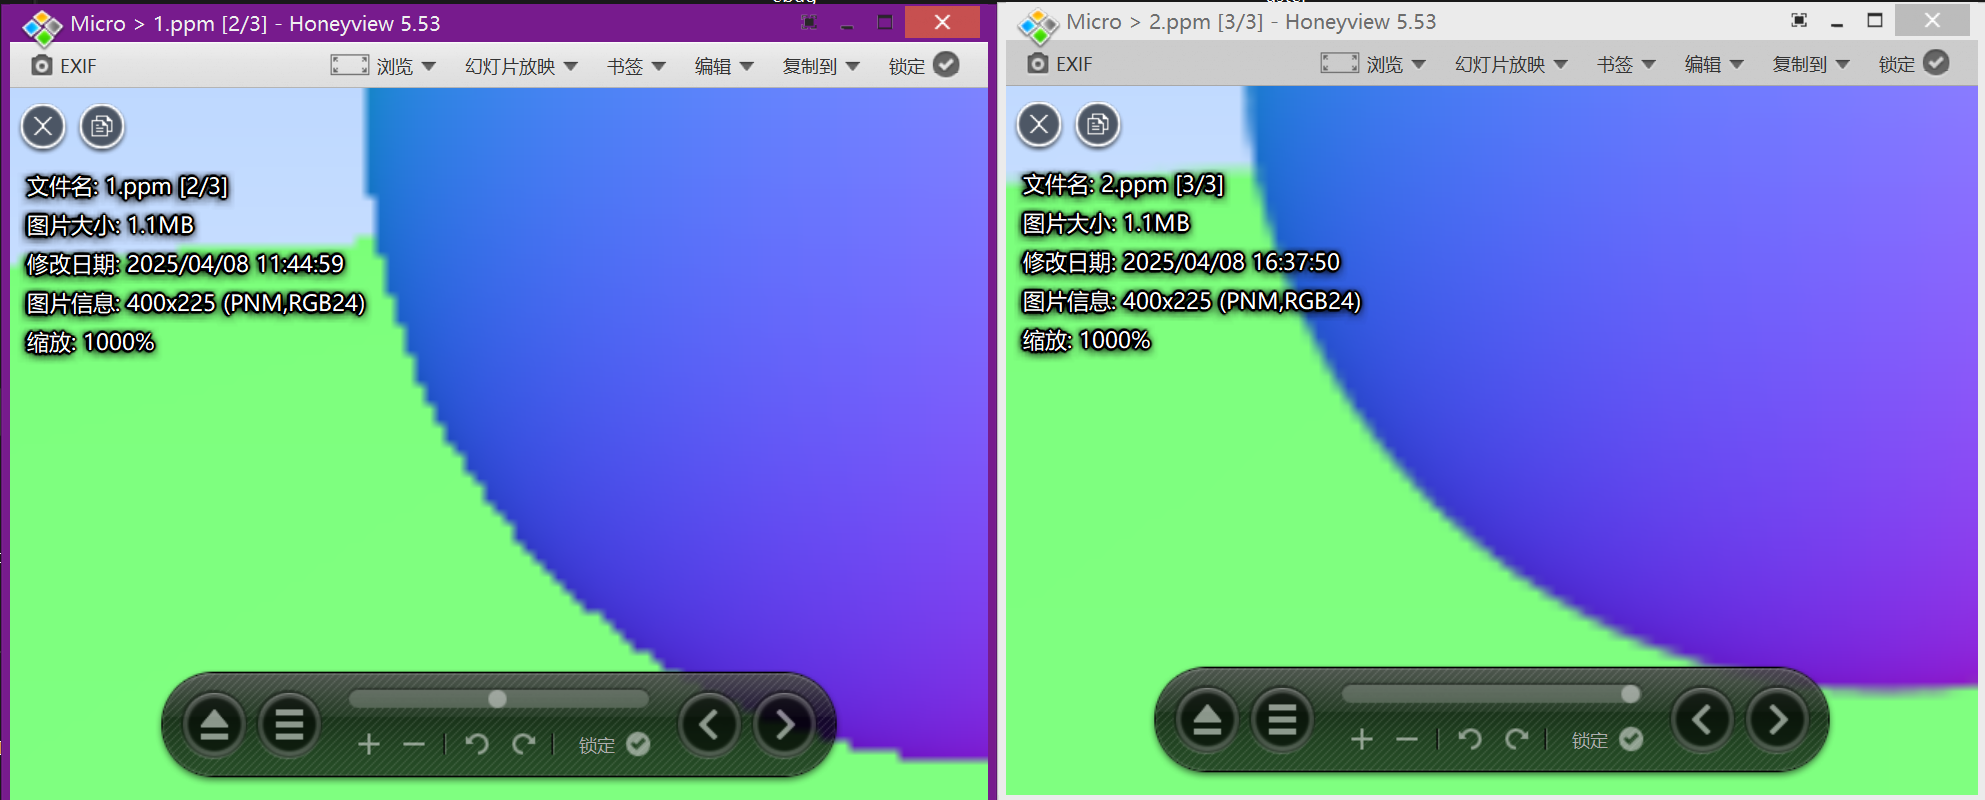
线程的一些事(2)
在java中,线程的终止,是一种“软性”操作,必须要对应的线程配合,才能把终止落实下去 然而,系统原生的api其实还提供了,强制终止线程的操作,无论线程执行到哪,都能强行把这个线程干掉…...

数据可视化:艺术与科学的交汇点,如何让数据“开口说话”?
数据可视化:艺术与科学的交汇点,如何让数据“开口说话”? 数据可视化,是科技与艺术的结合,是让冰冷的数字变得生动有趣的桥梁。它既是科学——讲究准确性、逻辑性、数据处理的严谨性;又是艺术——强调美感…...
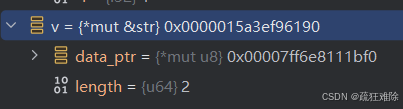
使用lldb看看Rust的HashMap
目录 前言 正文 读取桶的状态 获取键值对 键值对的指针地址 此时,读取数据 读取索引4的键值对 多添加几个键值对 使用i32作为键,&str作为值 使用i32作为键,String作为值 前言 前面使用ldb看了看不同的类型,这篇再使用…...
——版本体系)
Oracle版本、补丁及升级(12)——版本体系
12.1. 版本体系 Oracle作为最流行的一款关系数据库软件产品,其拥有自己一套成熟的版本管理体系。具体版本体系以12c为分界线,前后版本体系分别不同。 12.1.1. 12c之前版本 12c之前的Oracle,版本共有5位阿拉伯数字组成,其中的每位数字,都有各自的含义,具…...

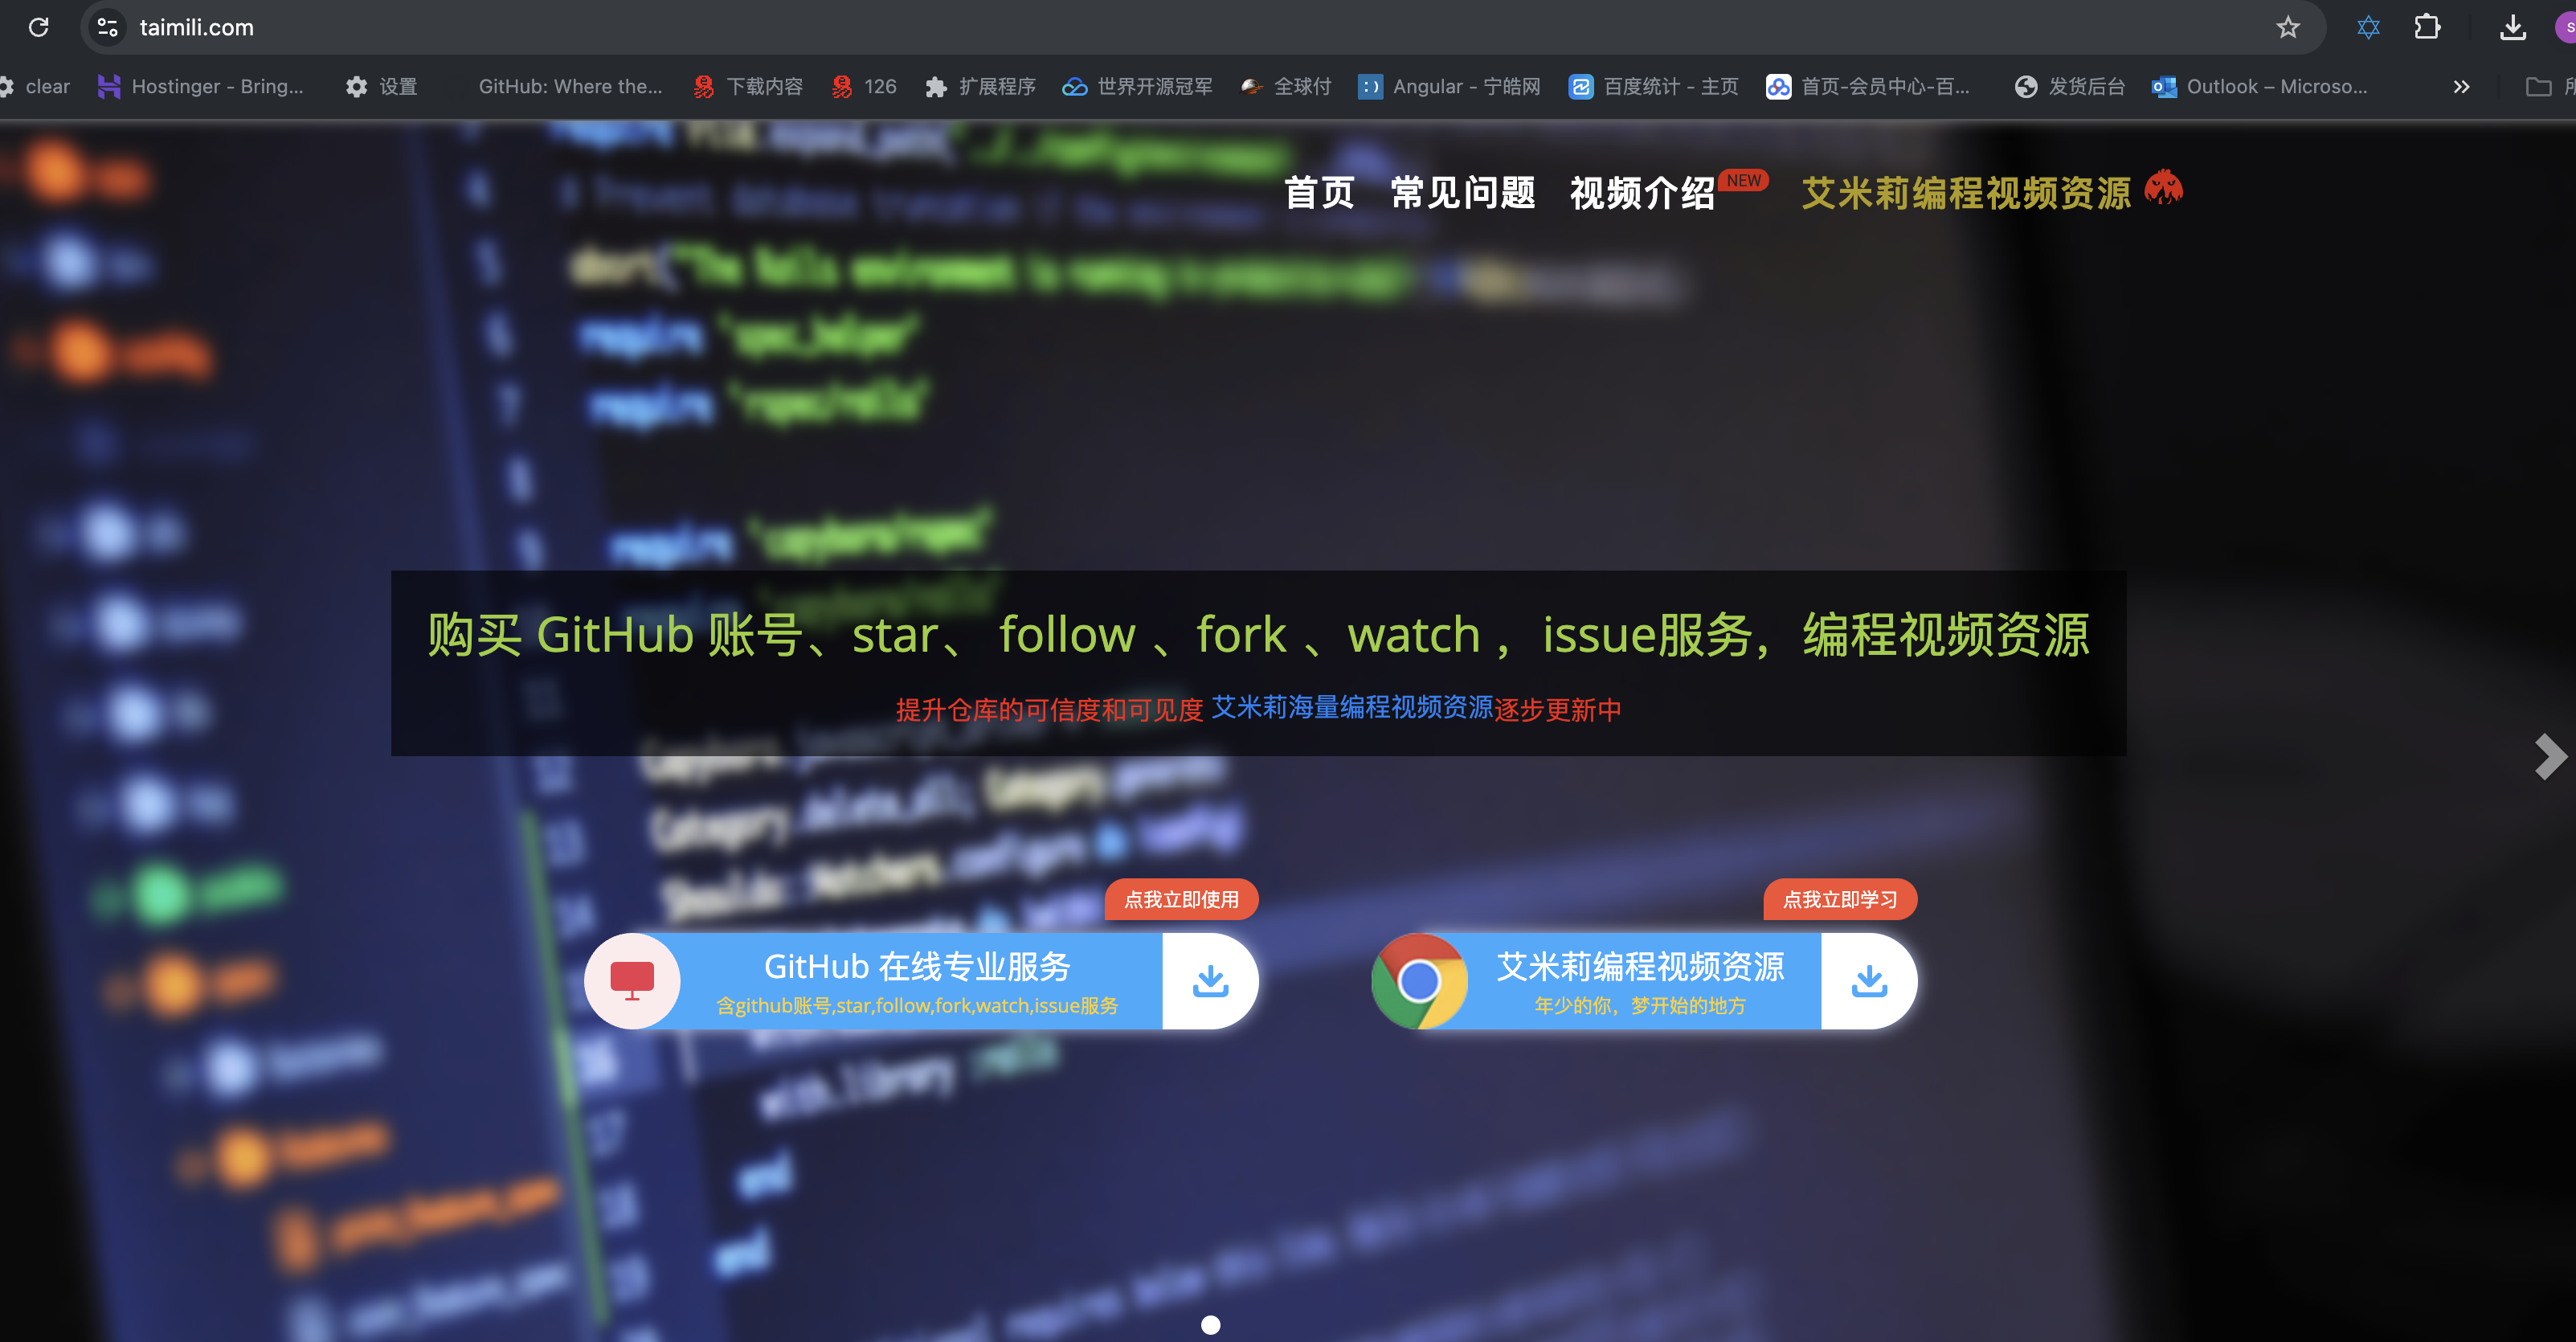
2025最新免费视频号下载工具!支持Win/Mac,一键解析原画质+封面
软件介绍 适用于Windows 2025 最新5月蝴蝶视频号下载工具,免费使用,无广告且免费,支持对原视频和封面进行解析下载,亲测可用,现在很多工具都失效了,难得的几款下载视频号工具,大家且用且珍…...

在 Ubuntu 中配置 Samba 实现「特定用户可写,其他用户只读」的共享目录
需求目标 所有认证用户可访问 Samba 共享目录 /path/to/home;**仅特定用户(如 developer)**拥有写权限;其他用户仅允许读取;禁止匿名访问。 配置步骤 1. 设置文件系统权限 将目录 /home3/guest 的所有权设为 develo…...
Newton GPU 机器人仿真器入门教程(零)— NVIDIA、DeepMind、Disney 联合推出
系列文章目录 目录 系列文章目录 前言 一、快速入门 1.1 实时渲染 1.2 USD 渲染 1.3 示例:创建一个粒子链 二、重要概念 三、API 参考 3.1 求解器 3.1.1 XPBD 求解器 3.1.2 VBD 求解器 3.1.3 MuJoCo 求解器 3.2 关节控制模式 四、Newton 集成 4.1 Is…...

《零基础学机器学习》学习大纲
《零基础学机器学习》学习大纲 《零基础学机器学习》采用对话体的形式,通过人物对话和故事讲解机器学习知识,使内容生动有趣、通俗易懂,降低了学习门槛,豆瓣高分9.1分,作者权威。 接下来的数篇文章,我将用…...

CSS 基础知识分享:从入门到注意事项
什么是CSS? CSS是用于描述HTML或XML文档呈现方式的语言。它控制网页的布局、颜色、字体等视觉表现,让内容与表现分离。 通俗的说,html是骨头,那么css就是他的画皮。 基本语法 CSS规则由两部分组成:选择器和声明块。…...

深入浅出理解JavaScript原型与原型链
先让我们结合生活案例理解原型原型链相关概念,想象一下一个大家庭,有很多成员。 1. 原型 (Prototype) - 家族的共同特征或技能模板 概念对应: 家族中代代相传的共同特征、习惯、或者家族里独有的某个手艺或知识。例子: 假设你们家族的成员普遍都有高个子、善于烹饪一道祖传菜…...

重操旧业,做起了OnlineTool.cc在线工具站
最近闲来无事,做了个在线工具站。 工具不多,起码有:当前IP查询,QRCode二维码生成,图片压缩,JSON格式化,简体繁体转换,等。 使用Astro框架React,Caddy,目前是…...

vue 中的数据代理
在 Vue 中,数据代理(Data Proxy) 是 Vue 实现 MVVM 模式 的关键技术之一。Vue 使用数据代理让你可以通过 this.message 访问 data.message,而不需要写 this.data.message —— 这大大简化了模板和逻辑代码。 我们来深入理解它的本…...

ubuntu安装Go SDK
# 下载最新版 Go 安装包(以 1.21.5 为例) wget https://golang.google.cn/dl/go1.21.5.linux-amd64.tar.gz # 解压到系统目录(需要 root 权限) sudo tar -C /usr/local -xzf go1.21.5.linux-amd64.tar.gz # 使用 Go 官方安装脚本…...
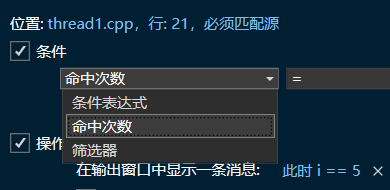
【C++】学习、项目时Debug总结
这里写目录标题 1. 内存问题1.1. 内存泄漏1.1.1. 内存泄漏案例检查方法1.1.2. 主线程提前退出导致【控】1.1.3. PostThreadMessage失败导致的内存泄漏**【控】**1.1.4. SendMessage 时关闭客户端【控】1.1.5. 线程机制导致【**控】**1.1.6. exit(0)导致【…...