Electron 桌面程序读取dll动态库
序幕:被GFW狙击的第一次构建
当我在工位上输入npm install electron时,控制台跳出的红色警报如同数字柏林墙上的一道弹痕:
Error: connect ETIMEDOUT 104.20.22.46:443网络问题不用愁,请移步我的另外文章进行配置:
electron 客户端 windows linux(麒麟V10)多系统离线打包 最新版 <一>_electron linux 离线打包-CSDN博客
第一章:构建electron-builder
builder排除文件夹,简单配置如下(package.json中):
"build": {"appId": "com.example.win7app","win": {"target": "nsis","defaultArch": "ia32"},"extraFiles": [{"from": "resources","to": "Resources","filter": ["**/*"]}],"nsis": {"oneClick": false,"allowToChangeInstallationDirectory": true}},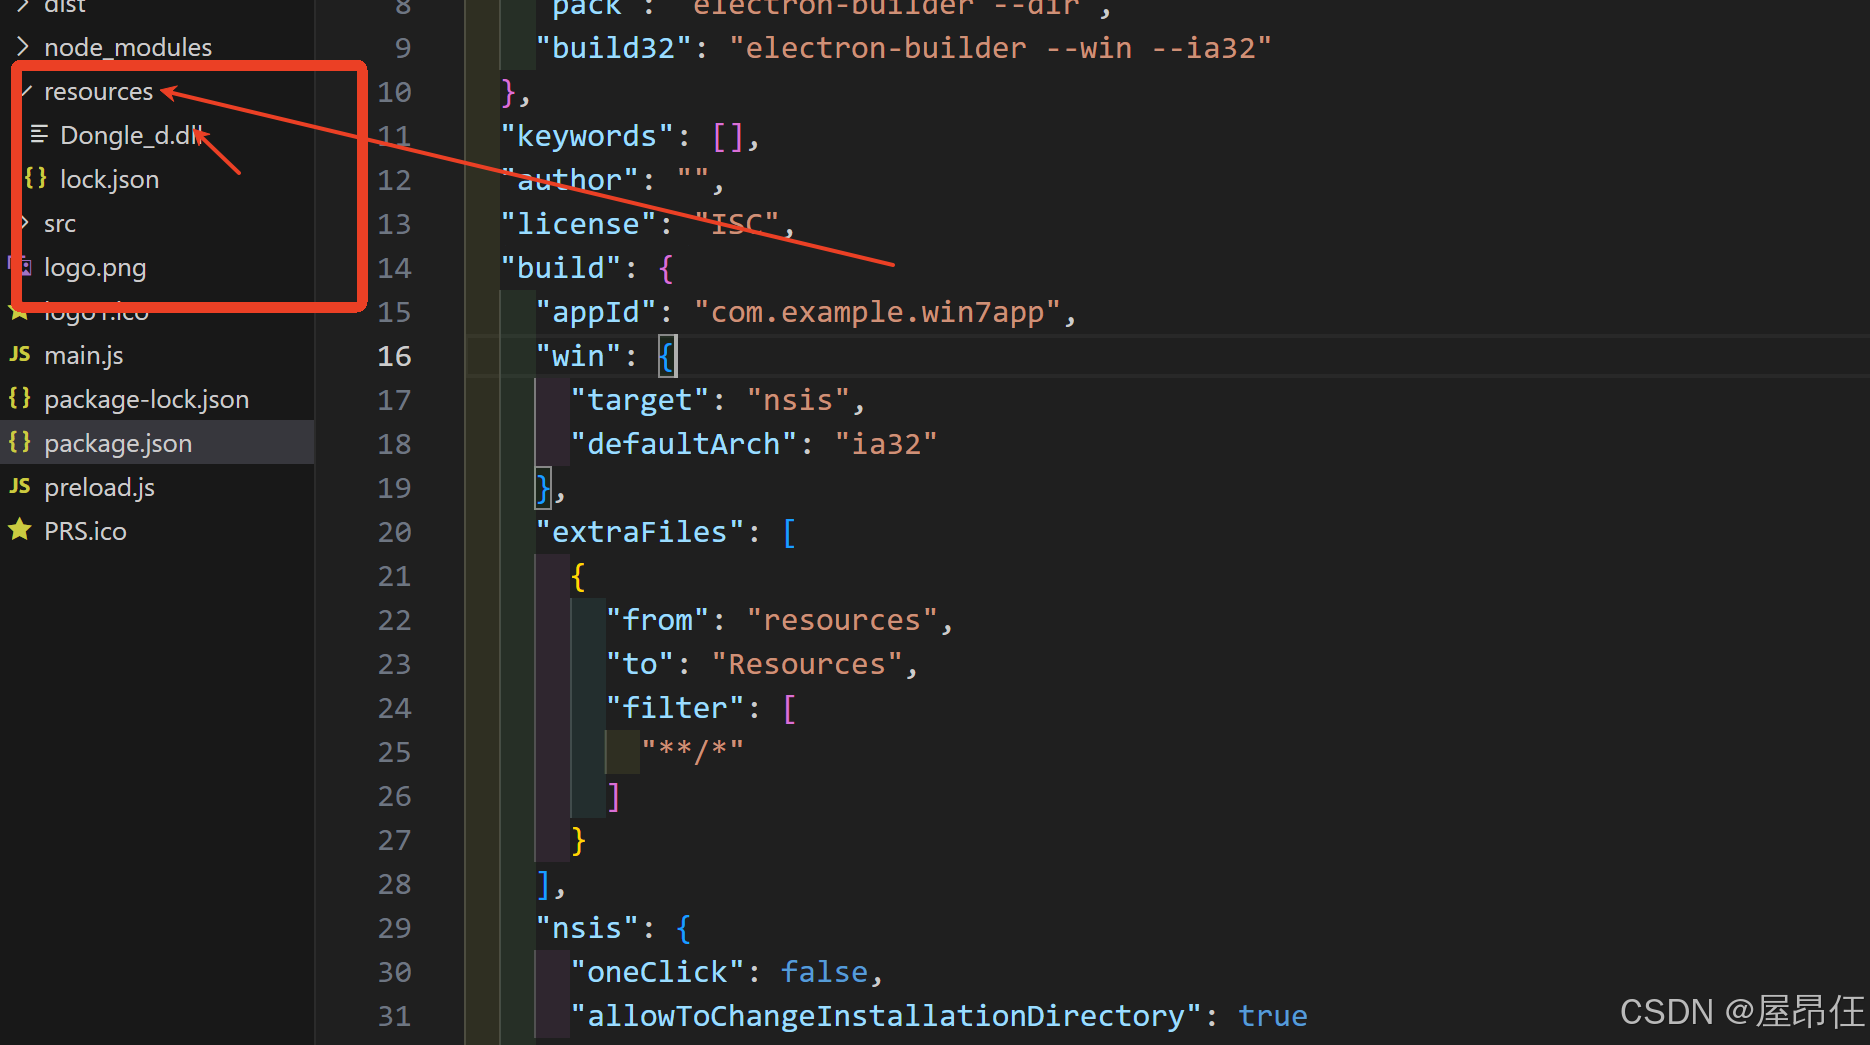
我们需要在这个文件夹中读取dll文件,同时希望它打包后在安装目录下。
第二章:跨维度通信协议——主进程与渲染进程的量子纠缠
根目录添加preload.js,添加如下代码:
// preload.js
const { contextBridge, ipcRenderer } = require('electron');// 向渲染进程暴露安全的 API 方法
contextBridge.exposeInMainWorld('electronAPI',{// 示例:调用 Node.js 文件系统 APIreadFile: async (path) => {const fs = await import('fs/promises');return fs.readFile(path, 'utf-8');},// 示例:进程间通信(IPC)openDialog: () => ipcRenderer.invoke('dialog:open'),// 检查是否存在加密狗并且是否匹配成功checkIfLock: () => ipcRenderer.invoke('checkIfLock'),captureUKey: () => ipcRenderer.invoke('captureUKey'),// 关闭窗口closeWindow: () => ipcRenderer.invoke('closeWindow'),// 监听打开设置onAction: (callback) => {ipcRenderer.on('renderer-action', (event, arg) => callback(arg))},}
)
然后再mainjs(electron主进程)中配置文件:
let mainWindow, tray = null;
function createWindow() {mainWindow = new BrowserWindow({width: 800,height: 600,webPreferences: {preload: path.join(__dirname, 'preload.js'), // 指定预加载脚本contextIsolation: true, // 开启上下文隔离(安全必备)nodeIntegration: false  // 禁用直接 Node.js 访问}})// 隐藏菜单mainWindow.setMenu(null);// 加载本地页面(开发时可替换为本地服务地址,如 http://localhost:3000)mainWindow.loadFile(path.join(__dirname, 'src', 'index.html'));// 窗口关闭事件处理mainWindow.on('close', (event) => {if (!app.isQuiting) {event.preventDefault()const choice = dialog.showMessageBoxSync(mainWindow, {type: 'question',buttons: ['直接退出', '最小化到托盘'],title: '确认',message: '您要如何操作?',defaultId: 1})if (choice === 0) {app.isQuiting = trueapp.quit()} else {mainWindow.hide()}}})
}
最后在html中使用上述方法(html中使用):
<script>//【IPC通信】检测开关(true false)
const checkIfLock = window.electronAPI.checkIfLock;
const checkArm = window.electronAPI.captureUKey;
const closeWindow = window.electronAPI.closeWindow;
// 打开设置
window.electronAPI.onAction(({ type, data }) => {switch(type) {case 'openSettings':showSetting()break;}
})// 显示设置
function showSetting () {try {var remortroot = localStorage.dpm_root;var remortport = localStorage.dpm_port;if (remortroot != null) {$("#remortroot").val(remortroot);}if (remortport != null) {$("#remortport").val(remortport);}$('#myModal').modal('show');} catch (err) {$('#myModal').modal('show');}
}// ===========================================
var timeout;
var lockState = false;
$(function () {checkIfLock().then(res => {lockState = res;})//初始化设置var remortroot = localStorage.dpm_root;//服务器IP地址var remortport = localStorage.dpm_port;//端口号if (remortroot == null || remortroot == "" || remortroot == "undefined"|| remortroot == null || remortroot == "" || remortroot == "undefined") {var err = "首次登录,请填写网络配置";showConfirmMsg(err, function (r) {if (r) {$('#myModal').modal('show');}});} else {loadLoginPage(remortroot, remortport);}
});function isPort(str) {var parten = /^(\d)+$/g;if (parten.test(str) && parseInt(str) <= 65535 && parseInt(str) >= 0) {return true;} else {return false;}
}
function isIP(strIP) {var re = /^(\d+)\.(\d+)\.(\d+)\.(\d+)$/gif (re.test(strIP)) {if (RegExp.$1 < 256 && RegExp.$2 < 256 && RegExp.$3 < 256 && RegExp.$4 < 256) return true;}return false;
}
function sendUrlPort(remortroot, remortport) {var err = "";if (isIP(remortroot)) {} else {err += "服务器地址无效,";}if (isPort(remortport)) {} else {err += "端口号无效,";}if (err != "" && err.length > 0) {err = err.substring(0, err.length - 1);showConfirmMsg(err, function (r) {if (r) {$('#myModal').modal('show');}});} else {layer.msg('正在加载登录页面,请稍候。。。', {icon: 16,shade: 0.01,time: 5000000,shadeClose: false});var dpmHid = $("#eam_hid").text();var ifUd = "";if (false == lockState) {//false代表 u盾登录 需要验证uidifUd = "xxx"}var url = "https://" + remortroot + ":" + remortport$.ajax({url: url,type: 'GET',timeout: 100000,datatype: "json",complete: function (response, textStatus) {//启动u盾检测timeout = setInterval("testUd()", 3000);layer.closeAll();if (response.status == 200) {localStorage.dpm_root = remortroot;localStorage.dpm_port = remortport;$('#github-iframe').attr('src', url);} else if (textStatus == 'timeout') {showConfirmMsg('未能成功连接系统(超时),请检查网络配置或联系管理员!', function (r) {if (r) {$('#myModal').modal('show');}});} else {showConfirmMsg('未能成功连接系统,请检查网络配置或联系管理员!', function (r) {if (r) {$('#myModal').modal('show');}});}}});}
}//启动时:加载登录页,并判断u端是否存在
function loadLoginPage(remortroot, remortport) {checkArm().then(res => {if (true == lockState) {if (false == res.flag) {$("#eam_hid").text("");}sendUrlPort(remortroot, remortport);} else {if (true == res.flag) {$("#eam_hid").text(res.randomNum);sendUrlPort(remortroot, remortport);} else {showLongErrorMsg("未插入U盾");}}})}
//启动后 监测u盾是否插入,未插入则退出系统
function testUd() {checkArm().then(res => {if (true == lockState) {if (false == res) {$("#eam_hid").text("");}} else {if (false == res) {clearInterval(timeout);showLongErrorMsg("未插入U盾");}}})
}
function showConfirmMsg(msg, callBack) {art.dialog({id: 'confirmId',title: '系统提示',content: msg,icon: 'warning',background: '#000000',opacity: 0.1,lock: true,button: [{name: '确定',callback: function () {callBack(true);},focus: true}]});
}
//错误提示
function showErrorMsg(msg) {top.art.dialog({id: 'errorId',title: '系统提示',content: msg,icon: 'error',time: 5,background: '#000',opacity: 0.1,lock: true,okVal: '关闭',ok: true});
}
function showLongErrorMsg(msg) {top.art.dialog({id: 'errorId',title: '5秒后自动关闭客户端...',content: msg,icon: 'error',time: 5,background: '#000',opacity: 0.1,lock: true,cancelVal: '关闭',cancel: function () {closeWindow();},close: function () {closeWindow();}});
}//弹出框事件
$("#initsetbtn").click(function () {var remortroot = $("#remortroot").val();var remortport = $("#remortport").val();$('#myModal').modal('hide');loadLoginPage(remortroot, remortport);
});</script>
第三章:调用dll
调用dll推荐使用koffi。另一篇文章也有说明:
Electron驯龙记:在Win7的废墟上唤醒32位DLL古老巨龙-CSDN博客
示例代码:
// 在mainjs中// 是否捕获U盾
ipcMain.handle('captureUKey', () => {return new Promise((resolve, reject) => {let promiseAry = [];var count = 0;while (count++ < 20) { //连续20次都失败 才认为失败promiseAry.push(checkOnceUKey());}Promise.all(promiseAry).then((results) => {console.log('所有检查结果:', results);if (Array.isArray(results) && results.length > 0) {resolve({flag: results.filter(item => item.flag == false).length == 0 ? true: false,randomNum: results[results.length - 1].randomNum || ''})} else {resolve({flag: false,randomNum: ''})}}) }).catch(error => {console.error('是否捕获U盾出错:', error);return false; // 读取失败})
})
// 单次检查U盾
function checkOnceUKey() {return new Promise((resolve, reject) => {let flag = false;let randomNum = ''; // 随机数// 常量定义const DONGLE_SUCCESS = 0;const koffi = require('koffi');// 加载 DLLconst dllPath = path.join(getDataPath(), 'Dongle_d.dll');const dongleLib = koffi.load(dllPath);// 定义结构体字段偏移量(单位:字节)const InfoStructOffsets = {m_Ver: 0,m_Type: 2,m_BirthDay: 4,m_Agent: 12,m_PID: 16,m_UserID: 20,m_HID: 24,m_IsMother: 32,m_DevType: 36};const InfoStructSize = 40;const Dongle_Enum = dongleLib.func('int Dongle_Enum(void*, int*)');const Dongle_Open = dongleLib.func('int Dongle_Open(int*, int)');const Dongle_ResetState = dongleLib.func('int Dongle_ResetState(int)');const Dongle_GenRandom = dongleLib.func('int Dongle_GenRandom(int, int, void*)');const Dongle_Close = dongleLib.func('int Dongle_Close(int)');// 初始化缓冲区const dongleInfo = Buffer.alloc(1024); // 假设最多 25 个设备(1024 / 40 ≈ 25)const countBuffer = Buffer.alloc(4);countBuffer.writeInt32LE(0, 0);// 1️⃣ 枚举设备let result = Dongle_Enum(dongleInfo, countBuffer);console.log(`** Dongle_Enum **: 0x${result.toString(16).padStart(8, '0')}`);if (result !== DONGLE_SUCCESS) {console.error(`** Enum errcode **: 0x${result.toString(16).padStart(8, '0')}`);flag = false;}const deviceCount = countBuffer.readInt32LE(0);console.log(`** Find Device **:  ${deviceCount}`);if (deviceCount === 0) {console.log('** No Device **');flag = false;}// 3️⃣ 打开设备const handleBuffer = Buffer.alloc(4);result = Dongle_Open(handleBuffer, 0);const handle = handleBuffer.readInt32LE(0);console.log(`** Dongle_Open **: 0x${result.toString(16).padStart(8, '0')}`);if (result !== DONGLE_SUCCESS) {console.error(`** Open Failed **`);flag = false;} else {console.log(`** Open Success **: [handle=0x${handle.toString(16).padStart(8, '0')}]`);randomNum = `0x${handle.toString(16).padStart(8, '0')}`;Dongle_Close(handle);flag = true;}// 4️⃣ 重置 COS 状态/*result = Dongle_ResetState(handle);console.log(`Dongle_ResetState 返回值: 0x${result.toString(16).padStart(8, '0')}`);if (result !== DONGLE_SUCCESS) {console.error(`重置 COS 状态失败`);Dongle_Close(handle);return;}console.log('重置 COS 状态成功');*/// 5️⃣ 生成随机数// const randomLen = 16;// const randomBuffer = Buffer.alloc(randomLen);// result = Dongle_GenRandom(handle, randomLen, randomBuffer);// console.log(`Dongle_GenRandom : 0x${result.toString(16).padStart(8, '0')}`);// if (result !== DONGLE_SUCCESS) {//   console.error(`生成随机数失败`);//   Dongle_Close(handle);// } else {//   randomNum = randomBuffer.toJSON().data.map(b => PrefixZero(b, 2)).join(' ').toUpperCase();//   Dongle_Close(handle);// }//console.log(`随机数据: ${randomBuffer.toJSON().data.map(b => PrefixZero(b, 2)).join(' ').toUpperCase()}`);/*// 6️⃣ 关闭设备result = Dongle_Close(handle);console.log(`Dongle_Close 返回值: 0x${result.toString(16).padStart(8, '0')}`);if (result !== DONGLE_SUCCESS) {console.error(`关闭设备失败`);return;}console.log('成功关闭设备');*/resolve({flag,randomNum})}).catch(err => {console.error('单次读取U盾失败:', err);return false; // 读取失败})
}
后记:与时间赛跑的混乱代码之旅
回首这次Electron的改造征程,更像是一场与编译警告共舞的午夜狂奔。由于项目周期紧张,某些技术方案难免带着「先跑起来再优化」的仓促痕迹——就像在暴雨中搭建帐篷,难免会有几处漏水的接缝。
过程中那些临时添加的Webpack补丁、为绕过环境问题硬编码的路径、甚至为了紧急交付保留的TODO注释,都如同代码迷宫中未清理的记号。虽然最终功能得以实现,但我深知这座代码大厦的某些承重墙上,或许还留着需要加固的裂缝。
在此特别恳请各位同行:若您在阅读中发现任何逻辑漏洞、安全隐患或架构缺陷,请务必通过Issue或邮件指正。您的一条建议,或许就能避免某个深夜的生产环境告警。技术之路本就如履薄冰,唯有开放交流才能让我们的每一步走得更稳。
~ end
相关文章:
Electron 桌面程序读取dll动态库
序幕:被GFW狙击的第一次构建 当我在工位上输入npm install electron时,控制台跳出的红色警报如同数字柏林墙上的一道弹痕: Error: connect ETIMEDOUT 104.20.22.46:443 网络问题不用愁,请移步我的另外文章进行配置:…...

实时技术对比:SSE vs WebSocket vs Long Polling
早期网站仅展示静态内容,而如今我们更期望:实时更新、即时聊天、通知推送和动态仪表盘。 那么要如何实现实时的用户体验呢?三大经典技术各显神通: • SSE(Server-Sent Events):轻量级单向数据…...

js 手写promise
const PENDING pending; const FULFILLED fulfilled; const REJECTED rejected;class MyPromise {#status PENDING;#result undefined;#handler undefined;constructor(executor) {// 不能写在外面,因为this指向会出问题const resolve (data) > {this.#ch…...

HTTP 与 HTTPS 深度解析:原理、实践与大型项目应用
1. HTTP 与 HTTPS 基础概念 1.1 HTTP(超文本传输协议) 定义:应用层协议,基于 TCP/IP 通信,默认端口 80 特点: 无状态协议(需 Cookie/Session 维护状态) 明文传输(易被…...

QT6.9中opencv引用路径的其中一种设置
RC_ICONSappimage.ico unix|win32: LIBS -L$$PWD/opencv455/vc15/lib/ -lopencv_world455 INCLUDEPATH $$PWD/opencv455/include DEPENDPATH $$PWD/opencv455/include RC_ICONS为指定图标文件,只写图标名appimage.ico,那么一般和pro文件在同一目录…...

k8s pod启动失败问题排查
1. 查看日志 kubectl describe pod xxx -n xxx kubectl logs podname -n xxx --tail200 2. 镜像 到pod所在主机检查pod所需的镜像是否能成功拉取(docker images) 3.硬件资源 检查pod所在服务器的磁盘空间是否被占满(df -h 和 du -sh /&a…...

Java类中各部分内容的加载执行顺序
目录 1. 静态初始化(类加载阶段) 示例代码 输出 2. 实例初始化(对象创建阶段) 详细顺序 示例代码 输出 3. 关键规则总结 4. 注意事项 5. 完整流程图 在Java中,类的实例化过程(对象创建࿰…...

git提交信息错误,如何修改远程git提交的备注信息
有时候我们在git提交时没有按照规范提交。此时就需要修改远程git提交的备注信息。 一、修改最近几次提交 首先确保当前分支没有未提交的更改 git status使用交互式rebase修改历史记录(假设要修改最近3次提交) git rebase -i HEAD~3在打开的编辑器中&…...
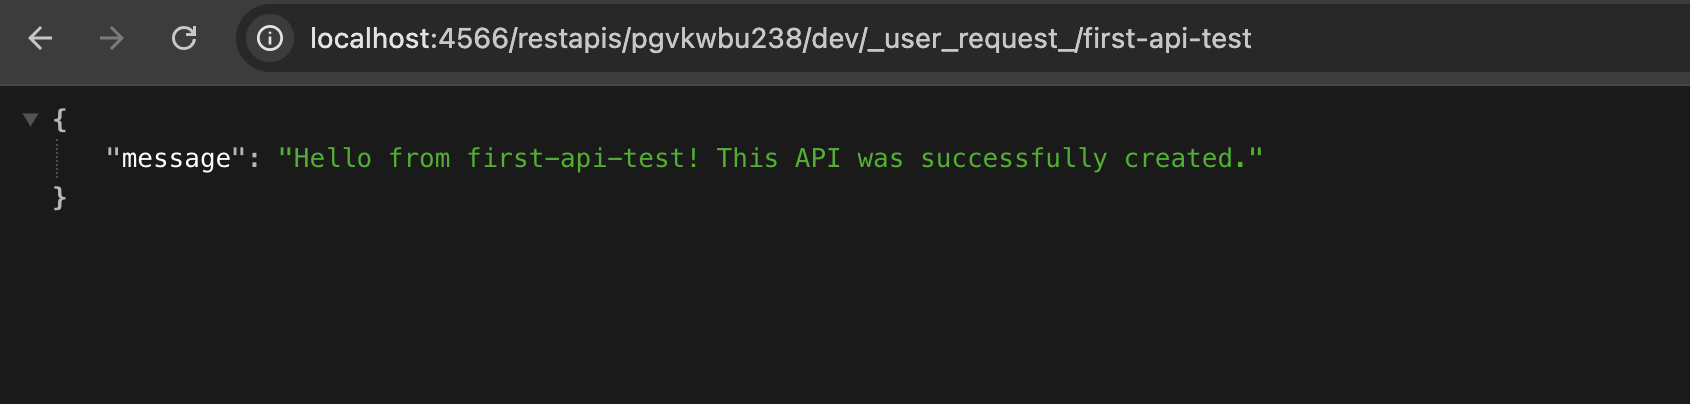
API Gateway CLI 实操入门笔记(基于 LocalStack)
API Gateway CLI 实操入门笔记(基于 LocalStack) Categories: Cloud Google Rank Proof: No Last edited time: May 26, 2025 4:18 AM Status: Early draft Tags: aws 主要先简单的走一下流程,熟悉一下在 terminal 操作 API Gateway local…...
算法)
基于MATLAB实现SFA(Slow Feature Analysis,慢特征分析)算法
基于MATLAB实现SFA(Slow Feature Analysis,慢特征分析)算法的代码示例: % SFA慢特征分析 % 需要signal处理工具箱% 生成示例信号 t linspace(0,1,1000); x sin(2*pi*10*t) sin(2*pi*20*t) randn(size(t));% 定义滤波器 b fi…...

数据分析案例-基于红米和华为手机的用户评论分析
🤵♂️ 个人主页:艾派森的个人主页 ✍🏻作者简介:Python学习者 🐋 希望大家多多支持,我们一起进步!😄 如果文章对你有帮助的话, 欢迎评论 💬点赞Ǵ…...

leetcode617.合并二叉树:递归思想下的树结构融合艺术
一、题目深度解析与核心规则 题目描述 合并两棵二叉树是一个经典的树结构操作问题,题目要求我们将两棵二叉树合并成一棵新二叉树。合并规则如下: 若两棵树的对应节点都存在,则将两个节点的值相加作为新节点的值若其中一棵树的节点存在&…...
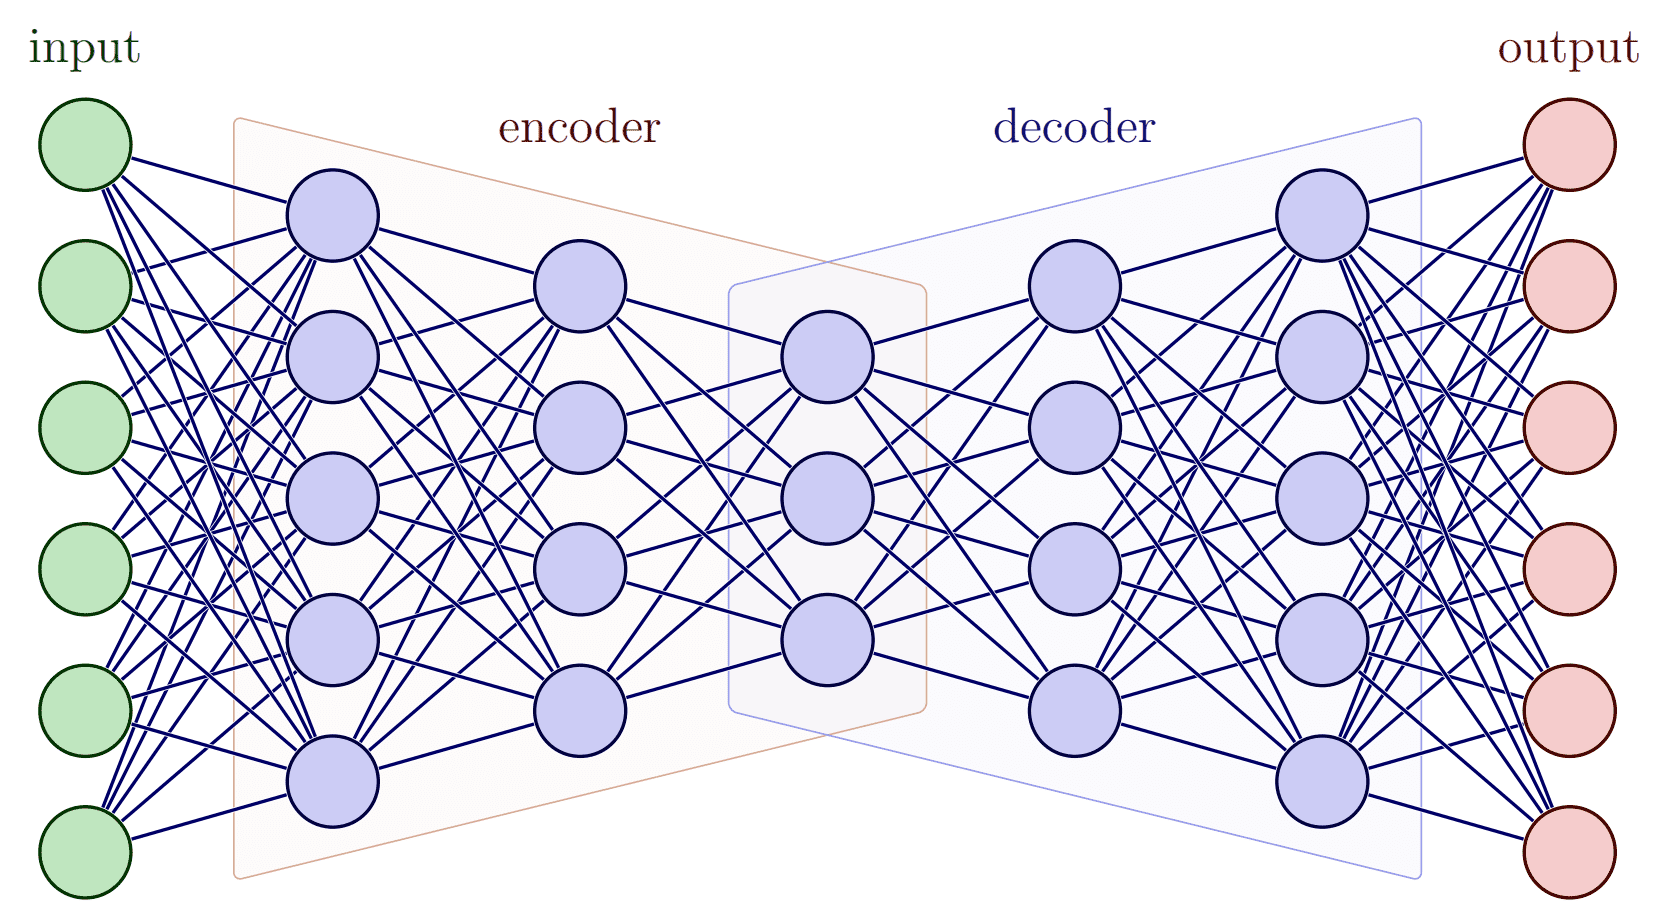
深度学习入门:从零搭建你的第一个神经网络
深度学习入门:从零搭建你的第一个神经网络 系统化学习人工智能网站(收藏):https://www.captainbed.cn/flu 文章目录 深度学习入门:从零搭建你的第一个神经网络摘要引言第一章:神经网络基础原理1.1 神经元…...

【HTML-13】HTML表格合并技术详解:打造专业数据展示
表格是HTML中展示结构化数据的重要元素,而表格合并则是提升表格表现力的关键技术。本文将全面介绍HTML中的表格合并方法,帮助您创建更专业、更灵活的数据展示界面。 1. 表格合并基础概念 在HTML中,表格合并主要通过两个属性实现:…...

鸿蒙OSUniApp 制作自定义的进度条组件#三方框架 #Uniapp
使用 UniApp 制作自定义的进度条组件 在移动应用开发中,进度条是非常常见的 UI 组件,无论是文件上传、下载、任务进度还是表单填写反馈,进度条都能为用户提供直观的进度提示。虽然 UniApp 提供了一些基础的进度条能力,但在实际项…...
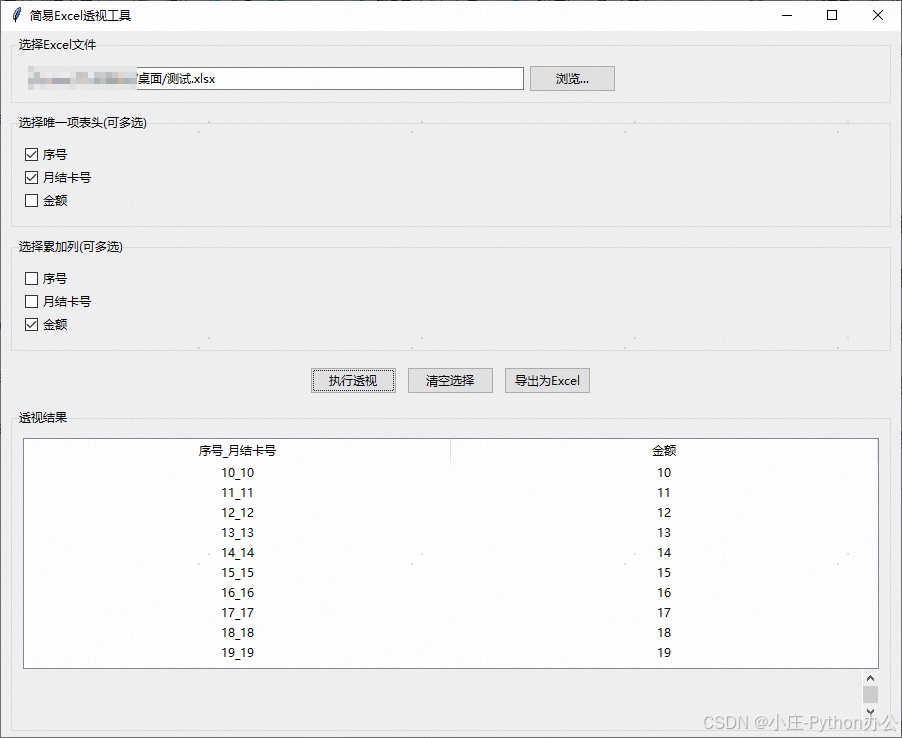
【Python办公】Excel简易透视办公小工具
目录 专栏导读1. 背景介绍2. 功能介绍3. 库的安装4. 界面展示5. 使用方法6. 实际应用场景7. 优化方向完整代码总结专栏导读 🌸 欢迎来到Python办公自动化专栏—Python处理办公问题,解放您的双手 🏳️🌈 博客主页:请点击——> 一晌小贪欢的博客主页求关注 👍 该系…...

m1 运行renrenfastvue出现的问题和解决方案
1. chromedriver 报错解决:执行 npm install --ignore-scripts。 2. node-sass 报错 "Node Sass does not yet support your current environment: OS X Unsupported ...": - 降低 Node 版本至 14。 - 安装版本控制工具:sudo npm insta…...
)
开源模型应用落地-qwen模型小试-Qwen3-8B-推理加速-vLLM-Docker(二)
一、前言 在AI模型部署效率竞争日益激烈的当下,如何将前沿大模型与高效推理框架结合,成为开发者关注的焦点。Qwen3-8B作为阿里云推出的混合推理模型,凭借80亿参数规模与128K超长上下文支持,展现了“快思考”与“慢思考”的协同能力,而vLLM框架则通过优化内存管理与并行计算…...

【C/C++】记录一次麻烦的Kafka+Json体验
文章目录 麻烦的KafkaJson体验1 目标2 工程搭建2.1 docker配置2.2 代码2.3 工程压缩包 3 执行结果 麻烦的KafkaJson体验 1 目标 初心:结合kafka json docker,验证基本的数据生产/消费。 Kafka 配合 JSON 工具,主要是为了数据的序列化和反…...
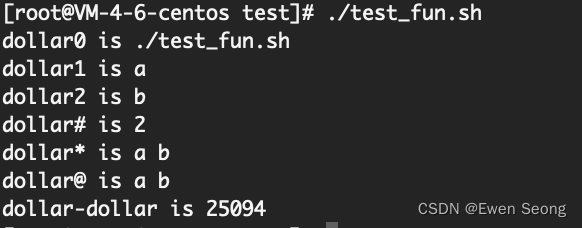
Linux系列-2 Shell常用命令收集
背景 本文用于收集Linux常用命令(基于Centos7),是一个持续更新的博客,建议收藏,编写shell时遇到问题可以随时查阅。 1.Shell类型 shell是用C语言编写的程序,作为命令解释器连接着用户和操作系统内核。常见的shell有sh(Bourne She…...

MATLAB使用多个扇形颜色变化表示空间一个点的多种数值
MATLAB使用多个扇形颜色变化表示空间一个点的多种数值 excel中表格中数据格式,多行 lonlatdata1data2data3117380.11100 clear;close all; figure(Position,[100 100 800 800]);num_points 14; [num,txt,raw] xlsread(test.xlsx); x num(:,1); y num(:,2);d…...

mysql:MVCC机制
MVCC机制 MVCC机制主要是mysql的多版本并发控制的一个机制,它主要是允许mysql去保存同一时间对同一份数据的不同历史版本的,从而避免读写之间的锁竞争,从而去提高并发的性能。 像传统的锁机制(读写互斥锁(Read-Write …...

Vue3 + Element Plus 实现树形结构的“单选 + 只选叶子节点 + 默认选中第一个子节点”
在 Vue 项目中,我们常使用树形结构组件来展示层级数据。本文将介绍如何使用 Element Plus 的 <el-tree> 组件,在 Vue3 中实现以下需求: ✅ 只能勾选叶子节点 ✅ 每次只能选中一个节点(单选) ✅ 页面加载时默认…...
CAD精简多段线顶点、优化、删除多余、重复顶点——CAD c#二次开发
附部分代码如下: public static void Pl精简(){Document doc Autodesk.AutoCAD.ApplicationServices.Application.DocumentManager.MdiActiveDocument;Database db doc.Database;Editor ed doc.Editor;var plOrigon db.SelectCurve("\n选择多段线:");…...
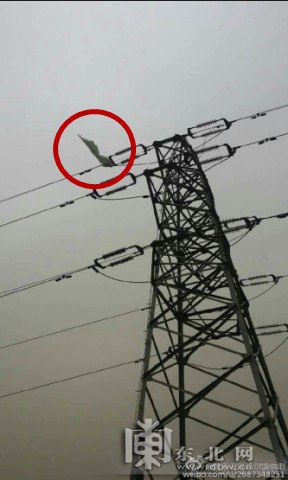
输电线路的“智慧之眼”:全天候可视化监测如何赋能电网安全运维
在电力需求持续攀升、电网规模日益庞大的今天,输电线路的安全稳定运行面临着前所未有的挑战。线路跨越地形复杂多变,尤其是在偏远山区、铁路沿线及恶劣天气条件下,传统的人工巡检方式显得力不从心——效率低、风险高、覆盖有限。如何实现更智…...

Spring 核心知识点补充
Spring 核心知识点补充 1. IoC(控制反转) 核心思想:将对象的创建和依赖管理交给容器,而非在代码中直接控制实现方式: XML 配置:<bean> 标签定义对象注解:Component, Service, Repositor…...
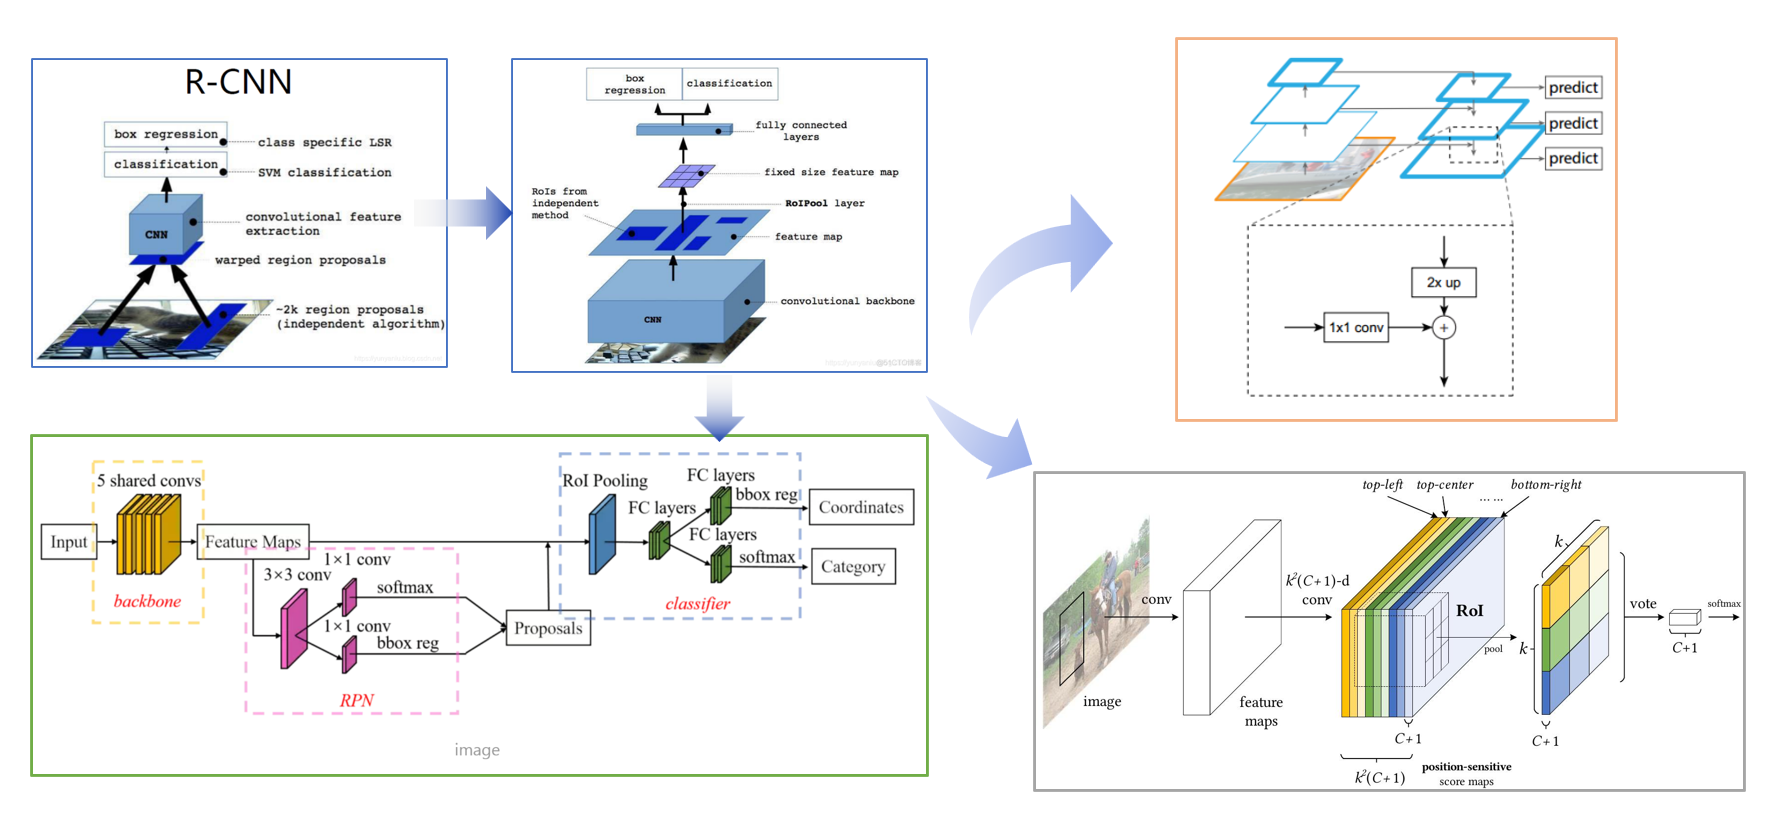
两阶段法目标检测发展脉络
模式识别期末展示大作业,做个记录,希望大家喜欢。 R-CNN Fast R-CNN R-FCN 整个过程可以分解为以下几个步骤: 输入图像 (image) 和初步特征提取 (conv, feature maps): 首先,输入一张原始图像,经过一系列…...

Flannel 支持的后端
Flannel 是一个为 Kubernetes 设计的容器网络解决方案,支持多种后端(backend)来处理节点间的数据包转发。根据官方文档和其他可靠来源,以下是 Flannel 支持的后端类型及其说明: VXLAN(推荐) 描述…...

小白的进阶之路系列之六----人工智能从初步到精通pytorch数据集与数据加载器
本文将介绍以下内容: 数据集与数据加载器 数据迁移 如何建立神经网络 数据集与数据加载器 处理数据样本的代码可能会变得混乱且难以维护;理想情况下,我们希望我们的数据集代码与模型训练代码解耦,以获得更好的可读性和模块化。PyTorch提供了两个数据原语:torch.utils…...

SQL进阶之旅 Day 5: 常用函数与表达式
【SQL进阶之旅 Day 5】常用函数与表达式 在SQL的进阶学习中,掌握常用函数和表达式是提升查询效率、解决复杂业务问题的关键。本篇文章将深入探讨聚合函数、日期函数、条件表达式等核心内容,并结合实际案例分析其应用价值。通过理论讲解、代码示例和性能…...