基于React + TypeScript构建高度可定制的QR码生成器
前言
在现代Web应用中,QR码已成为连接线上线下的重要桥梁。本文将详细介绍如何使用React + TypeScript + Vite构建一个功能强大、高度可定制的QR码生成器,支持背景图片、文本叠加、HTML模块、圆角导出等高级功能。
前往试试
项目概述
技术栈
- 前端框架: React 19 + TypeScript
- 构建工具: Vite 6
- 样式框架: TailwindCSS 4
- QR码生成: qr-code-styling
- 图像处理: html2canvas
- 状态管理: React Hooks
核心功能
- 🎨 丰富的QR码样式定制(点样式、颜色、渐变)
- 🖼️ 背景图片支持(多种适配模式)
- 📝 文本叠加(字体、颜色、位置可调)
- 🧩 HTML模块嵌入
- 🔄 实时预览
- 📤 高质量导出(PNG/JPEG/WebP)
- 🔄 圆角导出支持
- ⚙️ 配置参数导入导出
项目架构设计
目录结构
qr-vite-app-react/
├── src/
│   ├── components/          # React组件
│   │   ├── PreviewCanvas.tsx    # 预览画布
│   │   ├── settings/            # 设置面板
│   │   └── test/               # 测试组件
│   ├── hooks/              # 自定义Hooks
│   │   └── useQRGenerator.ts   # QR生成器Hook
│   ├── lib/                # 核心库
│   │   ├── qr-generator-core.ts # QR生成器核心
│   │   └── package.json        # 独立包配置
│   ├── types/              # TypeScript类型定义
│   └── utils/              # 工具函数
├── package.json
└── vite.config.ts
核心架构
1. 配置接口设计
interface QRGeneratorConfig {// 基础配置text: string;width: number;height: number;qrPosition: { x: number; y: number };qrSize: { width: number; height: number };// QR码样式qrOptions: {typeNumber: number;mode: 'Numeric' | 'Alphanumeric' | 'Byte' | 'Kanji';errorCorrectionLevel: 'L' | 'M' | 'Q' | 'H';};// 点样式配置dotsOptions: {color: string;type: 'rounded' | 'dots' | 'classy' | 'square';gradient?: GradientConfig;};// 背景图片backgrounds?: BackgroundImage[];// 文本叠加texts?: TextLayer[];// HTML模块htmlModules?: HtmlModule[];// 导出配置exportOptions: {format: 'png' | 'jpeg' | 'webp';quality: number;borderRadius: number;};
}
2. 核心生成器类
export class QRGenerator {private config: QRGeneratorConfig;private container: HTMLDivElement | null = null;private qrCode: any | null = null;private isRendered = false;constructor(config: Partial<QRGeneratorConfig>) {this.config = this.mergeWithDefaults(config);}// 动态创建画布private createCanvas(): HTMLDivElement {const canvas = document.createElement('div');canvas.style.cssText = `position: relative;width: ${this.config.width}px;height: ${this.config.height}px;background: ${this.config.backgroundOptions.color};overflow: hidden;`;return canvas;}// 添加背景图片private async addBackgrounds(canvas: HTMLDivElement): Promise<void> {if (!this.config.backgrounds?.length) return;const loadPromises = this.config.backgrounds.map(bg => this.loadBackgroundImage(canvas, bg));await Promise.all(loadPromises);}// 添加QR码private async addQRCode(canvas: HTMLDivElement): Promise<void> {const QRCodeStyling = await this.loadQRCodeStyling();const qrContainer = document.createElement('div');qrContainer.style.cssText = `position: absolute;left: ${this.config.qrPosition.x}px;top: ${this.config.qrPosition.y}px;width: ${this.config.qrSize.width}px;height: ${this.config.qrSize.height}px;z-index: 100;`;this.qrCode = new QRCodeStyling({width: this.config.qrSize.width,height: this.config.qrSize.height,data: this.config.text,qrOptions: this.config.qrOptions,dotsOptions: this.config.dotsOptions,// ... 其他配置});this.qrCode.append(qrContainer);canvas.appendChild(qrContainer);}// 渲染完整画布async render(): Promise<HTMLDivElement> {this.container = this.createCanvas();// 添加到DOM(隐藏位置)this.container.style.position = 'absolute';this.container.style.left = '-9999px';document.body.appendChild(this.container);try {await this.addBackgrounds(this.container);await this.addQRCode(this.container);this.addTexts(this.container);this.addHtmlModules(this.container);this.isRendered = true;return this.container;} catch (error) {this.cleanup();throw error;}}// 导出为PNGasync exportAsPNG(options?: ExportOptions): Promise<Blob> {if (!this.isRendered) await this.render();const canvas = await html2canvas(this.container!, {scale: options?.scale || 2,useCORS: true,allowTaint: false,backgroundColor: null,});return new Promise((resolve, reject) => {canvas.toBlob(blob => {blob ? resolve(blob) : reject(new Error('导出失败'));}, 'image/png', options?.quality || 0.9);});}
}
关键技术实现
1. 动态模块加载
为了解决qr-code-styling的模块导入问题,采用动态加载策略:
const loadQRCodeStyling = async (): Promise<any> => {try {// 尝试 ES6 导入const module = await import('qr-code-styling');const QRCodeStyling = module.default || module.QRCodeStyling || module;if (typeof QRCodeStyling !== 'function') {throw new Error('QRCodeStyling is not a constructor');}return QRCodeStyling;} catch (error) {// 回退到 requireconst qrModule = require('qr-code-styling');return qrModule.default || qrModule.QRCodeStyling || qrModule;}
};
2. 背景图片处理
支持多种适配模式的背景图片:
private getObjectFitStyle(mode: string): string {const modeMap = {'fill': 'width: 100%; height: 100%;','contain': 'width: 100%; height: 100%; object-fit: contain;','cover': 'width: 100%; height: 100%; object-fit: cover;','stretch': 'width: 100%; height: 100%;'};return modeMap[mode] || modeMap['fill'];
}private async loadBackgroundImage(canvas: HTMLDivElement, bg: BackgroundImage): Promise<void> {return new Promise((resolve, reject) => {const img = document.createElement('img');img.onload = () => {img.style.cssText = `position: absolute;left: ${bg.position.x}px;top: ${bg.position.y}px;width: ${bg.size.width}px;height: ${bg.size.height}px;z-index: ${bg.zIndex};opacity: ${bg.opacity};${this.getObjectFitStyle(bg.mode)}`;canvas.appendChild(img);resolve();};img.onerror = () => reject(new Error(`背景图片加载失败: ${bg.src}`));img.src = bg.src;});
}
3. 圆角导出功能
实现圆角导出的核心算法:
private applyRoundedCorners(canvas: HTMLCanvasElement, borderRadius: number): HTMLCanvasElement {if (borderRadius <= 0) return canvas;const roundedCanvas = document.createElement('canvas');const ctx = roundedCanvas.getContext('2d')!;roundedCanvas.width = canvas.width;roundedCanvas.height = canvas.height;// 创建圆角路径ctx.beginPath();ctx.roundRect(0, 0, canvas.width, canvas.height, borderRadius);ctx.clip();// 绘制原始图像ctx.drawImage(canvas, 0, 0);return roundedCanvas;
}
4. React Hook集成
使用自定义Hook管理状态:
export const useQRGenerator = () => {const [qrConfig, setQrConfig] = useState<QRConfig>(defaultQRConfig);const [exportConfig, setExportConfig] = useState<ExportConfig>(defaultExportConfig);const [qrDataUrl, setQrDataUrl] = useState<string>('');const [isGenerating, setIsGenerating] = useState(false);const generateQRCode = useCallback(async () => {setIsGenerating(true);try {const qrCode = new QRCodeStyling({width: 300,height: 300,data: qrConfig.content,qrOptions: qrConfig.qrOptions,dotsOptions: qrConfig.dotsOptions,// ... 其他配置});const dataUrl = await qrCode.getRawData('png');setQrDataUrl(URL.createObjectURL(dataUrl!));} catch (error) {console.error('QR码生成失败:', error);} finally {setIsGenerating(false);}}, [qrConfig]);const exportImage = useCallback(async () => {const generator = new QRGenerator({text: qrConfig.content,width: exportConfig.width,height: exportConfig.height,// ... 其他配置});const blob = await generator.exportAsPNG({quality: exportConfig.quality,borderRadius: exportConfig.borderRadius,});// 下载文件const url = URL.createObjectURL(blob);const a = document.createElement('a');a.href = url;a.download = `qr-code-${Date.now()}.png`;a.click();URL.revokeObjectURL(url);}, [qrConfig, exportConfig]);return {qrConfig,setQrConfig,exportConfig,setExportConfig,qrDataUrl,isGenerating,generateQRCode,exportImage,};
};
组件设计
1. 预览画布组件
interface PreviewCanvasProps {qrConfig: QRConfig;exportConfig: ExportConfig;qrDataUrl: string;onExport: () => void;isExporting: boolean;
}export const PreviewCanvas: React.FC<PreviewCanvasProps> = ({qrConfig,exportConfig,qrDataUrl,onExport,isExporting
}) => {const [showConfigModal, setShowConfigModal] = useState(false);const [configString, setConfigString] = useState('');const generateConfigString = () => {const config = {qrConfig,exportConfig,timestamp: new Date().toISOString(),};return JSON.stringify(config, null, 2);};const handleExportConfig = () => {const configStr = generateConfigString();setConfigString(configStr);setShowConfigModal(true);};return (<div className="bg-white rounded-lg shadow-lg p-6">{/* 工具栏 */}<div className="flex justify-between items-center mb-4"><h2 className="text-xl font-semibold">预览</h2><div className="flex gap-2"><buttononClick={handleExportConfig}className="px-4 py-2 bg-blue-500 text-white rounded hover:bg-blue-600">获取配置</button><buttononClick={onExport}disabled={isExporting}className="px-4 py-2 bg-green-500 text-white rounded hover:bg-green-600 disabled:opacity-50">{isExporting ? '导出中...' : '导出图片'}</button></div></div>{/* 画布容器 */}<div className="border-2 border-dashed border-gray-300 rounded-lg p-4 min-h-[400px] flex items-center justify-center"><divclassName="relative bg-white shadow-lg"style={{width: `${exportConfig.width}px`,height: `${exportConfig.height}px`,borderRadius: `${exportConfig.borderRadius}px`,transform: 'scale(0.5)',transformOrigin: 'center',}}>{/* 背景层 */}{qrConfig.backgrounds.map((bg, index) => (<imgkey={index}src={bg.src}alt={`背景 ${index + 1}`}className="absolute"style={{left: `${bg.position.x}px`,top: `${bg.position.y}px`,width: `${bg.size.width}px`,height: `${bg.size.height}px`,zIndex: bg.zIndex,opacity: bg.opacity,objectFit: bg.mode === 'contain' ? 'contain' : 'cover',}}/>))}{/* QR码层 */}{qrDataUrl && (<imgsrc={qrDataUrl}alt="QR Code"className="absolute"style={{left: `${qrConfig.qrPosition.x}px`,top: `${qrConfig.qrPosition.y}px`,width: `${qrConfig.qrSize.width}px`,height: `${qrConfig.qrSize.height}px`,zIndex: 100,}}/>)}{/* 文本层 */}{qrConfig.texts.map((text, index) => (<divkey={index}className="absolute whitespace-pre-wrap"style={{left: `${text.position.x}px`,top: `${text.position.y}px`,fontSize: `${text.fontSize}px`,color: text.color,fontFamily: text.fontFamily,fontWeight: text.fontWeight,zIndex: text.zIndex,opacity: text.opacity,textAlign: text.textAlign || 'left',lineHeight: text.lineHeight || 1.2,}}>{text.content}</div>))}{/* HTML模块层 */}{qrConfig.htmlModules.map((module, index) => (<divkey={index}className="absolute overflow-hidden"style={{left: `${module.position.x}px`,top: `${module.position.y}px`,width: `${module.size.width}px`,height: `${module.size.height}px`,zIndex: module.zIndex,opacity: module.opacity,}}dangerouslySetInnerHTML={{ __html: module.content }}/>))}</div></div>{/* 画布信息 */}<div className="mt-4 text-sm text-gray-600"><div>画布尺寸: {exportConfig.width} × {exportConfig.height}px</div><div>圆角半径: {exportConfig.borderRadius}px</div><div>图层数量: {qrConfig.backgrounds.length + qrConfig.texts.length + qrConfig.htmlModules.length + 1}</div></div>{/* 配置模态框 */}{showConfigModal && (<ConfigModalconfigString={configString}onClose={() => setShowConfigModal(false)}/>)}</div>);
};
2. 设置面板组件
export const QRSettings: React.FC<QRSettingsProps> = ({qrConfig,onConfigChange
}) => {return (<div className="space-y-6">{/* 基础设置 */}<div className="bg-white rounded-lg p-4 shadow"><h3 className="text-lg font-semibold mb-4">基础设置</h3><div className="space-y-4"><div><label className="block text-sm font-medium mb-2">QR码内容</label><textareavalue={qrConfig.content}onChange={(e) => onConfigChange({ content: e.target.value })}className="w-full p-2 border rounded-md"rows={3}placeholder="输入要生成QR码的内容..."/></div><div className="grid grid-cols-2 gap-4"><div><label className="block text-sm font-medium mb-2">QR码大小</label><inputtype="range"min="100"max="500"value={qrConfig.qrSize.width}onChange={(e) => onConfigChange({qrSize: {width: parseInt(e.target.value),height: parseInt(e.target.value)}})}className="w-full"/><span className="text-sm text-gray-500">{qrConfig.qrSize.width}px</span></div><div><label className="block text-sm font-medium mb-2">容错级别</label><selectvalue={qrConfig.qrOptions.errorCorrectionLevel}onChange={(e) => onConfigChange({qrOptions: {...qrConfig.qrOptions,errorCorrectionLevel: e.target.value as 'L' | 'M' | 'Q' | 'H'}})}className="w-full p-2 border rounded-md"><option value="L">低 (7%)</option><option value="M">中 (15%)</option><option value="Q">高 (25%)</option><option value="H">最高 (30%)</option></select></div></div></div></div>{/* 样式设置 */}<div className="bg-white rounded-lg p-4 shadow"><h3 className="text-lg font-semibold mb-4">样式设置</h3><div className="space-y-4"><div><label className="block text-sm font-medium mb-2">点样式</label><selectvalue={qrConfig.dotsOptions.type}onChange={(e) => onConfigChange({dotsOptions: {...qrConfig.dotsOptions,type: e.target.value as any}})}className="w-full p-2 border rounded-md"><option value="square">方形</option><option value="rounded">圆角</option><option value="dots">圆点</option><option value="classy">经典</option><option value="extra-rounded">超圆角</option></select></div><div><label className="block text-sm font-medium mb-2">点颜色</label><inputtype="color"value={qrConfig.dotsOptions.color}onChange={(e) => onConfigChange({dotsOptions: {...qrConfig.dotsOptions,color: e.target.value}})}className="w-full h-10 border rounded-md"/></div><div><label className="block text-sm font-medium mb-2">背景颜色</label><inputtype="color"value={qrConfig.backgroundOptions.color}onChange={(e) => onConfigChange({backgroundOptions: {...qrConfig.backgroundOptions,color: e.target.value}})}className="w-full h-10 border rounded-md"/></div></div></div></div>);
};
构建与部署
1. 构建配置
// vite.config.ts
import { defineConfig } from 'vite'
import react from '@vitejs/plugin-react'
import path from 'path'export default defineConfig({plugins: [react()],resolve: {alias: {'@': path.resolve(__dirname, './src'),'@lib': path.resolve(__dirname, './src/lib')}},optimizeDeps: {include: ['html2canvas', 'qr-code-styling'],},build: {rollupOptions: {output: {manualChunks: {vendor: ['react', 'react-dom'],qr: ['qr-code-styling', 'html2canvas']}}}}
})
2. 独立库打包
// src/lib/rollup.config.js
import typescript from '@rollup/plugin-typescript';
import { nodeResolve } from '@rollup/plugin-node-resolve';
import commonjs from '@rollup/plugin-commonjs';export default {input: 'index.ts',output: [{file: 'dist/index.js',format: 'cjs',exports: 'named'},{file: 'dist/index.esm.js',format: 'esm'}],plugins: [nodeResolve({browser: true,preferBuiltins: false}),commonjs({include: ['node_modules/**'],transformMixedEsModules: true}),typescript({tsconfig: './tsconfig.json'})],external: ['qr-code-styling', 'html2canvas']
};
性能优化
1. 懒加载优化
// 组件懒加载
const QRSettings = lazy(() => import('./components/settings/QRSettings'));
const ExportSettings = lazy(() => import('./components/settings/ExportSettings'));// 在使用时
<Suspense fallback={<div>加载中...</div>}><QRSettings {...props} />
</Suspense>
2. 内存管理
export class QRGenerator {// 清理资源cleanup(): void {if (this.container && this.container.parentNode) {this.container.parentNode.removeChild(this.container);}this.container = null;this.qrCode = null;this.isRendered = false;}// 销毁实例destroy(): void {this.cleanup();// 清理事件监听器等}
}
3. 缓存策略
// 图片缓存
const imageCache = new Map<string, HTMLImageElement>();const loadImage = async (src: string): Promise<HTMLImageElement> => {if (imageCache.has(src)) {return imageCache.get(src)!;}return new Promise((resolve, reject) => {const img = new Image();img.onload = () => {imageCache.set(src, img);resolve(img);};img.onerror = reject;img.src = src;});
};
测试与调试
1. 单元测试
// QRGenerator.test.ts
import { QRGenerator } from '../lib/qr-generator-core';describe('QRGenerator', () => {let generator: QRGenerator;beforeEach(() => {generator = new QRGenerator({text: 'Test QR Code',width: 800,height: 600});});afterEach(() => {generator.destroy();});test('should create QR generator with default config', () => {expect(generator.getConfig().text).toBe('Test QR Code');expect(generator.getConfig().width).toBe(800);});test('should render canvas successfully', async () => {const canvas = await generator.render();expect(canvas).toBeInstanceOf(HTMLDivElement);expect(canvas.style.width).toBe('800px');});test('should export PNG blob', async () => {const blob = await generator.exportAsPNG();expect(blob).toBeInstanceOf(Blob);expect(blob.type).toBe('image/png');});
});
2. 集成测试组件
export const QRGeneratorTest: React.FC = () => {const [testResults, setTestResults] = useState<TestResult[]>([]);const [isRunning, setIsRunning] = useState(false);const runTests = async () => {setIsRunning(true);const results: TestResult[] = [];try {// 基础功能测试const basicTest = await testBasicGeneration();results.push(basicTest);// 导出功能测试const exportTest = await testExportFunctionality();results.push(exportTest);// 配置序列化测试const configTest = await testConfigSerialization();results.push(configTest);} catch (error) {results.push({name: '测试执行失败',success: false,error: error.message});} finally {setTestResults(results);setIsRunning(false);}};return (<div className="p-6"><h2 className="text-2xl font-bold mb-4">QR生成器测试</h2><buttononClick={runTests}disabled={isRunning}className="px-4 py-2 bg-blue-500 text-white rounded disabled:opacity-50">{isRunning ? '测试中...' : '运行测试'}</button><div className="mt-6 space-y-4">{testResults.map((result, index) => (<divkey={index}className={`p-4 rounded-lg ${result.success ? 'bg-green-100 text-green-800' : 'bg-red-100 text-red-800'}`}><div className="font-semibold">{result.name}</div>{result.error && <div className="text-sm mt-1">{result.error}</div>}{result.duration && <div className="text-sm mt-1">耗时: {result.duration}ms</div>}</div>))}</div></div>);
};
总结
本文详细介绍了如何构建一个功能完整的QR码生成器,涵盖了从架构设计到具体实现的各个方面。主要特点包括:
技术亮点
- 模块化设计: 核心库可独立发布使用
- TypeScript支持: 完整的类型定义和类型安全
- 高度可定制: 支持丰富的样式和布局选项
- 性能优化: 懒加载、缓存、内存管理
- 测试完善: 单元测试和集成测试
应用场景
- 营销活动二维码生成
- 产品包装二维码定制
- 活动海报二维码嵌入
- 品牌二维码标准化生成
扩展方向
- 支持更多导出格式(SVG、PDF)
- 添加批量生成功能
- 集成云存储服务
- 支持动态二维码
- 添加数据分析功能
如果这篇文章对你有帮助,请点赞收藏支持一下! 🚀
相关文章:

基于React + TypeScript构建高度可定制的QR码生成器
前言 在现代Web应用中,QR码已成为连接线上线下的重要桥梁。本文将详细介绍如何使用React TypeScript Vite构建一个功能强大、高度可定制的QR码生成器,支持背景图片、文本叠加、HTML模块、圆角导出等高级功能。 前往试试 项目概述 技术栈 前端框架:…...

DeepSeek进阶教程:实时数据分析与自动化决策系统
进阶教程:实时数据分析与自动化决策系统 1. 实时数据流处理架构 class StreamProcessor:def __init__(self):self.window_size = 60 # 滑动窗口大小(秒)self.analytics_engine = AnalyticsEngine() # 复用之前的分析引擎def process_kafka_stream(self, topic):"&quo…...

visual studio 2022 初学流程
本文采用总-分的形式讲述流程 1.前端外部可以使用的接口 ExternalDataWebService.asmx?opReportWaterForWayder 新建ExternalDataWebService.asmx 文件 <% WebService Language"C#" CodeBehind"~/App_Code/ExternalDataWebService.cs" Class…...
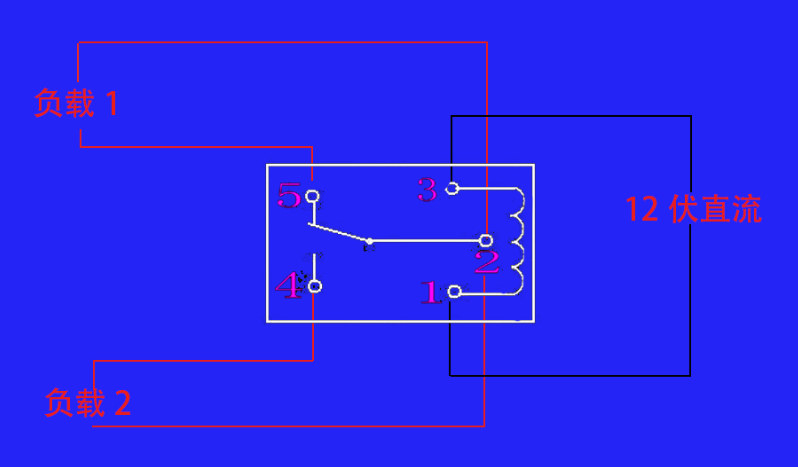
SRD-12VDC-SL-C 继电器接线图解
这个继电器可以使用12伏的直流电源控制250伏和125伏的交流电,也可以控制30伏和28伏的直流电,电流都为10安。 此继电器有5个引脚,各个的作用如下: 引脚4和引脚5为触点, 引脚1和引脚3为线圈引脚,接12伏的直…...

基于开源链动2+1模式AI智能名片S2B2C商城小程序的企业组织生态化重构研究
摘要:本文以互联网时代企业组织结构变革为背景,探讨开源链动21模式AI智能名片S2B2C商城小程序在推动企业从封闭式向开放式生态转型中的核心作用。通过分析传统企业资源获取模式与网络化组织生态的差异,结合开源链动21模式的裂变机制、AI智能名…...

前端面经 两栏布局
两栏布局 float实现 1.给父盒子加float:hidden实现BFC 2.给左盒子加浮动float:left 给宽度 flex布局 1父盒子 display:flex 2左盒子 固定宽度 3.右盒子 flex:1 三栏布局 法1:浮动实现 1 父盒子overflow:hidden 实现BFC 2左盒子:float:left 3右盒子 :floa…...
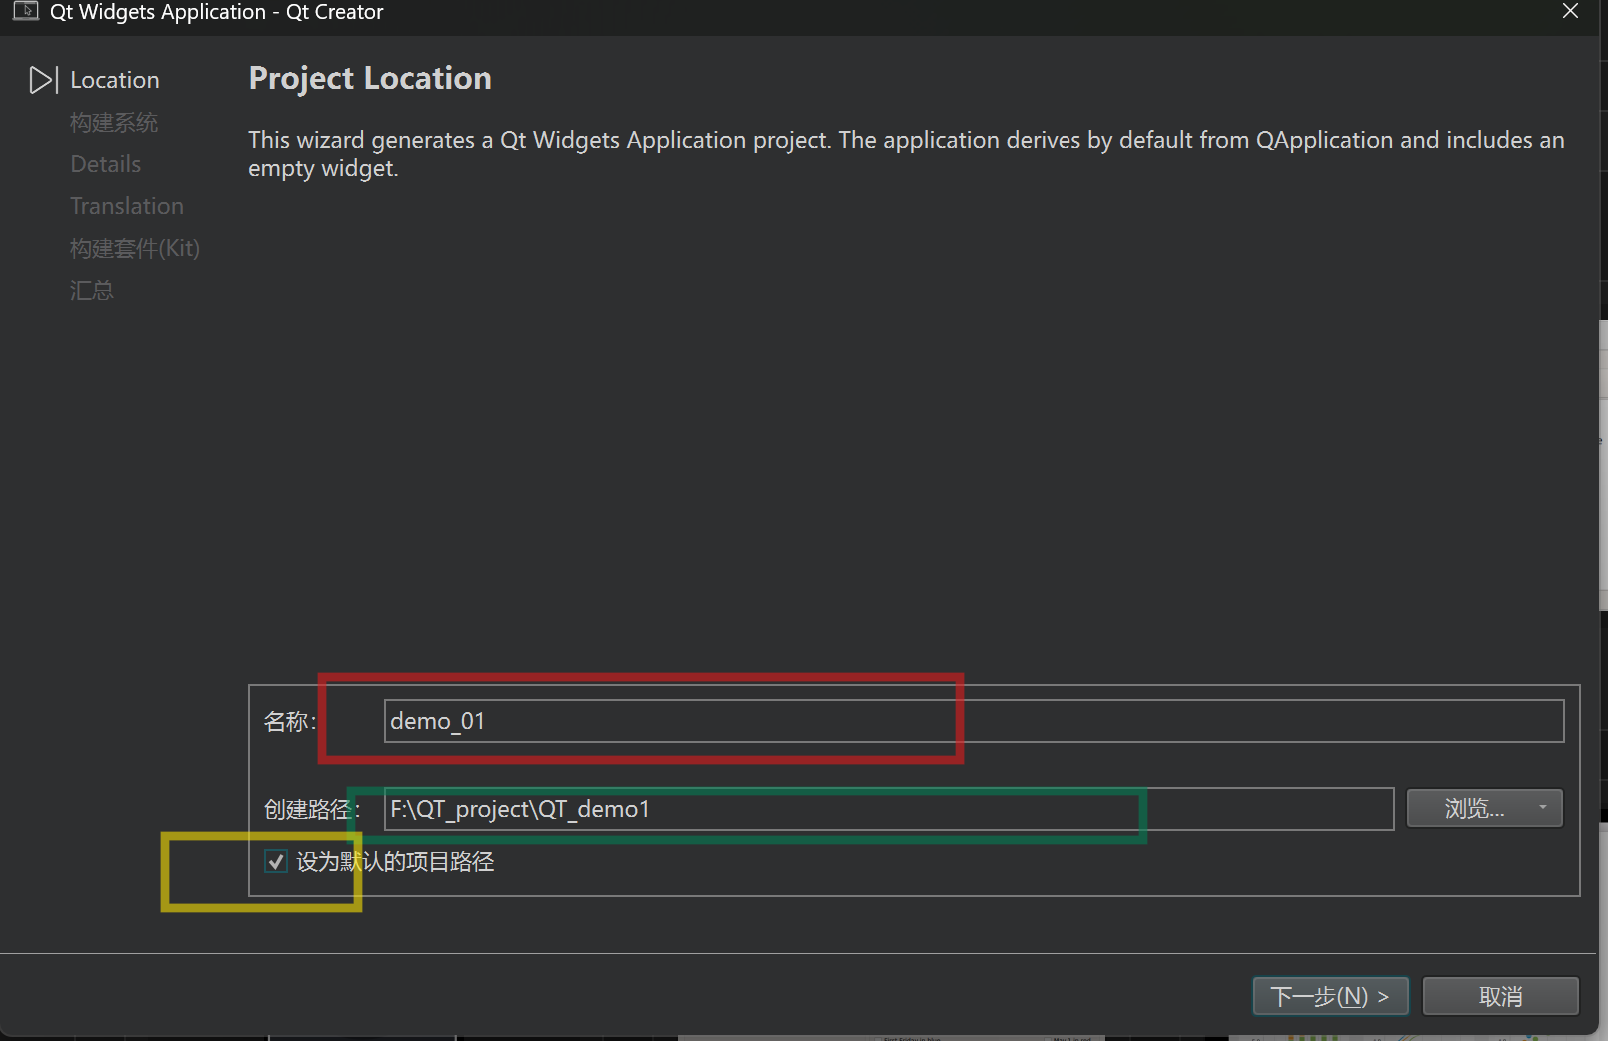
2,QT-Creator工具创建新项目教程
目录 1,创建一个新项目 demo_01.pro(项目配置文件) 类似 CMakeList.txt widget.h(头文件) main.cpp(程序入口) widget.cpp(源文件) widget.ui(界面设计文件) 1,创建一个新项目 依次选择: 设置路径: 选择编译器: 如果选择CMake, 就会生成cmakel…...
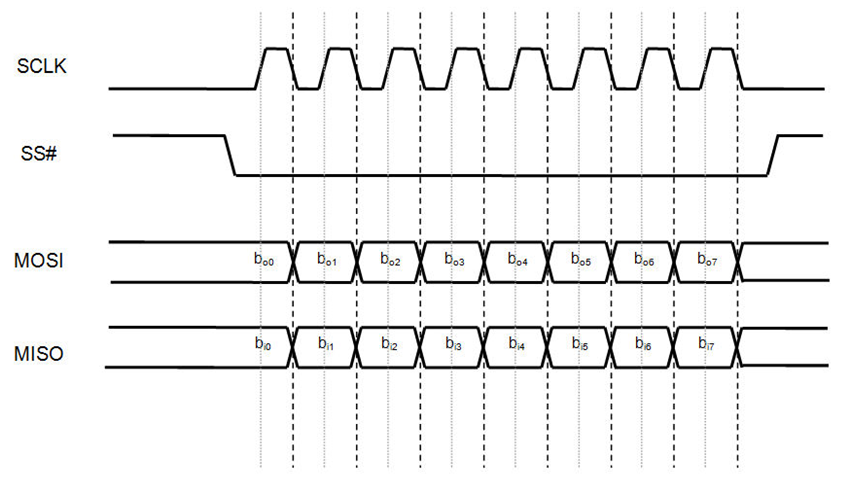
《深入解析SPI协议及其FPGA高效实现》-- 第一篇:SPI协议基础与工作机制
第一篇:SPI协议基础与工作机制 1. 串行外设接口导论 1.1 SPI的核心定位 协议本质 : 全双工同步串行协议(对比UART异步、IC半双工)核心优势 : 无寻址开销(通过片选直连)时钟速率可达100MHz&…...
2025年5月6日 飞猪Java一面
锐评 鸡蛋鸭蛋荷包蛋 我的蛋仔什么时候才能上巅峰凤凰蛋? 1. 如何保证数据库数据和redis数据一致性 数据库数据和 redis 数据不一致是在 高并发场景下更新数据的情况 首先我们要根据当前保持数据一致性的策略来决定方案 如果采取的策略是先删除缓存 更新数据库 我们假设现…...

技术深度解析:《鸿蒙5.0+:AI驱动的全场景功耗革命》
引言:鸿蒙5.0的能效革新目标 行业挑战: 移动设备多设备协同需求激增,传统系统面临分布式通信开销、AI算力碎片化、边缘设备能效瓶颈等问题。鸿蒙5.0突破: 引入方舟引擎3.0(ArkTS编译优化…...

Nodejs+http-server 使用 http-server 快速搭建本地图片访问服务
在开发过程中,我们经常需要临时查看或分享本地的图片资源,比如设计稿、截图、素材等。虽然可以通过压缩发送,但效率不高。本文将教你使用 Node.js 的一个轻量级工具 —— http-server,快速搭建一个本地 HTTP 图片预览服务…...

Zsh/Bash Conda设置延迟启动,启动速度优化
Zsh/Bash 启动速度优化 在安装完 Conda 之后,会发现每次启动 Zsh/Bash 的时候都需要加载时间,这个时候就会发现没有以前流畅了,原因是因为每次启动 Shell 时都需要去加载 Conda 环境,才能保证每次可以使用工具。然而官方自带的安…...
【AI论文】推理语言模型的强化学习熵机制
摘要:本文旨在克服将强化学习扩展到使用 LLM 进行推理的主要障碍,即策略熵的崩溃。 这种现象在没有熵干预的RL运行中一直存在,其中策略熵在早期训练阶段急剧下降,这种探索能力的减弱总是伴随着策略性能的饱和。 在实践中ÿ…...

Java中的JSONObject详解:从基础到高级应用
Java中的JSONObject详解:从基础到高级应用 在当今前后端分离的架构中,JSONObject已成为Java开发者处理JSON数据的瑞士军刀。本文将深入解析JSONObject的核心机制与实战技巧。 一、JSONObject的本质与实现库 1.1 核心定位 JSONObject是Java中表示JSON对…...
Ubuntu22.04 安装 IsaacSim 4.2.0
1. 从官网下载 IsaacSim 4.2.0 安装包 https://download.isaacsim.omniverse.nvidia.com/isaac-sim-standalone%404.2.0-rc.18%2Brelease.16044.3b2ed111.gl.linux-x86_64.release.zip 2. 查阅 Workstation Installation 安装方式 Workstation Installation — Isaac Sim Do…...

子串题解——和为 K 的子数组【LeetCode】
谨记: 数组不是单调的话,不要用滑动窗口,考虑用前缀和 写法一:两次遍历 代码的核心思想是通过 前缀和 和 哈希表 来高效地统计符合条件的子数组个数。具体步骤如下: 计算前缀和数组 s: s[i] 表示 nums 的前…...

深入理解设计模式之访问者模式
深入理解设计模式之访问者模式(Visitor Pattern) 一、什么是访问者模式? 访问者模式(Visitor Pattern)是一种行为型设计模式。它的主要作用是将数据结构与数据操作分离,使得在不改变数据结构的前提下&…...

Java代码重构:如何提升项目的可维护性和扩展性?
Java代码重构:如何提升项目的可维护性和扩展性? 在Java开发领域,随着项目规模的不断扩大和业务需求的频繁变更,代码的可维护性和扩展性逐渐成为了项目成功的关键因素。代码重构作为一种优化代码质量的重要手段,能够在…...
《Python语言程序设计》2018 第4章第9题3重量和价钱的对比,利用第7章的概念来解答你
利用类来解答这个问题。 pack1, price1 50, 24.59 pack2, price2 25, 11.99class result:def __init__(self,pack,price):self.pack packself.price pricedef set_pack(self):return self.packdef set_price(self):return self.pricedef get_result(self):return self.pric…...

Nginx安装操作命令
Nginx官网:https://nginx.org/ Nginx下载地址:http://nginx.org/en/download.html # 重载nginx服务 systemctl reload nginx # 启动nginx服务 systemctl start nginx # 关闭nginx服务 systemctl stop nginx # 设置nginx服务开机自启动 systemctl enable…...
在IIS上无法使用PUT等请求
错误来源: chat:1 Access to XMLHttpRequest at http://101.126.139.3:11000/api/receiver/message from origin http://101.126.139.3 has been blocked by CORS policy: No Access-Control-Allow-Origin header is present on the requested resource. 其实我的后…...
 B. Gellyfish and Baby‘s Breath)
Codeforces Round 1028 (Div. 2) B. Gellyfish and Baby‘s Breath
Codeforces Round 1028 (Div. 2) B. Gellyfish and Baby’s Breath 题目 Flower gives Gellyfish two permutations ∗ ^{\text{∗}} ∗ of [ 0 , 1 , … , n − 1 ] [0, 1, \ldots, n-1] [0,1,…,n−1]: p 0 , p 1 , … , p n − 1 p_0, p_1, \ldots, p_{n-1} p0,p1,……...

数据基座觉醒!大数据+AI如何重构企业智能决策金字塔(上)
1. 数据金字塔的千年进化史 1.1 从地窖到云端的存储革命 某家电企业在2010年遭遇库存危机时,市场部门需要三天才能从纸质单据中统计出全国滞销型号。当他们的数据工程师在2023年轻声唤醒对话式分析机器人,同样的需求响应时间缩短至9秒。 数据分层架构的…...

前端八股HTTP和https大全套
htttp 超文本传输协议 特点 1.CS 支持客户端服务器端模式 2.灵活 传输任意形式的数据 content-type规定 3.明文传输,https解决 4.无连接:每次连接仅处理一个请求 解决:1.1长连接 5.无状态,无法保存两次http连接之间的关联信…...

使用 DeepSeek API 搭建智能体《无间》- 卓伊凡的完整指南 -优雅草卓伊凡
使用 DeepSeek API 搭建智能体《无间》- 卓伊凡的完整指南 -优雅草卓伊凡 作者:卓伊凡 前言:为什么选择 DeepSeek API,而非私有化部署? 在开始搭建智能体之前,我想先说明 为什么推荐使用 DeepSeek API,而…...

量子语言模型——where to go
1️⃣ 在大语言模型(LLM)高度发达的今天,还研究这些小模型(如n-gram、RNN、量子语言模型)是否有意义? ✅ 有意义,但意义已经转变了——不再是用于「直接生产 SOTA 应用」,而是&…...

flutter使用html_editor_enhanced: ^2.6.0后,编辑框无法获取焦点,无法操作
flutter使用html_editor_enhanced: ^2.6.0后,编辑框无法获取焦点,无法操作,报如下错误: PlatformException(error, Unknown feature SUPPRESS_ERROR_PAGE, null, java.lang.RuntimeException: Unknown feature SUPPRESS_ERROR_PA…...

FPGA纯verilog实现MIPI-DSI视频编码输出,提供工程源码和技术支持
目录 1、前言工程概述免责声明 2、相关方案推荐我已有的所有工程源码总目录----方便你快速找到自己喜欢的项目我这里已有的 MIPI 编解码方案 3、设计思路框架工程设计原理框图FPGA内部彩条RGB数据位宽转换RGB数据缓存MIPI-DSI协议层编码MIPI-DPHY物理层串化MIPI-LVDS显示屏工程…...
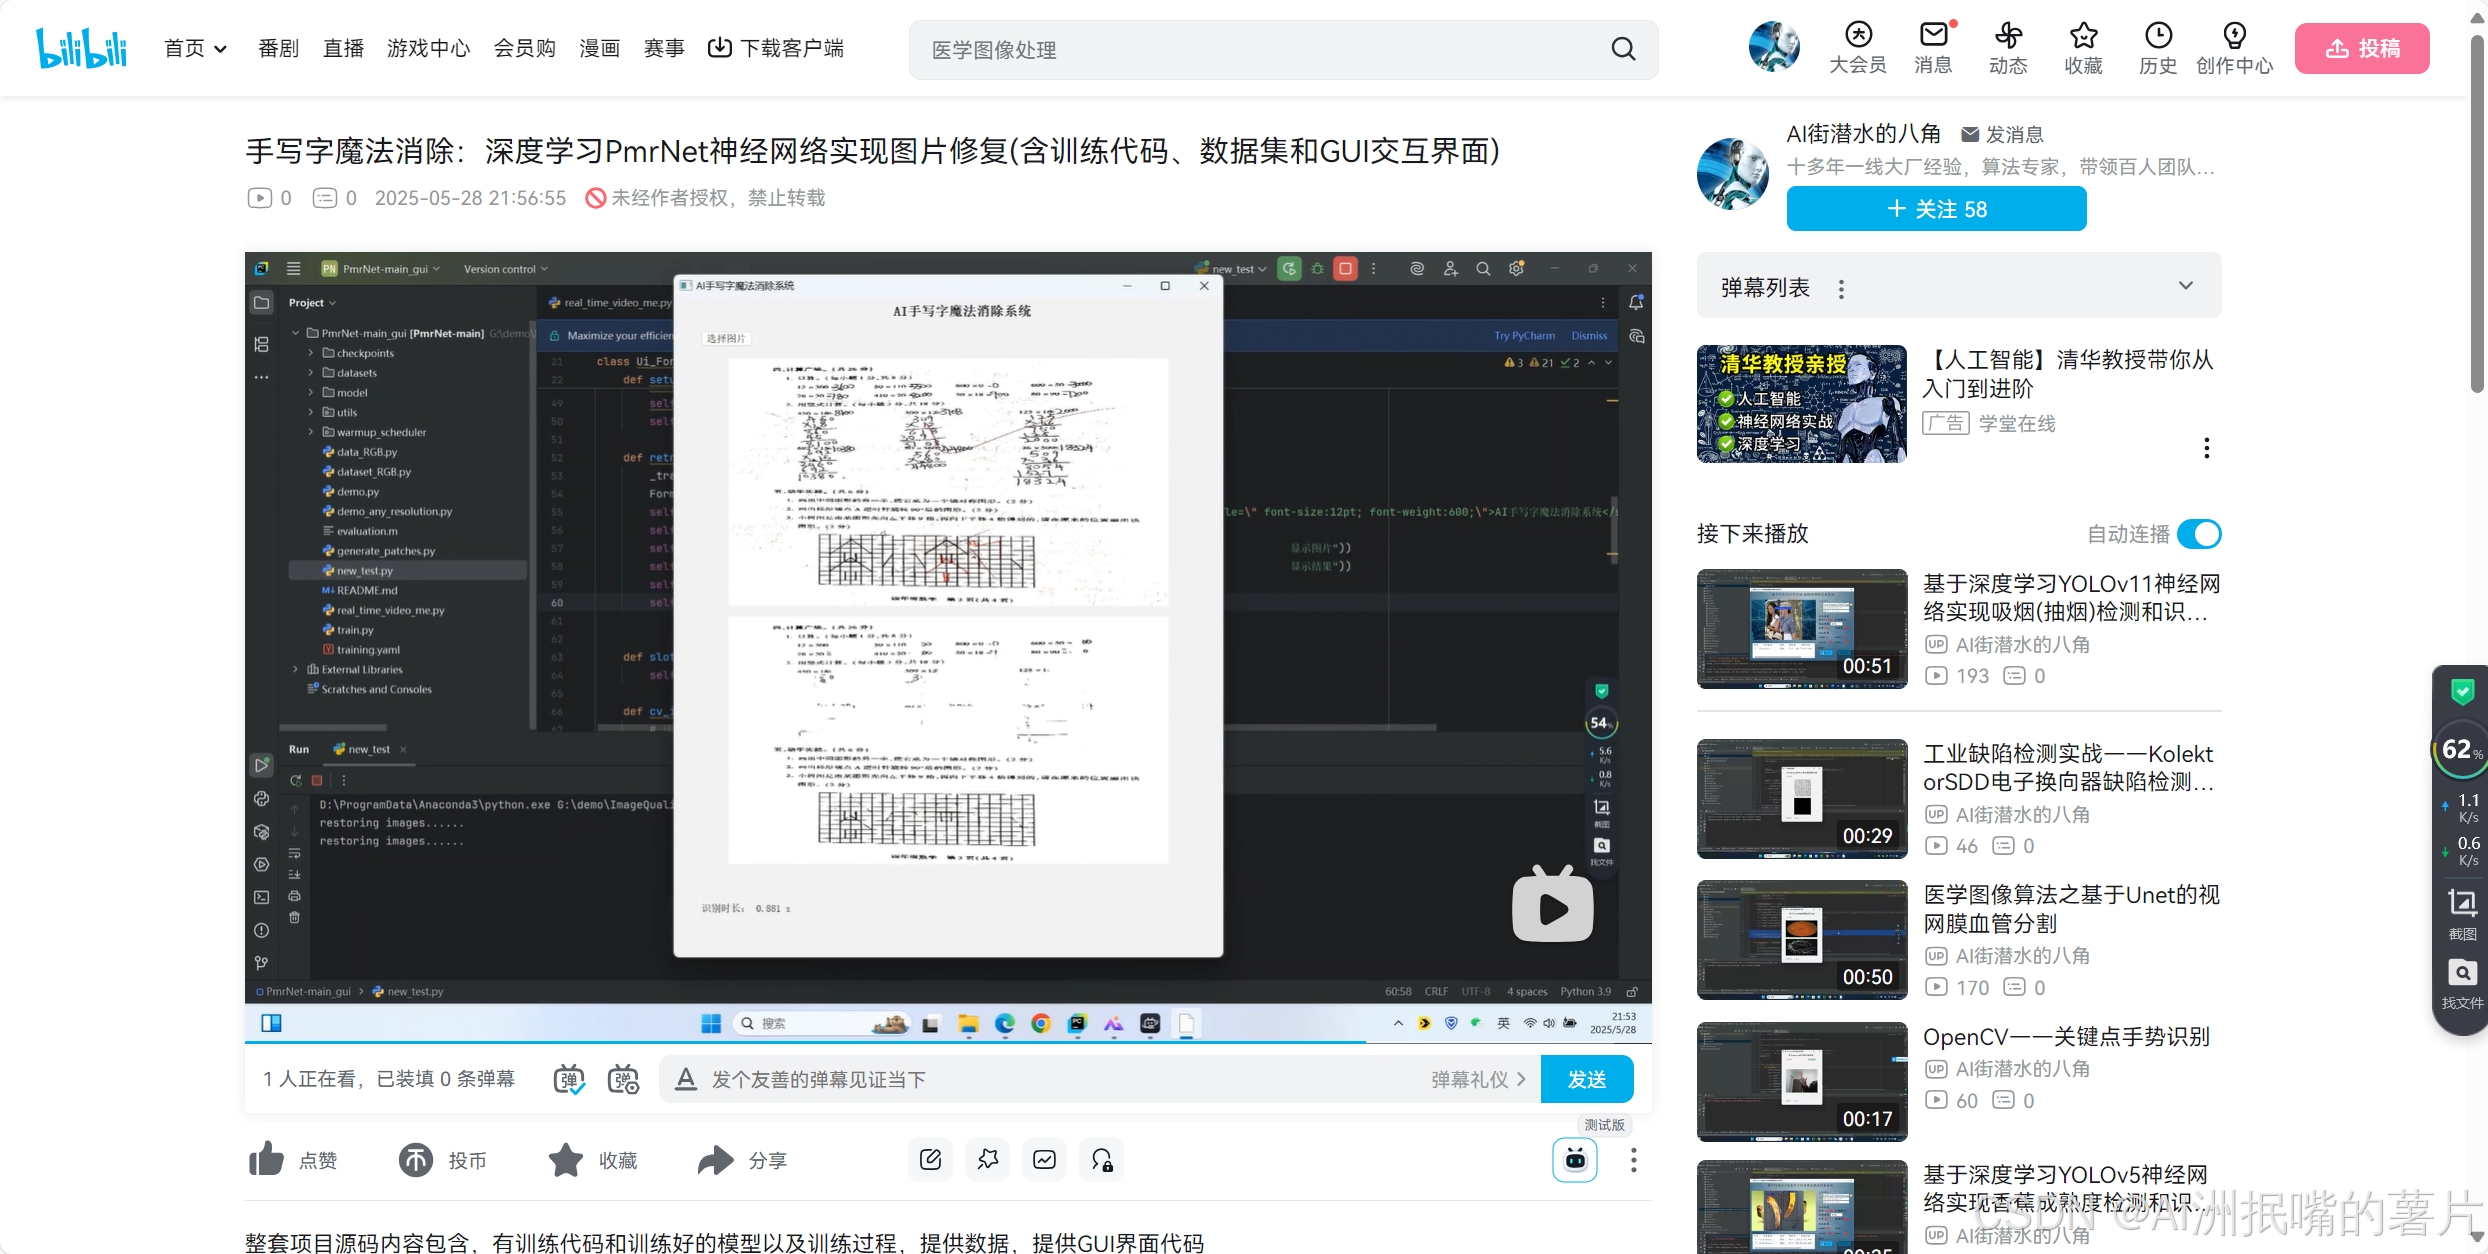
手写字魔法消除3:深度学习PmrNet神经网络实现图片修复(含训练代码、数据集和GUI交互界面)
第一步:PmrNet介绍 PmrNet是一种基于U-Net架构改进的深度学习网络,来自于论文《Practical Deep Raw Image Denoising on Mobile Devices》,这个网络聚焦于在移动设备上实现高效的原始图像(RAW)去噪(本文用来…...

大数据运维过程中常见的一些操作
大数据运维是确保大数据系统稳定运行、高效处理数据的关键环节。以下是大数据运维过程中常见的一些操作和任务: 1. 集群部署与配置 基础设施搭建:部署服务器、网络设备、存储系统,配置虚拟化环境(如 Docker、Kubernetes…...