C#数字图像处理(三)
文章目录
- 前言
- 1.图像平移
- 1.1 图像平移定义
- 1.2 图像平移编程实例
- 2.图像镜像
- 2.1 图像镜像定义
- 2.2 图像镜像编程实例
- 3.图像缩放
- 3.1 图像缩放定义
- 3.2 灰度插值法
- 3.3 图像缩放编程实例
- 4.图像旋转
- 4.1 图像旋转定义
- 4.2 图像旋转编程实例
前言
在某种意义上来说,图像的几何运算是与点运算相对立的。它改变了像素之间的空间位置和空间关系,但它没有改变灰度等级值。几何运算需要两个独立的算法:空间变换和灰度值插值。
在本章所介绍的几何运算中,应用空间变换算法对图像进行平移、镜像处理,应用空间变换和灰度值插值算法对图像进行缩放和旋转处理。
需要说明的是,在这里,以图像的几何中心作为坐标原点,x轴由左向右递增,y轴由上至下递增。
因此,在进行图像旋转时,是以图像的几何中心为基准进行旋转的:在进行图像缩放时,也是以图像的几何中心为基准,其上下左右均等地向内收缩或向外扩大的。这种坐标转换会使图像变换更自然。另外,在进行几何运算的时候,保持原图像的尺寸大小不变,如果变换后的图像超出该尺寸,超出部分会被截断,而不足部分会以白色像素填充。
1.图像平移
1.1 图像平移定义

1.2 图像平移编程实例
该实例通过设置横向和纵向的平移量,实现了图像的平移。

分别为该窗体内的2个Button控件添加Click事件,为了和主窗体之间传递数据,再添加2个get属性访问器,代码如下:
public partial class translation : Form{public translation(){InitializeComponent();}private void start_Click(object sender, EventArgs e){this.DialogResult = DialogResult.OK;}private void close_Click(object sender, EventArgs e){this.Close();}public string GetXOffset{get{//横向平移量return xOffset.Text;}}public string GetYOffset{get{//纵向平移量return yOffset.Text;}}}
回到主窗体,为“图像平移”按钮添加Click事件,代码如下:
/// <summary>/// 图像平移/// </summary>private void translation_Click(object sender, EventArgs e){if (curBitmap!=null){translation traForm = new translation();if (traForm.ShowDialog()==DialogResult.OK){Rectangle rect = new Rectangle(0, 0, curBitmap.Width, curBitmap.Height);BitmapData bmpData = curBitmap.LockBits(rect, ImageLockMode.ReadWrite, curBitmap.PixelFormat);IntPtr ptr = bmpData.Scan0;int bytes = bmpData.Stride * bmpData.Height;byte[] grayValues = new byte[bytes];Marshal.Copy(ptr, grayValues, 0, bytes);//得到两个方向的图像平移量int x = Convert.ToInt32(traForm.GetXOFFset);int y = Convert.ToInt32(traForm.GetYOffset);byte[] tempArray = new byte[bytes];//临时初始化为白色(255)像素for (int i = 0; i < bytes; i++){tempArray[i] = 255;}for (int j = 0; j < curBitmap.Height; j++){//保证纵向平移不出界if ((j + y) < curBitmap.Height && (j + y) > 0){for (int i = 0; i < curBitmap.Width * 3; i += 3){if ((i + x * 3) < curBitmap.Width * 3 && (i + x * 3) > 0){//保证横向平移不出界tempArray[(i + x * 3) + 0 + (j + y) * bmpData.Stride] = grayValues[i + 0 + j * bmpData.Stride];tempArray[i + x * 3 + 1 + (j + y) * bmpData.Stride] = grayValues[i + 1 + j * bmpData.Stride];tempArray[i + x * 3 + 2 + (j + y) * bmpData.Stride] = grayValues[i + 2 + j * bmpData.Stride];}}}}//数组复制,返回平移图像grayValues = (byte[])tempArray.Clone();Marshal.Copy(grayValues, 0, ptr, bytes);curBitmap.UnlockBits(bmpData);}Invalidate();}
要注意像素格式PixelFormat,如24位灰度图像是1440万色,但是我们书上给的算法是对8为进行处理,可以采用分割的思想将24位拆开成3个8位,由这三个8为所保存的数据组合为24位,在处理的时候就将他们分开处理但是要整体观看。

2.图像镜像
2.1 图像镜像定义
镜像是一个物体相对于一个镜面的复制品。图像镜像分为水平镜像和垂直镜像两种。
水平镜像就是将图像左半部分和右半部分以图像垂直中轴线为中心镜像进行对换;
垂直镜像就是将图像上半部分和下半部分以图像水平中轴线为中心镜像进行对换。

2.2 图像镜像编程实例
该实例实现了图像的水平镜像和垂直镜像。

分别为该窗体内的2个Button控件添加Click事件,并再添加1个get属性访问器,代码如下:
    private void startMirror_Click(object sender, EventArgs e){this.DialogResult = DialogResult.OK;}private void close_Click(object sender, EventArgs e){this.Close();}public bool GetMirror{get{return horMirror.Checked;}}
}
回到主窗体,为“图像镜像”按钮添加Click事件,代码如下:
private void mirror_Click(object sender, EventArgs e){if (curBitmap!=null){mirror mirForm = new mirror();if (mirForm.ShowDialog()==DialogResult.OK){Rectangle rect = new Rectangle(0, 0, curBitmap.Width, curBitmap.Height);BitmapData bmpData = curBitmap.LockBits(rect, ImageLockMode.ReadWrite, curBitmap.PixelFormat);IntPtr ptr = bmpData.Scan0;int bytes = 0;判断是灰度色图像还是彩色图像,给相应的大小if (curBitmap.PixelFormat==PixelFormat.Format8bppIndexed){bytes= curBitmap.Width * curBitmap.Height;}else if (curBitmap.PixelFormat == PixelFormat.Format24bppRgb){bytes = curBitmap.Width * curBitmap.Height * 3;}byte[] pixelValues = new byte[bytes];Marshal.Copy(ptr, pixelValues, 0, bytes);//水平中轴int halfWidth = curBitmap.Width / 2;//垂直中轴int halfHeight = curBitmap.Height / 2;byte temp;byte temp1;byte temp2;byte temp3;if (curBitmap.PixelFormat == PixelFormat.Format8bppIndexed){if (mirForm.GetMirror){for (int i = 0; i < curBitmap.Height; i++)for (int j = 0; j < halfWidth; j++){temp = pixelValues[i * curBitmap.Width + j];pixelValues[i * curBitmap.Width + j] = pixelValues[(i + 1) * curBitmap.Width - j - 1];pixelValues[(i + 1) * curBitmap.Width - j - 1] = temp;}}else{for (int j = 0; j < curBitmap.Width; j++){for (int i = 0; i < halfHeight; i++){temp = pixelValues[i * curBitmap.Width + j];pixelValues[i * curBitmap.Width + j] = pixelValues[(curBitmap.Height - i - 1) * curBitmap.Width + j];pixelValues[(curBitmap.Height - i - 1) * curBitmap.Width + j] = temp;}}}}else if (curBitmap.PixelFormat == PixelFormat.Format24bppRgb){if (mirForm.GetMirror){//水平镜像处理 for (int i = 0; i < curBitmap.Height; i++){//每个像素的三个字节在水平镜像时顺序不能变,所以这个方法不能用//for (int j = 0; j < halfWidth; j++)//{// //以水平中轴线为对称轴,两边像素值交换 // temp = pixelValues[i * curBitmap.Width * 3 + j * 3];// pixelValues[i * curBitmap.Width * 3 + j * 3] = pixelValues[(i + 1) * curBitmap.Width * 3 - 1 - j * 3];// pixelValues[(i + 1) * curBitmap.Width * 3 - 1 - j * 3] = temp;//}for (int j = 0; j < halfWidth; j++){//每三个字节组成一个像素,顺序不能乱temp = pixelValues[0 + i * curBitmap.Width * 3 + j * 3];temp1 = pixelValues[1 + i * curBitmap.Width * 3 + j * 3];temp2 = pixelValues[2 + i * curBitmap.Width * 3 + j * 3];pixelValues[0 + i * curBitmap.Width * 3 + j * 3] = pixelValues[0 + (i + 1) * curBitmap.Width * 3 - (j + 1) * 3];pixelValues[1 + i * curBitmap.Width * 3 + j * 3] = pixelValues[1 + (i + 1) * curBitmap.Width * 3 - (j + 1) * 3];pixelValues[2 + i * curBitmap.Width * 3 + j * 3] = pixelValues[2 + (i + 1) * curBitmap.Width * 3 - (j + 1) * 3];pixelValues[0 + (i + 1) * curBitmap.Width * 3 - (j + 1) * 3] = temp;pixelValues[1 + (i + 1) * curBitmap.Width * 3 - (j + 1) * 3] = temp1;pixelValues[2 + (i + 1) * curBitmap.Width * 3 - (j + 1) * 3] = temp2;}}}else{//垂直镜像处理 for (int i = 0; i < curBitmap.Width * 3; i++){for (int j = 0; j < halfHeight; j++){//以垂直中轴线为对称轴。两边像素值互换 temp = pixelValues[j * curBitmap.Width * 3 + i];pixelValues[j * curBitmap.Width * 3 + i] = pixelValues[(curBitmap.Height - j - 1) * curBitmap.Width * 3 + i];pixelValues[(curBitmap.Height - j - 1) * curBitmap.Width * 3 + i] = temp;}}}}Marshal.Copy(pixelValues, 0, ptr, bytes);curBitmap.UnlockBits(bmpData);}Invalidate();}}


3.图像缩放
在图像缩放运算和图像旋转运算中,要用到灰度插值算法,因此这里给出灰度插值的两种算法。
3.1 图像缩放定义

3.2 灰度插值法
应用公式(4.5)所产生的图像中的像素有可能在原图像中找不到相应的像素点,因为数字图像中的坐标总是整数。这样就必须进行近似处理。一般是应用灰度插值法。它包括最近邻插值和双线性插值。
最近邻插值也称零阶插值,是最简单的插值方法。其做法是令输出像素的灰度值等于离它所映射到的位置最近的输入像素的灰度值。该插值计算虽然十分简单,但它会带来锯齿形的边,图像中也会出现孔洞和重叠。
双线性插值也称一阶插值,该方法是求到相邻的4个方格上点的距离之比,用这个比率和4个邻点像素的灰度值进行灰度插值,具体方法如下。

双线性插值法计算量大,但缩放后图像质量高,不会出现像素值不连续的情况。由于双线性插值具有低通滤波器的性质,使高频分量受损,所以可能会使图像轮廓在一定程度上变得模糊。
3.3 图像缩放编程实例
该实例应用最近邻插值法和双线性插值法实现图像的缩放。
在主窗体内添加1个Button控件,其属性修改如表4.5所示。

创建1个名为zoom 的 Windows窗体,该窗体用于选择缩放量及用何种灰度插值法。为该窗体添加2个Button控件、1个GroupBox控件、2个RadioButton 控件、2个Label 控件和2个TextBox控件,其属性修改如表4.6所示。

分别为该窗体内的2个Button控件添加Click事件,并再添加3个get属性访问器,代码如下:
private void startZoom_Click(object sender, EventArgs e){if (xZoom.Text == "0" || yZoom.Text == "0"){MessageBox.Show("缩放量不能为0!\n请重新正确填写。", "警告", MessageBoxButtons.OK, MessageBoxIcon.Exclamation);}else{this.DialogResult = DialogResult.OK;}}private void close_Click(object sender, EventArgs e){this.Close();}public bool GetNearOrBil{get{//判断是最近邻插值法还是双线性插值法return nearestNeigh.Checked;}}public string GetXZoom{get{//得到横向缩放量return xZoom.Text;}}public string GetYZoom{get{//得到纵向缩放量return yZoom.Text;}}
回到主窗体,为“图像缩放”按钮控件添加Click事件代码,代码如下:
private void zoom_Click(object sender, EventArgs e){if (curBitmap != null){zoom zoomForm = new zoom();if (zoomForm.ShowDialog() == DialogResult.OK){Rectangle rect = new Rectangle(0, 0, curBitmap.Width, curBitmap.Height);System.Drawing.Imaging.BitmapData bmpData = curBitmap.LockBits(rect, System.Drawing.Imaging.ImageLockMode.ReadWrite, curBitmap.PixelFormat);IntPtr ptr = bmpData.Scan0;int bytes = curBitmap.Width * curBitmap.Height;byte[] grayValues = new byte[bytes];System.Runtime.InteropServices.Marshal.Copy(ptr, grayValues, 0, bytes);double x = Convert.ToDouble(zoomForm.GetXZoom);double y = Convert.ToDouble(zoomForm.GetYZoom);int halfWidth = (int)(curBitmap.Width / 2);int halfHeight = (int)(curBitmap.Height / 2);int xz = 0;int yz = 0;int tempWidth = 0;int tempHeight = 0;byte[] tempArray = new byte[bytes];if (zoomForm.GetNearOrBil == true){for (int i = 0; i < curBitmap.Height; i++){for (int j = 0; j < curBitmap.Width; j++){tempHeight = i - halfHeight;tempWidth = j - halfWidth;if (tempWidth > 0){xz = (int)(tempWidth / x + 0.5);}else{xz = (int)(tempWidth / x - 0.5);}if (tempHeight > 0){yz = (int)(tempHeight / y + 0.5);}else{yz = (int)(tempHeight / y - 0.5);}tempWidth = xz + halfWidth;tempHeight = yz + halfHeight;if (tempWidth < 0 || tempWidth >= curBitmap.Width || tempHeight < 0 || tempHeight >= curBitmap.Height){tempArray[i * curBitmap.Width + j] = 255;}else{tempArray[i * curBitmap.Width + j] = grayValues[tempHeight * curBitmap.Width + tempWidth];}}}}else{double tempX, tempY, p, q;for (int i = 0; i < curBitmap.Height; i++){for (int j = 0; j < curBitmap.Width; j++){tempHeight = i - halfHeight;tempWidth = j - halfWidth;tempX = tempWidth / x;tempY = tempHeight / y;if (tempWidth > 0){xz = (int)tempX;}else{xz = (int)(tempX - 1);}if (tempHeight > 0){yz = (int)tempY;}else{yz = (int)(tempY - 1);}p = tempX - xz;q = tempY - yz;tempWidth = xz + halfWidth;tempHeight = yz + halfHeight;if (tempWidth < 0 || (tempWidth + 1) >= curBitmap.Width || tempHeight < 0 || (tempHeight + 1) >= curBitmap.Height){tempArray[i * curBitmap.Width + j] = 255;}else{tempArray[i * curBitmap.Width + j] = (byte)((1.0 - q) * ((1.0 - p) * grayValues[tempHeight * curBitmap.Width + tempWidth] + p * grayValues[tempHeight * curBitmap.Width + tempWidth + 1]) + q * ((1.0 - p) * grayValues[(tempHeight + 1) * curBitmap.Width + tempWidth] + p * grayValues[(tempHeight + 1) * curBitmap.Width + 1 + tempWidth]));}}}}grayValues = (byte[])tempArray.Clone();System.Runtime.InteropServices.Marshal.Copy(grayValues, 0, ptr, bytes);curBitmap.UnlockBits(bmpData);}Invalidate();}}


4.图像旋转
4.1 图像旋转定义

同理,旋转后得到的图像像素也有可能在原图像中找不到相应的像素点,因此旋转处理也要用到插值法。由于双线性插值法在图像处理性能上要好过最近邻插值,因此,我们只应用双线性插值这一种方法对图像进行旋转处理。
4.2 图像旋转编程实例
该实例实现了任意角度的图像旋转。
1).在主窗体内添加1个Button 控件,其属性修改如表4.7所示。

2).创建1个名为rotation的 Windows窗体,该窗体用于选择旋转的角度。为该窗体添加2个Button控件、1个Label控件和1个TextBox控件,其属性修改如表4.8所示。


分别为该窗体内的2个Button控件添加Cick事件,并再添加1个get属性访问器,代码如下:
private void startRot_Click(object sender, EventArgs e){this.DialogResult = DialogResult.OK;}private void close_Click(object sender, EventArgs e){this.Close();}public string GetDegree{get{//得到所要旋转的角度return degree.Text;}}
回到主窗体,为“图像旋转”按钮控件添加Click事件,代码如下:
private void rotation_Click(object sender, EventArgs e){if (curBitmap != null){rotation rotForm = new rotation();if (rotForm.ShowDialog() == DialogResult.OK){Rectangle rect = new Rectangle(0, 0, curBitmap.Width, curBitmap.Height);System.Drawing.Imaging.BitmapData bmpData = curBitmap.LockBits(rect, System.Drawing.Imaging.ImageLockMode.ReadWrite, curBitmap.PixelFormat);IntPtr ptr = bmpData.Scan0;int bytes = curBitmap.Width * curBitmap.Height;byte[] grayValues = new byte[bytes];System.Runtime.InteropServices.Marshal.Copy(ptr, grayValues, 0, bytes);int degree = Convert.ToInt32(rotForm.GetDegree);double radian = degree * Math.PI / 180.0;double mySin = Math.Sin(radian);double myCos = Math.Cos(radian);int halfWidth = (int)(curBitmap.Width / 2);int halfHeight = (int)(curBitmap.Height / 2);int xr = 0;int yr = 0;int tempWidth = 0;int tempHeight = 0;byte[] tempArray = new byte[bytes];double tempX, tempY, p, q;for (int i = 0; i < curBitmap.Height; i++){for (int j = 0; j < curBitmap.Width; j++){tempHeight = i - halfHeight;tempWidth = j - halfWidth;tempX = tempWidth * myCos - tempHeight * mySin;tempY = tempHeight * myCos + tempWidth * mySin;if (tempWidth > 0){xr = (int)tempX;}else{xr = (int)(tempX - 1);}if (tempHeight > 0){yr = (int)tempY;}else{yr = (int)(tempY - 1);}p = tempX - xr;q = tempY - yr;tempWidth = xr + halfWidth;tempHeight = yr + halfHeight;if (tempWidth < 0 || (tempWidth + 1) >= curBitmap.Width || tempHeight < 0 || (tempHeight + 1) >= curBitmap.Height){tempArray[i * curBitmap.Width + j] = 255;}else{tempArray[i * curBitmap.Width + j] = (byte)((1.0 - q) * ((1.0 - p) * grayValues[tempHeight * curBitmap.Width + tempWidth] + p * grayValues[tempHeight * curBitmap.Width + tempWidth + 1]) +q * ((1.0 - p) * grayValues[(tempHeight + 1) * curBitmap.Width + tempWidth] + p * grayValues[(tempHeight + 1) * curBitmap.Width + 1 + tempWidth]));}}}grayValues = (byte[])tempArray.Clone();System.Runtime.InteropServices.Marshal.Copy(grayValues, 0, ptr, bytes);curBitmap.UnlockBits(bmpData);}Invalidate();}}


相关文章:
C#数字图像处理(三)
文章目录 前言1.图像平移1.1 图像平移定义1.2 图像平移编程实例 2.图像镜像2.1 图像镜像定义2.2 图像镜像编程实例 3.图像缩放3.1 图像缩放定义3.2 灰度插值法3.3 图像缩放编程实例 4.图像旋转4.1 图像旋转定义4.2 图像旋转编程实例 前言 在某种意义上来说,图像的几…...

STM32 智能小车项目 L298N 电机驱动模块
今天开始着手做智能小车的项目了 在智能小车或机器人项目中,我们经常会听到一个词叫 “H 桥电机驱动”,尤其是常见的 L298N 模块,就是基于“双 H 桥”原理设计的。那么,“H 桥”到底是什么?为什么要用“双 H 桥”来驱动…...
SQL Transactions(事务)、隔离机制
目录 Why Transactions? Example: Bad Interaction Transactions ACID Transactions COMMIT ROLLBACK How the Transaction Log Works How Data Is Stored Example: Interacting Processes Interleaving of Statements Example: Strange Interleaving Fixing the…...

【动画】unity中实现骨骼蒙皮动画
我是一名资深的游戏客户端,没事的时候我就想手搓轮子 本文目标 搓一个骨骼动画的核心实现,促进理解骨骼动画本质 骨骼动画简介 官方解释上网搜或者问豆包 快速理解 想知道骨骼动画怎么个事要先知道模型是怎么个事 简单来说:模型 顶点数…...

VSCODE的终端无法执行npm命令
问题原因:PowerShell 默认可能限制脚本执行。 解决方法: 在 PowerShell 中运行以下命令,查看当前策略: Get-ExecutionPolicy 如果结果是 Restricted,改为 RemoteSigned: Set-ExecutionPolicy RemoteSigne…...

Langchian - 自定义提示词模板 提取结构化的数据
场景:从自然语言中提取固定结构信息返回 例如:根据一段文字,提取文字中人的具体特征 马路上走来一个1米7的女生,她一头乌黑的长发披在肩上随风飘动,在她旁边的是她的男朋友,叫:刘山;比她高10厘米 如果想要提取上面这句话中人的身高及头发的颜色,并以固定的格式返回,…...

【机器学习基础】机器学习入门核心:Jaccard相似度 (Jaccard Index) 和 Pearson相似度 (Pearson Correlation)
机器学习入门核心:Jaccard相似度 (Jaccard Index) 和 Pearson相似度 (Pearson Correlation) 一、算法逻辑Jaccard相似度 (Jaccard Index)**Pearson相似度 (Pearson Correlation)** 二、算法原理与数学推导1. Jaccard相…...

QT之头像剪裁效果实现
文章目录 源码地址,环境:QT5.15,MinGW32位效果演示导入图片设置剪裁区域创建剪裁小窗口重写剪裁小窗口的鼠标事件mousePressEventmouseMoveEventmouseReleaseEvent 小窗口移动触发父窗口的重绘事件剪裁效果实现 源码地址,环境&…...

apptrace 视角下移动端深度链接技术与优势
官网链接:AppTrace - 专业的移动应用推广追踪平台 App 拉起,本质上是移动端深度链接技术的具象化呈现。在这一领域,apptrace 凭借前沿技术与创新理念,实现从 H5 网页到 App 的无缝跳转,精准定位 App 内指定页面&#…...

微前端之micro-app数据通信
在这之前如果还没接触过微前端,可以找一些视频、资料先去了解一下,就不在这里赘述了。 现在常见的微前端框架包括: single-spa micro-app qiankun EMP 无界 目前了解到的基本上是这些哈,大家感兴趣可以自行去了解一下,看下它们之间的区别。 因为我目前使用的是mic…...
【GPT入门】第40课 vllm与ollama特性对比,与模型部署
【GPT入门】第40课 vllm与ollama特性对比,与模型部署 1.两种部署1.1 vllm与ollama特性对比2. vllm部署2.1 服务器准备2.1 下载模型2.2 提供模型服务 1.两种部署 1.1 vllm与ollama特性对比 2. vllm部署 2.1 服务器准备 在autodl 等大模型服务器提供商,…...
unity开发棋牌游戏
使用unity开发的棋牌游戏,目前包含麻将、斗地主、比鸡、牛牛四种玩法游戏。 相关技术 客户端:unity 热更新:xlua 服务器:c Web服务器:ruoyi 游戏视频 unity开发棋牌游戏 游戏截图...
Nat Commun项目文章 ▏小麦CUTTag助力解析转录因子TaTCP6调控小麦氮磷高效利用机制
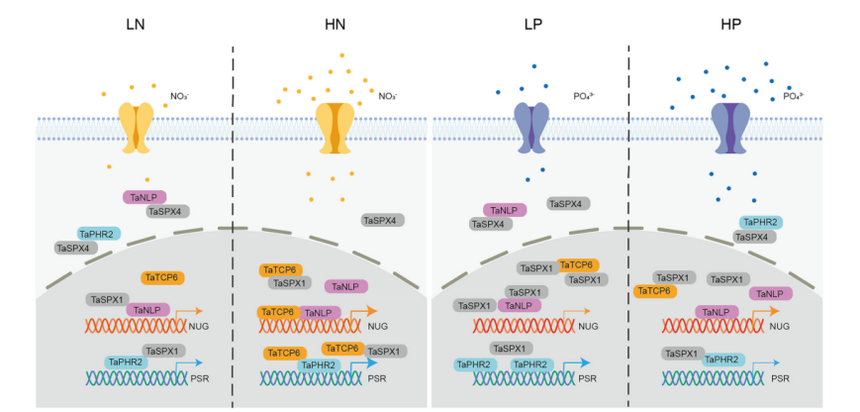
今年2月份发表在《Nature Communications》(IF14.4)的“TaTCP6 is required for efficientand balanced utilization of nitrate and phosphorus in wheat”揭示了TaTCP6在小麦氮磷利用中的关键调控作用,为优化肥料利用和提高作物产量提供了理…...

Qt OpenGL 相机实现
在Qt中使用OpenGL实现相机功能主要涉及视图矩阵(view matrix)的操作,包括相机位置、观察方向和上向量等概念。下面我将介绍如何在Qt中实现一个基本的3D相机。 基本概念 OpenGL相机本质上是通过视图矩阵(view matrix)来实现的,它定义了从世界空间到观察…...

云原生时代 Kafka 深度实践:03进阶特性与最佳实践
3.1 数据可靠性与一致性 Producer 端可靠性策略 Kafka 通过acks参数控制消息确认机制,不同设置适用于不同场景: acks0:Producer 发送消息后不等待 Broker 确认,立即返回。这种模式吞吐量最高,但可能丢失消息&#x…...
)
基于关联表字段映射的批量数据更新 SQL 实现方案(AIGC)
UPDATE po_upfiles u JOIN po_micro m ON u.from_id = m.ent_id_old SET u.from_id = m.ent_id; 我的提问 批量更新po_upfiles数据中from_id=ent_id_old的数据中from_id为ent_id,语句怎么写“问题重新按照适合AI的逻辑进行提问,如何修改 精确版...
)
Hadoop复习(二)
部署Hadoop 考试不考部署,就复习选择和大题 问题 1 单项选择 2 / 2 分 下面哪个是MapReduce的核心配置文件 core-site.xml hdfs-site.xml yarn-site.xml mapred-site.xml 问题 2 单项选择 2 / 2 分 下面哪个是HDFS的核心配置文件 core-site.xml hdf…...

C 语言开发中常见的开发环境
目录 1.Dev-C 2.Visual Studio Code 3.虚拟机 Linux 环境 4.嵌入式 MCU 专用开发环境 1.Dev-C 使用集成的 C/C 开发环境(适合基础学习),下载链接Dev-C下载 - 官方正版 - 极客应用 2.Visual Studio Code 结合 C/C 扩展 GCC/MinGW 编译器,…...

vscode命令行debug
vscode命令行debug 一般命令行debug会在远程连服务器的时候用上,命令行debug的本质是在执行时暴露一个监听端口,通过进入这个端口,像本地调试一样进行。 这里提供两种方式: 直接在命令行中添加debugpy,适用于python…...
Matlab作图之 subplot
1. subplot(m, n, p) 将当前图形划分为m*n的网格,在 p 指定的位置创建坐标轴 matlab 按照行号对子图的位置进行编号 第一个子图是第一行第一列,第二个子图是第二行第二列......... 如果指定 p 位置存在坐标轴, 此命令会将已存在的坐标轴设…...

Springboot 项目一启动就获取HttpSession
在 Spring Boot 项目中,HttpSession 是有状态的,通常只有在用户发起 HTTP 请求并建立会话后才会创建。因此,在项目启动时(即应用刚启动还未处理任何请求)是无法获取到 HttpSession 的。 方法一:使用 HttpS…...

PostgreSQL的扩展 insert_username
PostgreSQL的扩展 insert_username insert_username 是 PostgreSQL 的一个实用扩展,用于自动记录数据行的创建者和最后修改者信息。这个扩展特别适合需要审计跟踪的应用场景。 一 扩展安装与启用 1.1 安装扩展 -- 使用超级用户安装 CREATE EXTENSION insert_use…...
【机器学习基础】机器学习入门核心算法:层次聚类算法(AGNES算法和 DIANA算法)
机器学习入门核心算法:层次聚类算法(AGNES算法和 DIANA算法) 一、算法逻辑二、算法原理与数学推导1. 距离度量2. 簇间距离计算(连接标准)3. 算法伪代码(凝聚式) 三、模型评估1. 内部评估指标2. …...

Google Play的最新安全变更可能会让一些高级用户无法使用App
喜欢Root或刷机的Android用户要注意了,Google最近全面启用了新版Play Integrity API,可能会导致部分用户面临无法使用某些App的窘境。Play Integrity API是Google提供给开发者的工具,用于验证App是否在“未修改”的设备上运行。 许多重要应用…...

深度学习篇---人脸识别中的face-recognition库和深度学习
深度学习方法和使用 Python 的face_recognition库进行人脸识别在技术原理、实现方式和应用场景上有显著区别,以下从多个维度对比分析: 一、技术原理 1. 深度学习方法 核心逻辑:基于神经网络(如卷积神经网络 CNN)构建…...
java+ selenium->元素定位之By_tag_name)
(11)java+ selenium->元素定位之By_tag_name
1.简介 继续WebDriver关于元素定位,这篇介绍By ClassName。tagName是DOM结构的一部分,其中页面上的每个元素都是通过输入标签,按钮标签或锚定标签等标签定义的。每个标签都具有多个属性,例如ID,名称,值类等。就其他定位符而言在Selenium中,我们使用了标签的这些属性值来…...

React---day5
4、React的组件化 组件的分类: 根据组件的定义方式,可以分为:函数组件(Functional Component )和类组件(Class Component);根据组件内部是否有状态需要维护,可以分成:无状态组件(Stateless Component )和…...
Java开发之定时器学习
面试 一、线程池实现定时器 核心代码: public static void main(String[] args) {ScheduledExecutorService scheduledExecutorService Executors.newScheduledThreadPool(5);Runnable runnable () -> System.out.println("当前线程"Thread.current…...

HealthBench医疗AI评估基准:技术路径与核心价值深度分析(上)
引言:医疗AI评估的新范式 在人工智能技术迅猛发展的当下,医疗AI系统已逐渐从实验室走向临床应用。然而,医疗领域的特殊性要求这些系统不仅需要在技术指标上表现出色,更需要在实际临床场景中展现出可靠、安全且有效的性能。长期以来,医疗AI评估领域面临着三个核心挑战:评…...
Windows+VSCode搭建小智(xiaozhi)开发环境
作为一名DIY达人,肯定不会错过最近很火的“小智AI聊天机器人”,网上教程非常丰富,初级玩家可以直接在乐鑫官方下载ESP-IDF安装包并经过简单的菜单式配置后,即可进行代码编译和烧录(详见:Docs)。…...