Android Ble蓝牙App(一)扫描
Ble蓝牙App(一)扫描
- 前言
- 正文
- 一、基本配置
- 二、扫描准备
- 三、扫描页面
- ① 增加UI布局
- ② 点击监听
- ③ 扫描处理
- ④ 广播处理
- 四、权限处理
- 五、扫描结果
- ① 列表适配器
- ② 扫描结果处理
- ③ 接收结果
- 六、源码
前言
关于低功耗的蓝牙介绍我已经做过很多了,只不过很多人不是奔着学习的目的去的,拿着源码就去运行,后面又发现连接设备后马上断开,然后不会自己看问题,这个现象就是快餐式的,你不了解里面的知识内容,自然就不知道是怎么回事,重复的问题我回答了好多次了。而我也是觉得写的有问题,本意上来说我是希望读者可以参考来写,能看一看文章内容,而结果绝大多数,看个标题看个运行效果,下载源码就运行,运行有问题就问你,没有什么思考。
针对这个情况,我决定做了系列性的Ble蓝牙App,尽可能的避免在你运行的时候出现bug,所以这是一个低功耗蓝牙工具App,可以让你了解到一些东西。注意是低功耗,不是经典蓝牙,如果你不知道两者之间的区别,建议你先了解一下。本文的效果:
正文
本文将会重新创建一个项目,功能一个一个的做,尽量的做好每一个功能的优化,下面我们创建一个名为GoodBle的项目,语言为Kotlin。
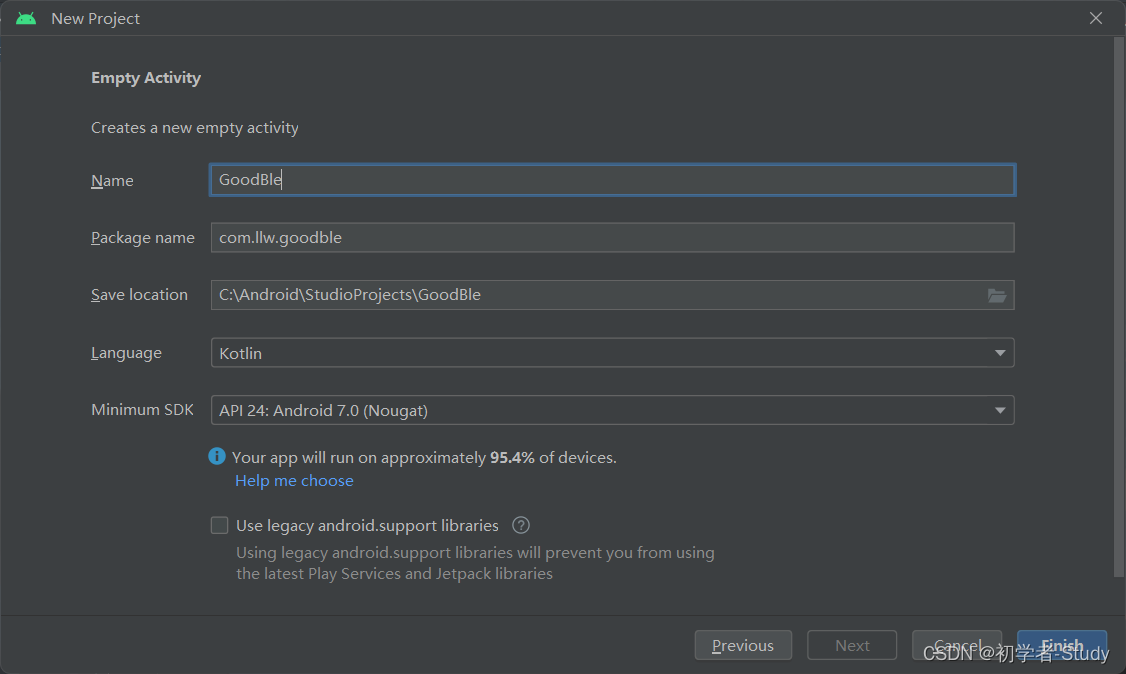
至于为什么使用Kotlin,稳固一下,不然太久不用就会生疏,文本我们讲述的是扫描,你可能回想,一个扫描有什么好写,不就是开始、结束、显示设备嘛?至于单独作为一个功能来写一篇文章嘛?那么我们带着问题来看这篇文章,看看扫描到底有没有必要这样来做。
一、基本配置
当前我们创建项目有一个MainActivity,然后我们需要打开viewBinding的开关,在app的build.gradle中的android{}闭包中添加如下代码:
buildFeatures {viewBinding true}
然后Sync Now,同步一下,开启成功。随后我们就可以在Activity中使用ViewBinding了,常规的使用方式是这样的:
class MainActivity : AppCompatActivity() {private lateinit var binding: ActivityMainBinding;override fun onCreate(savedInstanceState: Bundle?) {super.onCreate(savedInstanceState)binding = ActivityMainBinding.inflate(layoutInflater);setContentView(binding.root)}
}
在Java中封装通常采用反射的方式,在Kotlin中如果要对ViewBinding进行封装的话同时利用上Kotlin的一些特性的话,可以这样做,原文地址如下:Viewbinding使用和委托封装,感觉写得蛮好的,太久没用Kotlin了,还是看了一会才看懂,感兴趣的可以看看。
那么我们在com.llw.goodble下面创建一个base包,base包下创建BaseViewBinding.kt文件,里面的代码如下所示:
package com.llw.goodble.baseimport android.app.Activity
import android.view.LayoutInflater
import androidx.viewbinding.ViewBinding
import kotlin.properties.ReadOnlyProperty
import kotlin.reflect.KPropertyfun <VB : ViewBinding> viewBinding(viewInflater: (LayoutInflater) -> VB):ReadOnlyProperty<Activity, VB> = ActivityViewBindingProperty(viewInflater)class ActivityViewBindingProperty<VB : ViewBinding>(private val viewInflater: (LayoutInflater) -> VB
) : ReadOnlyProperty<Activity, VB> {private var binding: VB? = nulloverride fun getValue(thisRef: Activity, property: KProperty<*>): VB {return binding ?: viewInflater(thisRef.layoutInflater).also {thisRef.setContentView(it.root)binding = it}}
}
通过委托的方式进行封装,下面来看在MainActivity中怎么使用它,
class MainActivity : AppCompatActivity() {private val binding by viewBinding(ActivityMainBinding::inflate)override fun onCreate(savedInstanceState: Bundle?) {super.onCreate(savedInstanceState)setContentView(R.layout.activity_main)}
}
使用起来很简单,后面就采用这种方式,你可以运行一下,看看有没有问题,然后我们可以再创建一个ScanActivity类,用于扫描页面,修改一下activity_main.xml中的代码,如下所示:
<?xml version="1.0" encoding="utf-8"?>
<androidx.constraintlayout.widget.ConstraintLayout xmlns:android="http://schemas.android.com/apk/res/android"xmlns:app="http://schemas.android.com/apk/res-auto"xmlns:tools="http://schemas.android.com/tools"android:layout_width="match_parent"android:layout_height="match_parent"tools:context=".MainActivity"><com.google.android.material.appbar.MaterialToolbarandroid:id="@+id/toolbar"android:layout_width="match_parent"android:layout_height="?attr/actionBarSize"android:background="@color/orange"app:layout_constraintEnd_toEndOf="parent"app:layout_constraintStart_toStartOf="parent"app:layout_constraintTop_toTopOf="parent"app:navigationIcon="@drawable/ic_scan_ble"app:title="GoodBle"app:titleCentered="true"app:titleTextColor="@color/white" /></androidx.constraintlayout.widget.ConstraintLayout>
这里用到了图标,代码如下所示:
<vector xmlns:android="http://schemas.android.com/apk/res/android"android:width="32dp"android:height="32dp"android:viewportWidth="1024"android:viewportHeight="1024"><pathandroid:fillColor="#ffffff"android:pathData="M761.5,141.1c-14.3,-9.6 -33.6,-5.9 -43.2,8.4 -9.6,14.2 -5.9,33.6 8.4,43.2 106,71.6 169.3,190.7 169.3,318.4 0,211.7 -172.2,384 -384,384S128,722.9 128,511.1c0,-127.8 63.3,-246.8 169.3,-318.4 14.2,-9.6 18,-29 8.4,-43.2s-29,-18 -43.2,-8.4C139.3,224.4 65.7,362.7 65.7,511.1c0,246.1 200.2,446.2 446.2,446.2S958.2,757.2 958.2,511.1C958.2,362.7 884.6,224.4 761.5,141.1z" /><pathandroid:fillColor="#ffffff"android:pathData="M402.1,157.6c17.2,0 31.1,-13.9 31.1,-31.1L433.2,96c0,-17.2 -13.9,-31.1 -31.1,-31.1s-31.1,13.9 -31.1,31.1l0,30.4C371,143.6 384.9,157.6 402.1,157.6z" /><pathandroid:fillColor="#ffffff"android:pathData="M624.3,157.6c17.2,0 31.1,-13.9 31.1,-31.1L655.5,96c0,-17.2 -13.9,-31.1 -31.1,-31.1s-31.1,13.9 -31.1,31.1l0,30.4C593.2,143.6 607.1,157.6 624.3,157.6z" /><pathandroid:fillColor="#ffffff"android:pathData="M428.3,227.4c11.2,18 41.8,48.4 85.9,48.4 43.8,0 74.9,-30.2 86.3,-48.1 9.3,-14.5 5.1,-33.7 -9.4,-43 -14.5,-9.3 -33.7,-5 -43,9.4 -0.1,0.2 -13.3,19.4 -33.9,19.4 -19.9,0 -32.3,-18 -33.2,-19.3 -9.1,-14.4 -28.2,-18.7 -42.7,-9.7C423.7,193.6 419.2,212.8 428.3,227.4z" /><pathandroid:fillColor="#ffffff"android:pathData="M306,440.9c-9.2,14.5 -4.8,33.8 9.7,42.9l142.7,90.1L314.1,665.1c-14.5,9.2 -18.9,28.4 -9.7,42.9 5.9,9.4 16,14.5 26.3,14.5 5.7,0 11.4,-1.6 16.6,-4.8l135.7,-85.7 0,148c0,10.6 4,20.2 10.3,27.8 0.4,0.5 0.8,1 1.2,1.4 8.4,9.3 20.5,15.3 34.1,15.3 2.4,0 4.8,-0.3 7,-0.9 5.8,-0.9 11.4,-2.8 16.5,-5.8 0.8,-0.5 1.6,-1 2.3,-1.5l134,-96.2c12.7,-8.2 20.5,-22.2 20.6,-37.2 0,-15.5 -8.4,-30.1 -21.2,-37.7l-113,-71.4 110.6,-69.9c13.6,-8.1 22,-22.8 21.9,-38.3 -0.1,-15 -8,-29 -20.7,-37.1l-132.4,-94.4c-0.8,-0.6 -1.6,-1.1 -2.5,-1.6 -21,-12.1 -47.9,-6.1 -61.4,13.7 -2.5,3.7 -4.1,7.8 -4.8,11.9 -1.7,3.9 -2.7,8.1 -2.7,12.7l0,144.9 -134.1,-84.7C334.4,422 315.2,426.4 306,440.9zM545.3,746.4 L545.3,628.9l87.1,55L545.3,746.4zM630.7,465.1l-85.4,53.9L545.3,404.3 630.7,465.1z" />
</vector>
颜色值,在colors.xml中增加:
<color name="orange">#FF5722</color><color name="warm_yellow">#FFC107</color><color name="dark_orange">#FF9800</color><color name="light_orange">#FFF3E0</color><color name="gray_white">#F8F8F8</color><color name="gray">#989898</color>
这里给toolbar设置导航图标,点击这个导航到扫描页面,不过再次之前我们可以在base包下再创建一个BaseActivity,这里面可以写一些常用的函数,代码如下所示:
open class BaseActivity : AppCompatActivity() {private var context: Context? = nulloverride fun onCreate(savedInstanceState: Bundle?) {super.onCreate(savedInstanceState)context = this}protected fun jumpActivity(clazz: Class<*>?, finish: Boolean = false) {startActivity(Intent(context, clazz))if (finish) finish()}protected fun back(toolbar: Toolbar, finish: Boolean = false) =toolbar.setNavigationOnClickListener { if (finish) finish() else onBackPressed() }protected fun showMsg(msg: CharSequence) =Toast.makeText(context, msg, Toast.LENGTH_SHORT).show()protected open fun isAndroid12() = Build.VERSION.SDK_INT >= Build.VERSION_CODES.Sprotected open fun hasAccessFineLocation() =hasPermission(Manifest.permission.ACCESS_FINE_LOCATION)protected open fun hasCoarseLocation() =hasPermission(Manifest.permission.ACCESS_COARSE_LOCATION)@RequiresApi(Build.VERSION_CODES.S)protected open fun hasBluetoothConnect() = hasPermission(Manifest.permission.BLUETOOTH_CONNECT)@RequiresApi(Build.VERSION_CODES.S)protected open fun hasBluetoothScan() = hasPermission(Manifest.permission.BLUETOOTH_SCAN)/*** 检查是有拥有某权限** @param permission 权限名称* @return true 有  false 没有*/protected open fun hasPermission(permission: String) = checkSelfPermission(permission) == PackageManager.PERMISSION_GRANTED/*** 蓝牙是否打开** @return true or false*/protected open fun isOpenBluetooth(): Boolean {(getSystemService(BLUETOOTH_SERVICE) as BluetoothManager).also {it.adapter ?: return falsereturn it.adapter.isEnabled}}/*** 位置是否打开*/protected open fun isOpenLocation(): Boolean {val locationManager = getSystemService(LOCATION_SERVICE) as LocationManagerval gps = locationManager.isProviderEnabled(LocationManager.GPS_PROVIDER)val network = locationManager.isProviderEnabled(LocationManager.NETWORK_PROVIDER)val locationEnabled = isLocationEnabled()Log.d("TAG", "gps: $gps,network:$network,locationEnabled:$locationEnabled")return gps || network || locationEnabled}open fun isLocationEnabled(): Boolean {val locationMode = try {Settings.Secure.getInt(contentResolver, Settings.Secure.LOCATION_MODE)} catch (e: SettingNotFoundException) {e.printStackTrace()return false}return locationMode != Settings.Secure.LOCATION_MODE_OFF}
}
这里面就是一些比较基础的方法,在后面扫描页面会用到的,然后再修改一下MainActivity中的代码,继承BaseActivity,点击中跳转扫描页面:
class MainActivity : BaseActivity() {private val binding by viewBinding(ActivityMainBinding::inflate)override fun onCreate(savedInstanceState: Bundle?) {super.onCreate(savedInstanceState)setContentView(R.layout.activity_main)binding.toolbar.setNavigationOnClickListener { jumpActivity(ScanActivity::class.java) }}
}
为了保持一样的UI效果,下面更改一下themes.xml中的代码,如下所示:
<resources xmlns:tools="http://schemas.android.com/tools"><!-- Base application theme. --><style name="Theme.GoodBle" parent="Theme.MaterialComponents.DayNight.NoActionBar"><!-- Primary brand color. --><item name="colorPrimary">@color/orange</item><item name="colorPrimaryVariant">@color/orange</item><item name="colorOnPrimary">@color/white</item><!-- Secondary brand color. --><item name="colorSecondary">@color/light_orange</item><item name="colorSecondaryVariant">@color/dark_orange</item><item name="colorOnSecondary">@color/white</item><!-- Status bar color. --><item name="android:statusBarColor">?attr/colorPrimaryVariant</item><!-- Customize your theme here. --><item name="android:windowBackground">@color/gray_white</item></style><style name="BottomSheetDialogStyle" parent="Theme.Design.BottomSheetDialog"><item name="android:windowFrame">@null</item><item name="android:windowIsFloating">true</item><item name="android:windowIsTranslucent">true</item><item name="android:background">@android:color/transparent</item><item name="android:backgroundDimEnabled">true</item><item name="android:colorBackground">@android:color/transparent</item></style>
</resources>
主要就是修改状态栏颜色,窗口默认背景颜色,现在前置的条件都准备的差不多了,运行一下看看MainActivity的页面效果。

二、扫描准备
下面在com.llw.goodble包下新建一个ble包,里面我们需要创建一些类来处理扫描的相关事务,首先在ble包下创建一个BleCore类,里面先不写内容,然后我们在ble包下新建一个scan包。在scan包下新建一个BleScanCallback接口,这是一个扫描回调接口,代码如下所示:
interface BleScanCallback {/*** 扫描结果*/fun onScanResult(result: ScanResult)/*** 批量扫描结果*/fun onBatchScanResults(results: List<ScanResult>) {}/*** 扫描错误*/fun onScanFailed(failed: String) {}
}
同时在扫描页面需要监听一下蓝牙和定位是否打开,在scan包下添加一个广播接收器的ReceiverCallback 接口,代码如下所示:
interface ReceiverCallback {/*** 蓝牙关闭*/fun bluetoothClose()/*** 位置关闭*/fun locationClose()
}
下面在scan创建广播接收器ScanReceiver,代码如下所示:
class ScanReceiver : BroadcastReceiver() {private var callback: ReceiverCallback? = nullfun setCallback(callback: ReceiverCallback?) {this.callback = callback}private var isSend = 0override fun onReceive(context: Context, intent: Intent) {val action = intent.actionif (action == BluetoothAdapter.ACTION_STATE_CHANGED) {when (intent.getIntExtra(BluetoothAdapter.EXTRA_STATE, BluetoothAdapter.ERROR)) {BluetoothAdapter.STATE_OFF -> Log.d(TAG, "STATE_OFF Phone bluetooth off")BluetoothAdapter.STATE_TURNING_OFF -> {callback!!.bluetoothClose()Log.d(TAG, "STATE_TURNING_OFF Phone bluetooth is turning off")}BluetoothAdapter.STATE_ON -> Log.d(TAG, "STATE_ON Phone bluetooth turned on")BluetoothAdapter.STATE_TURNING_ON -> Log.d(TAG, "STATE_TURNING_ON Phone bluetooth is on")}} else if (action == LocationManager.PROVIDERS_CHANGED_ACTION) {if (!isGPSOpen(context)) {isSend++if (isSend == 1) {Log.d(TAG, "Positioning off")callback!!.locationClose()} else if (isSend == 4) {isSend = 0}}}}companion object {val TAG: String = ScanReceiver::class.java.simpleNamefun isGPSOpen(context: Context): Boolean {val locationMode = try {Settings.Secure.getInt(context.contentResolver, Settings.Secure.LOCATION_MODE)} catch (e: SettingNotFoundException) {e.printStackTrace()return false}return locationMode != Settings.Secure.LOCATION_MODE_OFF}}
}
这里的代码相对简单就是广播接收器接收相关的动作信息,再进行回调,然后我们写一个用于扫描类,在scan包下新建一个BleScan类,代码如下所示:
/*** 低功耗扫描类*/
@SuppressLint("MissingPermission", "InlinedApi")
class BleScan private constructor(private val context: Context) {private var mScanFilters: List<ScanFilter>private var mScanSettings: ScanSettingsprivate var bleScanCallback: BleScanCallback? = nullvar mIsScanning = falseinit {mScanFilters = ArrayList()mScanSettings = ScanSettings.Builder().build()}companion object {@SuppressLint("StaticFieldLeak")@Volatileprivate var instance: BleScan? = nullprivate var mBluetoothAdapter: BluetoothAdapter? = nullprivate var mScanner: BluetoothLeScanner? = nullfun getInstance(context: Context) = instance ?: synchronized(this) {instance ?: BleScan(context).also {instance = itval manager = context.getSystemService(Context.BLUETOOTH_SERVICE) as BluetoothManagermBluetoothAdapter = manager.adapterif (mBluetoothAdapter != null) {mScanner = mBluetoothAdapter?.bluetoothLeScanner}}}}/*** 设置扫描过滤*/fun setScanFilters(scanFilters: List<ScanFilter>) {mScanFilters = scanFilters}/*** 设置扫描设置选项*/fun setScanSettings(scanSettings: ScanSettings) {mScanSettings = scanSettings}/*** 设置扫描回调*/fun setPhyScanCallback(bleScanCallback: BleScanCallback?) {this.bleScanCallback = bleScanCallback}fun isScanning() = mIsScanning/*** 扫描回调*/private val scanCallback: ScanCallback = object : ScanCallback() {override fun onScanResult(callbackType: Int, result: ScanResult) {bleScanCallback?.onScanResult(result)}override fun onBatchScanResults(results: List<ScanResult>) {bleScanCallback?.onBatchScanResults(results)}override fun onScanFailed(errorCode: Int) {localScanFailed(when (errorCode) {SCAN_FAILED_ALREADY_STARTED -> "Fails to start scan as BLE scan with the same settings is already started by the app."SCAN_FAILED_APPLICATION_REGISTRATION_FAILED -> "Fails to start scan as app cannot be registered."SCAN_FAILED_INTERNAL_ERROR -> "Fails to start scan due an internal error"SCAN_FAILED_FEATURE_UNSUPPORTED -> "Fails to start power optimized scan as this feature is not supported."else -> "UNKNOWN_ERROR"})}}/*** 显示本地扫描错误*/private fun localScanFailed(failed: String) = bleScanCallback?.onScanFailed(failed)/*** 开始扫描*/@SuppressLint("MissingPermission")fun startScan() {if (!isOpenBluetooth()) {localScanFailed("Bluetooth is not turned on.")return}if (isAndroid12()) {if (!hasBluetoothScan()) {localScanFailed("Android 12 needs to dynamically request bluetooth scan permission.")return}} else {if (!hasAccessFineLocation()) {localScanFailed("Android 6 to 12 requires dynamic request location permission.")return}}if (mIsScanning) {localScanFailed("Currently scanning, please close the current scan and scan again.")return}if (mScanner == null) mScanner = mBluetoothAdapter?.bluetoothLeScannerif (!mBluetoothAdapter!!.isEnabled) {localScanFailed("Bluetooth not turned on.")return}mScanner?.startScan(mScanFilters, mScanSettings, scanCallback)mIsScanning = true}/*** 停止扫描*/fun stopScan() {if (!mIsScanning) {localScanFailed("Not currently scanning, your stop has no effect.")return}if (mScanner == null) {localScanFailed("BluetoothLeScanner is Null.")return}if (!mBluetoothAdapter!!.isEnabled) {localScanFailed("Bluetooth not turned on.")return}mIsScanning = falsemScanner?.stopScan(scanCallback)}/*** 是否打开蓝牙*/private fun isOpenBluetooth() = if (mBluetoothAdapter == null) {localScanFailed("BluetoothAdapter is Null."); false} else mBluetoothAdapter!!.isEnabledprivate fun isAndroid12() = Build.VERSION.SDK_INT >= Build.VERSION_CODES.Sprivate fun hasAccessFineLocation() = hasPermission(Manifest.permission.ACCESS_FINE_LOCATION)private fun hasBluetoothConnect() = hasPermission(Manifest.permission.BLUETOOTH_CONNECT)private fun hasBluetoothScan() = hasPermission(Manifest.permission.BLUETOOTH_SCAN)private fun hasPermission(permission: String) = context.checkSelfPermission(permission) == PackageManager.PERMISSION_GRANTED
}
这里首先是创建一个单例,在里面对当前类和一些变量进行初始化,核心就是一个扫描回调,开始和停止扫描的方法处理。因为后面还需要写Ble相关的数据处理,因此在ble包下创建一个BleCore类,代码如下所示:
class BleCore private constructor(private val context: Context) {@SuppressLint("StaticFieldLeak")companion object {@SuppressLint("StaticFieldLeak")@Volatileprivate var instance: BleCore? = null@SuppressLint("StaticFieldLeak")private lateinit var bleScan: BleScanfun getInstance(context: Context) = instance ?: synchronized(this) {instance ?: BleCore(context).also {instance = it//蓝牙扫描bleScan = BleScan.getInstance(context)}}}fun setPhyScanCallback(bleScanCallback: BleScanCallback) {bleScan.setPhyScanCallback(bleScanCallback)}fun isScanning() = bleScan.isScanning()fun startScan() = bleScan.startScan()fun stopScan() = bleScan.stopScan()
}
同样是一个单例,在里面初始化BleScan,然后增加几个函数去调用BleScan中的函数,最后我们在com.llw.goodble包下创建一个BleApp类,代码如下所示:
class BleApp : Application() {@SuppressLint("StaticFieldLeak")private lateinit var context: Context@SuppressLint("StaticFieldLeak")private lateinit var bleCore: BleCoreoverride fun onCreate() {super.onCreate()context = applicationContext//初始化Ble核心库bleCore = BleCore.getInstance(this)}fun getBleCore() = bleCore
}
这里继承Application,通过自定义的方式在App启动的时候加载这个类,然后在onCreate()函数中,完成对于Ble核心类的初始化,顺便完成对于Ble扫描类的初始化。最后在AndroidManifest.xml中的application标签中配置这个BleApp,如下所示:
<applicationandroid:name=".BleApp"...>
三、扫描页面
在Android12及以上版本,使用蓝牙时需要请求扫描、连接权限、如果还需要使用手机作为从机的话,就请求广播权限,后面会提到的,同时在低版本Android中我们扫描蓝牙请求定位权限,那么首先我们就把权限的部分先做了。
首先声明静态权限,在AndroidManifest.xml中增加如下代码:
<uses-permission android:name="android.permission.ACCESS_FINE_LOCATION" /><uses-permission android:name="android.permission.ACCESS_COARSE_LOCATION" /><uses-permission android:name="android.permission.BLUETOOTH" /><uses-permission android:name="android.permission.BLUETOOTH_ADMIN" /><uses-permission android:name="android.permission.BLUETOOTH_CONNECT" /><uses-permission android:name="android.permission.BLUETOOTH_SCAN" /><uses-feature android:name="android.hardware.bluetooth_le"/>
① 增加UI布局
动态权限请求有两种方式,一种是进入这个页面一下子请求多个权限,另一种是一个一个来请求,让你知道为什么会请求这个权限,这里我们选择第二种,因此需要增加一些布局xml,如下图所示的布局XML。

下面我们依次创建,lay_android12_should_connect.xml
<?xml version="1.0" encoding="utf-8"?>
<LinearLayout xmlns:android="http://schemas.android.com/apk/res/android"xmlns:app="http://schemas.android.com/apk/res-auto"android:id="@+id/request_location_lay"android:layout_width="match_parent"android:layout_height="match_parent"android:background="@color/gray_white"android:gravity="center"android:orientation="vertical"android:paddingStart="16dp"android:paddingEnd="16dp"><ImageViewandroid:layout_width="wrap_content"android:layout_height="wrap_content"android:layout_gravity="center_horizontal"android:padding="16dp"android:src="@drawable/ic_bluetooth_connected" /><TextViewandroid:layout_width="wrap_content"android:layout_height="wrap_content"android:text="需要蓝牙连接权限"android:textColor="@color/dark_orange"android:textSize="16sp" /><TextViewandroid:layout_width="match_parent"android:layout_height="wrap_content"android:layout_marginTop="16dp"android:layout_marginBottom="16dp"android:text="从Android12.0开始,打开蓝牙之前需要请求此权限,使用蓝牙连接权限"app:titleTextColor="@color/black" /><com.google.android.material.button.MaterialButtonandroid:id="@+id/btn_request_connect_permission"android:layout_width="wrap_content"android:layout_height="wrap_content"android:layout_gravity="center_horizontal"android:text="授予权限"android:textColor="@color/white" />
</LinearLayout>
用到一个图标ic_bluetooth_connected.xml
<?xml version="1.0" encoding="UTF-8" standalone="no"?>
<vector xmlns:android="http://schemas.android.com/apk/res/android"android:width="48dp"android:height="48dp"android:tint="@color/orange"android:viewportWidth="24.0"android:viewportHeight="24.0"><pathandroid:fillColor="@android:color/white"android:pathData="M7,12l-2,-2 -2,2 2,2 2,-2zM17.71,7.71L12,2h-1v7.59L6.41,5 5,6.41 10.59,12 5,17.59 6.41,19 11,14.41L11,22h1l5.71,-5.71 -4.3,-4.29 4.3,-4.29zM13,5.83l1.88,1.88L13,9.59L13,5.83zM14.88,16.29L13,18.17v-3.76l1.88,1.88zM19,10l-2,2 2,2 2,-2 -2,-2z" />
</vector>
布局lay_android12_should_scan.xml
<?xml version="1.0" encoding="utf-8"?>
<LinearLayout xmlns:android="http://schemas.android.com/apk/res/android"xmlns:app="http://schemas.android.com/apk/res-auto"android:id="@+id/request_location_lay"android:layout_width="match_parent"android:layout_height="match_parent"android:background="@color/gray_white"android:gravity="center"android:orientation="vertical"android:paddingStart="16dp"android:paddingEnd="16dp"><ImageViewandroid:layout_width="wrap_content"android:layout_height="wrap_content"android:layout_gravity="center_horizontal"android:padding="16dp"android:src="@drawable/ic_bluetooth_scan" /><TextViewandroid:layout_width="wrap_content"android:layout_height="wrap_content"android:text="需要扫描权限"android:textColor="@color/dark_orange"android:textSize="16sp" /><TextViewandroid:layout_width="match_parent"android:layout_height="wrap_content"android:layout_marginTop="16dp"android:layout_marginBottom="16dp"android:text="从Android12.0开始,扫描设备不再需要请求定位权限,使用此权限"app:titleTextColor="@color/black" /><com.google.android.material.button.MaterialButtonandroid:id="@+id/btn_request_scan_permission"android:layout_width="wrap_content"android:layout_height="wrap_content"android:layout_gravity="center_horizontal"android:text="授予权限"android:textColor="@color/white" />
</LinearLayout>
图标ic_bluetooth_scan.xml
<?xml version="1.0" encoding="UTF-8" standalone="no"?>
<vector xmlns:android="http://schemas.android.com/apk/res/android"android:width="48dp"android:height="48dp"android:autoMirrored="true"android:tint="@color/orange"android:viewportWidth="24.0"android:viewportHeight="24.0"><pathandroid:fillColor="@android:color/white"android:pathData="M14.24,12.01l2.32,2.32c0.28,-0.72 0.44,-1.51 0.44,-2.33 0,-0.82 -0.16,-1.59 -0.43,-2.31l-2.33,2.32zM19.53,6.71l-1.26,1.26c0.63,1.21 0.98,2.57 0.98,4.02s-0.36,2.82 -0.98,4.02l1.2,1.2c0.97,-1.54 1.54,-3.36 1.54,-5.31 -0.01,-1.89 -0.55,-3.67 -1.48,-5.19zM15.71,7.71L10,2L9,2v7.59L4.41,5 3,6.41 8.59,12 3,17.59 4.41,19 9,14.41L9,22h1l5.71,-5.71 -4.3,-4.29 4.3,-4.29zM11,5.83l1.88,1.88L11,9.59L11,5.83zM12.88,16.29L11,18.17v-3.76l1.88,1.88z" />
</vector>
布局lay_empty.xml:
<?xml version="1.0" encoding="utf-8"?>
<LinearLayout xmlns:android="http://schemas.android.com/apk/res/android"xmlns:app="http://schemas.android.com/apk/res-auto"android:layout_width="match_parent"android:layout_height="match_parent"android:gravity="center"android:orientation="vertical"><ImageViewandroid:id="@+id/imageView"android:layout_width="100dp"android:layout_height="100dp"app:srcCompat="@mipmap/ic_scanning" /><TextViewandroid:id="@+id/textView2"android:layout_width="wrap_content"android:layout_height="wrap_content"android:layout_marginTop="24dp"android:text="努力扫描中"android:textColor="@color/gray"android:textSize="18sp"android:textStyle="bold" />
</LinearLayout>
图标不是XML图片,去源码中获取,这是在扫描不到设备的时候显示的布局,布局lay_should_enable_bluetooth.xml。
<?xml version="1.0" encoding="utf-8"?>
<LinearLayout xmlns:android="http://schemas.android.com/apk/res/android"xmlns:app="http://schemas.android.com/apk/res-auto"android:layout_width="match_parent"android:layout_height="match_parent"android:background="@color/gray_white"android:gravity="center"android:orientation="vertical"><ImageViewandroid:layout_width="wrap_content"android:layout_height="wrap_content"android:padding="16dp"app:srcCompat="@drawable/ic_bluetooth_disabled" /><TextViewandroid:layout_width="wrap_content"android:layout_height="wrap_content"android:gravity="center_horizontal"android:text="蓝牙已禁用"android:textColor="@color/dark_orange"android:textSize="16sp" /><TextViewandroid:layout_width="match_parent"android:layout_height="wrap_content"android:layout_marginTop="16dp"android:gravity="center_horizontal"android:text="蓝牙适配器已关闭,单击下面的按钮以启用它。"android:textColor="@color/black" /><com.google.android.material.button.MaterialButtonandroid:id="@+id/btn_enable_bluetooth"android:layout_width="wrap_content"android:layout_height="wrap_content"android:layout_gravity="center_horizontal"android:layout_marginTop="16dp"android:text="启用"android:textColor="@color/white" />
</LinearLayout>
图标ic_bluetooth_disabled.xml
<vector xmlns:android="http://schemas.android.com/apk/res/android"android:width="48dp"android:height="48dp"android:viewportWidth="24.0"android:viewportHeight="24.0"><pathandroid:fillColor="@color/orange"android:pathData="M13,5.83l1.88,1.88 -1.6,1.6 1.41,1.41 3.02,-3.02L12,2h-1v5.03l2,2v-3.2zM5.41,4L4,5.41 10.59,12 5,17.59 6.41,19 11,14.41V22h1l4.29,-4.29 2.3,2.29L20,18.59 5.41,4zM13,18.17v-3.76l1.88,1.88L13,18.17z" />
</vector>
布局lay_should_enable_location.xml
<?xml version="1.0" encoding="utf-8"?>
<LinearLayout xmlns:android="http://schemas.android.com/apk/res/android"xmlns:app="http://schemas.android.com/apk/res-auto"android:layout_width="match_parent"android:layout_height="match_parent"android:background="@color/gray_white"android:gravity="center"android:orientation="vertical"><ImageViewandroid:layout_width="wrap_content"android:layout_height="wrap_content"android:layout_gravity="center_horizontal"android:padding="16dp"app:srcCompat="@drawable/ic_location_disabled" /><TextViewandroid:layout_width="wrap_content"android:layout_height="wrap_content"android:text="位置已禁用"android:textColor="@color/dark_orange"android:textSize="16sp" /><TextViewandroid:layout_width="match_parent"android:layout_height="wrap_content"android:layout_marginTop="16dp"android:gravity="center_horizontal"android:text="位置已关闭,单击下面的按钮以启用它。"android:textColor="@color/black" /><com.google.android.material.button.MaterialButtonandroid:id="@+id/btn_enable_location"android:layout_width="wrap_content"android:layout_height="wrap_content"android:layout_gravity="center_horizontal"android:layout_marginTop="16dp"android:text="启用"android:textColor="@color/white" />
</LinearLayout>
图标ic_location_disabled.xml
<?xml version="1.0" encoding="UTF-8" standalone="no"?>
<vector xmlns:android="http://schemas.android.com/apk/res/android"android:width="48dp"android:height="48dp"android:tint="@color/orange"android:viewportWidth="24.0"android:viewportHeight="24.0"><pathandroid:fillColor="@android:color/white"android:pathData="M20.94,11c-0.46,-4.17 -3.77,-7.48 -7.94,-7.94L13,1h-2v2.06c-1.13,0.12 -2.19,0.46 -3.16,0.97l1.5,1.5C10.16,5.19 11.06,5 12,5c3.87,0 7,3.13 7,7 0,0.94 -0.19,1.84 -0.52,2.65l1.5,1.5c0.5,-0.96 0.84,-2.02 0.97,-3.15L23,13v-2h-2.06zM3,4.27l2.04,2.04C3.97,7.62 3.25,9.23 3.06,11L1,11v2h2.06c0.46,4.17 3.77,7.48 7.94,7.94L11,23h2v-2.06c1.77,-0.2 3.38,-0.91 4.69,-1.98L19.73,21 21,19.73 4.27,3 3,4.27zM16.27,17.54C15.09,18.45 13.61,19 12,19c-3.87,0 -7,-3.13 -7,-7 0,-1.61 0.55,-3.09 1.46,-4.27l9.81,9.81z" />
</vector>
布局lay_should_location_lay.xml
<?xml version="1.0" encoding="utf-8"?>
<LinearLayout xmlns:android="http://schemas.android.com/apk/res/android"xmlns:app="http://schemas.android.com/apk/res-auto"android:id="@+id/request_location_lay"android:layout_width="match_parent"android:layout_height="match_parent"android:background="@color/gray_white"android:gravity="center"android:orientation="vertical"android:paddingStart="16dp"android:paddingEnd="16dp"><ImageViewandroid:layout_width="wrap_content"android:layout_height="wrap_content"android:layout_gravity="center_horizontal"android:padding="16dp"android:src="@drawable/ic_location_off" /><TextViewandroid:layout_width="wrap_content"android:layout_height="wrap_content"android:text="需要位置许可"android:textColor="@color/dark_orange"android:textSize="16sp" /><TextViewandroid:layout_width="match_parent"android:layout_height="wrap_content"android:layout_marginTop="16dp"android:layout_marginBottom="16dp"android:text="从 Android 6.0 Marshmallow 开始,应用程序需要位置权限才能扫描低功耗蓝牙设备。" /><com.google.android.material.button.MaterialButtonandroid:id="@+id/btn_request_location_permission"android:layout_width="wrap_content"android:layout_height="wrap_content"android:layout_gravity="center_horizontal"android:text="授予权限"android:textColor="@color/white" />
</LinearLayout>
图标ic_location_off.xml
<vector xmlns:android="http://schemas.android.com/apk/res/android"android:width="48dp"android:height="48dp"android:viewportWidth="24.0"android:viewportHeight="24.0"><pathandroid:fillColor="@color/orange"android:pathData="M12,6.5c1.38,0 2.5,1.12 2.5,2.5 0,0.74 -0.33,1.39 -0.83,1.85l3.63,3.63c0.98,-1.86 1.7,-3.8 1.7,-5.48 0,-3.87 -3.13,-7 -7,-7 -1.98,0 -3.76,0.83 -5.04,2.15l3.19,3.19c0.46,-0.52 1.11,-0.84 1.85,-0.84zM16.37,16.1l-4.63,-4.63 -0.11,-0.11L3.27,3 2,4.27l3.18,3.18C5.07,7.95 5,8.47 5,9c0,5.25 7,13 7,13s1.67,-1.85 3.38,-4.35L18.73,21 20,19.73l-3.63,-3.63z" />
</vector>
好了,在我们的努力下这些布局总算是创建完成了,下面我们将它们放置到activity_scan.xml中,代码如下所示:
<?xml version="1.0" encoding="utf-8"?>
<RelativeLayout xmlns:android="http://schemas.android.com/apk/res/android"xmlns:app="http://schemas.android.com/apk/res-auto"xmlns:tools="http://schemas.android.com/tools"android:layout_width="match_parent"android:layout_height="match_parent"tools:context=".ScanActivity"><com.google.android.material.appbar.MaterialToolbarandroid:id="@+id/toolbar"android:layout_width="match_parent"android:layout_height="?attr/actionBarSize"android:background="@color/orange"app:title="选择蓝牙设备"app:titleTextColor="@color/white"><TextViewandroid:id="@+id/tv_scan_status"android:layout_width="wrap_content"android:layout_height="wrap_content"android:layout_gravity="end"android:layout_marginEnd="6dp"android:padding="10dp"android:text="搜索"android:textColor="@color/white"android:textSize="14sp"android:visibility="gone" /></com.google.android.material.appbar.MaterialToolbar><ProgressBarandroid:id="@+id/pb_scan_loading"style="?android:attr/progressBarStyleHorizontal"android:layout_width="match_parent"android:layout_height="wrap_content"android:layout_alignBottom="@+id/toolbar"android:layout_marginBottom="-10dp"android:indeterminate="true"android:indeterminateTint="@color/orange"android:visibility="invisible" /><!--设备列表--><androidx.recyclerview.widget.RecyclerViewandroid:id="@+id/rv_device"android:layout_width="match_parent"android:layout_height="match_parent"android:layout_below="@+id/toolbar"android:layout_marginTop="4dp"android:overScrollMode="never" /><!--未扫描到设备时显示--><includeandroid:id="@+id/empty_lay"layout="@layout/lay_empty"android:layout_width="match_parent"android:layout_height="match_parent"android:layout_below="@id/toolbar" /><!-- Android 12蓝牙扫描权限为许可时显示 Shell_Unresponsive--><includeandroid:id="@+id/request_bluetooth_scan_lay"layout="@layout/lay_android12_should_scan"android:layout_width="match_parent"android:layout_height="match_parent"android:layout_below="@id/toolbar"android:visibility="gone" /><!--Android 6 至 11 没有打开位置开关 无法扫描蓝牙--><includeandroid:id="@+id/enable_location_lay"layout="@layout/lay_should_enable_location"android:layout_width="match_parent"android:layout_height="match_parent"android:layout_below="@id/toolbar"android:visibility="gone" /><!-- 位置权限未许可时显示 --><includeandroid:id="@+id/request_location_lay"layout="@layout/lay_should_location_lay"android:layout_width="match_parent"android:layout_height="match_parent"android:layout_below="@id/toolbar"android:visibility="gone" /><!-- 手机蓝牙未开启时显示 --><includeandroid:id="@+id/enable_bluetooth_lay"layout="@layout/lay_should_enable_bluetooth"android:layout_width="match_parent"android:layout_height="match_parent"android:layout_below="@id/toolbar"android:visibility="gone" /><!-- Android12 开启蓝牙需要先请求蓝牙连接权限 --><includeandroid:id="@+id/request_bluetooth_connect_lay"layout="@layout/lay_android12_should_connect"android:layout_width="match_parent"android:layout_height="match_parent"android:layout_below="@id/toolbar"android:visibility="gone" /></RelativeLayout>
下面我们可以写代码了,在ScanActivity中,
② 点击监听
首先是ScanActivity的一些基本配置,如下所示:
class ScanActivity : BaseActivity() {private val TAG = ScanActivity::class.java.simpleNameprivate val binding by viewBinding(ActivityScanBinding::inflate)override fun onCreate(savedInstanceState: Bundle?) {super.onCreate(savedInstanceState)setContentView(R.layout.activity_scan)}
}
然后增加布局中按钮的点击监听,创建一个initView()函数,在onCreate()中调用它,代码如下所示:
override fun onCreate(savedInstanceState: Bundle?) {super.onCreate(savedInstanceState)setContentView(R.layout.activity_scan)initView()}private fun initView() {binding.requestBluetoothConnectLay.btnRequestConnectPermission.setOnClickListener(this)binding.enableBluetoothLay.btnEnableBluetooth.setOnClickListener(this)binding.requestLocationLay.btnRequestLocationPermission.setOnClickListener(this)binding.enableLocationLay.btnEnableLocation.setOnClickListener(this)binding.requestBluetoothScanLay.btnRequestScanPermission.setOnClickListener(this)binding.toolbar.setOnClickListener(this)binding.tvScanStatus.setOnClickListener(this)}
然后实现点击监听
class ScanActivity : BaseActivity(), View.OnClickListener
重写onClick()函数,代码如下所示:
override fun onClick(v: View) {when (v.id) {//请求蓝牙连接权限R.id.btn_request_connect_permission -> {}//打开蓝牙开关R.id.btn_enable_bluetooth -> {}//请求定位权限R.id.btn_request_location_permission -> {}//打开位置开关R.id.btn_enable_location -> {}//请求蓝牙扫描权限R.id.btn_request_scan_permission -> {}//扫描或停止扫描R.id.tv_scan_status -> {}else -> {}}}
在这里我们先不写内容,后面再完善,然后我们可以先处理权限,再重写Activity的onResume()函数,代码如下所示:
override fun onResume() {super.onResume()if (isAndroid12()) {//蓝牙连接binding.requestBluetoothConnectLay.root.visibility = if (hasBluetoothConnect()) View.GONE else View.VISIBLEif (!hasBluetoothConnect()) {Log.d(TAG, "onResume: 未获取蓝牙连接权限")return}//打开蓝牙开关binding.enableBluetoothLay.root.visibility = if (isOpenBluetooth()) View.GONE else View.VISIBLEif (!isOpenBluetooth()) {Log.d(TAG, "onResume: 未打开蓝牙")return}//蓝牙扫描binding.requestBluetoothScanLay.root.visibility = if (hasBluetoothScan()) View.GONE else View.VISIBLEif (!hasBluetoothScan()) {Log.d(TAG, "onResume: 未获取蓝牙扫描权限")return}}//打开蓝牙binding.enableBluetoothLay.root.visibility = if (isOpenBluetooth()) View.GONE else View.VISIBLEif (!isOpenBluetooth()) {Log.d(TAG, "onResume: 未打开蓝牙")return}//打开定位binding.enableLocationLay.root.visibility = if (isOpenLocation()) View.GONE else View.VISIBLEif (!isOpenLocation()) {Log.d(TAG, "onResume: 未打开位置")return}//请求定位binding.requestLocationLay.root.visibility = if (hasCoarseLocation() && hasAccessFineLocation()) View.GONE else View.VISIBLEif (!hasAccessFineLocation()) {Log.d(TAG, "onResume: 未获取定位权限")return}binding.tvScanStatus.visibility = View.VISIBLE//开始扫描}
③ 扫描处理
在这个函数中对activity_scan.xml中引入的布局判断是否显示,在请求权限或者是打开开关之后都会触发这个函数,然后进行检查,当所有检查都通过之后说明你可以开始扫描了。那么如果要扫描,我们需要得到BleCore的对象,先声明,然后在onCreate中进行实例化。
private lateinit var bleCore: BleCoreoverride fun onCreate(savedInstanceState: Bundle?) {...bleCore = (application as BleApp).getBleCore()}
下面我们可以写扫描相关的方法,代码如下所示:
private fun startScan() {bleCore?.startScan()binding.tvScanStatus.text = "停止"binding.pbScanLoading.visibility = View.VISIBLE}private fun stopScan() {bleCore?.stopScan()binding.tvScanStatus.text = "搜索"binding.pbScanLoading.visibility = View.INVISIBLE}
这里就是开始和停止扫描,别忘了还有扫描回调,这个回调应该写在哪里,首先是在onCreate()函数中,代码如下:
override fun onCreate(savedInstanceState: Bundle?) {...//设置扫描回调if (isOpenBluetooth()) bleCore!!.setPhyScanCallback(this@ScanActivity)}
这里还判断了一下是否开启蓝牙,扫描的结果需要实现BleScanCallback接口,如下所示:
class ScanActivity : BaseActivity(), View.OnClickListener, BleScanCallback
重写onScanResult()函数,如下所示:
/*** 扫描回调*/override fun onScanResult(result: ScanResult) {}
④ 广播处理
然后别忘记了我们还有一个广播处理,在onCreate()函数中进行广播注册,代码如下所示:
override fun onCreate(savedInstanceState: Bundle?) {...//注册广播registerReceiver(ScanReceiver().apply { setCallback(this@ScanActivity) },IntentFilter().apply {addAction(BluetoothAdapter.ACTION_STATE_CHANGED)addAction(LocationManager.PROVIDERS_CHANGED_ACTION)})}
实现接口ReceiverCallback,代码如下所示:
class ScanActivity : BaseActivity(), View.OnClickListener, BleScanCallback, ReceiverCallback
重写里面的函数,代码如下所示:
/*** 蓝牙关闭*/override fun bluetoothClose() {}/*** 位置关闭*/override fun locationClose() {}
四、权限处理
下面我们进行权限和开关的请求处理,在ScanActivity中新增如下代码:
//蓝牙连接权限private val requestConnect =registerForActivityResult(ActivityResultContracts.RequestPermission()) {showMsg(if (it) "可以打开蓝牙" else "Android12 中不授予此权限无法打开蓝牙")}//启用蓝牙private val enableBluetooth =registerForActivityResult(ActivityResultContracts.StartActivityForResult()) { result ->if (result.resultCode == Activity.RESULT_OK) {showMsg("蓝牙已打开")Log.d(TAG, ": 蓝牙已打开")bleCore.setPhyScanCallback(this@ScanActivity)}}//请求定位private val requestLocation =registerForActivityResult(ActivityResultContracts.RequestMultiplePermissions()) { result ->val coarseLocation = result[Manifest.permission.ACCESS_COARSE_LOCATION]val fineLocation = result[Manifest.permission.ACCESS_FINE_LOCATION]if (coarseLocation == true && fineLocation == true) {//开始扫描设备showMsg("定位权限已获取")if (isOpenBluetooth()) bleCore.setPhyScanCallback(this@ScanActivity)}}//启用定位private val enableLocation =registerForActivityResult(ActivityResultContracts.StartActivityForResult()) { result ->if (result.resultCode == Activity.RESULT_OK) {showMsg("位置已打开")Log.d(TAG, ": 位置已打开")if (isOpenBluetooth()) bleCore.setPhyScanCallback(this@ScanActivity)}}//蓝牙连接权限private val requestScan =registerForActivityResult(ActivityResultContracts.RequestPermission()) {showMsg(if (it) "可以开始扫描设备了" else "Android12 Android12 中不授予此权限无法扫描蓝牙")}
这里使用了Activity Result API,需要注意的是它们是与onCreate()函数平级的,下面修改onClick()函数中的代码:
override fun onClick(v: View) {when (v.id) {//请求蓝牙连接权限R.id.btn_request_connect_permission -> if (isAndroid12()) requestConnect.launch(Manifest.permission.BLUETOOTH_CONNECT)//打开蓝牙开关R.id.btn_enable_bluetooth -> enableBluetooth.launch(Intent(BluetoothAdapter.ACTION_REQUEST_ENABLE))//请求定位权限R.id.btn_request_location_permission -> requestLocation.launch(arrayOf(Manifest.permission.ACCESS_COARSE_LOCATION,Manifest.permission.ACCESS_FINE_LOCATION))//打开位置开关R.id.btn_enable_location -> enableLocation.launch(Intent(Settings.ACTION_LOCATION_SOURCE_SETTINGS))//请求蓝牙扫描权限R.id.btn_request_scan_permission -> if (isAndroid12()) requestScan.launch(Manifest.permission.BLUETOOTH_SCAN)//扫描或停止扫描R.id.tv_scan_status -> if (bleCore.isScanning()) stopScan() else startScan()else -> {}}}
这里就比较的简单了,下面再修改bluetoothClose()和locationClose()函数,在回调时都判断当前是否正在扫描,在扫描则停止,同时显示对应的布局。
override fun bluetoothClose() {//蓝牙关闭时停止扫描if (bleCore.isScanning()) {stopScan()binding.enableBluetoothLay.root.visibility = View.VISIBLE}}override fun locationClose() {//位置关闭时停止扫描if (bleCore.isScanning()) {stopScan()binding.enableLocationLay.root.visibility = View.VISIBLE}}
最后再增加一个onStop()函数,代码如下:
override fun onStop() {super.onStop()//页面停止时停止扫描if (bleCore.isScanning()) stopScan()}
当页面销毁了或者是进入后台了,那么触发回调,停止扫描。
五、扫描结果
要显示扫描结果,首先要做的是定义一个类去装载扫描结果,在ble包下新建一个BleDevice数据类,代码如下所示:
data class BleDevice(var realName: String? = "Unknown device", //蓝牙设备真实名称var macAddress: String, //蓝牙设备Mac地址var rssi: Int, //信号强度var device: BluetoothDevice,//蓝牙设备var gatt: BluetoothGatt? = null//gatt
)
扫描的结果我们可以用列表来展示,选择使用RecyclerView,那么相应的会使用到适配器。
① 列表适配器
首先创建适配器的布局,在layout下新建一个item_device_rv.xml,代码如下所示:
<?xml version="1.0" encoding="utf-8"?>
<androidx.constraintlayout.widget.ConstraintLayout xmlns:android="http://schemas.android.com/apk/res/android"xmlns:app="http://schemas.android.com/apk/res-auto"xmlns:tools="http://schemas.android.com/tools"android:id="@+id/item_device"android:layout_width="match_parent"android:layout_height="wrap_content"android:layout_marginBottom="1dp"android:background="@color/white"android:foreground="?attr/selectableItemBackground"android:orientation="vertical"><ImageViewandroid:id="@+id/imageView2"android:layout_width="wrap_content"android:layout_height="wrap_content"android:layout_marginStart="16dp"android:src="@drawable/ic_bluetooth_blue"app:layout_constraintBottom_toBottomOf="parent"app:layout_constraintStart_toStartOf="parent"app:layout_constraintTop_toTopOf="parent" /><TextViewandroid:id="@+id/tv_device_name"android:layout_width="wrap_content"android:layout_height="wrap_content"android:layout_marginStart="16dp"android:layout_marginTop="8dp"android:ellipsize="end"android:singleLine="true"android:text="设备名称"android:textColor="@color/black"android:textSize="16sp"app:layout_constraintStart_toEndOf="@+id/imageView2"app:layout_constraintTop_toTopOf="parent" /><TextViewandroid:id="@+id/tv_mac_address"android:layout_width="wrap_content"android:layout_height="wrap_content"android:layout_marginBottom="8dp"android:ellipsize="end"android:singleLine="true"android:text="Mac地址"android:textSize="12sp"app:layout_constraintBottom_toBottomOf="parent"app:layout_constraintStart_toStartOf="@+id/tv_device_name"app:layout_constraintTop_toBottomOf="@+id/tv_device_name" /><TextViewandroid:id="@+id/tv_rssi"android:layout_width="wrap_content"android:layout_height="wrap_content"android:layout_marginEnd="16dp"android:text="信号强度"android:textSize="12sp"app:layout_constraintBottom_toBottomOf="parent"app:layout_constraintEnd_toEndOf="parent"app:layout_constraintTop_toTopOf="parent" /></androidx.constraintlayout.widget.ConstraintLayout>
这里的内容不多,主要内容就是设备名称、地址、信号强度,下面我们创建适配器,在com.llw.goodble包下新建一个adapter包,该包下新建一个OnItemClickListener接口,用于实现Item的点击监听,代码如下所示:
interface OnItemClickListener {fun onItemClick(view: View?, position: Int)
}
下面我们写适配器,在adapter包下新建一个BleDeviceAdapter类,代码如下所示:
class BleDeviceAdapter(private val mDevices: List<BleDevice>
) : RecyclerView.Adapter<BleDeviceAdapter.ViewHolder>() {private var mOnItemClickListener: OnItemClickListener? = nullfun setOnItemClickListener(mOnItemClickListener: OnItemClickListener?) {this.mOnItemClickListener = mOnItemClickListener}override fun onCreateViewHolder(parent: ViewGroup, viewType: Int): ViewHolder {val viewHolder = ViewHolder(ItemDeviceRvBinding.inflate(LayoutInflater.from(parent.context), parent, false))viewHolder.binding.itemDevice.setOnClickListener { v ->if (mOnItemClickListener != null) mOnItemClickListener!!.onItemClick(v, viewHolder.adapterPosition)}return viewHolder}override fun onBindViewHolder(holder: ViewHolder, position: Int) {val bleDevice: BleDevice = mDevices[position]val rssi: Int = bleDevice.rssiholder.binding.tvRssi.text = String.format(Locale.getDefault(), "%d dBm", rssi)//设备名称holder.binding.tvDeviceName.text = bleDevice.realName//Mac地址holder.binding.tvMacAddress.text = bleDevice.macAddress}override fun getItemCount() = mDevices.sizeclass ViewHolder(itemView: ItemDeviceRvBinding) : RecyclerView.ViewHolder(itemView.root) {var binding: ItemDeviceRvBindinginit {binding = itemView}}
}
这里就是基本的写法,结合了ViewBinding,在onBindViewHolder()中进行数据渲染,那么适配器就写好了,下面我们回到ScanActivity中,去完成后的扫描结果显示。
② 扫描结果处理
首先我们声明变量,在ScanActivity中增加如下代码:
private var mAdapter: BleDeviceAdapter? = null//设备列表private val mList: MutableList<BleDevice> = mutableListOf()private fun findIndex(bleDevice: BleDevice, mList: MutableList<BleDevice>): Int {var index = 0for (devi in mList) {if (bleDevice.macAddress.contentEquals(devi.macAddress)) return indexindex += 1}return -1}
这个findIndex()函数用于在列表中找是否有添加过设备,下面修改扫描的回调函数onScanResult(),代码如下所示:
override fun onScanResult(result: ScanResult) {if (result.scanRecord!!.deviceName == null) returnif (result.scanRecord!!.deviceName!!.isEmpty()) returnval bleDevice = BleDevice(result.scanRecord!!.deviceName,result.device.address,result.rssi,result.device)Log.d(TAG, "onScanResult: ${bleDevice.macAddress}")if (mList.size == 0) {mList.add(bleDevice)} else {val index = findIndex(bleDevice, mList)if (index == -1) {//添加新设备mList.add(bleDevice)} else {//更新已有设备的rssimList[index].rssi = bleDevice.rssi}}//如果未扫描到设备,则显示空内容布局binding.emptyLay.root.visibility = if (mList.size == 0) View.VISIBLE else View.GONE//如果mAdapter为空则会执行run{}中的代码,进行相关配置,最终返回配置的结果mAdaptermAdapter ?: run {mAdapter = BleDeviceAdapter(mList)binding.rvDevice.apply {(itemAnimator as SimpleItemAnimator).supportsChangeAnimations = falselayoutManager = LinearLayoutManager(this@ScanActivity)adapter = mAdapter}mAdapter!!.setOnItemClickListener(this@ScanActivity)mAdapter}mAdapter!!.notifyDataSetChanged()}
那么在开始扫描的时候我们最好清理一下列表,修改一下startScan()函数,代码如下所示:
private fun startScan() {mList.clear()mAdapter?.notifyDataSetChanged()bleCore.startScan()binding.tvScanStatus.text = "停止"binding.pbScanLoading.visibility = View.VISIBLE}
同时在扫描回调中还有一个适配器的Item点击监听,先实现它,修改代码:
class ScanActivity : BaseActivity(), View.OnClickListener, BleScanCallback, ReceiverCallback,OnItemClickListener {
重写onItemClick()函数,代码如下:
override fun onItemClick(view: View?, position: Int) {if (bleCore.isScanning()) stopScan()//选中设备处理val intent = Intent()intent.putExtra("device", mList[position].device)setResult(RESULT_OK, intent)finish()}
我们是通过MainActivity进入到ScanActivity的,那么在选中设备之后将设备对象返回并销毁当前页面。ScanActivity中还有最后一个修改的地方,那就是在onResume()函数中增加开始扫描的代码,代码如下所示:
override fun onResume() {...//开始扫描if (!bleCore.isScanning()) startScan()}
这里的意思就是当进入页面检查到条件都满足时就开始扫描。
③ 接收结果
最后我们在MainActivity中接收结果,修改代码如下所示:
class MainActivity : BaseActivity() {private val binding by viewBinding(ActivityMainBinding::inflate)@SuppressLint("MissingPermission")private val scanIntent =registerForActivityResult(ActivityResultContracts.StartActivityForResult()) { result ->if (result.resultCode == Activity.RESULT_OK) {if (result.data == null) return@registerForActivityResult//获取选中的设备val device = if (Build.VERSION.SDK_INT >= Build.VERSION_CODES.TIRAMISU) {result.data!!.getParcelableExtra("device", BluetoothDevice::class.java)} else {result.data!!.getParcelableExtra("device") as BluetoothDevice?}showMsg("${device?.name} , ${device?.address}")}}override fun onCreate(savedInstanceState: Bundle?) {super.onCreate(savedInstanceState)setContentView(R.layout.activity_main)binding.toolbar.setNavigationOnClickListener { scanIntent.launch(Intent(this,ScanActivity::class.java)) }}
}
下面我们运行一下:
六、源码
如果对你有所帮助的话,不妨 Star 或 Fork,山高水长,后会有期~
源码地址:GoodBle
相关文章:
Android Ble蓝牙App(一)扫描
Ble蓝牙App(一)扫描 前言正文一、基本配置二、扫描准备三、扫描页面① 增加UI布局② 点击监听③ 扫描处理④ 广播处理 四、权限处理五、扫描结果① 列表适配器② 扫描结果处理③ 接收结果 六、源码 前言 关于低功耗的蓝牙介绍我已经做过很多了࿰…...
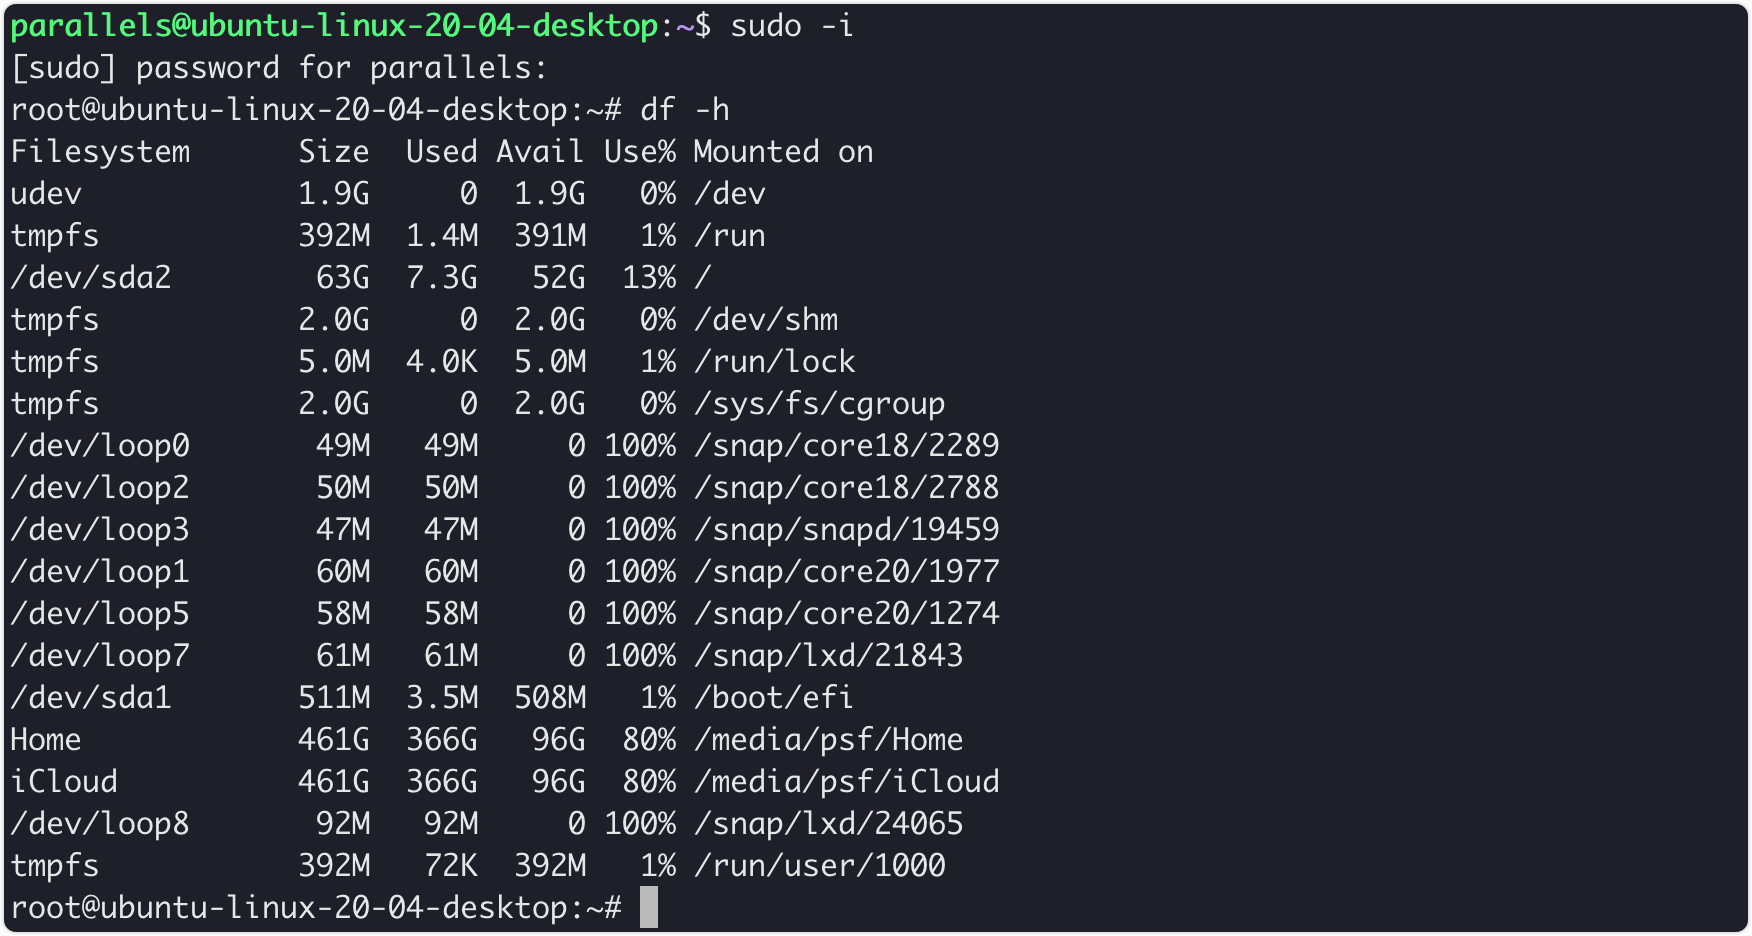
mac pd安装ubuntu并配置远程连接
背景 一个安静的下午,我又想去折腾点什么了。准备学习一下k8s的,但是没有服务器。把我给折腾的,在抱怨了:为什么M系列芯片的资源怎么这么少。 好在伙伴说,你可以尝试一下ubantu。于是,我只好在我的mac上安…...

1.3 eureka+ribbon,完成服务注册与调用,负载均衡源码追踪
本篇继先前发布的1.2 eureka注册中心,完成服务注册的内容。 目录 环境搭建 采用eurekaribbon的方式,对多个user服务发送请求,并实现负载均衡 负载均衡原理 负载均衡源码追踪 负载均衡策略 如何选择负载均衡策略? 饥饿加载…...

mysql修改字段长度是否锁表
Varchar对于小于等于255字节以内的长度可以使用一个byte 存储。大于255个字节的长度则需要使用2个byte存储 1, 如果是255长度之内的扩展,或者255之外的扩展,则不锁表,采用in-place方式执行 2, 如果从varchar长度从(0,2…...
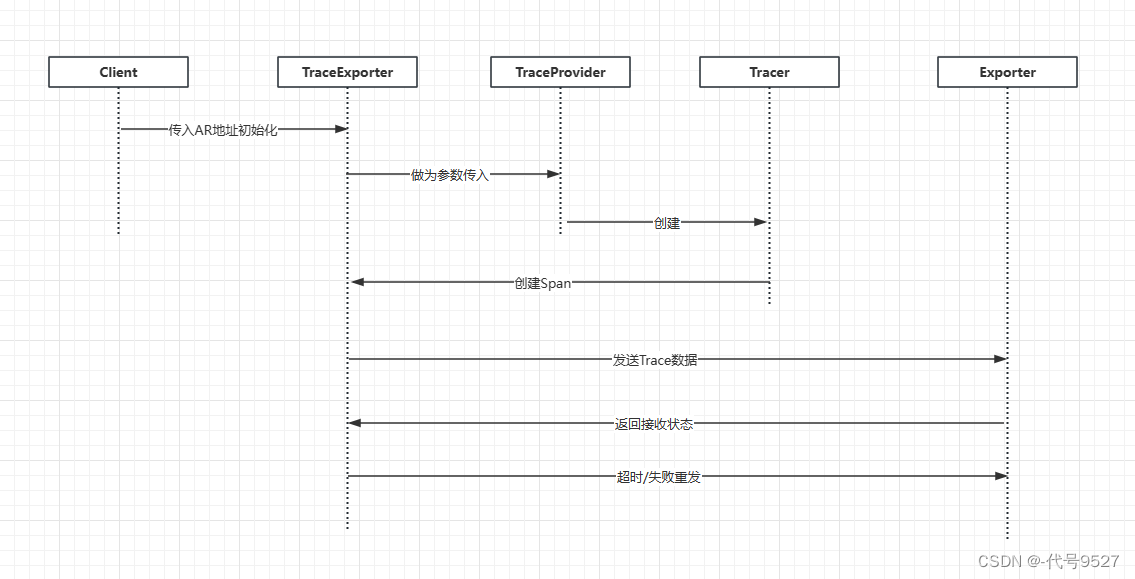
SpringCloud集成OpenTelemetry的实现
SpringCloud项目做链路追踪,比较常见的会集成SleuthZipKin来完成,但这次的需求要集成开源框架OpenTelemetry,这里整理下实现过程。相关文章: 【SpringCloud集成SleuthZipkin进行链路追踪】 【OpenTelemetry框架Trace部分整理】 …...
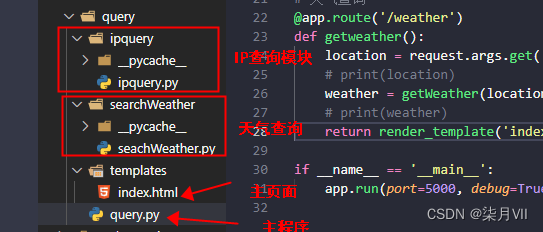
Python爬取IP归属地信息及各个地区天气信息
一、实现样式 二、核心点 1、语言:Python、HTML,CSS 2、python web框架 Flask 3、三方库:requests、xpath 4、爬取网站:https://ip138.com/ 5、文档结构 三、代码 ipquery.py import requests from lxml import etree # 请求…...
RedLock + Redisson
目录 2.9 RedLock2.9.1 上述实现的分布式锁在集群状态下失效的原因2.9.2 解决方式-RedLock 2.10 redisson中的分布式锁2.10.0 redisson简介以及简单使用简单使用redisson中的锁Redisson常用配置 2.10.1 Redisson可重入锁实现原理2.10.2 公平锁(Fair Lock)…...
计算机视觉:卷积层的参数量是多少?
本文重点 卷积核的参数量是卷积神经网络中一个重要的概念,它决定了网络的复杂度和计算量。在深度学习中,卷积操作是一种常用的操作,用于提取图像、语音等数据中的特征。卷积神经网络的优势点在于稀疏连接和权值共享,这使得卷积核的参数相较于传统的神经网络要少很多。 举例…...
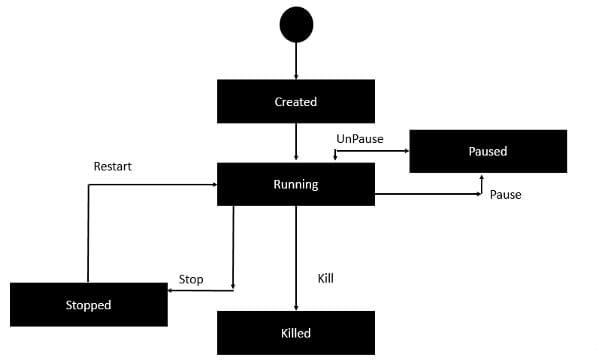
Docker 容器基础操作
Docker容器基础操作 容器(container)是Docker镜像的运行实例,类似于可执行文件与进程的关系,Docker是容器引擎,相当于系统平台。 容器的生命周期 容器的基础操作(以 tomcat8.0 为例) # 拉取tomcat8.0镜像 [root@tudou tudou]# docker pull tomcat:8.0 8.0: Pulling f…...
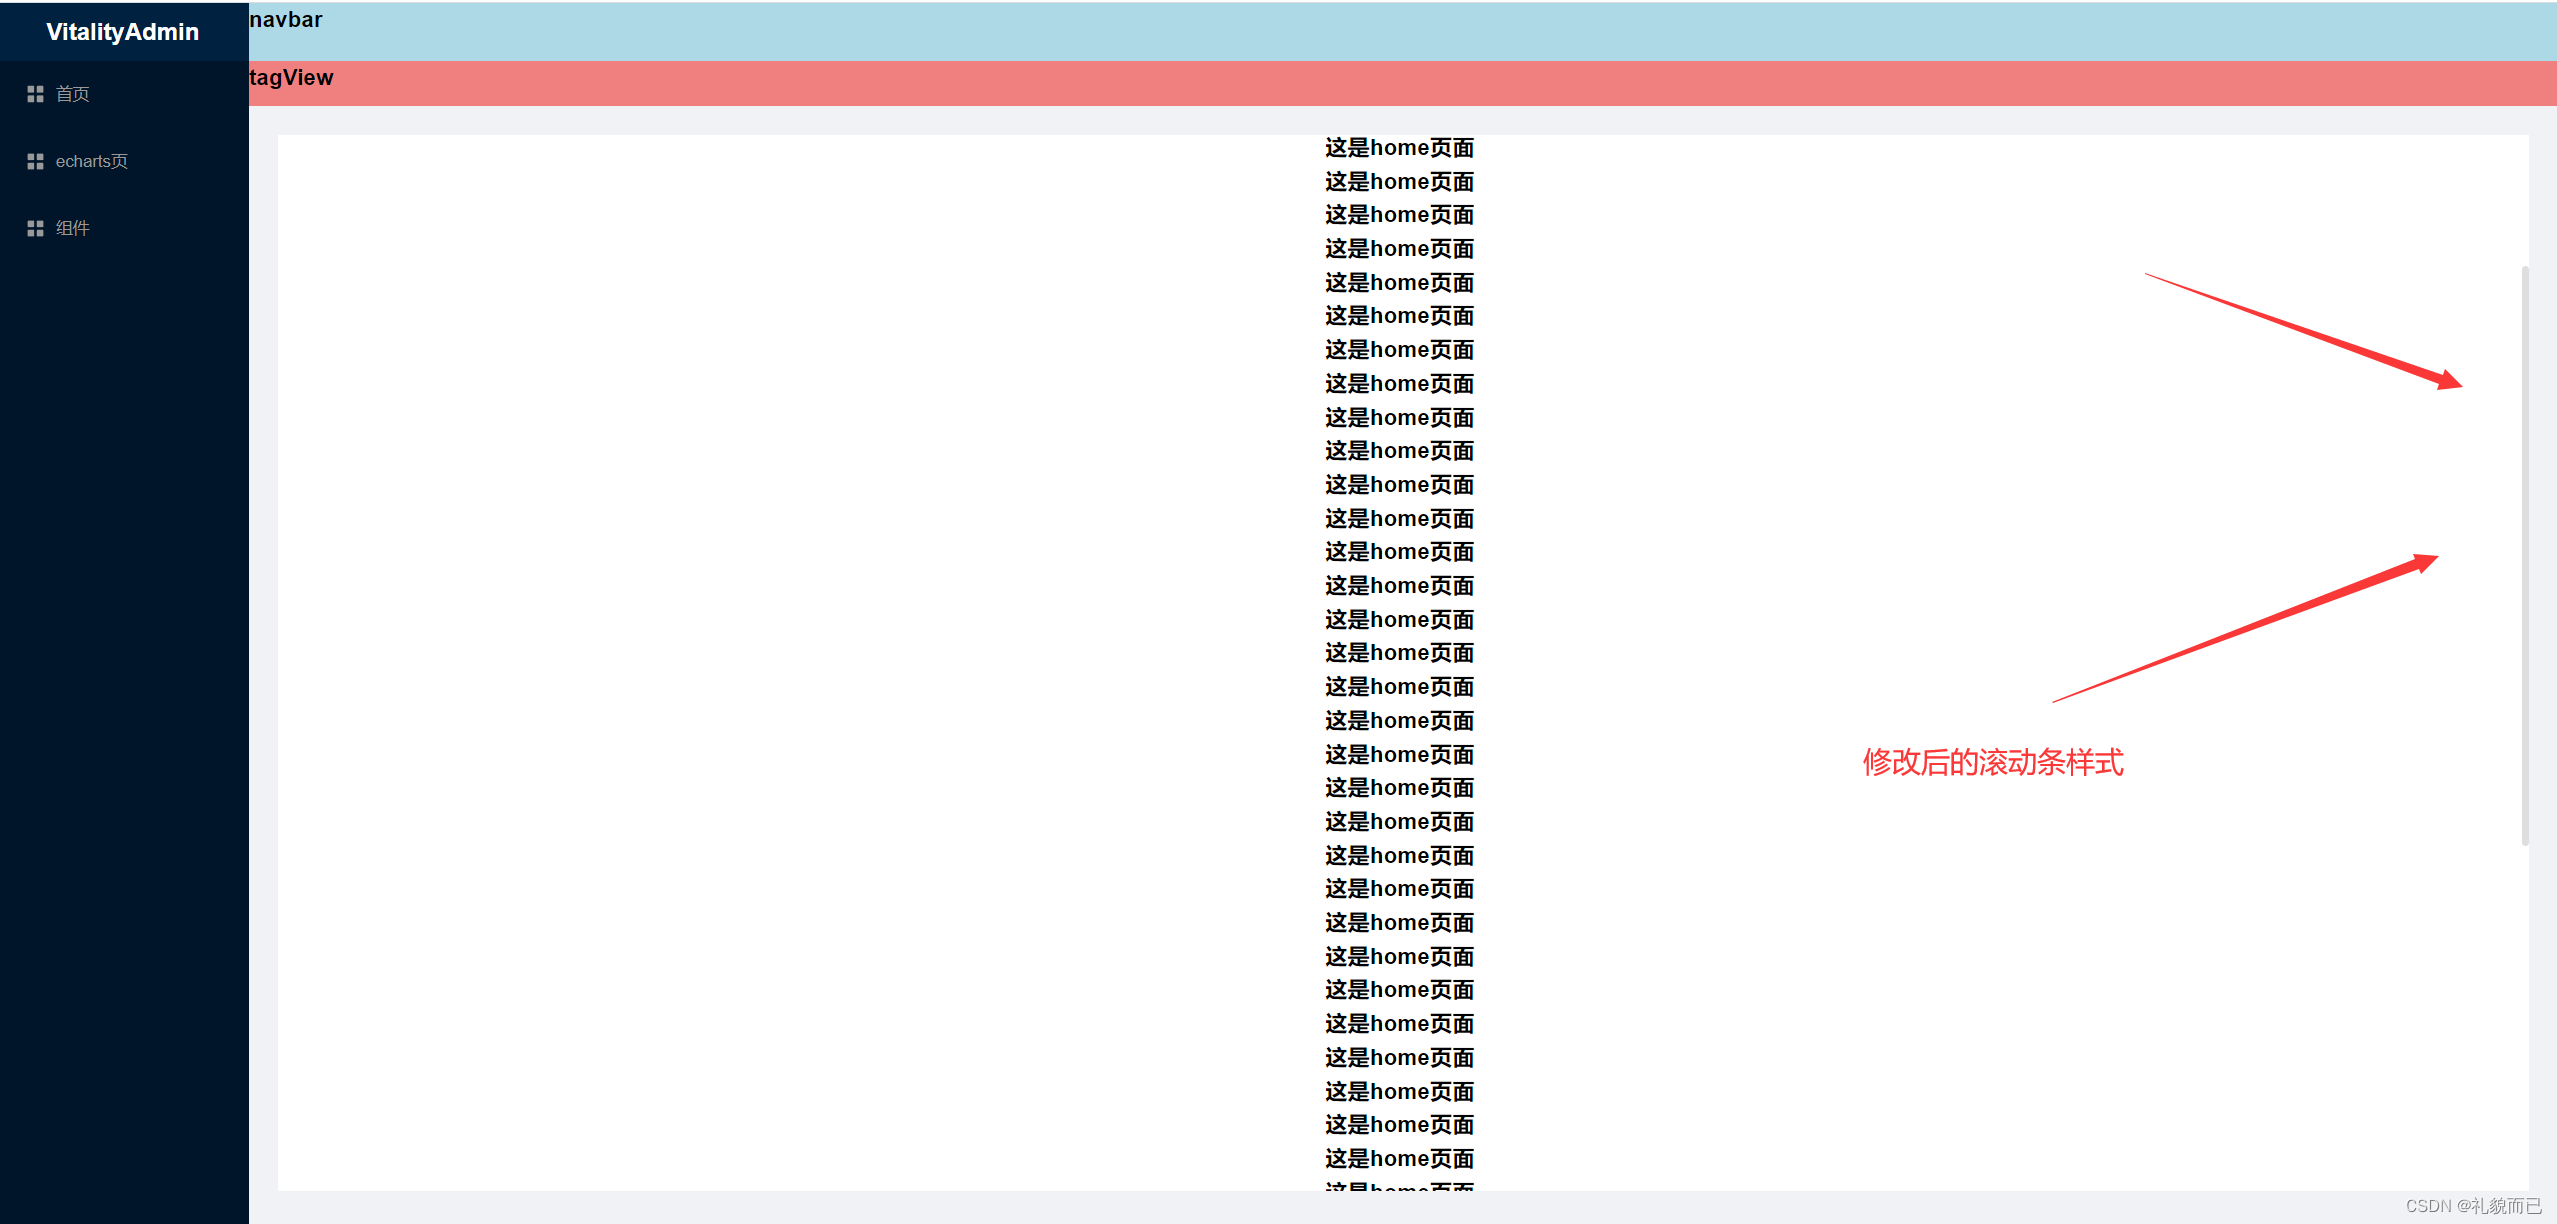
【Vue3+Ts+Vite】配置滚动条样式
一、先看效果 二、直接上代码 <template><div class"main-container"><h1 v-for"index in 50" :key"index">这是home页面</h1></div> </template> <style lang"scss" scoped> .main-conta…...

react map使用方法详解
在React中,map()方法是用于数组的常见方法之一,它可以用于处理数组并返回一个新的数组。在React中,经常使用map()方法来遍历数组,生成对应的组件列表或进行数据转换操作。 下面是map()方法在React中的使用方法详解: …...

PoseiSwap:通过 RWA 的全新叙事,反哺 Nautilus Chain 生态
PoseiSwap 是 Nautilus Chain 上的首个 DEX,作为目前行业内模块化区块链叙事的早期奉行者,PoseiSwap 也得到了较高的市场关注。基于 Nautilus Chain,PoseiSwap 打造了一个全新的 Rollup 应用层,并通过零知识证明来建立全新的订单簿…...
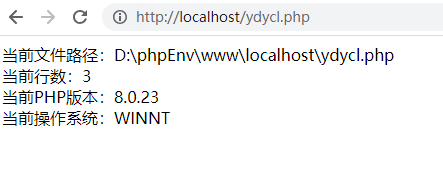
PHP8的常量-PHP8知识详解
常量和变量是构成PHP程序的基础,在PHP8中常量的这一节中,主要讲到了定义常量和预定义常量两大知识点。 一、定义常量 定义常量也叫声明常量。在PHP8中,常量就是一个标识符(名字),一旦定义(声明&…...

印花税的本质和底层逻辑是什么?印花税降低是利好股市吗?
内容由LLM协助生成: 印花税是一种对特定交易或证券交易征收的税费,由政府机构收取。其本质和底层逻辑可以归结为以下几点: 资金来源:印花税是国家财政收入的一部分,用于满足政府的财政需求和公共支出。政府通过征收印花…...

pytorch+GPU跑模型时 nvrtc: error: failed to open nvrtc-builtins64_117.dll
1.先检查自己cuda版本: print(torch.version.cuda) #查看cuda版本 print(torch.cuda.is_available()) # 查看cuda是否可用 print(torch.cuda.device_count()) # 查看可行的cuda数目如果版本高于11建议先降版本,然后再试下。 2.重新安装nvrtc-builtin…...
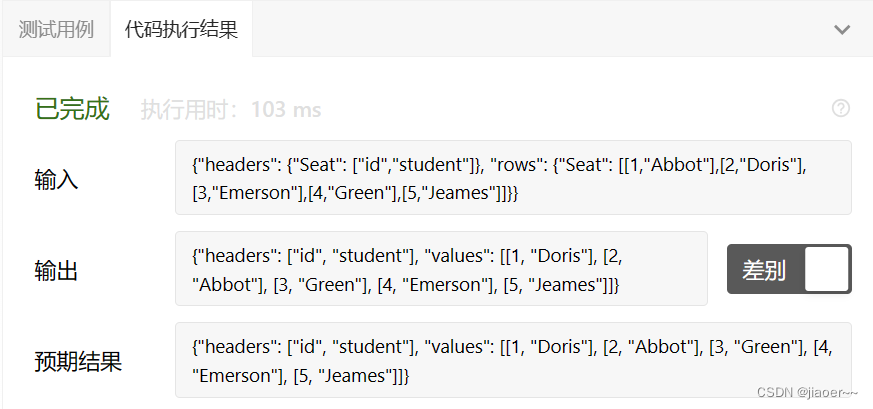
SQL-每日一题【626.换座位】
题目 表: Seat 编写SQL查询来交换每两个连续的学生的座位号。如果学生的数量是奇数,则最后一个学生的id不交换。 按 id 升序 返回结果表。 查询结果格式如下所示。 示例 1: 解题思路 前置知识 MySQL 的 MOD() 函数是取模运算的函数,它返回两个数相除…...

Swagger之Hello World !
目录 ■1.前言・Swagger介绍 ■2.例子,如果基于Spring Boot项目,实现Swagger---非常简单 2.1.已有的SpringBoot项目 2.2.修改POM文件 2.3.添加Config文件…...
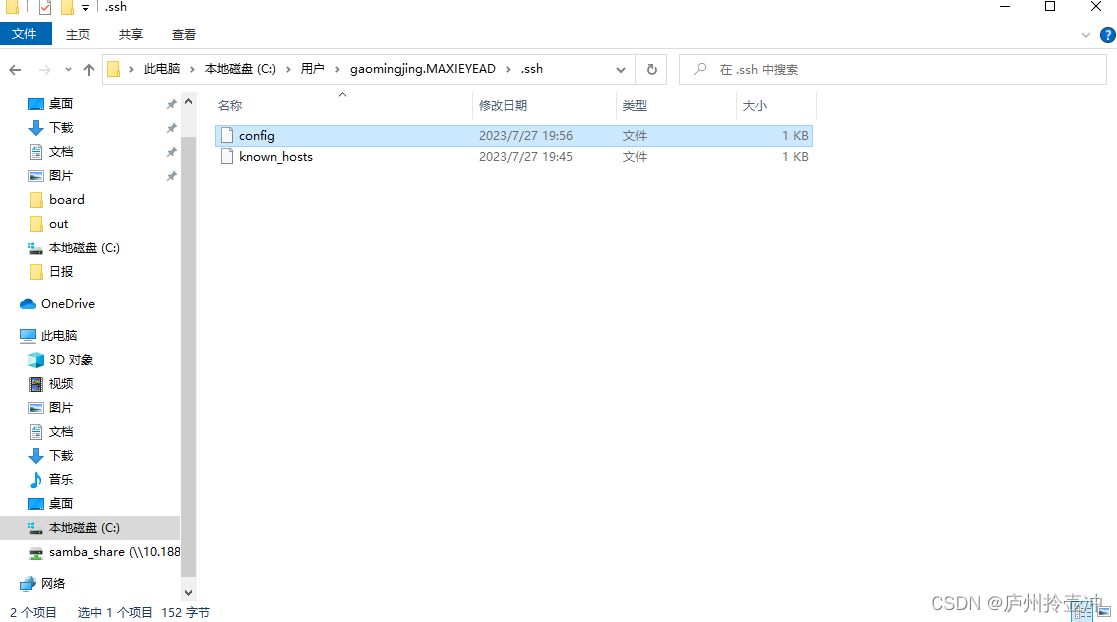
VSCode SSH远程连接与删除
1.ubuntu设置 安装SSH服务并获取远程访问的IP地址 在Ubuntu系统中,“CtrlAltT”打开终端工具,执行如下命令安装SSH服务。 sudo apt-get install openssh-server如果安装失败则先安装依赖项。 2.VS Code 设置 2.1安装与设置Remote SSH 打开Windows系…...
面试典中典之线程池的七大参数
文章目录 一、七大元素解释1.corePoolSize(核心线程数):2.maximumPoolSize(最大线程数):3.keepAliveTime(线程空闲时间):4.unit(时间单位)&#x…...

Maven如何创建Java web项目(纯干货版)!!!
1.创建Maven项目。 2.创建完成后会来到这个界面。 3.在src/main目录下,建立webapp / WEB-INF/web.xml文件,并在web.xml文件中写入以下内容: <?xml version"1.0" encoding"UTF-8"?> <web-app xmlns"http…...

边缘AI闭环数控系统:基于IIoT的轻量级CNC智能改造实践
1. 项目概述:这不是在改装一台机床,而是在给金属切削装上“神经系统”“AI-Driven Machining: Building a Closed-Loop CNC System with IIoT Feedback (Building the CNC)”——这个标题里没有一个词是虚的。它不是讲怎么用AI生成G代码,也不…...

基于微信小程序的疫苗预约管理系统的设计与实现
第1章 绪 论本章对疫苗预约管理系统的背景进行了研究和分析,并且对目前疫苗预约管理系统所存在的问题做了简单的分析,接着论述了选题的重要性以及现实意义,通过研究疫苗预约管理系统类系统的发展历程,给后面系统需求分析和设计打下…...

Unity场景文件本质解析:YAML序列化与Git工程化实践
1. 场景文件不是“点开就跑”的黑盒子,而是 Unity 项目的数据心脏很多人刚接触 Unity,把 .unity 场景文件当成一个“打包好的游戏画面快照”——双击就打开,拖拽就编辑,保存就生效。直到某天场景打不开、Prefab 变成粉红色、或者 …...

2026年,IP地理位置精准查询的几个硬核技术变化
关于IP定位相关最近和几个同行交流,发现大家对IP定位的理解还停留在之前,想把自己这段时间的一些实践整理出来,希望能给同样在搞网络或风控的同行一些参考。 IPv6流量超过IPv4、住宅代理攻击泛滥、CGNAT覆盖越来越广……这些变化正在悄悄改变…...
)
别再傻傻只用insmod了!Linux驱动加载,用modprobe才是真省心(附依赖问题解决全流程)
别再傻傻只用insmod了!Linux驱动加载,用modprobe才是真省心(附依赖问题解决全流程) 你是否曾在深夜调试Linux驱动时,被insmod报出的"Unknown symbol"错误折磨到崩溃?明明已经编译好了驱动模块&am…...

【SSD】闪存1
闪存的特点 闪存是非易失存储器,掉电了数据也不会丢失,但是闪存不能够覆写,必须按块擦除,按页写入。 闪存的基本单元 闪存的基本单元是Cell,一种类Nmos的双层浮栅MOS管 MOS管 首先理解什么是MOS管:(金…...

动态图神经网络实现多商品时序协同预测
1. 项目概述:为什么传统时序模型在多商品预测中频频“掉链子”你有没有遇到过这样的场景:一家区域连锁超市的运营团队,每天盯着几十种SKU的销售数据发愁——酸奶销量突然飙升,但库存系统还在按上周的均值补货;新款保温…...

C#从零开始学习笔记---第八天
大家好,欢迎来到我的频道,这里给大家先道个歉,这两天脚崴了,极度不适,所以昨天就没更新,今天的话确实也还挺不舒服的,所以今天我们的内容也不会有很多,希望大家谅解一下。那么接下来…...

AI Newsletter的本质:一种高信噪比的信息过滤与认知校准方法论
1. 项目概述:一份“AI Newsletter”背后的真实工作流与信息筛选逻辑你点开邮箱,看到标题为This AI newsletter is all you need #41的邮件——它没用夸张的“爆炸性突破”“颠覆认知”这类词,也没塞满emoji和感叹号,但你还是点了开…...

中国分县林地面积统计数据
一、数据简介 林地是指生长乔木、竹类、灌木及其他林业植物的土地,是陆地生态系统的重要组成部分,也是森林资源的核心载体。CnOpenData中国分县林地面积统计数据基于中国国土三调及国土年度变更调查汇总统计成果整合形成,包括全国、分省、分市…...