angr学习-入门篇
前言:
资源链接:GitHub - jakespringer/angr_ctf(题库仓库,里面有个讲解angr的PPT,里面有官方的题解很详细) GitHub - Hustcw/Angr_Tutorial_For_CTF: angr tutorial for ctf
安装:
关于angr的安装:官方提供了很多安装教程方式 这里用的是Anaconda来安装python然后安装angr https://mirrors.bfsu.edu.cn/anaconda/archive/Anaconda3-2022.10-Linux-x86_64.sh 去这里下载安装文件,不建议用wget下载,很慢很慢。 然后:
bash Anaconda3-2022.10-Linux-x86_64.sh
回车后查看许可证,按 q 退出许可证,然后输入 yes 表示同意
确认安装的路径,一般直接回车安装在默认的 /home/你的名字/anaconda
很快就安装完毕。输入 yes 来确认使用 conda init 来启动
source ~/.bashrc   //修改环境变量
然后就可以命令行输入conda直接来使用了
conda的常用命令:
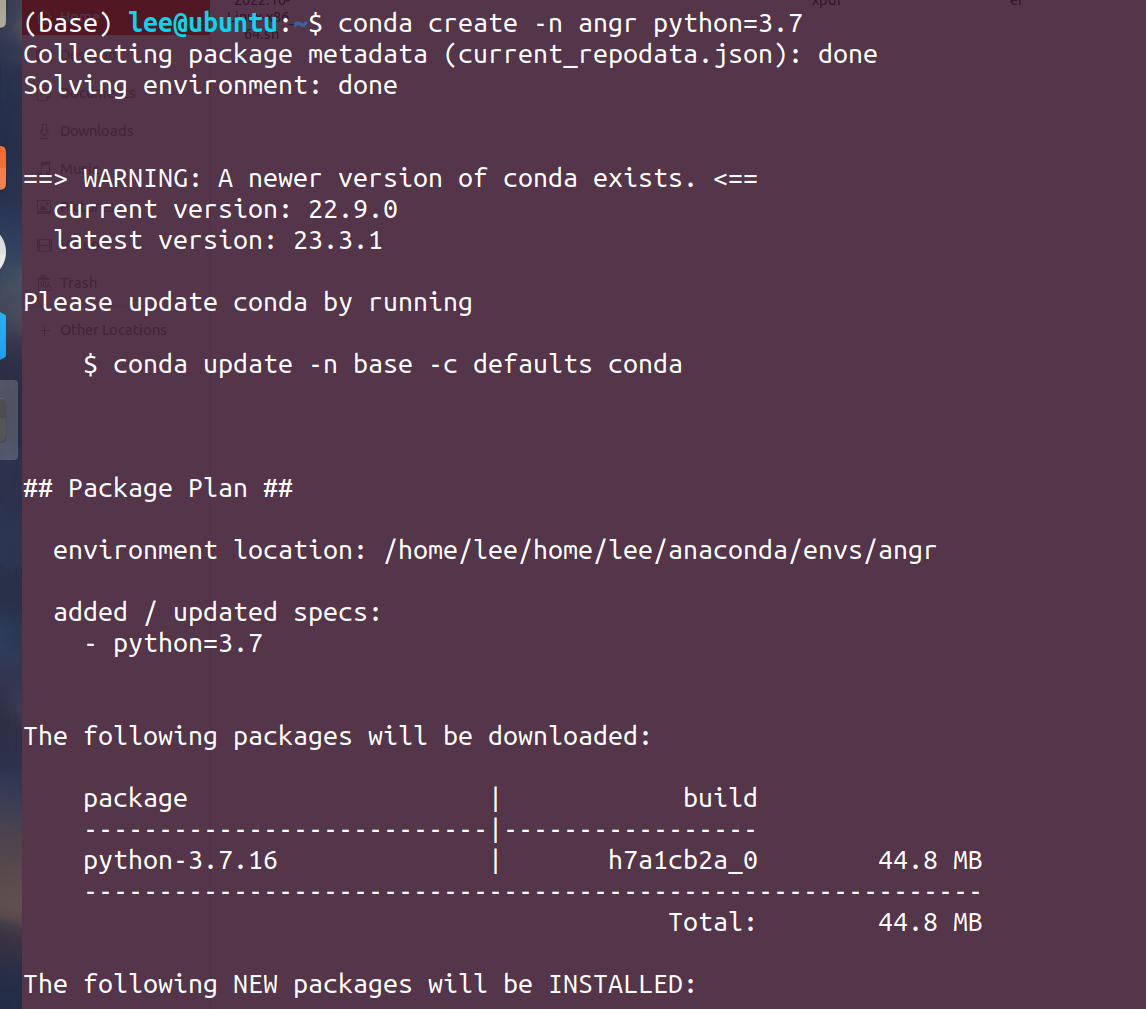
conda create -n  name  python=版本号 //name 为要创建的环境名
conda activate name   //进入环境
conda deactivate    //退出环境
conda info
conda info -e   //查看已经创建的环境
然后创建环境:
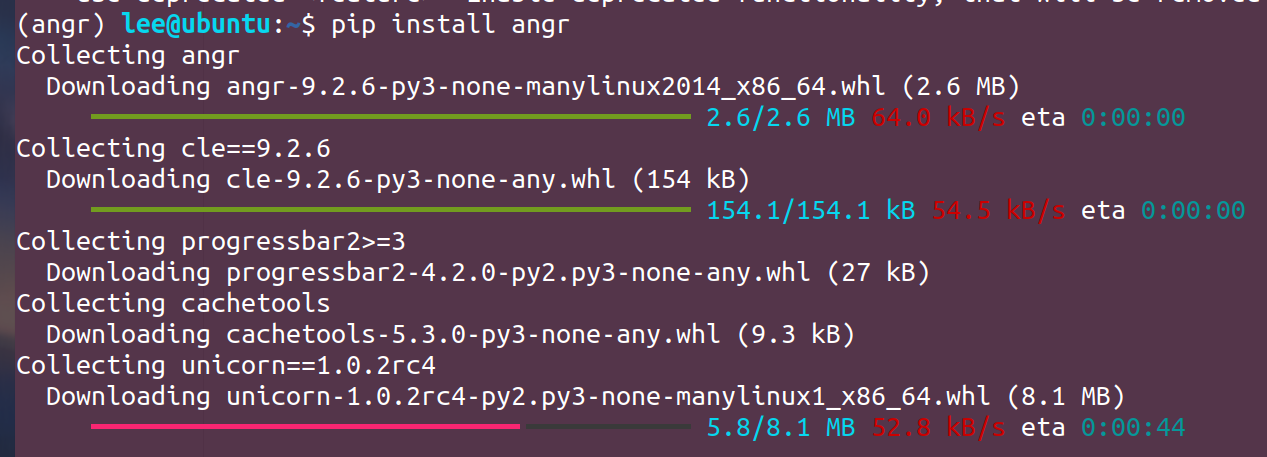
进入环境安装angr:
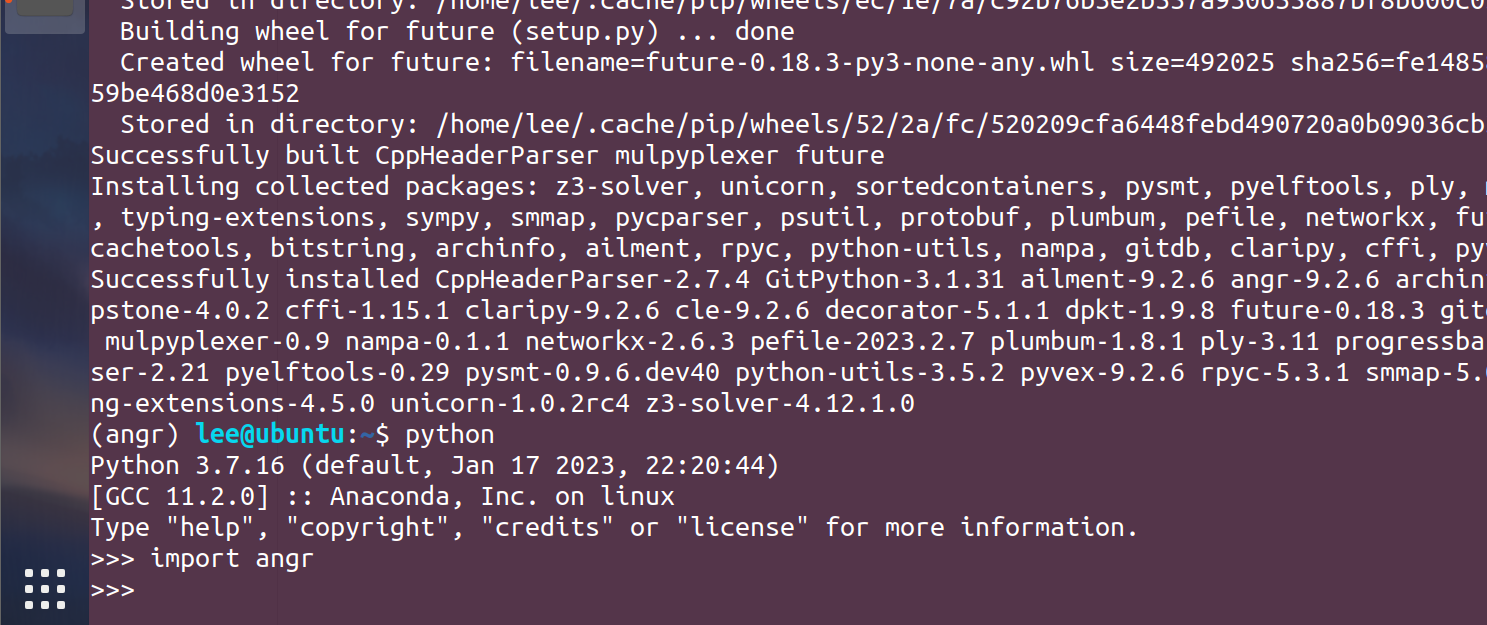
安装成功测试:
正文:
官方文档:Core Concepts - angr documentation 翻译版本:angr学习(2):基本命令 · 语雀 SymbolicExecution.pptx 常用命令:
import angr
import claripy
proj = angr.Project('./file_name') //load the binary file
proj.arch //arch of the binary file
proj.entry // the entry of the binary file
state = proj.factory.entry_state() //to create the state
start_addr = 0xdeadbeef
state = proj.factory.blank_state(addr=start_addr)
// to create a blank stateand we set the regs
parameter_1 = claripy.BVS("p1",32)
state.regs.eax = parameter_1
simgr = proj.factory.simulation_manger(state) //to create the simulation
simgr.explore(find=???,avoid=???)
solution = simgr.found[0]
print(solution.posix.dumps(0)) // '0' represents standard output
solution = state.solver.eval(parameter_1)
print("Solution:",hex(solution))
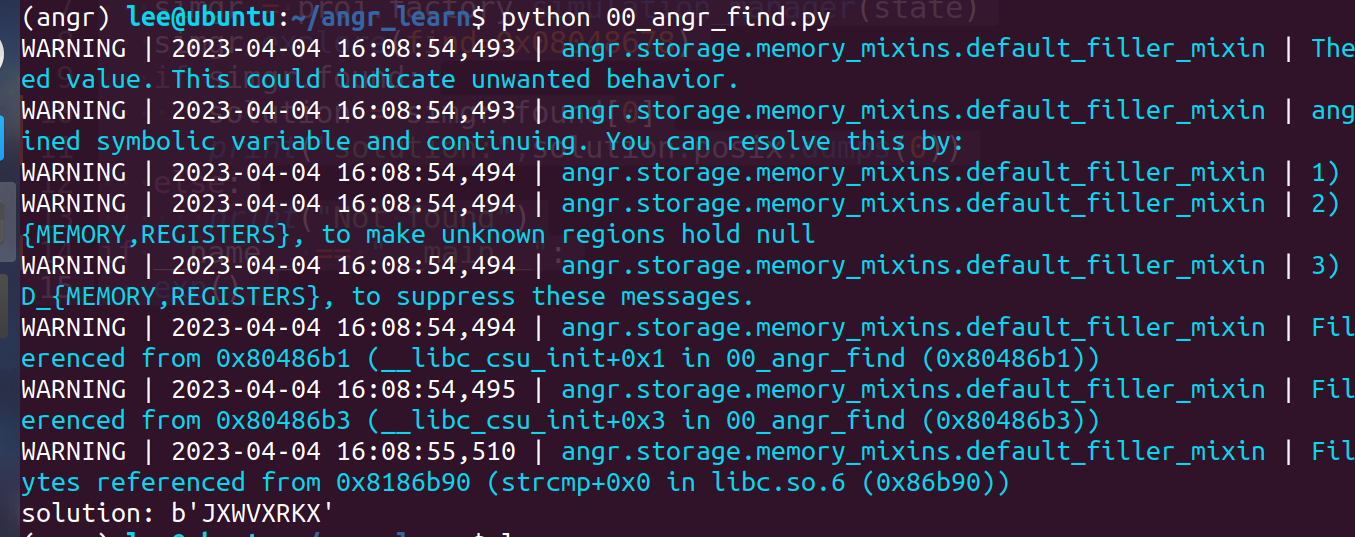
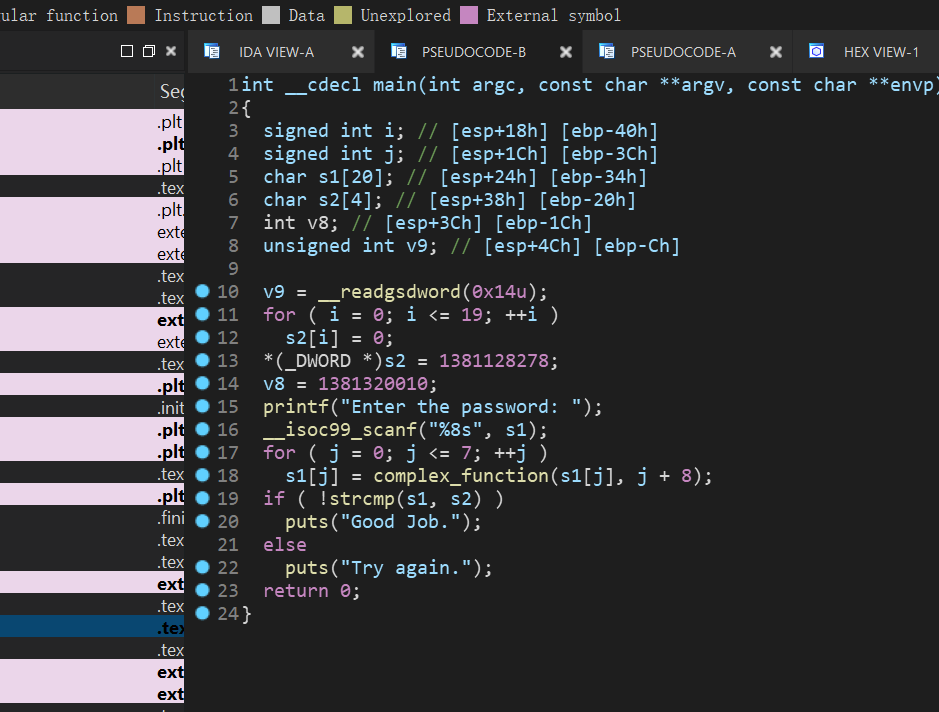
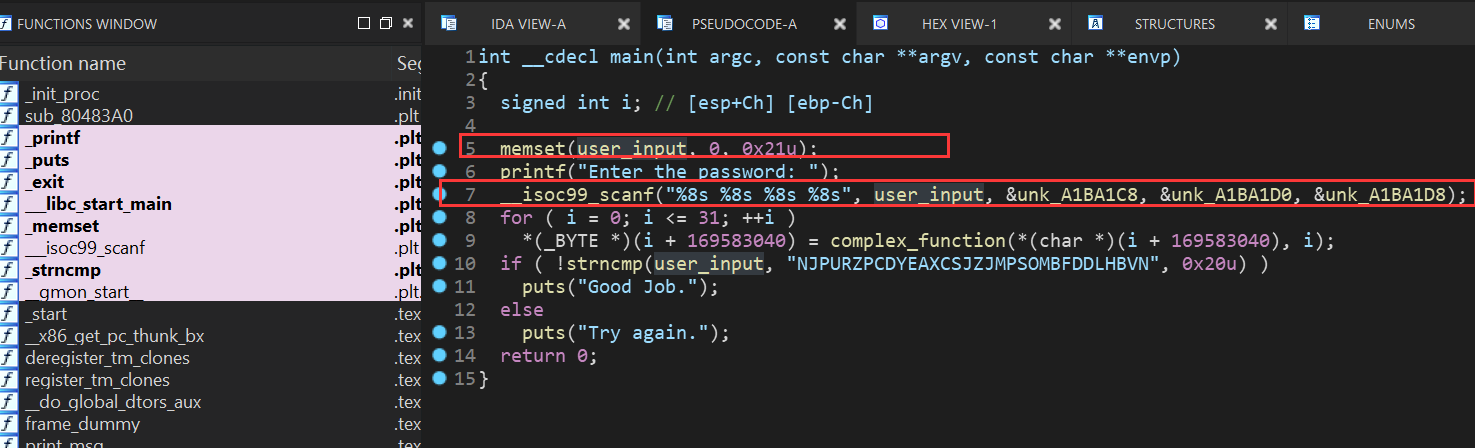
00_angr_find
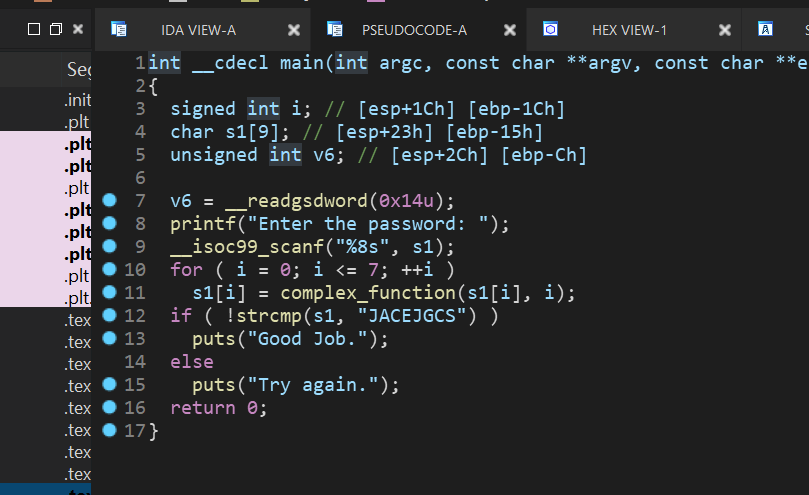
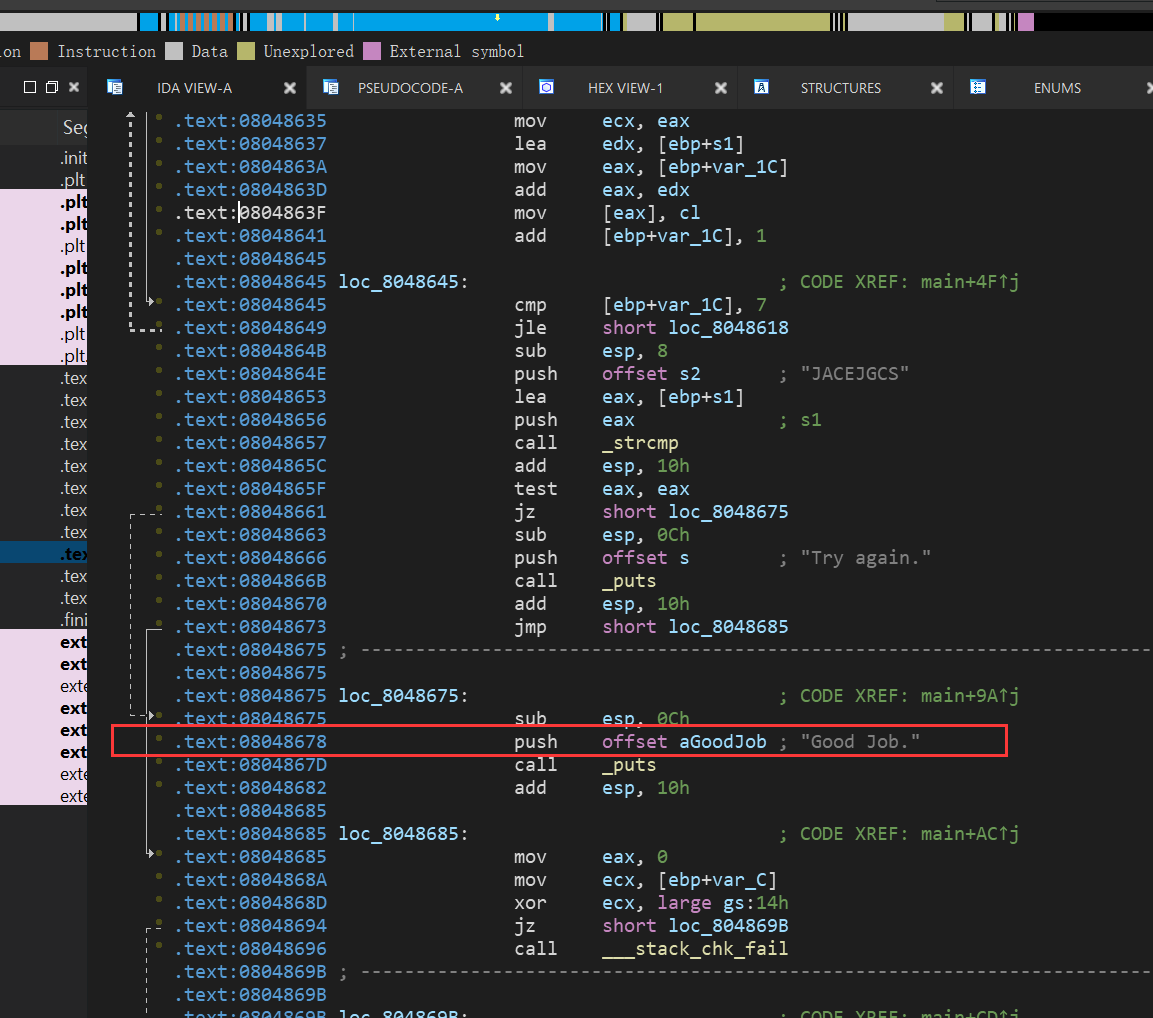
import angr
def exp():proj = angr.Project('./00_angr_find')state = proj.factory.entry_state()simgr = proj.factory.simulation_manager(state)simgr.explore(find=0x08048678)if simgr.found:solution = simgr.found[0]print("solution:",solution.posix.dumps(0))else:print("Not found")
if __name__ == "__main__":exp()

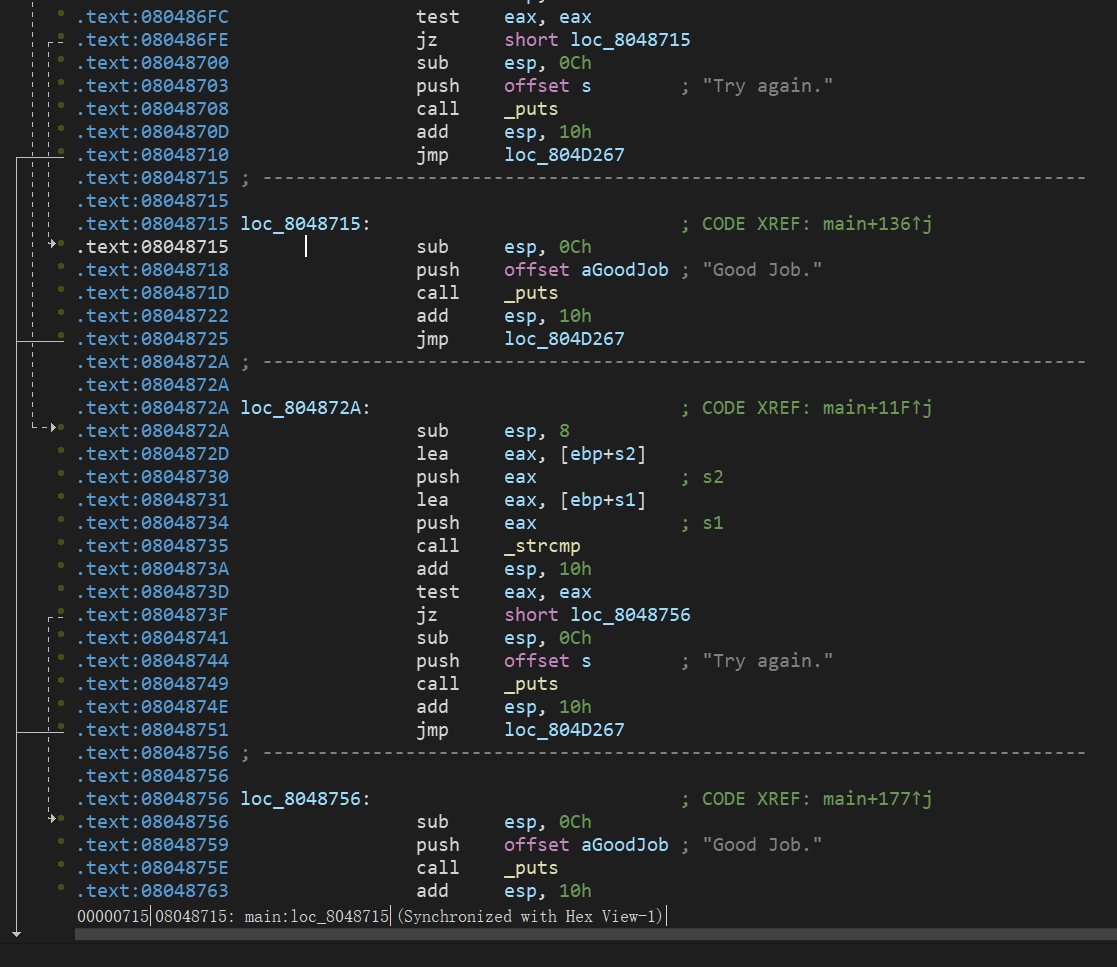
01_angr_avoid
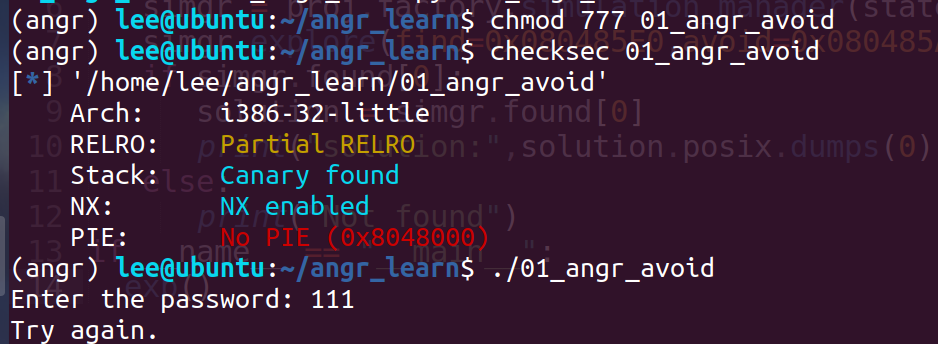
由于一些原因F5反编译main函数有点麻烦,修改IDA设置可以解决,但是本题影响不大
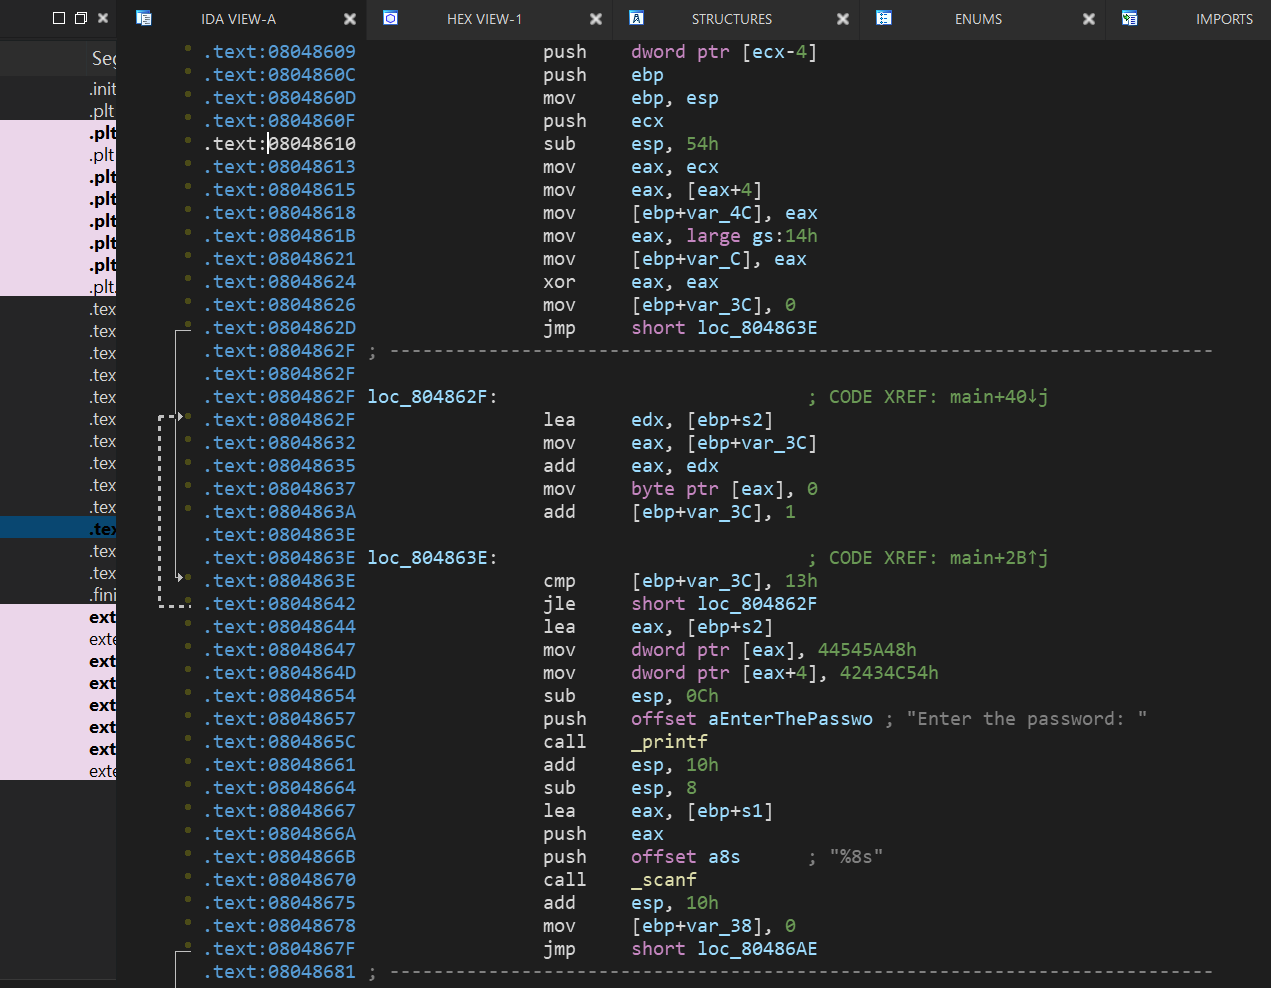
整个函数逻辑流程和00_angr_find一样,只不过加入了个分支avoid_me,倘若angr的explore中不加avoid参数,应该也能跑出来,只不过加了后直接会跳过那个avoid_me的分支,加快速度。

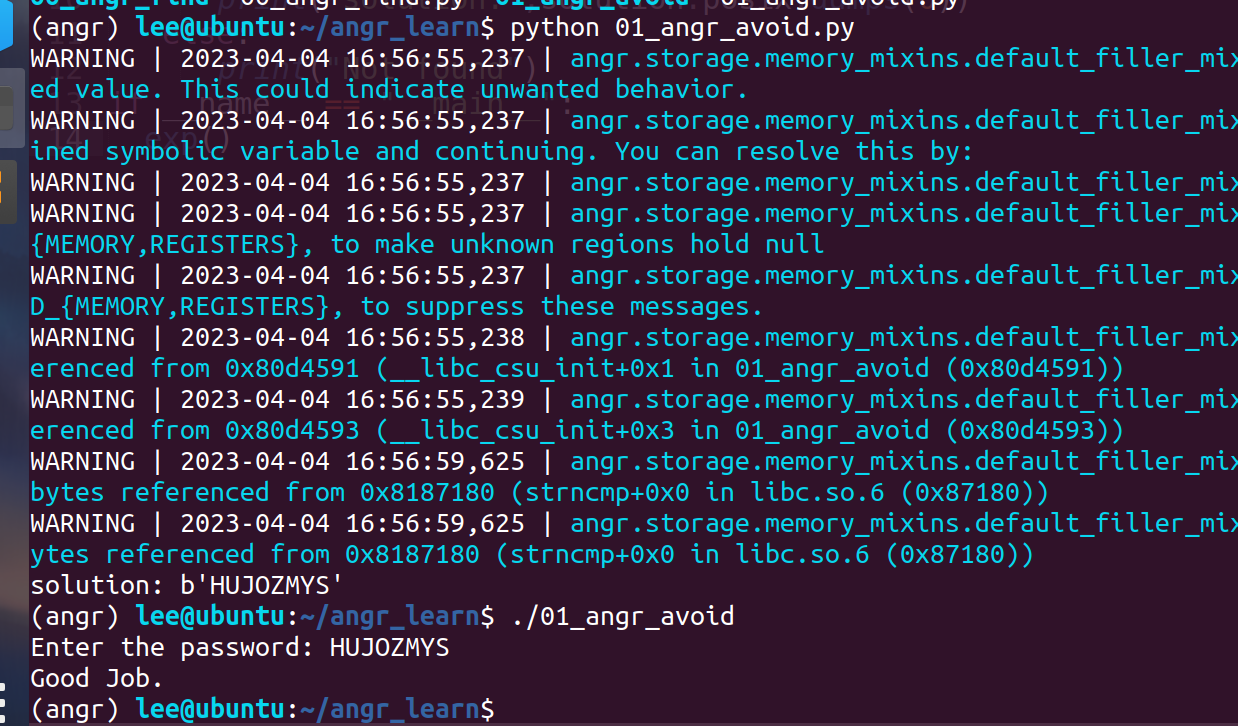
import angr
def exp():proj = angr.Project('./01_angr_avoid')state = proj.factory.entry_state()simgr = proj.factory.simulation_manager(state)simgr.explore(find=0x080485E0,avoid=0x080485A8)if simgr.found[0]:solution = simgr.found[0]print("solution:",solution.posix.dumps(0))else:print("Not found")
if __name__ == "__main__":exp()
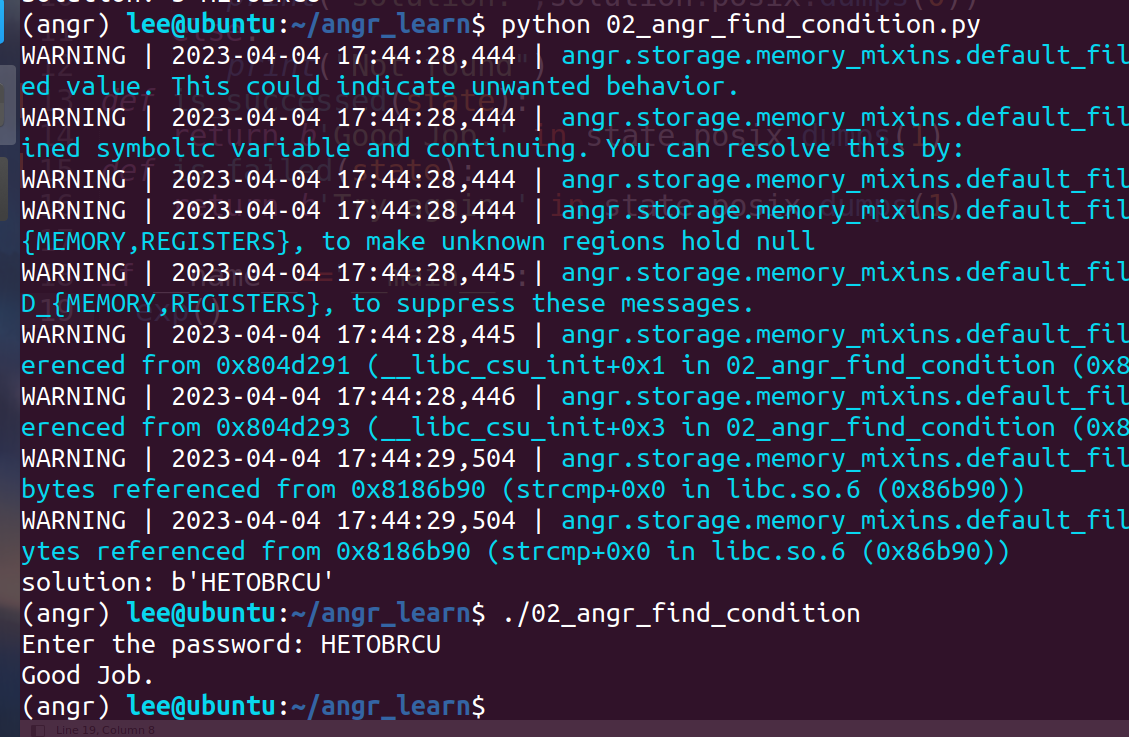
02_angr_find_condition
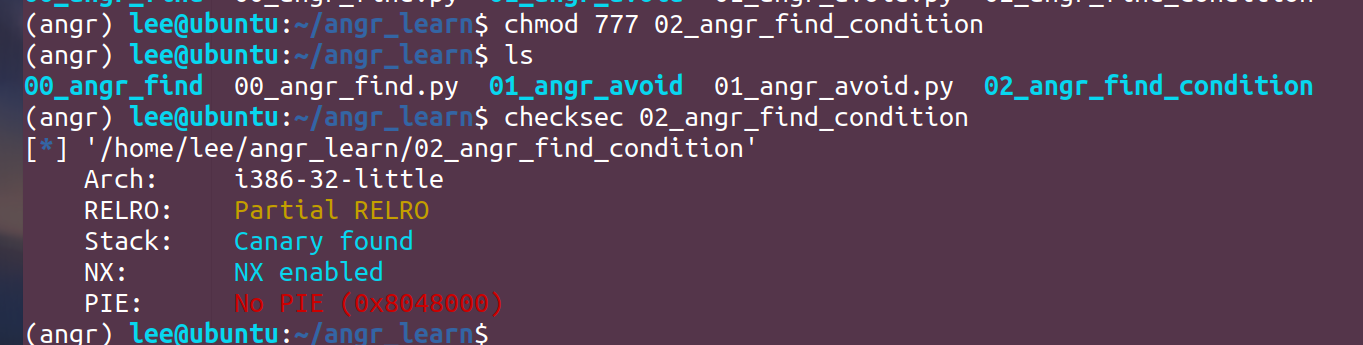
看这里没啥区别,但是:
这里就需要对explore中的find和avoid进行设置条件来让它们识别了
import angr
def exp():proj = angr.Project('./02_angr_find_condition')state = proj.factory.entry_state()simgr = proj.factory.simulation_manager(state)simgr.explore(find=is_success,avoid=is_fail)if simgr.found:solution = simgr.found[0]print("solution:",solution.posix.dumps(0))else:print("Not found")
def is_success(state):return b'Good Job.' in state.posix.dumps(1)
def is_fail(state):return b'Try again.' in state.posix.dumps(1)
if __name__=="__main__":exp()
这里添加了两个函数is_successed()和is_failed(),函数内的内容就是如果出现符合的条件输入,posix.dumps(1)中的参数为1时为输入。
03_angr_symbolic_registers
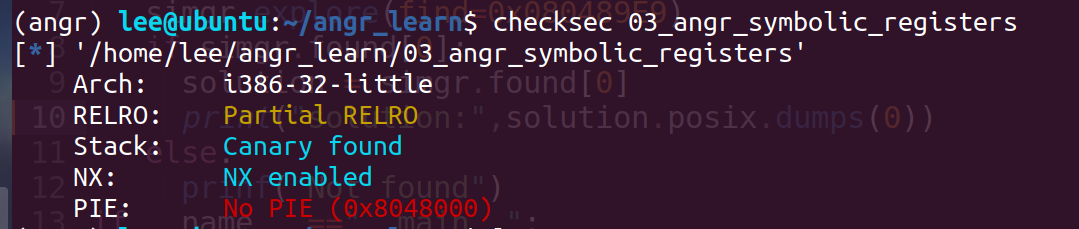
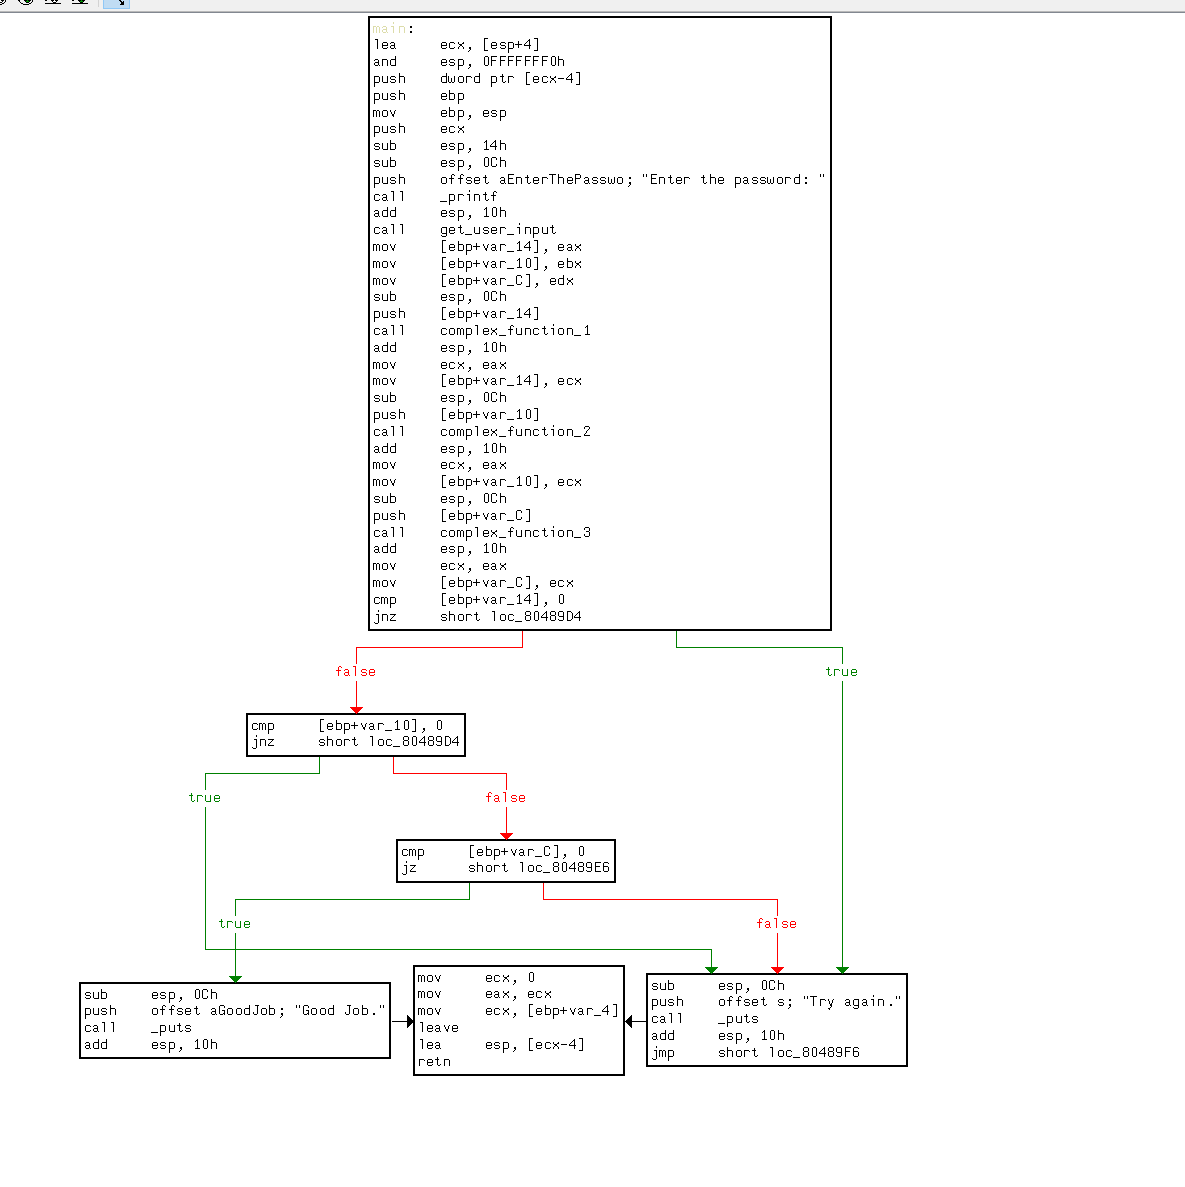
这次看起来不是太复杂
输入看得出不是一个参数了,而是三个参数
这里先按最简单的方法试试,即只设置一个find参数,结果很快也跑了出来,但是题目肯定不是考核的这个

实际做法:
Why we use the symbolic_registers:


import angr
import claripy
def exp():proj = angr.Project('./03_angr_symbolic_registers')start_addr = 0x08048980state = proj.factory.blank_state(addr=start_addr)rem_1 = claripy.BVS('rem_1',32)rem_2 = claripy.BVS('rem_2',32)rem_3 = claripy.BVS('rem_3',32)state.regs.eax=rem_1state.regs.ebx=rem_2state.regs.edx=rem_3simgr = proj.factory.simulation_manager(state)simgr.explore(find=is_find,avoid=not_find)if simgr.found[0]:solution = simgr.found[0]solution_1 = solution.solver.eval(rem_1)solution_2 = solution.solver.eval(rem_2)solution_3 = solution.solver.eval(rem_3)print("Solution:{} {} {}".format(hex(solution_1),hex(solution_2),hex(solution_3)))else:prinf("Not found")
def is_find(state):return b'Good Job.' in state.posix.dumps(1)
def not_find(state):return b'Try again.' in state.posix.dumps(1)
if __name__ =="__main__":exp()
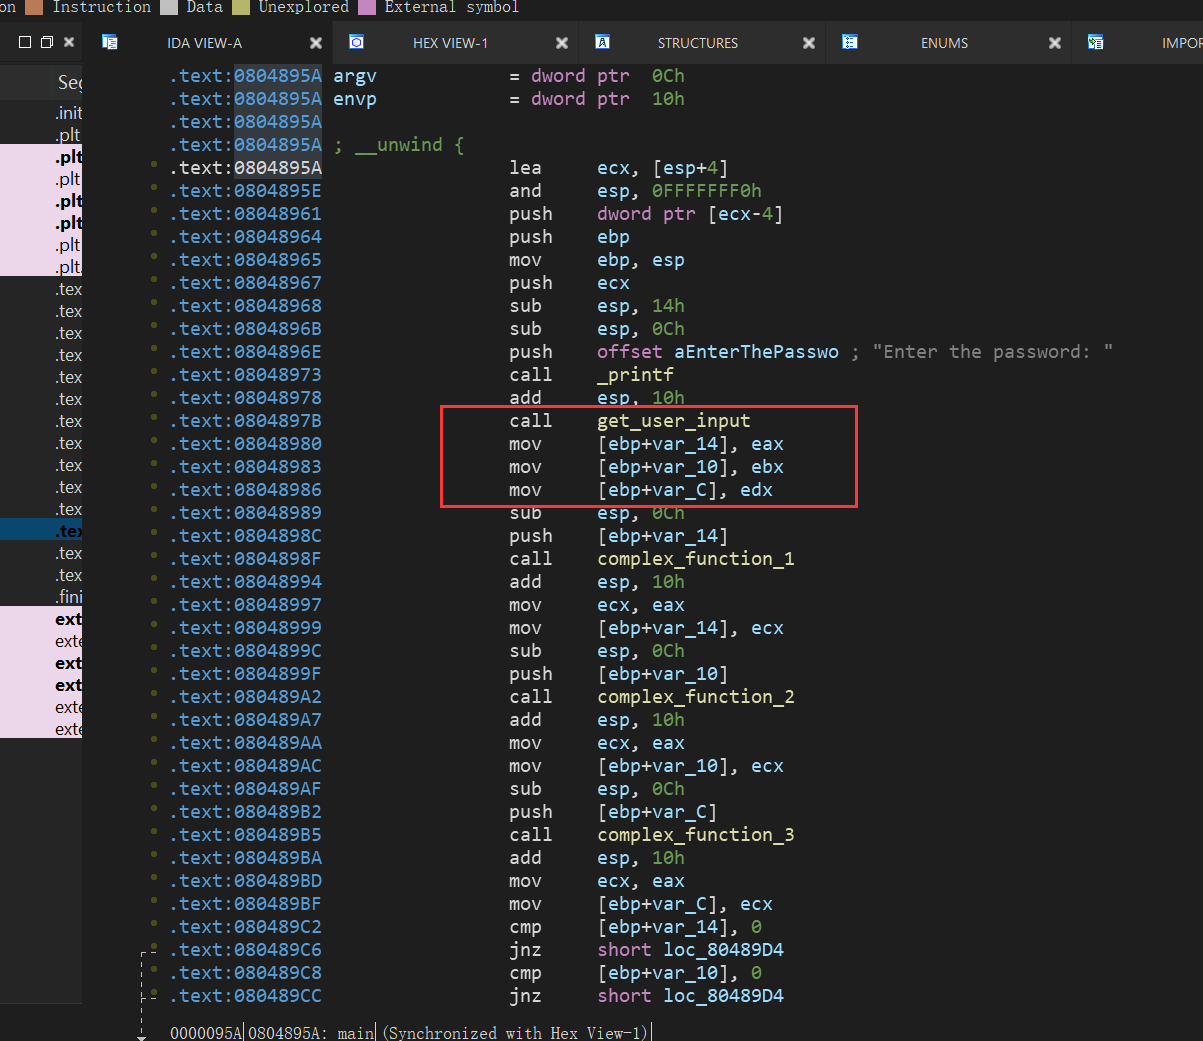
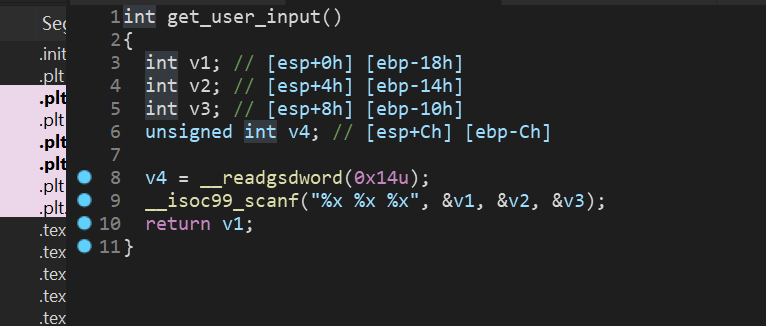
这里解释下脚本: 首先这里引入了factory.blank_state,这是创建一个空的状态,因为本题是scanf来读取值,然后需要跳过这个scanf函数的读入,所以看代码:
从这里可以看出,读入的三个值最终会分别存入eax和ebx和edx中,angr可以随意指定一个地址来往下进行运行,所以我们可以指定开始地址为:0x08048980

然后把地址传给我们创建的空状态中 再然后我们需要进行三个寄存器进行设置值,引入了claripy
import claripy
parameter_1 = claripy.BVS("p1",32) //to create a Bitvector Symbol size:32
state.regs.eax = parameter_1
最后找到结果值后,我们需要把parameter_1的 值打印出来,即:
solution_1 = solution.solver.eval(parameter_1)
结果和开始的一样。
04_angr_symbolic_stack
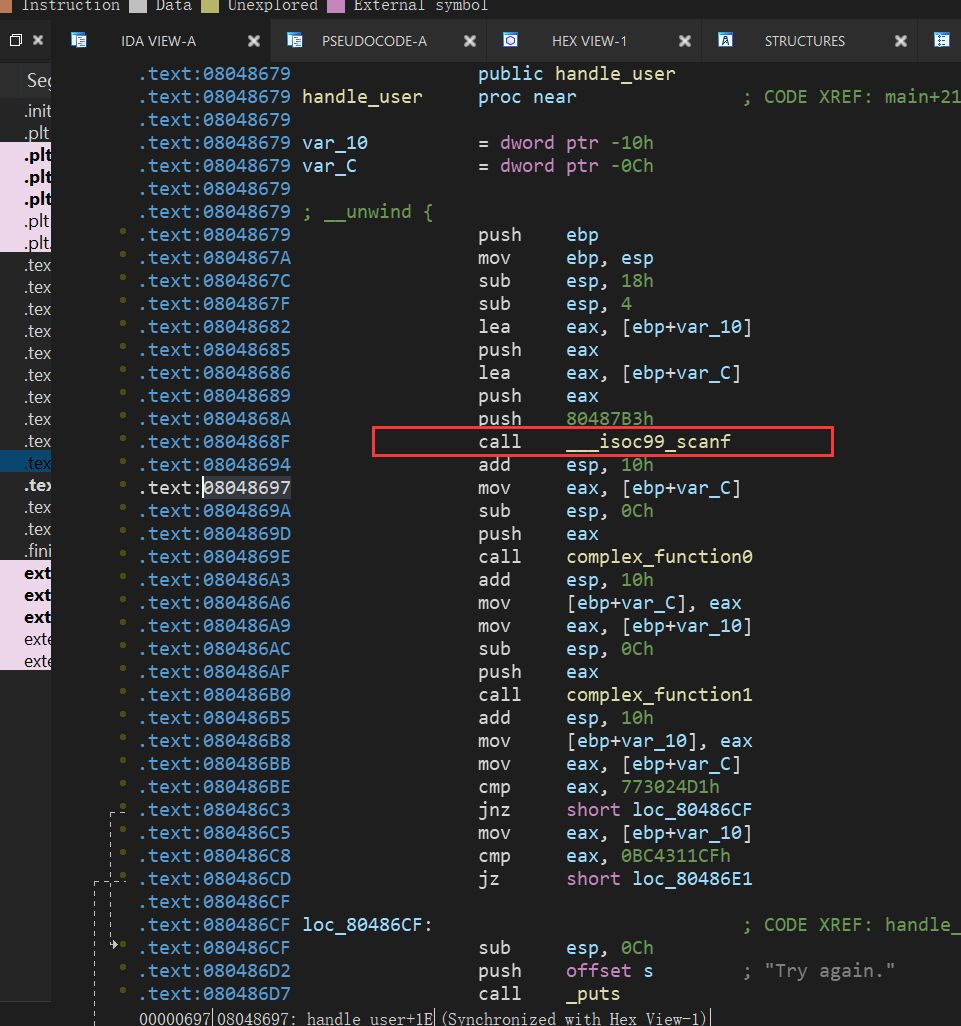
这里也是scanf读入数据,但是这次是储存在栈中,而不是寄存器
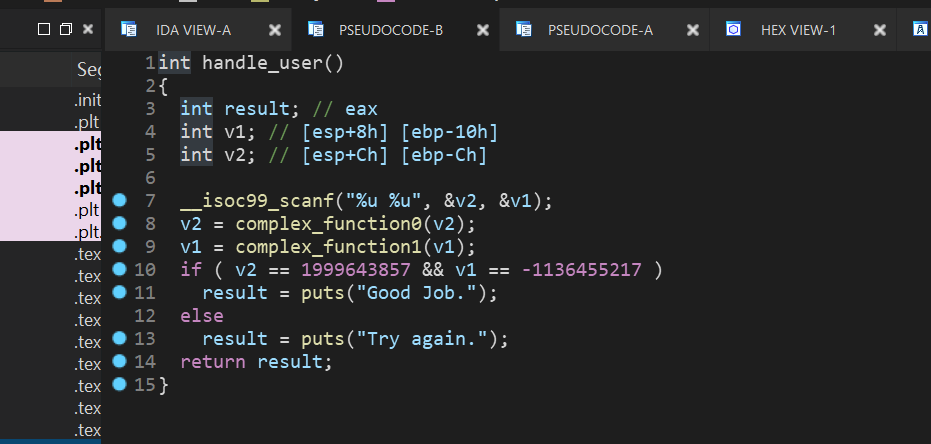
所以我们需要运行到angr中的对栈中的数据进行复制,这就要涉及到ebp和esp,然后还有距离,这里可以在gdb中调试来直观的计算距离:
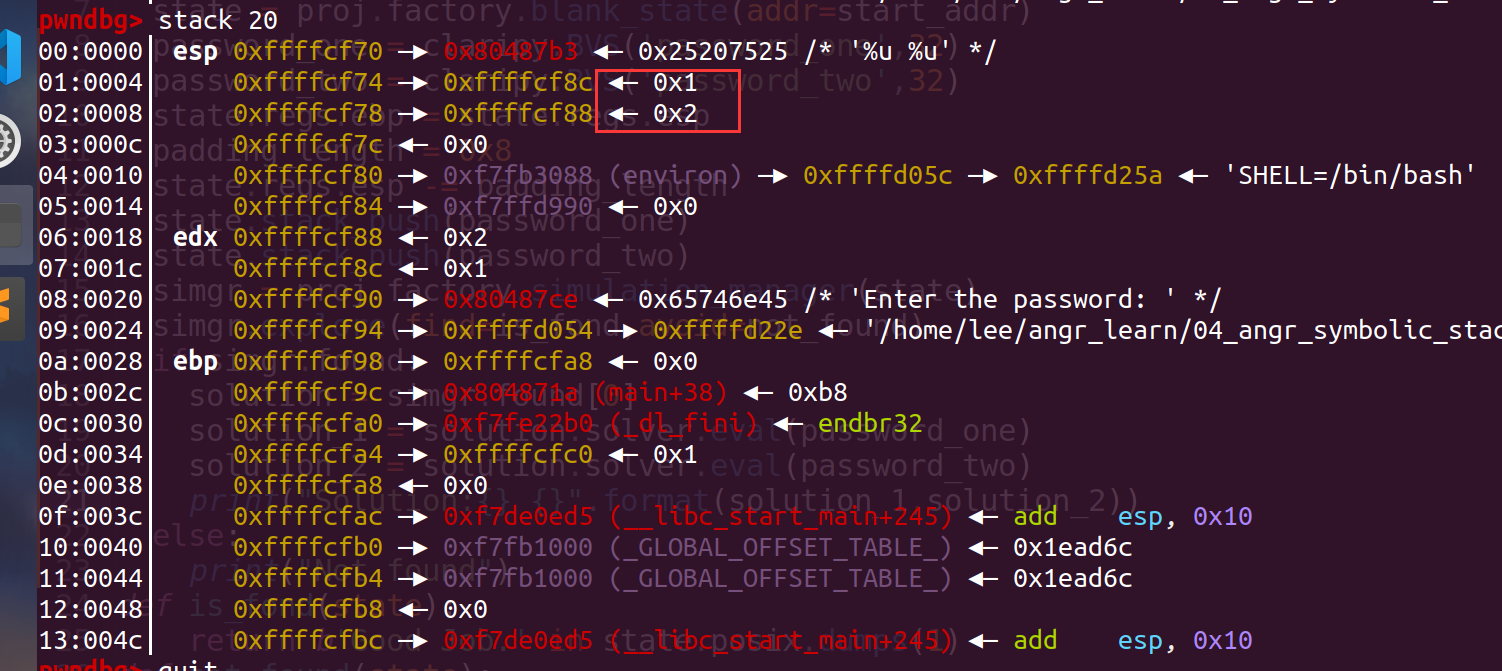
我们输入的两个值为1和2,可以看出存入时esp应该指向位置为esp-8(此处的esp为当前值) exp:
import angr
import claripydef exp():start_addr = 0x08048697proj = angr.Project('./04_angr_symbolic_stack')state = proj.factory.blank_state(addr=start_addr)password_one = claripy.BVS('password_one',32)password_two = claripy.BVS('password_two',32)state.regs.ebp = state.regs.esppadding_length = 0x8state.regs.esp -= padding_lengthstate.stack_push(password_one)state.stack_push(password_two)simgr = proj.factory.simulation_manager(state)simgr.explore(find=is_fond,avoid=not_found)if simgr.found:solution = simgr.found[0]solution_1 = solution.solver.eval(password_one)solution_2 = solution.solver.eval(password_two)print("Solution:{} {}".format(solution_1,solution_2))else:print("Not found")
def is_fond(state):return b'Good Job.' in state.posix.dumps(1)
def not_found(state):return b'Try again.' in state.posix.dumps(1)
if __name__ == "__main__":exp()
需要解释的是这个:
start_addr = 0x08048697
首先我们后面创造的是自己的一个栈空间,所以需要在同一个栈中的操作:

这里调用完scanf后回收栈空间然后开始又开辟新的栈空间 然后就是设置:
state.regs.ebp = state.regs.esp


05_angr_symbolic_memory
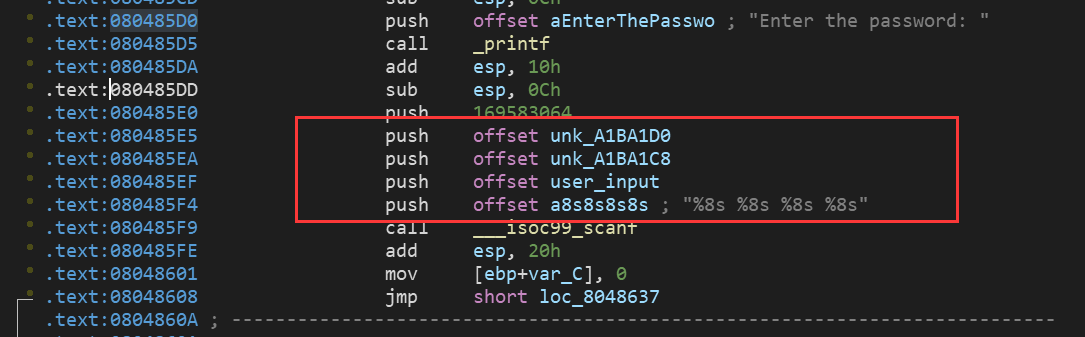
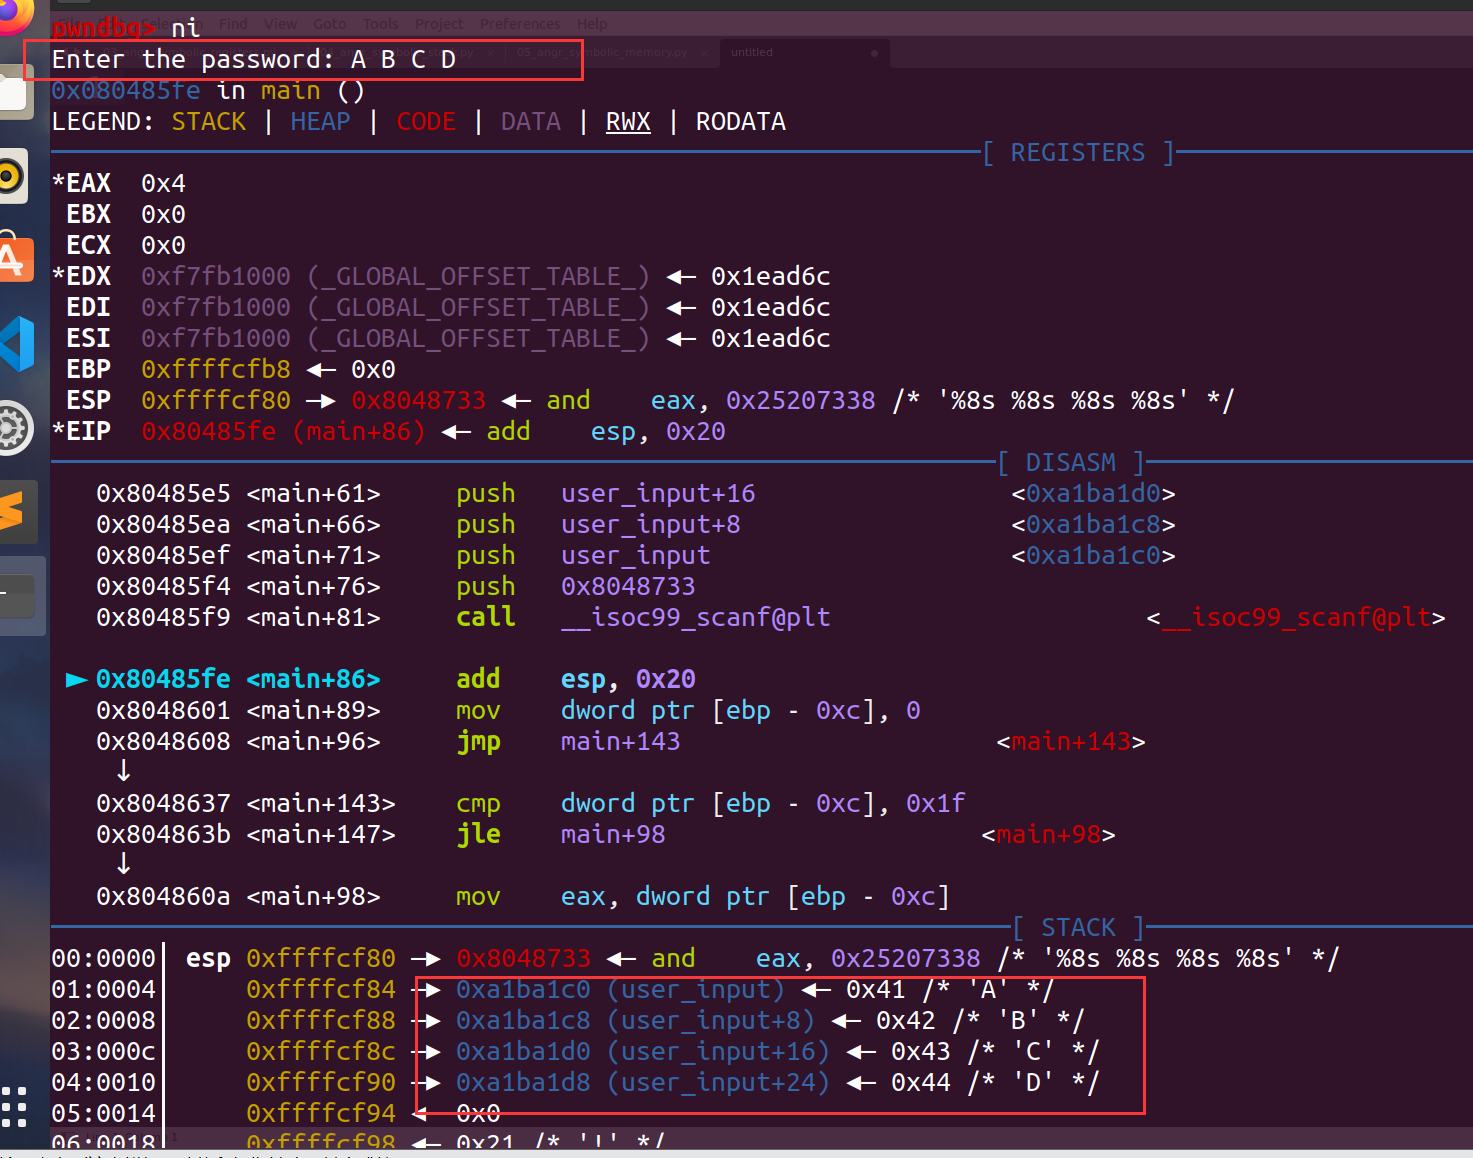
这次存储的地方和上次又不一样了,直接存入一个地址中 gdb下断点调试发现读入的值的存储地址:
然后就是利用claripy生成4个符号向量,注意这里scanf中的每个值为%8s,8个字符,C语言中char类型占1个字节,即8bit,所以BVS中大小得设置成8*8
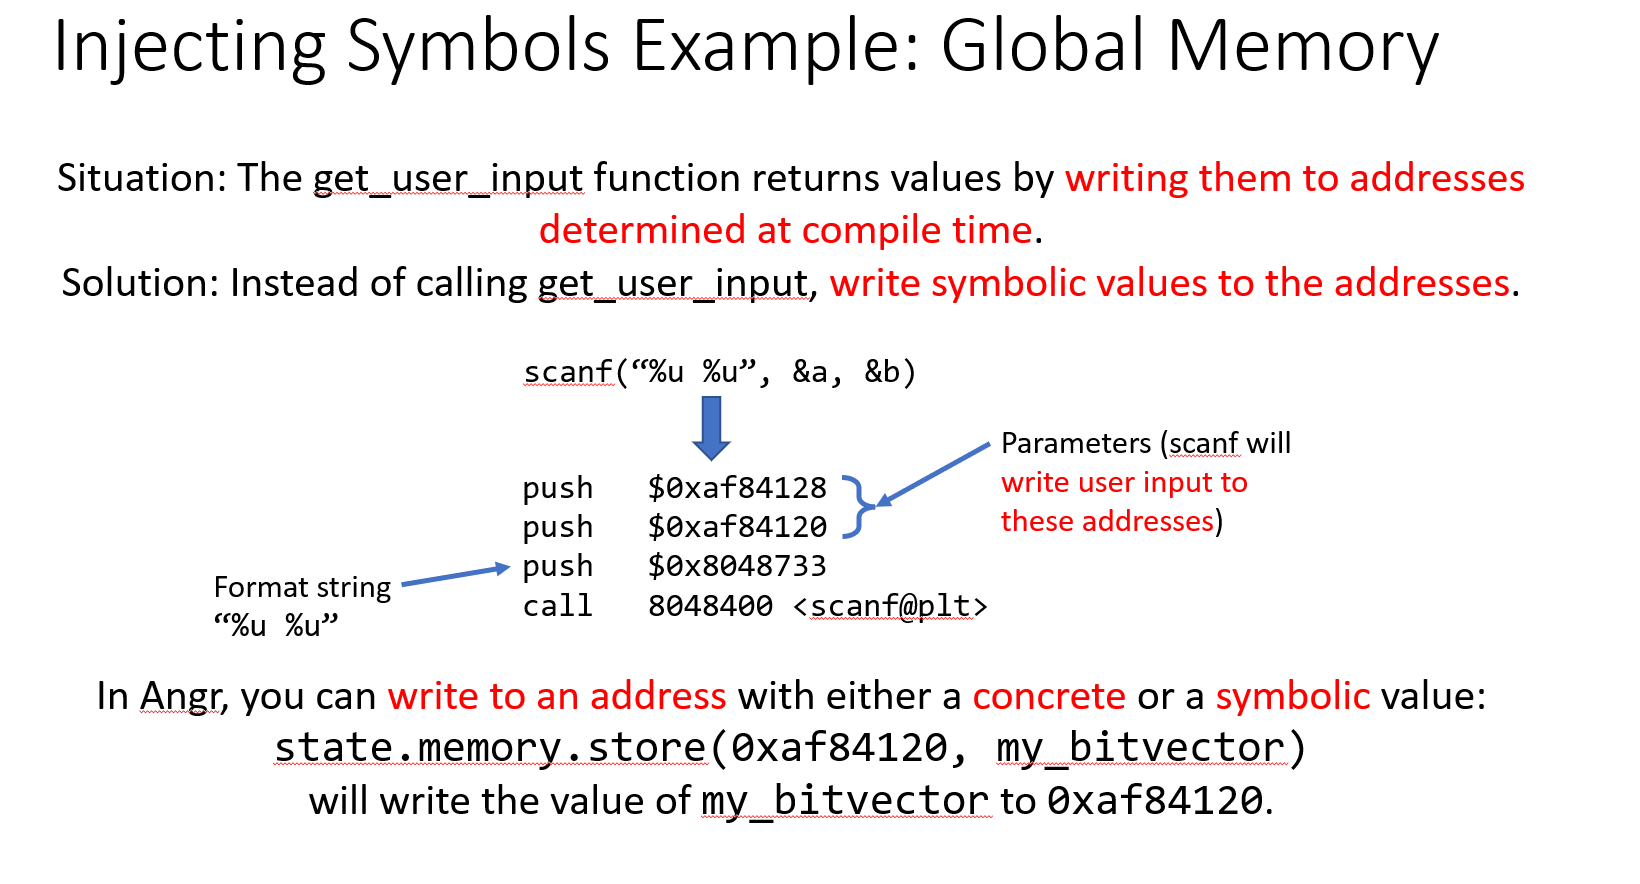
(官方提供的PPT中讲解,不过每个知识点就一笔带过) exp:
import angr
import claripydef exp():start_addr =  0x080485FEproj = angr.Project('./05_angr_symbolic_memory')state = proj.factory.blank_state(addr=start_addr)password_1 = claripy.BVS('p1',8*8)password_2 = claripy.BVS('p2',8*8)password_3 = claripy.BVS('p3',8*8)password_4 = claripy.BVS('p4',8*8)state.memory.store(0xa1ba1c0,password_1)state.memory.store(0xa1ba1c8,password_2)state.memory.store(0xa1ba1d0,password_3)state.memory.store(0xa1ba1d8,password_4)simgr = proj.factory.simulation_manager(state)simgr.explore(find=is_found,avoid=not_found)if simgr.found:solution = simgr.found[0]solution_1 = solution.solver.eval(password_1,cast_to=bytes).decode()solution_2 = solution.solver.eval(password_2,cast_to=bytes).decode()solution_3 = solution.solver.eval(password_3,cast_to=bytes).decode()solution_4 = solution.solver.eval(password_4,cast_to=bytes).decode()print("Solution:{} {} {} {}".format(solution_1,solution_2,solution_3,solution_4))else:print("Not found")def is_found(state):return b'Good Job.' in state.posix.dumps(1)
def not_found(state):return b'Try again.' in state.posix.dumps(1)
if __name__ == "__main__":exp()
这里的开始地址设置为(如果设置错地址会出现失败或者找到缺失的解的情况)
然后最后的时候因为程序读入的是字符串,而我们直接eval出来的是bytes类型的,所以进行个类型转换:
solution_1 = solution.solver.eval(password_1,cast_to=bytes).decode()solution_2 = solution.solver.eval(password_2,cast_to=bytes).decode()solution_3 = solution.solver.eval(password_3,cast_to=bytes).decode()solution_4 = solution.solver.eval(password_4,cast_to=bytes).decode()

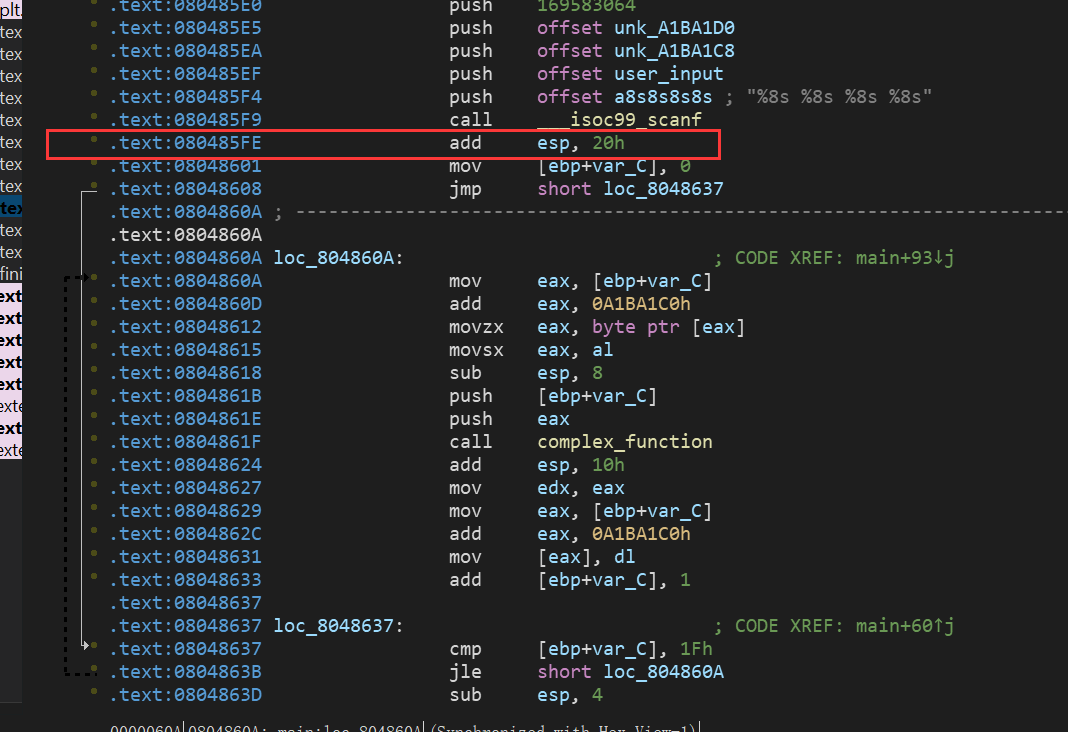
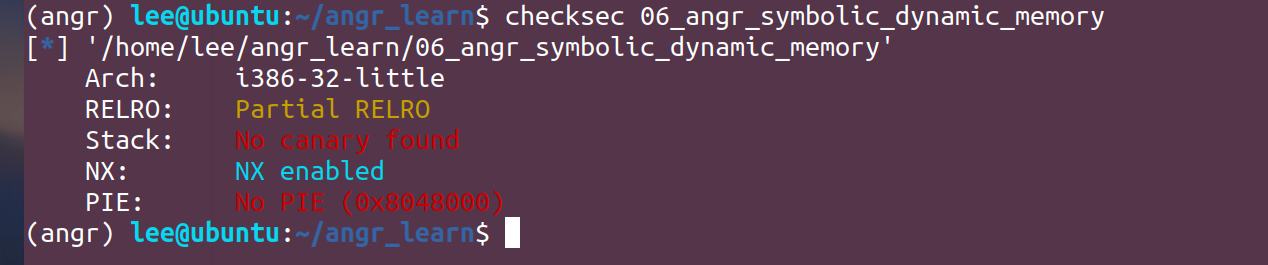
06_angr_symbolic_dynamic_memory
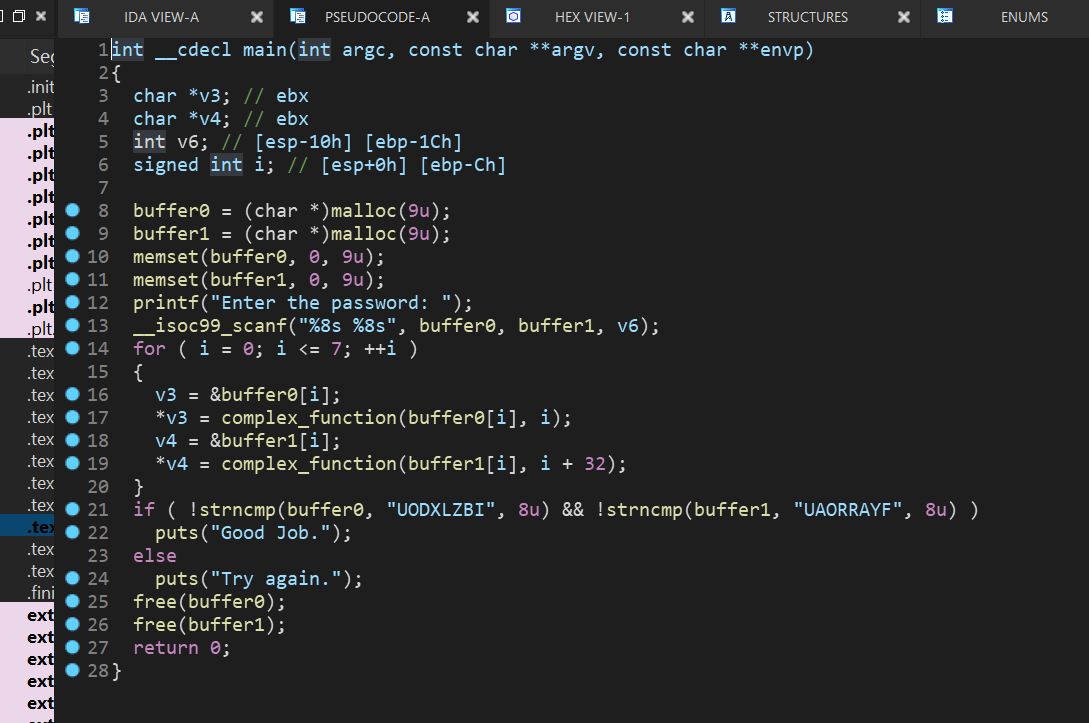
这次程序中引入了malloc,动态分配内存,然后再把读入的数据存放在分配的内存中
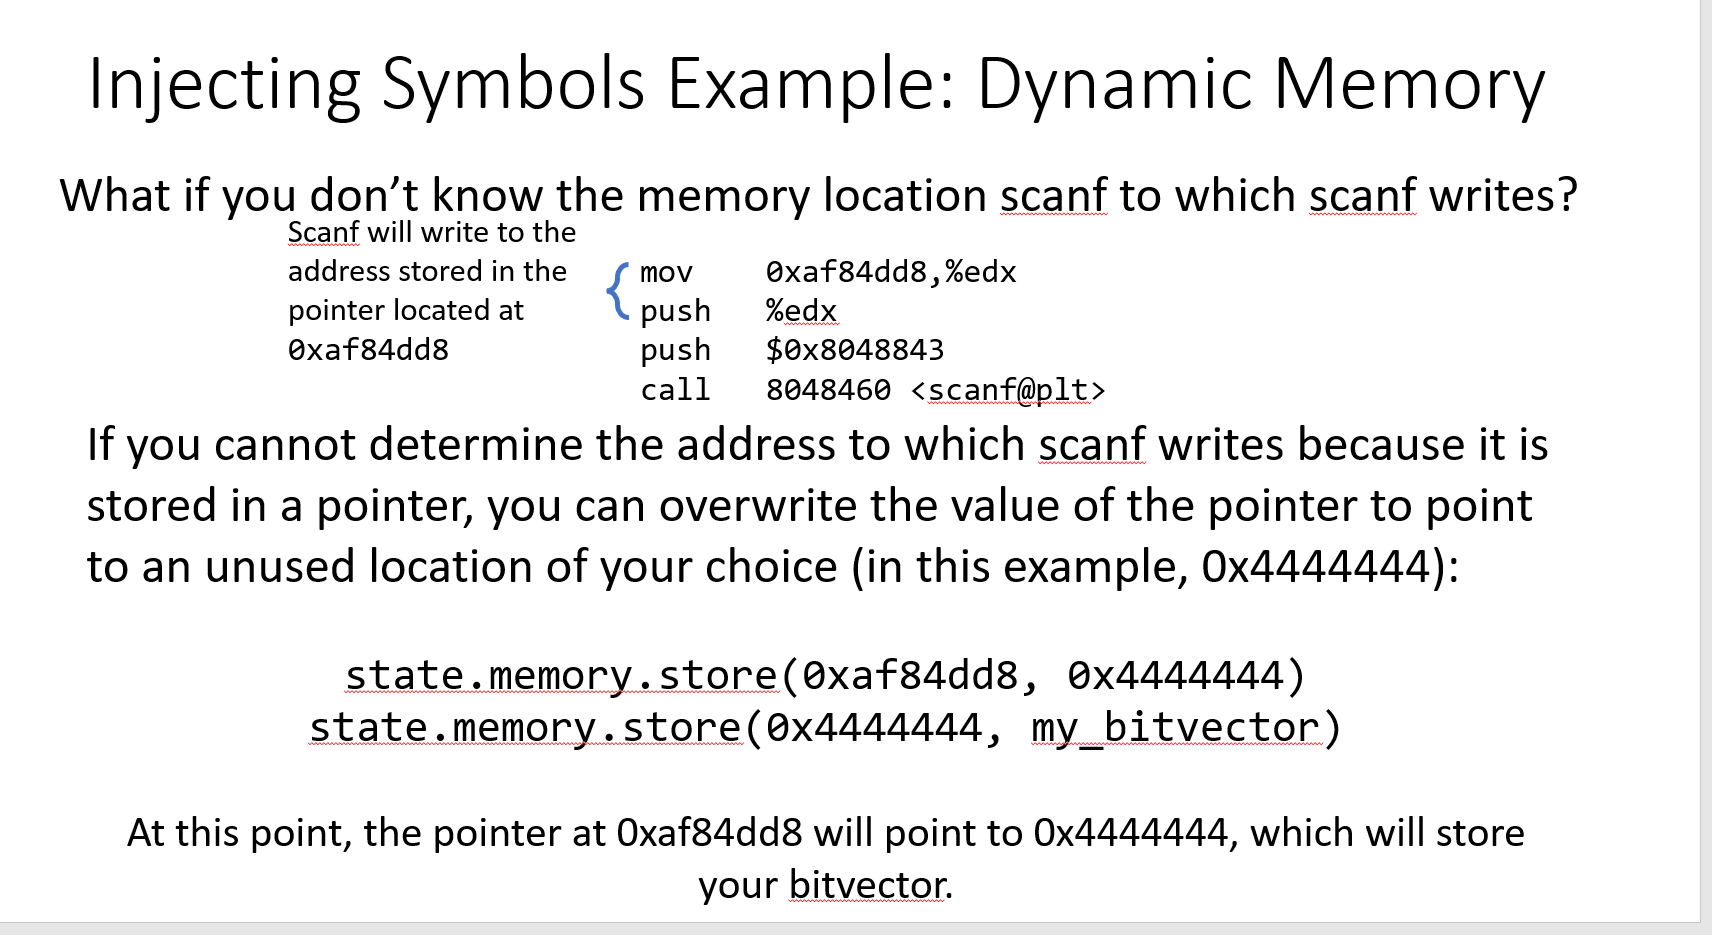
我们来看PPT中的汇编代码的作用:
mov    0xaf84dd8,%edx
push   %edx
push   $0x8048843
call   8048460 <scanf@plt>将0xaf84dd8的值移动到寄存器edx中。
将edx的值压入堆栈中。
将立即数0x8048843压入堆栈中。
调用标记为scanf@plt的过程,该过程是一个链接到程序的C库函数,用于从标准输入读取格式化输入,并将其存储到提供的参数中。
简而言之,这段代码的作用是读取标准输入并将其格式化存储在edx寄存器指向的内存地址中。
题目的汇编代码:

区别在于PPT中的是直接给出的地址,而题目中的buffer0和buffer1是动态分配的,这里的buffer0和buffer1都是指针的形式:

这里还是用到gdb来调试看看,首先我们大概了解了程序到底干了点啥,所以就是看看malloc后如何将指向分配的内存地址的指针存放在buffer0和buffer1这里
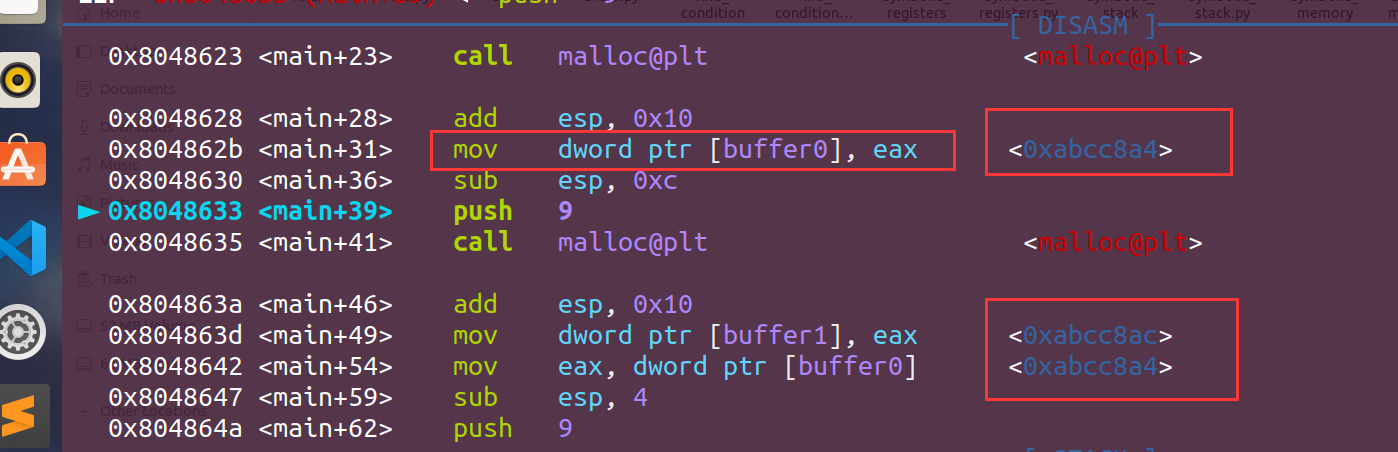
我们可以看到buffer0和buffer1的地址:
buffer0:0xabcc8a4
buffer1:0xabcc8ac
然后我们可以看看里面到底放了点啥(这里需要用十六进制的形式展现,所以用到的是x而不是p):
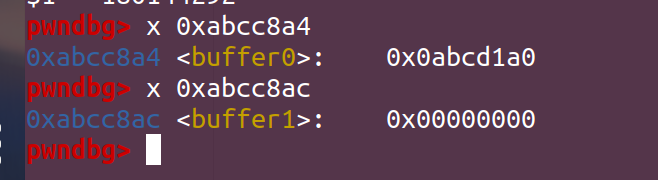
可以看出buffer0中已经放入了东西,而buffer1由于mallo还没完成,所以里面存的为空,我们可以继续单步执行,来看看malloc完后是否被赋值:
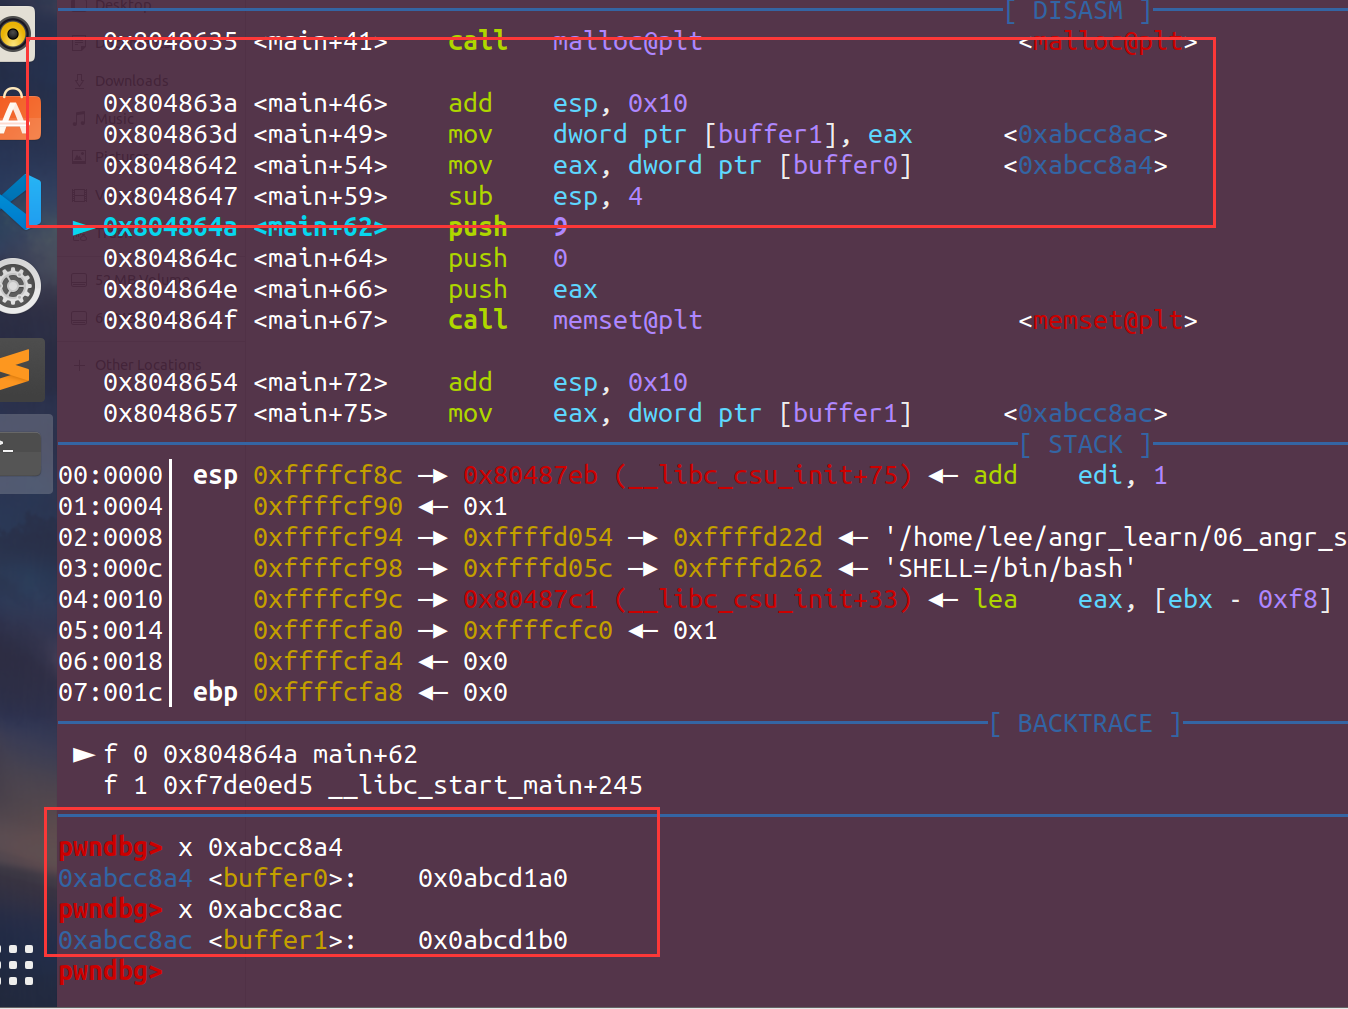
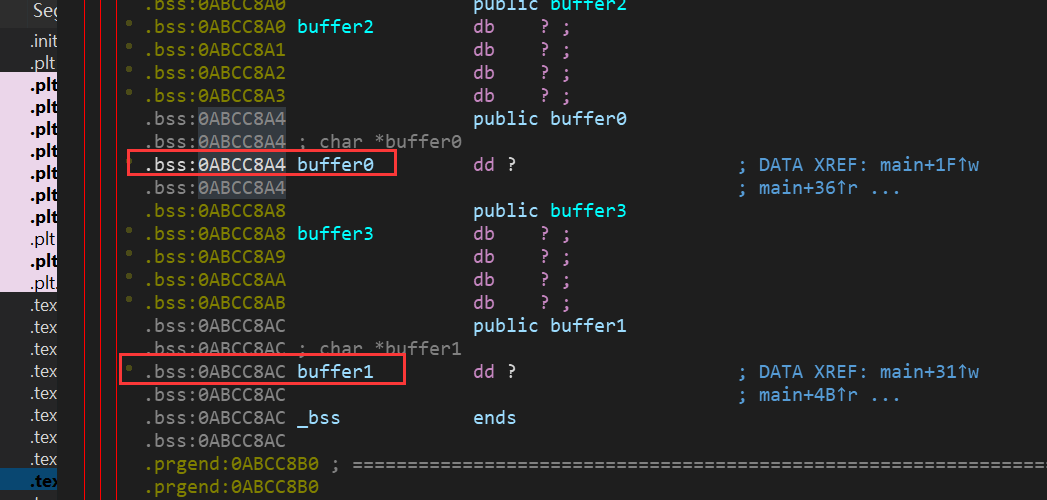
然后我们就可以确定本题的思路,把buffer0和buffer1中的东西改成我们的设置好的一个地址。 PS:buffer0和buffer1的地址也可直接从IDA中得到:
仿照PPT的思路写出个初始的:
import angr
import claripydef exp():start_addr = 0x08048696proj = angr.Project("./06_angr_symbolic_dynamic_memory")state = proj.factory.blank_state(addr=start_addr)simgr = proj.factory.simulation_manager(state)buffer_0 = claripy.BVS('b0',8*8)buffer_1 = claripy.BVS('b1',8*8)fake_addr_0 = 0x11111111fake_addr_1 = 0x22222222state.memory.store(0xabcc8a4,fake_addr_0)state.memory.store(0xabcc8ac,fake_addr_1)state.memory.store(fake_addr_0,buffer_0)state.memory.store(fake_addr_1,buffer_1)#这里是模拟的malloc过程simgr.explore(find=success,avoid=fail)if simgr.found:solution = simgr.found[0]solution_1 = solution.solver.eval(buffer_0,cast_to=bytes).decode()solution_2 = solution.solver.eval(buffer_1,cast_to=bytes).decode()print("Solution:{} {}".format(solution_1,solution_2))else:print("Not found")def success(state):return b"Good Job." in state.posix.dumps(1)
def fail(state):return b'Try again.' in state.posix.dumps(1)
if __name__ == "__main__":exp()
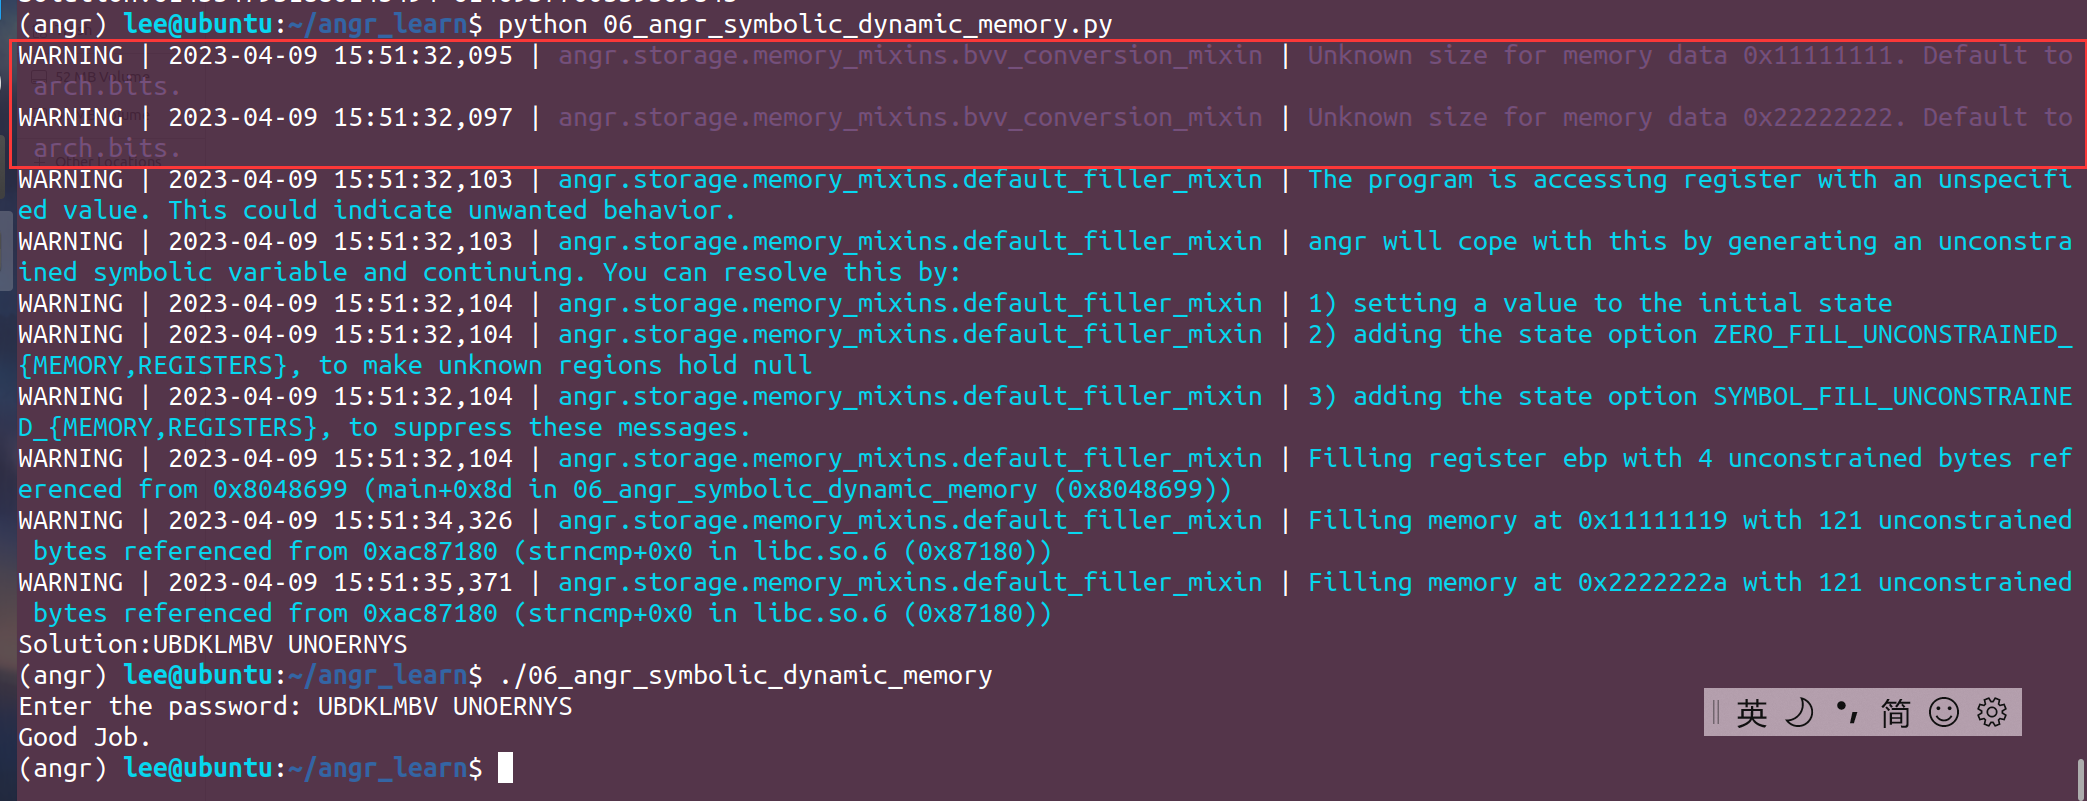
仔细看上面的打印结果,虽然能正确跑出结果,但是有两段warning:
WARNING | 2023-04-09 15:51:32,095 | angr.storage.memory_mixins.bvv_conversion_mixin | Unknown size for memory data 0x11111111. Default to arch.bits.
WARNING | 2023-04-09 15:51:32,097 | angr.storage.memory_mixins.bvv_conversion_mixin | Unknown size for memory data 0x22222222. Default to arch.bits.
解决办法:
state.memory.store(0xabcc8a4,fake_addr_0, endness=proj.arch.memory_endness,size=4)
state.memory.store(0xabcc8ac,fake_addr_1, endness=proj.arch.memory_endness,size=4)
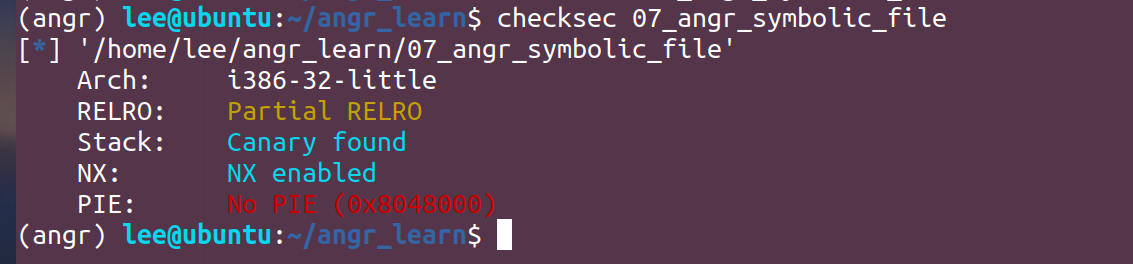
07_angr_symbolic_file

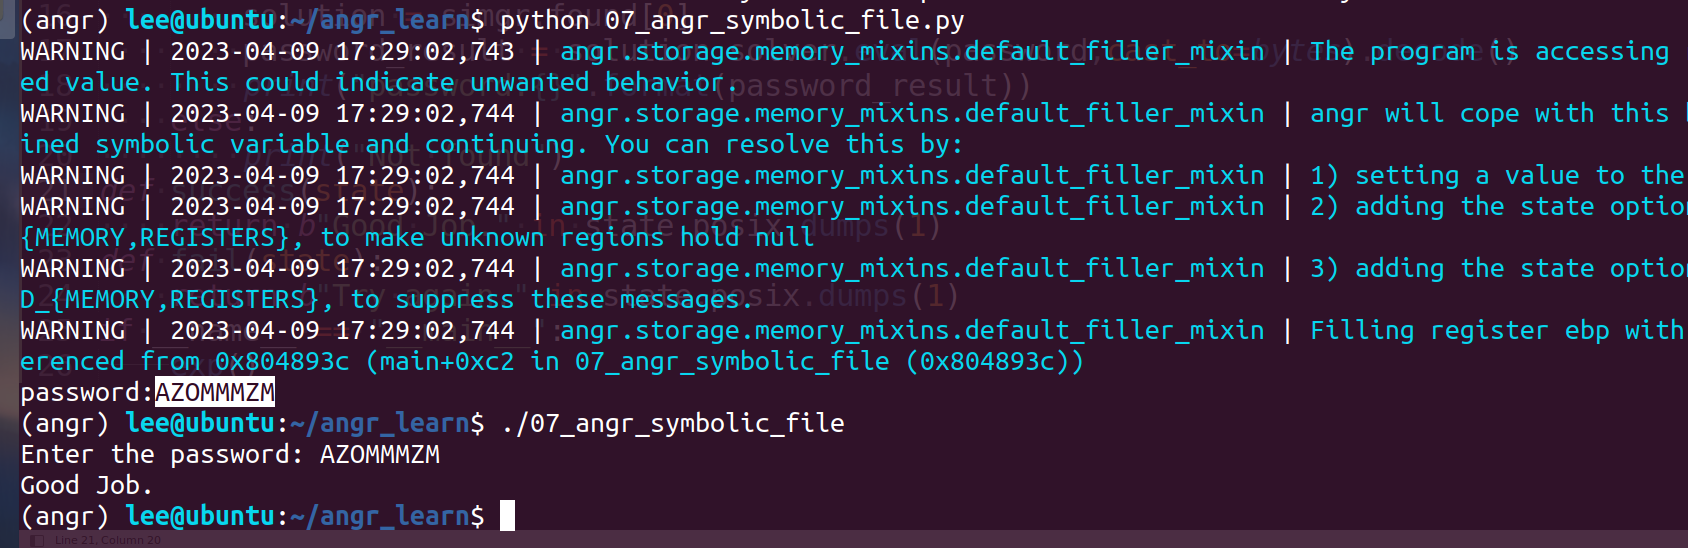
直接贴EXP:
import angr
import claripydef exp():start_addr = 0x080488E7# Get an address just before opening the file with th simbolic content# Or at least when the file is not going to suffer more changes before being readproj = angr.Project("./07_angr_symbolic_file")state = proj.factory.blank_state(addr=start_addr)file_name = "OJKSQYDP.txt"size_file = 64password = claripy.BVS('password',size_file*8)file_sym = angr.storage.SimFile(file_name,content=password)state.fs.insert(file_name,file_sym)simgr = proj.factory.simulation_manager(state)simgr.explore(find=success,avoid=fail)if simgr.found:solution = simgr.found[0]password_result = solution.solver.eval(password,cast_to=bytes).decode()print("password:{}".format(password_result))else:print("Not found")
def success(state):return b"Good Job." in state.posix.dumps(1)
def fail(state):return b"Try again." in state.posix.dumps(1)
if __name__ == "__main__":exp()
解释:这里引进了新的东西,首先我们要将整个文件进行符号化,然后再设置符号化文件中的内容
file_name = "OJKSQYDP.txt"
size_file = 64
password = claripy.BVS('password',size_file*8)  file_sym = angr.storage.SimFile(file_name,content=password)
state.fs.insert(file_name,file_sym)
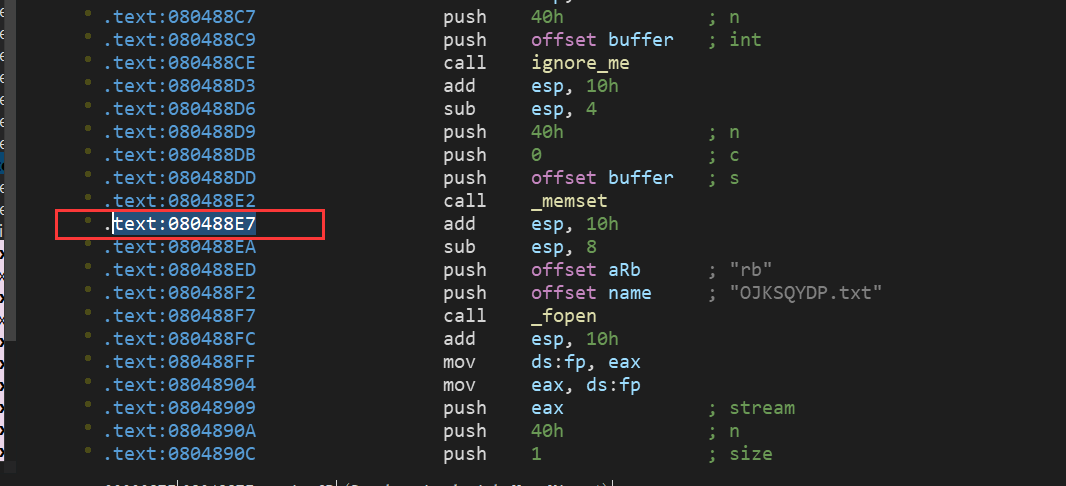
开始地址可能找不对,仔细分析代码就可以找到
08_angr_constraints
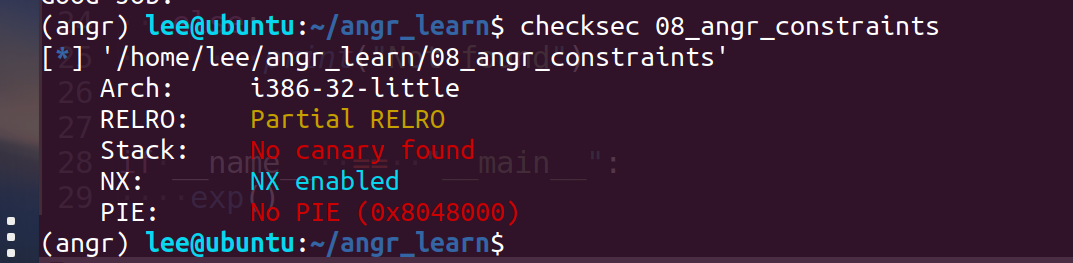
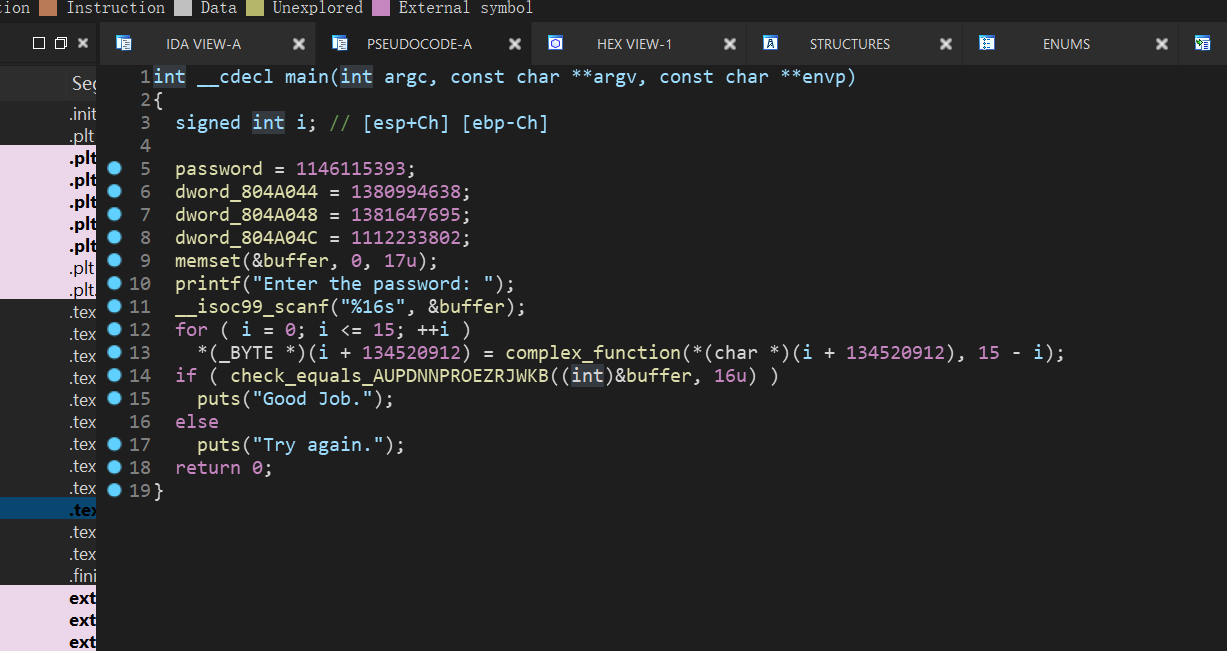
这题以为可以简单解出来,但是忽视了题目考点,点进去check函数,这里的比较是一位一位的比较,所以就会造成有很多可能,一个很大的数量级,angr在遍历过程中会状态爆炸

但是通过反汇编出来的代码我们可以大概知道比较的流程是如何,因为函数名也给出了提示信息,所以我们需要人为的添加一些限制条件,使遍历不那么盲目
import angr
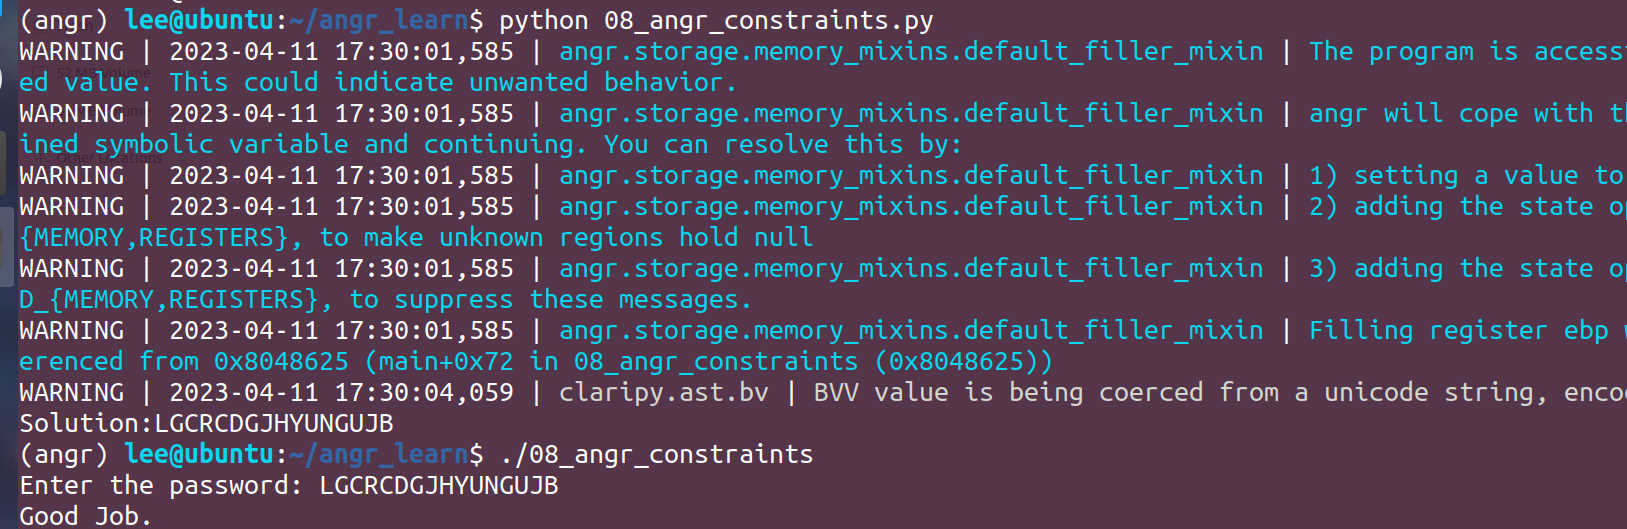
import claripydef exp():start_addr = 0x08048622proj = angr.Project('./08_angr_constraints')init_state = proj.factory.blank_state(addr=start_addr)password = claripy.BVS('p1',8*16)password_address = 0x804a050init_state.memory.store(password_address,password)simgr = proj.factory.simulation_manager(init_state)check_addr=0x08048673simgr.explore(find=check_addr)if simgr.found:solution_state = simgr.found[0]constrain_parameter_address = password_addressbyte_size = 16load_symbols = solution_state.memory.load(constrain_parameter_address,byte_size)desire_string = "AUPDNNPROEZRJWKB"solution_state.add_constraints(load_symbols == desire_string)solution = solution_state.solver.eval(password,cast_to=bytes).decode()print("Solution:{}".format(solution))else:print("Not found")if __name__ == "__main__":exp()
挨个解释下里面和以往不同的地方,以往都是在explore中设置成功和失败条件,但是这次我们需要人为添加判断的条件,所以我们explore中需要指定find为check函数的入口点,所以设置:
simgr.explore(find=check_addr)
然后我们需要指定程序读入后存储的位置,这个是为了后续添加限制条件时对比,这里的password_address在上面也定义了,在创建符号向量时
constrain_parameter_address = password_address
然后我们需要取出我们创建的符号向量:
byte_size = 16
load_symbols = solution_state.memory.load(constrain_parameter_address,byte_size)
然后手动添加限制,指定成功的条件,也就是当符号向量等于字符串"AUPDNNPROEZRJWKB"时
desire_string = "AUPDNNPROEZRJWKB"
solution_state.add_constraints(load_symbols == desire_string)
小结:关于这个状态爆炸问题,angr中也有很多缓解机制,以及添加算法来缓解,后面的题有专门的知识点,这里就不深入探究,后面遇到再深入剖析下。
09_angr_hooks
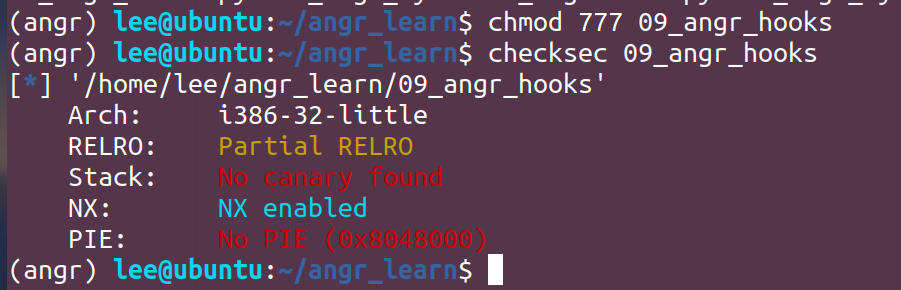
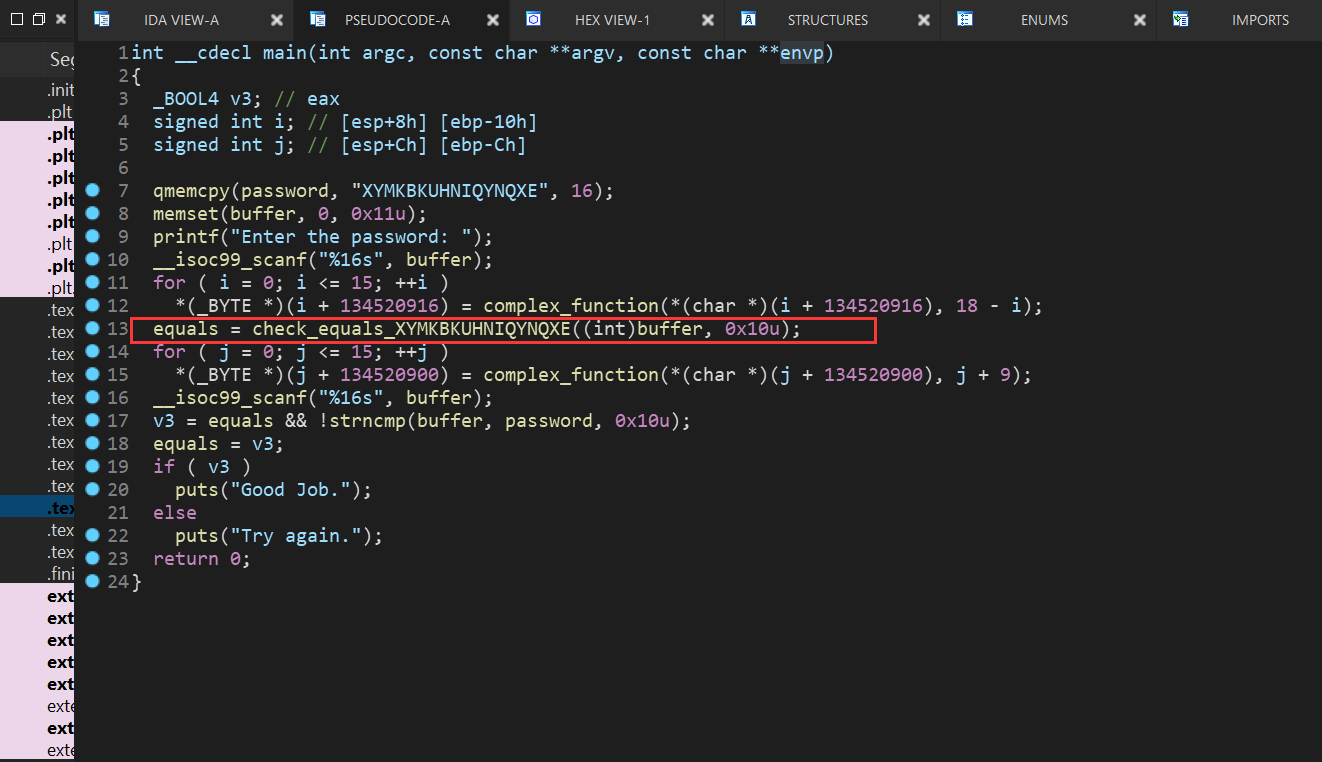
点进这个函数后发现还是存在状态爆炸问题,这里引入一个新的技术:hook
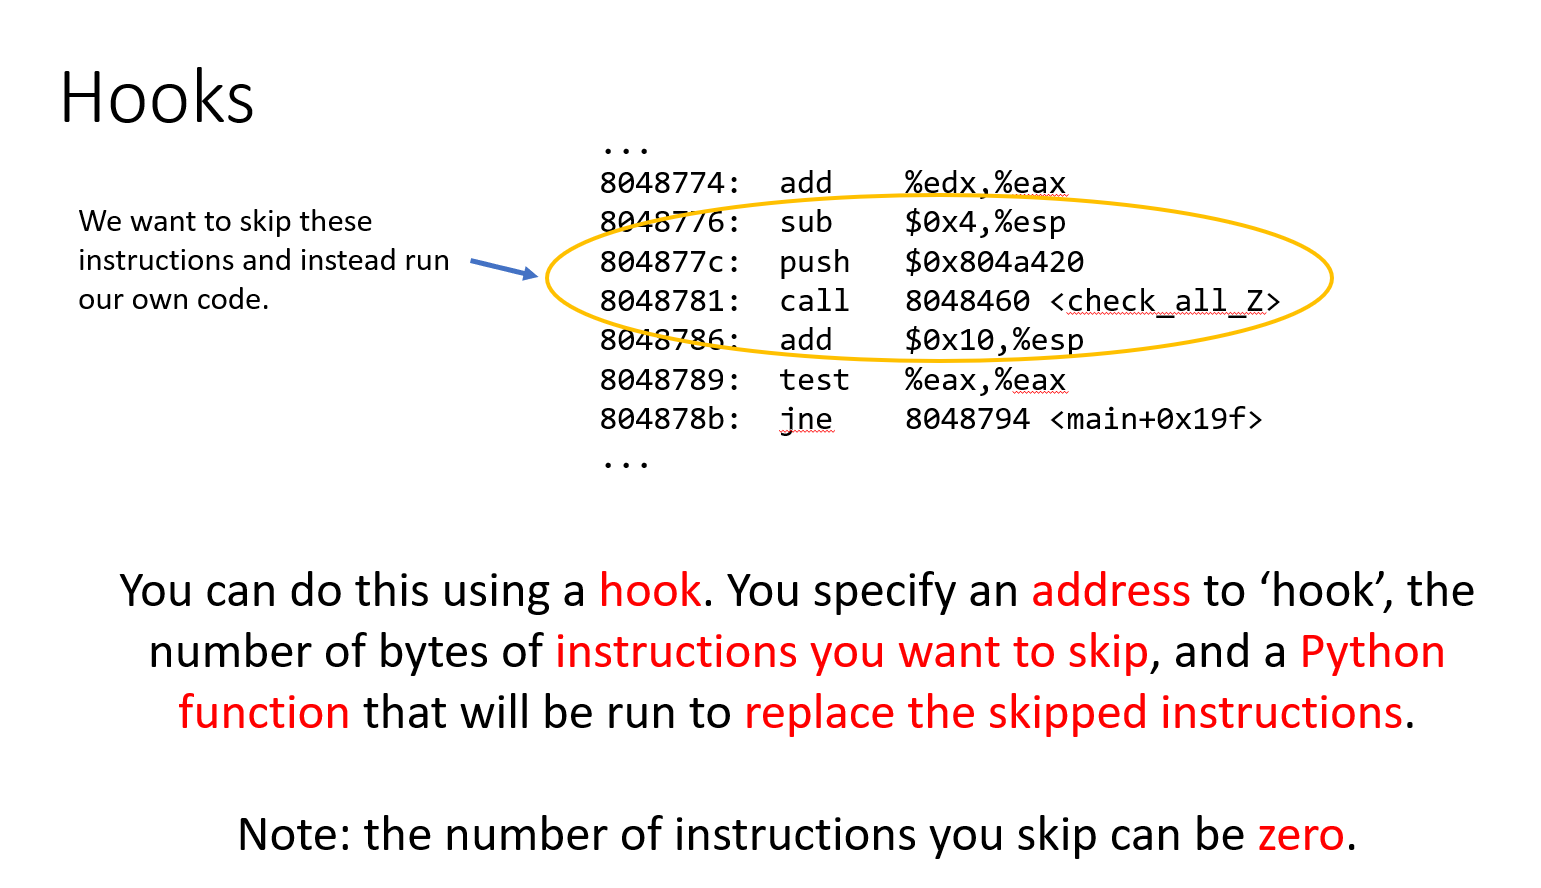
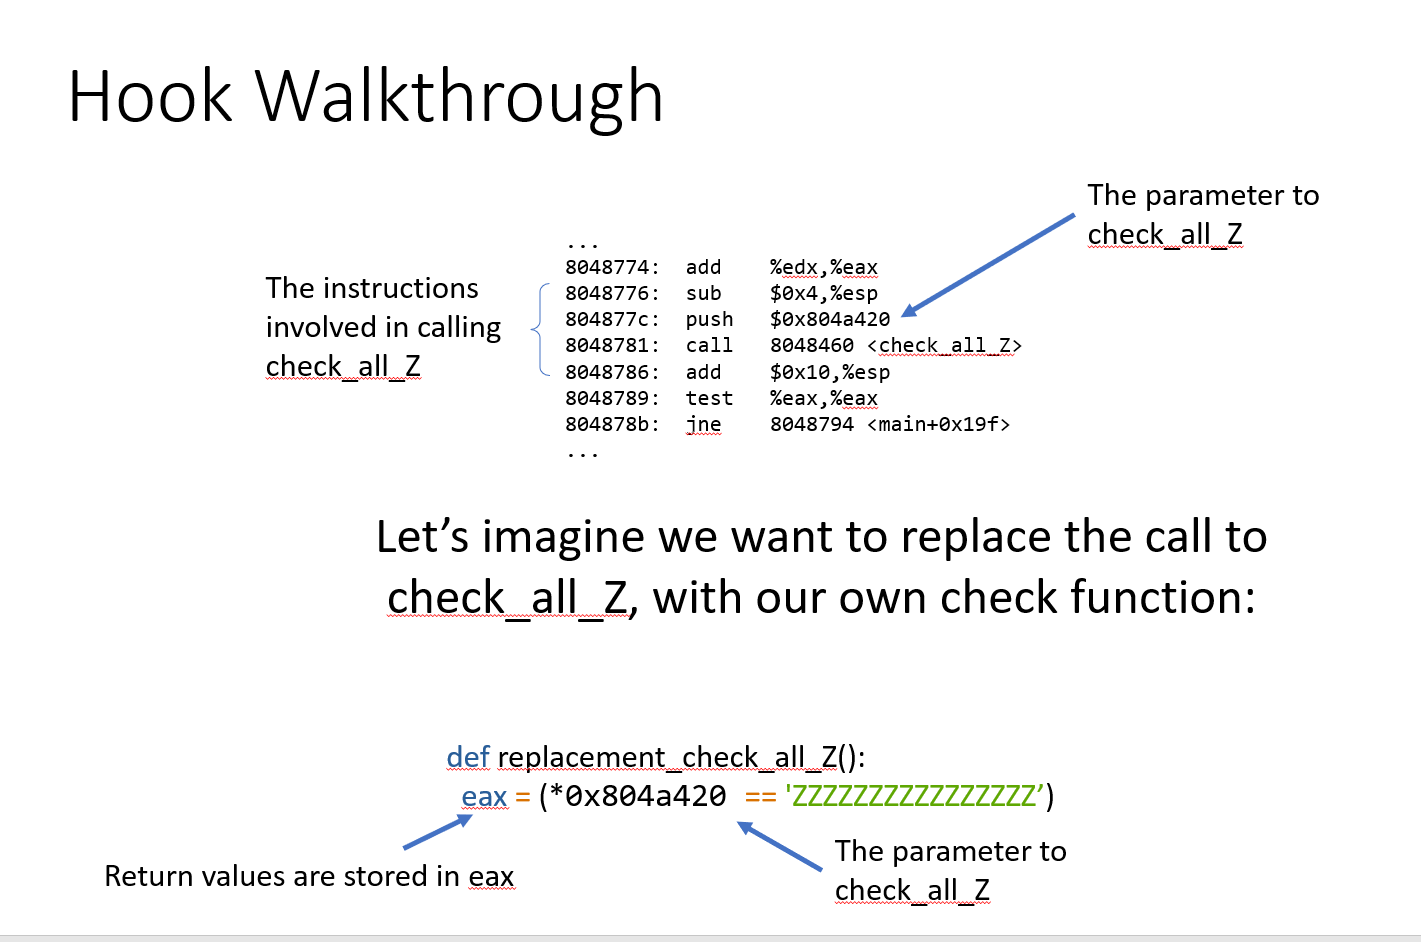
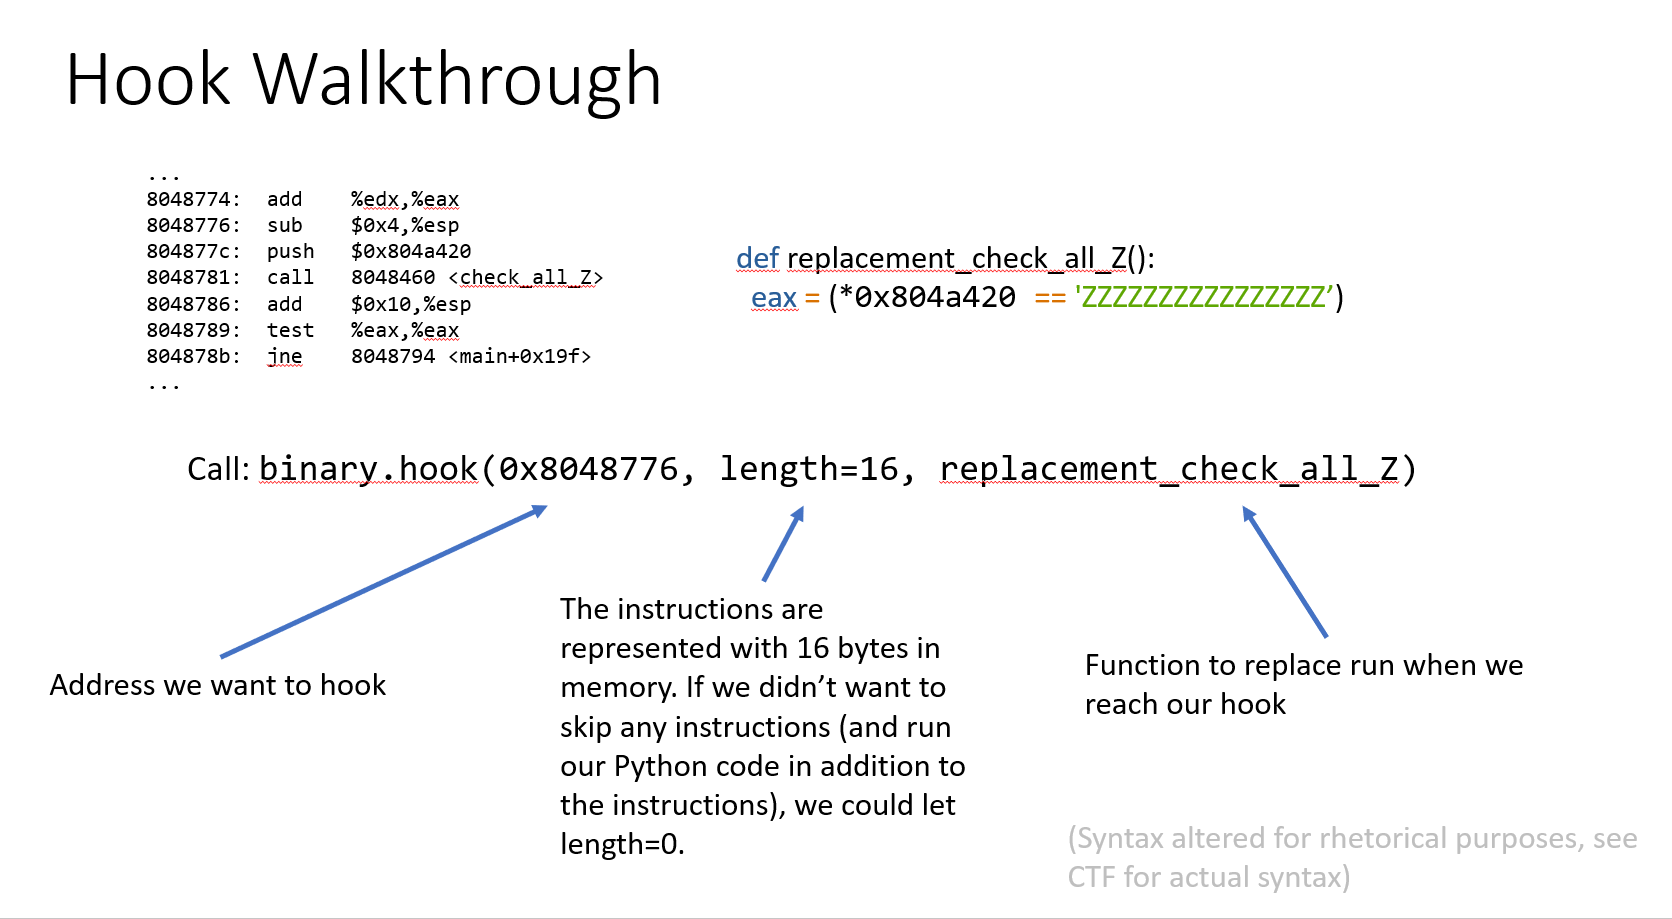
这里的PPT和实际题中的还是有些偏差,还是结合实际EXP来看看:
import angr
import claripydef exp():proj = angr.Project("./09_angr_hooks")init_state = proj.factory.entry_state()check_addr = 0x080486B3skip_len = 5@proj.hook(check_addr,length=skip_len)def check_equal(init_state):buffer_addr = 0x0804A054load_buffer_symbol = init_state.memory.load(buffer_addr,16)check_str = 'XYMKBKUHNIQYNQXE'init_state.regs.eax = claripy.If(load_buffer_symbol==check_str,claripy.BVV(1,32),claripy.BVV(0,32))simgr = proj.factory.simulation_manager(init_state)simgr.explore(find=is_success,avoid=is_fail)if simgr.found:solution = simgr.found[0]reuslt = solution.posix.dumps(0)print("Solution:{}".format(reuslt))
def is_success(init_state):return b'Good Job.' in init_state.posix.dumps(1)
def is_fail(init_state):return b'Try again.' in init_state.posix.dumps(1)
if __name__=="__main__":exp()
解释:
@proj.hook(check_addr,length=skip_len)
def check_equal(init_state):
#主体
我们想把check函数替换成我们自己设置的函数,所以需要从check函数前跳过

可以看出check函数占用的长度为5,所以skip_len=5
def check_equal(init_state):buffer_addr = 0x0804A054load_buffer_symbol = init_state.memory.load(buffer_addr,16)check_str = 'XYMKBKUHNIQYNQXE'init_state.regs.eax = claripy.If(load_buffer_symbol==check_str,claripy.BVV(1,32),claripy.BVV(0,32))
#然后就是读出内存中数据,对比,最后根据对比结果对eax的值进行设置,1为相同,0为不同,32位
10_angr_simprocedures
和上一个题差不多,但是由于我们要hook的函数多次被调用,hook时地址就不好设置,所以引进了新的技术
This challenge is similar to the previous one. It operates under the same
premise that you will have to replace the check_equals_ function. In this
case, however, check_equals_ is called so many times that it wouldn't make
sense to hook where each one was called. Instead, use a SimProcedure to write
your own check_equals_ implementation and then hook the check_equals_ symbol
to replace all calls to scanf with a call to your SimProcedure.
You may be thinking:
Why can't I just use hooks? The function is called many times, but if I hook
the address of the function itself (rather than the addresses where it is
called), I can replace its behavior everywhere. Furthermore, I can get the
parameters by reading them off the stack (with memory.load(regs.esp + xx)),
and return a value by simply setting eax! Since I know the length of the
function in bytes, I can return from the hook just before the 'ret'
instruction is called, which will allow the program to jump back to where it
was before it called my hook.
If you thought that, then congratulations! You have just invented the idea of
SimProcedures! Instead of doing all of that by hand, you can let the already-
implemented SimProcedures do the boring work for you so that you can focus on
writing a replacement function in a Pythonic way.
As a bonus, SimProcedures allow you to specify custom calling conventions, but
unfortunately it is not covered in this CTF.
import angr
import claripy
def exp():proj = angr.Project("./10_angr_simprocedures")init_state = proj.factory.entry_state()
class My_replace(angr.SimProcedure):def run(self,to_check,length):to_check_addr = to_checkcheck_len = lengthuser_input_string = self.state.memory.load(to_check_addr,length)check_string = 'ORSDDWXHZURJRBDH'return claripy.If(user_input_string == check_string,claripy.BVV(1,32),claripy.BVV(0,32))
check_symbol = 'check_equals_ORSDDWXHZURJRBDH'proj.hook_symbol(check_symbol,My_replace())simgr = proj.factory.simgr(init_state)simgr.explore(find=is_found,avoid=is_fail)
if simgr.found:solution = simgr.found[0]print("Solution{}".format(solution.posix.dumps(0)))else:print("Not found")
def is_found(init_state):return b'Good Job.' in init_state.posix.dumps(1)
def is_fail(init_state):return b'Try again.' in init_state.posix.dumps(1)
if __name__ == "__main__":exp()
加下方wx,拉你一起进群学习

相关文章:
angr学习-入门篇
前言: 资源链接:GitHub - jakespringer/angr_ctf(题库仓库,里面有个讲解angr的PPT,里面有官方的题解很详细) GitHub - Hustcw/Angr_Tutorial_For_CTF: angr tutorial for ctf 安装: 关于angr…...

基于java SpringBoot和HTML的博客系统
随着网络技术渗透到社会生活的各个方面,传统的交流方式也面临着变化。互联网是一个非常重要的方向。基于Web技术的网络考试系统可以在全球范围内使用互联网,可以在本地或异地进行通信,大大提高了通信和交换的灵活性。在当今高速发展的互联网时…...
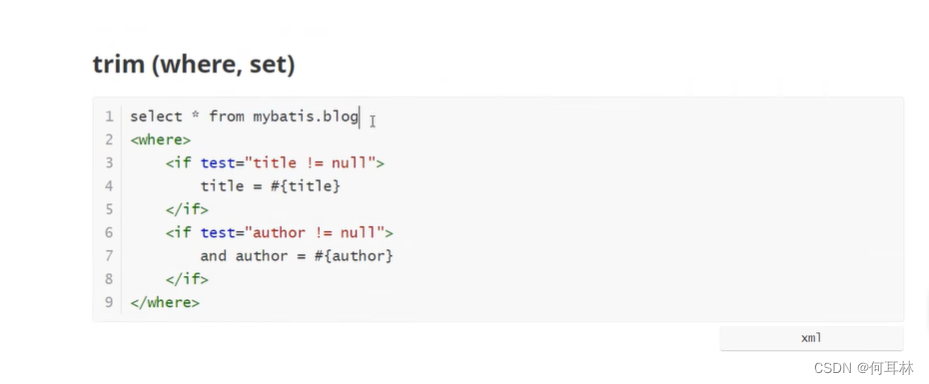
动态sql以及常用的标签
什么是动态sql: 指根据不同的条件生成不同的sql 搭建环境: 建表: create table blog( id varchar(50) not null comment 博客id, title varchar(100) not null comment 博客标题, author varchar(30) not null comment 博客作者, create_ti…...

DID以及社交网络中的ZKP
1. 引言 本文关键术语为: Decentralized Identity (DID,去中心化身份) or self-sovereign identity (SSI,自治身份) :是一个基于开放标准的框架,使用自主、独立的标识符和可验证证书,实现可信的数据交换。…...

基于SWAT-MODFLOW地表水与地下水耦合
耦合模型被应用到很多科学和工程领域来改善模型的性能、效率和结果,SWAT作为一个地表水模型可以较好的模拟主要的水文过程,包括地表径流、降水、蒸发、风速、温度、渗流、侧向径流等,但是对于地下水部分的模拟相对粗糙,考虑到SWAT…...

2023拒绝内卷!两年转行网络安全真实看法!
我目前转行网络安全两年,没啥天分,全靠努力,基本能够得上中级的水平了。看到大家对转行网络安全挺感兴趣,也有挺多争议,想把我的建议和经验告诉大家。 有很多人觉得网络安全已经饱和了,现在选择这个工作&a…...

【SA8295P 源码分析】57 - libDSI_MAX96789_0.so驱动库 之 QDI_Panel_Init 显示屏初始化函数 代码分析
【SA8295P 源码分析】57 - libDSI_MAX96789_0.so驱动库 之 QDI_Panel_Init 显示屏初始化函数 代码分析 一、QDI_Panel_Init() 显示屏初始化函数:Panel_DSI_MAX96789_0_Init()二、QDI_Panel_SetPower() 显示屏初始化:Panel_DSI_MAX96789_0_PowerLCD()三、QDI_Panel_GetInfo() …...
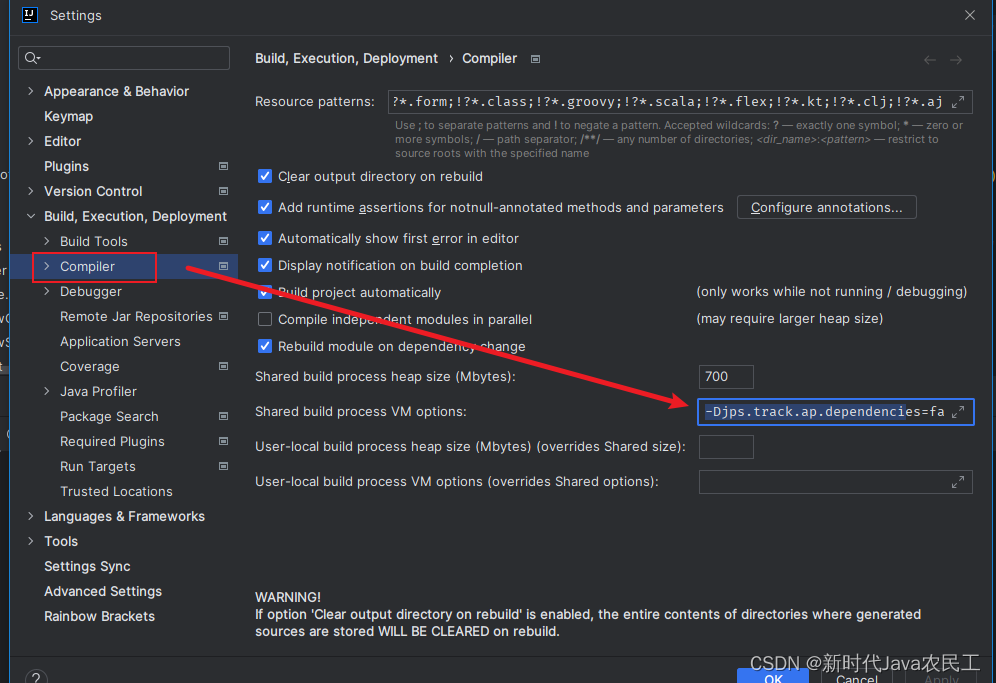
IDEA偶尔编译的时候不识别lombok
偶尔IDEA启动项目的时候会识别不到lombok,识别不到get()跟set()方法 方案 在settings添加下面代码 -Djps.track.ap.dependenciesfalse...

rust学习-构建服务器
单线程server 服务器会依次处理每一个请求,在完成第一个连接的处理之前不会处理第二个连接 // cat main.rs use std::io::prelude::*; use std::net::TcpListener; use std::net::TcpStream;fn main() {let listener TcpListener::bind("127.0.0.1:7878&quo…...

Java并发----进程、线程、并行、并发
一、进程与线程 进程 程序由指令和数据组成,但这些指令要运行,数据要读写,就必须将指令加载至 CPU,数据加载至内存。在指令运行过程中还需要用到磁盘、网络等设备。进程就是用来加载指令、管理内存、管理 IO 的 当一个程序被运行…...
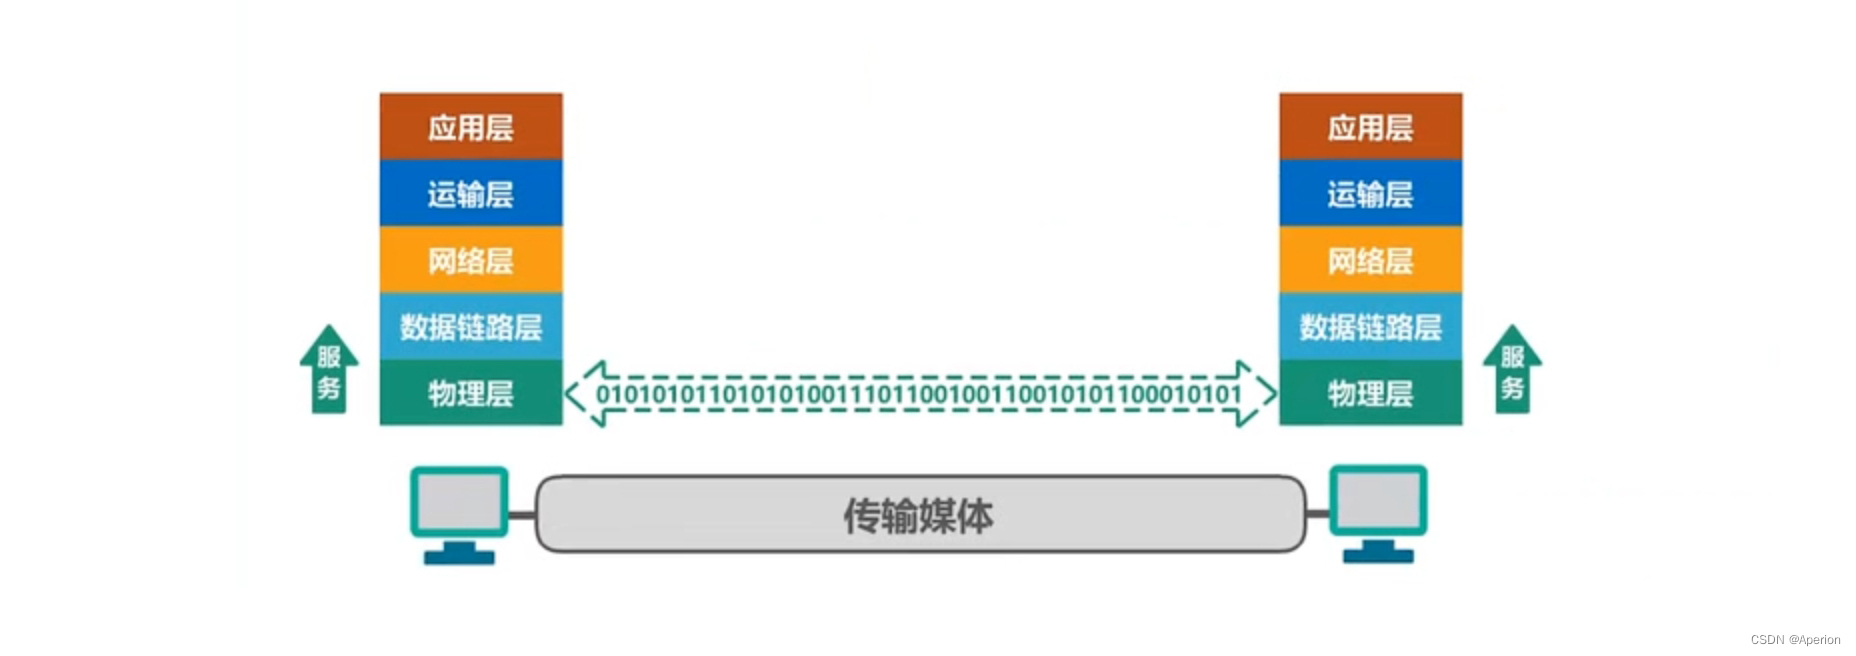
【计算机网络】第 4 课 - 物理层
欢迎来到博主 Apeiron 的博客,祝您旅程愉快 ! 时止则止,时行则行。动静不失其时,其道光明。 目录 1、物理层的基本概念 2、物理层协议的主要任务 3、物理层任务 4、总结 1、物理层的基本概念 在计算机网络中,用来…...

深入理解MVVM架构模式
MVVM原理 MVVM是一种用于构建用户界面的软件架构模式,它的名称代表着三个组成部分:Model(模型)、View(视图)和ViewModel(视图模型)。MVVM的主要目标是将应用程序的UI与其底层数据模…...
配置IPv6 over IPv4手动隧道示例
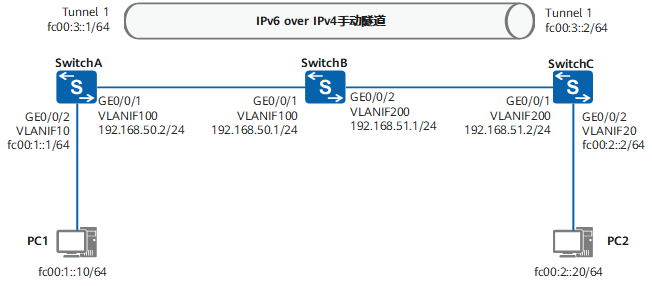
组网需求 如图1所示,两台IPv6主机分别通过SwitchA和SwitchC与IPv4骨干网络连接,客户希望两台IPv6主机能通过IPv4骨干网互通。 图1 配置IPv6 over IPv4手动隧道组网图 配置思路 配置IPv6 over IPv4手动隧道的思路如下: 配置IPv4网络。配置接…...
Vue3--->组合式API与Pinia
目录 使用create-vue搭建 1、使用create-vue创建项目 2、项目目录和关键文件 组合式API 1、组合式API - setup选项 2、组合式API - reactive和ref函数 3、组合式API - computed 4、组合式API - watch 1、基础使用 - 侦听单个数据 2、基础使用 - 侦听多个数据 3、immediate&…...

三言两语说透柯里化和反柯里化
JavaScript中的柯里化(Currying)和反柯里化(Uncurrying)是两种很有用的技术,可以帮助我们写出更加优雅、泛用的函数。本文将首先介绍柯里化的概念、实现原理和应用场景,然后介绍反柯里化的概念、实现原理和应用场景,通过大量的代码示例帮助读…...
)
细讲TCP三次握手四次挥手(四)
常见面试题 为什么TCP连接的时候是3次?2次不可以吗? 因为需要考虑连接时丢包的问题,如果只握手2次,第二次握手时如果服务端发给客户端的确认报文段丢失,此时服务端已经准备好了收发数(可以理解服务端已经连接成功)据…...

HarmonyOS/OpenHarmony元服务开发-配置卡片的配置文件
卡片相关的配置文件主要包含FormExtensionAbility的配置和卡片的配置两部分: 1.卡片需要在module.json5配置文件中的extensionAbilities标签下,配置FormExtensionAbility相关信息。FormExtensionAbility需要填写metadata元信息标签,其中键名称…...

mac安装nacos,M1芯片
第一步,官网下载 》nacos官网 去github中下载对应的版本,本人下载的是1.4.1版本 在这儿选择其他的版本,下面这里选择 tar.gz 压缩包 解压后放到一个非中文的目录下,我选择在 user目录下面创建一个other目录,将使用的环…...

老板说把跳针改过去,什么是主板跳针
最近骑车拍了很多视频,把电脑磁盘堆满了,想着买一条固态SSD卡扩展一下。 一咬牙一跺脚,直接安排,毫不犹豫。顺带加装了无限网卡和蓝牙5.2。 收到后立马安装。安装完发现识别不到新磁盘 确认安装没问题。然后就去问固态硬盘的客服 …...

PyTorch代码实战入门
人这辈子千万不要马虎两件事 一是找对爱人、二是选对事业 因为太阳升起时要投身事业 太阳落山时要与爱人相拥 一、准备数据集 蚂蚁蜜蜂数据集 蚂蚁蜜蜂的图片,文件名就是数据的label 二、使用Dataset加载数据 打开pycharm,选择Anaconda创建的pytorch环…...

ESP32 SPI读写SD卡实战:从硬件连接到FATFS文件操作,一篇搞定所有坑
ESP32 SPI读写SD卡实战:从硬件连接到FATFS文件操作,一篇搞定所有坑 在嵌入式开发中,SD卡存储是扩展设备数据容量的常见方案。ESP32作为一款高性价比的Wi-Fi/蓝牙双模芯片,其SPI接口与SD卡的配合使用尤为广泛。本文将带你从硬件连…...

OmenSuperHub:惠普OMEN游戏本硬件控制框架解析
OmenSuperHub:惠普OMEN游戏本硬件控制框架解析 【免费下载链接】OmenSuperHub 使用 WMI BIOS控制性能和风扇速度,自动解除DB功耗限制。 项目地址: https://gitcode.com/gh_mirrors/om/OmenSuperHub OmenSuperHub是一个专为惠普OMEN系列游戏笔记本…...

TCExam企业级在线考试系统快速部署与高可用配置指南
TCExam企业级在线考试系统快速部署与高可用配置指南 【免费下载链接】tcexam TCExam is a CBA (Computer-Based Assessment) system (e-exam, CBT - Computer Based Testing) for universities, schools and companies, that enables educators and trainers to author, schedu…...

次元画室Windows安装详解:从Git克隆到Web界面启动全流程
次元画室Windows安装详解:从Git克隆到Web界面启动全流程 想在自己的Windows电脑上搭建一个专属的二次元角色设计工具"次元画室",却不知道从何下手?这篇文章将带你从零开始,一步步完成从代码获取到Web界面启动的全过程。…...

2026最权威的五大降AI率神器解析与推荐
Ai论文网站排名(开题报告、文献综述、降aigc率、降重综合对比) TOP1. 千笔AI TOP2. aipasspaper TOP3. 清北论文 TOP4. 豆包 TOP5. kimi TOP6. deepseek 维普AIGC检测系统依靠语言模型以及文本特征分析,能够识别出由生成式人工智能所撰…...
)
用AT89C51单片机DIY一个可调速的步进电机小平台(附Proteus 8.10仿真文件)
用AT89C51单片机打造智能步进电机控制平台:从仿真到实物的全流程解析 在电子制作领域,步进电机因其精准的位置控制和简单的驱动方式,成为许多自动化项目的核心组件。而51单片机作为经久不衰的微控制器,依然是初学者入门嵌入式开发…...

各位爱因斯坦,小白想知道:
国产交换机、路由器、防火墙、AC/AP、负载均衡等设备的安装配置、调试。这些流程步骤与细节谢谢大佬们🙏...

Obsidian Dataview完全指南:3步将笔记库变成智能数据库的终极秘籍
Obsidian Dataview完全指南:3步将笔记库变成智能数据库的终极秘籍 【免费下载链接】obsidian-dataview A data index and query language over Markdown files, for https://obsidian.md/. 项目地址: https://gitcode.com/gh_mirrors/ob/obsidian-dataview 还…...
)
【日记】终于把思维导图弄完了(1085字)
正文 总行净整些垃圾软件,我真服了。工作量就是这么来的。 这两天可能最值得写的事情,就是把学海计划的路径图弄完了。今天周四,下午刚弄完,而就在昨天,周三晚上我和兄长打游戏的时候几乎都还在弄这个东西。 尝试了所有…...

AMD平台ESXI 7.0实战:避坑部署Win11与TrueNAS虚拟化存储方案
1. AMD平台与ESXI 7.0的兼容性陷阱 AMD平台在虚拟化领域的崛起让不少玩家跃跃欲试,但ESXI 7.0对AMD处理器的支持并非完美无缺。我最近用Ryzen 9 5900X搭建测试环境时,就遭遇了三个典型问题:首先是安装界面卡在"Loading modules"阶段…...