RabbitMQ快速入门
文章目录
- 1、RabbitMQ的概述
- 1.1、什么是消息队列?
- 1.2、为什么要使用消息队列?
- 1.3、RabbitMQ的特点:
- 2、RabbitMQ的安装
- 2.1 下载与安装
- 2.2 常用命令
- 3、RabbitMQ消息发送和接受
- 3.1 消息发送和接受机制
- 3.2 AMQP的消息路由
- 3.3 Exchange(交换机)的类型
- 3.4 Java发送和接收 Queue的消息
- 3.5 Java绑定Exchange 发送和接受消息
- Direct类型的交换机:
- Fanout类型的交换机:
- Topic类型的交换机:
- 3.6 消息的事务
- 3.6 消息的发送者确认模式
- 方式一:channel.waitForConfirms()普通发送方确认模式:
- 方式二:channel.waitForConfirmsOrDie() 批量确认模式:
- 方式三:channel.addConfirmListener() 异步监听发送确认模式:
- 3.7 消息的消费者确认模式
- 手动确认消息:
- 开启事务,必须提交事务,消息才会被确认:
- 消息的防重复确认:
- 4、SpringBoot继承RabbitMQ
- 发送者配置:分别对direct、fanout、topic类型的交换机做测试
- 接受者配置:
- 5、RabbitMQ集群
1、RabbitMQ的概述
1.1、什么是消息队列?
![[外链图片转存失败,源站可能有防盗链机制,建议将图片保存下来直接上传(img-kIKdMY5p-1690987919598)(/1604661953014.png)]](https://img-blog.csdnimg.cn/ecd394b0a12942cdbb1ca521fa3c3c0e.png)
1.2、为什么要使用消息队列?
![[外链图片转存失败,源站可能有防盗链机制,建议将图片保存下来直接上传(img-Dw5KyBhN-1690987919599)(/1604662274592.png)]](https://img-blog.csdnimg.cn/16e4f92708e54de799514a0831ab7c0e.png)
1.3、RabbitMQ的特点:
![[外链图片转存失败,源站可能有防盗链机制,建议将图片保存下来直接上传(img-kju4Ycoh-1690987919599)(/1604662728604.png)]](https://img-blog.csdnimg.cn/1405aac2a8f54530a166fe662975a689.png)
2、RabbitMQ的安装
2.1 下载与安装
…
2.2 常用命令
…
3、RabbitMQ消息发送和接受
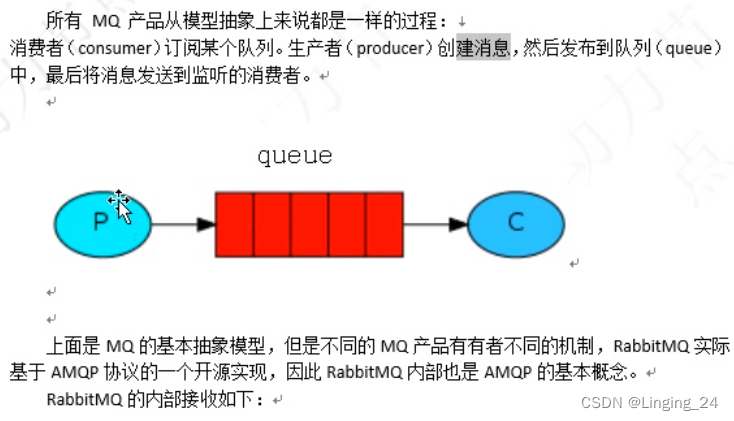
3.1 消息发送和接受机制
![[外链图片转存失败,源站可能有防盗链机制,建议将图片保存下来直接上传(img-U2XTZive-1690987919601)(/1604665228403.png)]](https://img-blog.csdnimg.cn/58dca6eb05bd473c8a4437d3499d2fa2.png)

![[外链图片转存失败,源站可能有防盗链机制,建议将图片保存下来直接上传(img-cbXo7mAn-1690987919602)(/1604665331633.png)]](https://img-blog.csdnimg.cn/4c942d5366b84e45882289ffe894ab20.png)
![[外链图片转存失败,源站可能有防盗链机制,建议将图片保存下来直接上传(img-pw5qFGSo-1690987919603)(/1604665350382.png)]](https://img-blog.csdnimg.cn/b8c0bf92899946c88c3eaf3e57d59cbf.png)
3.2 AMQP的消息路由
![[外链图片转存失败,源站可能有防盗链机制,建议将图片保存下来直接上传(img-MpJ63S8A-1690987919603)(/1604665523333.png)]](https://img-blog.csdnimg.cn/6397b829406344128a5f77493970b2a3.png)
![[外链图片转存失败,源站可能有防盗链机制,建议将图片保存下来直接上传(img-e6rdzoh6-1690987919604)(/1604665496642.png)]](https://img-blog.csdnimg.cn/5ed9fe719b5e42809b16a41fcbdd3813.png)
3.3 Exchange(交换机)的类型
![[外链图片转存失败,源站可能有防盗链机制,建议将图片保存下来直接上传(img-NagKZr6i-1690987919604)(/1604665614326.png)]](https://img-blog.csdnimg.cn/3dd1b038d4494b149e5bc50767510353.png)
![[外链图片转存失败,源站可能有防盗链机制,建议将图片保存下来直接上传(img-TidGWjrH-1690987919604)(/1604665635312.png)]](https://img-blog.csdnimg.cn/5bee51cf0356472f8f876b477f231fcd.png)
![[外链图片转存失败,源站可能有防盗链机制,建议将图片保存下来直接上传(img-oTmxo3yn-1690987919604)(/1604667447351.png)]](https://img-blog.csdnimg.cn/cf044e6daa154527bad059c6a02ab663.png)
![[外链图片转存失败,源站可能有防盗链机制,建议将图片保存下来直接上传(img-LqXq6jlN-1690987919605)(/1604666581680.png)]](https://img-blog.csdnimg.cn/90bd93fc65044c68822a2c266bf7c318.png)
![[外链图片转存失败,源站可能有防盗链机制,建议将图片保存下来直接上传(img-grkHbM7H-1690987919605)(/1604667273821.png)]](https://img-blog.csdnimg.cn/805811f3101d4663828ed3bdd2d64f12.png)
![[外链图片转存失败,源站可能有防盗链机制,建议将图片保存下来直接上传(img-cCKeKePV-1690987919606)(/1604667492011.png)]](https://img-blog.csdnimg.cn/79a9cd9ad5f7431d922851eb757c4759.png)
![[外链图片转存失败,源站可能有防盗链机制,建议将图片保存下来直接上传(img-KxyHkzXz-1690987919606)(/1604667248224.png)]](https://img-blog.csdnimg.cn/5a8d650674b24a19b0030cc2d80aa421.png)
![[外链图片转存失败,源站可能有防盗链机制,建议将图片保存下来直接上传(img-WVl48T8J-1690987919606)(/1604668208133.png)]](https://img-blog.csdnimg.cn/85feb602cfb2438a8c09e075fd2c17f0.png)
3.4 Java发送和接收 Queue的消息
导入依赖:
<dependency><groupId>com.rabbitmq</groupId><artifactId>amqp-client</artifactId><version>5.8.0</version>
</dependency>
发送消息模块:
/*** 消息生产者,发送者*/
public class SendMsg {//队列的名称final static String QUEUE_NAME = "myQueue";public static void main(String[] args) {//创建连接工厂ConnectionFactory factory = new ConnectionFactory();//设置mq的连接信息factory.setHost("192.168.65.128");  //主机ipfactory.setPort(5672);  //端口,此端口是factory.setUsername("root"); //账号factory.setPassword("root"); //密码factory.setVirtualHost("/mq");  //虚拟主机,没有设置可以不写//定义连接Connection conn = null;//定义通道Channel channel = null;try {conn = factory.newConnection(); //获取连接channel = conn.createChannel(); //创建通道/*** 声明一个队列* 参数1:队列的名称* 参数2:是否为持久化的队列* 参数3:是否为排外,如果是排外,则该队列只允许一个消费者监听* 参数4:是否自动删除队列,如果队列中没有消息,也没有消费者连接时,就会删除该队列* 参数5:为队列的一些其他属性设置,一般为null即可* 注意事项:* 1、队列存在,则不创建声明,队列不存在,则会创建一个新的队列* 2、队列名可以是任意值,但接收消息必须保持和队列名一致,否则消息不知道发送到哪去了* 3、下面这行代码可有可无,但是必须确保队列是存在的,否则消息不知道发送到哪去了*/channel.queueDeclare(QUEUE_NAME, true, false, false, null);//要发送的消息String message = "hello RabbitMQ, this is my first use1111111";/*** 发送消息到MQ* 参数1:交换机的名称,为空字符串表示不使用交换机* 参数2:为队列或者routingKey,当指定了交换机,这个值就是RoutingKey* 参数3:为消息属性信息,一般为null即可* 参数4:为具体的消息数据的字节数组*/channel.basicPublish("", QUEUE_NAME, null, message.getBytes("utf8"));System.out.println("消息发送完毕......");} catch (IOException e) {e.printStackTrace();} catch (TimeoutException e) {e.printStackTrace();}finally {if(channel != null){try {channel.close();} catch (IOException e) {e.printStackTrace();} catch (TimeoutException e) {e.printStackTrace();}}if(conn != null){try {conn.close();} catch (IOException e) {e.printStackTrace();}}}}
}
接收消息模块:
/*** 接收消息*/
public class ReceiveMsg {final static String QUEUE_NAME = "myQueue";public static void main(String[] args) {ConnectionFactory factory = new ConnectionFactory();factory.setHost("192.168.65.128");factory.setPort(5672);factory.setUsername("root");factory.setPassword("root");factory.setVirtualHost("/mq");try {Connection conn = factory.newConnection();Channel channel = conn.createChannel();channel.queueDeclare(QUEUE_NAME, true, false, false, null);/*** 接收消息* 参数1:当前监听的队列名称,此名字必须与发送时的队列名称保持一致,不然接收不到消息* 参数2:是否自动确认消息,true:会自动确认消息,并将消息从消息队列中移除* 参数3:消息接收者的标签,用于当多个消费者同时监听一个队列时,用于区分不同的消费者,通常为空串即可* 参数4:消息接收的回调函数,用于对接收的消息进行处理* 注意:使用basicConsume方法后,会自动启动一个线程持续监听队列,如果队列中有消息会自动接收,所以不能关闭连接和通道对象*/channel.basicConsume(QUEUE_NAME, true, "",new DefaultConsumer(channel){@Overridepublic void handleDelivery(String consumerTag, Envelope envelope, AMQP.BasicProperties properties, byte[] body) throws IOException {String msg = new String(body,"utf8");System.out.println("接收的消息: => " + msg);}});} catch (IOException e) {e.printStackTrace();} catch (TimeoutException e) {e.printStackTrace();}}
}
![[外链图片转存失败,源站可能有防盗链机制,建议将图片保存下来直接上传(img-PSNi1jRb-1690987919607)(/1604718939009.png)]](https://img-blog.csdnimg.cn/86199b22233e4ecb92cd98ff852deb03.png)
3.5 Java绑定Exchange 发送和接受消息
![[外链图片转存失败,源站可能有防盗链机制,建议将图片保存下来直接上传(img-f5cY6Sqt-1690987919607)(/1604719059849.png)]](https://img-blog.csdnimg.cn/2f7590f7352f42b4b5a421cbaf6ba3d3.png)
![[外链图片转存失败,源站可能有防盗链机制,建议将图片保存下来直接上传(img-cfIex08q-1690987919607)(/1604719157272.png)]](https://img-blog.csdnimg.cn/ac60b14a1687444fa71df0b24e52c6d1.png)
Direct类型的交换机:
发送消息:
/*** 发送消息到direct类型的交换机,交换机与队列绑定通过routingKey,然后交换机把消息发送给队列*/
public class DirectExchangeSendMsg {//队列的名称final static String QUEUE_NAME = "myDirectQueue";//交换机的名称final static String EXCHANGE_NAME = "directExchange";//消息的routingKeyfinal static String ROUTING_KEY = "directRoutingKey";public static void main(String[] args) {send();}public static void send(){ConnectionFactory factory = new ConnectionFactory();factory.setHost("192.168.65.128");factory.setPort(5672);factory.setUsername("root");factory.setPassword("root");factory.setVirtualHost("/mq");Connection conn = null;Channel channel = null;try {conn = factory.newConnection();channel = conn.createChannel();//声明一个队列channel.queueDeclare(QUEUE_NAME, true, false, false, null);/*** 声明一个交换机* 参数1:交换机的名称* 参数2:交换机的类型* 参数3:是否为持久化交换机* 注意:声明一个交换机,存在则不声明,不存在则声明,可有可无*/channel.exchangeDeclare(EXCHANGE_NAME, BuiltinExchangeType.DIRECT, true);/*** 将队列绑定到交换机* 参数1:队列名称* 参数2:交换机名称* 参数3:消息的routingKey,就是BindingKey,虽然参数名为routingKey*/channel.queueBind(QUEUE_NAME, EXCHANGE_NAME, ROUTING_KEY);/*** 发送消息到指定的队列* 参数1:交换机的名称* 参数2:routingKey,如果这个routingKey与某个队列绑定的交换机的routingKey一致,则消息就会被发送到这个队列中*/String msg = "要发送的消息...";channel.basicPublish(EXCHANGE_NAME, ROUTING_KEY, null, msg.getBytes("utf8"));System.out.println("消息发送完毕....");} catch (IOException e) {e.printStackTrace();} catch (TimeoutException e) {e.printStackTrace();}finally {if(channel != null){try {channel.close();} catch (IOException e) {e.printStackTrace();} catch (TimeoutException e) {e.printStackTrace();}}if(conn != null){try {conn.close();} catch (IOException e) {e.printStackTrace();}}}}
}
接收消息:
/*** 消费者消费队列中的消息*/
public class DirectExchangeReceiveMsg {//队列的名称final static String QUEUE_NAME = "myDirectQueue";//交换机的名称final static String EXCHANGE_NAME = "directExchange";//消息的routingKeyfinal static String ROUTING_KEY = "directRoutingKey";public static void main(String[] args) {receive();}public static void receive(){ConnectionFactory factory = new ConnectionFactory();factory.setHost("192.168.65.128");factory.setPort(5672);factory.setUsername("root");factory.setPassword("root");factory.setVirtualHost("/mq");Connection conn = null;Channel channel = null;try {conn = factory.newConnection();channel = conn.createChannel();//声明队列channel.queueDeclare(QUEUE_NAME, true, false, false, null);//声明交换机channel.exchangeDeclare(EXCHANGE_NAME, BuiltinExchangeType.DIRECT, true);//将队列绑定到交换机上channel.queueBind(QUEUE_NAME, EXCHANGE_NAME, ROUTING_KEY);//接收消息channel.basicConsume(QUEUE_NAME, true, "", new DefaultConsumer(channel){@Overridepublic void handleDelivery(String consumerTag, Envelope envelope, AMQP.BasicProperties properties, byte[] body) throws IOException {String msg = new String(body, "utf8");System.out.println("消费 ---> " + msg);}});} catch (IOException e) {e.printStackTrace();} catch (TimeoutException e) {e.printStackTrace();}}
}
Fanout类型的交换机:
发送消息:
/*** 发送消息到fanout类型的交换机*/
public class FanoutExchangeSendMsg {//交换机的名称final static String EXCHANGE_NAME = "fanOutExchange";public static void main(String[] args) {send();}public static void send(){ConnectionFactory factory = new ConnectionFactory();factory.setHost("192.168.65.128");factory.setPort(5672);factory.setUsername("root");factory.setPassword("root");factory.setVirtualHost("/mq");Connection conn = null;Channel channel = null;try {conn = factory.newConnection();channel = conn.createChannel();//channel.queueDeclare(QUEUE_NAME, true, false, false, null);//channel.exchangeDeclare(EXCHANGE_NAME, BuiltinExchangeType.DIRECT, true);//channel.queueBind(QUEUE_NAME, EXCHANGE_NAME, "");/*** 由于是fanout类型的交换机,所以存在多个消费者,因此不建议在发送消息的时候创建队列,以及绑定交换机* 建议在消费者中创建队列并绑定交换机,但必须在发送消息时确保队列存在,所以上面的代码不写*/channel.exchangeDeclare(EXCHANGE_NAME, BuiltinExchangeType.FANOUT, true);String msg = "要发送的消息...";channel.basicPublish(EXCHANGE_NAME, "", null, msg.getBytes("utf8"));System.out.println("消息发送完毕....");} catch (IOException e) {e.printStackTrace();} catch (TimeoutException e) {e.printStackTrace();}finally {if(channel != null){try {channel.close();} catch (IOException e) {e.printStackTrace();} catch (TimeoutException e) {e.printStackTrace();}}if(conn != null){try {conn.close();} catch (IOException e) {e.printStackTrace();}}}}
}
接收消息:
/*** 消费者消费队列中的消息*/
public class FanOutExchangeReceiveMsg {//交换机的名称final static String EXCHANGE_NAME = "fanOutExchange";public static void main(String[] args) {receive();}public static void receive(){ConnectionFactory factory = new ConnectionFactory();factory.setHost("192.168.65.128");factory.setPort(5672);factory.setUsername("root");factory.setPassword("root");factory.setVirtualHost("/mq");Connection conn = null;Channel channel = null;try {conn = factory.newConnection();channel = conn.createChannel();/*** 声明队列,由于fanout类型的交换机类似于广播的模式,会有多个消费者来接收交换机中的数据,* 所以创建一个随机的队列名称** channel.queueDeclare():创建一个随机名称的队列,不是持久化,排外的,自动删除的* getQueue():获取队列的名称*/String queueName = channel.queueDeclare().getQueue();//声明交换机channel.exchangeDeclare(EXCHANGE_NAME, BuiltinExchangeType.FANOUT, true);//将队列绑定到交换机上,fanout类型的交换机没有routingKeychannel.queueBind(queueName, EXCHANGE_NAME, "");//接收消息channel.basicConsume(queueName, true, "", new DefaultConsumer(channel){@Overridepublic void handleDelivery(String consumerTag, Envelope envelope, AMQP.BasicProperties properties, byte[] body) throws IOException {String msg = new String(body, "utf8");System.out.println("消费 ---> " + msg);}});} catch (IOException e) {e.printStackTrace();} catch (TimeoutException e) {e.printStackTrace();}}
}
Topic类型的交换机:
发送消息:
/*** 发送消息到topic类型的交换机*/
public class TopicExchangeSendMsg {//交换机的名称final static String EXCHANGE_NAME = "topicExchange";public static void main(String[] args) {send();}public static void send(){ConnectionFactory factory = new ConnectionFactory();factory.setHost("192.168.65.128");factory.setPort(5672);factory.setUsername("root");factory.setPassword("root");factory.setVirtualHost("/mq");Connection conn = null;Channel channel = null;try {conn = factory.newConnection();channel = conn.createChannel();channel.exchangeDeclare(EXCHANGE_NAME, BuiltinExchangeType.TOPIC, true);String msg = "要发送的消息...";channel.basicPublish(EXCHANGE_NAME, "aa.bb.cc", null, msg.getBytes("utf8"));System.out.println("消息发送完毕....");} catch (IOException e) {e.printStackTrace();} catch (TimeoutException e) {e.printStackTrace();}finally {if(channel != null){try {channel.close();} catch (IOException e) {e.printStackTrace();} catch (TimeoutException e) {e.printStackTrace();}}if(conn != null){try {conn.close();} catch (IOException e) {e.printStackTrace();}}}}
}
接收消息:
/*** 消费者消费队列中的消息*/
public class TopicExchangeReceiveMsg01 {//交换机的名称final static String EXCHANGE_NAME = "topicExchange";//队列的名称final static String QUEUE_NAME = "topicQueue01";//取topicQueue01、topicQueue02、topicQueue03//topic交换机的routingKey可以包含通配符, .分割单词   # 匹配0个或者多个单词  * 匹配恰好一个单词final static String ROUTING_KEY = "aa"; //取aa、aa.*、aa.# 进行测试public static void main(String[] args) {receive();}public static void receive(){ConnectionFactory factory = new ConnectionFactory();factory.setHost("192.168.65.128");factory.setPort(5672);factory.setUsername("root");factory.setPassword("root");factory.setVirtualHost("/mq");Connection conn = null;Channel channel = null;try {conn = factory.newConnection();channel = conn.createChannel();channel.queueDeclare(QUEUE_NAME,true,false,false, null);//声明交换机channel.exchangeDeclare(EXCHANGE_NAME, BuiltinExchangeType.TOPIC, true);//将队列绑定到交换机上,fanout类型的交换机没有routingKeychannel.queueBind(QUEUE_NAME, EXCHANGE_NAME, ROUTING_KEY);//接收消息channel.basicConsume(QUEUE_NAME, true, "", new DefaultConsumer(channel){@Overridepublic void handleDelivery(String consumerTag, Envelope envelope, AMQP.BasicProperties properties, byte[] body) throws IOException {String msg = new String(body, "utf8");System.out.println(QUEUE_NAME + "消费 ---> "+ROUTING_KEY+" --> " + msg);}});} catch (IOException e) {e.printStackTrace();} catch (TimeoutException e) {e.printStackTrace();}}
}
总结:
Topic类型的交换机也是消息一对多的一种交换机类型,它和fanout都能实现一个消息同时发送给多个队列;
fanout更适用于使用在一个功能不同的进程来获取数据,例如,手机App中的消息推送,一个App可能会还有很多个用户来进行安装,然后他们都会启动一个随机的队列来接收者自己的数据;
Topic更适用于不同功能模块来接收同一个消息,例如商城下单成功后需要发送消息到队列中,例如:RoutingKey为 order.success, 物流系统监听订单 order.*, 发票系统监听 order. *
Topic可以使用农随机的队列名也可以使用一个明确的队列名,但是如果应用在和订单有关的功能中,建议是有个名明确的队列 并且要求持久化的队列。
3.6 消息的事务
事务消息与数据库的事务类似,只是MQ中的消息是要保证消息是否会全部发送成功,防止丢失消息的一种策略。
RabbitMQ有两种方式来解决这个问题:
- 通过AMQP提供的事务机制实现
- 使用发送者确认模式实现
事务的使用:
事务的实现主要是对信道(Channel)的设置,主要的方法有三个:
- channel.txSelect()声明启动事务模式
- channel.txCommit()提交事务
- channel.txRollback()回滚事务
发送者在声明事务后没有提交,队列中不会有消息存在,只有事务提交后,才会将内存中的消息写入队列。
消费者在声明事务后,即使没有提交,也可以获取队列中的消息,并将消息从队列中移除。
回滚事务,就是将消息事务中的操作,进行撤销到事务开始前的状态。
发送者:
/*** 消息生产者,发送者*/
public class TransactionSendMsg {final static String QUEUE_NAME = "myTransactionQueue";public static void main(String[] args) throws Exception {//创建连接工厂ConnectionFactory factory = new ConnectionFactory();//设置mq的连接信息factory.setHost("192.168.65.128");  //主机ipfactory.setPort(5672);  //端口factory.setUsername("root"); //账号factory.setPassword("root"); //密码factory.setVirtualHost("/mq");  //虚拟主机//定义连接Connection conn = null;//定义通道Channel channel = null;try {conn = factory.newConnection(); //获取连接channel = conn.createChannel(); //创建通道channel.queueDeclare(QUEUE_NAME, true, false, false, null);//要发送的消息String message = "hello RabbitMQ, this is my first use1111111";//声明启动事务模式,只声明启动,如果没有提交事务,则事务中要发送的消息不会写入到队列中channel.txSelect();channel.basicPublish("", QUEUE_NAME, null, message.getBytes("utf8"));//int i = 10/0;channel.basicPublish("", QUEUE_NAME, null, message.getBytes("utf8"));channel.txCommit();System.out.println("消息发送完毕......");} catch (Exception e){channel.txRollback();   //事务回滚,放弃当前事务中所有要提交的消息,释放内存} finally{if(channel != null){try {channel.close();} catch (IOException e) {e.printStackTrace();}}if(conn != null){try {conn.close();} catch (IOException e) {e.printStackTrace();}}}}
}
接受者:
/*** 接收消息*/
public class TransactionReceiveMsg {final static String QUEUE_NAME = "myTransactionQueue";public static void main(String[] args) {ConnectionFactory factory = new ConnectionFactory();factory.setHost("192.168.65.128");factory.setPort(5672);factory.setUsername("root");factory.setPassword("root");factory.setVirtualHost("/mq");try {Connection conn = factory.newConnection();Channel channel = conn.createChannel();channel.queueDeclare(QUEUE_NAME, true, false, false, null);//消费端声明开启事务,不需要提交,也可以获取消息channel.txSelect();channel.basicConsume(QUEUE_NAME, true, "",new DefaultConsumer(channel){@Overridepublic void handleDelivery(String consumerTag, Envelope envelope, AMQP.BasicProperties properties, byte[] body) throws IOException {String msg = new String(body,"utf8");System.out.println("接收的消息: => " + msg);}});} catch (IOException e) {e.printStackTrace();} catch (TimeoutException e) {e.printStackTrace();}}
}
3.6 消息的发送者确认模式
事务适用于经常发生异常的情况下,当发生异常,会拒绝提交事务,而消息的发送者确认模式,适用于发生少量异常的情况,当发送消息发生异常或者消息的丢失,它会补发消息,即重新发送消息,来保证消息的一致性和正确性。
![[外链图片转存失败,源站可能有防盗链机制,建议将图片保存下来直接上传(img-rZ544hd5-1690987919608)(/1604748519941.png)]](https://img-blog.csdnimg.cn/b13ae9ae72ad451e95f4d0fc067a6914.png)
方式一:channel.waitForConfirms()普通发送方确认模式:
/*** 发送消息到direct类型的交换机------发送者普通确认模式*/
public class ConfirmDirectExchangeSendMsg {//队列的名称final static String QUEUE_NAME = "myConfirmDirectQueue";//交换机的名称final static String EXCHANGE_NAME = "confirmDirectExchange";//消息的routingKeyfinal static String ROUTING_KEY = "confirmDirectRoutingKey";public static void main(String[] args) {send();}public static void send(){ConnectionFactory factory = new ConnectionFactory();factory.setHost("192.168.65.128");factory.setPort(5672);factory.setUsername("root");factory.setPassword("root");factory.setVirtualHost("/mq");Connection conn = null;Channel channel = null;try {conn = factory.newConnection();channel = conn.createChannel();channel.queueDeclare(QUEUE_NAME, true, false, false, null);channel.exchangeDeclare(EXCHANGE_NAME, BuiltinExchangeType.DIRECT, true);channel.queueBind(QUEUE_NAME, EXCHANGE_NAME, ROUTING_KEY);//启动发送者确认模式channel.confirmSelect();String msg = "要发送的消息...";channel.basicPublish(EXCHANGE_NAME, ROUTING_KEY, null, msg.getBytes("utf8"));//阻塞线程等待服务返回响应,用于判断消息是否发送成功,如果服务端确认消息发送完成,则返回true//还可以为这个方法指定毫秒值,用于确认我们需要等待服务端响应的超时时间,//如果消息超过时间,则会抛出异常InterruptedException,表示服务器出现问题,需要补发消息//或将消息缓存到redis中,稍后利用定时任务补发。//无论是返回false,还是抛出异常,消息都有可能发送成功和失败//如果我们的消息一定要发送到队列中,例如:订单数据,那么我们可以采用消息补发//就是重新发送一次消息,可以使用递归或者redis + 定时任务完成补发boolean b = channel.waitForConfirms();System.out.println("消息发送完毕...." + b);} catch (IOException e) {e.printStackTrace();} catch (TimeoutException e) {e.printStackTrace();} catch (InterruptedException e) {e.printStackTrace();} finally {if(channel != null){try {channel.close();} catch (IOException e) {e.printStackTrace();} catch (TimeoutException e) {e.printStackTrace();}}if(conn != null){try {conn.close();} catch (IOException e) {e.printStackTrace();}}}}
}
方式二:channel.waitForConfirmsOrDie() 批量确认模式:
/*** 发送消息到direct类型的交换机------发送者批量确认模式*/
public class BatchConfirmDirectExchangeSendMsg {//队列的名称final static String QUEUE_NAME = "myBatchConfirmDirectQueue";//交换机的名称final static String EXCHANGE_NAME = "batchConfirmDirectExchange";//消息的routingKeyfinal static String ROUTING_KEY = "batchConfirmDirectRoutingKey";public static void main(String[] args) {send();}public static void send(){ConnectionFactory factory = new ConnectionFactory();factory.setHost("192.168.65.128");factory.setPort(5672);factory.setUsername("root");factory.setPassword("root");factory.setVirtualHost("/mq");Connection conn = null;Channel channel = null;try {conn = factory.newConnection();channel = conn.createChannel();channel.queueDeclare(QUEUE_NAME, true, false, false, null);channel.exchangeDeclare(EXCHANGE_NAME, BuiltinExchangeType.DIRECT, true);channel.queueBind(QUEUE_NAME, EXCHANGE_NAME, ROUTING_KEY);//启动发送者确认模式channel.confirmSelect();String msg = "要发送的消息...";channel.basicPublish(EXCHANGE_NAME, ROUTING_KEY, null, msg.getBytes("utf8"));//waitForConfirmsOrDie:批量消息确认,它会同时向服务中确认之前通道中发送的所有消息是否已经全部成功写入//这个方法没有返回值,如果服务器中有一条消息没有能够成功或向服务器发送确认时不可访问,都被认定为消息确认失败//可能有消息没有发送成功,我们需要进行消息的补发。//如果无法向服务器获取确认消息,那么方法抛出异常InterruptedException,这是就需要补发消息到队列中//waitForConfirmsOrDie可以指定一个参数timeout,用于等服务器的确认时间,如果超过了这个时间也会抛出异常,表示消息需要补发。//注意;//批量消息的确认速度比普通的消息确认要快,但是如果一旦出现了消息补发的情况,我们不能确定具体是哪条消息没有完成发送,//需要将本次发送的所有消息全部都进行补发。channel.waitForConfirmsOrDie();System.out.println("消息发送完毕....");} catch (IOException e) {e.printStackTrace();} catch (TimeoutException e) {e.printStackTrace();} catch (InterruptedException e) {e.printStackTrace();} finally {if(channel != null){try {channel.close();} catch (IOException e) {e.printStackTrace();} catch (TimeoutException e) {e.printStackTrace();}}if(conn != null){try {conn.close();} catch (IOException e) {e.printStackTrace();}}}}
}
方式三:channel.addConfirmListener() 异步监听发送确认模式:
/*** 发送消息到direct类型的交换机------发送者异步监听确认模式*/
public class AsyBatchConfirmDirectExchangeSendMsg {//队列的名称final static String QUEUE_NAME = "myAsyBatchConfirmDirectQueue";//交换机的名称final static String EXCHANGE_NAME = "asyBatchConfirmDirectExchange";//消息的routingKeyfinal static String ROUTING_KEY = "asyBatchConfirmDirectRoutingKey";public static void main(String[] args) {send();}public static void send(){ConnectionFactory factory = new ConnectionFactory();factory.setHost("192.168.65.128");factory.setPort(5672);factory.setUsername("root");factory.setPassword("root");factory.setVirtualHost("/mq");Connection conn = null;Channel channel = null;try {conn = factory.newConnection();channel = conn.createChannel();channel.queueDeclare(QUEUE_NAME, true, false, false, null);channel.exchangeDeclare(EXCHANGE_NAME, BuiltinExchangeType.DIRECT, true);channel.queueBind(QUEUE_NAME, EXCHANGE_NAME, ROUTING_KEY);//启动发送者确认模式channel.confirmSelect();//添加监听器channel.addConfirmListener(new ConfirmListener() {//消息确认后的回调函数//deliveryTag:确认的消息编号,从1开始,依次递增//multiple: 消息是否同时确认多个,true:同时确认多条  false:确认当前一条信息public void handleAck(long deliveryTag, boolean multiple) throws IOException {System.out.println("消息 -- " + deliveryTag + " --- " + multiple);}//消息没有别确认的回调函数//deliveryTag: 没没有确认的消息编号,从1开始,依次递增//multiple: 消息是否同时没有确认多个public void handleNack(long deliveryTag, boolean multiple) throws IOException {System.out.println("消息 -- " + deliveryTag + " --- " + multiple);}});String msg = "要发送的消息...";//批量发送消息for (int i = 0; i < 10000; i++) {channel.basicPublish(EXCHANGE_NAME, ROUTING_KEY, null, msg.getBytes("utf8"));}System.out.println("消息发送完毕....");} catch (IOException e) {e.printStackTrace();} catch (TimeoutException e) {e.printStackTrace();}  finally {if(channel != null){try {channel.close();} catch (IOException e) {e.printStackTrace();} catch (TimeoutException e) {e.printStackTrace();}}if(conn != null){try {conn.close();} catch (IOException e) {e.printStackTrace();}}}}
}
3.7 消息的消费者确认模式
![[外链图片转存失败,源站可能有防盗链机制,建议将图片保存下来直接上传(img-G6UpBwu7-1690987919609)(/1604816062591.png)]](https://img-blog.csdnimg.cn/de031caee34b41ae9644010e537fc578.png)
手动确认消息:
/*** 消费者消费队列中的消息,*/
public class AsyBatchConfirmDirectExchangeReceiveMsg {//队列的名称final static String QUEUE_NAME = "myAsyBatchConfirmDirectQueue";//交换机的名称final static String EXCHANGE_NAME = "asyBatchConfirmDirectExchange";//消息的routingKeyfinal static String ROUTING_KEY = "asyBatchConfirmDirectRoutingKey";public static void main(String[] args) {receive();}public static void receive(){ConnectionFactory factory = new ConnectionFactory();factory.setHost("192.168.65.128");factory.setPort(5672);factory.setUsername("root");factory.setPassword("root");factory.setVirtualHost("/mq");Connection conn = null;Channel channel = null;try {conn = factory.newConnection();channel = conn.createChannel();channel.queueDeclare(QUEUE_NAME, true, false, false, null);channel.exchangeDeclare(EXCHANGE_NAME, BuiltinExchangeType.DIRECT, true);channel.queueBind(QUEUE_NAME, EXCHANGE_NAME, ROUTING_KEY);//消息的手动确认//参数2:false:消息的手动确认 true:消息自动确认//自动确认,如果在处理消息的过程中出现错误,会导致消息的丢失,所以改为手动确认//判断消息是否手动确认,如果手动确认了,表示消息被处理了,需要从队列中移除channel.basicConsume(QUEUE_NAME, false, "", new DefaultConsumer(channel){@Overridepublic void handleDelivery(String consumerTag, Envelope envelope, AMQP.BasicProperties properties, byte[] body) throws IOException {String msg = new String(body, "utf8");System.out.println("消费 ---> " + msg);//获取channel对象Channel c = this.getChannel();//获取消息的编号long tag = envelope.getDeliveryTag();//消息的手动确认//参数1:消息的编号//参数2:true:确认多条消息,表示 编号<=tag的消息都已经被确认了c.basicAck(tag, true);}});} catch (IOException e) {e.printStackTrace();} catch (TimeoutException e) {e.printStackTrace();}}
}
开启事务,必须提交事务,消息才会被确认:
/*** 消费者消费队列中的消息,*/
public class AsyBatchConfirmDirectExchangeReceiveMsg2 {//队列的名称final static String QUEUE_NAME = "myAsyBatchConfirmDirectQueue";//交换机的名称final static String EXCHANGE_NAME = "asyBatchConfirmDirectExchange";//消息的routingKeyfinal static String ROUTING_KEY = "asyBatchConfirmDirectRoutingKey";public static void main(String[] args) {receive();}public static void receive(){ConnectionFactory factory = new ConnectionFactory();factory.setHost("192.168.65.128");factory.setPort(5672);factory.setUsername("root");factory.setPassword("root");factory.setVirtualHost("/mq");Connection conn = null;Channel channel = null;try {conn = factory.newConnection();channel = conn.createChannel();channel.queueDeclare(QUEUE_NAME, true, false, false, null);channel.exchangeDeclare(EXCHANGE_NAME, BuiltinExchangeType.DIRECT, true);channel.queueBind(QUEUE_NAME, EXCHANGE_NAME, ROUTING_KEY);//声明事务channel.txSelect();//消息的手动确认//参数2:false:消息的手动确认 true:消息自动确认//自动确认,如果在处理消息的过程中出现错误,会导致消息的丢失,所以改为手动确认//判断消息是否手动确认,如果手动确认了,表示消息被处理了,需要从队列中移除channel.basicConsume(QUEUE_NAME, false, "", new DefaultConsumer(channel){@Overridepublic void handleDelivery(String consumerTag, Envelope envelope, AMQP.BasicProperties properties, byte[] body) throws IOException {String msg = new String(body, "utf8");System.out.println("消费 ---> " + msg);//获取channel对象Channel c = this.getChannel();//获取消息的编号long tag = envelope.getDeliveryTag();//消息的手动确认//参数1:消息的编号//参数2:true:确认多条消息,表示 编号<=tag的消息都已经被确认了c.basicAck(tag, true);//当确认消息时,开启了事务,如果没有提交,那么消息不会被确认,也就不会从队列中移除,所以需要手动提交事务c.txCommit();}});} catch (IOException e) {e.printStackTrace();} catch (TimeoutException e) {e.printStackTrace();}}
}
消息的防重复确认:
接收和处理完成两个状态。
/*** 消费者消费队列中的消息,*/
public class AsyBatchConfirmDirectExchangeReceiveMsg3 {//队列的名称final static String QUEUE_NAME = "myAsyBatchConfirmDirectQueue";//交换机的名称final static String EXCHANGE_NAME = "asyBatchConfirmDirectExchange";//消息的routingKeyfinal static String ROUTING_KEY = "asyBatchConfirmDirectRoutingKey";public static void main(String[] args) {receive();}public static void receive(){ConnectionFactory factory = new ConnectionFactory();factory.setHost("192.168.65.128");factory.setPort(5672);factory.setUsername("root");factory.setPassword("root");factory.setVirtualHost("/mq");Connection conn = null;Channel channel = null;try {conn = factory.newConnection();channel = conn.createChannel();channel.queueDeclare(QUEUE_NAME, true, false, false, null);channel.exchangeDeclare(EXCHANGE_NAME, BuiltinExchangeType.DIRECT, true);channel.queueBind(QUEUE_NAME, EXCHANGE_NAME, ROUTING_KEY);//声明事务channel.txSelect();//消息的手动确认//参数2:false:消息的手动确认 true:消息自动确认//自动确认,如果在处理消息的过程中出现错误,会导致消息的丢失,所以改为手动确认//判断消息是否手动确认,如果手动确认了,表示消息被处理了,需要从队列中移除channel.basicConsume(QUEUE_NAME, false, "", new DefaultConsumer(channel){@Overridepublic void handleDelivery(String consumerTag, Envelope envelope, AMQP.BasicProperties properties, byte[] body) throws IOException {//获取channel对象Channel c = this.getChannel();//获取消息的编号long tag = envelope.getDeliveryTag();//false:表示消息没有被接收过//true:表示消息被接收过了,或者被处理完成了,因此需要进行消息的防重复确认boolean redeliver = envelope.isRedeliver();if(!redeliver){ //消息没有被处理过String msg = new String(body, "utf8");System.out.println("消费 ---> " + msg);//消息的手动确认//参数1:消息的编号//参数2:true:确认多条消息,表示 编号<=tag的消息都已经被确认了,false:表示确认当前一条消息//c.basicAck(tag, true);//当确认消息时,开启了事务,如果没有提交,那么消息不会被确认,也就不会从队列中移除,所以需要手动提交事务//c.txCommit();}else {//消息被接收或处理过,则防止重复确认//如果查询数据库是否已经添加了或者修改了记录,即表示消息是否被接收过一次//如果经确认,该消息被接收过,但没被处理完成,则需要重新处理该消息,并确认该消息//如果该消息已经处理完成,则不需要进行其他处理操作,直接调用下面的代码//c.basicAck(tag, false);}}});} catch (IOException e) {e.printStackTrace();} catch (TimeoutException e) {e.printStackTrace();}}
}
4、SpringBoot继承RabbitMQ
<dependency><groupId>org.springframework.boot</groupId><artifactId>spring-boot-starter-amqp</artifactId>
</dependency>
spring.rabbitmq.host=192.168.65.128
spring.rabbitmq.port=5672
spring.rabbitmq.username=root
spring.rabbitmq.password=root
spring.rabbitmq.virtual-host=/mq
发送者配置:分别对direct、fanout、topic类型的交换机做测试
配置:
@Configuration
public class RabbitMQConfig {/*** 配置一个direct类型的交换机* @return*/@Beanpublic DirectExchange directExchange(){return new DirectExchange("bootDirectExchange");}/*** 配置一个fanout类型的交换机* @return*/@Beanpublic FanoutExchange fanoutExchange(){return new FanoutExchange("bootFanoutExchange");}/*** 配置一个topic类型的交换机* @return*/@Beanpublic TopicExchange topicExchange(){return new TopicExchange("bootTopicExchange");}/*** 配置一个队列* @return*/@Beanpublic Queue queue(){return new Queue("bootQueue");}/*** 配置一个队列和交换机绑定* @param queue 队列* @param directExchange 交换机* @return*/@Beanpublic Binding binding(Queue queue, DirectExchange directExchange){//绑定一个队列到交换机return BindingBuilder.bind(queue).to(directExchange).with("bootRoutingKey");}
}
serviceIMpl:
@Service("sendService")
public class SendMsgImpl implements SendService {@Autowiredprivate AmqpTemplate amqpTemplate;/*** 发送消息到direct类型的交换机* @param message*/@Overridepublic void sendMsg(String message) {/*** 参数1:交换机名称* 参数2:routingKey* 参数3:发送的消息对象*/amqpTemplate.convertSendAndReceive("bootDirectExchange","bootRoutingKey", message);System.out.println("消息发送完毕....");}/*** 发送消息到fanout类型的交换机* @param message*/@Overridepublic void sendFanoutMsg(String message) {amqpTemplate.convertAndSend("bootFanoutExchange","",message);System.out.println("消息发送完毕....");}/*** 发送消息到topic类型的交换机* @param message*/@Overridepublic void sendTopicMsg(String message, String key) {amqpTemplate.convertAndSend("bootTopicExchange",key,message);System.out.println("消息发送完毕....");}
}
启动类:
@SpringBootApplication
public class SpringbootMqSendApplication {public static void main(String[] args) {ApplicationContext  context = SpringApplication.run(SpringbootMqSendApplication.class, args);SendService sendService = context.getBean(SendService.class);//sendService.sendMsg("springboot继承rabbitMq发送消息、.....");//sendService.sendFanoutMsg("springboot继承rabbitMq发送消息、.....");sendService.sendTopicMsg("springboot继承rabbitMq发送消息","aa.bb.cc");}
}
接受者配置:
@Configuration
public class RabbitMQConfig {/*** 配置一个direct类型的交换机* @return*/@Beanpublic DirectExchange directExchange(){return new DirectExchange("bootDirectExchange");}/*** 配置一个队列* @return*/@Beanpublic Queue queue(){return new Queue("bootQueue");}/*** 配置一个队列和交换机绑定* @param queue 队列* @param directExchange 交换机* @return*/@Beanpublic Binding binding(Queue queue, DirectExchange directExchange){//绑定一个队列到交换机return BindingBuilder.bind(queue).to(directExchange).with("bootRoutingKey");}
}
serviceIMpl:
@Service("receiveService")
public class ReceiveMsgImpl implements ReceiveService {@Autowiredprivate AmqpTemplate amqpTemplate;/*** 注意,此方法不是持续接收消息的,每启动一次就接收一次消息,因此不使用这种方式*/
/*    @Overridepublic void receiveMsg() {String msg = (String) amqpTemplate.receiveAndConvert("bootQueue");System.out.println("接收到的消息 --- > " + msg);}*//*** direct类型的交换机* @RabbitListener注解:作用是标记这是一个RabbitMQ的消息监听方法,用于持续的接收消息* 被标记的方法不需要手动调用,由spring自动调用。* queues:指定监听的消息队列* message:接收到的具体的消息** 注意:这个方法如果发生异常,能接受到消息,但是消息没有别确认,需要进行消息的防重复确认*      如果正常,spring会确认消息,将消息从队列中移除*/@RabbitListener(queues = "bootQueue")public void receiveMsg(String message) {System.out.println("接收到的消息 --- > " + message);//int i = 1/0;}//接收fanout类型绑定队列的消息,有两个,fanout类型的交换机为一对多//fanout类型的交换机,@QueueBinding完成队列和交换机的绑定,@Queue:用于生成一个随机的队列,@Exchange:创建一个交换机@RabbitListener(bindings = @QueueBinding(value = @Queue(),exchange = @Exchange(name = "bootFanoutExchange",type = ExchangeTypes.FANOUT)))public void fanoutReceiveMsg01(String message) {System.out.println("fanoutReceiveMsg01==》接收到的消息 --- > " + message);}@RabbitListener(bindings = @QueueBinding(value = @Queue(),exchange = @Exchange(name = "bootFanoutExchange",type = ExchangeTypes.FANOUT)))public void fanoutReceiveMsg02(String message) {System.out.println("fanoutReceiveMsg02==》接收到的消息 --- > " + message);}//接收topic类型的绑定的队列的消息@RabbitListener(bindings = @QueueBinding(value=@Queue(name = "topicReceiveMsg01"),key = "aa",exchange = @Exchange(value = "bootTopicExchange",type = ExchangeTypes.TOPIC)))public void topicReceiveMsg01(String message){System.out.println("topicReceiveMsg01==》接收到的消息 aa --- > " + message);}@RabbitListener(bindings = @QueueBinding(value=@Queue(name = "topicReceiveMsg02"),key = "aa.*",exchange = @Exchange(value = "bootTopicExchange",type = ExchangeTypes.TOPIC)))public void topicReceiveMsg02(String message){System.out.println("topicReceiveMsg02==》接收到的消息 aa.* --- 1 > " + message);}@RabbitListener(bindings = @QueueBinding(value=@Queue(name = "topicReceiveMsg03"),key = "aa.#",exchange = @Exchange(value = "bootTopicExchange",type = ExchangeTypes.TOPIC)))public void topicReceiveMsg03(String message){System.out.println("topicReceiveMsg03==》接收到的消息 aa.# --- 0/n > " + message);}
}
5、RabbitMQ集群
=》接收到的消息 — > " + message);
}
@RabbitListener(bindings = @QueueBinding(value = @Queue(),exchange = @Exchange(name = "bootFanoutExchange",type = ExchangeTypes.FANOUT)))
public void fanoutReceiveMsg02(String message) {System.out.println("fanoutReceiveMsg02==》接收到的消息 --- > " + message);
}//接收topic类型的绑定的队列的消息
@RabbitListener(bindings = @QueueBinding(value=@Queue(name = "topicReceiveMsg01"),key = "aa",exchange = @Exchange(value = "bootTopicExchange",type = ExchangeTypes.TOPIC)))
public void topicReceiveMsg01(String message){System.out.println("topicReceiveMsg01==》接收到的消息 aa --- > " + message);
}@RabbitListener(bindings = @QueueBinding(value=@Queue(name = "topicReceiveMsg02"),key = "aa.*",exchange = @Exchange(value = "bootTopicExchange",type = ExchangeTypes.TOPIC)))
public void topicReceiveMsg02(String message){System.out.println("topicReceiveMsg02==》接收到的消息 aa.* --- 1 > " + message);
}@RabbitListener(bindings = @QueueBinding(value=@Queue(name = "topicReceiveMsg03"),key = "aa.#",exchange = @Exchange(value = "bootTopicExchange",type = ExchangeTypes.TOPIC)))
public void topicReceiveMsg03(String message){System.out.println("topicReceiveMsg03==》接收到的消息 aa.# --- 0/n > " + message);
}
}
### 5、RabbitMQ集群相关文章:
RabbitMQ快速入门
文章目录 1、RabbitMQ的概述1.1、什么是消息队列?1.2、为什么要使用消息队列?1.3、RabbitMQ的特点: 2、RabbitMQ的安装2.1 下载与安装2.2 常用命令 3、RabbitMQ消息发送和接受3.1 消息发送和接受机制3.2 AMQP的消息路由3.3 Exchange(交换机)的…...
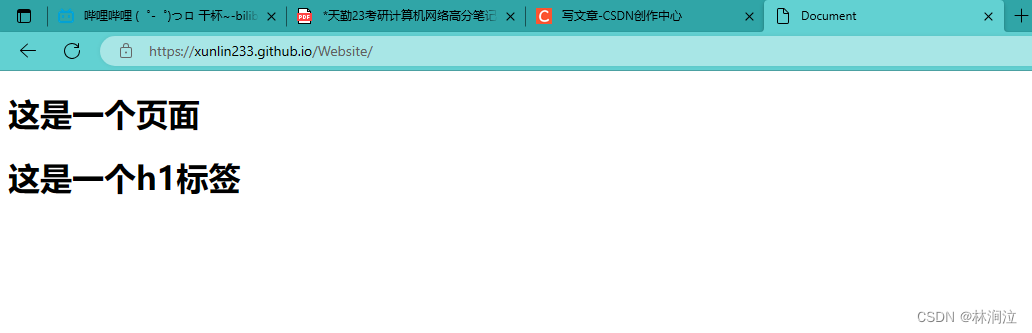
使用Git在GitHub上部署静态页面
在GitHub中,我们可以将自己的静态页面部署到GitHub中,它会给我们提供一个地址使得我们的页面变成一个真正的网站,可以供用户访问。 一、在GitHub下创建仓库 二、将项目部署到GitHub上 1. 初始化Git仓库 2. 提交代码 3. 关联远程仓库 在Gi…...
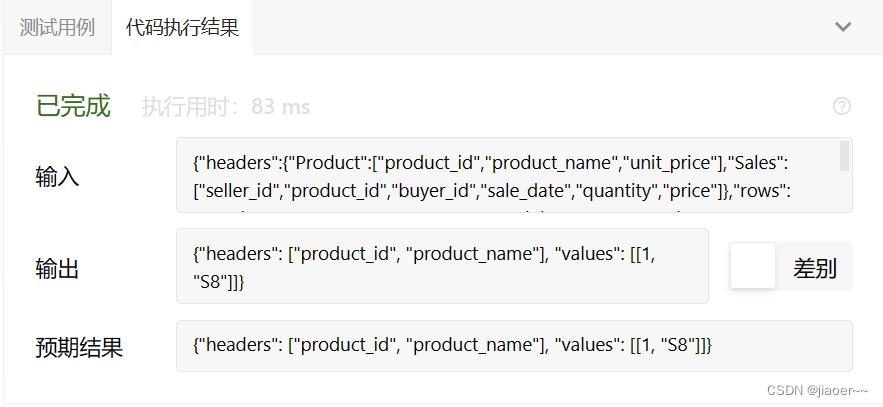
SQL-每日一题【1084. 销售分析III】
题目 Table: Product Table: Sales 编写一个SQL查询,报告2019年春季才售出的产品。即仅在2019-01-01至2019-03-31(含)之间出售的商品。 以 任意顺序 返回结果表。 查询结果格式如下所示。 示例 1: 解题思路 前置知识 between and between…...

Redis 软件包,在 CentOS 7 中安装 Redis
Download | Redis 1. 解压 Redis 软件包。假设你的 Redis 软件包名为 redis.tar.gz,进入redis.tar.gz所在目录下 ,可以使用以下命令进行解压: tar xzf redis.tar.gz 2. 切换到 Redis 软件包的解压目录。假设解压后的目录名为 redis…...

01.Redis实现发送验证码保存功能
学习目标: 提示:学习如何利用Redis来实现发送验证码功能 学习产出: 1. 准备pom环境 <dependency><groupId>org.springframework.boot</groupId><artifactId>spring-boot-starter-data-redis</artifactId><…...
C++STL——deque容器详解
纵有疾风起,人生不言弃。本文篇幅较长,如有错误请不吝赐教,感谢支持。 💬文章目录 一.deque容器的基本概念二.deque容器常用操作①deque构造函数②deque元素操作③deque赋值操作④deque交换操作⑤deque大小操作⑥deque插入和删除…...

docker 哨兵模式和集群模式安装Redis7.0.12
docker 哨兵模式和集群模式安装Redis7.0.12 1.下载镜像 1.1 配置阿里云加速源 墙外能访问https://hub.docker.com/_/redis 的可跳过 https://cr.console.aliyun.com/cn-hangzhou/instances/mirrors 登录后选择左侧的镜像工具>镜像加速器,获取加速器地址&#…...

go nil 与零值
go nil 与零值 区别描述: 在Go语言中,nil和零值是两个不同的概念,它们在处理空值或未初始化值时有不同的应用场景。 nil: 在Go语言中,nil表示指针类型的零值或者interface、function、map、slice、channel、error类…...
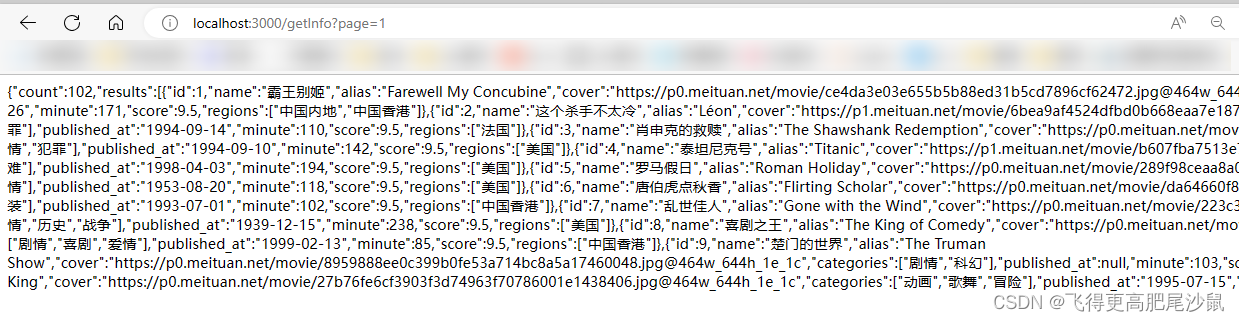
puppeteer监听response并封装为express服务调用
const express require(express); const puppeteer require(puppeteer); const app express(); let browser; // 声明一个全局变量来存储浏览器实例app.get(/getInfo, async (req, res) > {try {const page_param req.query.page; // 获取名为"page"的查询参数…...
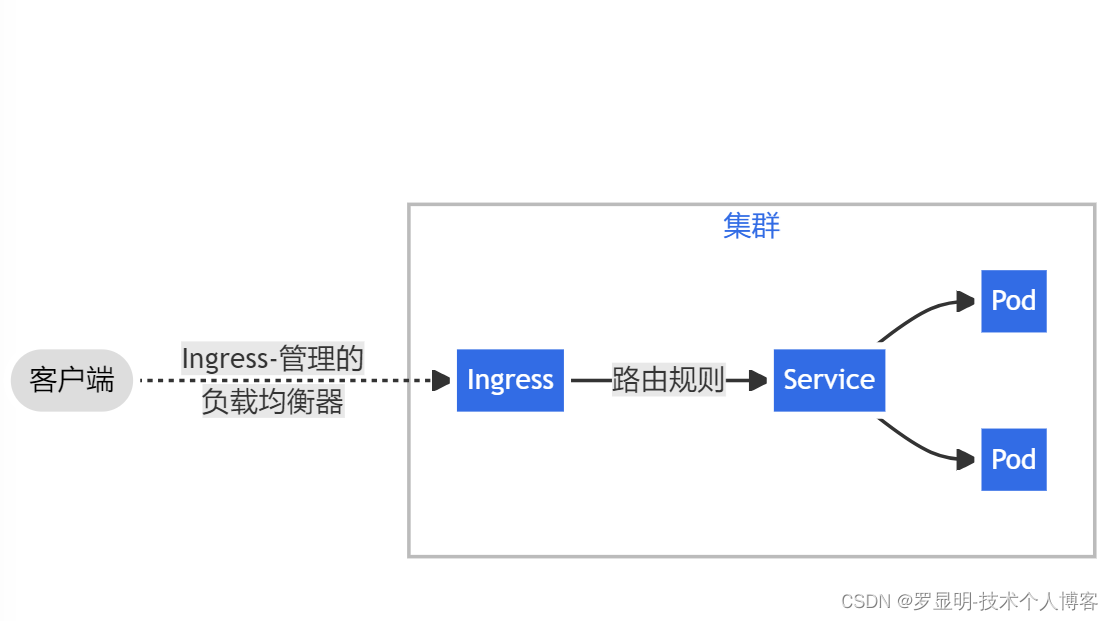
kubernetes之Ingress
一、背景 Ingress是k8s中实现7层负载的实现方式,是公开集群外部流量到集群内服务的HTTP和HTTPS路由 二、Ingress基础 通常Ingress实现由Ingress 控制器和Ingress组成,Ingress控制器负责具体实现反向代理及负载均衡,Ingress负责定义匹配规则和…...
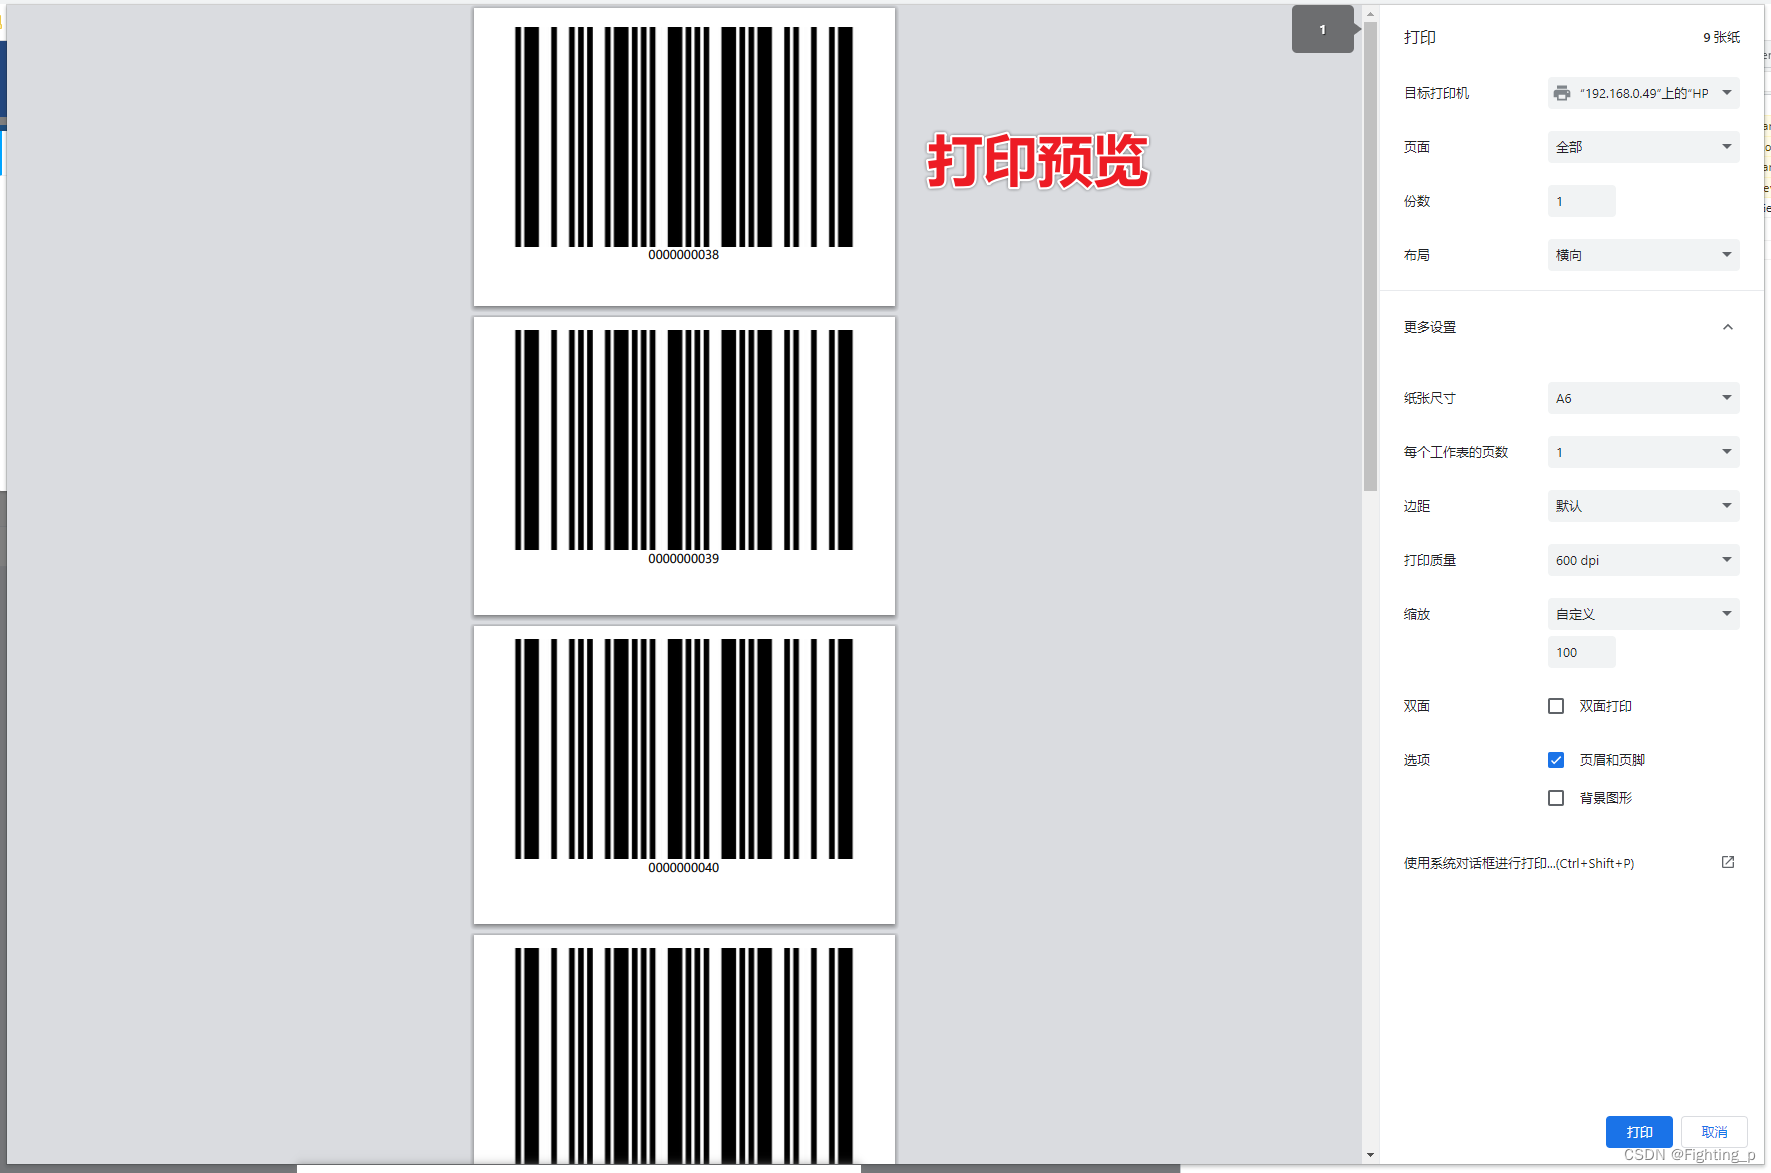
前端实现打印1 - 使用 iframe 实现 并 分页打印
目录 打印代码对话框预览打印预览 打印代码 <!-- 打印 --> <template><el-dialogtitle"打印":visible.sync"dialogVisible"width"50%"top"7vh"append-to-bodyclose"handleClose"><div ref"print…...

MIAOYUN获评“2023年度一云多芯稳定安全运行优秀案例”
2023年7月25日至26日,由中国信息通信研究院(简称“中国信通院”)、中国通信标准化协会主办的以“云领创新,算启新篇”为主题的“2023可信云大会”在北京成功举办。会上公布了多项前瞻领域的评估结果和2023年度最佳实践案例&#x…...
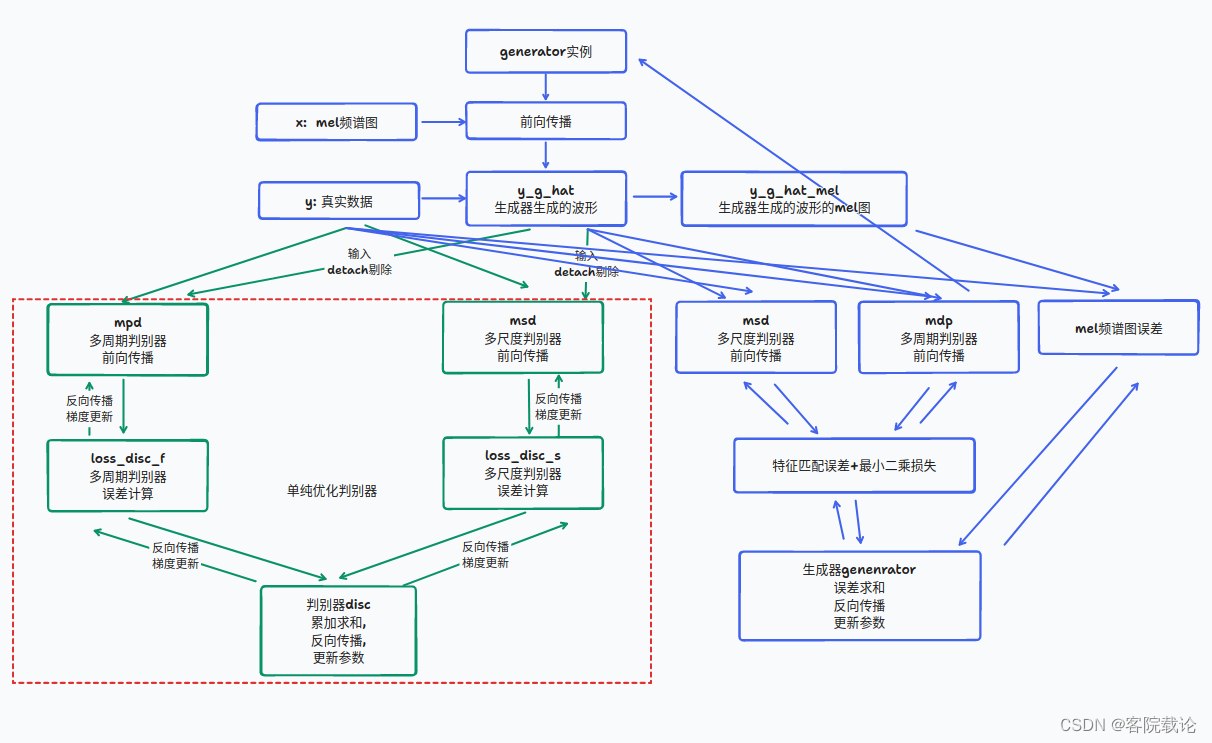
论文代码学习—HiFi-GAN(4)——模型训练函数train文件具体解析
文章目录 引言正文模型训练代码整体训练过程具体训练细节具体运行流程 多GPU编程main函数(通用代码)完整代码 总结引用 引言 这里翻译了HiFi-GAN这篇论文的具体内容,具体链接。这篇文章还是学到了很多东西,从整体上说,…...
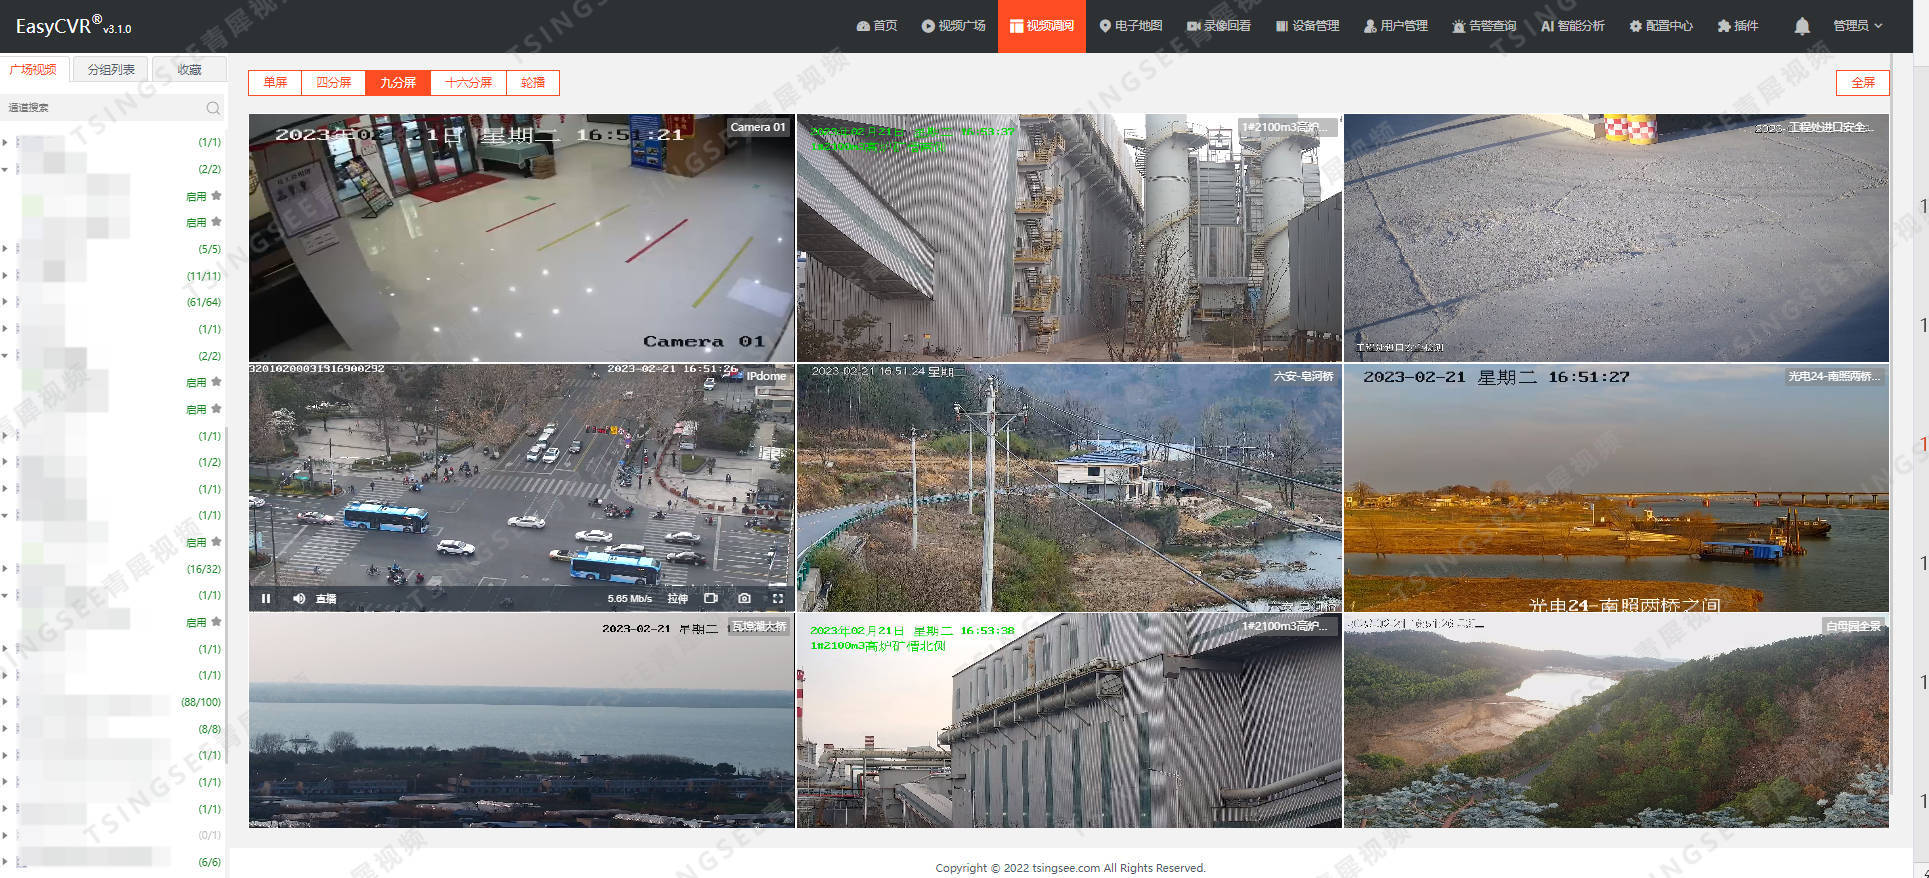
安防视频综合管理合平台EasyCVR可支持的视频播放协议有哪些?
EasyDarwin开源流媒体视频EasyCVR安防监控平台可提供视频监控直播、云端录像、云存储、录像检索与回看、智能告警、平台级联、云台控制、语音对讲、智能分析等能力。 视频监控综合管理平台EasyCVR具备视频融合能力,平台基于云边端一体化架构,具有强大的…...

一张表格讲明白white-space属性。html如何识别\n\r,让这些特殊换行符换行。
大多数标签在展示文本内容的时候都会默认把文本中的空白和换行符去掉,这的确大大的使得文本的排版更加美观了,也怎加了区域的利用率,可是就有一些需求是需要原原本本的展示出原汁原味的文本格式。那该如何展示出文本的内在格式呢?…...

【Linux】编写shell脚本将项目前一天打印的日志进行提取,并且单独保存
业务场景:又到了熟悉的业务场景环节,其实应用上有很多,我们为了方便提取日志中部分关键的内容,对接给其他人也好,方便自己统计也罢,都会比每次我们都去服务器上及时查看,或者下载全部日志再筛选…...

快速搭建单机RocketMQ服务(开发环境)
一、什么是RocketMQ RocketMQ是阿里巴巴开源的一个消息中间件,在阿里内部历经了双十一等很多高并发场景的考验,能够处理亿万级别的消息。2016年开源后捐赠给Apache,现在是Apache的一个顶级项目。 早期阿里使用ActiveMQ,…...
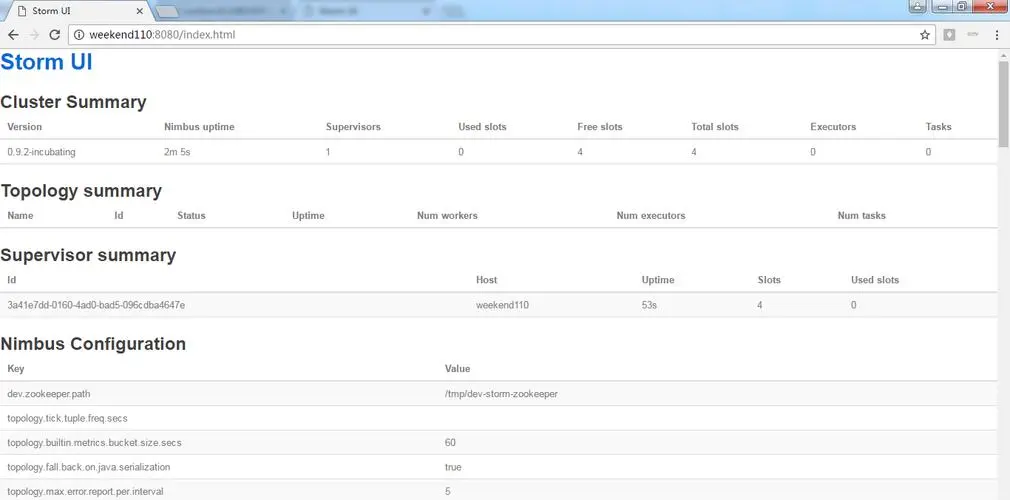
Centos7搭建Apache Storm 集群运行环境
文章目录 1. 安装 Java2. 下载并解压 Storm3. 配置环境变量4. 配置 ZooKeeper5. 配置 Stormstorm.yaml自定义 storm.yamlstorm-env.shlogback/cluster.xml 6. 启动 Storm 集群7. 验证 1. 安装 Java Storm 运行在 Java 平台上,因此需要先安装 Java。你可以使用以下命…...

C语言假期作业 DAY 12
一、选择题 1、请阅读以下程序,其运行结果是( ) int main() { char cA; if(0<c<9) printf("YES"); else printf("NO"); return 0; } A: YES B: NO C: YESNO D: 语句错误 答案解析 正确答案: A 0<c&l…...

2.4在运行时选择线程数量
在运行时选择线程数量 C标准库中对此有所帮助的特性是std::thread::hardware_currency()。这个函数返回一个对于给定程序执行时能够真正并发运行的线程数量的指示。例如,在多核系统上它可能是CPU 核心的数量。它仅仅是一个提示,如果该信息不可用则函数可…...

DeepSeek系统设计辅助效能断崖式下降的3个信号,第2个90%工程师至今未察觉!
更多请点击: https://kaifayun.com 第一章:DeepSeek系统设计辅助效能断崖式下降的3个信号,第2个90%工程师至今未察觉! 当 DeepSeek 的系统设计辅助能力突然变“笨”——接口建议频繁失准、上下文感知错乱、生成代码无法通过基础编…...

Redis沙盒体验:在浏览器中零门槛掌握NoSQL核心技能
Redis沙盒体验:在浏览器中零门槛掌握NoSQL核心技能 【免费下载链接】try.redis A demonstration of the Redis database. 项目地址: https://gitcode.com/gh_mirrors/tr/try.redis 当你第一次听说Redis时,是否被那些晦涩的技术术语吓退࿱…...

从Gamma函数到泊松分布:一个概率论中的含参量积分实用案例解析
Gamma函数与泊松分布:概率论中的数学之美 在数据科学和机器学习的实践中,概率分布构成了建模的基石。当我们深入探究这些分布背后的数学原理时,Gamma函数以其优雅的性质和广泛的应用脱颖而出。它不仅连接了离散与连续概率世界,更在…...

服务器日志分析实战:用Python追踪HTTP 404错误并可视化异常频率
作为一名爬虫开发者或网站运维人员,服务器日志就像飞机的“黑匣子”——它记录了每个请求的来龙去脉。而404错误(页面未找到)尤其值得关注:它可能是用户输错了网址,可能是你爬虫的URL构造逻辑有漏洞,也可能是网站改版后旧的链接失效了。更严重的是,大量突然涌出的404请求…...

极致精简,功能强大的PDF编辑工具
这是一款功能全面的PDF编辑工具 你只需要导入一份PDF格式文件 就可以快速的对它进行插入 批注编辑保护转换等各种操作 而且无需登录 也可以直接使用 在插入选项中可以进行插入文字图片 页面页眉页脚页码文档背景水印视频音频等 在批注选项中可以管理批注隐藏批注 高亮显示 文本…...
:支持Anthropic API兼容、流式响应、模型热切换与RBAC权限隔离)
Claude本地化部署终极方案(企业级容器化全栈手册):支持Anthropic API兼容、流式响应、模型热切换与RBAC权限隔离
更多请点击: https://codechina.net 第一章:Claude本地化部署的架构全景与企业级价值定位 Claude本地化部署并非简单地将模型权重下载后运行,而是一套融合推理引擎优化、安全沙箱隔离、API网关治理与可观测性集成的端到端架构体系。其核心目…...

【紧急预警】92%的DeepSeek测试用例生成失败源于这4个隐性配置缺陷——资深SDET连夜整理修复清单
更多请点击: https://codechina.net 第一章:DeepSeek测试用例生成的现状与危机本质 当前,DeepSeek系列大模型(如DeepSeek-Coder、DeepSeek-VL)在代码生成与理解任务中展现出强大能力,但其测试用例自动生成…...

VMware ESXi 9.1.0.0集成NVME+网卡驱动版发布|新特性+驱动集成+部署升级+FAQ全指南
一、ESXi 9.1.0.0 正式版核心新特性 VMware ESXi 9.1.0.0(2026 年 5 月发布)是 vSphere 9.1 核心组件,聚焦硬件兼容扩展、性能跃升、安全加固、运维简化四大方向,重点强化 NVMe 存储与网卡生态适配,以下为关键更新&am…...

为什么92%的团队用DeepSeek生成方案仍需人工重写?揭秘缺失的2个元认知层与1套校验协议
更多请点击: https://intelliparadigm.com 第一章:为什么92%的团队用DeepSeek生成方案仍需人工重写?揭秘缺失的2个元认知层与1套校验协议 当团队将DeepSeek-R1或DeepSeek-VL模型用于技术方案生成时,表面看响应迅速、逻辑连贯&…...

光轮智能 谢晨 访谈总结机器人仿真数据产业
光轮智能 谢晨 访谈总结机器人仿真关于创始人关于数据数据金字塔数据痛点仿真数据的重要性仿真数据的质量b站链接地址公司官网关于创始人 清华物理;哥伦比亚金融;英伟达智驾仿真;小鹏智驾仿真;现为光轮智能CEO 关于数据 数据的…...