数据结构: 线性表(无哨兵位单链表实现)
文章目录
- 1. 线性表的链式表示: 链表
- 1.1 顺序表的优缺点
- 1.2 链表的概念
- 1.3 链表的优缺点
- 1.4 链表的结构
- 2. 单链表的定义
- 2.1 单链表的结构体
- 2.2 接口函数
- 3. 接口函数的实现
- 3.1 动态申请一个结点 (BuySListNode)
- 3.2 单链表打印 (SListPrint)
- 3.3 单链表尾插 (SListPushBack)
- 3.4 单链表头插 (SListPushFront)
- 3.5 单链表尾删 (SListPopBack)
- 3.6 单链表头删 (SListPopFront)
- 3.7 单链表查找 (SListFind)
- 3.8 单链表在 pos 位置之前插入 (SListInsert)
- 3.9 单链表在 pos 位置上删除 (SListErase)
- 3.10 单链表在 pos 位置之后插入 (SListInsertAfter)
- 3.11 单链表在 pos 位置之后删除 (SListEraseAfter)
- 3.12 单链表销毁 (SListDestroy)
- 4. 完整代码
1. 线性表的链式表示: 链表
1.1 顺序表的优缺点
在介绍链表之前, 先回顾一下顺序表的优缺点

- 顺序表的优点:
存储密度高: 无需为表示表中元素之间的逻辑关系而增加额外的存储空间.
随机访问: 通过首地址和元素序号可以在时间 O ( 1 ) O(1) O(1) 内找到指定的元素.
- 顺序表的缺点:
顺序表逻辑上相邻的元素物理上也相邻, 插入和删除操作需要移动大量元素,时间复杂度为 O ( N ) O(N) O(N).
当线性表长度变化较大时, 难以确定存储空间的容量
造成存储空间的"碎片"
1.2 链表的概念
为了避免顺序表插入和删除的线性开销, 我们允许表可以不连续存储, 否则表的部分或全部需要整体移动.

链表由一系列不必在内存中相连的结构组成.
每个结构均含有表元素和指向包含该元素后继元的结构的指针.我们称为
next指针.最后一个单元的next指针指向NULL;该值由C定义并且不能与其他指针混淆.ANSI C 规定NULL为 0
如果 P 被声明为一个指向一个结构的指针, 那么存储在 P中的值就被解释为主存中的一个位置, 在该位置能够找到一个结构.
该结构的一个域可以通过 P->FieldName 访问, 其中 FieldName 是我们想要考察的域的名字.
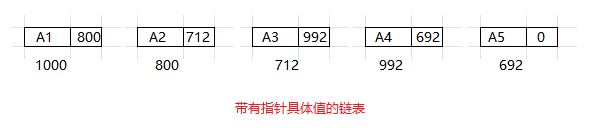
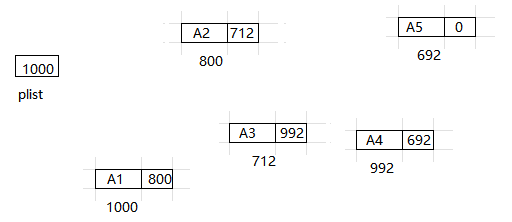
以下是表的具体表示, 即物理存储结构. 这个表含有 5 个结构, 内存分给它们的位置分别是 1000, 800, 712, 992 和 692.
第一个结构的指针含有值 800, 它提供了第二个结构所在的位置. 其余每个结构也都有一个指针用于类似的目的. 通过指针值, 可以访问到下一结构体的位置. 为了访问该表, 需要知道该表的第一个单元.
1.3 链表的优缺点
由此可以分析出单链表的优缺点:
- 链表的优点
更加合理使用空间: 按需申请空间, 不用则释放空间
元素的插入和删除效率更高, 只需要 O ( 1 ) O(1) O(1) 的时间
不存在空间浪费
- 链表的缺点
访问速度慢: 查找某一元素需要从头开始依次查找, 消耗 O ( N ) O(N) O(N) 的时间
存储密度低: 每个元素还需要额外空间存放指针空间, 用于将表中数据链接起来
1.4 链表的结构
typedef int SLTDateType;typedef struct SListNode
{SLTDateType data;struct SListNode* next;
}SListNode;
-
逻辑结构: 便于理解想象出来的, 实际不存在, 一般用箭头表示, 实际箭头不存在

-
物理结构: 主存中实际的存储方式, 不一定是处在连续存储的空间
2. 单链表的定义
2.1 单链表的结构体

typedef int SLTDateType;typedef struct SListNode
{SLTDateType data;struct SListNode* next;
}SListNode;
- 为了后续代码便于复用, 使用
typedef将数据类型和结构体类型重命名
- 每一个单链表结点包含两个域: 数据域
data和指针域next
struct SListNode* next实现结构体指向结构体
2.2 接口函数
// 动态申请一个结点
SListNode* BuySListNode(SLTDataType x);
// 单链表打印
void SListPrint(SListNode* pHead);
// 单链表尾插
void SListPushBack(SListNode** ppHead, SLTDataType x);
// 单链表头插
void SListPushFront(SListNode** ppHead, SLTDataType x);
// 单链表尾删
void SListPopBack(SListNode** pHead);
// 单链表头删
void SListPopFront(SListNode** pHead);
// 单链表查找
SListNode* SListFind(SListNode* pHead, SLTDataType x);
// 单链表在 pos 位置之前插入
void SListInsert(SListNode** ppHead, SListNode* pos, SLTDataType x);
// 单链表在 pos 位置上删除
void SListErase(SListNode** ppHead, SListNode* pos);
// 单链表在 pos 位置之后插入
void SListInsertAfter(SListNode* pos, SLTDataType x);
// 单链表在 pos 位置之后删除
void SListEraseAfter(SListNode* pos);
// 单链表的销毁
void SListDestroy(SListNode** ppHead);
3. 接口函数的实现
3.1 动态申请一个结点 (BuySListNode)
单链表插入元素必然要新向内存动态申请一个结点的空间, 这个操作可以直接封装成一个函数, 便于后续创建结点使用.
SList.h
SListNode* BuySListNode(SLTDataType x);
SList.c
// 动态申请一个结点
SListNode* BuySListNode(SLTDataType x)
{SListNode* newNode = (SListNode*)malloc(sizeof(SListNode));if (newNode == NULL){perror("BuySListNode:");exit(-1);}newNode->data = x;newNode->next = NULL;return newNode;
}
test.c
void SListTest1()
{SListNode* newNode = BuySListNode(3);free(newNode);
}int main(void)
{SListTest1();return 0;
}
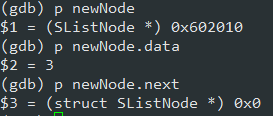
通过调试,创建结点成功:
3.2 单链表打印 (SListPrint)

通过plist的地址访问到第一个结点, 打印该结点的数据值, 同时访问下一结点直至该结点是空指针.
在访问链表的时候, 最好使用一个临时指针来访问, 避免后续增删元素的时候对链表首地址进行修改
SList.h
void SListPrint(SListNode* pHead);
SList.c
// 单链表打印
void SListPrint(SListNode* pHead)
{SListNode* cur = pHead;  //定义一个局部变量指针用来访问链表//从头依次访问链表, cur不为空进入循环while(cur != NULL){printf("%d -> ", cur->data);    //打印结构的数据域cur = cur->next;    //使cur指向下一结点}printf("NULL\n");
}
test.c
后续其他功能测试都会用到, 这里就先不测试了
3.3 单链表尾插 (SListPushBack)

创建一个新结点, 让原最后一个结点指向新结点, 同时新结点指向空指针.
SList.h
void SListPushBack(SListNode** ppHead, SLTDateType x);
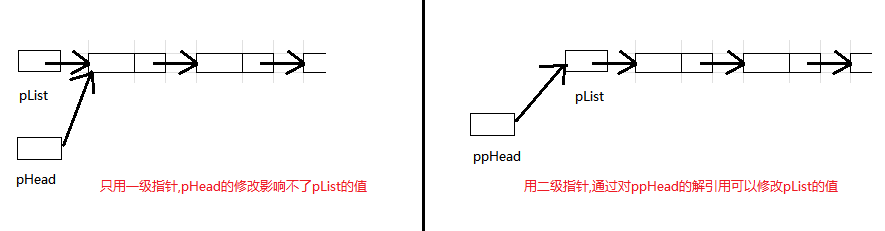
涉及对结构体指针的修改, 需要用到二级指针.虽然是尾插,但如果该链表没有一个元素, 就需要将新结点的地址赋值给实参
pList;想要函数修改指针的值,就需要形参是二级指针,也就是函数需要传址调用.
SList.c
// 单链表尾插
void SListPushBack(SListNode** ppHead, SLTDateType x);
{SListNode* newNode = BuySListNode(x);   //创建一个新结点if(*ppHead == NULL)    //没有结点, 直接将新结点的地址赋值{*ppHead = newNode;  //修改结构体指针, 需要用到二级指针}else    //有结点, 依次访问直到最后一个元素{SListNode* tail = *ppHead;  //tail 用于访问链表while (tail->next != NULL){tail = tail->next;  }tail->next = newNode;   //修改结构体, 只要用到一级指针}
}
- 首先创建一个新结点
newNode
- 接着判断链表是否为空,若为空,则直接使用二级指针将新结点的地址赋值给实参
pList
- 若链表不为空,则只需要修改结构体的内容,用到一级指针即可.当访问到该结点的
next为空时,进行尾插操作.
test.c
void SListTest1()
{SListNode* pList = NULL;SListPushBack(&pList, 1);SListPushBack(&pList, 2);SListPushBack(&pList, 3);SListPushBack(&pList, 4);SListPushBack(&pList, 5);SListPushBack(&pList, 6);SListPrint(pList);SListDestroy(&pList);
}int main(void)
{SListTest1();return 0;
}
测试运行结果如下:

3.4 单链表头插 (SListPushFront)
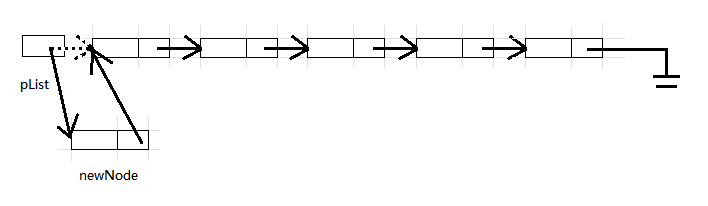
修改pList,让pList指向新结点,同时新结点的next指向原链表第一个结点
SList.h
void SListPushFront(SListNode** ppHead, SLTDateType x);
同样这里需要修改实参
pList的值,函数的形参需要传入二级指针.
SList.c
// 单链表的头插
void SListPushFront(SListNode** ppHead, SLTDateType x)
{SListNode* newNode = BuySListNode(x);   //创建新结点newNode->next = *ppHead;    //新结点指向原链表第一个结点*ppHead = newNode;          //更新头结点
}
- 首先创建新结点
newNode
- 随后先将新结点指向原头结点, 再更头结点的值.
注意这两步不可颠倒,否则头结点的地址就丢失了
test.c
void SListTest1()
{SListNode* pList = NULL;SListPushBack(&pList, 1);SListPushBack(&pList, 2);SListPushBack(&pList, 3);SListPushBack(&pList, 4);SListPushBack(&pList, 5);SListPushBack(&pList, 6);SListPrint(pList);SListPushFront(&pList, -1);SListPushFront(&pList, -2);SListPushFront(&pList, -3);SListPushFront(&pList, -4);SListPushFront(&pList, -5);SListPushFront(&pList, -6);SListPrint(pList);SListDestroy(&pList);
}int main(void)
{SListTest1();return 0;
}
测试结果如下:

3.5 单链表尾删 (SListPopBack)

注意分三种情况
SList.h
void SListPopBack(SListNode** ppHead);
同样有修改结构体指针的情况,需要用到二级指针
SList.c
// 单链表的尾删
void SListPopBack(SListNode** ppHead)
{assert(*ppHead);    //没有结点的情况if ((*ppHead)->next == NULL)  //只有一个结点的情况{free(*ppHead);*ppHead = NULL; //修改实参的值需要用到二级指针}else    //有两个结点以上的情况{SListNode* tail = *ppHead;   //tail用来访问结构体成员while (tail->next->next != NULL) //需要修改倒数第二个结点的值, 则访问到倒数第二个结点即停止{tail = tail->next;}free(tail->next);  //先释放最后一个结点的空间tail->next = NULL;  //倒数第二个结点指向NULL}
}
- 若链表为空,没有结点,程序直接结束
- 若只有一个结点,则需要用到二级指针来修改实参
pList的值为NULL,同时释放头结点空间
- 若有两个及以上结点,只用修改结构体.若要修改倒数第二个结点的值,则只要访问到倒数第二个结点就可以了.这是单向链表,不可返回访问
test.c
void SListTest2()
{SListNode* pList = NULL;SListPushBack(&pList, 1);SListPushBack(&pList, 2);SListPushBack(&pList, 3);SListPushBack(&pList, 4);SListPushBack(&pList, 5);SListPushBack(&pList, 6);SListPrint(pList);SListPopBack(&pList);SListPopBack(&pList);SListPrint(pList);SListPopBack(&pList);SListPopBack(&pList);SListPopBack(&pList);SListPrint(pList);  SListPopBack(&pList);       //一个结点SListPrint(pList);SListPopBack(&pList);       //没有结点SListPrint(pList);SListDestroy(&pList);
}int main(void)
{SListTest2();return 0;
}
测试运行结果如下:

3.6 单链表头删 (SListPopFront)
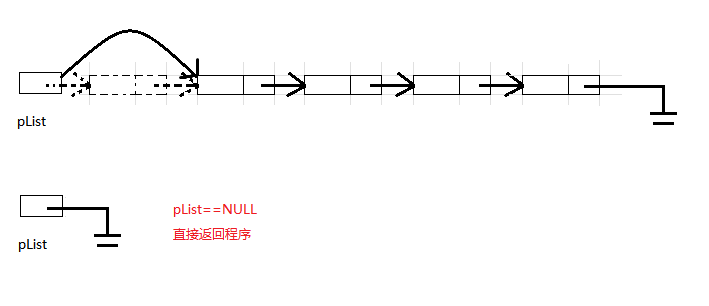
单链表头删则只有两种情况,若链表为空直接终止程序.链表不为空,使pList指向头结点指向的空间.
SList.h
void SListPopFront(SListNode** ppHead);
同样有修改结构体指针的情况,需要用到二级指针
SList.c
// 单链表头删
void SListPopFront(SListNode** ppHead)
{assert(*ppHead);    //链表为空//链表非空SListNode* newNode = (*ppHead)->next;   //记录新的头结点free(*ppHead);      //释放原头结点空间*ppHead = newNode;  //更新头结点
}
- 首先判断链表是否为空,若链表为空程序直接结束
- 接着先记录新的头结点,释放原头结点空间后,更新头结点.
同样两个操作不可颠倒,否则原头结点失去位置,造成内存泄漏
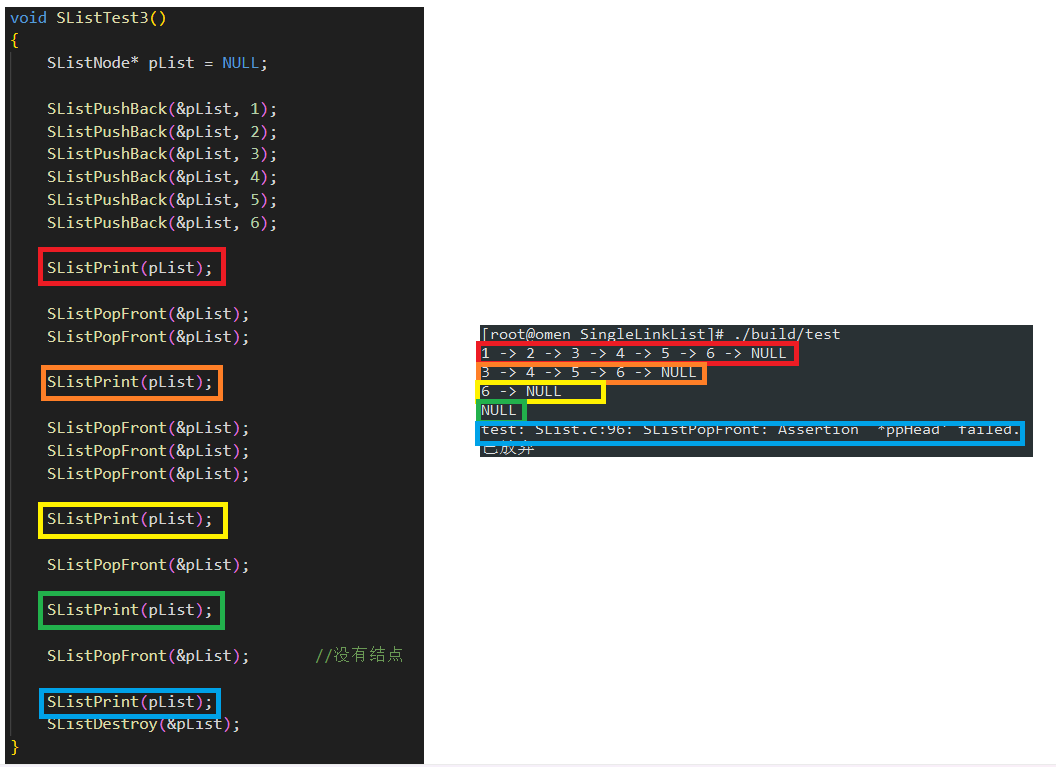
test.c
void SListTest3()
{SListNode* pList = NULL;SListPushBack(&pList, 1);SListPushBack(&pList, 2);SListPushBack(&pList, 3);SListPushBack(&pList, 4);SListPushBack(&pList, 5);SListPushBack(&pList, 6);SListPrint(pList);SListPopFront(&pList);SListPopFront(&pList);SListPrint(pList);SListPopFront(&pList);SListPopFront(&pList);SListPopFront(&pList);SListPrint(pList);  SListPopFront(&pList);      SListPrint(pList);SListPopFront(&pList);       //没有结点SListPrint(pList);SListDestroy(&pList);
}int main(void)
{SListTest3();return 0;
}
测试运行结果如下:
3.7 单链表查找 (SListFind)

从头依次访问每一个结点,并与要查找的值进行比较,若找到则直接返回该结点的地址,若找不到则返回空指针.
SList.h
SListNode* SListFind(SListNode* pHead, SLTDateType x);
SList.c
// 单链表查找
SListNode* SListFind(SListNode* pHead, SLTDateType x)
{SListNode* cur = pHead; //cur访问每个结点while (cur != NULL){if (cur->data == x){return cur;}cur = cur->next;}return NULL;
}
test.c
void SListTest4()
{SListNode* pList = NULL;SListPushBack(&pList, 1);SListPushBack(&pList, 2);SListPushBack(&pList, 3);SListPushBack(&pList, 4);SListPushBack(&pList, 5);SListPushBack(&pList, 6);SListPrint(pList);SListNode* pos;pos = SListFind(pList, 3);SListPrint(pos);pos = SListFind(pList, 6);SListPrint(pos);pos = SListFind(pList, 8);SListPrint(pos);SListDestroy(&pList);
}int main(void)
{SListTest4();return 0;
}
测试运行结果如下:

3.8 单链表在 pos 位置之前插入 (SListInsert)
将pos位置的之前插入分为两种情况: pos 指向头结点 和 其他情况

SList.h
void SListInsert(SListNode** ppHead, SListNode* pos, SLTDataType x);
涉及对实参
pList的修改需要用到二级指针
SList.c
// 单链表在 pos 位置之前插入
void SListInsert(SListNode** ppHead, SListNode* pos, SLTDataType x)
{assert(ppHead);assert(pos);SListNode* newNode = BuySListNode(x);	//创建新结点if (*ppHead == pos)	//如果pos指向第一个结点{//头插newNode->next = *ppHead;*ppHead = newNode;}else{SListNode* prev = *ppHead;	//prev用于访问到pos前一个结点的位置while (prev->next != pos){prev = prev->next;}//插入newNode->next = pos;prev->next = newNode;}
}
- 首先确保
ppHead和pos值合法
- 创建新结点后, 判断
pos是否指向头结点, 若指向头结点, 直接头插操作就可以了, 注意要使用二级指针以修改实参pList的值
- 若
pos不指向头结点, 因为要涉及对pos指向结点的前一个结点进行修改, 所以定义prev顺序访问单链表直至访问到pos指向结点的前一个结点. 这时进行插入操作, 直接修改newNode和prev的next即可
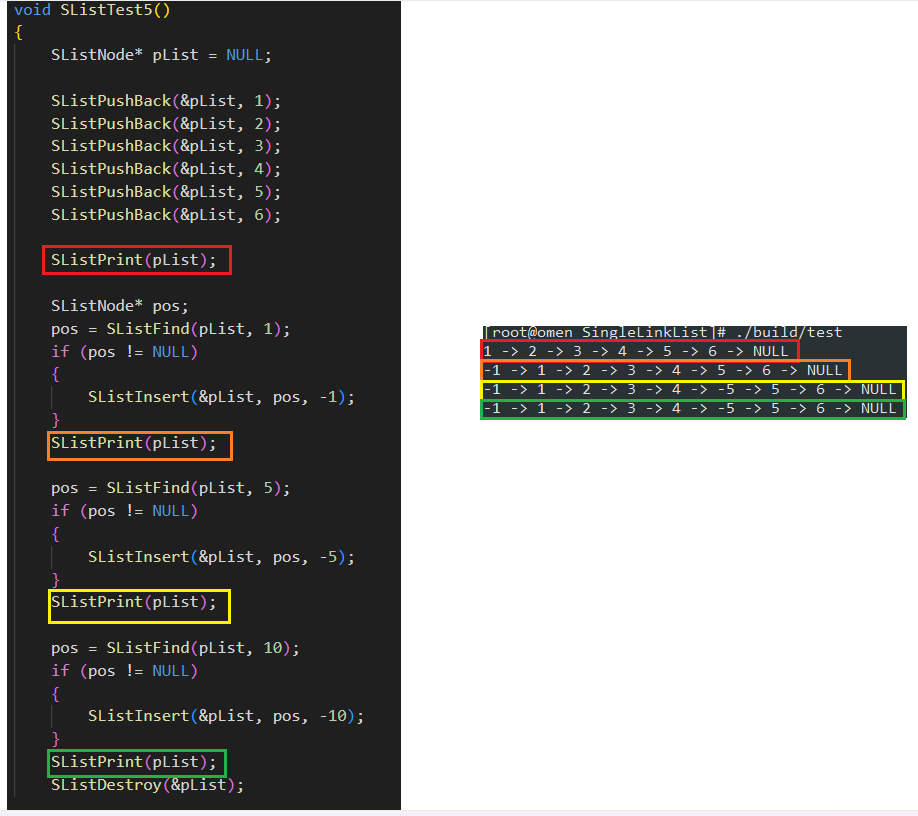
test.c
void SListTest5()
{SListNode* pList = NULL;SListPushBack(&pList, 1);SListPushBack(&pList, 2);SListPushBack(&pList, 3);SListPushBack(&pList, 4);SListPushBack(&pList, 5);SListPushBack(&pList, 6);SListPrint(pList);SListNode* pos;pos = SListFind(pList, 1);if (pos != NULL){SListInsert(&pList, pos, -1);}SListPrint(pList);pos = SListFind(pList, 5);if (pos != NULL){SListInsert(&pList, pos, -5);}SListPrint(pList);pos = SListFind(pList, 10);if (pos != NULL){SListInsert(&pList, pos, -10);}SListPrint(pList);SListDestroy(&pList);}int main(void)
{SListTest5();return 0;
}
测试运行结果如下:
3.9 单链表在 pos 位置上删除 (SListErase)
单链表在 pos 位置上删除, 也是有两种情况: 删除的是头结点 和 删除的不是头结点

SList.h
void SListErase(SListNode** ppHead, SListNode* pos);
涉及对实参
pList的修改需要用到二级指针
SList.c
// 单链表在 pos 位置上删除
void SListErase(SListNode** ppHead, SListNode* pos)
{	assert(ppHead);assert(pos);if (*ppHead == pos)	//如果 pos 指向第一个结点{				*ppHead = pos->next;free(pos);		//释放空间}else	//有两个及以上结点{SListNode* prev = *ppHead;	//prev 访问到pos之前的一个结点while (prev->next != pos){	prev = prev->next;}//删除prev->next = pos->next;free(pos);}
}
- 首先确保
ppHead和pos的值合法
- 接着判断
pos是否指向头结点, 如果指向头结点, 则按照头删的方式进行删除结点
- 如果
pos不指向头结点, 因为需要修改pos前面的结点的数据, 所以定义了变量prev, 顺序访问单链表直至访问到pos位置结点的前一个结点, 直接prev->next = pos->next
test.c
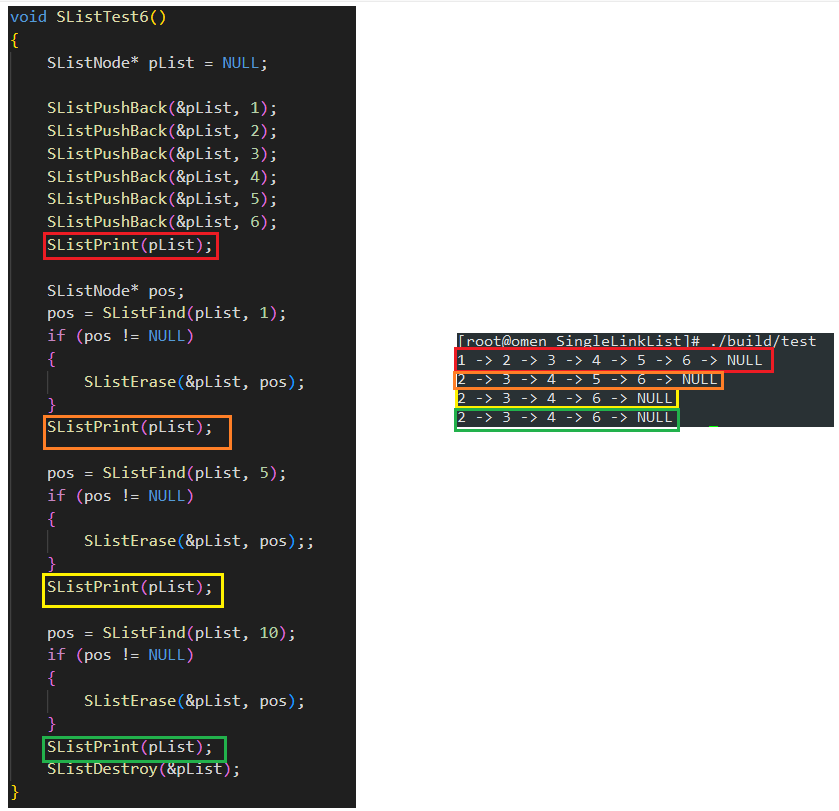
void SListTest6()
{SListNode* pList = NULL;SListPushBack(&pList, 1);SListPushBack(&pList, 2);SListPushBack(&pList, 3);SListPushBack(&pList, 4);SListPushBack(&pList, 5);SListPushBack(&pList, 6);SListPrint(pList);SListNode* pos;pos = SListFind(pList, 1);if (pos != NULL){SListErase(&pList, pos);}SListPrint(pList);pos = SListFind(pList, 5);if (pos != NULL){SListErase(&pList, pos);;}SListPrint(pList);pos = SListFind(pList, 10);if (pos != NULL){SListErase(&pList, pos);}SListPrint(pList);SListDestroy(&pList);
}int main(void)
{SListTest6();return 0;
}
测试运行结果如下:
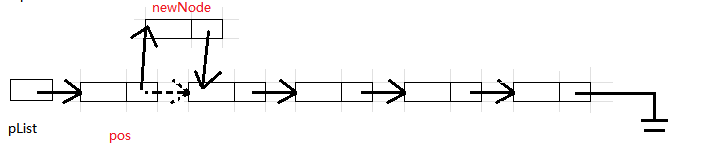
3.10 单链表在 pos 位置之后插入 (SListInsertAfter)
直接插入即可, 时间复杂度相比 SListInsert 要少很多
SList.h
void SListInsertAfter(SListNode* pos, SLTDataType x);
SList.c
// 单链表在 pos 位置后插入
void SListInsertAfter(SListNode* pos, SLTDataType x)
{assert(pos);	//确保插入位置合法SListNode* newNode = BuySListNode(x);newNode->next = pos->next;pos->next = newNode;
}
- 确保
pos的值合法
- 注意
newNode->next = pos->next;和pos->next = newNode;的顺序不可以颠倒, 否则会出现newNode指向自己的情况
test.c
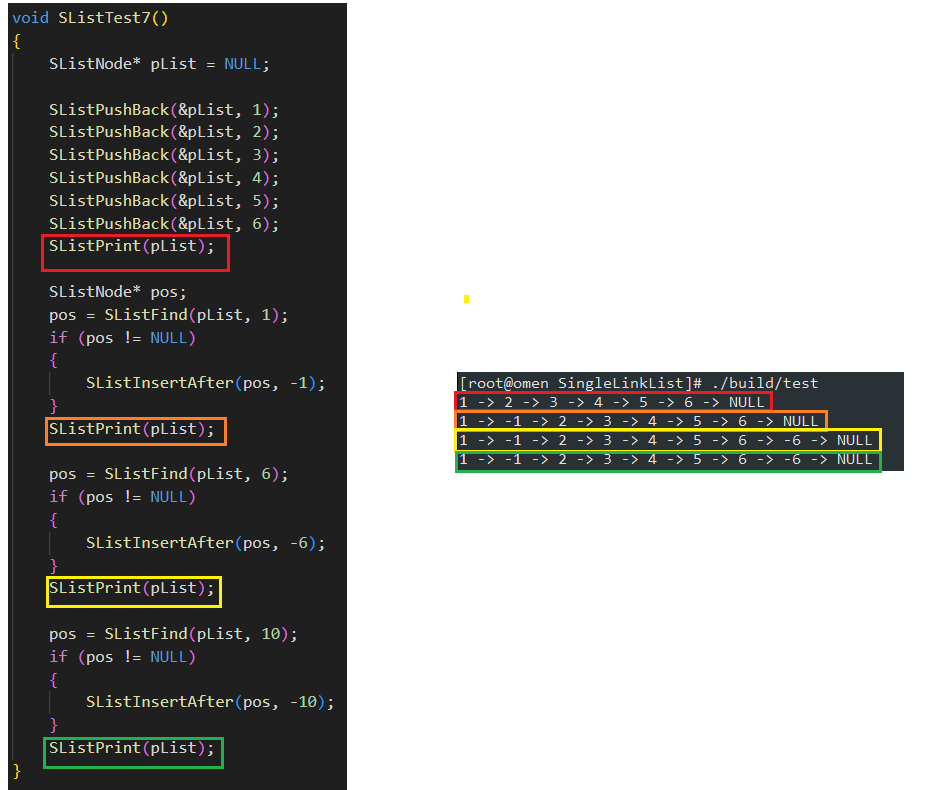
void SListTest7()
{SListNode* pList = NULL;SListPushBack(&pList, 1);	SListPushBack(&pList, 2);	SListPushBack(&pList, 3);	SListPushBack(&pList, 4);	SListPushBack(&pList, 5);	SListPushBack(&pList, 6);	SListPrint(pList);SListNode* pos;pos = SListFind(pList, 1);if (pos != NULL){SListInsertAfter(pos, -1);}SListPrint(pList);	pos = SListFind(pList, 6);if (pos != NULL){SListInsertAfter(pos, -6);}SListPrint(pList);pos = SListFind(pList, 10);if (pos != NULL){SListInsertAfter(pos, -10);}SListPrint(pList);SListDestroy(&pList);
}int main(void)
{SListTest7();return 0;
}
测试运行结果如下:
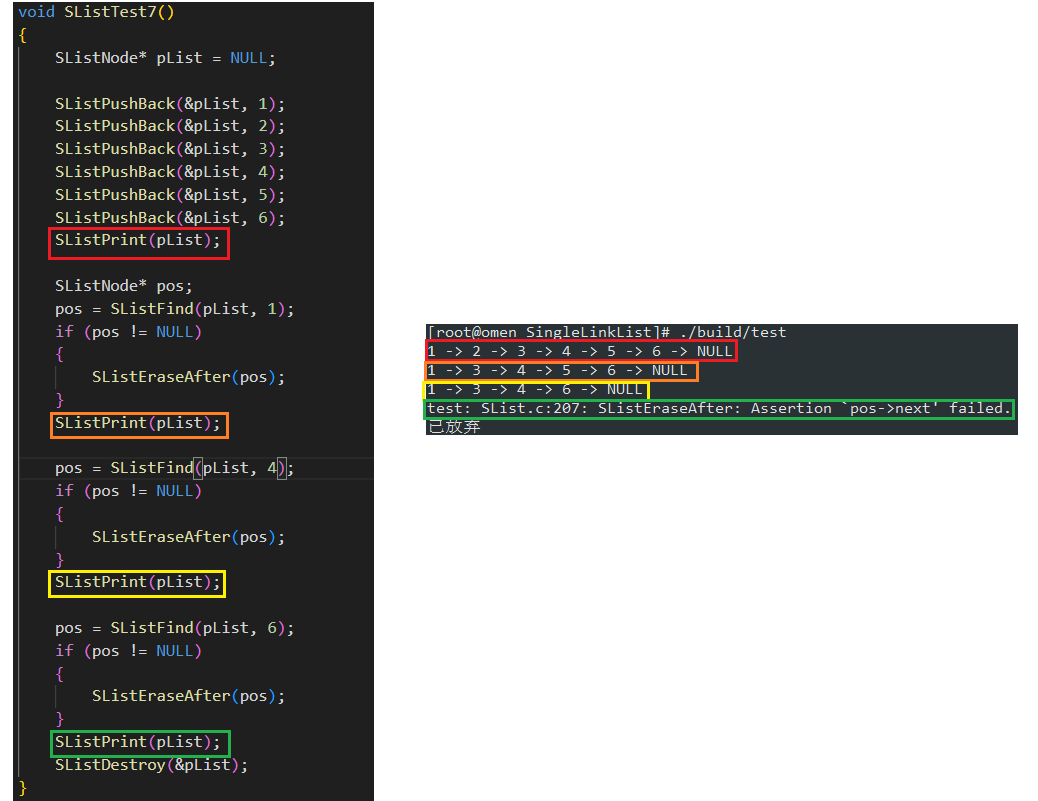
3.11 单链表在 pos 位置之后删除 (SListEraseAfter)
直接改变 pos 位置结点的指向即可, pos 不可指向链表结尾

SList.h
void SListEraseAfter(SListNode* pos);
SList.c
// 单链表在 pos 位置之后删除
void SListEraseAfter(SListNode* pos)
{assert(pos);	//确保删除位置合法assert(pos->next);SListNode* deleteNode = pos->next;pos->next = deleteNode->next;free(deleteNode);
}
- 确保
pos和pos->next合法
- 将要删除的结点命名为
deleteNode, 随后直接修改pos位置的next, 并释放空间即可
test.c
void SListTest7()
{SListNode* pList = NULL;SListPushBack(&pList, 1);	SListPushBack(&pList, 2);	SListPushBack(&pList, 3);	SListPushBack(&pList, 4);	SListPushBack(&pList, 5);	SListPushBack(&pList, 6);	SListPrint(pList);SListNode* pos;pos = SListFind(pList, 1);if (pos != NULL){SListEraseAfter(pos);}SListPrint(pList);pos = SListFind(pList, 4);if (pos != NULL){SListEraseAfter(pos);}SListPrint(pList);pos = SListFind(pList, 6);if (pos != NULL){SListEraseAfter(pos);}SListPrint(pList); SListDestroy(&pList);
}int main(void)
{SListTest7();return 0;
}
测试运行结果如下:
3.12 单链表销毁 (SListDestroy)
SList.h
void SListDestroy(SListNode** ppHead);
涉及对实参
pList的修改需要用到二级指针
SList.c
// 单链表销毁
void SListDestroy(SListNode** ppHead)
{assert(ppHead);SListNode* cur = *ppHead;while (cur != NULL){SListNode* next = cur->next;free(cur);cur = next;}*ppHead = NULL;
}
顺序访问链表并依次释放结点空间
由此可以看出: 单链表更多的还是头插和头删是最便利的, 在后面的复杂数据结构中会用到单链表, 算法相关笔试题也是单链表居多(单链表的坑比较多!)
4. 完整代码
SList.h
#pragma once#include <stdio.h>
#include <stdlib.h>
#include <assert.h>typedef int SLTDataType;
//单链表结点结构体
typedef struct SListNode
{SLTDataType data;struct SListNode* next;
}SListNode;//动态申请一个结点
SListNode* BuySListNode(SLTDataType x);
//单链表打印
void SListPrint(SListNode* pHead);
//单链表尾插
void SListPushBack(SListNode** ppHead, SLTDataType x);
//单链表头插
void SListPushFront(SListNode** ppHead, SLTDataType x);
//单链表尾删
void SListPopBack(SListNode** pHead);
//单链表头删
void SListPopFront(SListNode** pHead);
//单链表查找
SListNode* SListFind(SListNode* pHead, SLTDataType x);
//单链表在 pos 位置之前插入
void SListInsert(SListNode** ppHead, SListNode* pos, SLTDataType x);
//单链表在 pos 位置上删除
void SListErase(SListNode** ppHead, SListNode* pos);
//单链表在 pos 位置之后插入
void SListInsertAfter(SListNode* pos, SLTDataType x);
//单链表在 pos 位置之后删除
void SListEraseAfter(SListNode* pos);
//单链表的销毁
void SListDestroy(SListNode** ppHead);
SList.c
#include "SList.h"// 动态申请一个结点
SListNode* BuySListNode(SLTDataType x)
{SListNode* newNode = (SListNode*)malloc(sizeof(SListNode));if (newNode == NULL){perror("BuySListNode:");exit(-1);}newNode->data = x;newNode->next = NULL;return newNode;
}// 单链表打印
void SListPrint(SListNode* pHead)
{SListNode* cur = pHead;  //定义一个局部变量指针用来访问链表//从头依次访问链表, cur不为空进入循环while(cur != NULL){printf("%d -> ", cur->data);    //打印结构的数据域cur = cur->next;    //使cur指向下一结点}printf("NULL\n");
}// 单链表尾插
void SListPushBack(SListNode** ppHead, SLTDataType x)
{assert(ppHead);SListNode* newNode = BuySListNode(x);   //创建一个新结点if(*ppHead == NULL)    //没有结点, 直接将新结点的地址赋值{*ppHead = newNode;  //修改结构体指针, 需要用到二级指针}else    //有结点, 依次访问直到最后一个元素{SListNode* tail = *ppHead;  //tail 用于访问链表while (tail->next != NULL){tail = tail->next;  }tail->next = newNode;   //修改结构体, 只要用到一级指针}
}// 单链表的头插
void SListPushFront(SListNode** ppHead, SLTDataType x)
{SListNode* newNode = BuySListNode(x);   //创建新结点newNode->next = *ppHead;    //新结点指向原链表第一个结点*ppHead = newNode;          //更新头结点
}// 单链表的尾删
void SListPopBack(SListNode** ppHead)
{assert(ppHead);assert(*ppHead);    //没有结点的情况if ((*ppHead)->next == NULL)  //只有一个结点的情况{free(*ppHead);*ppHead = NULL; //修改实参的值需要用到二级指针}else    //有两个结点以上的情况{SListNode* tail = *ppHead;   //tail用来访问结构体成员while (tail->next->next != NULL) //需要修改倒数第二个结点的值, 则访问到倒数第二个结点即停止{tail = tail->next;}free(tail->next);  //先释放最后一个结点的空间tail->next = NULL;  //倒数第二个结点指向NULL}
}// 单链表头删
void SListPopFront(SListNode** ppHead)
{	assert(ppHead);assert(*ppHead);    //链表为空//链表非空SListNode* newNode = (*ppHead)->next;   //记录新的头结点free(*ppHead);      //释放原头结点空间*ppHead = newNode;  //更新头结点
}// 单链表查找
SListNode* SListFind(SListNode* pHead, SLTDataType x)
{SListNode* cur = pHead; //cur访问每个结点while (cur != NULL){if (cur->data == x){return cur;}cur = cur->next;}return NULL;
}// 指定位置前插
void SListInsert(SListNode** ppHead, SListNode* pos, SLTDataType x)
{assert(ppHead);assert(pos);SListNode* newNode = BuySListNode(x);	//创建新结点if (*ppHead == pos)	//如果pos指向第一个结点{//头插newNode->next = *ppHead;*ppHead = newNode;}else{SListNode* prev = *ppHead;	//prev用于访问到pos前一个结点的位置while (prev->next != pos){prev = prev->next;}//插入newNode->next = pos;prev->next = newNode;}
}// 单链表在 pos 位置上删除
void SListErase(SListNode** ppHead, SListNode* pos)
{	assert(ppHead);assert(pos);if (*ppHead == pos)	//如果 pos 指向第一个结点{				*ppHead = pos->next;free(pos);		//释放空间}else	//有两个及以上结点{SListNode* prev = *ppHead;	//prev 访问到pos之前的一个结点while (prev->next != pos){	prev = prev->next;}//删除prev->next = pos->next;free(pos);}
}// 单链表销毁
void SListDestroy(SListNode** ppHead)
{assert(ppHead);SListNode* cur = *ppHead;while (cur != NULL){SListNode* next = cur->next;free(cur);cur = next;}*ppHead = NULL;
}// 单链表在 pos 位置后插入
void SListInsertAfter(SListNode* pos, SLTDataType x)
{assert(pos);	//确保插入位置合法SListNode* newNode = BuySListNode(x);newNode->next = pos->next;pos->next = newNode;
}		 // 单链表在 pos 位置之后删除
void SListEraseAfter(SListNode* pos)
{assert(pos);	//确保删除位置合法assert(pos->next);SListNode* deleteNode = pos->next;pos->next = deleteNode->next;free(deleteNode);
}
test.c
#include "SList.h"void SListTest1()
{SListNode* pList = NULL;SListPushBack(&pList, 1);SListPushBack(&pList, 2);SListPushBack(&pList, 3);SListPushBack(&pList, 4);SListPushBack(&pList, 5);SListPushBack(&pList, 6);SListPrint(pList);SListPushFront(&pList, -1);SListPushFront(&pList, -2);SListPushFront(&pList, -3);SListPushFront(&pList, -4);SListPushFront(&pList, -5);SListPushFront(&pList, -6);SListPrint(pList);SListDestroy(&pList);
}void SListTest2()
{SListNode* pList = NULL;SListPushBack(&pList, 1);SListPushBack(&pList, 2);SListPushBack(&pList, 3);SListPushBack(&pList, 4);SListPushBack(&pList, 5);SListPushBack(&pList, 6);SListPrint(pList);SListPopBack(&pList);SListPopBack(&pList);SListPrint(pList);SListPopBack(&pList);SListPopBack(&pList);SListPopBack(&pList);SListPrint(pList);SListPopBack(&pList);SListPrint(pList);SListPopBack(&pList);SListPrint(pList);SListDestroy(&pList);
}void SListTest3()
{SListNode* pList = NULL;SListPushBack(&pList, 1);SListPushBack(&pList, 2);SListPushBack(&pList, 3);SListPushBack(&pList, 4);SListPushBack(&pList, 5);SListPushBack(&pList, 6);SListPrint(pList);SListPopFront(&pList);SListPopFront(&pList);SListPrint(pList);SListPopFront(&pList);SListPopFront(&pList);SListPopFront(&pList);SListPrint(pList);  SListPopFront(&pList);      SListPrint(pList);SListPopFront(&pList);       //没有结点SListPrint(pList);SListDestroy(&pList);
}void SListTest4()
{SListNode* pList = NULL;SListPushBack(&pList, 1);SListPushBack(&pList, 2);SListPushBack(&pList, 3);SListPushBack(&pList, 4);SListPushBack(&pList, 5);SListPushBack(&pList, 6);SListPrint(pList);SListNode* pos;pos = SListFind(pList, 3);SListPrint(pos);pos = SListFind(pList, 6);SListPrint(pos);pos = SListFind(pList, 8);SListPrint(pos);SListDestroy(&pList);
}void SListTest5()
{SListNode* pList = NULL;SListPushBack(&pList, 1);SListPushBack(&pList, 2);SListPushBack(&pList, 3);SListPushBack(&pList, 4);SListPushBack(&pList, 5);SListPushBack(&pList, 6);SListPrint(pList);SListNode* pos;pos = SListFind(pList, 1);if (pos != NULL){SListInsert(&pList, pos, -1);}SListPrint(pList);pos = SListFind(pList, 5);if (pos != NULL){SListInsert(&pList, pos, -5);}SListPrint(pList);pos = SListFind(pList, 10);if (pos != NULL){SListInsert(&pList, pos, -10);}SListPrint(pList);SListDestroy(&pList);}void SListTest6()
{SListNode* pList = NULL;SListPushBack(&pList, 1);SListPushBack(&pList, 2);SListPushBack(&pList, 3);SListPushBack(&pList, 4);SListPushBack(&pList, 5);SListPushBack(&pList, 6);SListPrint(pList);SListNode* pos;pos = SListFind(pList, 1);if (pos != NULL){SListErase(&pList, pos);}SListPrint(pList);pos = SListFind(pList, 5);if (pos != NULL){SListErase(&pList, pos);;}SListPrint(pList);pos = SListFind(pList, 10);if (pos != NULL){SListErase(&pList, pos);}SListPrint(pList);SListDestroy(&pList);
}void SListTest7()
{SListNode* pList = NULL;SListPushBack(&pList, 1);	SListPushBack(&pList, 2);	SListPushBack(&pList, 3);	SListPushBack(&pList, 4);	SListPushBack(&pList, 5);	SListPushBack(&pList, 6);	SListPrint(pList);SListNode* pos;pos = SListFind(pList, 1);if (pos != NULL){SListInsertAfter(pos, -1);}SListPrint(pList);	pos = SListFind(pList, 6);if (pos != NULL){SListInsertAfter(pos, -6);}SListPrint(pList);pos = SListFind(pList, 10);if (pos != NULL){SListInsertAfter(pos, -10);}SListPrint(pList);pos = SListFind(pList, -1);if (pos != NULL){SListEraseAfter(pos);}SListPrint(pList);pos = SListFind(pList, 5);if (pos != NULL){SListEraseAfter(pos);}SListPrint(pList);pos = SListFind(pList, -6);if (pos != NULL){SListEraseAfter(pos);}SListPrint(pList); SListDestroy(&pList);
}int main(void)
{//SListTest1();//SListTest2();//SListTest3();//SListTest4();//SListTest5();//SListTest6();SListTest7();return 0;
}
本章完.
相关文章:
数据结构: 线性表(无哨兵位单链表实现)
文章目录 1. 线性表的链式表示: 链表1.1 顺序表的优缺点1.2 链表的概念1.3 链表的优缺点1.4 链表的结构 2. 单链表的定义2.1 单链表的结构体2.2 接口函数 3. 接口函数的实现3.1 动态申请一个结点 (BuySListNode)3.2 单链表打印 (SListPrint)3.3 单链表尾插 (SListPushBack)3.4 …...

Exploring the Underlying Architecture of CSS3
引言 在现代的网页设计中,CSS(层叠样式表)起着至关重要的作用。CSS3作为最新的CSS标准,引入了许多令人兴奋的功能和特性。但是,要真正理解CSS3的底层架构实现原理,对于前端开发者来说,是非常重…...

方差分析||判断数据是否符合正态分布
方差分析练习题 练习学习笔记: (1) 标准差和标准偏差、均方差是一个东西。标准误差和标准误是一个东西。这两个东西有区别。 (2)单因素方差分析(MATLAB求解) (3)使用an…...

java linq多字段排序时间比较
public static void main(String[] args) {//100万条数据List<CrmInvestSaleUserCount> waitAssignUserList new ArrayList<>();for (int i 0; i < 1000000; i) {waitAssignUserList.add(new CrmInvestSaleUserCount().setSales_username("test" i…...

【c++】rand()随机函数的应用(二)——舒尔特方格数字的生成
目录 一、舒尔特方格简介 二、如何生成舒尔特方格 (一)线性同余法 1、利用线性同余法生成随机数序列的规律 (1) 当a和c选取合适的数时,可以生成周期为m的随机数序列 (2) 种子seed取值也是有周期的 2、利用线性同余法生成5阶舒尔特方格…...

“深入剖析JVM内部机制:探索Java虚拟机的运行原理“
标题:深入剖析JVM内部机制:探索Java虚拟机的运行原理 摘要:本文将深入探讨Java虚拟机(JVM)的内部机制,包括类加载、内存管理、垃圾回收、即时编译等关键概念和原理,帮助开发者更好地理解JVM的运…...

pandas 新增数据列的几种方式
准备数据 将下面的数据存到csv中 ymd,bWendu,yWendu,tianqi,fengxiang,fengli,aqi,aqiInfo,aqiLevel 2018-01-01,3℃,-6℃,晴~多云,东北风,1-2级,59,良,2 2018-01-02,2℃,-5℃,阴~多云,东北风,1-2级,49,优,1 2018-01-03,2℃,-5℃,多云,北风,1-2级,28,优,1 2018-01-04,0℃,-8℃…...
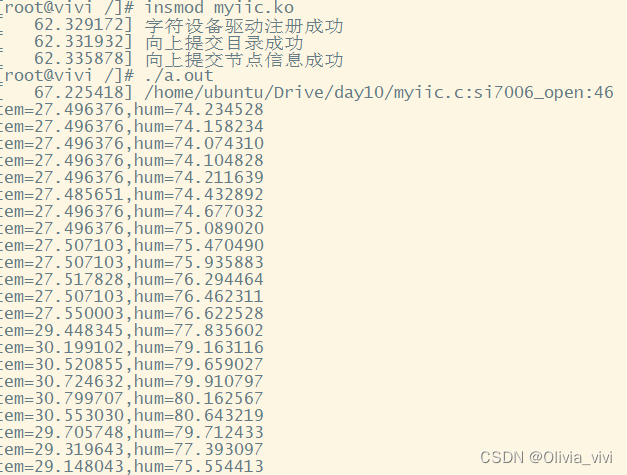
linux_驱动_iic总线获取si7006温湿度
应用层si7006.c #include<stdio.h> #include <sys/types.h> #include <sys/stat.h> #include <fcntl.h> #include <unistd.h> #include <stdlib.h> #include <string.h> #include <sys/ioctl.h> #include <arpa/inet.h>…...
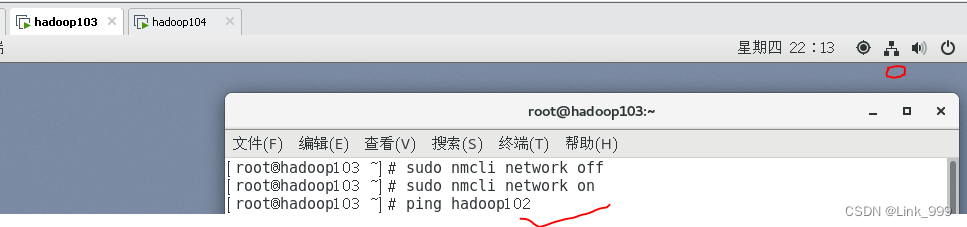
虚拟机网络图标不见了
有3台虚拟机之前正常运行的,有一天打开虚拟机发现2台虚拟机的网络连接图标不见了,也ping不通另外两台。 解决:在终端执行以下命令,即可ping通 [roothadoop103 ~]# sudo nmcli network off [roothadoop103 ~]# sudo nmcli network…...
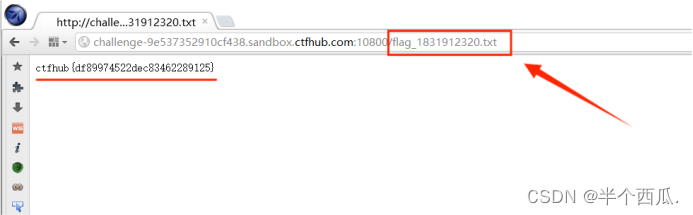
CTF:信息泄露.(CTFHub靶场环境)
CTF:信息泄露.(CTFHub靶场环境) “ 信息泄露 ” 是指网站无意间向用户泄露敏感信息,泄露了有关于其他用户的数据,例如:另一个用户名的财务信息,敏感的商业 或 商业数据 ,还有一些有…...
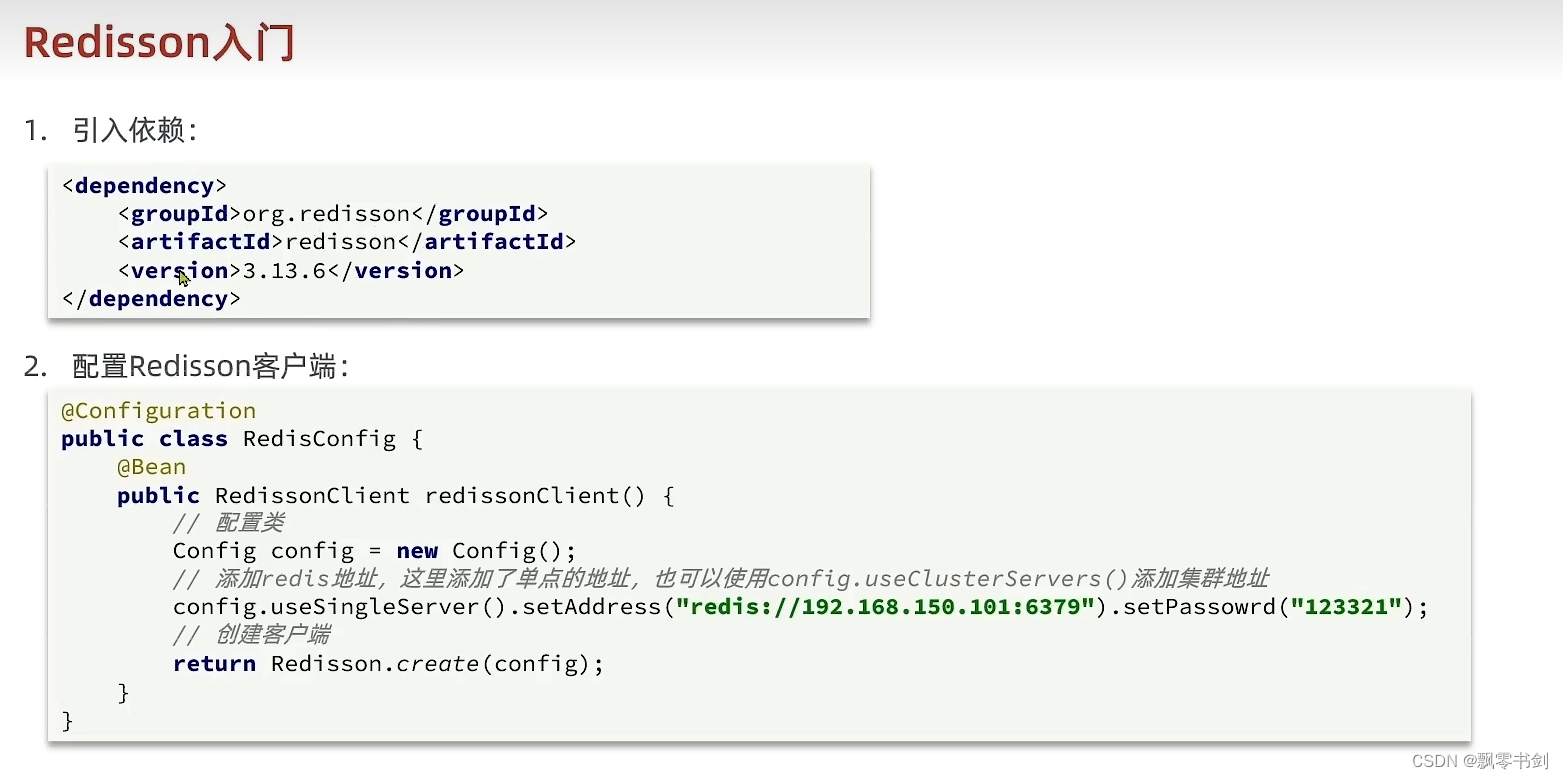
Redis学习总结
Redis学习总结 文章目录 Redis学习总结Radis基本介绍docker的安装基本数据结构通用命令字符型key的层次结构Hash类型Listset sortedset集合redis的java客户端jedis的使用jedis连接池的配置 SpringDataRedis自定义redistemplate的序列化与反序列化方式stringtemplate的使用 redi…...
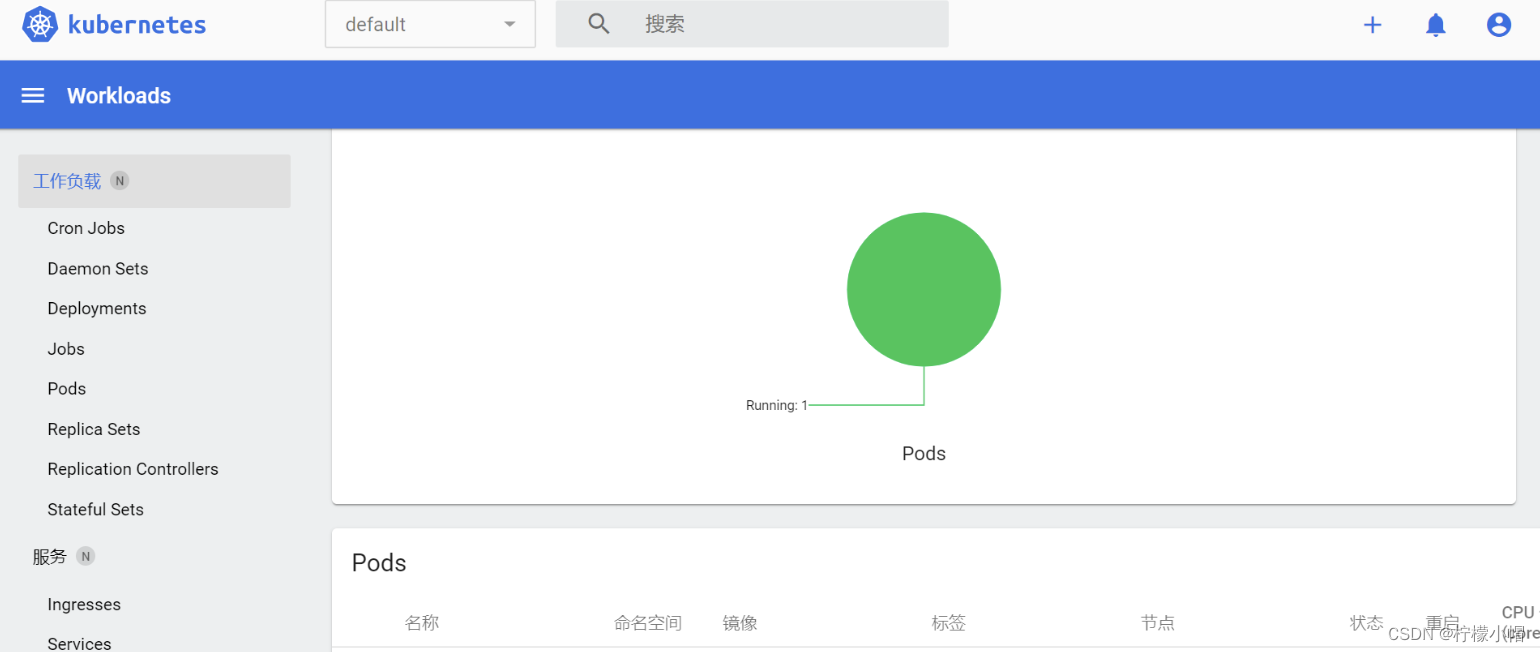
云原生全栈体系(二)
Kubernetes实战入门 第一章 Kubernetes基础概念 一、是什么 我们急需一个大规模容器编排系统kubernetes具有以下特性: 服务发现和负载均衡 Kubernetes 可以使用 DNS 名称或自己的 IP 地址公开容器,如果进入容器的流量很大,Kubernetes 可以负…...

C++设计模式之建造者设计模式
C建造者设计模式 什么是建造者设计模式 建造者设计模式是一种创建型设计模式,它是一种将复杂对象的分解为多个独立部分的模式,以便于构建对象的过程可以被抽象出来并独立变化。 该模式有什么优缺点 优点 灵活性:建造者设计模式允许对象的…...

HDFS Erasure coding-纠删码介绍和原理
HDFS Erasure coding-纠删码介绍和原理 三副本策略弊端Erasure Coding(EC)简介Reed- Solomon(RS)码 EC架构 三副本策略弊端 为了提供容错能力,hdfs回根据replication factor(复制因子)在不同的…...
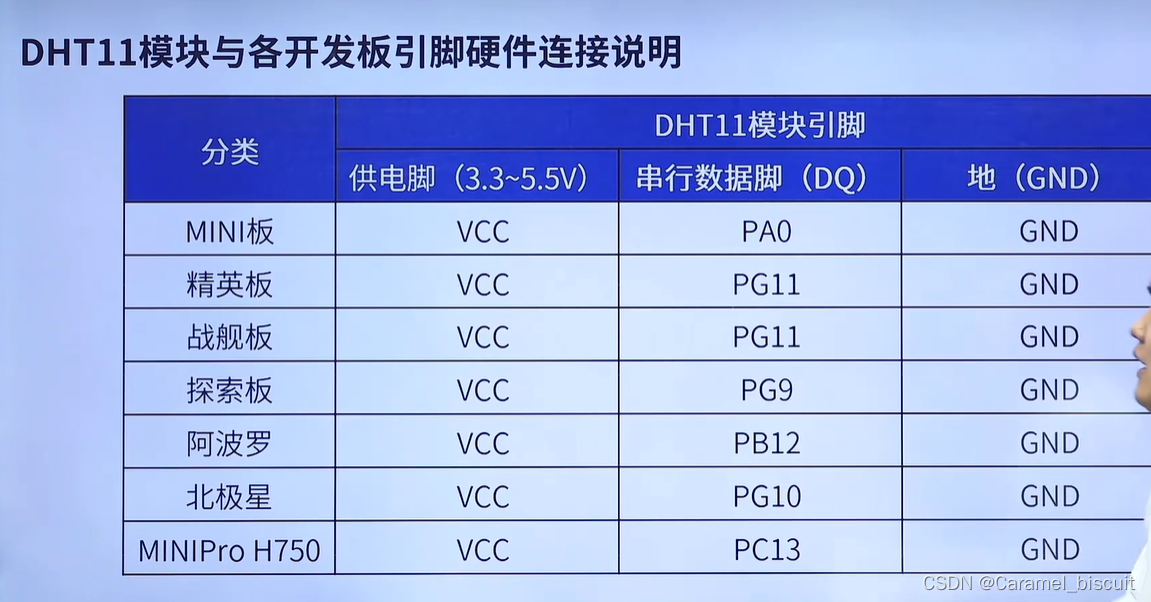
STM32 DHT11
DHT11 DHT11数字温湿度传感器是一款含有已校准数字信号输出的温湿度复合传感器。 使用单总线通信 该传感器包括一个电容式感湿元件和一个NTC测温元件,并于一个高性能8位单片机相连(模数转换)。 DHT11引脚说明 开漏模式下没有输出高电平的能…...

词法分析器
词法分析器 在早期编译1.0时代,我们的目标是完成程序语言到机器语言的翻译,所以重点在编译器前端,于是我们花费大量时间研究词法分析、语法分析、语义分析等内容。如今的本科编译原理课程,基本上也就到这一层面吧。 在编译2.0时…...

【Spring】Spring之启动过程源码解析
概述 我们说的Spring启动,就是构造ApplicationContext对象以及调用refresh()方法的过程。 Spring启动过程主要做了这么几件事情: 构造一个BeanFactory对象解析配置类,得到BeanDefinition,并注册到BeanFactory中 解析ComponentS…...
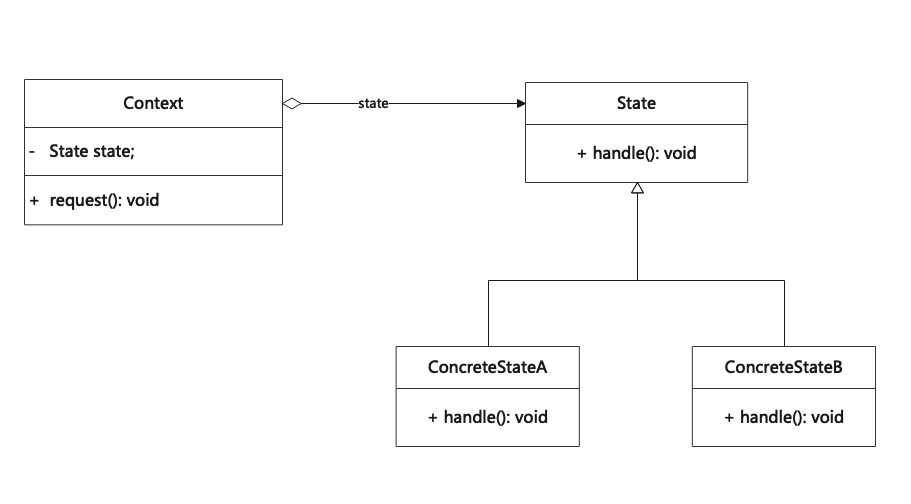
状态模式(State)
状态模式是一种行为设计模式,允许一个对象在其内部状态改变时改变它的行为,使其看起来修改了自身所属的类。其别名为状态对象(Objects for States)。 State is a behavior design pattern that allows an object to change its behavior when its inter…...

【uniapp】样式合集
1、修改uni-data-checkbox多选框的样式为单选框的样式 我原先是用的单选,但是单选并不支持选中后,再次点击取消选中;所以我改成了多选,然后改变多选样式,让他看起来像单选 在所在使用的页面上修改样式即可 <uni-d…...
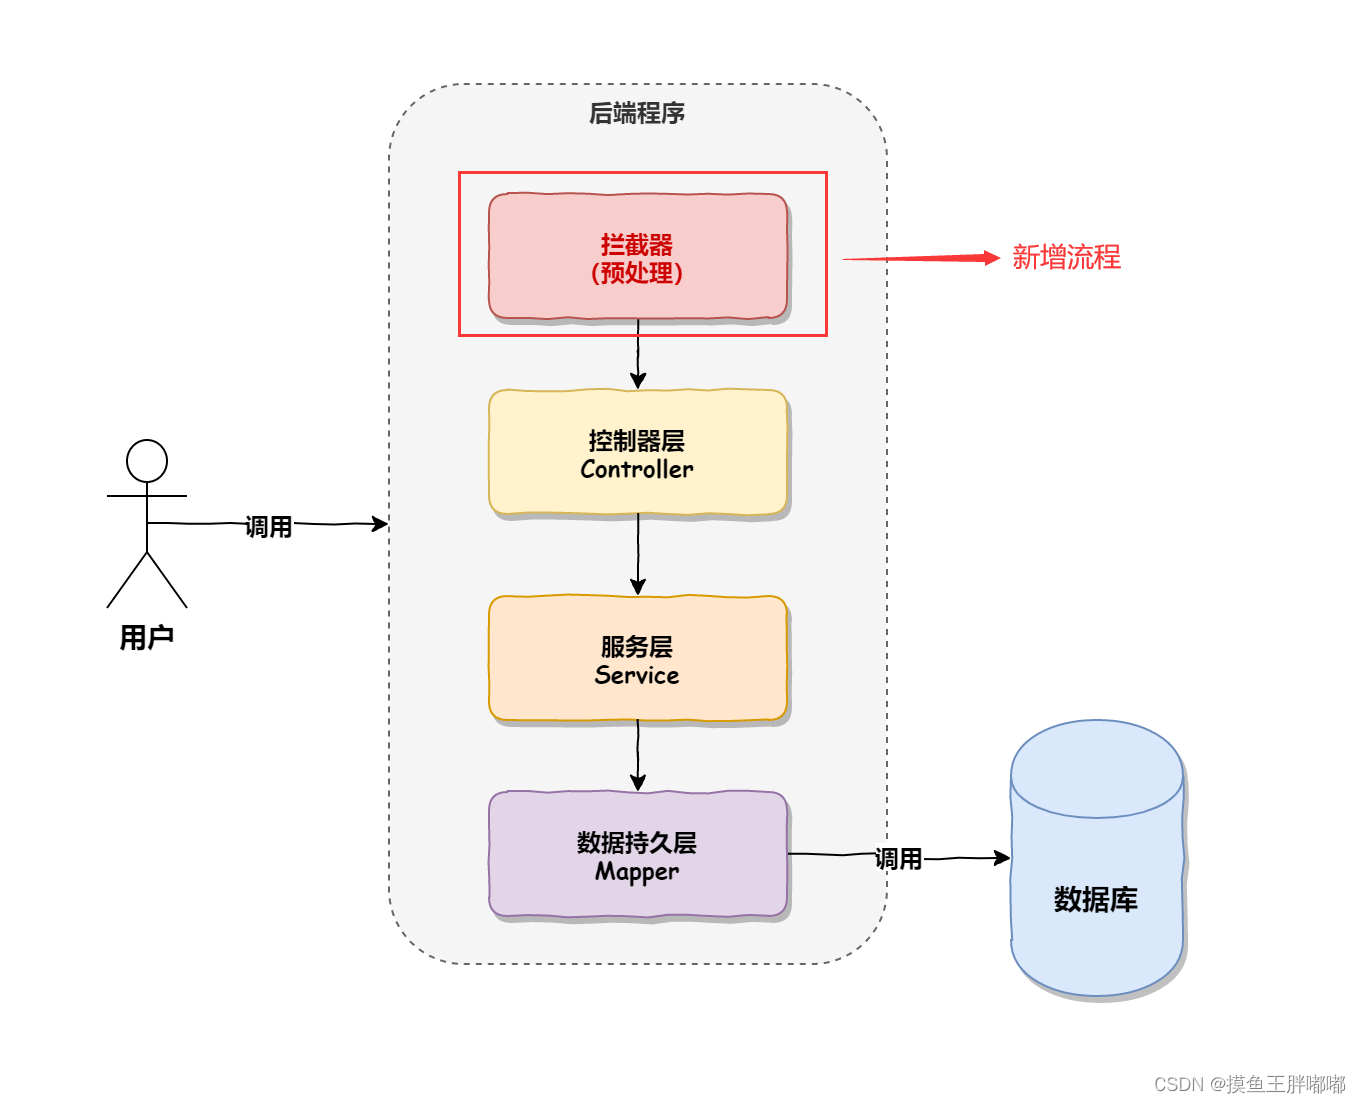
【Spring框架】SpringBoot统一功能处理
目录 用户登录权限校验用户登录拦截器排除所有静态资源练习:登录拦截器拦截器实现原理 统一异常处理统一数据返回格式为什么需要统⼀数据返回格式?统⼀数据返回格式的实现 用户登录权限校验 用户登录拦截器 1.自定义拦截器 package com.example.demo.…...

终极指南:detect-secrets架构设计与实现原理深度剖析
终极指南:detect-secrets架构设计与实现原理深度剖析 【免费下载链接】detect-secrets An enterprise friendly way of detecting and preventing secrets in code. 项目地址: https://gitcode.com/gh_mirrors/de/detect-secrets detect-secrets 是一款企业级…...

终极React Native Permissions测试与调试指南:从Jest模拟到真机调试的完整手册
终极React Native Permissions测试与调试指南:从Jest模拟到真机调试的完整手册 【免费下载链接】react-native-permissions An unified permissions API for React Native on iOS, Android and Windows. 项目地址: https://gitcode.com/gh_mirrors/re/react-nativ…...

【移动端知识,vw单位适配
移动端知识移动端不需要设置版心物料像素和css像素物料像素css像素物料像素和css像素的关系设计稿都是按物理像素给的,我们开发的时候要写css像素,所以要改总结实现移动端适配方案vw单位适配vw和vh的介绍一直占页面宽度和高度的一半移动端适配...

Mediapipe与Unity3D实时手部动作捕捉与驱动全流程解析
1. 从摄像头到虚拟手:Mediapipe基础配置 Mediapipe作为谷歌开源的跨平台多媒体机器学习框架,最让我惊艳的就是它的手部关键点检测能力。记得第一次跑通demo时,看着屏幕上实时追踪的21个手部关节点,那种"未来已来"的震撼…...

Webcamoid虚拟摄像头功能详解:如何在视频会议中应用特效
Webcamoid虚拟摄像头功能详解:如何在视频会议中应用特效 【免费下载链接】webcamoid Webcamoid is a full featured and multiplatform camera suite. 项目地址: https://gitcode.com/gh_mirrors/we/webcamoid Webcamoid是一款功能全面的跨平台摄像头套件&am…...

ASL-ML-Immersion时间序列预测:从数据探索到Keras建模的完整流程
ASL-ML-Immersion时间序列预测:从数据探索到Keras建模的完整流程 【免费下载链接】asl-ml-immersion This repos contains notebooks for the Advanced Solutions Lab: ML Immersion 项目地址: https://gitcode.com/gh_mirrors/as/asl-ml-immersion ASL-ML-I…...

实体链接与消歧:将文本提及映射到知识库实体的方法
点击 “AladdinEdu,你的AI学习实践工作坊”,注册即送-H卡级别算力,沉浸式云原生集成开发环境,80G大显存多卡并行,按量弹性计费,教育用户更享超低价。 一、引言 试想这样一个场景:我们阅读新闻时…...

为什么说“卷积永存”?从ViT到ConvNeXt,看FC-CLIP如何用卷积CLIP解决开放词汇分割的泛化难题
卷积神经网络在开放词汇分割中的复兴:FC-CLIP如何重新定义视觉骨干网络 当Transformer架构在计算机视觉领域掀起革命浪潮时,许多人预言卷积神经网络(CNN)的时代即将终结。然而,FC-CLIP的横空出世,用"C…...

佳能打印机报错5b00,1700,p07,e08这些错误解决方法,只需用清零软件清零即可修好了。
下载:点这里下载 备用下载:https://pan.baidu.com/s/1WrPFvdV8sq-qI3_NgO2EvA?pwd0000 常见型号如下: G系列 G1000、G1100、G1200、G1400、G1500、G1800、G1900、G1010、G1110、G1120、G1410、G1420、G1411、G1510、G1520、G1810、G1820、…...

【VsCode】告别配置焦虑:一文详解MSVC cl.exe编译C++的完整工作流
1. 为什么选择MSVC cl.exe编译C? 很多刚接触C开发的朋友都会遇到一个灵魂拷问:明明装了Visual Studio,为什么还要折腾VsCode?更让人头大的是,明明电脑里就有现成的MSVC编译器,却总是习惯性去下载MinGW。作为…...