【RealTek sdk-3.4.14b】Realtek WiFi开发调试指令总结
格式说明
RTL8192cd 驱动程序提供 MIB 接口,可通过“iwpriv”命令获取/设置参数。
set_mib
iwpriv set_mib name=value1[,value2,value3…]”
Iface: “wlan0”
value:
1.值可以是单个字段,也可以是用“,”分隔的多个字段,字段之间没有任何空格
2.如果值是字节数组的类型,则值的格式将是 0~f 的 ASCII 字符串,其中使用 2 ASCII 代表一个字节。
例如,设置WiFi path A的CCK的TXPower
iwpriv wlan0 set_mib pwrlevelCCK_A=08080909090a0a0a0a0b0b0b0c0c
说明:后面表示1~14信道的功率索引值,08表示信道1的
get_mib
iwpriv get_mib name
Iface: “wlan0”
Channel
获取channel
指令
iwpriv wlan0 get_mib channel
5G
# iwpriv wlan0 get_mib channel
wlan0 get_mib:40
2.4G
# iwpriv wlan1 get_mib channel
wlan1 get_mib:11
channel
2.4G指令
iwpriv wlan1 set_mib channel=1
设置之后读取
/# iwpriv wlan1 get_mib channel
wlan1 get_mib:1
注意:
此时只是设置到mib区了,并未实际生效,要生效需要将接口down up下,指令如下
ifconfig wlan1 down up
信道范围·1~14
5G指令
iwpriv wlan0 set_mib channel=36
设置之后读取
iwpriv wlan0 get_mib channel
wlan0 get_mib:36
信道范围36~165
ch_low/ch_hi
自动信道选择允许选择的最低信道和最高信道,默认值为0表示不限制
获取2.4G默认值
iwpriv wlan1 get_mib ch_low
wlan1 get_mib:0 0 0 0
iwpriv wlan1 get_mib ch_hi
wlan1 get_mib:0 0 0 0
设置2.4G
iwpriv wlan1 set_mib ch_low=1
iwpriv wlan1 set_mib ch_hi=1
备注:
为了测试方便,我们将自动选择限制为1信道,方便查看指令是否生效
设置之后测试
ifconfig wlan1 down up
查看获取信道为1
获取5G默认值
iwpriv wlan0 get_mib ch_low
wlan0 get_mib:0 0 0 0
iwpriv wlan0 get_mib ch_hi
wlan0 get_mib:0 0 0 0
设置5G
iwpriv wlan0 set_mib ch_low=36
iwpriv wlan0 set_mib ch_hi=36
设置之后测试
ifconfig wlan0 down up
查看获取信道为36
preamble
CCK preamble 类型 0: long preamble 1:short preamble
获取指令
iwpriv wlan1 get_mib preamble
wlan1 get_mib:1 0 0 0
设置指令
iwpriv wlan1 set_mib preamble=1
ifconfig wlan1 down up
disable_ch14_ofdm
禁用通道 14 中的 OFDM 发送和接收。它还将阻止自动通道选择 ch14。
value=0 表示disable
value=1 表示enable
获取指令
iwpriv wlan1 get_mib disable_ch14_ofdm
wlan1 get_mib:0 0 0 0
设置指令
iwpriv wlan1 set_mib disable_ch14_ofdm=1
ifconfig wlan1 down up
disable_ch1213
禁止自动信道选择到ch12 和ch13
0:enable
1:disable
获取指令
iwpriv wlan1 get_mib disable_ch1213
wlan1 get_mib:1 0 0 0
设置指令
enable
iwpriv wlan1 set_mib disable_ch1213=1
ifconfig wlan1 down up
disable
iwpriv wlan1 set_mib disable_ch1213=0
ifconfig wlan1 down up
pa_type
支持8812不同的PA类型
0 – skyworth-5022
1 – RFMD-4501 / skyworth-85703
2 – SKYWORKS_5023
3 – RTC5634
16 – Internal PA
获取指令
iwpriv wlan0 get_mib pa_type
设置指令
iwpriv wlan0 set_mib pa_type=0
xcap
晶体电容值
0~62(0x3E),0 表示未校准
获取指令
iwpriv wlan0 get_mib xcap
wlan0 get_mib:61 0 0 0
iwpriv wlan1 get_mib xcap
wlan1 get_mib:0 0 0 0
设置指令
iwpriv wlan1 set_mib xcap=61
iwpriv wlan1 get_mib xcap
wlan1 get_mib:61 0 0 0
备注:
一般都是生产写入,不要随便修改这个参数,可能会导致wifi连接不上
tssi1/tssi2
Tx 信号强度,tssi1表示Path A tssi2表示Path B,0~255,0表示未校准
获取指令
iwpriv wlan1 get_mib tssi1
wlan1 get_mib:0 0 0 0
iwpriv wlan1 get_mib tssi2
wlan1 get_mib:0 0 0 0
iwpriv wlan0 get_mib tssi1
wlan0 get_mib:0 0 0 0
iwpriv wlan0 get_mib tssi2
wlan0 get_mib:0 0 0 0
设置指令
iwpriv wlan1 set_mib tssi1=23
iwpriv wlan1 set_mib tssi2=23
iwpriv wlan0 set_mib tssi1=23
iwpriv wlan0 set_mib tssi2=23
iwpriv wlan0 get_mib tssi1
wlan0 get_mib:23 0 0 0
iwpriv wlan0 get_mib tssi2
wlan0 get_mib:23 0 0 0
iwpriv wlan1 get_mib tssi1
wlan1 get_mib:23 0 0 0
iwpriv wlan1 get_mib tssi2
wlan1 get_mib:23 0 0 0
ther
温度值,0表示未校准
范围:
For 8188C/8192C/8192D: 7 < ther <= 0x1d
Others: 7 < ther <= 0x32
获取指令
iwpriv wlan0 get_mib ther
wlan0 get_mib:30 0 0 0
iwpriv wlan1 get_mib ther
wlan1 get_mib:25 0 0 0
设置指令
iwpriv wlan0 set_mib ther=0x1e或者iwpriv wlan0 set_mib ther=30
iwpriv wlan1 set_mib ther=0x15或者iwpriv wlan1 set_mib ther=21
支持10进制和16进制设置
MIMO_TR_mode
MIMO模式分配
1 – 1T2R, 3 – 2T2R, 4 – 1T1R
获取指令
iwpriv wlan0 get_mib MIMO_TR_mode
wlan0 get_mib:3 0 0 0
iwpriv wlan1 get_mib MIMO_TR_mode
wlan1 get_mib:3 0 0 0
设置指令
iwpriv wlan0 set_mib MIMO_TR_mode=3
iwpriv wlan1 set_mib MIMO_TR_mode=3
tx2path
Enable tx using 2 path to send 1T rate
获取指令
iwpriv wlan0 get_mib tx2path
wlan0 get_mib:1 0 0 0
iwpriv wlan1 get_mib tx2path
wlan1 get_mib:1 0 0 0
设置指令
iwpriv wlan0 set_mib tx2path=1
iwpriv wlan1 set_mib tx2path=1
bcn2path
Enable 2 path to send beacon
获取指令
iwpriv wlan1 get_mib bcn2path
wlan1 get_mib:0
iwpriv wlan0 get_mib bcn2path
wlan0 get_mib:0
设置指令
iwpriv wlan0 set_mib bcn2path=1
iwpriv wlan1 set_mib bcn2path=1
acs_type
自动信道选择算法
0 – check numbers of APs to select a clear channel
1 – check numbers of APs, receiving traffic, false alarm counters to select a clear channel
获取指令
iwpriv wlan0 get_mib acs_type
iwpriv wlan1 get_mib acs_type
设置指令
iwpriv wlan0 set_mib acs_type=1
iwpriv wlan1 set_mib acs_type=0
add_cck1M_pwr
增加CCK 1M速率的功率值
0 – disable,
Other – the power added to CCK 1M in unit of power level
获取指令
iwpriv wlan0 get_mib add_cck1M_pwr
wlan0 get_mib:0
设置指令
iwpriv wlan0 set_mib add_cck1M_pwr=1
ssid
设置wifi SSID 最大32个字符
获取指令
iwpriv wlan0 get_mib ssid
设置指令
iwpriv wlan0 set_mib ssid="aaaa-test"
bcnint
设置beacon间隔单位ms,默认值100ms
范围20~1024
获取指令
iwpriv wlan0 get_mib bcnint
wlan0 get_mib:100 0 0 0
iwpriv wlan1 get_mib bcnint
wlan1 get_mib:100 0 0 0
设置指令
iwpriv wlan0 set_mib bcnint=200
iwpriv wlan0 set_mib bcnint=200
dtimperiod
DTIM period
1~255,默认1
获取指令
iwpriv wlan0 get_mib dtimperiod
wlan0 get_mib:1 0 0 0
iwpriv wlan1 get_mib dtimperiod
wlan1 get_mib:1 0 0 0
设置指令
iwpriv wlan0 set_mib dtimperiod=2
iwpriv wlan1 set_mib dtimperiod=2
swcrypto
S/w encryption enabled/disabled
0 – disable, 1 – enable
获取指令
iwpriv wlan0 get_mib swcrypto
iwpriv wlan1 get_mib swcrypto
设置指令
iwpriv wlan0 set_mib swcrypto=1
iwpriv wlan1 set_mib swcrypto=1
aclmode/aclnum/acladdr
aclmode
Access control mode 0 – disable, 1 – accept, 2 – deny
aclnum
Set number of ACL Suggest set ‘0’ whenever driver is re-initialized
acladdr
Set access control address xxxxxxxxxxxx (12 digits mac address) When acl is added, the aclnum will be increased automatically
oprates
Operational rates
Bit0-bit11 for 1,2,5.5,11,6,9,12,18,24,,36,48,54 M
默认值0xfff
获取指令
iwpriv wlan1 get_mib oprates
wlan1 get_mib:255 15 0 0
iwpriv wlan0 get_mib oprates
wlan0 get_mib:240 15 0 0
设置指令
iwpriv wlan0 set_mib oprates=0xfff
iwpriv wlan1 set_mib oprates=0xfff
basicrates
Basic rates
Bit0-bit11 for 1,2,5.5,11,6,9,12,18,24,,36,48,54 M
默认值0xf
获取指令
iwpriv wlan0 get_mib basicrates
wlan0 get_mib:15 0 0 0
iwpriv wlan1 get_mib basicrates
wlan1 get_mib:15 0 0 0
设置指令
iwpriv wlan0 set_mib basicrates=0xf
iwpriv wlan1 set_mib basicrates=0xf
regdomain
Regulation domain
1-15 (FCC, IC, ETSI, SPAIN, FRANCE, MKK, ISREAL, MKK1, MKK2, MKK3, NCC, RUSSIAN, CN, GLOBAL, WORLD-WIDE)
获取指令
iwpriv wlan1 get_mib regdomain
wlan1 get_mib:3 0 0 0
iwpriv wlan0 get_mib regdomain
wlan0 get_mib:3 0 0 0
设置指令
iwpriv wlan0 set_mib regdomain=3
iwpriv wlan1 set_mib regdomain=3
txpwr_lmt_index
Set specific region domain for tx power limit
0 – use mib regdomain for tx power limit,
Other – the specific region domain index for tx power limit
获取指令
iwpriv wlan0 get_mib txpwr_lmt_index
wlan0 get_mib:0 0 0 0
iwpriv wlan1 get_mib txpwr_lmt_index
wlan1 get_mib:0 0 0 0
设置指令
iwpriv wlan0 set_mib txpwr_lmt_index=0
iwpriv wlan1 set_mib txpwr_lmt_index=0
autorate
Auto rate adaptive
获取指令
iwpriv wlan0 get_mib autorate
wlan0 get_mib:1 0 0 0
iwpriv wlan1 get_mib autorate
wlan1 get_mib:1 0 0 0
设置指令
iwpriv wlan0 set_mib autorate=1
iwpriv wlan1 set_mib autorate=1
txforce
设置固定TX速率为固定速率。
指令
iwpriv wlan0 set txforce=11
取值说明:0~11 for rate 1, 2, 5.5, 11, 6, 9, 12, 18, 24, 36, 48, 54M;
12~27 for rate MCS0, MCS1, …, MCS15;
这个命令设置完之后会立即生效,不需要对wlan0进行down up操作
fixrate
Fixed Tx rate,Refer when auto rate is disabled
Bit0-bit11 for 1,2,5.5,11,6,9,12,18,24,,36,48,54 M
Bit12-Bit27 for MCS0,MCS1,…,MCS15
(Bit31 + 0) for NSS1-MCS0
(Bit31 + 1) for NSS1-MCS1
(Bit31 + 2) for NSS1-MCS2…
(Bit31 + 10) for NSS2-MCS0
(Bit31 + 11) for NSS2-MCS1
(Bit31 + 12) for NSS2-MCS2
设置TX为固定速率。
iwpriv wlan0 set fixrate=0x08000000 //mcs15
这个命令设置完之后不会立即生效,需要对wlan0进行down up操作之后才能生效。另外设置fixrate之前需要使用iwpriv wlan0 set_mib autorate=0把autorate关闭。
获取指令
iwpriv wlan0 get_mib fixrate
wlan0 get_mib:0 0 0 0
iwpriv wlan1 get_mib fixrate
wlan1 get_mib:0 0 0 0
设置指令
iwpriv wlan0 set_mib fixrate=0xf
iwpriv wlan1 set_mib fixrate=0xf
disable_protection
orcedly disable protection mode
0 – auto, 1 – disable protection
Normally when 11g is used, driver will auto detect if legacy (11b) device is existed. When 11n is used, driver will auto detect if legacy (11b/g) device is existed. If yes, it will enable protection mode automatically.
获取指令
iwpriv wlan0 get_mib disable_protection
wlan0 get_mib:1 0 0 0
iwpriv wlan1 get_mib disable_protection
wlan1 get_mib:1 0 0 0
设置指令
iwpriv wlan0 set_mib disable_protection=1
iwpriv wlan1 set_mib disable_protection=1
disable_olbc
Forcedly OLBC detection
0 – auto, 1 – disable protection
Normally 11g AP should detect OLBC. If disabled, AP will enter protection mode only when legacy device associated.
deny_legacy
Deny the association from legacy STA for corresponding band
1 – 11b, 2 – 11g, 4 – 11a, 8 – 11n
Set the corresponding legacy band of STA to deny
prob_info_enable
Enable wlan driver to collect probe request information
0 – disable, 1 – enable
cat /proc/wlan0/probe_in fo to see the collect results
fast_roaming
Client mode fast roaming
0 – disable, 1 – enable
lowestMlcstRate
Use lowest basic rate to send multicast and broadcast
0 – disable Bit0-bit11 for 1,2,5.5,11,6,9,12,18,24,,36,48,54 M
Bit12-Bit27 for MCS0,MCS1,…,MCS15
stanum
Limit max associated sta number
0-32. 0 – disable (not limit).
获取指令
iwpriv wlan0 get_mib stanum
iwpriv wlan1 get_mib stanum
设置指令
iwpriv wlan0 set_mib stanum=16
iwpriv wlan0 set_mib stanum=16
802_1x
Flag of using 802.1x
0 disable 1 enable
When 802.1x is enabled, the Auth daemon must be invoked
获取指令
iwpriv wlan0 get_mib 802_1x
iwpriv wlan1 get_mib 802_1x
设置指令
iwpriv wlan0 set_mib 802_1x=0
iwpriv wlan0 set_mib 802_1x=0
hiddenAP
Hidden AP enable/disable
0 disabled 1 enabled
获取指令
iwpriv wlan0 get_mib hiddenAP
wlan0 get_mib:0 0 0 0
iwpriv wlan1 get_mib hiddenAP
wlan1 get_mib:0 0 0 0
设置指令
iwpriv wlan0 set_mib hiddenAP=1
iwpriv wlan1 set_mib hiddenAP=1
rtsthres/fragthres
rtsthres
RTS threshold
0-2347 default 2347
fragthres
Fragment threshold
256-2346 default 2346
shortretry/longretry
shortretry
Short retry limit 0-255
0 When set to 0, driver choose appropriate retry limit itself
longretry
Long retry limit 0-255 0 When set to 0, driver choose appropriate retry limit itself
expired_time
Client inactivity time in 10ms
>100 30000 Time unit is 10 ms.
获取指令
iwpriv wlan0 get_mib expired_time
wlan0 get_mib:48 117 0 0
iwpriv wlan1 get_mib expired_time
wlan1 get_mib:48 117 0 0
设置指令
iwpriv wlan0 set_mib expired_time=30000
iwpriv wlan0 set_mib expired_time=30000
block_relay
Block packet relaying between associated clients
0 – relay, 1 – block relay and drop, 2 – block relay and indicate to bridge
获取指令
iwpriv wlan0 get_mib block_relay
wlan0 get_mib:0 0 0 0
iwpriv wlan1 get_mib block_relay
wlan1 get_mib:0 0 0 0
设置指令
iwpriv wlan0 set_mib block_relay=1
iwpriv wlan1 set_mib block_relay=1
deny_any
Deny the association SSID of “any” including upper and lower cases
0 – disable, 1 – enable
crc_log
Calculate CRC error packets
0 – disable, 1 – enable
wifi_specific
Do WiFi logo test specific check
0 – disable, 1 – enable, 2 – auto 2
0 for performance mode;
1 for WiFi mode,
2 for auto mode.
PS. For 8192DR 1x1 concurrent mode and 8188E, please set 1 to pass WiFi logo test.
disable_txsc/disable_rxsc/disable_brsc
disable_txsc
Tx shortcut enable/disable
0 – enable, 1 – enable
disable_rxsc
Rx shortcut enable/disable
0 – enable, 1 – enable
disable_brsc
Bridge shortcut enable/disable
0 – enable, 1 – enable
band
Band selection
1 – 11b, 2 – 11g, 4 – 11a, 8 – 11n 64 – 11ac
vap_enable
Tell driver if multiple AP function is enabled or disabled
0 – disable, 1 – enable
If multiple AP is enabled, this mib must be set to 1.
func_off
Temporary disable wlan function
0 – normal, 1 – wlan off
Qos相关
qos_enable
Support WMM and QoS
0 – disable, 1 – enable
apsd_enable
Support WMM APSD function
0 – disable, 1 – enable
apsd_sta_be
Enable client mode BE queue
0 – disable, 1 – enable
This mid is only valid when apsd_enable is 1(enable)
apsd_sta_bk
Enable client mode BK queue
0 – disable, 1 – enable This mid is only valid when apsd_enable is 1(enable)
apsd_sta_vi
Enable client mode VI queue
0 – disable, 1 – enable
This mid is only valid when apsd_enable is 1(enable)
apsd_sta_vo
Enable client mode VO queue
0 – disable, 1 – enable
This mid is only valid when apsd_enable is 1(enable)
supportedmcs
Supported MCS rates Bit 0-15 for MCS0, …, MCS15
0xffff
basicmcs
Basic MCS rates Bit 0-15 for MCS0, …, MCS15
use40M
Support 40M bandwidth in 11n mode
0 – 20M 1 – 40M 2 -80M
2ndchoffset
Control sideband offset
1 – secondary channel is below the primary channel,
2 – secondary channel is above the primary channel 1
shortGI20M
Support short GI in 20M bandwidth
0 – disable, 1 – enable
shortGI40M
Support short GI in 40M bandwidth
0 – disable, 1 – enable
stbc
Support Space Time Block Coding
0 – disable, 1 – enable
ldpc
Enable ldpc
0 – disable, 1 – enable
ampdu
Support packet aggratation
0 – disable, 1 – enable
coexist
Support 20M/40M coexistant mode
0 – disable, 1 – enable
debug_err
Flag of DEBUG_ERR() macro
Bit value defined in 8185ag_debug.h (in hex) ffffffff
debug_info
Flag of DEBUG_INFO() macro
Bit value defined in 8185ag_debug.h (in hex) 0
debug_warn
Flag of DEBUG_WARN() macro
Bit value defined in 8185ag_debug.h (in hex) 0
debug_trace
Flag of DEBUG_TRACE() macro
Bit value defined in 8185ag_debug.h (in hex) 0
NUM_TX_DESC
8192cd_cfg.h
#define NUM_TX_DESC 2176 //512 // kmalloc max size issue
CE认证测试
2.4G
iwpriv wlan1 set_mib adaptivity_enable=1
iwpriv wlan1 set_mib manual_edca=1
iwpriv wlan1 set regdomain=13
Ifconfig wlan1 down up
5G
iwpriv wlan0 set_mib adaptivity_enable=1
iwpriv wlan0 set_mib manual_edca=1
iwpriv wlan0 set regdomain=13
Ifconfig wlan0 down up
开启dbg
echo dbg 0 1 > /proc/wlan0/cmd // dig odfm debug
修改dig
iwpriv wlan0 set_mib original_dig_restore=0
0 :开启tdma_dig
1 :关闭tdma_dig
使用iwpriv wlan0 set_mib rssi_dump=1可以看到输出
[1] 45% tx VHT NSS2 7s rx VHT NSS2 2 (ss 23 24) (FA CCK 0 0 OFDM 852 80)(CCA 2198 180)(LIG 0x2a,HIG 0x4e)(TP 0,0)
LIG:远距离
HIG:近距离
iwpriv wlan0 set_mib dig_enable=1// 关闭 DIG
read DIG- 92Eiwpriv wlan0 read_reg b,c50siwpriv wlan0 read_reg b,c58- 8812ARiwpriv wlan0 read_reg b,c50iwpriv wlan0 read_reg b,e50- 8814ARiwpriv wlan0 read_reg b,c50iwpriv wlan0 read_reg b,e50iwpriv wlan0 read_reg b,1A50iwpriv wlan0 read_reg b,1850- write DIG- 89ESiwpriv wlan0 write_reg b,c50,20 - 92ESiwpriv wlan0 write_reg b,c50,20iwpriv wlan0 write_reg b,c58,20- 8812ARiwpriv wlan0 write_reg b,c50,2aiwpriv wlan0 write_reg b,e50,2a- 8814ARiwpriv wlan0 write_reg b,c50,30iwpriv wlan0 write_reg b,e50,30iwpriv wlan0 write_reg b,1A50,30iwpriv wlan0 write_reg b,1850,30   - DIG Related Registers- N-Series:Path-A IGI = RegC50[6:0]Path-B IGI = RegC58[6:0]CCK FA     = (RegA58[31:24]<<8) | RegA5C[7:0]OFDM FA    = RegCF0[15:0]RegCF0[31:16]RegDA0[31:16]RegDA4[15:0]RegDA4[31:16]RegDA8[15:0]- AC-Series:Path-A IGI = RegC50[6:0]Path-B IGI = RegE50[6:0]CCK FA     = RegA5C[15:0]OFDM FA    = RegF48[15:0]
配置mimo多路方法
iwpriv wlan0 mimo 0
1: switch to 1T1R
2: switch to 2T2R
3: switch to 3T3R
0: auto
countrycode和countrystr
iwpriv wlan0 set_mib countrycode=1
iwpriv wlan0 set_mib countrystr=CN
第一条命令是设置countrycode的使能状态,1为使能
后面那条命令为设置具体的国家码,2个字符
at_ss
触发扫描周边wifi
iwpriv wlan0 at_ss
iwpriv wlan1 at_ss
sleep 7 //需要休眠7s等待wifi扫描完成
查看扫描结果
cat /proc/wlan0/SS_Result
cat /proc/wlan1SS_Result
rssi_dump
设置周期性调试信息输出的时间间隔
Iwpriv wlan0 set_mib rssi_dump =1
0~ 100,单位为秒
0为关闭周期性输出的调试信息,否则周期性输出调试信息。
参考链接:
开发调试指令大全--(realtek开发调试命令)_珞珈琉璃的博客-CSDN博客
相关文章:

【RealTek sdk-3.4.14b】Realtek WiFi开发调试指令总结
格式说明 RTL8192cd 驱动程序提供 MIB 接口,可通过“iwpriv”命令获取/设置参数。 set_mib iwpriv set_mib namevalue1[,value2,value3…]” Iface: “wlan0” value: 1.值可以是单个字段,也可以是用“,”分隔的多个字段,字…...

基于Vue 的文本类弹框代码Demo
<template><div class"text-popup" v-if"showPopup"><h2>{{ title }}</h2><p>{{ content }}</p><button click"closePopup">关闭</button></div><div class"main-content"&…...

2023.08.01 驱动开发day8
驱动层 #include <linux/init.h> #include <linux/module.h> #include <linux/of.h> #include <linux/of_irq.h> #include <linux/interrupt.h> #include <linux/fs.h> #include <linux/gpio.h> #include <linux/of_gpio.h>#…...

计算机视觉--距离变换算法的实战应用
前言: Hello大家好,我是Dream。 计算机视觉CV是人工智能一个非常重要的领域。 在本次的距离变换任务中,我们将使用D4距离度量方法来对图像进行处理。通过这次实验,我们可以更好地理解距离度量在计算机视觉中的应用。希望大家对计算…...
MIT 6.824 -- MapReduce -- 01
MIT 6.824 -- MapReduce -- 01 引言抽象和实现可扩展性可用性(容错性)一致性MapReduceMap函数和Reduce函数疑问 课程b站视频地址: MIT 6.824 Distributed Systems Spring 2020 分布式系统 推荐伴读读物: 极客时间 – 大数据经典论文解读DDIA – 数据密集型应用大数据相关论文…...

概念解析 | 利用IAA迭代自适应方法实现高精度角度估计
利用IAA迭代自适应方法实现高精度角度估计 注1:本文系“概念辨析”系列之一,致力于简洁清晰地解释、辨析复杂而专业的概念。本次辨析的概念是:IAA迭代自适应方法在雷达角度估计中的应用。 背景介绍 在雷达目标检测与定位中,准确估计目标角度是实现高精度定位的关键。传统的基于…...

正则表达式必知必会
文章目录 前言匹配单个字符匹配任意字符匹配一组字符取非匹配元字符匹配数字匹配所有字母和数字匹配空白字符重复匹配避免过度匹配边界匹配字符串边界子表达式回溯引用回溯引用中的替换操作向前查找向后查找 前言 在工作中使用正则表达式可以提高我们的效率,这篇博…...

[SQL系列] 从头开始学PostgreSQL 分库分表
什么是分库分表 分库分表是一种数据库架构设计的方法,用于应对大规模数据的存储和查询。当单个数据库的存储容量或查询性能无法满足需求时,可以通过将数据分散存储在多个数据库服务器上,以提高系统的可扩展性和性能。 分库分表通常包…...

【VScode】Remote-SSH XHR failed无法访问远程服务器
问题概述 当使用VScode连接远程服务器时,往往需要使用Remote-SSH这个插件。而该插件有一个小bug,当远程服务器网络不佳时容易出现。 在控制台会出现下述语句: Resolver error: Error: XHR failed at y.onerror (vscode-file://vscode-app/…...

pycharm打开terminal报错
Pycharm打开终端报错如何解决?估计是终端启动conda不顺利,需要重新设置路径。参考以下文章的做法即可。 Windows下Pycharm中Terminal无法进入conda环境和Python Console 不能使用 给pycharm中Terminal 添加新的shell,才可以使用conda环境 W…...
C#与C/C++交互(1)——需要了解的基础知识
【前言】 C#中用于实现调用C/C的方案是P/Invoke(Platform Invoke),让托管代码可以调用库中的函数。类似的功能,JAVA中叫JNI,Python中叫Ctypes。 常见的代码用法如下: [DllImport("Test.dll", E…...

LeetCode笔记:Weekly Contest 356
LeetCode笔记:Weekly Contest 356 1. 题目一 1. 解题思路2. 代码实现 2. 题目二 1. 解题思路2. 代码实现 3. 题目三 1. 解题思路2. 代码实现 4. 题目四 1. 解题思路2. 代码实现 比赛链接:https://leetcode.com/contest/weekly-contest-356/ 1. 题目一…...

2 Python的基础语法
概述 在上一节的内容中,我们介绍了Python的诞生、发展历程、特色、缺点和应用领域。从本节开始,我们将正式学习Python。Python是一门简洁和优雅的语言,有自己特殊的一些语法规则。因此,在介绍Python编程的有关知识之前,…...

抖音seo矩阵系统源代码开发搭建技术分享
抖音SEO矩阵系统是一个较为复杂的系统,其开发和搭建需要掌握一定的技术。以下是一些技术分享: 技术分享 抖音SEO矩阵系统的源代码可以使用JAVA、Python、PHP等多种语言进行开发。其中,JAVA语言的应用较为广泛,因为JAVA语言有良好…...

python#django数据库一对一/一对多/多对多
一对一OneToOneField 用户和用户信息 搭建 # 一对一 class TestUser(models.Model): usernamemodels.CharField(max_length32) password models.CharField(max_length32) class TestInfo(models.Model): mick_namemodels.CharField(max_length32) usermode…...

记RT-Thread rt_timer_start函数的问题
我使用的RT-Thread版本为4.0.3。 我看了5.0.1的代码,此问已经被修复。 在4.0.3版本中的rt_timer_start函数源码如下: rt_err_t rt_timer_start(rt_timer_t timer) {unsigned int row_lvl;rt_list_t *timer_list;register rt_base_t level;rt_list_t *r…...
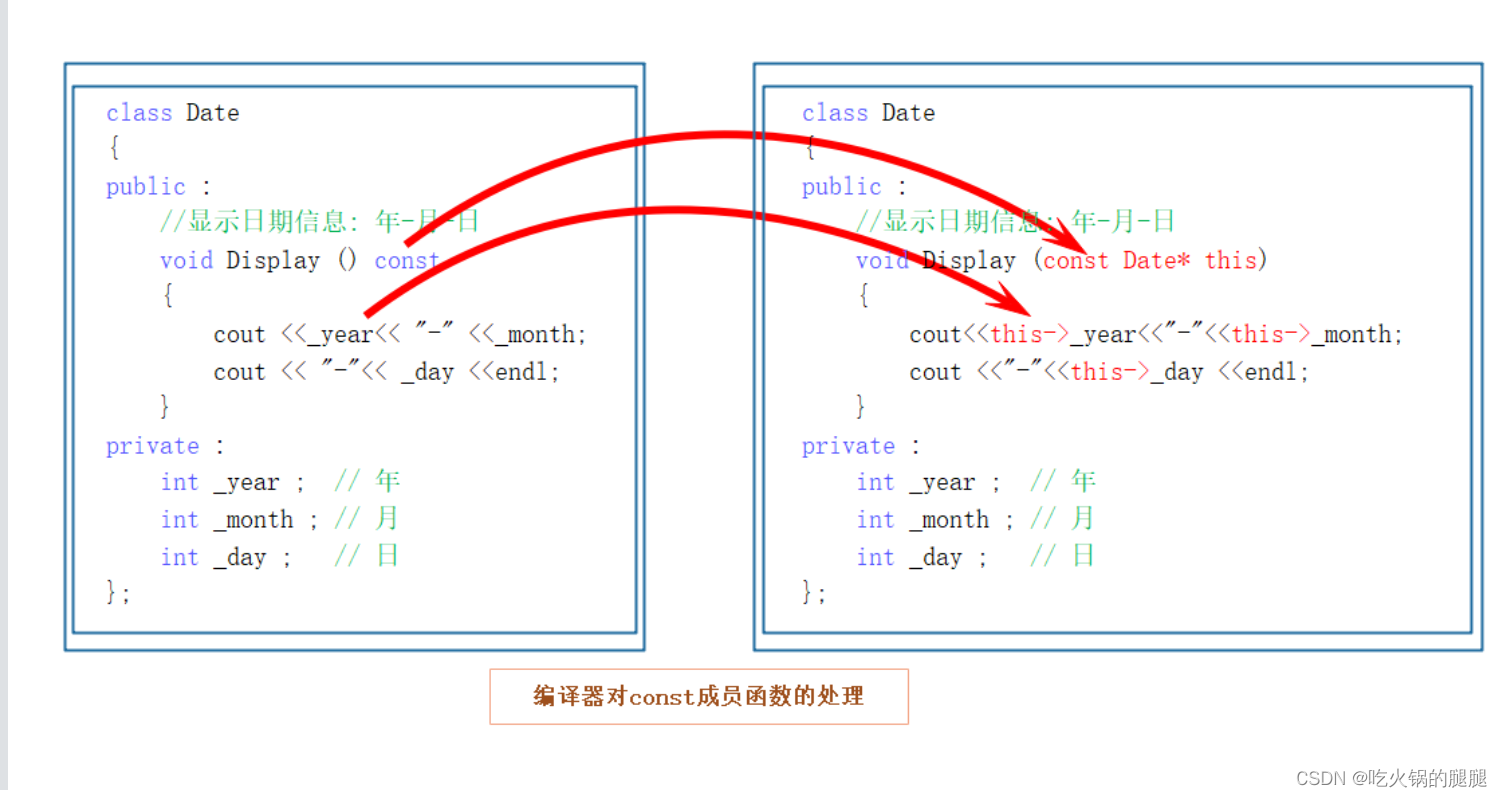
C++初阶——拷贝构造和运算符重载(const成员)
目录 1. 拷贝构造函数 1.2 拷贝构造函数特征: 2. 默认拷贝构造函数 2.1 未显式定义,编译器会生成默认的拷贝构造函数。 默认的拷贝构造函数对象按内存存储按字节序完成拷贝,这种拷贝叫做浅拷贝,或者值拷贝 3. 运算符重载 3.1…...
go练习 day01
DTO: note_dto.go package dtoimport "king/model"type NoteAddDTO struct {ID uintTitle string json:"title" form:"title" binding:"required" message:"标题不能为空"Content string json:"conten…...
C# Blazor 学习笔记(0.1):如何开始Blazor和vs基本设置
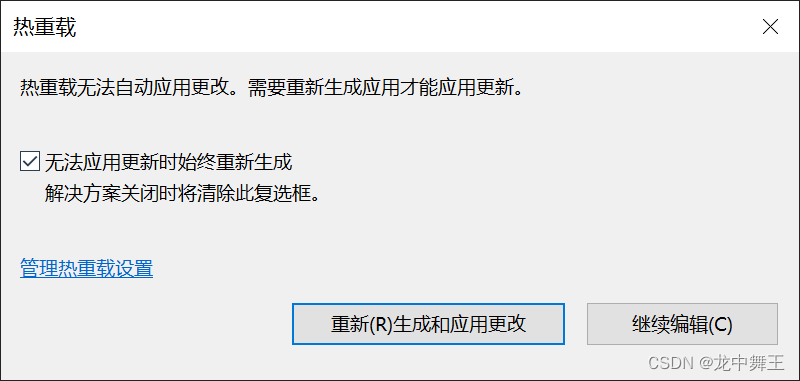
文章目录 前言资源推荐环境如何开始Blazor个人推荐设置注释快捷键热重载设置 前言 Blazor简单来说就是微软提供的.NET 前端框架。使用 WebAssembly的“云浏览器”,集成了Vue,React,Angular等知名前端框架的特点。 资源推荐 微软官方文档 Blazor入门基础视频合集 …...

原码的乘法运算 补码乘法运算
补码乘法 对比...

打破平台壁垒:Windows上安装APK文件的完整解决方案
打破平台壁垒:Windows上安装APK文件的完整解决方案 【免费下载链接】APK-Installer An Android Application Installer for Windows 项目地址: https://gitcode.com/GitHub_Trending/ap/APK-Installer 你是否曾想过在Windows电脑上直接运行安卓应用ÿ…...

如何为《欧洲卡车模拟2》实现完整智能驾驶体验?ETS2LA自动驾驶插件终极指南
如何为《欧洲卡车模拟2》实现完整智能驾驶体验?ETS2LA自动驾驶插件终极指南 【免费下载链接】Euro-Truck-Simulator-2-Lane-Assist Plugin based interface program for ETS2/ATS. 项目地址: https://gitcode.com/gh_mirrors/eur/Euro-Truck-Simulator-2-Lane-Ass…...

Redis增强工具包:封装分布式锁、缓存模板与监控的最佳实践
1. 项目概述:一个Redis开发者的“瑞士军刀”在分布式系统和高并发场景下,Redis几乎成了标配。但用久了你会发现,官方客户端虽然稳定,但在日常开发、调试、运维中,总有些“不够顺手”的地方。比如,想批量按模…...

从零构建可定制对话系统:模块化架构与RAG实战指南
1. 项目概述:从零构建一个可定制的对话系统最近在折腾一个挺有意思的东西,我把它叫做“定制化聊天系统”。起因很简单,市面上现成的聊天机器人,无论是开源的还是商业的,总感觉差了那么点意思。要么是功能太臃肿&#x…...

终极游戏性能调优指南:DLSS Swapper智能管理工具深度解析
终极游戏性能调优指南:DLSS Swapper智能管理工具深度解析 【免费下载链接】dlss-swapper 项目地址: https://gitcode.com/GitHub_Trending/dl/dlss-swapper 游戏体验痛点剖析:当DLSS版本成为性能瓶颈 你是否曾在畅玩《赛博朋克2077》时…...

Copaw_dev:AI编程助手增强框架,提升代码生成与自动化开发效率
1. 项目概述:Copaw_dev 是什么,以及它为何值得关注如果你是一名开发者,尤其是对自动化、代码生成或者AI辅助编程感兴趣,那么“Copaw_dev”这个项目标题很可能已经引起了你的注意。乍一看,这个由“G-Divine”维护的项目…...

Lingoose:轻量级LLM编排框架的设计哲学与工程实践
1. 项目概述:从“Lingo”到“Goose”,一个轻量级LLM编排框架的诞生最近在折腾大语言模型应用开发的朋友,估计都绕不开一个核心问题:如何高效、优雅地编排和串联多个LLM调用、工具调用以及数据处理流程?当你从简单的单次…...

基于意图与技能解耦的智能对话系统构建指南
1. 项目概述:一个意图与技能驱动的AI对话引擎最近在折腾AI应用开发,特别是对话型AI助手时,发现一个核心痛点:如何让AI不仅能理解用户说了什么(意图识别),还能精准地调用相应的功能(技…...
)
【2026年阿里巴巴集团暑期实习- 5月16日-算法岗-第二题- 坏掉的键盘】(题目+思路+JavaC++Python解析+在线测试)
题目内容 小明准备输入一个仅由小写英文字母组成的字符串,但他的键盘在一开始就有且仅有一个按键失灵,导致该字母在原串中的所有出现都没有被输入,最终得到的字符串为 sss。小明还告诉你:原本要输入的完整字符串中任意相邻两个字符都不相同。 请你计算,对于每一个可能的…...

Arduino驱动128x64 VFD显示屏:SPI像素回读与图形应用实战
1. 项目概述:为什么选择128x64图形VFD?如果你玩过各种OLED、LCD或者TFT屏幕,可能会觉得显示技术已经足够成熟,亮度、对比度似乎都够用。但当你第一次点亮一块真空荧光显示屏时,那种独特的、带着一丝复古科技感的蓝色辉…...