详解Spring Bean的生命周期
详解Spring Bean的生命周期
Spring Bean的生命周期包括以下阶段:
1. 实例化Bean
对于BeanFactory容器,当客户向容器请求一个尚未初始化的bean时,或初始化bean的时候需要注入另一个尚未初始化的依赖时,容器就会调用createBean进行实例化。 对于ApplicationContext容器,当容器启动结束后,便实例化所有的bean。 容器通过获取BeanDefinition对象中的信息进行实例化。并且这一步仅仅是简单的实例化,并未进行依赖注入。 实例化对象被包装在BeanWrapper对象中,BeanWrapper提供了设置对象属性的接口,从而避免了使用反射机制设置属性。
2. 设置对象属性(依赖注入)
实例化后的对象被封装在BeanWrapper对象中,并且此时对象仍然是一个原生的状态,并没有进行依赖注入。 紧接着,Spring根据BeanDefinition中的信息进行依赖注入。 并且通过BeanWrapper提供的设置属性的接口完成依赖注入。
3. 注入Aware接口
紧接着,Spring会检测该对象是否实现了xxxAware接口,并将相关的xxxAware实例注入给bean。
4. BeanPostProcessor
当经过上述几个步骤后,bean对象已经被正确构造,但如果你想要对象被使用前再进行一些自定义的处理,就可以通过BeanPostProcessor接口实现。 该接口提供了两个函数:postProcessBeforeInitialzation( Object bean, String beanName ) 当前正在初始化的bean对象会被传递进来,我们就可以对这个bean作任何处理。 这个函数会先于InitialzationBean执行,因此称为前置处理。 所有Aware接口的注入就是在这一步完成的。postProcessAfterInitialzation( Object bean, String beanName ) 当前正在初始化的bean对象会被传递进来,我们就可以对这个bean作任何处理。 这个函数会在InitialzationBean完成后执行,因此称为后置处理。
5. InitializingBean与init-method
当BeanPostProcessor的前置处理完成后就会进入本阶段。 InitializingBean接口只有一个函数:afterPropertiesSet()这一阶段也可以在bean正式构造完成前增加我们自定义的逻辑,但它与前置处理不同,由于该函数并不会把当前bean对象传进来,因此在这一步没办法处理对象本身,只能增加一些额外的逻辑。 若要使用它,我们需要让bean实现该接口,并把要增加的逻辑写在该函数中。然后Spring会在前置处理完成后检测当前bean是否实现了该接口,并执行afterPropertiesSet函数。当然,Spring为了降低对客户代码的侵入性,给bean的配置提供了init-method属性,该属性指定了在这一阶段需要执行的函数名。Spring便会在初始化阶段执行我们设置的函数。init-method本质上仍然使用了InitializingBean接口。
6. DisposableBean和destroy-method
和init-method一样,通过给destroy-method指定函数,就可以在bean销毁前执行指定的逻辑。
详解Spring Bean生命周期
Spring Bean的完整生命周期从创建Spring容器开始,直到最终Spring容器销毁Bean,这其中包含了一系列关键点。


例子演示
我们用一个简单的Spring Bean来演示一下Spring Bean的生命周期。
1.首先是一个简单的Spring Bean,调用Bean自身的方法和Bean级生命周期接口方法,为了方便演示,它实现了BeanNameAware、BeanFactoryAware、InitializingBean和DiposableBean这4个接口,同时有2个方法,对应配置文件中的init-method和destroy-method。如下:
package springBeanTest;import org.springframework.beans.BeansException;
import org.springframework.beans.factory.BeanFactory;
import org.springframework.beans.factory.BeanFactoryAware;
import org.springframework.beans.factory.BeanNameAware;
import org.springframework.beans.factory.DisposableBean;
import org.springframework.beans.factory.InitializingBean;/*** @author qsk*/
public class Person implements BeanFactoryAware, BeanNameAware,InitializingBean, DisposableBean {private String name;private String address;private int phone;private BeanFactory beanFactory;private String beanName;public Person() {System.out.println("【构造器】调用Person的构造器实例化");}public String getName() {return name;}public void setName(String name) {System.out.println("【注入属性】注入属性name");this.name = name;}public String getAddress() {return address;}public void setAddress(String address) {System.out.println("【注入属性】注入属性address");this.address = address;}public int getPhone() {return phone;}public void setPhone(int phone) {System.out.println("【注入属性】注入属性phone");this.phone = phone;}@Overridepublic String toString() {return "Person [address=" + address + ", name=" + name + ", phone="+ phone + "]";}// 这是BeanFactoryAware接口方法@Overridepublic void setBeanFactory(BeanFactory arg0) throws BeansException {System.out.println("【BeanFactoryAware接口】调用BeanFactoryAware.setBeanFactory()");this.beanFactory = arg0;}// 这是BeanNameAware接口方法@Overridepublic void setBeanName(String arg0) {System.out.println("【BeanNameAware接口】调用BeanNameAware.setBeanName()");this.beanName = arg0;}// 这是InitializingBean接口方法@Overridepublic void afterPropertiesSet() throws Exception {System.out.println("【InitializingBean接口】调用InitializingBean.afterPropertiesSet()");}// 这是DiposibleBean接口方法@Overridepublic void destroy() throws Exception {System.out.println("【DiposibleBean接口】调用DiposibleBean.destory()");}// 通过<bean>的init-method属性指定的初始化方法public void myInit() {System.out.println("【init-method】调用<bean>的init-method属性指定的初始化方法");}// 通过<bean>的destroy-method属性指定的初始化方法public void myDestory() {System.out.println("【destroy-method】调用<bean>的destroy-method属性指定的初始化方法");}
}
2.接下来是演示BeanPostProcessor接口的方法,如下:
package springBeanTest;import org.springframework.beans.BeansException;
import org.springframework.beans.factory.config.BeanPostProcessor;public class MyBeanPostProcessor implements BeanPostProcessor {public MyBeanPostProcessor() {super();System.out.println("这是BeanPostProcessor实现类构造器!!");// TODO Auto-generated constructor stub}@Overridepublic Object postProcessAfterInitialization(Object arg0, String arg1)throws BeansException {System.out.println("BeanPostProcessor接口方法postProcessAfterInitialization对属性进行更改!");return arg0;}@Overridepublic Object postProcessBeforeInitialization(Object arg0, String arg1)throws BeansException {System.out.println("BeanPostProcessor接口方法postProcessBeforeInitialization对属性进行更改!");return arg0;}
}
如上,BeanPostProcessor接口包括2个方法postProcessAfterInitialization和postProcessBeforeInitialization,这两个方法的第一个参数都是要处理的Bean对象,第二个参数都是Bean的name。返回值也都是要处理的Bean对象。这里要注意。
3、InstantiationAwareBeanPostProcessor 接口本质是BeanPostProcessor的子接口,一般我们继承Spring为其提供的适配器类InstantiationAwareBeanPostProcessorAdapter来使用它,如下:
package springBeanTest;import java.beans.PropertyDescriptor;import org.springframework.beans.BeansException;
import org.springframework.beans.PropertyValues;
import org.springframework.beans.factory.config.InstantiationAwareBeanPostProcessorAdapter;public class MyInstantiationAwareBeanPostProcessor extendsInstantiationAwareBeanPostProcessorAdapter {public MyInstantiationAwareBeanPostProcessor() {super();System.out.println("这是InstantiationAwareBeanPostProcessorAdapter实现类构造器!!");}// 接口方法、实例化Bean之前调用@Overridepublic Object postProcessBeforeInstantiation(Class beanClass,String beanName) throws BeansException {System.out.println("InstantiationAwareBeanPostProcessor调用postProcessBeforeInstantiation方法");return null;}// 接口方法、实例化Bean之后调用@Overridepublic Object postProcessAfterInitialization(Object bean, String beanName)throws BeansException {System.out.println("InstantiationAwareBeanPostProcessor调用postProcessAfterInitialization方法");return bean;}// 接口方法、设置某个属性时调用@Overridepublic PropertyValues postProcessPropertyValues(PropertyValues pvs,PropertyDescriptor[] pds, Object bean, String beanName)throws BeansException {System.out.println("InstantiationAwareBeanPostProcessor调用postProcessPropertyValues方法");return pvs;}
}
这个有3个方法,其中第二个方法postProcessAfterInitialization就是重写了BeanPostProcessor的方法。第三个方法postProcessPropertyValues用来操作属性,返回值也应该是PropertyValues对象。
4.演示工厂后处理器接口方法,如下:
package springBeanTest;import org.springframework.beans.BeansException;
import org.springframework.beans.factory.config.BeanDefinition;
import org.springframework.beans.factory.config.BeanFactoryPostProcessor;
import org.springframework.beans.factory.config.ConfigurableListableBeanFactory;public class MyBeanFactoryPostProcessor implements BeanFactoryPostProcessor {public MyBeanFactoryPostProcessor() {super();System.out.println("这是BeanFactoryPostProcessor实现类构造器!!");}@Overridepublic void postProcessBeanFactory(ConfigurableListableBeanFactory arg0)throws BeansException {System.out.println("BeanFactoryPostProcessor调用postProcessBeanFactory方法");BeanDefinition bd = arg0.getBeanDefinition("person");bd.getPropertyValues().addPropertyValue("phone", "110");}}
5.配置文件如下beans.xml,很简单,使用ApplicationContext,处理器不用手动注册:
<?xml version="1.0" encoding="UTF-8"?><beans xmlns="http://www.springframework.org/schema/beans"xmlns:xsi="http://www.w3.org/2001/XMLSchema-instance" xmlns:p="http://www.springframework.org/schema/p"xmlns:aop="http://www.springframework.org/schema/aop" xmlns:tx="http://www.springframework.org/schema/tx"xsi:schemaLocation="http://www.springframework.org/schema/beans http://www.springframework.org/schema/beans/spring-beans-3.2.xsd"><bean id="beanPostProcessor" class="springBeanTest.MyBeanPostProcessor"></bean><bean id="instantiationAwareBeanPostProcessor" class="springBeanTest.MyInstantiationAwareBeanPostProcessor"></bean><bean id="beanFactoryPostProcessor" class="springBeanTest.MyBeanFactoryPostProcessor"></bean><bean id="person" class="springBeanTest.Person" init-method="myInit"destroy-method="myDestory" scope="singleton" p:name="张三" p:address="广州"p:phone="15900000000" /></beans>
6.下面测试一下:
package springBeanTest;import org.springframework.context.ApplicationContext;
import org.springframework.context.support.ClassPathXmlApplicationContext;public class BeanLifeCycle {public static void main(String[] args) {System.out.println("现在开始初始化容器");ApplicationContext factory = new ClassPathXmlApplicationContext("springBeanTest/beans.xml");System.out.println("容器初始化成功");//得到Preson,并使用Person person = factory.getBean("person",Person.class);System.out.println(person);System.out.println("现在开始关闭容器!");((ClassPathXmlApplicationContext)factory).registerShutdownHook();}
}
我们来看一下结果:
现在开始初始化容器
2014-5-18 15:46:20 org.springframework.context.support.AbstractApplicationContext prepareRefresh
信息: Refreshing org.springframework.context.support.ClassPathXmlApplicationContext@19a0c7c: startup date [Sun May 18 15:46:20 CST 2014]; root of context hierarchy
2014-5-18 15:46:20 org.springframework.beans.factory.xml.XmlBeanDefinitionReader loadBeanDefinitions
信息: Loading XML bean definitions from class path resource [springBeanTest/beans.xml]
这是BeanFactoryPostProcessor实现类构造器!!
BeanFactoryPostProcessor调用postProcessBeanFactory方法
这是BeanPostProcessor实现类构造器!!
这是InstantiationAwareBeanPostProcessorAdapter实现类构造器!!
2014-5-18 15:46:20 org.springframework.beans.factory.support.DefaultListableBeanFactory preInstantiateSingletons
信息: Pre-instantiating singletons in org.springframework.beans.factory.support.DefaultListableBeanFactory@9934d4: defining beans [beanPostProcessor,instantiationAwareBeanPostProcessor,beanFactoryPostProcessor,person]; root of factory hierarchy
InstantiationAwareBeanPostProcessor调用postProcessBeforeInstantiation方法
【构造器】调用Person的构造器实例化
InstantiationAwareBeanPostProcessor调用postProcessPropertyValues方法
【注入属性】注入属性address
【注入属性】注入属性name
【注入属性】注入属性phone
【BeanNameAware接口】调用BeanNameAware.setBeanName()
【BeanFactoryAware接口】调用BeanFactoryAware.setBeanFactory()
BeanPostProcessor接口方法postProcessBeforeInitialization对属性进行更改!
【InitializingBean接口】调用InitializingBean.afterPropertiesSet()
【init-method】调用<bean>的init-method属性指定的初始化方法
BeanPostProcessor接口方法postProcessAfterInitialization对属性进行更改!
InstantiationAwareBeanPostProcessor调用postProcessAfterInitialization方法
容器初始化成功
Person [address=广州, name=张三, phone=110]
现在开始关闭容器!
【DiposibleBean接口】调用DiposibleBean.destory()
【destroy-method】调用<bean>的destroy-method属性指定的初始化方法
Spring Bean生命周期流程图


相关文章:
详解Spring Bean的生命周期
详解Spring Bean的生命周期 Spring Bean的生命周期包括以下阶段: 1. 实例化Bean 对于BeanFactory容器,当客户向容器请求一个尚未初始化的bean时,或初始化bean的时候需要注入另一个尚未初始化的依赖时,容器就会调用createBean进…...

详解Shell 脚本中 “$” 符号的多种用法
通常情况下,在工作中用的最多的有如下几项: $0:Shell 的命令本身 1到9:表示 Shell 的第几个参数 $? :显示最后命令的执行情况 $#:传递到脚本的参数个数 $$:脚本运行的当前进程 ID 号 $*&#…...

Redis如何实现Session存储
在Redis中实现Session存储,主要有两种方式:使用Spring Session和手动存储。 使用Spring Session:Spring Session是Spring框架提供的一个模块,用于简化Session管理,并将Session数据存储到外部数据存储中,如Redis。使用Spring Session,你只需要在Spring Boot项目中添加相应…...

安防视频监控汇聚EasyCVR平台接入Ehome告警,公网快照不显示的原因排查
智能视频监控汇聚平台TSINGSEE青犀视频EasyCVR可拓展性强、视频能力灵活、部署轻快,可支持的主流标准协议有国标GB28181、RTSP/Onvif、RTMP等,以及支持厂家私有协议与SDK接入,包括海康Ehome、海大宇等设备的SDK等,视频监控管理平台…...

【Springboot】@ComponentScan 详解
文章目录 ComponentScanComponentScan ANNOTATION 和 REGEXComponentScan CUSTOMComponentScan ASSIGNABLE_TYPE ComponentScan ComponentScan 是 Spring 框架中的一个注解,用于自动扫描和注册容器中的组件。 使用 ComponentScan 注解可以告诉 Spring 在指定的包或…...

flask-----信号
安装: flask中的信号使用的是一个第三方插件,叫做blinker。通过pip list看一下,如果没有安装,通过以下命令即可安装blinker: pip install blinker flask其中有内置的信号 template_rendered _signals.signal(temp…...
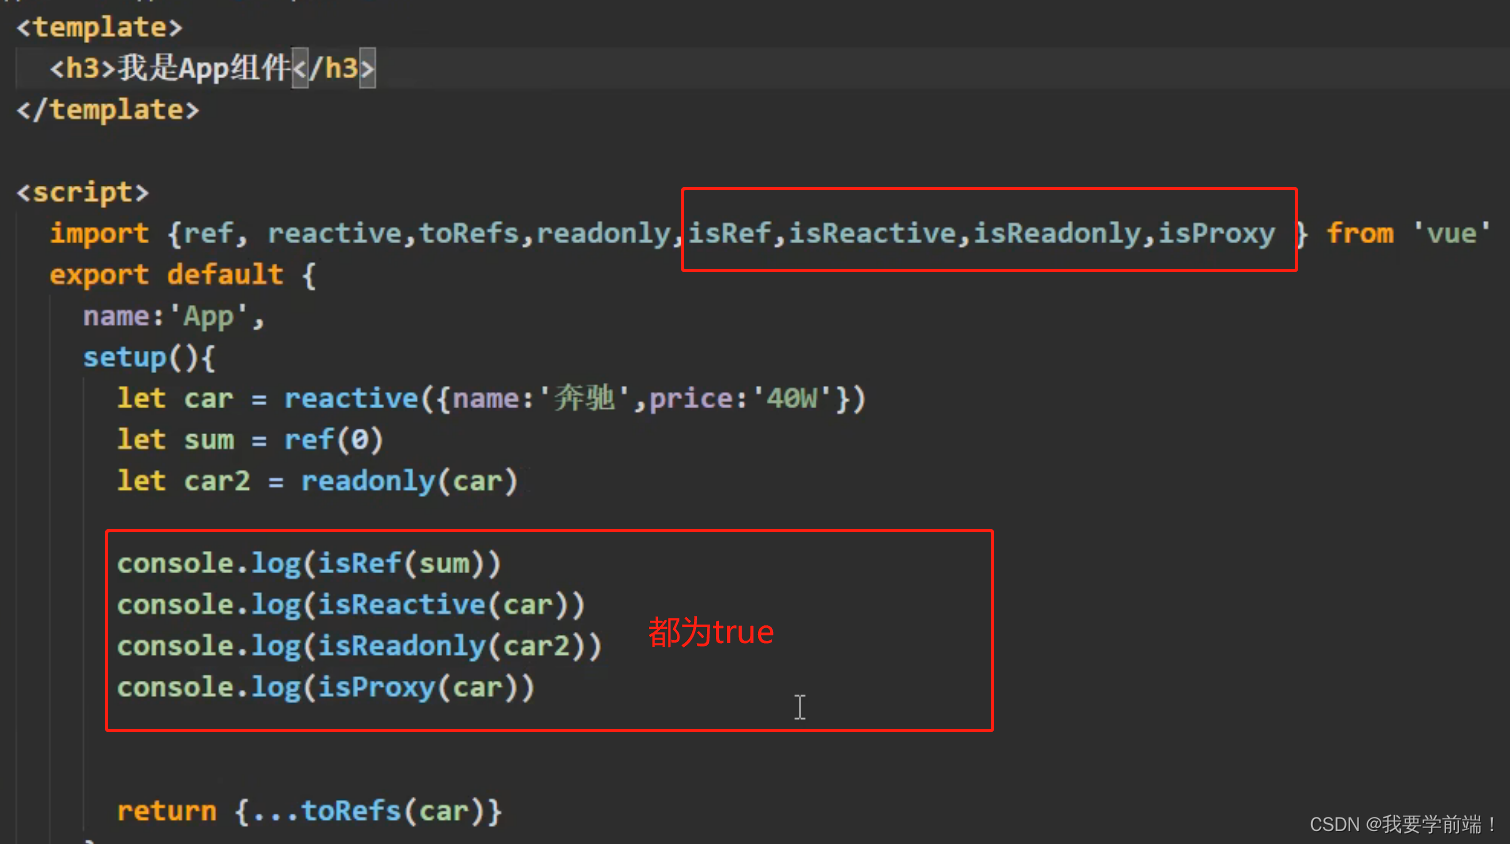
10_Vue3 其它的组合式API(Composition API)
Vue3 中的其它组合式API 1.shallowReactive 与 shallowRef 2. readonly 与 shallowReadonly 3.toRaw 与 markRaw 4.customRef 5.provide 与 inject 6.响应式数据的判断...
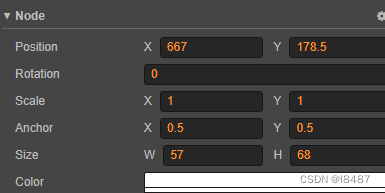
COCOS项目运行的时候图片模糊的原因
1、首先。用X坐标来分析,如果size*Anchor Position有小数,如上图57*0.5667695.5。这样就会导致x模糊。如果y同样计算结果包含小数,那么y也会模糊。xy同时模糊的情况是最模糊的。 2、如果当前node没有问题,那么就要检查上级node是…...
Python中搭建IP代理池的妙招
在Python的爬虫世界里,你是否也想搭建一个功能强大的IP代理池,让你的爬虫无忧无虑地畅游各大网站?今天,我就来教你使用Scrapy框架搭建IP代理池,让你的爬虫更加智能、高效!跟着我一步一步来,轻松…...

学习pytorch 2
学习pytorch 2 2. dataset实战代码数据集 2. dataset实战 B站小土堆视频 代码 from torch.utils.data import Dataset from PIL import Image #import cv2 import osclass MyData(Dataset):def __init__(self, root_dir, label_dir):self.root_dir root_dirself.label_dir …...

elementui动态表单实现计算属性携带参数,并将计算出的值四舍五入保留两位小数
提示:文章写完后,目录可以自动生成,如何生成可参考右边的帮助文档 文章目录 前言方法1方法2结论 前言 写项目的时候,遇到需要在动态表单中,将同一级输入框输入的内容计算出来,并动态显示,发现c…...

嵌入式面试5 -makefile shell
2、 如果有一个简单的helloworld项目目录如下: tree helloworld helloworld |– file2.h |– file1.cpp |– file2.cpp 请编写一个Makefile文件。 答: TARGET helloworld CXX g COMPILE : $(COMPILE) file1.cpp COMPILE : $(COMPILE) file2.cpp OBJE…...

获40余家主机厂青睐,这家OTA「吸金王」完成超亿元B2轮融资!
继今年4月获得上汽集团旗下尚颀资本及其合作方山高投控的投资后,近日上海艾拉比智能科技有限公司(以下简称“艾拉比”)正式完成总额过亿元的B2轮融资,新的投资方为聚卓资本、老股东国科新能继续增持,势能资本持续担任独…...
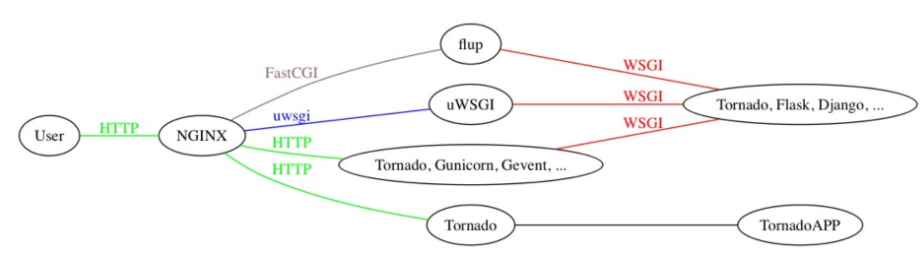
CGI, FastCGI, WSGI, uWSGI, uwsgi分别是什么?
CGI 1、通用网关接口(Common Gateway Interface/CGI),CGI描述了服务器(nginx,apache)和请求处理程序(django,flask,springboot web框架)之间传输数据的一种标准. 2.所有bs架构软件都是遵循CGI协议的 3.一…...

Android T 窗口层级相关的类(更新中)
窗口在App端是以PhoneWindow的形式存在,承载了一个Activity的View层级结构。这里我们探讨一下WMS端窗口的形式。 可以通过adb shell dumpsys activity containers 来看窗口显示的层级 窗口容器类 —— WindowContainer类 /*** Defines common functionality for c…...

【云原生】深入掌握k8s中Pod和生命周期
个人主页:征服bug-CSDN博客 kubernetes专栏:kubernetes_征服bug的博客-CSDN博客 目录 1 什么是 Pod 2 Pod 基本操作 3 Pod 运行多个容器 4 Pod 的 Labels(标签) 5 Pod 的生命周期 1 什么是 Pod 摘取官网: Pod | Kubernetes 1.1 简介 Pod 是可以在 …...

openKylin+KingbaseES+Nginx安装
openKylin开放麒麟开启ssh 一、查看ssh服务是否开启。 终端输入命令:sudo ps -e |grep ssh ,只显示如下内容则证明未安装ssh服务。 2127 ? 00:00:00 ssh-agent若显示如下内容则证明ssh服务已开启。 1657 ? 00:00:00 ssh-agent 2349 ?…...
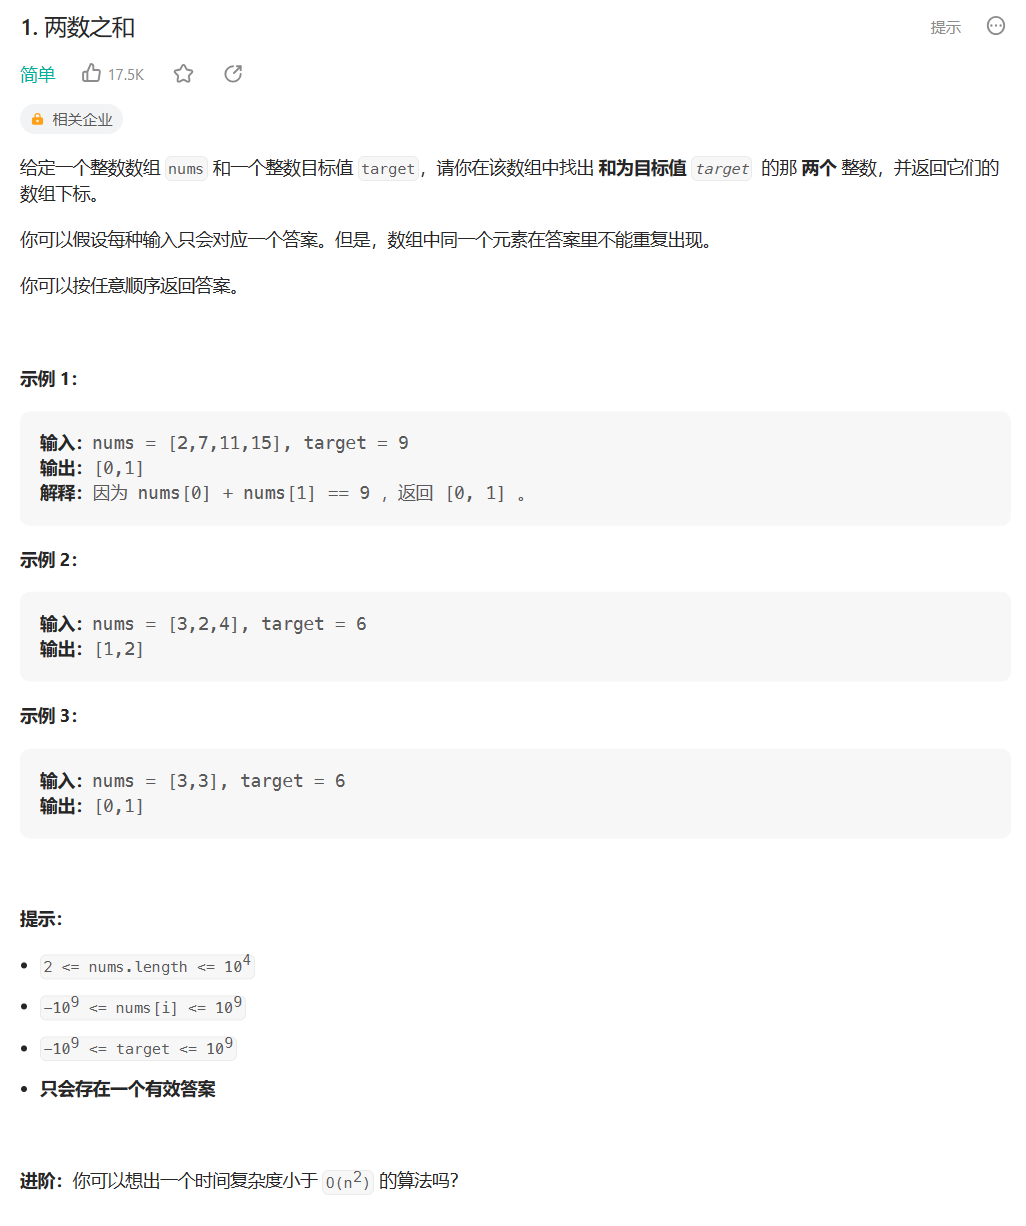
lc1.两数之和
暴力解法:两个for循环,寻找和为target的两个数的索引 时间复杂度:O(n2) 空间复杂度:O(1) 哈希表:遍历数组,将nums数组的数和索引分别存储在map的key和value中,一边遍历,一边寻找是…...

c# 初始化列表,并给列表里面所有的元素进行初始化
Enumerable.Repeat 方法是用于生成一个包含指定元素重复若干次的序列。它接受两个参数,第一个参数是要重复的元素,第二个参数是重复次数。 下面是 Enumerable.Repeat 方法的用法和示例: using System; using System.Collections.Generic; u…...

Java笔记(三十):MySQL(上)-- 数据库、MySQL常用数据类型、DDL、DML、多表设计
一、数据库 0、MySQL安装,IDEA配置MySQL 用MySQL installer for windows(msi)MySQL默认安装位置:C:\Program Files\MySQL\MySQL Server 8.0配置环境变量使用前先确保启动了mysql服务my.ini位置:C:\ProgramData\MySQL…...

工位是公司的,腰是自己的:00后正在重塑职场观
来自:推荐一个程序员编程资料站:http://cxyroad.com副业赚钱专栏:https://xbt100.top2024年IDEA最新激活方法后台回复:激活码CSDN免登录复制代码插件下载:CSDN复制插件以下是正文。我是小路。最近看到一个特别有意思的…...

3分钟掌握:Windows电脑上安装安卓应用的终极解决方案
3分钟掌握:Windows电脑上安装安卓应用的终极解决方案 【免费下载链接】APK-Installer An Android Application Installer for Windows 项目地址: https://gitcode.com/GitHub_Trending/ap/APK-Installer 想在Windows电脑上直接安装和运行安卓应用吗ÿ…...

告别.osa!用PCL玩转ORB-SLAM3点云地图:保存、加载与二次开发实战
告别.osa!用PCL玩转ORB-SLAM3点云地图:保存、加载与二次开发实战 当ORB-SLAM3完成环境建图后,.osa格式的地图文件就像被锁在保险箱里的宝藏——虽然安全,却难以直接利用。本文将带你突破这一限制,通过PCL(P…...

别再折腾gcc版本了!Ubuntu 20.04下用Docker一键搞定OLLVM编译环境
用Docker容器化技术快速搭建OLLVM混淆编译环境 在逆向工程和移动安全研究领域,代码混淆是一项基础而重要的技术。传统搭建OLLVM环境需要处理复杂的依赖关系、版本冲突等问题,往往让初学者望而却步。本文将介绍如何利用Docker技术,在Ubuntu 20…...

长波双色InAs/GaSb超晶格红外探测器芯片:从材料设计到焦平面集成
1. 项目概述:从“双色”到“芯片”的技术跨越在红外探测领域,追求“看得更清、看得更远、看得更准”是永恒的主题。我们这次要聊的“长/长波双色InAs/GaSb超晶格焦平面探测器芯片”,听起来名字很长很专业,但它本质上解决的是一个非…...

查询不准?响应延迟?Perplexity阅读推荐失效全归因,一线SRE团队72小时压测实录
更多请点击: https://intelliparadigm.com 第一章:查询不准?响应延迟?Perplexity阅读推荐失效全归因,一线SRE团队72小时压测实录 问题爆发现场还原 凌晨2:17,Perplexity阅读推荐API的P99延迟突增至8.4s&a…...

RISC-V SoC中TileLink互连验证IP的设计与实战应用
1. 项目概述:为什么RISC-V SoC需要一个专门的TileLink验证IP?如果你正在设计或验证一个基于RISC-V的片上系统(SoC),尤其是当它集成了多个处理器核心、加速器、DMA控制器和各种内存控制器时,那么“互连”这个…...

3.1 FiRa UCI规范解析——命令、响应与通知的交互逻辑
1. FiRa UCI规范的核心交互机制 第一次接触FiRa UCI规范时,我被它严谨的消息交互设计所震撼。这个看似简单的命令-响应机制,实际上蕴含着UWB通信的精妙控制逻辑。就像交通信号灯指挥车辆通行一样,UCI规范通过明确的指令流向和状态反馈&#…...
)
CTF新手必看:用Python脚本搞定RSA常见攻击(附实战代码)
CTF密码学实战:Python脚本破解RSA五大攻击场景 在CTF竞赛中,RSA加密系统是最常见的密码学挑战之一。本文将带你深入实战,通过Python代码复现五种经典RSA攻击场景,从基础分解到高级数学技巧,每个案例都配有可直接运行的…...

时间序列预测中的注意力剪枝技术:SPAT方法解析
1. 项目概述:当时间序列预测遇上注意力剪枝在多元时间序列预测领域,Transformer架构凭借其强大的注意力机制已成为主流解决方案。这种机制通过动态计算序列元素间的关联权重,能够有效捕捉电力负荷、交通流量等场景中的复杂时序模式。然而在实…...