竞赛项目 深度学习的水果识别 opencv python
文章目录
- 0 前言
- 2 开发简介
- 3 识别原理
- 3.1 传统图像识别原理
- 3.2 深度学习水果识别
- 4 数据集
- 5 部分关键代码
- 5.1 处理训练集的数据结构
- 5.2 模型网络结构
- 5.3 训练模型
- 6 识别效果
- 7 最后
0 前言
🔥 优质竞赛项目系列,今天要分享的是
🚩 深度学习的水果识别 opencv python
该项目较为新颖,适合作为竞赛课题方向,学长非常推荐!
🥇学长这里给一个题目综合评分(每项满分5分)
- 难度系数:3分
- 工作量:3分
- 创新点:4分
🧿 更多资料, 项目分享:
https://gitee.com/dancheng-senior/postgraduate
2 开发简介
深度学习作为机器学习领域内新兴并且蓬勃发展的一门学科, 它不仅改变着传统的机器学习方法, 也影响着我们对人类感知的理解,
已经在图像识别和语音识别等领域取得广泛的应用。 因此, 本文在深入研究深度学习理论的基础上, 将深度学习应用到水果图像识别中,
以此来提高了水果图像的识别性能。
3 识别原理
3.1 传统图像识别原理
传统的水果图像识别系统的一般过程如下图所示,主要工作集中在图像预处理和特征提取阶段。
在大多数的识别任务中, 实验所用图像往往是在严格限定的环境中采集的, 消除了外界环境对图像的影响。 但是实际环境中图像易受到光照变化、 水果反光、
遮挡等因素的影响, 这在不同程度上影响着水果图像的识别准确率。
在传统的水果图像识别系统中, 通常是对水果的纹理、 颜色、 形状等特征进行提取和识别。

3.2 深度学习水果识别
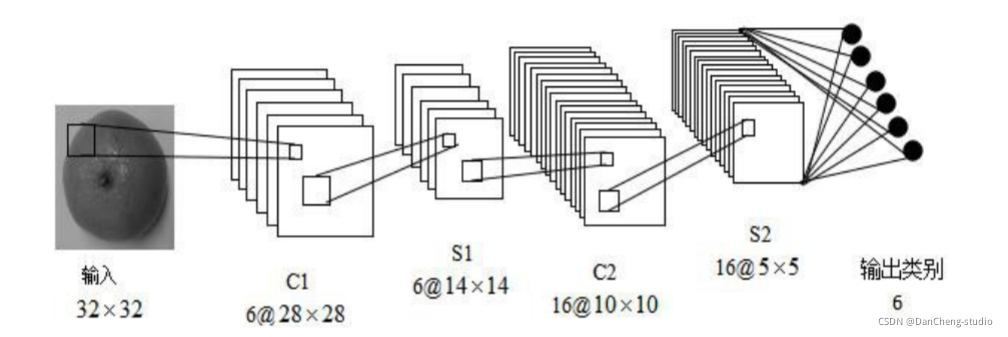
CNN 是一种专门为识别二维特征而设计的多层神经网络, 它的结构如下图所示,这种结构对平移、 缩放、 旋转等变形具有高度的不变性。
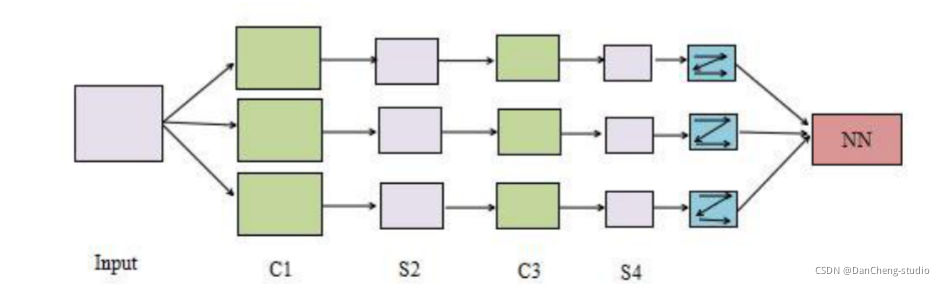
学长本次采用的 CNN 架构如图:
4 数据集
-
数据库分为训练集(train)和测试集(test)两部分
-
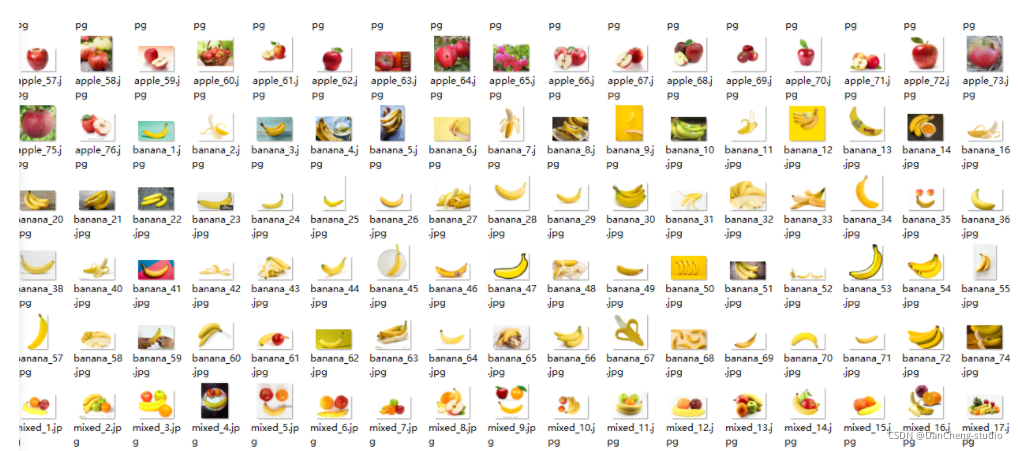
训练集包含四类apple,orange,banana,mixed(多种水果混合)四类237张图片;测试集包含每类图片各两张。图片集如下图所示。
-
图片类别可由图片名称中提取。
训练集图片预览
测试集预览

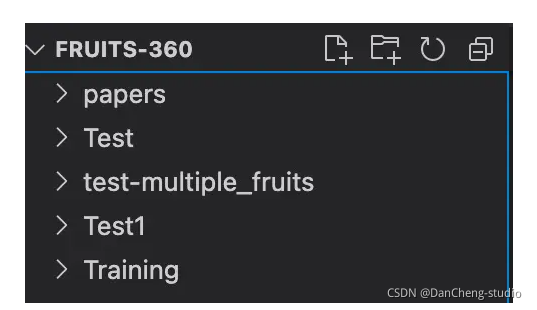
数据集目录结构
5 部分关键代码
5.1 处理训练集的数据结构
import os
import pandas as pdtrain_dir = './Training/'
test_dir = './Test/'
fruits = []
fruits_image = []for i in os.listdir(train_dir):for image_filename in os.listdir(train_dir + i):fruits.append(i) # name of the fruitfruits_image.append(i + '/' + image_filename)
train_fruits = pd.DataFrame(fruits, columns=["Fruits"])
train_fruits["Fruits Image"] = fruits_imageprint(train_fruits)
5.2 模型网络结构
import matplotlib.pyplot as plt
import seaborn as sns
from keras.preprocessing.image import ImageDataGenerator, img_to_array, load_img
from glob import glob
from keras.models import Sequential
from keras.layers import Conv2D, MaxPooling2D, Activation, Dropout, Flatten, Dense
img = load_img(train_dir + "Cantaloupe 1/r_234_100.jpg")
plt.imshow(img)
plt.axis("off")
plt.show()array_image = img_to_array(img)# shape (100,100)
print("Image Shape --> ", array_image.shape)# 131个类目
fruitCountUnique = glob(train_dir + '/*' )
numberOfClass = len(fruitCountUnique)
print("How many different fruits are there --> ",numberOfClass)# 构建模型
model = Sequential()
model.add(Conv2D(32,(3,3),input_shape = array_image.shape))
model.add(Activation("relu"))
model.add(MaxPooling2D())
model.add(Conv2D(32,(3,3)))
model.add(Activation("relu"))
model.add(MaxPooling2D())
model.add(Conv2D(64,(3,3)))
model.add(Activation("relu"))
model.add(MaxPooling2D())
model.add(Flatten())
model.add(Dense(1024))
model.add(Activation("relu"))
model.add(Dropout(0.5))# 区分131类
model.add(Dense(numberOfClass)) # output
model.add(Activation("softmax"))
model.compile(loss = "categorical_crossentropy",optimizer = "rmsprop",metrics = ["accuracy"])print("Target Size --> ", array_image.shape[:2])
5.3 训练模型
train_datagen = ImageDataGenerator(rescale= 1./255,shear_range = 0.3,horizontal_flip=True,zoom_range = 0.3)test_datagen = ImageDataGenerator(rescale= 1./255)
epochs = 100
batch_size = 32
train_generator = train_datagen.flow_from_directory(train_dir,target_size= array_image.shape[:2],batch_size = batch_size,color_mode= "rgb",class_mode= "categorical")test_generator = test_datagen.flow_from_directory(test_dir,target_size= array_image.shape[:2],batch_size = batch_size,color_mode= "rgb",class_mode= "categorical")for data_batch, labels_batch in train_generator:print("data_batch shape --> ",data_batch.shape)print("labels_batch shape --> ",labels_batch.shape)breakhist = model.fit_generator(generator = train_generator,steps_per_epoch = 1600 // batch_size,epochs=epochs,validation_data = test_generator,validation_steps = 800 // batch_size)#保存模型 model_fruits.h5
model.save('model_fruits.h5')
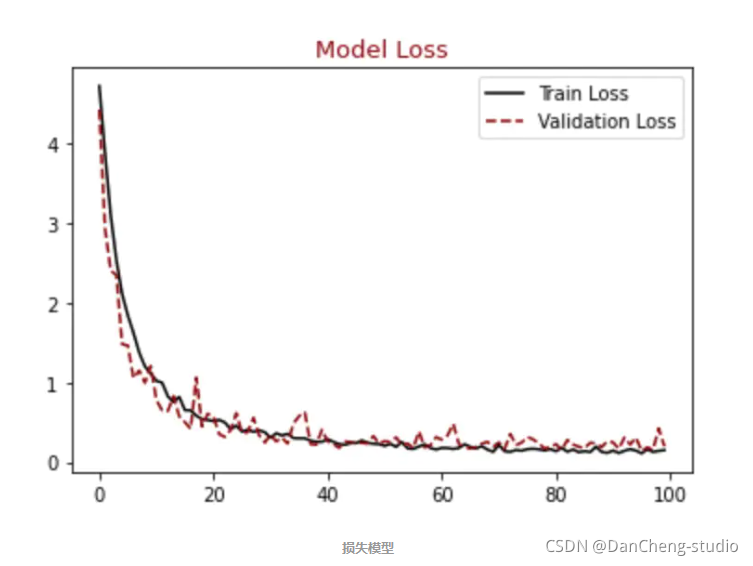
顺便输出训练曲线
#展示损失模型结果
plt.figure()
plt.plot(hist.history["loss"],label = "Train Loss", color = "black")
plt.plot(hist.history["val_loss"],label = "Validation Loss", color = "darkred", linestyle="dashed",markeredgecolor = "purple", markeredgewidth = 2)
plt.title("Model Loss", color = "darkred", size = 13)
plt.legend()
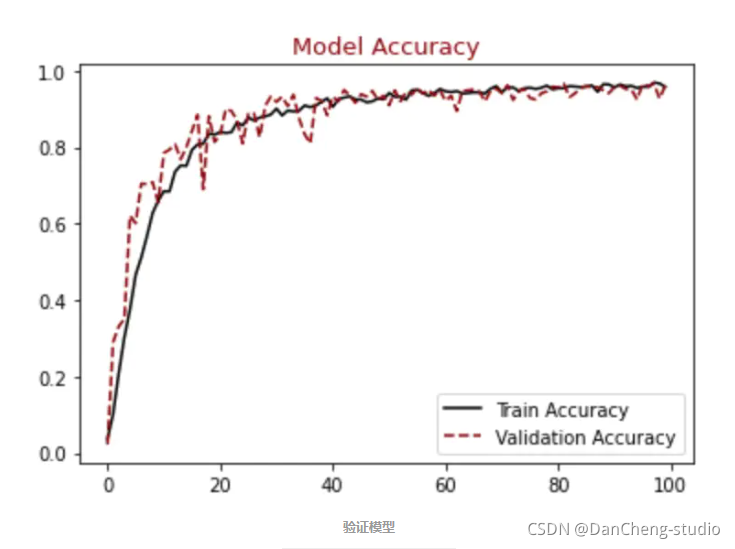
plt.show()#展示精确模型结果
plt.figure()
plt.plot(hist.history["accuracy"],label = "Train Accuracy", color = "black")
plt.plot(hist.history["val_accuracy"],label = "Validation Accuracy", color = "darkred", linestyle="dashed",markeredgecolor = "purple", markeredgewidth = 2)
plt.title("Model Accuracy", color = "darkred", size = 13)
plt.legend()
plt.show()
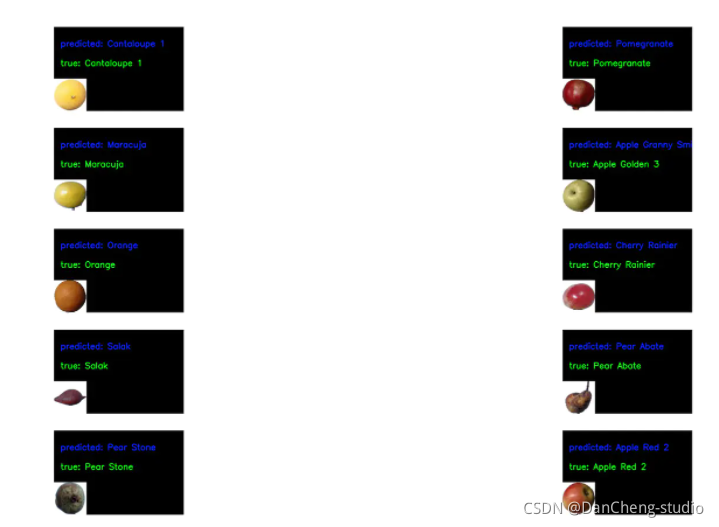
6 识别效果
from tensorflow.keras.models import load_model
import os
import pandas as pdfrom keras.preprocessing.image import ImageDataGenerator,img_to_array, load_img
import cv2,matplotlib.pyplot as plt,numpy as np
from keras.preprocessing import imagetrain_datagen = ImageDataGenerator(rescale= 1./255,shear_range = 0.3,horizontal_flip=True,zoom_range = 0.3)model = load_model('model_fruits.h5')
batch_size = 32
img = load_img("./Test/Apricot/3_100.jpg",target_size=(100,100))
plt.imshow(img)
plt.show()array_image = img_to_array(img)
array_image = array_image * 1./255
x = np.expand_dims(array_image, axis=0)
images = np.vstack([x])
classes = model.predict_classes(images, batch_size=10)
print(classes)
train_dir = './Training/'train_generator = train_datagen.flow_from_directory(train_dir,target_size= array_image.shape[:2],batch_size = batch_size,color_mode= "rgb",class_mode= "categorical”)
print(train_generator.class_indices)
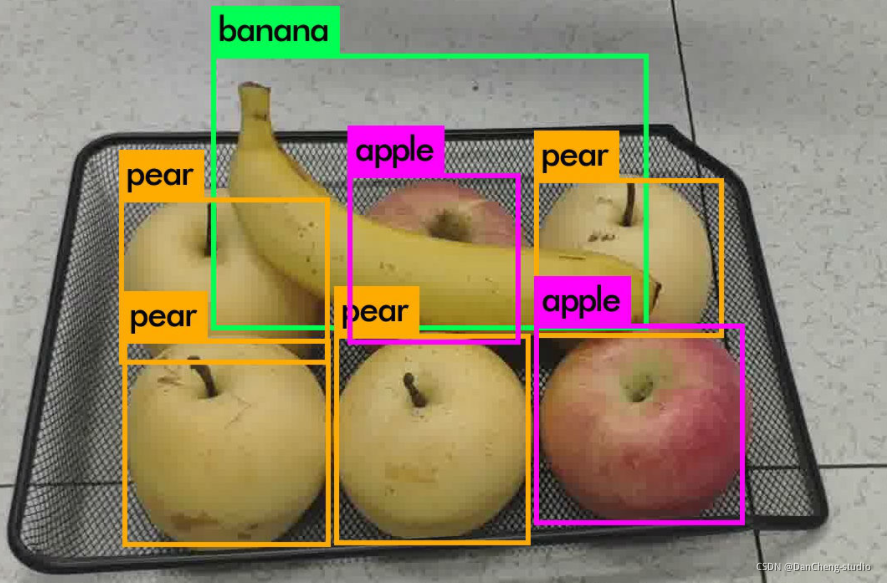
fig = plt.figure(figsize=(16, 16))
axes = []
files = []
predictions = []
true_labels = []
rows = 5
cols = 2# 随机选择几个图片
def getRandomImage(path, img_width, img_height):"""function loads a random image from a random folder in our test path"""folders = list(filter(lambda x: os.path.isdir(os.path.join(path, x)), os.listdir(path)))random_directory = np.random.randint(0, len(folders))path_class = folders[random_directory]file_path = os.path.join(path, path_class)file_names = [f for f in os.listdir(file_path) if os.path.isfile(os.path.join(file_path, f))]random_file_index = np.random.randint(0, len(file_names))image_name = file_names[random_file_index]final_path = os.path.join(file_path, image_name)return image.load_img(final_path, target_size = (img_width, img_height)), final_path, path_classdef draw_test(name, pred, im, true_label):BLACK = [0, 0, 0]expanded_image = cv2.copyMakeBorder(im, 160, 0, 0, 300, cv2.BORDER_CONSTANT, value=BLACK)cv2.putText(expanded_image, "predicted: " + pred, (20, 60), cv2.FONT_HERSHEY_SIMPLEX,0.85, (255, 0, 0), 2)cv2.putText(expanded_image, "true: " + true_label, (20, 120), cv2.FONT_HERSHEY_SIMPLEX,0.85, (0, 255, 0), 2)return expanded_image
IMG_ROWS, IMG_COLS = 100, 100# predicting images
for i in range(0, 10):path = "./Test"img, final_path, true_label = getRandomImage(path, IMG_ROWS, IMG_COLS)files.append(final_path)true_labels.append(true_label)x = image.img_to_array(img)x = x * 1./255x = np.expand_dims(x, axis=0)images = np.vstack([x])classes = model.predict_classes(images, batch_size=10)predictions.append(classes)class_labels = train_generator.class_indices
class_labels = {v: k for k, v in class_labels.items()}
class_list = list(class_labels.values())for i in range(0, len(files)):image = cv2.imread(files[i])image = draw_test("Prediction", class_labels[predictions[i][0]], image, true_labels[i])axes.append(fig.add_subplot(rows, cols, i+1))plt.imshow(cv2.cvtColor(image, cv2.COLOR_BGR2RGB))plt.grid(False)plt.axis('off')
plt.show()
7 最后
🧿 更多资料, 项目分享:
https://gitee.com/dancheng-senior/postgraduate
相关文章:
竞赛项目 深度学习的水果识别 opencv python
文章目录 0 前言2 开发简介3 识别原理3.1 传统图像识别原理3.2 深度学习水果识别 4 数据集5 部分关键代码5.1 处理训练集的数据结构5.2 模型网络结构5.3 训练模型 6 识别效果7 最后 0 前言 🔥 优质竞赛项目系列,今天要分享的是 🚩 深度学习…...

Java项目部署云windows细节
springboot项目 pom文件中必须要有这个插件(正常其实都有就是我手贱以前不小心删除了) 他的作用是查找主类 <build><plugins><plugin><groupId>org.springframework.boot</groupId><artifactId>spring-boot-maven-…...

软件功能测试有什么注意事项?功能测试报告起到什么作用?
软件功能测试是软件开发过程中至关重要的一环,它用于评估软件功能的质量和稳定性,并确保软件能够按照预期进行工作。然而,在进行功能测试时,有一些注意事项需要特别关注,以确保测试的准确性和有效性。 一、软件功能测…...

Kubernetes 调度 约束
调度约束 Kubernetes 是通过 List-Watch 的机制进行每个组件的协作,保持数据同步的,每个组件之间的设计实现了解耦。 用户是通过 kubectl 根据配置文件,向 APIServer 发送命令,在 Node 节点上面建立 Pod 和 Container。 APIServer…...

Grafana技术文档-概念-《十分钟扫盲》
Grafana官网链接 Grafana: The open observability platform | Grafana Labs 基本概念 Grafana是一个开源的度量分析和可视化套件,常用于对大量数据进行实时分析和可视化。以下是Grafana的基本概念: 数据源(Data Source)&#…...
【JavaEE进阶】Spring 更简单的读取和存储对象
文章目录 一. 存储Bean对象1. 配置扫描路径2. 添加注解存储 Bean 对象2.1 使用五大类注解存储Bean2.2 为什么要有五大类注解?2.3 有关获取Bean参数的命名规则 3. 使用方法注解储存 Bean 对象3.1 方法注解储存对象的用法3.2 Bean的重命名3.3 同⼀类型多个 Bean 报错 …...

KafKa集群搭建和知识点
一、KafKa概述 1.1 定义 KafKa是一个分布式的基于发布/订阅模式的消息队列,主要应用于大数据试试处理领域 是一个分布式、支持分区的(partition)、多副本的(replica),基于zookeeper协调的分布式消息系统&a…...

剑指 Offer 56 - I. 数组中数字出现的次数题解
题目描述:剑指 Offer 56 - I. 数组中数字出现的次数 - 力扣(LeetCode) 一个整型数组 nums 里除两个数字之外,其他数字都出现了两次。请写程序找出这两个只出现一次的数字。要求时间复杂度是O(n),空间复杂度是O(1)。 示…...

CSDN付费专栏写作协议
一、总则 1.1、欢迎您选用CSDN付费专栏服务(“本服务”)。以下所述条款和条件即构成您与CSDN就使用本服务所达成的协议(“本协议)。本协议被视为《CSDN用户服务条款》(链接:https://passport.csdn.net/ser…...

[保研/考研机试] KY30 进制转换-大整数转二进制 清华大学复试上机题 C++实现
描述 将一个长度最多为30位数字的十进制非负整数转换为二进制数输出。 输入描述: 多组数据,每行为一个长度不超过30位的十进制非负整数。 (注意是10进制数字的个数可能有30个,而非30bits的整数) 输出描述ÿ…...

vue3多条件搜索功能
搜索功能在后台管理页面中非常常见,本篇就着重讲一下vue3-admin-element框架中如何实现一个顶部多条件搜索功能 一、首先需要在vue页面的<template></template>中写入对应的结构 <!-- 搜索 --><div style"display: flex; justify-content…...
C++20协程
目录 协程原理: 进程、线程和协程的区别和联系编辑 协程在IO多路复用中 协程的目的: 协程的优势: 协程原理: (学习来源:幼麟实验室) 线程是进程中的执行体,拥有一个…...

Zabbix 6.0 监控其他
文章目录 一、Zabbix 监控 Windows 系统1)下载 Windows 客户端 Zabbix agent 22)安装客户端,配置3)在服务端 Web 页面添加主机,关联模板 二、Zabbix 监控 java 应用1)客户端开启 java jmxremote 远程监控功…...

Django rest_framework Serializer中的create、Views中的create/perform_create的区别
Django rest_framework Serializer中的create、Views中的create/perform_create的区别 对于后端来说,前后端分离的方式能让前后端的开发都爽。和所有的爽一样,每爽一次都要付出一定的代价。而前后端分离的代价,就是后端要面对巨量的模块化的功…...

差异性分析傻瓜版
path1输入你的第一个Excel path2输入你的第二个Excel DEG.dig <- function(path1,path2) { require(xlsx) require(tidyverse) require(limma) require(edgeR) E<- read.xlsx (path1,sheetIndex 1,header 1) %>% column_to_rownames(var &…...
Keystone Automotive EDI 需求分析
Keystone Automotive 是一家知名的汽车零部件销售卖场,自创立以来,在汽车行业取得了卓越的成就。作为一家专业的汽车零部件供应商,Keystone Automotive 致力于为客户提供优质的产品和卓越的服务。公司的经营范围涵盖广泛,涉及多个…...
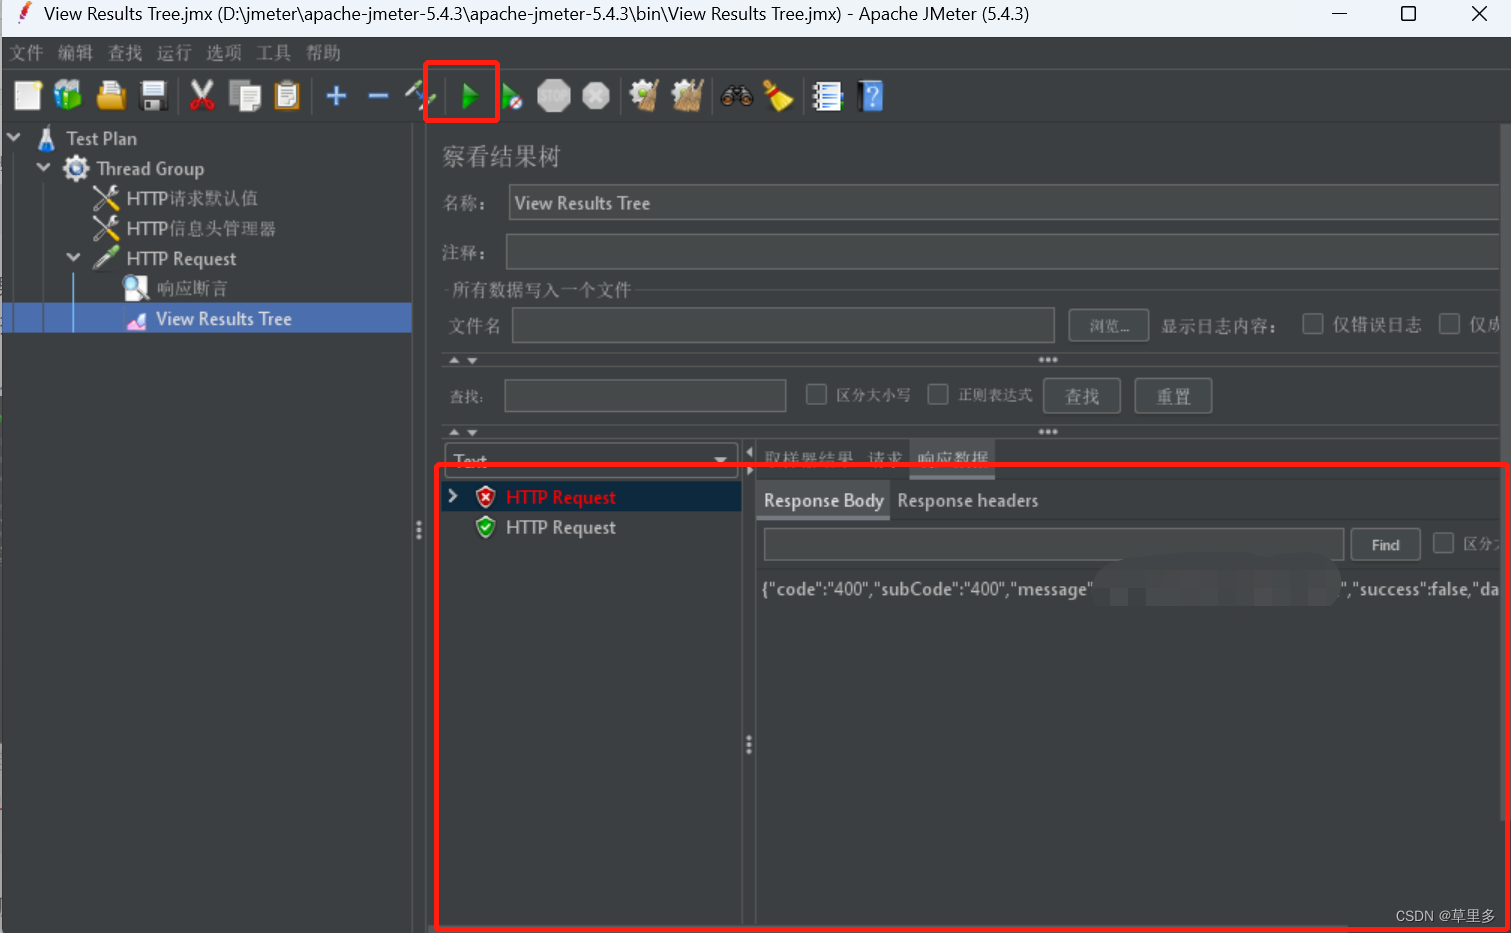
jmeter创建一个压测项目
1.jemeter新建一个项目: 2.接下来对Thread进行描述,也可以先使用默认的Thread进行操作。 3.添加http请求头的信息。按照如图所示操作 4.在请求头里面添加必要的字段,可以只填必要字段就可以 5.添加Http请求信息,如下图ÿ…...
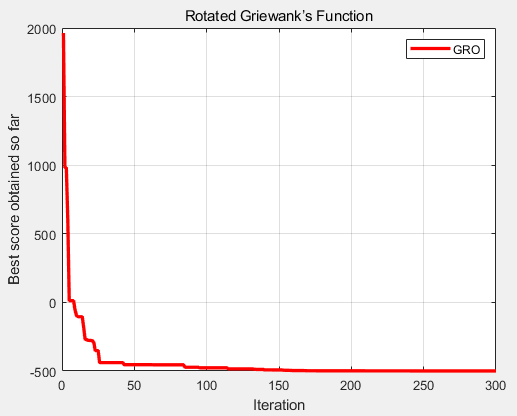
CEC2013(MATLAB):淘金优化算法GRO求解CEC2013的28个函数
一、淘金优化算法GRO 淘金优化算法(Gold rush optimizer,GRO)由Kamran Zolf于2023年提出,其灵感来自淘金热,模拟淘金者进行黄金勘探行为。淘金优化算法(Gold rush optimizer,GRO)提…...
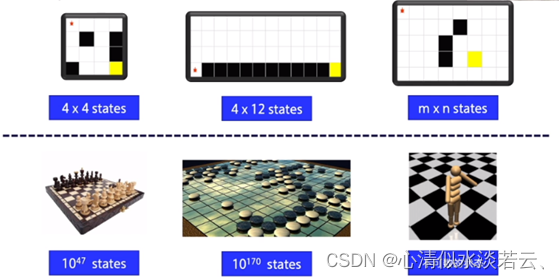
AI Deep Reinforcement Learning Autonomous Driving(深度强化学习自动驾驶)
AI Deep Reinforcement Learning Autonomous Driving(深度强化学习自动驾驶) 背景介绍研究背景研究目的及意义项目设计内容算法介绍马尔可夫链及马尔可夫决策过程强化学习神经网络 仿真平台OpenAI gymTorcs配置GTA5 参数选择行动空间奖励函数 环境及软件…...

Java super
在Java中,关键字"super"用于引用一个类的父类。它可以有以下几种用法: 1. 访问父类成员:通过使用"super"后跟一个点,你可以从子类中访问父类的成员(方法或字段)。当子类重写一个方法或…...

Qwen3.5-4B-Claude-OpusAI应用:轻量级推理服务嵌入内部知识库方案
Qwen3.5-4B-Claude-OpusAI应用:轻量级推理服务嵌入内部知识库方案 1. 模型概述 Qwen3.5-4B-Claude-4.6-Opus-Reasoning-Distilled-GGUF是基于Qwen3.5-4B的推理蒸馏模型,特别强化了结构化分析、分步骤回答、代码与逻辑类问题的处理能力。该版本以GGUF量…...

Jasminum:中文文献管理的终极解决方案,三步提升Zotero效率300%
Jasminum:中文文献管理的终极解决方案,三步提升Zotero效率300% 【免费下载链接】jasminum A Zotero add-on to retrive CNKI meta data. 一个简单的Zotero 插件,用于识别中文元数据 项目地址: https://gitcode.com/gh_mirrors/ja/jasminum …...

VMware虚拟化环境中的Cosmos-Reason1-7B性能调优
VMware虚拟化环境中的Cosmos-Reason1-7B性能调优 在VMware虚拟化环境中部署和优化大语言模型时,合理的资源配置和性能调优至关重要。本文将分享针对Cosmos-Reason1-7B模型的VMware专项优化指南,帮助你在虚拟化环境中获得接近物理机的性能表现。 1. 环境准…...

一文吃透Scrapy:从本质到实战,揭秘商用爬虫的核心框架
一文吃透Scrapy:从本质到实战,揭秘商用爬虫的核心框架 在网络爬虫领域,Scrapy绝对是绕不开的核心工具。无论是个人做数据采集,还是企业级商用爬虫项目,它都是绝大多数开发者的首选。但很多人对Scrapy的认知存在偏差&a…...

OpenClaw技能市场指南:为千问3.5-9B寻找合适的功能扩展
OpenClaw技能市场指南:为千问3.5-9B寻找合适的功能扩展 1. 为什么需要技能市场 当我第一次在本地部署完OpenClaw并成功接入千问3.5-9B模型时,发现这个组合虽然能完成基础的对话和简单任务,但面对实际工作场景中的复杂需求时总显得力不从心。…...

3步快速部署通义千问1.8B对话模型:无需复杂配置
3步快速部署通义千问1.8B对话模型:无需复杂配置 1. 为什么选择通义千问1.8B对话模型 通义千问1.5-1.8B-Chat-GPTQ-Int4是阿里云推出的轻量级对话模型,特别适合资源有限的部署场景。这个版本经过GPTQ-Int4量化后,显存需求大幅降低到仅4GB左右…...

探索MuJoCo视觉抓取强化学习:从零开始的智能机器人控制实战指南
探索MuJoCo视觉抓取强化学习:从零开始的智能机器人控制实战指南 【免费下载链接】MuJoCo_RL_UR5 A MuJoCo/Gym environment for robot control using Reinforcement Learning. The task of agents in this environment is pixel-wise prediction of grasp success c…...

AI基础设施权力更迭:AWS Bedrock 凭什么在 2026 年让开发者集体“倒戈”?
声明:本文由AI编辑生成,内容仅供参考。文中涉及的行业判断、平台能力分析、商业趋势推演与产品价值描述,均基于公开资料、通用观察及示意性表达整理,不构成任何商业承诺、采购建议、投资建议或服务保证。实际产品能力、接口支持范…...

500行代码还原儿时经典 Python Pygame 制作带 AI 决策的飞行棋
1. 前言 飞行棋(Aeroplane Chess)是许多人童年的回忆。今天,我们将使用 Python 的 Pygame 库,从零开始构建一个完整的飞行棋游戏。 这不仅仅是一个简单的绘图程序,它包含了完整的游戏逻辑状态机、一维路径坐标映射&am…...
 信号通路机制与药物研发技术综述)
免疫治疗新视角:CD47 (分化簇47) 信号通路机制与药物研发技术综述
在生物制药与免疫学领域,CD47 (分化簇47) 作为连接先天免疫与适应性免疫的关键节点,近年来备受关注。作为一种广泛表达的跨膜糖蛋白,它通过复杂的信号轴调控免疫细胞的吞噬行为。本文将深入剖析CD47的作用机制、当前药物研发的临床进展以及未…...