SpringBoot使用自定义事件监听器的demo
记录一下SpringBoot自定义事件监听器的使用方法
案例源码:SpringBoot使用自定义事件监听器的demo
使用的SpringBoot2.0.x版本
<parent><groupId>org.springframework.boot</groupId><artifactId>spring-boot-starter-parent</artifactId><version>2.0.5.RELEASE</version><relativePath/> <!-- lookup parent from repository -->
</parent>
自定义事件监听: 自定义事件 和 自定义监听两部分
自定义事件
继承自ApplicationEvent抽象类,定义自己的构造器
自定义监听
实现ApplicationListener接口,然后实现onApplicationEvent方法
首先自定义事件
ApplicationEvent抽象类

实现继承,用对象方式,新建对象
DemoUser.java
package boot.example.event.events;public class DemoUser {private String username;private String password;public String getUsername() {return username;}public void setUsername(String username) {this.username = username;}public String getPassword() {return password;}public void setPassword(String password) {this.password = password;}
}
EventDemoUser.java
package boot.example.event.events;import org.springframework.context.ApplicationEvent;public class EventDemoUser extends ApplicationEvent {private final DemoUser demoUser;public EventDemoUser(Object source, DemoUser demoUser) {super(source);this.demoUser = demoUser;}public DemoUser getDemoUser() {return demoUser;}
}
ApplicationListener接口

自定义监听类
EventDemoUserListener.java
package boot.example.event.listener;import boot.example.event.events.EventDemoUser;
import org.springframework.context.ApplicationListener;
import org.springframework.scheduling.annotation.Async;
import org.springframework.stereotype.Component;
import org.springframework.stereotype.Service;//  将监听器装载入spring容器
@Component
//@Service
public class EventDemoUserListener implements ApplicationListener<EventDemoUser> {@Async@Overridepublic void onApplicationEvent(EventDemoUser eventDemoUser) {System.out.println("自定义事件监听器(EventDemoUserListener)收到发布的消息: " + eventDemoUser.getDemoUser().getUsername());System.out.println("自定义事件监听器(EventDemoUserListener)收到发布的消息: " + eventDemoUser.getDemoUser().getPassword());}
}
我这里使用接口的方式来触发
EventDemoUserController.java
package boot.example.event.controller;import boot.example.event.events.DemoUser;
import boot.example.event.events.EventDemo;
import boot.example.event.events.EventDemoUser;
import org.springframework.context.ApplicationContext;
import org.springframework.context.ApplicationEventPublisher;
import org.springframework.web.bind.annotation.RequestMapping;
import org.springframework.web.bind.annotation.RestController;import javax.annotation.Resource;@RestController
@RequestMapping(value="/eventDemoUser")
public class EventDemoUserController {@Resourceprivate ApplicationContext applicationContext;@RequestMapping(value="/test1")public String test1() {DemoUser demoUser = new DemoUser();demoUser.setUsername("admin");demoUser.setPassword("123456");applicationContext.publishEvent(new EventDemoUser(this, demoUser));return "testEventDemo";}@Resourceprivate ApplicationEventPublisher applicationEventPublisher;@RequestMapping(value="/test2")public String test2() {DemoUser demoUser = new DemoUser();demoUser.setUsername("admin2");demoUser.setPassword("654321");applicationContext.publishEvent(new EventDemoUser(this, demoUser));return "testEventDemo";}}
这里使用了两种触发方式
@Resource
private ApplicationContext applicationContext;
@Resource
private ApplicationEventPublisher applicationEventPublisher;
控制台输出查看

自定义监听的几种方式
1.启动时手动向ApplicationContext中添加监听器
EventDemo.java
package boot.example.event.events;import org.springframework.context.ApplicationEvent;public class EventDemo extends ApplicationEvent {public EventDemo(Object source) {super(source);}
}
AppEventDemo.java
package boot.example.event;import boot.example.event.listener.EventDemoListener1;
import org.springframework.boot.SpringApplication;
import org.springframework.boot.autoconfigure.SpringBootApplication;
import org.springframework.context.ConfigurableApplicationContext;
import org.springframework.scheduling.annotation.EnableAsync;@SpringBootApplication
@EnableAsync
public class AppEventDemo {public static void main( String[] args ) {ConfigurableApplicationContext context = SpringApplication.run(AppEventDemo.class, args);// 手动向ApplicationContext中添加监听器context.addApplicationListener(new EventDemoListener1());System.out.println( "Hello World!" );}//  事件监听,自定义事件和自定义监听器类//  自定义事件:继承自ApplicationEvent抽象类,定义自己的构造器//  自定义监听:实现ApplicationListener接口,实现onApplicationEvent方法}
EventDemoListener1.java
package boot.example.event.listener;import boot.example.event.events.EventDemo;
import org.springframework.context.ApplicationListener;//  手动向ApplicationContext中添加监听器  不要@Component注解就能监听到
public class EventDemoListener1 implements ApplicationListener<EventDemo> {@Overridepublic void onApplicationEvent(EventDemo eventDemo) {Object msg = eventDemo.getSource();System.out.println("自定义事件监听器(MyEventListener1)收到发布的消息: " + msg);}
}
2.使用@Component注解自动监听
EventDemoListener2.java
package boot.example.event.listener;import boot.example.event.events.EventDemo;
import org.springframework.context.ApplicationListener;
import org.springframework.stereotype.Component;//  将监听器装载入spring容器
@Component
public class EventDemoListener2 implements ApplicationListener<EventDemo> {@Overridepublic void onApplicationEvent(EventDemo eventDemo) {Object msg = eventDemo.getSource();System.out.println("自定义事件监听器(MyEventListener2)收到发布的消息: " + msg);}
}
3.在application.properties中配置监听器,可以不用注解
EventDemoListener3.java
package boot.example.event.listener;import boot.example.event.events.EventDemo;
import org.springframework.context.ApplicationListener;//  在application.properties中配置监听器,可以不用注解
public class EventDemoListener3 implements ApplicationListener<EventDemo> {@Overridepublic void onApplicationEvent(EventDemo eventDemo) {Object msg = eventDemo.getSource();System.out.println("自定义事件监听器(MyEventListener3)收到发布的消息: " + msg);}}
application.properties配置
context.listener.classes=boot.example.event.listener.EventDemoListener3
4.通过@EventListener注解实现事件监听(使用最方便)
EventDemoListener4.java
package boot.example.event.listener;import boot.example.event.events.EventDemo;
import org.springframework.context.event.EventListener;
import org.springframework.stereotype.Component;//  通过@EventListener注解实现事件监听
@Component
public class EventDemoListener4 {@EventListenerpublic void listener(EventDemo eventDemo) {Object msg = eventDemo.getSource();System.out.println("自定义事件监听器(MyEventListener4)收到发布的消息: " + msg);}}
触发监听
EventDemoController .java
package boot.example.event.controller;import boot.example.event.events.EventDemo;
import org.springframework.context.ApplicationContext;
import org.springframework.web.bind.annotation.RequestMapping;
import org.springframework.web.bind.annotation.RestController;import javax.annotation.Resource;@RestController
@RequestMapping(value="/eventDemo")
public class EventDemoController {@Resourceprivate ApplicationContext applicationContext;@RequestMapping(value="/test")public String test() {applicationContext.publishEvent(new EventDemo("测试监听事件"));return "testEventDemo";}
}
控制台查看 四种方式执行默认是有先后顺序的

还有一种方式 这种方式使用更方便
DemoRole.java 和 DemoUser.java
package boot.example.event.events;public class DemoRole {private Integer roleId;private String roleName;public Integer getRoleId() {return roleId;}public void setRoleId(Integer roleId) {this.roleId = roleId;}public String getRoleName() {return roleName;}public void setRoleName(String roleName) {this.roleName = roleName;}
}
package boot.example.event.events;public class DemoUser {private String username;private String password;public String getUsername() {return username;}public void setUsername(String username) {this.username = username;}public String getPassword() {return password;}public void setPassword(String password) {this.password = password;}
}监听类EventDemoListenerMultiple.java
package boot.example.event.listener;import boot.example.event.events.DemoRole;
import boot.example.event.events.DemoUser;
import org.springframework.context.event.EventListener;
import org.springframework.scheduling.annotation.Async;
import org.springframework.stereotype.Component;
import org.springframework.stereotype.Service;@Component
//@Service
public class EventDemoListenerMultiple {@Async@EventListener(DemoUser.class)public void listenerDemoUser(DemoUser demoUser) {String name = demoUser.getUsername();System.out.println("listenerDemoUser---"+name);}@Async@EventListener(DemoRole.class)public void listenerDemoUser(DemoRole demoRole) {String name = demoRole.getRoleName();System.out.println("listenerDemoUser---"+name);}}
监听器触发类EventDemoMultipleController.java
package boot.example.event.controller;import boot.example.event.events.DemoRole;
import boot.example.event.events.DemoUser;
import org.springframework.context.ApplicationContext;
import org.springframework.context.ApplicationEventPublisher;
import org.springframework.web.bind.annotation.RequestMapping;
import org.springframework.web.bind.annotation.RestController;
import javax.annotation.Resource;@RestController
@RequestMapping(value="/eventDemo")
public class EventDemoMultipleController {@Resourceprivate ApplicationContext applicationContext;@RequestMapping(value="/demoUser")public String demoUser() {DemoUser demoUser = new DemoUser();demoUser.setUsername("admin");demoUser.setPassword("123456");applicationContext.publishEvent(demoUser);return "testEventDemo";}@Resourceprivate ApplicationEventPublisher applicationEventPublisher;@RequestMapping(value="/demoRole")public String demoRole() {DemoRole demoRole = new DemoRole();demoRole.setRoleId(4);demoRole.setRoleName("角色");applicationContext.publishEvent(demoRole);return "testEventDemo";}}
Servlet渐渐地淡出视野,也记录一下使用
CustomServletContextListener.java
package boot.example.event.config;import javax.servlet.ServletContextEvent;
import javax.servlet.ServletContextListener;
import javax.servlet.annotation.WebListener;/***  servelt的监听器*/
@WebListener
public class CustomServletContextListener implements ServletContextListener {@Overridepublic void contextInitialized(ServletContextEvent sce) {//  SpringBoot WEB启动间执行一次System.out.println("CustomServletContextListener--contextInitialized");}@Overridepublic void contextDestroyed(ServletContextEvent sce) {//  SpringBoot WEB销毁执行System.out.println("CustomServletContextListener--contextDestroyed");}}
在启动类加上扫描注解
@ServletComponentScan("boot.example.event.config")
项目结构

记录到此!
相关文章:
SpringBoot使用自定义事件监听器的demo
记录一下SpringBoot自定义事件监听器的使用方法 案例源码:SpringBoot使用自定义事件监听器的demo 使用的SpringBoot2.0.x版本 <parent><groupId>org.springframework.boot</groupId><artifactId>spring-boot-starter-parent</artifactId><…...

arcgis定义投影与投影
1、定义 地理坐标系(GCS):利用地球表面的经纬度表示的坐标系统。一般单位为度。投影坐标系(PCS):利用数学换算将三维地球表面上的经纬度坐标转换到二维平面上的坐标系统。一般单位为米。可以认为ÿ…...
Flink多流处理之Broadcast(广播变量)
写过Spark批处理的应该都知道,有一个广播变量broadcast这样的一个算子,可以优化我们计算的过程,有效的提高效率;同样在Flink中也有broadcast,简单来说和Spark中的类似,但是有所区别,首先Spark中的broadcast是静态的数据,而Flink中的broadcast是动态的,也就是源源不断的数据流.在…...
LVS/DR+Keepalived负载均衡实战(一)
引言 负载均衡这个概念对于一个IT老鸟来说再也熟悉不过了,当听到此概念的第一反应是想到举世闻名的nginx,但殊不知还有一个大名鼎鼎的负载均衡方案可能被忽略了,因为对于一般系统来说,很多应用场合中采用nginx基本已经满足需求&a…...

测试DWPose的onnx +Unity barracuda
环境: Unity Barracuda 3.0.1 从github直接拉取的barracuda仓库才能装到这个版本Barracuda以后不再升级了,会迁移到Unity AI大计划里的Sentis 我想申请的来着但好像已经不开放了 Unity 2021.3.20模型:dw-ll_ucoco_384.onnx 报了一些错&…...
轻装上阵,不调用jar包,用C#写SM4加密算法【卸载IKVM 】
前言 记得之前写了一个文章,是关于java和c#加密不一致导致需要使用ikvm的方式来进行数据加密,主要是ikvm把打包后的jar包打成dll包,然后Nuget引入ikvm,从而实现算法的统一,这几天闲来无事,网上找了一下加密…...
redis学习笔记(一)
文章目录 一、引言二、redis介绍2.1、定义2.2、Redis的数据类型及主要特性2.3、Redis的应用场景有哪些? 三、redis环境安装3.1、下载和安装 一、引言 在Web应用发展的初期,那时关系型数据库受到了较为广泛的关注和应用,原因是因为那时候Web站…...

最优化问题 - 拉格朗日对偶
primal 原问题 dual 对偶问题 目标函数 约束条件 可行域D 对偶专题 “拉格朗日对偶问题”如何直观理解?“KKT条件” “Slater条件” “凸优化”打包理解——bilibili 王木头 拉格朗日乘子法与对偶问题...
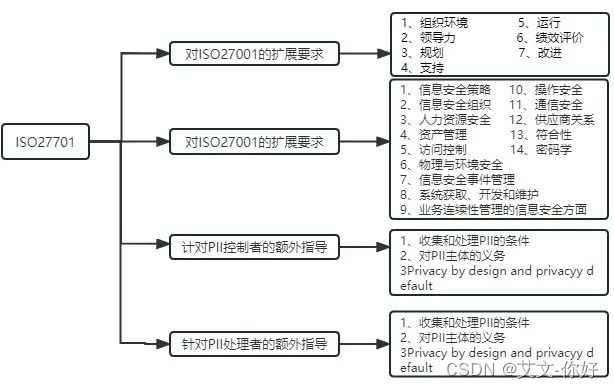
关于ISO27701隐私信息安全管理体系介绍
01 什么是ISO27701 ISO27701是对ISO27001信息安全管理和ISO27002安全控制的隐私扩展,全称《安全技术—扩展ISO27001和ISO27002的隐私信息管理—要求与指南》,是ISO标准委员会以ISO 27001为基准,以ISO27552为蓝本,建立发布的隐私…...
C语言案例 分数列求和-11
题目:有一分数列:2 / 1,3 / 2,5 / 3,8 / 5,13 / 8,21 / 13 …求出这个数列的前20项之和。 程序分析 这是一个典型的分数列数学逻辑题,考究这类题目是需要从已知的条件中找到它们的分布规律 我们把前6荐的分子与分母分别排列出来,…...

Git 入门
一、版本控制 1.1 什么是版本控制 版本控制(Revision control)是一种在开发的过程中用于管理我们对文件、目录或工程等内容的修改历史,方便查看更改历史记录,备份以便恢复以前的版本的软件工程技术。简单说就是用于管理多人协同开…...

PAT 1010 Radix
个人学习记录,代码难免不尽人意 Given a pair of positive integers, for example, 6 and 110, can this equation 6 110 be true? The answer is yes, if 6 is a decimal number and 110 is a binary number. Now for any pair of positive integers N 1and N 2…...

ruoyi-cloud微服务新建子模块
目录 相关文章1、复制system模块2、在modules下的 pom.xml文件中添加子模块 test3、进入 test模块修改 pom.xml4、修改对应的包名、目录名和启动应用程序为test5、修改bootstrap.yml文件中的端口号和应用名称6、nacos中克隆 system-dev.yml的配置,修改名称为 test-d…...
)
Dijkstra(求最短路)
时间复杂是 O(n2m) ,n 表示点数,m 表示边数 模板(朴素法一般m等于n^2的时候使用) #include<bits/stdc.h> #include<algorithm> using namespace std; const int N510; int g[N][N]; //为稠密阵所以用邻接矩阵存储 int dist[N]; //用…...

React 脚手架
1.React 定义 React 脚手架(React boilerplate)是一种预先设置好的、可以快速启动 React 项目的工具。脚手架已经包含了 React、Webpack、Babel、ESLint、Jest 等一些常用的工具和库,并已经配置好了这些工具的参数,可以直接使用和…...

CTFSHOW php命令执行
目录 web29 过滤flag web30 过滤system php web31 过滤 cat|sort|shell|\. 这里有一个新姿势 可以学习一下 web32 过滤 ; . web33 web34 web35 web36 web37 data伪协议 web38 短开表达式 web39 web40 __FILE__命令的扩展 web41 web42 重定向…...

侧滑置顶,取消置顶
第一步:布局 <?xml version"1.0" encoding"utf-8"?> <com.ddmh.magic.camera.ui.widget.SwipeMenuLayout xmlns:android"http://schemas.android.com/apk/res/android"xmlns:app"http://schemas.android.com/apk/res-auto"…...
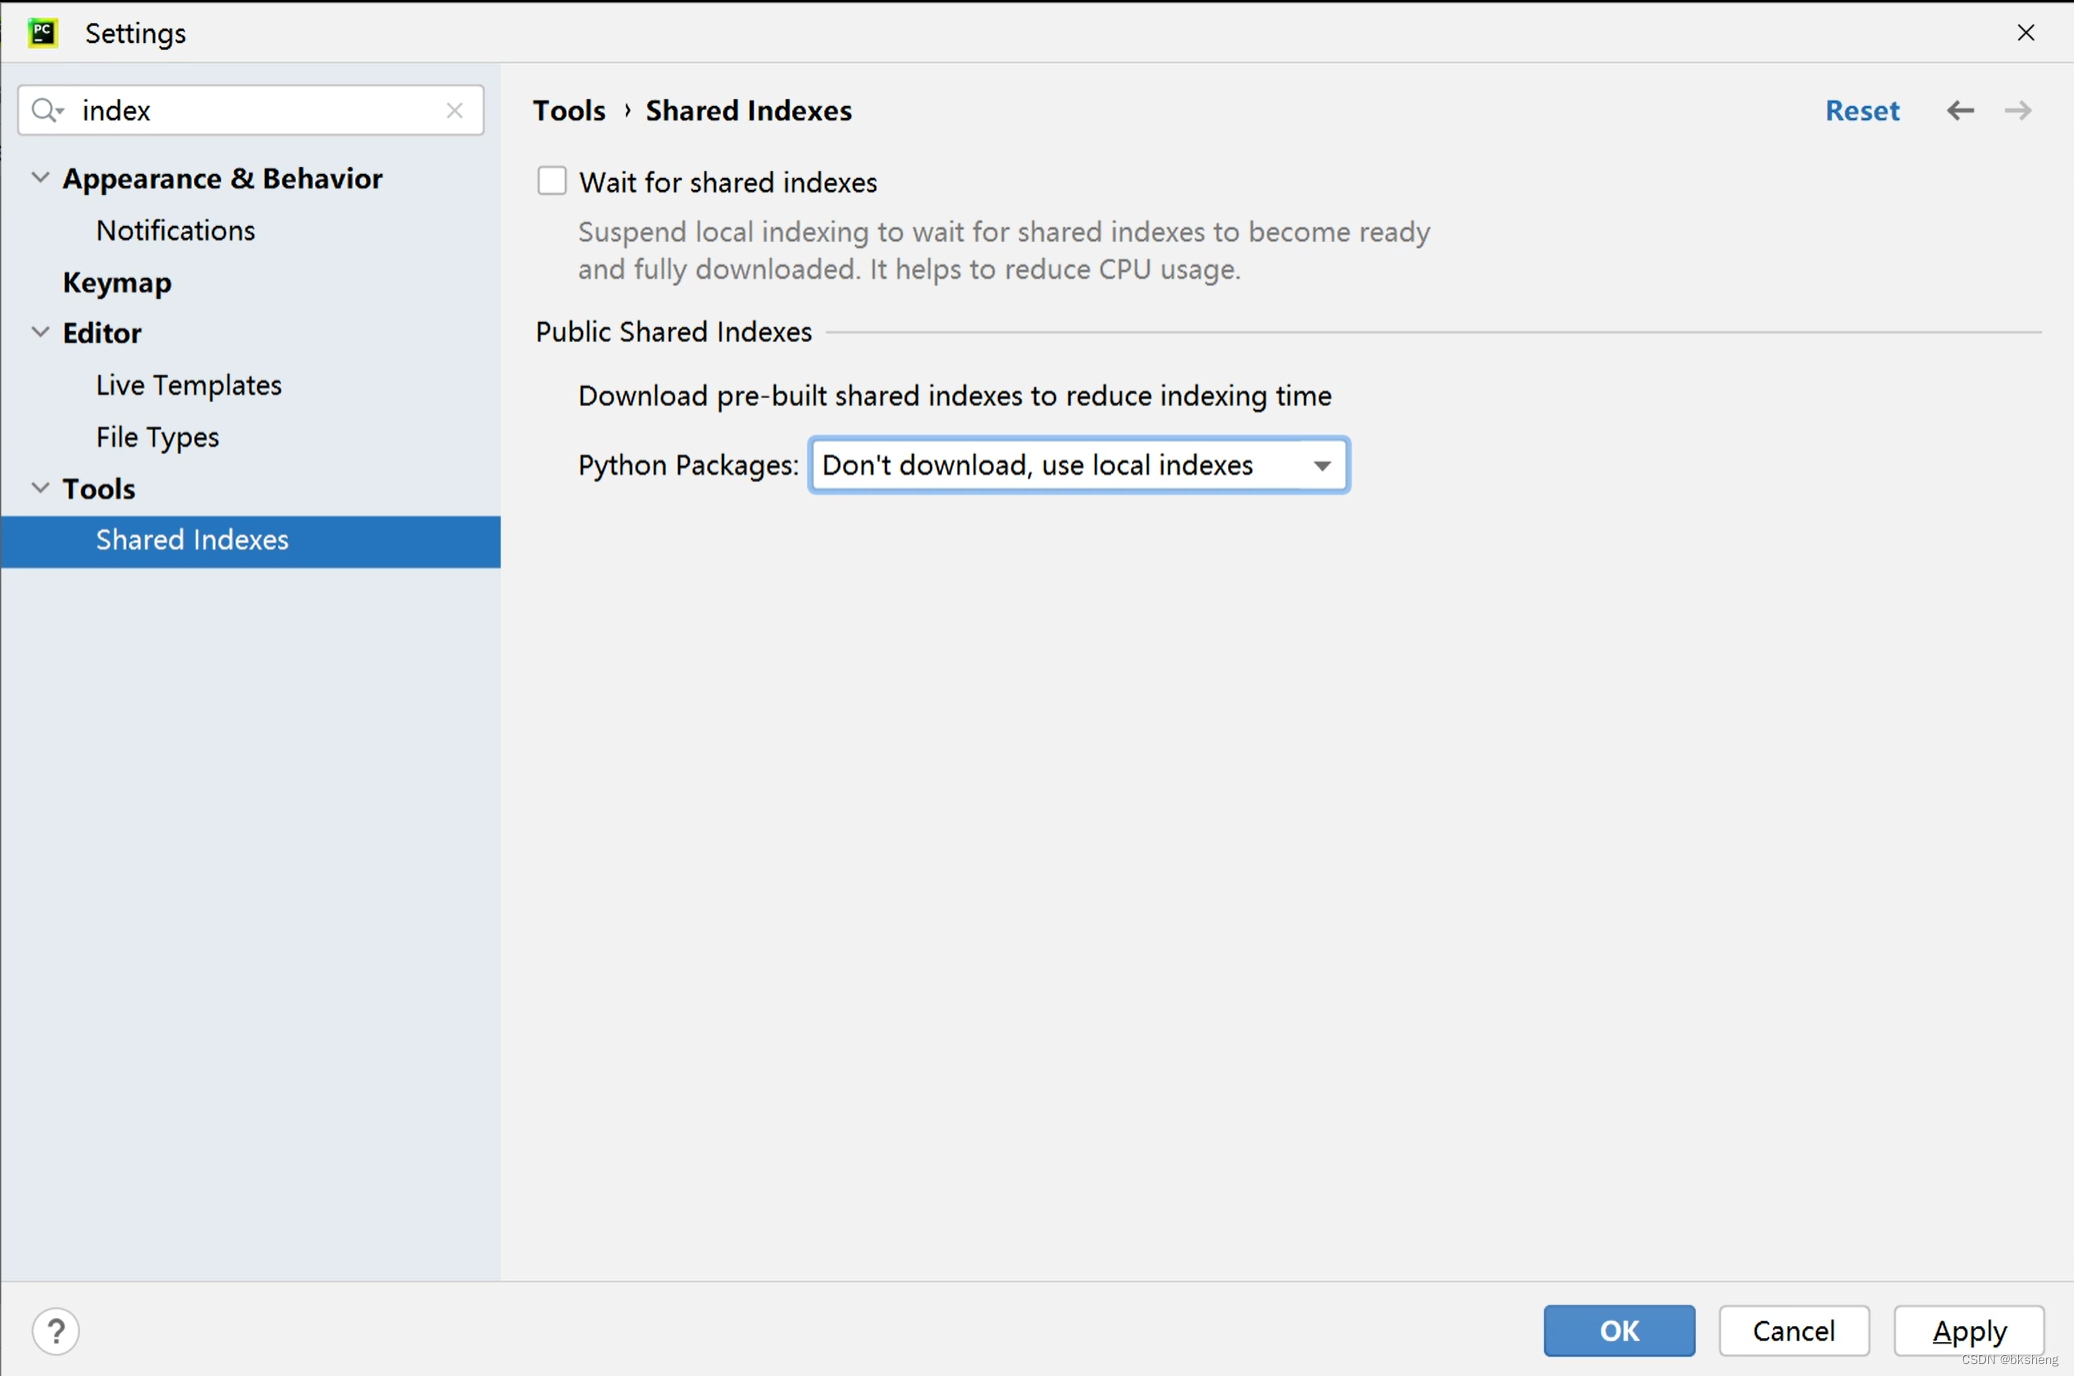
Pycharm解决启动时候索引慢的问题
设置里去掉update里面的两个勾 shared indexes中,把自动下载索引改成不下载使用本地索引...

Http请求响应时间一般划分标准
HTTP请求的响应时间被认为是长或短通常取决于具体应用场景和性能需求。一般来说,以下是一些常见的对HTTP请求响应时间进行划分的标准: 即时响应:通常在毫秒级别的响应时间被认为是即时响应。这适用于对实时性要求较高的应用,如实时…...
生成测试报告,在Unittest框架中就是简单
测试套件(Test Suite)是测试用例、测试套件或两者的集合,用于组装一组要运行的测试(多个测试用例集合在一起)。 (1)创建一个测试套件: import unittest suite unittest.TestSuite…...

Lambda与Stream详解
Lambda与Stream详解 本章导读 Lambda表达式和Stream API是Java 8最具革命性的两大特性,它们共同为Java带来了函数式编程的能力。Lambda让代码更简洁,Stream让数据处理更优雅,二者配合使用可以大幅提升开发效率和代码质量。 学习目标: 目标1:掌握Lambda表达式的语法规则和常…...

大语言模型驱动的智能体在开放世界中的终身学习:以Voyager玩转《我的世界》为例
1. 项目概述:当大语言模型“学会”玩《我的世界》 如果你关注AI领域,尤其是具身智能和智能体(Agent)的发展,那么“MineDojo/Voyager”这个项目绝对值得你花时间深入研究。这不仅仅是一个让AI玩《我的世界》(…...

LangChain OAP开源智能体平台架构解析与无代码实践指南
1. 项目概述与核心价值如果你对AI智能体(Agent)感兴趣,但又觉得从零开始写代码、处理复杂的部署和运维是件头疼事,那么你肯定不是一个人。这正是LangChain团队当初推出Open Agent Platform(OAP)的初衷。简单…...

2026-04-22-55
烽火 FitServer R4200 换盘后RAID 不自动重建 date: 2026-04-22 烽火 FitServer R4200 换盘后RAID 不自动重建 ,本质就几类原因,我给你按最常见到最少见的顺序讲清楚,你对照一下基本就能定位: 1. 新硬盘有 “外来配置”࿰…...

# 2026年SaaS小程序制作平台对比:乔拓云、有赞、微盟
2026年SaaS小程序制作平台对比:乔拓云、有赞、微盟 SaaS小程序制作平台对比:乔拓云、有赞、微盟的深度剖析 在数字化转型浪潮中,微信小程序已成为企业触达用户、拓展线上业务的核心载体。面对市场上琳琅满目的SaaS小程序制作平台,…...

重磅!DeepSeek V4横空出世,百万上下文时代来了!
4月24日,国产AI大模型圈炸出了一波"深水炸弹"——深度求索(DeepSeek)正式发布了V4模型预览版,并同步开源全部权重,协议为MIT。这款新模型的发布,被业内视为中国AI从"偶尔令人震撼"迈向…...

TiDB 实战项目:从需求分析到生产级代码完整记录
一、前言TiDB 实战项目:从需求分析到生产级代码完整记录。本文从实际项目出发,给出完整可运行的代码,帮你快速掌握实战技能。二、需求分析与架构设计2.1 业务需求功能需求: - 用户注册/登录,支持邮箱和手机号 - JWT 无…...

告别多余空白:Matplotlib 图像输出精细化控制指南 / 详解 bbox_inches 与 subplots_adjust 实战
1. 为什么你的Matplotlib图表总有多余空白? 每次用Matplotlib保存图表时,你是不是也遇到过这样的烦恼:明明在代码里设置了完美的尺寸,保存出来的图片却总带着一圈多余的空白边缘?这些空白不仅浪费空间,还会…...

Git克隆报错SSL routines:ssl3_get_record?别慌,这可能是你的代理在‘捣乱’
Git克隆报错SSL routines:ssl3_get_record的深度排查与解决方案 当你正专注于某个开源项目,准备通过git clone获取代码时,突然遇到SSL routines:ssl3_get_record:wrong version number的错误提示,这种突如其来的技术障碍往往会打乱开发节奏。…...
)
别再让Docker和K8s打架了:手把手教你统一cgroup驱动为systemd(附完整daemon.json配置)
深度解析:如何统一Docker与Kubernetes的cgroup驱动为systemd 在容器化技术栈中,Docker和Kubernetes的协同工作已经成为现代应用部署的标准模式。然而,当这两种技术相遇时,一个经常被忽视却可能导致严重稳定性问题的配置细节就是cg…...