[高光谱]PyTorch使用CNN对高光谱图像进行分类
项目原地址:
Hyperspectral-Classification![]() https://github.com/eecn/Hyperspectral-ClassificationDataLoader讲解:
https://github.com/eecn/Hyperspectral-ClassificationDataLoader讲解:
[高光谱]使用PyTorch的dataloader加载高光谱数据![]() https://blog.csdn.net/weixin_37878740/article/details/130929358
https://blog.csdn.net/weixin_37878740/article/details/130929358
一、模型加载
在原始项目中,提供了14种模型可供选择,从最简单的SVM到3D-CNN,这里以2D-CNN为例,在原项目中需要将model属性设置为:sharma。

模型通过一个get_model(.)函数获得,该函数一共四个返回(model, optimizer, loss, hyperparams;分别为:模型,迭代器,损失函数,超参数),输入为模型类别。
进入函数内部,找到对应的函数体如下:
elif name == 'sharma':kwargs.setdefault('batch_size', 60) #batch_szieepoch = kwargs.setdefault('epoch', 30) #迭代数lr = kwargs.setdefault('lr', 0.05) #学习率center_pixel = True #是否开启中心像素模型# We assume patch_size = 64kwargs.setdefault('patch_size', 64) #patch_szie,即图像块大小model = SharmaEtAl(n_bands, n_classes, patch_size=kwargs['patch_size']) #模型本体optimizer = optim.SGD(model.parameters(), lr=lr, weight_decay=0.0005) #迭代器criterion = nn.CrossEntropyLoss(weight=kwargs['weights']) #交叉熵损失函数kwargs.setdefault('scheduler', optim.lr_scheduler.MultiStepLR(optimizer, milestones=[epoch // 2, (5 * epoch) // 6], gamma=0.1))这里设置了一部分超参数,同时设置了patch_size为64(此概念可以参见dataloader篇),采用的损失函数为常见的交叉熵损失函数,而模型本体则是使用SharmaEtAl(.)进行加载。
二、模型本体
跳转至SharmaEtAl(nn.Module),其继承自nn.model,输入参数3个,分别为:输入通道数、分类数、图块尺寸。
def __init__(self, input_channels, n_classes, patch_size=64):该网络的结构如图,模型中里面包含3个卷积、2个bn、2个池化和2个全连接,如下:
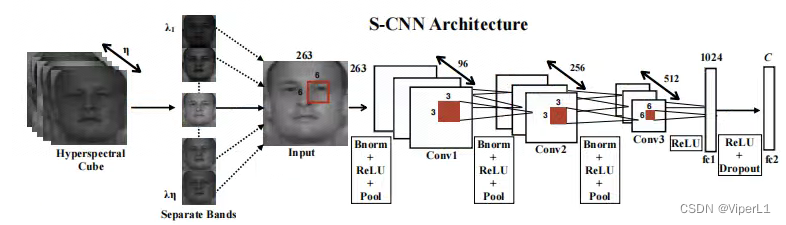
# 卷积层1
self.conv1 = nn.Conv3d(1, 96, (input_channels, 6, 6), stride=(1,2,2))
self.conv1_bn = nn.BatchNorm3d(96)
self.pool1 = nn.MaxPool3d((1, 2, 2))
# 卷积层2
self.conv2 = nn.Conv3d(1, 256, (96, 3, 3), stride=(1,2,2))
self.conv2_bn = nn.BatchNorm3d(256)
self.pool2 = nn.MaxPool3d((1, 2, 2))
# 卷积层3
self.conv3 = nn.Conv3d(1, 512, (256, 3, 3), stride=(1,1,1))# 展平函数
self.features_size = self._get_final_flattened_size()# 由两个全连接组成的分类器
self.fc1 = nn.Linear(self.features_size, 1024)
self.dropout = nn.Dropout(p=0.5)
self.fc2 = nn.Linear(1024, n_classes)其中的展平函数_get_final_flattened_size(.),并不实际参与前向传递,仅计算转换后的通道数。
def _get_final_flattened_size(self):with torch.no_grad():x = torch.zeros((1, 1, self.input_channels,self.patch_size, self.patch_size))x = F.relu(self.conv1_bn(self.conv1(x)))x = self.pool1(x)print(x.size())b, t, c, w, h = x.size()x = x.view(b, 1, t*c, w, h) x = F.relu(self.conv2_bn(self.conv2(x)))x = self.pool2(x)print(x.size())b, t, c, w, h = x.size()x = x.view(b, 1, t*c, w, h) x = F.relu(self.conv3(x))print(x.size())_, t, c, w, h = x.size()return t * c * w * h实际的前向传递如下:
def forward(self, x):# 卷积块1x = F.relu(self.conv1_bn(self.conv1(x)))x = self.pool1(x)# 获取tensor尺寸b, t, c, w, h = x.size()# 调整tensor尺寸x = x.view(b, 1, t*c, w, h) # 卷积块2x = F.relu(self.conv2_bn(self.conv2(x)))x = self.pool2(x)# 获取tensor尺寸b, t, c, w, h = x.size()# 调整tensor尺寸x = x.view(b, 1, t*c, w, h) # 卷积块3x = F.relu(self.conv3(x))# 调整tensor尺寸x = x.view(-1, self.features_size)# 分类器x = self.fc1(x)x = self.dropout(x)x = self.fc2(x)return x三、训练与测试
主函数中,训练和测试结构如下:
try:train(model, optimizer, loss, train_loader, hyperparams['epoch'],scheduler=hyperparams['scheduler'], device=hyperparams['device'],supervision=hyperparams['supervision'], val_loader=val_loader,display=viz)except KeyboardInterrupt:# Allow the user to stop the trainingpassprobabilities = test(model, img, hyperparams)prediction = np.argmax(probabilities, axis=-1)训练被封装在train(.)函数中,测试封装在test(.)函数中,下面逐一来看。
首先是train函数,这里省去外围部分,仅看核心的循环控制段。
# 外循环控制,用于控制轮次(epoch)
for e in tqdm(range(1, epoch + 1), desc="Training the network"):# 进入训练模式net.train()avg_loss = 0.# 从dataloader中取出图像(data)和标签(target)for batch_idx, (data, target) in tqdm(enumerate(data_loader), total=len(data_loader)):# 如果是GPU模式则需要转换为cuda格式data, target = data.to(device), target.to(device)#---实际的训练部分---## 冻结梯度optimizer.zero_grad()# 训练模式(监督训练/半监督训练)if supervision == 'full':# 前向传递output = net(data)#target = target - 1# 交叉熵损失函数loss = criterion(output, target)elif supervision == 'semi':outs = net(data)output, rec = outs#target = target - 1loss = criterion[0](output, target) + net.aux_loss_weight * criterion[1](rec, data)#---实际的训练部分---## 损失函数反向传递loss.backward()# 迭代器步进optimizer.step()# 记录损失函数avg_loss += loss.item()losses[iter_] = loss.item()mean_losses[iter_] = np.mean(losses[max(0, iter_ - 100):iter_ + 1])iter_ += 1del(data, target, loss, output)接下来是test函数,与train不同的是,其参数为:model, img, hyperparams。其中img,是一整张高光谱图像,而不是由DataSet块采样后的图像块。故其结构也与train大不相同。
在进行测试的时候,需要一个滑动窗口(sliding_window)函数将其进行切块以满足图像输入的要求。同时还需要一个grouper函数将其组装为batch送入神经网络中。所以我们可以看到循环控制的最外层实际上就是上面两个函数来组成的。
# 图像切块iterations = count_sliding_window(img, **kwargs) // batch_sizefor batch in tqdm(grouper(batch_size, sliding_window(img, **kwargs)),total=(iterations),desc="Inference on the image"):# 锁定梯度with torch.no_grad():# 逐像素模式if patch_size == 1:data = [b[0][0, 0] for b in batch]data = np.copy(data)data = torch.from_numpy(data)# 其他模式else:data = [b[0] for b in batch]data = np.copy(data)data = data.transpose(0, 3, 1, 2)data = torch.from_numpy(data)data = data.unsqueeze(1)indices = [b[1:] for b in batch]# 类型转换data = data.to(device)# 前向传递output = net(data)if isinstance(output, tuple):output = output[0]output = output.to('cpu')if patch_size == 1 or center_pixel:output = output.numpy()else:output = np.transpose(output.numpy(), (0, 2, 3, 1))for (x, y, w, h), out in zip(indices, output):# 将得到的像素平装回原尺寸if center_pixel:probs[x + w // 2, y + h // 2] += outelse:probs[x:x + w, y:y + h] += outreturn probs这个函数会使用上述的两个函数,将图像切割成可以放入神经网络的尺寸并逐个进行前向传递,最后将得到的所有像素的结果按照原来的尺寸组成一个结果矩阵返回。
最后,这个结果由一个argmax函数得到其概率最大的预测结果:
prediction = np.argmax(probabilities, axis=-1)四、结果计算
在完成上述步骤后,由metrics(.)函数计算最终的模型结果:
run_results = metrics(prediction, test_gt, ignored_labels=hyperparams['ignored_labels'], n_classes=N_CLASSES)其函数体如下:
def metrics(prediction, target, ignored_labels=[], n_classes=None):"""Compute and print metrics (accuracy, confusion matrix and F1 scores).Args:prediction: list of predicted labelstarget: list of target labelsignored_labels (optional): list of labels to ignore, e.g. 0 for undefn_classes (optional): number of classes, max(target) by defaultReturns:accuracy, F1 score by class, confusion matrix"""ignored_mask = np.zeros(target.shape[:2], dtype=np.bool)for l in ignored_labels:ignored_mask[target == l] = Trueignored_mask = ~ignored_mask#target = target[ignored_mask] -1target = target[ignored_mask]prediction = prediction[ignored_mask]results = {}n_classes = np.max(target) + 1 if n_classes is None else n_classescm = confusion_matrix(target,prediction,labels=range(n_classes))results["Confusion matrix"] = cm# Compute global accuracytotal = np.sum(cm)accuracy = sum([cm[x][x] for x in range(len(cm))])accuracy *= 100 / float(total)results["Accuracy"] = accuracy# Compute F1 scoreF1scores = np.zeros(len(cm))for i in range(len(cm)):try:F1 = 2. * cm[i, i] / (np.sum(cm[i, :]) + np.sum(cm[:, i]))except ZeroDivisionError:F1 = 0.F1scores[i] = F1results["F1 scores"] = F1scores# Compute kappa coefficientpa = np.trace(cm) / float(total)pe = np.sum(np.sum(cm, axis=0) * np.sum(cm, axis=1)) / \float(total * total)kappa = (pa - pe) / (1 - pe)results["Kappa"] = kappareturn results相关文章:
[高光谱]PyTorch使用CNN对高光谱图像进行分类
项目原地址: Hyperspectral-Classificationhttps://github.com/eecn/Hyperspectral-ClassificationDataLoader讲解: [高光谱]使用PyTorch的dataloader加载高光谱数据https://blog.csdn.net/weixin_37878740/article/details/130929358 一、模型加载 在…...
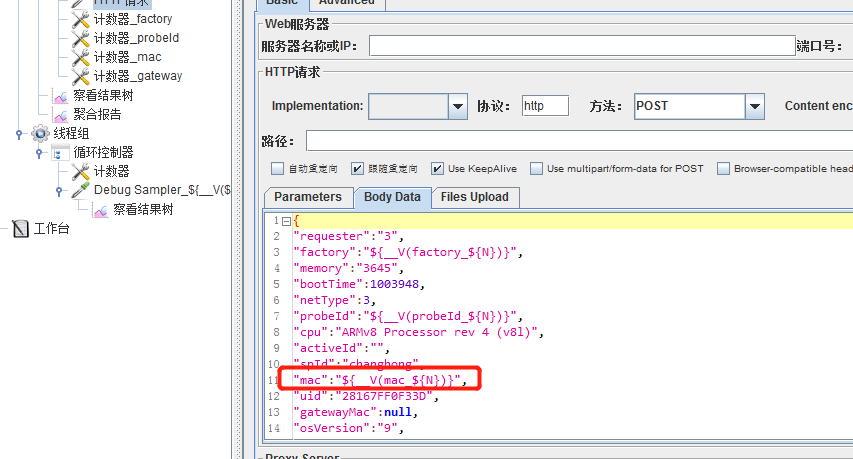
jmeter获取mysql数据
JDBC Connection Configuration Database URL: jdbc:mysql:// 数据库地址 /库名 JDBC Driver class:com.mysql.jdbc.Driver Username:账号 Password:密码 JDBC Request 字段含义 字段含义 Variable Name Bound to Pool 数据库连接池配置…...
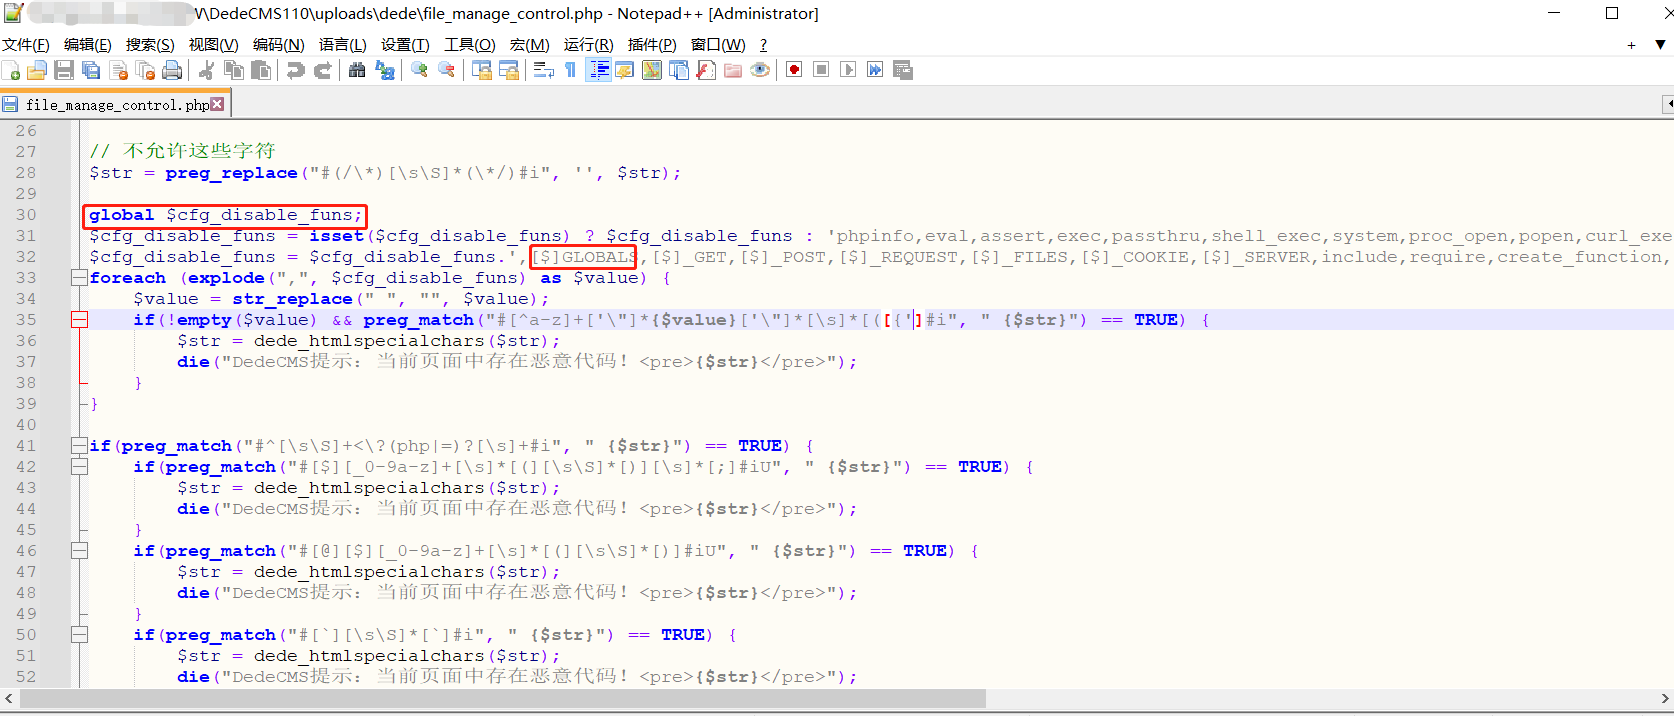
Dedecms V110最新版RCE---Tricks
前言 刚发现Dedecms更新了发布版本,顺便测试一下之前的day有没有修复,突然想到了新的tricks去实现RCE。 文章发布的时候估计比较晚了,一直没时间写了。 利用 /uploads/dede/article_string_mix.php /uploads/dede/article_template_rand.…...
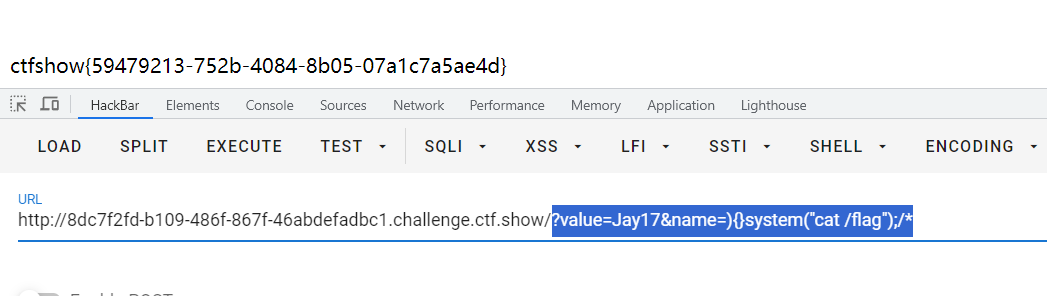
CTFshow 限时活动 红包挑战7、红包挑战8
CTFshow红包挑战7 写不出来一点,还是等了官方wp之后才复现。 直接给了源码 <?php highlight_file(__FILE__); error_reporting(2);extract($_GET); ini_set($name,$value);system("ls ".filter($_GET[1])."" );function filter($cmd){$cmd…...

Redis使用Lua脚本和Redisson来保证库存扣减中的原子性和一致性
文章目录 前言1.使用SpringBoot Redis 原生实现方式2.使用redisson方式实现3. 使用RedisLua脚本实现3.1 lua脚本代码逻辑 3.2 与SpringBoot集成 4. Lua脚本方式和Redisson的方式对比5. 源码地址6. Redis从入门到精通系列文章7. 参考文档 前言 背景:最近有社群技术交…...
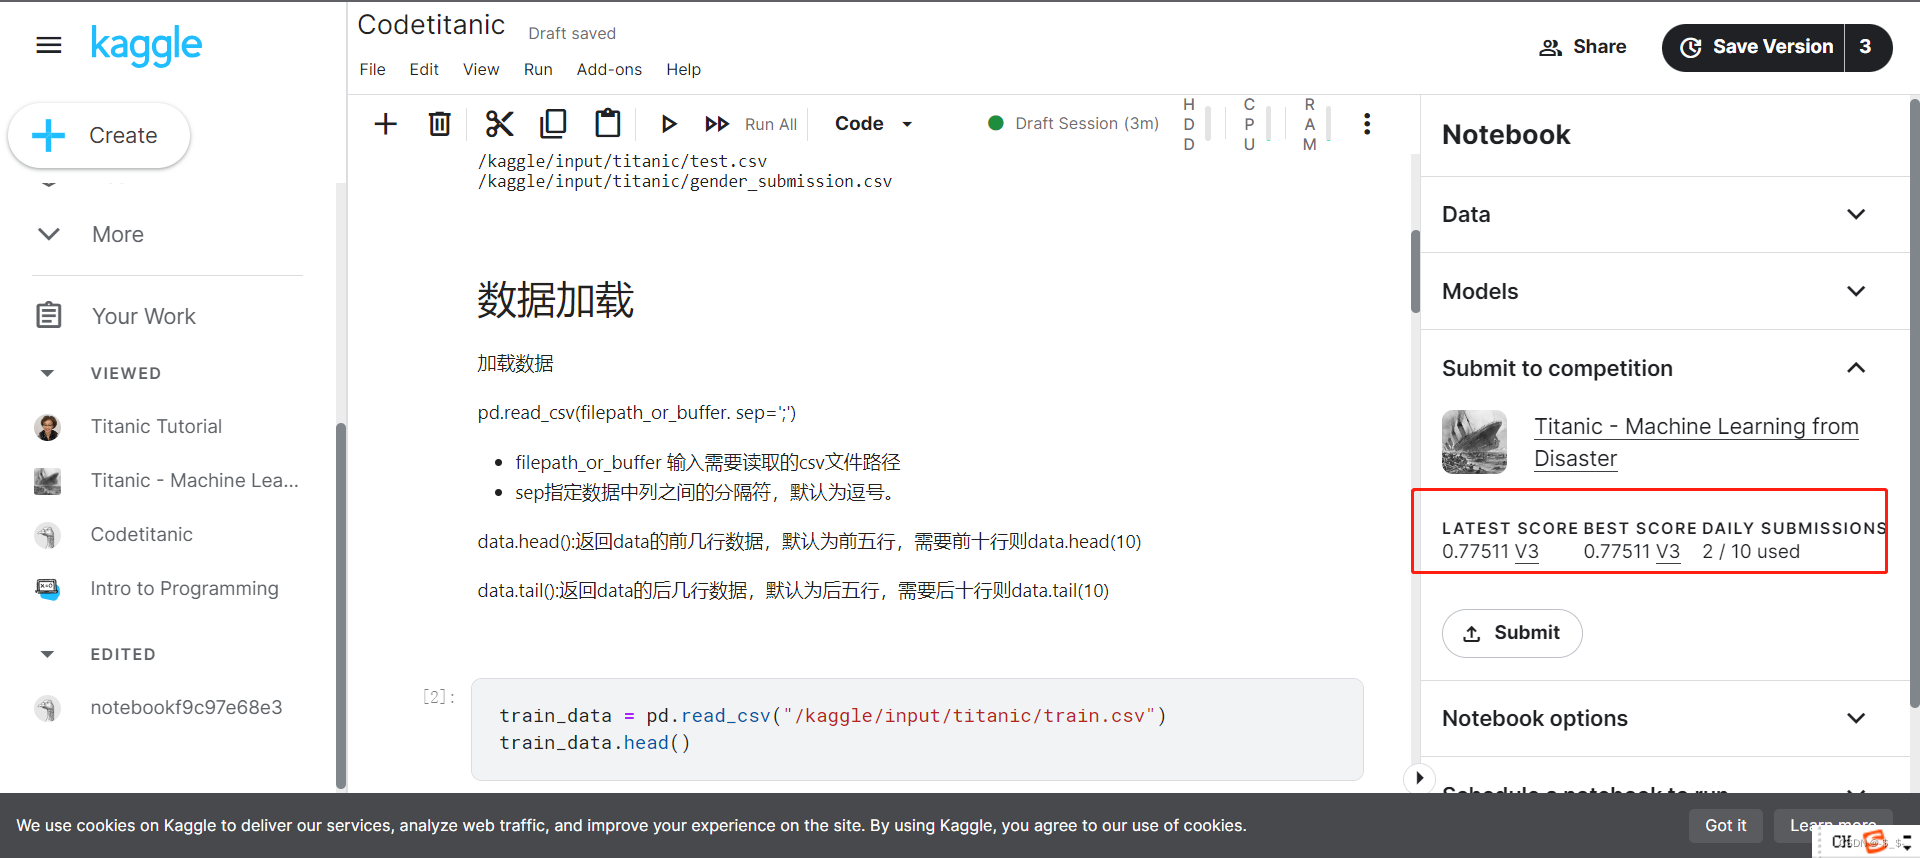
【从零开始学Kaggle竞赛】泰坦尼克之灾
目录 0.准备1.问题分析挑战流程数据集介绍结果提交 2.代码实现2.1 加载数据2.1.1 加载训练数据2.1.2 加载测试数据 2.2 数据分析2.3 模型建立与预测 3.结果提交 0.准备 注册kaggle账号后,进入titanic竞赛界面 https://www.kaggle.com/competitions/titanic 进入后界…...

输出无重复的3位数和计算无人机飞行坐标
编程题总结 题目一:输出无重复的3位数 题目描述 从{1,2,3,4,5,6,7,8,9}中随机挑选不重复的5个数字作为输入数组‘selectedDigits’,能组成多少个互不相同且无重复数字的3位数?请编写程》序,从小到大顺序,以数组形式输出这些3位…...

muduo 29 异步日志
目录 Muduo双缓冲异步日志模型: 异步日志实现: 为什么要实现非阻塞的日志...

Qt 对象序列化/反序列化
阅读本文大概需要 3 分钟 背景 日常开发过程中,避免不了对象序列化和反序列化,如果你使用 Qt 进行开发,那么有一种方法实现起来非常简单和容易。 实现 我们知道 Qt 的元对象系统非常强大,基于此属性我们可以实现对象的序列化和…...
)
从零学算法(非官方题库)
输入两棵二叉树A和B,判断B是不是A的子结构。(约定空树不是任意一个树的子结构) B是A的子结构, 即 A中有出现和B相同的结构和节点值。 例如: 给定的树 A:3/ \4 5/ \1 2给定的树 B:4 / 1返回 true,因为 B 与 A 的一个子树拥有相…...

Java # JVM内存管理
一、运行时数据区域 程序计数器、Java虚拟机栈、本地方法栈、Java堆、方法区、运行时常量池、直接内存 二、HotSpot虚拟机对象 对象创建: 引用检查类加载检查分配内存空间:指针碰撞、空闲列表分配空间初始化对象信息设置(对象头内࿰…...

大疆第二批笔试复盘
大疆笔试复盘(8-14) 笔试时候的状态和下来复盘的感觉完全不一样,笔试时脑子是懵的。 (1)输出无重复三位数 题目描述 从 { 1 , 2 , 3 , 4 , 5 , 6 , 7 , 8 , 9 } \left \{ 1,2,3,4,5,6,7,8,9 \right \...

【Linux】磁盘或内存 占用比较高要怎么排
当 Linux 磁盘空间满了时 请注意,在进行任何删除操作之前,请确保你知道哪些文件可以安全删除,并备份重要文件,以免意外丢失数据。当 Linux 磁盘空间满了时,可以按照以下步骤进行排查: 检查磁盘使用情况&…...
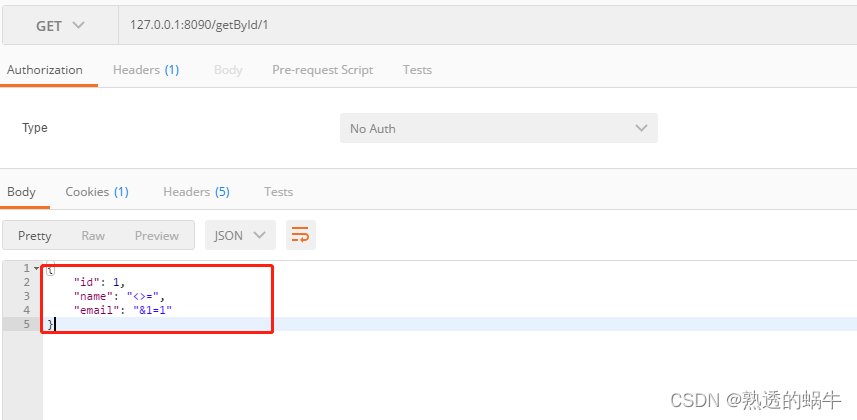
解决xss转义导致转码的问题
一、xss简介 人们经常将跨站脚本攻击(Cross Site Scripting)缩写为CSS,但这会与层叠样式表(Cascading Style Sheets,CSS)的缩写混淆。因此,有人将跨站脚本攻击缩写为XSS。跨站脚本攻击ÿ…...
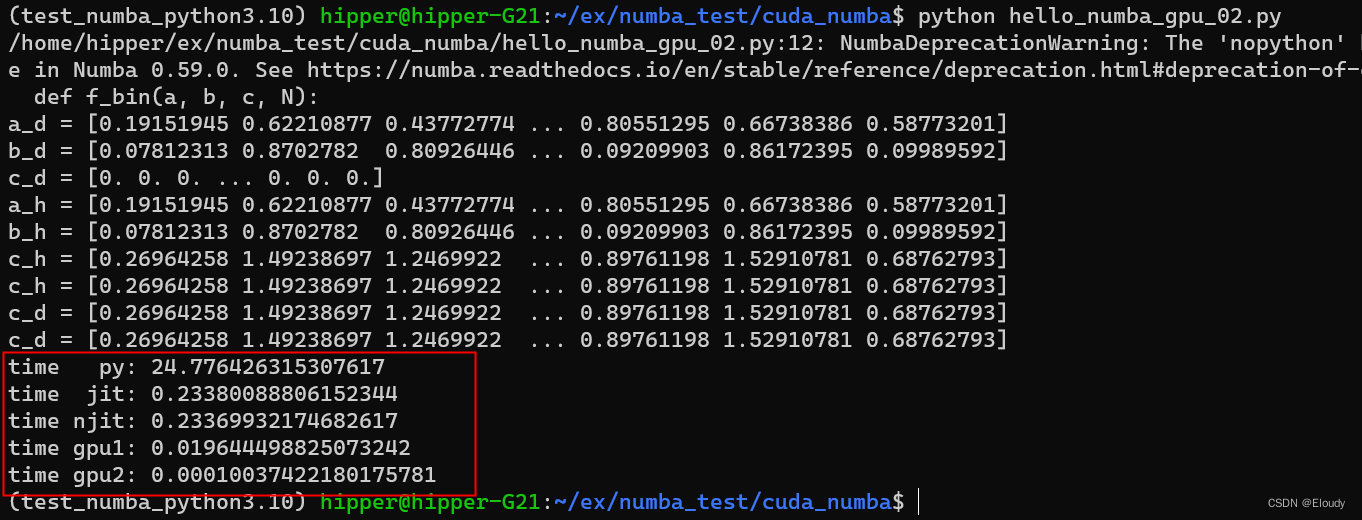
numba 入门示例
一维向量求和: C A B 在有nv 近几年gpu的ubuntu 机器上, 环境预备: conda create -name numba_cuda_python3.10 python3.10 conda activate numba_cuda_python3.10conda install numba conda install cudatoolkit conda install -c nvi…...

BUUCTF 还原大师 1
题目描述: 我们得到了一串神秘字符串:TASC?O3RJMV?WDJKX?ZM,问号部分是未知大写字母,为了确定这个神秘字符串,我们通过了其他途径获得了这个字串的32位MD5码。但是我们获得它的32位MD5码也是残缺不全,E903???4D…...

自定义hook之首页数据请求动作封装 hooks
本例子实现了自定义hook之首页数据请求动作封装 hooks,具体代码如下 export type OrganData {dis: Array<{ disease: string; id: number }>;is_delete: number;name: string;organ_id: number;parent_id: number;sort: number; }; export type SwiperData …...

2023上半年京东手机行业品牌销售排行榜(京东数据平台)
后疫情时代,不少行业都迎来消费复苏,我国智能手机市场在今年上半年也实现温和的复苏,手机市场的出货量回暖。 根据鲸参谋平台的数据显示,2023年上半年,京东平台上手机的销量为2830万,环比增长约4%…...
源码阅读笔记)
lodash之cloneDeep()源码阅读笔记
lodash之cloneDeep()源码阅读笔记 基本上都在写业务代码,没有机会写库,还是想了解一下lodash的库源码是怎么样的,平时用的最多的就是cloneDeep()方法了,终于有空详细看看其中的源码。 本文基于lodash5.0.0版本的源码进行阅读。 /…...

算法模版,今天开始背
二分查找算法 int left_bound(int[] nums, int target) {int left 0, right nums.length - 1;// 搜索区间为 [left, right]while (left < right) {int mid left (right - left) / 2;if (nums[mid] < target) {// 搜索区间变为 [mid1, right]left mid 1;} else if …...

如何用deberta-v3-base-zeroshot-v2.0构建企业级NLP应用?完整教程来了
如何用deberta-v3-base-zeroshot-v2.0构建企业级NLP应用?完整教程来了 【免费下载链接】deberta-v3-base-zeroshot-v2.0 项目地址: https://ai.gitcode.com/hf_mirrors/NingBo_Ascend/deberta-v3-base-zeroshot-v2.0 deberta-v3-base-zeroshot-v2.0是一款基…...

FM3773 低功耗离线式恒流/恒压 PSR 控制器
概述 FM3773 是一种高性能的交流/直流用于电池充电器和适配器的电源控制器,内置 850V 功率三极管。该设备采用脉冲频率调制(PFM)的方法来建立非连续导通模式(DCM)反激式电源。 FM3773 提供精确的恒定电压,恒…...

别再死记硬背了!用5个生活化比喻彻底搞懂Linux进程的fork、exec和wait
别再死记硬背了!用5个生活化比喻彻底搞懂Linux进程的fork、exec和wait想象你正在厨房准备一顿大餐。菜谱上写着"切菜"、"炒菜"、"装盘"等步骤,但突然发现需要同时处理多道菜品——这时候,你会本能地让家人分工…...

网络配置工具类详解
CNet 网络配置工具类详解平台:仅支持 Linux,大量使用 ioctl 系统调用一、概述 CNet 是一个 纯静态方法的网络配置工具类,封装了 Linux 下常用的网络操作:功能类别涵盖内容IP 地址读取/设置本机 IP、子网掩码网关读取/添加/删除/设…...

Godot4 2D游戏开发避坑指南:TileMap绘制、节点顺序与相机设置的三个常见问题
Godot4 2D游戏开发避坑指南:TileMap绘制、节点顺序与相机设置的三个常见问题当你第一次用Godot4完成一个2D场景搭建时,那种成就感往往会被几个突如其来的bug瞬间击碎——角色神秘消失、背景纹丝不动、屏幕边缘出现诡异黑边。这些问题看似简单,…...

艾尔登法环存档迁移终极指南:3分钟解决角色转移难题
艾尔登法环存档迁移终极指南:3分钟解决角色转移难题 【免费下载链接】EldenRingSaveCopier 项目地址: https://gitcode.com/gh_mirrors/el/EldenRingSaveCopier 还在为《艾尔登法环》存档版本不兼容而烦恼吗?EldenRingSaveCopier 是你的终极解决…...

基于KS距离度量交通流分布偏移:提升DRL交通信号控制鲁棒性的工程实践
1. 项目概述与核心挑战在智能交通系统(ITS)领域,基于深度强化学习(DRL)的交通信号控制(Traffic Signal Control)正从研究走向实际部署。作为一名长期关注AI落地应用的从业者,我见过太…...

突破本地媒体解码屏障:QQ影音 4K/H.265 硬件加速优化与 DLL 运行库环境修复
突破本地媒体解码屏障:QQ影音 4K/H.265 硬件加速优化与 DLL 运行库环境修复 在日常开发和技术写作中,我们经常需要处理本地音视频文件,或者截取一段高质量的 GIF 动图作为 GitHub PR、CSDN 博客的演示说明。 虽然目前市面上有 PotPlayer、V…...

从UE/Unity转战Godot:一个老引擎开发者的踩坑与真香实录
从UE/Unity转战Godot:一个老引擎开发者的踩坑与真香实录 第一次双击Godot图标时,我正坐在堆满Unity参考书的办公桌前。作为用过五年Unity、三年Unreal的"引擎老油条",我带着审视新玩具的心态点开了这个不到100MB的绿色软件——没想…...

【开源】前端拖拽表单设计器 自定义表单
【开源】开源 VUE拖拽表单设计器 自定义表单 开源 tduck-platform: Tduck-填鸭收集器是一款开源的表单在线收集系统,后台基于SpringBootMybatisPlusMySqlRedis,前端基于Vue ElementUI开发,功能强大,界面美观。keywords࿱…...