ELKstack-Elasticsearch配置与使用
一. 部署前准备
最小化安装 Centos 7.x/Ubuntu x86_64 操作系统的虚拟机,vcpu 2,内存 4G 或更多,
操作系统盘 50G,主机名设置规则为 es-server-nodeX , 额外添加一块单独的数据磁盘
大小为 50G 并格式化挂载到/data/elk目录来存储 ES 的数据和日志。
环境:
| 主机名 | IP | 运行的服务 |
|---|---|---|
| es-server-node1 | 192.168.100.142 | Elasticsearch、Head、Cerebro |
| es-server-node2 | 192.168.100.144 | Elasticsearch 、Logstash |
| es-server-node3 | 192.168.100.146 | Elasticsearch 、Kibana |
1.1 设置主机名和新增磁盘
设置主机名并重启:
~# hostnamectl set-hostname es-server-node1 && reboot
~# hostnamectl set-hostname es-server-node2 && reboot
~# hostnamectl set-hostname es-server-node3 && reboot
在各主机新增 50G 磁盘,并挂载到/data/elk目录:
root@es-server-node2:~# lsblk
NAME   MAJ:MIN RM  SIZE RO TYPE MOUNTPOINT
sda      8:0    0   40G  0 disk
└─sda1   8:1    0   40G  0 part /
sdb      8:16   0   50G  0 disk   # 新增的磁盘
sr0     11:0    1  900M  0 rom
root@es-server-node2:~# mkfs.xfs -L "ELK-data" /dev/sdb  # 创建文件系统
meta-data=/dev/sdb               isize=512    agcount=4, agsize=3276800 blks=                       sectsz=512   attr=2, projid32bit=1=                       crc=1        finobt=1, sparse=0, rmapbt=0, reflink=0
data     =                       bsize=4096   blocks=13107200, imaxpct=25=                       sunit=0      swidth=0 blks
naming   =version 2              bsize=4096   ascii-ci=0 ftype=1
log      =internal log           bsize=4096   blocks=6400, version=2=                       sectsz=512   sunit=0 blks, lazy-count=1
realtime =none                   extsz=4096   blocks=0, rtextents=0
root@es-server-node2:~# blkid
/dev/sr0: UUID="2019-08-05-18-43-22-00" LABEL="Ubuntu-Server 18.04.3 LTS amd64" TYPE="iso9660" PTUUID="4a427a6a" PTTYPE="dos"
/dev/sda1: UUID="20ac9956-a99b-4eb7-b10f-72da0e2df911" TYPE="ext4" PARTUUID="754f5135-01"
/dev/sdb: LABEL="ELK-data" UUID="f7fc3a36-5c5a-4746-8c26-7ac2fb30dbf9" TYPE="xfs"  # 获取UUIDroot@es-server-node2:~# mkdir /data/elk -pv
mkdir: created directory '/data'
mkdir: created directory '/data/elk'root@es-server-node2:~# vim /etc/fstab  # 编辑挂载文件
...
UUID="f7fc3a36-5c5a-4746-8c26-7ac2fb30dbf9" /data/elk/    xfs    defaults   0  0
...root@es-server-node2:~# mount -a  # 挂载root@es-server-node2:~# df -HT  # 查看
Filesystem     Type      Size  Used Avail Use% Mounted on
udev           devtmpfs  2.1G     0  2.1G   0% /dev
tmpfs          tmpfs     412M  9.8M  402M   3% /run
/dev/sda1      ext4       43G  5.7G   35G  15% /
tmpfs          tmpfs     2.1G     0  2.1G   0% /dev/shm
tmpfs          tmpfs     5.3M     0  5.3M   0% /run/lock
tmpfs          tmpfs     2.1G     0  2.1G   0% /sys/fs/cgroup
tmpfs          tmpfs     412M     0  412M   0% /run/user/0
/dev/sdb       xfs        54G   88M   54G   1% /data/elk  # 已经挂载
1.2 关闭防火墙和 SElinux
关闭所有服务器的火墙和 selinux,包括 web 服务器、redis 和 logstash 服务器。
此步骤是为了避免出现因为防火墙策略或 selinux 安全权限引起的各种未知问题。
~# systemctl disable firewalld
~# systemctl disable NetworkManager
~# sed -i '/SELINUX/s/enforcing/disabled/' /etc/selinux/config
~# echo "* soft nofile 65536" >> /etc/security/limits.conf
1.3 同步时间
~# ntpdate ntp.aliyun.com
1.4 内核参数和资源限制调整
分别在各 es-server-node 上配置:
~# vim /etc/sysctl.conf
...
vm.max_map_count = 262144
...~# sysctl -p~# vim /etc/security/limits.conf
...
*  soft nofile unlimited
*  hard nofile unlimited
*  soft memlock unlimited
*  hard memlock unlimited
...
更改/etc/systemd/system.sconf进行默认的资源限制调整:
~# vim /etc/systemd/system.conf
...
DefaultLimitNOFILE=65536
DefaultLimitNPROC=32000
DefaultLimitMEMLOCK=infinity
更改上面的配置后,重启系统:
~# reboot
二. 部署 Elasticsearch 集群
2.1 下载 ES 的 deb 安装包并安装
ES 各版本下载点
root@es-server-node2:/usr/local/src# wget https://artifacts.elastic.co/downloads/elasticsearch/elasticsearch-7.6.1-amd64.debroot@es-server-node2:/usr/local/src# dpkg -i elasticsearch-7.6.1-amd64.deb
2.2 编辑 ES 配置文件
root@es-server-node1:~# grep "^[a-Z]" /etc/elasticsearch/elasticsearch.yml
cluster.name: es-cluster-demo
node.name: node-1-100.142
path.data: /data/elk/esdata
path.logs: /data/elk/eslogs
bootstrap.memory_lock: true
network.host: 0.0.0.0
http.port: 9200
discovery.seed_hosts: ["192.168.100.142", "192.168.100.144", "192.168.100.146"]
cluster.initial_master_nodes: ["192.168.100.142", "192.168.100.144", "192.168.100.146"]
gateway.recover_after_nodes: 2
action.destructive_requires_name: true
http.cors.enabled: true
http.cors.allow-origin: "*"root@es-server-node2:/usr/local/src# grep "^[a-Z]" /etc/elasticsearch/elasticsearch.yml
cluster.name: es-cluster-demo
node.name: node-1-100.140
path.data: /data/elk/esdata
path.logs: /data/elk/eslogs
bootstrap.memory_lock: true
network.host: 0.0.0.0
http.port: 9200
discovery.seed_hosts: ["192.168.100.142", "192.168.100.144", "192.168.100.146"]
cluster.initial_master_nodes: ["192.168.100.142", "192.168.100.144", "192.168.100.146"]
gateway.recover_after_nodes: 2
action.destructive_requires_name: true
http.cors.enabled: true
http.cors.allow-origin: "*"root@es-server-node3:~# grep "^[a-Z]" /etc/elasticsearch/elasticsearch.yml
cluster.name: es-cluster-demo
node.name: node-2-100.146
path.data: /data/elk/esdata
path.logs: /data/elk/eslogs
bootstrap.memory_lock: true
network.host: 0.0.0.0
http.port: 9200
discovery.seed_hosts: ["192.168.100.142", "192.168.100.144", "192.168.100.146"]
cluster.initial_master_nodes: ["192.168.100.142", "192.168.100.144", "192.168.100.146"]
gateway.recover_after_nodes: 2
action.destructive_requires_name: true
http.cors.enabled: true
http.cors.allow-origin: "*"
2.3 启动各个 Elasticsearch 实例
启动:
root@es-server-node1:~# systemctl start elasticsearch.service
root@es-server-node2:~# systemctl start elasticsearch.service
root@es-server-node3:~# systemctl start elasticsearch.service
查看启动日志:
root@es-server-node1:~# tail /data/elk/eslogs/es-cluster-demo.log
[2020-03-17T15:30:11,173][INFO ][o.e.t.TransportService   ] [node-1-100.142] publish_address {192.168.100.142:9300}, bound_addresses {[::]:9300}
[2020-03-17T15:30:11,381][INFO ][o.e.b.BootstrapChecks    ] [node-1-100.142] bound or publishing to a non-loopback address, enforcing bootstrap checks
[2020-03-17T15:30:11,621][INFO ][o.e.c.c.Coordinator      ] [node-1-100.142] setting initial configuration to VotingConfiguration{Q-_aRyUgRcyoV1Nu9bzXUQ,XusEfx2jTXiXppt1hFi9JA,Ltga74JkRIuIybyz8vrWhw}
[2020-03-17T15:30:11,856][INFO ][o.e.c.s.ClusterApplierService] [node-1-100.142] master node changed {previous [], current [{node-1-100.140}{Ltga74JkRIuIybyz8vrWhw}{wprheu5OSfuWPVHNjsiGbA}{192.168.100.144}{192.168.100.144:9300}{dilm}{ml.machine_memory=4112027648, ml.max_open_jobs=20, xpack.installed=true}]}, added {{node-1-100.140}{Ltga74JkRIuIybyz8vrWhw}{wprheu5OSfuWPVHNjsiGbA}{192.168.100.144}{192.168.100.144:9300}{dilm}{ml.machine_memory=4112027648, ml.max_open_jobs=20, xpack.installed=true},{node-2-100.146}{XusEfx2jTXiXppt1hFi9JA}{AzN68NrESTaPj9nriIH0Bg}{192.168.100.146}{192.168.100.146:9300}{dilm}{ml.machine_memory=4112027648, ml.max_open_jobs=20, xpack.installed=true}}, term: 3, version: 25, reason: ApplyCommitRequest{term=3, version=25, sourceNode={node-1-100.140}{Ltga74JkRIuIybyz8vrWhw}{wprheu5OSfuWPVHNjsiGbA}{192.168.100.144}{192.168.100.144:9300}{dilm}{ml.machine_memory=4112027648, ml.max_open_jobs=20, xpack.installed=true}}
[2020-03-17T15:30:12,016][INFO ][o.e.x.s.a.TokenService   ] [node-1-100.142] refresh keys
[2020-03-17T15:30:12,171][INFO ][o.e.x.s.a.TokenService   ] [node-1-100.142] refreshed keys
[2020-03-17T15:30:12,196][INFO ][o.e.l.LicenseService     ] [node-1-100.142] license [61a2b087-a872-42d3-b789-5871f5f93d81] mode [basic] - valid
[2020-03-17T15:30:12,197][INFO ][o.e.x.s.s.SecurityStatusChangeListener] [node-1-100.142] Active license is now [BASIC]; Security is disabled
[2020-03-17T15:30:12,224][INFO ][o.e.h.AbstractHttpServerTransport] [node-1-100.142] publish_address {192.168.100.142:9200}, bound_addresses {[::]:9200}
[2020-03-17T15:30:12,225][INFO ][o.e.n.Node               ] [node-1-100.142] startedroot@es-server-node2:~# tail /data/elk/eslogs/es-cluster-demo.log -n44
[2020-03-17T15:29:03,020][INFO ][o.e.x.s.a.s.FileRolesStore] [node-1-100.140] parsed [0] roles from file [/etc/elasticsearch/roles.yml]
[2020-03-17T15:29:03,557][INFO ][o.e.x.m.p.l.CppLogMessageHandler] [node-1-100.140] [controller/1353] [Main.cc@110] controller (64 bit): Version 7.6.1 (Build 6eb6e036390036) Copyright (c) 2020 Elasticsearch BV
[2020-03-17T15:29:04,428][DEBUG][o.e.a.ActionModule       ] [node-1-100.140] Using REST wrapper from plugin org.elasticsearch.xpack.security.Security
[2020-03-17T15:29:04,670][INFO ][o.e.d.DiscoveryModule    ] [node-1-100.140] using discovery type [zen] and seed hosts providers [settings]
[2020-03-17T15:29:06,307][INFO ][o.e.n.Node               ] [node-1-100.140] initialized
[2020-03-17T15:29:06,308][INFO ][o.e.n.Node               ] [node-1-100.140] starting ...
[2020-03-17T15:29:06,497][INFO ][o.e.t.TransportService   ] [node-1-100.140] publish_address {192.168.100.144:9300}, bound_addresses {[::]:9300}
[2020-03-17T15:29:06,904][INFO ][o.e.b.BootstrapChecks    ] [node-1-100.140] bound or publishing to a non-loopback address, enforcing bootstrap checks
[2020-03-17T15:29:06,922][INFO ][o.e.c.c.Coordinator      ] [node-1-100.140] cluster UUID [zh_266x1TGeD76UkU3wWag]
[2020-03-17T15:29:07,057][INFO ][o.e.c.s.MasterService    ] [node-1-100.140] elected-as-master ([1] nodes joined)[{node-1-100.140}{Ltga74JkRIuIybyz8vrWhw}{wprheu5OSfuWPVHNjsiGbA}{192.168.100.144}{192.168.100.144:9300}{dilm}{ml.machine_memory=4112027648, xpack.installed=true, ml.max_open_jobs=20} elect leader, _BECOME_MASTER_TASK_, _FINISH_ELECTION_], term: 3, version: 21, delta: master node changed {previous [], current [{node-1-100.140}{Ltga74JkRIuIybyz8vrWhw}{wprheu5OSfuWPVHNjsiGbA}{192.168.100.144}{192.168.100.144:9300}{dilm}{ml.machine_memory=4112027648, xpack.installed=true, ml.max_open_jobs=20}]}
[2020-03-17T15:29:07,112][INFO ][o.e.c.s.ClusterApplierService] [node-1-100.140] master node changed {previous [], current [{node-1-100.140}{Ltga74JkRIuIybyz8vrWhw}{wprheu5OSfuWPVHNjsiGbA}{192.168.100.144}{192.168.100.144:9300}{dilm}{ml.machine_memory=4112027648, xpack.installed=true, ml.max_open_jobs=20}]}, term: 3, version: 21, reason: Publication{term=3, version=21}
[2020-03-17T15:29:07,182][INFO ][o.e.h.AbstractHttpServerTransport] [node-1-100.140] publish_address {192.168.100.144:9200}, bound_addresses {[::]:9200}
[2020-03-17T15:29:07,183][INFO ][o.e.n.Node               ] [node-1-100.140] started
[2020-03-17T15:29:12,869][INFO ][o.e.c.s.MasterService    ] [node-1-100.140] node-join[{node-2-100.146}{XusEfx2jTXiXppt1hFi9JA}{AzN68NrESTaPj9nriIH0Bg}{192.168.100.146}{192.168.100.146:9300}{dilm}{ml.machine_memory=4112027648, ml.max_open_jobs=20, xpack.installed=true} join existing leader], term: 3, version: 22, delta: added {{node-2-100.146}{XusEfx2jTXiXppt1hFi9JA}{AzN68NrESTaPj9nriIH0Bg}{192.168.100.146}{192.168.100.146:9300}{dilm}{ml.machine_memory=4112027648, ml.max_open_jobs=20, xpack.installed=true}}
[2020-03-17T15:29:12,946][INFO ][o.e.c.s.ClusterApplierService] [node-1-100.140] added {{node-2-100.146}{XusEfx2jTXiXppt1hFi9JA}{AzN68NrESTaPj9nriIH0Bg}{192.168.100.146}{192.168.100.146:9300}{dilm}{ml.machine_memory=4112027648, ml.max_open_jobs=20, xpack.installed=true}}, term: 3, version: 22, reason: Publication{term=3, version=22}
[2020-03-17T15:29:13,368][INFO ][o.e.l.LicenseService     ] [node-1-100.140] license [61a2b087-a872-42d3-b789-5871f5f93d81] mode [basic] - valid
[2020-03-17T15:29:13,369][INFO ][o.e.x.s.s.SecurityStatusChangeListener] [node-1-100.140] Active license is now [BASIC]; Security is disabled
[2020-03-17T15:29:13,376][INFO ][o.e.g.GatewayService     ] [node-1-100.140] recovered [0] indices into cluster_state
[2020-03-17T15:30:11,765][INFO ][o.e.c.s.MasterService    ] [node-1-100.140] node-join[{node-1-100.142}{Q-_aRyUgRcyoV1Nu9bzXUQ}{iDxrjY_WSCa78w_o-UQMVA}{192.168.100.142}{192.168.100.142:9300}{dilm}{ml.machine_memory=4112027648, ml.max_open_jobs=20, xpack.installed=true} join existing leader], term: 3, version: 25, delta: added {{node-1-100.142}{Q-_aRyUgRcyoV1Nu9bzXUQ}{iDxrjY_WSCa78w_o-UQMVA}{192.168.100.142}{192.168.100.142:9300}{dilm}{ml.machine_memory=4112027648, ml.max_open_jobs=20, xpack.installed=true}}
[2020-03-17T15:30:12,221][INFO ][o.e.c.s.ClusterApplierService] [node-1-100.140] added {{node-1-100.142}{Q-_aRyUgRcyoV1Nu9bzXUQ}{iDxrjY_WSCa78w_o-UQMVA}{192.168.100.142}{192.168.100.142:9300}{dilm}{ml.machine_memory=4112027648, ml.max_open_jobs=20, xpack.installed=true}}, term: 3, version: 25, reason: Publication{term=3, version=25}root@es-server-node3:~# tail /data/elk/eslogs/es-cluster-demo.log
[2020-03-17T15:29:12,551][INFO ][o.e.b.BootstrapChecks    ] [node-2-100.146] bound or publishing to a non-loopback address, enforcing bootstrap checks
[2020-03-17T15:29:12,569][INFO ][o.e.c.c.Coordinator      ] [node-2-100.146] cluster UUID [zh_266x1TGeD76UkU3wWag]
[2020-03-17T15:29:12,925][INFO ][o.e.c.s.ClusterApplierService] [node-2-100.146] master node changed {previous [], current [{node-1-100.140}{Ltga74JkRIuIybyz8vrWhw}{wprheu5OSfuWPVHNjsiGbA}{192.168.100.144}{192.168.100.144:9300}{dilm}{ml.machine_memory=4112027648, ml.max_open_jobs=20, xpack.installed=true}]}, added {{node-1-100.140}{Ltga74JkRIuIybyz8vrWhw}{wprheu5OSfuWPVHNjsiGbA}{192.168.100.144}{192.168.100.144:9300}{dilm}{ml.machine_memory=4112027648, ml.max_open_jobs=20, xpack.installed=true}}, term: 3, version: 22, reason: ApplyCommitRequest{term=3, version=22, sourceNode={node-1-100.140}{Ltga74JkRIuIybyz8vrWhw}{wprheu5OSfuWPVHNjsiGbA}{192.168.100.144}{192.168.100.144:9300}{dilm}{ml.machine_memory=4112027648, ml.max_open_jobs=20, xpack.installed=true}}
[2020-03-17T15:29:12,953][INFO ][o.e.h.AbstractHttpServerTransport] [node-2-100.146] publish_address {192.168.100.146:9200}, bound_addresses {[::]:9200}
[2020-03-17T15:29:12,954][INFO ][o.e.n.Node               ] [node-2-100.146] started
[2020-03-17T15:29:13,174][INFO ][o.e.l.LicenseService     ] [node-2-100.146] license [61a2b087-a872-42d3-b789-5871f5f93d81] mode [basic] - valid
[2020-03-17T15:29:13,175][INFO ][o.e.x.s.s.SecurityStatusChangeListener] [node-2-100.146] Active license is now [BASIC]; Security is disabled
[2020-03-17T15:29:13,425][INFO ][o.e.x.s.a.TokenService   ] [node-2-100.146] refresh keys
[2020-03-17T15:29:13,579][INFO ][o.e.x.s.a.TokenService   ] [node-2-100.146] refreshed keys
[2020-03-17T15:30:11,703][INFO ][o.e.c.s.ClusterApplierService] [node-2-100.146] added {{node-1-100.142}{Q-_aRyUgRcyoV1Nu9bzXUQ}{iDxrjY_WSCa78w_o-UQMVA}{192.168.100.142}{192.168.100.142:9300}{dilm}{ml.machine_memory=4112027648, ml.max_open_jobs=20, xpack.installed=true}}, term: 3, version: 25, reason: ApplyCommitRequest{term=3, version=25, sourceNode={node-1-100.140}{Ltga74JkRIuIybyz8vrWhw}{wprheu5OSfuWPVHNjsiGbA}{192.168.100.144}{192.168.100.144:9300}{dilm}{ml.machine_memory=4112027648, ml.max_open_jobs=20, xpack.installed=true}}
三. 使用 Head 插件管理 ES 集群
elasticsearch-head 插件官方镜像
3.1 安装 Docker
在 es-server-node1 上使用 head 插件:
# step 1: 安装必要的一些系统工具
sudo apt-get update
sudo apt-get -y install apt-transport-https ca-certificates curl software-properties-common
# step 2: 安装GPG证书
curl -fsSL https://mirrors.aliyun.com/docker-ce/linux/ubuntu/gpg | sudo apt-key add -
# Step 3: 写入软件源信息
sudo add-apt-repository "deb [arch=amd64] https://mirrors.aliyun.com/docker-ce/linux/ubuntu $(lsb_release -cs) stable"
# Step 4: 更新并安装Docker-CE
sudo apt-get -y update
sudo apt-get -y install docker-ce# 安装指定版本的Docker-CE:
# Step 1: 查找Docker-CE的版本:
# apt-cache madison docker-ce
#   docker-ce | 17.03.1~ce-0~ubuntu-xenial | https://mirrors.aliyun.com/docker-ce/linux/ubuntu xenial/stable amd64 Packages
#   docker-ce | 17.03.0~ce-0~ubuntu-xenial | https://mirrors.aliyun.com/docker-ce/linux/ubuntu xenial/stable amd64 Packages
# Step 2: 安装指定版本的Docker-CE: (VERSION例如上面的17.03.1~ce-0~ubuntu-xenial)
# sudo apt-get -y install docker-ce=[VERSION]
3.2 使用 Docker 运行 Head 插件
直接从 Docker 运行该插件:
root@es-server-node1:~# docker run -d -p 9100:9100 mobz/elasticsearch-head:5
Unable to find image 'mobz/elasticsearch-head:5' locally
5: Pulling from mobz/elasticsearch-head
75a822cd7888: Downloading [==============================================>    ]  47.57MB/51.36MB
57de64c72267: Download complete
4306be1e8943: Download complete
871436ab7225: Downloading [=======>                                           ]  18.86MB/129.8MB
0110c26a367a: Download complete
1f04fe713f1b: Download complete
723bac39028e: Downloading [=========================>                         ]  7.822MB/15.55MB
7d8cb47f1c60: Waiting
7328dcf65c42: Waiting
b451f2ccfb9a: Waiting
304d5c28a4cf: Waiting
4cf804850db1: Waiting
启动成功后验证 9100 端口:
root@es-server-node1:~# docker run -d -p 9100:9100 mobz/elasticsearch-head:5
Unable to find image 'mobz/elasticsearch-head:5' locally
5: Pulling from mobz/elasticsearch-head
75a822cd7888: Pull complete
57de64c72267: Pull complete
4306be1e8943: Pull complete
871436ab7225: Pull complete
0110c26a367a: Pull complete
1f04fe713f1b: Pull complete
723bac39028e: Pull complete
7d8cb47f1c60: Pull complete
7328dcf65c42: Pull complete
b451f2ccfb9a: Pull complete
304d5c28a4cf: Pull complete
4cf804850db1: Pull complete
Digest: sha256:55a3c82dd4ba776e304b09308411edd85de0dc9719f9d97a2f33baa320223f34
Status: Downloaded newer image for mobz/elasticsearch-head:5
a95d13d601b2d6bd02795e9f48330bb85077daf59259d33f7c97cf18e2e6cfde
root@es-server-node1:~# docker ps
CONTAINER ID        IMAGE                       COMMAND                  CREATED             STATUS              PORTS                    NAMES
a95d13d601b2        mobz/elasticsearch-head:5   "/bin/sh -c 'grunt s…"   3 minutes ago       Up 3 minutes        0.0.0.0:9100->9100/tcp   focused_wing
root@es-server-node1:~# lsof -i:9100
COMMAND     PID USER   FD   TYPE DEVICE SIZE/OFF NODE NAME
docker-pr 23627 root    4u  IPv6  68664      0t0  TCP *:9100 (LISTEN)
四. 使用 Cerebro 插件管理 ES 集群
4.1 下载 Cerebro
Cerebro-Github 项目地址
Release-下载
root@es-server-node1:/usr/local/src# wget https://github.com/lmenezes/cerebro/releases/download/v0.8.5/cerebro-0.8.5.tgz
4.2 安装
root@es-server-node1:/usr/local/src# tar xf cerebro-0.8.5.tgz
root@es-server-node1:/usr/local/src# cd cerebro-0.8.5/
root@es-server-node1:/usr/local/src/cerebro-0.8.5# ll
total 24
drwxr-xr-x 5  501 staff 4096 Nov 18 16:13 ./
drwxr-xr-x 3 root root  4096 Mar 17 16:34 ../
drwxr-xr-x 2  501 staff 4096 Mar 17 16:34 bin/
drwxr-xr-x 3  501 staff 4096 Nov 18 16:13 conf/
drwxr-xr-x 2  501 staff 4096 Mar 17 16:34 lib/
-rw-r--r-- 1  501 staff 2932 Nov 18 16:13 README.md
4.3 配置并启动
# 配置
root@es-server-node1:/usr/local/src/cerebro-0.8.5# vim conf/application.conf
...
# A list of known hosts
hosts = [{host = "http://192.168.100.142:9200"name = "es-cluster-demo"headers-whitelist = [ "x-proxy-user", "x-proxy-roles", "X-Forwarded-For" ]}...
]# 安装openjdk11
root@es-server-node1:/usr/local/src/cerebro-0.8.5# apt install openjdk-11-jdk# 启动
root@es-server-node1:/usr/local/src/cerebro-0.8.5# ./bin/cerebro
WARNING: An illegal reflective access operation has occurred
WARNING: Illegal reflective access by com.google.inject.internal.cglib.core.$ReflectUtils$1 (file:/usr/local/src/cerebro-0.8.5/lib/com.google.inject.guice-4.2.2.jar) to method java.lang.ClassLoader.defineClass(java.lang.String,byte[],int,int,java.security.ProtectionDomain)
WARNING: Please consider reporting this to the maintainers of com.google.inject.internal.cglib.core.$ReflectUtils$1
WARNING: Use --illegal-access=warn to enable warnings of further illegal reflective access operations
WARNING: All illegal access operations will be denied in a future release
[info] play.api.Play - Application started (Prod) (no global state)
[info] p.c.s.AkkaHttpServer - Listening for HTTP on /0:0:0:0:0:0:0:0:9000
五. ES 集群的简单监控
ES 集群健康状态 API
使用Cluster Health API来获取当前某个节点所在集群的简要信息。使用该 API
的方式如下:
~# curl -sXGET http://IP:9200/_cluster/health?pretty=true## 响应信息
{"cluster_name" : "es-cluster-demo","status" : "green","timed_out" : false,"number_of_nodes" : 3,"number_of_data_nodes" : 3,"active_primary_shards" : 0,"active_shards" : 0,"relocating_shards" : 0,"initializing_shards" : 0,"unassigned_shards" : 0,"delayed_unassigned_shards" : 0,"number_of_pending_tasks" : 0,"number_of_in_flight_fetch" : 0,"task_max_waiting_in_queue_millis" : 0,"active_shards_percent_as_number" : 100.0
}
响应信息中最重要的一块就是 status 字段。状态可能是下列三个值之一:
green
所有的主分片和副本分片都已分配。你的集群是 100% 可用的。
yellow
所有的主分片已经分片了,但至少还有一个副本是缺失的。不会有数据丢失,所以搜索
结果依然是完整的。不过,你的高可用性在某种程度上被弱化。如果更多的分片消失,
你就会丢数据了。把 yellow 想象成一个需要及时调查的警告。
red
至少一个主分片(以及它的全部副本)都在缺失中。这意味着你在缺少数据:搜索只能
返回部分数据,而分配到这个分片上的写入请求会返回一个异常。
5.1 使用 shell 脚本
5.2 使用 Python
在 windows 下使用 python 获取集群信息:
import requests
req_url = "http://192.168.100.142:9200/_cluster/health?pretty=true"
get = requests.get(req_url)
stat = get.json()["status"]
print(stat)
在 Linux 下使用 python:
root@es-server-node1:/data/elk/esdata# vim get_cluster_info.py
#!/usr/bin/env python3
# Edited by suosuoli.cn on 2020.03.17
# This script is created for getting elasticsearch cluster infoimport smtplib
import subprocess
from email.utils import formataddr
from email.mime.text import MIMETextfalse=""
IP="192.168.100.142"
body="curl -sXGET http://" + IP + ":9200/_cluster/health?pretty=true"
pro=subprocess.Popen((body),shell=True,stdout=subprocess.PIPE)
data=pro.stdout.read()
tmp=eval(data)
stat=tmp.get("status")
nu_nodes=tmp.get("number_of_nodes")
act_pri_shard=tmp.get("active_primary_shards")
act_shard=tmp.get("active_shards")
unassigned_shard=tmp.get("unassigned_shards")print("         集群状态:{}".format(stat))
print("       集群节点数:{}".format(nu_nodes))
print("集群中的主分片数量:{}".format(act_pri_shard))
print("集群中的所有分片数:{}".format(act_shard))
print("集群状态中存在而找不到的分片:{}".format(unassigned_shard))
5.3 运行获取数据
root@es-server-node1:/data/elk/esdata# python3 get_cluster_info.py集群状态:green集群节点数:3集群中的主分片数量:8集群中的所有分片数:16
集群状态中存在而找不到的分片:0
相关文章:

ELKstack-Elasticsearch配置与使用
一. 部署前准备 最小化安装 Centos 7.x/Ubuntu x86_64 操作系统的虚拟机,vcpu 2,内存 4G 或更多, 操作系统盘 50G,主机名设置规则为 es-server-nodeX , 额外添加一块单独的数据磁盘 大小为 50G 并格式化挂载到/data/e…...

Kotlin 基础教程二
constructor 构造器一般情况下可以简化为主构造器 即: class A constructor(参数) : 父类 (参数) 也可以在构造器上直接声明属性constructor ( var name) 这样可以全局访问 init { } 将和成员变量一起初始化 susped 挂起 data class 可以简化一些bean类 比如get / set ,自动…...

K8S deployment挂载
挂载到emptyDir 挂载在如下目录,此目录是pod所在的node节点主机的目录,此目录下的data即对应容器里的/usr/share/nginx/html,实现目录挂载;图1红框里的号对应docker 的name中的编号,如下俩个图 apiVersion: apps/v1 k…...

类之间的比较
作者简介: zoro-1,目前大一,正在学习Java,数据结构等 作者主页: zoro-1的主页 欢迎大家点赞 👍 收藏 ⭐ 加关注哦!💖💖 类之间的比较 固定需求式比较器 固定需求式 通过…...
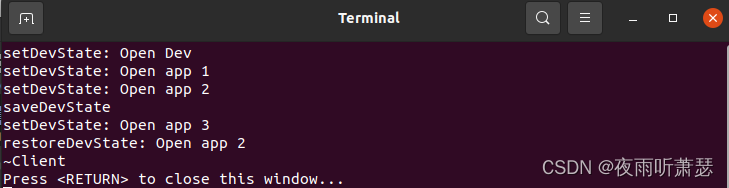
设计模式之备忘录模式(Memento)的C++实现
1、备忘录模式的提出 在软件功能开发过程中,某些对象的状态在转换过程中,由于业务场景需要,要求对象能够回溯到对象之前某个点的状态。如果使用一些共有接口来让其他对象得到对象的状态,便会暴露对象的实现细节。备忘录模式是在不…...
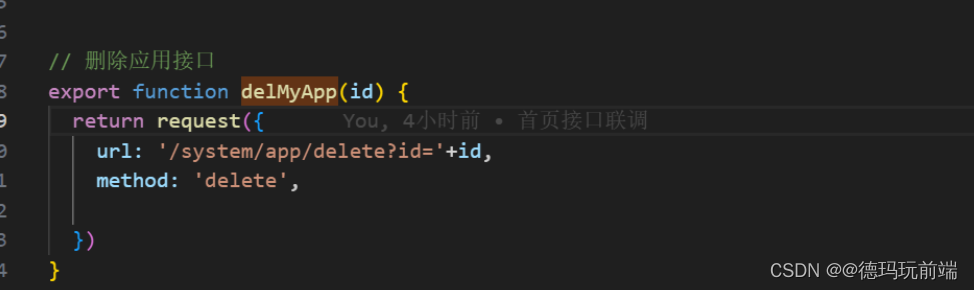
学习笔记230804---restful风格的接口,delete的传参方式问题
如果后端提供的删除接口是restful风格,那么使用地址栏拼接的方式发送请求,数据放在主体中,后端接受不到,当然也还有一种可能,后端在这个接口的接参设置上是req.query接参。 问题描述 今天遇到的问题是,de…...
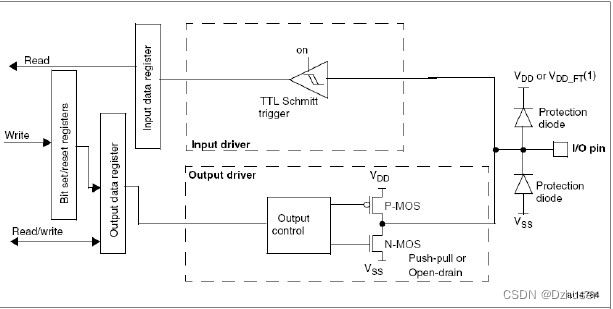
STM32使用IIC通信的引脚配置问题
STM32使用IIC通信的引脚配置问题 在使用IIC通信时,遇到引脚配置问题,记录一下: IIC的两个引脚SDA和SCL都要求既能输入又能输出。 问题: SDA线是由不同的器件分时控制的,这样就会有一个问题:当一个器件主动…...

题解 | #K.First Last# 2023牛客暑期多校10
K.First Last 签到题 题目大意 n n n 个人参加 m m m 场比赛,每场比赛中获得名次得概率均等 问针对某一人,他在所有场次比赛中都获得第一或倒数第一的概率 解题思路 如果人数 n > 1 n>1 n>1 ,每场比赛的概率是 p 2 n p\dfra…...
—— 使用 os 模块操作文件与目录)
Python 程序设计入门(025)—— 使用 os 模块操作文件与目录
Python 程序设计入门(025)—— 使用 os 模块操作文件与目录 目录 Python 程序设计入门(025)—— 使用 os 模块操作文件与目录一、操作目录的常用函数1、os 模块提供的操作目录的函数2、os.path 模块提供的操作目录的函数 二、相对…...
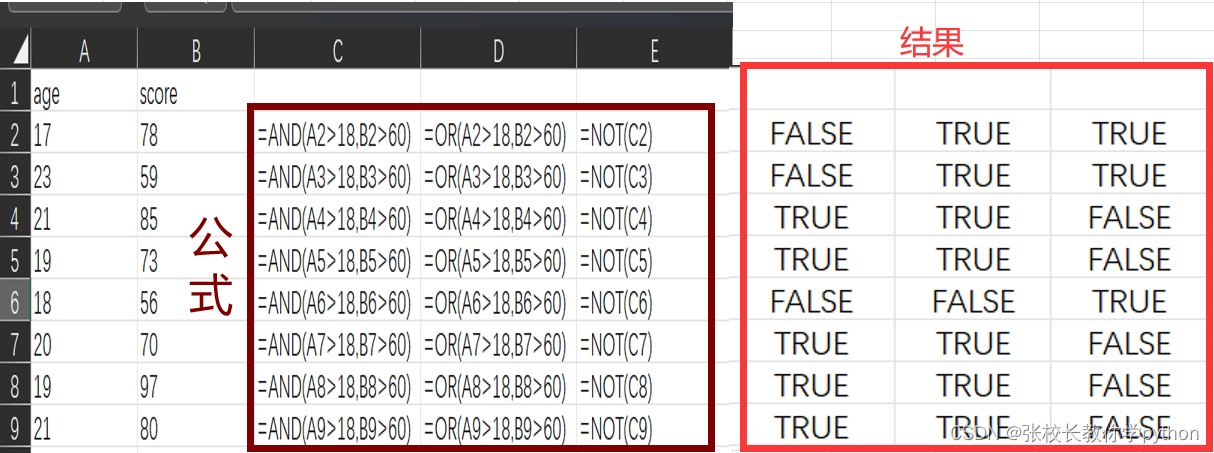
excel逻辑函数篇1
1、AND(logical1,[logical2],…):用于测试所有条件是否均为TRUE 检查所有参数均为true,如果是则返回true 2、OR(logical1,[logical2],…):用于测试是否有为TRUE的条件 如果任意参数值为true,即返回true;只有当所有参数…...

前端基础(Vue的模块化开发)
目录 前言 响应式基础 ref reactive 学习成果展示 Vue项目搭建 总结 前言 前面学习了前端HMTL、CSS样式、JavaScript以及Vue框架的简单适用,接下来运用前面的基础继续学习Vue,运用前端模块化编程的思想。 响应式基础 ref reactive 关于ref和react…...
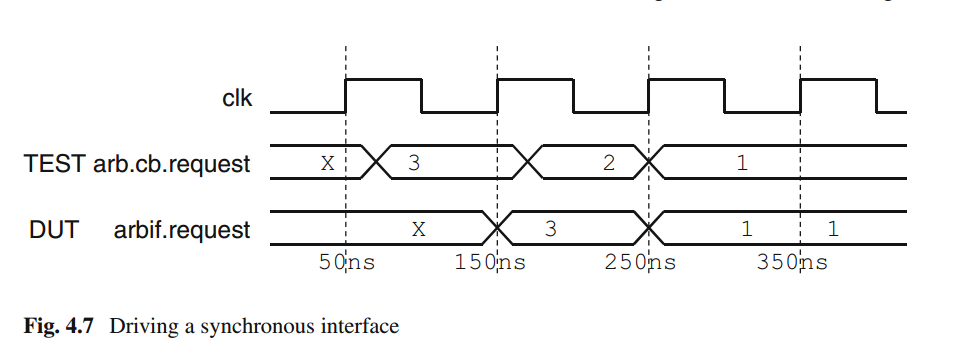
SystemVerilog interface使用说明
1. Interface概念 System Verilog中引入了接口定义,接口与module 等价的定义,是要在其他的接口、module中直接定义,不能写在块语句中,跟class是不同的。接口是将一组线捆绑起来,可以将接口传递给module。 2. 接口的优…...

机器人制作开源方案 | 送餐机器人
作者:赖志彩、曹柳洲、王恩开、李雪儿、杨玉凯 单位:华北科技学院 指导老师:张伟杰、罗建国 一、作品简介 1. 场景调研 1.1项目目的 近年来,全国多地疫情频发,且其传染性极高,食品接触是传播途径之一。…...

Gradio部署应用到服务器不能正常访问
用Gradio部署一个基于ChatGLM-6B的应用,发布到团队的服务器上(局域网,公网不能访问),我将gradio应用发布到服务器的9001端口 import gradio as gr with gr.Blocks() as demo:......demo.queue().launch(server_port90…...

数据暴涨时代,该如何数据治理?_光点科技
随着信息技术的迅猛发展,数据已经成为现代社会的核心资源。在这个被称为"数据暴涨时代"的时代里,大量的数据源源不断地被产生和积累,但如何有效地管理、分析和利用这些数据成为了一个迫切需要解决的问题。数据治理,作为…...

2021年03月 C/C++(三级)真题解析#中国电子学会#全国青少年软件编程等级考试
第1题:找和为K的两个元素 在一个长度为n(n < 1000)的整数序列中,判断是否存在某两个元素之和为k。 时间限制:1000 内存限制:65536 输入 第一行输入序列的长度n和k,用空格分开。 第二行输入序列中的n个整数ÿ…...

GPT-5出世?OpenAI GPT-5商标已注册
OpenAI的GPT已经成为了业界标杆,升级速度之快让人瞠目,别人追GPT-3.5的时候GPT-4横空出世,差距被拉开了,现在GPT-5就要来了。 据商标律师泄露的消息,OpenAI已于7月18日注册了GPT-5商标。虽然注册商标并不罕见…...

优雅的使用 Dockerfile 定制镜像
一、使用 Dockerfile 定制镜像 1.1、Dockerfile 定制镜像 镜像的定制实际上就是定制每一层所添加的配置、文件。如果我们可以把每一层修改、安装、构建、操作的命令都写入一个脚本,用这个脚本来构建、定制镜像,无法重复的问题、镜像构建透明性的问题、…...

limit的用法mysql
当你在 MySQL 数据库中使用 LIMIT 语句,它可以用于限制查询结果的行数。这在分页查询或者限制返回的数据量时非常有用。下面是一些示例: 返回前几行数据: SELECT * FROM Customers LIMIT 5;这将返回 Customers 表中的前 5 行数据。 分页查…...

clickhouse Checksum doesn‘t match: 问题修复
1. 问题描述 SQL 错误 [40] [07000]: Code: 40. DB::Exception: Checksum doesnt match: corrupted data. Reference: 50e8c1efa78de2881b725d44b04be1fe. Actual: 161c99eb681ec36b83540ecdd65ad8c9. Size of compressed block: 32846. The mismatch is caused by single bit…...

观察智能体项目使用 Taotoken 后的月度 token 消耗与成本趋势
🚀 告别海外账号与网络限制!稳定直连全球优质大模型,限时半价接入中。 👉 点击领取海量免费额度 观察智能体项目使用 Taotoken 后的月度 token 消耗与成本趋势 对于一个持续运行的智能体项目而言,清晰的成本洞察是项目…...

STFT音高迁移:C++实现音频变调不变速的核心原理与工程实践
1. 项目概述:音频处理的“时间魔法师”如果你玩过音乐制作或者做过音频分析,肯定遇到过这样的场景:一段人声录音的音调有点低,你想把它调高一点,但又不想改变它说话的速度和节奏感。或者反过来,一段背景音乐…...

赛博朋克风格商业变现闭环:从DALL·E对比测试到Fiverr接单模板,7天打造高单价AI艺术IP
更多请点击: https://intelliparadigm.com 第一章:赛博朋克视觉语法与AI艺术IP的神经接口 赛博朋克视觉语法并非仅关乎霓虹、雨巷与义体——它是一套高度结构化的符号系统,其色彩模型(如青紫-品红双主调)、构图逻辑&a…...

数字IC前端学习笔记:从结构到实现,深入剖析Wallace Tree乘法器的性能优势
1. 为什么需要Wallace Tree乘法器 在数字IC设计中,乘法器是最基础也最关键的运算单元之一。传统的阵列乘法器虽然结构简单直观,但随着位宽增加,其关键路径延迟会呈平方级增长。我曾经在设计一个32位乘法器时,发现阵列结构的延迟直…...
)
保姆级教程:在Ubuntu 22.04上为LAMMPS编译ReaxFF+Kokkos+OpenMP混合加速包(含GPU/CPU架构识别)
在Ubuntu 22.04上为LAMMPS编译ReaxFFKokkosOpenMP混合加速包的完整指南 对于计算材料科学和分子动力学模拟的研究者来说,LAMMPS是一个不可或缺的工具。然而,当模拟系统变得复杂时,计算效率往往成为瓶颈。本文将详细介绍如何在Ubuntu 22.04系统…...
)
大模型小白入门指南:3分钟读懂核心逻辑+高性价比产品推荐(建议收藏+转发)
大模型小白入门指南:3分钟读懂核心逻辑高性价比产品推荐(建议收藏转发) 本文通俗易懂地拆解了大众对大模型的三个常见误区,如“大模型高级聊天机器人”、“大模型会说谎”、“AI会取代人类”。通过比喻方式解释了大语言模型和多模…...

SwarmVault:去中心化AI数据存储与管理的实践指南
1. 项目概述与核心价值最近在探索分布式存储和AI应用结合的前沿领域时,我遇到了一个非常有意思的项目:swarmclawai/swarmvault。这个名字本身就透露了它的野心——将去中心化存储网络Swarm与人工智能(AI)能力相结合,构…...

OpenClaw用户如何通过Taotoken获得更优的模型调用体验
🚀 告别海外账号与网络限制!稳定直连全球优质大模型,限时半价接入中。 👉 点击领取海量免费额度 OpenClaw用户如何通过Taotoken获得更优的模型调用体验 对于使用OpenClaw构建智能体工作流的开发者而言,直接对接多个大…...

三步实现本地化视频硬字幕提取:免费AI工具轻松生成SRT字幕文件
三步实现本地化视频硬字幕提取:免费AI工具轻松生成SRT字幕文件 【免费下载链接】video-subtitle-extractor 视频硬字幕提取,生成srt文件。无需申请第三方API,本地实现文本识别。基于深度学习的视频字幕提取框架,包含字幕区域检测、…...

边缘计算中ViT模型压缩与硬件加速技术解析
1. 边缘计算中的ViT模型压缩技术全景解析Vision Transformer(ViT)模型在计算机视觉领域展现出卓越性能的同时,其庞大的计算量和内存需求成为边缘设备部署的主要障碍。模型压缩技术通过降低模型复杂度,使其能够在资源受限的边缘设备…...