CUDA小白 - NPP(2) - Arithmetic and Logical Operations(1)
cuda小白
原文链接 NPP
GPU架构近些年也有不少的变化,具体的可以参考别的博主的介绍,都比较详细。还有一些cuda中的专有名词的含义,可以参考《详解CUDA的Context、Stream、Warp、SM、SP、Kernel、Block、Grid》
常见的NppStatus,可以看这里。
如有问题,请指出,谢谢
Arithmetic Operations
当前模块主要是加减乘除,abs,平方,矩阵相乘,开根,ln,exp等。不同相同功能,以其中一个为例进行介绍。
AddC
针对图像中每一个像素添加一个常量值。与之类似的还有MulC,SubC,DivC,AbsDiffC,MulScale
大概接口样式:
// 两个结果的区别在于,有I的结果可以就原始的图像地址进行操作,无需进行拷贝
// Sfs的含义 表示可以对图像的数值范围进行约束操作。
NppStatus nppiAddC_[数据类型]_C[通道数]RSfs_[是否使用流]
NppStatus nppiAddC_[数据类型]_C[通道数]IRSfs_[是否使用流]
以为三通道的uint8_t的图像数据为例子:
NppStatus nppiAddC_8u_C3RSfs(const Npp8u * pSrc1,int nSrc1Step,const Npp8u aConstants[3],Npp8u *pDst,int nDstStep,NppiSize oSizeROI,int nScaleFactor);
NppStatus nppiAddC_8u_C3RSfs(const Npp8u aConstants[3],Npp8u *pDst,int nDstStep,NppiSize oSizeROI,int nScaleFactor);
code
#include <iostream>
#include <cuda_runtime.h>
#include <npp.h>
#include <opencv2/opencv.hpp>#define CUDA_FREE(ptr) { if (ptr != nullptr) { cudaFree(ptr); ptr = nullptr; } }int main() {std::string directory = "../";// =============== load image ===============cv::Mat image = cv::imread(directory + "dog.png");if (image.empty()) {std::cout << "Load image error!" << std::endl;return -1;}int image_width = image.cols;int image_height = image.rows;int image_size = image_width * image_height * 3 * sizeof(uint8_t);std::cout << "Image info : image_width = " << image_width<< ", image_height = " << image_height << std::endl;// =============== malloc && cpy ===============uint8_t *in_ptr, *in_ptr2, *out_ptr, *roi_out_ptr;cudaMalloc((void**)&in_ptr, image_size);cudaMalloc((void**)&in_ptr2, image_size);cudaMalloc((void**)&out_ptr, image_size);cudaMalloc((void**)&roi_out_ptr, image_size);cudaMemcpy(in_ptr, image.data, image_size, cudaMemcpyHostToDevice);cudaMemcpy(in_ptr2, image.data, image_size, cudaMemcpyHostToDevice);uint8_t host_constant[3] = { (uint8_t)0, (uint8_t)20, (uint8_t)0 };NppiSize roi1, roi2;roi1.width = image_width;roi1.height = image_height;roi2.width = image_width / 2;roi2.height = image_height / 2;// nppiAddC_8u_C3RSfscv::Mat out_image = cv::Mat::zeros(image_height, image_width, CV_8UC3);NppStatus status;status = nppiAddC_8u_C3RSfs(in_ptr, image_width * 3, host_constant, out_ptr, image_width * 3, roi1, 0);if (status != NPP_SUCCESS) {std::cout << "[GPU] ERROR nppiAddC_8u_C3RSfs failed, status = " << status << std::endl;return false;}cudaMemcpy(out_image.data, out_ptr, image_size, cudaMemcpyDeviceToHost);cv::imwrite(directory + "add_constant.jpg", out_image);status = nppiAddC_8u_C3RSfs(in_ptr, image_width * 3, host_constant, out_ptr, image_width * 3, roi1, 1);if (status != NPP_SUCCESS) {std::cout << "[GPU] ERROR nppiAddC_8u_C3RSfs failed, status = " << status << std::endl;return false;}cudaMemcpy(out_image.data, out_ptr, image_size, cudaMemcpyDeviceToHost);cv::imwrite(directory + "add_constant_scale.jpg", out_image);status = nppiAddC_8u_C3RSfs(in_ptr, image_width * 3, host_constant, out_ptr, image_width * 3, roi2, 0);if (status != NPP_SUCCESS) {std::cout << "[GPU] ERROR nppiAddC_8u_C3RSfs failed, status = " << status << std::endl;return false;}cudaMemcpy(out_image.data, out_ptr, image_size, cudaMemcpyDeviceToHost);cv::imwrite(directory + "add_constant_roi.jpg", out_image);// freeCUDA_FREE(in_ptr)CUDA_FREE(in_ptr2)CUDA_FREE(out_ptr)CUDA_FREE(roi_out_ptr)
}
make
cmake_minimum_required(VERSION 3.20)
project(test)find_package(OpenCV REQUIRED)
include_directories(${OpenCV_INCLUDE_DIRS})find_package(CUDA REQUIRED)
include_directories(${CUDA_INCLUDE_DIRS})
file(GLOB CUDA_LIBS "/usr/local/cuda/lib64/*.so")add_executable(test test.cpp)
target_link_libraries(test${OpenCV_LIBS}${CUDA_LIBS}
)
result

注意点:
- 对图像的进行值的范围进行一定的约束,最初的图像RGB的值都是[0, 255],如果对应的scale设置为1的时候,相当于将数值的范围变为2的-nScaleFactor倍数,即[0, 128],超过128的会变成128,因此整体的图像色调会变暗;同样的,如果设置为-1,则整体的会变为2倍,因为存图的限制只能是[0, 255],所以整体看起来会变亮。
- 如果指定的roi不是整张图的时候,由于roi的类型是NppiSize(width, height),因此输入的指针不是指向图像的起始位置,而是roi的起始位置。
- MulScale相较于MulC来说,默认nScaleFactor为0;
- AbsDiffC中主要功能就是得到整张图像与host_constant的绝对差值。
- 每个结果都有一个对应的包含cudastream的版本,按需使用。
Add
与AddC不同的是,Add输入的是两张图像。同样的还有Mul,MulScale,Sub,Div,Div_round,Abs,AbsDiff,Sqr,Sqrt,Ln,Exp。(由于Abs,AbsDiff,Sqr,Sqrt,Ln,Exp在图像出列方面使用的不是很多,就不细述)。
以uint8_t的三通道图像为例:
// 命名规则与nppiAddC*类似
NppStatus nppiAdd_8u_C3RSfs(const Npp8u * pSrc1,int nSrc1Step,const Npp8u *pSrc2,int nSrc2Step,Npp8u * pDst,int nDstStep,NppiSize oSizeROI,int nScaleFactor);
NppStatus nppiAdd_8u_C3IRSfs(const Npp8u *pSrc,int nSrcStep,Npp8u *pSrcDst,int nSrcDstStep,NppiSize oSizeROI,int nScaleFactor);
code
#include <iostream>
#include <cuda_runtime.h>
#include <npp.h>
#include <opencv2/opencv.hpp>#define PRINT_VALUE(value) {  \std::cout << "[GPU] " << #value << " = " << value << std::endl; }#define CUDA_FREE(ptr) { if (ptr != nullptr) { cudaFree(ptr); ptr = nullptr; } }int main() {std::string directory = "../";// =============== load image ===============cv::Mat image = cv::imread(directory + "dog.png");if (image.empty()) {std::cout << "Load image error!" << std::endl;return -1;}int image_width = image.cols;int image_height = image.rows;int image_size = image_width * image_height * 3 * sizeof(uint8_t);std::cout << "Image info : image_width = " << image_width<< ", image_height = " << image_height << std::endl;// =============== malloc && cpy ===============uint8_t *in_ptr, *in_ptr2, *out_ptr, *roi_out_ptr;cudaMalloc((void**)&in_ptr, image_size);cudaMalloc((void**)&in_ptr2, image_size);cudaMalloc((void**)&out_ptr, image_size);cudaMalloc((void**)&roi_out_ptr, image_size);cudaMemcpy(in_ptr, image.data, image_size, cudaMemcpyHostToDevice);cudaMemcpy(in_ptr2, image.data, image_size, cudaMemcpyHostToDevice);NppiSize roi1, roi2;roi1.width = image_width;roi1.height = image_height;roi2.width = image_width / 2;roi2.height = image_height / 2;// nppiAdd_8u_C3RSfscv::Mat out_image = cv::Mat::zeros(image_height, image_width, CV_8UC3);NppStatus status;status = nppiAdd_8u_C3RSfs(in_ptr, image_width * 3, in_ptr2, image_width * 3, out_ptr, image_width * 3, roi1, 0);if (status != NPP_SUCCESS) {std::cout << "[GPU] ERROR nppiAdd_8u_C3RSfs failed, status = " << status << std::endl;return false;}cudaMemcpy(out_image.data, out_ptr, image_size, cudaMemcpyDeviceToHost);cv::imwrite(directory + "add.jpg", out_image);status = nppiAdd_8u_C3RSfs(in_ptr, image_width * 3, in_ptr2, image_width * 3, out_ptr, image_width * 3, roi1, 1);if (status != NPP_SUCCESS) {std::cout << "[GPU] ERROR nppiAdd_8u_C3RSfs failed, status = " << status << std::endl;return false;}cudaMemcpy(out_image.data, out_ptr, image_size, cudaMemcpyDeviceToHost);cv::imwrite(directory + "add_scale.jpg", out_image);status = nppiAdd_8u_C3RSfs(in_ptr, image_width * 3, in_ptr2, image_width * 3, out_ptr, image_width * 3, roi2, 0);if (status != NPP_SUCCESS) {std::cout << "[GPU] ERROR nppiAdd_8u_C3RSfs failed, status = " << status << std::endl;return false;}cudaMemcpy(out_image.data, out_ptr, image_size, cudaMemcpyDeviceToHost);cv::imwrite(directory + "add_roi.jpg", out_image);// freeCUDA_FREE(in_ptr)CUDA_FREE(in_ptr2)CUDA_FREE(out_ptr)CUDA_FREE(roi_out_ptr)
}
make
cmake_minimum_required(VERSION 3.20)
project(test)find_package(OpenCV REQUIRED)
include_directories(${OpenCV_INCLUDE_DIRS})find_package(CUDA REQUIRED)
include_directories(${CUDA_INCLUDE_DIRS})
file(GLOB CUDA_LIBS "/usr/local/cuda/lib64/*.so")add_executable(test test.cpp)
target_link_libraries(test${OpenCV_LIBS}${CUDA_LIBS}
)
result

注意点:
- nScaleFactor与AddC中的功能一致。roi的操作也与AddC中的一致。
- 由于使用的是两个相同的图片进行相加,因此在nScaleFactor为1的时候,所有的数值都变成原来的值,因此保存的图像与原图一致。
- 同样有cudastream版本,按需使用。
AddWeighted
将特定区域的图像进行填充weight
NppStatus nppiAddWeighted_8u32f_C1IR(const Npp8u *pSrc,int nSrcStep,Npp32f * pSrcDst,int nSrcDstStep,NppiSize oSizeROI,Npp32f nAlpha);
NppStatus nppiAddWeighted_8u32f_C1IMR(const Npp8u *pSrc,int nSrcStep,const Npp8u *pMask,int nMaskStep,Npp32f * pSrcDst,int nSrcDstStep,NppiSize oSizeROI,Npp32f nAlpha);
code
#include <iostream>
#include <cuda_runtime.h>
#include <npp.h>
#include <opencv2/opencv.hpp>#define PRINT_VALUE(value) {  \std::cout << "[GPU] " << #value << " = " << value << std::endl; }#define CUDA_FREE(ptr) { if (ptr != nullptr) { cudaFree(ptr); ptr = nullptr; } }int main() {std::string directory = "../";// =============== load image ===============cv::Mat image = cv::imread(directory + "dog.png");if (image.empty()) {std::cout << "Load image error!" << std::endl;return -1;}cv::Mat gray;cv::cvtColor(image, gray, CV_BGR2GRAY);cv::imwrite(directory + "gray.jpg", gray);int image_width = gray.cols;int image_height = gray.rows;int image_size = image_width * image_height;std::cout << "Image info : image_width = " << image_width<< ", image_height = " << image_height << std::endl;cv::Mat mat_mask = cv::Mat::ones(image_height, image_width, CV_8UC1);cv::Rect rc_center = cv::Rect(image_width / 4, image_height / 4, image_width / 2, image_height / 2);mat_mask(rc_center) = cv::Mat::ones(image_height / 2, image_width / 2, CV_8UC1) * 255;cv::imwrite(directory + "mask.jpg", mat_mask);// =============== malloc && cpy ===============uint8_t *in_ptr, *mask;cudaMalloc((void**)&in_ptr, image_size * sizeof(uint8_t));cudaMalloc((void**)&mask, image_size * sizeof(uint8_t));cudaMemcpy(in_ptr, gray.data, image_size, cudaMemcpyHostToDevice);cudaMemcpy(mask, mat_mask.data, image_size, cudaMemcpyHostToDevice);float *out_ptr, *out_ptr1, *out_ptr2;cudaMalloc((void**)&out_ptr, image_size * sizeof(float));cudaMalloc((void**)&out_ptr1, image_size * sizeof(float));cudaMalloc((void**)&out_ptr2, image_size * sizeof(float));NppiSize roi1, roi2;roi1.width = image_width;roi1.height = image_height;roi2.width = image_width / 2;roi2.height = image_height / 2;// nppiAdd_8u_C3RSfscv::Mat out_image = cv::Mat::zeros(image_height, image_width, CV_32FC1);NppStatus status;status = nppiAddWeighted_8u32f_C1IMR(in_ptr, image_width * sizeof(uint8_t), mask, image_width * sizeof(uint8_t), out_ptr, image_width * sizeof(float), roi1, 1.0);if (status != NPP_SUCCESS) {std::cout << "[GPU] ERROR nppiAddWeighted_8u32f_C1IMR failed, status = " << status << std::endl;return false;}cudaMemcpy(out_image.data, out_ptr, image_size * sizeof(float), cudaMemcpyDeviceToHost);cv::imwrite(directory + "addweight.jpg", out_image);status = nppiAddWeighted_8u32f_C1IMR(in_ptr, image_width * sizeof(uint8_t), mask, image_width * sizeof(uint8_t), out_ptr1, image_width * sizeof(float), roi1, 0.5);if (status != NPP_SUCCESS) {std::cout << "[GPU] ERROR nppiAddWeighted_8u32f_C1IMR failed, status = " << status << std::endl;return false;}cudaMemcpy(out_image.data, out_ptr1, image_size * sizeof(float), cudaMemcpyDeviceToHost);cv::imwrite(directory + "addweight_scale.jpg", out_image);status = nppiAddWeighted_8u32f_C1IMR(in_ptr, image_width * sizeof(uint8_t), mask, image_width * sizeof(uint8_t), out_ptr2, image_width * sizeof(float), roi2, 0.5);if (status != NPP_SUCCESS) {std::cout << "[GPU] ERROR nppiAddWeighted_8u32f_C1IMR failed, status = " << status << std::endl;return false;}cudaMemcpy(out_image.data, out_ptr2, image_size * sizeof(float), cudaMemcpyDeviceToHost);cv::imwrite(directory + "addweight_roi_scale.jpg", out_image);// freeCUDA_FREE(in_ptr)CUDA_FREE(mask)CUDA_FREE(out_ptr)CUDA_FREE(out_ptr1)CUDA_FREE(out_ptr2)
}
make
cmake_minimum_required(VERSION 3.20)
project(test)find_package(OpenCV REQUIRED)
include_directories(${OpenCV_INCLUDE_DIRS})find_package(CUDA REQUIRED)
include_directories(${CUDA_INCLUDE_DIRS})
file(GLOB CUDA_LIBS "/usr/local/cuda/lib64/*.so")add_executable(test test.cpp)
target_link_libraries(test${OpenCV_LIBS}${CUDA_LIBS}
)
result
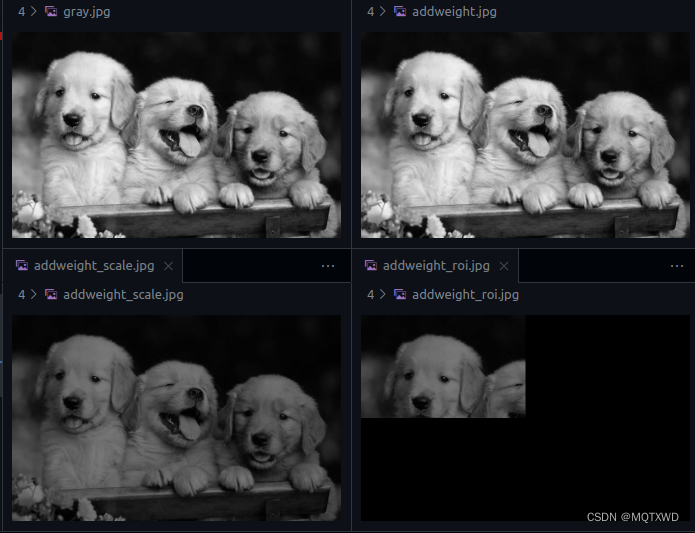
注意点:
1.nAlpha是针对原图中的每一个像素的值需要添加的权重,mask仅影响目标位置中那些部分需要输出。
2. roi表示输入的区域约束。
相关文章:
CUDA小白 - NPP(2) - Arithmetic and Logical Operations(1)
cuda小白 原文链接 NPP GPU架构近些年也有不少的变化,具体的可以参考别的博主的介绍,都比较详细。还有一些cuda中的专有名词的含义,可以参考《详解CUDA的Context、Stream、Warp、SM、SP、Kernel、Block、Grid》 常见的NppStatus,…...

计算机视觉-LeNet
目录 LeNet LeNet在手写数字识别上的应用 LeNet在眼疾识别数据集iChallenge-PM上的应用 LeNet LeNet是最早的卷积神经网络之一。1998年,Yann LeCun第一次将LeNet卷积神经网络应用到图像分类上,在手写数字识别任务中取得了巨大成功。LeNet通过连续使用…...
Java 复习笔记 - 面向对象篇
文章目录 一,面向对象概述二,类和对象(一)类和对象的概述(二)定义类的补充注意事项 三,封装四,就近原则和this关键字(一)就近原则(二)…...

行业追踪,2023-08-31
自动复盘 2023-08-31 凡所有相,皆是虚妄。若见诸相非相,即见如来。 k 线图是最好的老师,每天持续发布板块的rps排名,追踪板块,板块来开仓,板块去清仓,丢弃自以为是的想法,板块去留让…...

科技资讯|苹果发布新专利:可在车内定位苹果的智能设备
根据美国商标和专利局近期公示的清单,苹果公司获得了一项名为《车内定位移动设备的系统和方式》专利,概述了在车内狭窄空间内如何定位 iPhone 等移动设备。 Find My 服务现阶段没有使用 UWB 来追踪 iPhone 或者 iPad,而是依赖 GPS 等相关辅…...
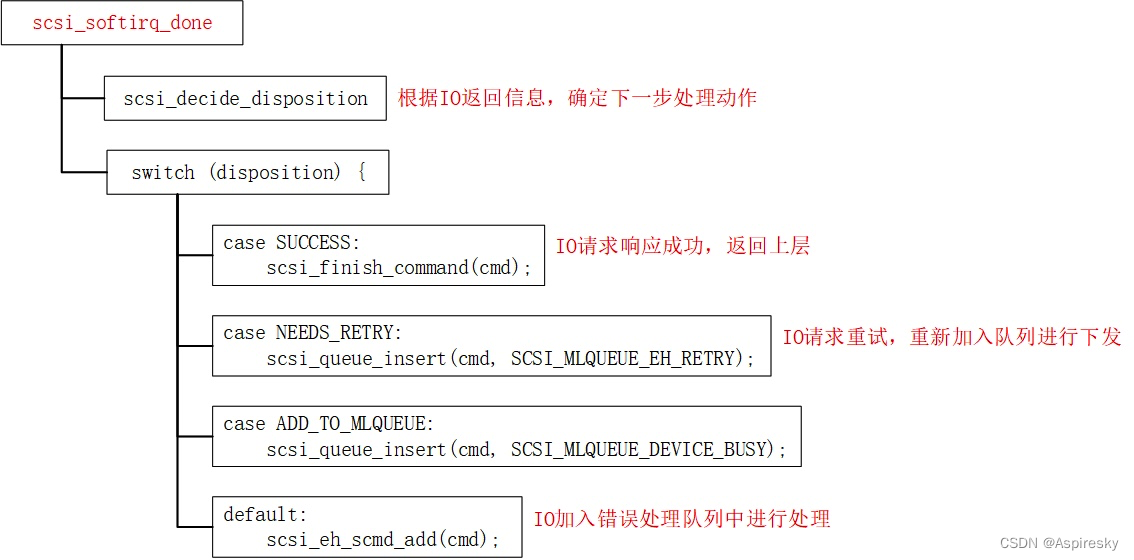
浅析Linux SCSI子系统:IO路径
文章目录 概述scsi_cmd:SCSI命令result字段proto_op字段proto_type字段 SCSI命令下发scsi_request_fnscsi_dev_queue_readyscsi_host_queue_ready SCSI命令响应命令请求完成的软中断处理 相关参考 概述 SCSI子系统向上与块层对接,由块层提交的对块设备的…...

linux系统(centos、Ubuntu、银河服务器)备份
制作u盘启动盘 下载usblive系统镜像 Get Kali | Kali Linux 下载u盘启动工具 balenaEtcher - Flash OS images to SD cards & USB drives 点击下载,等待下载完成 双击安装,等待安装完成 双击 启动 选择镜像 选择U盘 开始烧录 等地制作完成 进入…...

堆栈深度超过限制
报错:Cause: com.kingbase8.util.KSQLException: 错误: 堆栈深度超过限制 Hint: 在确定了平台的堆栈深度限制是足够大后,增加配置参数 "max_stack_depth"的值(当前值为2048kB).; 错误: 堆栈深度超过限制 Hint: 在确定了平台的堆栈深度限制是足…...

Linux ptrace系统调用
文章目录 一、ptrace 简介二、ptrace 参数request2.1 PTRACE_TRACEME2.2 PTRACE_PEEKTEXT, PTRACE_PEEKDATA2.3 PTRACE_PEEKUSER2.4 PTRACE_POKETEXT, PTRACE_POKEDATA2.5 PTRACE_POKEUSER2.6 PTRACE_GETREGS, PTRACE_GETFPREGS2.7 PTRACE_GETREGSET2.8 PTRACE_SETREGS, PTRACE…...

CSDN每日一练 |『贝博士发奖金』『Longest Continuous Increasing Subsequence』『最小差值』2023-09-01
CSDN每日一练 |『贝博士发奖金』『Longest Continuous Increasing Subsequence』『最小差值』2023-09-01 一、题目名称:贝博士发奖金二、题目名称:Longest Continuous Increasing Subsequence三、题目名称:最小差值一、题目名称:贝博士发奖金 时间限制:1000ms内存限制:25…...

二维数组创建方式比较
暑假跟着地质队去跑山了,到现在还没结束,今天休息的时候突然刷到了一篇关于C二维数组创建方面的文章,我觉得还是非常不错滴,就将其中提到的新方法和我已经使用过的三种方法进行了比较,发现该方法提高了二维数组的分配、…...

安达发|富士康科技集团利用自动排程APS软件打造智慧工厂
富士康科技集团作为全球领先的3C产品研发制造企业,近年来积极布局智能制造领域,通过引入先进的自动化排程系统(APS),成功打造了智慧工厂,提高了生产质量与效率,降低了生产成本。 富士康集团自2019年下半年提出在观澜厂区建立数字可…...

云计算在大数据分析中的应用与优势
文章目录 云计算在大数据分析中的应用云计算在大数据分析中的优势云计算在大数据分析中的示例未来发展和拓展结论 🎉欢迎来到AIGC人工智能专栏~云计算在大数据分析中的应用与优势 ☆* o(≧▽≦)o *☆嗨~我是IT陈寒🍹✨博客主页:IT陈寒的博客&…...
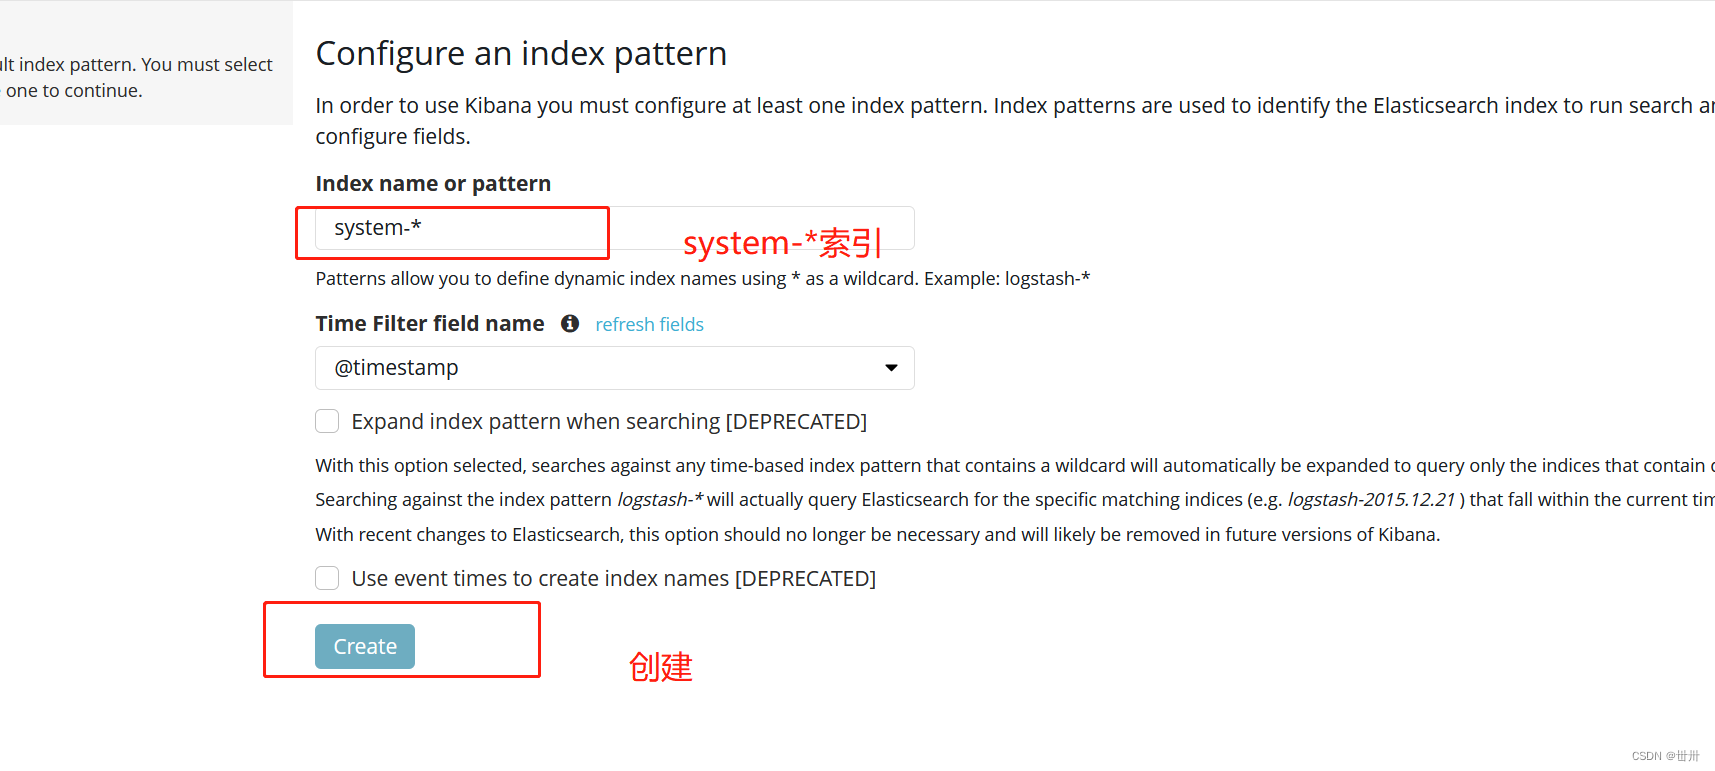
linux————ELK(日志收集系统集群)
目录 一、为什么要使用ELK 二、ELK作用 二、组件 一、elasticsearch 特点 二、logstash 工作过程 INPUT(输入) FILETER(过滤) OUTPUTS(输出) 三、kibana 三、架构类型 ELK ELKK ELFK ELFKK EFK 四、构建ELk集群…...
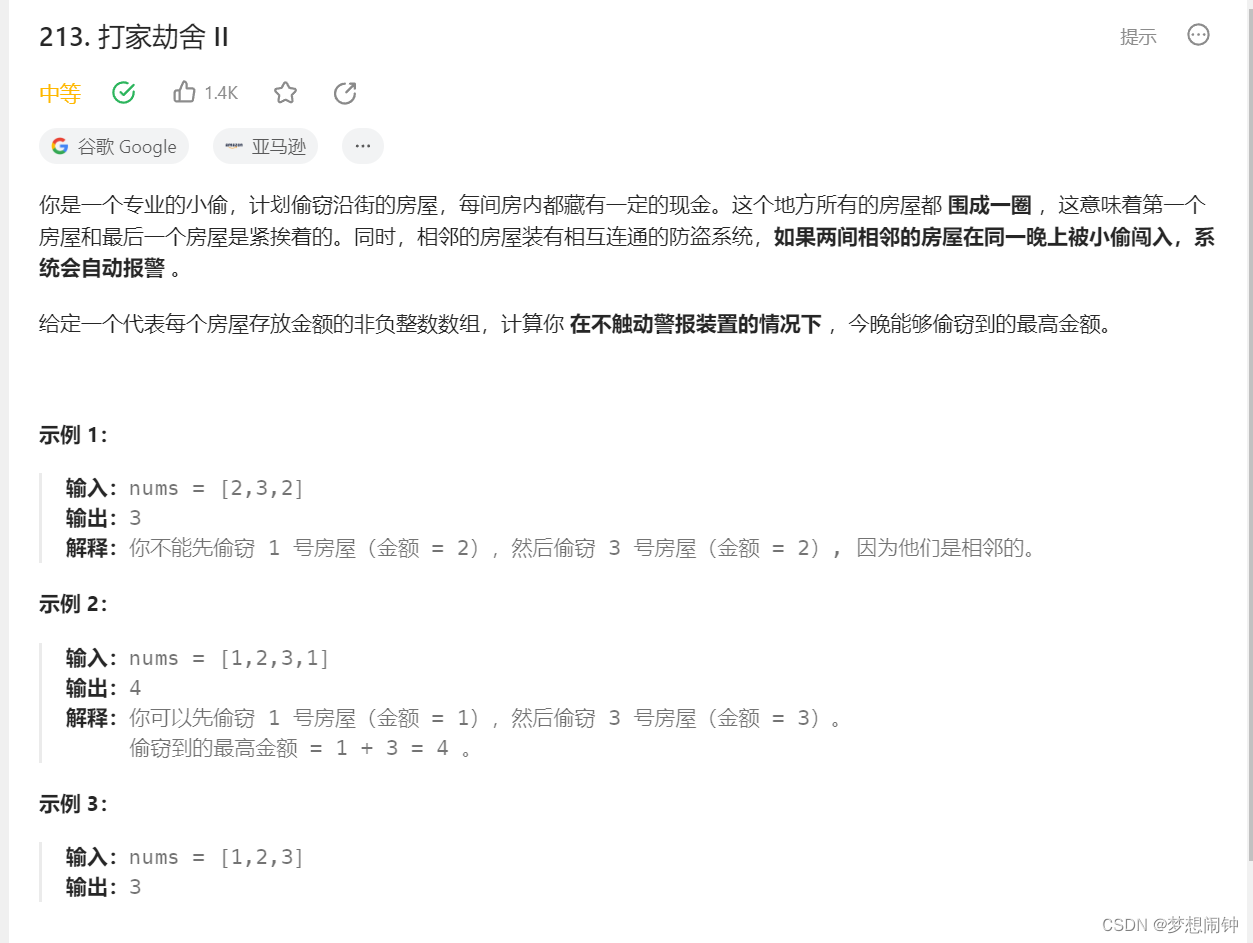
Leetcode213 打劫家舍2
思路:既然头尾不能同时取,那就分别算只取头或者只取尾,不考虑特殊情况的话是一个简单的动态规划 class Solution:def rob(self, nums: list[int]) -> int:if len(nums) < 3:return max(nums)max_sum [nums[0], max(nums[1], nums[0])…...
Redis全局命令
"那篝火在银河尽头~" Redis-cli命令启动 现如今,我们已经启动了Redis服务,下⾯将介绍如何使⽤redis-cli连接、操作Redis服务。客户端与服务端交互的方式有两种: ● 第⼀种是交互式⽅式: 后续所有的操作都是通过交互式的⽅式实现,…...

Xml转json
利用fastjson转换,pom文件依赖: <dependency><groupId>dom4j</groupId><artifactId>dom4j</artifactId><version>1.6.1</version> </dependency> <dependency><groupId>com.alibaba</groupId><artifa…...
Spring框架知识点汇总
01.Spring框架的基本理解 关键字:核心思想IOC/AOP,作用(解耦,简化),简单描述框架组成; Spring框架是一款轻量级的开发框架,核心思想是IOC(反转控制)和AOP&a…...
JavaScript Web APIs - 06 正则表达式
Web APIs - 06 文章目录 Web APIs - 06正则表达式正则基本使用元字符边界符量词范围字符类 替换和修饰符正则插件change 事件判断是否有类 目标:能够利用正则表达式完成小兔鲜注册页面的表单验证,具备常见的表单验证能力 正则表达式综合案例阶段案例 正…...
Python入门教程 | Python3 字符串
字符串是 Python 中最常用的数据类型。我们可以使用引号( ’ 或 " )来创建字符串。 创建字符串很简单,只要为变量分配一个值即可。例如: var1 Hello World! var2 "Tarzan"Python 访问字符串中的值 Python 不支持单字符类型ÿ…...

Tonzhon音乐:纯净无干扰的现代音乐播放平台终极指南
Tonzhon音乐:纯净无干扰的现代音乐播放平台终极指南 【免费下载链接】tonzhon-music 铜钟 Tonzhon (tonzhon.whamon.com): 干净纯粹的音乐平台 (铜钟已不再使用 tonzhon.com,现在的 tonzhon.com 不是正版的铜钟) 项目地址: https://gitcode.com/GitHub…...

AI代理开发终极指南:深度解析Awesome Agent Skills中Google Gemini官方技能
AI代理开发终极指南:深度解析Awesome Agent Skills中Google Gemini官方技能 【免费下载链接】awesome-agent-skills A curated collection of 1000 agent skills from official dev teams and the community, compatible with Claude Code, Codex, Gemini CLI, Curs…...

终极指南:5分钟掌握JarEditor,无需解压直接编辑JAR文件
终极指南:5分钟掌握JarEditor,无需解压直接编辑JAR文件 【免费下载链接】JarEditor IDEA plugin for directly editing and modifying files in jar without decompression. (一款无需解压直接编辑修改jar包内文件的IDEA插件) 项…...

H3CSE 高性能园区网:VRRP 技术详解
H3CSE 高性能园区网:VRRP 技术详解VRRP 技术详解一、VRRP 简介1.1 VRRP 技术背景与定义1.1.1 技术背景1.1.2 VRRP 核心定义1.2 VRRP 核心原理与关键概念1.2.1 主备切换工作流程1.2.2 关键概念解析1.2.3 免费ARP工作原理二、VRRP 核心工作原理2.1 VRRP 基础运行原理概…...
)
农业电商服务系统(10078)
有需要的同学,源代码和配套文档领取,加文章最下方的名片哦 一、项目演示 项目演示视频 二、资料介绍 完整源代码(前后端源代码SQL脚本)配套文档(LWPPT开题报告/任务书)远程调试控屏包运行一键启动项目&…...

Open MCT性能测试实战:JMeter多协议分层压测方法
1. 为什么Open MCT的性能不能只靠“感觉”来判断?Open MCT——NASA开源的航天器监控与控制系统可视化平台,这几年在工业物联网、能源调度、科研实验数据看板等场景里越来越常见。但凡接触过它的人,几乎都会在部署后遇到同一个问题:…...

免费在线去水印软件怎样选择?2026 优缺点对比及推荐指南
随着内容创作和素材收集的日常化,去水印的需求越来越普遍。一张素材上的水印、一段视频中的平台标志,都可能影响二次创作或个人使用的体验。市面上的去水印方案从专业软件到在线工具五花八门,选择合适的工具需要了解各自的特点和适用场景。本…...

ElevenLabs陕西话语音落地实录:从零配置API到高保真秦腔语调还原,7步搞定方言TTS部署
更多请点击: https://kaifayun.com 第一章:ElevenLabs陕西话语音落地实录:从零配置API到高保真秦腔语调还原,7步搞定方言TTS部署 环境准备与API密钥获取 首先注册ElevenLabs账号并进入 Profile → API Keys页面,生成…...

股票打分制方法论
人工列提纲做评审,AI丰富内容AI模型:Deepseek仅供参考,市场有风险,投资需谨慎打分制股票算法:构建系统化、多维度的股票评估体系在股票投资领域,面对纷繁复杂的市场信息和海量数据,如何科学、客…...

Sequin实战教程:构建企业级变更数据捕获管道
Sequin实战教程:构建企业级变更数据捕获管道 【免费下载链接】sequin Postgres change data capture to streams, queues, and search indexes like Kafka, SQS, Elasticsearch, HTTP endpoints, and more 项目地址: https://gitcode.com/gh_mirrors/se/sequin …...