MongoDB实验——在Java应用程序中操作 MongoDB 数据
在Java应用程序中操作 MongoDB 数据
1. 启动MongoDB Shell
2. 切换到admin数据库,使用root账户

3.开启Eclipse,创建Java Project项目,命名为MongoJava
File --> New --> Java Project
4.在MongoJava项目下新建包,包名为mongo
MongoJava右键 --> New --> mongo
5. 在mongo包下新建类,类名为mimalianjie
mongo右键 --> New --> Class

6. 添加项目依赖的jar包,右键单击MongoJava,选择Import
7. 选择General中的File System,点击Next

8. 选择存放mongo连接java的驱动程序的文件夹,并进行勾选Create top-level folder
9. 选中导入的文件夹中的mongo-java-driver-3.2.2.jar,右击选择Build Path中的Add to Build Path。
10. 连接数据库:编写代码,功能为连接Mongodb数据库。我们需要指定数据库名称,如果指定的数据库不存在,mongo会自动创建数据库
package mongo;import java.util.ArrayList;import com.mongodb.MongoClient;
import com.mongodb.MongoCredential;
import com.mongodb.ServerAddress;
import com.mongodb.client.MongoDatabase;public class mimalianjie {public static void main(String[] args) {try {ServerAddress serverAddress = new ServerAddress("localhost",27017);ArrayList<ServerAddress> addrs = new ArrayList<ServerAddress>();addrs.add(serverAddress);MongoCredential credential = MongoCredential.createScramSha1Credential("root", "admin", "strongs".toCharArray());ArrayList<MongoCredential> credentials = newArrayList<MongoCredential>();credentials.add(credential);MongoClient mongoClient = new MongoClient(addrs,credentials);MongoDatabase mongoDatabase = mongoClient.getDatabase("databaseName");System.out.println("Connect to database successfully");} catch (Exception e) {System.err.println( e.getClass().getName() + ": " + e.getMessage() );}}}

11. 创建集合:与上述步骤相同,在mongo包下新建类,类名为chuangjianjihe,编写代码,功能为在test库下创建集合mycol(使用com.mongodb.client.MongoDatabase类中的createCollection()来创建集合)
package mongo;import java.util.ArrayList;import com.mongodb.MongoClient;
import com.mongodb.MongoCredential;
import com.mongodb.ServerAddress;
import com.mongodb.client.MongoDatabase;public class chuanjianjihe {public static void main(String[] args) {try {ServerAddress serverAddress = new ServerAddress("localhost",27017);ArrayList<ServerAddress> addrs = new ArrayList<ServerAddress>();addrs.add(serverAddress);MongoCredential credential = MongoCredential.createScramSha1Credential("root","admin","strongs".toCharArray());ArrayList<MongoCredential> credentials = new ArrayList<MongoCredential>();credentials.add(credential);MongoClient mongoClient = new MongoClient(addrs,credentials);MongoDatabase mongoDatabase = mongoClient.getDatabase("test");System.out.println("Connect to database successfully");mongoDatabase.createCollection("mycol");System.out.println("集合mycol创建成功");}catch (Exception e) {System.err.println( e.getClass().getName() + ": " + e.getMessage());}}}

12. 在mongodb中进行验证

13. 获取集合:在mongo包下新建类,名为huoqujihe,并编写代码,功能为获取所需集合(使用com.mongodb.client.MongoDatabase类的 getCollection() 方法来获取一个集合)
package mongo;import java.util.ArrayList;import com.mongodb.MongoClient;
import com.mongodb.MongoCredential;
import com.mongodb.ServerAddress;
import com.mongodb.client.MongoCollection;
import com.mongodb.client.MongoDatabase;public class huoqujihe {public static void main(String[] args) {try {ServerAddress serverAddress = new ServerAddress("localhost",27017);ArrayList<ServerAddress> addrs = new ArrayList<ServerAddress>();addrs.add(serverAddress);MongoCredential credential = MongoCredential.createScramSha1Credential("root","admin","strongs".toCharArray());ArrayList<MongoCredential> credentials = new ArrayList<MongoCredential>();credentials.add(credential);MongoClient mongoClient = new MongoClient(addrs,credentials);MongoDatabase mongoDatabase = mongoClient.getDatabase("test");System.out.println("Connect to database successfully");MongoCollection<org.bson.Document> collection = mongoDatabase.getCollection("mycol");System.out.println("集合mycol选择成功");} catch (Exception e) {System.err.println( e.getClass().getName() + ": " + e.getMessage());}}}

14.插入文档:在mongo包中新建类,名为charuwendang,功能为连接test库,选择mycol集合并向其中插入文档。(使用com.mongodb.client.MongoCollection类的insertMany()方法来插入一个文档)
package mongo;import java.util.ArrayList;
import java.util.List;import org.bson.Document;import com.mongodb.MongoClient;
import com.mongodb.MongoCredential;
import com.mongodb.ServerAddress;
import com.mongodb.client.MongoCollection;
import com.mongodb.client.MongoDatabase;public class charuwendang {public static void main (String[] args) {try {ServerAddress serverAddress = new ServerAddress("localhost",27017);ArrayList<ServerAddress> addrs = new ArrayList<ServerAddress>();addrs.add(serverAddress);MongoCredential credential = MongoCredential.createScramSha1Credential("root","admin","strongs".toCharArray());ArrayList<MongoCredential> credentials = new ArrayList<MongoCredential>();credentials.add(credential);MongoClient mongoClient = new MongoClient(addrs,credentials);MongoDatabase mongoDatabase = mongoClient.getDatabase("test");System.out.println("Connect to database successfully");MongoCollection<org.bson.Document> collection = mongoDatabase.getCollection("mycol");System.out.println("集合mycol选择成功");Document document = new Document("name", "zhangyudashuju").append("description", "YXCX").append("likes", 100).append("location", "BJ");List<Document> documents = new ArrayList<Document>();documents.add(document);collection.insertMany(documents);System.out.println("文档插入成功");}catch(Exception e) {System.err.println( e.getClass().getName() + ": " + e.getMessage() );}}
}

15.在mongodb中进行查询验证

16. 检索文档:在mongo包中新建类,名为jiansuosuoyouwendang,功能为检索test库下,mycol集合中的所有文档(使用 com.mongodb.client.MongoCollection 类中的 find() 方法来获取集合中的所有文档)
package mongo;import java.util.ArrayList;import org.bson.Document;import com.mongodb.MongoClient;
import com.mongodb.MongoCredential;
import com.mongodb.ServerAddress;
import com.mongodb.client.FindIterable;
import com.mongodb.client.MongoCollection;
import com.mongodb.client.MongoCursor;
import com.mongodb.client.MongoDatabase;public class jiansuosuoyouwendang {public static void main( String args[] ){try{ServerAddress serverAddress = new ServerAddress("localhost",27017);ArrayList<ServerAddress> addrs = new ArrayList<ServerAddress>();addrs.add(serverAddress);MongoCredential credential = MongoCredential.createScramSha1Credential("root","admin", "strongs".toCharArray());ArrayList<MongoCredential> credentials = new ArrayList<MongoCredential>();credentials.add(credential);MongoClient mongoClient = new MongoClient(addrs,credentials);MongoDatabase mongoDatabase = mongoClient.getDatabase("test");System.out.println("Connect to database successfully");MongoCollection<org.bson.Document> collection = mongoDatabase.getCollection("mycol");System.out.println("集合mycol选择成功");FindIterable<Document> findIterable = collection.find();MongoCursor<Document> mongoCursor = findIterable.iterator();while(mongoCursor.hasNext()){System.out.println(mongoCursor.next());}}catch(Exception e){System.err.println( e.getClass().getName() + ": " + e.getMessage() );}}
}

17. 更新文档:在mongo包中新建类,名为gengxinwendang,功能为选择test库下mycol集合,将文档中的likes=100改为likes=200(使用 com.mongodb.client.MongoCollection 类中的updateMany()方法来更新集合中的文档)
package mongo;import java.util.ArrayList;import org.bson.Document;import com.mongodb.MongoClient;
import com.mongodb.MongoCredential;
import com.mongodb.ServerAddress;
import com.mongodb.client.FindIterable;
import com.mongodb.client.MongoCollection;
import com.mongodb.client.MongoCursor;
import com.mongodb.client.MongoDatabase;
import com.mongodb.client.model.Filters;public class gengxinwendang {public static void main( String args[] ){try{ServerAddress serverAddress = new ServerAddress("localhost",27017);ArrayList<ServerAddress> addrs = new ArrayList<ServerAddress>();addrs.add(serverAddress);MongoCredential credential = MongoCredential.createScramSha1Credential("root","admin", "strongs".toCharArray());ArrayList<MongoCredential> credentials = new ArrayList<MongoCredential>();credentials.add(credential);MongoClient mongoClient = new MongoClient(addrs,credentials);MongoDatabase mongoDatabase = mongoClient.getDatabase("test");System.out.println("Connect to database successfully");MongoCollection<org.bson.Document> collection = mongoDatabase.getCollection("mycol");System.out.println("集合mycol选择成功");collection.updateMany(Filters.eq("likes", 100), new Document("$set",new Document("likes",200)));FindIterable<Document> findIterable = collection.find();MongoCursor<Document> mongoCursor = findIterable.iterator();while(mongoCursor.hasNext()){System.out.println(mongoCursor.next());}}catch(Exception e){System.err.println( e.getClass().getName() + ": " + e.getMessage() );}}
}

18. 在mongodb中进行查询验证

19. 删除文档:在mongo包中新建类,名为sanchuwendang,功能为选择test库下mycol集合,删除所有符合条件(likes=200)的文档。(使用com.mongodb.DBCollection类中的findOne()方法来获取第一个文档,然后使用remove方法删除)
package mongo;import java.util.ArrayList;import org.bson.Document;import com.mongodb.MongoClient;
import com.mongodb.MongoCredential;
import com.mongodb.ServerAddress;
import com.mongodb.client.FindIterable;
import com.mongodb.client.MongoCollection;
import com.mongodb.client.MongoCursor;
import com.mongodb.client.MongoDatabase;
import com.mongodb.client.model.Filters;public class shanchuwendang {public static void main( String args[] ){try{ServerAddress serverAddress = new ServerAddress("localhost",27017);ArrayList<ServerAddress> addrs = new ArrayList<ServerAddress>();addrs.add(serverAddress);MongoCredential credential = MongoCredential.createScramSha1Credential("root","admin", "strongs".toCharArray());ArrayList<MongoCredential> credentials = new ArrayList<MongoCredential>();credentials.add(credential);MongoClient mongoClient = new MongoClient(addrs,credentials);MongoDatabase mongoDatabase = mongoClient.getDatabase("test");System.out.println("Connect to database successfully");MongoCollection<org.bson.Document> collection = mongoDatabase.getCollection("mycol");System.out.println("集合mycol选择成功");//删除符合条件的第一个文档//collection.deleteOne(Filters.eq("likes", 200));//删除所有符合条件的文档collection.deleteMany (Filters.eq("likes", 200));//检索查看结果FindIterable<Document> findIterable = collection.find();MongoCursor<Document> mongoCursor = findIterable.iterator();while(mongoCursor.hasNext()){System.out.println(mongoCursor.next());}}catch(Exception e){System.err.println( e.getClass().getName() + ": " + e.getMessage() );}}
}

20. 在mongodb中进行查询验证
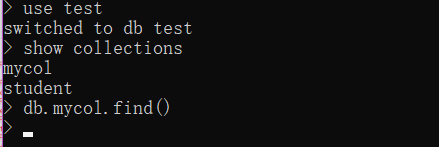
查询结果为空,证明文档已被删除。
至此,实验结束!
相关文章:
MongoDB实验——在Java应用程序中操作 MongoDB 数据
在Java应用程序中操作 MongoDB 数据 1. 启动MongoDB Shell 2. 切换到admin数据库,使用root账户 3.开启Eclipse,创建Java Project项目,命名为MongoJava File --> New --> Java Project 4.在MongoJava项目下新建包,包名为mo…...
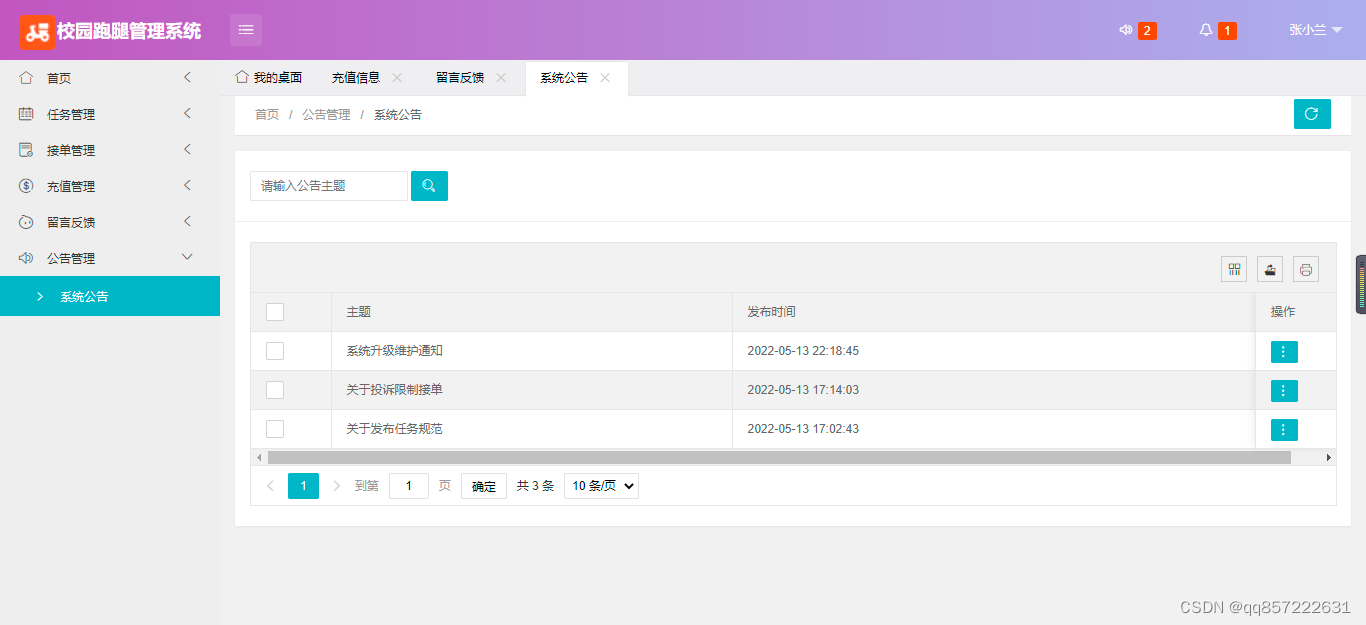
java+springboot+mysql校园跑腿管理系统
项目介绍: 使用javaspringbootmysql开发的校园跑腿管理系统,系统包含超级管理员,系统管理员、用户角色,功能如下: 超级管理员:管理员管理;用户管理(充值);任…...

ubuntu20.04 server 安装后磁盘空间只有一半的处理
这里扩展:/dev/mapper/ubuntu–vg-ubuntu–lv rootbook:/data# df -h Filesystem Size Used Avail Use% Mounted on udev 3.9G 0 3.9G 0% /dev tmpfs 795M 1.2M 79…...

〔017〕Stable Diffusion 之 常用模型推荐 篇
✨ 目录 🎈 模型网站🎈 仿真系列🎈 国风系列🎈 卡通动漫系列🎈 3D系列🎈 一些好用的lora模型🎈 模型网站 由于现在大模型超级多,导致每种画风的模型太多,那么如何选择最好最适合的模型,成了很多人头疼的问题由于用的大部分都是1.5的模型,所以优先下载 safete…...
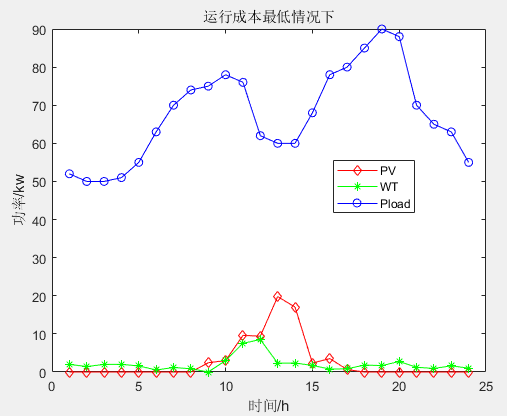
多目标应用:基于多目标人工蜂鸟算法(MOAHA)的微电网多目标优化调度MATLAB
一、微网系统运行优化模型 参考文献: [1]李兴莘,张靖,何宇,等.基于改进粒子群算法的微电网多目标优化调度[J].电力科学与工程, 2021, 37(3):7 二、多目标人工蜂鸟算法MOAHA 多目标人工蜂鸟算法(multi-objective artificial hummingbird algorithm&…...

【HTML5】HTML5 特性
HTML5 特性 1. 语义化标签 <header>:表示网页或某个区域的页眉部分,通常包含网站的标志、导航菜单等内容。<nav>:表示导航区域,用于包含网站的主要导航链接。<main>:表示网页的主要内容区域&#…...

【FreeRTOS】互斥量的使用与逐步实现
在FreeRTOS中,互斥量是一种用于保护共享资源的同步机制。它通过二进制信号量的方式,确保在任意时刻只有一个任务可以获取互斥量并访问共享资源,其他任务将被阻塞。使用互斥量的基本步骤包括创建互斥量、获取互斥量、访问共享资源和释放互斥量…...
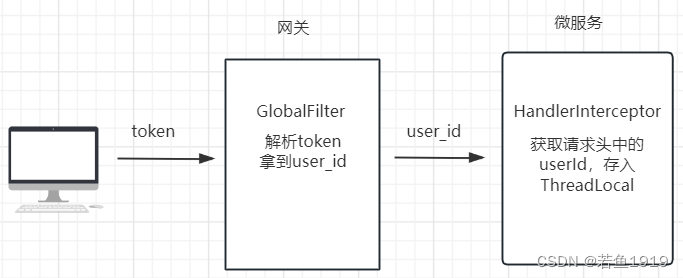
Spring-Cloud-Openfeign如何传递用户信息?
用户信息传递 微服务系统中,前端会携带登录生成的token访问后端接口,请求会首先到达网关,网关一般会做token解析,然后把解析出来的用户ID放到http的请求头中继续传递给后端的微服务,微服务中会有拦截器来做用户信息的…...

OpenCV(十一):图像仿射变换
目录 1.图像仿射变换介绍 仿射变换: 仿射变换矩阵: 仿射变换公式: 2.仿射变换函数 仿射变换函数:warpAffine() 图像旋转:getRotationMatrix2D() 计算仿射变换矩阵:getAffineTransform() 3.demo 1.…...
多路波形发生器的控制
本次波形发生器,主要使用运算放大器、NE555以及一些其他的电阻电容器件来实现。整体电路图如下所示: 产生的三角波如下: 正弦波如下 方波如下: 运算放大器(Operational Amplifier,简称OP-AMP)是…...

[C/C++]天天酷跑超详细教程-中篇
个人主页:北海 🎐CSDN新晋作者 🎉欢迎 👍点赞✍评论⭐收藏✨收录专栏:C/C🤝希望作者的文章能对你有所帮助,有不足的地方请在评论区留言指正,大家一起学习交流!ǹ…...
面试被打脸,数据结构底层都不知道么--回去等通知吧
数据结构之常见的8种数据结构: -数组Array -链表 Linked List -堆 heap -栈 stack -队列 Queue -树 Tree -散列表 Hash -图 Graph 数据结构-链表篇 Linklist定义: -是一种线性表,并不会按线性的顺序存储数据,即逻辑上相邻…...
)
微服务面试问题小结( 微服务、分布式、MQ、网关、zookeeper、nginx)
什么是微服务,单体架构的优点和缺点,微服务架构的优点和缺点? 单体架构 优点:架构简单,维护成本低缺点:各个模块耦合度太高,当对一个模块进行更新修改时,会影响到其他模块ÿ…...

Vue3全局变量使用
全局变量(函数等)可以在任意组件内访问,可以当组件间的传值使用。 main.js import ./assets/main.cssimport { createApp } from vue import App from ./App.vueconst app createApp(App); app.config.globalProperties.$global_id10; app.…...

拼多多海量商品数据接口API 商品详情接口 商品价格主图接口
拼多多,作为中国最大的社交电商之一,提供了丰富的商品信息和海量的用户数据。对于广大开发者而言,如何快速、准确地获取这些数据,进而开发出各种创新应用,是他们关心的问题。本文将详细介绍拼多多海量商品数据接口API的…...

结构化日志记录增强网络安全性
日志是一种宝贵的资产,在监视和分析应用程序或组织的 IT 基础结构的整体安全状况和性能方面发挥着至关重要的作用。它们提供系统事件、用户活动、网络流量和应用程序行为的详细记录,从而深入了解潜在威胁或未经授权的访问尝试。虽然组织历来依赖于传统的…...
企业架构LNMP学习笔记5
Nginx: 常见用法: 1)web服务器软件 httpd http协议 同类的web服务器软件:apache Nginx(俄罗斯)IIS(微软)lighttpd(德国) 2)代理服务器 反向代…...
Idea安装免注册版ChatGPT
文章目录 一、前期准备二、开始使用 一、前期准备 1.准备Idea开发软件并打开(VS Code同理)! 2.【CtrlAltS】快捷键调出Settings窗口,如图 3.找到NexChatGPT 此插件不需要注册,可以直接使用(高级一些的需要会员收费限…...

git操作
一、查看远程分支 使用如下git命令查看所有远程分支: git branch -r 查看远程和本地所有分支: git branch -a 查看本地分支: git branch 在输出结果中,前面带* 的是当前分支。 二、拉取远程分支并创建本地分支 方法一 使用如下…...

9 | 求出不同性别和不同科目的学生平均分数
需求描述:学生成绩分析 背景: 我们有一组学生的成绩数据,其中包括学生的姓名、性别和科目,我们需要分析不同性别和不同科目的学生平均分数。 功能要求: 从数据源中获取学生的成绩数据,包括学生姓名、性别和科目。使用Spark进行数据处理,将学生数据按性别和科目分组。计…...

【文档翻译】QNX Neutrino RTOS 7.1用户手册 - 第五章 文件操作
本文翻译自BlackBerry官方提供的QNX Neutrino RTOS User’s Guide,仅供学习参考使用 第五章 文件操作 文章目录第五章 文件操作文件类型文件名和路径名绝对路径和相对路径点和点点目录没有硬盘字母以点开头的路径名扩展名路径空间映射文件名规则所有内容的存储位置…...

递归提示策略:构建高效可靠的自然语言转SQL系统
1. 引言:当自然语言撞上结构化查询作为一名和数据打了十几年交道的“老码农”,我见过太多业务同学对着数据库“望洋兴叹”的场景。他们能清晰地用中文描述需求:“帮我找出上个月华东地区销售额超过10万,但客户满意度低于平均值的所…...
)
【LeetCode刷题日记】617.合并二叉树(空间换安全,还是原地省内存)
🔥个人主页:北极的代码(欢迎来访) 🎬作者简介:java后端学习者 ❄️个人专栏:苍穹外卖日记,SSM框架深入,JavaWeb ✨命运的结局尽可永在,不屈的挑战却不可须臾或…...

Claude Mythos:首个具备自主渗透能力的通用AI安全模型
1. 这不是一次普通升级:Mythos 的能力跃迁到底意味着什么 如果你过去三年一直在跟进大模型的演进节奏,大概率会记得2023年Claude 2发布时那种“稳扎稳打”的观感——推理更连贯、长文本更可靠、代码能力有提升,但整体仍属于渐进式优化。2024年…...

Tokenizer与Embedding
Transformers 系列文章目录 第一章 Transformers 简介 第二章 Transformers 模型推理; 第三章 Tokenizer 与 Embedding 文章目录Transformers 系列文章目录前言Tokenizer与Embedding一、Tokenizer(分词器)和Embedding(词嵌入&a…...

Agent记忆系统工程:让AI真正记住重要的事
无状态的 AI 助手每次对话都从零开始,这是当前应用体验差的核心原因之一。本文系统性地拆解 Agent 记忆系统的工程实现,从短期工作记忆到长期知识库,构建有"真实记忆"的 AI Agent。 记忆系统的四个层次人类记忆是分层的:…...

交互形态的深层迭代:从文本到具象化表达
行业在探索智能交互形态时,会发现一个共性现象:不少智能体的逻辑与生成能力已经成熟,但对外交互始终局限在文本对话框。 过去一年,行业主流做法高度趋同:大模型对接知识库、工具调用、流程编排,最终收敛为文…...

BarrageGrab:重塑直播数据采集的技术范式
BarrageGrab:重塑直播数据采集的技术范式 【免费下载链接】BarrageGrab 抖音快手bilibili直播弹幕wss直连,非系统代理方式,无需多开浏览器窗口 项目地址: https://gitcode.com/gh_mirrors/ba/BarrageGrab 在数字直播经济蓬勃发展的今天…...

新手教程使用curl命令通过Taotoken测试大模型API连通性
🚀 告别海外账号与网络限制!稳定直连全球优质大模型,限时半价接入中。 👉 点击领取海量免费额度 新手教程:使用curl命令通过Taotoken测试大模型API连通性 当你刚刚在Taotoken平台创建了API Key,最直接、最…...

终极FanControl风扇控制指南:如何彻底告别Windows风扇噪音与过热烦恼
终极FanControl风扇控制指南:如何彻底告别Windows风扇噪音与过热烦恼 【免费下载链接】FanControl.Releases This is the release repository for Fan Control, a highly customizable fan controlling software for Windows. 项目地址: https://gitcode.com/GitH…...