HikariCP源码修改,使其连接池支持Kerberos认证
HikariCP-4.0.3
修改HikariCP源码,使其连接池支持Kerberos认证
修改后的Hikari源码地址:https://github.com/Raray-chuan/HikariCP-4.0.3
Springboot使用hikari连接池并进行Kerberos认证访问Impala的demo地址:https://github.com/Raray-chuan/springboot-kerberos-hikari-impala
1. Java连接impala的Kerberos认证
import org.apache.hadoop.conf.Configuration;
import org.apache.hadoop.security.UserGroupInformation;import java.io.IOException;
import java.security.PrivilegedAction;
import java.sql.Connection;
import java.sql.DriverManager;
import java.sql.ResultSet;
import java.sql.Statement;
/*** @Author Xichuan* @Date 2022/10/28 17:53* @Description*/
public class TestKerberosImpala {public static final String KRB5_CONF = "D:\\development\\license_dll\\krb5.conf";public static final String PRINCIPAL = "xichuan/admin@XICHUAN.COM";public static final String KEYTAB = "D:\\development\\license_dll\\xichuan.keytab";public static String connectionUrl = "jdbc:impala://node01:21050/;AuthMech=1;KrbRealm=XICHUAN.COM;KrbHostFQDN=node01;KrbServiceName=impala";public static String jdbcDriverName = "com.cloudera.impala.jdbc41.Driver";public static void main(String[] args) throws Exception {UserGroupInformation loginUser = kerberosAuth(KRB5_CONF,KEYTAB,PRINCIPAL);int result = loginUser.doAs((PrivilegedAction<Integer>) () -> {int result1 = 0;try {Class.forName(jdbcDriverName);} catch (ClassNotFoundException e) {e.printStackTrace();}try (Connection con = DriverManager.getConnection(connectionUrl)) {Statement stmt = con.createStatement();ResultSet rs = stmt.executeQuery("SELECT count(1) FROM test_dws.dws_test_id");while (rs.next()) {result1 = rs.getInt(1);}stmt.close();con.close();} catch (Exception e) {e.printStackTrace();}return result1;});System.out.println("count: "+ result);}/*** kerberos authentication* @param krb5ConfPath* @param keyTabPath* @param principle* @return* @throws IOException*/public static UserGroupInformation kerberosAuth(String krb5ConfPath, String keyTabPath, String principle) throws IOException {System.setProperty("java.security.krb5.conf", krb5ConfPath);Configuration conf = new Configuration();conf.set("hadoop.security.authentication", "Kerberos");UserGroupInformation.setConfiguration(conf);UserGroupInformation loginInfo = UserGroupInformation.loginUserFromKeytabAndReturnUGI(principle, keyTabPath);if (loginInfo.hasKerberosCredentials()) {System.out.println("kerberos authentication success!");System.out.println("login user: "+loginInfo.getUserName());} else {System.out.println("kerberos authentication fail!");}return loginInfo;}
}
2. 解读源码,了解Hikari连接池如何保持Connection个数在一定数目上
1.在我们初始化Hikari Pool参数后,第一次调用com.zaxxer.hikari.HikariDataSource#getConnection()的时候,会进行初始化HikariPool,HikariPool正式管理Connection的类
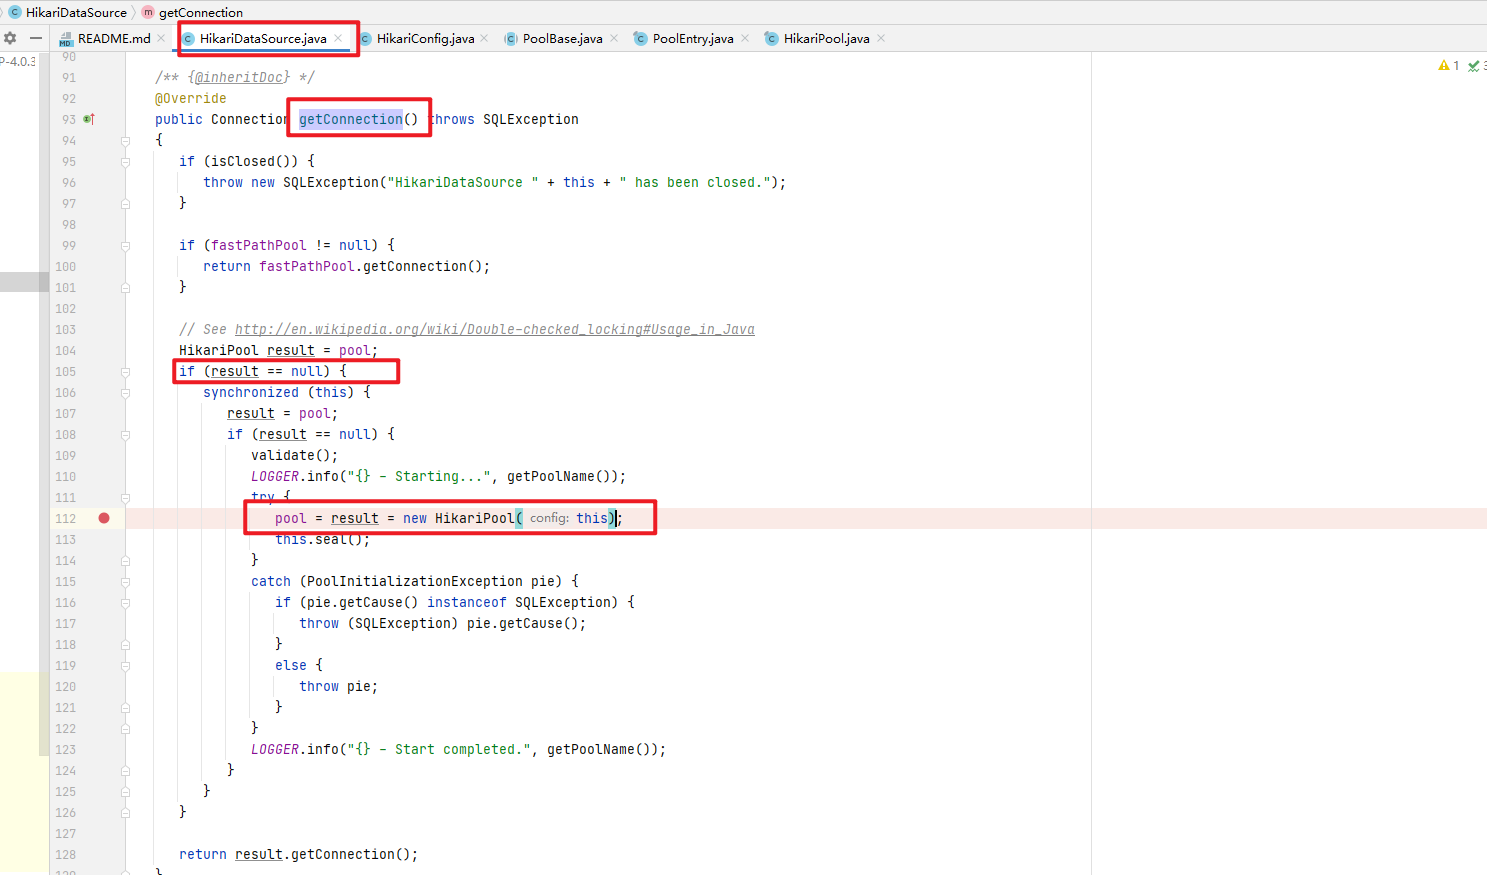
2.进入com.zaxxer.hikari.pool.HikariPool#HikariPool类中,查看HikariPool如何初始化连接池的
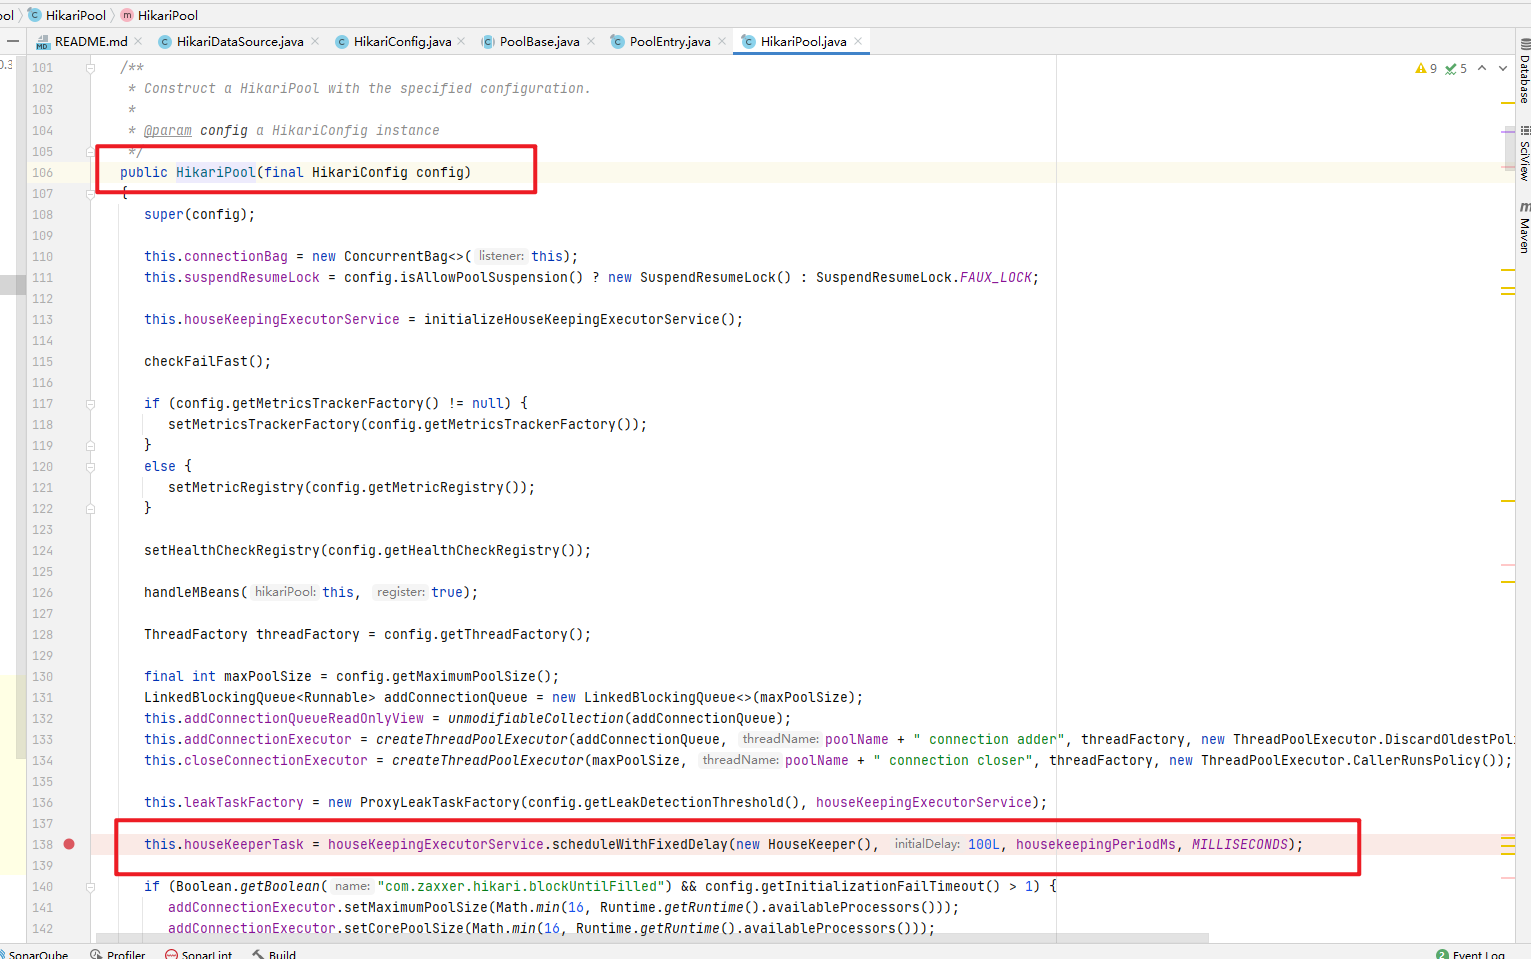
HikariPool初始化的前面参数先不管,不是研究重点,看红框中,HikariPool会初始化一个HouseKeeper的线程,HouseKeeper的作用的是保持连接池的idle数据在一定的数目
3.进入com.zaxxer.hikari.pool.HikariPool.HouseKeeper类,看它如何是保持Connection的数据在一定的数据

我们可以看到,HouseKeeper是一个内部类,继续往下看代码,有一个fillPool()方法,看注解,这个方法可以保持连接数在一定数据上

4.进入com.zaxxer.hikari.pool.HikariPool#fillPool方法

从上图我们可以看出,此方法会判断pool是否需要新添加Connection,如果需要,则在pool中添加Connection。添加Connection方式是提交一个线程,我们直接看PoolEntryCreator如何添加Connection即可。下面只会跟踪Hikari最终创建Connection的代码地方,不会解释每个方法以及类的作用
5.跟踪代码,找到Hikari最终创建Connection的代码地方
进入com.zaxxer.hikari.pool.HikariPool.PoolEntryCreator类,

可以看出该线程会创建一个PoolEntry类,PoolEntry类就是用来保存Connection的.
继续进入com.zaxxer.hikari.pool.HikariPool#createPoolEntry方法,看如何创建PoolEntry类的

可以看出,创建PoolEntry是通过newPoolEntry()方法进行创建的
继续进入com.zaxxer.hikari.pool.PoolBase#newPoolEntry方法,看如何创建PoolEntry的


可以看出newPoolEntry()方法创建PoolEntry对象,是通过PoolEntry构造方法创建的,进入此构造方法,第一个参数就是Connection,那我们就需要进入newConnection()方法看此Connection是如何创建的
进入com.zaxxer.hikari.pool.PoolBase#newConnection方法

我们看出Connection的创建是通过dataSource.getConnection()来创建的,那这个dataSource的实现类是哪个?打断点可以看出是DriverDataSource类
进入com.zaxxer.hikari.util.DriverDataSource#getConnection()方法,查看Connection是如何创建的

可以看出创建connection是通过调用impala、mysql、h2等驱动包的接口创建的
6.总结
通过上面的源码跟踪,可以发现,创建Connection是在HikariPool类中的HouseKeeper线程中进行的。所以我们在com.zaxxer.hikari.HikariDataSource#getConnection()中,在HikariPool初始化的时候进行Kerberos认证是行不通的,因为Kerberos默认24小时就失效了; 但Kerberos失效后,HouseKeeper创建Connection的时候并没有再次认证。
所以我们思路可以是,修改hikari的源码,在com.zaxxer.hikari.util.DriverDataSource#getConnection()方法调用 driver.connect(jdbcUrl, driverProperties)之前认证即可。并且hikari连接池的max-lifetime参数要小于Kerberos的过期时长
3. 修改Hikari源码,使其支持Kerberos认证
3.1 修改HikariConfig类,添加Kerberos的四个参数
四个参数分别是:
authenticationType:安全验证的类型,如果值是"kerberos",则进行Kerberos认证,如果为null,则不进行认证
krb5FilePath:krb5.conf文件的路径
principal:principal的名称
keytabPath:对应principal的keytab的路径
//kerberos paramsprivate volatile String authenticationType;private volatile String krb5FilePath;private volatile String keytabPath;private volatile String principal;public String getAuthenticationType() {return authenticationType;}public void setAuthenticationType(String authenticationType) {this.authenticationType = authenticationType;}public String getKrb5FilePath() {return krb5FilePath;}public void setKrb5FilePath(String krb5FilePath) {this.krb5FilePath = krb5FilePath;}public String getKeytabPath() {return keytabPath;}public void setKeytabPath(String keytabPath) {this.keytabPath = keytabPath;}public String getPrincipal() {return principal;}public void setPrincipal(String principal) {this.principal = principal;}3.2 在PoolBase类中初始化DriverDataSource的时候,添加Kerberos参数
private void initializeDataSource(){final String jdbcUrl = config.getJdbcUrl();final String username = config.getUsername();final String password = config.getPassword();final String dsClassName = config.getDataSourceClassName();final String driverClassName = config.getDriverClassName();final String dataSourceJNDI = config.getDataSourceJNDI();final Properties dataSourceProperties = config.getDataSourceProperties();//add kerberos propertiesdataSourceProperties.setProperty("authenticationType",config.getAuthenticationType());dataSourceProperties.setProperty("keytabPath",config.getKeytabPath());dataSourceProperties.setProperty("krb5FilePath",config.getKrb5FilePath());dataSourceProperties.setProperty("principal",config.getPrincipal());DataSource ds = config.getDataSource();if (dsClassName != null && ds == null) {ds = createInstance(dsClassName, DataSource.class);PropertyElf.setTargetFromProperties(ds, dataSourceProperties);}else if (jdbcUrl != null && ds == null) {ds = new DriverDataSource(jdbcUrl, driverClassName, dataSourceProperties, username, password);}else if (dataSourceJNDI != null && ds == null) {try {InitialContext ic = new InitialContext();ds = (DataSource) ic.lookup(dataSourceJNDI);} catch (NamingException e) {throw new PoolInitializationException(e);}}if (ds != null) {setLoginTimeout(ds);createNetworkTimeoutExecutor(ds, dsClassName, jdbcUrl);}this.dataSource = ds;}
3.3 DriverDataSource类在getConnection()的时候进Kerberos认证
public final class DriverDataSource implements DataSource{......//kerberos paramsprivate String authenticationType = "";private String krb5FilePath;private String keytabPath;private String principal;public DriverDataSource(String jdbcUrl, String driverClassName, Properties properties, String username, String password) {this.jdbcUrl = jdbcUrl;this.driverProperties = new Properties();//init kerberos propertiesif (properties.getProperty("authenticationType") != null && properties.getProperty("authenticationType").equals("kerberos")){authenticationType = properties.getProperty("authenticationType");krb5FilePath = properties.getProperty("krb5FilePath");keytabPath = properties.getProperty("keytabPath");principal = properties.getProperty("principal");}...}......@Overridepublic Connection getConnection() throws SQLException {//if authenticationType=kerberos,it must be kerberos authentication first!if (authenticationType != null && authenticationType.equals("kerberos")){UserGroupInformation ugi = authentication();try {return ugi.doAs(new XichuanGenerateConnectionAction(jdbcUrl, driverProperties));} catch (IOException | InterruptedException e) {e.printStackTrace();}return null;}else{return driver.connect(jdbcUrl, driverProperties);}}@Overridepublic Connection getConnection(final String username, final String password) throws SQLException{final Properties cloned = (Properties) driverProperties.clone();if (username != null) {cloned.put(USER, username);if (cloned.containsKey("username")) {cloned.put("username", username);}}if (password != null) {cloned.put(PASSWORD, password);}//if authenticationType=kerberos,it must be kerberos authentication first!if (authenticationType != null && authenticationType.equals("kerberos")){UserGroupInformation ugi = authentication();try {return ugi.doAs(new XichuanGenerateConnectionAction(jdbcUrl, cloned));} catch (IOException | InterruptedException e) {e.printStackTrace();}return null;}else{return driver.connect(jdbcUrl, cloned);}}/*** generate connection action*/public class XichuanGenerateConnectionAction implements PrivilegedExceptionAction<Connection> {private String jdbcUrl;private Properties driverProperties;public XichuanGenerateConnectionAction(String jdbcUrl, Properties driverProperties){this.jdbcUrl = jdbcUrl;this.driverProperties = driverProperties;}@Overridepublic Connection run() throws Exception {return driver.connect(jdbcUrl, driverProperties);}}/*** kerberos authentication*/private UserGroupInformation authentication() {if(authenticationType != null && "kerberos".equalsIgnoreCase(authenticationType.trim())) {LOGGER.info("kerberos authentication is begin");} else {LOGGER.info("kerberos authentication is not open");return null;}System.setProperty("java.security.krb5.conf", krb5FilePath);org.apache.hadoop.conf.Configuration conf = new org.apache.hadoop.conf.Configuration();conf.set("hadoop.security.authentication", authenticationType);try {UserGroupInformation.setConfiguration(conf);UserGroupInformation userGroupInformation = UserGroupInformation.loginUserFromKeytabAndReturnUGI(principal, keytabPath);LOGGER.info("kerberos authentication success!, krb5FilePath:{}, principal:{}, keytab:{}", krb5FilePath, principal, keytabPath);LOGGER.info("login user::{}", userGroupInformation.getUserName());return userGroupInformation;} catch (IOException e1) {LOGGER.info("kerberos authentication fail!");LOGGER.error(e1.getMessage() + ", detail:{}", e1);}return null;}...
}
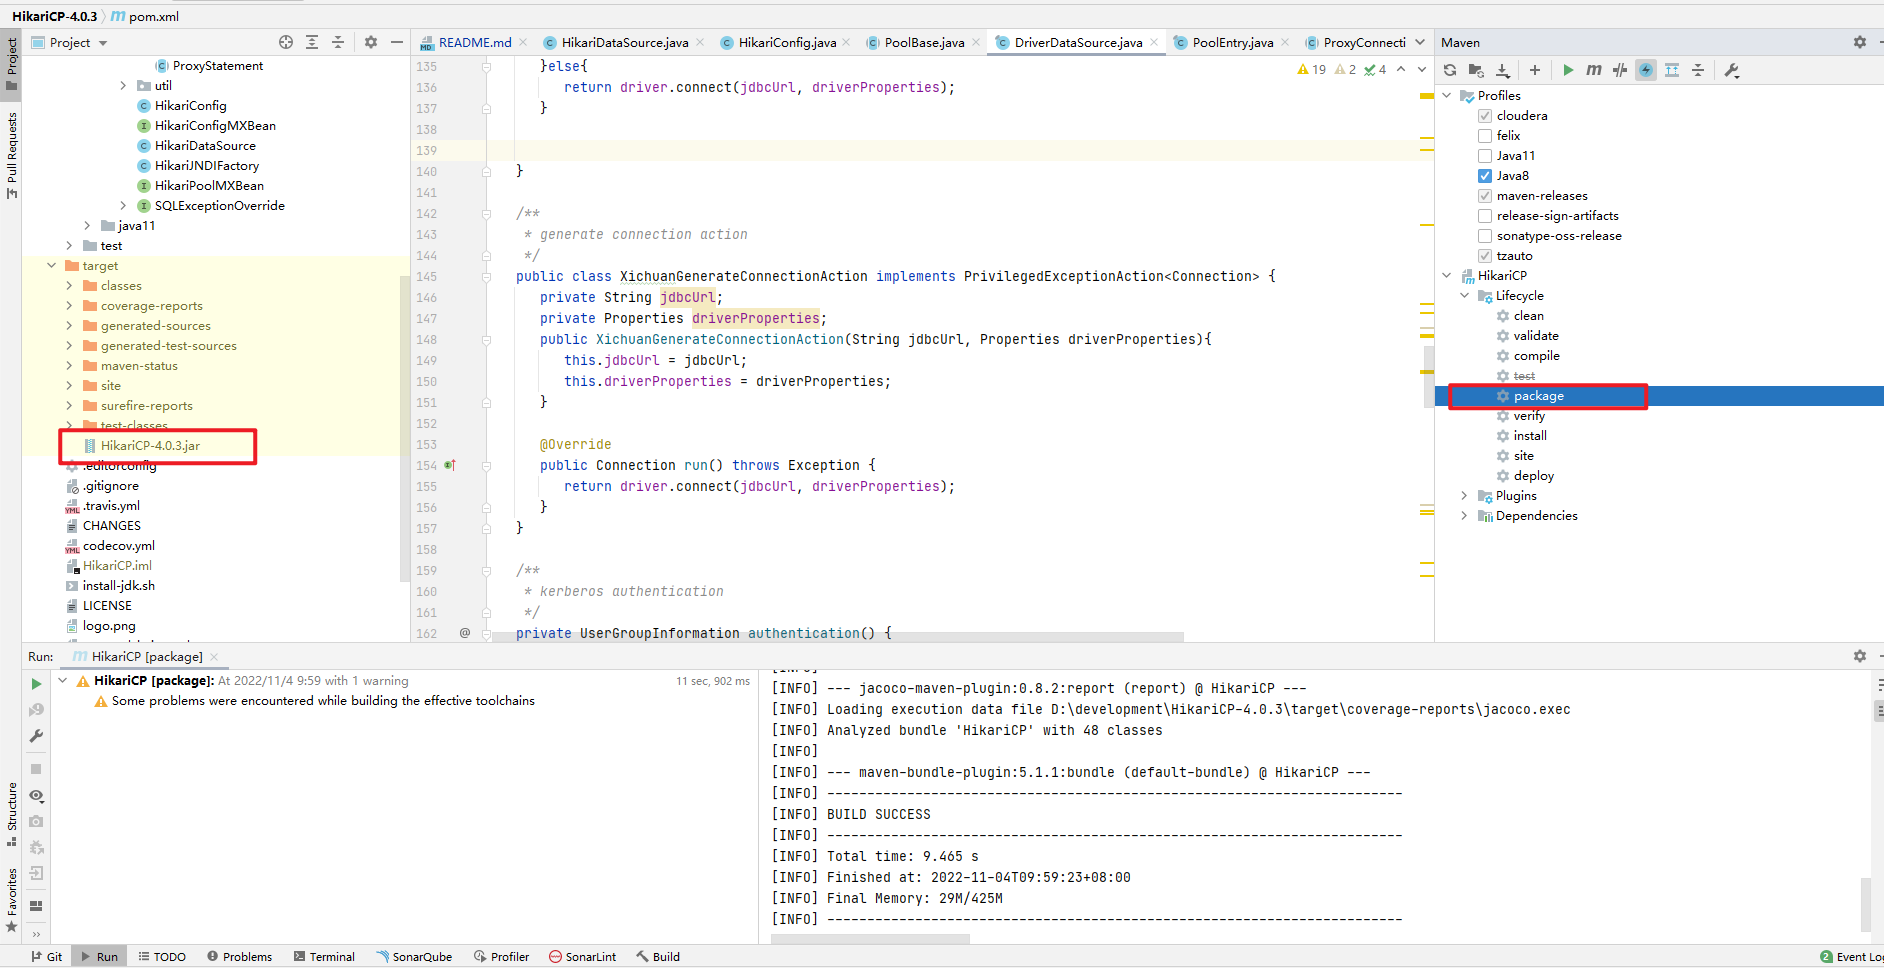
4. 对修改后的源码打包
1.maven一定要用HikariCP的对应版本的maven版本
HikariCP-4.0.3要求的maven版本是3.3.9,必须使用apache-maven-3.3.9才能打包

2.添加toolchains.xml文档
toolchains.xml文件的内容:
<?xml version="1.0" encoding="UTF-8"?>
<toolchains xmlns="http://maven.apache.org/TOOLCHAINS/1.1.0" xmlns:xsi="http://www.w3.org/2001/XMLSchema-instance"xsi:schemaLocation="http://maven.apache.org/TOOLCHAINS/1.1.0 http://maven.apache.org/xsd/toolchains-1.1.0.xsd"><toolchain><type>jdk</type><provides><version>1.8</version><vendor>sun</vendor></provides><configuration><!--jdkHome是jdk的安装home路径--><jdkHome>D:\development tool\Java\jdk1.8.0_211</jdkHome></configuration></toolchain></toolchains>
将此文件放在apache-maven-3.3.9\conf目录中
如果打包的时候还是报缺失toolchains.xml文件,可以将此文件放到本地仓库的路径中,如下图:


3.进行package,然后在本地仓库中将HikariCP-4.0.3.jar替换即可
5.在springboot中使用hikari连接池并进行Kerberos认证
1. 在application.yml添加四个参数
# kerberos
# authenticationType:安全验证的类型,如果值是"kerberos",则进行Kerberos认证,如果为null,则不进行认证
authentication.type=kerberos
# krb5FilePath:krb5.conf文件的路径
authentication.kerberos.krb5FilePath=D:\\development\\license_dll\\krb5.conf
# principal:principal的名称
authentication.kerberos.principal=xichuan/admin@XICHUAN.COM
# keytabPath:对应principal的keytab的路径
authentication.kerberos.keytabPath=D:\\development\\license_dll\\xichuan.keytab# datasource and pool
datasource.xichuan.url=jdbc:impala://node01:21050/;AuthMech=1;KrbRealm=XICHUAN.COM;KrbHostFQDN=node01;KrbServiceName=impala
datasource.xichuan.driver-class-name=com.cloudera.impala.jdbc41.Driver
datasource.xichuan.username=
datasource.xichuan.password=
datasource.xichuan.pool-name=xichuan-pool
datasource.xichuan.read-only=false
datasource.xichuan.auto-commit=true
datasource.xichuan.maximum-pool-size=3
#此值务必要小于Kerberos的过期时长(默认24小时)
datasource.xichuan.max-lifetime=35000
datasource.xichuan.idle-timeout=10000
datasource.xichuan.validation-timeout=5000
2.获取DataSourceProperties并封装成类
import org.springframework.boot.context.properties.ConfigurationProperties;
import org.springframework.stereotype.Component;/*** @Author Xichuan* @Date 2022/11/1 17:44* @Description*/
@Component
@ConfigurationProperties(prefix = "datasource.xichuan")
public class DataSourceProperties {private String url;private String driverClassName;private String username;private String password;private String poolName;private boolean readOnly;private boolean autoCommit;private int maximumPoolSize;private long maxLifetime;private long idleTimeout;private long validationTimeout;public String getPoolName() {return poolName;}public void setPoolName(String poolName) {this.poolName = poolName;}public boolean isReadOnly() {return readOnly;}public void setReadOnly(boolean readOnly) {this.readOnly = readOnly;}public boolean isAutoCommit() {return autoCommit;}public void setAutoCommit(boolean autoCommit) {this.autoCommit = autoCommit;}public int getMaximumPoolSize() {return maximumPoolSize;}public void setMaximumPoolSize(int maximumPoolSize) {this.maximumPoolSize = maximumPoolSize;}public long getMaxLifetime() {return maxLifetime;}public void setMaxLifetime(long maxLifetime) {this.maxLifetime = maxLifetime;}public long getIdleTimeout() {return idleTimeout;}public void setIdleTimeout(long idleTimeout) {this.idleTimeout = idleTimeout;}public long getValidationTimeout() {return validationTimeout;}public void setValidationTimeout(long validationTimeout) {this.validationTimeout = validationTimeout;}public String getUrl() {return url;}public void setUrl(String url) {this.url = url;}public String getDriverClassName() {return driverClassName;}public void setDriverClassName(String driverClassName) {this.driverClassName = driverClassName;}public String getUsername() {return username;}public void setUsername(String username) {this.username = username;}public String getPassword() {return password;}public void setPassword(String password) {this.password = password;}
}
3. 在配置文件中创建dataSource的bean
/*** @Author Xichuan* @Date 2022/11/1 15:15* @Description*/
@Configuration
public class DataSourceConfig {private Logger logger = LoggerFactory.getLogger(DataSourceConfig.class);@Value("${authentication.type}")private String authenticationType;@Value("${authentication.kerberos.krb5FilePath}")private String krb5FilePath;@Value("${authentication.kerberos.principal}")private String principal;@Value("${authentication.kerberos.keytabPath}")private String keytabPath;/*** inint datasource* @return*/@Beanpublic DataSource dataSource(DataSourceProperties dataSourceProperties) throws SQLException {HikariConfig config = new HikariConfig();//kerberos configconfig.setAuthenticationType(authenticationType);config.setKrb5FilePath(krb5FilePath);config.setPrincipal(principal);config.setKeytabPath(keytabPath);//jdbc and pool configconfig.setJdbcUrl(dataSourceProperties.getUrl());config.setDriverClassName(dataSourceProperties.getDriverClassName());config.setUsername(dataSourceProperties.getUsername());config.setPassword(dataSourceProperties.getPassword());config.setPoolName(dataSourceProperties.getPoolName());config.setReadOnly(dataSourceProperties.isReadOnly());config.setAutoCommit(dataSourceProperties.isAutoCommit());config.setMaximumPoolSize(dataSourceProperties.getMaximumPoolSize());//maxLifetime 池中连接最长生命周期config.setMaxLifetime(dataSourceProperties.getMaxLifetime());//等待来自池的连接的最大毫秒数 30000config.setIdleTimeout(dataSourceProperties.getIdleTimeout());//连接将被测试活动的最大时间量config.setValidationTimeout(dataSourceProperties.getValidationTimeout());HikariDataSource dataSource = new HikariDataSource(config);logger.info("init new dataSource: {}", dataSource);return dataSource;}
}
4.使用
此时使用与其他数据库连接池的使用方式没什么区别了
详细的Springboot使用hikari连接池并进行Kerberos认证访问Impala的demo地址:https://github.com/Raray-chuan/springboot-kerberos-hikari-impala
相关文章:
HikariCP源码修改,使其连接池支持Kerberos认证
HikariCP-4.0.3 修改HikariCP源码,使其连接池支持Kerberos认证 修改后的Hikari源码地址:https://github.com/Raray-chuan/HikariCP-4.0.3 Springboot使用hikari连接池并进行Kerberos认证访问Impala的demo地址:https://github.com/Raray-chuan/springboot-kerberos-hikari-im…...

5分钟看明白rust mod use
rust把mod简单的事没说清,一片混乱,似懂非懂. mod语句查找只有一条规则:先找mod名1.rs,没有就我同名文件夹下的mod名1.rs,如果没有,就同名文件夹下的mod名1/mod.rs,再没有就error. 在mod.rs中,pub mod 文件…...

【Java核心知识】ThreadLocal相关知识
ThreadLocal 什么是ThreadLocal ThreadLoacal类可以为每个线程保存一份独有的变量,该变量对于每个线程都是独占的。实现原理为每个Thread类中包含一个ThreadHashMap,key为变量的对应的ThreadLocal对象,value为变量的值。 在日常使用中&…...
》阅读笔记 1)
《Python基础教程(第三版)》阅读笔记 1
目录 1 快速上手:基础知识2 列表和元组3 字符串4 字典5 条件、循环及其他6 抽象7 再谈抽象8 异常9 魔法方法、特性和迭代器10 开箱即用 本文参考自《Beginning Python: from novice to professional》,中文版为《Python基础教程(第三版&#…...

坦克400 Hi4-T预售价28.5万元起,越野新能源好理解
8月25日,在以“智享蓉城,驭见未来”为主题的成都国际车展上,坦克品牌越野新能源再启新程,首次以全Hi4-T新能源阵容亮相展台,释放坦克品牌加速布局越野新能源的强烈信号。 Hi4-T架构首款落地车型坦克500 Hi4-T上市至今斩…...
)
我的Vim学习笔记(不定期更新)
2023年9月3日,周日上午 学到了啥就写啥,不定期更新 目录 字体 文件 标签页 分屏 调用系统命令 字体 设置字体大小 :set guifont字体:h字体大小 例如,:set guifontMonospace:h20 查询当前使用的字体和字体大小 :set guifont? 查看…...
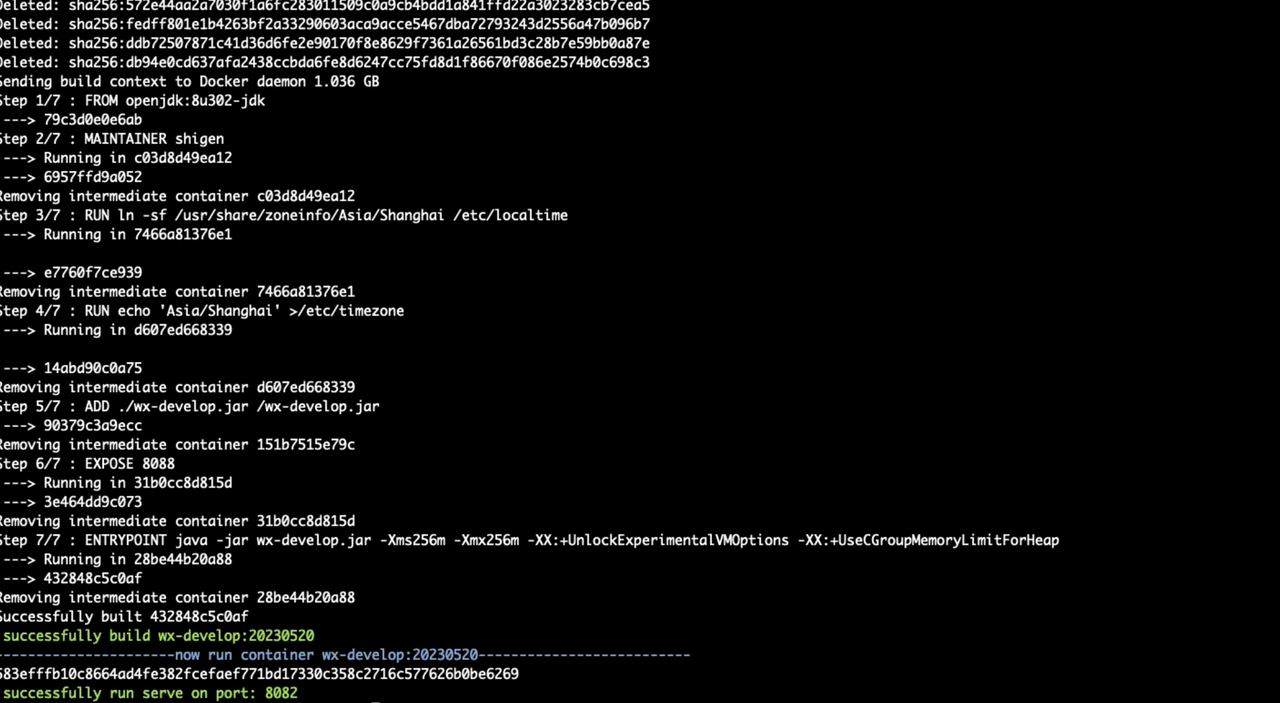
spring boot项目生成容器并运行
一个安静的周末,shigen又睡懒觉了,上次说的拖延症的惩罚来了:早晚各100个健腹轮练习,早上的已经完成了。今天的文章来的有点晚,但是依旧保持质量。 springboot项目生成容器并运行 背景 将springboot项目打包成jar包&…...

Vue之html中特殊符号的展示
Vue之html中特殊符号的展示 在html中使用特殊字符时直接展示会报错,需要使用实体名称或者实体编号才能展示。 最常用的字符实体 显示结果 描述 实体名称 实体编号空格 < 小于号 < &…...

数据结构1 -- leetcode练习
三. 练习 3.1 时间复杂度 用函数 f ( n ) f(n) f(n) 表示算法效率与数据规模的关系,假设每次解决问题需要 1 微秒( 1 0 − 6 10^{-6} 10−6 秒),进行估算: 如果 f ( n ) n 2 f(n) n^2 f(n)n2 那么 1 秒能解决多…...

Java设计模式:四、行为型模式-05:备忘录模式
文章目录 一、定义:备忘录模式二、模拟场景:备忘录模式三、改善代码:备忘录模式3.1 工程结构3.2 备忘录模式模型结构图3.3 备忘录模式定义3.3.1 配置信息类3.3.2 备忘录类3.3.3 记录者类3.3.4 管理员类 3.4 单元测试 四、总结:备忘…...
MongoDB实验——MongoDB配置用户的访问控制
MongoDB 配置用户的访问控制 一、 实验原理 理解admin数据库:安装MongoDB时,会自动创建admin数据库,这是一个特殊数据库,提供了普通数据库没有的功能,例如,有些账户角色赋予用户操作多个数据库的权限&…...

golang逃逸技术分析
“ 申请到栈内存好处:函数返回直接释放,不会引起垃圾回收,对性能没有影响。 申请到堆上面的内存才会引起垃圾回收。 func F() { a : make([]int, 0, 20) b : make([]int, 0, 20000) l : 20 c : make([]int, 0, l)} “ a和b代码一样࿰…...

说说你了解的 Nginx
分析&回答 nginx性能数据 高并发连接: 官方称单节点支持5万并发连接数,实际生产环境能够承受2-3万并发。内存消耗少: 在3万并发连接下,开启10个nginx进程仅消耗150M内存 (15M10150M) 1. 正向、反向代理 所谓“代理”,是指在内网边缘 …...
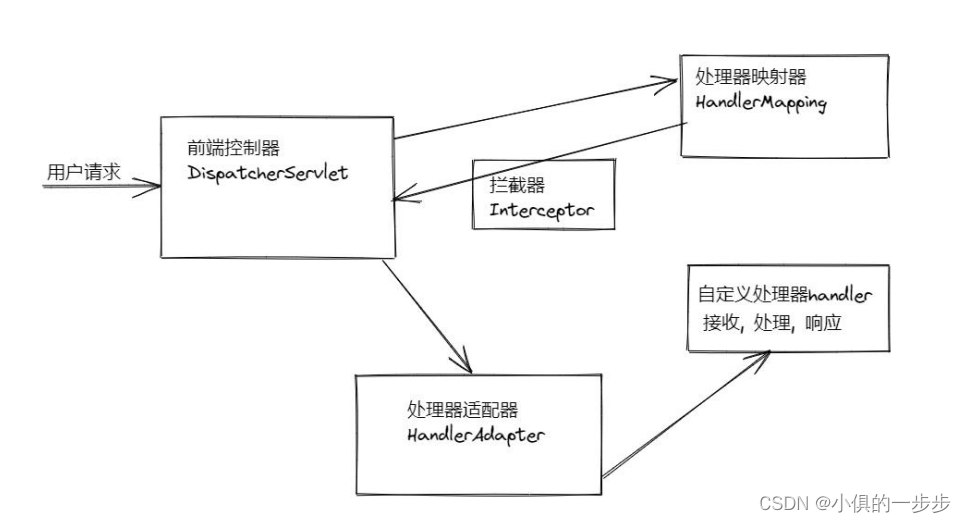
SpringWeb(SpringMVC)
目录 SpringWeb介绍 搭建 SpringWeb SpringWeb介绍 Spring Web是一个基于 Servlet API 构建的原始 web 框架,用于构建基于MVC模式的Web应用程序。在 web 层框架历经 Strust1,WebWork,Strust2 等诸多产品的历代更选 之后,目前业界普…...

Mysql 语句
数据库管理 SQL语言分类 DDL 数据定义语言,用于创建数据库对象,如库、表、索引等 create 创建 create database/table; 数据库/表 create table 表名 (括号内添加类型和字段);drop 删除 drop database/table; 数据库/表…...
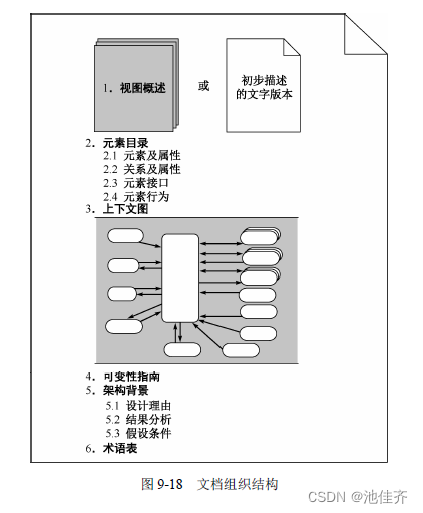
软考高级架构师——6、软件架构设计
像学写文章一样,在学会字、词、句之后,就应上升到段落,就应追求文章的“布局谋 篇”,这就是架构。通俗地讲,软件架构设计就是软件系统的“布局谋篇”。 人们在软件工程实践中,逐步认识到了软件架构的重要性…...

虚拟内存相关笔记
虚拟内存是计算机系统内存管理的一个功能,它允许程序认为它们有比实际物理内存更多的可用内存。它使用硬盘来模拟额外的RAM。当物理内存不足时,操作系统将利用磁盘空间作为虚拟内存来存储数据。这种机制提高了资源的利用率并允许更大、更复杂的应用程序的…...

【linux】定时任务讲解
文章目录 一. 在某时刻只执行一次:at1. 设置定时任务2. 查看和删除定时任务 二. 周期性执行任务:cron1. 启动crond进程2. 编辑定时任务3. 查看和删除4. 用户权限4.1. 黑名单4.2指定用户 三. /etc/crontab的管理 一. 在某时刻只执行一次:at 1…...

安卓10创建文件夹失败
最近在做拍照录像功能,已经有了文件读写权限,却发现在9.0手机上正常使用,但是在安卓12系统上根本没有创建文件夹。经过研究发现,创建名称为“DCIM”的文件夹可以,别的又都不行。而且是getExternalStorageDirectory和ge…...
)
文件操作(c/c++)
文件操作可以概括为几步: 打开文件,写入文件,读取文件,关闭文件 FILE FILE 是一个在C语言中用于文件操作的库函数,它提供了一系列函数来实现文件的创建、打开、读取、写入、关闭等操作。FILE 库函数可以帮助开发者处理…...

搜索引擎技巧
一.搜索行动框架第三步:抽取关键词、构造检索式在选择好搜索工具之后,紧接着就是抽取关键词、构造检索式了。检索式通常由三个要素组成。• 关键词:这个非常容易理解,我们常常在搜索过程中只会输入关键词。但很多时候,…...

OpenOCD入门到精通:第30章 综合实战:安全调试与逆向分析
第30章 综合实战:安全调试与逆向分析 导读:在嵌入式安全研究领域,JTAG/SWD 调试接口既是开发者的利器,也是安全研究人员的重要切入点。通过调试接口,可以探测芯片类型、读取固件内容、分析安全配置,甚至绕过某些保护机制。本章将围绕 OpenOCD 在合法授权安全研究场景中的…...

DeepSeek-OCR-2惊艳效果展示:多栏/斜拍/模糊PDF精准识别对比图集
DeepSeek-OCR-2惊艳效果展示:多栏/斜拍/模糊PDF精准识别对比图集 1. 从机械扫描到智能理解:OCR技术的革命性突破 如果你曾经尝试过从PDF文档中提取文字,特别是那些排版复杂、图片模糊或者拍摄角度倾斜的文档,你一定会理解那种挫…...

OpenClaw技能市场盘点:10个Qwen3-32B最佳自动化插件推荐
OpenClaw技能市场盘点:10个Qwen3-32B最佳自动化插件推荐 1. 为什么需要关注OpenClaw技能市场? 去年冬天,当我第一次在本地部署OpenClaw时,最让我惊喜的不是框架本身,而是它背后那个充满可能性的技能市场。作为一个长…...

SPAD全彩图像传感器:单光子探测技术如何重塑视觉感知
传统观念中,单光子雪崩二极管(SPAD)主要用于激光雷达(LiDAR)等深度感知场景,而彩色成像则被认为是CMOS图像传感器(CIS)的专属领域。然而,近年来从学术研究到产业落地的一系列突破表明,SPAD不仅能做全彩成像,更在极弱光、高动态范围(HDR)和高速场景中展现出超越传统…...

零基础入门QWEN-AUDIO:3步完成语音合成,开箱即用
零基础入门QWEN-AUDIO:3步完成语音合成,开箱即用 1. 为什么选择QWEN-AUDIO语音合成 语音合成技术正在改变我们与数字世界互动的方式。想象一下,你只需要输入文字,就能获得听起来和真人几乎无异的语音输出——这就是QWEN-AUDIO带…...

springboot-vue+nodejs 的酒店客房预定管理系统的设计与实现
目录技术栈选择系统模块划分后端实现前端实现中间层实现数据库设计支付集成测试与部署项目技术支持源码获取详细视频演示 :文章底部获取博主联系方式!同行可合作技术栈选择 Spring Boot 作为后端框架,提供 RESTful API 接口;Vue.…...

探索照片转3D模型:用Meshroom实现7步从2D到3D的蜕变
探索照片转3D模型:用Meshroom实现7步从2D到3D的蜕变 【免费下载链接】Meshroom 3D Reconstruction Software 项目地址: https://gitcode.com/gh_mirrors/me/Meshroom 定位3D重建价值:打破技术壁垒的开源方案 在数字创作领域,3D模型一…...

当游戏语言成为障碍:如何用XUnity.AutoTranslator打破语言壁垒
当游戏语言成为障碍:如何用XUnity.AutoTranslator打破语言壁垒 【免费下载链接】XUnity.AutoTranslator 项目地址: https://gitcode.com/gh_mirrors/xu/XUnity.AutoTranslator 想象一下,你终于等到了期待已久的日式角色扮演游戏,但打…...

10-红外接收探头电路设计实战指南
1. 红外接收探头基础入门 第一次接触红外接收探头时,我也被那一堆专业术语搞得晕头转向。其实这东西就像个"红外线翻译官",专门把遥控器发来的红外光信号转换成电信号。市面上常见的HS0038、LF0038L这些型号,本质上都是将光敏二极…...