Netty服务端启动的整体流程-基于源码4.1.96Final分析

Netty采用的是主从Reactor多线程的模型,参考Scalable IO in Java,但netty的subReactor为一个组
一、从FileServer服务器示例入手
public final class FileServer {static final boolean SSL = System.getProperty("ssl") != null;// Use the same default port with the telnet example so that we can use the telnet client example to access it.static final int PORT = Integer.parseInt(System.getProperty("port", SSL? "8992" : "8023"));public static void main(String[] args) throws Exception {// Configure SSL.final SslContext sslCtx = ServerUtil.buildSslContext();// Configure the server.主从Reactor线程组EventLoopGroup bossGroup = new NioEventLoopGroup(1);EventLoopGroup workerGroup = new NioEventLoopGroup();try {ServerBootstrap b = new ServerBootstrap();b.group(bossGroup, workerGroup)//配置主Reactor中的channel类型.channel(NioServerSocketChannel.class)// 设置主Reactor中channel的option选项,设置底层JDK NIO Socket的一些选项.option(ChannelOption.SO_BACKLOG, 100)//设置主Reactor中Channel->pipline->handler.handler(new LoggingHandler(LogLevel.INFO))//设置 SocketChannel 对应的 Handler;.childHandler(new ChannelInitializer<SocketChannel>() {@Overridepublic void initChannel(SocketChannel ch) throws Exception {ChannelPipeline p = ch.pipeline();if (sslCtx != null) {p.addLast(sslCtx.newHandler(ch.alloc()));}p.addLast(new StringEncoder(CharsetUtil.UTF_8),new LineBasedFrameDecoder(8192),new StringDecoder(CharsetUtil.UTF_8),new ChunkedWriteHandler(),new FileServerHandler());}});// Start the server.ChannelFuture f = b.bind(PORT).sync();// Wait until the server socket is closed.f.channel().closeFuture().sync();} finally {// Shut down all event loops to terminate all threads.bossGroup.shutdownGracefully();workerGroup.shutdownGracefully();}}
}
1.1 netty的主从模式
首先大致了解netty的主从模式中:bossGroup 中的MainReactor管理的Channel类型为NioServerSocketChannel,用来监听端口,接收客户端连接,为客户端创建初始化NioSocketChannel,然后采用round-robin轮询的方式从workerGroup中选择一个SubReactor与该客户端NioSocketChannel进行绑定。一个SubReactor线程负责处理多个NioSocketChannel上的IO事件
1.2 NioServerSocketChannel
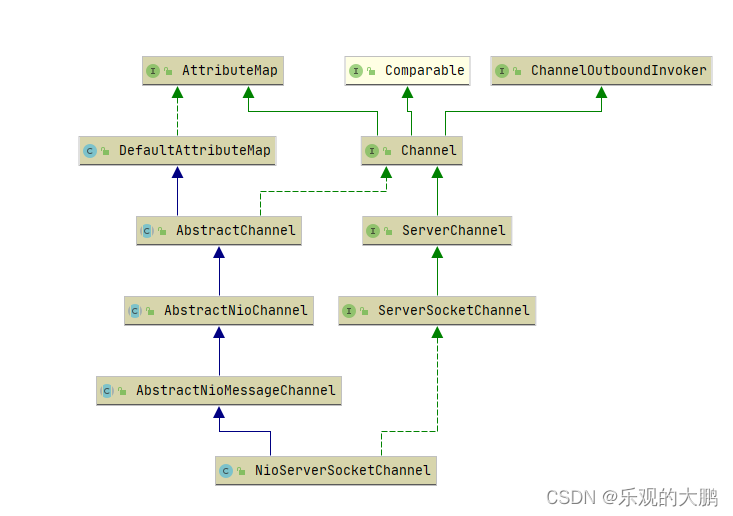
包含了JDK原生的ServerSocketChannel属性
1.2.1 channel(NioServerSocketChannel.class)
在执行channel的时候,返回的是channelFactory属性,如下:
return channelFactory(new ReflectiveChannelFactory<C>(ObjectUtil.checkNotNull(channelClass, "channelClass")// ReflectiveChannelFactory通过泛型,反射,工厂的方式灵活创建不同类型的channel
public class ReflectiveChannelFactory<T extends Channel> implements ChannelFactory<T> {private final Constructor<? extends T> constructor;public ReflectiveChannelFactory(Class<? extends T> clazz) {ObjectUtil.checkNotNull(clazz, "clazz");try {this.constructor = clazz.getConstructor();} catch (NoSuchMethodException e) {throw new IllegalArgumentException("Class " + StringUtil.simpleClassName(clazz) +" does not have a public non-arg constructor", e);}}@Overridepublic T newChannel() {try {return constructor.newInstance();} catch (Throwable t) {throw new ChannelException("Unable to create Channel from class " + constructor.getDeclaringClass(), t);}}@Overridepublic String toString() {return StringUtil.simpleClassName(ReflectiveChannelFactory.class) +'(' + StringUtil.simpleClassName(constructor.getDeclaringClass()) + ".class)";}
}
1.3 ChannelInitializer的作用
Pipeline添加ChannelHandler:1、显式添加的方式是由用户在main线程中通过ServerBootstrap#handler的方式添加。2、如果需要添加多个ChannelHandler,则可以通过ChannelInitializer向pipeline中进行添加。
1.3.1 childHandler(new ChannelInitializer<SocketChannel>() {}使用的原因:
NioSocketChannel是在服务端accept连接后,在服务端NioServerSocketChannel中被创建出来的。但是此时我们正处于配置ServerBootStrap阶段,服务端还没有启动,更没有客户端连接上来,此时客户端NioSocketChannel还没有被创建出来,所以也就没办法向客户端NioSocketChannel的pipeline中添加ChannelHandler。 以及客户端NioSocketChannel中Pipeline里可以添加任意多个ChannelHandler,但是Netty框架无法预知用户到底需要添加多少个ChannelHandler,所以Netty框架提供了回调函数ChannelInitializer#initChannel,使用户可以自定义ChannelHandler的添加行为。
二、服务端启动全过程
public ChannelFuture bind(int inetPort) {return bind(new InetSocketAddress(inetPort));}public ChannelFuture bind(SocketAddress localAddress) {//校验Netty核心组件是否配置齐全validate();//服务端开始启动,绑定端口地址,接收客户端连接return doBind(ObjectUtil.checkNotNull(localAddress, "localAddress"));}private ChannelFuture doBind(final SocketAddress localAddress) {//异步创建,初始化,注册ServerSocketChannel到main reactor上final ChannelFuture regFuture = initAndRegister();final Channel channel = regFuture.channel();if (regFuture.cause() != null) {return regFuture;}if (regFuture.isDone()) { ........serverSocketChannel向Main Reactor注册成功后开始绑定端口...., } else {//如果此时注册操作没有完成,则向regFuture添加operationComplete回调函数,注册成功后回调。regFuture.addListener(new ChannelFutureListener() {@Overridepublic void operationComplete(ChannelFuture future) throws Exception {........serverSocketChannel向Main Reactor注册成功后开始绑定端口...., });return promise;}}2.1 初始化并注册channel
final ChannelFuture initAndRegister() {Channel channel = null;try {// io.netty.channel.ReflectiveChannelFactory.newChannelchannel = channelFactory.newChannel();// 初始化channelinit(channel);} catch (Throwable t) {if (channel != null) {// channel can be null if newChannel crashed (eg SocketException("too many open files"))channel.unsafe().closeForcibly();// as the Channel is not registered yet we need to force the usage of the GlobalEventExecutorreturn new DefaultChannelPromise(channel, GlobalEventExecutor.INSTANCE).setFailure(t);}// as the Channel is not registered yet we need to force the usage of the GlobalEventExecutorreturn new DefaultChannelPromise(new FailedChannel(), GlobalEventExecutor.INSTANCE).setFailure(t);}ChannelFuture regFuture = config().group().register(channel);if (regFuture.cause() != null) {if (channel.isRegistered()) {channel.close();} else {channel.unsafe().closeForcibly();}}// If we are here and the promise is not failed, it's one of the following cases:// 1) If we attempted registration from the event loop, the registration has been completed at this point.// i.e. It's safe to attempt bind() or connect() now because the channel has been registered.// 2) If we attempted registration from the other thread, the registration request has been successfully// added to the event loop's task queue for later execution.// i.e. It's safe to attempt bind() or connect() now:// because bind() or connect() will be executed *after* the scheduled registration task is executed// because register(), bind(), and connect() are all bound to the same thread.return regFuture;}2.1.1 channelFactory.newChannel();
根据1.2.1 可以知道,实际就是调用return constructor.newInstance();也就是实例化NioServerSocketChannel
public class NioServerSocketChannel extends AbstractNioMessageChannelimplements io.netty.channel.socket.ServerSocketChannel {//SelectorProvider(用于创建Selector和Selectable Channels)private static final SelectorProvider DEFAULT_SELECTOR_PROVIDER = SelectorProvider.provider();/*** Create a new instance*/public NioServerSocketChannel() {this(DEFAULT_SELECTOR_PROVIDER);}/*** Create a new instance using the given {@link SelectorProvider}.*/public NioServerSocketChannel(SelectorProvider provider) {this(provider, null);}/*** Create a new instance using the given {@link SelectorProvider} and protocol family (supported only since JDK 15).*/public NioServerSocketChannel(SelectorProvider provider, InternetProtocolFamily family) {this(newChannel(provider, family));}/*** Create a new instance using the given {@link ServerSocketChannel}.*/public NioServerSocketChannel(ServerSocketChannel channel) {super(null, channel, SelectionKey.OP_ACCEPT);config = new NioServerSocketChannelConfig(this, javaChannel().socket());}}2.1.1.1 SelectorProvider选择器和可选择通道的服务提供者类
    public static SelectorProvider provider() {synchronized (lock) {if (provider != null)return provider;return AccessController.doPrivileged(new PrivilegedAction<SelectorProvider>() {public SelectorProvider run() {if (loadProviderFromProperty())return provider;if (loadProviderAsService())return provider;provider = sun.nio.ch.DefaultSelectorProvider.create();return provider;}});}}// 支持根据系统属性名进行实例化。private static boolean loadProviderFromProperty() {String cn = System.getProperty("java.nio.channels.spi.SelectorProvider");if (cn == null)return false;try {Class<?> c = Class.forName(cn, true,ClassLoader.getSystemClassLoader());provider = (SelectorProvider)c.newInstance();return true;} catch (ClassNotFoundException x) {throw new ServiceConfigurationError(null, x);} catch (IllegalAccessException x) {throw new ServiceConfigurationError(null, x);} catch (InstantiationException x) {throw new ServiceConfigurationError(null, x);} catch (SecurityException x) {throw new ServiceConfigurationError(null, x);}}// 根据spi进行实例化,即META-INF/services/下的定义名为java.nio.channels.spi.SelectorProvider的SPI文件,文件中第一个定义的SelectorProvider实现类全限定名就会被加载。private static boolean loadProviderAsService() {ServiceLoader<SelectorProvider> sl =ServiceLoader.load(SelectorProvider.class,ClassLoader.getSystemClassLoader());Iterator<SelectorProvider> i = sl.iterator();for (;;) {try {if (!i.hasNext())return false;provider = i.next();return true;} catch (ServiceConfigurationError sce) {if (sce.getCause() instanceof SecurityException) {// Ignore the security exception, try the next providercontinue;}throw sce;}}}//因为是windows
public class DefaultSelectorProvider {private DefaultSelectorProvider() {}public static SelectorProvider create() {return new WindowsSelectorProvider();}
}
nio中的channel注册selector
2.1.1.2 newChannel(provider, family)
private static ServerSocketChannel newChannel(SelectorProvider provider, InternetProtocolFamily family) {try {// family为空时 SelectorProviderUtil.newChannel 返回nullServerSocketChannel channel =SelectorProviderUtil.newChannel(OPEN_SERVER_SOCKET_CHANNEL_WITH_FAMILY, provider, family);// 创建 JDK 底层的 ServerSocketChannelreturn channel == null ? provider.openServerSocketChannel() : channel;} catch (IOException e) {throw new ChannelException("Failed to open a socket.", e);}}因为初始化的时候family为null,所以调用的是JDK底层的openServerSocketChannel
2.1.1.3 NioServerSocketChannel构造
//设置的是SelectionKey.OP_ACCEPT事件super(null, channel, SelectionKey.OP_ACCEPT);// 创建Channel的配置类NioServerSocketChannelConfig,在配置类中封装了对Channel底层的一些配置行为,以及JDK中的ServerSocket。以及创建NioServerSocketChannel接收数据用的Buffer分配器AdaptiveRecvByteBufAllocatorconfig = new NioServerSocketChannelConfig(this, javaChannel().socket());protected AbstractNioChannel(Channel parent, SelectableChannel ch, int readInterestOp) {super(parent);this.ch = ch;this.readInterestOp = readInterestOp;try {// 设置 Channel 为非阻塞模式。ch.configureBlocking(false);} catch (IOException e) {try {ch.close();} catch (IOException e2) {logger.warn("Failed to close a partially initialized socket.", e2);}throw new ChannelException("Failed to enter non-blocking mode.", e);}}protected AbstractChannel(Channel parent) {this.parent = parent;id = newId(); // 全局唯一idunsafe = newUnsafe(); // unsafe 操作底层读写pipeline = newChannelPipeline(); // pipeline 负责业务处理器编排}protected DefaultChannelPipeline newChannelPipeline() {return new DefaultChannelPipeline(this);}protected DefaultChannelPipeline(Channel channel) {this.channel = ObjectUtil.checkNotNull(channel, "channel");succeededFuture = new SucceededChannelFuture(channel, null);voidPromise = new VoidChannelPromise(channel, true);tail = new TailContext(this);head = new HeadContext(this);head.next = tail;tail.prev = head;}此时channel的pipeline只有head和tail两个节点;
2.1.2 init(channel);初始化
@Overridevoid init(Channel channel) {setChannelOptions(channel, newOptionsArray(), logger);setAttributes(channel, newAttributesArray());ChannelPipeline p = channel.pipeline();final EventLoopGroup currentChildGroup = childGroup;final ChannelHandler currentChildHandler = childHandler;final Entry<ChannelOption<?>, Object>[] currentChildOptions = newOptionsArray(childOptions);final Entry<AttributeKey<?>, Object>[] currentChildAttrs = newAttributesArray(childAttrs);// ChannelInitializer 实现的 initChannel() 方法用于添加 ServerSocketChannel 对应的 Handlerp.addLast(new ChannelInitializer<Channel>() {@Overridepublic void initChannel(final Channel ch) {final ChannelPipeline pipeline = ch.pipeline();// 将handler(new LoggingHandler(LogLevel.INFO)) 中的handler加入pipeLineChannelHandler handler = config.handler();if (handler != null) {pipeline.addLast(handler);}// 然后 Netty 通过异步 task 的方式又向 Pipeline 一个处理器 ServerBootstrapAcceptor,这是一个连接接入器,专门用于接收新的连接,然后把事件分发给 EventLoop 执行ch.eventLoop().execute(new Runnable() {@Overridepublic void run() {pipeline.addLast(new ServerBootstrapAcceptor(ch, currentChildGroup, currentChildHandler, currentChildOptions, currentChildAttrs));}});}});}-
ServerBootstrapAcceptor:也就是对应MainReactor中的acceptor,本质上也是一种ChannelHandler,主要负责在客户端连接建立好后,初始化客户端NioSocketChannel,在从Reactor线程组中选取一个SubReactor,将客户端NioSocketChannel注册到SubReactor中的selector上。
-
初始化NioServerSocketChannel中pipeline的时机是:当NioServerSocketChannel注册到Main Reactor之后,绑定端口地址之前,同时为了保证
线程安全地初始化pipeline,初始化的动作netty统一交给了Reactor线程进行 -
ServerBootstrapAcceptor 的注册过程为什么又需要封装成异步 task 呢?因为本文案例是
handler(new LoggingHandler(LogLevel.INFO))但是考虑到过程中可能为new ChannelInitializer<SocketChannel>() ,那么在后续Main Reactor处理register0任务invokeHandlerAddedIfNeeded方法时会调用具体的ChannelInitializer的initChannel方法进行实例会进行添加到最后一个处理节点,如果这里不是异步task那么就会导致该Acceptor为pipeline的一个中间Handler,因此为了保证ServerBootstrapAcceptor是最后一个处理节点,所以本文就封装了一个异步任务。 等到新连接接入时,就可以调用
pipeline.fireChannelRead();从head节点依次往下进行传播,直到传播到ServerBootstrapAcceptor
2.2 注册channel到mainReactor中
2.2.1 轮询选取MainReactor
 ChannelFuture regFuture = config().group().register(channel);
从ServerBootstrap获取主Reactor线程组NioEventLoopGroup,将NioServerSocketChannel注册到NioEventLoopGroup中。@Overridepublic ChannelFuture register(Channel channel) {return next().register(channel);}@Overridepublic EventExecutor next() {return chooser.next();}//获取绑定策略@Overridepublic EventExecutorChooser newChooser(EventExecutor[] executors) {// 判断2的次幂if (isPowerOfTwo(executors.length)) {return new PowerOfTwoEventExecutorChooser(executors);} else {return new GenericEventExecutorChooser(executors);}}//采用轮询round-robin的方式选择Reactor@Overridepublic EventExecutor next() {return executors[(int) Math.abs(idx.getAndIncrement() % executors.length)];}private static boolean isPowerOfTwo(int val) {return (val & -val) == val;}正数的补码,反码,原码都是一样的。
负数的补码为反码加1,负数的反码为除符号位原码按位取反。
2.2.2 register
@Overridepublic ChannelFuture register(Channel channel) {return register(new DefaultChannelPromise(channel, this));}@Overridepublic ChannelFuture register(final ChannelPromise promise) {ObjectUtil.checkNotNull(promise, "promise");promise.channel().unsafe().register(this, promise);return promise;}@Overridepublic final void register(EventLoop eventLoop, final ChannelPromise promise) {ObjectUtil.checkNotNull(eventLoop, "eventLoop");if (isRegistered()) {promise.setFailure(new IllegalStateException("registered to an event loop already"));return;}if (!isCompatible(eventLoop)) {promise.setFailure(new IllegalStateException("incompatible event loop type: " + eventLoop.getClass().getName()));return;}//在channel上设置绑定的ReactorAbstractChannel.this.eventLoop = eventLoop;/*** 执行channel注册的操作必须是Reactor线程来完成** 1: 如果当前执行线程是Reactor线程,则直接执行register0进行注册* 2:如果当前执行线程是外部线程,则需要将register0注册操作 封装程异步Task 由Reactor线程执行* */if (eventLoop.inEventLoop()) {register0(promise);} else {//外部线程调用try {eventLoop.execute(new Runnable() {@Overridepublic void run() {register0(promise);}});} catch (Throwable t) {logger.warn("Force-closing a channel whose registration task was not accepted by an event loop: {}",AbstractChannel.this, t);closeForcibly();closeFuture.setClosed();safeSetFailure(promise, t);}}}当前执行线程并不是Reactor线程,而是用户程序的启动线程Main线程,所以提交异步task并进行了启动Reactor线程
//Reactor线程的启动是在向Reactor提交第一个异步任务的时候启动的。private void execute(Runnable task, boolean immediate) {boolean inEventLoop = inEventLoop();addTask(task);if (!inEventLoop) {startThread();if (isShutdown()) {boolean reject = false;try {if (removeTask(task)) {reject = true;}} catch (UnsupportedOperationException e) {// The task queue does not support removal so the best thing we can do is to just move on and// hope we will be able to pick-up the task before its completely terminated.// In worst case we will log on termination.}if (reject) {reject();}}}if (!addTaskWakesUp && immediate) {wakeup(inEventLoop);}}private void startThread() {if (state == ST_NOT_STARTED) {if (STATE_UPDATER.compareAndSet(this, ST_NOT_STARTED, ST_STARTED)) {boolean success = false;try {doStartThread();success = true;} finally {if (!success) {STATE_UPDATER.compareAndSet(this, ST_STARTED, ST_NOT_STARTED);}}}}}2.2.3 register0()-MainReactor异步任务执行
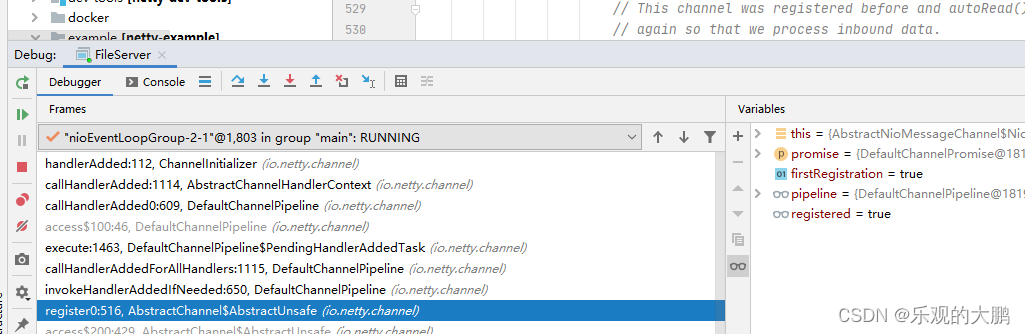
//一开始Reactor中的任务队列中只有一个任务register0,Reactor线程启动后,会从任务队列中取出任务执行。
private void register0(ChannelPromise promise) {try {// check if the channel is still open as it could be closed in the mean time when the register// call was outside of the eventLoopif (!promise.setUncancellable() || !ensureOpen(promise)) {return;}boolean firstRegistration = neverRegistered;// 调用 JDK 底层的 register() 进行注册doRegister();neverRegistered = false;registered = true;// Ensure we call handlerAdded(...) before we actually notify the promise. This is needed as the// user may already fire events through the pipeline in the ChannelFutureListener.//回调pipeline中添加的ChannelInitializer的handlerAdded方法,在这里初始化channelPipelinepipeline.invokeHandlerAddedIfNeeded(); // 触发 handlerAdded 事件safeSetSuccess(promise);// channelRegistered 事件是由 fireChannelRegistered() 方法触发,沿着 Pipeline 的 Head 节点传播到 Tail 节点pipeline.fireChannelRegistered();// Only fire a channelActive if the channel has never been registered. This prevents firing// multiple channel actives if the channel is deregistered and re-registered.//对于服务端ServerSocketChannel来说 只有绑定端口地址成功后 channel的状态才是active的。//此时绑定操作作为异步任务在Reactor的任务队列中,绑定操作还没开始,所以这里的isActive()是false                if (isActive()) {if (firstRegistration) {pipeline.fireChannelActive();} else if (config().isAutoRead()) {// This channel was registered before and autoRead() is set. This means we need to begin read// again so that we process inbound data.//// See https://github.com/netty/netty/issues/4805beginRead();}}} catch (Throwable t) {// Close the channel directly to avoid FD leak.closeForcibly();closeFuture.setClosed();safeSetFailure(promise, t);}}
2.2.3.1 doRegister
@Overrideprotected void doRegister() throws Exception {boolean selected = false;for (;;) {try {selectionKey = javaChannel().register(eventLoop().unwrappedSelector(), 0, this);return;} catch (CancelledKeyException e) {if (!selected) {// Force the Selector to select now as the "canceled" SelectionKey may still be// cached and not removed because no Select.select(..) operation was called yet.eventLoop().selectNow();selected = true;} else {// We forced a select operation on the selector before but the SelectionKey is still cached// for whatever reason. JDK bug ?throw e;}}}}public final SelectionKey register(Selector sel, int ops,Object att)throws ClosedChannelException{synchronized (regLock) {if (!isOpen())throw new ClosedChannelException();if ((ops & ~validOps()) != 0)throw new IllegalArgumentException();if (blocking)throw new IllegalBlockingModeException();SelectionKey k = findKey(sel);if (k != null) {k.interestOps(ops);k.attach(att);}if (k == null) {// New registrationsynchronized (keyLock) {if (!isOpen())throw new ClosedChannelException();k = ((AbstractSelector)sel).register(this, ops, att);addKey(k);}}return k;}}
javaChannel().register() 负责调用 JDK 底层,将 Channel 注册到 Selector 上,register() 的第三个入参传入的是 Netty 自己实现的 Channel 对象,调用 register() 方法会将它绑定在 JDK 底层 Channel 的attachment上。这样在每次 Selector 对象进行事件循环时,Netty 都可以从返回的 JDK 底层 Channel 中获得自己的 Channel 对象。
2.2.3.2 handlerAdded
初始化ChannelPipeline的时机是当Channel向对应的Reactor注册成功后,在handlerAdded事件回调中利用ChannelInitializer进行初始化。
io.netty.channel.ChannelInitializer#handlerAdded
@Overridepublic void handlerAdded(ChannelHandlerContext ctx) throws Exception {// 必须是注册以后if (ctx.channel().isRegistered()) {// This should always be true with our current DefaultChannelPipeline implementation.// The good thing about calling initChannel(...) in handlerAdded(...) is that there will be no ordering// surprises if a ChannelInitializer will add another ChannelInitializer. This is as all handlers// will be added in the expected order.if (initChannel(ctx)) {// We are done with init the Channel, removing the initializer now.removeState(ctx);}}}//ChannelInitializer实例是被所有的Channel共享的,用于初始化ChannelPipeline//通过Set集合保存已经初始化的ChannelPipeline,避免重复初始化同一ChannelPipelineprivate final Set<ChannelHandlerContext> initMap = Collections.newSetFromMap(new ConcurrentHashMap<ChannelHandlerContext, Boolean>());private boolean initChannel(ChannelHandlerContext ctx) throws Exception {if (initMap.add(ctx)) { // Guard against re-entrance.try {initChannel((C) ctx.channel());} catch (Throwable cause) {exceptionCaught(ctx, cause);} finally {ChannelPipeline pipeline = ctx.pipeline();if (pipeline.context(this) != null) {//初始化完毕后,从pipeline中移除自身pipeline.remove(this);}}return true;}return false;}//匿名类实现,这里指定具体的初始化逻辑protected abstract void initChannel(C ch) throws Exception;private void removeState(final ChannelHandlerContext ctx) {//从initMap防重Set集合中删除ChannelInitializerif (ctx.isRemoved()) {initMap.remove(ctx);} else {ctx.executor().execute(new Runnable() {@Overridepublic void run() {initMap.remove(ctx);}});}}执行完成后pipeline如下:

执行完整个 register0() 的注册流程之后,EventLoop 线程会将 ServerBootstrapAcceptor 添加到 Pipeline 当中(提交的任务执行)
ch.eventLoop().execute(new Runnable() {@Overridepublic void run() {pipeline.addLast(new ServerBootstrapAcceptor(ch, currentChildGroup, currentChildHandler, currentChildOptions, currentChildAttrs));}}
也就是统一在EventLoop 线程中初始化pipeLine,保证线程安全
2.2.4 Reactor线程触发注册成功safeSetSuccess(promise);
Reactor设置注册成功后,启动线程监听到完成任务,那么就进行接下来的绑定端口操作
// 若执行完毕进行端口绑定if (regFuture.isDone()) {// At this point we know that the registration was complete and successful.ChannelPromise promise = channel.newPromise();doBind0(regFuture, channel, localAddress, promise);return promise;} else {// Registration future is almost always fulfilled already, but just in case it's not.final PendingRegistrationPromise promise = new PendingRegistrationPromise(channel);regFuture.addListener(new ChannelFutureListener() {@Overridepublic void operationComplete(ChannelFuture future) throws Exception {Throwable cause = future.cause();if (cause != null) {// Registration on the EventLoop failed so fail the ChannelPromise directly to not cause an// IllegalStateException once we try to access the EventLoop of the Channel.promise.setFailure(cause);} else {// Registration was successful, so set the correct executor to use.// See https://github.com/netty/netty/issues/2586promise.registered();doBind0(regFuture, channel, localAddress, promise);}}});return promise;}2.3 端口绑定
    private static void doBind0(final ChannelFuture regFuture, final Channel channel,final SocketAddress localAddress, final ChannelPromise promise) {// This method is invoked before channelRegistered() is triggered.  Give user handlers a chance to set up// the pipeline in its channelRegistered() implementation.channel.eventLoop().execute(new Runnable() {@Override
sss if (regFuture.isSuccess()) {channel.bind(localAddress, promise).addListener(ChannelFutureListener.CLOSE_ON_FAILURE);} else {promise.setFailure(regFuture.cause());}}});}
提交到异步任务到Reactor,绑定逻辑需要注册逻辑处理完之后运行,如上面的ServerBootstrapAcceptor异步任务执行完
@Overridepublic ChannelFuture bind(SocketAddress localAddress, ChannelPromise promise) {return pipeline.bind(localAddress, promise);}@Overridepublic final ChannelFuture bind(SocketAddress localAddress, ChannelPromise promise) {return tail.bind(localAddress, promise);}@Overridepublic ChannelFuture bind(final SocketAddress localAddress, final ChannelPromise promise) {ObjectUtil.checkNotNull(localAddress, "localAddress");if (isNotValidPromise(promise, false)) {// cancelledreturn promise;}final AbstractChannelHandlerContext next = findContextOutbound(MASK_BIND);EventExecutor executor = next.executor();if (executor.inEventLoop()) {next.invokeBind(localAddress, promise);} else {safeExecute(executor, new Runnable() {@Overridepublic void run() {next.invokeBind(localAddress, promise);}}, promise, null, false);}return promise;}private void invokeBind(SocketAddress localAddress, ChannelPromise promise) {if (invokeHandler()) {try {// DON'T CHANGE// Duplex handlers implements both out/in interfaces causing a scalability issue// see https://bugs.openjdk.org/browse/JDK-8180450final ChannelHandler handler = handler();final DefaultChannelPipeline.HeadContext headContext = pipeline.head;if (handler == headContext) {headContext.bind(this, localAddress, promise);} else if (handler instanceof ChannelDuplexHandler) {((ChannelDuplexHandler) handler).bind(this, localAddress, promise);} else {((ChannelOutboundHandler) handler).bind(this, localAddress, promise);}} catch (Throwable t) {notifyOutboundHandlerException(t, promise);}} else {bind(localAddress, promise);}}调用pipeline.bind(localAddress, promise)在pipeline中传播bind事件,触发回调pipeline中所有ChannelHandler的bind方法。
事件在pipeline中的传播具有方向性:
-
inbound事件从HeadContext开始逐个向后传播直到TailContext。 -
outbound事件则是反向传播,从TailContext开始反向向前传播直到HeadContext。 -
    private AbstractChannelHandlerContext findContextOutbound(int mask) {AbstractChannelHandlerContext ctx = this;EventExecutor currentExecutor = executor();do {ctx = ctx.prev;
// 跳过了 private static class ServerBootstrapAcceptor extends ChannelInboundHandlerAdapter} while (skipContext(ctx, currentExecutor, mask, MASK_ONLY_OUTBOUND));return ctx;}private static boolean skipContext(AbstractChannelHandlerContext ctx, EventExecutor currentExecutor, int mask, int onlyMask) {// Ensure we correctly handle MASK_EXCEPTION_CAUGHT which is not included in the MASK_EXCEPTION_CAUGHTreturn (ctx.executionMask & (onlyMask | mask)) == 0 ||// We can only skip if the EventExecutor is the same as otherwise we need to ensure we offload// everything to preserve ordering.//// See https://github.com/netty/netty/issues/10067(ctx.executor() == currentExecutor && (ctx.executionMask & mask) == 0);}
通过上面代码可以知道bind事件在Netty中被定义为outbound事件,所以它在pipeline中是反向传播。先从TailContext开始反向传播直到HeadContext。
因此bind的核心逻辑也正是实现在HeadContext中。
headContext.bind(this, localAddress, promise);
底层实际就是
@Overridepublic void bind(ChannelHandlerContext ctx, SocketAddress localAddress, ChannelPromise promise) {unsafe.bind(localAddress, promise);}@Overridepublic final void bind(final SocketAddress localAddress, final ChannelPromise promise) {assertEventLoop();if (!promise.setUncancellable() || !ensureOpen(promise)) {return;}// See: https://github.com/netty/netty/issues/576if (Boolean.TRUE.equals(config().getOption(ChannelOption.SO_BROADCAST)) &&localAddress instanceof InetSocketAddress &&!((InetSocketAddress) localAddress).getAddress().isAnyLocalAddress() &&!PlatformDependent.isWindows() && !PlatformDependent.maybeSuperUser()) {// Warn a user about the fact that a non-root user can't receive a// broadcast packet on *nix if the socket is bound on non-wildcard address.logger.warn("A non-root user can't receive a broadcast packet if the socket " +"is not bound to a wildcard address; binding to a non-wildcard " +"address (" + localAddress + ") anyway as requested.");}boolean wasActive = isActive();try {doBind(localAddress);} catch (Throwable t) {safeSetFailure(promise, t);closeIfClosed();return;}if (!wasActive && isActive()) {invokeLater(new Runnable() {@Overridepublic void run() {pipeline.fireChannelActive();}});}safeSetSuccess(promise);}@SuppressJava6Requirement(reason = "Usage guarded by java version check")@Overrideprotected void doBind(SocketAddress localAddress) throws Exception {if (PlatformDependent.javaVersion() >= 7) {javaChannel().bind(localAddress, config.getBacklog());} else {javaChannel().socket().bind(localAddress, config.getBacklog());}}Netty 会根据 JDK 版本的不同,分别调用 JDK 底层不同的 bind() 方法。我使用的是 JDK8,所以会调用 JDK 原生 Channel 的 bind() 方法。执行完 doBind() 之后,服务端 JDK 原生的 Channel 真正已经完成端口绑定了。
2.3.1 判断是否为激活
@Overridepublic boolean isActive() {// As java.nio.ServerSocketChannel.isBound() will continue to return true even after the channel was closed// we will also need to check if it is open.return isOpen() && javaChannel().socket().isBound();}2.3.2 channelActive事件
完成端口绑定之后,Channel 处于活跃 Active 状态,然后会调用 pipeline.fireChannelActive() 方法触发 channelActive 事件。
channelActive事件在Netty中定义为inbound事件,所以它在pipeline中的传播为正向传播,从HeadContext一直到TailContext为止。
在channelActive事件回调中需要触发向Selector指定需要监听的IO事件~~OP_ACCEPT事件。
@Overridepublic final ChannelPipeline fireChannelActive() {AbstractChannelHandlerContext.invokeChannelActive(head);return this;}private void invokeChannelActive() {if (invokeHandler()) {try {// DON'T CHANGE// Duplex handlers implements both out/in interfaces causing a scalability issue// see https://bugs.openjdk.org/browse/JDK-8180450final ChannelHandler handler = handler();final DefaultChannelPipeline.HeadContext headContext = pipeline.head;if (handler == headContext) {headContext.channelActive(this);} else if (handler instanceof ChannelDuplexHandler) {((ChannelDuplexHandler) handler).channelActive(this);} else {((ChannelInboundHandler) handler).channelActive(this);}} catch (Throwable t) {invokeExceptionCaught(t);}} else {fireChannelActive();}}@Overridepublic void channelActive(ChannelHandlerContext ctx) {//pipeline中继续向后传播channelActive事件ctx.fireChannelActive();//如果是autoRead 则自动触发read事件传播//在read回调函数中 触发OP_ACCEPT注册readIfIsAutoRead();}private void readIfIsAutoRead() {if (channel.config().isAutoRead()) {channel.read();}}
@Overridepublic Channel read() {pipeline.read();return this;}@Overridepublic final ChannelPipeline read() {tail.read();return this;}@Overridepublic void read(ChannelHandlerContext ctx) {unsafe.beginRead();}@Overridepublic final void beginRead() {assertEventLoop();try {doBeginRead();} catch (final Exception e) {invokeLater(new Runnable() {@Overridepublic void run() {pipeline.fireExceptionCaught(e);}});close(voidPromise());}}@Overrideprotected void doBeginRead() throws Exception {// Channel.read() or ChannelHandlerContext.read() was calledfinal SelectionKey selectionKey = this.selectionKey;if (!selectionKey.isValid()) {return;}readPending = true;final int interestOps = selectionKey.interestOps();if ((interestOps & readInterestOp) == 0) {selectionKey.interestOps(interestOps | readInterestOp);}}
在执行完 channelActive 事件传播之后,会调用 readIfIsAutoRead() 方法触发 Channel 的 read 事件,而它最终调用到 AbstractNioChannel 中的 doBeginRead() 方法,其中 readInterestOp 参数就是在前面初始化 Channel 所传入的 SelectionKey.OP_ACCEPT 事件,所以 OP_ACCEPT 事件会被注册到 Channel 的事件集合中。
2.4 服务启动总结
- 创建服务端 Channel:本质是创建 JDK 底层原生的 Channel,并初始化几个重要的属性,包括 id、unsafe、pipeline 等。
- 初始化服务端 Channel:设置 Socket 参数以及用户自定义属性,并添加两个特殊的处理器 ChannelInitializer 和 ServerBootstrapAcceptor。
- 注册服务端 Channel:调用 JDK 底层将 Channel 注册到 Selector 上。
- 端口绑定:调用 JDK 底层进行端口绑定,并触发 channelActive 事件,把 OP_ACCEPT 事件注册到 Channel 的事件集合中。
相关文章:
Netty服务端启动的整体流程-基于源码4.1.96Final分析
Netty采用的是主从Reactor多线程的模型,参考Scalable IO in Java,但netty的subReactor为一个组 一、从FileServer服务器示例入手 public final class FileServer {static final boolean SSL System.getProperty("ssl") ! null;// Use the …...

预训练Bert添加new token的问题
问题 最近遇到使用transformers的AutoTokenizer的时候,修改vocab.txt中的[unused1]依然无法识别相应的new token。 实例: 我将[unused1]修改为了[TRI],句子中的[TRI]并没有被整体识别,而是识别为了[,T,RI,]。这明显是有问题的。…...

非常典型和高效的枚举类写法
目录 1、讲讲好处 2、例子 (1)枚举类: (2)DTO类: 3、根据上面例子进行具体讲解 1、讲讲好处 在使用这种标准枚举模式编写业务逻辑时,可以直接通过枚举成员来表示状态,不需要担心底层的 value 或描述信…...

kafka-- kafka集群环境搭建
kafka集群环境搭建 # 准备zookeeper环境 (zookeeper-3.4.6) # 下载kafka安装包 https://archive.apache.org/dist/kafka/2.1.0/kafka_2.12-2.1.0.tgz # 上传 : 172.16.144.133 cd /usr/local/softwaretar -zxvf /usr/local/software/kafka_2.12-2.1.0.tgz -C /usr/local…...

3.flask-sqlalchemy ORM库
介绍 Flask-SQLAlchemy是一个用于Flask的扩展,它提供了一个便捷的方式来处理数据库操作。Flask-SQLAlchemy基于SQLAlchemy,一个功能强大的Python SQL工具包和对象关系映射(ORM)系统 官网文档:http://www.pythondoc.com/flask-sql…...

mac 安装 homebrew
摘要: 本文主要是下载安装包安装homebrew,然后配置环境变量Path。检验是否安装成功。 homebrew地址:macOS(或 Linux)缺失的软件包的管理器 — Homebrew 在终端命令下载安装: /bin/bash -c "$(curl…...
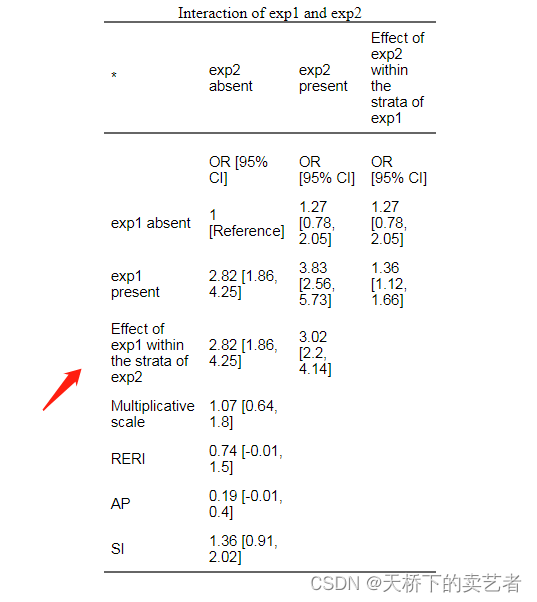
R语言应用interactionR包进行亚组相加交互作用分析
在统计分析中交互作用是指某因素的作用随其他因素水平变化而变化,两因素共同作用不等于两因素单独作用之和(相加交互作用)或之积(相乘交互作用)。相互作用的评估是尺度相关的:乘法或加法。乘法尺度上的相互作用意味着两次暴露的综合效应大于(…...

mysql 数据库面试题整理
Mysql 中 MyISAM 和 InnoDB 的区别 1、InnoDB 支持事务MyISAM 不支持 2、InnoDB 支持外键MyISAM 不支持 3、InnoDB 是聚集索引,MyISAM 是非聚集索引 4、InnoDB 不保存表的具体行数 5、InnoDB 最小的锁粒度是行锁,MyISAM是表锁 mysql中有就更新…...

LeetCode-435-无重叠区间
题目链接: 力扣435 -无重叠区间 解题思路:和之前的合并区间、汇总区间都比较相似, 先对二维数组排序,按照左边界升序;当 当前区间的左区间 < 前一个区间的右区间,说明有重叠,res1,还要更新当…...
)
记录深度学习常用指令(一)
一、创建Conda虚拟Python环境 conda create -n [仓库名字] python[版本]二、激活环境 conda activate [仓库名字]三、安装PyTorch PyTorch官方 GPU: conda install pytorch1.11.0 torchvision0.12.0 torchaudio0.11.0 cudatoolkit11.3 -c pytorchCPU࿱…...

Shell脚本练习——系统应用相关
显示系统信息 [rootwenzi data]#cat systemInfo.sh #/bin/bash RED"\E[1;31m" GREEN"\E[1;32m" END"\E[0m" echo -e "$GREEN----------------------Host systeminfo--------------------$END" echo -e "HOSTNAME: $REDho…...

同创永益入选首批“金融数字韧性与混沌工程实践试点机构”
8月16日下午,由北京国家金融科技认证中心、北京国家金融标准化研究院联合主办的“传递信任 服务发展”金融科技标准认证生态大会在太原成功举办。中国金融电子化集团有限公司党委书记、董事长周逢民,中国科学院院士冯登国,中国工商银行首席技…...

Hive 表注释乱码解决
文章目录 出现原因MySQL 字符集修改调整元数据库字符集测试 出现原因 一般 Hive 的元数据信息都存储在 MySQL 中,但 MySQL 数据库中的 character_set_server 和 character_set_database 参数,默认都为 latin1 字符集,这两个参数决定了服务器…...

【搭建私人图床】使用LightPicture开源搭建图片管理系统并远程访问
文章目录 1.前言2. Lightpicture网站搭建2.1. Lightpicture下载和安装2.2. Lightpicture网页测试2.3.cpolar的安装和注册 3.本地网页发布3.1.Cpolar云端设置3.2.Cpolar本地设置 4.公网访问测试5.结语 1.前言 现在的手机越来越先进,功能也越来越多,而手机…...

Ubuntu入门04——目录与文件
目录 1.显示当前工作目录 2.更改目录 3.创建工作目录 4.删除工作目录 5.移动文件或者文件夹 6.文件夹and文件查看命令 7. 回到根目录,回到上一级 8.删除工作目录 9.查看目录和文件 10.以树状图列出目录内容 11.文件查找 12.在数据库中查找文件或目录 1…...

深度学习中有哪些超参数,都有什么作用
深度学习中有许多超参数需要设置,它们会对模型的性能和训练过程产生重要影响。以下是一些常见的超参数及其作用: 学习率(Learning Rate):控制参数更新的步长。较小的学习率可以使模型收敛更稳定,但可能需要…...
centOS下载与安装
1 下载centOS镜像 The CentOS Project 选择阿里云的镜像 2 下载虚拟机 Vmware workstation VMware - Delivering a Digital Foundation For Businesses 1 下载安装 centOs是一个操作系统,操作硬件的。所以需要有机器,可以使用虚拟机。 2 创建新的虚…...

uniapp中mixins的使用
mixins 是一个 js 对象,它可以包含我们组件中JS部分的任意功能选项,如:data、components、methods、created、computed 等等。我们只要将公用的功能以对象的方式传入 mixins 选项中,当组件使用 mixins 对象时所有 mixins 对象都将…...

【JAVA基础——JAVA虚拟机JVM】
JVM 文章目录 JVM一.JVM结构1.1.JVM包含两个子系统和两个组件1.2.运行时数据区1.2.1.简介1.2.2.程序计数器1.2.3.虚拟机栈1.2.4.堆1.2.5.本地方法栈1.2.6.方法区(永久代实现)java8-1.2.7.元空间(Metaspace)1.2.8.JVM字节码执行引擎1.2.9.直接内存(Direct Memory)1.2.10.垃圾收集…...
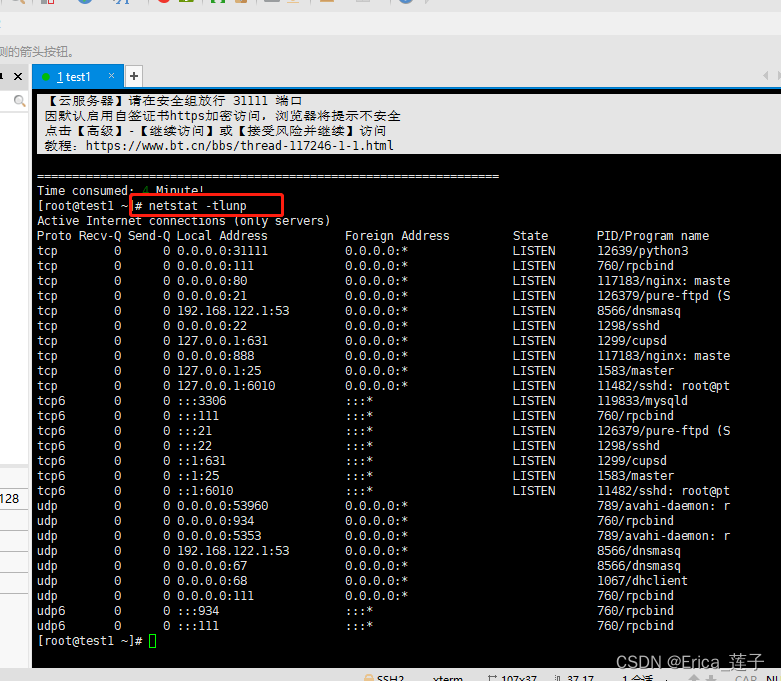
RTSP/Onvif视频服务器EasyNVR安防视频平台服务器频繁重启的问题解决方案
EasyNVR平台优秀的视频能力在于通过RTSP/ONVIF协议,将前端接入设备的音视频资源进行采集,并转码成适合全平台、全终端分发的视频流格式,包括RTSP、RTMP、FLV、HLS、WebRTC等格式。平台可拓展性强、部署轻快,在安防监控领域有着广泛…...

MySQL-进阶篇-锁
温馨提示:建议在PC端浏览~锁概述介绍 锁是计算机协调多个进程或线程并发访问某一资源的机制。在数据库中,除传统的计算资源(CPU、RAM、I/O)的争用以外,数据也是一种供许多用户共享的资源。如何保证数据并发访问的一致性…...

全域矩阵系统的底层逻辑:从流量分散到流量聚合的技术解法
矩阵运营最大的坑,不是做不起来,是做着做着就散了。账号在A平台火了,B平台没动静;今天发了20条,明天只剩3条能坚持——问题的本质不是能力不够,是缺乏一套把分散流量聚合起来的全域矩阵系统架构。一、全域流…...

STFT与小波变换深度对比:时频分析工具选型与实战指南
1. 项目概述:时频分析工具箱的深度对比在信号处理这个行当里,时频分析一直是个绕不开的核心话题。无论是处理一段音频、分析机械振动信号,还是解读脑电图数据,我们面对的信号往往不是一成不变的。它们内部的频率成分会随着时间推移…...
)
WordPress密码忘了别慌!5种找回方法保姆级教程(含MySQL命令行和functions.php修改)
WordPress密码重置全攻略:从基础操作到高级解决方案 1. 紧急情况下的密码恢复策略 遇到WordPress后台密码丢失的情况,首先需要保持冷静。作为全球使用最广泛的内容管理系统之一,WordPress提供了多种密码恢复机制,适用于不同技术水…...

从CID到SCR:一张SD卡的‘身份证’里到底藏了多少秘密?聊聊厂商、版本与总线宽度的那些事
从CID到SCR:一张SD卡的‘身份证’里到底藏了多少秘密?聊聊厂商、版本与总线宽度的那些事 当你从抽屉里翻出一张积灰的SD卡,除了容量标签和品牌Logo,是否想过这张小塑料片里还藏着完整的"身份档案"?就像法医通…...

从STM32转战合泰HT32F52352:手把手教你用GPTM定时器搞定四路舵机PWM控制
从STM32到HT32F52352的平滑迁移:GPTM定时器实现四路舵机PWM控制实战 对于习惯了STM32生态的开发者而言,初次接触合泰HT32系列MCU时往往面临两个挑战:如何快速理解新芯片的架构设计,以及如何将已有的STM32开发经验有效迁移。HT32F…...

对比按需计费与套餐taotoken token plan在长期项目中的成本优势分析
🚀 告别海外账号与网络限制!稳定直连全球优质大模型,限时半价接入中。 👉 点击领取海量免费额度 对比按需计费与套餐:Taotoken Token Plan 在长期项目中的成本优势分析 1. 项目背景与成本考量 在长期依赖大模型 API …...

WzComparerR2:冒险岛游戏数据的终极可视化与解密平台
WzComparerR2:冒险岛游戏数据的终极可视化与解密平台 【免费下载链接】WzComparerR2 Maplestory online Extractor 项目地址: https://gitcode.com/gh_mirrors/wz/WzComparerR2 你是否曾经好奇《冒险岛》游戏中那些精美的装备图标、华丽的技能动画和复杂的地…...

彻底告别iPhone过热降频!thermalmonitordDisabler让你的设备性能满血释放
彻底告别iPhone过热降频!thermalmonitordDisabler让你的设备性能满血释放 【免费下载链接】thermalmonitordDisabler A tool used to disable iOS daemons. 项目地址: https://gitcode.com/gh_mirrors/th/thermalmonitordDisabler 你是否曾经在游戏激战中突然…...

长期项目使用Taotoken聚合API在稳定性与成本上的综合感受
🚀 告别海外账号与网络限制!稳定直连全球优质大模型,限时半价接入中。 👉 点击领取海量免费额度 长期项目使用Taotoken聚合API在稳定性与成本上的综合感受 在最近一个持续数月的实际开发项目中,我们选择将Taotoken作为…...