Cyber RT学习笔记---7、Component组件认知与实践
7、Component组件认知与实践
前言
本文是对Cyber RT的学习记录,文章可能存在不严谨、不完善、有缺漏的部分,还请大家多多指出。
课程地址: https://apollo.baidu.com/community/course/outline/329?activeId=10200
更多还请参考:
[1] Apollo星火计划学习笔记——第三讲(Apollo Cyber RT 模块详解与实战)https://blog.csdn.net/sinat_52032317/article/details/126924375
[2] 【Apollo星火计划】—— Cyber基础概念|通信机制
https://blog.csdn.net/sinat_52032317/article/details/131878429?spm=1001.2014.3001.5501
[3] 第一章:Cyber RT基础入门与实践https://apollo.baidu.com/community/article/1093
[4] 第二章:Cyber RT通信机制解析与实践https://apollo.baidu.com/community/article/1094
[5] 第三章:Component组件认知与实践https://apollo.baidu.com/community/article/1103
说明
本文1-4节以此文中的example-component例子为基础;
TEST1.Component案例和TEST2.TimerComponent案例基于星火计划中的例子
7.0.前置知识
这部分内容详见第三章:Component组件认知与实践https://apollo.baidu.com/community/article/1103
7.0.1 Component定义
Apollo 的 Cyber RT 框架是基于组件(component)概念来构建的。每个组件都是 Cyber RT 框架的一个特定的算法模块, 处理一组输入并产生其输出数椐,配合Component对应的DAG文件,Cyber RT可实现对该模块的动态加载。
7.0.2 Component的类型
Component可分为两类:
以消息驱动的Component,即只有消息到来时,才会调用proc
定时调用的TimerComponent,定时调度模块没有绑定消息收发,需要用户自己创建reader来读取消息,如果需要读取多个消息,则可以创建多个reader
注意:
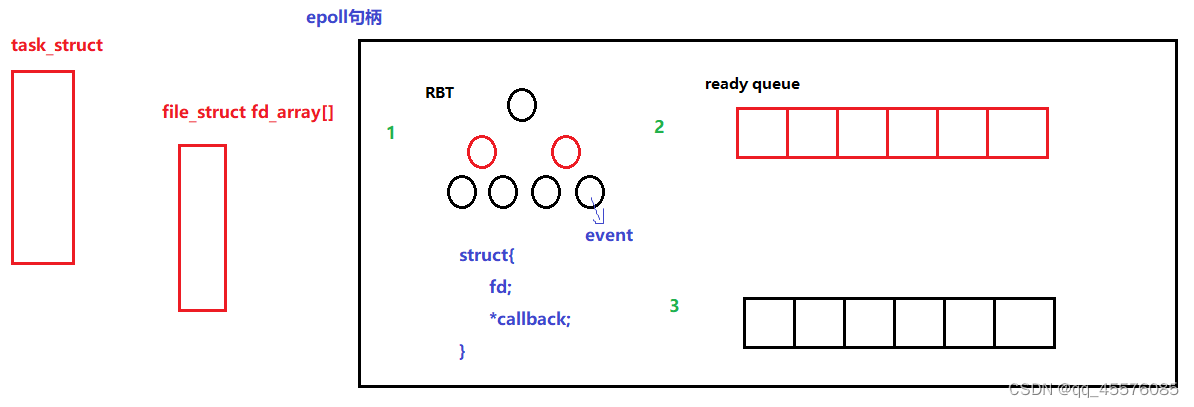
Component提供消息融合机制,最多可以支持4路消息,当从多个channel读取数据的时候,以第一个Channel为主Channel,当主Channel有消息到达,Cyber RT会调用Component的Proc()进行一次数据处理。
TimerComponent不提供消息融合,与Component不同的是TimerComponent的Proc()函数不是基于主Channel触发执行,而是由系统定时调用,开发者可以在配置文件中确定调用的时间间隔。
7.0.3 Component的创建及工作流程
(1)包含头文件(具体见2.1)
(2)定义一个类,并继承Component或者timer Component,根据component功能需要,选择继承Component或者继承TimerComponent
(3)重写Init()和Proc()函数,init函数在Component被加载的时候执行,用来对Component进行初始化,如Node的创建,Node Reader创建,Node Writer创建等;Proc函数是实现该Component功能的核心函数,其中实现了该Component的核心逻辑功能。
(4)在Cyber Rt中注册该Component,只有在Cyber RT中注册了该Component,Cyber RT才能对其进行动态的加载,否则,报错
7.0.4 Component如何被加载
在Cyber RT中,所有的Component都会被编译成独立的.so文件,Cyber Rt会根据开发者提供的配置文件,按照需要加载对应的Component。所以,开发者需要为.so文件编写好配置文件:.dag文件和.launch文件,以供Cyber RT正确的加载执行Component。
Cyber RT提供两种加载启动Component的方式:
使用cyber_launch工具启动Component对应的launch文件
使用mainboard启动component对应的dag文件
cyber_launch工具可以启动dag文件和二进制文件,而mainboard执行启动dag文件
7.0.5 Component的优点
优点:
可以通过配置launch文件加载到不同进程中,可以弹性部署可以通过配置DAG文件来修改其中的参数配置,调度策略,Channel名称可以接收多个种类的消息,并有多种消息融合策略接口简单,并且可以被Cyber框架动态的加载
要创建并启动一个算法组件,需要通过以下4个步骤:
初始化组件的目录结构实现组件类设置配置文件启动组件
7.1.初始化组件的目录结构
├── BUILD
├── cyberfile.xml
├── example-components.BUILD
├── example.dag
├── example.launch
├── proto
│ ├── BUILD
│ └── examples.proto
└── src
├── BUILD
├── common_component_example.cc
├── common_component_example.h
├── timer_common_component_example.cc
└── timer_common_component_example.h
C++头文件: common_component_example.hC++源文件: common_component_example.ccBazel 构建文件: BUILDDAG 文件: examples.dagLaunch 文件: examples.launch
7.2.实现组件类
7.2.1 头文件
实现common_component_example.h有以下步骤:
包含头文件
基于模板类Component派生出组件类ComponentSample
在派生类中定义自己的Init和proc函数。Proc函数需要指定输入的数据类型
使用CYBER_REGISTER_COMPONENT宏定义把组件类注册成全局可用
实例如下所示:
#pragma once
#include <memory>#include "cyber/component/component.h"
#include "example_components/proto/examples.pb.h"//  CommonComponentSample类不能被继承
class CommonComponentSample : public apollo::cyber::Component<example::proto::Driver, example::proto::Driver> {//有几个数据就有几个example::proto::Driverpublic:bool Init() override;bool Proc(const std::shared_ptr<example::proto::Driver>& msg0,const std::shared_ptr<example::proto::Driver>& msg1) override;
};
CYBER_REGISTER_COMPONENT(CommonComponentSample)
模板类Component的定义在cyber/component/component.h中,如下所示:
template <typename M0 = NullType, typename M1 = NullType,typename M2 = NullType, typename M3 = NullType>
class Component : public ComponentBase {public:Component() {}~Component() override {}/*** @brief init the component by protobuf object.** @param config which is defined in 'cyber/proto/component_conf.proto'** @return returns true if successful, otherwise returns false*/bool Initialize(const ComponentConfig& config) override;bool Process(const std::shared_ptr<M0>& msg0, const std::shared_ptr<M1>& msg1,const std::shared_ptr<M2>& msg2,const std::shared_ptr<M3>& msg3);private:/*** @brief The process logical of yours.** @param msg0 the first channel message.* @param msg1 the second channel message.* @param msg2 the third channel message.* @param msg3 the fourth channel message.** @return returns true if successful, otherwise returns false*/virtual bool Proc(const std::shared_ptr<M0>& msg0,const std::shared_ptr<M1>& msg1,const std::shared_ptr<M2>& msg2,const std::shared_ptr<M3>& msg3) = 0;
};
由代码可见,Component类最多可以接收4个模板参数,每个模板参数均表示一种输入的消息类型,这些消息在Proc函数中被周期性的调用和处理
7.2.2 源文件
对于源文件commoncomponent_example.cc,Init和Proc这两个函数需要实现。
#include "example_components/src/common_component_example.h"bool CommonComponentSample::Init() {AINFO << "Commontest component init";return true;
}bool CommonComponentSample::Proc(const std::shared_ptr<example::proto::Driver>& msg0,const std::shared_ptr<example::proto::Driver>& msg1) {AINFO << "Start common component Proc [" << msg0->msg_id() << "] ["<< msg1->msg_id() << "]";return true;
}
7.2.3 创建组件源码及BUILD文件(bazel编译文件)
可见基于common_component_example_lib库最终生成了一个共享库文件libcommon_component_example.so,而该共享库通过Cyber RT调度程序mainboard动态加载运行。
load("//tools:cpplint.bzl", "cpplint")
load("@rules_cc//cc:defs.bzl", "cc_binary", "cc_library")package(default_visibility = ["//visibility:public"])cc_binary(name = "libcomponent_examples.so",linkshared = True,linkstatic = True,deps = [":timer_common_component_example_lib",":common_component_example_lib"],
)cc_library(name = "timer_common_component_example_lib",srcs = ["timer_common_component_example.cc"],hdrs = ["timer_common_component_example.h"],visibility = ["//visibility:private"],alwayslink = True,deps = ["//cyber","//example_components/proto:examples_cc_proto",],
)cc_library(name = "common_component_example_lib",srcs = ["common_component_example.cc"],hdrs = ["common_component_example.h"],visibility = ["//visibility:private"],alwayslink = True,deps = ["//cyber","//example_components/proto:examples_cc_proto",],
)cpplint()
7.3.设置配置文件
7.3.1 配置DAG文件
DAG配置文件是Cyber RT调度程序mainboard动态加载模块的最终配置文件。在DAG依赖配置文件(例如example.dag)中配置如下项目:
Channel names: 输入 Channel 的名称Library path: 该组件生成的共享库路径Class name: 此组件类的名称
配置实例如下所示:
# Define all coms in DAG streaming.module_config {
# 共享库文件路径module_library : "/opt/apollo/neo/packages/example-components-dev/latest/lib/libcomponent_examples.so"timer_components {class_name : "TimerCommonComponentSample"config {name : "CommonComponent"# 消息频率:10msinterval : 10}}components {# 组件类名称,一定不能写错,否则mainboard无法动态创建CommonComponentSample组件对象class_name : "CommonComponentSample"config {# 模块名name : "example"readers {channel: "/apollo/channel_example/driver_test"}readers {channel: "/apollo/channel_example/driver_test2"}}}}
7.3.2 配置Launch启动文件
在launch启动文件中(example.launch),配置下面的选项:
name :组件的名字dag_conf :上一步配置的 DAG 文件路径process_name :运行组件时的进程名
配置实例:
<cyber><component><name>common</name><dag_conf>/apollo/cyber/examples/common_component_example/common.dag</dag_conf><process_name>common</process_name></component>
</cyber>
7.4.启动组件
通过下面的命令来编译组件:
buildtool build --packages example_components
运行组件的命令:
(1)通过launch文件启动
cyber_launch start example_components/example.launch
(2)通过.dag文件启动
mainboard -d example_components/example.dag
同时在另一个终端开启Cyber_monitor
cyber_monitor
7.5.TEST1.Component案例
本节实现一个简单的Component实例,实现两路channel消息融合,并将两路channel消息编号依次打印到屏幕终端。
7.5.1 创建目录结构
apollo_workspace
|--test|--common_component_example|  |--BUILD    // bazel编译文件|  |--driver_writer.cc    // 向driver channel中写消息的writer|  |--chatter_writer.cc   // 向chatter channel中写消息的writer|  |--common_component_example.cc    // component 源文件|  |--common_component_example.h    // component 头文件|  |--common.dag    // component 配置文件|  |--common.launch    // component launch文件|--proto|--BUILD    // protobuf的编译文件|--examples.proto    // protobuf|--BUILD|--test.BUILD|--cyberfile.xml
7.5.2 proto文件及BUILD文件
proto文件
syntax = "proto2";  // proto版本package apollo.cyber.test.proto; // proto命名空间message Chatter {optional uint64 timestamp = 1;optional uint64 lidar_timestamp = 2;optional uint64 seq = 3;optional bytes content = 4;
};message Driver {optional string content = 1;optional uint64 msg_id = 2;optional uint64 timestamp = 3;
};
BUILD文件
load("@rules_proto//proto:defs.bzl", "proto_library")
load("@rules_cc//cc:defs.bzl", "cc_proto_library")
load("//tools:python_rules.bzl", "py_proto_library")package(default_visibility = ["//visibility:public"])cc_proto_library(name = "examples_cc_proto",deps = [":examples_proto",],
)proto_library(name = "examples_proto",srcs = ["examples.proto"],
)
load("@rules_proto//proto:defs.bzl", "proto_library") proto相关编译规则
load("@rules_cc//cc:defs.bzl", "cc_proto_library") c++相关编译规则
load("//tools:python_rules.bzl", "py_proto_library") python相关编译规则,apollo中自定义的
7.5.3 driver/chatter writer的实现
chatter_writer.cc
#include "cyber/cyber.h"
#include "test/common_component_example/proto/examples.pb.h" //自己的路径
#include "cyber/time/rate.h"
#include "cyber/time/time.h"using apollo::cyber::Rate;
using apollo::cyber::Time;
using apollo::cyber::test::proto::Chatter; //命名空间int main(int argc, char *argv[]) {apollo::cyber::Init(argv[0]);auto talker_node = apollo::cyber::CreateNode("chatter_writer");// 创建writer,写Chatter类型消息auto talker = talker_node->CreateWriter<Chatter>("/apollo/chatter");// 创建计时器Rate rate(3.0);std::string content("apollo_prediction");while (apollo::cyber::OK()) {static uint64_t seq = 0;auto msg = std::make_shared<Chatter>();  // Chatter的智能指针msg->set_timestamp(Time::Now().ToNanosecond()); // 时间戳msg->set_lidar_timestamp(Time::Now().ToNanosecond());msg->set_seq(seq++);msg->set_content(content + std::to_string(seq - 1));talker->Write(msg); // 将数据写入channelAINFO << "/apollo/chatter sent message, seq=" << (seq - 1) << ";";// 每秒3次rate.Sleep();}return 0;
}
driver_writer.cc
#include "cyber/cyber.h"
#include "test/common_component_example/proto/examples.pb.h"
#include "cyber/time/rate.h"
#include "cyber/time/time.h"using apollo::cyber::Rate;
using apollo::cyber::Time;
using apollo::cyber::test::proto::Driver;int main(int argc, char *argv[]) {// 初始化cyberapollo::cyber::Init(argv[0]);// 创建nodeauto talker_node = apollo::cyber::CreateNode("driver_writer");// 创建writer,写Driver类型消息auto talker = talker_node->CreateWriter<Driver>("/apollo/driver");// 新建计时器Rate rate(2.0);std::string content("apollo_test");while (apollo::cyber::OK()) {static uint64_t seq = 0;auto msg = std::make_shared<Driver>();// 创建一个Driver类型的消息并填入数据msg->set_timestamp(Time::Now().ToNanosecond());msg->set_msg_id(seq++);msg->set_content(content + std::to_string(seq - 1));talker->Write(msg);AINFO << "/apollo/driver sent message, seq=" << (seq - 1) << ";";// 每秒2次rate.Sleep();}return 0;
}
7.5.4 component实现
common_component_example.h
#pragma once
#include <memory>#include "cyber/component/component.h"
#include "test/common_component_example/proto/examples.pb.h"using apollo::cyber::Component;
using apollo::cyber::ComponentBase;
using apollo::cyber::test::proto::Driver;
using apollo::cyber::test::proto::Chatter;// 有两个消息源,继承以Driver和Chatter为参数的Component模版类
class CommonComponentSample : public Component<Driver, Chatter> {public:bool Init() override;// Proc() 函数的两个参数表示两个channel中的最新的信息bool Proc(const std::shared_ptr<Driver>& msg0,const std::shared_ptr<Chatter>& msg1) override;
};
// 将CommonComopnentSample注册在cyber中
CYBER_REGISTER_COMPONENT(CommonComponentSample)
可以看到,此处继承了Component<Driver, Chatter>来读取两个 channel 中的两种格式的消息,Proc()函数参数与其相对应。以此类推,如果继承了Component<Driver, Chatter, Driver>,则Proc()函数应为 Proc(const std::shared_ptr& msg0, const std::shared_ptr& msg1, const std::shared_ptr& msg2)
common_component_example.cc
#include "test/common_component_example/com_component_test/common_component_example.h"
// 在加载component时调用
bool CommonComponentSample::Init() {AINFO << "Commontest component init";return true;
}
// 在主channel,也就是Driver有消息到达时调用
bool CommonComponentSample::Proc(const std::shared_ptr<Driver>& msg0,const std::shared_ptr<Chatter>& msg1) {// 将两个消息的序号格式化输出AINFO << "Start common component Proc [" << msg0->msg_id() << "] ["<< msg1->seq() << "]";return true;
}
7.5.5 配置文件
DAG文件
module_config {module_library : "/opt/apollo/neo/packages/test-dev/latest/lib/libcommon_component_example.so"components {class_name : "CommonComponentSample"config {name : "common"readers {channel: "/apollo/driver"}readers {channel: "/apollo/chatter"}}}}
module_library:指向 Component 编译后得到的.so文件的存放目录。components:表示 Component 的类型,除了components外,还有一种是timer_component,将会在下个例子中讲解。class_name:表示被加载的 Component 的类名,在这个例子中是 CommonComponentSample。name:表示被加载的类在 Cyber 中的标识名。readers:表示 Component 所读取的 Channel ,与其继承的基类读取的类型一一对应。
launch文件
<cyber><module><name>common</name><dag_conf>/apollo_workspace/test/common_component_example/com_component_test/common.dag</dag_conf><process_name>common</process_name></module>
</cyber>
<name>:表示加载的 Component 在 Cyber 中的标识名,与 dag 文件中的name字段对应。
<dag_conf>:表示 dag 配置文件路径。
<process_name>:表示启动后的线程名,与线程名相同的component 会在此线程中运行。
BUILD文件-bazel编译文件
load("@rules_cc//cc:defs.bzl", "cc_binary", "cc_library")
load("//tools/install:install.bzl", "install", "install_src_files")
load("//tools:cpplint.bzl", "cpplint")package(default_visibility = ["//visibility:public"])cc_binary(name = "libcommon_component_example.so",linkshared = True,linkstatic = True,deps = [":common_component_example_lib"],
)cc_library(name = "common_component_example_lib",srcs = ["common_component_example.cc"],hdrs = ["common_component_example.h"],visibility = ["//visibility:private"],deps = ["//cyber","//test/common_component_example/proto:examples_cc_proto",       // 路径按自己的改],alwayslink = True,
)cc_binary(name = "driver_writer",srcs = ["driver_writer.cc"],linkstatic = True,deps = ["//cyber","//test/common_component_example/proto:examples_cc_proto",],
)cc_binary(name = "chatter_writer",srcs = ["chatter_writer.cc"],linkstatic = True,deps = ["//cyber","//test/common_component_example/proto:examples_cc_proto",],
)filegroup(name = "conf",srcs = [":common.dag",":common.launch",],
)install(name = "install",data = [":conf",],runtime_dest = "test/bin",library_dest = "test/lib",data_dest = "test/common_component_example/conf",targets = [":chatter_writer",":driver_writer","libcommon_component_example.so",],
)install_src_files(name = "install_src",src_dir = ["."],dest = "test/src/common_component_example",filter = "*",
)cpplint()
编译
buildtool build -p test/
注意:
install关键字:
runtime_dest 可执行文件位置library_dest 库文件位置data_dest.dag/.launch 文件的位置
记得修改包管理BUILD文件中的deps
运行
完成编译后,我们就可以运行 Cyber 并加载 Component了,如上文所说,Cyber 会根据配置文件来加载 Component。Cyber 提供了两种加载 Component 的方法:
方法一、使用mainboard启动:mainboard -d <path/to/dag>,在这个例子中,运行的命令是
mainboard -d test/common_component_example/common.dag
方法二、使用cyber_launch启动:cyber_launch start <path/to/launch>,在这个例子中,运行的命令是
cyber_launch start test/common_component/common.launch
启动三个终端
#第一个
export GLOG_alsologtostderr=1
./bazel-bin/test/common_component_example/driver_writer
#第二个
export GLOG_alsologtostderr=1
./bazel-bin/test/common_component_example/chatter_writer
#第三个
export GLOG_alsologtostderr=1
cyber_launch start test/common_component_example/common.launch
cyber_monitor可以查看channel信息

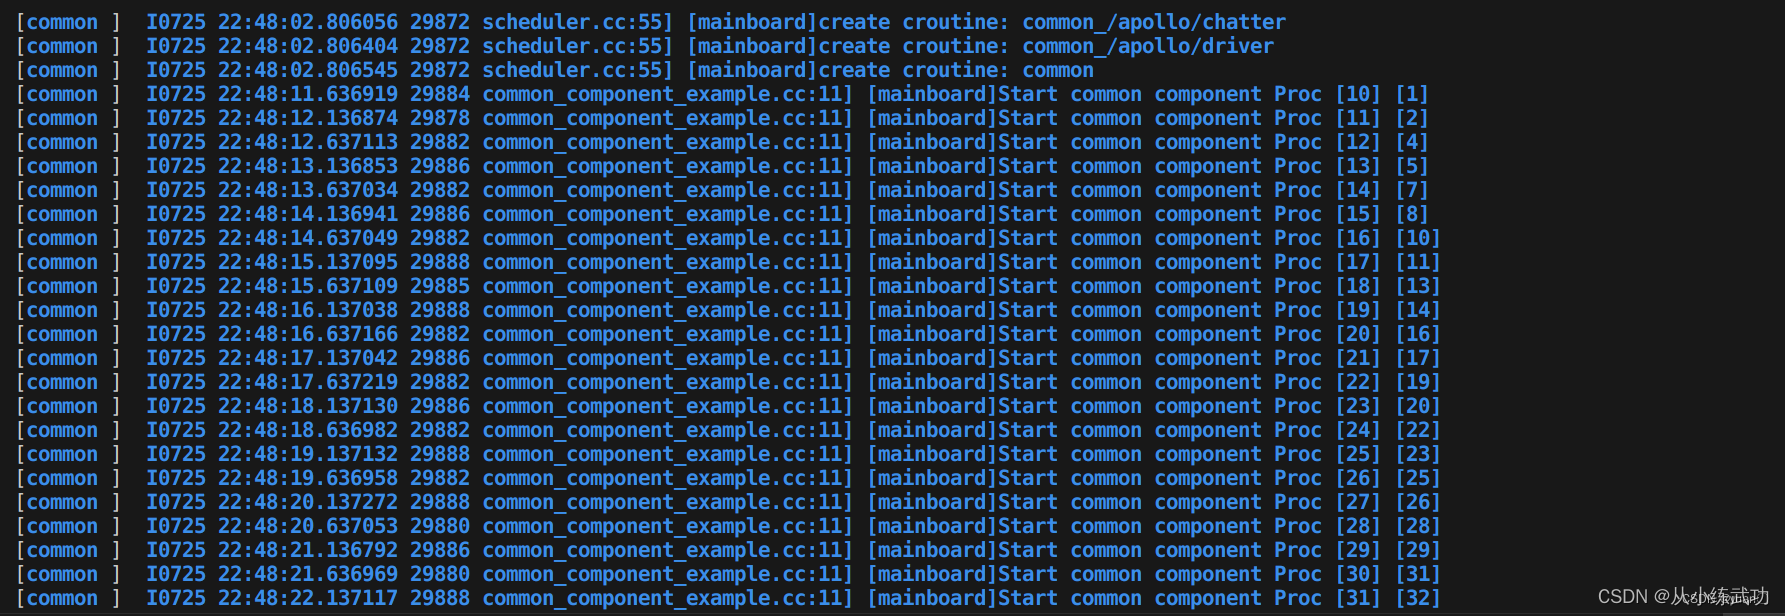
CommonComponentSample每接受到一次主channel信息,执行一次Proc()函数,Proc()函数执行消息融合逻辑依次打印出两路消息的编号到屏幕上。
可以看到CommonComponentSample打印到屏幕上的信息,其中主channel信息(Driver信息)编号是依次递增的,而非主channel信息(Chatter信息)编号会出现缺失或者重复,这是因为component的Proc()函数只有主channel消息到达时才会触发执行,Proc()函数执行时会读取所有融合channel最新消息。
6.TEST2.TimerComponent案例
在本节中,我们会实现两个TimerComponent,分别是TimerDriverSample和TimerChatterSample,用来替换掉上一个案例中的两个 Writer。
7.6.1 创建目录结构
apollo_workspace
|--test|--timer_component_example|--BUILD|--timer_chatter.h    // TimerChatterSample 头文件|--timer_chatter.cc    // TimerChatterSample 源文件|--timer_driver.h    // TimerDriverSample 头文件|--timer_driver.cc    // TimerDriverSample 源文件|--driver.dag    // TimerDriverSample 配置文件|--driver.launch    // TimerDriverSample launch文件|--chatter.dag    // TimerChatterSample 配置文件|--chatter.launch    // TimerChatterSample launch文件
7.6.2 proto文件及BUILD文件
沿用TEST1中的文件
7.6.3TimerComponent 实现
timer_chatter.h
#include <memory>
#include "cyber/class_loader/class_loader.h"
#include "cyber/component/component.h"
#include "cyber/component/timer_component.h"
#include "test/common_component_example/proto/examples.pb.h"using apollo::cyber::Component;
using apollo::cyber::ComponentBase;
using apollo::cyber::TimerComponent;
using apollo::cyber::Writer;
using apollo::cyber::test::proto::Chatter;class TimerChatterSample : public TimerComponent {public:bool Init() override;bool Proc() override;private:std::shared_ptr<Writer<Chatter>> chatter_writer_ = nullptr;
};
CYBER_REGISTER_COMPONENT(TimerChatterSample)
可以看到,TimeChatterComponent 需要继承 TimerComponent基类,代码结构与普通的 Component 几乎相同。
不同的是因为没有数据源,所以没有模版参数。
timer_chatter.cc
#include "test/timer_component_example/timer_chatter.h"
#include "cyber/class_loader/class_loader.h"
#include "cyber/component/component.h"
#include "test/common_component_example/proto/examples.pb.h"bool TimerChatterSample::Init() {chatter_writer_ = node_->CreateWriter<Chatter>("/apollo/chatter");return true;
}bool TimerChatterSample::Proc() {static int i = 0;auto out_msg = std::make_shared<Chatter>();out_msg->set_seq(i++);chatter_writer_->Write(out_msg);AINFO << "timer_chatter: Write chattermsg->"<< out_msg->ShortDebugString();return true;
}
TimerChatter 在 Init()中初始化了 Writer,并在 Proc()中向 Channel 中写信息。
timer_driver.h
#include <memory>
#include "cyber/class_loader/class_loader.h"
#include "cyber/component/component.h"
#include "cyber/component/timer_component.h"
#include "test/common_component_example/proto/examples.pb.h"using apollo::cyber::Component;
using apollo::cyber::ComponentBase;
using apollo::cyber::TimerComponent;
using apollo::cyber::Writer;
using apollo::cyber::test::proto::Driver;class TimerDriverSample : public TimerComponent {public:bool Init() override;bool Proc() override;private:std::shared_ptr<Writer<Driver>> driver_writer_ = nullptr;
};
CYBER_REGISTER_COMPONENT(TimerDriverSample)
timer_driver.cc
#include "test/timer_component_example/timer_driver.h"
#include "cyber/class_loader/class_loader.h"
#include "cyber/component/component.h"
#include "test/common_component_example/proto/examples.pb.h"
bool TimerDriverSample::Init() {driver_writer_ = node_->CreateWriter<Driver>("/apollo/driver");return true;
}bool TimerDriverSample::Proc() {static int i = 0;auto out_msg = std::make_shared<Driver>();out_msg->set_msg_id(i++);driver_writer_->Write(out_msg);AINFO << "timer_driver: Write drivermsg->"<< out_msg->ShortDebugString();return true;
}
7.6.4 配置文件
chatter.dag
module_config {module_library : "/opt/apollo/neo/packages/test-dev/latest/lib/libtimer_chatter.so"timer_components {class_name : "TimerChatterSample"config {name : "timer_chatter"interval : 400}}
}
interval:表示 TimerComponent 执行 Proc()的间隔,此配置中为 400 ms 执行一次。
因为没有数据融合,所以没有readers字段
其余配置和普通 Component 相同
chatter.launch
<cyber><module><name>timer_chatter</name><dag_conf>/opt/apollo/neo/packages/test-dev/latest/timer_component_example/conf/chatter.dag</dag_conf><process_name>timer_chatter</process_name></module>
</cyber>
driver.dag
module_config {module_library : "/opt/apollo/neo/packages/test-dev/latest/lib/libtimer_driver.so"timer_components {class_name : "TimerDriverSample"config {name : "timer_driver"interval : 200}}
}
driver.launch
<cyber><module><name>timer_driver</name><dag_conf>/opt/apollo/neo/packages/test-dev/latest/timer_component_example/conf/driver.dag</dag_conf><process_name>timer_driver</process_name></module>
</cyber>
7.6.5 BUILD文件
load("@rules_cc//cc:defs.bzl", "cc_binary", "cc_library")
load("//tools/install:install.bzl", "install", "install_src_files")
load("//tools:cpplint.bzl", "cpplint")package(default_visibility = ["//visibility:public"])cc_binary(name = "libcommon_component_example.so",linkshared = True,linkstatic = True,deps = [":common_component_example_lib"],
)cc_library(name = "common_component_example_lib",srcs = ["common_component_example.cc"],hdrs = ["common_component_example.h"],visibility = ["//visibility:private"],deps = ["//cyber","//test/common_component_example/proto:examples_cc_proto",],alwayslink = True,
)cc_binary(name = "driver_writer",srcs = ["driver_writer.cc"],linkstatic = True,deps = ["//cyber","//test/common_component_example/proto:examples_cc_proto",],
)cc_binary(name = "chatter_writer",srcs = ["chatter_writer.cc"],linkstatic = True,deps = ["//cyber","//test/common_component_example/proto:examples_cc_proto",],
)filegroup(name = "conf",srcs = [":common.dag",":common.launch",],
)install(name = "install",data = [":conf",],runtime_dest = "test/bin",library_dest = "test/lib",data_dest = "test/common_component_example/conf",targets = [":chatter_writer",":driver_writer","libcommon_component_example.so",],
)install_src_files(name = "install_src",src_dir = ["."],dest = "test/src/cyberatest",filter = "*",
)cpplint()
记得修改包管理BUILD文件中的deps.
7.6.6 编译运行
编译
同上
运行
我们实现的两个 TimerComponent 可以用来替代上一个案例中的两个定时写消息的 Writer,启动方法也与上一案例类似,不同的是 TimerComponent 可以通过配置文件配置。
同样开启三个终端
# 第一个
export GLOG_alsologtostderr=1
cyber_launch start test/common_component_example/common.launch
# 第二个
export GLOG_alsologtostderr=1
cyber_launch start test/timer_component_example/driver.launch
# 第三个
export GLOG_alsologtostderr=1
cyber_launch start test/timer_component_example/chatter.launch
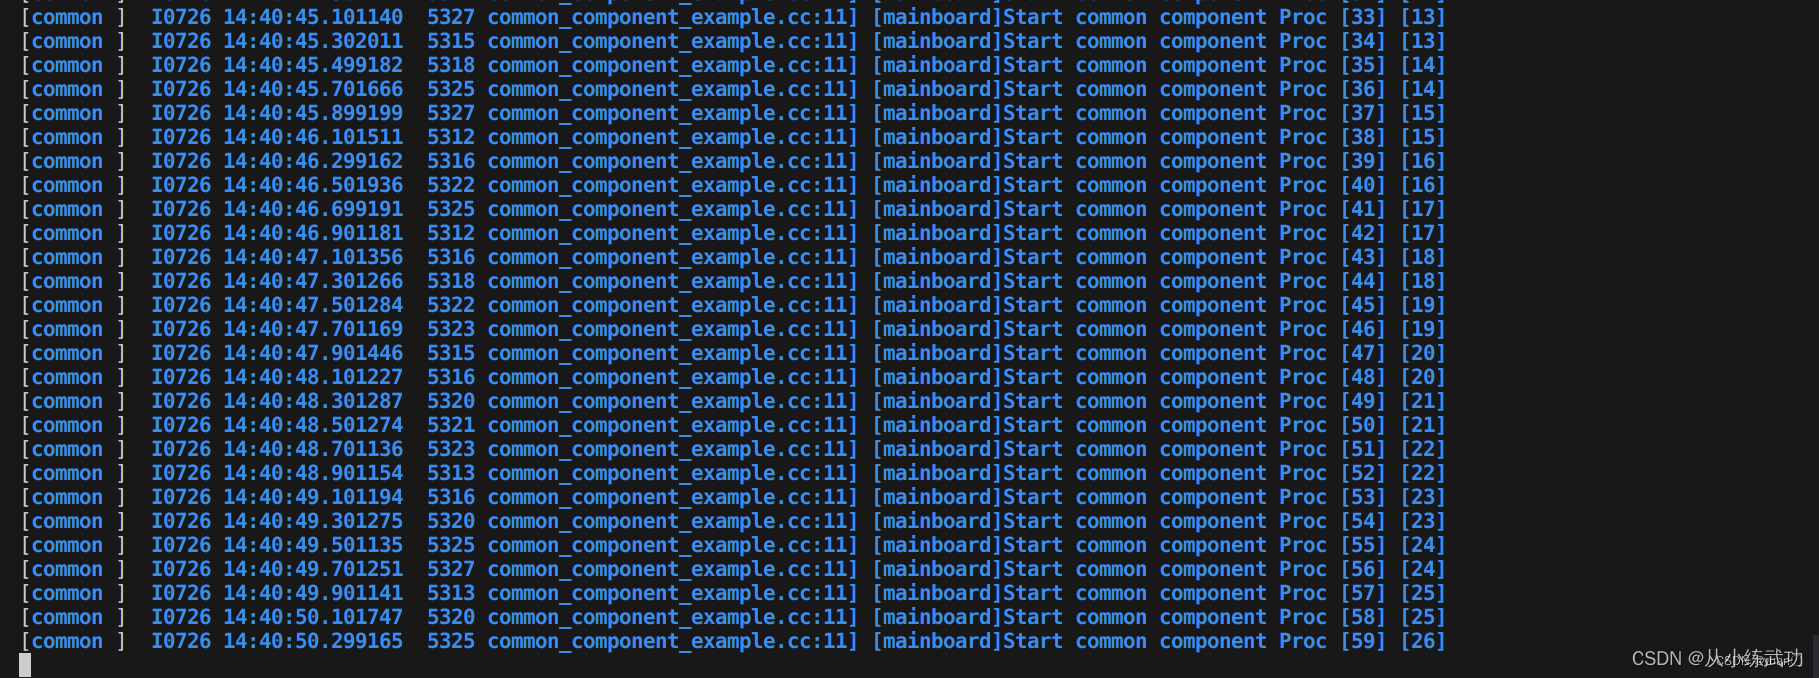 CommonComponentSample每接受到一次主channel信息,执行一次Proc()函数,Proc()函数执行消息融合逻辑依次打印出两路消息的编号到屏幕上。
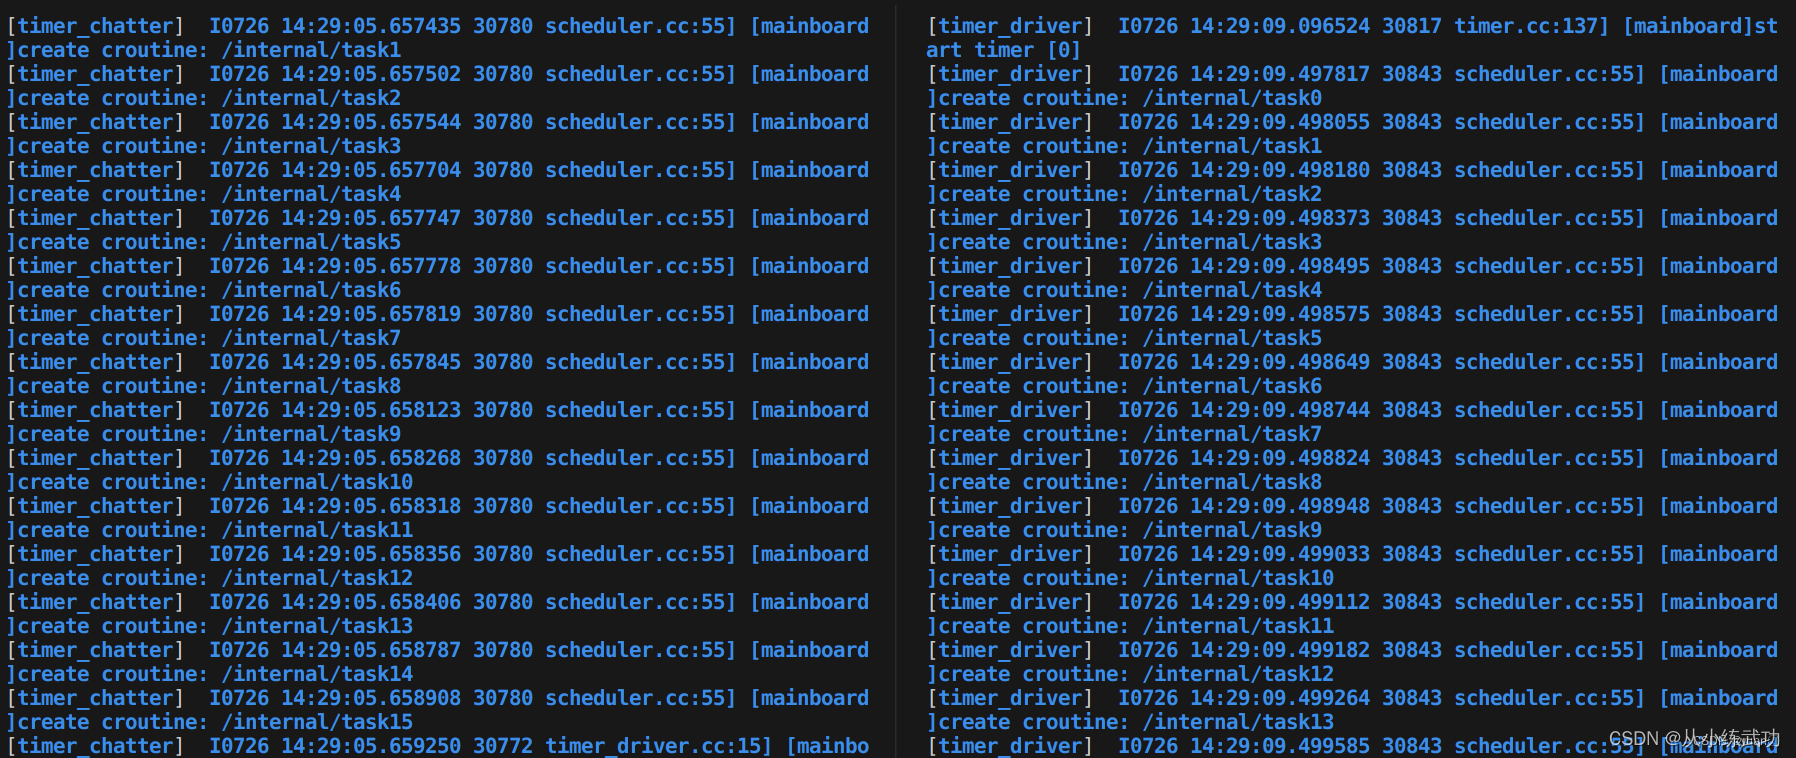
TimerChatterSample每隔400ms/200ms,由系统定时器调用Proc()函数,Proc()函数每执行一次就发出一条消息。并打印该条消息的编号到屏幕上。
相关文章:
Cyber RT学习笔记---7、Component组件认知与实践
7、Component组件认知与实践 前言 本文是对Cyber RT的学习记录,文章可能存在不严谨、不完善、有缺漏的部分,还请大家多多指出。 课程地址: https://apollo.baidu.com/community/course/outline/329?activeId10200 更多还请参考: [1] Apollo星火计划学习笔记——第…...

常见配置文件格式INI/XML/YAML/JSON/Properties/TOML/HCL/YAML Front Matter/.env介绍及实例
1. 常见配置文件INI XML YAML JSON Properties介绍 以下是常见配置文件格式(INI、XML、YAML、JSON、Properties、TOML、HCL、YAML Front Matter、.env)的比较: 配置文件格式简介语法定义优点缺点常见使用场景常见编程语言INI简单的文本文件…...
JS 方法实现复制粘贴
背景 以前我们一涉及到复制粘贴功能,实现思路一般都是: 创建一个 textarea 标签 让这个 textarea 不可见(定位) 给这个 textarea 赋值 把这个 textarea 塞到页面中 调用 textarea 的 select 方法 调用 document.execCommand…...

后端面试话术集锦第 十六 篇:java锁面试话术
这是后端面试集锦第十六篇博文——java锁面试话术❗❗❗ 1. 介绍一下乐观锁和悲观锁 乐观锁的话就是比较乐观,每次去拿数据的时候,认为别人不会修改,所以不会上锁,但是在更新的时候会判断一下在此期间别人有没有去更新这个数据,可以使用版本号机制或者CAS算法实现。 乐观…...
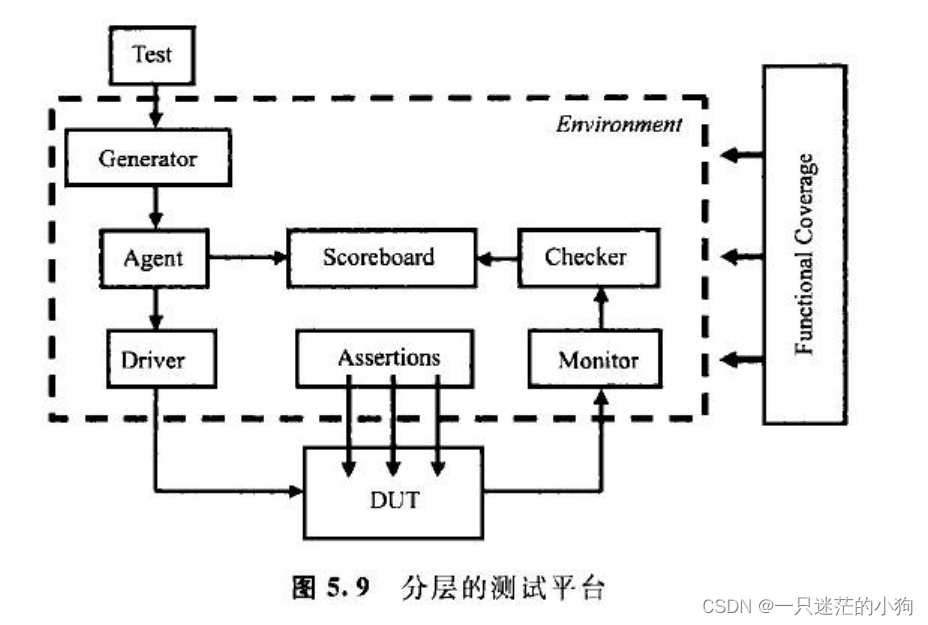
SystemVerilog 第5章 面向对象编程基础
5.1概述 对结构化编程语言,例如 Verilog和C语言来讲,它们的数据结构和使用这些数据结构的代码之间存在很大的沟壑。数据声明、数据类型与操作这些数据的算法经常放在不同的文件里,因此造成了对程序理解的困难。 Verilog程序员的境遇比C程序员更加棘手,因为Ⅴ erilog语言…...
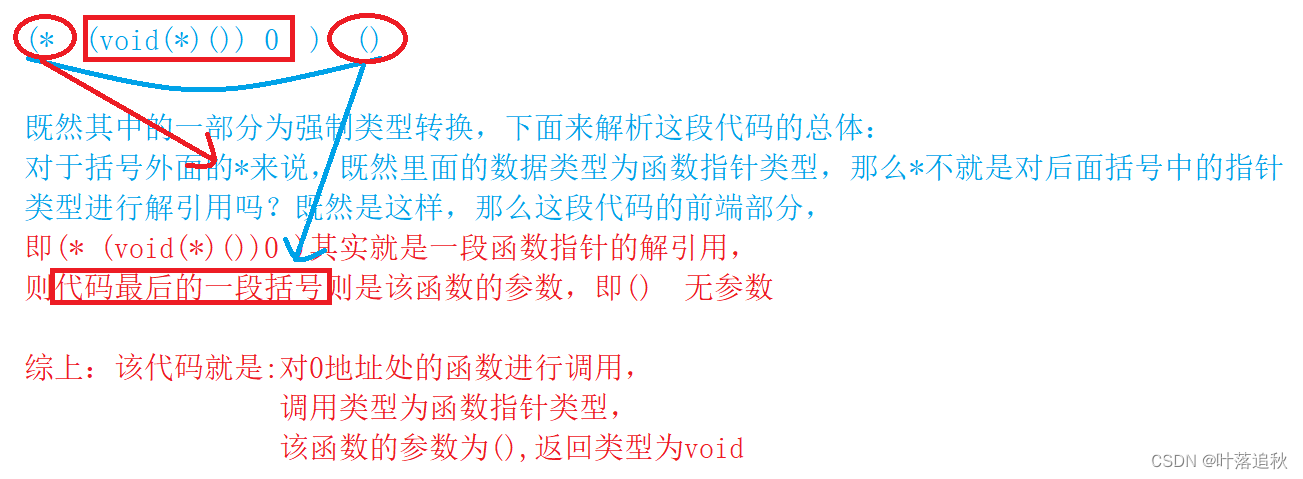
指针进阶(1)
指针进阶 朋友们,好久不见,这次追秋给大家带来的是内容丰富精彩的指针知识的拓展内容,喜欢的朋友们三连走一波!!! 字符指针 在指针的类型中我们知道有一种指针类型为字符指针 char* ; 使用方法如…...
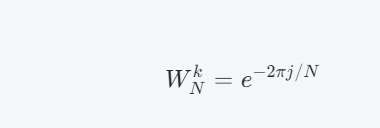
蝶形运算法
蝶形运算法是一种基于FFT(Fast Fourier Transform)算法的计算方法,其基本思想是将长度为N的DFT分解成若干个长度为N/2的DFT计算,并通过不断的合并操作得到最终的结果。该算法也称为“蝴蝶算法”,因为它的计算过程中需要…...

day 48|● 583. 两个字符串的删除操作 ● 72. 编辑距离
583. 两个字符串的删除操作 dp的含义:指0开头,i- 1和j - 1为结尾的两个序列的删除最小数 递推公式方面: 初始化方面:前面0行和0列的初值要赋好 func minDistance(word1 string, word2 string) int {dp : make([][]int, len(wor…...
服务器(I/O)之多路转接
五种IO模型 1、阻塞等待:在内核将数据准备好之前,系统调用会一直等待。所有的套接字,默认都是阻塞方式。 2、非阻塞等待:如果内核没有将数据准备好,系统调用仍然会返回,并且会返回EWUOLDBLOCK或者EAGAIN错…...

后端面试话术集锦第 十三 篇:java集合面试话术
这是后端面试集锦第十三篇博文——java集合面试话术❗❗❗ 1. Java里常见的数据结构都有哪些以及特征 数组 数组是最常用的数据结构。 数组的特点是长度固定,可以用下标索引,并且所有的元素的类型都是一致的。 列表 列表和数组很相似,只不过它的大小可以改变。 列表一般都是…...
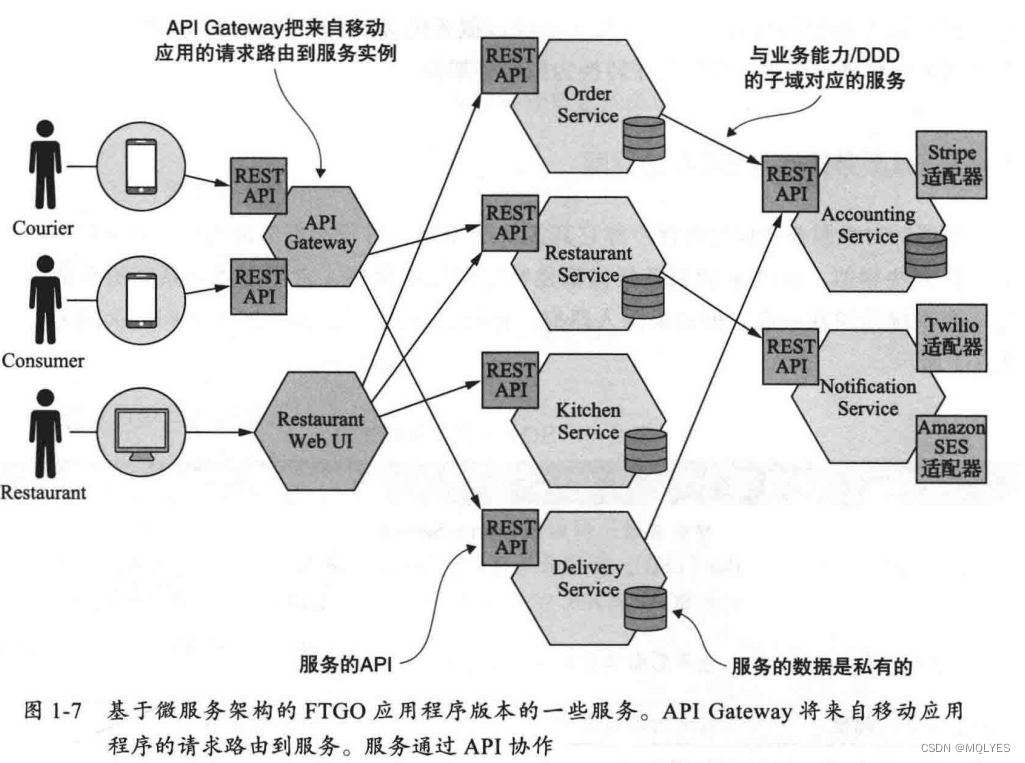
《微服务架构设计模式》第一章
逃离单体地狱 FTGO单体架构 作者用国外FTGO公司(一家做线餐饮外卖)的应用程序举例,阐述了单体架构的优缺点。FTGO应用架构如下: 应用程序是单体应用,具有六边形架构,最内侧是业务逻辑&…...

前端是如何打包的
前端项目的打包过程通常涉及将多个源文件(包括HTML、CSS、JavaScript等)合并、优化和压缩,以生成最终用于生产环境的静态资源。这个过程可以使用构建工具和打包工具来自动化完成。以下是前端项目的常见打包步骤: 1. **源代码编写…...

Qt 5.15编译(MinGW)及集成Crypto++ 8.7.0笔记
一、背景 为使用AES加密库(AES/CBC加解密),选用Crypto 库(官网)。 最新Crypto C库依次为:8.8.0版本(2023-6-25)、8.7.0(2022-8-7)和8.6.0(202…...
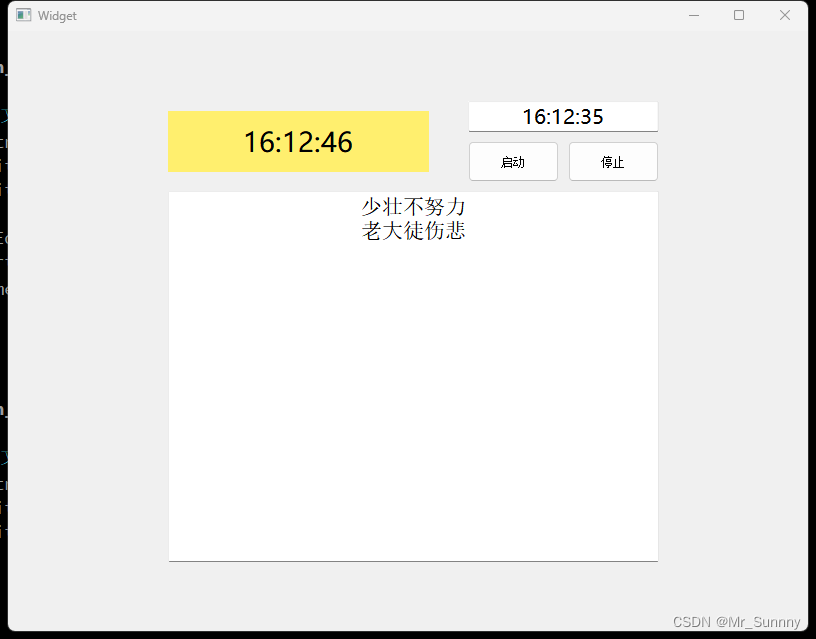
Qt 简单闹钟
//wiget.h#ifndef WIDGET_H #define WIDGET_H#include <QWidget> #include <QTime> //时间类 #include <QTimer> //定时器类 #include <QTextToSpeech> #include <QDebug> QT_BEGIN_NAMESPACE namespace Ui { class Widget; } QT_END_NAMESPA…...

简单谈下Spring、Spring MVC和Spring Boot
Spring是一个开源的轻量级框架,用于构建Java应用程序。它提供了一种全面的编程和配置模型,可以帮助开发人员构建各种类型的应用程序,从简单的控制台应用程序到大型企业级应用程序。Spring框架的主要目标是提高应用程序的可维护性、可扩展性和…...

利用python进行视频下载并界面播放快速下载素材
工具:python designer(python自带):UI界面设计工具 VLC:视频播放工具 需要的库如下: import os,platform os.environ[PYTHON_VLC_MODULE_PATH] "./vlc-3.0.14" import vlc from 脚本 import Player from …...
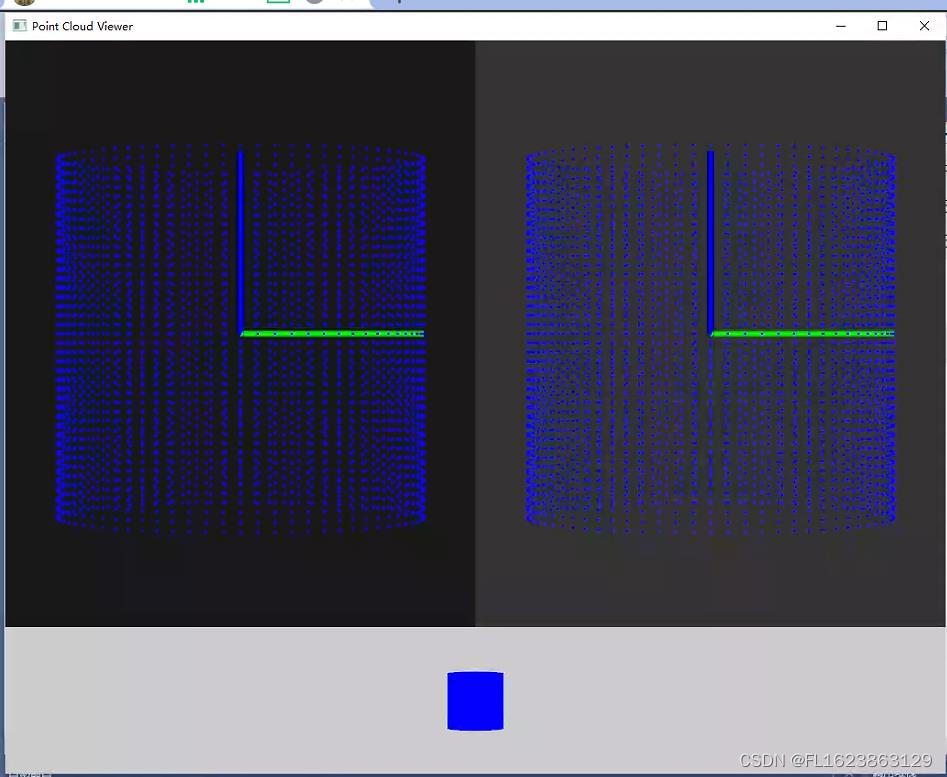
[C++][pcl]pcl安装后测试代码3
测试环境: vs2019 pcl1.12.1 代码: #include<iostream> #include <thread>#include <pcl/common/common_headers.h> #include <pcl/features/normal_3d.h> #include <pcl/io/pcd_io.h> #include <pcl/visualizatio…...

在WSL下使用makefile运行modelsim进行混合编译
modelsim的图像界面加载缓慢,实际上modelsim可以在纯命令行环境下仿真,使用-c参数:vsim -c。可以在WSL下用makefile运行Windows下的modelsim: HDL_CODE . HDL_CODE ../../rtl/ MODELSIM_ROOT : /mnt/e/exe/modeltech64_10.4/win…...
idea 常用插件和常用快捷键 - 记录
idea 常用插件 记得下载插件完成后,点击 Apply 和 OK Alibaba Java Coding Guidelines 作用:使用该插件可以,自动提示相关的语法格式问题,格式参考 阿里巴巴代码规范 详情链接: 代码规范之Alibaba Java Coding G…...

IDEA报错:Plugin ‘org.springframework.boot:spring-boot-maven-plugin:‘ not found
问题: 使用IDEA新建spring boot项目,报错如下: Plugin org.springframework.boot:spring-boot-maven-plugin: not found解决办法: 1.在本地maven仓库中找到spring-boot-maven-plugin的版本号 2.在pom.xml文件中添加对应的版本…...

Seraphine:5大核心技术构建的智能英雄联盟战绩查询与决策系统
Seraphine:5大核心技术构建的智能英雄联盟战绩查询与决策系统 【免费下载链接】Seraphine 英雄联盟战绩查询工具 项目地址: https://gitcode.com/gh_mirrors/se/Seraphine Seraphine是一款基于Python和PyQt5开发的高效智能开源英雄联盟战绩查询工具ÿ…...

编写程序统计职场上下级沟通频率,工作执行效果数据,搭建高效沟通模式,减少指令传达偏差工作失误。
构建一个职场上下级沟通频率与工作执行效果分析的商务智能示例项目,去营销化、中立化,仅用于学习与工程实践参考。一、实际应用场景描述在任何组织中,上下级沟通质量直接决定执行效率:- 上级布置任务 → 下级理解并执行 → 反馈结…...

高校站群建设方案:站群模式VS单站建设,核心优势详解
在高校信息化建设中,"官网站群改造"正逐渐取代传统的"单站建设"模式,成为主流选择。要理解这一趋势,首先要明白高校网站建设面临的现实困境。高校传统单站建设的痛点过去,高校各学院、职能部门往往各自为政&a…...

Arduino与FastLED库驱动WS2812B实现彩虹闪烁可穿戴灯光系统
1. 项目概述:用代码点亮创意的可穿戴灯光几年前,我第一次尝试把LED灯带缝进一件卫衣的帽子里,初衷很简单,就是想在做夜跑时更醒目一些。但当那些WS2812B灯珠第一次随着音乐节奏亮起彩虹般流动的色彩时,我知道我打开了一…...

【NotebookLM企业级权限治理白皮书】:为什么87%的AI协作项目在上线30天内遭遇越权访问?
更多请点击: https://intelliparadigm.com 第一章:NotebookLM企业级权限治理的底层逻辑 NotebookLM 的企业级权限治理并非简单叠加 RBAC(基于角色的访问控制),而是构建在「数据主权可追溯、策略执行零信任、上下文感知…...

Golang怎么实现HTTP请求取消_Golang如何用context取消正在进行的HTTP请求【实战】
HTTP客户端默认不取消请求是设计选择,需显式通过context.Context传递取消信号;必须用NewRequestWithContext、禁用Client.Timeout、确保Transport组件响应同一ctx。为什么 http.Client 默认不取消请求?Go 的 http.Client 本身不自动响应外部中…...

基于NXP i.MX6的智能电子后视镜方案:硬件选型、软件架构与车规级实践
1. 项目概述与核心价值 在汽车智能化浪潮中,驾驶安全始终是首要课题。传统的光学后视镜存在固有的物理盲区,尤其是在车辆侧方和侧后方,这些盲区是变道、转弯时发生剐蹭甚至碰撞事故的主要诱因。作为一名在嵌入式车载系统领域摸爬滚打了十多年…...

ARM SMMU-700内存管理单元原理与优化实践
1. MMU-700 SMMU架构概述与典型应用场景内存管理单元(MMU)是现代计算机系统中不可或缺的核心组件,负责处理虚拟地址到物理地址的转换。在ARM架构中,系统级内存管理单元(SMMU)扮演着更为关键的角色ÿ…...

别再死磕EfficientNetV1了!V2的Fused-MBConv模块和渐进式学习,让你的模型又快又好
EfficientNetV2实战指南:如何用Fused-MBConv和渐进式学习打造高效图像分类模型 当你在深夜盯着训练进度条缓慢爬升时,是否想过那些被浪费的GPU小时正在吞噬你的研发预算?EfficientNetV2的出现彻底改变了这个局面——我们的测试显示࿰…...

GEO优化实操框架:GEO优化的正确姿势是“带着答案去找客户”
如果你是B2B企业的老板或市场负责人,你一定听过这句话: “我们网上曝光是不少,但来的询盘都不对——问价格的比问方案的还多,还有不少是学生做调研的。” 这不是你一个人遇到的问题。这是传统SEO和竞价广告的天然缺陷——你只能“…...