python通过tkinter制作词云图工具
一、基本功能
1.采取上传文本文档(仅支持.txt格式)的方式统计词频
2.背景图形样式可选择已经设定好的,也可选择本地上传的(支持.png .jpg .jpeg格式)
3.本地上传的图片需要进行抠图处理,并将抠图结果保存到本地
4.背景图形颜色可通过调节RGB值和十六进制颜色值的方式进行设置
5.绘制好的词云图可供预览,并且可保存到本地
二、python程序
import re
import io
import jieba
import rembg
import numpy as np
import pandas as pd
import tkinter as tk
from tkinter.filedialog import *
from tkinter.ttk import *
from PIL import Image
from wordcloud import WordCloud
from wordcloud import ImageColorGenerator
from matplotlib import pyplot as plt
from matplotlib import patches as mp
from matplotlib.path import Path
from matplotlib.backends.backend_tkagg import FigureCanvasTkAggdef openfile():global file_path, path1file_path = askopenfilename(title='打开文本文档:', filetypes=[('Text Files', '*.txt')])path1.set(file_path)print(path1.get())return path1def openbackground():global background_path, path2background_path = askopenfilename(title='打开图片文件:', filetypes=[('Picture Files', '*.png *.jpg *.jpeg')])path2.set(background_path)print(path2.get())return path2def input_own_bg():button_bg.config(state=tk.NORMAL)def input_basic_graphic_bg():button_bg.config(state=tk.DISABLED)def input_rgb():combobox_r.config(state=tk.NORMAL)combobox_g.config(state=tk.NORMAL)combobox_b.config(state=tk.NORMAL)entry3.config(state=tk.DISABLED)def input_hex():combobox_r.config(state=tk.DISABLED)combobox_g.config(state=tk.DISABLED)combobox_b.config(state=tk.DISABLED)entry3.config(state=tk.NORMAL)def background():if choice_color.get() == 1:hex_r = hex(r.get())[2:].upper()hex_g = hex(g.get())[2:].upper()hex_b = hex(b.get())[2:].upper()hex_r0 = hex_r.zfill(2)hex_g0 = hex_g.zfill(2)hex_b0 = hex_b.zfill(2)hexcolor = '#' + hex_r0 + hex_g0 + hex_b0else:hexcolor = '#' + hex_color.get()plt.close(fig=None)fig_bg = plt.figure(figsize=(5, 5))ax = fig_bg.add_subplot(111, facecolor='white')if choice_shape.get() == 1:  # 心形t = np.arange(-3, 3, 0.1)x = 18 * np.power(np.sin(t), 3)y = 16 * np.cos(t) - 4 * np.cos(2 * t) - 3 * np.cos(3 * t) - np.cos(4 * t)shape = plt.fill(x, y, hexcolor)[0]ax.add_patch(shape)plt.axis('equal')plt.axis('off')elif choice_shape.get() == 2:  # 矩形shape = mp.Rectangle(xy=(0.1, 0.2), width=0.8, height=0.6, color=hexcolor)ax.add_patch(shape)plt.axis('off')elif choice_shape.get() == 3:  # 正方形shape = mp.Rectangle(xy=(0, 0), width=1, height=1, color=hexcolor)ax.add_patch(shape)plt.axis('off')elif choice_shape.get() == 4:  # 圆形shape = mp.Circle(xy=(0.5, 0.5), radius=0.5, alpha=0.8, color=hexcolor)ax.add_patch(shape)plt.axis('off')elif choice_shape.get() == 5:  # 五角星verts = []for i in [0, 3, 1, 4, 2, 0]:verts.append((np.sin(2 * np.pi / 5 * i), np.cos(2 * np.pi / 5 * i)))codes = [Path.MOVETO, Path.LINETO, Path.LINETO, Path.LINETO, Path.LINETO, Path.CLOSEPOLY]path = Path(verts, codes)shape = mp.PathPatch(path, facecolor=hexcolor, lw=0, alpha=1)ax.add_patch(shape)plt.axis('equal')plt.axis('off')else:  # 自导入return background_pathbuffer = io.BytesIO()# if hexcolor=='#FFFFFF':#     fig_bg.patch.set_facecolor('black')canvas_bg = fig_bg.canvascanvas_bg.print_png(buffer)data = buffer.getvalue()buffer.write(data)plt.close(fig=None)return bufferdef check(event):if path1.get() and len(hex_color.get()) == 6:button_draw.config(state=tk.NORMAL, fg='green')else:button_draw.config(state=tk.DISABLED, fg='red')def check_hex(hex_input):hex_characters = '0123456789abcdefABCDEF'if len(hex_input) <= 6 and all(char in hex_characters for char in hex_input):return Trueelse:return Falsedef wordcloud():global button_savetext = pd.read_csv(file_path, index_col=0, encoding='utf-8', sep='\t')text2 = str(text)text3 = re.sub("[a-zA-Z0-9'!""#$%&\'()*+,-./:;<=>?@,。?★、…【】《》:?“”‘'![\\]^_`{|}~\s]+", "", text2)text4 = jieba.lcut(text3)text5 = ' '.join(text4)stop_words = set()content = [line.strip() for line in open('stopwords.txt', 'r', encoding='utf-8').readlines()]stop_words.update(content)font = r'C:\Windows\Fonts\simhei.ttf'img = Image.open(background())img_remove = rembg.remove(img, alpha_matting=True, bgcolor=(255, 255, 255, 1))img_remove.save('background_remove.png')MASK = np.array(img_remove)img_col = ImageColorGenerator(MASK)plt.close(fig=None)fig = plt.figure(figsize=(5, 2.5))plt.subplot(121)wordcloud = WordCloud(background_color='white', scale=2, max_words=500, max_font_size=50, min_font_size=1, font_path=font, stopwords=stop_words, mask=MASK, mode='RGB').generate_from_text(text5)plt.imshow(wordcloud.recolor(color_func=img_col), alpha=1)plt.axis('off')plt.subplot(122)plt.imshow(img)plt.axis('off')plt.subplots_adjust(top=1, bottom=0, right=1, left=0, hspace=0, wspace=0)plt.margins(0, 0)canvas = FigureCanvasTkAgg(figure=fig, master=windows)canvas.draw()canvas.get_tk_widget().grid(row=4, column=0, rowspan=1, columnspan=8, padx=0, pady=15)button_save = tk.Button(windows, text='保存词云图', command=show)button_save.grid(row=5, column=0, rowspan=1, columnspan=8)def show():plt.show()button_save.config(state=tk.DISABLED)if __name__ == '__main__':windows = tk.Tk()windows.geometry('550x450+500+200')windows.resizable(width=False, height=False)windows.title('词云图')windows.iconbitmap('image.ico')path1 = tk.StringVar()tk.Label(windows, text='文件路径:').grid(row=0, column=0, pady=5, padx=2)entry1 = tk.Entry(windows, textvariable=path1, width=50, state=tk.DISABLED)entry1.grid(row=0, column=1, rowspan=1, columnspan=6, pady=5)tk.Button(windows, text='打开文件', command=openfile, fg='green', width=9).grid(row=0, column=7, pady=5, padx=2)choice_shape = tk.IntVar()choice_shape.set(1)tk.Label(windows, text='图形样式:').grid(row=1, column=0, padx=2)button_bg = tk.Button(windows, text='打开文件', command=openbackground, fg='green', width=9, state=tk.DISABLED)button_bg.grid(row=1, column=7, padx=2)path2 = tk.StringVar()entry2 = tk.Entry(windows, textvariable=path2, width=50, state=tk.DISABLED)entry2.grid(row=1, column=1, rowspan=1, columnspan=6)tk.Radiobutton(windows, text='心形', value=1, variable=choice_shape, justify=tk.LEFT, command=input_basic_graphic_bg).grid(row=2, column=1)tk.Radiobutton(windows, text='矩形', value=2, variable=choice_shape, justify=tk.LEFT, command=input_basic_graphic_bg).grid(row=2, column=2)tk.Radiobutton(windows, text='正方形', value=3, variable=choice_shape, justify=tk.LEFT, command=input_basic_graphic_bg).grid(row=2, column=3)tk.Radiobutton(windows, text='圆形', value=4, variable=choice_shape, justify=tk.LEFT, command=input_basic_graphic_bg).grid(row=2, column=4)tk.Radiobutton(windows, text='五角星', value=5, variable=choice_shape, justify=tk.LEFT, command=input_basic_graphic_bg).grid(row=2, column=5)tk.Radiobutton(windows, text='自导入', value=6, variable=choice_shape, justify=tk.LEFT, command=input_own_bg).grid(row=2, column=6)choice_color = tk.IntVar()choice_color.set(1)tk.Label(windows, text='图形颜色:').grid(row=3, column=0, padx=5)tk.Radiobutton(windows, text='RGB:', value=1, variable=choice_color, justify=tk.LEFT, width=5, command=input_rgb, state=tk.NORMAL).grid(row=3, column=1)r = tk.IntVar()combobox_r = Combobox(windows, textvariable=r, width=3)combobox_r['value'] = tuple(range(256))combobox_r.set(0)combobox_r.grid(row=3, column=2)g = tk.IntVar()combobox_g = Combobox(windows, textvariable=g, width=3)combobox_g['value'] = tuple(range(256))combobox_g.set(0)combobox_g.grid(row=3, column=3)b = tk.IntVar()combobox_b = Combobox(windows, textvariable=b, width=3)combobox_b['value'] = tuple(range(256))combobox_b.set(0)combobox_b.grid(row=3, column=4)tk.Radiobutton(windows, text='十六进制:#', value=2, variable=choice_color, justify=tk.LEFT, width=8, command=input_hex).grid(row=3, column=5)hex_color = tk.StringVar()entry3 = tk.Entry(windows, textvariable=hex_color, validate='key', validatecommand=(windows.register(check_hex), '%P'), width=7, state=tk.DISABLED)hex_color.set('000000')entry3.grid(row=3, column=6)button_draw = tk.Button(windows, text='绘制词云图', command=wordcloud, fg='red', width=9, height=2, state=tk.DISABLED)button_draw.bind('<Motion>', check)button_draw.grid(row=2, column=7, rowspan=2, columnspan=1, padx=2)windows.mainloop()
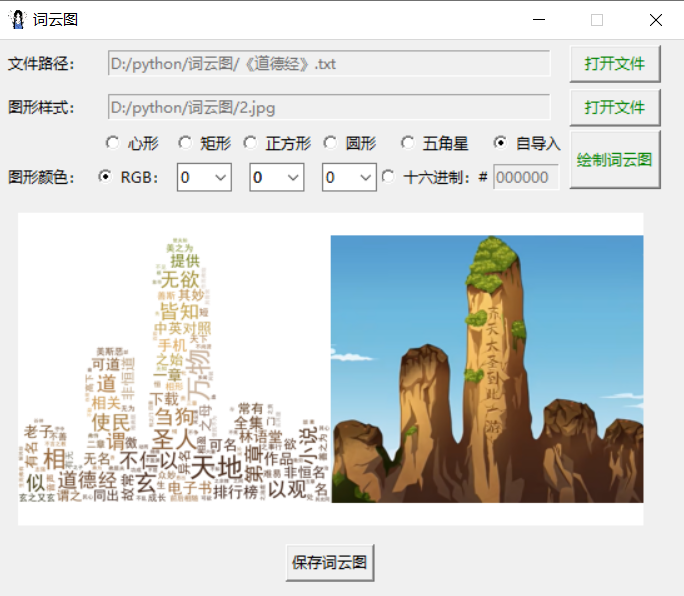
三、效果展示
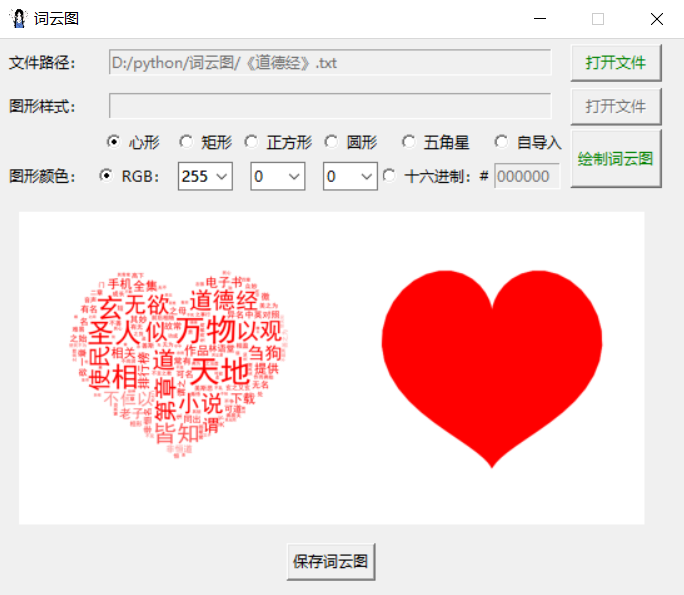
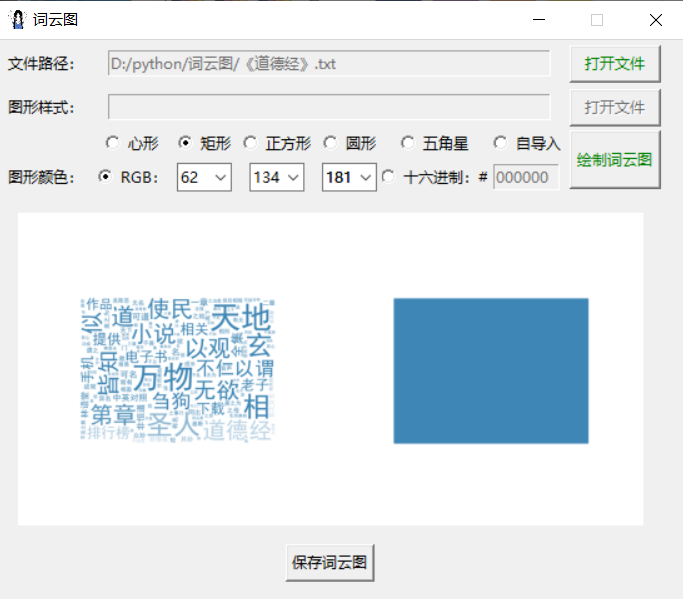
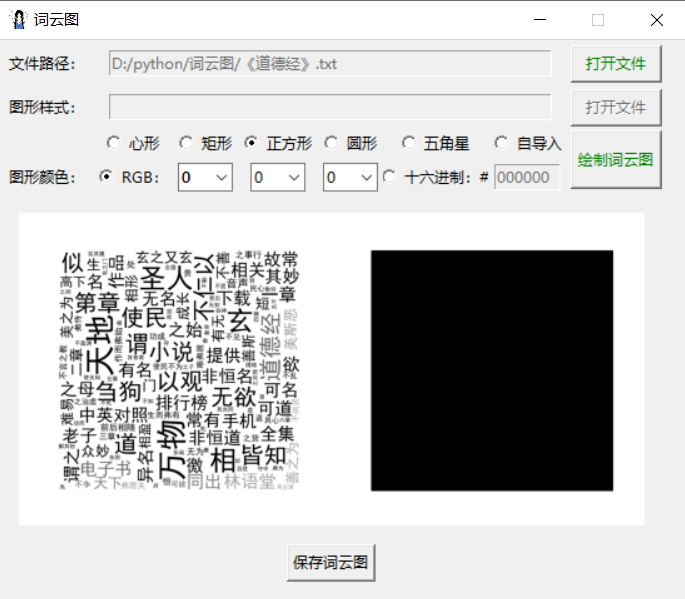
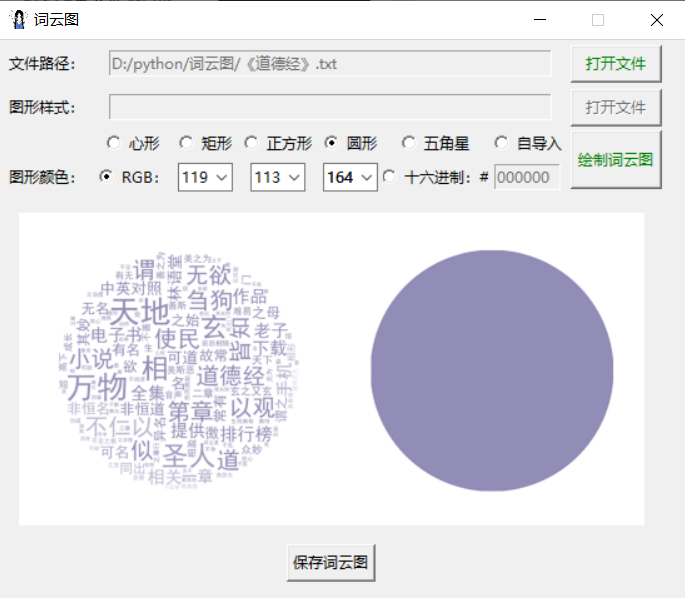
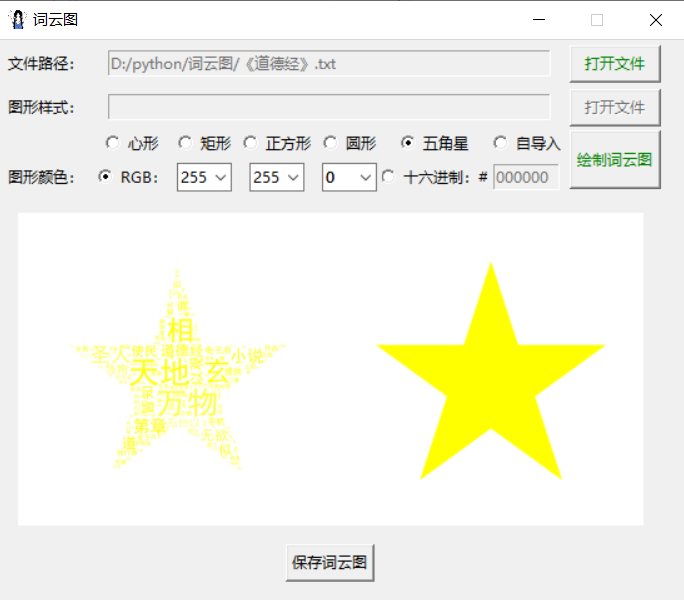
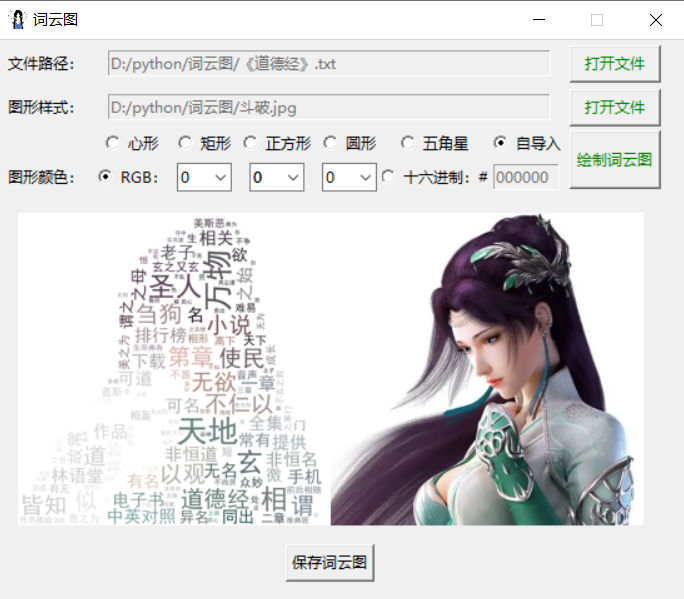
python通过tkinter制作词云图工具
四、源代码下载(含虚拟环境)
词云图工具下载链接:
https://url86.ctfile.com/f/32005086-932012628-2a8f6b?p=5422
访问密码:5422
相关文章:
python通过tkinter制作词云图工具
一、基本功能 1.采取上传文本文档(仅支持.txt格式)的方式统计词频 2.背景图形样式可选择已经设定好的,也可选择本地上传的(支持.png .jpg .jpeg格式) 3.本地上传的图片需要进行抠图处理,并将抠图结果保存…...

Java-钉钉订阅事件
文章目录 背景什么是钉钉订阅事件钉钉订阅事件的应用场景 整体思路查看钉钉文档 什么是钉钉回调钉钉回调具体实操创建自己的应用钉钉回调开发过程中遇到的问题 总结 背景 最近需要做一个业务:钉钉组织架构下添加人员之后,要对该人员的数据信息做一个处理…...
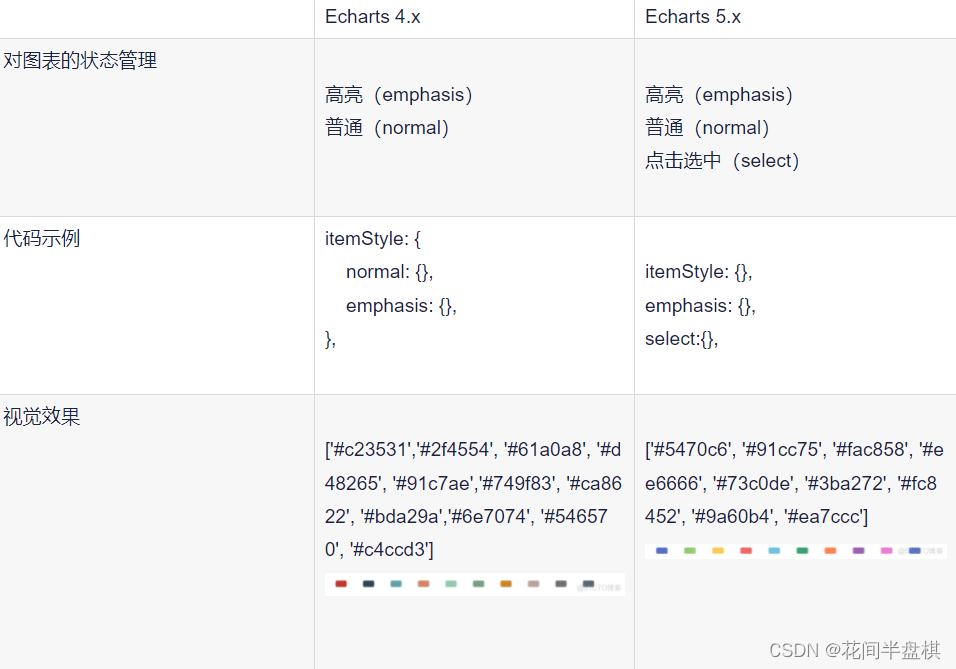
【DataV/echarts】vue中使用,修改地图和鼠标点击部分的背景色
引入:使用 DataV 引入地图的教程是参考别人的,主要介绍修改地图相关的样式; 引入地图 是参考别人的,这里自己再整理一遍,注意需要安装 5 版本以上的 echarts; DataV 网址:https://datav.aliyun.…...

系统设计类题目汇总四
25 十个异步入库任务,如何保证他们原子入库? 了解了你的问题背景,确保10个异步入库任务原子性执行(即要么全部成功,要么全部失败)有以下几种方法: 数据库事务: 如果所有的入库操作都是在同一个…...
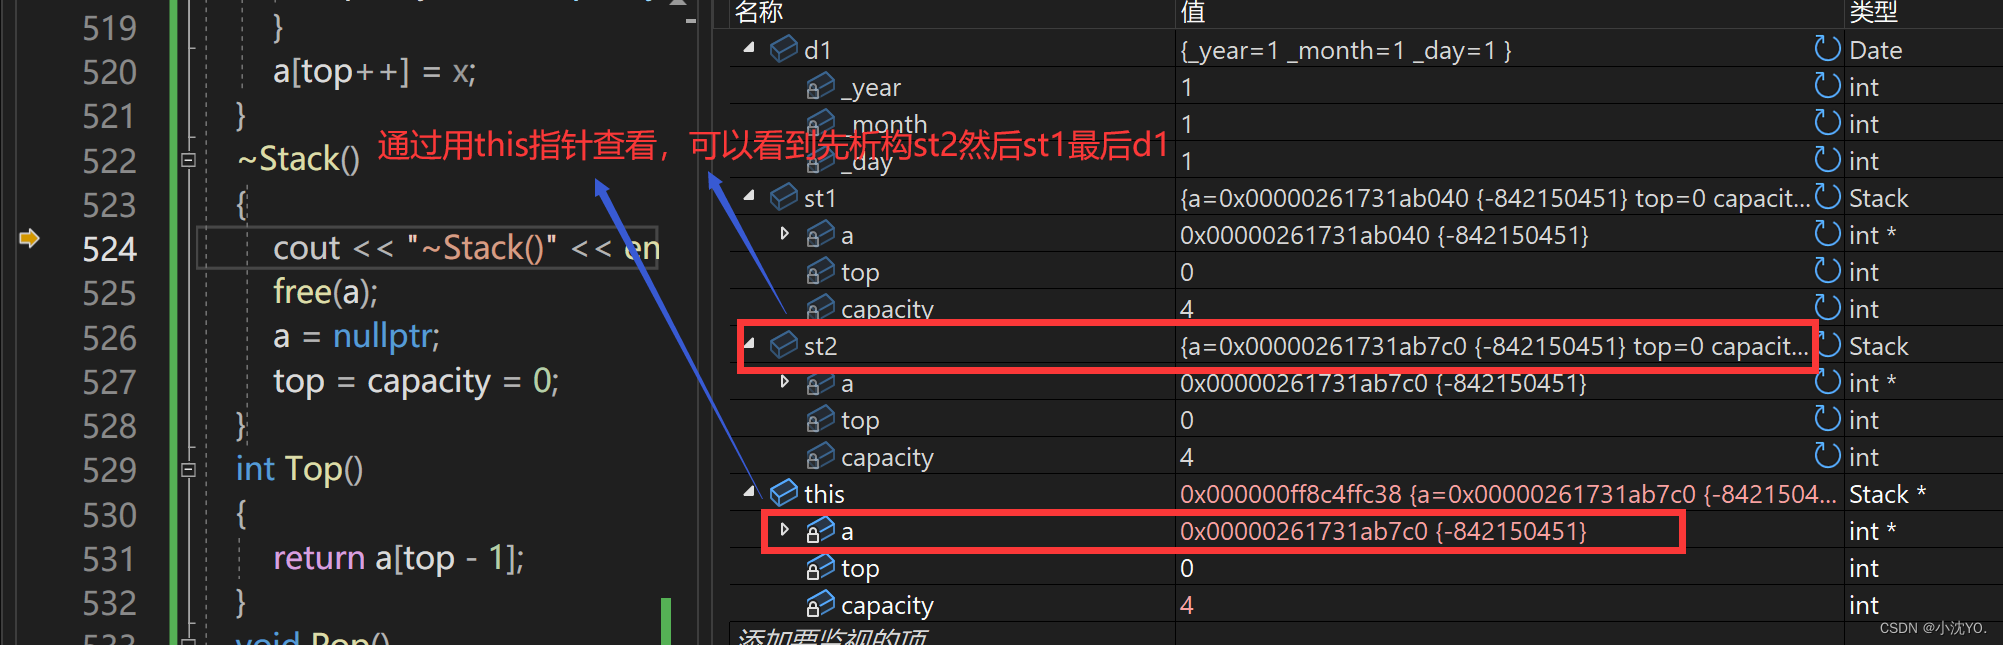
【C++心愿便利店】No.5---构造函数和析构函数
文章目录 前言一、类的6个默认成员函数二、构造函数三、析构函数 前言 👧个人主页:小沈YO. 😚小编介绍:欢迎来到我的乱七八糟小星球🌝 📋专栏:C 心愿便利店 🔑本章内容:类…...
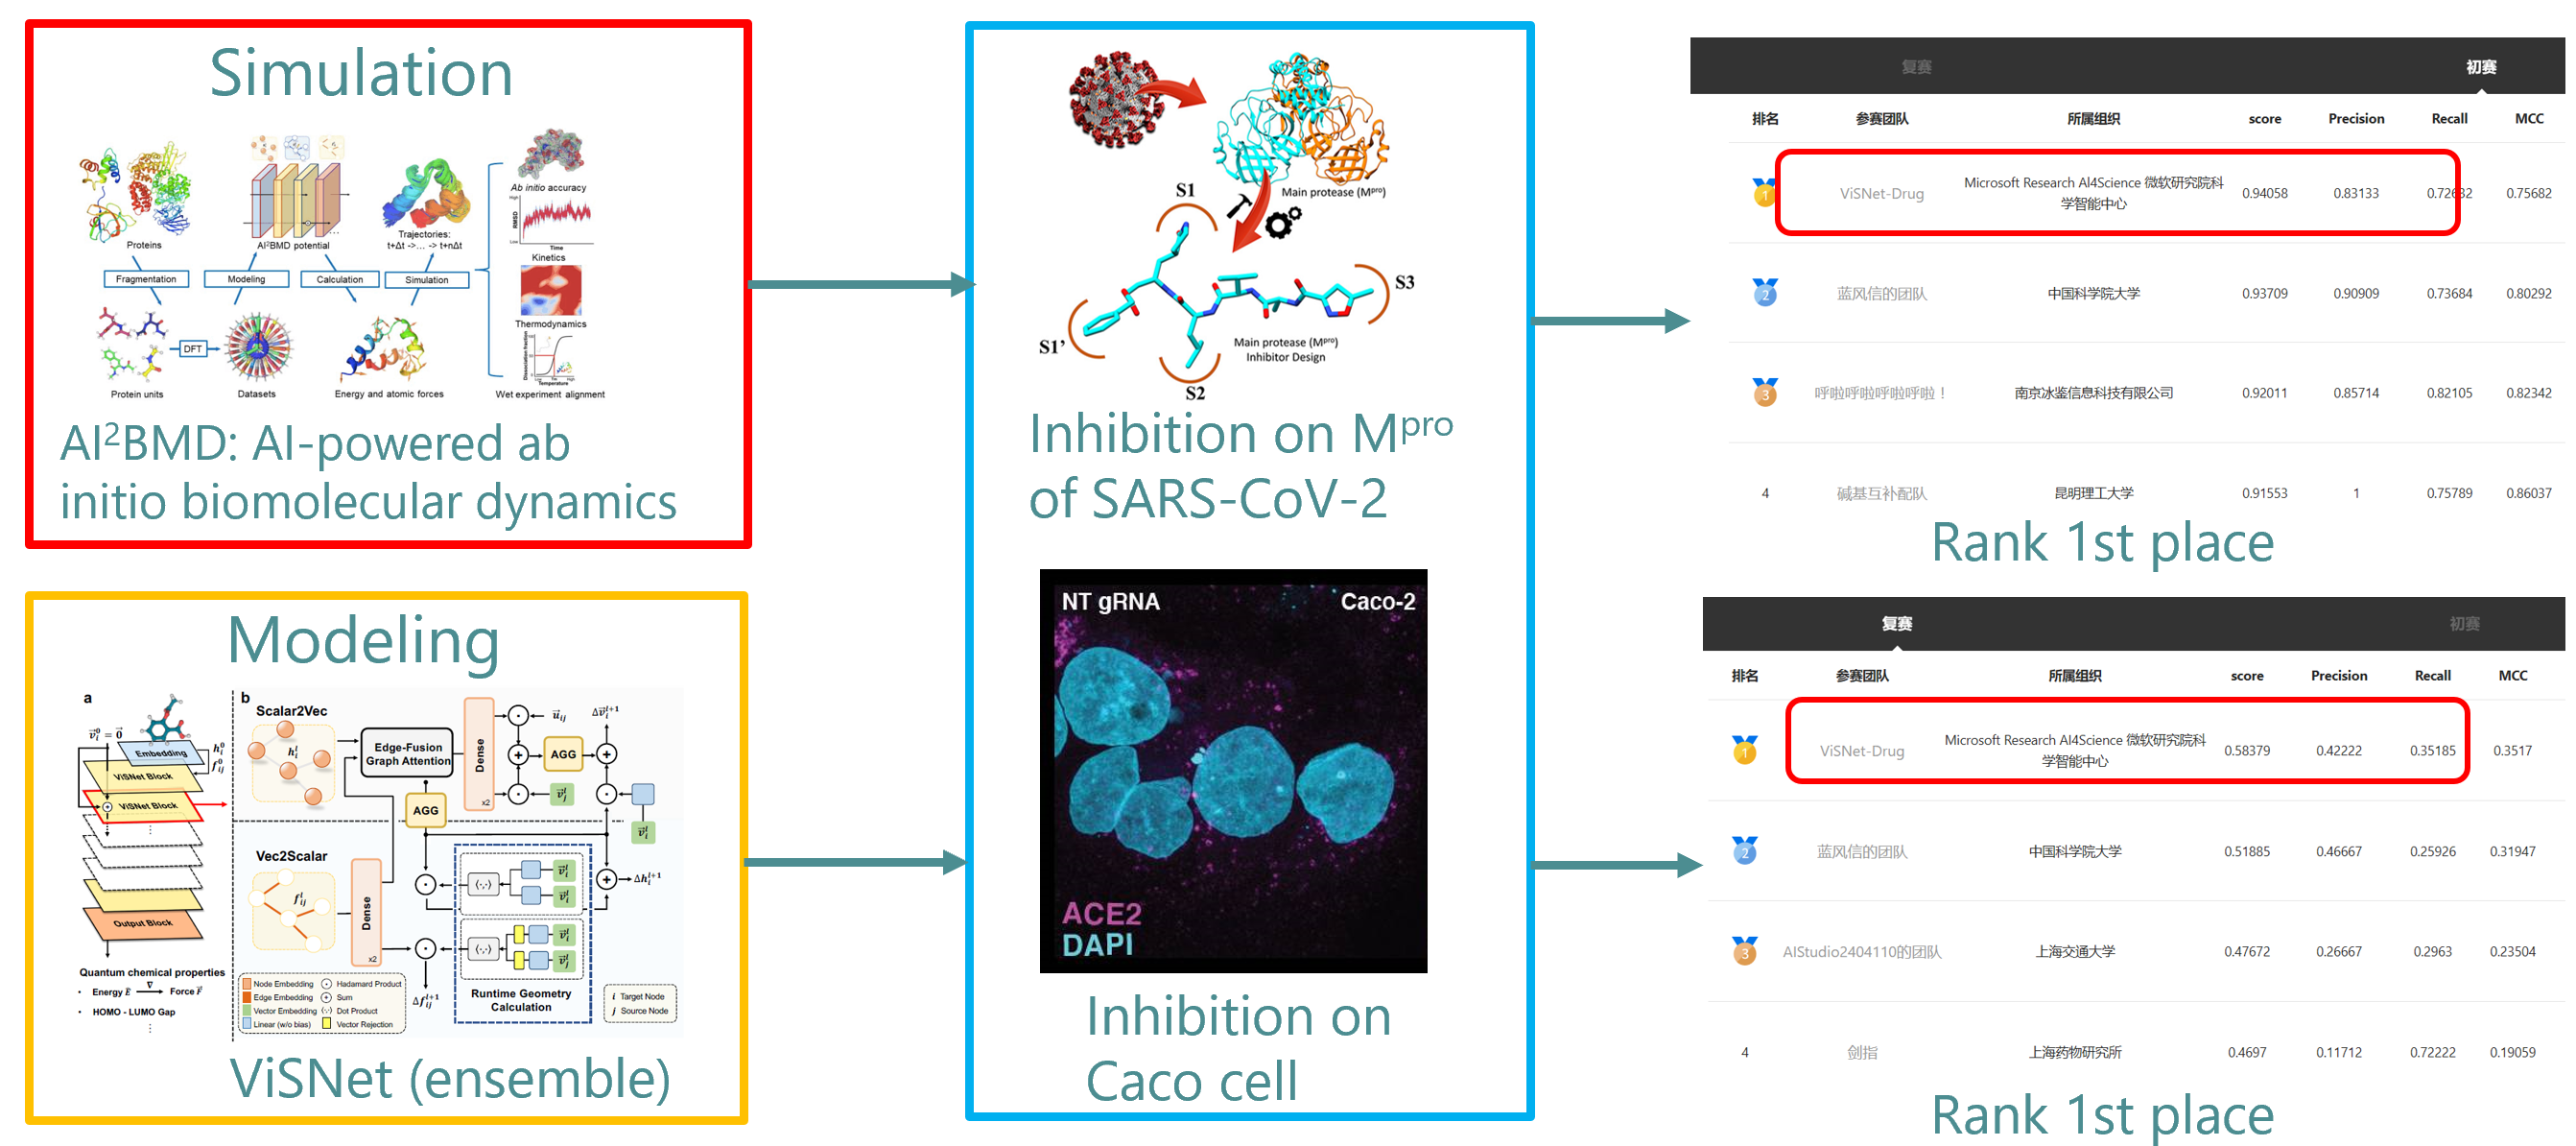
微软研究院团队获得首届AI药物研发算法大赛总冠军
编者按:AI 药物研发是人工智能未来应用的重要方向之一。自新冠病毒(SARS-CoV-2)首次爆发以来,新冠病毒的小分子药物研发备受关注,于近期举行的首届 AI 药物研发算法大赛便聚焦于此。在比赛中,来自微软研究院…...

redis实战篇之导入黑马点评项目
1. 搭建黑马点评项目 链接:https://pan.baidu.com/s/1Q0AAlb4jM-5Fc0H_RYUX-A?pwd6666 提取码:6666 1.1 首先,导入SQL文件 其中的表有: tb_user:用户表 tb_user_info:用户详情表 tb_shop:商户…...
【C++】详解红黑树并模拟实现
前言: 上篇文章我们一起学习了AVL树比模拟实现,我们发现AVL树成功地把时间复杂度降低到了O(logN)。但是同时我们不难发现一个问题,在构建AVL树中我们也付出了不小的代价,频繁的旋转操作导致效率变低。为了解决这个问题,…...

Matlab图像处理-最大类间方差阈值选择法(Otsu)
基本思想 最大类间方差阈值选择法又称为Otsu 算法,该算法是在灰度直方图的基础上用最小二乘法原理推导出来的,具有统计意义上的最佳分割阈值。它的基本原理是以最佳阈值将图像的灰度直方图分割成两部分,使两部分之间的方差取得最大值&#x…...
系列教程(三) 服务消费者(Feign))
Spring Cloud(Finchley版本)系列教程(三) 服务消费者(Feign)
Spring Cloud(Finchley版本)系列教程(三) 服务消费者(Feign) 一、Feign和OpenFeign的对比 Feign是Netflix公司写的,是SpringCloud组件中的一个轻量级RESTful的HTTP服务客户端,是SpringCloud中的第一代负载均衡客户端。OpenFeign是SpringCloud自己研发的,在Feign的基础上支…...

AI图片生成 discord 使用midjourney
参考: 不用找咒语了!Midjourney图生文功能特征解析,玩转Describe命令,快速搞定AI绘画_哔哩哔哩_bilibili 1 登录 discord 2 点发现 找 midjourney 3 创建 服务器 -> 亲自创建 4 选 仅供我和我的朋友使用 5 起个 服务器名字 6 加bot 由于…...
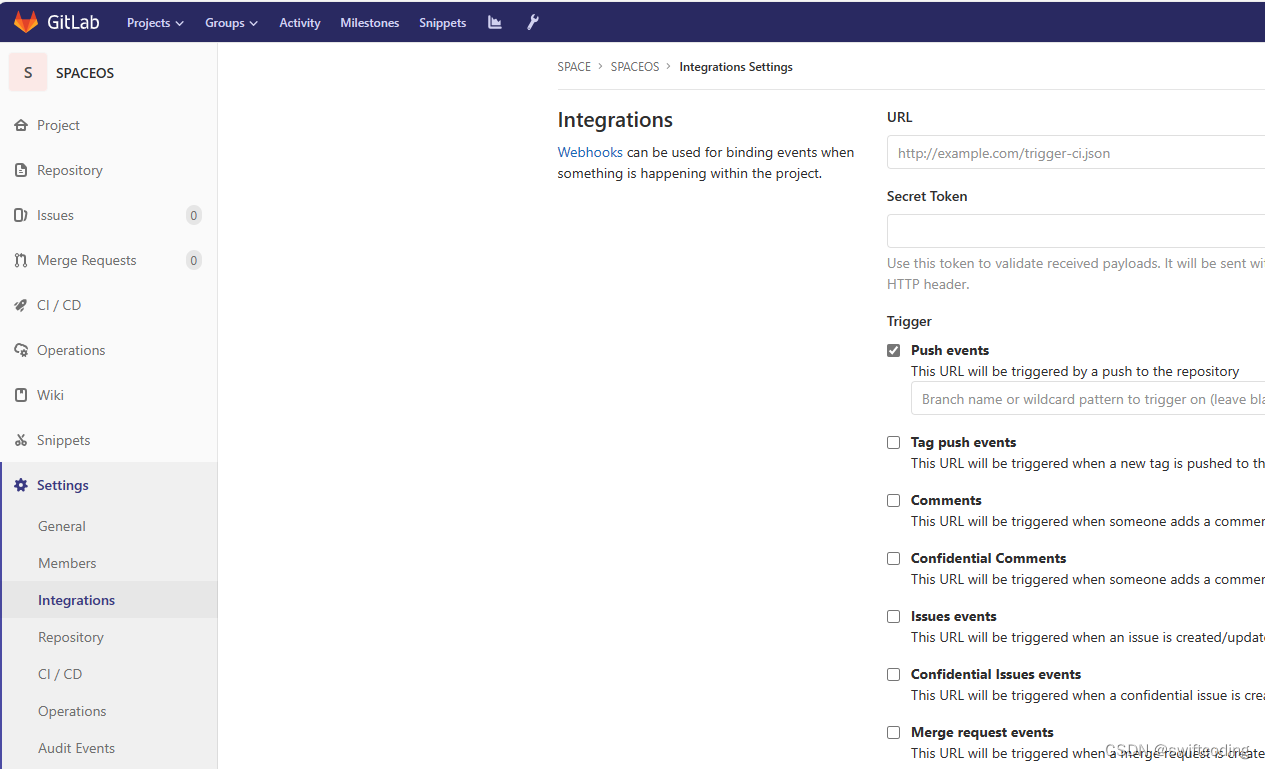
gitlab 点击Integrations出现500错误
背景:在新服务器重新搭建了gitlab,并导入原来gitlab的备份,在项目中点击点击Integrations出现500错误。 解决方法:1.进入新服务器,将 /etc/gitlab/gitlab-secrets.json重命名为 /etc/gitlab/gitlab-secrets.json.bak …...

【2023高教社杯】A题 定日镜场的优化设计 问题分析及数学模型
【2023高教社杯】A题 定日镜场的优化设计 问题分析及数学模型 1 题目 构建以新能源为主体的新型电力系统,是我国实现“碳达峰”“碳中和”目标的一项重要措施。塔式太阳能光热发电是一种低碳环保的新型清洁能源技术[1]。 定日镜是塔式太阳能光热发电站(…...
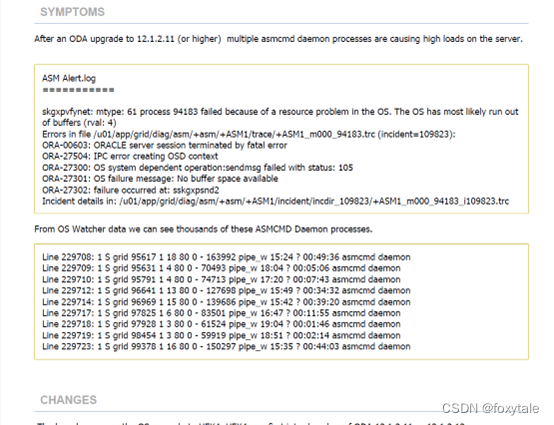
rac异常hang死故障分析(sskgxpsnd2)
x86虚拟化的平台麒麟系统的一套RAC。事件梳理20:24左右,发现一个节点hang死,关闭操作没有响应。关闭hang死节点,另一个节点也发生hang死,然后重启了另一个节点。 无效分析部分 检查gi的alert日志 有一个很大跨度的时间回退 再看…...
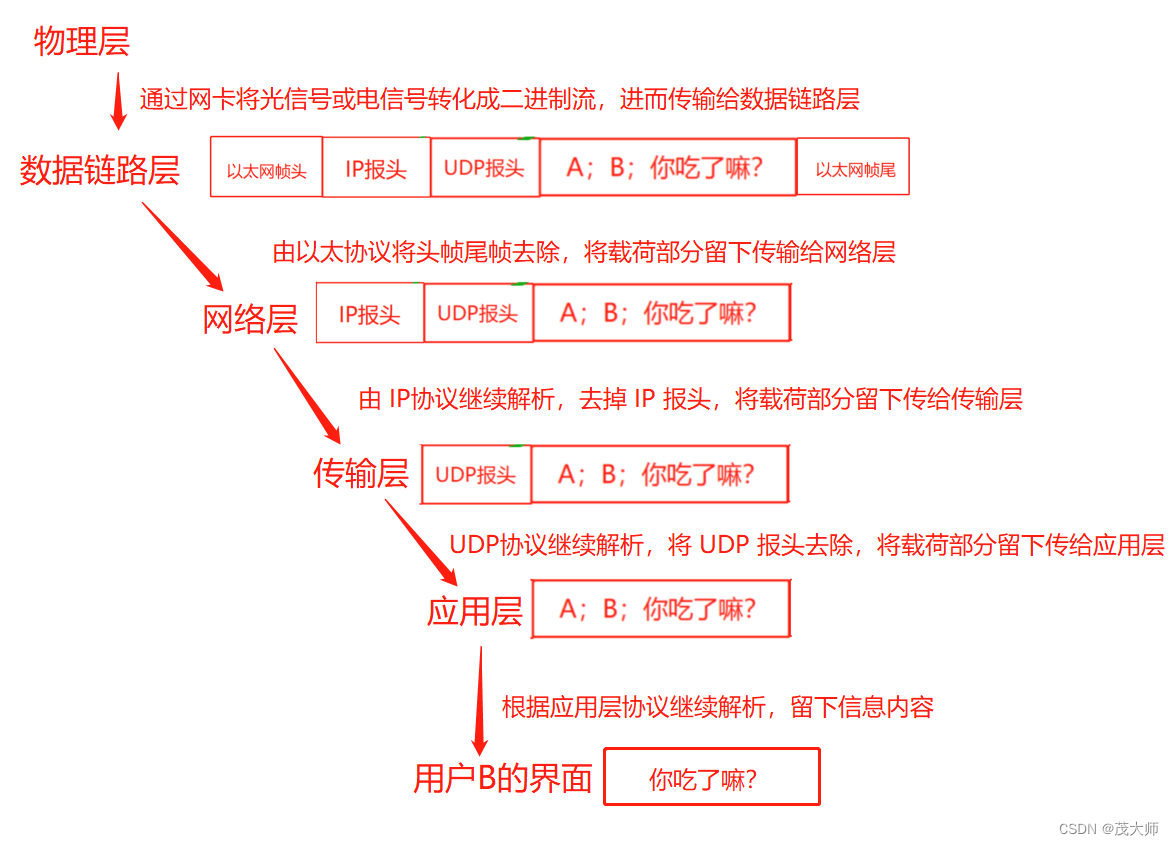
2023.9.7 关于 TCP / IP 的基本认知
目录 网络协议分层 TCP/IP 五层(四层)模型 应用层 传输层 网络层(互联网层) 数据链路层(网络接口层) 物理层 网络数据传输的基本流程 网络协议分层 为什么需要分层? 分层之后,…...

Python 图片处理
Step1 提取PDF中的图片,并另存 Step2 去除灰色纸张背景 import PyPDF2 from PIL import ImageEnhance,Image,ImageFilter import cv2 import numpy as np from skimage.filters import unsharp_mask from skimage.filters import gaussian from skimage.restora…...

信道估计 | 信道
文章目录 定义分类LS 估计MMSE估计LS vs MMSE 定义 从接收数据中将假定的某个信道模型参数估计出来的过程,如果信道是线性的,信道估计是对系统的冲击响应进行估计,需强调的是,信道估计是信道对输入信号影响的一种数学表示&#x…...
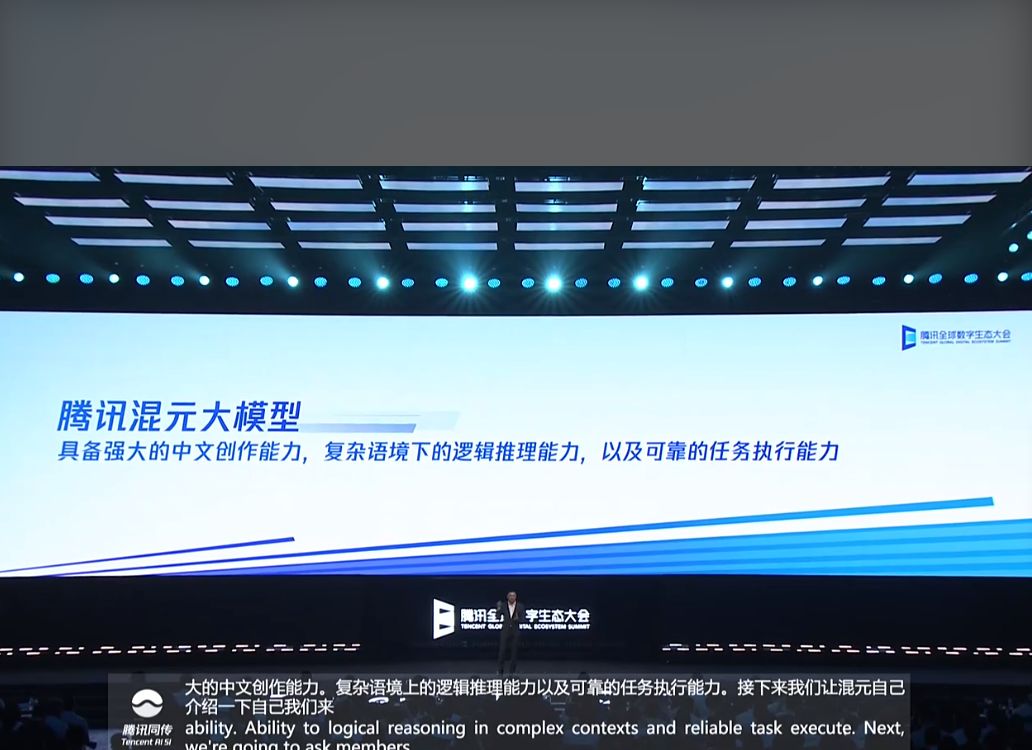
腾讯发布超千亿参数规模的混元大模型;深度学习与音乐分析与生成课程介绍
🦉 AI新闻 🚀 腾讯发布超千亿参数规模的混元大模型 摘要:腾讯在2023腾讯全球数字生态大会上发布混元大模型,该模型拥有超千亿的参数规模和超2万亿 tokens 的预训练语料。混元大模型将支持多轮对话、内容创作、逻辑推理、知识增强…...
[html]当网站搭建、维护的时候,你会放个什么界面?
效果图: <!DOCTYPE html> <html lang"en"> <head><meta charset"UTF-8"><title>网站建设中</title><style>/* 基础样式 */body, html {margin: 0;padding: 0;height: 100%;font-family: Arial, sa…...
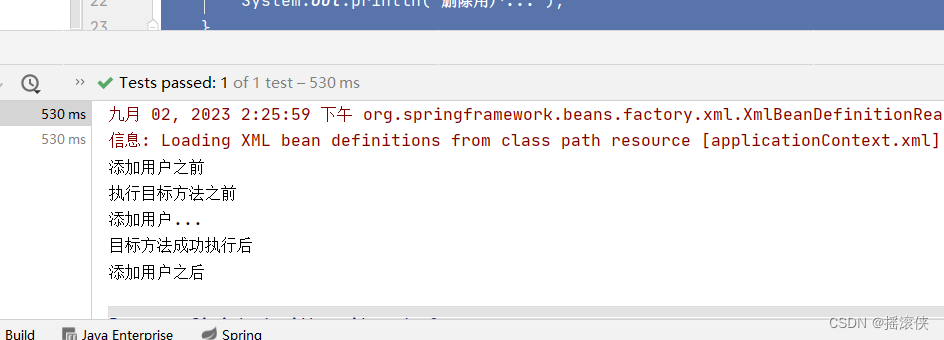
javaee spring aop 的五种通知方式
spring配置文件 <?xml version"1.0" encoding"UTF-8"?> <beans xmlns"http://www.springframework.org/schema/beans"xmlns:xsi"http://www.w3.org/2001/XMLSchema-instance" xmlns:aop"http://www.springframework.…...
 ViewEngine 深入解析与应用实例)
ASP.NET MVC 1.0 (五) ViewEngine 深入解析与应用实例
一.摘要 本文讲解ViewEngine的作用, 并且深入解析了实现ViewEngine相关的所有接口和类, 最后演示了如何开发一个自定义的ViewEngine. 本系列文章已经全部更新为ASP.NET MVC 1.0版本.希望大家多多支持! 二.承上启下 首先注意: 我会将大家在MVC之前一直使用的ASP.NET页面编程模…...

别再为UI动画发愁了!用Spine+Unity 2021制作丝滑2D动画的保姆级流程
SpineUnity 2021:打造专业级2D UI动画的完整实战指南 在独立游戏开发领域,UI动画的质量往往决定着玩家的第一印象。那些流畅的按钮反馈、生动的界面过渡,不仅提升了产品质感,更直接影响着用户的留存率。然而对于资源有限的中小团队…...

终极指南:如何快速构建响应式React网格布局
终极指南:如何快速构建响应式React网格布局 【免费下载链接】react-grid-layout A draggable and resizable grid layout with responsive breakpoints, for React. 项目地址: https://gitcode.com/gh_mirrors/re/react-grid-layout React网格布局࿰…...

水墨江南模型效果对比:不同参数下的笔触与渲染风格
水墨江南模型效果对比:不同参数下的笔触与渲染风格 最近在尝试用AI生成水墨画,发现一个挺有意思的现象:同一个“水墨江南”模型,用不同的参数设置,画出来的效果天差地别。有时候是寥寥几笔的写意小品,有时…...

从MATLAB验证到FPGA上板:双频信号叠加的完整开发闭环实战
从MATLAB验证到FPGA上板:双频信号叠加的完整开发闭环实战 在数字信号处理领域,实现双频信号的精确叠加是一个常见但极具挑战性的任务。无论是通信系统中的载波调制,还是音频处理中的音效合成,都需要工程师能够准确地在硬件层面实现…...

AI辅助开发新体验:描述需求即可让快马AI生成智能浏览器下载插件
今天想和大家分享一个用AI辅助开发浏览器插件的实战经验。最近在InsCode(快马)平台上尝试开发了一个智能下载插件,整个过程让我深刻体会到AI如何改变传统开发流程。 需求分析 这个插件的核心目标是让下载变得更智能。传统下载工具需要我们手动选择保存位置ÿ…...

Whisper语音识别镜像快速部署:5分钟搭建多语言客服转写服务
Whisper语音识别镜像快速部署:5分钟搭建多语言客服转写服务 1. 引言:语音识别在客服场景的挑战 在全球化的商业环境中,客服中心面临着多语言支持的巨大挑战。传统语音识别系统往往需要为每种语言单独部署模型,不仅成本高昂&…...

从FamNet到通用计数:小样本学习如何让AI“数”遍万物
1. 小样本计数的革命:从专用工具到通用能力 记得我第一次接触物体计数任务时,用的还是专门针对人群计数的模型。当时为了统计商场人流量,不得不专门训练一个模型。后来遇到统计停车场的需求,又要重新收集数据训练新模型。这种&quo…...

PHP PhantomJS 安装与使用指南
PHP PhantomJS 安装与使用指南 【免费下载链接】php-phantomjs Execute PhantomJS commands through PHP 项目地址: https://gitcode.com/gh_mirrors/ph/php-phantomjs 1. 项目目录结构及介绍 在安装jonnnnyw/php-phantomjs库后,您将得到一个基本的目录结构…...

Carsim与Matlab Simulink联合仿真四轮电动汽车转向容错控制模型
Carsim与matlab/simulink联合仿真,线控转向,四轮电动汽车转向失效容错控制模型,提供参考文献 线控转向系统(Steer-by-Wire)在四轮独立驱动电动汽车中的应用越来越火,但转向失效问题始终是悬在工程师头上的…...