k8s集群的简单搭建
K8S简单集群搭建
前提条件
- windos11电脑,内存16g以上
- 安装vmware虚拟机软件
- 安装三个centos7虚拟机,分配硬盘40g,内存4g,CPU4核心
- 网络均采用NAT模式(新建虚拟机默认的模式)
centos7镜像下载:https://mirrors.tuna.tsinghua.edu.cn/centos/7/isos/x86_64/CentOS-7-x86_64-Everything-2207-02.iso
我电脑上三个centos7虚拟机均采用最小化安装,IP如下:
| 名称 | IP地址 |
|---|---|
| k8s-master1 | 192.169.94.132 |
| k8s-node1 | 192.168.94.133 |
| k8s-node2 | 192.168.94.134 |
其中硬盘分配:
- /boot 1024M
- swap 2048M
- / 37G
系统准备
如下命令,没有特殊说明,则在三个节点上都要执行一次
关闭防火墙
systemctl stop firewalld
systemctl disable firewalld
关闭selinux
sed -i 's/enforcing/disabled/' /etc/selinux/config  # 永久
setenforce 0  # 临时
关闭swap
swapoff -a  # 临时
sed -ri 's/.*swap.*/#&/' /etc/fstab    # 永久
设置主机名
-
在master虚拟机上执行
hostnamectl set-hostname k8s-master1 -
在node1虚拟机上执行
hostnamectl set-hostname k8s-node1 -
在node2虚拟机上执行
hostnamectl set-hostname k8s-node2
添加hosts
在master虚拟机上执行
cat >> /etc/hosts << EOF
192.168.94.132 k8s-master1
192.168.94.133 k8s-node1
192.168.94.134 k8s-node2
EOF
将桥接的IPv4流量传递到iptables的链
cat > /etc/sysctl.d/k8s.conf << EOF
net.bridge.bridge-nf-call-ip6tables = 1
net.bridge.bridge-nf-call-iptables = 1
EOF
生效:
sysctl --system
时间同步
yum install ntpdate -y
ntpdate time.windows.com
可能的问题
-
无法使用
ifconfig命令需要安装net-tools:
yum install net-tools
k8s安装
k8s的默认容器运行时(CRI)为docker,因此要先安装docker
docker安装
wget https://mirrors.aliyun.com/docker-ce/linux/centos/docker-ce.repo -O /etc/yum.repos.d/docker-ce.repoyum -y install docker-ce-18.06.1.ce-3.el7systemctl enable docker && systemctl start docker
验证docker是否安装好:
docker --version
如果下方出现了docker的版本,则说明安装没问题。
设置docker的镜像拉取地址:
cat > /etc/docker/daemon.json << EOF
{"registry-mirrors": ["https://b9pmyelo.mirror.aliyuncs.com"]
}
EOF
kubeadm/kubelet/kubectl的安装
设置k8s的软件源
$ cat > /etc/yum.repos.d/kubernetes.repo << EOF
[kubernetes]
name=Kubernetes
baseurl=https://mirrors.aliyun.com/kubernetes/yum/repos/kubernetes-el7-x86_64
enabled=1
gpgcheck=0
repo_gpgcheck=0
gpgkey=https://mirrors.aliyun.com/kubernetes/yum/doc/yum-key.gpg
EOF
安装
注意:最好是指定版本,因为坑已踩过
$ yum install -y kubelet-1.18.0 kubeadm-1.18.0 kubectl-1.18.0
$ systemctl enable kubelet
初始化Master
在master1上执行集群的master节点初始化:(指定阿里云镜像仓库)
kubeadm init \--apiserver-advertise-address=192.168.94.132 \--image-repository registry.aliyuncs.com/google_containers \--kubernetes-version v1.18.0 \--service-cidr=10.96.0.0/12 \--pod-network-cidr=10.244.0.0/16
执行这句话之后,控制台输出如下:
[root@localhost ~]# kubeadm init \
>   --apiserver-advertise-address=192.168.94.132 \
>   --image-repository registry.aliyuncs.com/google_containers \
>   --kubernetes-version v1.18.0 \
>   --service-cidr=10.96.0.0/12 \
>   --pod-network-cidr=10.244.0.0/16
W1004 11:44:59.317714   70492 configset.go:202] WARNING: kubeadm cannot validate component configs for API groups [kubelet.config.k8s.io kubeproxy.config.k8s.io]
[init] Using Kubernetes version: v1.18.0
[preflight] Running pre-flight checks[WARNING IsDockerSystemdCheck]: detected "cgroupfs" as the Docker cgroup driver. The recommended driver is "systemd". Please follow the guide at https://kubernetes.io/docs/setup/cri/
[preflight] Pulling images required for setting up a Kubernetes cluster
[preflight] This might take a minute or two, depending on the speed of your internet connection
[preflight] You can also perform this action in beforehand using 'kubeadm config images pull'
[kubelet-start] Writing kubelet environment file with flags to file "/var/lib/kubelet/kubeadm-flags.env"
[kubelet-start] Writing kubelet configuration to file "/var/lib/kubelet/config.yaml"
[kubelet-start] Starting the kubelet
[certs] Using certificateDir folder "/etc/kubernetes/pki"
[certs] Generating "ca" certificate and key
[certs] Generating "apiserver" certificate and key
[certs] apiserver serving cert is signed for DNS names [k8s-master1 kubernetes kubernetes.default kubernetes.default.svc kubernetes.default.svc.cluster.local] and IPs [10.96.0.1 192.168.94.132]
[certs] Generating "apiserver-kubelet-client" certificate and key
[certs] Generating "front-proxy-ca" certificate and key
[certs] Generating "front-proxy-client" certificate and key
[certs] Generating "etcd/ca" certificate and key
[certs] Generating "etcd/server" certificate and key
[certs] etcd/server serving cert is signed for DNS names [k8s-master1 localhost] and IPs [192.168.94.132 127.0.0.1 ::1]
[certs] Generating "etcd/peer" certificate and key
[certs] etcd/peer serving cert is signed for DNS names [k8s-master1 localhost] and IPs [192.168.94.132 127.0.0.1 ::1]
[certs] Generating "etcd/healthcheck-client" certificate and key
[certs] Generating "apiserver-etcd-client" certificate and key
[certs] Generating "sa" key and public key
[kubeconfig] Using kubeconfig folder "/etc/kubernetes"
[kubeconfig] Writing "admin.conf" kubeconfig file
[kubeconfig] Writing "kubelet.conf" kubeconfig file
[kubeconfig] Writing "controller-manager.conf" kubeconfig file
[kubeconfig] Writing "scheduler.conf" kubeconfig file
[control-plane] Using manifest folder "/etc/kubernetes/manifests"
[control-plane] Creating static Pod manifest for "kube-apiserver"
[control-plane] Creating static Pod manifest for "kube-controller-manager"
W1004 11:45:44.142408   70492 manifests.go:225] the default kube-apiserver authorization-mode is "Node,RBAC"; using "Node,RBAC"
[control-plane] Creating static Pod manifest for "kube-scheduler"
W1004 11:45:44.143008   70492 manifests.go:225] the default kube-apiserver authorization-mode is "Node,RBAC"; using "Node,RBAC"
[etcd] Creating static Pod manifest for local etcd in "/etc/kubernetes/manifests"
[wait-control-plane] Waiting for the kubelet to boot up the control plane as static Pods from directory "/etc/kubernetes/manifests". This can take up to 4m0s
[apiclient] All control plane components are healthy after 14.503883 seconds
[upload-config] Storing the configuration used in ConfigMap "kubeadm-config" in the "kube-system" Namespace
[kubelet] Creating a ConfigMap "kubelet-config-1.18" in namespace kube-system with the configuration for the kubelets in the cluster
[upload-certs] Skipping phase. Please see --upload-certs
[mark-control-plane] Marking the node k8s-master1 as control-plane by adding the label "node-role.kubernetes.io/master=''"
[mark-control-plane] Marking the node k8s-master1 as control-plane by adding the taints [node-role.kubernetes.io/master:NoSchedule]
[bootstrap-token] Using token: t6p6ko.ok8x7h1era4pq66e
[bootstrap-token] Configuring bootstrap tokens, cluster-info ConfigMap, RBAC Roles
[bootstrap-token] configured RBAC rules to allow Node Bootstrap tokens to get nodes
[bootstrap-token] configured RBAC rules to allow Node Bootstrap tokens to post CSRs in order for nodes to get long term certificate credentials
[bootstrap-token] configured RBAC rules to allow the csrapprover controller automatically approve CSRs from a Node Bootstrap Token
[bootstrap-token] configured RBAC rules to allow certificate rotation for all node client certificates in the cluster
[bootstrap-token] Creating the "cluster-info" ConfigMap in the "kube-public" namespace
[kubelet-finalize] Updating "/etc/kubernetes/kubelet.conf" to point to a rotatable kubelet client certificate and key
[addons] Applied essential addon: CoreDNS
[addons] Applied essential addon: kube-proxyYour Kubernetes control-plane has initialized successfully!To start using your cluster, you need to run the following as a regular user:mkdir -p $HOME/.kubesudo cp -i /etc/kubernetes/admin.conf $HOME/.kube/configsudo chown $(id -u):$(id -g) $HOME/.kube/configYou should now deploy a pod network to the cluster.
Run "kubectl apply -f [podnetwork].yaml" with one of the options listed at:https://kubernetes.io/docs/concepts/cluster-administration/addons/Then you can join any number of worker nodes by running the following on each as root:kubeadm join 192.168.94.132:6443 --token t6p6ko.ok8x7h1era4pq66e \--discovery-token-ca-cert-hash sha256:c1b3fd084dac33494a27532c368c844181e6942c5c0d2007c2e683ac3ffea83a
注意最后这一句,这是初始化master几点生成的node加入时使用的token,默认为24小时,后面会用到
kubeadm join 192.168.94.132:6443 --token t6p6ko.ok8x7h1era4pq66e \--discovery-token-ca-cert-hash sha256:c1b3fd084dac33494a27532c368c844181e6942c5c0d2007c2e683ac3ffea83a
当token过期后,想其他的node节点加入,可通过如下命令重新创建token:
kubeadm token create --print-join-command
部署CNI网络插件
在master节点上执行(下载yml文件):
wget https://raw.githubusercontent.com/coreos/flannel/master/Documentation/kube-flannel.yml
在master节点上应用文件:
kubectl apply -f kube-fannel.yml
可能出现问题:拉取yml文件失败:
wget https://raw.githubusercontent.com/coreos/flannel/master/Documentation/kube-flannel.yml
--2023-10-04 11:50:46--  https://raw.githubusercontent.com/coreos/flannel/master/Documentation/kube-flannel.yml
正在解析主机 raw.githubusercontent.com (raw.githubusercontent.com)... ::1, 127.0.0.1
正在连接 raw.githubusercontent.com (raw.githubusercontent.com)|::1|:443... 失败:拒绝连接。
正在连接 raw.githubusercontent.com (raw.githubusercontent.com)|127.0.0.1|:443... 失败:拒绝连接。
解决办法:参考wget安装flannel插件-连接失败_Geray-zsg的博客-CSDN博客
在/etc/hosts 文件中添加如下解析:
199.232.68.133 raw.githubusercontent.com
再执行就可以正常下载了
k8s安装后测试
在k8s集群中创建一个pod:
kubectl create deployment nginx --image=nginx
暴露端口:
kubectl expose deployment nginx --port=80 --type=NodePort
查看暴露的服务:
[root@localhost etc]# kubectl get pod,svc
NAME                        READY   STATUS    RESTARTS   AGE
pod/nginx-f89759699-hnhl9   1/1     Running   0          59mNAME                 TYPE        CLUSTER-IP     EXTERNAL-IP   PORT(S)        AGE
service/kubernetes   ClusterIP   10.96.0.1      <none>        443/TCP        67m
service/nginx        NodePort    10.96.178.17   <none>        80:32377/TCP   46m
验证访问:
http://192.168.94.132:32377
http://192.168.94.133:32377
http://192.168.94.134:32377
如果都能访问,代表k8s集群部署正常
相关文章:

k8s集群的简单搭建
K8S简单集群搭建 前提条件 windos11电脑,内存16g以上安装vmware虚拟机软件安装三个centos7虚拟机,分配硬盘40g,内存4g,CPU4核心网络均采用NAT模式(新建虚拟机默认的模式) centos7镜像下载:https://mirrors.tuna.tsi…...

语义分割笔记(三):通过opencv对mask图片来画分割对象的外接椭圆
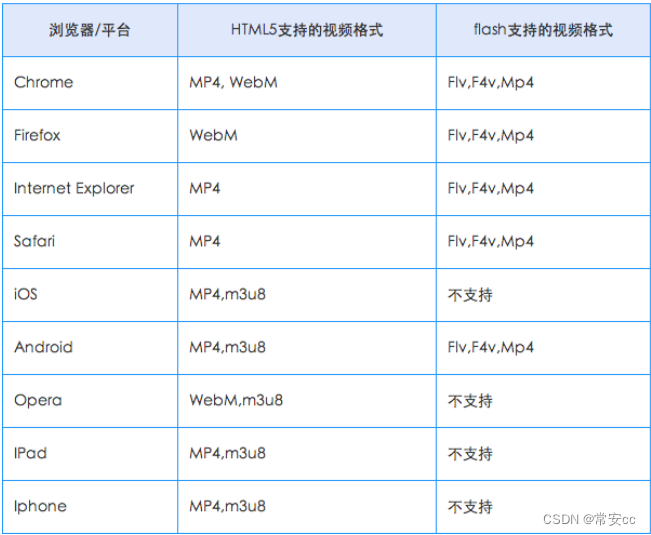
文章目录 mask图像介绍步骤代码 mask图像介绍 根据 mask 图像来画分割对象的外接椭圆是一种常见的图像分割任务。Mask 图像通常是一个二值图像,其中包含了感兴趣对象的像素。通常情况下,白色像素表示对象,黑色像素表示背景。 步骤 以下是一…...
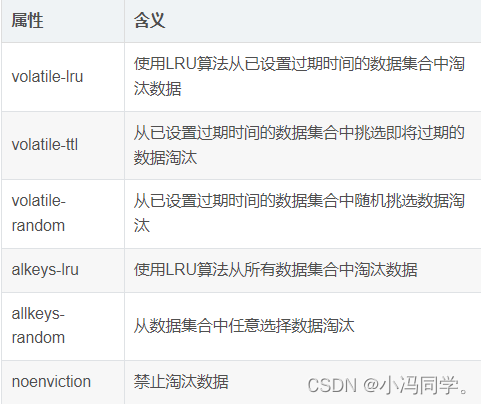
Nosql redis高可用和持久化
Nosql redis高可用和持久化 1、redis高可用2、redis持久化2.1redis持久化2.2Redis 持久化方法2.3RDB 持久化2.3.1RDB持久化工作原理2.3.2触发条件2.3.3其他自动触发机制2.3.4执行流程2.3.5启动时加载 2.4AOF 持久化2.4.1AOF持久化原理2.4.2开启AOF2.4.3执行流程2.4.4文件重写的…...
)
软件工程(1、2;5~7小测参考答案)
目录 软件工程第1、2章小测 需求工程第5-7章小测 软件工程第1、2章小测 一 单项选择题(12分) 1、下列关于软件开发的描述不正确的是()。(1分) 软件是独立于计算机硬件的一部分,但它又依赖于计算机硬件。 软件既是一种复杂的逻辑实体,又是一种工具。 软件的核心是程序,…...

服务器存储面临的两大难题
服务器存储面临的两大难题 服务器存储为核心的IT系统承受着业务发展带来的巨大压力: 随着业务发展,IT应用数量不断增多,当前数据中心的IT基础设施愈加复杂,服务器、存储等设备的数量不断增加。服务器与存储管理更加复杂:随着业务应用对IT基础…...

Blind Signature盲签名与fabric区块链结合的应用
盲签名的概念 首先由 David Chaum 于1982年提出,盲签名实现了签名者对发送者的消息进行签名,却不能知道签名者消息的具体内容。 相当于将文件放入信封,签名者在信封上对文件进行签名,而不知道具体的文件内容。 盲签名的实现方式…...
ueditor
下载文件 文档 UEditor入门部署 入门部署和体验 1.1 下载编辑器 到官网下载 UEditor 最新版:http://ueditor.baidu.com/website/download.html#ueditor 1.2 创建demo文件 解压下载的包,在解压后的目录创建 demo.html 文件,填入下面的…...
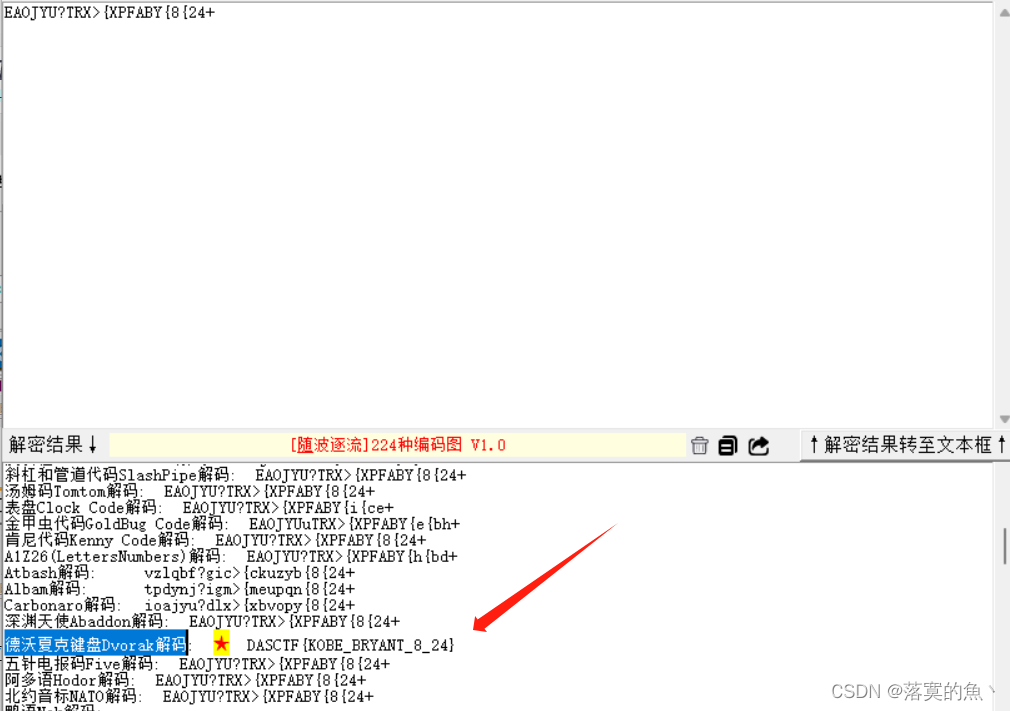
2023年台州市第三届网络安全技能大赛(MISC)—Black Mamba
前言:当时比赛没有做出来现在来复现一下 就当记录一下(这个思路没想到) Black Mamba: 一张图片 常规得分离,属性,LSB,盲水印等都尝试过 无果! 考点:异或解密࿰…...
这道面试题工作中经常碰到,但 99% 的程序员都答不上来
小时候都被问过一个脑筋急转弯,把大象放进冰箱有几个步骤?我们一开始都会抓耳挠腮,去想着该如何把大象塞进冰箱。最终揭晓的答案却根本不关心具体的操作方法,只是提供了 3 个步骤组成的流程,「把冰箱打开,把…...

Linux安装单机PostgreSQL15.4
1. 联网rpm安装 1.1.关闭服务 ## 关闭防火墙 systemctl stop firewalld.service systemctl disable firewalld.service ## 关闭 selinux cat /etc/selinux/config SELINUXdisabled1.2.安装yum源 yum install -y https://download.postgresql.org/pub/repos/yum/reporpms/EL-…...

最新 SpringCloud微服务技术栈实战教程 微服务保护 分布式事务 课后练习等
SpringCloud微服务技术栈实战教程,涵盖springcloud微服务架构Nacos配置中心分布式服务等 SpringCloud及SpringCloudAlibaba是目前最流行的微服务技术栈。但大家学习起来的感受就是组件很多,不知道该如何应用。这套《微服务实战课》从一个单体项目入手&am…...
Docker搭建MySQL8.0主从复制(一主一从)
0. 配置说明 宿主机使用的版本为19045的win10专业版,MySQL使用的是8.0,Docker容器使用Linux。 1. 安装Docker Desktop 略 修改Docker默认安装路径 安装包自己就提供了修改安装路径的功能,CMD中运行: “Docker Desktop Installe…...
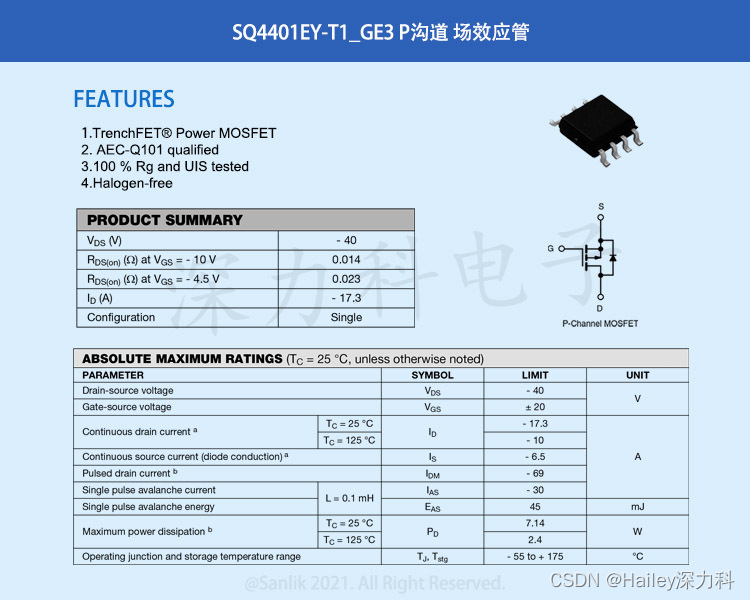
40V汽车级P沟道MOSFET SQ4401EY-T1_GE3 工作原理、特性参数、封装形式—节省PCB空间,更可靠
AEC-Q101车规认证是一种基于失效机制的分立半导体应用测试认证规范。它是为了确保在汽车领域使用的分立半导体器件能够在严苛的环境条件下正常运行和长期可靠性而制定的。AEC-Q101认证包括一系列的失效机制和应力测试,以验证器件在高温、湿度、振动等恶劣条件下的可…...

记录在搭建Jenkins时,所遇到的坑,以及解决方案
项目场景: 记录在搭建Jenkins时,所遇到的坑,以及解决方案.问题描述1 在使用Jenkins构建时,报错如下: cp: cannot stat /project/xx/xxxx/dist/: No such file or directory Build step Execute shell marked build as failure Finished: FAILURE解决方…...

二极管“天马行空”的作用,你知道吗?
网友:二极管怎么有这么多种类呀? 工程师:二极管可以说除了电阻电容外用的比较多的一种元器件,起到的作用多着呢 那么二极管都可以起到哪些作用呢: 一、防反作用,主回路中串联一个二极管,是利用…...

鼎盛合:adc芯片的五种结构
随着国内消费电子产品、通信、工业自动化、汽车电子等行业的快速发展,对ADC芯片的需求不断增加,国内ADC芯片近年也在持续稳定地发展着。ADC种类多样,可分为单通道ADC、多通道ADC、高速ADC、精密ADC和集成ADC等,主要应用于医疗仪器…...
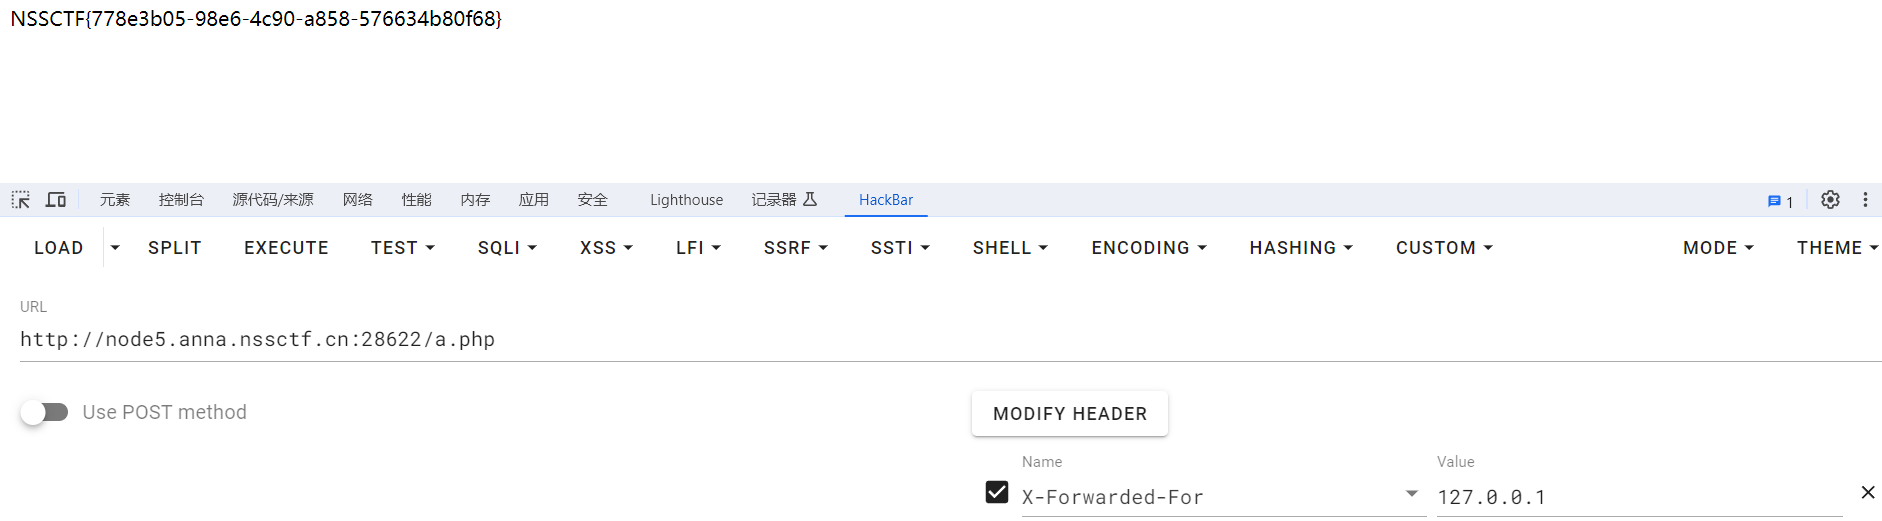
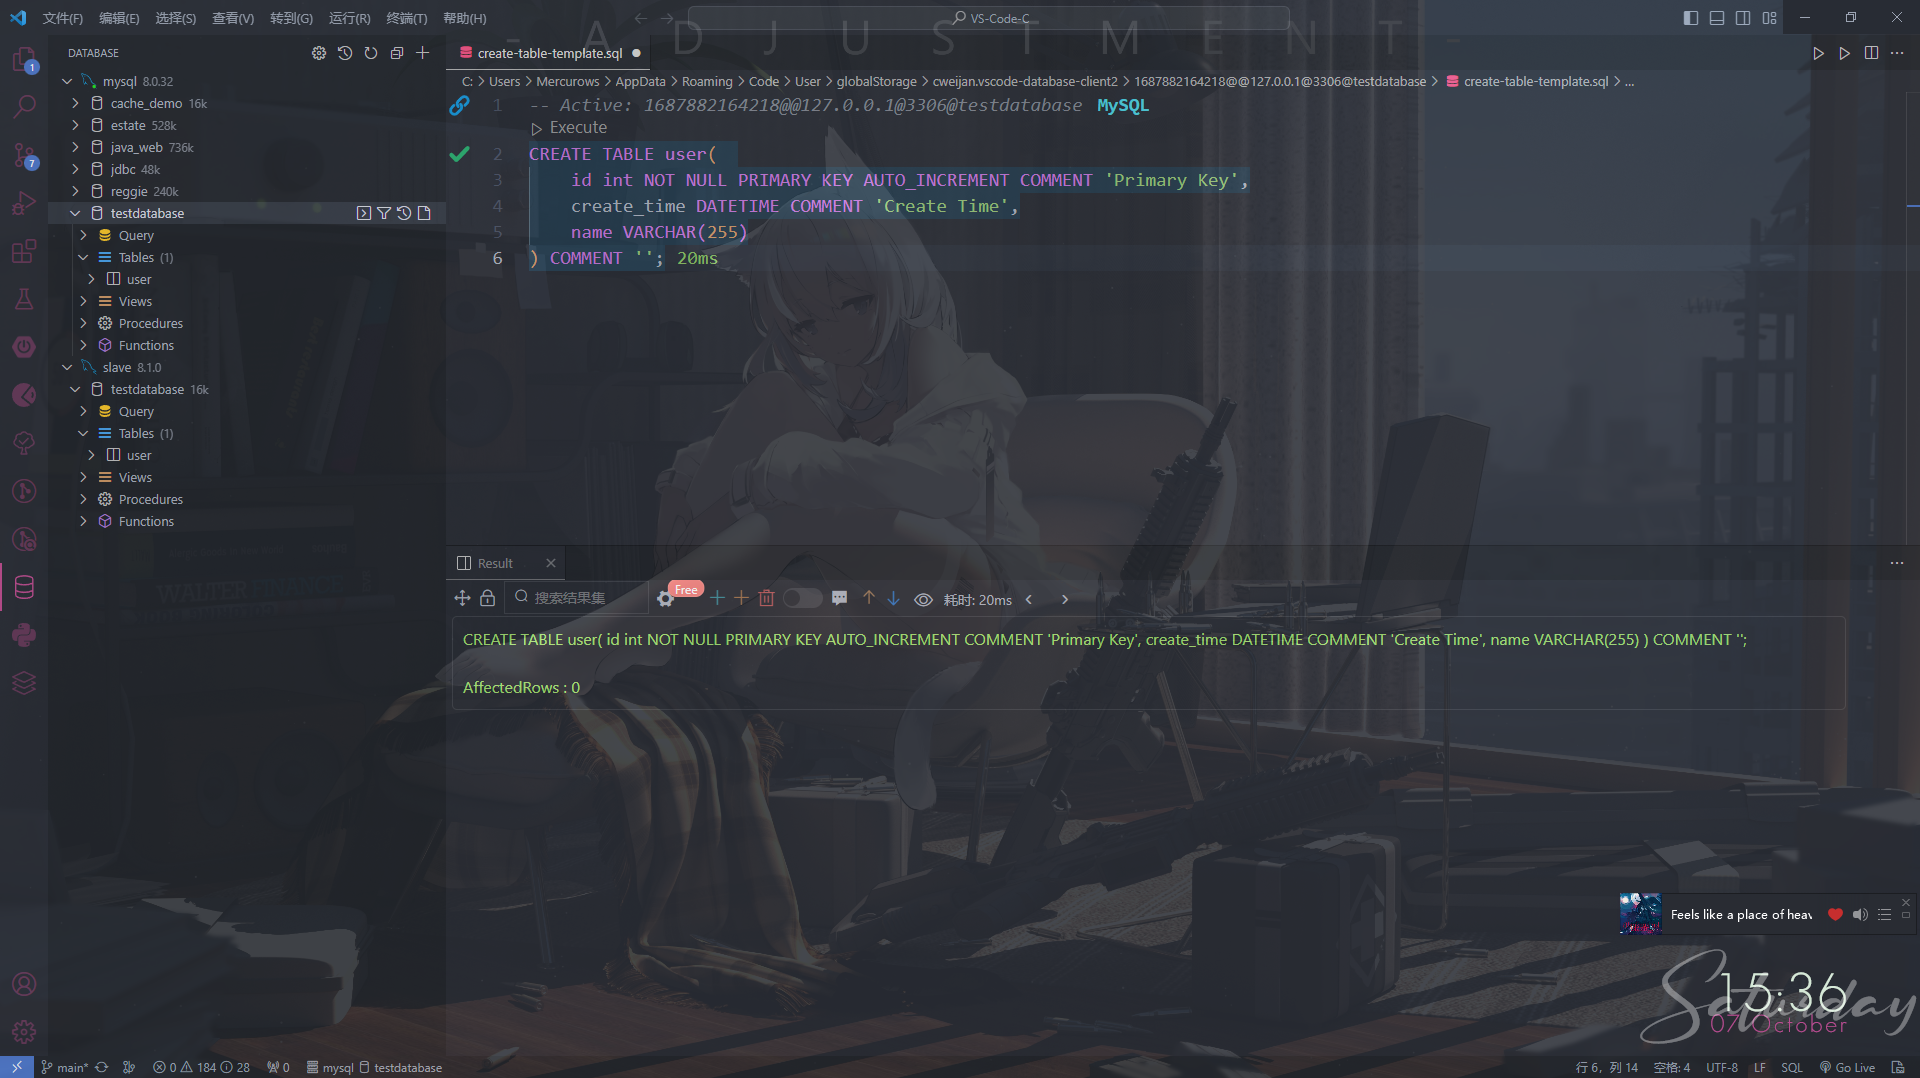
CTF 全讲解:[SWPUCTF 2021 新生赛]Do_you_know_http
文章目录 参考环境题目hello.php雾现User-Agent伪造 User-AgentHackBarHackBar 插件的获取修改请求头信息 雾散 a.php雾现本地回环地址与客户端 IP 相关的 HTTP 请求头X-Forwarded-For 雾散 参考 项目描述搜索引擎Bing、GoogleAI 大模型文心一言、通义千问、讯飞星火认知大模型…...
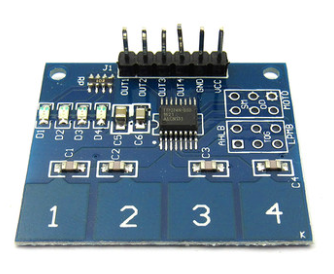
物联网AI MicroPython传感器学习 之 4路电容式触摸开关
学物联网,来万物简单IoT物联网!! 一、产品简介 板载TTP224电容式4键触摸感应IC,开发者通过触摸该电容模块获取对应的高低电平状态,可以广泛应用于灯光控制、玩具、家用电器等产品中。 引脚定义: VCC&…...

头戴式耳机什么牌子最好?头戴式耳机推荐性价比高
脖子上挎个头戴式作为随身装备,不仅给服装配饰添加了潮流感,还可以可以随时聆听音乐,随着广大消费者的生活水平不断提高,市面上的头戴式耳机越来越多。 选择头戴式耳机时无非就是听音质、看外观、舒适度等等,那么头戴…...
第 366 场周赛 LeetCode 周赛题解
A 分类求和并作差 模拟 class Solution { public:int differenceOfSums(int n, int m) {int res 0;for (int i 1; i < n; i)res i % m ! 0 ? i : -i;return res;} };B 最小处理时间 排序:设四个 p r o c e s s o r T i m e processorTime processorTime 的元…...

efinance:Python量化交易的免费金融数据终极解决方案
efinance:Python量化交易的免费金融数据终极解决方案 【免费下载链接】efinance efinance 是一个可以快速获取基金、股票、债券、期货数据的 Python 库,回测以及量化交易的好帮手!🚀🚀🚀 项目地址: https…...

机器人抓取仿真与数据分析:从PyBullet集成到抓取性能评估
1. 项目概述与核心价值最近在机器人控制与仿真领域,一个名为PyroMind-Dynamics/openclaw-tracer的项目引起了我的注意。乍一看这个标题,它像是一个典型的GitHub仓库名,由组织名“PyroMind-Dynamics”和项目名“openclaw-tracer”组成。作为一…...

通过 Python 快速将现有应用接入 Taotoken 的多模型服务
🚀 告别海外账号与网络限制!稳定直连全球优质大模型,限时半价接入中。 👉 点击领取海量免费额度 通过 Python 快速将现有应用接入 Taotoken 的多模型服务 如果你正在使用 OpenAI 官方的 Python SDK 开发应用,并且希望…...

OpenClaw爬虫框架Docker化实践:从环境封装到生产部署
1. 项目概述:当“OpenClaw”遇见Docker最近在折腾一个挺有意思的项目,叫“OpenClaw”。这名字听起来有点酷,对吧?它本质上是一个网络爬虫框架,但设计理念和常见的Scrapy、Puppeteer这些不太一样。OpenClaw更侧重于“规…...

NocoDB企业数据管理平台:如何用可视化数据库解决业务协作难题
NocoDB企业数据管理平台:如何用可视化数据库解决业务协作难题 【免费下载链接】nocodb 🔥 🔥 🔥 A Free & Self-hostable Airtable Alternative 项目地址: https://gitcode.com/GitHub_Trending/no/nocodb 在数字化转型…...
)
DeepSeek MMLU成绩暴涨11.2分的秘密武器:不是更大参数,而是这个被顶会论文雪藏2年的校准框架(附开源复现代码)
更多请点击: https://intelliparadigm.com 第一章:DeepSeek MMLU成绩暴涨11.2分的实证现象 近期,DeepSeek-R1 在大规模多任务语言理解(MMLU)基准测试中取得显著突破——其零样本准确率从 72.3% 提升至 83.5%ÿ…...

Taotoken官方折扣与活动价接入实践带来的成本节省感受
🚀 告别海外账号与网络限制!稳定直连全球优质大模型,限时半价接入中。 👉 点击领取海量免费额度 Taotoken官方折扣与活动价接入实践带来的成本节省感受 1. 背景与决策起点 作为个人开发者或小团队,在构建基于大模型的…...

Lightweight Charts:高性能金融图表库的架构哲学与技术实现
Lightweight Charts:高性能金融图表库的架构哲学与技术实现 【免费下载链接】lightweight-charts Performant financial charts built with HTML5 canvas 项目地址: https://gitcode.com/gh_mirrors/li/lightweight-charts 在金融数据可视化领域,…...

WindowResizer:终极免费的Windows窗口强制调整工具
WindowResizer:终极免费的Windows窗口强制调整工具 【免费下载链接】WindowResizer 一个可以强制调整应用程序窗口大小的工具 项目地址: https://gitcode.com/gh_mirrors/wi/WindowResizer 你是否遇到过那些固执的应用程序窗口,无论你怎么拖动都无…...
)
机器视觉 Vs 智能体视觉(29)
重磅预告:本专栏将独家连载新书《智能体视觉技术与应用》(系列丛书)部分精华内容,该书是世界首套系统阐述“因式智能体”视觉理论与实践的专著,特邀美国 TypeOne 公司首席科学家、斯坦福大学博士 Bohan 担任技术顾问。…...