Spring源码解析——IOC之bean 的初始化
正文
一个 bean 经历了 createBeanInstance() 被创建出来,然后又经过一番属性注入,依赖处理,历经千辛万苦,千锤百炼,终于有点儿 bean 实例的样子,能堪大任了,只需要经历最后一步就破茧成蝶了。这最后一步就是初始化,也就是 initializeBean(),所以这篇文章我们分析 doCreateBean() 中最后一步:初始化 bean。
我回到之前的doCreateBean方法中,如下
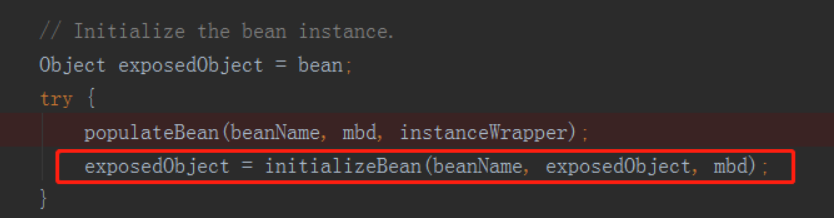
在populateBean方法下面有一个initializeBean(beanName, exposedObject, mbd)方法,这个就是用来执行用户设定的初始化操作。我们看下方法体:
最全面的Java面试网站
protected Object initializeBean(final String beanName, final Object bean, @Nullable RootBeanDefinition mbd) {if (System.getSecurityManager() != null) {AccessController.doPrivileged((PrivilegedAction<Object>) () -> {// 激活 Aware 方法invokeAwareMethods(beanName, bean);return null;}, getAccessControlContext());}else {// 对特殊的 bean 处理:Aware、BeanClassLoaderAware、BeanFactoryAwareinvokeAwareMethods(beanName, bean);}Object wrappedBean = bean;if (mbd == null || !mbd.isSynthetic()) {// 后处理器wrappedBean = applyBeanPostProcessorsBeforeInitialization(wrappedBean, beanName);}try {// 激活用户自定义的 init 方法invokeInitMethods(beanName, wrappedBean, mbd);}catch (Throwable ex) {throw new BeanCreationException((mbd != null ? mbd.getResourceDescription() : null),beanName, "Invocation of init method failed", ex);}if (mbd == null || !mbd.isSynthetic()) {// 后处理器wrappedBean = applyBeanPostProcessorsAfterInitialization(wrappedBean, beanName);}return wrappedBean;
}
初始化 bean 的方法其实就是三个步骤的处理,而这三个步骤主要还是根据用户设定的来进行初始化,这三个过程为:
- 激活 Aware 方法
- 后置处理器的应用
- 激活自定义的 init 方法
激Aware方法
我们先了解一下Aware方法的使用。Spring中提供了一些Aware接口,比如BeanFactoryAware,ApplicationContextAware,ResourceLoaderAware,ServletContextAware等,实现这些Aware接口的bean在被初始化后,可以取得一些相对应的资源,例如实现BeanFactoryAware的bean在初始化之后,Spring容器将会注入BeanFactory实例,而实现ApplicationContextAware的bean,在bean被初始化后,将会被注入ApplicationContext实例等。我们先通过示例方法了解下Aware的使用。
定义普通bean,如下代码:
public class HelloBean {public void say(){System.out.println("Hello");}
}
定义beanFactoryAware类型的bean
public class MyBeanAware implements BeanFactoryAware {private BeanFactory beanFactory;public void setBeanFactory(BeanFactory beanFactory) throws BeansException {this.beanFactory = beanFactory;}public void testAware(){//通过hello这个bean id从beanFactory获取实例  HelloBean hello = (HelloBean)beanFactory.getBean("hello");hello.say();}
}
分享一份大彬精心整理的大厂面试手册,包含计算机基础、Java基础、多线程、JVM、数据库、Redis、Spring、Mybatis、SpringMVC、SpringBoot、分布式、微服务、设计模式、架构、校招社招分享等高频面试题,非常实用,有小伙伴靠着这份手册拿过字节offer~
需要的小伙伴可以自行下载:
http://mp.weixin.qq.com/s?__biz=Mzg2OTY1NzY0MQ==&mid=2247485445&idx=1&sn=1c6e224b9bb3da457f5ee03894493dbc&chksm=ce98f543f9ef7c55325e3bf336607a370935a6c78dbb68cf86e59f5d68f4c51d175365a189f8#rd
进行测试
public class Test {public static void main(String[] args) {ApplicationContext ctx = new ClassPathXmlApplicationContext("applicationContext.xml");MyBeanAware test = (MyBeanAware)ctx.getBean("myBeanAware");test.testAware();}
}<?xml version="1.0" encoding="UTF-8" ?>
<beans xmlns="http://www.springframework.org/schema/beans"xmlns:xsi="http://www.w3.org/2001/XMLSchema-instance"xsi:schemaLocation="http://www.springframework.org/schema/beanshttp://www.springframework.org/schema/beans/spring-beans.xsd"><bean id="myBeanAware" class="com.dabin.spring.MyBeanAware"></bean><bean id="hello" class="com.dabin.spring.HelloBean"></bean>
</beans>
输出
Hello
上面的方法我们获取到Spring中BeanFactory,并且可以根据BeanFactory获取所有的bean,以及进行相关设置。还有其他Aware的使用都是大同小异,看一下Spring的实现方式:
private void invokeAwareMethods(final String beanName, final Object bean) {  if (bean instanceof Aware) {  if (bean instanceof BeanNameAware) {  ((BeanNameAware) bean).setBeanName(beanName);  }  if (bean instanceof BeanClassLoaderAware) {  ((BeanClassLoaderAware) bean).setBeanClassLoader(getBeanClassLoader());  }  if (bean instanceof BeanFactoryAware) {  ((BeanFactoryAware) bean).setBeanFactory(AbstractAutowireCapableBeanFactory.this);  }  }
}
处理器的应用
BeanPostPrecessor我们经常看到Spring中使用,这是Spring开放式架构的一个必不可少的亮点,给用户充足的权限去更改或者扩展Spring,而除了BeanPostProcessor外还有很多其他的PostProcessor,当然大部分都以此为基础,集成自BeanPostProcessor。BeanPostProcessor在调用用户自定义初始化方法前或者调用自定义初始化方法后分别会调用BeanPostProcessor的postProcessBeforeInitialization和postProcessAfterinitialization方法,使用户可以根据自己的业务需求就行相应的处理。
public Object applyBeanPostProcessorsBeforeInitialization(Object existingBean, String beanName)  throws BeansException {  Object result = existingBean;  for (BeanPostProcessor beanProcessor : getBeanPostProcessors()) {  result = beanProcessor.postProcessBeforeInitialization(result, beanName);  if (result == null) {  return result;  }  }  return result;
}public Object applyBeanPostProcessorsAfterInitialization(Object existingBean, String beanName)  throws BeansException {  Object result = existingBean;  for (BeanPostProcessor beanProcessor : getBeanPostProcessors()) {  result = beanProcessor.postProcessAfterInitialization(result, beanName);  if (result == null) {  return result;  }  }  return result;
}
激活自定义的init方法
客户定制的初始化方法除了我们熟知的使用配置init-method外,还有使自定义的bean实现InitializingBean接口,并在afterPropertiesSet中实现自己的初始化业务逻辑。
init-method与afterPropertiesSet都是在初始化bean时执行,执行顺序是afterPropertiesSet先执行,而init-method后执行。
在invokeInitMethods方法中就实现了这两个步骤的初始化调用。
protected void invokeInitMethods(String beanName, final Object bean, @Nullable RootBeanDefinition mbd)throws Throwable {// 是否实现 InitializingBean// 如果实现了 InitializingBean 接口,则只掉调用bean的 afterPropertiesSet()boolean isInitializingBean = (bean instanceof InitializingBean);if (isInitializingBean && (mbd == null || !mbd.isExternallyManagedInitMethod("afterPropertiesSet"))) {if (logger.isDebugEnabled()) {logger.debug("Invoking afterPropertiesSet() on bean with name '" + beanName + "'");}if (System.getSecurityManager() != null) {try {AccessController.doPrivileged((PrivilegedExceptionAction<Object>) () -> {((InitializingBean) bean).afterPropertiesSet();return null;}, getAccessControlContext());}catch (PrivilegedActionException pae) {throw pae.getException();}}else {// 直接调用 afterPropertiesSet()((InitializingBean) bean).afterPropertiesSet();}}if (mbd != null && bean.getClass() != NullBean.class) {// 判断是否指定了 init-method(),// 如果指定了 init-method(),则再调用制定的init-methodString initMethodName = mbd.getInitMethodName();if (StringUtils.hasLength(initMethodName) &&!(isInitializingBean && "afterPropertiesSet".equals(initMethodName)) &&!mbd.isExternallyManagedInitMethod(initMethodName)) {// 利用反射机制执行invokeCustomInitMethod(beanName, bean, mbd);}}
}
首先检测当前 bean 是否实现了 InitializingBean 接口,如果实现了则调用其 afterPropertiesSet(),然后再检查是否也指定了 init-method(),如果指定了则通过反射机制调用指定的 init-method()。
init-method()
public class InitializingBeanTest {private String name;public String getName() {return name;}public void setName(String name) {this.name = name;}public void setOtherName(){System.out.println("InitializingBeanTest setOtherName...");this.name = "dabin";}
}// 配置文件
<bean id="initializingBeanTest" class="com.dabin.spring.InitializingBeanTest"init-method="setOtherName"><property name="name" value="dabin123"/>
</bean>
执行结果:
dabin
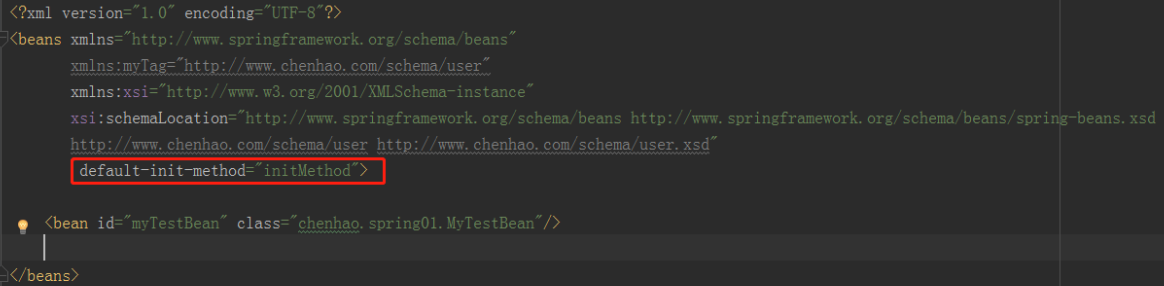
我们可以使用 <beans> 标签的 default-init-method 属性来统一指定初始化方法,这样就省了需要在每个 <bean> 标签中都设置 init-method 这样的繁琐工作了。比如在 default-init-method 规定所有初始化操作全部以 initBean() 命名。如下:
我们看看 invokeCustomInitMethod 方法:
protected void invokeCustomInitMethod(String beanName, final Object bean, RootBeanDefinition mbd)throws Throwable {String initMethodName = mbd.getInitMethodName();Assert.state(initMethodName != null, "No init method set");Method initMethod = (mbd.isNonPublicAccessAllowed() ?BeanUtils.findMethod(bean.getClass(), initMethodName) :ClassUtils.getMethodIfAvailable(bean.getClass(), initMethodName));if (initMethod == null) {if (mbd.isEnforceInitMethod()) {throw new BeanDefinitionValidationException("Could not find an init method named '" +initMethodName + "' on bean with name '" + beanName + "'");}else {if (logger.isTraceEnabled()) {logger.trace("No default init method named '" + initMethodName +"' found on bean with name '" + beanName + "'");}// Ignore non-existent default lifecycle methods.return;}}if (logger.isTraceEnabled()) {logger.trace("Invoking init method  '" + initMethodName + "' on bean with name '" + beanName + "'");}Method methodToInvoke = ClassUtils.getInterfaceMethodIfPossible(initMethod);if (System.getSecurityManager() != null) {AccessController.doPrivileged((PrivilegedAction<Object>) () -> {ReflectionUtils.makeAccessible(methodToInvoke);return null;});try {AccessController.doPrivileged((PrivilegedExceptionAction<Object>) () ->methodToInvoke.invoke(bean), getAccessControlContext());}catch (PrivilegedActionException pae) {InvocationTargetException ex = (InvocationTargetException) pae.getException();throw ex.getTargetException();}}else {try {ReflectionUtils.makeAccessible(initMethod);initMethod.invoke(bean);}catch (InvocationTargetException ex) {throw ex.getTargetException();}}
}
我们看出最后是使用反射的方式来执行初始化方法。
相关文章:
Spring源码解析——IOC之bean 的初始化
正文 一个 bean 经历了 createBeanInstance() 被创建出来,然后又经过一番属性注入,依赖处理,历经千辛万苦,千锤百炼,终于有点儿 bean 实例的样子,能堪大任了,只需要经历最后一步就破茧成蝶了。…...
)
互联网摸鱼日报(2023-10-07)
互联网摸鱼日报(2023-10-07) 36氪新闻 小米汽车将研发增程式电动车,产品已有规划;LG新能源和丰田汽车北美公司签署电动汽车电池供应协议|36氪新能源日报1005 详解企业数字化转型建设过程中所需的七种能力 电商平台,如何让丰收「…...
深入理解RBAC
RBAC是一种基于角色实现访问控制的权限管理机制,通过定义角色和权限、用户和角色、角色和角色之间的关系,实现多层次、细粒度、可复用的权限管理系统。原文: Role-based Access Control (RBAC) Model[1] Bernard HermantUnsplash Avery Pennarun写的&quo…...

uniapp微信小程序蓝牙连接与设备数据对接
蓝牙连接并通信方法封装大致步骤。 初始化蓝牙并搜索;获取并启用service服务;数据读取和监听设备返回数据 需要使用uniapp官方提供api: // 关闭蓝牙 uni.closeBluetoothAdapter({}) // 打开蓝牙 uni.openBluetoothAdapter({}) // 搜索附近…...

HBase 计划外启动 Major Compaction 的原因
HBase 的 Compaction 有两个线程池,一个是为 Minor Compaction 准备的, 一个是为 Major Compaction 准备的,hbase.regionserver.thread.compaction.throttle 是决定 Compaction 请求放入哪个线程池的阈值,当待合并文件的总大小小于这个阈值时,就是一个 Minor Compaction,…...

设计模式-桥接模式
概念 用于把抽象化与实现化解耦使得二者可以独立变化 演示 class ColorShape {yellowCircle() {console.log(yellow circle)}redCircle() {console.log(red circle)}yellowTriangle() {console.log(yellow triangle)}redTriangle() {console.log(red triangle)} }// 测试 le…...

arcgis地形分析全流程
主要内容:DEM的获取与处理、高程分析、坡度分析、坡向分析、地形起伏度分析、地表粗糙度分析、地表曲率分析; 主要工具:镶嵌至新栅格、按掩膜提取、投影栅格、坡度、坡向、焦点统计 一 DEM的获取与处理 1.1 DEM是什么? DEM(D…...

mapper.xml中的sql标签
在MyBatis中,mapper.xml文件是用于定义数据库操作的映射文件,其中的<sql>标签用于定义可重用的SQL片段。这些SQL片段可以在<select>, <update>, <insert>, <delete>等操作中被引用,以避免在多个地方重复编写相…...

重启redis的步骤
要重启 Redis,需要使用以下步骤: 登录到您的服务器:使用 SSH 或其他远程访问方式登录到托管 Redis 的服务器。 停止 Redis 服务器:您可以使用以下命令停止 Redis 服务器: redis-cli shutdown 这将向 Redis 服务器发送…...

第二证券:如何选股票的龙头股?
在股票商场中,每个出资者的方针都是可以出资到那些未来可以表现出色并带领整个工作开展的龙头股。选股关于出资者来说非常要害,由于选股不妥或许会导致出资失利。那么,怎么选股票的龙头股呢?本文从多个角度进行剖析,协…...
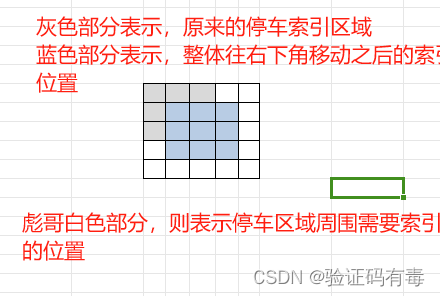
【华为OD机考B卷 | 100分】统计监控、需要打开多少监控器(JAVA题解——也许是全网最详)
前言 本人是算法小白,甚至也没有做过Leetcode。所以,我相信【同为菜鸡的我更能理解作为菜鸡的你们的痛点】。 题干 OD,B 卷 100 分题目【OD 统一考试(B 卷)】 1. 题目描述 某长方形停车场每个车位上方都有一个监控…...
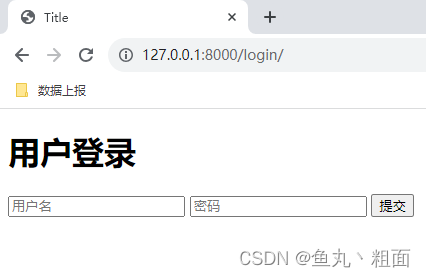
Python Django 详解(基础)
文章目录 1 概述1.1 安装 django1.2 创建 django 项目1.3 创建 app 2 启动 Django2.1 settings.py:注册 app2.2 view.py:URL和视图对应2.3 启动 Django2.4 访问 3 快速上手3.1 templates:html 模板3.2 static:静态文件3.3 模板语法…...
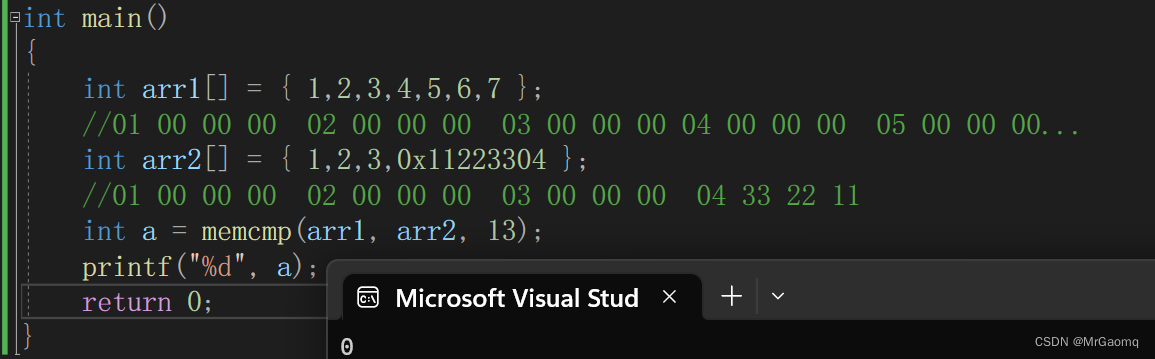
C语言内存函数
目录 memcpy(Copy block of memory)使用和模拟实现memcpy的模拟实现 memmove(Move block of memory)使用和模拟实现memmove的模拟实现: memset(Fill block of memory)函数的使用扩展 memcmp(Compare two blocks of memory)函数的使用 感谢各位大佬对我的支持,如果我的文章对你有…...

【Docker】Docker-compose及Consul多容器编排工具
使用一个Dockerfile模版文件可以定义一个单独的应用容器,当需要定义多个容器时就需要编排 docker swarm(管理跨节点) 编排工具——docker compose Dockerfile可以让用户管理一个单独的应用容器;而Compose则允许用户在一个模板&…...

Unity网络同步方案帧同步和状态同步
网络同步方案 介绍开始我们使用的状态同步(实时状态同步)后来采用的帧同步 状态同步优点缺点 帧同步顺序执行追帧重连优点缺点 总结 这两年做的都是帧同步和状态同步的项目,正好最近有时间总结一下什么是帧同步和状态同步,之前在做…...
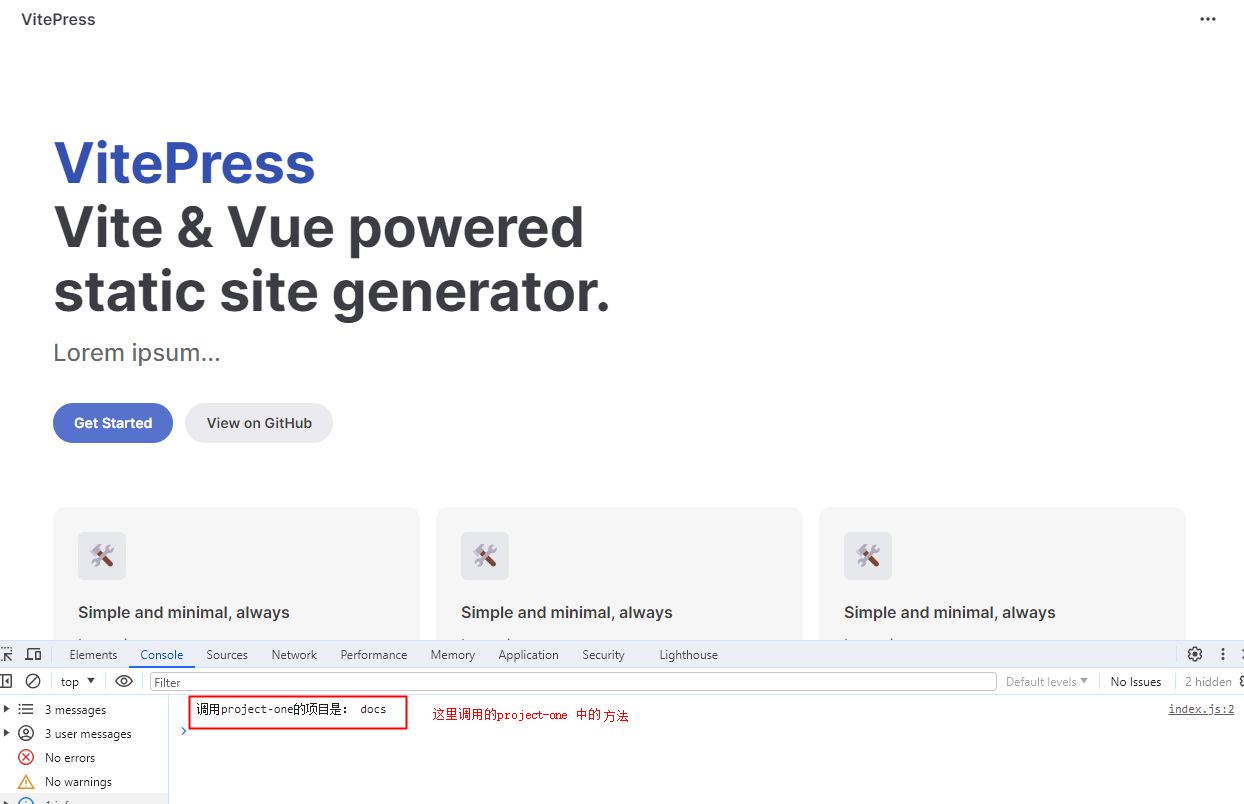
【Monorepo实战】pnpm+turbo+vitepress构建公共组件库文档系统
Monorepo架构可以把多个独立的系统放到一起联调,本文记录基于pnpm > workspace功能,如何构建将vitepress和组件库进行联调,并且使用turbo进行任务顺序编排。 技术栈清单: pnpm 、vitepress 、turbo 一、需求分析 1、最终目标…...
CentOS 编译安装Redis
一、编译配置hiredis.h C来操作redis数据库。通过hiredis接口来实现,目前只能在Linux环境使用。 下载hiredis.h hiredis的下载地址为:https://github.com/redis/hiredis 解压并编译hiredis [rootlocalhost source_code]# pwd /usr/local/source_…...

可拓展的低代码全栈框架
尽管现在越来越多的人开始对低代码开发感兴趣,但已有低代码方案的局限性仍然让大家有所保留。其中最常见的担忧莫过于低代码缺乏灵活性以及容易被厂商锁定。 显然这样的担忧是合理的,因为大家都不希望在实现特定功能的时候才发现低代码平台无法支持&…...

C++11 智能指针
目录 智能指针 异常导致执行流乱跳 智能指针解决问题 auto_ptr unique_ptr sharded_ptr weak_ptr 智能指针 由于C11引入异常之后,执行流乱跳,所以导致之前 malloc/new 的空间很容易没有被释放,导致内存泄露问题。 所以这时候&#x…...

二、WebGPU阶段间变量(inter-stage variables)
二、WebGPU阶段间变量(inter-stage variables) 在上一篇文章中,我们介绍了一些关于WebGPU的基础知识。在本文中,我们将介绍阶段变量(inter-stage variables)的基础知识。 阶段变量在顶点着色器和片段着色…...

Windows Cleaner终极指南:3分钟彻底解决C盘爆红问题!
Windows Cleaner终极指南:3分钟彻底解决C盘爆红问题! 【免费下载链接】WindowsCleaner Windows Cleaner——专治C盘爆红及各种不服! 项目地址: https://gitcode.com/gh_mirrors/wi/WindowsCleaner 还在为Windows系统越用越慢而烦恼吗&…...

Noto Emoji:专业解决跨平台表情符号渲染难题的终极方案
Noto Emoji:专业解决跨平台表情符号渲染难题的终极方案 【免费下载链接】noto-emoji Noto Emoji fonts 项目地址: https://gitcode.com/gh_mirrors/no/noto-emoji 在现代数字通信中,表情符号已成为不可或缺的语言元素,然而跨平台表情符…...

Deep Lake:AI数据湖与向量数据库一体化管理实践
1. 项目概述:当数据湖遇上深度学习如果你正在构建一个AI应用,无论是图像识别、自然语言处理还是多模态模型,数据管理绝对是你绕不开的“硬骨头”。数据分散在各个文件夹、云存储、数据库里,格式五花八门,加载速度慢&am…...

Arm Fast Models中VGIC架构与中断虚拟化解析
1. Arm Fast Models中的VGIC架构解析虚拟通用中断控制器(Virtual Generic Interrupt Controller, VGIC)是Armv7/v8架构虚拟化扩展的核心组件之一。在Fast Models仿真环境中,Iris组件通过精确建模实现了VGIC的完整功能,包括:物理中断与虚拟中断…...

2026产品经理学数据分析对升职的价值
一、数据分析能力对产品经理升职的重要性数据分析能力已成为产品经理的核心竞争力之一。掌握数据分析技能可以帮助产品经理更精准地决策,提升产品成功率,从而在职业发展中占据优势。二、数据分析在产品经理工作中的具体应用通过数据分析优化产品功能迭代…...
)
告别串口线!用STM32CubeMX给STM32F103C8T6做个USB DFU Bootloader(Keil工程+完整代码)
STM32F103C8T6 USB DFU Bootloader实战:从实验室到产品的完整方案 在嵌入式产品开发中,固件升级是一个绕不开的话题。想象一下,当你的设备已经部署在现场,却发现需要修复一个关键bug或增加新功能时,传统的JTAG/SWD调试…...

终极指南:如何在英雄联盟国服免费解锁所有皮肤?R3nzSkin国服特供版完全解析
终极指南:如何在英雄联盟国服免费解锁所有皮肤?R3nzSkin国服特供版完全解析 【免费下载链接】R3nzSkin-For-China-Server Skin changer for League of Legends (LOL) 项目地址: https://gitcode.com/gh_mirrors/r3/R3nzSkin-For-China-Server 还在…...

Sunshine游戏串流架构深度解析:3种高效部署方案完全指南
Sunshine游戏串流架构深度解析:3种高效部署方案完全指南 【免费下载链接】Sunshine Self-hosted game stream host for Moonlight. 项目地址: https://gitcode.com/GitHub_Trending/su/Sunshine Sunshine作为一款开源自托管的游戏串流服务器,为Mo…...

如何高效使用Diablo Edit2:暗黑破坏神II存档修改的全面解决方案
如何高效使用Diablo Edit2:暗黑破坏神II存档修改的全面解决方案 【免费下载链接】diablo_edit Diablo II Character editor. 项目地址: https://gitcode.com/gh_mirrors/di/diablo_edit 想要在暗黑破坏神II中打造理想角色,却苦于漫长的刷怪过程&a…...

雷达目标检测与成像算法实时实现【附代码】
✨ 长期致力于阵列雷达、多输入多输出、现场可编程门阵列、目标检测定位、高分辨成像研究工作,擅长数据搜集与处理、建模仿真、程序编写、仿真设计。 ✅ 专业定制毕设、代码 ✅ 如需沟通交流,点击《获取方式》 (1)相控阵和差波束目…...