[Spring] SpringMVC 简介(二)
目录
五、域对象共享数据
1、使用 ServletAPI 向 request 域对象共享数据
2、使用 ModelAndView 向 request 域对象共享数据
3、使用 Model、Map、ModelMap 向 request 域对象共享数据
4、向 session 域和 application 域共享数据
六、SpringMVC 的视图
1、ThymeleafView
2、转发视图(InternalResourceView)
3、重定向视图(RedirectView)
4、视图控制器 view-controller
七、RESTful
1、RESTful 简介
2、RESTful 书写格式
3、请求方式
4、实现简单的查询、添加功能
5、实现简单的修改、删除功能(HiddenHttpMethodFilter)
八、RESTful 实体类的增删改查
1、查询所有信息(列表)
2、处理静态资源
3、添加用户信息
4、修改用户信息
5、删除用户信息
五、域对象共享数据
在 jsp 中,有 4 个域对象:pageContext、request、session、application。
现在我们使用 Thymeleaf,仅有后 3 个域对象:request、session、application。
1、使用 ServletAPI 向 request 域对象共享数据
这种方法看一下即可,实际开发中不会使用。
其中 HttpServletRequest 是由 DispatcherServlet 传递下来的。
@RequestMapping
public String servletAPI(HttpServletRequest req) {// 参数名是 req 还是 request 呢?其实都可以req.setAttribute("requestScope", "request object");return "success";
}
2、使用 ModelAndView 向 request 域对象共享数据
这个方法是 Spring 官方推荐使用的。
ModelAndView 有 Model 和 View 的功能:
- Model 只能向 request 域共享数据,addObject,同 setAttribute;
- View 主要用于设置视图,实现页面跳转,setViewName,参数为逻辑视图("success");
- 方法的返回值必须为 ModelAndView;
(1)示例代码
(1-1)java
@RequestMapping("/object/mav")
public ModelAndView mav() {ModelAndView modelAndView = new ModelAndView();modelAndView.addObject("requestScope", "ModelAndView");modelAndView.setViewName("success");return modelAndView;
}
(1-2)index.html
<h1> index 页面 </h1>
<a th:href="@{/object/mav}">通过 ModelAndView 设置域对象</a>
(1-3)success.html
<h1> 登录成功 </h1>
这是 request 域中 requestScope 的属性值: <p th:text="${ requestScope }"></p>
(2)输出结果

(3)为什么可以这么用(原理)
在前面的学习中,我们知道 SpringMVC 的实现原理,其中有一步,就是将 ModelAndView 返回给 DispatcherServlet,最后再用 ModelAndView 去渲染页面。
因此,返回一个 ModelAndView,就相当于自定义了一个渲染行为。
3、使用 Model、Map、ModelMap 向 request 域对象共享数据
(1)Model
前面说到,Model 的功能就是向 request 域共享数据,因此 Model 是可以独立使用的。
又因为单独使用 Model,因此在设置逻辑视图方面,还需要返回 String 类型的逻辑视图。
(1-1)那么如何获取 mode 对象呢?
后面再说。
(1-2)java 代码
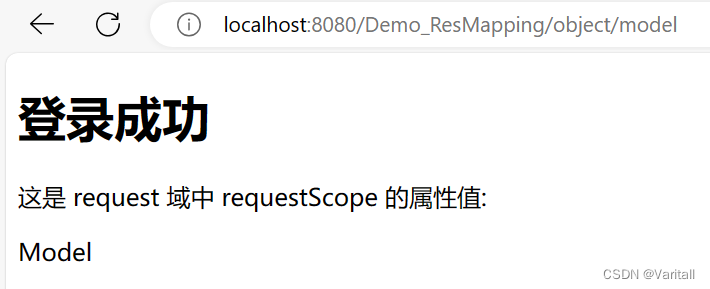
@RequestMapping("/object/model")
public String model(Model model) {model.addAttribute("requestScope", "Model");return "success";
}
(1-3)输出结果
(2)ModelMap
使用方法与 Model 一模一样。
@RequestMapping("/object/modelMap")
public String modelMap(ModelMap modelMap) {modelMap.addAttribute("requestScope", "ModelMap");return "success";
} 
(3)Map
使用 map,其实就是相当于设置一个请求域,都是键值对。
(3-1)java 代码
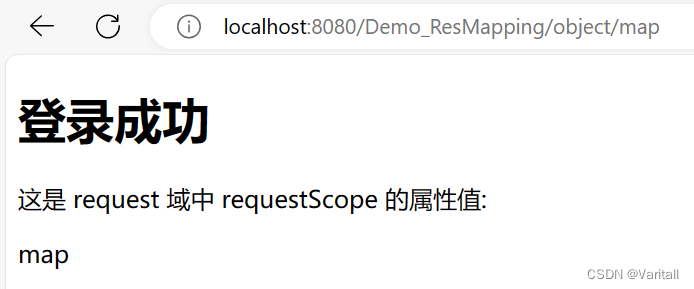
@RequestMapping("/object/map")
public String modelMap(Map<String, Object> map) {map.put("requestScope", "map");return "success";
}
(3-2)输出结果
(4)Model、Map、ModelMap 的关系
我们现在一定有一个疑问,在之前的学习中,方法参数都是请求信息中的属性,可以由请求信息进行注入。
但是现在这 3 个东西,在请求信息中并没有体现,为什么却可以作为对象实例来使用?
实际上,这 3 个东西都会被 Spring 实例化为 BindingAwareModelMap 类型的对象,因为在底层中:
- ModelMap 继承自 LinkedHashMap;
- Model 是一个接口,其实现类被 BindingAwareModelMap 继承;
- Map 是一个接口,其实现类被 BindingAwareModelMap 继承;
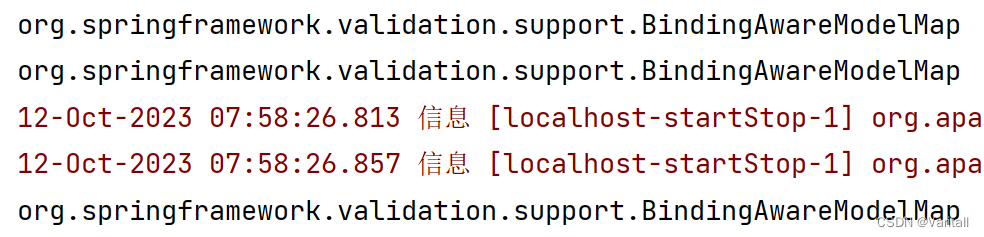
(4-1)测试代码
依次访问这三个 servlet,观察他们输出的类名是什么
@RequestMapping("/object/model")
public String model(Model model) {System.out.println(model.getClass().getName());model.addAttribute("requestScope", "Model");return "success";
}@RequestMapping("/object/modelMap")
public String modelMap(ModelMap modelMap) {System.out.println(modelMap.getClass().getName());modelMap.addAttribute("requestScope", "ModelMap");return "success";
}@RequestMapping("/object/map")
public String modelMap(Map<String, Object> map) {System.out.println(map.getClass().getName());map.put("requestScope", "map");return "success";
}
(4-2)输出结果
显然,他们都是 Spring 在底层通过 BindingAwareModelMap 来实例化对象的。
4、向 session 域和 application 域共享数据
对于这 2 个域对象,建议使用 ServletAPI 的方式,因为 SpringMVC 提供的方式更加麻烦。
其中需要注意的是,在 html 页面中,对 session、application 域对象的访问,需要加上 session. 和 application.
(1)session
直接用 HttpSession 可以,用 HttpServletRequest 也可以。
@RequestMapping("/object/session")
public String session(HttpSession session) {session.setAttribute("sessionScope", "session");return "success";
}
(2)application
同上。
@RequestMapping("/object/application")
public String application(HttpSession session) {ServletContext servletContext = session.getServletContext();servletContext.setAttribute("applicationScope", "application");return "success";
}
(3)success.html
这是 session 域中 sessionScope 的属性值:
<p th:text="${ session.sessionScope }"></p> <br/>这是 application 域中 applicationScope 的属性值:
<p th:text="${ application.applicationScope }"></p> <br/>
六、SpringMVC 的视图
SpringMVC 中的视图是 View 接口,视图的作用渲染数据,将模型 Model 中的数据展示给用户。
SpringMVC 视图的种类很多,默认有转发视图(InternalResourceView)和重定向视图(RedirectView):
- 当工程引入 jstl 的依赖,转发视图会自动转换为 JstlView;
- 若使用的视图技术为 Thymeleaf,并在 SpringMVC 的配置文件中配置了 Thymeleaf 的视图解析器,那么视图解析器解析之后所得到的是 ThymeleafView;
1、ThymeleafView
当控制器方法的返回值为 String 时,这个逻辑视图会被 SpringMVC 配置文件中所配置的视图解析器解析,形成最终的转发地址。
(1)示例代码
(1-1)java 代码
@RequestMapping("/view/thymeleaf")
public String thymeleaf() {return "hello";
}
(1-2)配置文件
<bean id="viewResolver" class="org.thymeleaf.spring5.view.ThymeleafViewResolver"><property name="characterEncoding" value="UTF-8"/><property name="templateEngine"> <!-- 模板引擎 --><bean class="org.thymeleaf.spring5.SpringTemplateEngine"><property name="templateResolver"> <!-- 模板解析器 --><bean class="org.thymeleaf.spring5.templateresolver.SpringResourceTemplateResolver"><!-- 视图前缀 --><property name="prefix" value="/WEB-INF/templates/"/><!-- 视图后缀 --><property name="suffix" value=".html"/><!-- 以 html5 作为模板 --><property name="templateMode" value="HTML5"/><property name="characterEncoding" value="UTF-8" /><property name="order" value="1"/> <!-- 优先级 --><property name="cacheable" value="false"/></bean></property></bean></property>
</bean>
2、转发视图(InternalResourceView)
前面我们一直在用的都是基于 Thymeleaf 的视图解析,需要配置出 Thymeleaf 的视图解析器,这样包含 thymeleaf 语法的 html 页面就可以被 thymeleaf 渲染。
(1)InternalResourceView 简介
InternalResourceView 是基于 JSP 的视图解析器,它将 JSP 作为模板引擎来解析和渲染视图。它依赖于 Servlet 容器来执行 JSP,并且需要在 web.xml 文件中进行配置。
总的来说,InternalResourceView 适用于传统的 JSP 开发,而 ThymeleafView 适用于更加灵活和独立的模板引擎开发。
(2)用法
相比于 Thymeleaf 只能转发逻辑视图(目标页面名)的地址,InternalResource 还可以转发 @RequestMapping 的地址。
(2-1)用法一:转发至设置 model 域对象的 @RequestMapping 的地址
这个例子没有任何意义(因为可以直接访问 /object/model),只是举个用法例子。
@RequestMapping("/view/internal")
public String internal() {return "forward:/object/model";
}
(2-2)用法二:类似 Thymeleaf 的逻辑视图
这种逻辑视图的使用,都需要设置视图解析器,效果类似前面的 Thymeleaf。如何设置自行搜索即可。
(2-3)需要注意的是:
- 通过 InternalResourceView 转发的页面,不能解析 Thymeleaf 的语法;
- 转发之后,地址不变(不会变成 return 的值,这点 Thymeleaf 也一样);
3、重定向视图(RedirectView)
一般情况下,业务逻辑处理失败时,使用请求转发;业务逻辑处理成功时,使用重定向。
(1)RedirectView 简介
将请求重定向,地址会发生改变。
(2)用法
在 SpringMVC 中,不需要担心 / 被浏览器解析成 http://ip:port/,而没有工程名。重定向在解析时,会判断是否以 / 开头,如果是,则 Spring 会自动加上工程名。
@RequestMapping("/view/redirect")
public String redirect() {return "redirect:/object/model";
}
(3)三者发起请求后的地址栏


显然,只有重定向的地址栏发生了改变。
4、视图控制器 view-controller
当控制器方法仅仅用来进行页面跳转时,可以将控制器方法用 view-controller 标签来替换。
在 Spring 的配置文件中写上:
<mvc:view-controller path="/view/thymeleaf" view-name="hello"/>就可以替换掉:
@RequestMapping("/view/thymeleaf")
public String thymeleaf() {return "hello";
}
但是仅仅这样写,就会发现,除了 /view/thymeleaf 可以访问,其他的 @RequestMapping 都不能访问了,因为设置 view-controller 后,其他的请求就不会被 DispatcherServlet 处理了。
这时候需要在 Spring 的配置文件中加上:
<mvc:annotation-driven/>其功能有:
- 开启 mvc 的注解驱动;
- 处理 Ajax、Json 等数据;
七、RESTful
1、RESTful 简介
RESTful 是一种设计风格,目前市面上使用较为广泛。
REST:Representational State Transfer,表现层资源状态转移。
2、RESTful 书写格式
我们先看一下,百度百科是怎么访问服务器的:
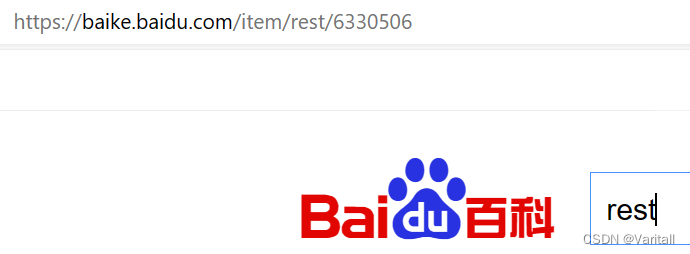
当我们查询 rest 时,这个 url 其实就是 REST 设计风格。
REST 风格提倡 URL 地址使用统一的风格设计,从前到后各个单词使用斜杠分开,不使用问号键值对方式携带请求参数,而是将要发送给服务器的数据作为 URL 地址的一部分,以保证整体风格的一致性。
当然这只是一种风格,并不是说所有的数据都要拼接到 url 中。
3、请求方式
HTTP 协议里面,四个表示操作方式的动词:GET、POST、PUT、DELETE。它们分别对应四种基本操作:
- GET 用来获取资源;
- POST 用来新建资源;
- PUT 用来更新资源;
- DELETE 用来删除资源;

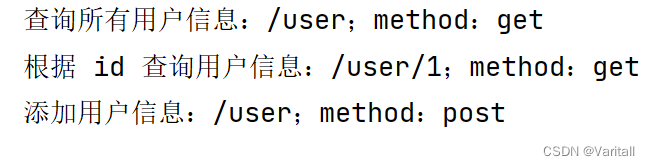
4、实现简单的查询、添加功能
- 查询所有用户信息;
- 根据 id 查询用户信息;
- 添加用户信息;
(1)代码
(1-1)java 代码
@RequestMapping(value = "/user", method = RequestMethod.GET)
public String queryForAllUsers() {System.out.println("查询所有用户信息:/user;method:get");return "success";
}@RequestMapping(value = "/user/{id}", method = RequestMethod.GET)
public String queryForAllUsers(@PathVariable("id") Integer id) {System.out.println("根据 id 查询用户信息:/user/" + id + ";method:get");return "success";
}@RequestMapping(value = "/user", method = RequestMethod.POST)
public String addUser() {System.out.println("添加用户信息:/user;method:post");return "success";
}
(1-2)index.html
<!DOCTYPE html>
<html lang="en" xmlns:th="http://www.thymeleaf.org">
<head><meta charset="UTF-8"><title>Title</title>
</head>
<body><h1>index 页面</h1><a th:href="@{/user}"> 查询所有用户 </a> <br/><a th:href="@{/user/1}"> 查询 id = 1 的用户 </a> <br/><form th:action="@{/user}" method="post"><input type="submit" value="添加用户"/></form>
</body>
</html>
(1-3)success.html
<body><h1>success 页面</h1>
</body>
(2)输出结果
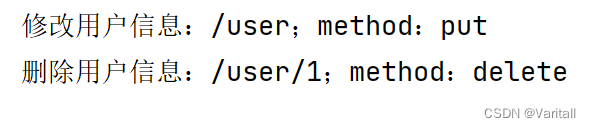
5、实现简单的修改、删除功能(HiddenHttpMethodFilter)
- 修改用户信息 PUT;
- 删除用户信息 DELETE;
(1)由于浏览器只支持发送 get 和 post 方式的请求,那么该如何发送 put 和 delete 请求呢?
SpringMVC 提供了 HiddenHttpMethodFilter,它可以将 POST 请求转换为 DELETE 或 PUT 请求。HiddenHttpMethodFilter 处理 put 和 delete 请求的条件:
- 当前请求的请求方式必须为 post;
- 当前请求必须传输请求参数 _method;
- _method 的值 value 设置为 put 或 delete;
满足以上条件,HiddenHttpMethodFilter 过滤器就会将当前请求的请求方式转换为请求参数_method 的值,因此请求参数 _method 的值才是最终的请求方式。
(2)代码
(2-1)index.html
<form th:action="@{/user}" method="post"><input type="hidden" name="_method" value="put"/><input type="submit" value="更新用户 "/>
</form> <br/><form th:action="@{/user/1}" method="post"><input type="hidden" name="_method" value="delete"/><input type="submit" value="删除用户 "/>
</form> <br/>
(2-2)java 代码
@RequestMapping(value = "/user", method = RequestMethod.PUT)
public String updateUser() {System.out.println("修改用户信息:/user;method:put");return "success";
}@RequestMapping(value = "/user/{id}", method = RequestMethod.DELETE)
public String deleteUser(@PathVariable Integer id) {System.out.println("删除用户信息:/user/" + id + ";method:delete");return "success";
}
(2-3) 处理请求方式过滤器 HiddenHttpMethodFilter
<filter><filter-name>HiddenHttpMethodFilter</filter-name><filter-class>org.springframework.web.filter.HiddenHttpMethodFilter</filter-class>
</filter>
<filter-mapping><filter-name>HiddenHttpMethodFilter</filter-name><url-pattern>/*</url-pattern>
</filter-mapping>
(3)输出结果
八、RESTful 实体类的增删改查
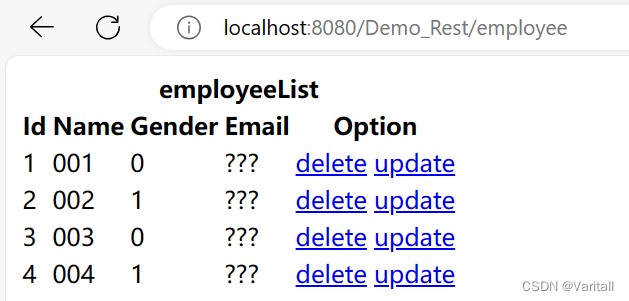
1、查询所有信息(列表)
(1)创建实体类
package com.demo.pojo;public class Employee {private Integer id;private String name;private Integer gender;private String email;public Employee() {}@Overridepublic String toString() {return "Employee{" +"id=" + id +", name='" + name + '\'' +", gender=" + gender +", email='" + email + '\'' +'}';}public Integer getId() {return id;}public void setId(Integer id) {this.id = id;}public String getName() {return name;}public void setName(String name) {this.name = name;}public Integer getGender() {return gender;}public void setGender(Integer gender) {this.gender = gender;}public String getEmail() {return email;}public void setEmail(String email) {this.email = email;}public Employee(Integer id, String name, Integer gender, String email) {this.id = id;this.name = name;this.gender = gender;this.email = email;}
}
(2)创建 EmployeeService 类
假设已经从 EmployeeDao 中获取到表信息,用 Map 保存起来。
注意,这里使用了 @Service 注解,记得将 Spring 配置文件中的组件扫描修改一下。
package com.demo.service;import com.demo.pojo.Employee;
import org.springframework.stereotype.Repository;import java.util.*;@Service
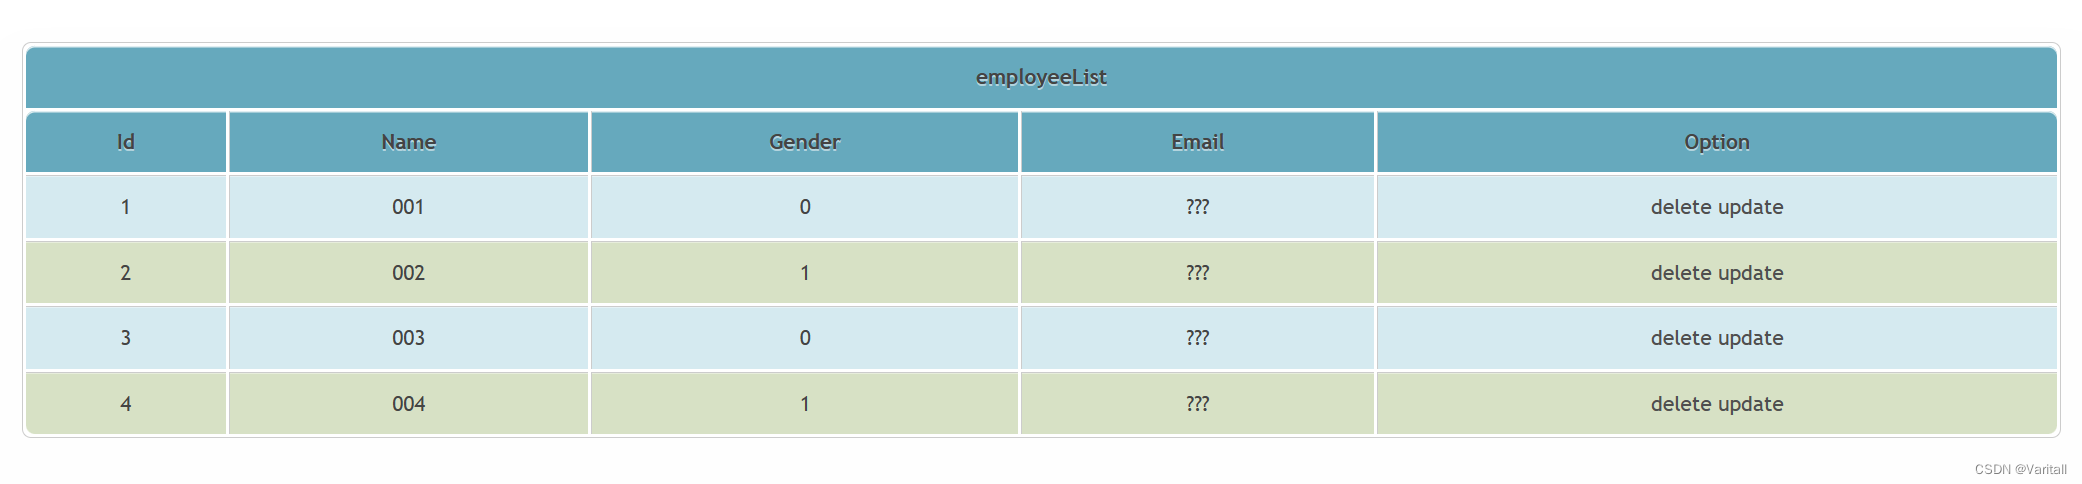
public class EmployeeService {private static Map<Integer, Employee> employees;private static Integer totalNum;static {employees = new HashMap<Integer, Employee>();employees.put(1, new Employee(1, "001", 0, "???"));employees.put(2, new Employee(2, "002", 1, "???"));employees.put(3, new Employee(3, "003", 0, "???"));employees.put(4, new Employee(4, "004", 1, "???"));totalNum = 4;}public Collection<Employee> queryForAllEmployees() {return employees.values();}}
(3)创建 EmployeeController 控制类
自动配置 EmployeeService 实例。
查询所有用户信息,GET 请求。
用 model 将用户列表信息保存到 request 域。
最后将视图模型转发至 employee.html。
package com.demo.controller;import com.demo.pojo.Employee;
import com.demo.service.EmployeeService;
import org.springframework.beans.factory.annotation.Autowired;
import org.springframework.stereotype.Controller;
import org.springframework.ui.Model;
import org.springframework.web.bind.annotation.RequestMapping;
import org.springframework.web.bind.annotation.RequestMethod;import java.util.Collection;@Controller
public class EmployeeController {@Autowiredprivate EmployeeService employeeService;@RequestMapping(value = "/employee", method = RequestMethod.GET)public String queryForAllEmployees(Model model) {Collection<Employee> employees = employeeService.queryForAllEmployees();model.addAttribute("employeeList", employees);return "employee";}
}
(4)前端页面 employee.html
使用 Thymeleaf 的 each 属性,将保存到 request 域的列表信息遍历展示。
(注意,<a> 的 href 不能留空,无论是写 th:href 还是 href,否则只能显示第一个数据 )
<!DOCTYPE html>
<html lang="en" xmlns:th="http://www.thymeleaf.org">
<head><meta charset="UTF-8"><title>Title</title>
</head>
<body><table class="employeeTable"><tr><th colspan="5">employeeList</th></tr><tr><th>Id</th><th>Name</th><th>Gender</th><th>Email</th><th>Option</th></tr><tr th:each="employee : ${employeeList}"><td th:text="${employee.id}"></td><td th:text="${employee.name}"></td><td th:text="${employee.gender}"></td><td th:text="${employee.email}"></td><td><a th:href="@{#}">delete</a><a th:href="@{#}">update</a></td></tr></table></body>
</html>
(5)输出结果
2、处理静态资源
前面的 employee 列表没有添加样式,非常难看,如果我们想要为其添加外部 CSS,使用 <link> 标签后,就会发现报错 404。
<link rel="stylesheet" th:href="@{/static/css/index_work.css}"/>(1)问题原因
这是因为,处理静态资源所需要的 Servlet 不是我们在 web.xml 中配置的 DispatcherServlet,而是 DefaultServlet。
而 DefaultServlet 是在 Tomcat 的 web.xml 中配置的,其 url-pattern 也是 /。
这就导致了 DispatcherServlet 会取代 DefaultServlet 处理路径为 / 的请求,从而无法处理静态资源。
(2)解决方法
使用 mvc 配置默认 Servlet 处理静态资源:
<!-- 开启 mvc 注解驱动 -->
<mvc:annotation-driven/>
<!-- 配置默认 servlet 处理静态资源 -->
<mvc:default-servlet-handler/>
需要注意的是,它的使用与 <mvc:view-controller> 一样,都会导致所有资源都被他们对应的 servlet/controller 处理,所以都需要加上 <mvc:annotation-driven/>。
这样无法被 DispatcherServlet 处理的请求,就会交给 DefaultServlet 进行处理。
(2-1)index_work.css
@charset "UTF-8";form {margin: 0px;
}img {border: medium none;margin: 0;padding: 0;
} /* img elements 图片元素 */
/** 设置默认字体 **/
body,button,input,select,textarea {font-size: 12px;font: 12px/1.5 ’宋体’, Arial, tahoma, Srial, helvetica, sans-serif;
}h1,h2,h3,h4,h5,h6 {font-size: 100%;
}em {font-style: normal;
}
/** 重置列表元素 **/
ul,ol {list-style: none;
}
/** 重置超链接元素 **/
a {text-decoration: none;color: #4f4f4f;
}a:hover {text-decoration: underline;color: #F40;
}
/** 重置图片元素 **/
img {border: 0px;margin-bottom: -7px;
}body {width: 80%;margin: 40px auto;font-family: 'trebuchet MS', 'Lucida sans', Arial;font-size: 14px;color: #444;background: url(../css/img/body1.jpg);background-repeat: no-repeat;background-size: 100% auto;/* background: #F5F5F5; */
}table {border: solid #ccc 1px;-webkit-border-radius: 6px;border-radius: 6px;/* -webkit-box-shadow: 0 1px 1px #ccc;box-shadow: 0 1px 1px #ccc; */-webkit-box-shadow:  0px 2px 1px 5px rgba(242, 242, 242, 0.1);box-shadow:  5px 20px 30px 30px rgba(242, 242, 242, 0.1);width: 100%;
}table thead th {background:url(../css/img/zebratable.png);background-repeat:no-repeat;background-position: 0px center;
}table tr {background: #D5EAF0;-webkit-box-shadow: 0 1px 0 rgba(255, 255, 255, .8) inset;box-shadow: 0 1px 0 rgba(255, 255, 255, .8) inset;
}table tr:nth-child(even) {background: #D7E1C5;-webkit-box-shadow: 0 1px 0 rgba(255, 255, 255, .8) inset;box-shadow: 0 1px 0 rgba(255, 255, 255, .8) inset;
}table tr:hover {background: #91C5D4;-o-transition: all 0.1s ease-in-out;-webkit-transition: all 0.1s ease-in-out;-ms-transition: all 0.1s ease-in-out;transition: all 3s ease-in-out;background-image: -webkit-gradient(linear, left top, left bottom, from(#151515), to(#404040)) !important;background-image: -webkit-linear-gradient(top, #151515, #404040) !important;background-image:    -moz-linear-gradient(top, #151515, #404040) !important;background-image:     -ms-linear-gradient(top, #151515, #404040) !important;background-image:      -o-linear-gradient(top, #151515, #404040) !important;background-image:         linear-gradient(top, #151515, #404040) !important;color:#fff !important;
}table td,table th {border-left: 1px solid #ccc;border-top: 1px solid #ccc;padding: 10px;text-align: center;
}table th {background-color: #66a9bd;background-image: -moz-linear-gradient(top, #dce9f9, #66a9bd);-webkit-box-shadow: 0 1px 0 rgba(255, 255, 255, .8) inset;box-shadow: 0 1px 0 rgba(255, 255, 255, .8) inset;border-top: none;text-shadow: 0 1px 0 rgba(255, 255, 255, .5);
}table td:first-child,table th:first-child {border-left: none;
}table th:first-child {-webkit-border-radius: 6px 0 0 0;border-radius: 6px 0 0 0;
}table th:last-child {-webkit-border-radius: 0 6px 0 0;border-radius: 0 6px 0 0;
}table th:only-child {-webkit-border-radius: 6px 6px 0 0;border-radius: 6px 6px 0 0;
}table tr:last-child td:first-child {-webkit-border-radius: 0 0 0 6px;border-radius: 0 0 0 6px;
}table tr:last-child td:last-child {-webkit-border-radius: 0 0 6px 0;border-radius: 0 0 6px 0;
}input[type="button"],input[type="submit"],input[type="reset"] {border: solid #ccc 1px;-webkit-border-radius: 6px;border-radius: 6px;-webkit-box-shadow: 0 1px 1px #ccc;box-shadow: 0 1px 1px #ccc;background: #B0CC7F;margin: 0 2px 0;
}input[type="text"],input[type="password"] {border: solid #ccc 2px;-webkit-border-radius: 6px;border-radius: 6px;-webkit-box-shadow: 0 1px 1px #ccc;box-shadow: 0 1px 1px #ccc;background: #efefef;margin: 0 2px 0;text-indent: 5px;
}
select {width:200px;border: solid #ccc 2px;-webkit-border-radius: 6px;border-radius: 6px;-webkit-box-shadow: 0 1px 1px #ccc;background: #efefef;margin: 0 2px 0;text-indent: 5px;
}
option {width:180px;border: solid #ccc 2px;-webkit-border-radius: 6px;border-radius: 6px;-webkit-box-shadow: 0 1px 1px #ccc;background: #efefef;margin: 0 2px 0;text-indent: 5px;
}input[name="page.now"] {border: solid #ccc 1px;-webkit-border-radius: 6px;border-radius: 6px;-webkit-box-shadow: 0 1px 1px #ccc;box-shadow: 0px 0px 0px #CEB754;background: #D5EAF0;margin: 0px 10px 0px 0px;padding-bottom: 0px;padding-top: 5px; width: 24px; line-height:10px; height: 12xp;
}
(3)输出结果
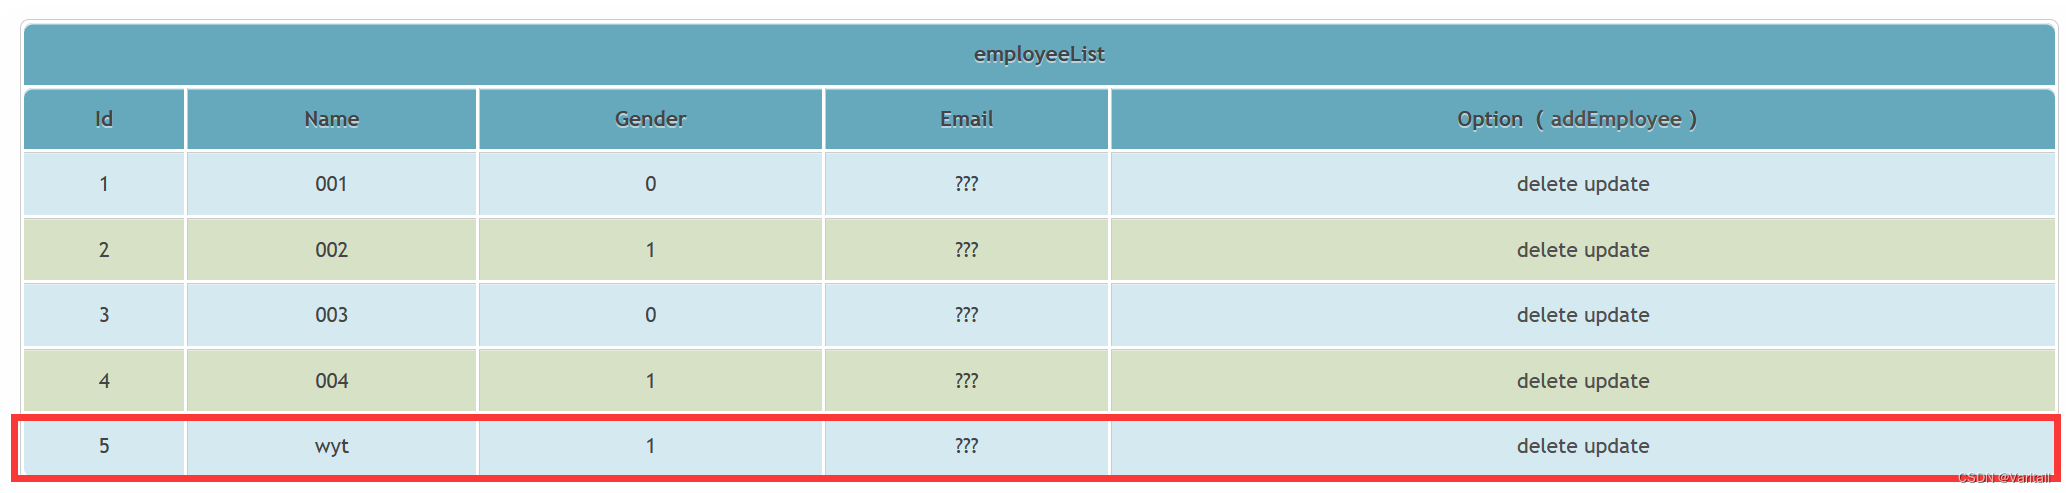
3、添加用户信息
(1)为 index 添加 addEmployee 选项
跳转至添加用户页面。
<th>Id</th>
<th>Name</th>
<th>Gender</th>
<th>Email</th>
<th>Option(<a th:href="@{/addEmployee.html}"> addEmployee </a>)
</th>
(2)为 addEmployee.html 添加视图控制器
也可以选择写一个 Controller 的方法转发。
<!-- 配置 addEmployee 页面的视图控制器 -->
<mvc:view-controller path="/addEmployee.html" view-name="addEmployee"/>
(3)addEmployee.html 页面
随便写写即可。
<!DOCTYPE html>
<html lang="en" xmlns:th="http://www.thymeleaf.org">
<head><meta charset="UTF-8"><title>Title</title><link rel="stylesheet" th:href="@{/static/css/index_work.css}"/>
</head>
<body><form th:action="@{/addEmployee}" method="post"><table><tr><th colspan="2"> addEmployee </th></tr><tr><td>name</td><td><input type="text" name="name"/></td></tr><tr><td>gender</td><td><input type="radio" value="1" name="gender"/> male<input type="radio" value="0" name="gender"/> female</td></tr><tr><td>email</td><td><input type="text" name="email"/></td></tr><tr><td colspan="2"><input type="submit" value="添加"/></td></tr></table></form></body>
</html>
(4)给 EmployeeService 添加一个 addEmployee 方法
因为参数没有 id,所以可以自增 id。
public void addEmployee(Employee employee) {if (employee.getId() == null ) {employee.setId(++ totalNum);}employees.put(totalNum, employee);
}
(5)在 EmployeeController 中处理请求的方法
添加用户信息,我们规定使用 POST 方法。
参数列表直接使用 POJO 类,Spring 会自动将请求参数注入到 POJO 类中。
最后重定向回 employee 列表。
@RequestMapping(value = "/addEmployee", method = RequestMethod.POST)
public String addEmployee(Employee employee) {employeeService.addEmployee(employee);return "redirect:/employee";
}
(6)测试结果
4、修改用户信息
修改用户,需要先将首页的用户信息,通过 GET 请求传递到修改页面。然后修改页面再发出 PUT 请求。
因此需要 2 个 Controller 来完成修改操作。
(1)新增的 Service 方法
public Employee getEmployeeById(Integer id) {return employees.get(id);
}public void updateEmployee(Employee employee) {employees.put(employee.getId(), employee);
}
(2)编写 toUpdatePage 方法
根据 id 获取对应 employee;
将 employee 信息放到 request 域;
最后转发至 updateEmployee.html;
@RequestMapping(value = "/employee/{id}", method = RequestMethod.GET)
public String toUpdatePage(@PathVariable("id") Integer id, Model model) {Employee employee = employeeService.getEmployeeById(id);model.addAttribute("employee", employee);return "updateEmployee";
}(3)编写 updateEmployee 方法
接收 updateEmployee.html 传递来的 POJO 数据;
更新 employee 信息;
重定向至 employee.html;(防止再次发送请求)
stMapping(value = "/updateEmployee", method = RequestMethod.PUT)
public String updateEmployee(Employee employee) {employeeService.updateEmployee(employee);return "redirect:/employee";
}
(4)updateEmployee.html
两个隐藏域:employee.id 的值、put 请求;
<!DOCTYPE html>
<html lang="en" xmlns:th="http://www.thymeleaf.org">
<head><meta charset="UTF-8"><title>Title</title><link rel="stylesheet" th:href="@{/static/css/index_work.css}"/>
</head>
<body><form th:action="@{/updateEmployee}" method="post"><input type="hidden" name="_method" value="put"/><input type="hidden" name="id" th:value="${employee.id}"/><table><tr><th colspan="2">update Employee</th></tr><tr><td>name</td><td><input type="text" name="name" th:value="${employee.name}"/></td></tr><tr><td>gender</td><td><input type="radio" name="gender" th:value="1" th:field="${employee.gender}"/> male<input type="radio" name="gender" th:value="0" th:field="${employee.gender}"/> female</td></tr><tr><td>email</td><td><input type="text" name="email" th:value="${employee.email}"/></td></tr><tr><td colspan="2"><input type="submit" value="修改"/></td></tr></table></form>
</body>
</html>(5)为 index 添加 updateEmployee 选项
<a th:href="@{'/employee/' + ${employee.id} }">update</a>5、删除用户信息
由于我们使用了超链接的方式发起请求(GET),并且 delete 也没有像 update 一样有一个新的页面可以提交表单,无法发出 DELETE 请求。
因此我们可以为 delete 的超链接添加点击事件,在事件中将 href 赋值给一个表单的 action,再让表单提交 DELETE 请求即可。
(1)index.html
添加 JQuery 的 js 文件;
添加一个没有设置 action 属性的表单,其发出 DELETE 请求;
添加处理超链接的点击事件;
<!DOCTYPE html>
<html lang="en" xmlns:th="http://www.thymeleaf.org">
<head><meta charset="UTF-8"><title>Title</title><link rel="stylesheet" th:href="@{/static/css/index_work.css}"/><script type="text/javascript" th:src="@{/static/js/JQuery-3.7.0.js}"></script>
</head>
<body><table class="employeeTable"><tr><th colspan="5">employeeList</th></tr><tr><th>Id</th><th>Name</th><th>Gender</th><th>Email</th><th>Option(<a th:href="@{/addEmployee.html}"> addEmployee </a>)</th></tr><tr th:each="employee : ${employeeList}"><td th:text="${employee.id}"></td><td th:text="${employee.name}"></td><td th:text="${employee.gender}"></td><td th:text="${employee.email}"></td><td><a class="deleteEmployee" th:href="@{'/deleteEmployee/' + ${employee.id}}">delete</a><a th:href="@{'/employee/' + ${employee.id}}">update</a></td></tr></table><form method="post" id="deleteEmployeeForm"><input type="hidden" name="_method" value="delete"/></form><script type="text/javascript">$(".deleteEmployee").click(function() {var form = $("#deleteEmployeeForm");form.attr("action", this.href); /* 不能用 .action 直接等于 this.href */form.submit();return false;});</script></body>
</html>
(2)编写 deleteEmployee 的控制器方法
equestMapping(value = "/deleteEmployee/{id}", method = RequestMethod.DELETE)
public String deleteEmployee(@PathVariable("id") Integer id) {employeeService.deleteEmployeeById(id);return "redirect:/employee";
}
相关文章:
[Spring] SpringMVC 简介(二)
目录 五、域对象共享数据 1、使用 ServletAPI 向 request 域对象共享数据 2、使用 ModelAndView 向 request 域对象共享数据 3、使用 Model、Map、ModelMap 向 request 域对象共享数据 4、向 session 域和 application 域共享数据 六、SpringMVC 的视图 1、ThymeleafVie…...

idea一些不太常用但是能提升编码效率的快捷键
Ctrl Shift V:从历史选择粘贴 从历史剪粘版中选择要粘贴的内容。Ctrl Shift Z:重做 恢复上一步撤销内容Shift F4:在新窗口中打开 比如要从另一个类中复制代码 可以把这个类在新窗口单独打开 用AltTab 来回切换复制Ctrl PageUpÿ…...

vsto word属性信息 并读取
要通过VSTO (Visual Studio Tools for Office) 读取和操作 Microsoft Word 文档的属性信息,您可以使用 C# 或 VB.NET 等 .NET 编程语言结合 VSTO 来实现。以下是一个示例,演示如何获取 Word 文档的属性信息:首先,确保您已经在 Vis…...
android之TextView自由选择复制
文章目录 前言一、效果图二、实现步骤1.OnSelectListener2.SelectionInfo类3.TextLayoutUtil类4.复制弹框的xml布局5.弹框背景Drawable6.倒三角Drawable7.复制工具类8.调用 总结 前言 根据时代进步,那些干产品的也叼砖起来了,今天就遇到一个需求&#x…...

【mysql】 bash: mysql: command not found
在linux 服务器上安装了mysql 也可以正常运行。 但是执行命令,系统提示:bash: mysql: command not found bash:mysql:找不到命令 执行的命令是: mysql -u root -h 127.0.0.1 -p由于系统默认会查找的 /usr/bin/ 中下的命令,如…...
鲲山科技:引入和鲸 ModelWhale,实现量化策略的高效迭代
量化投资是数据科学在金融行业的应用。 2023 年,量化行业的超额收益开始收敛,量化私募如何形成自身核心竞争力? 和鲸拜访客户鲲山科技(深圳),揭示其“弯道超车”的独家秘诀。 群体作战 年初至今ÿ…...

PFSK152 3BSE018877R1 有源滤波器的定义
PFSK152 3BSE018877R1 有源滤波器的定义 有源滤波器是以晶体管和运算放大器为基本元件设计的滤波电路。除了这些元件,有源滤波器的电路还包含电阻和电容,但不包含电感。 我们知道滤波器具有频率选择性。因此,有源滤波器电路使用晶体管和运算…...

WebDAV之π-Disk派盘 + 恒星播放器
想要拥有一款万能视频播放器,全能解码播放器,无需转码,支持所有格式的视频和音频,直接播放的播放器?那就选恒星播放器。 恒星播放器支持视频投屏,倍速播放,后台播放等功能,还能一键截图和录制gif动图。支持全格式超高清真4K解码,蓝光HDR低占用,支持ISO文件直出的播放…...

亚马逊,速卖通,敦煌产品测评补单攻略:低成本、高安全实操指南
随着电商平台的发展和消费者对产品质量的要求提升,测评补单成为了商家们提升销售和用户口碑的关键环节。然而,如何在保持成本低廉的同时确保操作安全,一直是卖家们面临的挑战。今天林哥分享一些实用的技巧和策略,帮助卖家们产品的…...

常用linux解压命令
1. 超过4g的zip文件在linux下unzip失败。需要用7z压缩,然后用p7zip命令解压。 p7zip -d x.7z 2. gzip解压.gz文件 gzip -d a11.txt.gz 和 gunzip a1.txt.gz gunzip –c filename.gz > filename #解压缩保留源文件, 上述命令非常容易写错,最后导…...
)
TensorFlow入门(二十二、梯度下降)
梯度下降的定义及作用 梯度下降本身是一个最优化算法,通常也被称为最速下降法。常被用于机器学习和人工智能中递归性地逼近最小偏差模型,也就是使用它找到一个函数的局部极小值。 使用过程中,梯度下降算法以函数上当前点对于梯度(或者是近似梯度)反方向的规定步长距离点进行迭代…...

WPF中的多重绑定
MultiBinding 将会给后端传回一个数组, 其顺序为绑定的顺序. 例如: <DataGridMargin"10"AutoGenerateColumns"False"ItemsSource"{Binding Stu}"><DataGrid.Columns><DataGridTextColumn Binding"{Binding Id}" Header…...
区块链在游戏行业的应用
区块链技术在游戏行业有许多潜在的应用,它可以改变游戏开发、发行和玩家交互的方式。以下是区块链技术在游戏行业的一些主要应用,希望对大家有所帮助。北京木奇移动技术有限公司,专业的软件外包开发公司,欢迎交流合作。 1.游戏资产…...
- 微信小程序开发)
uniapp快速入门系列(4)- 微信小程序开发
第四章 微信小程序开发 4.1 微信小程序开发与uniapp的融合4.2 微信小程序API在uniapp中的使用4.3 微信小程序常见问题的解决方法问题1: 如何获取用户信息?问题2: 如何获取当前位置?问题3: 如何发送网络请求? 在本章中,我们将学习如…...
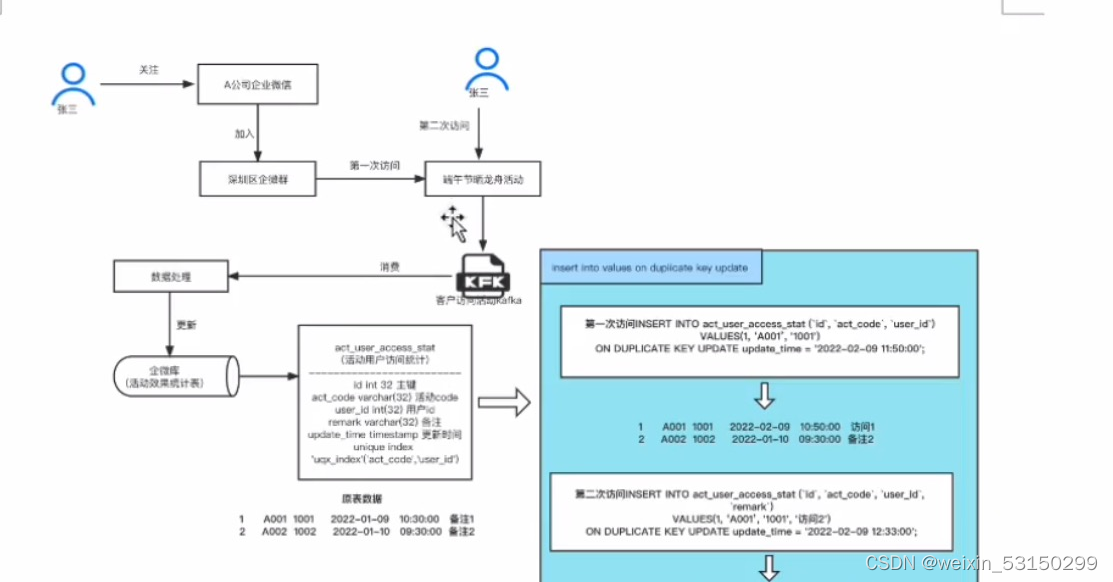
Kafka保证消息幂等以及解决方案
1、幂等的基本概念 幂等简单点讲,就是用户对于同一操作发起的一次请求或者多次请求的结果是一致的,不会产生任何副作用。幂等分很多种,比如接口的幂等、消息的幂等,它是分布式系统设计时必须要考虑的一个方面。 查询操作(天然幂等…...
接口测试用例设计
接口测试...
wireshark抓rtp包,提取出H265裸流数
调试rtsp收发流时,经常会需要抓包以确认是网络问题还是程序问题还是其它问题。通过tcpdump或者wireshark抓到的包通常是rtp流,保存为.pcap格式文件后中,可通过wireshark进行解析,得出h264裸流,并保存为文件。 1.wires…...
Excel往Word复制表格时删除空格
1.背景 在编写文档,经常需要从Excel往Word里复制表格 但是复制过去的表格前面会出现空格(缩进) 再WPS中试了很多方法,终于摆脱了挨个删除的困扰 2. WPS排版中删除 选择表格菜单栏-选在【开始】-【排版】选择【更多段落处理】-【段…...
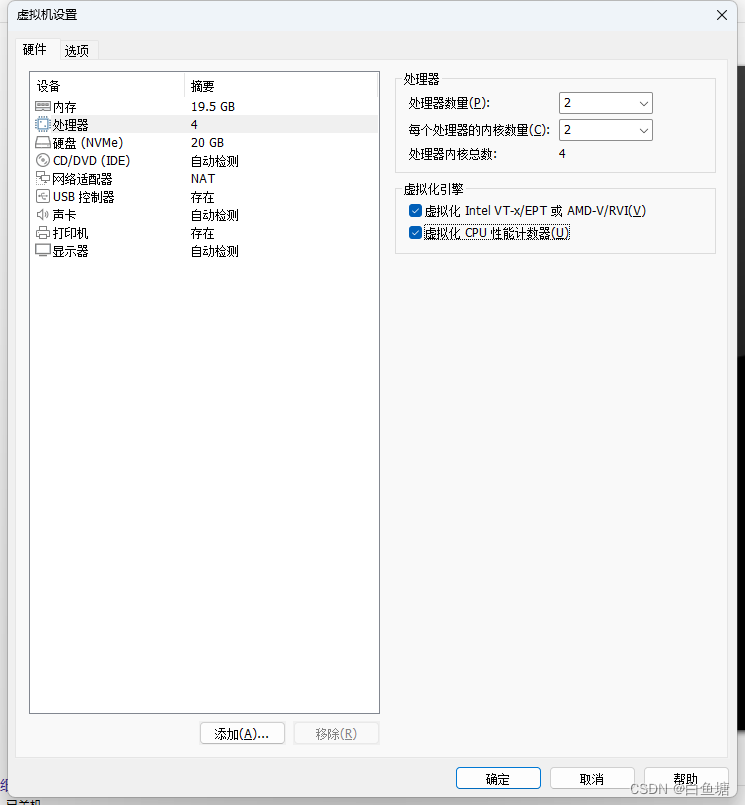
客户机操作系统已禁用 CPU。请关闭或重置虚拟机(解决)
解决: 关闭虚拟机进入设置点击处理器给虚拟化引擎两个勾上确认后重新即可...
UnityShaderLab —— 简单的流光shader
原理: 就是在原先的模型表面叠加一层可以流动的图片, 算法代码: float2 tex; tex float2(i.uv.x - _Time.x * _Speed,i.uv.y); fixed4 col0 tex2D(_Tex, tex)* _Strenth; fixed4 col1 tex2D(_MainTex, i.uv); return col0 col1; 这里…...

北京理工大学:数据中心节能降碳之算电协同——背景、技术、实践和展望 2026
这份由北京理工大学 2026 年初发布的《数据中心节能降碳之算电协同:背景、技术、实践和展望》报告,围绕算电协同,从背景、技术、实践、展望四方面系统分析,核心是推动算力与电力、热力深度融合,助力数据中心节能降碳、…...
)
X.509证书格式(SPDM协议)
字段名称含义用途示例待签名内容(tbsCertificate)Version (版本)含义: 证书版本号。取值: v1(0), v2(1), v3(2)。互联网 PKI 必须使用 v3 (值为 2)。告诉解析程序该按照哪个标准来读取后续的字段(目前绝大多数为 v3)。Version: 3 (0x2)Serial Number (序…...

抖音批量下载工具终极指南:3分钟实现无水印高效下载
抖音批量下载工具终极指南:3分钟实现无水印高效下载 【免费下载链接】douyin-downloader A practical Douyin downloader for both single-item and profile batch downloads, with progress display, retries, SQLite deduplication, and browser fallback support…...

政企级无人机管理系统,如何用一套方案搞定多行业巡检?
一、为什么政企客户越来越倾向私有化无人机平台?在低空经济政策收紧、数据安全要求趋严的今天,很多单位在采购无人机管理系统时,已经不再满足于 “能用就行”。公有云平台无法部署在政务内网,数据出网存在合规风险;通用…...

AI行业的“伦理困境”:隐私保护、算法偏见与失业问题
在人工智能技术飞速发展的今天,软件测试行业正经历着前所未有的变革。AI测试工具的广泛应用,极大提升了测试效率,改变了传统测试流程。然而,技术进步的同时,一系列伦理困境也随之而来,隐私保护、算法偏见与…...

AI英语智能体的开发
构建一个专门用于英语学习的AI智能体(AI Agent),核心在于如何将大语言模型(LLM)的通用能力,转化为符合二语习得(SLA)理论的教学逻辑。这类智能体不仅需要“懂英语”,更需…...

帆软FineReport 10升级实战:从路径映射到安全配置的完整指南
1. 从FineReport 9到10的升级背景与准备工作 最近接手了一个企业级报表系统的升级项目,需要将现有的FineReport 9环境迁移到最新的10版本。在实际操作过程中发现,这不仅仅是简单的版本替换,而是涉及到路径映射、参数调整、安全配置等多个关键…...

深入解析RISC-V CLINT:多核中断与定时器编程实战
1. 项目概述:深入理解SiFive U54内核的CLINT如果你正在基于SiFive的Freedom U540 SoC或者类似的RISC-V多核平台进行嵌入式开发,特别是涉及到操作系统移植、多核启动或者中断管理,那么“CLINT”(Core-Local Interruptor,…...

VCSA底层网络配置实战:从IP修改到SSH登录的运维指南
1. 环境准备与基础概念 刚接触VMware vCenter Server Appliance(VCSA)的朋友可能会觉得底层配置有点神秘。其实就像给新买的智能手机设置Wi-Fi一样,我们需要根据实际网络环境调整它的"网络身份"。VCSA本质上是个预配置的Linux虚拟机…...

AzurLaneAutoScript:解放双手的碧蓝航线智能自动化脚本
AzurLaneAutoScript:解放双手的碧蓝航线智能自动化脚本 【免费下载链接】AzurLaneAutoScript Azur Lane bot (CN/EN/JP/TW) 碧蓝航线脚本 | 无缝委托科研,全自动大世界 项目地址: https://gitcode.com/gh_mirrors/az/AzurLaneAutoScript 还在为《…...