项目管理与SSM框架(二)| Spring
Spring简介
Spring是一个开源框架,为简化企业级开发而生。它以IOC(控制反转)和AOP(面向切面)为思想内核,提供了控制层
SpringMVC、数据层SpringData、服务层事务管理等众多技术,并可以整合众多第三方框架。
Spring将很多复杂的代码变得优雅简洁,有效的降低代码的耦合度,极大的方便项目的后期维护、升级和扩展。
Spring官网地址:https://spring.io/
Spring体系结构
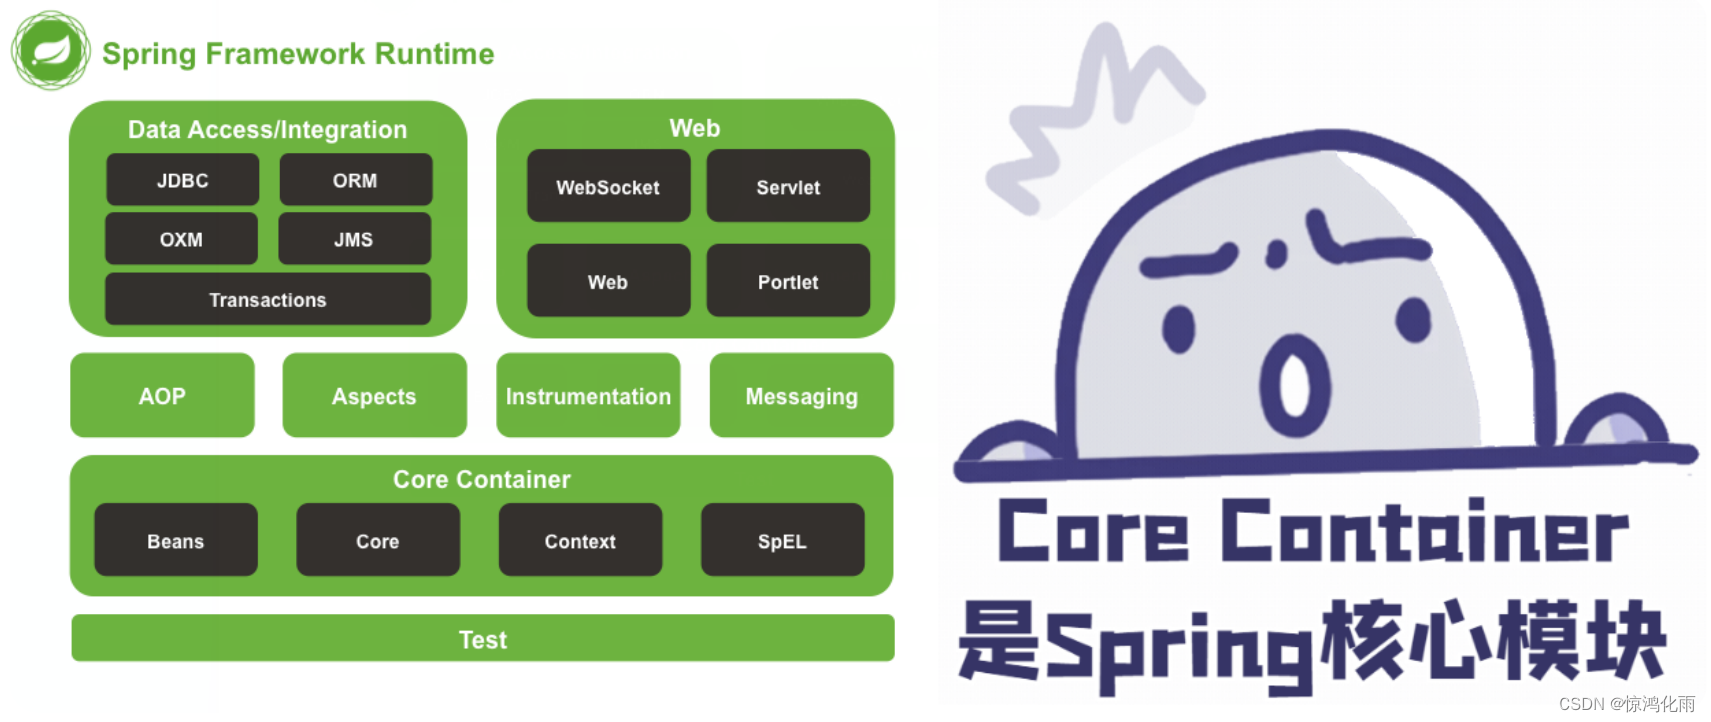
Spring框架根据不同的功能被划分成了多个模块,这些模块可以满足一切企业级应用开发的需求,在开发过程中可以根据需求有选择性地使用所需要的模块。
- Core Container:Spring核心模块,任何功能的使用都离不开该模块,是其他模块建立的基础。
- Data Access/Integration:该模块提供了数据持久化的相应功能。
- Web:该模块提供了web开发的相应功能。
- AOP:提供了面向切面编程实现
- Aspects:提供与AspectJ框架的集成,该框架是一个面向切面编程框架。
- Instrumentation:提供了类工具的支持和类加载器的实现,可以在特定的应用服务器中使用。
- Messaging:为Spring框架集成一些基础的报文传送应用
- Test:提供与测试框架的集成
IOC_控制反转思想
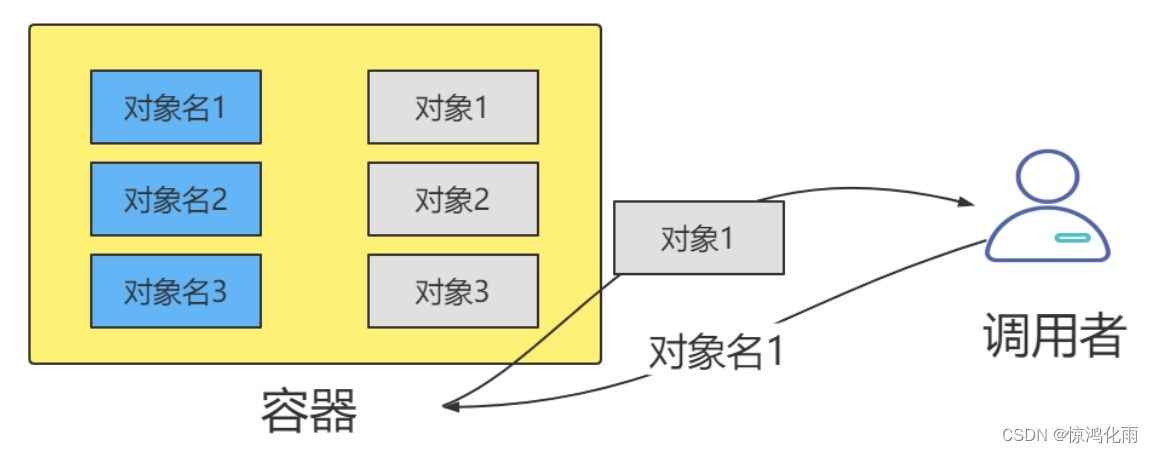
IOC(Inversion of Control) :程序将创建对象的权利交给框架。
之前在开发过程中,对象实例的创建是由调用者管理的
这种写法有两个缺点:
- 浪费资源:StudentService调用方法时即会创建一个对象,如果不断调用方法则会创建大量StudentDao对象。
- 代码耦合度高:假设随着开发,我们创建了StudentDao另一个更加完善的实现类StudentDaoImpl2,如果在StudentService中想使用StudentDaoImpl2,则必须修改源码。
而IOC思想是将创建对象的权利交给框架,框架会帮助我们创建对象,分配对象的使用,控制权由程序代码转移到了框架中,控制权
发生了反转,这就是Spring的IOC思想。而IOC思想可以完美的解决以上两个问题。
IOC_Spring实现IOC
- 创建Maven工程,引入依赖
<dependencies><dependency><groupId>org.springframework</groupId><artifactId>spring-context</artifactId><version>5.3.13</version></dependency><dependency><groupId>junit</groupId><artifactId>junit</artifactId><version>4.12</version><scope>test</scope></dependency>
</dependencies>
- 创建POJO类、Dao类和接口
public class Student {private int id;private String name;private String address;// 省略getter/setter/构造方法/tostring
}
public interface StudentDao {// 根据id查询学生Student findById(int id);
}
public class StudentDaoImpl implements StudentDao{@Overridepublic Student findById(int id) {// 模拟从数据库查找出学生return new Student(1,"程序员","北京");}
}
- 编写xml配置文件,配置文件中配置需要Spring帮我们创建的对象
<?xml version="1.0" encoding="UTF-8"?>
<beans xmlns="http://www.springframework.org/schema/beans"xmlns:xsi="http://www.w3.org/2001/XMLSchema-instance"xsi:schemaLocation="http://www.springframework.org/schema/beanshttp://www.springframework.org/schema/beans/spring-beans.xsd"><bean id="studentDao" class="com.gb.dao.StudentDaoImpl"></bean>
</beans>
- 测试从Spring容器中获取对象。
public class TestContainer {@Testpublic void t1(){// 创建Spring容器ApplicationContext ac = new ClassPathXmlApplicationContext("bean.xml");// 从容器获取对象StudentDao studentDao1 = (StudentDao) ac.getBean("studentDao");StudentDao studentDao2 = (StudentDao) ac.getBean("studentDao");System.out.println(studentDao1.hashCode());System.out.println(studentDao2.hashCode());System.out.println(studentDao1.findById(1));}
}
IOC_Spring容器类型
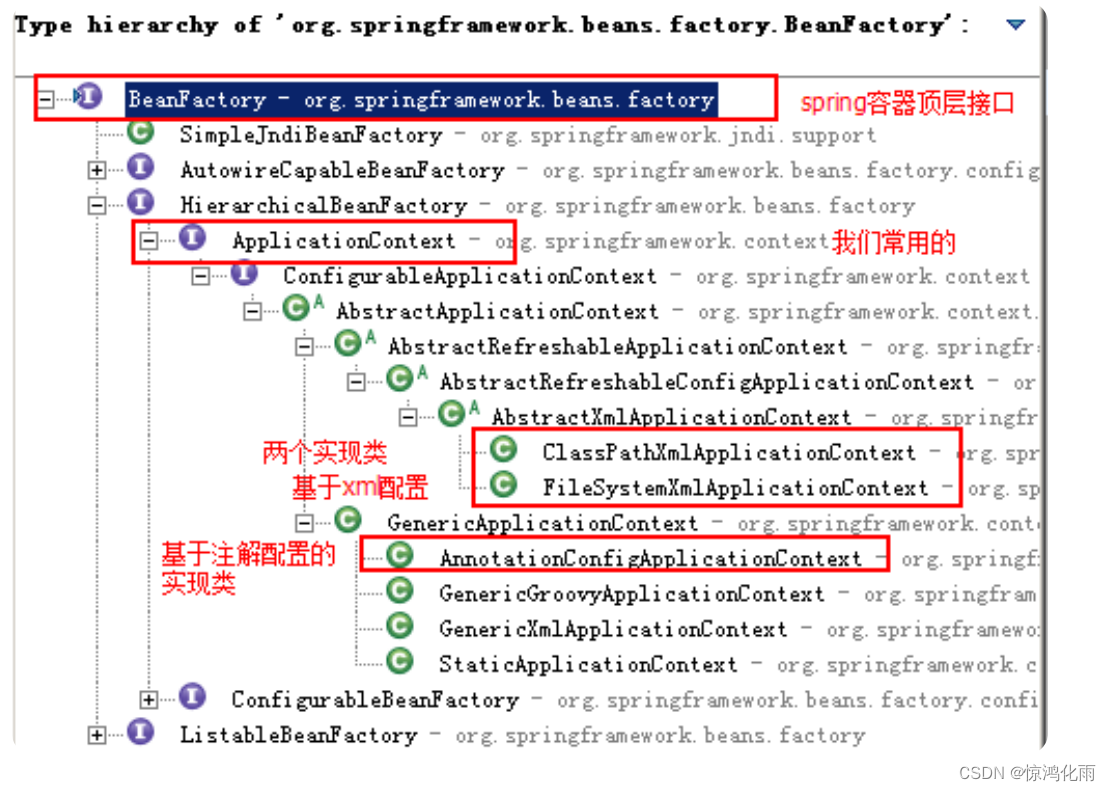
容器接口
- BeanFactory:BeanFactory是Spring容器中的顶层接口,它可以对Bean对象进行管理。
- ApplicationContext:ApplicationContext是BeanFactory的子接口。它除了继承 BeanFactory的所有功能外,还添加了对国际化、资源访问、事件传播等方面的良好支持。
ApplicationContext有以下三个常用实现类:
- ClassPathXmlApplicationContext:该类可以从项目中读取配置文件
- FileSystemXmlApplicationContext:该类从磁盘中读取配置文件
- AnnotationConfigApplicationContext:使用该类不读取配置文件,而是会读取注解
@Test
public void t2(){// 创建spring容器//       ApplicationContext ac = new ClassPathXmlApplicationContext("bean.xml");
ApplicationContext ac = new FileSystemXmlApplicationContext("C:\\Users\\a\\IdeaProjects\\spring_demo\\src\\main\\resources\\bean.xml");// 从容器中获取对象StudentDao userDao = (StudentDao)ac.getBean("studentDao");System.out.println(userDao);System.out.println(userDao.findById(1));
}
IOC_对象的创建方式
使用构造方法
Spring默认使用类的空参构造方法创建bean:
使用工厂类的方法
Spring可以调用工厂类的方法创建bean:
- 创建工厂类,工厂类提供创建对象的方法:
public class StudentDaoFactory {public StudentDao getStudentDao(){return new StudentDaoImpl(1);}
}
- 在配置文件中配置创建bean的方式为工厂方式。
<bean id="studentDaoFactory" class="com.gb.dao.StudentDaoFactory"></bean>
<!--   id:bean对象的id,factory-bean:工厂对象的id,factory-method:工厂方法 -->
<bean id="studentDao" factory-bean="studentDaoFactory" factory-method="getStudentDao"></bean>
使用工厂类的静态方法
Spring可以调用工厂类的静态方法创建bean:
<!-- id:bean的id class:工厂全类名 factory-method:工厂静态方法   -->
<bean id="studentDao" class="com.gb.dao.StudentDaoFactory2" factory-method="getStudentDao"></bean>
IOC_对象的创建策略
Spring通过配置 <bean> 中的 scope 属性设置对象的创建策略,共有五种创建策略:
- singleton:单例,默认策略。整个项目只会创建一个对象,通过
<bean>中的 lazy-init 属性可以设置单例对象的创建时机:
lazy-init=“false”(默认):立即创建,在容器启动时会创建配置文件中的所有Bean对象。
lazy-init=“true”:延迟创建,第一次使用Bean对象时才会创建。
- prototype:多例,每次从容器中获取时都会创建对象。
- request:每次请求创建一个对象,只在web环境有效。
- session:每次会话创建一个对象,只在web环境有效。
- gloabal-session:一次集群环境的会话创建一个对象,只在web环境有效。
IOC_对象的销毁时机
对象的创建策略不同,销毁时机也不同:
- singleton:对象随着容器的销毁而销毁。
- prototype:使用JAVA垃圾回收机制销毁对象。
- request:当处理请求结束,bean实例将被销毁。
- session:当HTTP Session最终被废弃的时候,bean也会被销毁掉。
- gloabal-session:集群环境下的session销毁,bean实例也将被销毁。
IOC_生命周期方法
Bean对象的生命周期包含创建——使用——销毁,Spring可以配置Bean对象在创建和销毁时自动执行的方法:
- 定义生命周期方法
public class StudentDaoImpl2 implements
StudentDao{// 创建时自动执行的方法public void init(){System.out.println("创建StudentDao!!!");}// 销毁时自动执行的方法public void destory(){System.out.println("销毁StudentDao!!!");}
}
- 配置生命周期方法
<!-- init-method:创建对象时执行的方法
destroy-method:销毁对象时执行的方法 -->
<bean id="studentDao" class="com.gb.dao.StudentDaoImpl2" scope="singleton" init-method="init" destroy-method="destory"></bean>
- 测试
@Test
public void t3(){// 创建Spring容器ClassPathXmlApplicationContext ac =new ClassPathXmlApplicationContext("bean1.xml");// 销毁Spring容器,ClassPathXmlApplicationContext才有销毁容器的方法ac.close();
}
IOC_获取Bean对象的方式
通过id/name获取
- 配置文件
<bean name="studentDao" class="com.gb.dao.StudentDaoImpl2"></bean>
<bean id="studentDao" class="com.gb.dao.StudentDaoImpl2"></bean>
- 获取对象
StudentDao studentDao = (StudentDao)ac.getBean("studentDao");
通过类型获取
- 配置文件
<bean name="studentDao" class="com.gb.dao.StudentDaoImpl2"></bean>
- 获取对象
StudentDao studentDao = (StudentDao)ac.getBean("StudentDao.class");
可以看到使用类型获取不需要强转。
通过类型+id/name获取
虽然使用类型获取不需要强转,但如果在容器中有一个接口的多个实现类对象,则获取时会报错,此时需要使用类型+id/name获取
- 配置文件
<bean name="studentDao" class="com.gb.dao.StudentDaoImpl2"></bean>
<bean name="studentDao1" class="com.gb.dao.StudentDaoImpl"></bean>
- 获取对象
StudentDao studentDao2 = ac.getBean("studentDao",StudentDao.class);
DI_什么是依赖注入
依赖注入(Dependency Injection,简称DI),它是Spring控制反转思想的具体实现。
控制反转将对象的创建交给了Spring,但是对象中可能会依赖其他对象。比如service类中要有dao类的属性,我们称service依赖于dao。
简单来说,控制反转是创建对象,依赖注入是为对象的属性赋值。
DI_依赖注入方式
Setter注入
1 被注入类编写属性的setter方法
public class StudentService {private StudentDao studentDao;public void setStudentDao(StudentDao studentDao) {this.studentDao = studentDao;}
}
- 配置文件中,给需要注入属性值的
<bean>中设置<property>
<bean id="studentDao" class="com.gb.dao.StudentDaoImpl"></bean>
<bean id="studentService" class="com.gb.service.StudentService"><!--依赖注入--><!--name:对象的属性名 ref:容器中对象的id值--><property name="studentDao" ref="studentDao"></property>
</bean>
构造方法注入
- 被注入类编写有参的构造方法
public class StudentService {private StudentDao studentDao;public StudentService(StudentDao studentDao) {this.studentDao = studentDao;}
}
- 给需要注入属性值的
<bean>中设置<constructor-arg>
<bean id="studentDao" class="com.gb.dao.StudentDaoImpl"></bean>
<bean id="studentService" class="com.gb.service.StudentService"><!-- 依赖注入 --><!-- name:对象的属性名 ref:配置文件中注入对象的id值 --><constructor-arg name="studentDao" ref="studentDao"></constructor-arg>
</bean>
自动注入
自动注入不需要在 <bean> 标签中添加其他标签注入属性值,而是自动从容器中找到相应的bean对象设置为属性值。
自动注入有两种配置方式:
- 全局配置:在
<beans>中设置 default-autowire 属性可以定义所有bean对象的自动注入策略。- 局部配置:在
<bean>中设置 autowire 属性可以定义当前bean对象的自动注入策略。
autowire的取值如下:
- no:不会进行自动注入。
- default:全局配置default相当于no,局部配置default表示使用全局配置
- byName:在Spring容器中查找id与属性名相同的bean,并进行注入。需要提供set方法。
- byType:在Spring容器中查找类型与属性类型相同的bean,并进行注入。需要提供set方法。
- constructor:在Spring容器中查找id与属性名相同的bean,并进行注入。需要提供构造方法。
测试自动注入:
- 为依赖的对象提供setter和构造方法:
public class StudentService {// 依赖private StudentDao studentDao;// 构造方法public StudentService() {}public StudentService(StudentDao studentDao) {this.studentDao = studentDao;}// setter方法public void setStudentDao(StudentDao studentDao) {this.studentDao = studentDao;}// 调用依赖的方法public Student findStudentById(int id){return studentDao.findById(id);}
}
- 配置自动注入:
<!-- 根据beanId等于属性名自动注入 -->
<bean id="studentDao" class="com.gb.dao.StudentDaoImpl"></bean>
<bean id="studentService"class="com.gb.service.StudentService" autowire="byName"></bean>
<!-- 根据bean类型等于属性类型自动注入 -->
<bean id="studentDao" class="com.gb.dao.StudentDaoImpl"></bean>
<bean id="studentService" class="com.gb.service.StudentService" autowire="byType"></bean>
<!-- 利用构造方法自动注入 -->
<bean id="studentDao" class="com.gb.dao.StudentDaoImpl"></bean>
<bean id="studentService" class="com.gb.service.StudentService" autowire="constructor"></bean>
<!-- 配置全局自动注入 -->
<beans xmlns="http://www.springframework.org/schema/beans"xmlns:xsi="http://www.w3.org/2001/XMLSchema-instance"xsi:schemaLocation="http://www.springframework.org/schema/beanshttp://www.springframework.org/schema/beans/spring-beans.xsd"default-autowire="constructor">
DI_依赖注入类型
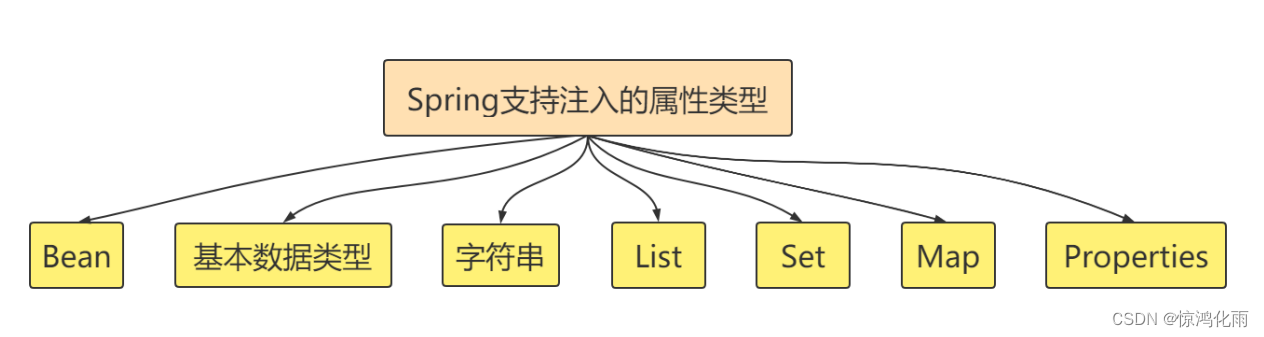
DI支持注入bean类型、基本数据类型和字符串、List集合、Set集合、Map集合、Properties对象类型等,他们的写法如下:
- 准备注入属性的类
public class StudentService {private StudentDao studentDao; // bean属性private String name; //字符串类型private int count; //基本数据类型private List<String> names; // 字符串类型List集合private List<Student> students1; // 对象类型List集合private Set<Student> students2; // 对象类型Set集合private Map<String,String> names2; //字符串类型Map集合private Map<String,Student> students3;// 对象类型Map集合private Properties properties;//Properties类型// 省略getter/setter/toString
}
注入bean类型
写法一:
<bean id="studentDao" class="com.gb.dao.StudentDaoImpl"></bean>
<bean id="studentService" class="com.gb.service.StudentService"><property name="studentDao" ref="studentDao"></property>
</bean>
写法二:
<bean id="studentDao" class="com.itbaizhan.dao.StudentDaoImpl"></bean>
<bean id="studentService" class="com.itbaizhan.service.StudentService"><property name="studentDao" ><ref bean="studentDao"></ref></property>
</bean>
注入基本数据类型
<bean id="studentService"
class="com.itbaizhan.service.StudentService"><!-- 写法一 name:属性名 value:属性值--><property name="name" value="程序员"></property><!-- 写法二 name:属性名 value:属性值--><property name="count"><value>10</value></property>
</bean>
注入List集合
<bean id="studentService" class="com.gb.service.StudentService"><!-- 简单数据类型List集合 name:属性名 --><property name="names"><list><value>程序员</value><value>悍匪</value></list></property><!-- 对象类型List集合 name:属性名 --><property name="students1"><list><bean class="com.gb.domain.Student"><property name="id" value="1"/><property name="name" value="Java"/><property name="address" value="北京"/></bean><bean class="com.gb.domain.Student"><property name="id" value="2"/><property name="name" value="大数据"/><property name="address" value="北京"/></bean></list></property>
</bean>
注入Set集合
<bean id="studentService" class="com.itbaizhan.service.StudentService"><!-- Set集合 --><property name="students2"><set><bean class="com.itbaizhan.domain.Student"><property name="id" value="1"/><property name="name" value="悍匪"/><property name="address" value="北京"/></bean><bean class="com.itbaizhan.domain.Student"><property name="id" value="2"/><property name="name" value="程序员"/><property name="address"value="北京"/></bean></set></property>
</bean>
注入Map集合
简单数据类型Map集合:
<bean id="studentService" class="com.gb.service.StudentService"><property name="names2"><map><entry key="student1" value="bz"/><entry key="student2" value="sxt"/></map></property>
</bean>
对象类型Map集合:
<bean id="studentService" class="com.gb.service.StudentService"><property name="students3"><map><entry key="student1" value-ref="s1"/><entry key="student2" valueref="s2"/></map></property>
</bean>
<bean id="s1"class="com.gb.domain.Student"><property name="id" value="1"/><property name="name" value="尚学堂"/><property name="address" value="北京"/>
</bean>
<bean id="s2" class="com.gb.domain.Student"><property name="id" value="2"/><property name="name" value="百战"/><property name="address" value="北京"/>
</bean>
注入Properties对象
<bean id="studentService" class="com.gb.service.StudentService"><property name="properties"><props><prop key="配置1">值1</prop><prop key="配置2">值2</prop></props></property>
</bean>
注解实现IOC
准备工作
- 创建一个新的Spring项目。
- 编写pojo,dao,service类。
- 编写空的配置文件,如果想让该文件支持注解,需要添加新的约束:
<?xml version="1.0" encoding="UTF-8"?>
<beans xmlns="http://www.springframework.org/schema/beans"xmlns:context="http://www.springframework.org/schema/context"xmlns:xsi="http://www.w3.org/2001/XMLSchema-instance"xsi:schemaLocation="http://www.springframework.org/schema/beanshttp://www.springframework.org/schema/beans/spring-beans.xsdhttp://www.springframework.org/schema/contexthttp://www.springframework.org/schema/context/spring-context.xsd">
</beans>
@Component注解
作用:用于创建对象,放入Spring容器,相当于 <bean id="" class="">
位置:类上方
注意:
- 要在配置文件中配置扫描的包,扫描到该注解才能生效。
<!-- 扫描包 --><context:component-scan base-package="com.gb"></context:component-scan>
@Component 注解配置bean的默认id是首字母小写的类名。也可以手动设置bean的id值。
// 此时bean的id为studentDaoImpl
@Component
public class StudentDaoImpl implements StudentDao{public Student findById(int id) {// 模拟根据id查询学生return new Student(1,"程序员","北京");}
}
// 此时bean的id为studentDao
@Component("studentDao")
public class StudentDaoImpl implements StudentDao{public Student findById(int id) {// 模拟根据id查询学生return new Student(1,"程序员","北京");}
}
@Repository、@Service、@Controller
作用:这三个注解和@Component的作用一样,使用它们是为了区分该类属于什么层。
位置:
- @Repository用于Dao层
- @Service用于Service层
- @Controller用于Controller层
@Scope
作用:指定bean的创建策略
位置:类上方
取值:singleton prototype request session globalsession
@Service
@Scope("singleton")
public class StudentService {}
@Autowired
作用:从容器中查找符合属性类型的对象自动注入属性中。用于代替 <bean> 中的依赖注入配置。
位置:属性上方、setter方法上方、构造方法上方。
注意:
- @Autowired 写在属性上方进行依赖注入时,可以省略setter方法。
- 容器中没有对应类型的对象会报错
- 容器中有多个对象匹配类型时,会找beanId等于属性名的对象,找不到会报错。
@Qualifier
作用:在按照类型注入对象的基础上,再按照bean的id注入。
位置:属性上方
注意:@Qualifier必须和@Autowired一起使用。
@Value
作用:注入String类型和基本数据类型的属性值。
位置:属性上方
@Configuration
纯注解实现IOC需要一个Java类代替xml文件。这个Java类上方需要添加@Configuration,表示该类是一个配置类,作用是代替配置文件。
@Configuration
public class SpringConfig {
}
@ComponentScan
作用:指定spring在初始化容器时扫描的包。
位置:配置类上方
@Configuration
@ComponentScan("com.gb")
public class SpringConfig {
}
@PropertySource
作用:代替配置文件中的 <context:property-placeholder> 扫描配置文件
位置:配置类上方
注意:配置文件位置前要加关键字 classpath
@Configuration
@PropertySource("classpath:db.properties")
public class JdbcConfig {@Value("${jdbc.username}")private String username;@Value("${jdbc.password}")private String password;
}
@Bean
作用:将方法的返回值对象放入Spring容器中。如果想将第三方类的对象放入容器,可以使用@Bean
位置:配置类的方法上方。
属性:name:给bean对象设置id
注意:@Bean修饰的方法如果有参数,spring会根据参数类型从容器中查找可用对象。
@Import
作用:如果配置过多,会有多个配置类,该注解可以为主配置类导入其他配置类
位置:主配置类上方
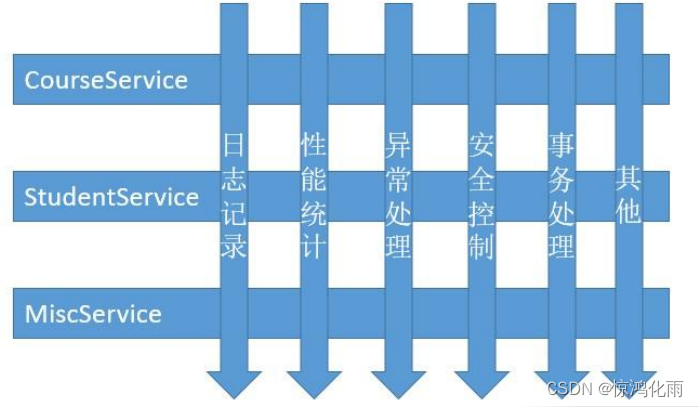
SpringAOP_AOP简介
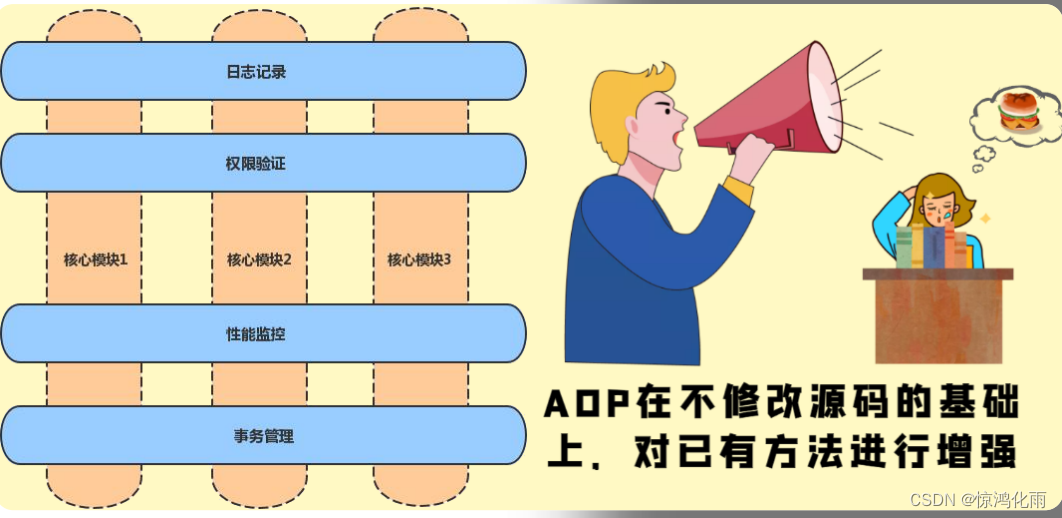
AOP的全称是Aspect Oriented Programming,即面向切面编程。是实现功能统一维护的一种技术,它将业务逻辑的各个部分进行隔
离,使开发人员在编写业务逻辑时可以专心于核心业务,从而提高了开发效率。
- 作用:在不修改源码的基础上,对已有方法进行增强。
- 实现原理:动态代理技术。
- 优势:减少重复代码、提高开发效率、维护方便
- 应用场景:事务处理、日志管理、权限控制、异常处理等方面。
SpringAOP_AOP相关术语
| 名称 | 说明 |
|---|---|
| Joinpoint | (连接点) 指能被拦截到的点,在Spring中只有方法能被拦截。 |
| Pointcut | (切点) 指要对哪些连接点进行拦截,即被增强的方法。 |
| Advice | (通知) 指拦截后要做的事情,即切点被拦截后执行的方法。 |
| Aspect | (切面) 切点+通知称为切面 |
| Target | (目标) 被代理的对象 |
| Proxy | (代理) 代理对象 |
| Weaving | (织入) 生成代理对象的过程 |
SpringAOP_AOP入门
AspectJ是一个基于Java语言的AOP框架,在Spring框架中建议使用AspectJ实现AOP。
接下来我们写一个AOP入门案例:dao层的每个方法结束后都可以打印一条日志:
- 引入依赖
<!-- spring -->
<dependency><groupId>org.springframework</groupId><artifactId>springcontext</artifactId><version>5.3.13</version>
</dependency>
<!-- AspectJ -->
<dependency><groupId>org.aspectj</groupId><artifactId>aspectjweaver</artifactId><version>1.8.7</version>
</dependency>
<!-- junit -->
<dependency><groupId>junit</groupId><artifactId>junit</artifactId><version>4.12</version><scope>test</scope>
</dependency>
- 编写连接点
@Repository
public class UserDao {public void add(){System.out.println("用户新增");}public void delete(){System.out.println("用户删除");}public void update(){System.out.println("用户修改");}
}
- 编写通知类
public class MyAspectJAdvice {// 后置通知public void myAfterReturning() {System.out.println("打印日志...");}
}
- 配置切面
<?xml version="1.0" encoding="UTF-8"?>
<beans xmlns="http://www.springframework.org/schema/beans"xmlns:context="http://www.springframework.org/schema/context"xmlns:xsi="http://www.w3.org/2001/XMLSchema-instance" xmlns:tx="http://www.springframework.org/schema/tx"xmlns:aop="http://www.springframework.org/schema/aop"xsi:schemaLocation="http://www.springframework.org/schema/beanshttp://www.springframework.org/schema/beans/spring-beans.xsdhttp://www.springframework.org/schema/contexthttp://www.springframework.org/schema/context/spring-context.xsd http://www.springframework.org/schema/tx 		http://www.springframework.org/schema/tx/spring-tx.xsd http://www.springframework.org/schema/aop 	https://www.springframework.org/schema/aop/spring-aop.xsd"><context:component-scan base-package="com.gb"></context:component-scan><!-- 通知对象 --><bean id="myAspectJAdvice" class="com.gb.advice.MyAspectAdvice"></bean><!-- 配置AOP --><aop:config><!-- 配置切面 --><aop:aspect ref="myAspectJAdvice"><!-- 配置切点 --><aop:pointcut id="myPointcut" expression="execution(* com.gb.dao.UserDao.*(..))"/><!-- 配置通知 --><aop:after-returning method="myAfterReturning" pointcut-ref="myPointcut"/></aop:aspect></aop:config>
</beans>
SpringAOP_通知类型
AOP有以下几种常用的通知类型:
| 通知类型 | 描述 |
|---|---|
| 前置通知 | 在方法执行前添加功能 |
| 后置通知 | 在方法正常执行后添加功能 |
| 异常通知 | 在方法抛出异常后添加功能 |
| 最终通知 | 无论方法是否抛出异常,都会执行该通知 |
| 环绕通知 | 在方法执行前后添加功能 |
- 编写通知方法
// 通知类
public class MyAspectAdvice {// 后置通知public void myAfterReturning(JoinPoint joinPoint) {System.out.println("切点方法名:" + joinPoint.getSignature().getName());System.out.println("目标对象:" + joinPoint.getTarget());System.out.println("打印日志" + joinPoint.getSignature().getName() + "方法被执行了!");}// 前置通知public void myBefore() {System.out.println("前置通知...");}// 异常通知public void myAfterThrowing(Exception ex) {System.out.println("异常通知...");System.err.println(ex.getMessage());}// 最终通知public void myAfter() {System.out.println("最终通知");}// 环绕通知public Object myAround(ProceedingJoinPoint proceedingJoinPoint) throws Throwable {System.out.println("环绕前");Object obj = proceedingJoinPoint.proceed(); // 执行方法System.out.println("环绕后");return obj;}
}
- 配置切面
<!-- 配置AOP -->
<aop:config><!-- 配置切面 --><aop:aspect ref="myAspectJAdvice"><!-- 配置切点 --> <aop:pointcut id="myPointcut" expression="execution(* com.gb.dao.UserDao.*(..))"/><!-- 前置通知 --><aop:before method="myBefore" pointcut-ref="myPointcut"></aop:before><!-- 后置通知 --><aop:after-returning method="myAfterReturning" pointcutref="myPointcut"/><!-- 异常通知 --><aop:after-throwing method="myAfterThrowing" pointcutref="myPointcut" throwing="ex"/><!-- 最终通知 --><aop:after method="myAfter" pointcut-ref="myPointcut"></aop:after><!-- 环绕通知 --><aop:around method="myAround" pointcut-ref="myPointcut"></aop:around></aop:aspect>
</aop:config>
SpringAOP_切点表达式
使用AspectJ需要使用切点表达式配置切点位置,写法如下:
-
标准写法:访问修饰符 返回值 包名.类名.方法名(参数列表)
-
访问修饰符可以省略。
-
返回值使用 * 代表任意类型。
-
包名使用 * 表示任意包,多级包结构要写多个 * ,使用 *… 表示任意包结构
-
类名和方法名都可以用 * 实现通配。
-
参数列表
- 基本数据类型直接写类型
- 引用类型写 包名.类名
- * 表示匹配一个任意类型参数
- … 表示匹配任意类型任意个数的参数
-
全通配: * *…*.*(…)
SpringAOP_多切面配置
我们可以为切点配置多个通知,形成多切面,比如希望dao层的每个方法结束后都可以打印日志并发送邮件:
- 编写发送邮件的通知:
public class MyAspectJAdvice2 {// 后置通知public void myAfterReturning(JoinPoint joinPoint) {System.out.println("发送邮件");}
}
- 配置切面:
<!-- 通知对象 -->
<bean id="myAspectJAdvice" class="com.itbaizhan.advice.MyAspectAdvice"></bean>
<bean id="myAspectJAdvice2" class="com.itbaizhan.advice.MyAspectAdvice2"></bean>
<!-- 配置AOP -->
<aop:config><!-- 配置切面 --><aop:aspect ref="myAspectJAdvice"><!-- 配置切点 --><aop:pointcut id="myPointcut" expression="execution(* *..*.*(..))"/><!-- 后置通知 --><aop:after-returning method="myAfterReturning" pointcut-ref="myPointcut"/></aop:aspect><aop:aspect ref="myAspectJAdvice2"><aop:pointcut id="myPointcut2" expression="execution(* com.gb.dao.UserDao.*(..))"/><aop:after-returning method="myAfterReturning" pointcut-ref="myPointcut2"/></aop:aspect>
</aop:config>
SpringAOP_注解配置AOP
Spring可以使用注解代替配置文件配置切面:
- 在xml中开启AOP注解支持
<!-- 开启注解配置Aop --><aop:aspectj-autoproxy></aop:aspectj-autoproxy>
- 在通知类上方加入注解 @Aspect
- 在通知方法上方加入注解
@Before/@AfterReturning/@AfterThrowing/@After/@Around
@Aspect
@Component
public class MyAspectJAdvice {@Pointcut("execution(* com.gb.dao.UserDao.*(..))")public void point(){}// 后置通知@AfterReturning("point()")public void myAfterReturning(JoinPoint joinPoint) {System.out.println("切点方法名:" + joinPoint.getSignature().getName());System.out.println("目标对象:" + joinPoint.getTarget());System.out.println("打印日志" + joinPoint.getSignature().getName() + "方法被执行了!");}@Before("point()")// 前置通知public void myBefore() {System.out.println("前置通知...");}@AfterThrowing(value = "point()",throwing = "ex")// 异常通知public void myAfterThrowing(Exception ex) {System.out.println("异常通知...");System.err.println(ex.getMessage());}@After("point()")// 最终通知public void myAfter() {System.out.println("最终通知");}@Around("point()")// 环绕通知public Object myAround(ProceedingJoinPoint proceedingJoinPoint) throws Throwable {System.out.println("环绕前");Object obj = proceedingJoinPoint.proceed(); // 执行方法System.out.println("环绕后");return obj;}
}
SpringAOP_原生Spring实现AOP
除了AspectJ,Spring支持原生方式实现AOP。
- 引入依赖
<!-- AOP -->
<dependency><groupId>org.springframework</groupId><artifactId>spring-aop</artifactId><version>5.3.13</version>
</dependency>
- 编写通知类
package com.gb.advice;import org.aopalliance.intercept.MethodInterceptor;
import org.aopalliance.intercept.MethodInvocation;
import org.springframework.aop.AfterReturningAdvice;
import org.springframework.aop.MethodBeforeAdvice;
import org.springframework.aop.ThrowsAdvice;import java.lang.reflect.Method;public class SpringAop implements MethodBeforeAdvice, AfterReturningAdvice, ThrowsAdvice, MethodInterceptor {/*** 前置通知* @param method 目标方法* @param args 目标方法的参数列表* @param target 目标对象* @throws Throwable*/@Overridepublic void before(Method method, Object[] args, Object target) throws Throwable {System.out.println("前置通知");}/*** 后置通知* @param returnValue 目标方法的返回值* @param method 目标方法* @param args 目标方法的参数列表* @param target 目标对象* @throws Throwable*/@Overridepublic void afterReturning(Object returnValue, Method method, Object[] args, Object target) throws Throwable {System.out.println("后置通知");}/*** 环绕通知* @param invocation 目标方法* @return* @throws Throwable*/@Overridepublic Object invoke(MethodInvocation invocation) throws Throwable {System.out.println("环绕前");Object proceed = invocation.proceed();System.out.println("环绕后");return proceed;}/*** 异常通知* @param ex 异常对象*/public void afterThrowing(Exception ex){System.out.println("发生异常了!");}
}
Spring原生方式实现AOP时,只支持四种通知类型:
| 通知类型 | 实现接口 |
|:--|:--|
前置通知 | MethodBeforeAdvice
后置通知 |AfterReturningAdvice
异常通知 |ThrowsAdvice
环绕通知 |MethodInterceptor
- 编写配置类
<?xml version="1.0" encoding="UTF-8"?>
<beans xmlns="http://www.springframework.org/schema/beans"xmlns:context="http://www.springframework.org/schema/context"xmlns:xsi="http://www.w3.org/2001/XMLSchema-instance" xmlns:aop="http://www.springframework.org/schema/aop"xsi:schemaLocation="http://www.springframework.org/schema/beanshttp://www.springframework.org/schema/beans/spring-beans.xsdhttp://www.springframework.org/schema/contexthttp://www.springframework.org/schema/context/spring-context.xsd http://www.springframework.org/schema/aop https://www.springframework.org/schema/aop/spring-aop.xsd"><!-- 包扫描 --><context:component-scan base-package="com.gb"></context:component-scan><bean id="springAop" class="com.gb.advice.SpringAop"></bean><!-- 开启注解配置Aop --><aop:aspectj-autoproxy proxy-target-class="true"></aop:aspectj-autoproxy><!-- 配置代理对象 --><bean id="userDaoProxy" class="org.springframework.aop.framework.ProxyFactoryBean"><!-- 配置目标对象 --><property name="target" ref="userDao"></property><!-- 配置通知 --><property name="interceptorNames"><list><value>springAop</value></list></property><!-- 代理对象的生成方式  true:使用CGLib false:使用原生JDK生成--><property name="proxyTargetClass" value="true"></property></bean>
</beans>
- 编写测试类
public class UserDaoTest2 {@Testpublic void testAdd(){ApplicationContext ac = new ClassPathXmlApplicationContext("bean2.xml");UserDao userDao = (UserDao)ac.getBean("userDaoProxy"); // 获取的是代理对象userDao.update();}
}
SpringAOP_SchemaBased实现AOP
SchemaBased(基础模式)配置方式是指使用Spring原生方式定义通知,而使用AspectJ框架配置切面。
- 编写通知类
// Spring原生Aop的通知类
public class SpringAop2 implements MethodBeforeAdvice, AfterReturningAdvice, ThrowsAdvice, MethodInterceptor {/*** 前置通知* @param method 目标方法* @param args 目标方法的参数列表* @param target 目标对象* @throws Throwable*/@Overridepublic void before(Method method, Object[] args, Object target) throws Throwable {System.out.println("前置通知");}/*** 后置通知* @param returnValue 目标方法的返回值* @param method 目标方法* @param args 目标方法的参数列表* @param target 目标对象* @throws Throwable*/@Overridepublic void afterReturning(Object returnValue, Method method, Object[] args, Object target) throws Throwable {System.out.println("后置通知");}/*** 环绕通知* @param invocation 目标方法* @return* @throws Throwable*/@Overridepublic Object invoke(MethodInvocation invocation) throws Throwable {System.out.println("环绕前");Object proceed = invocation.proceed();System.out.println("环绕后");return proceed;}/*** 异常通知* @param ex 异常对象*/public void afterThrowing(Exception ex){System.out.println("发生异常了!");}}
- 配置切面
<?xml version="1.0" encoding="UTF-8"?>
<beans xmlns="http://www.springframework.org/schema/beans"xmlns:context="http://www.springframework.org/schema/context"xmlns:xsi="http://www.w3.org/2001/XMLSchema-instance" xmlns:aop="http://www.springframework.org/schema/aop"xsi:schemaLocation="http://www.springframework.org/schema/beanshttp://www.springframework.org/schema/beans/spring-beans.xsdhttp://www.springframework.org/schema/contexthttp://www.springframework.org/schema/context/spring-context.xsd http://www.springframework.org/schema/aop https://www.springframework.org/schema/aop/spring-aop.xsd"><!-- 包扫描 --><context:component-scan base-package="com.gb"></context:component-scan><bean id="springAop2" class="com.gb.advice.SpringAop2"></bean><!-- 配置切面 --><aop:config><!-- 配置切点--><aop:pointcut id="myPointcut" expression="execution(* com.gb.dao.UserDao.*(..))"/><!-- 配置切面:advice-ref:通知对象 pointcut-ref:切点 --><aop:advisor advice-ref="springAop2" pointcut-ref="myPointcut"/></aop:config>
</beans>
- 测试
public class UserDaoTest3 {@Testpublic void add() {ApplicationContext ac =new ClassPathXmlApplicationContext("applicationContext4.xml");UserDao userDao = (UserDao) ac.getBean("userDao");userDao.add();}
}
Spring整合MyBatis
我们知道使用MyBatis时需要写大量创建SqlSessionFactoryBuilder、SqlSessionFactory、SqlSession等对象的代码,而Spring的作用是帮我们创建和管理对象,所以我们可以使用Spring整合MyBatis,简化MyBatis开发。
搭配环境
<dependencies><!-- mybatis --><dependency><groupId>org.mybatis</groupId><artifactId>mybatis</artifactId><version>3.5.7</version></dependency><!-- mysql驱动包 --><dependency><groupId>mysql</groupId><artifactId>mysql-connector-java</artifactId><version>8.0.26</version></dependency><dependency><groupId>com.alibaba</groupId><artifactId>druid</artifactId><version>1.1.21</version></dependency><!-- spring --><dependency><groupId>org.springframework</groupId><artifactId>spring-context</artifactId><version>5.3.13</version></dependency><dependency><groupId>org.springframework</groupId><artifactId>spring-tx</artifactId><version>5.3.13</version></dependency><dependency><groupId>org.springframework</groupId><artifactId>spring-jdbc</artifactId><version>5.3.13</version></dependency><!-- MyBatis与Spring的整合包,该包可以让Spring创建MyBatis的对象 --><dependency><groupId>org.mybatis</groupId><artifactId>mybatis-spring</artifactId><version>2.0.6</version></dependency><!-- junit,如果Spring5整合junit,则junit版本至少在4.12以上 --><dependency><groupId>junit</groupId><artifactId>junit</artifactId><version>4.12</version><scope>test</scope></dependency><!-- spring整合测试模块 --><dependency><groupId>org.springframework</groupId><artifactId>spring-test</artifactId><version>5.3.13</version></dependency></dependencies>
编写配置文件
编写数据库配置文件db.properties
jdbc.driverClassName=com.mysql.cj.jdbc.Driver
jdbc.url=jdbc:mysql:///student
jdbc.username=root
jdbc.password=521314
创建MyBatis配置文件SqlMapConfig.xml,数据源、扫描接口都交由Spring管理,不需要在MyBatis配置文件中设置。
<?xml version="1.0" encoding="UTF-8"?>
<!DOCTYPE configurationPUBLIC "-//mybatis.org//DTD Config 3.0//EN""http://mybatis.org/dtd/mybatis-3-config.dtd">
<configuration>
</configuration>创建Spring配置文件applicationContext.xml
<?xml version="1.0" encoding="UTF-8"?>
<beans xmlns="http://www.springframework.org/schema/beans"xmlns:context="http://www.springframework.org/schema/context"xmlns:xsi="http://www.w3.org/2001/XMLSchema-instance"xsi:schemaLocation="http://www.springframework.org/schema/beanshttp://www.springframework.org/schema/beans/spring-beans.xsdhttp://www.springframework.org/schema/contexthttp://www.springframework.org/schema/context/spring-context.xsd"><!-- 包扫描 --><context:component-scan base-package="com.gb"></context:component-scan><!-- 读取配置文件 --><context:property-placeholder location="classpath:db.properties"></context:property-placeholder><!-- 创建druid数据源对象 --><bean id="dataSource" class="com.alibaba.druid.pool.DruidDataSource"><property name="driverClassName" value="${jdbc.driverClassName}"></property><property name="url" value="${jdbc.url}"></property><property name="username" value="${jdbc.username}"></property><property name="password" value="${jdbc.password}"></property></bean><!-- Spring创建封装过的SqlSessionFactory --><bean id="sqlSessionFactory" class="org.mybatis.spring.SqlSessionFactoryBean"><property name="dataSource" ref="dataSource"></property></bean><!-- Spring创建封装过的SqlSession -->
<!--    <bean id="sqlSession" class="org.mybatis.spring.SqlSessionTemplate">-->
<!--        <constructor-arg name="sqlSessionFactory" ref="sqlSessionFactory"/>-->
<!--    </bean>--><bean id="mapperScannerConfigurer" class="org.mybatis.spring.mapper.MapperScannerConfigurer"><property name="basePackage" value="com.gb.dao"></property></bean>
</beans>
编写持久层接口和service类
@Repository
public interface StudentDao {// 查询所有学生@Select("select * from student")List<Student> findAll();// 添加学生@Insert("insert into student values(null,#{name},#{sex},#{address})")void add(Student student);
}
@Service
public class StudentService {// SqlSession对象@Autowiredprivate SqlSessionTemplate sqlSession;// 使用SqlSession获取代理对象public List<Student> findAllStudent(){StudentDao studentDao = sqlSession.getMapper(StudentDao.class);return studentDao.findAll();}
}
整合Junit进行单元测试
引入Junit和Spring整合Junit依赖
<!-- junit,如果Spring5整合junit,则junit版本至少在4.12以上 -->
<dependency><groupId>junit</groupId><artifactId>junit</artifactId><version>4.12</version><scope>test</scope>
</dependency>
<!-- spring整合测试模块 -->
<dependency><groupId>org.springframework</groupId><artifactId>spring-test</artifactId><version>5.3.13</version>
</dependency>
编写测试类
// JUnit使用Spring方式运行代码,即自动创建spring容器。
@RunWith(SpringJUnit4ClassRunner.class)
// 告知创建spring容器时读取哪个配置类或配置文件
// 配置类写法:@ContextConfiguration(classes=配置类.class)
@ContextConfiguration("classpath:applicationContext.xml")
public class StudentServiceTest {@Autowiredprivate StudentService studentService;@Testpublic void t1(){List<Student> studentList = studentService.findStudenAll();studentList.forEach(System.out::println);}@Testpublic void t2(){Student student = new Student("龙傲天","男","荒芜大陆");studentService.addStudent(student);}
}
自动创建代理对象
Spring提供了MapperScannerConfigurer对象,该对象可以自动扫描包创建代理对象,并将代理对象放入容器中,此时不需要使用SqlSession手动创建代理对象。
- 创建MapperScannerConfigurer对象
<bean id="mapperScannerConfigurer" class="org.mybatis.spring.mapper.MapperScannerConfigurer"><property name="basePackage" value="com.gb.dao"></property></bean>
- Service类直接使用代理对象即可
@Service
public class StudentService {// 直接注入代理对象@Autowiredprivate StudentDao studentDao;// 直接使用代理对象public void addStudent(Student student){studentDao.add(student);}
}
Spring事务_事务简介
事务:不可分割的原子操作。即一系列的操作要么同时成功,要么同时失败。
开发过程中,事务管理一般在service层,service层中可能会操作多次数据库,这些操作是不可分割的。否则当程序报错时,可能会造成数据异常。
Spring事务_Spring事务管理方案
在Spring框架中提供了两种事务管理方案:
- 编程式事务:通过编写代码实现事务管理。
- 声明式事务:基于AOP技术实现事务管理。
在Spring框架中,编程式事务管理很少使用,Spring的声明式事务管理在底层采用了AOP技术,其最大的优点在于无需通过编程的方式管理事务,只需要在配置文件中进行相关的规则声明,就可以将事务规则应用到业务逻辑中。
使用AOP技术为service方法添加如下通知:
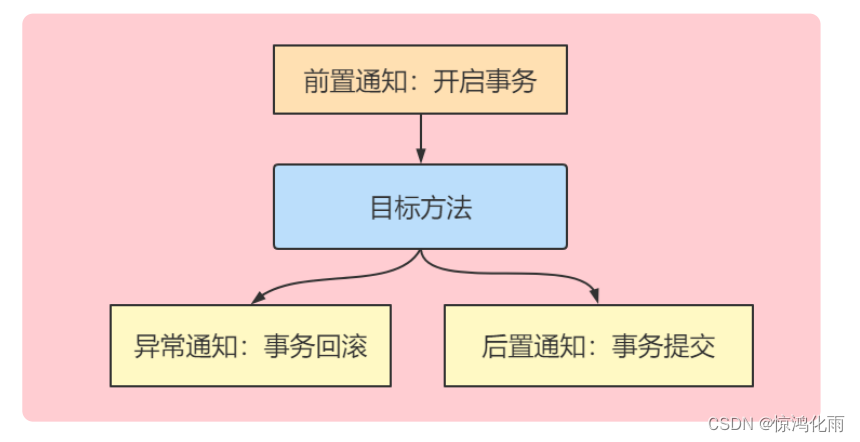
Spring事务_Spring事务管理器
Spring依赖事务管理器进行事务管理,事务管理器即一个通知类,我们为该通知类设置切点为service层方法即可完成事务自动管理。
由于不同技术操作数据库,进行事务操作的方法不同。如:JDBC提交事务是 connection.commit() ,MyBatis提交事务是 sqlSession.commit() ,所以Spring提供了多个事务管理器。
| 事务管理器名称 | 作用 |
|---|---|
| org.springframework.jdbc.datasource.DataSourceTransactionManager | 针对JDBC技术提供的事务管理器。适用于JDBC和MyBatis。 |
| org.springframework.orm.hibernate3.HibernateTransactionManager | 针对于Hibernate框架提供的事务管理器。适用于Hibernate框架。 |
| org.springframework.orm.jpa.JpaTransactionManager | 针对于JPA技术提供的事务管理器。适用于JPA技术。 |
| org.springframework.transaction.jta.JtaTransactionManager | 跨越了多个事务管理源。适用在两个或者是多个不同的数据源中实现事务控制。 |
我们使用MyBatis操作数据库,接下来使用 DataSourceTransactionManager 进行事务管理。
- 引入依赖
<!-- 事务管理 -->
<dependency><groupId>org.springframework</groupId><artifactId>spring-tx</artifactId><version>5.3.13</version>
</dependency>
<!-- AspectJ -->
<dependency><groupId>org.aspectj</groupId><artifactId>aspectjweaver</artifactId><version>1.8.7</version>
</dependency>
- 引入约束
xmlns:aop="http://www.springframework.org/schema/aop"
xmlns:tx="http://www.springframework.org/schema/tx"http://www.springframework.org/schema/aop
http://www.springframework.org/schema/aop/spring-aop.xsd
http://www.springframework.org/schema/tx
http://www.springframework.org/schema/tx/spring-tx.xsd
- 进行事务配置
<!-- 进行事务配置 --><tx:advice id="txAdvice"><tx:attributes><!-- propagation:设置事务的传播方式 isolation:设置方法的事务隔离级别 --><tx:method name="*" propagation="REQUIRED" isolation="DEFAULT"/><!--设置查询方法为只读事务--><tx:method name="find*" read-only="true" isolation="READ_UNCOMMITTED"></tx:method></tx:attributes></tx:advice><!-- 配置切面 --><aop:config><aop:pointcut id="myPoint" expression="execution(* com.gb.service.*.*(..))"/><aop:advisor advice-ref="txAdvice" pointcut-ref="myPoint"></aop:advisor></aop:config>
Spring事务_事务控制的API
Spring进行事务控制的功能是由三个接口提供的,这三个接口是Spring实现的,在开发中我们很少使用到,只需要了解他们的作用即可:
PlatformTransactionManager接口
PlatformTransactionManager是Spring提供的事务管理器接口,所有事务管理器都实现了该接口。该接口中提供了三个事务操作方法:
- TransactionStatus getTransaction(TransactionDefinition definition):获取事务状态信息。
- void commit(TransactionStatus status):事务提交
- void rollback(TransactionStatus status):事务回滚
TransactionDefinition接口
TransactionDefinition是事务的定义信息对象,它有如下方法:
- String getName():获取事务对象名称。
- int getIsolationLevel():获取事务的隔离级别。
- int getPropagationBehavior():获取事务的传播行为。
- int getTimeout():获取事务的超时时间。
- boolean isReadOnly():获取事务是否只读。
TransactionStatus接口
TransactionStatus是事务的状态接口,它描述了某一时间点上事务的状态信息。它有如下方法:
- void flush() 刷新事务
- boolean hasSavepoint() 获取是否存在保存点
- boolean isCompleted() 获取事务是否完成
- boolean isNewTransaction() 获取是否是新事务
- boolean isRollbackOnly() 获取是否回滚
- void setRollbackOnly() 设置事务回滚
Spring事务_事务的相关配置
在<tx:advice>中可以进行事务的相关配置:
<tx:advice id="txAdvice"><tx:attributes><tx:method name="*"/><tx:method name="find*" read-only="true"/></tx:attributes>
</tx:advice>
<tx:method>中的属性:
- name:指定配置的方法。 * 表示所有方法, find* 表示所有以find开头的方法。
- read-only:是否是只读事务,只读事务不存在数据的修改,数据库将会为只读事务提供一些优化手段,会对性能有一定提升,建议在查询中开启只读事务。
- timeout:指定超时时间,在限定的时间内不能完成所有操作就会抛异常。默认永不超时
- rollback-for:指定某个异常事务回滚,其他异常不回滚。默认所有异常回滚。
- no-rollback-for:指定某个异常不回滚,其他异常回滚。默认所有异常回滚。
- propagation:事务的传播行为
- isolation:事务的隔离级别
Spring事务_事务的传播行为
事务传播行为是指多个含有事务的方法相互调用时,事务如何在这些方法间传播。
如果在service层的方法中调用了其他的service方法,假设每次执行service方法都要开启事务,此时就无法保证外层方法和内层方法处于同一个事务当中。
// method1的所有方法在同一个事务中
public void method1(){// 此时会开启一个新事务,这就无法保证method1()中所有的代码是在同一个事务中method2();System.out.println("method1");
}
public void method2(){System.out.println("method2");
}
事务的传播特性就是解决这个问题的,Spring帮助我们将外层方法和内层方法放入同一事务中。
| 传播行为 | 介绍 |
|---|---|
| REQUIRED | 默认。支持当前事务,如果当前没有事务,就新建一个事务。这是最常见的选择。 |
| SUPPORTS | 支持当前事务,如果当前没有事务,就以非事务方式执行。 |
| MANDATORY | 支持当前事务,如果当前没有事务,就抛出异常。 |
| REQUIRES_NEW | 新建事务,如果当前存在事务,把当前事务挂起。 |
| NOT_SUPPORTED | 以非事务方式执行操作,如果当前存在事务,就把当前事务挂起。 |
| NEVER | 以非事务方式执行,如果当前存在事务,则抛出异常。 |
| NESTED | 必须在事务状态下执行,如果没有事务则新建事务,如果当前有事务则创建一个嵌套事务 |
Spring事务_事务的隔离级别
事务隔离级别反映事务提交并发访问时的处理态度,隔离级别越高,数据出问题的可能性越低,但效率也会越低。
| 隔离级别 | 脏读 | 不可重复读 | 幻读 |
|---|---|---|---|
| READ_UNCOMMITED | (读取未提交内容) | Yes | Yes |
| READ_COMMITED | (读取提交内容) | No | Yes |
| REPEATABLE_READ | (重复读) | No | No |
| SERIALIZABLE | (可串行化) | No | No |
如果设置为DEFAULT会使用数据库的隔离级别。
- SqlServer , Oracle默认的事务隔离级别是READ_COMMITED
- Mysql的默认隔离级别是REPEATABLE_READ
Spring事务_注解配置声明式事务
- 注册事务注解驱动
<!-- 注册事务注解驱动 -->
<tx:annotation-driven transactionmanager="transactionManager"></tx:annotation-driven>
- 在需要事务支持的方法或类上加
@Transactional - 3 配置类代替xml中的注解事务支持:在配置类上方写
@EnableTranscationManagement
相关文章:
项目管理与SSM框架(二)| Spring
Spring简介 Spring是一个开源框架,为简化企业级开发而生。它以IOC(控制反转)和AOP(面向切面)为思想内核,提供了控制层 SpringMVC、数据层SpringData、服务层事务管理等众多技术,并可以整合众多…...
Ubuntu系统忘记Root用户密码-无法登录系统-更改Root密码-Ubuntu系统维护
一、背景 很多时候,我们总会设计复杂的密码,但是大多数时候,我们反而会先忘记我们的密码,导致密码不仅仅阻挡其他用户进入系统,同时也阻碍我们进入系统。 本文将介绍在忘记密码的情况下,如何进入系统并更改…...

webSocket 有哪些安全问题?
WebSocket在实现实时通信和双向数据传输方面非常有用,但也存在一些安全问题需要注意。以下是一些与WebSocket相关的安全问题: 1:跨站脚本攻击(XSS): WebSocket在消息传递过程中可能传输恶意脚本ÿ…...
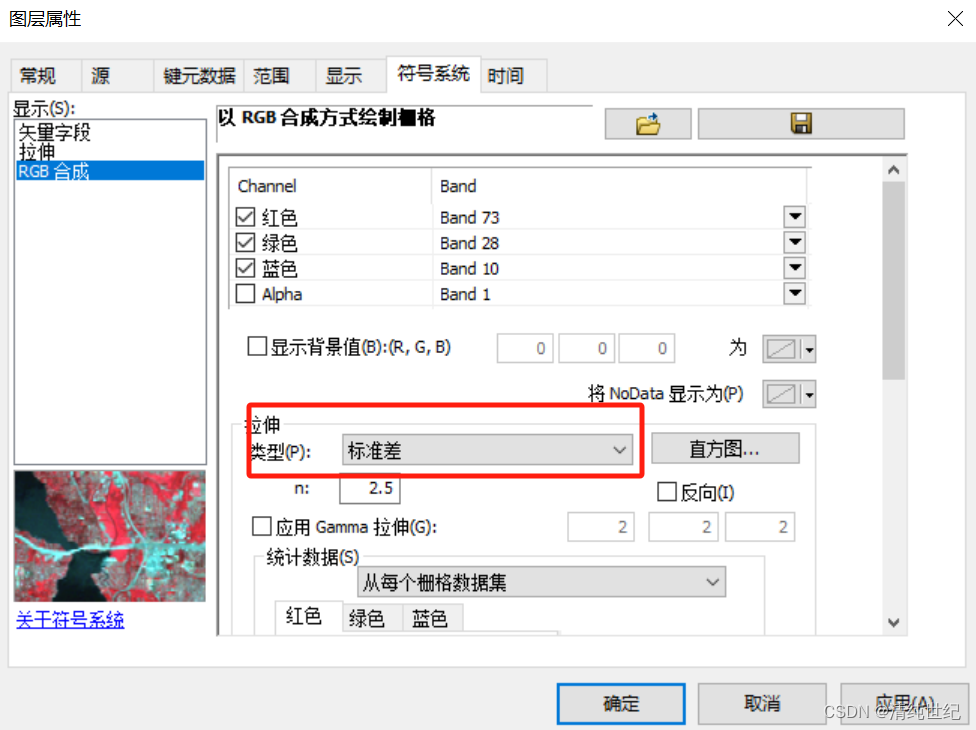
ArcGis打开影像显示全黑解决方法
我们加载图像,显示如下: 解决方法: 问题分析:Gamma值高于1影像亮化,低于1影像暗化。栅格影像导入进来呈现黑色,可能是因为影像的“Gamma校正”设置出现问题,影响了影像的拉伸度、亮度、对比度等…...
雷达基础导论及MATLAB仿真
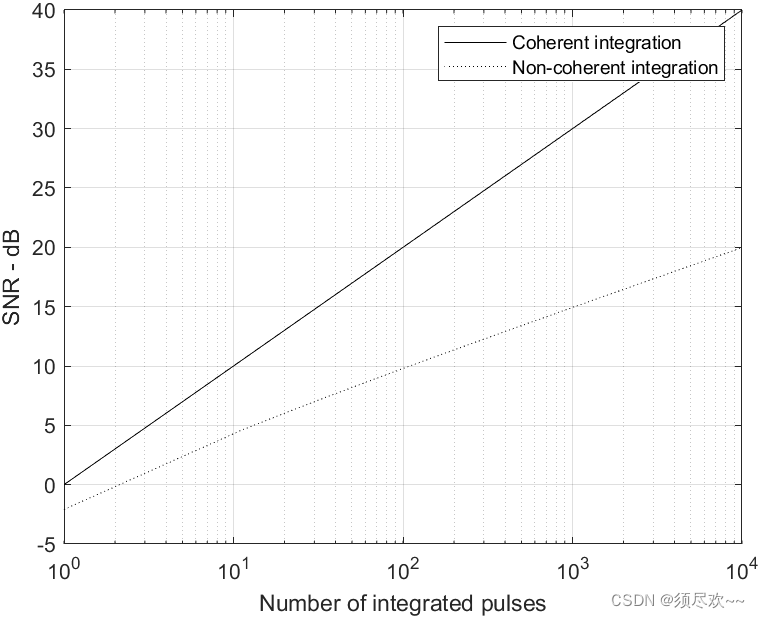
文章目录 前言一、雷达基础导论二、Matlab 仿真1、SNR 相对检测距离的仿真①、Matlab 源码②、仿真1)、不同 RCS,SNR 相对检测距离仿真2)、不同雷达峰值功率,SNR 相对检测距离仿真 2、脉冲宽度相对所要求的 SNR 仿真①、Matlab 源…...
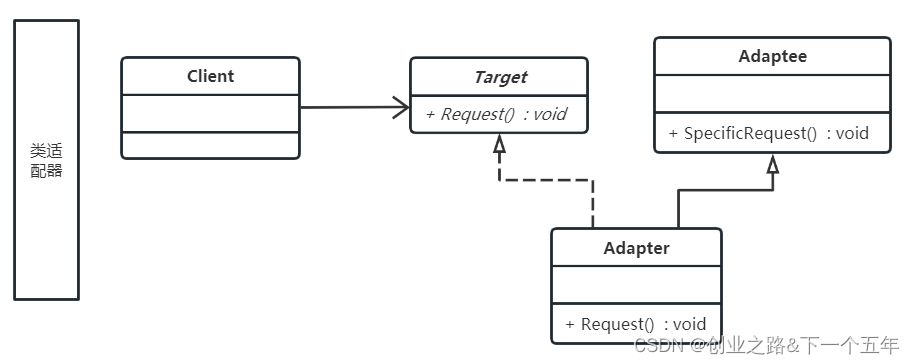
设计模式再探——适配器模式
目录 一、背景介绍二、思路&方案三、过程1.适配器模式简介2.适配器模式的类图3.适配器模式代码4.适配器模式,类适配器模式和对象的对比5.适配器模式终极奥秘 四、总结五、升华 一、背景介绍 最近公司在对业务模型做构建的时候,涉及到和三方系统的对…...

【无标题】光伏逆变器的IEC62109测试,逆变器IEC62109测试项目
光伏逆变器的IEC62109测试,逆变器IEC62109测试项目 逆变器又称电源调整器,根据逆变器在光伏发电系统中的用途可分为独立型电源用和并网用二种。根据波形调制方式又可分为方波逆变器、阶梯波逆变器、正弦波逆变器和组合式三相逆变器。对于用于并网系统的…...
Windows用VM虚拟机安装MacOS Ventura 13.6系统全流程教程(附资源)
安装成果: 所需容量:至少40GB的硬盘空间,推荐80GB以上。 所需资源 VMware虚拟机激活密钥:VMware Workstation Pro 17.0.2MacOS Ventura 13.6的ISO镜像MacOS的解锁工具卡顿优化工具:beamoff 有人反馈说需要能用的ISO镜…...

PHP7和PHP8的新特性
PHP 7 新特性: 改进的性能:最显著的变化就是性能提升,据官方报告,PHP 7 的速度是 PHP 5.6 的两倍。 标量类型声明:PHP 7 添加了 int, float, string 和 bool 四种标量类型声明,这使得函数可以通过预定义参…...
mysql按照日期分组统计数据(date_formatstr_to_date)
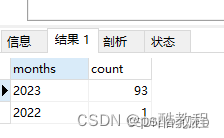
学习链接 mysql按照日期分组统计数据 博主-山茶花开时的 【Mysql专栏学习】 mysql按照日期分组统计数据 Mysql的date_format函数想必大家都使用过吧,一般用于日期时间转化,如下所示 # 可以得出 2023-01-01 08:30:50 select DATE_FORMAT(2023-01-01…...

【C++程序员必修第一课】C++基础课程-07:switch 分支选择
1 本课主要内容: 为什么需要有 switch 多分支选择?应用场景在哪里?switch 多分支选择的应用讲解:case, break,default 2 主要知识点: 为什么需要有 switch 多分支选择 思考一个问题,数学老师需要统计班上同…...

initramfs介绍
initramfs介绍 什么是initramfs? initramfs(Initial RAM Filesystem)是一种临时文件系统,它在Linux系统启动过程中被加载到内存中。它包含了必要的驱动程序、工具和配置文件,用于在内核启动后挂载真实的根文件系统之…...
)
数据结构与算法:二分查找(心得)
前言 前些天我做了一道题目,题目中要求使用二分查找,我便按照我心中的二分查找,信心满满的提交上去了。结果发现无限循环,后面我便去查阅了资料 二分查找的条件 用于查找的内容需要是有序的查找的数量只能是一个 二分查找的二种方…...
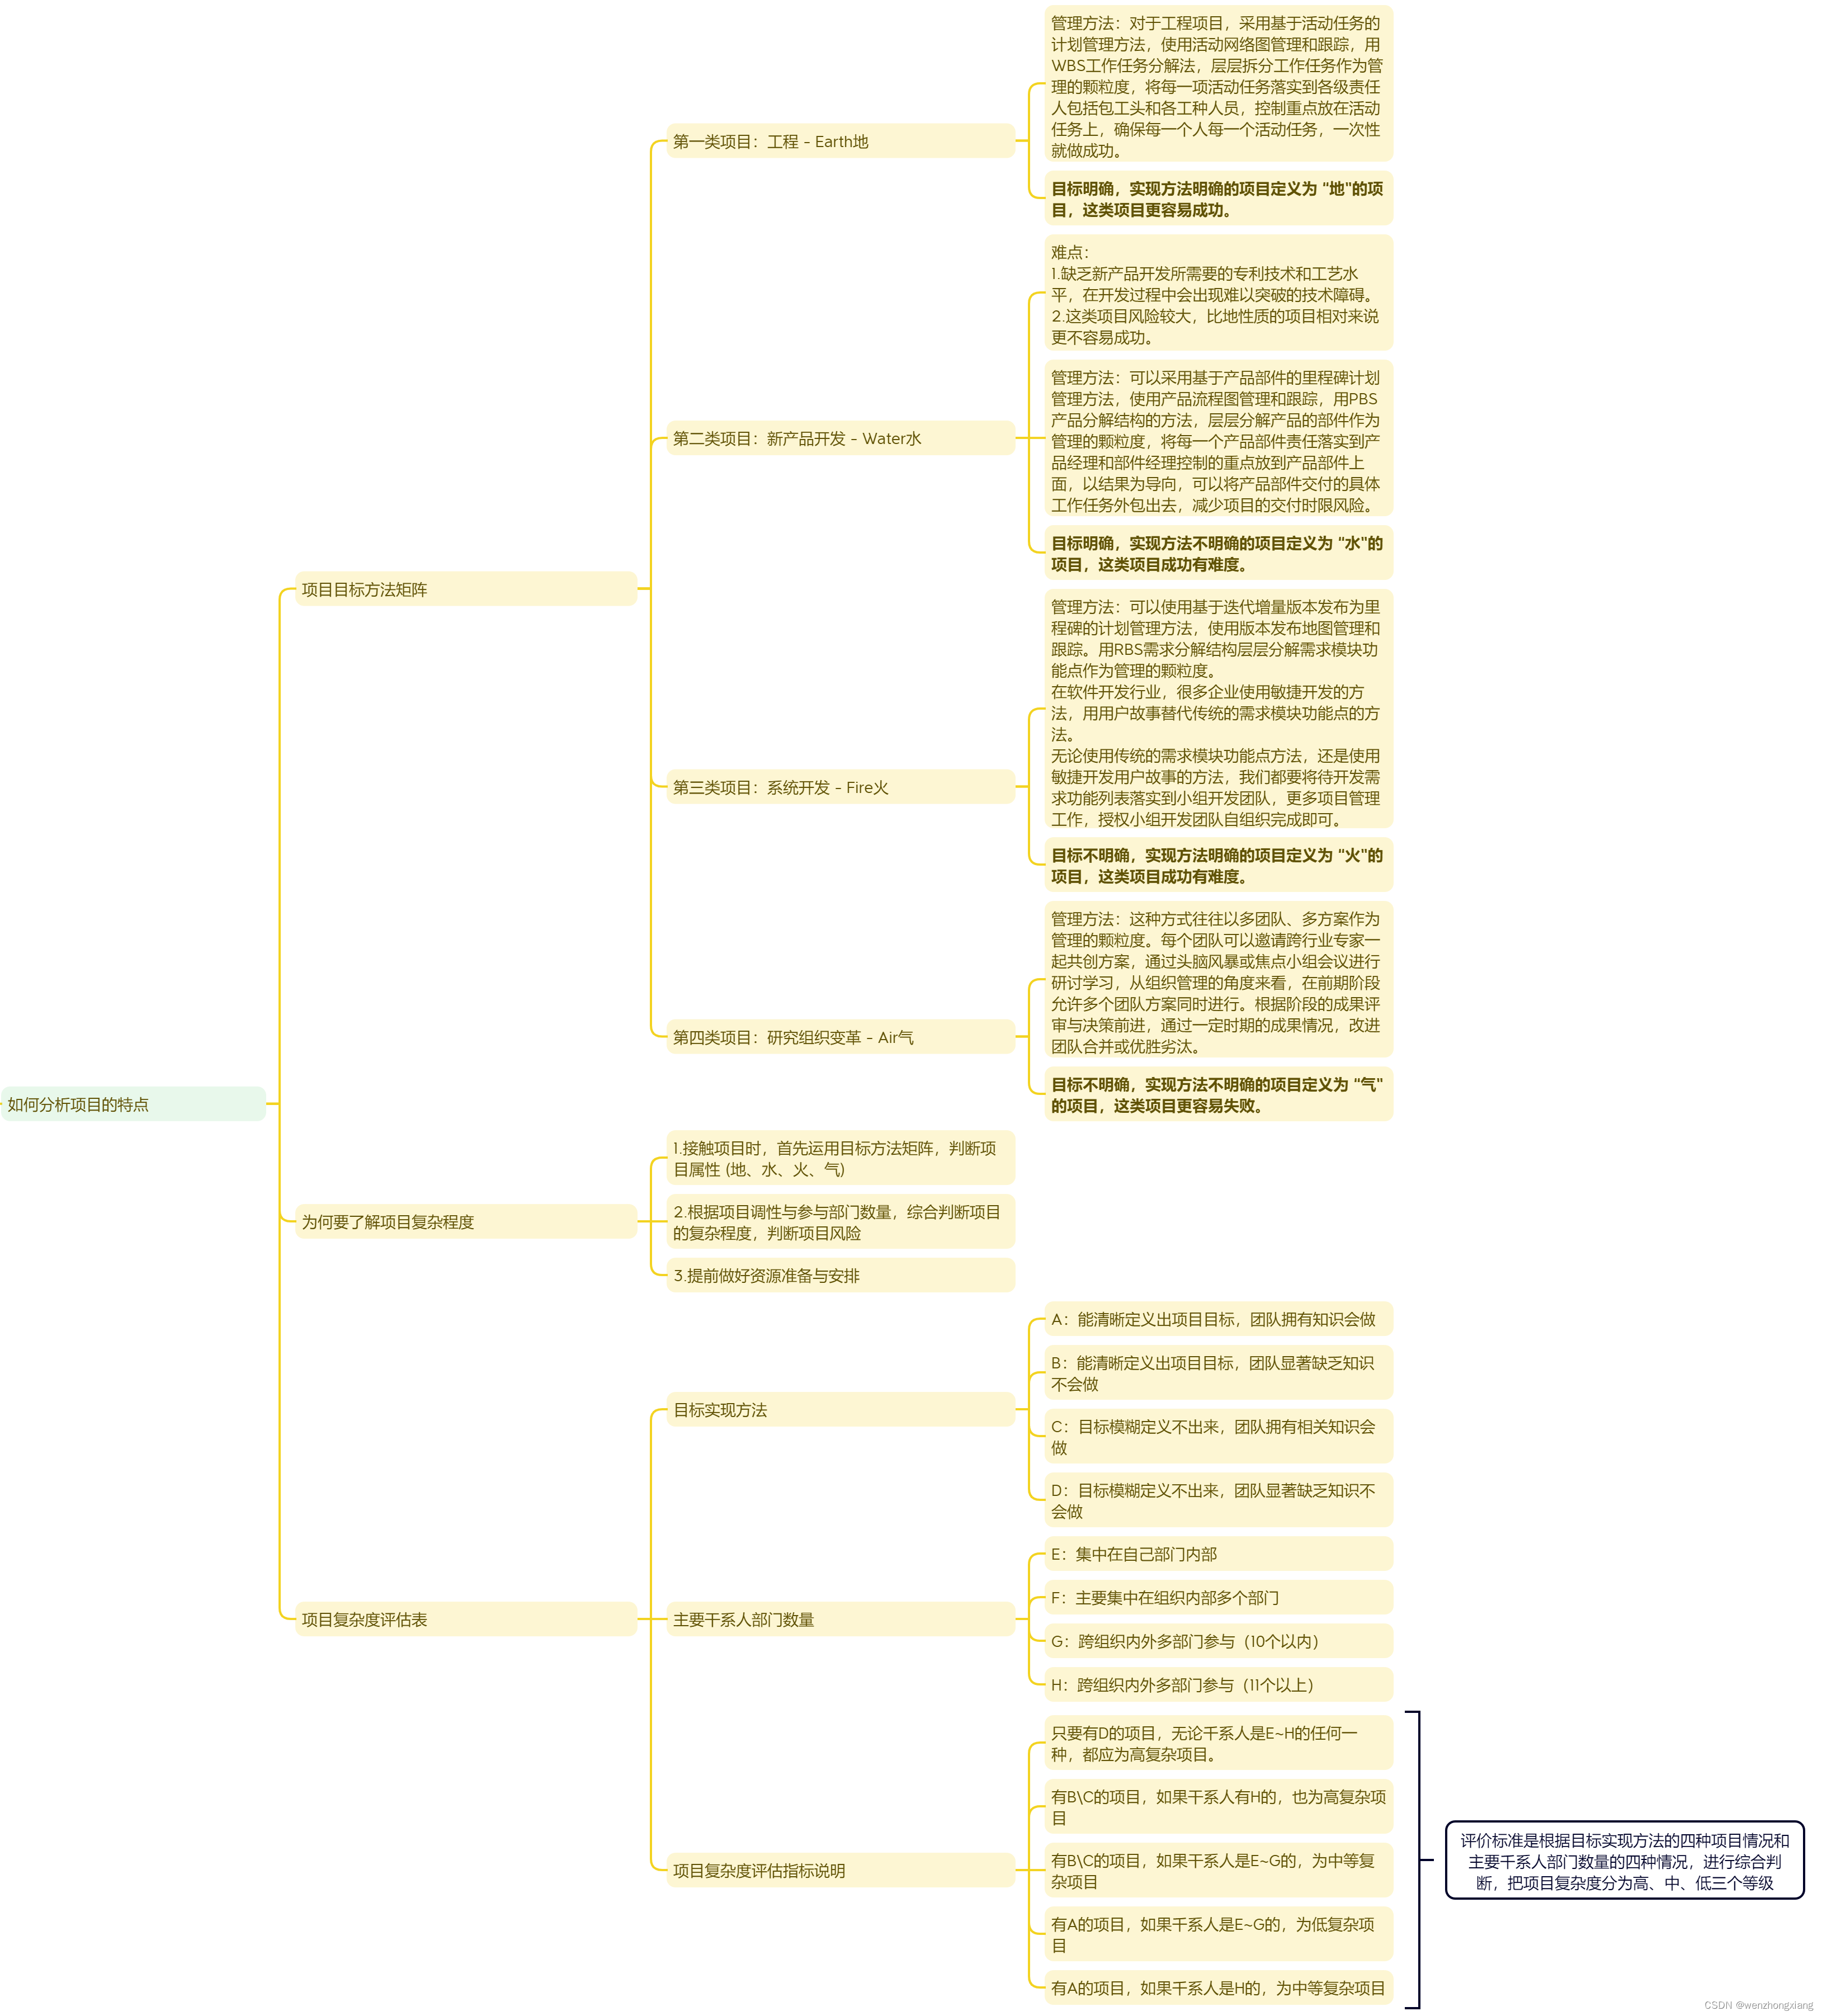
项目管理之分析项目特点的方法
在管理项目时,了解项目的目标和实现方法可以帮助我们更好地规划和执行项目。根据项目的目标和实现方法的不同,可以将项目分为四种类型:地、水、火和气。 对于工程项目,采用基于活动任务的计划管理方法,使用活动网络图…...
MyBatisPlus(二十一)乐观锁
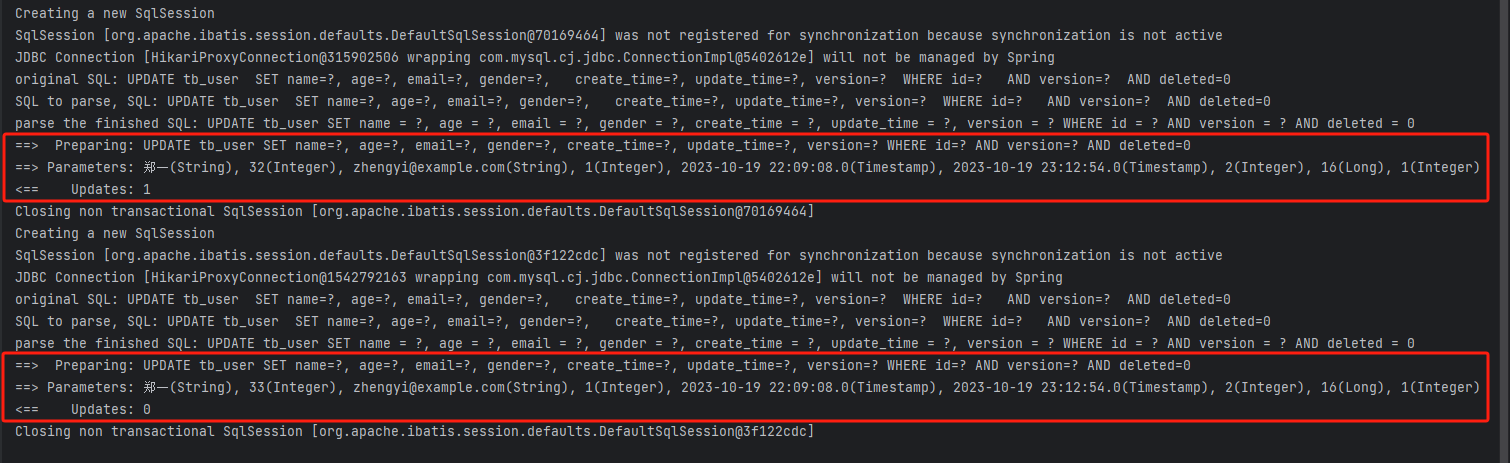
使用场景 用于当有多个用户同时修改同一条数据的时候,只允许有一个修改成功。 实现原理 使用一个字段,用于记录数据的版本。 当修改数据时,会去检测当前版本是否是正在修改的版本,同时修改成功后会把 版本号 1。 实现方式 配…...
node 通过axios发送post请求(FormData)
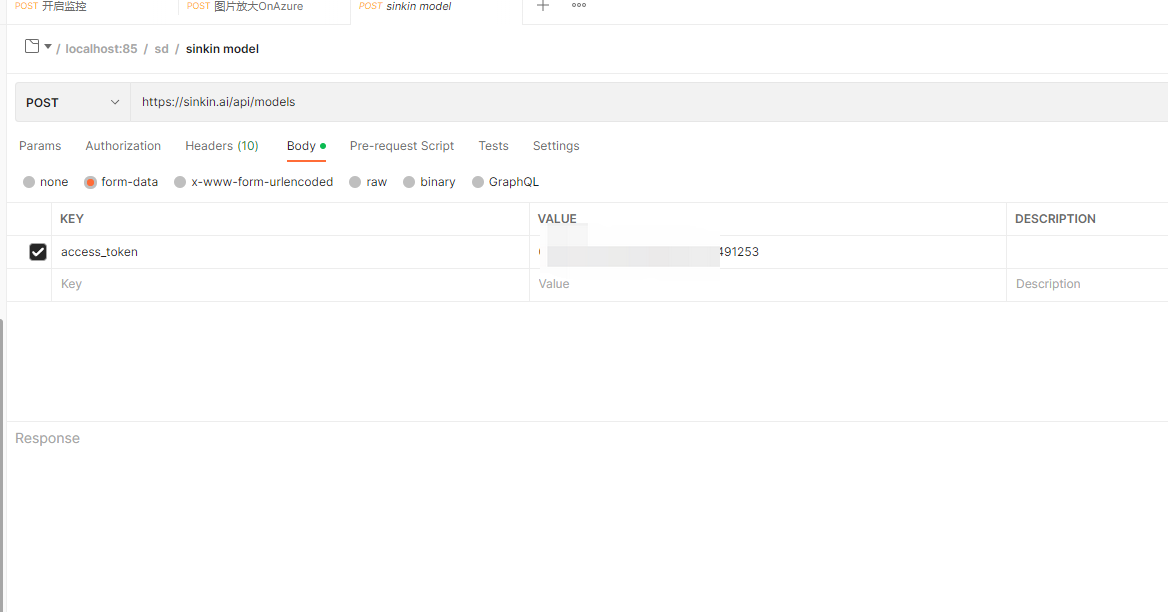
方案一: const axios require(axios) const FormData require(form-data) const fs require(fs)const sdUpscaleOnAzure async (req, res) > {const data new FormData()data.append(image, fs.readFileSync(/temp/ai/sd/download/1.png))let config {hea…...

2024 王道考研-数据结构
第二章 线性表算法题(线性表的顺序表示) 二、综合应用题 01.从顺序表中删除具有最小值的元素(假设唯一)并由函数返回被删元素的值。空出的位 置由最后一个元素填补,若顺序表为空,则显示出错信息并退出运行。 算法思想:搜索整个顺序表…...
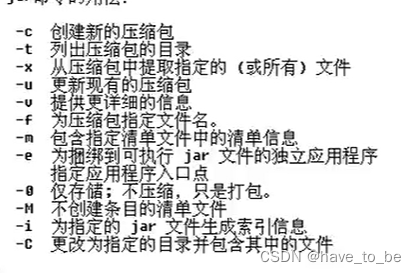
【疯狂Java讲义】Java学习记录(使用jar命令打包)
jar命令 把多个文件打包成一个压缩包——这个压缩包和WinZip的压缩格式是一样的。 区别在于jar压缩的文件默认多一个META-INF的文件夹,该文件夹里包含一个MANIFEST.MF的文件(清单)。 通常来说,得到的压缩包有3种(压缩格…...

数据库第一、二章作业
只为记录与分享 第1,2章作业.xls 题量: 34 满分: 100 一. 单选题(共34题) 1. (单选题)在数据库中,下列说法( )是不正确的。 A. 数据库避免了一切数据的重复B. 若系统是完全可以控制的,则系统可确保更新…...
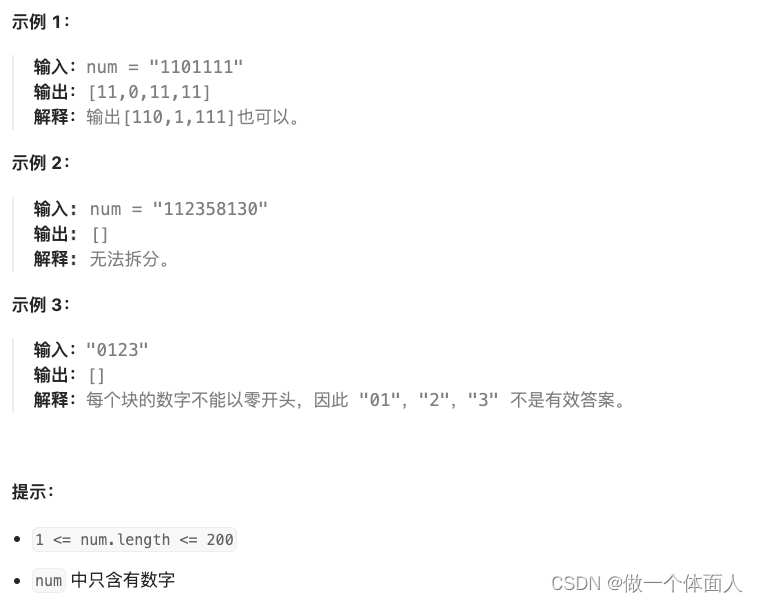
将数组拆分成斐波那契序列
题目描述 示例 代码如下: public class SplitIntoFibonacci {LinkedList<Integer> res new LinkedList<>();public List<Integer> splitIntoFibonacci(String num) {if(num.length() < 3) return res;if(dfs(num, 0)) return res;return new…...

M3U8视频下载技术全解析:从误区破除到未来演进
M3U8视频下载技术全解析:从误区破除到未来演进 【免费下载链接】N_m3u8DL-CLI-SimpleG N_m3u8DL-CLIs simple GUI 项目地址: https://gitcode.com/gh_mirrors/nm3/N_m3u8DL-CLI-SimpleG 开篇:认知重构——打破M3U8下载的三大迷思 在数字内容获取…...

文墨共鸣大模型快速开发:.NET后端集成与API封装
文墨共鸣大模型快速开发:.NET后端集成与API封装 最近在做一个需要集成大语言模型的项目,后端用的是.NET技术栈。市面上很多教程都是Python的,对.NET开发者不太友好。其实用ASP.NET Core来封装大模型调用,既简单又高效,…...

STM32F407最小可行硬件平台设计与实测验证
1. 项目概述本项目是一款基于STM32F407ZET6微控制器的高集成度核心板设计,面向嵌入式系统开发、教学实验及原型验证场景。与常规功能导向型核心板不同,该设计在保证完整硬件功能的前提下,融入了明确的工程美学表达——PCB正反面分别采用“纳西…...

文墨共鸣效果体验:输入两段话,看AI盖上什么等级的朱砂印
文墨共鸣效果体验:输入两段话,看AI盖上什么等级的朱砂印 1. 引言:当AI学会品鉴文字 在文字的世界里,有些句子看似不同却心意相通,有些则形似神离。传统的人工比对方法往往耗时费力,而冰冷的数字评分又缺乏…...

IEC104协议实战:从报文解析到主从站交互全流程
1. 从零开始:IEC104协议到底是什么? 如果你在电力自动化或者工业监控领域工作,一定听过IEC104协议的大名。它就像电力监控系统里的“普通话”,让调度中心的主站和遍布各地的变电站子站能够顺畅地对话。简单来说,IEC104…...

DirectX修复有什么用?解决游戏闪退dll报错,DirectX修复工具下载安装教程
什么是DirectX修复工具? DirectX修复工具(DirectX Repair)是一款系统级工具软件,主要功能是用来自动修复和安装Windows系统常用的DirectX和C运行库。程序分为标准版、增强版以及在线修复版。所有版本都支持修复DirectX的功能,而增强版则额外…...

从零搭建个人独立博客:Hexo + GitHub Pages 极速建站与踩坑实录
引言作为一名爱折腾的开发者,刚解决完一个极其棘手的 WebGL 3D 网页滚动陷阱 Bug,最爽的事情莫过于把这份血汗经验写成文章分享出来!这篇文章将为你带来一份实战教程,完整记录我是如何使用 Hexo 配合 GitHub Pages 建站࿰…...

智能厨房置物架:AI Agent的食材新鲜度监测
智能厨房置物架:AI Agent的食材新鲜度监测 关键词:智能厨房置物架、AI Agent、食材新鲜度监测、传感器技术、机器学习 摘要:本文围绕智能厨房置物架利用AI Agent进行食材新鲜度监测展开深入探讨。首先介绍了该技术的背景,包括目的、预期读者、文档结构和相关术语。接着阐述…...

Z-Image-Turbo-辉夜巫女完整指南:开源可部署+GPU显存优化+Gradio开箱即用
Z-Image-Turbo-辉夜巫女完整指南:开源可部署GPU显存优化Gradio开箱即用 1. 引言:当二次元创作遇上开源AI 如果你是一位动漫爱好者,或者对二次元角色创作感兴趣,最近是不是经常被各种精美的AI生成图刷屏?特别是那些风…...

从入门到精通:Ultra-Light-Fast-Generic-Face-Detector-1MB完整使用教程
从入门到精通:Ultra-Light-Fast-Generic-Face-Detector-1MB完整使用教程 【免费下载链接】Ultra-Light-Fast-Generic-Face-Detector-1MB 💎1MB lightweight face detection model (1MB轻量级人脸检测模型) 项目地址: https://gitcode.com/gh_mirrors/…...