MySQL外键
目录
一.外键
1.表与表之间建立关系
2.什么是外键
3.一对多关系
4.多对多关系
(1)建表会遇到的问题
(2)解决循环建表的问题
5.一对一关系、
6.小结
二.多表查询
1.数据准备
2.多表查询案例
(1)联表
(2)子查询
1.用途
2.简单使用
(1)execute
(2)fetchone
(3)fetchall
(4)fetchmany
(5)scroll
一.外键
1.表与表之间建立关系
- 表与表之间只有三种关系
- 一对一
- 多对一
- 一对多
- 在MySQL的关系中没有多对一的说法
- 一对多、多对多,都叫一对多
2.什么是外键
外键是关系数据库中的一个概念,用于建立两个关系表之间的关联关系
它是一个列或一组列,用来指向另一个表的主键
外键在建立数据表与数据表之间的关系时起到了重要的作用
3.一对多关系
- 一对多关系,外键建在字段多的地方
- 在创建表的时候一定要先创建被关联表
- 在录入数据的时候必须先录入被关联表
以员工部门表为例:
- 在员工表
- 要考虑到员工表里面的一个员工是否能对应部门表里的多个部门
- 在部门表
- 要考虑到一个部门是否能对应员工表里多个员工
- 总结
- 员工表与部门表只是单项的一对多成立,那么员工表与部门表就是一对多关系
创建部门表
create table dep(id int primary key auto_increment,dep_name char(16),dep_desc char(32)
);#Query OK, 0 rows affected (0.82 sec)
查看部门表
desc dep;+----------+----------+------+-----+---------+----------------+
| Field    | Type     | Null | Key | Default | Extra          |
+----------+----------+------+-----+---------+----------------+
| id       | int(11)  | NO   | PRI | NULL    | auto_increment |
| dep_name | char(16) | YES  |     | NULL    |                |
| dep_desc | char(32) | YES  |     | NULL    |                |
+----------+----------+------+-----+---------+----------------+
3 rows in set (0.01 sec)
创建员工表
create table emp(id int primary key auto_increment,emp_name char(16),emp_gender enum("male","female","others") default "male",dep_id int,foreign key (dep_id) references dep(id)
);# Query OK, 0 rows affected (0.92 sec)
查看员工表
desc emp;+------------+--------------------------------+------+-----+---------+----------------+
| Field      | Type                           | Null | Key | Default | Extra          |
+------------+--------------------------------+------+-----+---------+----------------+
| id         | int(11)                        | NO   | PRI | NULL    | auto_increment |
| emp_name   | char(16)                       | YES  |     | NULL    |                |
| emp_gender | enum('male','female','others') | YES  |     | male    |                |
| dep_id     | int(11)                        | YES  | MUL | NULL    |                |
+------------+--------------------------------+------+-----+---------+----------------+
4 rows in set (0.00 sec)
插入部门表数据
insert into dep(dep_name,dep_desc) values("sm运动社","日常活动"),("游戏社","休闲娱乐"),("技术部","能力提升"),("cp外交部","社交沟通");# Query OK, 4 rows affected (0.14 sec)
# Records: 4  Duplicates: 0  Warnings: 0
插入员工表数据
insert  into emp(emp_name,emp_gender,dep_id) values("dream","male",1),("chimeng","female",4),("mengmeng","female",2),("drunkmeng","male",3);# Query OK, 4 rows affected (0.13 sec)
# Records: 4  Duplicates: 0  Warnings: 0
查看部门表数据
select * from dep;+----+-------------+--------------+
| id | dep_name    | dep_desc     |
+----+-------------+--------------+
|  1 | sm运动社    | 日常活动     |
|  2 | 游戏社      | 休闲娱乐     |
|  3 | 技术部      | 能力提升     |
|  4 | cp外交部    | 社交沟通     |
+----+-------------+--------------+
4 rows in set (0.00 sec)
查看员工表数据
select * from emp;+----+-----------+------------+--------+
| id | emp_name  | emp_gender | dep_id |
+----+-----------+------------+--------+
|  1 | dream     | male       |      1 |
|  2 | chimeng   | female     |      4 |
|  3 | mengmeng  | female     |      2 |
|  4 | drunkmeng | male       |      3 |
+----+-----------+------------+--------+
4 rows in set (0.00 sec)
4.多对多关系
以图书表和作者为例
- 站在图书表角度
- 一本书可以有多个作者
- 站在作者表的角度
- 一个作者可以写多本书
- 总结
- 如果两个都可以那么就是多对多关系
***** 针对多对多的表关系,外键字段在第三张表中 *****
(1)建表会遇到的问题
创建图书表
id title price author_idcreate table book(id int primary key auto_increment,title varchar(32),price int,author_id int,foreign key(author_id) references author(id)on update cascadeon delete cascade)
创建作者表
id name age book_idcreate table author (id int primary key auto_increment,name varchar(32),age int,book_id int,foreign key(book_id) references book(id)on update cascadeon delete cascade
)
这种方式建表,由于外键具有”在创建表的时候一定要先创建被关联表“的特性,从而导致都无法创建彼此的关联表,针对多对多字段关系,不能在原有两张表的基础上创建外键,需要创建一张新表来建立两表的关系
(2)解决循环建表的问题
建表
book
id title priceauthor
id name agebook_connect
id boo_id author_id
创建表
# 图书表
create table book(id int primary key auto_increment, title varchar(32), price int
);# 作者表
create table author(id int primary key auto_increment,name varchar(32),age int
);# 中转联系表
create table book_connect(id int primary key auto_increment,author_id int,book_id int,foreign key(author_id) references author(id)on update cascadeon delete cascade,foreign key(book_id) references book(id)on update cascadeon delete cascade
);
查看表
desc book;+-------+-------------+------+-----+---------+----------------+
| Field | Type        | Null | Key | Default | Extra          |
+-------+-------------+------+-----+---------+----------------+
| id    | int(11)     | NO   | PRI | NULL    | auto_increment |
| title | varchar(32) | YES  |     | NULL    |                |
| price | int(11)     | YES  |     | NULL    |                |
+-------+-------------+------+-----+---------+----------------+
3 rows in set (0.00 sec)desc author;+-------+-------------+------+-----+---------+----------------+
| Field | Type        | Null | Key | Default | Extra          |
+-------+-------------+------+-----+---------+----------------+
| id    | int(11)     | NO   | PRI | NULL    | auto_increment |
| name  | varchar(32) | YES  |     | NULL    |                |
| age   | int(11)     | YES  |     | NULL    |                |
+-------+-------------+------+-----+---------+----------------+
3 rows in set (0.00 sec)desc book_connect;+-----------+---------+------+-----+---------+----------------+
| Field     | Type    | Null | Key | Default | Extra          |
+-----------+---------+------+-----+---------+----------------+
| id        | int(11) | NO   | PRI | NULL    | auto_increment |
| author_id | int(11) | YES  | MUL | NULL    |                |
| book_id   | int(11) | YES  | MUL | NULL    |                |
+-----------+---------+------+-----+---------+----------------+
3 rows in set (0.00 sec)
插入数据
insert into book(title,price) values("西游记",18),("水浒传",29),("三国演义",99),("如何让富婆爱上你",999);insert into author(name,age) values("dream",18),("chimeng",28),("mengmeng",38);insert into book_connect(author_id,book_id) values(1,3),(2,1),(2,3),(1,1);
查看表数据
select * from book;+----+--------------------------+-------+
| id | title                    | price |
+----+--------------------------+-------+
|  1 | 西游记                   |    18 |
|  2 | 水浒传                   |    29 |
|  3 | 三国演义                 |    99 |
|  4 | 如何让富婆爱上你         |   999 |
+----+--------------------------+-------+
4 rows in set (0.00 sec)select * from author;+----+----------+------+
| id | name     | age  |
+----+----------+------+
|  1 | dream    |   18 |
|  2 | chimeng  |   28 |
|  3 | mengmeng |   38 |
+----+----------+------+
3 rows in set (0.00 sec)select * from book_connect;+----+-----------+---------+
| id | author_id | book_id |
+----+-----------+---------+
|  1 |         1 |       3 |
|  2 |         2 |       1 |
|  3 |         2 |       3 |
|  4 |         1 |       1 |
+----+-----------+---------+
4 rows in set (0.00 sec)
5.一对一关系
在MySQL的关系中没有多对一的说法
一对多、多对多 都叫做 一对多
如果一个表的字段特别多,每次查询又不是所有字段的数据都需要,那么可以将表一分为二
- 用户表
- 一个用户不能对应多个用户详情
- 用户详情表
- 一个用户详情表不属于多个用户
- 结论
- 单向的一对多都不能成立,那么这个时候两者之间的表关系要么是一对一,要么就没有关系
创建表
authors
id name age author_detail_idauthor_detail
id phone addr
一对一,外键建在任意一方都可以,但是建议建立在查询频率较高的表内
创建表
create table author_detail(id int primary key auto_increment,phone int,addr varchar(64)
);create table authors(id int primary key auto_increment,name varchar(16),age int,author_detail_id int unique,foreign key(author_detail_id) references author_detail(id)on update cascadeon delete cascade
);
查看表
desc author_detail;+-------+-------------+------+-----+---------+----------------+
| Field | Type        | Null | Key | Default | Extra          |
+-------+-------------+------+-----+---------+----------------+
| id    | int(11)     | NO   | PRI | NULL    | auto_increment |
| phone | int(11)     | YES  |     | NULL    |                |
| addr  | varchar(64) | YES  |     | NULL    |                |
+-------+-------------+------+-----+---------+----------------+
3 rows in set (0.01 sec)desc authors;+------------------+-------------+------+-----+---------+----------------+
| Field            | Type        | Null | Key | Default | Extra          |
+------------------+-------------+------+-----+---------+----------------+
| id               | int(11)     | NO   | PRI | NULL    | auto_increment |
| name             | varchar(16) | YES  |     | NULL    |                |
| age              | int(11)     | YES  |     | NULL    |                |
| author_detail_id | int(11)     | YES  | UNI | NULL    |                |
+------------------+-------------+------+-----+---------+----------------+
4 rows in set (0.01 sec)
6.小结
- 表关系的建立需要用到foreign key
- 一对多
- 外键在多的一方
- 多对多
- 建立第三张表作为媒介
- 一对一
- 建在任意一方均可,推荐建在查询频率较高的表里
- 判断表与表之间的关系要站在双方的角度考虑
二.多表查询
1.数据准备
创建数据库
create database day04;
创建表
create table dep(id int,name varchar(20)
);CREATE TABLE emp (id INT PRIMARY KEY AUTO_INCREMENT,name VARCHAR(20),sex ENUM("male","female") NOT NULL DEFAULT "male",age INT,dep_id INT
);
插入数据
insert into dep(id,name) values
("200","技术部"),
("201","人力资源"),
("202","销售部"),
("203","运营部"),
("204","售后部"),
("206","外交部");insert into emp(name,sex,age,dep_id) values
("dream","male",18,200),
("chimeng","female",18,201),
("menmgneg","male",38,202),
("hope","male",18,203),
("own","male",28,204),
("thdream","male",18,205);
2.多表查询案例
- 只要涉及到多表查询就两种思路:
- 联表
- 子查询
(1)联表
先拿到部门和员工表拼接之后的结果
对拼接后的结果进行部门分组
查询数据
select * from emp inner join dep on emp.dep_id = dep.id;+----+----------+--------+------+--------+------+--------------+
| id | name     | sex    | age  | dep_id | id   | name         |
+----+----------+--------+------+--------+------+--------------+
|  1 | dream    | male   |   18 |    200 |  200 | 技术部       |
|  2 | chimeng  | female |   18 |    201 |  201 | 人力资源     |
|  3 | menmgneg | male   |   38 |    202 |  202 | 销售部       |
|  4 | hope     | male   |   18 |    203 |  203 | 运营部       |
|  5 | own      | male   |   28 |    204 |  204 | 售后部       |
+----+----------+--------+------+--------+------+--------------+
5 rows in set (0.00 sec)
查询数据
select dep.name from emp inner join dep
on emp.dep_id = dep.id
group by dep.name
having avg(age) > 25
;select dep.name from emp inner join dep
on emp.dep_id = dep.id
group by dep.name
having avg(age) > 25
;
(2)子查询
分步操作
查询数据
select name from dep where id in
(select dep_id from emp group by dep_idhaving avg(age) > 25);+-----------+
| name      |
+-----------+
| 销售部    |
| 售后部    |
+-----------+
2 rows in set (0.00 sec)
三.Navicat的使用
1.用途
Navicat可以充当多个数据库的客户端
2.简单使用
(1)execute
返回的是查询到的数据的条数
# -*-coding: Utf-8 -*-
# @File : 01 简介 .py
# author: Chimengmeng
# blog_url : https://www.cnblogs.com/dream-ze/
# Time:2023/7/2
import pymysql# (1)链接数据库
conn = pymysql.connect(# 指定 ip端口host='127.0.0.1',port=3306,# 指定用户名密码user='root',password='1314521',# 指定数据库database='day04',# 指定编码charset='utf8'
)# (2)创建游标对象 - 执行命令 对象
cursor = conn.cursor()# (3)创建SQL语句
sql = 'select * from emp;'# (4)游标对象执行SQL语句
# 【1】execute: 返回的是数据的条数
res = cursor.execute(sql)
print(res) # 6
(2)fetchone
返回查询到的第一条数据
返回数据以元祖形式:
# -*-coding: Utf-8 -*-
# @File : 01 简介 .py
# author: Chimengmeng
# blog_url : https://www.cnblogs.com/dream-ze/
# Time:2023/7/2
import pymysql# (1)链接数据库
conn = pymysql.connect(# 指定 ip端口host='127.0.0.1',port=3306,# 指定用户名密码user='root',password='1314521',# 指定数据库database='day04',# 指定编码charset='utf8'
)# (2)创建游标对象 - 执行命令 对象
cursor = conn.cursor()# (3)创建SQL语句
sql = 'select * from emp;'# (4)游标对象执行SQL语句
# 【2】
res = cursor.execute(sql) # 先执行这条语句
res1 = cursor.fetchone() # 拿第一条数据
print(res1)  # (1, 'dream', 'male', 18, 200)
返回数据以字典形式:
# -*-coding: Utf-8 -*-
# @File : 01 简介 .py
# author: Chimengmeng
# blog_url : https://www.cnblogs.com/dream-ze/
# Time:2023/7/2
import pymysql# (1)链接数据库
conn = pymysql.connect(# 指定 ip端口host='127.0.0.1',port=3306,# 指定用户名密码user='root',password='1314521',# 指定数据库database='day04',# 指定编码charset='utf8'
)# (2)创建游标对象 - 执行命令 对象
# cursor=pymysql.cursors.DictCursor:将查询的参数以字典的形式返回
cursor = conn.cursor(cursor=pymysql.cursors.DictCursor)# (3)创建SQL语句
sql = 'select * from emp;'# (4)游标对象执行SQL语句
# 【2】
res = cursor.execute(sql)  # 先执行这条语句
res1 = cursor.fetchone()  # 拿一条数据 - 返回的是字典
print(res1)  # {'id': 1, 'name': 'dream', 'sex': 'male', 'age': 18, 'dep_id': 200}
(3)fetchall
# -*-coding: Utf-8 -*-
# @File : 01 简介 .py
# author: Chimengmeng
# blog_url : https://www.cnblogs.com/dream-ze/
# Time:2023/7/2
import pymysql# (1)链接数据库
conn = pymysql.connect(# 指定 ip端口host='127.0.0.1',port=3306,# 指定用户名密码user='root',password='1314521',# 指定数据库database='day04',# 指定编码charset='utf8'
)# (2)创建游标对象 - 执行命令 对象
# cursor=pymysql.cursors.DictCursor:将查询的参数以字典的形式返回
cursor = conn.cursor(cursor=pymysql.cursors.DictCursor)# (3)创建SQL语句
sql = 'select * from emp;'# (4)游标对象执行SQL语句
# 【2】
res = cursor.execute(sql)  # 先执行这条语句
res2 = cursor.fetchall()  # 拿一条数据 - 返回的是列表
print(res2)  # [{'id': 2, 'name': 'chimeng', 'sex': 'female', 'age': 18, 'dep_id': 201}, {'id': 3, 'name': 'menmgneg', 'sex': 'male', 'age': 38, 'dep_id': 202}, {'id': 4, 'name': 'hope', 'sex': 'male', 'age': 18, 'dep_id': 203}, {'id': 5, 'name': 'own', 'sex': 'male', 'age': 28, 'dep_id': 204}, {'id': 6, 'name': 'thdream', 'sex': 'male', 'age': 18, 'dep_id': 205}]
(4)fetchmany
# -*-coding: Utf-8 -*-
# @File : 01 简介 .py
# author: Chimengmeng
# blog_url : https://www.cnblogs.com/dream-ze/
# Time:2023/7/2
import pymysql# (1)链接数据库
conn = pymysql.connect(# 指定 ip端口host='127.0.0.1',port=3306,# 指定用户名密码user='root',password='1314521',# 指定数据库database='day04',# 指定编码charset='utf8'
)# (2)创建游标对象 - 执行命令 对象
# cursor=pymysql.cursors.DictCursor:将查询的参数以字典的形式返回
cursor = conn.cursor(cursor=pymysql.cursors.DictCursor)# (3)创建SQL语句
sql = 'select * from emp;'# (4)游标对象执行SQL语句
# 【2】
res = cursor.execute(sql)  # 先执行这条语句
res3 = cursor.fetchmany(2)  # 拿指定条数据 - 返回的是列表
print(res3) # [{'id': 1, 'name': 'dream', 'sex': 'male', 'age': 18, 'dep_id': 200}, {'id': 2, 'name': 'chimeng', 'sex': 'female', 'age': 18, 'dep_id': 201}]
(5)scroll
# -*-coding: Utf-8 -*-
# @File : 02 scroll方法 .py
# author: Chimengmeng
# blog_url : https://www.cnblogs.com/dream-ze/
# Time:2023/7/2
import pymysqldef connect_mysql():import pymysql# (1)链接数据库conn = pymysql.connect(# 指定 ip端口host='127.0.0.1',port=3306,# 指定用户名密码user='root',password='1314521',# 指定数据库database='day04',# 指定编码charset='utf8')return conndef create_cursor():conn = connect_mysql()# (2)创建游标对象 - 执行命令 对象# cursor=pymysql.cursors.DictCursor:将查询的参数以字典的形式返回cursor = conn.cursor(cursor=pymysql.cursors.DictCursor)# (3)创建SQL语句sql = 'select * from emp;'cursor.execute(sql)return cursordef main_fetch():cursor = create_cursor()print('第一次fetchone:>>>>', cursor.fetchone())print('第二次fetchone:>>>>', cursor.fetchone())print('fetchall:>>>>', cursor.fetchall())# 第一次fetchone:>>>> {'id': 1, 'name': 'dream', 'sex': 'male', 'age': 18, 'dep_id': 200}# 第二次fetchone:>>>> {'id': 2, 'name': 'chimeng', 'sex': 'female', 'age': 18, 'dep_id': 201}# fetchall:>>>> [{'id': 3, 'name': 'menmgneg', 'sex': 'male', 'age': 38, 'dep_id': 202}, {'id': 4, 'name': 'hope', 'sex': 'male', 'age': 18, 'dep_id': 203}, {'id': 5, 'name': 'own', 'sex': 'male', 'age': 28, 'dep_id': 204}, {'id': 6, 'name': 'thdream', 'sex': 'male', 'age': 18, 'dep_id': 205}]# 当已经执行了 fetchone 时 光标就会向下移动一次 所以最后的查询是从索引 3 开始的def main_scroll():cursor = create_cursor()# 【1】 cursor.scroll(1, 'absolute'))# 控制 光标的移动# print('第一次fetchone:>>>>', cursor.fetchone())# print('第二次fetchone:>>>>', cursor.fetchone())# print('第二次fetchone:>>>>', cursor.scroll(1, 'relative'))  # 相当于光标所在的位置向后移动一次# print('fetchall:>>>>', cursor.fetchall())# 第一次fetchone:>>>> {'id': 1, 'name': 'dream', 'sex': 'male', 'age': 18, 'dep_id': 200}# 第二次fetchone:>>>> {'id': 2, 'name': 'chimeng', 'sex': 'female', 'age': 18, 'dep_id': 201}# 第二次fetchone:>>>> None# fetchall:>>>> [{'id': 4, 'name': 'hope', 'sex': 'male', 'age': 18, 'dep_id': 203}, {'id': 5, 'name': 'own', 'sex': 'male', 'age': 28, 'dep_id': 204}, {'id': 6, 'name': 'thdream', 'sex': 'male', 'age': 18, 'dep_id': 205}]# 当遇到 scroll 的时候 ,光标向下移动了一次,所以最后的索引是从4 开始的# 【2】 cursor.scroll(1, 'absolute'))print('第一次fetchone:>>>>', cursor.fetchone())print('第二次fetchone:>>>>', cursor.fetchone())print('第二次fetchone:>>>>', cursor.scroll(1, 'absolute'))  # 相当于光标所在的位置向后移动一次print('fetchall:>>>>', cursor.fetchall())# 第一次fetchone:>>>> {'id': 1, 'name': 'dream', 'sex': 'male', 'age': 18, 'dep_id': 200}# 第二次fetchone:>>>> {'id': 2, 'name': 'chimeng', 'sex': 'female', 'age': 18, 'dep_id': 201}# 第二次fetchone:>>>> None# fetchall:>>>> [{'id': 2, 'name': 'chimeng', 'sex': 'female', 'age': 18, 'dep_id': 201}, {'id': 3, 'name': 'menmgneg', 'sex': 'male', 'age': 38, 'dep_id': 202}, {'id': 4, 'name': 'hope', 'sex': 'male', 'age': 18, 'dep_id': 203}, {'id': 5, 'name': 'own', 'sex': 'male', 'age': 28, 'dep_id': 204}, {'id': 6, 'name': 'thdream', 'sex': 'male', 'age': 18, 'dep_id': 205}]# 相对于数据的起始位置向后移动一位if __name__ == '__main__':main_scroll()
相关文章:

MySQL外键
目录 一.外键 1.表与表之间建立关系 2.什么是外键 3.一对多关系 4.多对多关系 (1)建表会遇到的问题 (2)解决循环建表的问题 5.一对一关系、 6.小结 二.多表查询 1.数据准备 2.多表查询案例 (1)…...
)
自制数据库迁移工具-C版-02-HappySunshineV1.1-(支持Gbase8a)
目录 一、环境信息 二、简述 三、升级点 四、支持功能 五、安装包下载地址 六、配置参数介绍 七、安装步骤 1、配置环境变量 2、生效环境变量 3、检验动态链接是否正常 4、修改配置文件MigrationConfig.txt 八、运行效果 一、环境信息 名称值CPUIntel(R) Core(TM) i…...

k8s创建pod-affinity亲和性时报错解决办法
1.如下报错 Error from server (BadRequest): error when creating “pod-required-affinity-demo-2.yaml”: Pod in version “v1” cannot be handled as a Pod: json: cannot unmarshal string into Go struct field LabelSelectorRequirement.spec.affinity.podAffinity.re…...

基于边缘智能网关的储能系统安全监测管理方案
“储能系统充电”是配套新能源汽车产业发展的重要应用之一。得益于电池技术的发展,新能源汽车正逐步迈入快充时代,由于在使用快速充电桩时,可能导致用电峰值负荷超过电网的承载能力,对于电网的稳定性和持续性会有较大影响…...

大数据Flink(一百零一):SQL 表值函数(Table Function)
文章目录 SQL 表值函数(Table Function) SQL 表值函数(Table Function) Python UDTF,即 Python TableFunction,针对每一条输入数据,Python UDTF 可以产生 0 条、1 条或者多条输出数据,此外,一条输出数据可以包含多个列。比如以下示例,定义了一个名字为 split 的Pyt…...

内核进程初始化和创建
task_struct 1.进程的状态 分时技术进行多进程调度 重点:进程的创建是如何的? linux在初始化的过程中那个会进行0号进程的创建,fork sched_init(); 做了什么 内核态 不可抢占 用户态 可以抢占 move_to_user_mode(); 把内核状态切换到…...
【进程概念④】:进程地址空间(虚拟内存与物理内存)
【进程概念④】:进程地址空间(虚拟内存与物理内存) 一.进程地址空间二.分页与虚拟地址①.what②.how③.why 三.页表细节①.标志位②.缺页中断 四.总结意义 一.进程地址空间 你觉得我们代码中写的数据都在哪存储着呢? 在内存里存着࿰…...

C语言内存四分区
四个区域:代码区,全局区,栈区,堆区 ①代码区 存放所写代码,二进制内容 ②全局区(又分data区和bss区) 存放全局变量,静态变量,常量 data区:已经初始化的全局变…...

数据可视化报表分享:区域管理驾驶舱
在零售数据分析中,区域管理驾驶舱报表是用来分析企业运营数据,以制定销售策略和提高利润。因此这张报表需要整合大量数据,数据整合、分析、指标计算的工作量极大,在讲究高效率、高度及时性的大数据时代,BI数据可视化分…...

解决pip安装包后但是Pycharm检测不到
首先要知道python找包的原理:原理 之后把一下代码打印一下: import sys print(sys.executable)# /usr/bin/python2 print(sys.path)# [/usr/lib/python2.7, /usr/lib/python2.7/dist-packages, /usr/local/lib/python2.7/dist-packages] print(sys.prefi…...
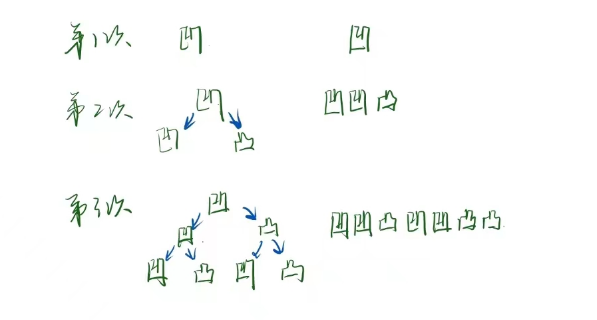
折纸问题
折纸的次数 —— 从上到下的折痕 本质上是中序遍历的问题,因为每一次在已有的折痕后折的时候,当前折痕上的折痕一定为凹,当前折痕下的折痕一定为凸 。实际模拟了一个不存在的二叉树结构的中序遍历。 注:折纸折几次整颗二叉树就有…...
mysql-面试50题-2
一、查询数据 学生表 Student create table Student(SId varchar(10),Sname varchar(10),Sage datetime,Ssex varchar(10)); insert into Student values(01 , 赵雷 , 1990-01-01 , 男); insert into Student values(02 , 钱电 , 1990-12-21 , 男); insert into Student v…...
FoLR:Focus on Local Regions for Query-based Object Detection论文学习笔记
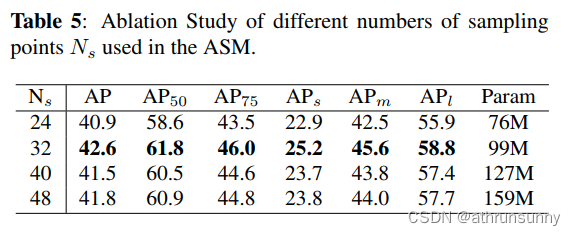
论文地址:https://arxiv.org/abs/2310.06470 自从DETR问询式检测器首次亮相以来,基于查询的方法在目标检测中引起了广泛关注。然而,这些方法面临着收敛速度慢和性能亚优等挑战。值得注意的是,在目标检测中,自注意力机制…...
【QT开发(15)】QT在没有桌面的系统中可以使用
在没有桌面的系统中,可以使用QT库。QT库可以在没有图形用户界面(GUI)的环境中运行,例如在服务器或命令行终端中。 这样就可利用Qt的: 对象模型,信号和槽容器类多线程和多进程网络编程 等...

『heqingchun-Qt的艺术-优雅界面设计开发』
Qt的艺术-优雅界面设计开发 效果图 一、新建Qt窗口工程 二、准备资源文件 1.图标资源 链接: 图标资源 2.Qss资源 链接: Qss资源 三、设计开发 项目源码链接: CSDN资源...

webGL编程指南 第四章 平移+旋转.RotatdTanslatedTriangle.html
我会持续更新关于wegl的编程指南中的代码。 当前的代码不会使用书中的缩写,每一步都是会展开写。希望能给后来学习的一些帮助 git代码地址 :git 本篇文章将把旋转和平位移结合起来,因为矩阵的不存在交换法则 文章中设计的矩阵地址在这里…...
使用canvas实现时间轴上滑块的各种常用操作(仅供参考)
一、简介 使用canvas,模拟绘制时间轴区域,有时间刻度标尺,时间轴区域上会有多行,每行都有一个滑块。 1、时间刻度标尺可以拖动,会自动对齐整数点秒数,最小步数为0.1秒。 2、滑块可以自由拖动,…...

Netty优化-扩展自定义协议中的序列化算法
Netty优化-扩展自定义协议中的序列化算法 一. 优化与源码1. 优化1.1 扩展自定义协议中的序列化算法 一. 优化与源码 1. 优化 1.1 扩展自定义协议中的序列化算法 序列化,反序列化主要用在消息正文的转换上 序列化时,需要将 Java 对象变为要传输的数据…...
【Java网络编程】二
本文主要介绍了传输层的UDP协议和TCP协议,以及在Java中如何通过Socket套接字实现网络编程(内附UDP和TCP版本的回显服务器代码) 一.网络通信 网络编程,就是写一个应用程序,让这个程序可以使用网络通信,这里就…...
通过IP地址可以做什么
通过IP地址可以做很多事情,因为它是互联网通信的基础之一。本文将探讨IP地址的定义、用途以及一些可能的应用。 IP地址的用途 1. 设备标识:IP地址用于标识互联网上的每个设备,这包括计算机、服务器、路由器、智能手机等。它类似于我们日常生…...

在Python项目中集成多模型API实现智能对话功能
🚀 告别海外账号与网络限制!稳定直连全球优质大模型,限时半价接入中。 👉 点击领取海量免费额度 在Python项目中集成多模型API实现智能对话功能 对于需要在应用中集成AI对话能力的Python开发者而言,直接对接多个模型厂…...

面试题详解:Agent 记忆管理全解析——历史对话获取、摘要记忆、事实记忆、知识图谱记忆一次讲透
1. 什么是 Agent 记忆管理?为什么这件事越来越重要?1.1 如果没有记忆,Agent 就只能“活在当下”很多人第一次接触 Agent 时,会觉得记忆似乎就是保存聊天记录。可一旦系统要跨多轮、多天、甚至跨任务持续工作,就会发现单…...

如何在Windows平台上快速构建专业级词法语法分析器:WinFlexBison终极指南
如何在Windows平台上快速构建专业级词法语法分析器:WinFlexBison终极指南 【免费下载链接】winflexbison Main winflexbision repository 项目地址: https://gitcode.com/gh_mirrors/wi/winflexbison WinFlexBison是Windows平台上最专业的词法分析和语法解析…...

3分钟搞定Windows安卓应用:APK安装器让你的电脑秒变安卓设备!
3分钟搞定Windows安卓应用:APK安装器让你的电脑秒变安卓设备! 【免费下载链接】APK-Installer An Android Application Installer for Windows 项目地址: https://gitcode.com/GitHub_Trending/ap/APK-Installer 你知道吗?现在无需安装…...

OpenCore Legacy Patcher技术揭秘:4步实现老旧Mac硬件兼容性修复与系统升级
OpenCore Legacy Patcher技术揭秘:4步实现老旧Mac硬件兼容性修复与系统升级 【免费下载链接】OpenCore-Legacy-Patcher Experience macOS just like before 项目地址: https://gitcode.com/GitHub_Trending/op/OpenCore-Legacy-Patcher 在苹果生态系统中&…...

基于ToF传感器与MIDI协议的动态激光竖琴设计与实现
1. 项目概述:当激光竖琴遇见飞行时间传感器如果你玩过电子音乐,或者对创客项目感兴趣,那你一定见过那种用手“拨动”激光束来触发音符的激光竖琴。传统的激光竖琴大多基于“遮光即触发”的原理,就像一道光电门,手一挡&…...

workout-cool项目实战:构建自动化运动数据流,打通健康管理与效率工具
1. 项目概述与核心价值 最近在健身圈和开发者社区里,一个叫“workout-cool”的项目热度悄然攀升。乍一看这个标题,你可能会觉得它只是一个简单的健身记录工具,但当你真正深入进去,会发现它远不止于此。作为一个长期在健康科技和效…...

情绪语音落地难?ElevenLabs新版本上线首周,92%开发者忽略的3个TTS情感对齐关键阈值,你踩雷了吗?
更多请点击: https://intelliparadigm.com 第一章:ElevenLabs正式情绪语音发布全景与行业意义 ElevenLabs 于2024年第三季度正式推出「Emotion Voice API」,标志着AI语音合成从“可听”迈向“可感”的关键跃迁。该能力支持在TTS输出中动态注…...

利用 Taotoken 多模型能力为 AIGC 应用构建降级容灾方案
🚀 告别海外账号与网络限制!稳定直连全球优质大模型,限时半价接入中。 👉 点击领取海量免费额度 利用 Taotoken 多模型能力为 AIGC 应用构建降级容灾方案 当你的 AIGC 应用从内部测试走向面向真实用户的生产环境时,服…...

基于本地大模型的字幕翻译:LM Studio集成方案与实战优化
1. 项目概述:当本地大模型遇上字幕翻译最近在折腾本地大模型应用时,发现了一个挺有意思的场景:字幕翻译。很多朋友喜欢看海外影视剧或学习资料,但苦于没有高质量的中文字幕。在线翻译工具要么有字数限制,要么担心隐私泄…...