c++编译使用log4cplus
提示:文章写完后,目录可以自动生成,如何生成可参考右边的帮助文档
文章目录
- 前言
- 一、log4cplus是什么?
- 二、使用步骤
- 1.下载源代码
- 2.开始配置
- 1.配置介绍
- 2.开始编译
- 3.cmake引用
- 4.示例
- 总结
前言
C++很强大,但是仍然有很多不尽如人意的地方,比如打印日志方面就没有java的log4j那种信手拈来,自然而然地东西。目前官方没有推出这个东西,只能借助第三方开源项目实现,或者干脆自己实现。但是,今天我们说一说一个很强大地日志库log4cplus在c++项目中地使用。
一、log4cplus是什么?
看名字就明白了,为c++开发地日志库。接下来引用开发者的话:
log4cplus is a simple to use C++ logging API providing thread–safe, flexible, and arbitrarily granular control over log management and configuration. It is modeled after the Java log4j API.
二、使用步骤
1.下载源代码
这个地方需要注意地是现在master是3.x版本了,这个版本基于C++ 20以后,使用C++ 11会直接编译报错。如果你是C++ 11的话请在分支里找到2.x的版本(包括2.0.x和2.1.x)。
由于这两个版本编译上没有显著区别,今天就以2.0.x版本为基础讲一下log4cplus的编译使用。
log4cplus下载地址
git clone https://gitee.com/anold/log4cplus.git -b 2.0.x
这里克隆完了还不能拿来直接用,还需要同步下引用的子项目。直接克隆的代码很小,包括子项目之后的大概是不到60MB,请留一下项目大小。

进入到项目目录后执行以下命令:
git submodule update --init --recursive
一定要确认所有操作成功了才行,否则编译时一定失败。
2.开始配置
1.配置介绍
log4cplus配置项众多,可以根据需要来配置。
请注意,不同的版本分支配置项可能不一样,请注意区分。这个东西在配置文件里可以看到,这里不细说了。
Configure script options
--enable-debugging
This option is disabled by default. This option mainly affects GCC builds but it also has some limited effect on non-GCC builds. It turns on debugging information generation, undefines NDEBUG symbol and adds -fstack-check (GCC).--enable-warnings
This option is enabled by default. It adds platform / compiler dependent warning options to compiler command line.--enable-so-version
This option is enabled by default. It enables SO version decoration on resulting library file, e.g., the .2.0.0 in liblog4cplus-1.2.so.2.0.0.--enable-release-version
This option is enabled by default. It enables release version decoration on the resulting library file, e.g., the -1.2 in liblog4cplus-1.2.so.2.0.0.--enable-symbols-visibility-options
This option is enabled by default. It enables use of compiler and platform specific option for symbols visibility. See also the Visibility page on GCC Wiki.--enable-profiling
This option is disabled by default. This option adds profiling information generation compiler option -pg to GCC and Sun CC / Solaris Studio builds.--enable-threads
This option is enabled by default. It turns on detection of necessary compiler and linker flags that enable POSIX threading support.While this detection usually works well, some platforms still need help with configuration by supplying additional flags to the configure script. One of the know deficiencies is Solaris Studio on Linux. See one of the later note for details.--with-wchar_t-support
This option is enabled by default. When enabled, additional binaries will be built, marked with U suffix in file name and compiled with -DUNICODE=1 flag. In effect, these binaries assume that log4cplus::tchar is wchar_t.--with-working-locale
This is one of three locale and wchar_t↔char conversion related options. It is disabled by default.It is know to work well with GCC on Linux. Other platforms generally have lesser locale support in their implementations of the C++ standard library. It is known not to work well on any BSDs.See also docs/unicode.txt.--with-working-c-locale
This is second of wchar_t↔char conversion related options. It is disabled by default.It is known to work well on most Unix--like platforms, including recent Cygwin.--with-iconv
This is third of wchar_t↔char conversion related options. It is disabled by default.The conversion using iconv() function always uses "UTF-8" and "WCHAR_T" as source/target encoding. It is known to work well on platforms with GNU iconv. Different implementations of iconv() might not support "WCHAR_T" encoding selector.Either system provided iconv() or library provided libiconv() are detected and accepted. Also both SUSv3 and GNU iconv() function signatures are accepted.--with-qt
This option is disabled by default. It enables compilation of a separate shared library (liblog4cplusqt4debugappender) that implements Qt4DebugAppender. It requires Qt4 and pkg-config to be installed.--enable-tests
This option is enabled by default. It enables compilation of test executables.--enable-unit-tests
This option is disabled by default. It enables compilation of unit tests along their units. These unit tests then can be executed through unit_tests test executable that is built during compilation.
主要包括调试,so版本号支持,宽字符支持和本地化等。如果看不懂英文就维持原样。
2.开始编译
编译方法原作者已经给出了,这里着重说一下LInux上的编译。
这里还是建议安装到/usr/local;一方面,因为/usr本身包含很多操作系统预装的应用,相比来说/usr/local基本上空空如也,管理起来方便。另一方面,也是为了以后使用pkgconfig查找方便,这个后面再说。
./configure --prefix=/usr/local --enable-so-version=yes --enable-release-version=yes \
--enable-threads=yes
配置好之后使用下面的命令:
make -j6 && sudo make install
安装好之后会在/usr/local下面找到,重点是/usr/local/lib/pkgconfig/log4cplus.pc,一会配置要用到这个文件。
3.cmake引用
这里选用的是cmake,不为了别的就是因为简单。这里需要先通过cmake找到pkgconf这个包管理器,再通过pkgconf进一步定位log4cplus这个最终需要的包。
请看配置:
cmake_minimum_required(VERSION 3.10)
project(log_4_cplus)set(CMAKE_CXX_STANDARD 11)
find_package(PkgConfig REQUIRED)
if (PKG_CONFIG_FOUND)message(STATUS "PkgConfig Found")pkg_search_module(log4cplusREQUIREDlog4cplusIMPORTED_TARGET)if (TARGET PkgConfig::log4cplus)message(STATUS "log4cplus Found")add_executable(log_4_cplus main.cpp)target_link_libraries(log_4_cplus PkgConfig::log4cplus)endif ()
endif ()
重点就是find_package(PkgConfig REQUIRED)和pkg_search_module,前者找到Linux上面安装的pkgconf,后者通过pkgconf找到它管理的module,也就是log4cplus。
这个时候你就可以使用log4cplus了。下面列出几个简单的例子,其它的用法可以看下开发者的tests或wiki。
4.示例
简单实用1:
#include <iostream>
#include <iomanip>
#include <log4cplus/logger.h>
#include <log4cplus/loggingmacros.h>
#include <log4cplus/configurator.h>
#include <log4cplus/initializer.h>using namespace std;
using namespace log4cplus;
using namespace log4cplus::helpers;void printTest(log4cplus::Logger const &logger) {LOG4CPLUS_INFO(logger,LOG4CPLUS_TEXT("This is")<< LOG4CPLUS_TEXT(" a reall")<< LOG4CPLUS_TEXT("y long message.") << std::endl<< LOG4CPLUS_TEXT("Just testing it out") << std::endl<< LOG4CPLUS_TEXT("What do you think?"));LOG4CPLUS_INFO(logger, LOG4CPLUS_TEXT("This is a bool: ") << true);LOG4CPLUS_INFO(logger, LOG4CPLUS_TEXT("This is a char: ")<< LOG4CPLUS_TEXT('x'));LOG4CPLUS_INFO(logger, LOG4CPLUS_TEXT("This is a short: ")<< static_cast<short>(-100));LOG4CPLUS_INFO(logger, LOG4CPLUS_TEXT("This is a unsigned short: ")<< static_cast<unsigned short>(100));LOG4CPLUS_INFO(logger, LOG4CPLUS_TEXT("This is a int: ") << 1000);LOG4CPLUS_INFO(logger, LOG4CPLUS_TEXT("This is a unsigned int: ") << 1000U);LOG4CPLUS_INFO(logger, LOG4CPLUS_TEXT("This is a long(hex): ")<< std::hex << 100000000L);LOG4CPLUS_INFO(logger, LOG4CPLUS_TEXT("This is a unsigned long: ")<< static_cast<unsigned long>(100000000U));LOG4CPLUS_INFO(logger, LOG4CPLUS_TEXT("This is a float: ") << 1.2345f);LOG4CPLUS_INFO(logger, LOG4CPLUS_TEXT("This is a double: ")<< std::setprecision(15)<< 1.2345234234);LOG4CPLUS_INFO(logger, LOG4CPLUS_TEXT("This is a long double: ")<< std::setprecision(15)<< 123452342342.342L);
}int main(){log4cplus::Initializer initializer;log4cplus::BasicConfigurator config;config.configure(logger);log4cplus::Logger logger = log4cplus::Logger::getInstance(LOG4CPLUS_TEXT("main"));printTest();return 0;
}
简单实用2:
#include <iostream>
#include <iomanip>
#include <log4cplus/logger.h>
#include <log4cplus/loggingmacros.h>
#include <log4cplus/configurator.h>
#include <log4cplus/initializer.h>using namespace std;
using namespace log4cplus;
using namespace log4cplus::helpers;//带时间格式的日志
void time_format_test() {log4cplus::tchar const fmtstr[] =LOG4CPLUS_TEXT("%s, %Q%%q%q %%Q %%q=%%%q%%;%%q, %%Q=%Q");std::cout << "Entering main()..." << std::endl;log4cplus::Initializer initializer;try {Time time;log4cplus::tstring str;time = now();str = getFormattedTime(fmtstr, time);log4cplus::tcout << LOG4CPLUS_TEXT ("now: ") << str << std::endl;time = time_from_parts(0, 7);str = getFormattedTime(fmtstr, time);log4cplus::tcout << str << std::endl;time = time_from_parts(0, 17);str = getFormattedTime(fmtstr, time);log4cplus::tcout << str << std::endl;time = time_from_parts(0, 123);str = getFormattedTime(fmtstr, time);log4cplus::tcout << str << std::endl;time = time_from_parts(0, 1234);str = getFormattedTime(fmtstr, time);log4cplus::tcout << str << std::endl;time = time_from_parts(0, 12345);str = getFormattedTime(fmtstr, time);log4cplus::tcout << str << std::endl;time = time_from_parts(0, 123456);str = getFormattedTime(fmtstr, time);log4cplus::tcout << str << std::endl;time = time_from_parts(0, 0);str = getFormattedTime(fmtstr, time);log4cplus::tcout << str << std::endl;}catch (std::exception const &e) {std::cout << "Exception: " << e.what() << std::endl;}catch (...) {std::cout << "Exception..." << std::endl;}std::cout << "Exiting main()..." << std::endl;
}int main(){time_format_test();return 0;
}
总结
1、蛮简单的,倒是log4cplus的使用有很多需要研究的地方
相关文章:
c++编译使用log4cplus
提示:文章写完后,目录可以自动生成,如何生成可参考右边的帮助文档 文章目录 前言一、log4cplus是什么?二、使用步骤1.下载源代码2.开始配置1.配置介绍2.开始编译 3.cmake引用4.示例 总结 前言 C很强大,但是仍然有很多…...

zookeeper源码(02)源码编译启动及idea导入
本文介绍一下zookeeper-3.9.0源码下载、编译及本地启动。 下载源码 git clone https://gitee.com/apache/zookeeper.gitcd zookeeper git checkout release-3.9.0 git checkout -b release-3.9.0源码编译 README_packaging.md文件 该文件介绍了编译zookeeper需要的环境和命…...

Github 2FA绑定中国+86手机号码实现两步验证
GitHub宣布,到 2023 年底,所有用户都必须要启用双因素身份验证 (2FA),不能只用密码. GitHub开启2FA后,除了输入密码外,还需要通过一次性密码(OTP)等方式做第二级身份验证,才能成功登…...

windows安装mysql-8.0.35
打开cmd(以管理员身份运行),切换到mysql下的bin目录 mysqld --initialize 执行完毕之后,在data目录下会生成很多文件。 打开cmd(以管理员身份运行),切换到mysql下的bin目录,如果刚才的cmd没有关闭,可以继续mysqld -…...
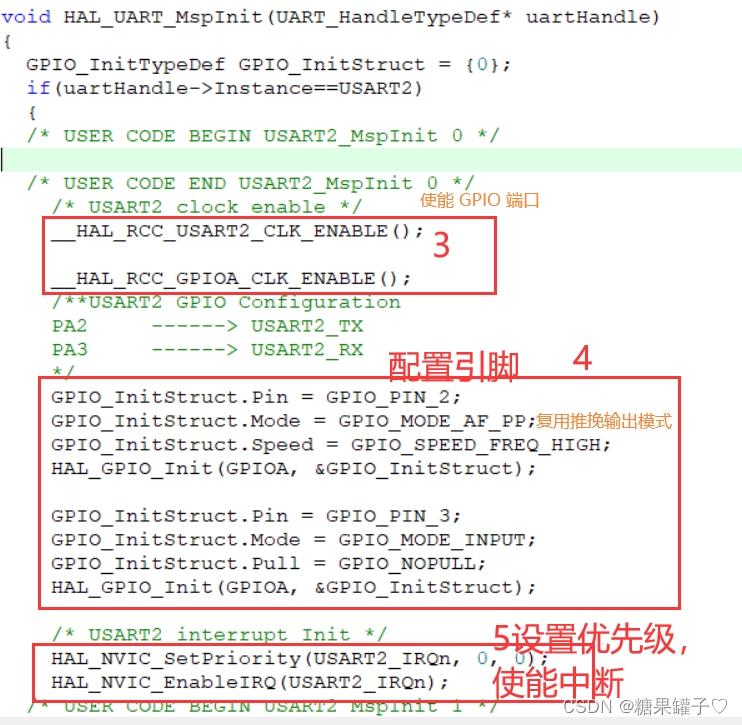
最详细STM32,cubeMX串口发送,接收数据
这篇文章将详细介绍 串口 发送数据,接受数据。 文章目录 前言一、串口的基础知识二、cubeMX 配置三、自动生成代码解析四、串口发送数据函数五、使用串口收发数据点亮 led重定向函数: 总结 前言 实验开发板:STM32F103C8T6。所需软件…...
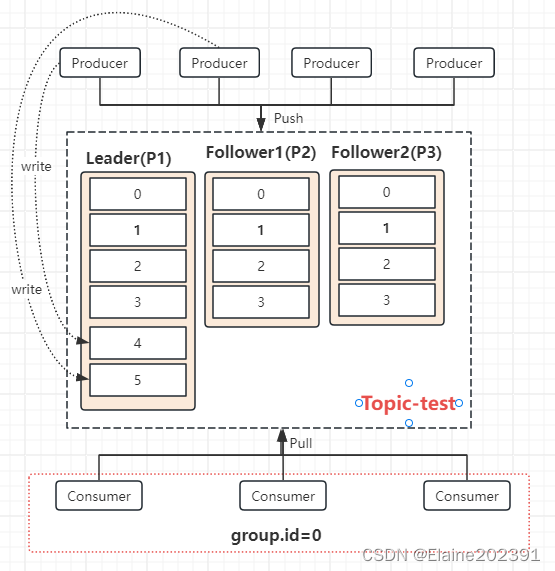
Kafka入门04——原理分析
目录 01理解Topic和Partition Topic(主题) Partition(分区) 02理解消息分发 消息发送到分区 消费者订阅和消费指定分区 总结 03再均衡(rebalance) 再均衡的触发 分区分配策略 RangeAssignor(范围分区) RoundRobinAssignor(轮询分区) StickyAssignor(粘性分区) Re…...
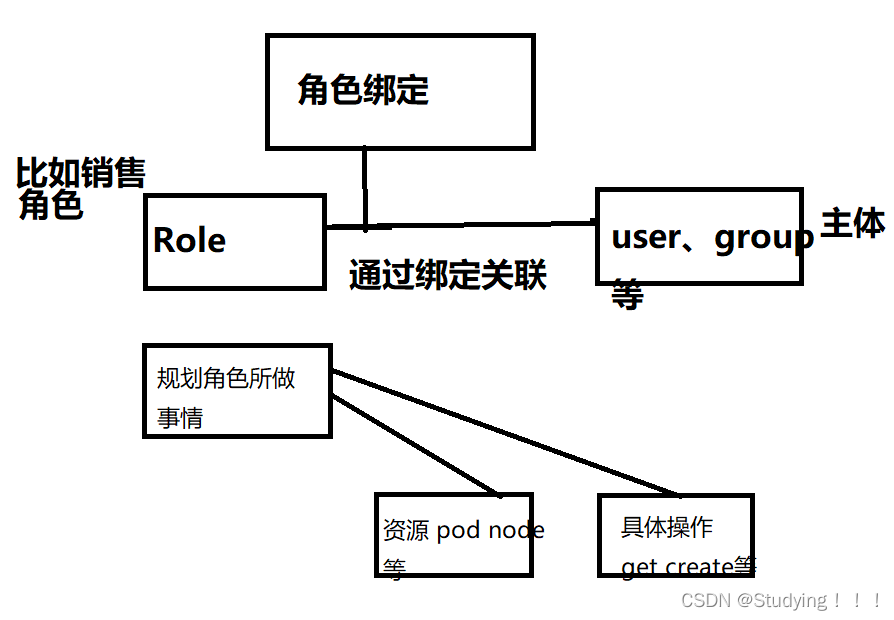
k8s-----17、集群安全机制
1、集群安全机制概述 1.1 访问k8s的三个步骤 1、认证 2、鉴权(授权) 3、准入控制 进行访问的时候,过程中都需要经过apiserver,apiserver做统一协调,比如门卫。且访问过程中需要证书、token、或者用户名密码。如果需要访问pod,…...

蓝桥算法赛(铺地板)
问题描述 小蓝家要装修了,小蓝爸爸买来了很多块(你可以理解为数量无限) 23 规格的地砖,小蓝家的地板是 nm 规格的,小蓝想问你,能否用这些 23 的地砖铺满地板。 铺满地板:对于地板的每个区域&…...
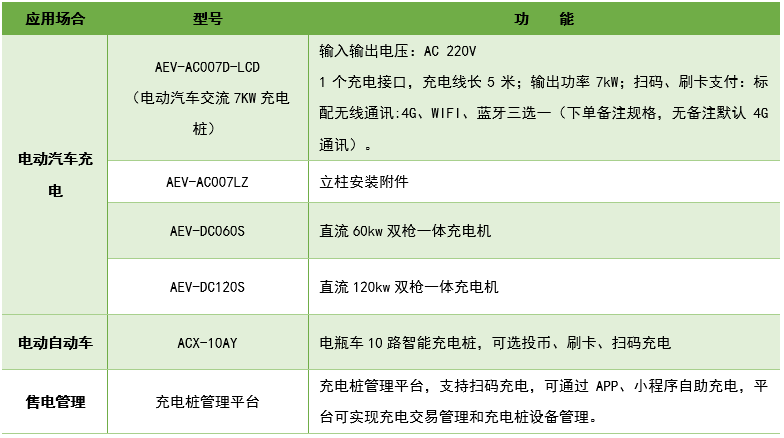
浅谈AcrelEMS-GYM文体建筑能效管理解决方案-安科瑞 蒋静
1 概述 AcrelEMS-CA 文体建筑能效管理聚焦建筑的能量和信息的流向搭建平台解决方案。该系统解决方案集变电站综合自动化、电力监控、电能质量分析及治理、电气安全、能耗分析、照明控制、设备运维于一体。打破子系统孤立,配置方便,运维便捷;…...

在LayerUI中使用onChange事件监听复选框的值变化
在LayerUI中,你可以使用onChange事件监听复选框的值变化。当复选框的状态发生变化时,onChange事件会被触发。 以下是一个示例代码,演示了如何使用onChange事件监听复选框的值变化: jsx import React from react; import { Chec…...

决策树--ID3算法
决策树–ID3算法 概念 (1)信息熵 E n t r o p y ( x ) − ∑ i N c l a s s P ( x i ) l o g 2 P ( x i ) Entropy(x) -\sum_{i}^{N_{class}}P(x_i)log_2 P(x_i) Entropy(x)−i∑NclassP(xi)log2P(xi) 假设只有2个类别(N2&…...

js延时加载有哪些方式
...

VSCode运行python提示No module name ‘xxx‘
在进行from * import *导入操作时,编辑器能够解析到module, 但是在编辑器中运行时确提示。 No module name xxx 而且单独运行该文件,或在其他编辑器、或terminal中python file运行,都能正常导入module. 解决方案: 在vscode的用…...
【网安大模型专题10.19】※论文5:ChatGPT+漏洞定位+补丁生成+补丁验证+APR方法+ChatRepair+不同修复场景+修复效果(韦恩图展示)
Keep the Conversation Going: Fixing 162 out of 337 bugs for $0.42 each using ChatGPT 写在最前面背景介绍自动程序修复流程Process of APR (automated program repair)1、漏洞程序2、漏洞定位模块3、补丁生成4、补丁验证 (可以学习的PPT设计)经典的…...
C盘满了怎么清理文件?
电脑的C盘是我们电脑存储系统文件和应用程序的一个重要盘符,很多人经常会遇到C盘空间不足的问题;虽然我们可以通过卸载程序或者删除文件来释放空间,但是在这个过程中往往会误删掉一些重要的文件,造成部分程序可能无法正常使用。 因…...

pytest方法间变量值传递--request夹具
相当于self对象,因为调试的时候测试用例是类似沙箱的单步运行,所以self对象的属性被阻挡在沙箱外边。 request.cls 是pytest中的一个属性,它允许您在测试类中共享数据或属性。当您使用pytest编写测试类时,request 夹具允许您在测…...
)
Linux 内核定时器(高级字符设备五)
一、Linux 内核定时器介绍 在 Linux 内核中很多函数是基于定时器进行驱动的,但是内核定时器的精度并不高,所以不能作为高精度定时器使用。并且内核定时器的运行没有周期性,到达计时终点后会自动关闭。如果要实现周期性定时,就要在…...
「快学Docker」Docker镜像和容器的创建与管理
「快学Docker」Docker镜像和容器的创建与管理 引言什么是Docker镜像?镜像获取和使用镜像获取镜像使用 什么是Docker容器?Docker容器与主机之间的交互基于Dockerfile创建镜像基于镜像创建容器总结 引言 Docker镜像和容器是当今云计算领域中最受欢迎的技术…...
Zabbix出现 404Not FoundThe requested URL /zabbix was not found on this server.
目录 一、问题: 二、原因: 三、解决方法: 一、问题: Not Found The requested URL /zabbix was not found on this server. 二、原因: 未找到 在此服务器上找不到请求的 URL /zabbix。 /etc/httpd/conf.d 目录…...
【STM32】标准库的引入
一、为什么要会有标志外设库 1、传统单片机软件开发方式 (1)芯片厂商提供数据手册、示例代码、开发环境 (2)单片机软件工程师面向产品功能,查阅数据手册,参考官方示例代码进行开发 (3)硬件操作的方式是用C语言对寄存器进行读写以操作硬件 (4)主要工作量…...

38岁大厂P9被裁后卖保险:成年人的职场,没有铁饭碗
来自:推荐一个程序员编程资料站:http://cxyroad.com副业赚钱专栏:https://xbt100.top2024年IDEA最新激活方法后台回复:激活码CSDN免登录复制代码插件下载:CSDN复制插件以下是正文。01 | P9也不是免死金牌最近在网上看到…...
Pixelle-Video完整指南:如何用AI在3分钟内创建专业短视频
Pixelle-Video完整指南:如何用AI在3分钟内创建专业短视频 【免费下载链接】Pixelle-Video 🚀 AI 全自动短视频引擎 | AI Fully Automated Short Video Engine 项目地址: https://gitcode.com/GitHub_Trending/pi/Pixelle-Video 在当今内容爆炸的时…...

逆向实战:用X32dbg条件断点精准定位MFC程序的窗口消息处理函数
逆向实战:用X32dbg条件断点精准定位MFC程序的窗口消息处理函数 在逆向分析领域,MFC程序因其复杂的消息映射机制和封装层次,常常让分析者感到无从下手。特别是当我们需要分析某个特定窗口消息(如按钮点击、菜单选择)的处…...

拆解进销存流程的5大核心功能,手把手教你规范企业的进销存流程
在现代企业的数字化管理中,规范进销存流程是提升运营效率、降低管理成本的关键所在。一个科学、严谨的进销存流程不仅能帮助企业实现采购、销售与库存数据的实时同步,还能有效解决账实不符、库存积压等长期痛点。本文将深入拆解进销存流程中的5大核心功能…...

基于本地大模型的字幕翻译:LM Studio集成方案与实战优化
1. 项目概述:当本地大模型遇上字幕翻译最近在折腾本地大模型应用时,发现了一个挺有意思的场景:字幕翻译。很多朋友喜欢看海外影视剧或学习资料,但苦于没有高质量的中文字幕。在线翻译工具要么有字数限制,要么担心隐私泄…...

Yolov5算法界面 PyQt5 +.exe文件部署 yolo双击运行 yolo打包识别
介绍 Yolov5是一种基于深度学习的目标检测算法,PyQt5是一个Python编写的GUI框架,用于创建交互式界面。在部署和运行Yolov5模型时,结合PyQt5可以方便地创建一个用户友好的界面,并将代码打包为.exe文件以供其他人使用。 下面是一个简…...

Python try...except ImportError 语句详解
在Python编程中,ImportError 是与模块导入相关的核心异常。优雅地处理它,是编写健壮、可维护和跨平台代码的关键。try...except ImportError 结构正是实现这一目标的标准工具。本文将为你抽丝剥茧,从基础概念到高级实践,全面解析这…...

GEO优化实操框架:GEO优化的正确姿势是“带着答案去找客户”
如果你是B2B企业的老板或市场负责人,你一定听过这句话: “我们网上曝光是不少,但来的询盘都不对——问价格的比问方案的还多,还有不少是学生做调研的。” 这不是你一个人遇到的问题。这是传统SEO和竞价广告的天然缺陷——你只能“…...

手把手教你用三菱FX3U PLC的RS指令和RS2指令与电脑串口调试助手‘对话’
三菱FX3U PLC串口通信实战:从零搭建RS485数据收发系统 第一次接触工业控制系统的串口通信时,我被那些密密麻麻的接线和晦涩的协议参数弄得晕头转向。直到在自动化生产线上亲眼看到PLC通过两根电线与十几台设备稳定通信,才意识到串口技术的精妙…...

通达信数据解析终极指南:mootdx让金融数据获取变得如此简单
通达信数据解析终极指南:mootdx让金融数据获取变得如此简单 【免费下载链接】mootdx 通达信数据读取的一个简便使用封装 项目地址: https://gitcode.com/GitHub_Trending/mo/mootdx 在金融数据分析和量化交易的世界里,获取准确、完整的市场数据是…...