【安全篇】金刚不坏之身:整合 Spring Security + JWT 实现无状态认证与授权
摘要
本文是《Spring Boot 实战派》系列的第四篇。我们将直面所有 Web 应用都无法回避的核心问题:安全。文章将详细阐述认证(Authentication) 与授权(Authorization的核心概念,对比传统 Session-Cookie 与现代 JWT(JSON Web Token)的优劣。
我们将从零开始,一步步整合强大的 Spring Security 框架,并结合 JWT 实现一套无状态(Stateless)、适用于前后端分离架构的认证授权体系。读者将学会如何创建登录接口、生成和解析 Token、保护需要权限的 API,并最终实现基于注解的精细化方法级权限控制。完成本章,你将能为任何 Spring Boot 应用构建起坚不可摧的安全防线。
系列回顾:
在前三篇文章中,我们已经构建了一个功能完备且接口优雅的 CRUD 应用。它有规范的 API、健壮的异常处理和严格的参数校验。但它现在是“夜不闭户”的,任何人都可以随意调用接口增删改查。这在真实世界中是致命的。是时候给我们的应用穿上“金刚不坏之身”了!
欢迎来到充满挑战与机遇的第四站!
安全,是 Web 开发的“生命线”。一个没有安全机制的应用,就像一座没有门锁的宝库,里面的数据和功能可以被任意窃取和滥用。今天,我们将要学习的,就是如何为我们的应用铸造一把牢不可破的“锁”。
我们将要面对两个核心概念:
- 认证 (Authentication): 你是谁?—— 验证用户身份的过程,通常是通过用户名和密码。
- 授权 (Authorization): 你能干什么?—— 验证用户是否有权限执行某个操作,比如“只有管理员才能删除用户”。
我们将使用业界标准的 Spring Security 框架来处理这一切。虽然它以“配置复杂”著称,但别担心,我会带你绕过所有坑,直达核心。并且,我们将采用现代前后端分离架构中最流行的 JWT (JSON Web Token) 方案,实现无状态认证。
第一步:理论先行 —— 为什么选择 JWT?
在前后端分离的架构下,服务端不再存储用户的会话信息(Session),每一次请求都必须是独立的、自包含的。这就是无状态 (Stateless)。
-
传统 Session-Cookie 方案 (有状态):
- 用户登录,服务端验证成功后,创建一个 Session 对象存储用户信息,并生成一个 Session ID。
- 服务端将 Session ID 通过 Cookie 返回给浏览器。
- 浏览器后续每次请求都会带上这个 Cookie。
- 服务端根据 Session ID 找到对应的 Session,从而知道是哪个用户。
- 缺点: 服务端需要存储大量 Session,在分布式环境下,需要解决 Session 共享问题(如使用 Redis 共享 Session),扩展性较差。
-
JWT 方案 (无状态):
- 用户登录,服务端验证成功后,将用户的核心信息(如用户ID、角色)编码成一个加密的字符串(Token)。
- 服务端将这个 Token 直接返回给客户端(前端)。
- 客户端(前端)将 Token 存储起来(比如在
localStorage或sessionStorage中)。 - 后续每次请求,客户端都通过请求头(
AuthorizationHeader)将 Token 发送给服务端。 - 服务端收到 Token 后,用密钥进行解密验证,无需查询数据库或缓存就能确认用户身份和权限。
- 优点: 服务端无需存储任何会话信息,天然适合分布式和微服务架构,扩展性极好。
一个 JWT Token 通常长这样:xxxxx.yyyyy.zzzzz,由三部分组成:
- Header (头部): 包含了 Token 的类型和所使用的加密算法。
- Payload (载荷): 包含了你想传递的数据,如用户 ID、用户名、过期时间等(切记不要放敏感信息如密码!)。
- Signature (签名): 将前两部分加上一个密钥(secret)进行加密生成。服务端用这个签名来验证 Token 是否被篡改。
理论讲完,开始实战!
第二步:添加依赖,引入 Security 和 JWT
打开 pom.xml,添加以下依赖:
<!-- Spring Boot Security 启动器 -->
<dependency><groupId>org.springframework.boot</groupId><artifactId>spring-boot-starter-security</artifactId>
</dependency><!-- JJWT (Java JWT) 库,用于生成和解析 JWT -->
<dependency><groupId>io.jsonwebtoken</groupId><artifactId>jjwt-api</artifactId><version>0.11.5</version>
</dependency>
<dependency><groupId>io.jsonwebtoken</groupId><artifactId>jjwt-impl</artifactId><version>0.11.5</version><scope>runtime</scope>
</dependency>
<dependency><groupId>io.jsonwebtoken</groupId><artifactId>jjwt-jackson</artifactId><version>0.11.5</version><scope>runtime</scope>
</dependency>
注意: 仅仅添加 spring-boot-starter-security 依赖后,直接重启应用,你会发现你所有的 API 都无法访问了,会弹出一个登录框。这是 Spring Security 的默认行为,它会保护所有路径。我们的任务就是自定义这个行为。
第三步:创建 JWT 工具类
我们需要一个工具类来专门负责生成和解析 JWT。
-
在
com.example.myfirstapp下创建config包。 -
在
application.properties中添加 JWT 配置:# JWT Settings jwt.secret=your-super-secret-key-that-is-long-enough-for-hs256 jwt.expiration-ms=86400000 # 24 hours强烈建议:
jwt.secret应该是一个足够长且复杂的随机字符串,并且不应硬编码在代码里,最好通过环境变量注入。 -
在
config包下创建JwtTokenProvider.java:
package com.example.myfirstapp.config;import com.example.myfirstapp.entity.User;
import io.jsonwebtoken.*;
import io.jsonwebtoken.security.Keys;
import jakarta.annotation.PostConstruct;
import org.slf4j.Logger;
import org.slf4j.LoggerFactory;
import org.springframework.beans.factory.annotation.Value;
import org.springframework.stereotype.Component;
import java.security.Key;
import java.util.Date;@Component
public class JwtTokenProvider {private static final Logger log = LoggerFactory.getLogger(JwtTokenProvider.class);@Value("${jwt.secret}")private String jwtSecret;@Value("${jwt.expiration-ms}")private long jwtExpirationInMs;private Key key;@PostConstructpublic void init() {this.key = Keys.hmacShaKeyFor(jwtSecret.getBytes());}public String generateToken(User user) {Date now = new Date();Date expiryDate = new Date(now.getTime() + jwtExpirationInMs);return Jwts.builder().setSubject(Long.toString(user.getId())) // 将用户ID作为 subject.setIssuedAt(new Date()).setExpiration(expiryDate).signWith(key, SignatureAlgorithm.HS256).compact();}public Long getUserIdFromJWT(String token) {Claims claims = Jwts.parserBuilder().setSigningKey(key).build().parseClaimsJws(token).getBody();return Long.parseLong(claims.getSubject());}public boolean validateToken(String authToken) {try {Jwts.parserBuilder().setSigningKey(key).build().parseClaimsJws(authToken);return true;} catch (JwtException | IllegalArgumentException e) {log.error("JWT validation error: {}", e.getMessage());}return false;}
}
第四步:配置 Spring Security
这是最核心的一步。我们将创建一个配置类,告诉 Spring Security:
- 哪些 URL 是公开的(如登录、注册),不需要认证。
- 哪些 URL 是受保护的,需要认证。
- 如何处理登录请求。
- 如何使用我们自定义的 JWT 过滤器来验证 Token。
- 在
config包下创建SecurityConfig.java:
package com.example.myfirstapp.config;import org.springframework.beans.factory.annotation.Autowired;
import org.springframework.context.annotation.Bean;
import org.springframework.context.annotation.Configuration;
import org.springframework.security.config.annotation.web.builders.HttpSecurity;
import org.springframework.security.config.annotation.web.configuration.EnableWebSecurity;
import org.springframework.security.config.http.SessionCreationPolicy;
import org.springframework.security.crypto.bcrypt.BCryptPasswordEncoder;
import org.springframework.security.crypto.password.PasswordEncoder;
import org.springframework.security.web.SecurityFilterChain;@Configuration
@EnableWebSecurity
public class SecurityConfig {// 1. 定义哪些 URL 是公开的,哪些是受保护的@Beanpublic SecurityFilterChain securityFilterChain(HttpSecurity http) throws Exception {http// 禁用 CSRF 防护,因为我们使用 JWT,是无状态的.csrf(csrf -> csrf.disable())// 配置会话管理为无状态,不使用 Session.sessionManagement(session -> session.sessionCreationPolicy(SessionCreationPolicy.STATELESS))// 配置 URL 的授权规则.authorizeHttpRequests(authorize -> authorize.requestMatchers("/api/auth/**").permitAll() // 登录/注册接口公开.requestMatchers("/users/**").hasRole("ADMIN") // 用户管理接口需要 ADMIN 角色.anyRequest().authenticated() // 其他所有请求都需要认证);// TODO: 在这里添加 JWT 过滤器return http.build();}// 2. 配置密码编码器@Beanpublic PasswordEncoder passwordEncoder() {return new BCryptPasswordEncoder();}
}
注意: 上面的代码还未完成,我们还需要实现 JWT 过滤器并添加到 securityFilterChain 中。BCryptPasswordEncoder 是 Spring Security 推荐的密码加密方式,它会自动加盐,非常安全。
第五步:实现登录逻辑和 JWT 过滤器
1. 改造 User 实体和创建认证服务
- 修改
User.java: 添加password和role字段。
// User.java
public class User {// ... id, name, email ...private String password;private String role; // e.g., "ROLE_USER", "ROLE_ADMIN"// ... getters and setters for new fields ...
}
- 创建
AuthService.java和AuthController.java:
在 com.example.myfirstapp下创建 service 和 dto 包。
LoginRequest.java (DTO)
package com.example.myfirstapp.dto;
// DTO for login request
public record LoginRequest(String email, String password) {}
AuthController.java
package com.example.myfirstapp.controller;import com.example.myfirstapp.config.JwtTokenProvider;
import com.example.myfirstapp.dto.LoginRequest;
import com.example.myfirstapp.entity.User;
import com.example.myfirstapp.repository.UserRepository;
import org.springframework.beans.factory.annotation.Autowired;
import org.springframework.http.ResponseEntity;
import org.springframework.security.crypto.password.PasswordEncoder;
import org.springframework.web.bind.annotation.*;
import java.util.Optional;@RestController
@RequestMapping("/api/auth")
public class AuthController {@Autowired private UserRepository userRepository;@Autowired private PasswordEncoder passwordEncoder;@Autowired private JwtTokenProvider tokenProvider;@PostMapping("/login")public ResponseEntity<?> authenticateUser(@RequestBody LoginRequest loginRequest) {Optional<User> userOptional = userRepository.findByEmail(loginRequest.email());if (userOptional.isPresent() && passwordEncoder.matches(loginRequest.password(), userOptional.get().getPassword())) {String jwt = tokenProvider.generateToken(userOptional.get());return ResponseEntity.ok(new JwtAuthenticationResponse(jwt));} else {return ResponseEntity.status(401).body("Invalid credentials");}}// DTO for JWT responsepublic record JwtAuthenticationResponse(String accessToken) {}// 你还需要在 UserRepository 中添加 findByEmail 方法
}
UserRepository.java
public interface UserRepository extends JpaRepository<User, Long> {Optional<User> findByEmail(String email);
}
2. 创建 JWT 认证过滤器
这个过滤器是核心,它会在每个受保护的请求到达时,从 Authorization 头中提取 Token,验证它,并设置 Spring Security 的上下文。
在 config 包下创建 JwtAuthenticationFilter.java:
package com.example.myfirstapp.config;import jakarta.servlet.FilterChain;
import jakarta.servlet.ServletException;
import jakarta.servlet.http.HttpServletRequest;
import jakarta.servlet.http.HttpServletResponse;
import org.springframework.beans.factory.annotation.Autowired;
import org.springframework.security.authentication.UsernamePasswordAuthenticationToken;
import org.springframework.security.core.context.SecurityContextHolder;
import org.springframework.security.core.userdetails.UserDetails;
import org.springframework.security.core.userdetails.UserDetailsService;
import org.springframework.security.web.authentication.WebAuthenticationDetailsSource;
import org.springframework.stereotype.Component;
import org.springframework.util.StringUtils;
import org.springframework.web.filter.OncePerRequestFilter;
import java.io.IOException;@Component
public class JwtAuthenticationFilter extends OncePerRequestFilter {@Autowired private JwtTokenProvider tokenProvider;@Autowired private UserDetailsService userDetailsService; // Spring Security 的核心服务@Overrideprotected void doFilterInternal(HttpServletRequest request, HttpServletResponse response, FilterChain filterChain)throws ServletException, IOException {try {String jwt = getJwtFromRequest(request);if (StringUtils.hasText(jwt) && tokenProvider.validateToken(jwt)) {Long userId = tokenProvider.getUserIdFromJWT(jwt);// 从数据库加载用户信息UserDetails userDetails = userDetailsService.loadUserByUsername(userId.toString());UsernamePasswordAuthenticationToken authentication = new UsernamePasswordAuthenticationToken(userDetails, null, userDetails.getAuthorities());authentication.setDetails(new WebAuthenticationDetailsSource().buildDetails(request));// 设置到 Spring Security 上下文中SecurityContextHolder.getContext().setAuthentication(authentication);}} catch (Exception ex) {logger.error("Could not set user authentication in security context", ex);}filterChain.doFilter(request, response);}private String getJwtFromRequest(HttpServletRequest request) {String bearerToken = request.getHeader("Authorization");if (StringUtils.hasText(bearerToken) && bearerToken.startsWith("Bearer ")) {return bearerToken.substring(7);}return null;}
}
3. 实现 UserDetailsService
Spring Security 通过 UserDetailsService 来加载用户信息。我们需要提供一个自己的实现。
在 service 包下创建 CustomUserDetailsService.java:
package com.example.myfirstapp.service;import com.example.myfirstapp.entity.User;
import com.example.myfirstapp.repository.UserRepository;
import org.springframework.beans.factory.annotation.Autowired;
import org.springframework.security.core.authority.SimpleGrantedAuthority;
import org.springframework.security.core.userdetails.UserDetails;
import org.springframework.security.core.userdetails.UserDetailsService;
import org.springframework.security.core.userdetails.UsernameNotFoundException;
import org.springframework.stereotype.Service;
import java.util.Collections;@Service
public class CustomUserDetailsService implements UserDetailsService {@Autowired private UserRepository userRepository;@Overridepublic UserDetails loadUserByUsername(String userId) throws UsernameNotFoundException {User user = userRepository.findById(Long.valueOf(userId)).orElseThrow(() -> new UsernameNotFoundException("User not found with id: " + userId));return new org.springframework.security.core.userdetails.User(user.getEmail(), user.getPassword(),Collections.singleton(new SimpleGrantedAuthority(user.getRole())));}
}
4. 完善 SecurityConfig
最后,回到 SecurityConfig.java,把我们的过滤器加进去。
// SecurityConfig.java
// ... imports
import org.springframework.security.web.authentication.UsernamePasswordAuthenticationFilter;@Configuration
@EnableWebSecurity
public class SecurityConfig {@Autowired private JwtAuthenticationFilter jwtAuthenticationFilter;@Beanpublic SecurityFilterChain securityFilterChain(HttpSecurity http) throws Exception {http.csrf(csrf -> csrf.disable()).sessionManagement(session -> session.sessionCreationPolicy(SessionCreationPolicy.STATELESS)).authorizeHttpRequests(authorize -> authorize.requestMatchers("/api/auth/**").permitAll()// .requestMatchers("/users/**").hasRole("ADMIN") // 暂时注释,先测试认证.anyRequest().authenticated())// 在 UsernamePasswordAuthenticationFilter 之前添加我们的 JWT 过滤器.addFilterBefore(jwtAuthenticationFilter, UsernamePasswordAuthenticationFilter.class);return http.build();}// ... passwordEncoder bean
}
第六步:测试与方法级授权
- 准备数据: 手动在数据库中插入一个用户,密码要用
BCrypt加密后的。你可以写个小程序生成,或者在注册功能中实现。 - 测试登录: 使用 Postman 调用
POST /api/auth/login,传入正确的邮箱和密码,你会得到一个 JWT Token。 - 测试受保护接口: 调用
GET /users/all,不带 Token,会返回 403 Forbidden。带上 Token (在 Headers 中添加Authorization: Bearer <your_jwt_token>),就能成功访问。
方法级授权 (@PreAuthorize)
现在,我们来实现更精细的权限控制。
- 开启方法级安全: 在
SecurityConfig上添加@EnableMethodSecurity。 - 修改
SecurityConfig:取消对/users/**的全局hasRole配置,因为我们要在方法上控制。 - 在
UserController的方法上添加注解:
// UserController.java
import org.springframework.security.access.prepost.PreAuthorize;@RestController
@RequestMapping("/users")
public class UserController {// ...@GetMapping("/all")@PreAuthorize("hasRole('ADMIN')") // 只有 ADMIN 角色的用户才能调用public Result<List<User>> getAllUsers() {// ...}@DeleteMapping("/delete/{id}")@PreAuthorize("hasRole('ADMIN')")public Result<Void> deleteUserById(@PathVariable Long id) {// ...}
}
现在,即使用户登录了,如果他的角色不是 ROLE_ADMIN,调用这两个接口也一样会收到 403 Forbidden。
总结与展望
这一章内容非常密集,但恭喜你坚持了下来!你已经掌握了 Spring Boot 安全体系中最核心、最实用的部分:
- 理解了 JWT 无状态认证的原理和优势。
- 整合了 Spring Security,并自定义了安全策略。
- 实现了登录接口,能够生成和验证 JWT Token。
- 构建了 JWT 认证过滤器,保护了应用的 API。
- 学会了使用
@PreAuthorize实现方法级的精细化授权。
你的应用现在不仅功能强大,而且固若金汤。它已经非常接近一个企业级的应用了。
在接下来的文章中,我们将从后端转向应用的“可维护性”和“性能优化”。下一篇 《【配置篇】告别硬编码:多环境配置、@ConfigurationProperties 与配置中心初探》,我们将学习如何优雅地管理应用的配置,让它能轻松地在开发、测试、生产等不同环境中切换。我们下期再会!
相关文章:

【安全篇】金刚不坏之身:整合 Spring Security + JWT 实现无状态认证与授权
摘要 本文是《Spring Boot 实战派》系列的第四篇。我们将直面所有 Web 应用都无法回避的核心问题:安全。文章将详细阐述认证(Authentication) 与授权(Authorization的核心概念,对比传统 Session-Cookie 与现代 JWT(JS…...
软件工程 期末复习
瀑布模型:计划 螺旋模型:风险低 原型模型: 用户反馈 喷泉模型:代码复用 高内聚 低耦合:模块内部功能紧密 模块之间依赖程度小 高内聚:指的是一个模块内部的功能应该紧密相关。换句话说,一个模块应当只实现单一的功能…...

spring Security对RBAC及其ABAC的支持使用
RBAC (基于角色的访问控制) RBAC (Role-Based Access Control) 是 Spring Security 中最常用的权限模型,它将权限分配给角色,再将角色分配给用户。 RBAC 核心实现 1. 数据库设计 users roles permissions ------- ------…...

【FTP】ftp文件传输会丢包吗?批量几百个文件传输,有一些文件没有传输完整,如何解决?
FTP(File Transfer Protocol)本身是一个基于 TCP 的协议,理论上不会丢包。但 FTP 文件传输过程中仍可能出现文件不完整、丢失或损坏的情况,主要原因包括: ✅ 一、FTP传输可能“丢包”或文件不完整的原因 原因描述网络…...

es6+和css3新增的特性有哪些
一:ECMAScript 新特性(ES6) ES6 (2015) - 革命性更新 1,记住的方法,从一个方法里面用到了哪些技术 1,let /const块级作用域声明2,**默认参数**:函数参数可以设置默认值。3&#x…...
算法打卡第18天
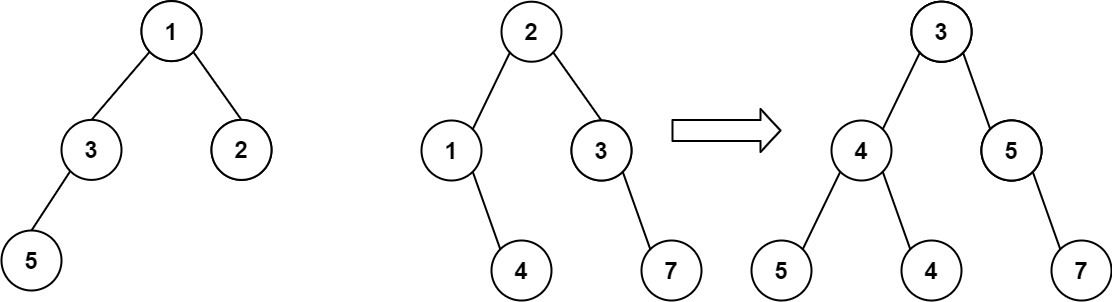
从中序与后序遍历序列构造二叉树 (力扣106题) 给定两个整数数组 inorder 和 postorder ,其中 inorder 是二叉树的中序遍历, postorder 是同一棵树的后序遍历,请你构造并返回这颗 二叉树 。 示例 1: 输入:inorder [9,3,15,20,7…...

Visual Studio Code 扩展
Visual Studio Code 扩展 change-case 大小写转换EmmyLua for VSCode 调试插件Bookmarks 书签 change-case 大小写转换 https://marketplace.visualstudio.com/items?itemNamewmaurer.change-case 选中单词后,命令 changeCase.commands 可预览转换效果 EmmyLua…...
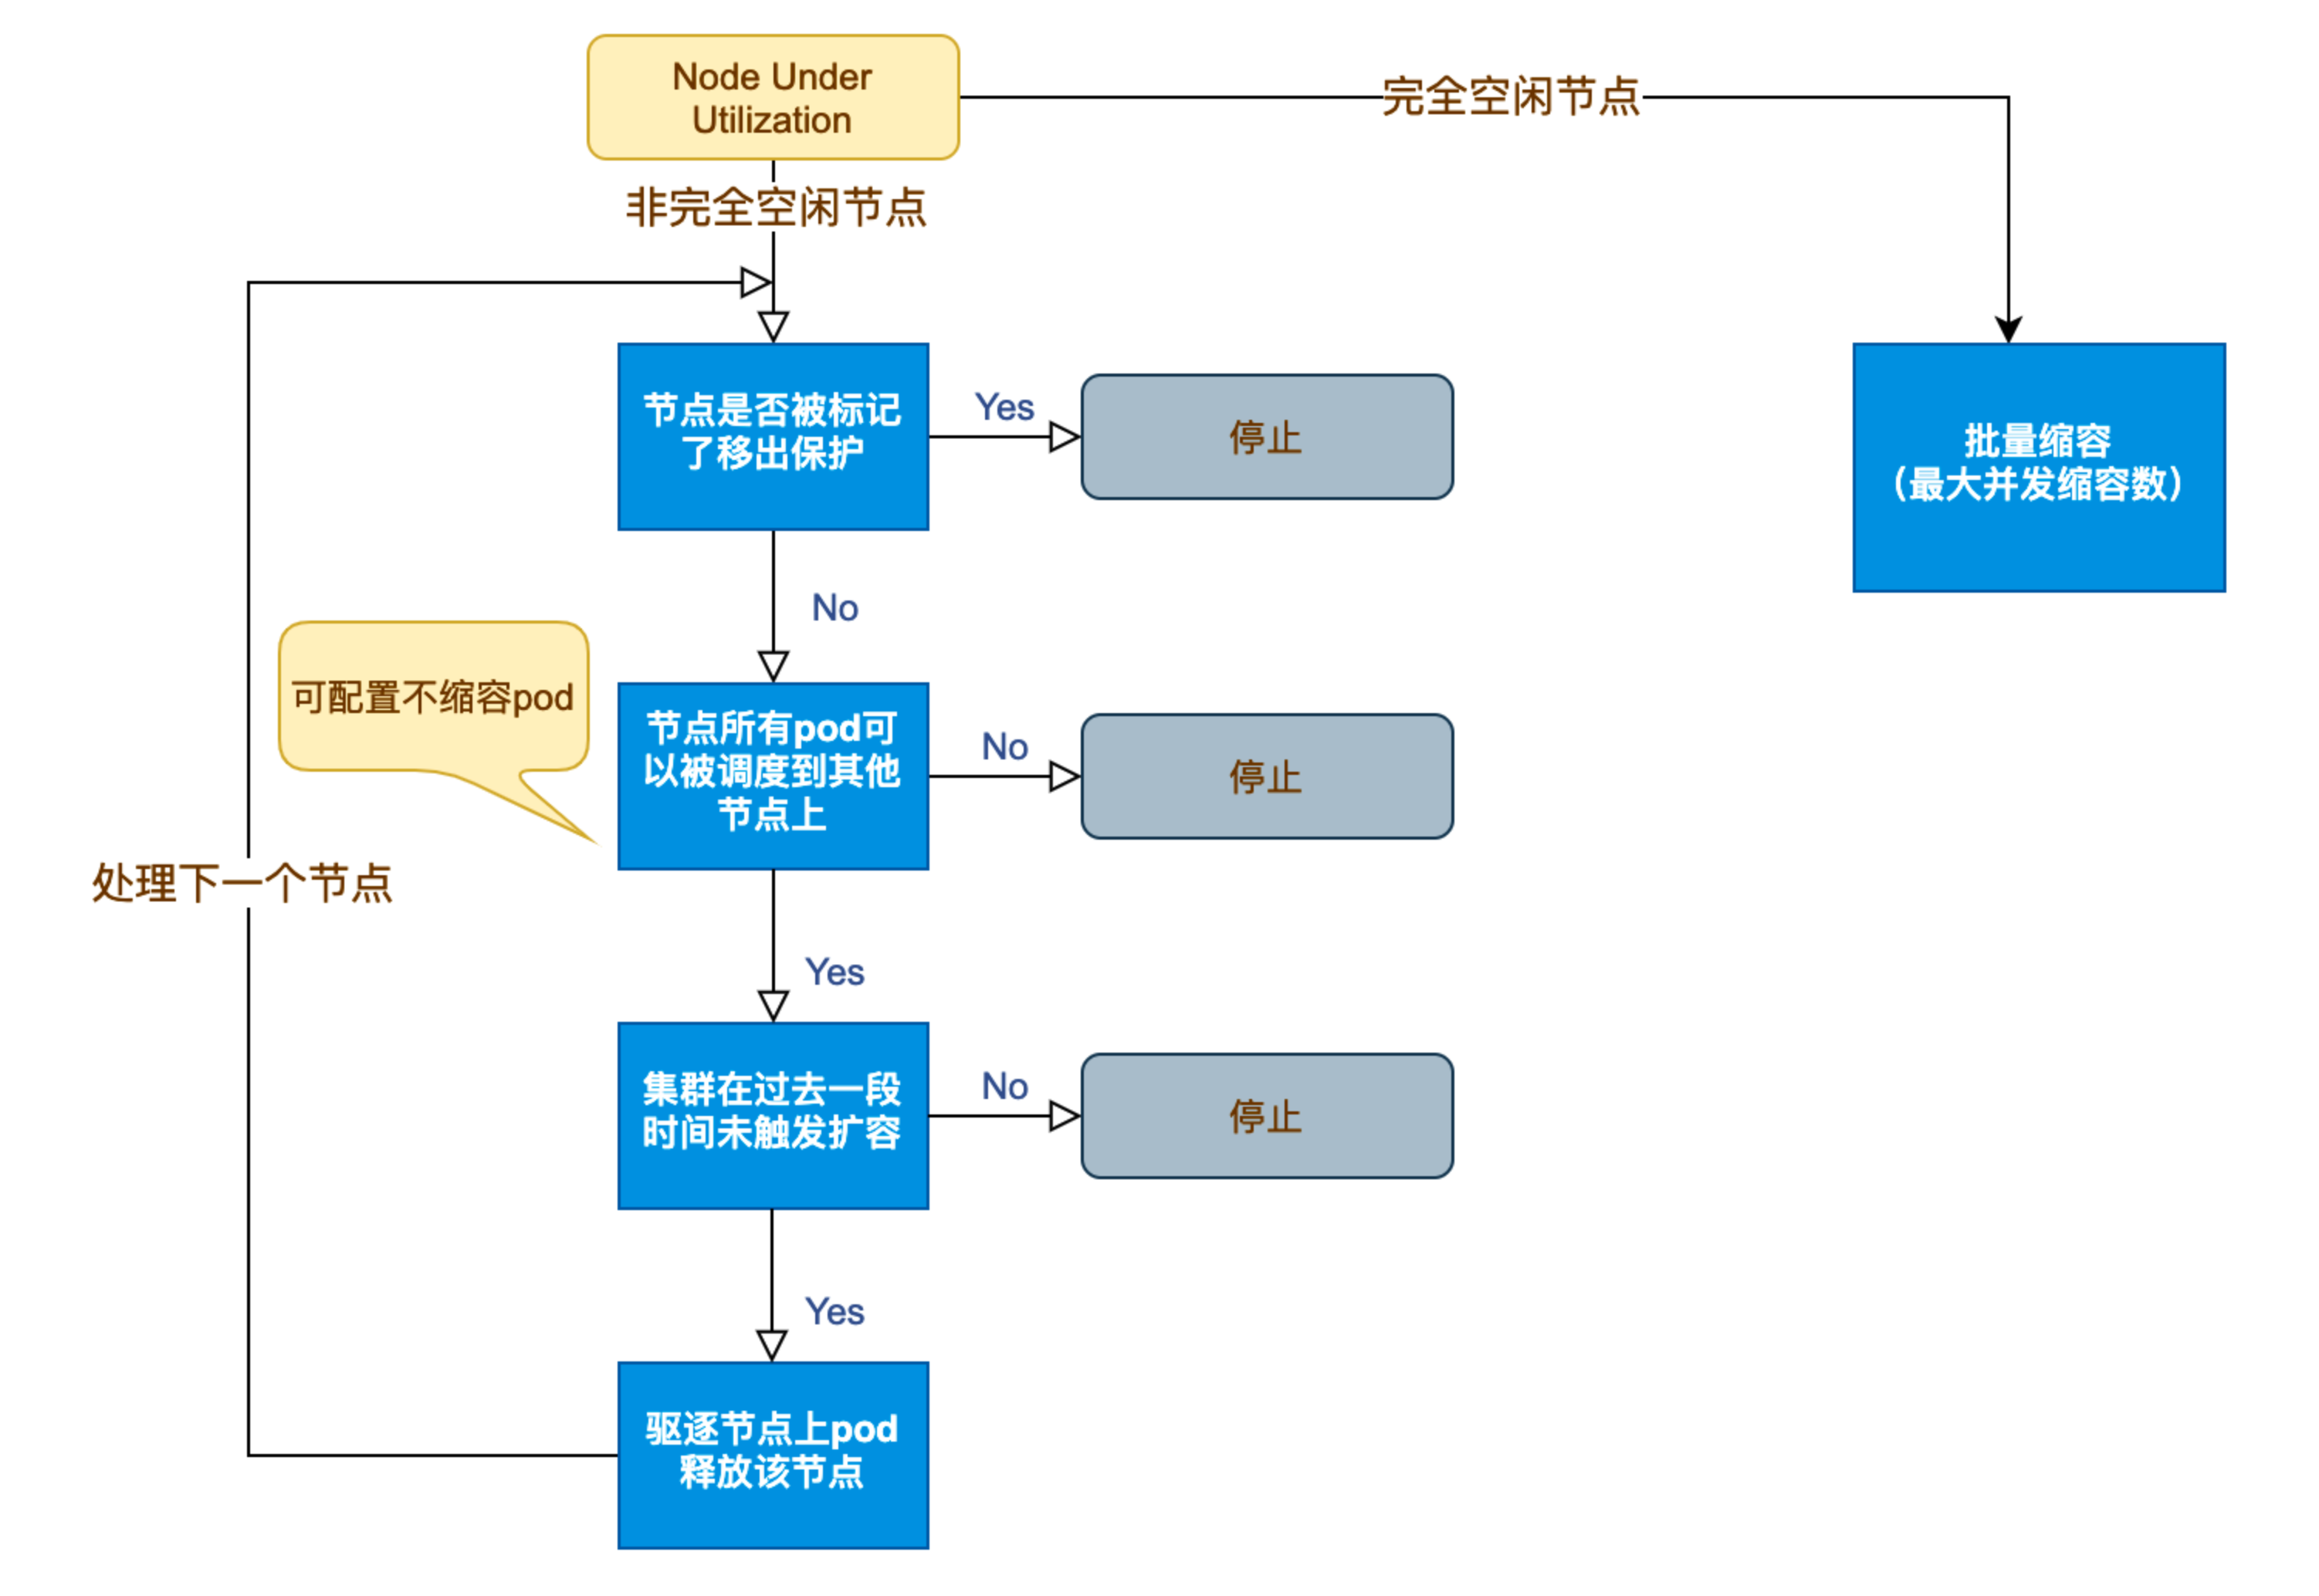
Kubernetes 节点自动伸缩(Cluster Autoscaler)原理与实践
在 Kubernetes 集群中,如何在保障应用高可用的同时有效地管理资源,一直是运维人员和开发者关注的重点。随着微服务架构的普及,集群内各个服务的负载波动日趋明显,传统的手动扩缩容方式已无法满足实时性和弹性需求。 Cluster Auto…...

【深度学习新浪潮】什么是credit assignment problem?
Credit Assignment Problem(信用分配问题) 是机器学习,尤其是强化学习(RL)中的核心挑战之一,指的是如何将最终的奖励或惩罚准确地分配给导致该结果的各个中间动作或决策。在序列决策任务中,智能体执行一系列动作后获得一个最终奖励,但每个动作对最终结果的贡献程度往往…...
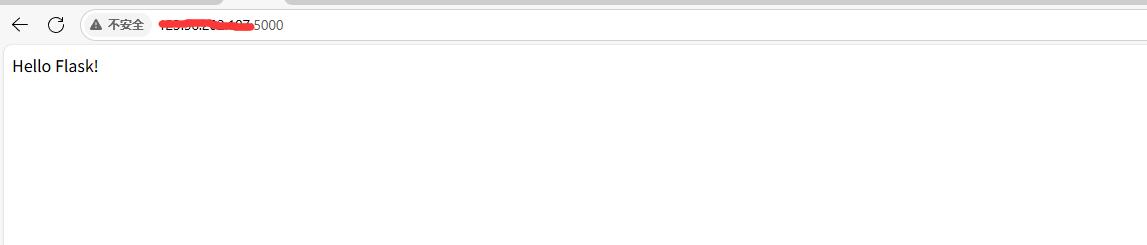
阿里云Ubuntu 22.04 64位搭建Flask流程(亲测)
cd /home 进入home盘 安装虚拟环境: 1、安装virtualenv pip install virtualenv 2.创建新的虚拟环境: virtualenv myenv 3、激活虚拟环境(激活环境可以在当前环境下安装包) source myenv/bin/activate 此时,终端…...

面试高频问题
文章目录 🚀 消息队列核心技术揭秘:从入门到秒杀面试官1️⃣ Kafka为何能"吞云吐雾"?性能背后的秘密1.1 顺序写入与零拷贝:性能的双引擎1.2 分区并行:数据的"八车道高速公路"1.3 页缓存与批量处理…...

xmind转换为markdown
文章目录 解锁思维导图新姿势:将XMind转为结构化Markdown 一、认识Xmind结构二、核心转换流程详解1.解压XMind文件(ZIP处理)2.解析JSON数据结构3:递归转换树形结构4:Markdown层级生成逻辑 三、完整代码 解锁思维导图新…...

【WebSocket】SpringBoot项目中使用WebSocket
1. 导入坐标 如果springboot父工程没有加入websocket的起步依赖,添加它的坐标的时候需要带上版本号。 <dependency><groupId>org.springframework.boot</groupId><artifactId>spring-boot-starter-websocket</artifactId> </dep…...
恶补电源:1.电桥
一、元器件的选择 搜索并选择电桥,再multisim中选择FWB,就有各种型号的电桥: 电桥是用来干嘛的呢? 它是一个由四个二极管搭成的“桥梁”形状的电路,用来把交流电(AC)变成直流电(DC)。…...
论文阅读:Matting by Generation
今天介绍一篇关于 matting 抠图的文章,抠图也算是计算机视觉里面非常经典的一个任务了。从早期的经典算法到如今的深度学习算法,已经有很多的工作和这个任务相关。这两年 diffusion 模型很火,大家又开始用 diffusion 模型做各种 CV 任务了&am…...

Neko虚拟浏览器远程协作方案:Docker+内网穿透技术部署实践
前言:本文将向开发者介绍一款创新性协作工具——Neko虚拟浏览器。在数字化协作场景中,跨地域的团队常需面对实时共享屏幕、协同编辑文档等需求。通过本指南,你将掌握在Ubuntu系统中使用容器化技术部署该工具的具体方案,并结合内网…...

实战设计模式之模板方法模式
概述 模板方法模式定义了一个操作中的算法骨架,并将某些步骤延迟到子类中实现。模板方法使得子类可以在不改变算法结构的前提下,重新定义算法中的某些步骤。简单来说,就是在一个方法中定义了要执行的步骤顺序或算法框架,但允许子类…...

【Linux】Linux安装并配置RabbitMQ
目录 1. 安装 Erlang 2. 安装 RabbitMQ 2.1.添加 RabbitMQ 仓库 2.2.安装 RabbitMQ 3.配置 3.1.启动和管理服务 4. 访问管理界面 5.安装问题 6.修改密码 7.修改端口 7.1.找到文件 7.2.修改文件 1. 安装 Erlang 由于 RabbitMQ 是用 Erlang 编写的,需要先安…...
Python训练营-Day26-函数专题1:函数定义与参数
题目1:计算圆的面积 任务: 编写一个名为 calculate_circle_area 的函数,该函数接收圆的半径 radius 作为参数,并返回圆的面积。圆的面积 π * radius (可以使用 math.pi 作为 π 的值)要求:函数接收一个位置参数 radi…...

【Kafka】Kafka从入门到实战:构建高吞吐量分布式消息系统
Kafka从入门到实战:构建高吞吐量分布式消息系统 一、Kafka概述 Apache Kafka是一个分布式流处理平台,最初由LinkedIn开发,后成为Apache顶级项目。它被设计用于高吞吐量、低延迟的消息处理,能够处理来自多个生产者的海量数据,并将这些数据实时传递给消费者。 Kafka核心特…...
Android写一个捕获全局异常的工具类
项目开发和实际运行过程中难免会遇到异常发生,系统提供了一个可以捕获全局异常的工具Uncaughtexceptionhandler,它是Thread的子类(就是package java.lang;里线程的Thread)。本文将利用它将设备信息、报错信息以及错误的发生时间都…...

人工智能 - 在Dify、Coze、n8n、FastGPT和RAGFlow之间做出技术选型
在Dify、Coze、n8n、FastGPT和RAGFlow之间做出技术选型。这些平台各有侧重,适用场景差异显著。下面我将从核心功能定位、典型应用场景、真实体验痛点、选型决策关键点进行拆解,并提供具体场景下的推荐方案。 一、核心功能定位速览 平台核心定位技术栈亮…...

绕过 Xcode?使用 Appuploader和主流工具实现 iOS 上架自动化
iOS 应用的发布流程一直是开发链路中最“苹果味”的环节:强依赖 Xcode、必须使用 macOS、各种证书和描述文件配置……对很多跨平台开发者来说,这一套流程并不友好。 特别是当你的项目主要在 Windows 或 Linux 下开发(例如 Flutter、React Na…...
C++_哈希表
本篇文章是对C学习的哈希表部分的学习分享 相信一定会对你有所帮助~ 那咱们废话不多说,直接开始吧! 一、基础概念 1. 哈希核心思想: 哈希函数的作用:通过此函数建立一个Key与存储位置之间的映射关系。理想目标:实现…...

WEB3全栈开发——面试专业技能点P7前端与链上集成
一、Next.js技术栈 ✅ 概念介绍 Next.js 是一个基于 React 的 服务端渲染(SSR)与静态网站生成(SSG) 框架,由 Vercel 开发。它简化了构建生产级 React 应用的过程,并内置了很多特性: ✅ 文件系…...
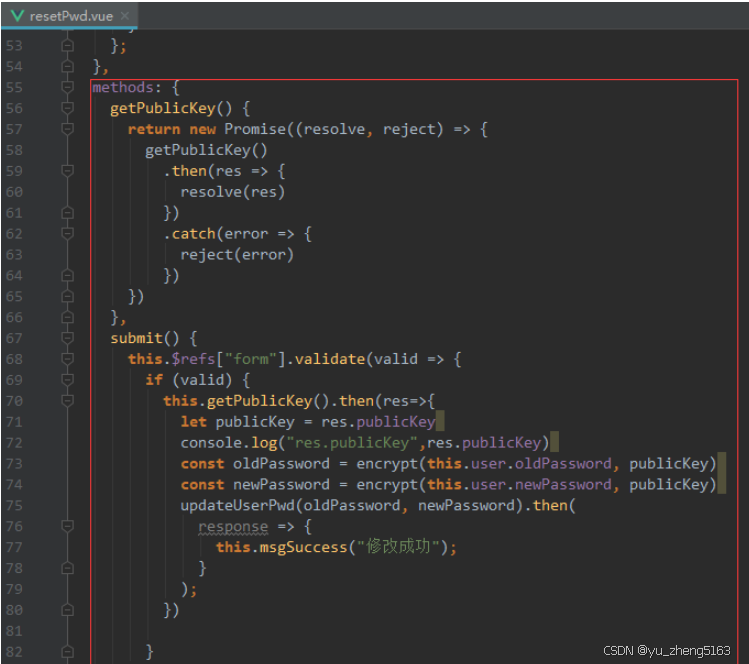
若依登录用户名和密码加密
/*** 获取公钥:前端用来密码加密* return*/GetMapping("/getPublicKey")public RSAUtil.RSAKeyPair getPublicKey() {return RSAUtil.rsaKeyPair();}新建RSAUti.Java package com.ruoyi.common.utils;import org.apache.commons.codec.binary.Base64; im…...
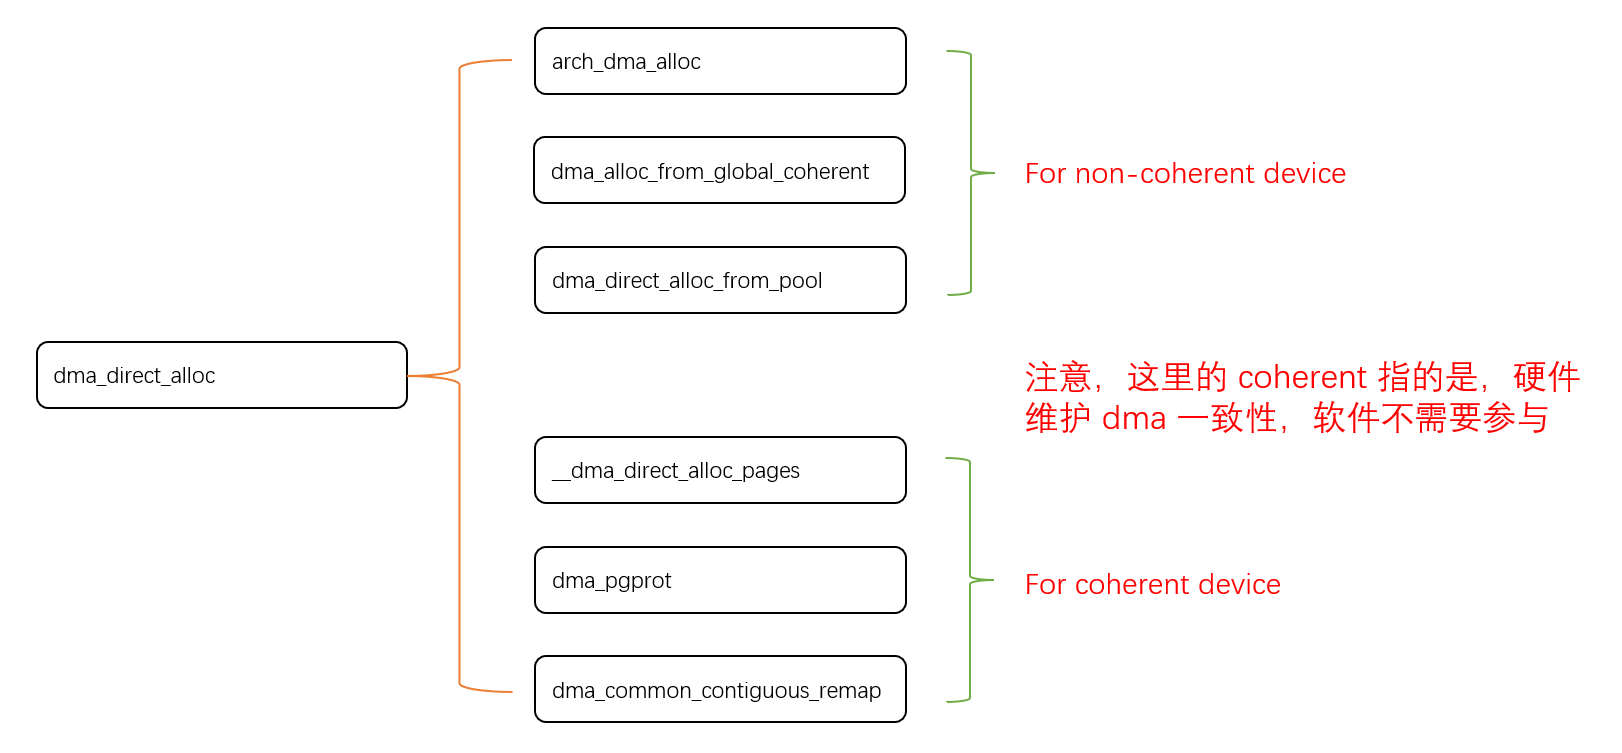
Linux 下 DMA 内存映射浅析
序 系统 I/O 设备驱动程序通常调用其特定子系统的接口为 DMA 分配内存,但最终会调到 DMA 子系统的dma_alloc_coherent()/dma_alloc_attrs() 等接口。 关于 dma_alloc_coherent 接口详细的代码讲解、调用流程,可以参考这篇文章,我觉得写的非常…...

第八部分:阶段项目 6:构建 React 前端应用
现在,是时候将你学到的 React 基础知识付诸实践,构建一个简单的前端应用来模拟与后端 API 的交互了。在这个阶段,你可以先使用模拟数据,或者如果你的后端 API(阶段项目 5)已经搭建好,可以直接连…...

6️⃣Go 语言中的哈希、加密与序列化:通往区块链世界的钥匙
Go 语言中的哈希、加密与序列化:通往区块链世界的钥匙 一、前言:离区块链还有多远? 区块链听起来可能遥不可及,似乎是只有密码学专家和资深工程师才能涉足的领域。但事实上,构建一个区块链的核心并不复杂,尤其当你已经掌握了一门系统编程语言,比如 Go。 要真正理解区…...
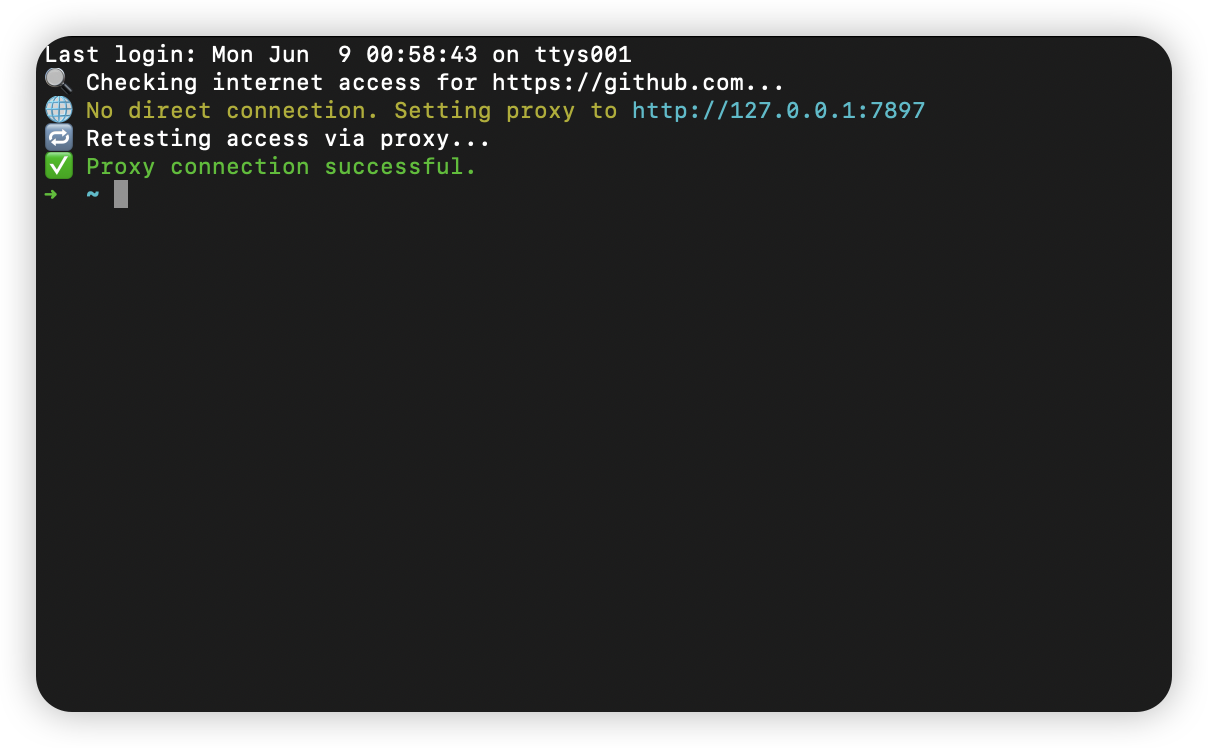
macOS 终端智能代理检测
🧠 终端智能代理检测:自动判断是否需要设置代理访问 GitHub 在开发中,使用 GitHub 是非常常见的需求。但有时候我们会发现某些命令失败、插件无法更新,例如: fatal: unable to access https://github.com/ohmyzsh/oh…...