基于 ResNet18 架构使用 deformable convolution的车道线检测
下面是一个基于关键点的车道线检测网络的 PyTorch 代码示例,其中使用了 deformable convolution。该代码示例基于 ResNet18 架构,可以根据实际情况进行修改。
首先,需要导入必要的库和模块:
import torch
import torch.nn as nn
import torch.nn.functional as F
from torch.nn.modules.utils import _pair
from torch.nn.parameter import Parameterfrom torchvision.models.resnet import resnet18
然后,定义一个基于 ResNet18 架构的车道线检测网络模型:
class LaneDetectionNet(nn.Module):def __init__(self, num_classes=1, deformable_groups=2):super(LaneDetectionNet, self).__init__()# load ResNet18self.resnet = resnet18(pretrained=True)# replace the first conv layerself.resnet.conv1 = nn.Conv2d(3, 64, kernel_size=7, stride=2, padding=3, bias=False)# add deformable convolutionsself.resnet.layer1[0].conv1 = DeformConv2d(64, 64, kernel_size=(3, 3), padding=(1, 1), stride=(1, 1), bias=False, deformable_groups=deformable_groups)self.resnet.layer1[0].conv2 = DeformConv2d(64, 64, kernel_size=(3, 3), padding=(1, 1), stride=(1, 1), bias=False, deformable_groups=deformable_groups)self.resnet.layer2[0].conv1 = DeformConv2d(128, 128, kernel_size=(3, 3), padding=(1, 1), stride=(1, 1), bias=False, deformable_groups=deformable_groups)self.resnet.layer2[0].conv2 = DeformConv2d(128, 128, kernel_size=(3, 3), padding=(1, 1), stride=(1, 1), bias=False, deformable_groups=deformable_groups)self.resnet.layer3[0].conv1 = DeformConv2d(256, 256, kernel_size=(3, 3), padding=(1, 1), stride=(1, 1), bias=False, deformable_groups=deformable_groups)self.resnet.layer3[0].conv2 = DeformConv2d(256, 256, kernel_size=(3, 3), padding=(1, 1), stride=(1, 1), bias=False, deformable_groups=deformable_groups)self.resnet.layer4[0].conv1 = DeformConv2d(512, 512, kernel_size=(3, 3), padding=(1, 1), stride=(1, 1), bias=False, deformable_groups=deformable_groups)self.resnet.layer4[0].conv2 = DeformConv2d(512, 512, kernel_size=(3, 3), padding=(1, 1), stride=(1, 1), bias=False, deformable_groups=deformable_groups)# add the output layersself.fc1 = nn.Linear(512, 512)self.fc2 = nn.Linear(512, num_classes)def forward(self, x):x = self.resnet(x)x = F.relu(self.fc1(x))x = self.fc2(x)return x
其中,DeformConv2d 是一个 deformable convolution 的实现类。其代码如下:
class DeformConv2d(nn.Module):def __init__(self, in_channels, out_channels, kernel_size, stride=1, padding=0, dilation=1, groups=1, bias=True, deformable_groups=1):super(DeformConv2d, self).__init__()self.offset_conv = nn.Conv2d(in_channels, 2 * kernel_size[0] * kernel_size[1] * deformable_groups, kernel_size=kernel_size, stride=stride, padding=padding, dilation=dilation, groups=groups, bias=True)self.weight = Parameter(torch.Tensor(out_channels, in_channels, kernel_size[0], kernel_size[1]))if bias:self.bias = Parameter(torch.Tensor(out_channels))else:self.register_parameter('bias', None)self.reset_parameters()self.stride = _pair(stride)self.padding = _pair(padding)self.dilation = _pair(dilation)self.groups = groupsself.deformable_groups = deformable_groupsdef reset_parameters(self):nn.init.kaiming_uniform_(self.weight, a=math.sqrt(5))if self.bias is not None:fan_in, _ = nn.init._calculate_fan_in_and_fan_out(self.weight)bound = 1 / math.sqrt(fan_in)nn.init.uniform_(self.bias, -bound, bound)def forward(self, x):offset = self.offset_conv(x)output = deform_conv2d(x, offset, self.weight, self.bias, self.stride, self.padding, self.dilation, self.groups, self.deformable_groups)return output
最后,定义一个 deformable convolution 的实现函数 deform_conv2d,代码如下:
def deform_conv2d(input, offset, weight, bias=None, stride=1, padding=0, dilation=1, groups=1, deformable_groups=1):# get shapes and parametersbatch_size, in_channels, in_h, in_w = input.size()out_channels, _, kernel_h, kernel_w = weight.size()stride_h, stride_w = _pair(stride)pad_h, pad_w = _pair(padding)dilation_h, dilation_w = _pair(dilation)input_padded = F.pad(input, (pad_w, pad_w, pad_h, pad_h))# calculate output shapeout_h = (in_h + 2*pad_h - dilation_h*(kernel_h-1) - 1) // stride_h + 1out_w = (in_w + 2*pad_w - dilation_w*(kernel_w-1) - 1) // stride_w + 1# unfold input and offsetoffset = offset.view(batch_size, deformable_groups, 2 * kernel_h * kernel_w, out_h, out_w)input_unfolded = F.unfold(input_padded, (kernel_h, kernel_w), dilation=dilation, stride=stride)# calculate outputoutput = torch.zeros(batch_size, out_channels, out_h, out_w).to(input.device)weight = weight.view(1, out_channels, in_channels // groups, kernel_h, kernel_w).repeat(batch_size, 1, 1, 1, 1)for h in range(out_h):for w in range(out_w):input_region = input_unfolded[:, :, h, w].view(batch_size, -1, 1, 1)offset_region = offset[:, :, :, h, w]weight_region = weightoutput_region = F.conv2d(input_region, weight_region, bias=None, stride=1, padding=0, dilation=1, groups=deformable_groups)output_region = deformable_conv2d_compute(output_region, offset_region)output[:, :, h, w] = output_region.squeeze()if bias is not None:output += bias.view(1, -1, 1, 1)return output
其中,deformable_conv2d_compute 函数是 deformable convolution 的计算函数。它的代码如下:
def deformable_conv2d_compute(input, offset):# get shapes and parametersbatch_size, out_channels, out_h, out_w = input.size()in_channels = offset.size(1) // 2# sample input according to offsetgrid_h = torch.linspace(-1, 1, out_h).view(1, 1, out_h, 1).to(input.device)grid_w = torch.linspace(-1, 1, out_w).view(1, 1, 1, out_w).to(input.device)offset_h = offset[:, :in_channels, :, :]offset_w = offset[:, in_channels:, :, :]sample_h = torch.add(grid_h, offset_h)sample_w = torch.add(grid_w, offset_w)sample_h = sample_h.clamp(-1, 1)sample_w = sample_w.clamp(-1, 1)sample_h = ((sample_h + 1) / 2) * (out_h - 1)sample_w = ((sample_w + 1) / 2) * (out_w - 1)sample_h_floor = sample_h.floor().long()sample_w_floor = sample_w.floor().long()sample_h_ceil = sample_h.ceil().long()sample_w_ceil = sample_w.ceil().long()sample_h_floor = sample_h_floor.clamp(0, out_h - 1)sample_w_floor = sample_w_floor.clamp(0, out_w - 1)sample_h_ceil = sample_h_ceil.clamp(0, out_h - 1)sample_w_ceil = sample_w_ceil.clamp(0, out_w - 1)# gather input values according to sampled indicesinput_flat = input.view(batch_size, in_channels, out_h * out_w)index_base = torch.arange(0, batch_size, device=input.device).view(batch_size, 1, 1) * out_h * out_windex_base = index_base.expand(batch_size, in_channels, out_h * out_w)index_offset = torch.arange(0, out_h * out_w, device=input.device).view(1, 1, -1)index_offset = index_offset.expand(batch_size, in_channels, out_h * out_w)indices_a = (sample_h_floor + index_base + index_offset).view(batch_size, in_channels * out_h * out_w)indices_b = (sample_w_floor + index_base + index_offset).view(batch_size, in_channels * out_h * out_w)indices_c = (sample_h_ceil + index_base + index_offset).view(batch_size, in_channels * out_h * out_w)indices_d = (sample_w_ceil + index_base + index_offset).view(batch_size, in_channels * out_h * out_w)value_a = input_flat.gather(2, indices_a.unsqueeze(1).repeat(1, out_channels, 1))value_b = input_flat.gather(2, indices_b.unsqueeze(1).repeat(1, out_channels, 1))value_c = input_flat.gather(2, indices_c.unsqueeze(1).repeat(1, out_channels, 1))value_d = input_flat.gather(2, indices_d.unsqueeze(1).repeat(1, out_channels, 1))# calculate interpolation weights and outputw_a = ((sample_w_ceil - sample_w) * (sample_h_ceil - sample_h)).view(batch_size, 1, out_h, out_w)w_b = ((sample_w - sample_w_floor) * (sample_h_ceil - sample_h)).view(batch_size, 1, out_h, out_w)w_c = ((sample_w_ceil - sample_w) * (sample_h - sample_h_floor)).view(batch_size, 1, out_h, out_w)w_d = ((sample_w - sample_w_floor) * (sample_h - sample_h_floor)).view(batch_size, 1, out_h, out_w)output = w_a * value_a + w_b * value_b + w_c * value_c + w_d * value_dreturn output
最后,可以使用以下代码进行网络的测试:
net = LaneDetectionNet(num_classes=1, deformable_groups=2)  # create the network
input = torch.randn(1, 3, 100, 100)  # create a random input tensor
output = net(input)  # feed it through the network
print(output.shape)  # print the output shape
输出的结果应该为 (1, 1, 1, 1)。这说明网络已经成功地将 100*100 的像素图压缩成了一个标量。可以根据实际情况进行调整和优化,来达到更好的性能。
相关文章:

基于 ResNet18 架构使用 deformable convolution的车道线检测
下面是一个基于关键点的车道线检测网络的 PyTorch 代码示例,其中使用了 deformable convolution。该代码示例基于 ResNet18 架构,可以根据实际情况进行修改。 首先,需要导入必要的库和模块: import torch import torch.nn as nn…...
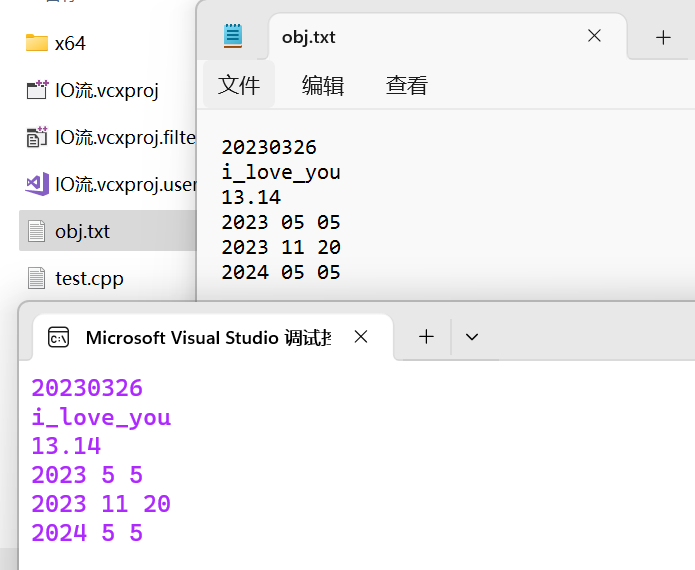
C++in/out输入输出流[IO流]
文章目录 1. C语言的输入与输出2.C的IO流2.1流的概念2.2CIO流2.3刷题常见while(cin >> str)重载强制类型转换运算符模拟while(cin >> str) 2.4C标准IO流2.5C文件IO流1.ifstream 1. C语言的输入与输出 C语言用到最频繁的输入输出方式就是scanf ()与printf()。 scanf…...

MongoDB的安装
MongoDB的安装 1、Windows下MongoDB的安装及配置 1.1 下载Mongodb安装包 下载地址: https://www.mongodb.com/try/download http://www.mongodb.org/dl/win32 MongoDB Windows系统64位下载地址:http://www.mongodb.org/dl/win32/x86_64 MongoDB W…...
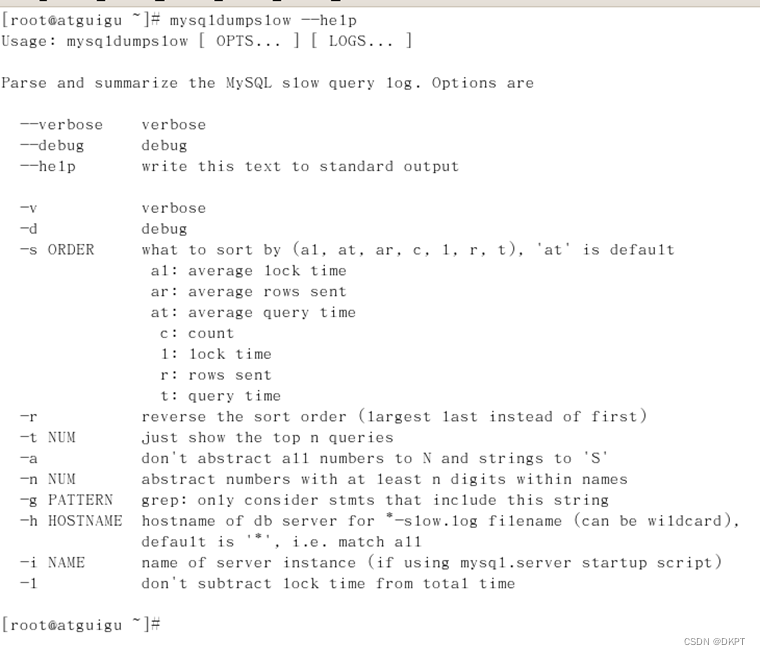
SQL查询优化---如何查询截取分析
慢查询日志 1、慢查询日志是什么 MySQL的慢查询日志是MySQL提供的一种日志记录,它用来记录在MySQL中响应时间超过阀值的语句,具体指运行时间超过long_query_time值的SQL,则会被记录到慢查询日志中。 具体指运行时间超过long_query_time值的…...

vue3基础流程
目录 1. 安装和创建项目 2. 项目结构 3. 主要文件解析 3.1 main.js 3.2 App.vue 4. 组件和Props 5. 事件处理 6. 生命周期钩子 7. Vue 3的Composition API 8. 总结和结论 响应式系统: 组件化: 易于学习: 灵活性: 社…...
Vue 数据绑定 和 数据渲染
目录 一、Vue快速入门 1.简介 : 2.MVVM : 3.准备工作 : 二、数据绑定 1.实例 : 2.验证 : 三、数据渲染 1.单向渲染 : 2.双向渲染 : 一、Vue快速入门 1.简介 : (1) Vue[/vju/],是Vue.js的简称,是一个前端框架,常用于构建前端用户…...

【原创】解决Kotlin无法使用@Slf4j注解的问题
前言 主要还是辟谣之前的网上的用法,当然也会给出最终的使用方法。这可是Kotlin,关Slf4j何事!? 辟谣内容:创建注解来解决这个问题 例如: Target(AnnotationTarget.CLASS) Retention(AnnotationRetentio…...

CDN是如何实现全球节点同步的
当谈到内容交付网络(Content Delivery Network,CDN)加速时,我们必须了解CDN是如何实现全球节点同步的。CDN是一种网络架构,通过将内容分发到全球各地的服务器节点,以降低用户访问网站或应用程序时的延迟和提…...

Centos7 Linux系统下生成https的crt和key证书
linux下生成https的crt和key证书 步骤如下: x509证书一般会用到三类文,key,csr,crt Key 是私用密钥openssl格,通常是rsa算法。 Csr 是证书请求文件,用于申请证书。在制作csr文件的时,必须使…...
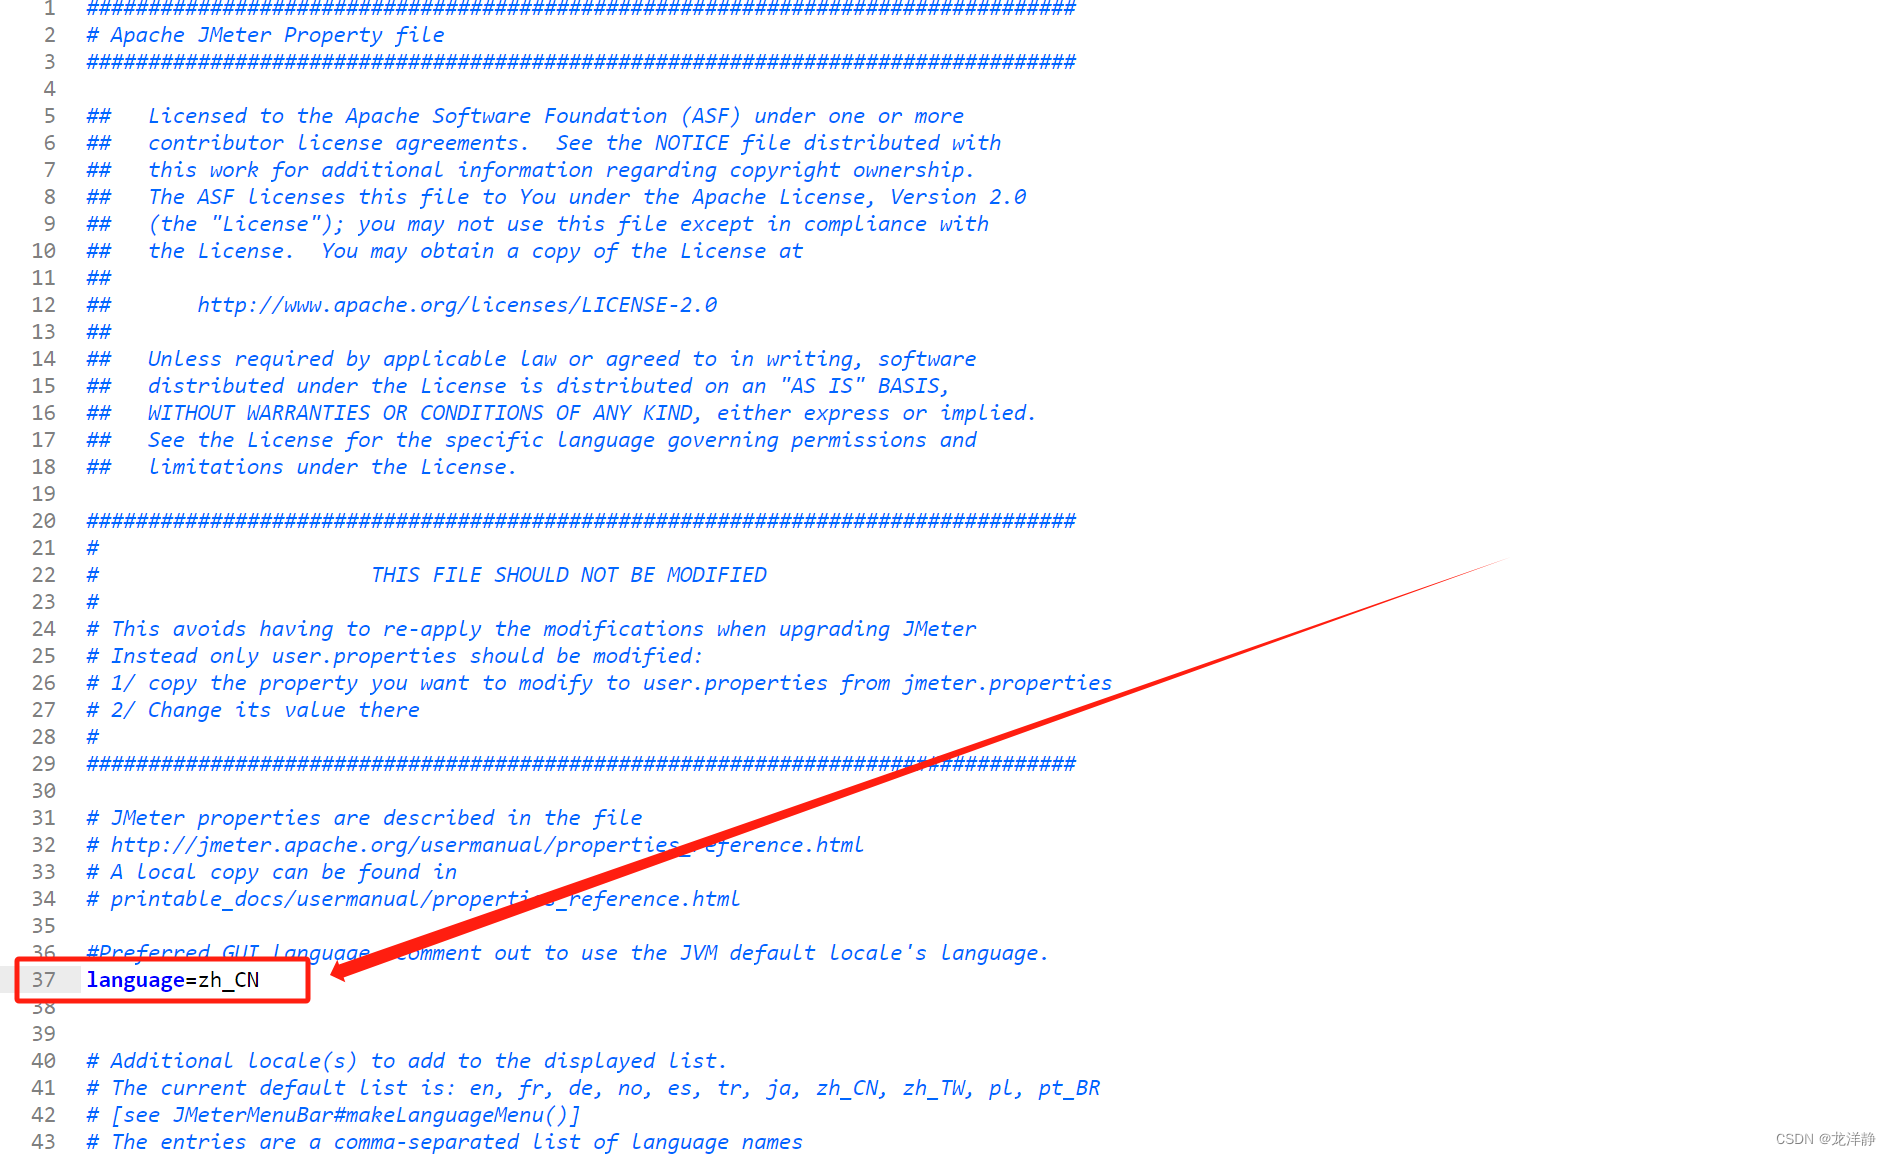
性能测试工具——Jmeter的安装【超详细】
目录 1、性能测试工具:JMeter和LoadRunner对比 2、为什么学习JMeter? 3、JMeter环境搭建 3.1、安装JDK 3.2、下载安装JMeter 3.3、配置环境变量 2.4、启动验证JMeter是否安装成功 4、认识JMeter的目录结构 1)bin目录:存放…...

系列三十、Spring AOP vs AspectJ AOP
一、关系 (1)当在Spring中要使用Aspect、Before、After等注解时,需要添加AspectJ的相关依赖,如下 <dependency><groupId>cglib</groupId><artifactId>cglib</artifactId><version>3.1</…...

面向对象设计模式——策略模式
策略设计模式(Strategy Pattern)是一种行为型设计模式,它允许在运行时选择算法的行为。该模式定义了一系列算法,将每个算法封装到一个独立的类中,使它们可以相互替换。策略模式使算法独立于客户端而变化,客…...
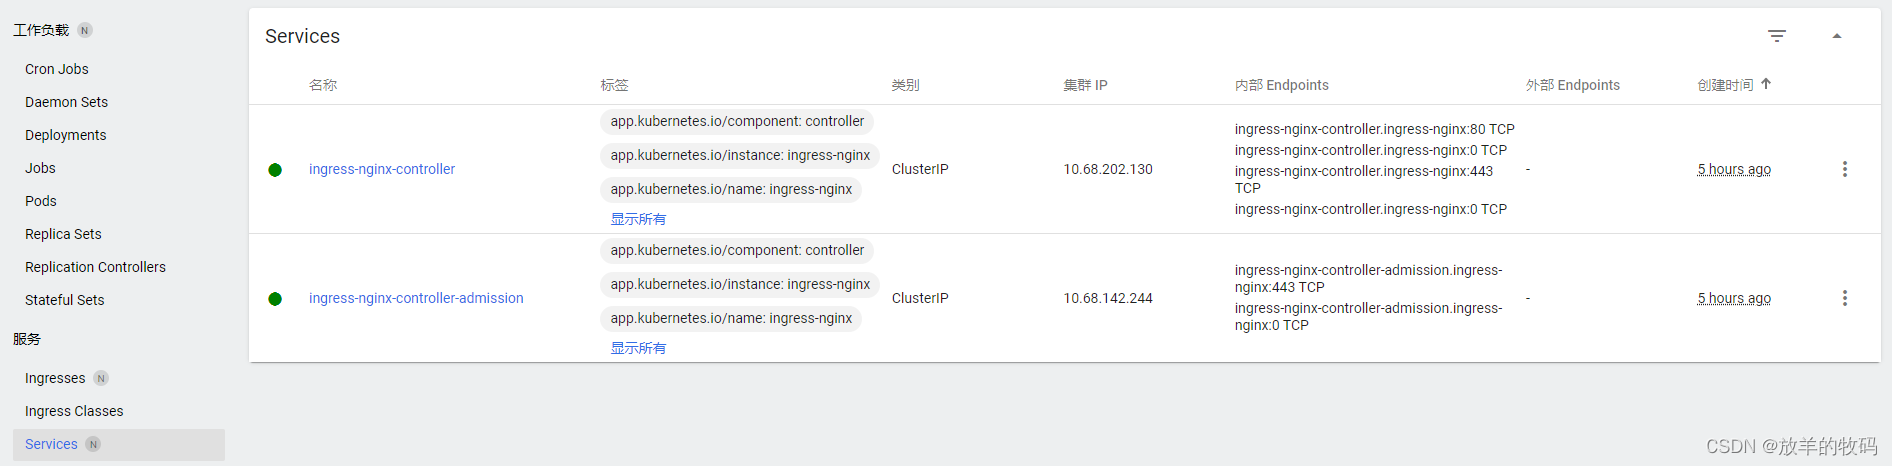
Kubernetes - Ingress HTTP 负载搭建部署解决方案(新版本v1.21+)
在看这一篇之前,如果不了解 Ingress 在 K8s 当中的职责,建议看之前的一篇针对旧版本 Ingress 的部署搭建,在开头会提到它的一些简介Kubernetes - Ingress HTTP 负载搭建部署解决方案_放羊的牧码的博客-CSDN博客 开始表演 1、kubeasz 一键安装…...
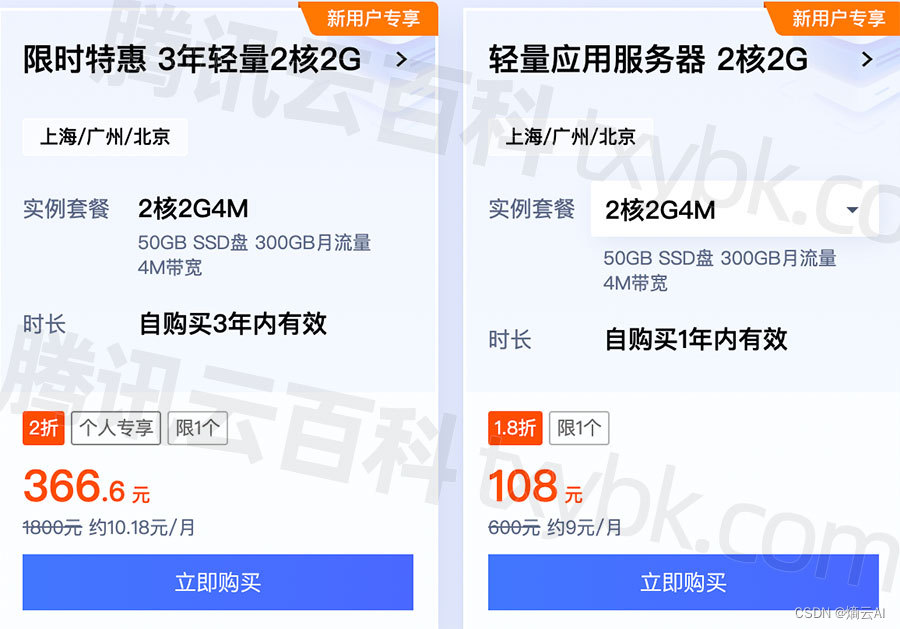
刚刚:腾讯云3年轻量2核2G4M服务器优惠价格366元三年
腾讯云3年轻量2核2G4M服务器,2023双十一优惠价格366元三年,自带4M公网带宽,下载速度可达512KB/秒,300GB月流量,50GB SSD盘系统盘,腾讯云百科txybk.com分享腾讯云轻量2核2G4M服务器性能、优惠活动、购买条件…...

`include指令【FPGA】
案例: 在Verilog中,include指令可以将一个文件的内容插入到当前文件中。 这个指令通常用于将一些常用的代码片段或者模块定义放在单独的文件中, 然后在需要使用的地方通过include指令将其插入到当前文件中。 这样可以提高代码的复用性和可维…...
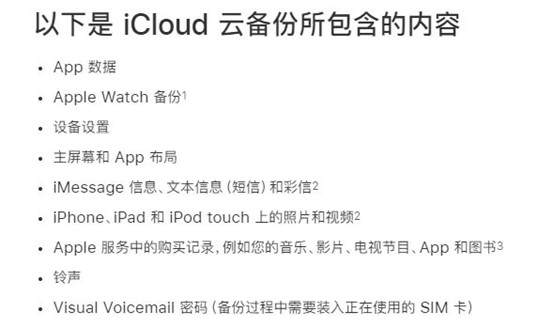
iphone备份后怎么转到新手机,iphone备份在哪里查看
iphone备份会备份哪些东西?iphone可根据需要备份设备数据、应用数据、苹果系统等。根据不同的备份数据,可备份的数据类型不同,有些工具可整机备份,有些工具可单项数据备份。本文会详细讲解苹果手机备份可以备份哪些东西。 一、ip…...

JAVA毕业设计106—基于Java+Springboot的外卖系统(源码+数据库)
基于JavaSpringboot的外卖系统(源码数据库)106 一、系统介绍 本系统分为用户端和管理端角色 前台用户功能: 登录、菜品浏览,口味选择,加入购物车,地址管理,提交订单。 管理后台: 登录,员工管…...
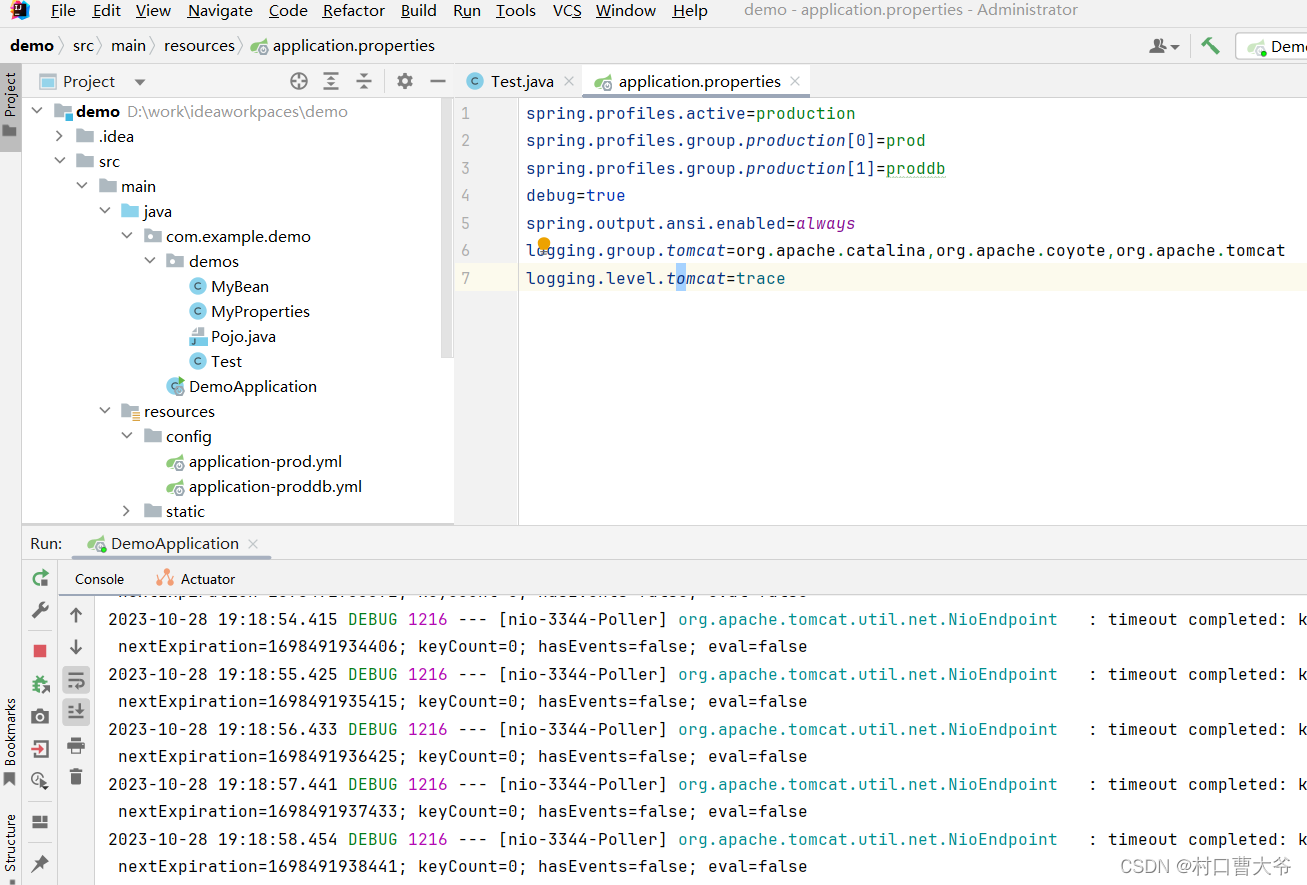
SpringCore完整学习教程4,入门级别
本章从第4章开始 4. Logging Spring Boot使用Commons Logging进行所有内部日志记录,但保留底层日志实现开放。为Java Util Logging、Log4J2和Logback提供了默认配置。在每种情况下,记录器都预先配置为使用控制台输出和可选的文件输出。 默认情况下&…...

如何能在项目具体编码实现之前能尽可能早的发现问题并解决问题
在项目的具体编码实现之前尽可能早地发现并解决问题,可以大大节省时间和资源,提高项目的成功率。以下是一些策略和方法: 1. 明确需求和预期: 确保所有的项目需求都是清晰和明确的。需求模糊不清是项目失败的常见原因之一。与利益…...

Windows server服务器允许多用户远程的设置
在Windows Server上允许多用户同时进行远程桌面连接,您需要配置远程桌面服务以支持多用户并确保许可证和授权允许多用户连接。以下是在Windows Server上允许多用户远程桌面连接的步骤: 注意:这些步骤适用于 Windows Server 2012、Windows Ser…...

从集合运算到代码:一文搞懂Jaccard系数,附Python/NumPy/Pandas三种实现方法对比
从集合运算到代码:一文搞懂Jaccard系数,附Python/NumPy/Pandas三种实现方法对比在数据挖掘和机器学习领域,衡量两个集合的相似度是一项基础而重要的任务。Jaccard相似系数作为一种简单直观的度量方法,广泛应用于推荐系统、文本挖掘…...

鸿蒙问卷投票台页面构建:问卷统计与状态网格模块详解
鸿蒙问卷投票台页面构建:问卷统计与状态网格模块详解 前言 在 HarmonyOS 6.0 应用开发中,问卷调研类页面的核心挑战在于如何清晰展示问卷进度、回收数据和题型分布。本文将以“问卷投票台”应用的主页面为例,深入解析如何在鸿蒙平台上构建问卷…...

Linux渗透测试实战命令指南:从信息收集到横向移动
1. 这不是命令手册,而是一张渗透测试现场的“作战地图”你有没有过这样的经历:坐在靶机前,刚扫出一个Web服务,脑子里立刻蹦出七八个工具名——nmap、gobuster、sqlmap、hydra……可手一伸向键盘,却卡在了第一个参数上&…...

eClinMed 中国人民解放军总医院第五医学中心介入超声科:基于超声的可解释性机器学习模型用于≤3cm肝细胞癌分类的开发与验证
01文献信息本次分享的文献是由中国人民解放军总医院第五医学中心介入超声科联合厦门大学附属翔安医院、南开大学医学院和福州市第一总医院超声科等55家医院在2025年2月在柳叶刀子刊《eClinicalMedicine》(中科院1区,IF10.0)上的研究“Develop…...

深度剖析Claude Code实操逻辑,解锁AI编程高效开发方式
文章目录前言一、我用Claude Code的翻车现场,能写一本《程序员血泪史》二、Claude Code的核心设计思想:你以为它是保姆,其实它是保安三、普通模式vs规划模式:一个是临时工,一个是项目经理四、两条核心指令,…...

Kubernetes安全加固指南:构建安全的容器平台
Kubernetes安全加固指南:构建安全的容器平台 一、Kubernetes安全概述 Kubernetes安全涉及多个层面,包括网络安全、Pod安全、数据安全、访问控制等。构建安全的Kubernetes集群需要从多个维度进行加固。 1.1 安全维度 维度说明关注点网络安全Pod间通信…...

【ChatGPT故事化表达黄金法则】:20年AI内容专家亲授3步叙事框架,让提示词转化率提升300%
更多请点击: https://intelliparadigm.com 第一章:ChatGPT故事化表达的底层认知革命 传统人机交互长期受限于指令式范式——用户需精确编码意图,系统则机械匹配关键词或规则。ChatGPT 的突破性不在于参数规模,而在于其将语言建模…...

第39天:SQL详解之DQL
Python学习100天(从入门到精通系列文章) 文章目录 Python学习100天(从入门到精通系列文章) 前言 一、基本查询与投影 1.1 查询所有列 1.2 投影与别名 二、数据筛选(WHERE 子句) 2.1 等值与比较筛选 2.2 多条件组合(AND / OR) 2.3 范围查询(BETWEEN) 2.4 CASE 表达式与…...

通达信ChanlunX缠论插件:3步实现自动化技术分析的终极指南
通达信ChanlunX缠论插件:3步实现自动化技术分析的终极指南 【免费下载链接】ChanlunX 缠中说禅炒股缠论可视化插件 项目地址: https://gitcode.com/gh_mirrors/ch/ChanlunX 还在为复杂的缠论分析而烦恼吗?ChanlunX通达信缠论插件正是您需要的解决…...

如何快速配置游戏存档编辑器:面向玩家的完整指南
如何快速配置游戏存档编辑器:面向玩家的完整指南 【免费下载链接】SPT-AKI-Profile-Editor Программа для редактирования профиля игрока на сервере SPT-AKI 项目地址: https://gitcode.com/gh_mirrors/sp/SPT…...