osgEarth之添加shp
目录
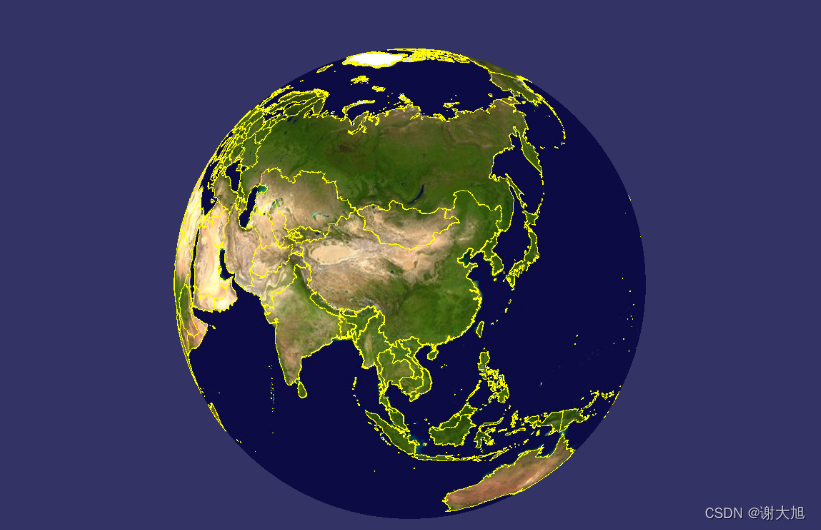
效果
代码
代码分析
加载模式
效果
代码
#include "stdafx.h"
#include <osg/Notify>
#include <osgGA/StateSetManipulator>
#include <osgViewer/Viewer>
#include <osgViewer/ViewerEventHandlers>#include <osgEarth/MapNode>
#include <osgEarth/ImageLayer>
#include <osgEarth/ModelLayer>
#include <osgEarthUtil/ExampleResources>
#include <osgEarthUtil/EarthManipulator>#include <osgEarthSymbology/Style>
#include <osgEarthFeatures/FeatureModelLayer>#include <osgEarthDrivers/gdal/GDALOptions>
#include <osgEarthDrivers/feature_ogr/OGRFeatureOptions>
#include <osgEarthDrivers/agglite/AGGLiteOptions>using namespace osgEarth;
using namespace osgEarth::Features;
using namespace osgEarth::Drivers;
using namespace osgEarth::Symbology;
using namespace osgEarth::Util;int usage(const std::string& app)
{OE_NOTICE "\n" << app << "\n"	// 绘制特征的方法<< "  --rasterize           : draw features as rasterized image tiles \n" // 光栅化平铺瓦片图<< "  --drape               : draw features as projected texture \n"	// 投影纹理<< "  --clamp               : draw features using shader clamping \n"	// 使用贴地着色器<< "  --mem                 : load features from memory \n"				// 加载默认线<< "  --labels              : add feature labels \n"					// 添加文本标签<< "\n"<< MapNodeHelper().usage()<< std::endl;return 0;
}//
// NOTE: run this sample from the repo/tests directory.
//
int main(int argc, char** argv)
{osg::ArgumentParser arguments(&argc, argv);if (arguments.read("--help"))return usage(argv[0]);// cmd执行命令时,输入: osgearth_featuresd.exe --rasterize --mem --labels --drape --clamp (一些参数)// 当输入了某个参数,则获取到的值为1,否则为0/*bool useRaster = arguments.read("--rasterize");bool useMem = arguments.read("--mem");bool useLabels = arguments.read("--labels");bool useDraping = arguments.read("--drape");bool useClamping = arguments.read("--clamp");*/bool useRaster = true;bool useMem = true;bool useLabels = true;bool useDraping = true;bool useClamping = true;std::cout << useRaster << useMem << useLabels << useDraping << useClamping << std::endl;osgViewer::Viewer viewer(arguments);// Start by creating the map:Map* map = new Map();// Start with a basemap imagery layer; we'll be using the GDAL driver// to load a local GeoTIFF file:// 添加默认地图GDALOptions basemap;// GDAL选项类,继承自TileSourceOptionsbasemap.url() = "../data/world.tif";map->addLayer(new ImageLayer(ImageLayerOptions("basemap", basemap)));// Next we add a feature layer. // 添加shp文件OGRFeatureOptions featureData;if (!useMem){// Configures the feature driver to load the vectors from a shapefile:// 如果给出相对路径,则国界线总是加载不上// 此处必须给全路径!!!featureData.url() = "F:\\point-cloud-lab-new\\PointCloudLab\\GeoEngine_output\\data\\world.shp";std::cout << "add world.shp" << std::endl;}else{// the --mem options tells us to just make an in-memory geometry:// 当没有 --mem参数时,采用默认的line绘制Ring* line = new Ring();line->push_back(osg::Vec3d(60, 20, 0));line->push_back(osg::Vec3d(120, 20, 0));line->push_back(osg::Vec3d(120, 60, 0));line->push_back(osg::Vec3d(60, 60, 0));featureData.geometry() = line;std::cout << "don't add world.shp" << std::endl;}// Make a feature source layer and add it to the Map:// 制作特征源图层并添加到mapFeatureSourceLayerOptions ogrLayer;ogrLayer.name() = "vector-data";// 矢量数据ogrLayer.featureSource() = featureData;// shp 文件或者默认linemap->addLayer(new FeatureSourceLayer(ogrLayer));// Define a style for the feature data. Since we are going to render the// vectors as lines, configure the line symbolizer:// 设置矢量面样式(包括边界线)Style style;LineSymbol* ls = style.getOrCreateSymbol<LineSymbol>();ls->stroke()->color() = Color::Yellow;ls->stroke()->width() = 2.0f;// 可以将线宽设置宽一些,更容易看出不同参数useDraping和useClamping产生的区别ls->tessellationSize()->set(100, Units::KILOMETERS);// 细分程度if (useDraping)//是否设置drape属性{AltitudeSymbol* alt = style.getOrCreate<AltitudeSymbol>();alt->clamping() = alt->CLAMP_TO_TERRAIN;alt->technique() = alt->TECHNIQUE_DRAPE;std::cout << "drape" << std::endl;}else if (useClamping)// 贴地属性{AltitudeSymbol* alt = style.getOrCreate<AltitudeSymbol>();alt->clamping() = alt->CLAMP_TO_TERRAIN;alt->technique() = alt->TECHNIQUE_GPU;// 线的细分程度ls->tessellationSize()->set(100, Units::KILOMETERS);RenderSymbol* render = style.getOrCreate<RenderSymbol>();render->depthOffset()->enabled() = true;render->depthTest() = false;std::cout << "no drape,but clamp" << std::endl;}if (useRaster)// 光栅化{AGGLiteOptions rasterOptions;rasterOptions.featureOptions() = featureData;rasterOptions.styles() = new StyleSheet();rasterOptions.styles()->addStyle(style);map->addLayer(new ImageLayer("My Features", rasterOptions));std::cout << "raster" << std::endl;}else //if (useGeom){FeatureModelLayerOptions fml;fml.name() = "My Features";fml.featureSourceLayer() = "vector-data";fml.styles() = new StyleSheet();fml.styles()->addStyle(style);// fml.enableLighting() = false;map->addLayer(new FeatureModelLayer(fml));std::cout << "no raster" << std::endl;}if (useLabels && !useRaster)// 有标签且非光栅化{// set up symbology for drawing labels. We're pulling the label// text from the name attribute, and its draw priority from the// population attribute.// 设置文本样式Style labelStyle;TextSymbol* text = labelStyle.getOrCreateSymbol<TextSymbol>();text->content() = StringExpression("[cntry_name]");//如果需要显示汉字,则需要转换成UTF-8编码text->priority() = NumericExpression("[pop_cntry]");text->size() = 26.0f;// 字号有些大text->alignment() = TextSymbol::ALIGN_CENTER_CENTER;text->fill()->color() = Color::White;text->halo()->color() = Color::DarkGray;// 文字光环颜色// and configure a model layer:FeatureModelLayerOptions fml;fml.name() = "Labels";fml.featureSourceLayer() = "vector-data";fml.styles() = new StyleSheet();fml.styles()->addStyle(labelStyle);map->addLayer(new FeatureModelLayer(fml));std::cout << "no raster, but labels" << std::endl;}// That's it, the map is ready; now create a MapNode to render the Map:MapNode* mapNode = new MapNode(map);viewer.setSceneData(mapNode);viewer.setCameraManipulator(new EarthManipulator());// add some stock OSG handlers:MapNodeHelper().configureView(&viewer);return viewer.run();
}
代码分析
osgEarth表达矢量的基本思路是:
- 先将shp文件读取到矢量源图层FeatureSourceLayer中,
- 这个图层加载到osgEarth的图层列表中是不显示的,
- 必须得再加载一个专门的符号化图层,将其符号化,才能正常显示。
1. 先声明基础地图
osgEarth::Drivers::GDALOptions basemap;
basemap.url() = "world.tif";
// 添加影像图到map节点
map->addLayer( new ImageLayer(ImageLayerOptions("basemap", basemap)));
2. 加载特征数据
osgEarth::Drivers::OGRFeatureOptions featureData;
featureData.url() = "world.shp";
// 特征源图层选项设置
osgEarth::Features::FeatureSourceLayerOptions ogrLayer;
ogrLayer.name() = "vector-data";
ogrLayer.featureSource() = featureData;
map->addLayer(new osgEarth::Features::FeatureSourceLayer(ogrLayer));
/*******↑featureData添加到FeatureSourceLayer,*****↓符号化*******/
3.初始化线样式
// 对ls alt render 进行设置
Style style;
osgEarth::Symbology::LineSymbol* ls = style.getOrCreateSymbol<LineSymbol>();
osgEarth::Symbology::AltitudeSymbol* alt = style.getOrCreate<AltitudeSymbol>();
osgEarth::Symbology::RenderSymbol* render = style.getOrCreate<RenderSymbol>();
4.光栅化或矢量化,二选一
4.1光栅化
osgEarth::Drivers::AGGLiteOptions rasterOptions;
rasterOptions.featureOptions() = featureData;
rasterOptions.styles()->addStyle( style );
map->addLayer(new ImageLayer("My Features", rasterOptions) );
4.2矢量化
osgEarth::Features::FeatureModelLayerOptions fml;
fml.styles()->addStyle(style);
map->addLayer(new FeatureModelLayer(fml));
5.如果需要加入label样式,以矢量化为前提
osgEarth::Symbology::Style labelStyle;
osgEarth::Symbology::TextSymbol* text = labelStyle.getOrCreateSymbol<TextSymbol>();
FeatureModelLayerOptions fml;
fml.styles()->addStyle( labelStyle );
map->addLayer(new FeatureModelLayer(fml));
加载模式
// rasterize 光栅化,不输入时,会显示名称
// mem参数输入,加载矩形,否则加载world.shp文件。shp文件路径一定要写全路径,否则无法加载。
// labels 可以不用填写。
// clamp 和 drape 任选其一。// 采用clamp方式绘制
osgearth_featuresd.exe --rasterize --mem --labels --clamp// 采用drape方式绘制
osgearth_featuresd.exe --rasterize --mem --labels --drape// 还有多种组合方式
osgearth_featuresd.exe --labels --drape
相关文章:
osgEarth之添加shp
目录 效果 代码 代码分析 加载模式 效果 代码 #include "stdafx.h" #include <osg/Notify> #include <osgGA/StateSetManipulator> #include <osgViewer/Viewer> #include <osgViewer/ViewerEventHandlers>#include <osgEarth/MapNo…...
Eolink Apikit 版本更新:「数据字典」功能上线、支持 MongoDB 数据库操作、金融行业私有化协议、GitLab 生成 API 文档...
🎉 新增 搭建自定义接口协议架构,支持快速适配金融行业各类型私有协议的导入、编辑和展示。 数据字典功能上线,支持以数据字典的形式管理参数枚举值; 数据库连接支持 MongoDB 数据库操作; 基于 Apikit 类型导入 API…...

GPT-4V:AI在医疗领域的应用
OpenAI最新发布的GPT-4V模型为ChatGPT增添了语音和图像功能,为用户提供了更多在日常生活中使用ChatGPT的方式。这次更新将为用户带来更加便捷、直观的交互体验,用户可以直接通过拍照上传图片,并提出相关问题。OpenAI的最终目标是构建一个安全…...

OpenCV 在ImShow窗体上选择感兴趣的区域
窗体上选择感兴趣ROI区域 在计算机视觉处理中, 通常是针对图像中的一个特定区域进行处理, 有时候这个特定区域需要人来选择, OpenCV 也提供了窗口选择ROI机制. 窗体支持两种选择ROI区域的方法, 一个是单选, 一个是多选, 操作方法如下: 单选: 通过鼠标在屏幕上选择区域, 然后通过…...

ubuntu 安装redis详细教程
下载redis安装包 链接如下: http://redis.io/download 本例版本为:redis-7.2.3.tar.gz 下载安装包到目录/opt下,路径可修改,本例为/opt wget https://github.com/redis/redis/archive/7.2.3.tar.gz 解压安装包,并…...
qframework 架构 (作者:凉鞋)使用笔记
一些准则: 根据VIEW->SYSTEM->MODEL的分层架构 初始架构: app. using FrameworkDesign;namespace ShootingEditor2D(项目的命名空间) {public class ShootingEditor2D (游戏名称): Architecture&l…...
【JMeter】定时器分类以及场景介绍
1. 定时器分类 固定定时器 作用:请求之间设置等待时间应用场景:查询商品列表后,去查看列表商品详情页。针对商品列表数据量比较大的,响应时间会比较长,就需要设置等待时间然后去查看商详 2.定时器的作用域࿱…...

Spring Boot 请求/actuator/beans 无法访问 返回404
问题复现 在保证项目加入了spring-boot-starter-actuator依赖,并成功启动后。通过浏览器进行访问,返回如下图结果: 问题排查 1. 查看日志 从日志中可以看到基于路径’/actuator’下只暴露了一个端点 2. 访问http://localhost:8080/actua…...
AVD联网
AVD联网: 解决Android Studio模拟器无法联网_android studio模拟器没有网络-CSDN博客 挺好的,就是访问网站的时候只能用ip,而不能用域名。 AVD设置代理: android studio踩坑记 AVD模拟器代理设置_android studio avd 配置代理-…...

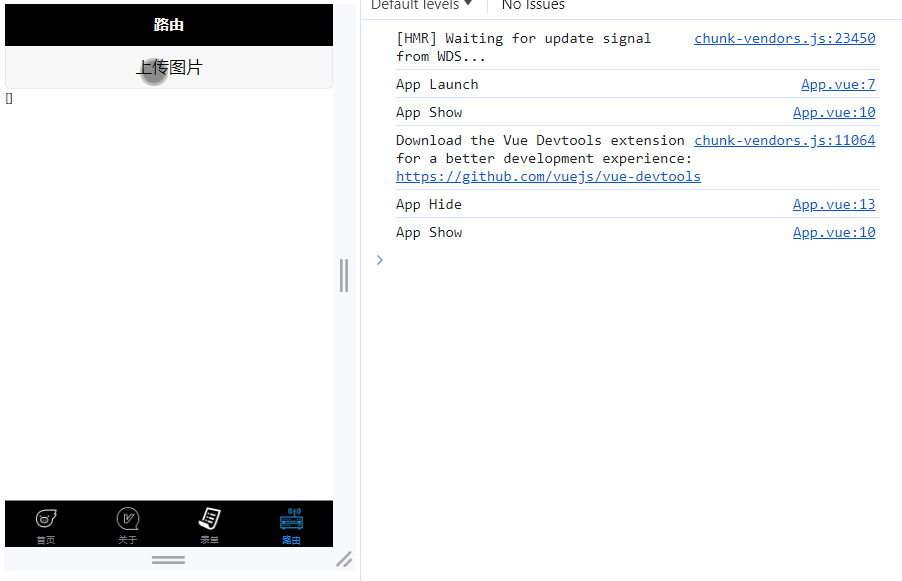
[Vue warn]: Missing required prop: “action“
控制台显示错误信息 vue.runtime.esm.js:4605 [Vue warn]: Missing required prop: "action" found in ---> <ElUpload> at packages/upload/src/index.vue <ElTableRow> <ElTableBody> <ElTable> at pack…...

Python标准库有哪些
概述 可用性注释 内置函数 内置常量 由 site 模块添加的常量 # Author : 小红牛 # 微信公众号:wdPython内置类型 逻辑值检测 布尔运算 — and, or, not 比较运算 数字类型 — int, float, complex 布尔类型 - bool 迭代器类型 序列类型 — list, tuple, range 文本…...

基于ssm的校园办公室报修管理系统
基于ssm的校园办公室报修管理系统 摘要 基于SSM的校园办公室报修管理系统是一个现代化的、高效的报修平台,它能够帮助校园内的教职工和学生更方便、更快捷地提交和处理报修请求。该系统基于Spring、SpringMVC和MyBatis(简称SSM)开发ÿ…...

1Panel 升级 Halo报错
1Panel 升级 Halo报错 通过 1panel 升级 2.10.0 -> 2.10.1 后启动失败,出现 No value found for protocol 错误, 1Panel-halo-rzxY | Caused by: io.r2dbc.spi.NoSuchOptionException: No value found for protocol 1Panel-halo-rzxY | at io.r2dbc.spi.Conn…...

spring-clound基础开发
一、使用openfeig调用远程另外一个服务接口 1、创建一个spring boot工程,并且创建2个模块来当微服务模块 2、分别配置2个模块的启动文件 3、分别两个模块下创建一个测试的控制器 4、在项目的根目录的pom.xml中添加spring-cloud配置 <properties><java.version>1…...
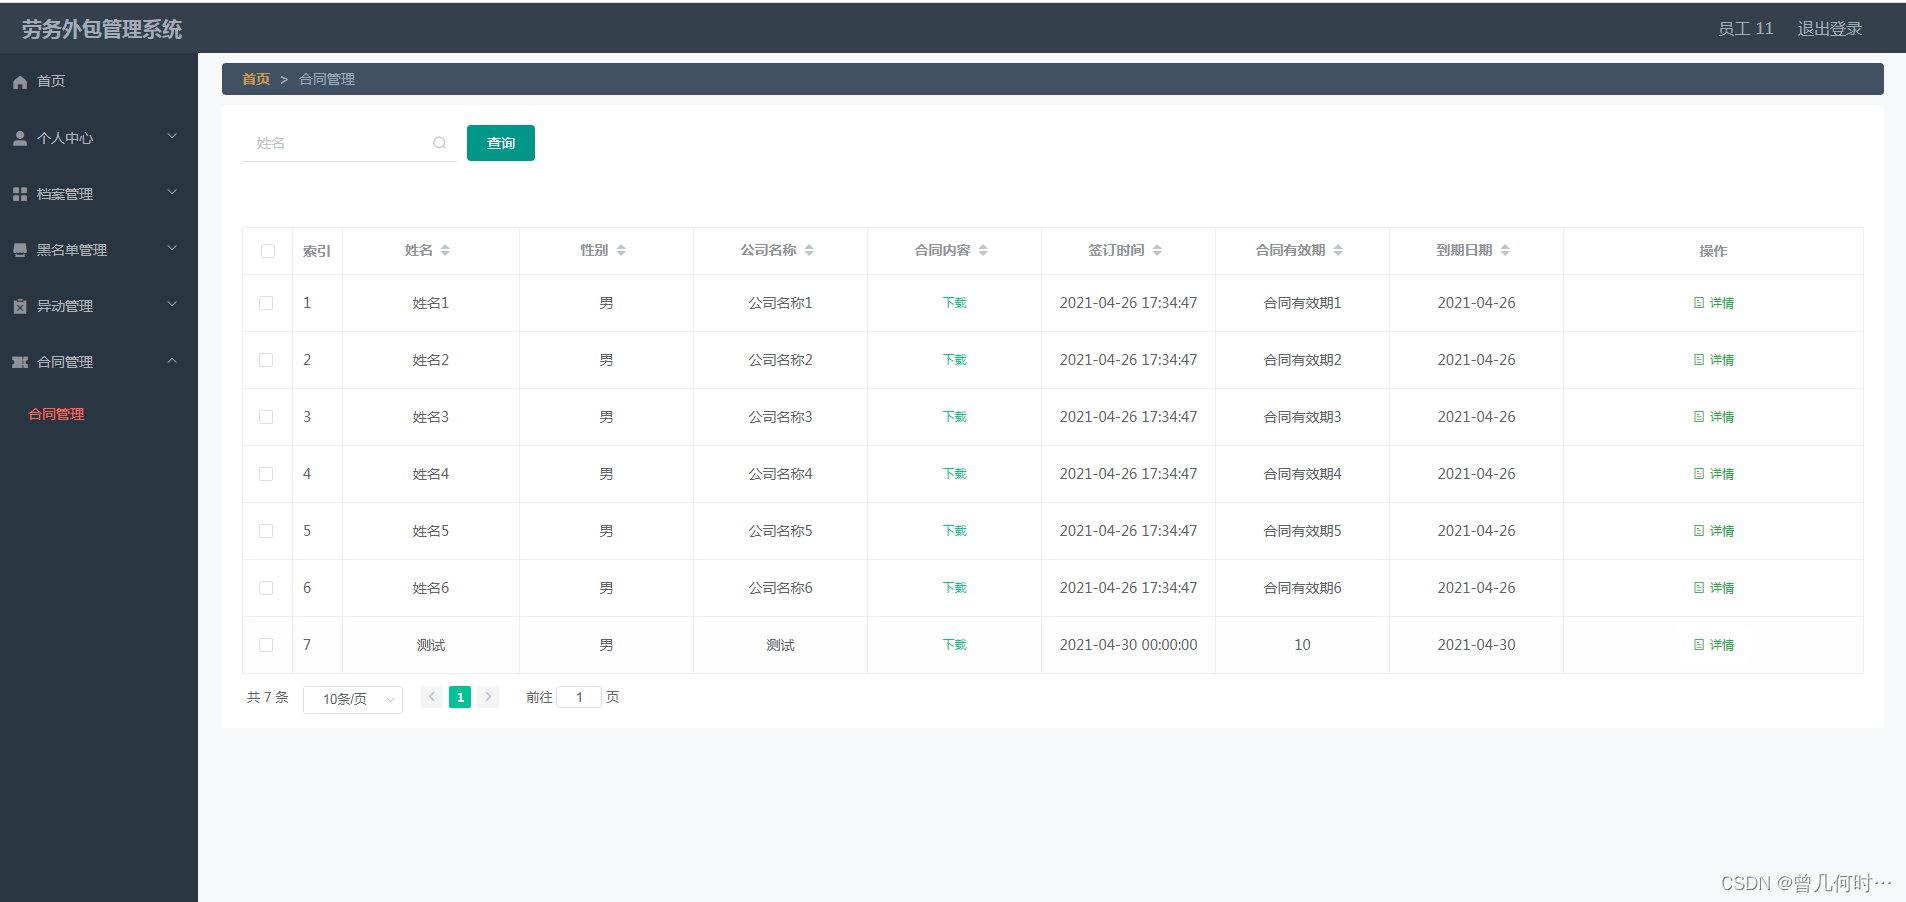
基于SSM的劳务外包管理系统的设计与实现
末尾获取源码 开发语言:Java Java开发工具:JDK1.8 后端框架:SSM 前端:Vue 数据库:MySQL5.7和Navicat管理工具结合 服务器:Tomcat8.5 开发软件:IDEA / Eclipse 是否Maven项目:是 目录…...
uni-app学习笔记(二)
目录 一、路由与页面跳转 1、tabar与普通页面跳转例子 2、navigateTo 3、switchTab 二、vue组件 1、传统vue组件的使用 2、easycom 三、uView组件库 1、安装配置 2、引入配置 3、使用 四、Vuex 1、认识 2、state基本使用 3、mapState使用 五、网络请求 1、封装…...

使用axios拦截器解决前端并发冲突问题
使用 axios 拦截器解决「 前端并发冲突 」 问题 背景 并发冲突问题, 是日常开发中一个比较常见的问题。 不同用户在较短时间间隔内变更数据,或者某一个用户进行的重复提交操作都可能导致并发冲突。 并发场景在开发和测试阶段难以排查全面,…...
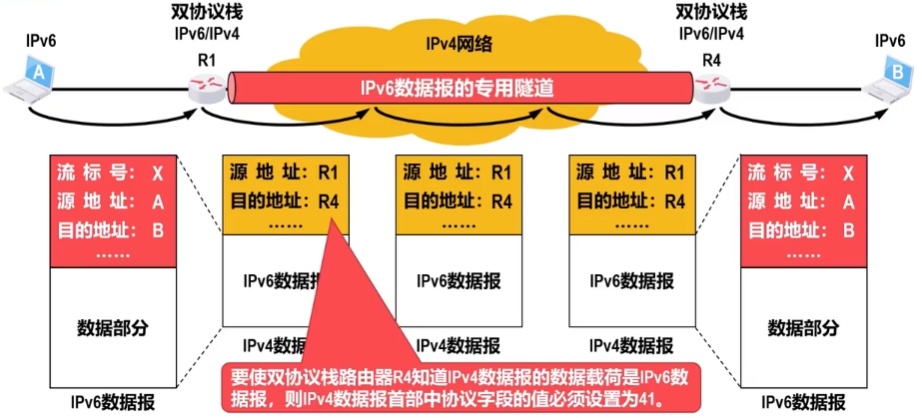
IPv6详解
目录: 第一部分 IPv6的诞生背景和引起的主要变化 第二部分 IPv6数据报的基本首部和扩展首部 第三部分 IPv6地址 第四部分 IPv4向IPv6过渡 第一部分 IPv6的诞生背景和引起的主要变化 一.IPv6的诞生背景 IPv4存在设计缺陷: IPv4的设计者最初并没有想到该协议会在全球范围内广…...
【C++干货铺】STL简述 | string类的使用指南
个人主页点击直达:小白不是程序媛 C系列专栏:C干货铺 代码仓库:Gitee 目录 什么是STL STL的版本 STL的六大组件 STL的缺陷 string类 C语言中的字符串 标准库中的string类 string类常用的接口使用指南 string类中常见的构造 strin…...
合肥工业大学数字逻辑实验三
** 数字逻辑 实验报告** ✅作者简介:CSDN内容合伙人、信息安全专业在校大学生🏆 🔥系列专栏 :hfut实验课设 📃新人博主 :欢迎点赞收藏关注,会回访! 💬舞台再大,你不上台,永远是个观众。平台再好,你不参与,永远是局外人。能力再大,你不行动,只能看别人成功!…...

WeDLM-7B-Base实际效果:中文古文风格、现代白话、技术文档三体裁续写
WeDLM-7B-Base实际效果:中文古文风格、现代白话、技术文档三体裁续写 1. 模型概览 WeDLM-7B-Base是一款基于扩散机制(Diffusion)的高性能基座语言模型,拥有70亿参数规模。该模型在标准因果注意力机制基础上实现了并行掩码恢复技…...

RTL8852BE Linux驱动实战指南:解决Realtek无线网卡兼容性问题
RTL8852BE Linux驱动实战指南:解决Realtek无线网卡兼容性问题 【免费下载链接】rtl8852be Realtek Linux WLAN Driver for RTL8852BE 项目地址: https://gitcode.com/gh_mirrors/rt/rtl8852be 还在为Linux系统下Realtek RTL8852BE无线网卡无法正常工作而烦恼…...
)
一文读懂分享网站模块介绍(附实操教程)
很多商家做小程序商城,最头疼的就是分享网站模块介绍的设置。一、为什么需要这个功能?很多做得好的小程序商城,都把分享网站模块介绍用到了极致。二、适用场景以下场景特别适合使用分享网站模块介绍:• 日常商城运营:通…...

安卓虚拟摄像头终极指南:5分钟学会VCAM视频替换技巧
安卓虚拟摄像头终极指南:5分钟学会VCAM视频替换技巧 【免费下载链接】com.example.vcam 虚拟摄像头 virtual camera 项目地址: https://gitcode.com/gh_mirrors/co/com.example.vcam VCAM是一款基于Xposed框架的安卓虚拟摄像头工具,能够为您的手机…...

BilibiliDown:跨平台B站视频下载的完整解决方案
BilibiliDown:跨平台B站视频下载的完整解决方案 【免费下载链接】BilibiliDown (GUI-多平台支持) B站 哔哩哔哩 视频下载器。支持稍后再看、收藏夹、UP主视频批量下载|Bilibili Video Downloader 😳 项目地址: https://gitcode.com/gh_mirrors/bi/Bili…...

5分钟为WPF应用注入专业Office界面:Fluent.Ribbon终极指南
5分钟为WPF应用注入专业Office界面:Fluent.Ribbon终极指南 【免费下载链接】Fluent.Ribbon WPF Ribbon control like in Office 项目地址: https://gitcode.com/gh_mirrors/fl/Fluent.Ribbon 想要让你的WPF应用程序拥有像Microsoft Office那样专业、直观的用…...

2025_NIPS_Visual Anchors Are Strong Information Aggregators For Multimodal Large Language Model
文章核心总结与翻译 一、主要内容 本文聚焦多模态大语言模型(MLLMs)中的视觉-语言连接器设计,核心目标是在提升模型精度的同时降低计算成本。现有连接器(如Q-Former、Perceiver Resampler)存在依赖海量训练数据、固定查询导致信息丢失等问题。 研究通过分析视觉Transfo…...

GPU加速与树模型在制造业数据科学中的应用
1. 制造业数据科学中的GPU加速训练概述在半导体制造和芯片测试领域,每天产生的结构化数据量通常达到TB级别。以某8英寸晶圆厂为例,单条产线每月可产生超过500万条测试记录,每条记录包含300-500个特征参数。面对如此庞大的数据规模,…...

AI编码助手工程化实战:用agent-skills注入资深工程师思维
1. 项目概述:为AI编码智能体注入“资深工程师思维”如果你和我一样,每天都在和Claude Code、Cursor、Antigravity IDE这类AI编码助手打交道,你肯定经历过这种时刻:你让它写个功能,它噼里啪啦给你生成了一堆代码&#x…...

别再给外包送钱了:小微企业数字化转型的“平替”方案
小公司或初创团队在数字化转型的起步阶段,最怕的就是陷入“外包深坑”。动辄几十万的开发费用,漫长的沟通周期,最后交付的系统可能还并不贴合实际业务。事实上,现在的职场人真的不必再当这个“冤大头”,因为低代码工具…...