DHorse(K8S的CICD平台)的实现原理
综述
首先,本篇文章所介绍的内容,已经有完整的实现,可以参考这里。
在微服务、DevOps和云平台流行的当下,使用一个高效的持续集成工具也是一个非常重要的事情。虽然市面上目前已经存在了比较成熟的自动化构建工具,比如jekines,还有一些商业公司推出的自动化构建工具,但他们都不能够很好的和云环境相结合。那么究竟该如何实现一个简单、快速的基于云环境的自动化构建系统呢?我们首先以一个Springboot应用为例来介绍一下整体的发布流程,然后再来看看具体如何实现。发布的步骤大体如下:
1.首先从代码仓库下载代码,比如Gitlab、GitHub等;
2.接着是进行打包,比如使用Maven、Gradle等;
3.如果要使用k8s作为编排,还需要把步骤2产生的包制作成镜像,比如用Docker等;
4.上传步骤3的镜像到远程仓库,比如Harhor、DockerHub等;
5.最后,下载镜像并编写Deployment文件部署到k8s集群;
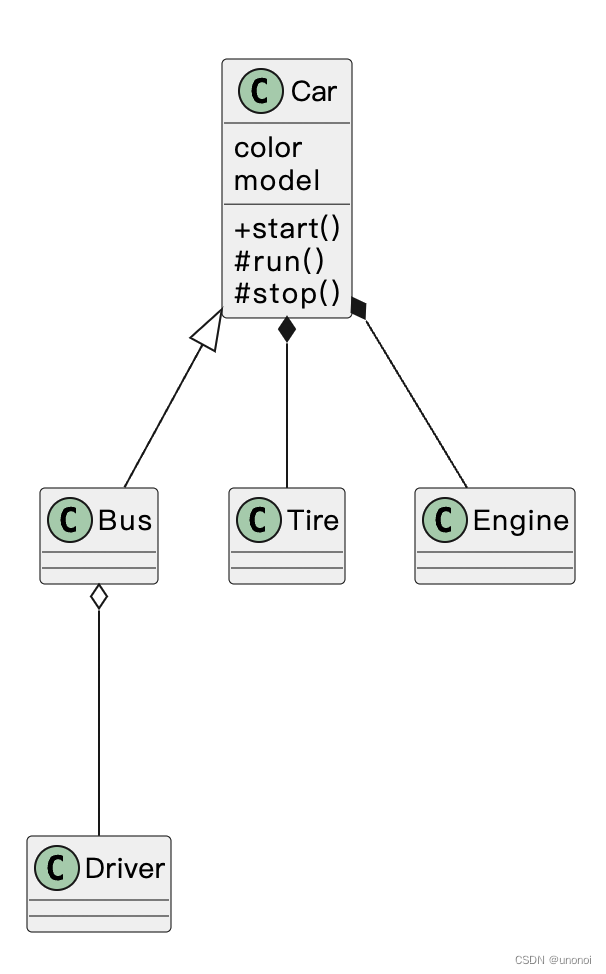
如图1所示:

图1
从以上步骤可以看出,发布过程中需要的工具和环境至少包括:代码仓库(Gitlab、GitHub等)、打包环境(Maven、Gradle等)、镜像制作(Docker等)、镜像仓库(Harbor、DockerHub等)、k8s集群等;此外,还包括发布系统自身的数据存储等。
可以看出,整个流程里依赖的环境很多,如果发布系统不能与这些环境解耦,那么要想实现一个安装简单、功能快速的系统没有那么容易。那么有没有合理的解决方案来实现与这些环境的解耦呢?答案是有的,下面就分别介绍。
代码仓库
操作代码仓库,一般系统提供的都有对应Restful API,以GitLab系统提供的Java客户端为例,如下代码:
<dependency><groupId>org.gitlab4j</groupId><artifactId>gitlab4j-api</artifactId><version>4.17.0</version>
</dependency>
比如,我们想获取某个项目的分支列表,如下代码所示:
public List<Branch> branchList(CodeRepo codeRepo, BranchListParam param) {GitLabApi gitLabApi = gitLabApi(codeRepo);List<Branch> list = null;try {list = gitLabApi.getRepositoryApi().getBranches(param.getProjectIdOrPath(), param.getBranchName());} catch (GitLabApiException e) {LogUtils.throwException(logger, e, MessageCodeEnum.PROJECT_BRANCH_PAGE_FAILURE);} finally {gitLabApi.close();}
}private GitLabApi gitLabApi(CodeRepo codeRepo) {GitLabApi gitLabApi = new GitLabApi(codeRepo.getUrl(), codeRepo.getAuthToken());gitLabApi.setRequestTimeout(1000, 5 * 1000);try {gitLabApi.getVersion();}catch(GitLabApiException e) {//如果token无效,则用账号登录if(e.getHttpStatus() == 401 && !StringUtils.isBlank(codeRepo.getAuthUser())) {gitLabApi = new GitLabApi(codeRepo.getUrl(), codeRepo.getAuthUser(), codeRepo.getAuthPassword());gitLabApi.setRequestTimeout(1000, 5 * 1000);}}return gitLabApi;
}
打包环境
我们以Maven为例进行说明,一般情况下,我们使用Maven打包时,需要首先安装Maven环境,接着引入打包插件,然后使用mvn clean package命令就可以打包了。比如springboot自带插件:
<plugin><groupId>org.springframework.boot</groupId><artifactId>spring-boot-maven-plugin</artifactId><version>2.5.6</version><configuration><classifier>execute</classifier><mainClass>com.test.Application</mainClass></configuration><executions><execution><goals><goal>repackage</goal></goals></execution></executions>
</plugin>
再比如,通用的打包插件:
<plugin><groupId>org.apache.maven.plugins</groupId><artifactId>maven-assembly-plugin</artifactId><version>3.8.2</version><configuration><appendAssemblyId>false</appendAssemblyId><descriptors><descriptor>src/main/resources/assemble.xml</descriptor></descriptors><outputDirectory>../target</outputDirectory></configuration><executions><execution><id>make-assembly</id><phase>package</phase><goals><goal>single</goal></goals></execution></executions>
</plugin>
等等。然后再通过运行mvn clean package命令进行打包。那么,在打包时如果要去除对maven环境的依赖,该如何实现呢?
可以使用嵌入式maven插件maven-embedder来实现。
具体可以这样来做,首先在平台项目里引入依赖,如下:
<dependency><groupId>org.apache.maven</groupId><artifactId>maven-embedder</artifactId><version>3.8.1</version>
</dependency>
<dependency><groupId>org.apache.maven</groupId><artifactId>maven-compat</artifactId><version>3.8.1</version>
</dependency>
<dependency><groupId>org.apache.maven.resolver</groupId><artifactId>maven-resolver-connector-basic</artifactId><version>1.7.1</version>
</dependency>
<dependency><groupId>org.apache.maven.resolver</groupId><artifactId>maven-resolver-transport-http</artifactId><version>1.7.1</version>
</dependency>
运行如下代码,就可以对项目进行打包了:
String[] commands = new String[] { "clean", "package", "-Dmaven.test.skip" };
String pomPath = "D:/hello/pom.xml";
MavenCli cli = new MavenCli();
try {cli.doMain(commands, pomPath, System.out, System.out);
} catch (Exception e) {e.printStackTrace();
}
但是,一般情况下,我们通过maven的settings文件还会做一些配置,比如配置工作目录、nexus私服地址、Jdk版本、编码方式等等,如下:
<?xml version="1.0" encoding="UTF-8"?>
<settings xmlns="http://maven.apache.org/SETTINGS/1.0.0"xmlns:xsi="http://www.w3.org/2001/XMLSchema-instance"xsi:schemaLocation="http://maven.apache.org/SETTINGS/1.0.0 http://maven.apache.org/xsd/settings-1.0.0.xsd"><localRepository>C:/m2/repository</localRepository><profiles><profile><id>myNexus</id><repositories><repository><id>nexus</id><name>nexus</name><url>https://repo.maven.apache.org/maven2</url><releases><enabled>true</enabled></releases><snapshots><enabled>true</enabled></snapshots></repository></repositories><pluginRepositories><pluginRepository><id>nexus</id><name>nexus</name><url>https://repo.maven.apache.org/maven2</url><releases><enabled>true</enabled></releases><snapshots><enabled>true</enabled></snapshots></pluginRepository></pluginRepositories></profile><profile><id>java11</id><activation><activeByDefault>true</activeByDefault><jdk>11</jdk></activation><properties><maven.compiler.source>11</maven.compiler.source><maven.compiler.target>11</maven.compiler.target><maven.compiler.compilerVersion>11</maven.compiler.compilerVersion><project.build.sourceEncoding>UTF-8</project.build.sourceEncoding><project.build.outputEncoding>UTF-8</project.build.outputEncoding></properties></profile></profiles><activeProfiles><activeProfile>myNexus</activeProfile></activeProfiles>
</settings>
通过查看MavenCli类发现,doMain(CliRequest cliRequest)方法有比较丰富的参数,CliRequest的代码如下:
package org.apache.maven.cli;public class CliRequest
{String[] args;CommandLine commandLine;ClassWorld classWorld;String workingDirectory;File multiModuleProjectDirectory;boolean debug;boolean quiet;boolean showErrors = true;Properties userProperties = new Properties();Properties systemProperties = new Properties();MavenExecutionRequest request;CliRequest( String[] args, ClassWorld classWorld ){this.args = args;this.classWorld = classWorld;this.request = new DefaultMavenExecutionRequest();}public String[] getArgs(){return args;}public CommandLine getCommandLine(){return commandLine;}public ClassWorld getClassWorld(){return classWorld;}public String getWorkingDirectory(){return workingDirectory;}public File getMultiModuleProjectDirectory(){return multiModuleProjectDirectory;}public boolean isDebug(){return debug;}public boolean isQuiet(){return quiet;}public boolean isShowErrors(){return showErrors;}public Properties getUserProperties(){return userProperties;}public Properties getSystemProperties(){return systemProperties;}public MavenExecutionRequest getRequest(){return request;}public void setUserProperties( Properties properties ) {this.userProperties.putAll( properties );      }
}
可以看出,这些参数非常丰富,也许可以满足我们的需求,但是CliRequest只有一个默认修饰符的构造方法,也就说只有位于org.apache.maven.cli包下的类才有访问CliRequest构造方法的权限,我们可以在平台项目里新建一个包org.apache.maven.cli,然后再创建一个类(如:DefaultCliRequest)继承自CliRequest,然后实现一个public的构造方法,就可以在任何包里使用该类了,如下代码:
package org.apache.maven.cli;import org.codehaus.plexus.classworlds.ClassWorld;public class DefaultCliRequest extends CliRequest{public DefaultCliRequest(String[] args, ClassWorld classWorld) {super(args, classWorld);}public void setWorkingDirectory(String directory) {this.workingDirectory = directory;}
}
定义好参数类型DefaultCliRequest后,我们再来看看打包的代码:
public void doPackage() {String[] commands = new String[] { "clean", "package", "-Dmaven.test.skip" };DefaultCliRequest request = new DefaultCliRequest(commands, null);request.setWorkingDirectory("D:/hello/pom.xml");Repository repository = new Repository();repository.setId("nexus");repository.setName("nexus");repository.setUrl("https://repo.maven.apache.org/maven2");RepositoryPolicy policy = new RepositoryPolicy();policy.setEnabled(true);policy.setUpdatePolicy("always");policy.setChecksumPolicy("fail");repository.setReleases(policy);repository.setSnapshots(policy);String javaVesion = "11";Profile profile = new Profile();profile.setId("java11");Activation activation = new Activation();activation.setActiveByDefault(true);activation.setJdk(javaVesion);profile.setActivation(activation);profile.setRepositories(Arrays.asList(repository));profile.setPluginRepositories(Arrays.asList(repository));Properties properties = new Properties();properties.put("java.home", "D:/java/jdk-11.0.16.2");properties.put("java.version", javaVesion);properties.put("maven.compiler.source", javaVesion);properties.put("maven.compiler.target", javaVesion);properties.put("maven.compiler.compilerVersion", javaVesion);properties.put("project.build.sourceEncoding", "UTF-8");properties.put("project.reporting.outputEncoding", "UTF-8");profile.setProperties(properties);MavenExecutionRequest executionRequest = request.getRequest();executionRequest.setProfiles(Arrays.asList(profile));MavenCli cli = new MavenCli();try {cli.doMain(request);} catch (Exception e) {e.printStackTrace();}
}
如果需要设置其他参数,也可以通过以上参数自行添加。
镜像制作
一般情况下,我们在Docker环境中通过Docker命令来制作镜像,过程如下:
1.首先编写Dockerfile文件;
2.通过docker build制作镜像;
3.通过docker push上传镜像;
可以看出,如果要使用docker制作镜像的话,必须要有docker环境,而且需要编写Dockerfile文件。当然,也可以不用安装docker环境,直接使用doker的远程接口:post/build。但是,在远程服务器中仍然需要安装doker环境和编写Dockerfile。在不依赖Docker环境的情况下,仍然可以制作镜像,下面就介绍一款工具Jib的用法。
Jib是谷歌开源的一套工具,github地址,它是一个无需Docker守护进程——也无需深入掌握Docker最佳实践的情况下,为Java应用程序构建Docker和OCI镜像, 它可以作为Maven和Gradle的插件,也可以作为Java库。
比如,使用jib-maven-plugin插件构建镜像的代码如下:
<plugin><groupId>com.google.cloud.tools</groupId><artifactId>jib-maven-plugin</artifactId><version>3.3.0</version><configuration><from><image>openjdk:13-jdk-alpine</image></from><to><image>gcr.io/dhorse/client</image><tags><tag>102</tag></tags><auth><!--连接镜像仓库的账号和密码 --><username>username</username><password>password</password></auth></to><container><ports><port>8080</port></ports></container></configuration><executions><execution><phase>package</phase><goals><goal>build</goal></goals></execution></executions>
</plugin>
然后使用命令进行构建:
mvn compile jib:build
可以看出,无需docker环境就可以实现镜像的构建。但是,要想通过平台类型的系统去为每个系统构建镜像,显然通过插件的方式,不太合适,因为需要每个被构建系统引入jib-maven-plugin插件才行,也就是需要改造每一个系统,这样就会带来一定的麻烦。那么有没有不需要改造系统的方式直接进行构建镜像呢?答案是通过Jib-core就可以实现。
首先,在使用Jib-core的项目中引入依赖,maven如下:
<dependency><groupId>com.google.cloud.tools</groupId><artifactId>jib-core</artifactId><version>0.22.0</version>
</dependency>
然后就可以直接使用Jib-core的API来进行制作镜像,如下代码:
try {JibContainerBuilder jibContainerBuilder = null;if (StringUtils.isBlank(context.getProject().getBaseImage())) {jibContainerBuilder = Jib.fromScratch();} else {jibContainerBuilder = Jib.from(context.getProject().getBaseImage());}//连接镜像仓库5秒超时System.setProperty("jib.httpTimeout", "5000");System.setProperty("sendCredentialsOverHttp", "true");String fileNameWithExtension = targetFiles.get(0).toFile().getName();List<String> entrypoint = Arrays.asList("java", "-jar", fileNameWithExtension);RegistryImage registryImage = RegistryImage.named(context.getFullNameOfImage()).addCredential(context.getGlobalConfigAgg().getImageRepo().getAuthUser(),context.getGlobalConfigAgg().getImageRepo().getAuthPassword());jibContainerBuilder.addLayer(targetFiles, "/").setEntrypoint(entrypoint).addVolume(AbsoluteUnixPath.fromPath(Paths.get("/etc/localtime"))).containerize(Containerizer.to(registryImage).setAllowInsecureRegistries(true).addEventHandler(LogEvent.class, logEvent -> logger.info(logEvent.getMessage())));
} catch (Exception e) {logger.error("Failed to build image", e);return false;
}
其中,targetFiles是要构建镜像的目标文件,比如springboot打包后的jar文件。
通过Jib-core,可以很轻松的实现镜像构建,而不需要依赖任何其他环境,也不需要被构建系统做任何改造,非常方便。
镜像仓库
类似代码仓库提供的Restful API,也可以通过Restful API来操作镜像仓库,以Harbor创建一个项目为例,代码如下:
public void createProject(ImageRepo imageRepo) {String uri = "api/v2.0/projects";if(!imageRepo.getUrl().endsWith("/")) {uri = "/" + uri;}HttpPost httpPost = new HttpPost(imageRepo.getUrl() + uri);RequestConfig requestConfig = RequestConfig.custom().setConnectionRequestTimeout(5000).setConnectTimeout(5000).setSocketTimeout(5000).build();httpPost.setConfig(requestConfig);httpPost.setHeader("Content-Type", "application/json;charset=UTF-8");httpPost.setHeader("Authorization", "Basic "+ Base64.getUrlEncoder().encodeToString((imageRepo.getAuthUser() + ":" + imageRepo.getAuthPassword()).getBytes()));ObjectNode objectNode = JsonUtils.getObjectMapper().createObjectNode();objectNode.put("project_name", "dhorse");//1:公有类型objectNode.put("public", 1);httpPost.setEntity(new StringEntity(objectNode.toString(),"UTF-8"));try (CloseableHttpResponse response = createHttpClient(imageRepo.getUrl()).execute(httpPost)){if (response.getStatusLine().getStatusCode() != 201&& response.getStatusLine().getStatusCode() != 409) {LogUtils.throwException(logger, response.getStatusLine().getReasonPhrase(),MessageCodeEnum.IMAGE_REPO_PROJECT_FAILURE);}} catch (IOException e) {LogUtils.throwException(logger, e, MessageCodeEnum.IMAGE_REPO_PROJECT_FAILURE);}
}
k8s集群
同样,k8s也提供了Restful API。同时,官方也提供了各种语言的客户端,下面以Java语言的客户端为例,来创建一个deployment。
首先,引入Maven依赖:
<dependency><groupId>io.kubernetes</groupId><artifactId>client-java</artifactId><version>13.0.0</version>
</dependency>
然后,使用如下代码:
public boolean createDeployment(DeployContext context) {V1Deployment deployment = new V1Deployment();deployment.apiVersion("apps/v1");deployment.setKind("Deployment");deployment.setMetadata(deploymentMetaData(context.getDeploymentAppName()));deployment.setSpec(deploymentSpec(context));ApiClient apiClient = this.apiClient(context.getCluster().getClusterUrl(),context.getCluster().getAuthToken(), 1000, 1000);AppsV1Api api = new AppsV1Api(apiClient);CoreV1Api coreApi = new CoreV1Api(apiClient);String namespace = context.getProjectEnv().getNamespaceName();String labelSelector = K8sUtils.getDeploymentLabelSelector(context.getDeploymentAppName());try {V1DeploymentList oldDeployment = api.listNamespacedDeployment(namespace, null, null, null, null,labelSelector, null, null, null, null, null);if (CollectionUtils.isEmpty(oldDeployment.getItems())) {deployment = api.createNamespacedDeployment(namespace, deployment, null, null, null);} else {deployment = api.replaceNamespacedDeployment(context.getDeploymentAppName(), namespace, deployment, null, null,null);}} catch (ApiException e) {if (!StringUtils.isBlank(e.getMessage())) {logger.error("Failed to create k8s deployment, message: {}", e.getMessage());} else {logger.error("Failed to create k8s deployment, message: {}", e.getResponseBody());}return false;}return true;
}private ApiClient apiClient(String basePath, String accessToken, int connectTimeout, int readTimeout) {ApiClient apiClient = new ClientBuilder().setBasePath(basePath).setVerifyingSsl(false).setAuthentication(new AccessTokenAuthentication(accessToken)).build();apiClient.setConnectTimeout(connectTimeout);apiClient.setReadTimeout(readTimeout);return apiClient;
}
至此,关键的技术点已经介绍完了,更多内容,请参考这里
相关文章:
DHorse(K8S的CICD平台)的实现原理
综述 首先,本篇文章所介绍的内容,已经有完整的实现,可以参考这里。 在微服务、DevOps和云平台流行的当下,使用一个高效的持续集成工具也是一个非常重要的事情。虽然市面上目前已经存在了比较成熟的自动化构建工具,比如…...
类图复习:类图简单介绍
入职新公司在看新项目的代码,所以借助类图梳理各个类之间的关系,奈何知识已经还给了老师,不得不重新学习下类图的相关知识,此处将相关内容记录下方便后续使用。 文章目录 类图语法类与类的关系画类图 类图语法 语法描述public-pr…...
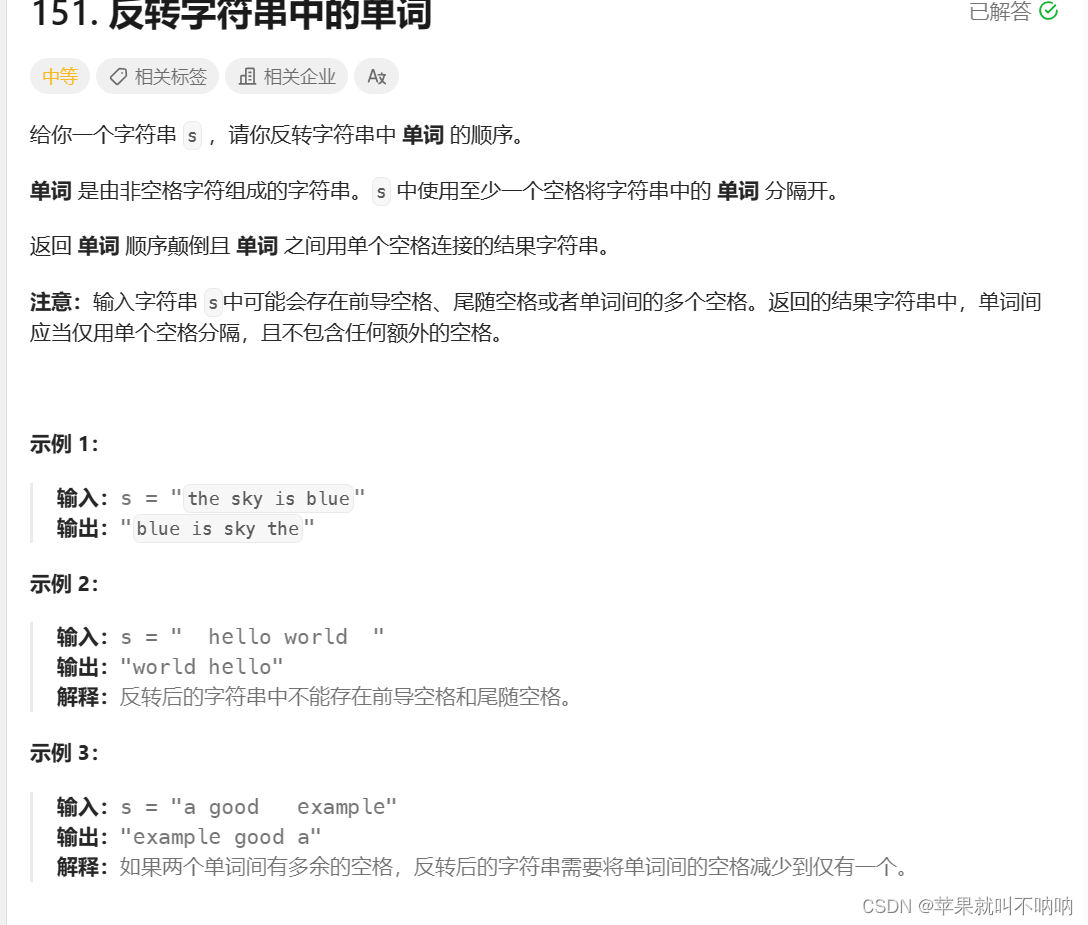
【字符串】【双指针翻转字符串+快慢指针】Leetcode 151 反转字符串中单词【好】
【字符串】【双指针翻转字符串快慢指针】Leetcode 151 反转字符串中单词 解法1 双指针翻转字符串快慢指针更新数组大小 ---------------🎈🎈题目链接🎈🎈------------------- ---------------🎈🎈解答链接…...

3D Gaussian Splatting:用于实时的辐射场渲染
Kerbl B, Kopanas G, Leimkhler T, et al. 3d gaussian splatting for real-time radiance field rendering[J]. ACM Transactions on Graphics (ToG), 2023, 42(4): 1-14. 3D Gaussian Splatting 是 Siggraph 2023 的 Best Paper,法国团队在会议上展示了其实现的最…...

【nlp】文本处理的基本方法
文本处理的基本方法 1 什么是分词2 什么是命名实体识别3 什么是词性标准1 什么是分词 分词就是将连续的字序列按照一定的规范重新组合成词序列的过程。在英文的行文中,单词之间是以空格作为自然分界符的,而中文只是字、句和段能通过明显的分界符来简单划界,唯独词没有一个形…...

C++17 std::filesystem
std::filesystem 是 C17 标准引入的文件系统库,提供了一套用于处理文件和目录的 API。它主要包括以下几个核心类: std::filesystem::path:用于表示文件系统路径。它提供了一系列方法,允许你对路径进行各种操作,如拼接…...

JVM在线分析-解决问题的工具一(jinfo,jmap,jstack)
1. jinfo (base) PS C:\Users\zishi\Desktop> jinfo Usage:jinfo <option> <pid>(to connect to a running process)where <option> is one of:-flag <name> to print the value of the named VM flag #输出对应名称的参数-flag [|-]<n…...

[深度学习]不平衡样本的loss
不平衡样本的loss ”softmax“、”weighted softmax“、”focal“、”class-balanced“ 和 ”balanced softmax“ 都是用于多类分类任务的损失函数。它们之间的区别在于如何处理类别不均衡的问题。 Softmax 是常用的多类分类损失函数。它将输出分布转换为概率分布,…...
【MySQL】表的增删改查(强化)
作者主页:paper jie_博客 本文作者:大家好,我是paper jie,感谢你阅读本文,欢迎一建三连哦。 本文录入于《MySQL》专栏,本专栏是针对于大学生,编程小白精心打造的。笔者用重金(时间和精力)打造&a…...

MyBatis-Plus--在xml中使用wrapper的方法
原文网址:MyBatis-Plus--在xml中使用wrapper的方法_IT利刃出鞘的博客-CSDN博客 简介 本文介绍MyBatis-Plus如何在xml中使用wrapper。 Service QueryWrapper<T> wrapper new QueryWrapper<T>(); wrapper.eq("r.room_id", vo.getRoomId())…...

Oracle RAC是啥?
Oracle RAC,全称是Oracle Real Application Cluster,翻译过来为Oracle真正的应用集群,它是Oracle提供的一个并行集群系统,由 Oracle Clusterware(集群就绪软件) 和 Real Application Cluster(RA…...

springboot中定时任务cron不生效,fixedRate指定间隔失效,只执行一次的问题
在调试计算任务的时候,手动重置任务为初始状态,但是并没有重新开始计算,检查定时任务代码: 从Scheduled(fixedRate 120000)可以看到,应该是间隔120秒执行一次该定时任务,查看后台日志,并没有重…...
苹果手机发热发烫是什么原因?看完这篇你就知道了!
苹果手机以其卓越的用户体验和优秀的性能得到了广大用户的喜爱和追捧。在日常使用苹果手机时,我们可能会遇到手机发热发烫的情况。那么,苹果手机发热发烫是什么原因呢?小编将为大家解析这一问题的原因,并为您提供相应的解决方案&a…...
:助力健身房提升客户满意度的秘密武器)
民安智库(第三方满意度调研公司):助力健身房提升客户满意度的秘密武器
在当今的健身行业,客户满意度已经成为衡量健身房竞争力的关键因素。为了准确了解客户的需求和反馈,某健身房委托民安智库对其进行客户满意度调查。 本次调查的主要目的是了解客户对健身房的满意度,包括对设施、课程、教练和服务的评价。调查…...

2011年09月01日 Go生态洞察:Go语言词法扫描与App Engine演示
🌷🍁 博主猫头虎(🐅🐾)带您 Go to New World✨🍁 🦄 博客首页——🐅🐾猫头虎的博客🎐 🐳 《面试题大全专栏》 🦕 文章图文…...

pytorch搭建squeezenet网络的整套工程(升级版)
上一篇当中,使用pytorch搭建了一个squeezenet,效果还行。但是偶然间发现了一个稍微改动的版本,拿来测试一下发现效果会更好,大概网络结构还是没有变,还是如下的第二个版本: 具体看网络结构代码:…...

222. 完全二叉树的节点个数
题目链接:222. 完全二叉树的节点个数 需复刷 全代码: class Solution { public:int getnums(TreeNode* Node){if(Node NULL){return 0;}int leftnums getnums(Node ->left);int rightnums getnums(Node ->right);int cns 1 leftnums righ…...
adb and 软件架构笔记
Native Service,这是Android系统里的一种特色,就是通过C或是C代码写出来的,供Java进行远程调用的Remote Service,因为C/C代码生成的是Native代码(机器代码),于是叫Native Service。 native服务…...
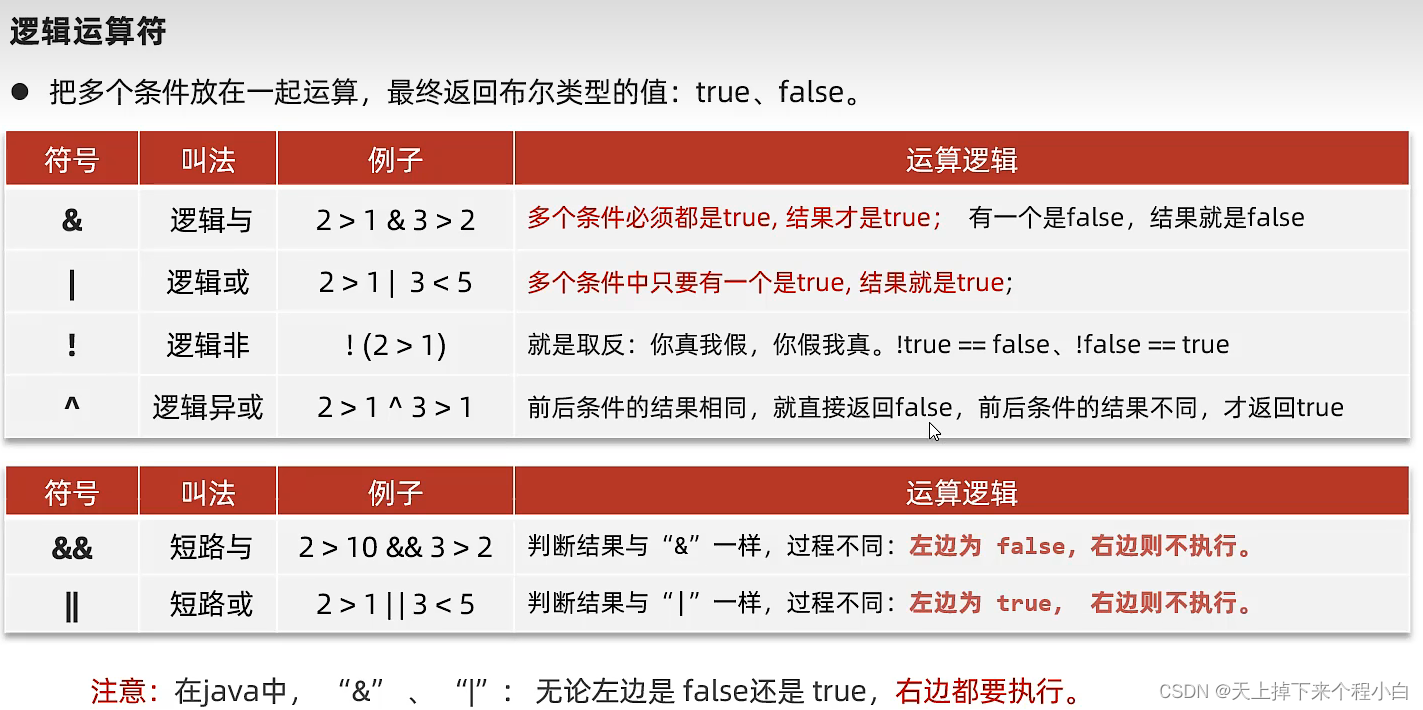
算术运算符、自增自减运算符、赋值运算符、关系运算符、逻辑运算符、三元运算符
1.算术运算符 public class OperatorDemo1 {public static void main(String[] args) {int a 10;int b 2;System.out.println(a b);System.out.println(a - b);System.out.println(a * b);System.out.println(a / b);System.out.println(5 / 2);System.out.println(5.0 / 2);…...
k8s 配置资源管理
配置资源管理 //Secret Secret 是用来保存密码、token、密钥等敏感数据的 k8s 资源,这类数据虽然也可以存放在 Pod 或者镜像中,但是放在 Secret 中是为了更方便的控制如何使用数据,并减少暴露的风险。 有三种类型: ●kubernetes.…...

治愈不内卷!星露谷物语v1.6.15,承包你的所有温柔时光
如果你被快节奏的生活压得喘不过气,被内耗裹挟得身心俱疲,那一定要试试《星露谷物语》v1.6.15版本——这款Steam好评率98%的治愈神作,用一方小小农场,给你一个逃离喧嚣的精神避风港。 今天,就有免费的pc资源࿱…...

VoiceFixer终极指南:让任何受损音频重获新生的AI声音修复神器
VoiceFixer终极指南:让任何受损音频重获新生的AI声音修复神器 【免费下载链接】voicefixer General Speech Restoration 项目地址: https://gitcode.com/gh_mirrors/vo/voicefixer 你是否曾为那些珍贵的录音感到遗憾?家庭录像中的背景噪音、历史档…...

OpenClaw 安装教程 Windows 系统 AI 智能体快速配置
下载安装包链接 OpenClaw 安装教程 Windows 系统 AI 智能体快速配置 下载安装包链接 2026 年热度很高的开源 AI 智能体 OpenClaw(小龙虾),在 GitHub 平台收获大量开发者关注,凭借本地运行、低门槛操作、自动执行任务的特点&…...

汽车行业云端Android系统模块开发深度实践与面试指南
引言 随着智能汽车技术的飞速发展,Android系统在车载云端模块中的应用日益广泛。作为Android研发主任工程师,核心职责是确保系统的高效性、稳定性和可扩展性。本文将从需求分析开始,逐步深入架构设计、开发实践、性能优化等关键环节,结合Java和Kotlin语言特性,分享实战经…...

【C# .NET 11 AI推理加速终极指南】:实测提升3.7倍吞吐量、降低62%延迟的5大硬核优化法
第一章:C# .NET 11 AI推理加速全景概览.NET 11 标志着 C# 在原生 AI 推理支持上的重大跃迁——它不再仅依赖外部 Python 运行时或 REST API 调用,而是通过深度集成 ONNX Runtime、硬件感知推理调度器与 JIT 编译优化,实现端到端的高性能、跨平…...

大模型Computer Use能力训练全解析:从原理到实践
大模型Computer Use能力训练全解析:从原理到实践 引言 随着大语言模型(LLM)的快速发展,AI系统正从单纯的文本生成向更复杂的任务执行能力演进。其中,Computer Use(计算机使用)能力成为了大模型领域最受关注的研究方向之一。这种能力使AI能够像人类一样操作计算机——浏…...

别再死记硬背了!用‘预约医生’的例子,5分钟搞懂数据流图里的‘黑洞’、‘白洞’和‘灰洞’
预约医生场景下的数据流图三洞原理:用生活化案例破解系统分析难题 每次打开医院预约系统,看着屏幕上跳转的医生排班表和闪烁的确认按钮,你可能不会想到这背后隐藏着一套精密的数据流动逻辑。就像水管中的水流可能遇到堵塞、泄漏或污染&#x…...

Qwen3.5-9B-GGUF部署教程:Docker容器化封装+Supervisor进程守护方案
Qwen3.5-9B-GGUF部署教程:Docker容器化封装Supervisor进程守护方案 1. 项目概述 Qwen3.5-9B-GGUF是阿里云开源的Qwen3.5-9B官方模型经过GGUF格式量化后的版本。这个90亿参数的稠密模型采用了创新的Gated Delta Networks架构和混合注意力机制(75%线性25…...
)
15.【UPF】UPF Power Aware Simulation(UPF功耗感知仿真)
第一步:UPF Power Aware Simulation 分析与知识整理 1. 为什么学习Power-Aware Simulation 传统RTL仿真假设电源稳定,不建模断电行为、断电域X传播、保持单元操作。功耗感知仿真扩展RTL仿真,验证UPF功耗意图正确管理低功耗场景,在…...

复旦微FMQL芯片PS网口调试实录:一路MDIO控制双PHY的完整配置与排错心法
复旦微FMQL芯片双PHY网络配置实战:从设备树优化到链路调优 在嵌入式网络接口开发中,多网口设计常面临MDIO总线资源紧张的问题。FMQL系列芯片作为国产高性能可编程SoC,其PS侧双千兆以太网控制器(GMAC)的灵活配置为复杂网络拓扑提供了可能。本…...