vue分片上传视频并转换为m3u8文件并播放
开发环境:
基于若依开源框架的前后端分离版本的实践,后端java的springboot,前端若依的vue2,做一个分片上传视频并分段播放的功能,因为是小项目,并没有专门准备文件服务器和CDN服务,后端也是套用的若依的上传功能
实现思路:
- 前端根据视频文件计算出文件md5值
- 前端按照指定大小截取视频,执行分片上传(可优化,先使用文件MD5检查文件是否已上传)
- 后端实现接收分片的接口,当已上传分片数等于总分片数时执行合并分片,得到原视频文件
- 后端使用ffmpeg按照时间进行视频分割,切割时间根据视频清晰度不同而不同,得到m3u8文件和ts文件列表
- 后端保存视频信息和文件实际保存地址,并提供查询接口
- 前端使用流播放器播放视频文件
代码实现
1. vue的分片上传
前端分片上传功能按照以下步骤实现:
1.1,先要写一个上传组件,这里使用elementUI的上传组件
在 :auto-upload 设置的视频直接不解释上传,即选择好本地文件就上传
在 :before-upload 中需要计算好文件的md5值,然后去后端查看文件是否已被上传
在 :http-request 中实现具体的分片上传逻辑
在 :action 虽然设置了上传地址,但是任然是以http-request设置的方法为准,只是不设置会报错
<el-form-item label="视频文件" prop="file" v-if="form.id==null"><el-upload ref="upload":action="uploadUrl":on-error="onError":before-upload="beforeUpload":before-remove="beforeRemove":auto-upload="true":limit="1":http-request="chunkedUpload":on-progress="onProgress"><div style="border: 1px dashed #c0ccda;padding: 1rem;"><i class="el-icon-upload"></i><div class="el-upload__text">将文件拖到此处,或<em>点击上传</em></div></div><div class="el-upload__tip" slot="tip">只能上传mp4文件,且不超过500M</div><el-progress :percentage="uploadPercentage" status="success"></el-progress></el-upload>
</el-form-item>
1.2,上传方法的js
我使用了两个后端接口,
一个是 testUploadVideo 判断文件是否存在,是若依分装的请求
一个是 process.env.VUE_APP_BASE_API + ‘/manage/video/upload’,单独用axios执行上传分片

<script>
import { addVideo, getVideo, testUploadVideo, updateVideo } from '@/api/manage/video'
import SparkMD5 from 'spark-md5'
import axios from 'axios'export default {name: 'videoWin',data() {return {uploadUrl: process.env.VUE_APP_BASE_API + '/manage/video/upload', //文件上传的路径uploadPromises: [], // 记录并发上传分片的线程uploadPercentage:0 //上传进度}},,methods: {beforeUpload: async function(file) {// 在上传之前获取视频的宽高和分辨率const video = document.createElement('video')video.src = URL.createObjectURL(file)video.preload = 'metadata'const loadedMetadata = new Promise(resolve => {video.onloadedmetadata = () => {window.URL.revokeObjectURL(video.src)const width = video.videoWidthconst height = video.videoHeightconsole.log('视频宽高:', width, height)this.form.width = widththis.form.height = heightresolve();}});// 等待视频的宽高和分辨率获取完成await loadedMetadata;// 计算文件的md5值const reader = new FileReader()const md5Promise = new Promise(resolve => {reader.onload = () => {const spark = new SparkMD5.ArrayBuffer()spark.append(reader.result)const md5 = spark.end(false)this.form.identifier = md5 // 将MD5值存储到form中resolve(md5);}});reader.readAsArrayBuffer(file); // 读取文件内容并计算MD5值const md5 = await md5Promise;// 检查文件是否已被上传const response = await testUploadVideo(md5);console.log("判断文件是否存在", response)if (response.msg === "文件已存在,秒传成功") {console.log("文件已存在")// 取消上传this.$refs.upload.abort(file);return false;} else {return true;}},chunkedUpload({ file }) {const totalSize = file.sizeconst chunkCount = Math.ceil(totalSize / (5 * 1024 * 1024)) // 每个分片5MB// 创建分片上传请求数组// 上传分片for (let i = 0; i < chunkCount; i++) {const start = i * (5 * 1024 * 1024)const end = Math.min((i + 1) * (5 * 1024 * 1024), totalSize)const chunk = file.slice(start, end)const formData = new FormData()formData.append('file', chunk)formData.append('filename', file.name)formData.append('totalChunks', chunkCount)formData.append('chunkNumber', i)formData.append('identifier', this.form.identifier) // 添加文件的MD5值作为参数// 发送分片上传请求const source = axios.CancelToken.source() // 创建cancelTokenconst uploadPromise = this.uploadChunk(formData, source.token, (progressEvent) => {console.log('更新进度', progressEvent)this.uploadPercentage = Math.round((progressEvent.loaded / progressEvent.total) * 100) // 更新进度条的值;}).catch(error => {console.error('分片上传失败', error)// 弹出告警消息this.$message({type: 'error',message: '视频上传失败!'})})this.uploadPromises.push({ promise: uploadPromise, source }) // 保存cancelToken}// 等待所有分片上传完成return Promise.all(this.uploadPromises).then(responses => {console.log('分片上传完成', responses)}).catch(error => {console.error('分片上传失败', error)})},/**更新进度*/onProgress(event, file) {this.uploadPercentage = Math.floor((event.loaded / event.total) * 100);},/**上传分片*/uploadChunk(formData, onProgress) {return axios.post(process.env.VUE_APP_BASE_API + '/manage/video/upload', formData, {onUploadProgress: onProgress // 添加进度回调}).then(response => {console.log('分片上传成功', response.data)})},/**上传分片失败*/onError(error, file, fileList) {console.error('上传失败', error)},// 取消上传请求beforeRemove(file, fileList) {this.form.identifier = nullreturn true}}
}
</script>
2. 后端接口实现
2.1 控制层代码
@RestController
@RequestMapping("/manage/video")
@CrossOrigin // 允许跨域
public class ManageVideoController extends BaseController {@Autowiredprivate IManageVideoService manageVideoService;/*** 上传分片前校验文件是否存在** @return*/@GetMapping("/preUpload")public AjaxResult preUpload(@RequestParam("fileMd5") String fileMd5) {return manageVideoService.checkExists(fileMd5);}/*** 上传分片** @return*/@PostMapping("/upload")public AjaxResult fragmentation(@ModelAttribute UploadPO uploadPO) {return manageVideoService.uploadChunk(uploadPO);}
}
2.1 服务层代码
接收到分片上传文件后经历以下步骤:
- 再次校验是否文件已存在,不存在就保存临时分片文件;
- 校验已上传分片数是否等于总分篇数,如果是则合并;
- 将临时文件合并和源mp4文件;
- 获取视频的时长和大小,因为ffmpeg不支持按照大小拆分,如果只是按照固定时长拆分,20s可能是2M也可能是34M,无法达到拆分视频以缩短预览视频等待时间的目的;
- 执行视频拆分,生成playlist.m3u8和一系列ts文件
- 重写m3u8文件的ts地址,1是因为若依开发环境和线上环境的指定前缀不一致,2是因为本地开发没开nginx转发静态资源,线上也没开文件服务
@Overridepublic AjaxResult checkExists(String fileMd5) {String fileUploadDir = RuoYiConfig.getProfile() + "/video";//判断文件是否已被上传String videoFile = fileUploadDir + "/" + fileMd5 + ".mp4";File file = new File(videoFile);if (file.exists()) {return AjaxResult.success("文件已存在,秒传成功");}return AjaxResult.success();}@Overridepublic AjaxResult uploadChunk(UploadPO uploadPO) {String fileUploadTempDir = RuoYiConfig.getProfile() + "/videotmp";String fileUploadDir = RuoYiConfig.getProfile() + "/video";// 获得文件分片数据MultipartFile fileData = uploadPO.getFile();// 分片第几片int index = uploadPO.getChunkNumber();//总分片数int totalChunk = uploadPO.getTotalChunks();// 文件md5标识String fileMd5 = uploadPO.getIdentifier();//判断文件是否已被上传String videoFile = fileUploadDir + "/" + fileMd5 + ".mp4";File file = new File(videoFile);if (file.exists()) {return AjaxResult.success("文件已存在,秒传成功");}String newName = fileMd5 + index + ".tem";File uploadFile = new File(fileUploadTempDir + "/" + fileMd5, newName);if (!uploadFile.getParentFile().exists()) {uploadFile.getParentFile().mkdirs();}try {fileData.transferTo(uploadFile);// 判断总分片数是否等于当前目录下的分片文件数量int currentChunkCount = getChunkCount(fileUploadTempDir + "/" + fileMd5);if (totalChunk == currentChunkCount) {// 调用合并方法merge(fileMd5, fileUploadTempDir, fileUploadDir);//根据运行环境分别调用ffmpegString os = System.getProperty("os.name").toLowerCase();String m3u8Dir = fileUploadDir + "/" + fileMd5;File m3u8FileDir = new File(m3u8Dir);if (!m3u8FileDir.exists()) {m3u8FileDir.mkdirs();}//计算视频总时长和视频大小,确定视频的分段时长String mp4File = fileUploadDir + "/" + fileMd5 + ".mp4";//每个2M分片的毫秒数long duration = getTsDuration(mp4File);// 异步执行视频拆分if (os.contains("win")) {mp4ToM3u8ForWindow(fileMd5, mp4File, m3u8Dir, duration);} else {mp4ToM3u8ForLinux(fileMd5, mp4File, m3u8Dir, duration);}}//执行成功返回 urlreturn AjaxResult.success();} catch (IOException | InterruptedException e) {log.error("上传视频失败:{}", e.toString());FileUtil.del(fileUploadTempDir + "/" + fileMd5); //删除临时文件FileUtil.del(videoFile); //删除视频源文件FileUtil.del(fileUploadDir + "/" + fileMd5); //删除分段ts视频return AjaxResult.error(502, "上传视频失败");} catch (EncoderException e) {log.error("视频切割时计算分段时长失败:{}", e.toString());FileUtil.del(fileUploadTempDir + "/" + fileMd5); //删除临时文件FileUtil.del(videoFile); //删除视频源文件FileUtil.del(fileUploadDir + "/" + fileMd5); //删除分段ts视频return AjaxResult.error(502, "上传视频失败");}}/*** 获取当前目录下的分片文件数量** @param directoryPath* @return*/private int getChunkCount(String directoryPath) {File directory = new File(directoryPath);if (!directory.exists() || !directory.isDirectory()) {return 0;}File[] files = directory.listFiles((dir, name) -> name.endsWith(".tem"));return files != null ? files.length : 0;}/*** 合并分片** @param uuid* @return*/public void merge(String uuid, String fileUploadTempDir, String fileUploadDir) throws IOException {File dirFile = new File(fileUploadTempDir + "/" + uuid);//分片上传的文件已经位于同一个文件夹下,方便寻找和遍历(当文件数大于十的时候记得排序用冒泡排序确保顺序是正确的)String[] fileNames = dirFile.list();Arrays.sort(fileNames, (o1, o2) -> {int i1 = Integer.parseInt(o1.substring(o1.indexOf(uuid) + uuid.length()).split("\\.tem")[0]);int i2 = Integer.parseInt(o2.substring(o2.indexOf(uuid) + uuid.length()).split("\\.tem")[0]);return i1 - i2;});//创建空的合并文件,以未见md5为文件名File targetFile = new File(fileUploadDir, uuid + ".mp4");if (!targetFile.getParentFile().exists()) {targetFile.getParentFile().mkdirs();}RandomAccessFile writeFile = new RandomAccessFile(targetFile, "rw");long position = 0;for (String fileName : fileNames) {System.out.println(fileName);File sourceFile = new File(fileUploadTempDir + "/" + uuid, fileName);RandomAccessFile readFile = new RandomAccessFile(sourceFile, "rw");int chunksize = 1024 * 3;byte[] buf = new byte[chunksize];writeFile.seek(position);int byteCount;while ((byteCount = readFile.read(buf)) != -1) {if (byteCount != chunksize) {byte[] tempBytes = new byte[byteCount];System.arraycopy(buf, 0, tempBytes, 0, byteCount);buf = tempBytes;}writeFile.write(buf);position = position + byteCount;}readFile.close();}writeFile.close();cn.hutool.core.io.FileUtil.del(dirFile);}/*** 视频拆分** @param inputFilePath D:/home/dxhh/uploadPath/video/md5.mp4* @param outputDirectory D:/home/dxhh/uploadPath/video/md5*/@Asyncpublic void mp4ToM3u8ForWindow(String fileMd5, String inputFilePath, String outputDirectory, long ms) throws IOException {File uploadFile = new File(outputDirectory);if (!uploadFile.exists()) {uploadFile.mkdirs();}Path outputDirPath = Paths.get(outputDirectory);//我的ffmpeg.exe放在 项目的/resources/script目录下Path resourcePath = Paths.get("./script/ffmpeg.exe");FFmpeg.atPath(resourcePath.getParent()).addInput(UrlInput.fromPath(Paths.get(inputFilePath))).addOutput(UrlOutput.toPath(outputDirPath.resolve("output_%03d.ts"))).addArguments("-f", "segment").addArguments("-segment_time", ms + "ms") // 分片时长为30s.addArguments("-segment_list", outputDirPath.resolve("playlist.m3u8").toString()).addArguments("-c:v", "copy") // 优化视频编码参数.addArguments("-c:a", "copy") // 优化音频编码参数.execute();// 修改生成的m3u8文件,将ts链接替换为完整URLupdateM3u8File(fileMd5, outputDirectory);}/*** 视频拆分** @param fileMd5 adw1dwdadadwdadasd* @param inputFilePath /home/dxhh/uploadPath/video/md5.mp4* @param outputDirectory /home/dxhh/uploadPath/video/md5* @throws IOException* @throws InterruptedException*/public void mp4ToM3u8ForLinux(String fileMd5, String inputFilePath, String outputDirectory, long ms) throws IOException, InterruptedException {String command = "ffmpeg -i " + inputFilePath + " -c copy -map 0 -f segment -segment_time " + ms + "ms -segment_list " + outputDirectory + "/playlist.m3u8 " + outputDirectory + "/output_%03d.ts";//ffmpeg -i /home/dxhh/uploadPath/video/md5.mp4 -c copy -map 0 -f segment -segment_time 1236ms -segment_list /home/dxhh/uploadPath/video/md5/playlist.m3u8 /home/dxhh/uploadPath/video/md5/output_%03d.tslog.info("视频分割脚本:{}", command);ProcessBuilder builder = new ProcessBuilder(command.split(" "));builder.redirectErrorStream(true);Process process = builder.start();BufferedReader reader = new BufferedReader(new InputStreamReader(process.getInputStream()));String line;while ((line = reader.readLine()) != null) {System.out.println(line);}int exitCode = process.waitFor();if (exitCode == 0) {System.out.println("FFmpeg command executed successfully");updateM3u8File(fileMd5, outputDirectory);} else {System.out.println("FFmpeg command failed with exit code " + exitCode);}}private void updateM3u8File(String fileMd5, String outputDirectory) throws IOException {String m3u8FilePath = outputDirectory + "/playlist.m3u8";List<String> lines = Files.readAllLines(Paths.get(m3u8FilePath));List<String> newLines = new ArrayList<>();for (String line : lines) {if (line.endsWith(".ts")) {if ("dev".equals(active)) {newLines.add("/dev-api/profile/video/" + fileMd5 + "/" + line);} else {newLines.add("/stage-api/profile/video/" + fileMd5 + "/" + line);}} else {newLines.add(line);}}Files.write(Paths.get(m3u8FilePath), newLines);}public long getTsDuration(String filePath) throws EncoderException {int targetSize = 2 * 1024 * 1024; // 2MBFile videoFile = new File(filePath);long fileSize = videoFile.length();Encoder encoder = new Encoder();MultimediaInfo multimediaInfo = encoder.getInfo(videoFile);long duration = multimediaInfo.getDuration();System.out.println("Duration: " + duration + " ms");System.out.println("File size: " + fileSize + " bytes");// Calculate target duration for a 2MB videolong targetDuration = (duration * targetSize) / fileSize;System.out.println("Target duration for a 2MB video: " + targetDuration + " ms");return targetDuration;}
获取视频时长需要用到jave工具包,想上传资源的提示已存在,应该可以在csdn搜到;
还需要ffmpeg软件,如果是windows环境运行,只需要调用本地的ffmpeg.exe就好,如果是在linux运行,需要安装ffmpeg;
<!--视频切割--><dependency><groupId>com.github.kokorin.jaffree</groupId><artifactId>jaffree</artifactId><version>2023.09.10</version></dependency><dependency><groupId>it.sauronsoftware.jave</groupId><artifactId>jave2</artifactId><version>1.0.2</version><scope>system</scope><systemPath>${project.basedir}/lib/jave-1.0.2.jar</systemPath></dependency>
2.3 linux中安装ffmpeg
- 下载 ffmpeg 工具包并解压
wget http://www.ffmpeg.org/releases/ffmpeg-4.2.tar.gz
tar -zxvf ffmpeg-4.2.tar.gz
- 进入工具包文件夹并进行安装,将 ffmpeg 安装至 / usr/local/ffmpeg 下
 cd ffmpeg-4.2./configure --prefix=/usr/local/ffmpeg
./configure --prefix=/usr/local/ffmpeg --enable-openssl --disable-x86asm
make && make install
注意:若出现以下报错,请跳至第五步,待第五步安装成功后再返回第二步。

- 配置环境变量,使其 ffmpeg 命令生效
 #利用vi编辑环境变量
vi /etc/profile#在最后位置处添加环境变量,点击i进入编辑模式,esc键可退出编辑模式
export PATH=$PATH:/usr/local/ffmpeg/bin#退出编辑模式后,:wq 保存退出
#刷新资源,使其生效
source /etc/profile
- 查看 ffmpeg 版本,验证是否安装成功
ffmpeg -version若出现以下内容,则安装成功。

- 若第二步出现图片中的错误信息,则需要安装 yasm
记得退出 ffmpeg 工具包文件夹,cd … 返回上一层
 #下载yasm工具包
wget http://www.tortall.net/projects/yasm/releases/yasm-1.3.0.tar.gz#解压
tar -zxvf yasm-1.3.0.tar.gz#进入工具包文件夹并开始安装
cd yasm-1.3.0
./configure
make && make install
安装完成后直接返回第二步即可,此时命令就不会报错了。
2.4 视频资源地址
因为是基于若依框架开发的,其实只要上传的的时候是往 RuoYiConfig.getProfile() 这个指定配置目录保存文件,都是能直接访问不需要额外开发,这里就简单过一下
若依的自定义参数配置类从yml文件读取用户配置
@Component
@ConfigurationProperties(prefix = "xxx")
public class RuoYiConfig {/*** 上传路径 /home/user/xxxx/upload*/private static String profile;
}
在通用配置定义一个静态资源路由前缀
/*** 通用常量定义** @author li.dh*/
public class CommonConstant {/*** 资源映射路径 前缀*/public static final String RESOURCE_PREFIX = "/profile";
}
在mvc配置中添加静态资源的转发映射,将/profile前缀的请求转发到RuoYiConfig.getProfile()路径下
@Configuration
public class ResourcesConfig implements WebMvcConfigurer {@Overridepublic void addResourceHandlers(ResourceHandlerRegistry registry) {/** 本地文件上传路径 */registry.addResourceHandler(CommonConstant.RESOURCE_PREFIX + "/**").addResourceLocations("file:" + RuoYiConfig.getProfile() + "/");/** swagger配置 */registry.addResourceHandler("/swagger-ui/**").addResourceLocations("classpath:/META-INF/resources/webjars/springfox-swagger-ui/").setCacheControl(CacheControl.maxAge(5, TimeUnit.HOURS).cachePublic());}
}
3. vue播放流视频
我的需求是在列表上点击视频弹出播放弹窗
<!-- 播放视频 --><el-dialog :title="title" :visible.sync="open" width="800px" append-to-body @close="open=false"><video-player class="video-player vjs-custom-skin"ref="videoPlayer":playsinline="true":options="playerOptions"></video-player></el-dialog>
import 'video.js/dist/video-js.css'data(){return {// 弹出层标题title: '',m3u8Url: '',// 是否显示弹出层open: false,playerOptions: {playbackRates: [0.5, 1.0, 1.5, 2.0], // 可选的播放速度autoplay: true, // 如果为true,浏览器准备好时开始回放。muted: false, // 默认情况下将会消除任何音频。loop: false, // 是否视频一结束就重新开始。preload: 'auto', // 建议浏览器在<video>加载元素后是否应该开始下载视频数据。auto浏览器选择最佳行为,立即开始加载视频(如果浏览器支持)language: 'zh-CN',aspectRatio: '16:9', // 将播放器置于流畅模式,并在计算播放器的动态大小时使用该值。值应该代表一个比例 - 用冒号分隔的两个数字(例如"16:9"或"4:3")fluid: true, // 当true时,Video.js player将拥有流体大小。换句话说,它将按比例缩放以适应其容器。sources: [{type: 'application/x-mpegURL', // 类型src: this.m3u8Url}],poster: '', // 封面地址notSupportedMessage: '此视频暂无法播放,请稍后再试', // 允许覆盖Video.js无法播放媒体源时显示的默认信息。controlBar: {timeDivider: true, // 当前时间和持续时间的分隔符durationDisplay: true, // 显示持续时间remainingTimeDisplay: false, // 是否显示剩余时间功能fullscreenToggle: true // 是否显示全屏按钮}}}
},
methods: {openVideo(picurl, url, title) {this.title = titlelet videourl = process.env.VUE_APP_BASE_API + urllet imgurl = process.env.VUE_APP_BASE_API + picurl// console.log("视频地址:" , videourl)this.m3u8Url = videourlthis.playerOptions.sources[0].src = videourl // 重新加载视频this.playerOptions.poster = imgurl // 封面// this.$refs.videoPlayer.play() // 播放视频this.open = true}
}
4. 实现效果

相关文章:
vue分片上传视频并转换为m3u8文件并播放
开发环境: 基于若依开源框架的前后端分离版本的实践,后端java的springboot,前端若依的vue2,做一个分片上传视频并分段播放的功能,因为是小项目,并没有专门准备文件服务器和CDN服务,后端也是套用…...
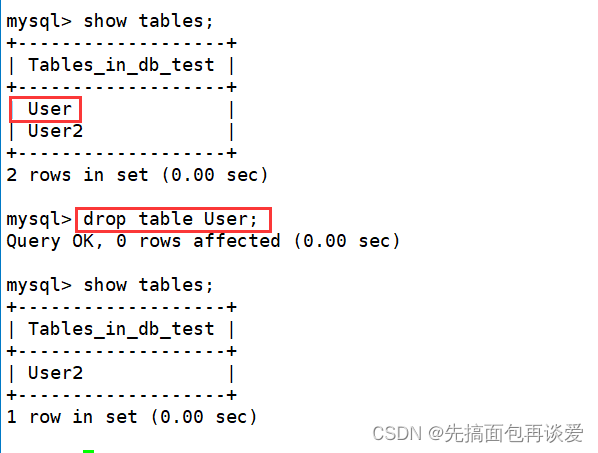
【MySQL】对表结构进行增删查改的操作
表的操作 前言正式开始建表查看表show tables;desc xxx;show create table xxx; 修改表修改表名 rename to对表结构进行修改新增一个列 add 对指定列的属性做修改 modify修改列名 change 删除某列 drop 删除表 drop 前言 前一篇讲了库相关的操作,如果你不太懂&…...
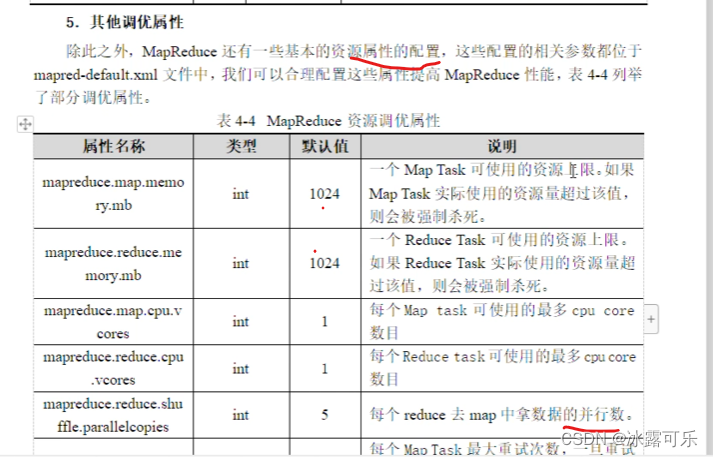
Hadoop原理,HDFS架构,MapReduce原理
Hadoop原理,HDFS架构,MapReduce原理 2022找工作是学历、能力和运气的超强结合体,遇到寒冬,大厂不招人,可能很多算法学生都得去找开发,测开 测开的话,你就得学数据库,sql,…...
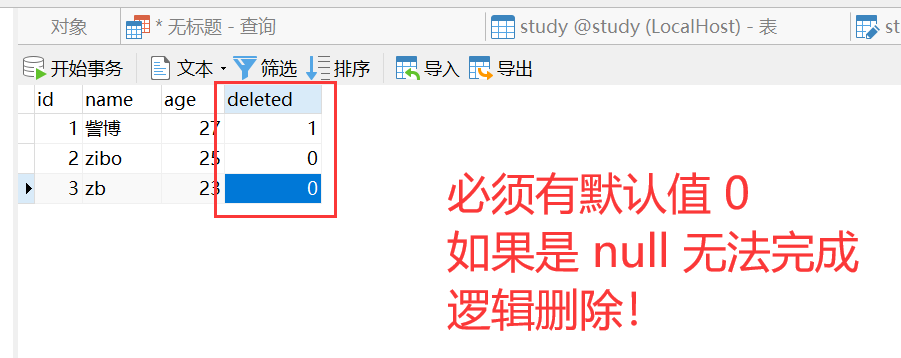
【Spring Boot】035-Spring Boot 整合 MyBatis Plus
【Spring Boot】035-Spring Boot 整合 MyBatis Plus 【Spring Boot】010-Spring Boot整合Mybatis https://blog.csdn.net/qq_29689343/article/details/108621835 文章目录 【Spring Boot】035-Spring Boot 整合 MyBatis Plus一、MyBatis Plus 概述1、简介2、特性3、结构图4、相…...

Hafnium之强制性的接口
安全之安全(security)博客目录导读 目录 一、FFA_VERSION 二、FFA_FEATURES 三、FFA_RXTX_MAP/FFA_RXTX_UNMAP 四、FFA_PARTITION_INFO_GET 五、FFA_PARTITION_INFO_GET_REGS...
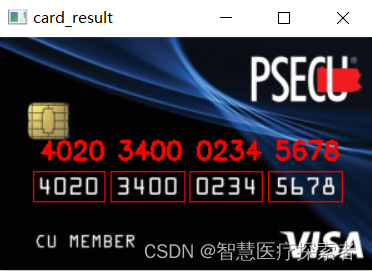
计算机视觉:使用opencv实现银行卡号识别
1 概述 1.1 opencv介绍 OpenCV是Open Source Computer Vision Library(开源计算机视觉库)的简称,由Intel公司在1999年提出建立,现在由Willow Garage提供运行支持,它是一个高度开源发行的计算机视觉库,可以…...
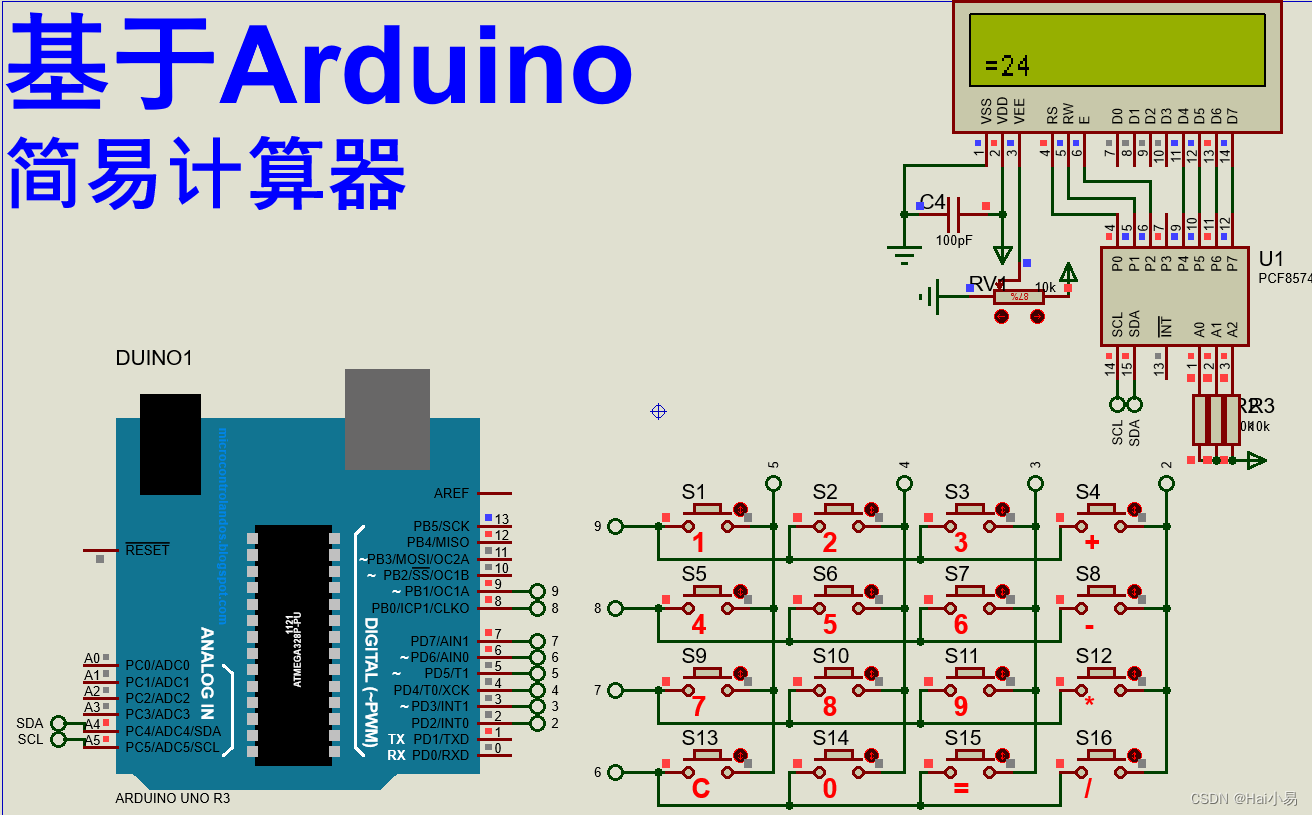
【Proteus仿真】【Arduino单片机】简易计算器设计
文章目录 一、功能简介二、软件设计三、实验现象联系作者 一、功能简介 本项目使用Proteus8仿真Arduino单片机控制器,使用PCF8574、LCD1602液晶、4*4矩阵键盘等。 主要功能: 系统运行后,操作矩阵按键可实现简单四则运算。 二、软件设计 /* …...

pychon/PIL/opencv/json学习过程中遇到的问题
1. 使用PIL.Image读取图片 注意:pytorch中对图像预处理是transforms的输入必须是PIL格式的文件,使用cv2读取的图片就按照第二条的代码处理(3通道合并、归一化处理) from PIL import Image img Image.open("test1.jpg"…...
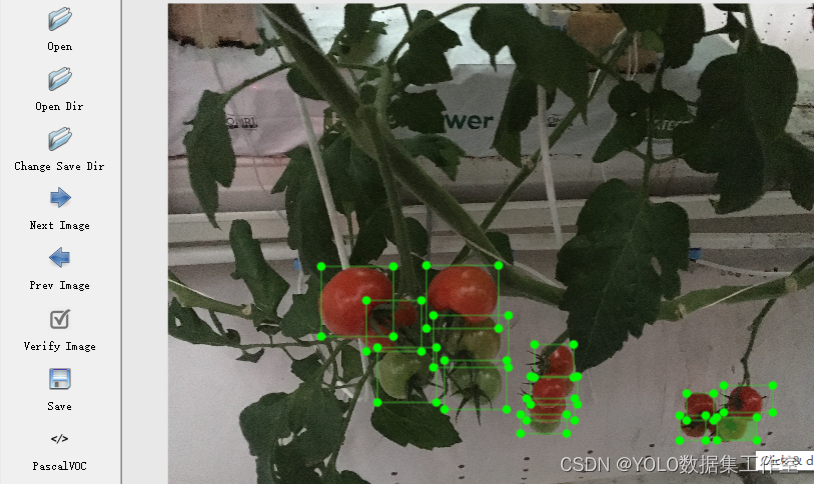
YOLO目标检测——番茄数据集下载分享【含对应voc、coco和yolo三种格式标签】
实际项目应用:番茄检测数据集说明:番茄目标检测数据集,真实场景的高质量图片数据,数据场景丰富标签说明:使用lableimg标注软件标注,标注框质量高,含voc(xml)、coco(json)和yolo(txt)三种格式标签…...
线程)
(JAVA)线程
线程的创建 方式一:Thread public class dome {public static void main(String[] args) {MyThread myThread new MyThread();myThread.start();for(int i1;i<5;i){System.out.println("主线程"i);}} }public class MyThread extends Thread{Overri…...

【深度学习环境】windows安装 NVIDIA Docker
摘要 不要安装 Docker Desktop!我们将在 Ubuntu 中自行安装 Docker。 请安装 Windows 10 Insider Build 或 Windows 11 (Beta也行)。(稳定发行版无法在 WSL 2 中使用 GPU) 请安装 WSL 2 w/Ubuntu 20.04 或同等版本。…...
)
【微信小程序】自定义组件(三)
自定义组件 插槽1、什么是插槽2、单个插槽3、定义多个插槽 父子组件之间的通信1、父子组件之间的通信的3种方式2、事件绑定3、behaviors 插槽 1、什么是插槽 在自定义组件的wxml结构中,可以提供一个<solot> 节点(插槽),用…...

Python语言:经典案例分析讲解2
例题1:文件的操作 例题2:调用函数求偶数之和 例题3:调用函数并使用递归的方法求斐波那契数前N项之和 题1: 以只写的模式打开文件test.txt,写入"Python",关闭文件。 代码如下: f open("E:/…...
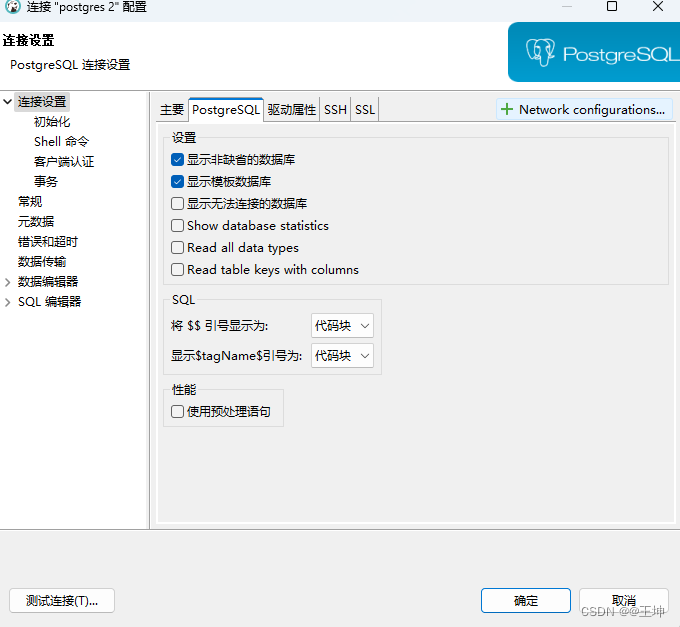
dbeaver连接别人的数据库没有表
1.概念 非缺省的数据库: 通常是指在一个数据库管理系统(DBMS)中,除了系统默认创建的数据库之外的其他用户创建或自定义的数据库。许多数据库系统在安装后会创建一个默认数据库,例如MySQL中的mysql数据库,…...
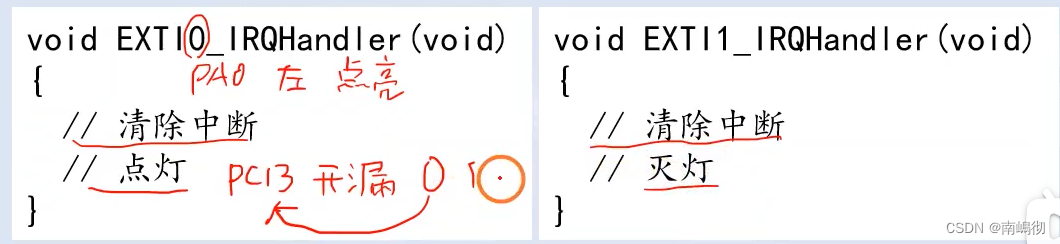
EXIT(1)
EXTI介绍 EXTI是片上外设 NVIC是cpu内的外设 回忆起之前的GPIO和AFIO 我们是如何检测按键按下的 我们是一直用while循环读取IDR寄存器的对应位置的值 一直检测判断按键是否被按下 那么是否有第二种方式检测按键是否被按下了呢? 通过EXTI 当EXTI检测到按键的电平发生…...

Qt信号量用于对共享资源进行同步
定义信号量与缓冲区: const int BufferSize 8; int buffer1[BufferSize]; int buffer2[BufferSize]; int curBuf1; //当前正在写入的Bufferint bufNo0; //采集的缓冲区序号quint8 counter0;//数据生成器QSemaphore emptyBufs(2);//信号量:空的缓冲区…...
在报错中学python something
这里写目录标题 动手学深度学习pandas完整代码数据处理TypeError: can only concatenate str (not "int") to str(fillna填补缺失值) 创建文件夹学习这个数据分组get_dummies实现one hot encode 动手学深度学习pandas完整代码 import osimpor…...

如何调用 DBMS_DISKGROUP 对 ASM 文件进行随机读取
目录 一、概述 二、实现思路与注意点 三、Java Demo 1、直接调用 2、读写异步 一、概述 对于 Oracle Rac 环境下,数据文件大多默认存放在 ASM 共享存储上,当我们需要读取 ASM 上存储的数据文件时可以使用 Oracle 提供的一些方法,比如 ASMCMD CP。但是,对于一些备份场景…...

UART学习
uart.c #include "stm32mp1xx_gpio.h" #include "stm32mp1xx_uart.h" // UART4_TX : PG11 AF6 // UART4_RX : PB2 AF8 void __uart_init() {// GPIOB2 设置为复用功能GPIOB->MODER & (~(0x3 << 4));GPIOB->MODER | (0x2 << 4);G…...

洗地机哪个牌子最好用?洗地机品牌排行榜
近年来,洗地机相当热门,洗地机结合了扫地拖地吸地为一体的多功能清洁工具,让我们告别了传统方式打扫卫生,让我们清洁不再费劲,可是市面上的洗地机五花八门,怎么挑选到一个洗地机也是一个问题,下…...

如何轻松备份你的QQ空间回忆?GetQzonehistory三步搞定完整导出
如何轻松备份你的QQ空间回忆?GetQzonehistory三步搞定完整导出 【免费下载链接】GetQzonehistory 获取QQ空间发布的历史说说 项目地址: https://gitcode.com/GitHub_Trending/ge/GetQzonehistory 你是否曾担心那些记录青春时光的QQ空间说说会随着时间消失&am…...

373. Java IO API - 文件存储属性
文章目录373. Java IO API - 文件存储属性📏 示例:检查文件存储的空间使用情况⚙️ 解释🔍 确定 MIME 类型📂 示例:获取文件 MIME 类型⚠️ 重要注意事项🛠️ 示例:自定义文件类型探测器&#x…...

TradingAgents-CN终极指南:3步搭建你的AI量化投资分析系统
TradingAgents-CN终极指南:3步搭建你的AI量化投资分析系统 【免费下载链接】TradingAgents-CN 基于多智能体LLM的中文金融交易框架 - TradingAgents中文增强版 项目地址: https://gitcode.com/GitHub_Trending/tr/TradingAgents-CN 还在为复杂的金融量化系统…...

Rust离线部署技术方案:企业级零网络依赖实施指南
Rust离线部署技术方案:企业级零网络依赖实施指南 【免费下载链接】rustup The Rust toolchain installer 项目地址: https://gitcode.com/gh_mirrors/ru/rustup 场景痛点:网络隔离环境下的Rust部署挑战 在企业内网、高安全等级环境或网络不稳定场…...

Kandinsky-5.0-I2V-Lite-5s社区作品精选:看看其他开发者创造了什么
Kandinsky-5.0-I2V-Lite-5s社区作品精选:看看其他开发者创造了什么 1. 开篇:一场视觉创意的盛宴 Kandinsky-5.0-I2V-Lite-5s作为当前最热门的开源图像转视频模型,正在全球开发者社区掀起创作热潮。短短5秒就能将静态图片转化为富有生命力的…...

OpenClaw对比测试:千问3.5-9B与其他模型在自动化任务中的表现
OpenClaw对比测试:千问3.5-9B与其他模型在自动化任务中的表现 1. 测试背景与动机 作为一个长期使用OpenClaw进行个人工作流自动化的技术爱好者,我最近遇到了一个现实问题:当需要处理复杂任务链时,不同的大模型在OpenClaw框架下的…...

如何在Windows系统上高效安装和管理Android应用:APK Installer完整指南
如何在Windows系统上高效安装和管理Android应用:APK Installer完整指南 【免费下载链接】APK-Installer An Android Application Installer for Windows 项目地址: https://gitcode.com/GitHub_Trending/ap/APK-Installer 对于需要在Windows电脑上运行Androi…...

如何完整解决Bilibili API风控限制?开发者高效应对指南
如何完整解决Bilibili API风控限制?开发者高效应对指南 【免费下载链接】bilibili-api 哔哩哔哩常用API调用。支持视频、番剧、用户、频道、音频等功能。原仓库地址:https://github.com/MoyuScript/bilibili-api 项目地址: https://gitcode.com/gh_mir…...

Simulink AUTOSAR实战:从模型信号到RTE接口的完整映射流程解析
Simulink AUTOSAR实战:从模型信号到RTE接口的完整映射流程解析 在汽车电子软件开发领域,AUTOSAR标准已经成为行业通用架构,而Simulink作为模型化开发的主流工具,如何实现两者无缝衔接是每个汽车软件工程师必须掌握的技能。本文将带…...

告别‘白边’!用HBuilderX给你的UniApp应用做个全屏SPA:安卓透明导航栏+iOS安全区域配置详解
全屏SPA美学:UniApp应用透明导航栏与安全区域配置实战指南 当你在手机上打开一个视频应用,最影响沉浸感的往往不是内容本身,而是那些挥之不去的系统UI元素——安卓底部的虚拟导航栏、iOS标志性的"刘海"安全区域。这些设计本意是为…...