OpenMMlab导出yolov3模型并用onnxruntime和tensorrt推理
导出onnx文件
直接使用脚本
import torch
from mmdet.apis import init_detector, inference_detectorconfig_file = './configs/yolo/yolov3_mobilenetv2_8xb24-ms-416-300e_coco.py'
checkpoint_file = 'yolov3_mobilenetv2_mstrain-416_300e_coco_20210718_010823-f68a07b3.pth'
model = init_detector(config_file, checkpoint_file, device='cpu')  # or device='cuda:0'
torch.onnx.export(model, (torch.zeros(1, 3, 416, 416),), "out.onnx", opset_version=11)
导出的onnx结构如下:
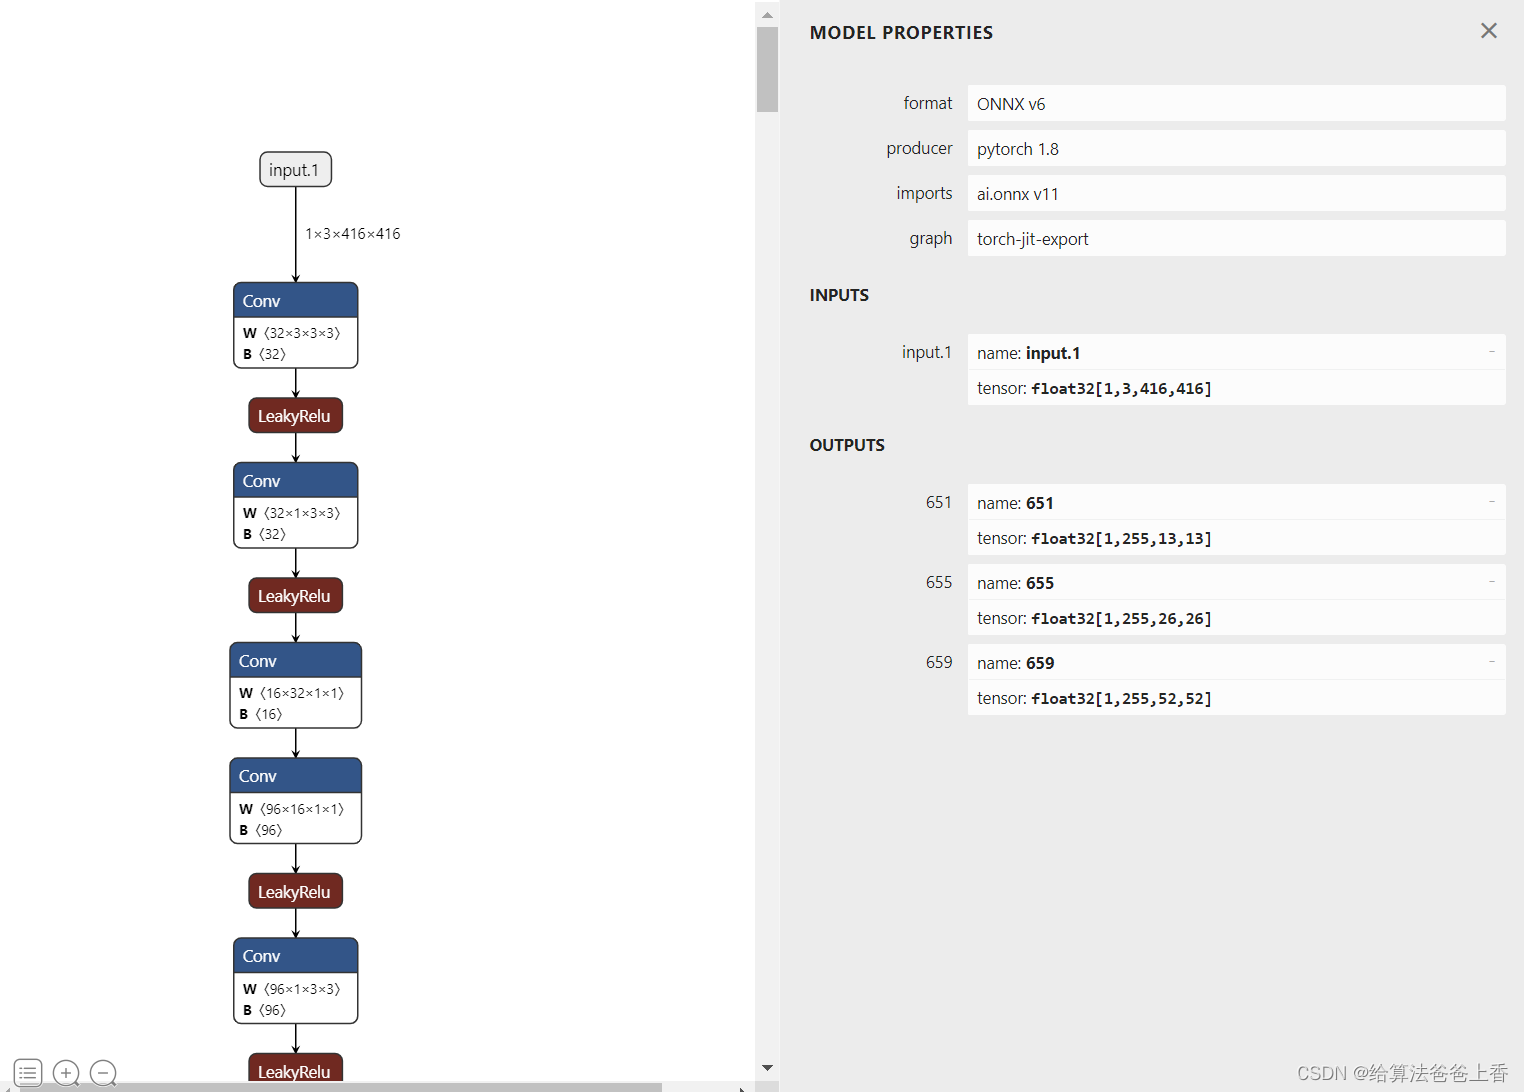
输出是包含三个不同层级检测头的输出。若需要合并检测结果,需要修改脚本如下:
import torch
from itertools import repeat
from mmdet.apis import init_detector, inference_detectorconfig_file = './configs/yolo/yolov3_mobilenetv2_8xb24-ms-416-300e_coco.py'
checkpoint_file = 'yolov3_mobilenetv2_mstrain-416_300e_coco_20210718_010823-f68a07b3.pth'
model = init_detector(config_file, checkpoint_file, device='cpu') # or device='cuda:0'class YOLOV3(torch.nn.Module):def __init__(self):super().__init__()self.model = init_detector(config_file, checkpoint_file, device='cpu')self.class_num = 80self.base_sizes = [[(116, 90), (156, 198), (373, 326)], [(30, 61), (62, 45), (59, 119)], [(10, 13), (16, 30), (33, 23)]]self.stride = [32, 16, 8]self.strides = [tuple(repeat(x, 2)) for x in self.stride]self.centers = [(x[0] / 2., x[1] / 2.) for x in self.strides]self.base_anchors=self.gen_base_anchors()def gen_base_anchors(self):multi_level_base_anchors = []for i, base_sizes_per_level in enumerate(self.base_sizes):center = self.centers[i]x_center, y_center = centerbase_anchors = []for base_size in base_sizes_per_level:w, h = base_sizebase_anchor = torch.Tensor([x_center - 0.5 * w, y_center - 0.5 * h, x_center + 0.5 * w, y_center + 0.5 * h])base_anchors.append(base_anchor)base_anchors = torch.stack(base_anchors, dim=0)multi_level_base_anchors.append(base_anchors)return multi_level_base_anchorsdef _meshgrid(self, x, y):xx = x.repeat(y.shape[0])yy = y.view(-1, 1).repeat(1, x.shape[0]).view(-1)return xx, yydef grid_priors(self, featmap_sizes):multi_level_anchors = []for i in range(len(featmap_sizes)):base_anchors = self.base_anchors[i]feat_h, feat_w = featmap_sizes[i]stride_w, stride_h = self.strides[i]shift_x = torch.arange(0, feat_w) * stride_wshift_y = torch.arange(0, feat_h) * stride_hshift_xx, shift_yy = self._meshgrid(shift_x, shift_y)shifts = torch.stack([shift_xx, shift_yy, shift_xx, shift_yy], dim=-1)anchors = base_anchors[None, :, :] + shifts[:, None, :]anchors = anchors.view(-1, 4) multi_level_anchors.append(anchors)return multi_level_anchorsdef decode(self, bboxes, pred_bboxes, stride):xy_centers = (bboxes[..., :2] + bboxes[..., 2:]) * 0.5 + (pred_bboxes[..., :2] - 0.5) * stridewhs = (bboxes[..., 2:] - bboxes[..., :2]) * 0.5 * pred_bboxes[..., 2:].exp()decoded_bboxes = torch.stack((xy_centers[..., 0] - whs[..., 0], xy_centers[..., 1] - whs[..., 1], xy_centers[..., 0] + whs[..., 0], xy_centers[..., 1] + whs[..., 1]), dim=-1)return decoded_bboxesdef forward(self, x):x = self.model.backbone(x)x = self.model.neck(x)pred_maps = self.model.bbox_head(x)flatten_preds = []flatten_strides = []for pred, stride in zip(pred_maps[0], self.stride):pred = pred.permute(0, 2, 3, 1).reshape(1, -1, 5+self.class_num)pred[..., :2] = pred[..., :2].sigmoid()flatten_preds.append(pred)flatten_strides.append(pred.new_tensor(stride).expand(pred.size(1)))flatten_preds = torch.cat(flatten_preds, dim=1)flatten_bbox_preds = flatten_preds[..., :4] flatten_objectness = flatten_preds[..., 4].sigmoid()flatten_preds[..., 4] = flatten_objectnessflatten_cls_scores = flatten_preds[..., 5:].sigmoid()flatten_preds[..., 5:] = flatten_cls_scoresfeatmap_sizes = [pred_map.shape[-2:] for pred_map in pred_maps[0]]mlvl_anchors = self.grid_priors(featmap_sizes)flatten_anchors = torch.cat(mlvl_anchors)flatten_strides = torch.cat(flatten_strides)flatten_bboxes = self.decode(flatten_anchors, flatten_bbox_preds, flatten_strides.unsqueeze(-1))flatten_preds[..., :4] = flatten_bboxesreturn flatten_predsmodel = YOLOV3().eval()
input = torch.zeros(1, 3, 416, 416, device='cpu')
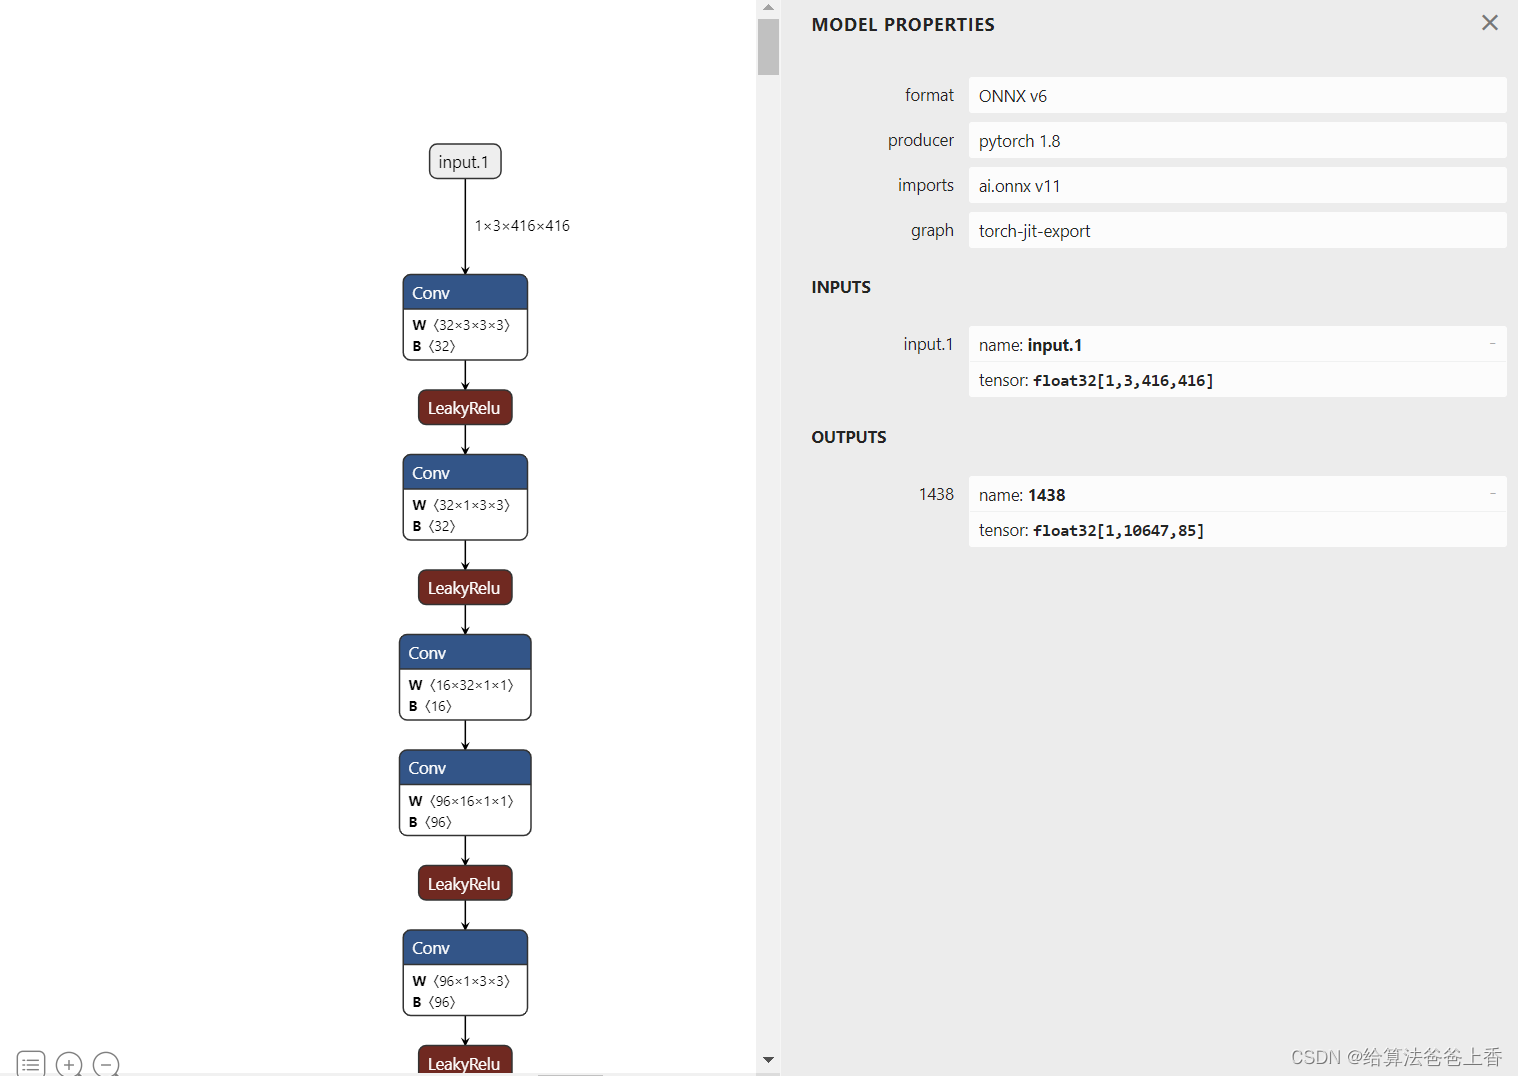
torch.onnx.export(model, input, "out.onnx", opset_version=11)
导出的onnx结构如下:
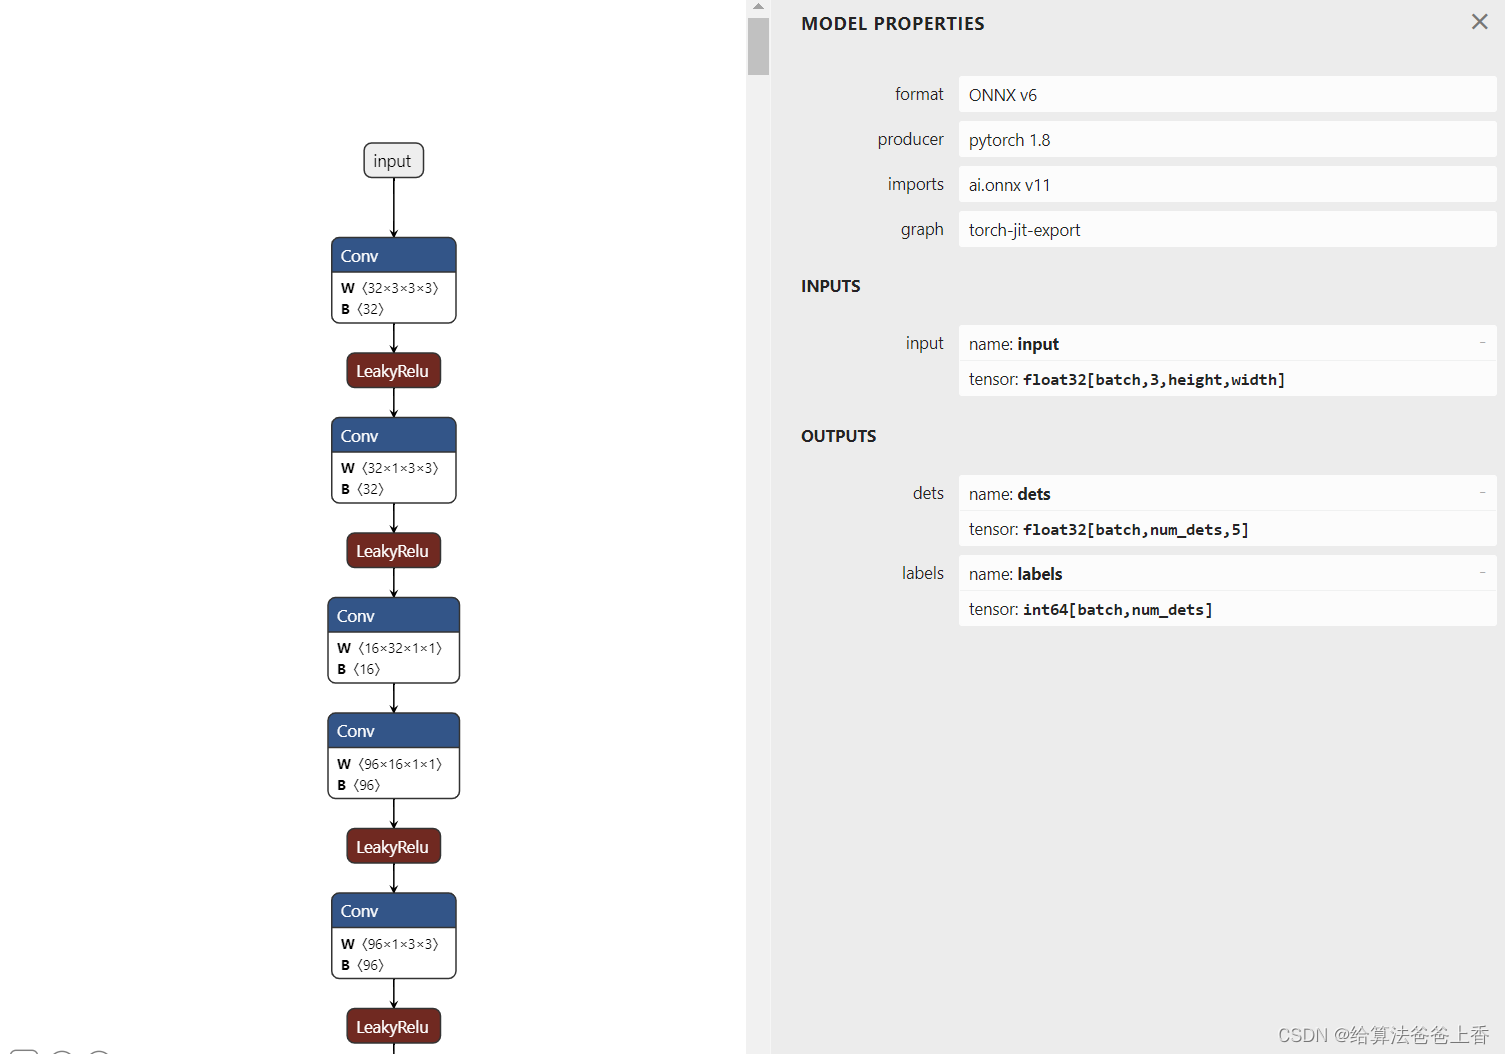
安装mmdeploy的话,可以通过下面脚本导出onnx模型。
from mmdeploy.apis import torch2onnx
from mmdeploy.backend.sdk.export_info import export2SDKimg = 'bus.jpg'
work_dir = './work_dir/onnx/yolov3'
save_file = './end2end.onnx'
deploy_cfg = 'mmdeploy/configs/mmdet/detection/detection_onnxruntime_dynamic.py'
model_cfg = 'mmdetection/configs/yolo/yolov3_mobilenetv2_8xb24-ms-416-300e_coco.py'
model_checkpoint = 'checkpoints/yolov3_mobilenetv2_mstrain-416_300e_coco_20210718_010823-f68a07b3.pth'
device = 'cpu'# 1. convert model to onnx
torch2onnx(img, work_dir, save_file, deploy_cfg, model_cfg, model_checkpoint, device)# 2. extract pipeline info for sdk use (dump-info)
export2SDK(deploy_cfg, model_cfg, work_dir, pth=model_checkpoint, device=device)
onnx模型的结构如下:
onnxruntime推理
手动导出的onnx模型使用onnxruntime推理:
import cv2
import numpy as np
import onnxruntimeCLASSES = ['person', 'bicycle', 'car', 'motorcycle', 'airplane', 'bus', 'train', 'truck', 'boat', 'traffic light','fire hydrant', 'stop sign', 'parking meter', 'bench', 'bird', 'cat', 'dog', 'horse', 'sheep', 'cow','elephant', 'bear', 'zebra', 'giraffe', 'backpack', 'umbrella', 'handbag', 'tie', 'suitcase', 'frisbee','skis', 'snowboard', 'sports ball', 'kite', 'baseball bat', 'baseball glove', 'skateboard', 'surfboard','tennis racket', 'bottle', 'wine glass', 'cup', 'fork', 'knife', 'spoon', 'bowl', 'banana', 'apple','sandwich', 'orange', 'broccoli', 'carrot', 'hot dog', 'pizza', 'donut', 'cake', 'chair', 'couch','potted plant', 'bed', 'dining table', 'toilet', 'tv', 'laptop', 'mouse', 'remote', 'keyboard', 'cell phone','microwave', 'oven', 'toaster', 'sink', 'refrigerator', 'book', 'clock', 'vase', 'scissors', 'teddy bear','hair drier', 'toothbrush'] #coco80类别
use_letterbox = True
input_shape = (416, 416)      def nms(dets, thresh):x1 = dets[:, 0]y1 = dets[:, 1]x2 = dets[:, 2]y2 = dets[:, 3]areas = (y2 - y1 + 1) * (x2 - x1 + 1)scores = dets[:, 4]keep = []index = scores.argsort()[::-1] while index.size > 0:i = index[0]keep.append(i)x11 = np.maximum(x1[i], x1[index[1:]]) y11 = np.maximum(y1[i], y1[index[1:]])x22 = np.minimum(x2[i], x2[index[1:]])y22 = np.minimum(y2[i], y2[index[1:]])w = np.maximum(0, x22 - x11 + 1)                              h = np.maximum(0, y22 - y11 + 1) overlaps = w * hious = overlaps / (areas[i] + areas[index[1:]] - overlaps)idx = np.where(ious <= thresh)[0]index = index[idx + 1]return keepdef filter_box(org_box, conf_thres, iou_thres): #过滤掉无用的框org_box = np.squeeze(org_box)conf = org_box[..., 4] > conf_thresbox = org_box[conf == True]cls_cinf = box[..., 5:]cls = []for i in range(len(cls_cinf)):cls.append(int(np.argmax(cls_cinf[i])))all_cls = list(set(cls))    output = []for i in range(len(all_cls)):curr_cls = all_cls[i]curr_cls_box = []curr_out_box = []for j in range(len(cls)):if cls[j] == curr_cls:box[j][4] *= cls_cinf[j][curr_cls]box[j][5] = curr_clscurr_cls_box.append(box[j][:6])curr_cls_box = np.array(curr_cls_box)curr_out_box = nms(curr_cls_box,iou_thres)for k in curr_out_box:output.append(curr_cls_box[k])output = np.array(output) #(4, 6)return outputdef letterbox(im, new_shape=(416, 416), color=(114, 114, 114)):# Resize and pad image while meeting stride-multiple constraintsshape = im.shape[:2]  # current shape [height, width]# Scale ratio (new / old)r = min(new_shape[0] / shape[0], new_shape[1] / shape[1])# Compute paddingnew_unpad = int(round(shape[1] * r)), int(round(shape[0] * r))    dw, dh = (new_shape[1] - new_unpad[0])/2, (new_shape[0] - new_unpad[1])/2  # wh padding top, bottom = int(round(dh - 0.1)), int(round(dh + 0.1))left, right = int(round(dw - 0.1)), int(round(dw + 0.1))if shape[::-1] != new_unpad:  # resizeim = cv2.resize(im, new_unpad, interpolation=cv2.INTER_LINEAR)im = cv2.copyMakeBorder(im, top, bottom, left, right, cv2.BORDER_CONSTANT, value=color)  # add borderreturn imdef scale_boxes(input_shape, boxes, shape):# Rescale boxes (xyxy) from input_shape to shapegain = min(input_shape[0] / shape[0], input_shape[1] / shape[1])  # gain  = old / newpad = (input_shape[1] - shape[1] * gain) / 2, (input_shape[0] - shape[0] * gain) / 2  # wh paddingboxes[..., [0, 2]] -= pad[0]  # x paddingboxes[..., [1, 3]] -= pad[1]  # y paddingboxes[..., :4] /= gainboxes[..., [0, 2]] = boxes[..., [0, 2]].clip(0, shape[1])  # x1, x2boxes[..., [1, 3]] = boxes[..., [1, 3]].clip(0, shape[0])  # y1, y2return boxesdef draw(image, box_data):box_data = scale_boxes(input_shape, box_data, image.shape)boxes = box_data[...,:4].astype(np.int32) scores = box_data[...,4]classes = box_data[...,5].astype(np.int32)for box, score, cl in zip(boxes, scores, classes):top, left, right, bottom = boxprint('class: {}, score: {}, coordinate: [{}, {}, {}, {}]'.format(CLASSES[cl], score, top, left, right, bottom))cv2.rectangle(image, (top, left), (right, bottom), (255, 0, 0), 1)cv2.putText(image, '{0} {1:.2f}'.format(CLASSES[cl], score), (top, left), cv2.FONT_HERSHEY_SIMPLEX, 0.6, (0, 0, 255), 1)if __name__=="__main__":img = cv2.imread('bus.jpg')if use_letterbox:input = letterbox(img, input_shape)else:input = cv2.resize(img, input_shape)input = input[:, :, ::-1].transpose(2, 0, 1).astype(dtype=np.float32)  #BGR2RGB和HWC2CHWinput[0,:] = (input[0,:] - 123.675) / 58.395   input[1,:] = (input[1,:] - 116.28) / 57.12input[2,:] = (input[2,:] - 103.53) / 57.375input = np.expand_dims(input, axis=0)onnx_session = onnxruntime.InferenceSession('yolov3.onnx', providers=['CPUExecutionProvider'])input_name=[]for node in onnx_session.get_inputs():input_name.append(node.name)output_name=[]for node in onnx_session.get_outputs():output_name.append(node.name)input_feed={}for name in input_name:input_feed[name] = inputpred = onnx_session.run(None, input_feed)outbox = filter_box(pred, 0.5, 0.5)draw(img, outbox)cv2.imwrite('res.jpg', img)
mmdeploy导出的onnx模型使用onnxruntime推理:
import cv2
import numpy as np
import onnxruntimeCLASSES = ['person', 'bicycle', 'car', 'motorcycle', 'airplane', 'bus', 'train', 'truck', 'boat', 'traffic light','fire hydrant', 'stop sign', 'parking meter', 'bench', 'bird', 'cat', 'dog', 'horse', 'sheep', 'cow','elephant', 'bear', 'zebra', 'giraffe', 'backpack', 'umbrella', 'handbag', 'tie', 'suitcase', 'frisbee','skis', 'snowboard', 'sports ball', 'kite', 'baseball bat', 'baseball glove', 'skateboard', 'surfboard','tennis racket', 'bottle', 'wine glass', 'cup', 'fork', 'knife', 'spoon', 'bowl', 'banana', 'apple','sandwich', 'orange', 'broccoli', 'carrot', 'hot dog', 'pizza', 'donut', 'cake', 'chair', 'couch','potted plant', 'bed', 'dining table', 'toilet', 'tv', 'laptop', 'mouse', 'remote', 'keyboard', 'cell phone','microwave', 'oven', 'toaster', 'sink', 'refrigerator', 'book', 'clock', 'vase', 'scissors', 'teddy bear','hair drier', 'toothbrush'] #coco80类别
use_letterbox = True
input_shape = (416, 416)      def filter_box(org_box, conf_thres): #删除置信度小于conf_thres的BOXflag = org_box[0][..., 4] > conf_thresbox = org_box[0][flag == True] cls = org_box[1][flag == True].reshape(-1, 1) output = np.concatenate((box, cls), axis=1)  return outputdef letterbox(im, new_shape=(416, 416), color=(114, 114, 114)):# Resize and pad image while meeting stride-multiple constraintsshape = im.shape[:2]  # current shape [height, width]# Scale ratio (new / old)r = min(new_shape[0] / shape[0], new_shape[1] / shape[1])# Compute paddingnew_unpad = int(round(shape[1] * r)), int(round(shape[0] * r))    dw, dh = (new_shape[1] - new_unpad[0])/2, (new_shape[0] - new_unpad[1])/2  # wh padding top, bottom = int(round(dh - 0.1)), int(round(dh + 0.1))left, right = int(round(dw - 0.1)), int(round(dw + 0.1))if shape[::-1] != new_unpad:  # resizeim = cv2.resize(im, new_unpad, interpolation=cv2.INTER_LINEAR)im = cv2.copyMakeBorder(im, top, bottom, left, right, cv2.BORDER_CONSTANT, value=color)  # add borderreturn imdef scale_boxes(input_shape, boxes, shape):# Rescale boxes (xyxy) from input_shape to shapegain = min(input_shape[0] / shape[0], input_shape[1] / shape[1])  # gain  = old / newpad = (input_shape[1] - shape[1] * gain) / 2, (input_shape[0] - shape[0] * gain) / 2  # wh paddingboxes[..., [0, 2]] -= pad[0]  # x paddingboxes[..., [1, 3]] -= pad[1]  # y paddingboxes[..., :4] /= gainboxes[..., [0, 2]] = boxes[..., [0, 2]].clip(0, shape[1])  # x1, x2boxes[..., [1, 3]] = boxes[..., [1, 3]].clip(0, shape[0])  # y1, y2return boxesdef draw(image, box_data):box_data = scale_boxes(input_shape, box_data, image.shape)boxes = box_data[...,:4].astype(np.int32) scores = box_data[...,4]classes = box_data[...,5].astype(np.int32)for box, score, cl in zip(boxes, scores, classes):top, left, right, bottom = boxprint('class: {}, score: {}, coordinate: [{}, {}, {}, {}]'.format(CLASSES[cl], score, top, left, right, bottom))cv2.rectangle(image, (top, left), (right, bottom), (255, 0, 0), 1)cv2.putText(image, '{0} {1:.2f}'.format(CLASSES[cl], score), (top, left), cv2.FONT_HERSHEY_SIMPLEX, 0.6, (0, 0, 255), 1)if __name__=="__main__":img = cv2.imread('bus.jpg')if use_letterbox:input = letterbox(img, input_shape)else:input = cv2.resize(img, input_shape)input = input[:, :, ::-1].transpose(2, 0, 1).astype(dtype=np.float32)  #BGR2RGB和HWC2CHWinput[0,:] = (input[0,:] - 123.675) / 58.395   input[1,:] = (input[1,:] - 116.28) / 57.12input[2,:] = (input[2,:] - 103.53) / 57.375input = np.expand_dims(input, axis=0)onnx_session = onnxruntime.InferenceSession('../work_dir/onnx/yolov3/end2end.onnx', providers=['CPUExecutionProvider'])input_name=[]for node in onnx_session.get_inputs():input_name.append(node.name)output_name=[]for node in onnx_session.get_outputs():output_name.append(node.name)input_feed={}for name in input_name:input_feed[name] = inputpred = onnx_session.run(None, input_feed)outbox = filter_box(pred, 0.5)draw(img, outbox)cv2.imwrite('res.jpg', img)
直接使用mmdeploy的api推理:
from mmdeploy.apis import inference_modelmodel_cfg = 'mmdetection/configs/yolo/yolov3_mobilenetv2_8xb24-ms-416-300e_coco.py'
deploy_cfg = 'mmdeploy/configs/mmdet/detection/detection_onnxruntime_dynamic.py'
img = 'bus.jpg'
backend_files = ['work_dir/onnx/yolov3/end2end.onnx']
device = 'cpu'result = inference_model(model_cfg, deploy_cfg, backend_files, img, device)
print(result)
或者
from mmdeploy_runtime import Detector
import cv2# 读取图片
img = cv2.imread('bus.jpg')# 创建检测器
detector = Detector(model_path='work_dir/onnx/yolov3', device_name='cpu')# 执行推理
bboxes, labels, _ = detector(img)
# 使用阈值过滤推理结果,并绘制到原图中
indices = [i for i in range(len(bboxes))]
for index, bbox, label_id in zip(indices, bboxes, labels):[left, top, right, bottom], score = bbox[0:4].astype(int),  bbox[4]if score < 0.3:continuecv2.rectangle(img, (left, top), (right, bottom), (0, 255, 0))
cv2.imwrite('output_detection.png', img)
导出engine文件
这里通过trtexec转换onnx文件,LZ的版本是TensorRT-8.2.1.8。
./trtexec.exe --onnx=yolov3.onnx --saveEngine=yolov3.engine --workspace=20480
tensorrt推理
手动导出的模型使用tensorrt推理:
import cv2
import numpy as np
import tensorrt as trt
import pycuda.autoinit
import pycuda.driver as cuda  CLASSES = ['person', 'bicycle', 'car', 'motorcycle', 'airplane', 'bus', 'train', 'truck', 'boat', 'traffic light','fire hydrant', 'stop sign', 'parking meter', 'bench', 'bird', 'cat', 'dog', 'horse', 'sheep', 'cow','elephant', 'bear', 'zebra', 'giraffe', 'backpack', 'umbrella', 'handbag', 'tie', 'suitcase', 'frisbee','skis', 'snowboard', 'sports ball', 'kite', 'baseball bat', 'baseball glove', 'skateboard', 'surfboard','tennis racket', 'bottle', 'wine glass', 'cup', 'fork', 'knife', 'spoon', 'bowl', 'banana', 'apple','sandwich', 'orange', 'broccoli', 'carrot', 'hot dog', 'pizza', 'donut', 'cake', 'chair', 'couch','potted plant', 'bed', 'dining table', 'toilet', 'tv', 'laptop', 'mouse', 'remote', 'keyboard', 'cell phone','microwave', 'oven', 'toaster', 'sink', 'refrigerator', 'book', 'clock', 'vase', 'scissors', 'teddy bear','hair drier', 'toothbrush'] #coco80类别
use_letterbox = True
input_shape = (416, 416)      def nms(dets, thresh):x1 = dets[:, 0]y1 = dets[:, 1]x2 = dets[:, 2]y2 = dets[:, 3]areas = (y2 - y1 + 1) * (x2 - x1 + 1)scores = dets[:, 4]keep = []index = scores.argsort()[::-1] while index.size > 0:i = index[0]keep.append(i)x11 = np.maximum(x1[i], x1[index[1:]]) y11 = np.maximum(y1[i], y1[index[1:]])x22 = np.minimum(x2[i], x2[index[1:]])y22 = np.minimum(y2[i], y2[index[1:]])w = np.maximum(0, x22 - x11 + 1)                              h = np.maximum(0, y22 - y11 + 1) overlaps = w * hious = overlaps / (areas[i] + areas[index[1:]] - overlaps)idx = np.where(ious <= thresh)[0]index = index[idx + 1]return keepdef filter_box(org_box, conf_thres, iou_thres): #过滤掉无用的框org_box = np.squeeze(org_box)conf = org_box[..., 4] > conf_thresbox = org_box[conf == True]cls_cinf = box[..., 5:]cls = []for i in range(len(cls_cinf)):cls.append(int(np.argmax(cls_cinf[i])))all_cls = list(set(cls))    output = []for i in range(len(all_cls)):curr_cls = all_cls[i]curr_cls_box = []curr_out_box = []for j in range(len(cls)):if cls[j] == curr_cls:box[j][4] *= cls_cinf[j][curr_cls]box[j][5] = curr_clscurr_cls_box.append(box[j][:6])curr_cls_box = np.array(curr_cls_box)curr_out_box = nms(curr_cls_box,iou_thres)for k in curr_out_box:output.append(curr_cls_box[k])output = np.array(output) #(4, 6)return outputdef letterbox(im, new_shape=(416, 416), color=(114, 114, 114)):# Resize and pad image while meeting stride-multiple constraintsshape = im.shape[:2]  # current shape [height, width]# Scale ratio (new / old)r = min(new_shape[0] / shape[0], new_shape[1] / shape[1])# Compute paddingnew_unpad = int(round(shape[1] * r)), int(round(shape[0] * r))    dw, dh = (new_shape[1] - new_unpad[0])/2, (new_shape[0] - new_unpad[1])/2  # wh padding top, bottom = int(round(dh - 0.1)), int(round(dh + 0.1))left, right = int(round(dw - 0.1)), int(round(dw + 0.1))if shape[::-1] != new_unpad:  # resizeim = cv2.resize(im, new_unpad, interpolation=cv2.INTER_LINEAR)im = cv2.copyMakeBorder(im, top, bottom, left, right, cv2.BORDER_CONSTANT, value=color)  # add borderreturn imdef scale_boxes(input_shape, boxes, shape):# Rescale boxes (xyxy) from input_shape to shapegain = min(input_shape[0] / shape[0], input_shape[1] / shape[1])  # gain  = old / newpad = (input_shape[1] - shape[1] * gain) / 2, (input_shape[0] - shape[0] * gain) / 2  # wh paddingboxes[..., [0, 2]] -= pad[0]  # x paddingboxes[..., [1, 3]] -= pad[1]  # y paddingboxes[..., :4] /= gainboxes[..., [0, 2]] = boxes[..., [0, 2]].clip(0, shape[1])  # x1, x2boxes[..., [1, 3]] = boxes[..., [1, 3]].clip(0, shape[0])  # y1, y2return boxesdef draw(image, box_data):box_data = scale_boxes(input_shape, box_data, image.shape)boxes = box_data[...,:4].astype(np.int32) scores = box_data[...,4]classes = box_data[...,5].astype(np.int32)for box, score, cl in zip(boxes, scores, classes):top, left, right, bottom = boxprint('class: {}, score: {}, coordinate: [{}, {}, {}, {}]'.format(CLASSES[cl], score, top, left, right, bottom))cv2.rectangle(image, (top, left), (right, bottom), (255, 0, 0), 1)cv2.putText(image, '{0} {1:.2f}'.format(CLASSES[cl], score), (top, left), cv2.FONT_HERSHEY_SIMPLEX, 0.6, (0, 0, 255), 1)if __name__=="__main__":logger = trt.Logger(trt.Logger.WARNING)with open("yolov3.engine", "rb") as f, trt.Runtime(logger) as runtime:engine = runtime.deserialize_cuda_engine(f.read())context = engine.create_execution_context()h_input = cuda.pagelocked_empty(trt.volume(context.get_binding_shape(0)), dtype=np.float32)h_output = cuda.pagelocked_empty(trt.volume(context.get_binding_shape(1)), dtype=np.float32)d_input = cuda.mem_alloc(h_input.nbytes)d_output = cuda.mem_alloc(h_output.nbytes)stream = cuda.Stream()img = cv2.imread('bus.jpg')if use_letterbox:input = letterbox(img, input_shape)else:input = cv2.resize(img, input_shape)input = input[:, :, ::-1].transpose(2, 0, 1).astype(dtype=np.float32)  #BGR2RGB和HWC2CHWinput[0,:] = (input[0,:] - 123.675) / 58.395   input[1,:] = (input[1,:] - 116.28) / 57.12input[2,:] = (input[2,:] - 103.53) / 57.375input = np.expand_dims(input, axis=0) np.copyto(h_input, input.ravel())with engine.create_execution_context() as context:cuda.memcpy_htod_async(d_input, h_input, stream)context.execute_async_v2(bindings=[int(d_input), int(d_output)], stream_handle=stream.handle)cuda.memcpy_dtoh_async(h_output, d_output, stream)stream.synchronize()  pred = h_output.reshape(1, 10647, 85) outbox = filter_box(pred, 0.5, 0.5)draw(img, outbox)cv2.imwrite('res.jpg', img)
使用mmdeploy的api推理:
from mmdeploy.apis import inference_modelmodel_cfg ='mmdetection/configs/yolo/yolov3_mobilenetv2_8xb24-ms-416-300e_coco.py'
deploy_cfg = 'mmdeploy/configs/mmdet/detection/detection_tensorrt_static-320x320.py'
img = 'bus.jpg'
backend_files = ['work_dir/trt/yolov3/end2end.engine']
device = 'cuda'result = inference_model(model_cfg, deploy_cfg, backend_files, img, device)
print(result)
或者
from mmdeploy_runtime import Detector
import cv2# 读取图片
img = cv2.imread('bus.jpg')# 创建检测器
detector = Detector(model_path='work_dir/trt/yolox', device_name='cuda')# 执行推理
bboxes, labels, _ = detector(img)
# 使用阈值过滤推理结果,并绘制到原图中
indices = [i for i in range(len(bboxes))]
for index, bbox, label_id in zip(indices, bboxes, labels):[left, top, right, bottom], score = bbox[0:4].astype(int),  bbox[4]if score < 0.3:continuecv2.rectangle(img, (left, top), (right, bottom), (0, 255, 0))
cv2.imwrite('output_detection.png', img)
相关文章:
OpenMMlab导出yolov3模型并用onnxruntime和tensorrt推理
导出onnx文件 直接使用脚本 import torch from mmdet.apis import init_detector, inference_detectorconfig_file ./configs/yolo/yolov3_mobilenetv2_8xb24-ms-416-300e_coco.py checkpoint_file yolov3_mobilenetv2_mstrain-416_300e_coco_20210718_010823-f68a07b3.pth…...

单链表的插入删除
#include <iostream>#include <stdio.h> #include <stdlib.h>using namespace std;//带头指针的单链表typedef struct LNode{int data;struct LNode *next;}LNode, *LinkList;bool InitList(LinkList &L){L (LNode *) malloc(sizeof(LNode));if(L NUL…...
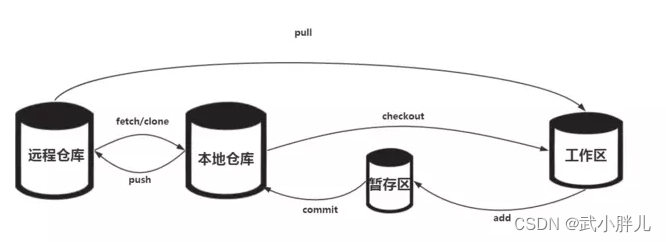
github使用手册
核心代码 配置用户名/邮箱 best practice git init #在本地初始化一个仓库 git add . #将当前目录所有的文件加入(注意这里是加入)到缓存区 git commit -m "xxx" #将当前缓存区里的内容提交到本地仓库 git remote add <remote_rep_name&g…...

怎样做ChatGPT应用开发?
要开发一个基于ChatGPT的应用,你可以按照以下步骤进行: 步骤1:了解ChatGPT API ChatGPT的使用通常通过API进行。你需要了解ChatGPT的API文档,包括如何进行请求、API端点、身份验证等信息。在开发之前,确保你已经获取了…...
漏洞-任意账号注册
一漏洞介绍 1.未验证邮箱/手机号 情景:应用为了方便用户记录用户名,使用邮箱和手机号作为用户名(因此很多应用在注册的时候就要求用户填写,多数时候都会给用户发送激活信息,激活后才能登录) 缺陷ÿ…...
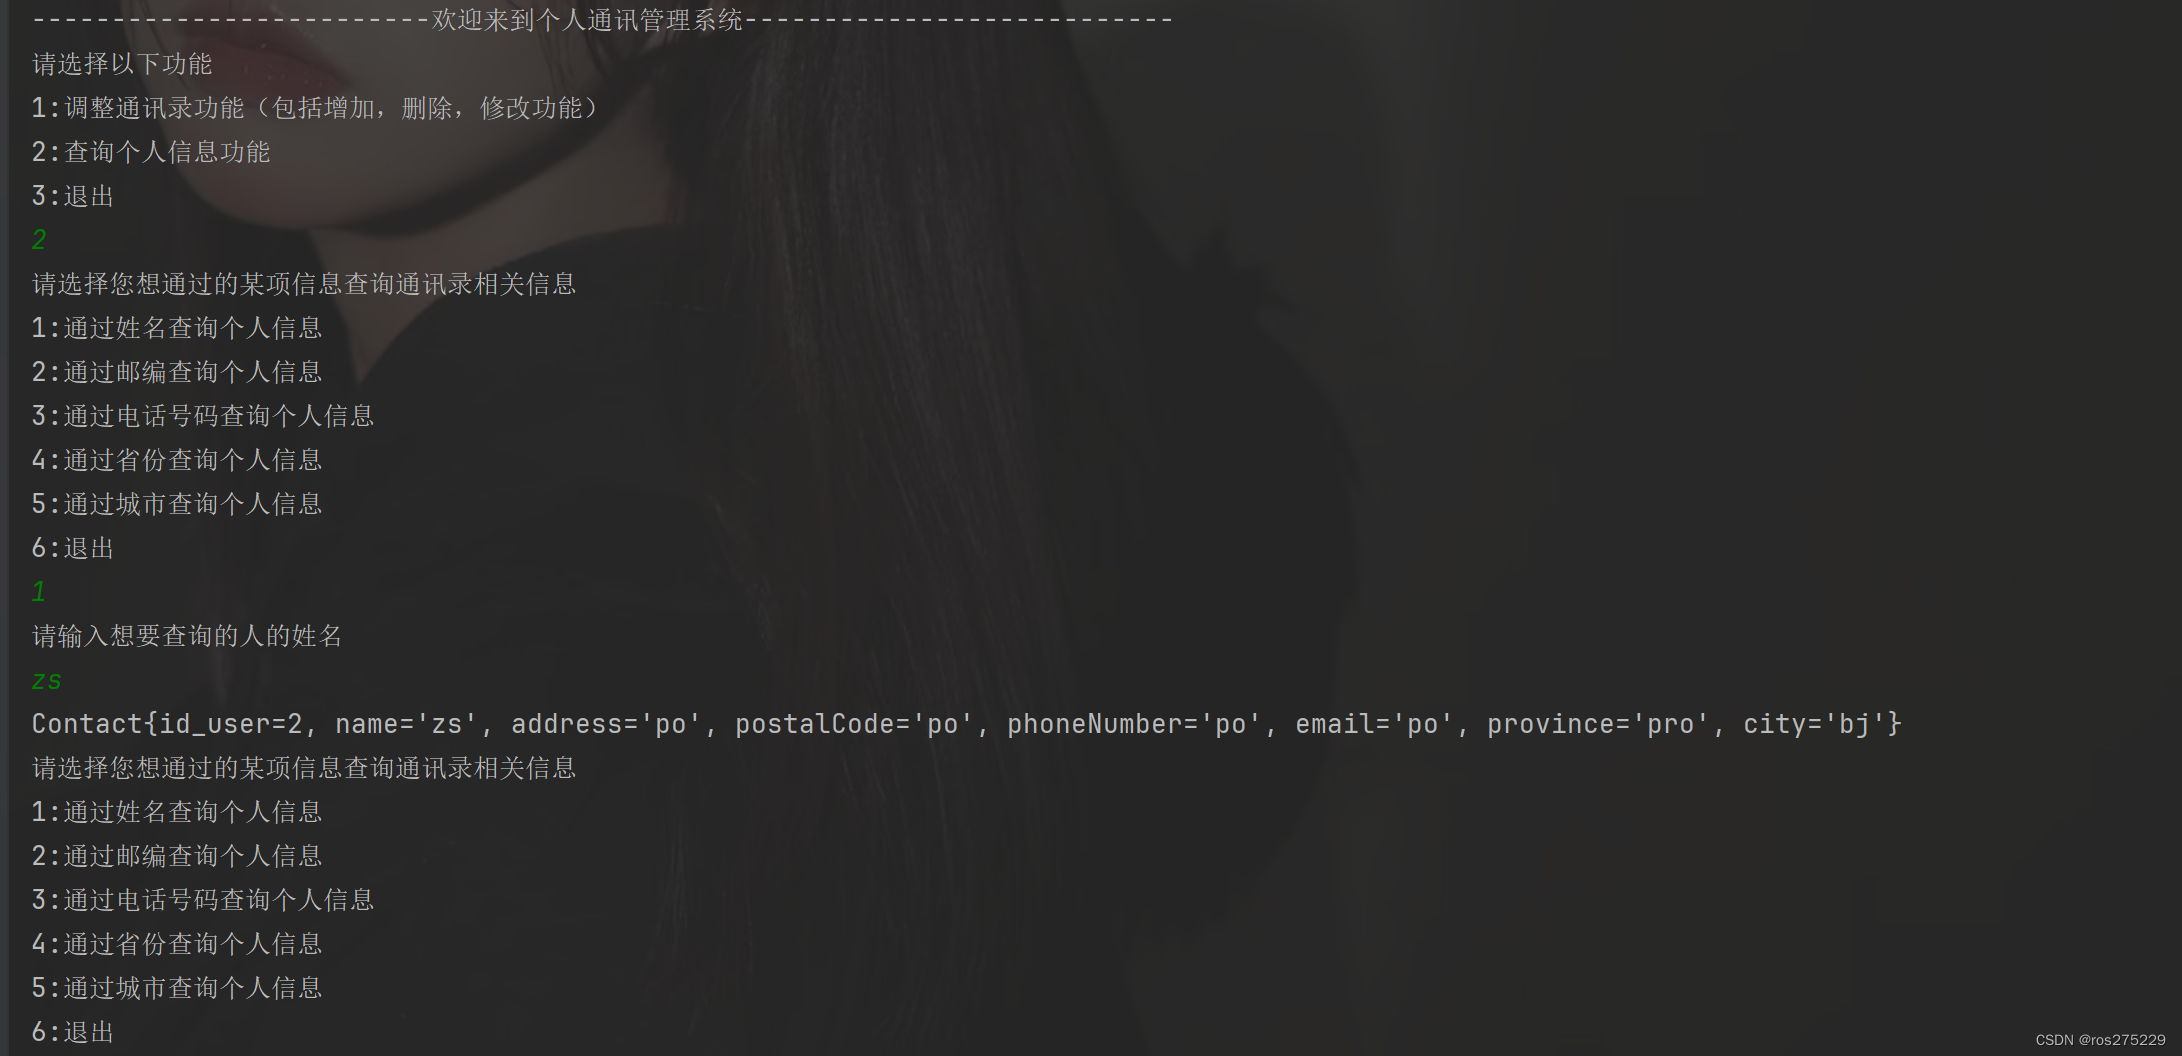
一个关于jdbc操作mysql和java基础练手的通讯录管理系统小项目
首先 : 整个项目的项目结构为 : 1.第一步先导入数据库的驱动,我的mysql数据库是8.0以上版本,然后导入的驱动就是8.0.16版本的jar包; 1.JdbcBase : JDBC基础操作封装成了JdbcBase类,在里面先静态定义了数据库连接对象和DQL查询结果&#x…...

C++用条件变量实现线程安全的queue容器
#include <queue> #include <memory> #include <mutex> #include <condition_variable> template<typename T> class threadsafe_queue { private:mutable std::mutex mut; // 1 互斥量必须是可变的 std::queue<T> data_queue;std::condi…...

EDA实验-----3-8译码器设计(QuartusII)
目录 一. 实验目的 二. 实验仪器 三. 实验原理及内容 1.实验原理 2.实验内容 四.实验步骤 五. 实验报告 六. 注意事项 七. 实验过程 1.创建Verilog文件,写代码 编辑 2.波形仿真 3.连接电路图 4.烧录操作 一. 实验目的 学会Verilog HDL的…...

NFTScan | 11.06~11.12 NFT 市场热点汇总
欢迎来到由 NFT 基础设施 NFTScan 出品的 NFT 生态热点事件每周汇总。 周期:2023.11.06~ 2023.11.12 NFT Hot News 01/ 《辛普森一家》提及 NFT 及区块链,相关 NFT 地板价涨至 0.35 ETH 11 月 6 日,据 Coindesk 报道,美国时间周…...

2022年12月 Python(五级)真题解析#中国电子学会#全国青少年软件编程等级考试
Python等级考试(1~6级)全部真题・点这里 一、单选题(共25题,每题2分,共50分) 第1题 下面哪个语句正确定义了元组类型数据tuple1?( ) A: tuple1=[“张三”,“李四”,“王五”] B: tuple1=(“张三”;“李四”;“王五”) C: tuple1=(张三,李四,王五) D: tuple1=(“张三…...

第三章 将对象映射到 XML - 使用列表或数组定义的属性
文章目录 第三章 将对象映射到 XML - 使用列表或数组定义的属性使用列表或数组定义的属性%ListOfDataTypes 或 %ArrayOfDataTypes 类型的属性%ListOfObjects 或 %ArrayOfObjects 类型的属性 第三章 将对象映射到 XML - 使用列表或数组定义的属性 使用列表或数组定义的属性 对…...
)
C/S架构学习之基于TCP的本地通信(客户机)
基于TCP的本地通信(客户机):创建流程:一、创建字节流式套接字(socket函数): int sock_fd socket(AF_LOCAL,SOCK_STREAM,0);二、创建客户机和服务器的本地网络信息结构体并填充客户机和服务器本…...

CCF 备忘
一、不错的网站 CCF CCSP 竞赛历年资料 官网 http://118.190.20.162/home.page 二、基础套路 循环输入 数组标记法(数组下标-数值 的映射) 两个矩阵相乘 map<long long, map<long long, long long> > ans; for(int i1;i<d;i){for(int…...
Spring Framework中的依赖注入:构造器注入 vs. Setter注入
前言 构造器注入和Setter注入是依赖注入(Dependency Injection,DI)中两种常见的方式,用于向一个对象注入其所依赖的其他对象或数值。这两种注入方式有各自的特点和用途。 构造器注入(Constructor Injectionÿ…...
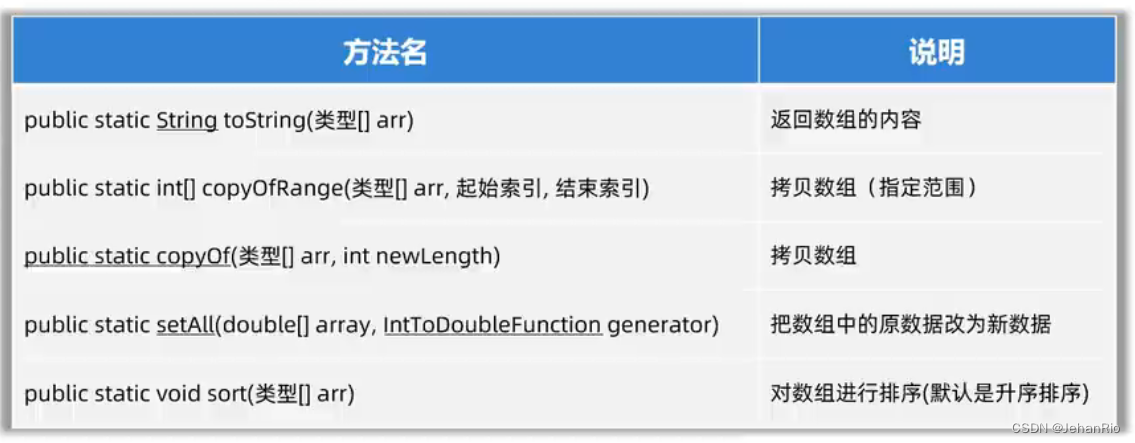
Java学习之路 —— API篇
文章目录 前言Object类2. Objects类3. 包装类4. StringBuilder和StringBuffer5. StringJoiner6. Math7. System8. JDK8开始新增的日期、时间9. Arrays10. Lambda表达式11. 方法引用 前言 其实转语言来说,语法都比较简单,花个三天就会了,但最…...
Windows下安装Anaconda5.3.1+Python3.8+TensorFlow2.13.0-CPU版本总结
Python3.8安装可以参考博文https://janus.blog.csdn.net/article/details/55274849 进行安装即可。 【1】Anaconda 清华的开源软件镜像站:https://mirrors.tuna.tsinghua.edu.cn/anaconda/archive/下载,这里选择的是5.3.1版本。 然后正常安装就可以&am…...

DigitalVirt 日本 Lite VPS 测评
发布于 2023-07-18 在 https://chenhaotian.top/vps/digitalvirt-jp-lite/ 官网链接(含AFF):https://digitalvirt.com/aff.php?aff459 日本 软银 CMI,联通首选。 流媒体解锁很好,详见测试。 注意,测速…...
Ridgeline plot / 远山图 / 山脊图 怎么画?怎么优化?
工具 Origin 2022 当然,用Matlab、Python也是可以的。 颜色配置 色卡调整...
【STM32/FreeRTOS】SysTick定时器及FreeRTOS系统节拍
目录 一、SysTick定时器 1、SysTick寄存器介绍 (1)控制及状态寄存器 (2)重装载数值寄存器 (3)当前数值寄存器 2、SysTick寄存器配置函数 二、FreeRTOS中的SysTick定时器 1、SysTick配置函数及分析 …...
Vue3封装自定义指令+h()
官方install介绍 directive/myDir/index.js 定义指令 import { h, render, ref } from "vue"; const vMyDir {mounted(el, binding) {renderElement(el, binding);}, }; // inserted是Vue2的生命周期钩子,所以在Vue3项目中要使用mounted const renderEl…...

Unity-MCP协议:可嵌入、可协商的AI上下文通信标准
1. 这不是又一个“AI插件”,而是Unity开发工作流的底层重定义你有没有过这样的时刻:在Unity里反复调整Animator Controller的过渡条件,只为让角色转身动画不穿模;写完一段NavMesh寻路逻辑,却要花两小时调试Agent卡在斜…...

Hirschmann RS20-0800M4M4SDAE工业以太网交换机
Hirschmann RS20-0800M4M4SDAE 工业以太网交换机产品特点:端口配置:共8个端口,含6个RJ45电口和2个ST光纤接口。端口速率:所有端口均为100Mbps快速以太网。光纤类型:2个光纤端口为多模、ST接头。管理类型:二…...

从RD、CS到WK:一文讲透SAR主流成像算法的演进与选型实战
从RD、CS到WK:SAR成像算法选型实战指南 当无人机掠过灾区上空,或卫星扫描地球表面时,合成孔径雷达(SAR)正通过电磁波穿透云层和黑暗,将地面信息转化为高分辨率图像。而决定图像质量的关键,在于工…...

3大实战秘籍:揭秘raylib如何让游戏开发像搭积木一样简单
3大实战秘籍:揭秘raylib如何让游戏开发像搭积木一样简单 【免费下载链接】raylib A simple and easy-to-use library to enjoy videogames programming 项目地址: https://gitcode.com/GitHub_Trending/ra/raylib 你是否曾经被复杂的游戏引擎配置搞得焦头烂额…...

AI率总超标?2026年AI写作辅助网站排行榜权威发布,轻松定稿不是梦!
写论文效率低、熬夜赶稿、查重不过关?别慌!2026 年最新 AI 论文写作工具合集来了,覆盖选题、大纲、初稿、润色、降重、格式、文献引用全流程,帮你精准匹配最适合的学术助手,彻底告别论文内耗!🏆…...

利用 Taotoken 多模型能力为智能客服场景提供备份路由
🚀 告别海外账号与网络限制!稳定直连全球优质大模型,限时半价接入中。 👉 点击领取海量免费额度 利用 Taotoken 多模型能力为智能客服场景提供备份路由 智能客服系统是许多企业与用户交互的关键入口,其响应能力和服务…...

LeagueAkari:基于LCU接口的英雄联盟客户端自动化工具深度解析
LeagueAkari:基于LCU接口的英雄联盟客户端自动化工具深度解析 【免费下载链接】League-Toolkit An all-in-one toolkit for LeagueClient. Gathering power 🚀. 项目地址: https://gitcode.com/gh_mirrors/le/League-Toolkit 功能模块架构与核心技…...
)
大模型测试新范式:Claude端到端验证的5层断言体系(语义一致性/上下文连贯性/安全边界/成本阈值/时序鲁棒性)
更多请点击: https://codechina.net 第一章:大模型测试新范式:Claude端到端验证的5层断言体系(语义一致性/上下文连贯性/安全边界/成本阈值/时序鲁棒性) 传统LLM测试常聚焦于准确率或BLEU等静态指标,而Cla…...

MFCC与可解释机器学习:构建可解释的L2发音AI诊断系统
1. 项目概述:当语音技术遇见二语教学 作为一名在语音技术和教育技术交叉领域摸爬滚打了十多年的从业者,我常常思考一个问题:我们能用算法“听”出一个人说外语时,他的母语口音吗?更进一步,我们能否不仅“听…...
如何在macOS上免费安装HSTracker:终极炉石传说套牌追踪器完整指南
如何在macOS上免费安装HSTracker:终极炉石传说套牌追踪器完整指南 【免费下载链接】HSTracker A deck tracker and deck manager for Hearthstone on macOS 项目地址: https://gitcode.com/gh_mirrors/hs/HSTracker 还在为炉石传说对局中记不住对手出牌而烦恼…...