OnlyOffice验证(二)在Centos7上部署OnlyOffice编译结果
在Centos7上部署OnlyOffice编译结果
此处将尝试将OnlyOffice验证(一)DocumentServer编译验证的结果部署到Centos7上。并且使用其它服务器现有的RabbitMq和Mysql。
安装Nginx
先安装Nginx需要的依赖环境:
yum install openssl* -y
yum install ncurses-devel -y
先下载Nginx资源包:
[root@test nginx]# pwd
/usr/local/nginx
[root@test nginx]# ll
总用量 1052
-rw-r--r--. 1 root root 1073948 2月  24 09:25 nginx-1.22.1.tar.gz
[root@test nginx]# tar -zxvf nginx-1.22.1.tar.gz
解压后目录结构如下(目录为:/usr/local/nginx/nginx-1.22.1):
[root@test nginx]# ll
总用量 1052
drwxr-xr-x. 8 1001 1001     158 10月 19 16:02 nginx-1.22.1
-rw-r--r--. 1 root root 1073948 2月  24 09:25 nginx-1.22.1.tar.gz
[root@test nginx]# cd nginx-1.22.1
[root@test nginx-1.22.1]# ll
总用量 804
drwxr-xr-x. 6 1001 1001   4096 2月  24 09:34 auto
-rw-r--r--. 1 1001 1001 317399 10月 19 16:02 CHANGES
-rw-r--r--. 1 1001 1001 485035 10月 19 16:02 CHANGES.ru
drwxr-xr-x. 2 1001 1001    168 2月  24 09:34 conf
-rwxr-xr-x. 1 1001 1001   2590 10月 19 16:02 configure
drwxr-xr-x. 4 1001 1001     72 2月  24 09:34 contrib
drwxr-xr-x. 2 1001 1001     40 2月  24 09:34 html
-rw-r--r--. 1 1001 1001   1397 10月 19 16:02 LICENSE
drwxr-xr-x. 2 1001 1001     21 2月  24 09:34 man
-rw-r--r--. 1 1001 1001     49 10月 19 16:02 README
drwxr-xr-x. 9 1001 1001     91 2月  24 09:34 src
开始安装
./configure && make
切换目录到/usr/local/nginx,如果没有新的文件回到安装目录再执行一下:
make install
最终目录结构应该和下面差不多:
[root@test nginx-1.22.1]# pwd
/usr/local/nginx/nginx-1.22.1
[root@test nginx-1.22.1]# cd ../
[root@test nginx]# ll
总用量 1056
drwxr-xr-x. 2 root root    4096 2月  24 09:45 conf
drwxr-xr-x. 2 root root      40 2月  24 09:45 html
drwxr-xr-x. 2 root root       6 2月  24 09:45 logs
drwxr-xr-x. 9 1001 1001     186 2月  24 09:43 nginx-1.22.1
-rw-r--r--. 1 root root 1073948 2月  24 09:25 nginx-1.22.1.tar.gz
drwxr-xr-x. 2 root root      19 2月  24 09:45 sbin
切换目录到sbin,启动Nginx:
[root@test nginx]# cd sbin/
[root@test sbin]# pwd
/usr/local/nginx/sbin
[root@test sbin]# ./nginx
[root@test sbin]#
当前虚拟机配的IP是192.168.95.131,访问http://192.168.95.131:80/(端口可以不用写):

配置自启服务,此处不重要可以略过。这里先关闭Nginx:
[root@test sbin]# pwd
/usr/local/nginx/sbin
[root@test sbin]# ./nginx -s stop
[root@test sbin]#
创建一个系统服务配置文件
[root@test sbin]# pwd
/usr/local/nginx/sbin
[root@test sbin]# vim nginx.service
[root@test sbin]# cat nginx.service
[Unit]
Description=nginx service
After=network.target[Service]
Type=forking
ExecStart=/usr/local/nginx/sbin/nginx
ExecReload=/usr/local/nginx/sbin/nginx -s reload
ExecStop=/usr/local/nginx/sbin/nginx -s stop
WorkingDirectory=/usr/local/nginx/sbin
PrivateTmp=true[Install]
WantedBy=multi-user.target
创建软连接,随后重新加载服务配置
[root@test sbin]# ln -s /usr/local/nginx/sbin/nginx.service /usr/lib/systemd/system/nginx.service
[root@test sbin]# systemctl daemon-reload
接下来使用systemctl start nginx来启动Nginx
[root@test sbin]# systemctl start nginx
[root@test sbin]# systemctl status nginx
● nginx.service - nginx serviceLoaded: loaded (/usr/local/nginx/sbin/nginx.service; disabled; vendor preset: disabled)Active: active (running) since 五 2023-02-24 10:18:52 CST; 1s agoProcess: 35348 ExecStart=/usr/local/nginx/sbin/nginx (code=exited, status=0/SUCCESS)Main PID: 35349 (nginx)Memory: 952.0KCGroup: /system.slice/nginx.service├─35349 nginx: master process /usr/local/nginx/sbin/nginx└─35350 nginx: worker process2月 24 10:18:52 test systemd[1]: Starting nginx service...
2月 24 10:18:52 test systemd[1]: Started nginx service.
配置自启,重启服务器验证即可
[root@test sbin]# systemctl enable nginx
Created symlink from /etc/systemd/system/multi-user.target.wants/nginx.service to /usr/local/nginx/sbin/nginx.service.
Created symlink from /etc/systemd/system/nginx.service to /usr/local/nginx/sbin/nginx.service.
资源准备
Ubuntu虚拟机资源准备
此处先将安装资源准备一下,将之前编译好的documentserver打个压缩包。然后将资源传到Centos7上。
root@t16:/opt/build_master/build_tools/out/linux_64/onlyoffice# tar -zcvf documentserver.tar.gz documentserver
root@t16:/opt/build_master/build_tools/out/linux_64/onlyoffice# pwd
/opt/build_master/build_tools/out/linux_64/onlyoffice
root@t16:/opt/build_master/build_tools/out/linux_64/onlyoffice# ll
总用量 822728
drwxr-xr-x  5 root root      4096 2月  24 10:35 ./
drwxr-xr-x  3 root root      4096 2月  19 23:26 ../
drwxr-xr-x 10 root root      4096 2月  23 14:00 documentserver/
drwxr-xr-x  3 root root      4096 2月  23 13:56 documentserver-example/
drwxr-xr-x  3 root root      4096 2月  19 23:27 documentserver-snap/
-rw-r--r--  1 root root 842447109 2月  24 10:36 documentserver.tar.gz
将压缩文件传到目标Centos7上
root@t16:/opt/build_master/build_tools/out/linux_64/onlyoffice# scp documentserver.tar.gz root@192.168.95.131:/usr/local/nginx/html
The authenticity of host '192.168.95.131 (192.168.95.131)' can't be established.
ECDSA key fingerprint is SHA256:P8yATBEzmZX9B7VcnUT6yYWDksUcNMdapeO4alDUYSw.
Are you sure you want to continue connecting (yes/no)? yes
Warning: Permanently added '192.168.95.131' (ECDSA) to the list of known hosts.
root@192.168.95.131's password:
documentserver.tar.gz                                                                                                100%  803MB 160.7MB/s   00:05
root@t16:/opt/build_master/build_tools/out/linux_64/onlyoffice#
Centos7虚拟机资源准备
在上一步将安装资源打压缩包,传到了Centos7中的/usr/local/nginx/html目录
[root@test html]# pwd
/usr/local/nginx/html
[root@test html]# ll -h
总用量 804M
-rw-r--r--. 1 root root  497 2月  24 09:45 50x.html
-rw-r--r--. 1 root root 804M 2月  24 10:40 documentserver.tar.gz
-rw-r--r--. 1 root root  615 2月  24 09:45 index.html
解压资源
[root@test html]# tar -zxvf documentserver.tar.gz
[root@test html]# pwd
/usr/local/nginx/html
[root@test html]# ll
总用量 822712
-rw-r--r--.  1 root root       497 2月  24 09:45 50x.html
drwxr-xr-x. 10 root root       147 2月  23 14:00 documentserver
-rw-r--r--.  1 root root 842447109 2月  24 10:40 documentserver.tar.gz
-rw-r--r--.  1 root root       615 2月  24 09:45 index.html
修改启动配置,切换目录到/usr/local/nginx/html/documentserver/server/Common/config。修改development-linux.json配置文件,此处只保留了修改的配置内容。分别是RabbitMQ连接、欢迎页、Mysql数据库连接和文件上传大小。
{"rabbitmq": {"url": "amqp://test:123456@192.168.95.130:5672"}, "services": {"CoAuthoring": {"server": {"static_content": {"/welcome": {"path": "../../server/welcome"}}},"sql": {"type": "mysql","dbHost": "192.168.95.130","dbPort": "3306","dbName": "onlyoffice","dbUser": "root","dbPass": "123456"} }},"FileConverter": {"converter": {"maxDownloadBytes": "524288000"}}
}
※RabbitMQ注意默认用户只能本机访问,注意提前配置好用户权限
※Mysql表创建脚本在目录/usr/local/nginx/html/documentserver/server/schema/mysql中,提前创建数据库执行createdb.sql脚本
[root@test mysql]# pwd
/usr/local/nginx/html/documentserver/server/schema/mysql
[root@test mysql]# ll
总用量 12
-rwxrwxrwx. 1 root root 3125 2月  19 19:44 createdb.sql
-rwxrwxrwx. 1 root root   35 2月  19 19:44 removedb.sql
-rwxrwxrwx. 1 root root  146 2月  19 19:44 removetbl.sql
drwxrwxrwx. 2 root root   98 2月  19 19:44 upgrade
功能测试验证
启动转换服务:
[root@test FileConverter]# pwd
/usr/local/nginx/html/documentserver/server/FileConverter
[root@test FileConverter]# LD_LIBRARY_PATH=$PWD/bin \
> NODE_ENV=development-linux \
> NODE_CONFIG_DIR=$PWD/../Common/config \
> ./converter
[2023-02-24T14:21:50.564] [WARN] [localhost] [docId] [userId] nodeJS - update cluster with 1 workers
[2023-02-24T14:21:50.572] [WARN] [localhost] [docId] [userId] nodeJS - worker 112277 started.
[2023-02-24T14:21:50.575] [WARN] [localhost] [docId] [userId] nodeJS - update cluster with 1 workers
[2023-02-24T14:21:51.170] [DEBUG] [localhost] [docId] [userId] nodeJS - [AMQP] connected
启动文档服务:
[root@test DocService]# NODE_ENV=development-linux \
> NODE_CONFIG_DIR=$PWD/../Common/config \
> ./docservice
[2023-02-24T14:22:26.774] [WARN] [localhost] [docId] [userId] nodeJS - Express server starting...
[2023-02-24T14:22:26.775] [WARN] [localhost] [docId] [userId] nodeJS - Set services.CoAuthoring.token.enable.browser, services.CoAuthoring.token.enable.request.inbox, services.CoAuthoring.token.enable.request.outbox in the Document Server config to prevent an unauthorized access to your documents and the substitution of important parameters in ONLYOFFICE Document Server requests.
[2023-02-24T14:22:26.775] [INFO] [localhost] [docId] [userId] nodeJS - End updateLicense
[2023-02-24T14:22:26.777] [WARN] [localhost] [docId] [userId] nodeJS - Failed to subscribe to plugin folder updates. When changing the list of plugins, you must restart the server. https://nodejs.org/docs/latest/api/fs.html#fs_availability
[2023-02-24T14:22:26.780] [INFO] [localhost] [docId] [userId] nodeJS - End updateLicense
[2023-02-24T14:22:26.840] [DEBUG] [localhost] [docId] [userId] nodeJS - [AMQP] connected
[2023-02-24T14:22:26.901] [DEBUG] [localhost] [docId] [userId] nodeJS - [AMQP] connected
[2023-02-24T14:22:26.922] [INFO] [localhost] [docId] [userId] nodeJS - Start callbackFunction
[2023-02-24T14:22:26.928] [WARN] [localhost] [docId] [userId] nodeJS - Express server listening on port 8000 in development-linux mode. Version: 7.3.2. Build: 0
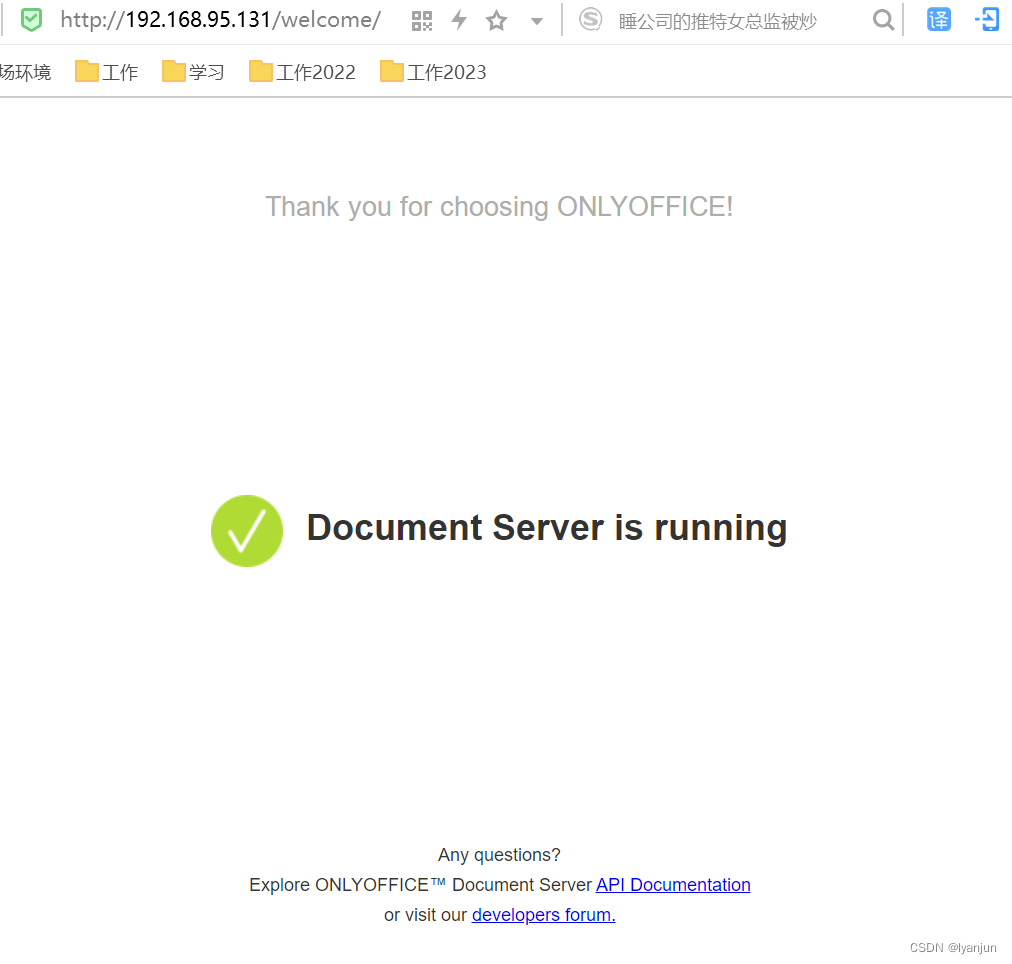
访问欢迎页,默认端口是8000:
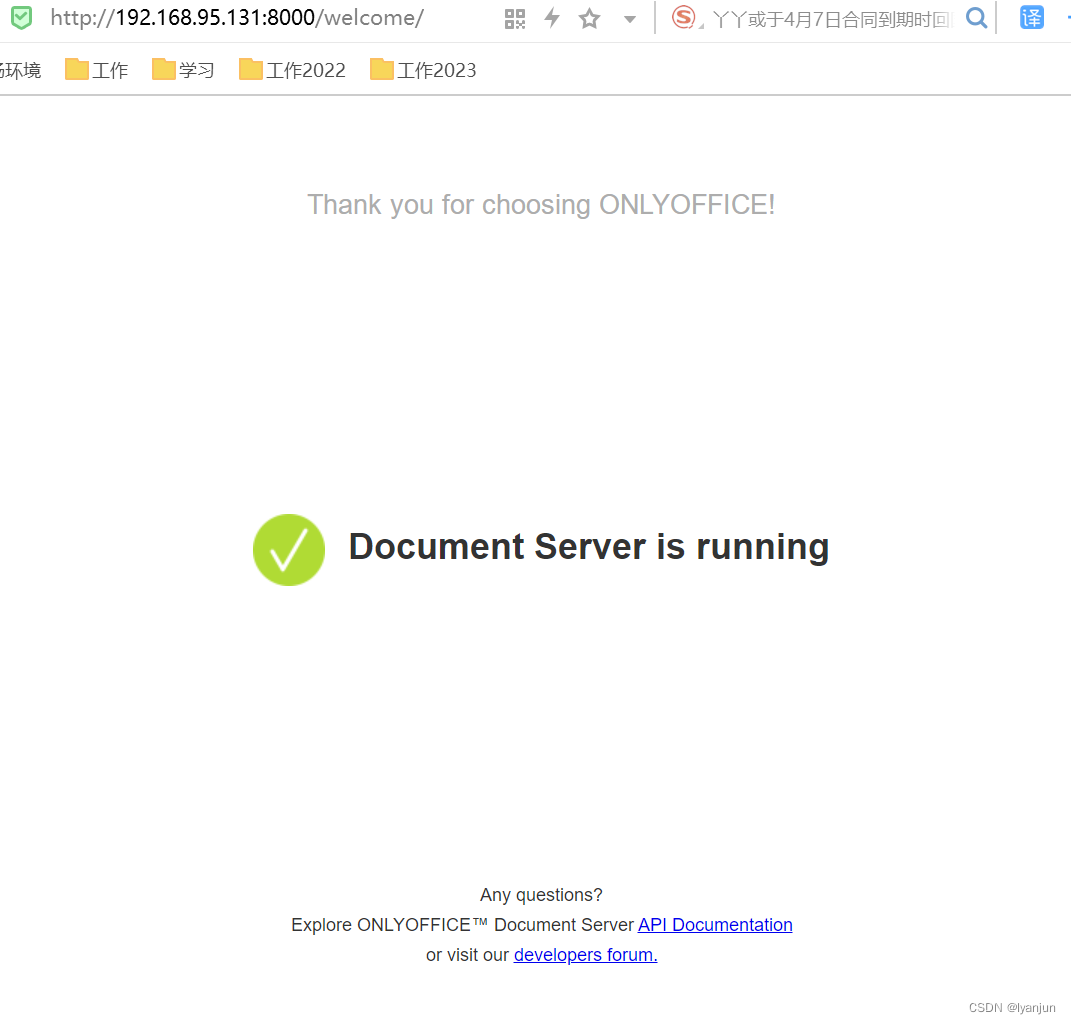
接下来测试文档是否可以正常加载:
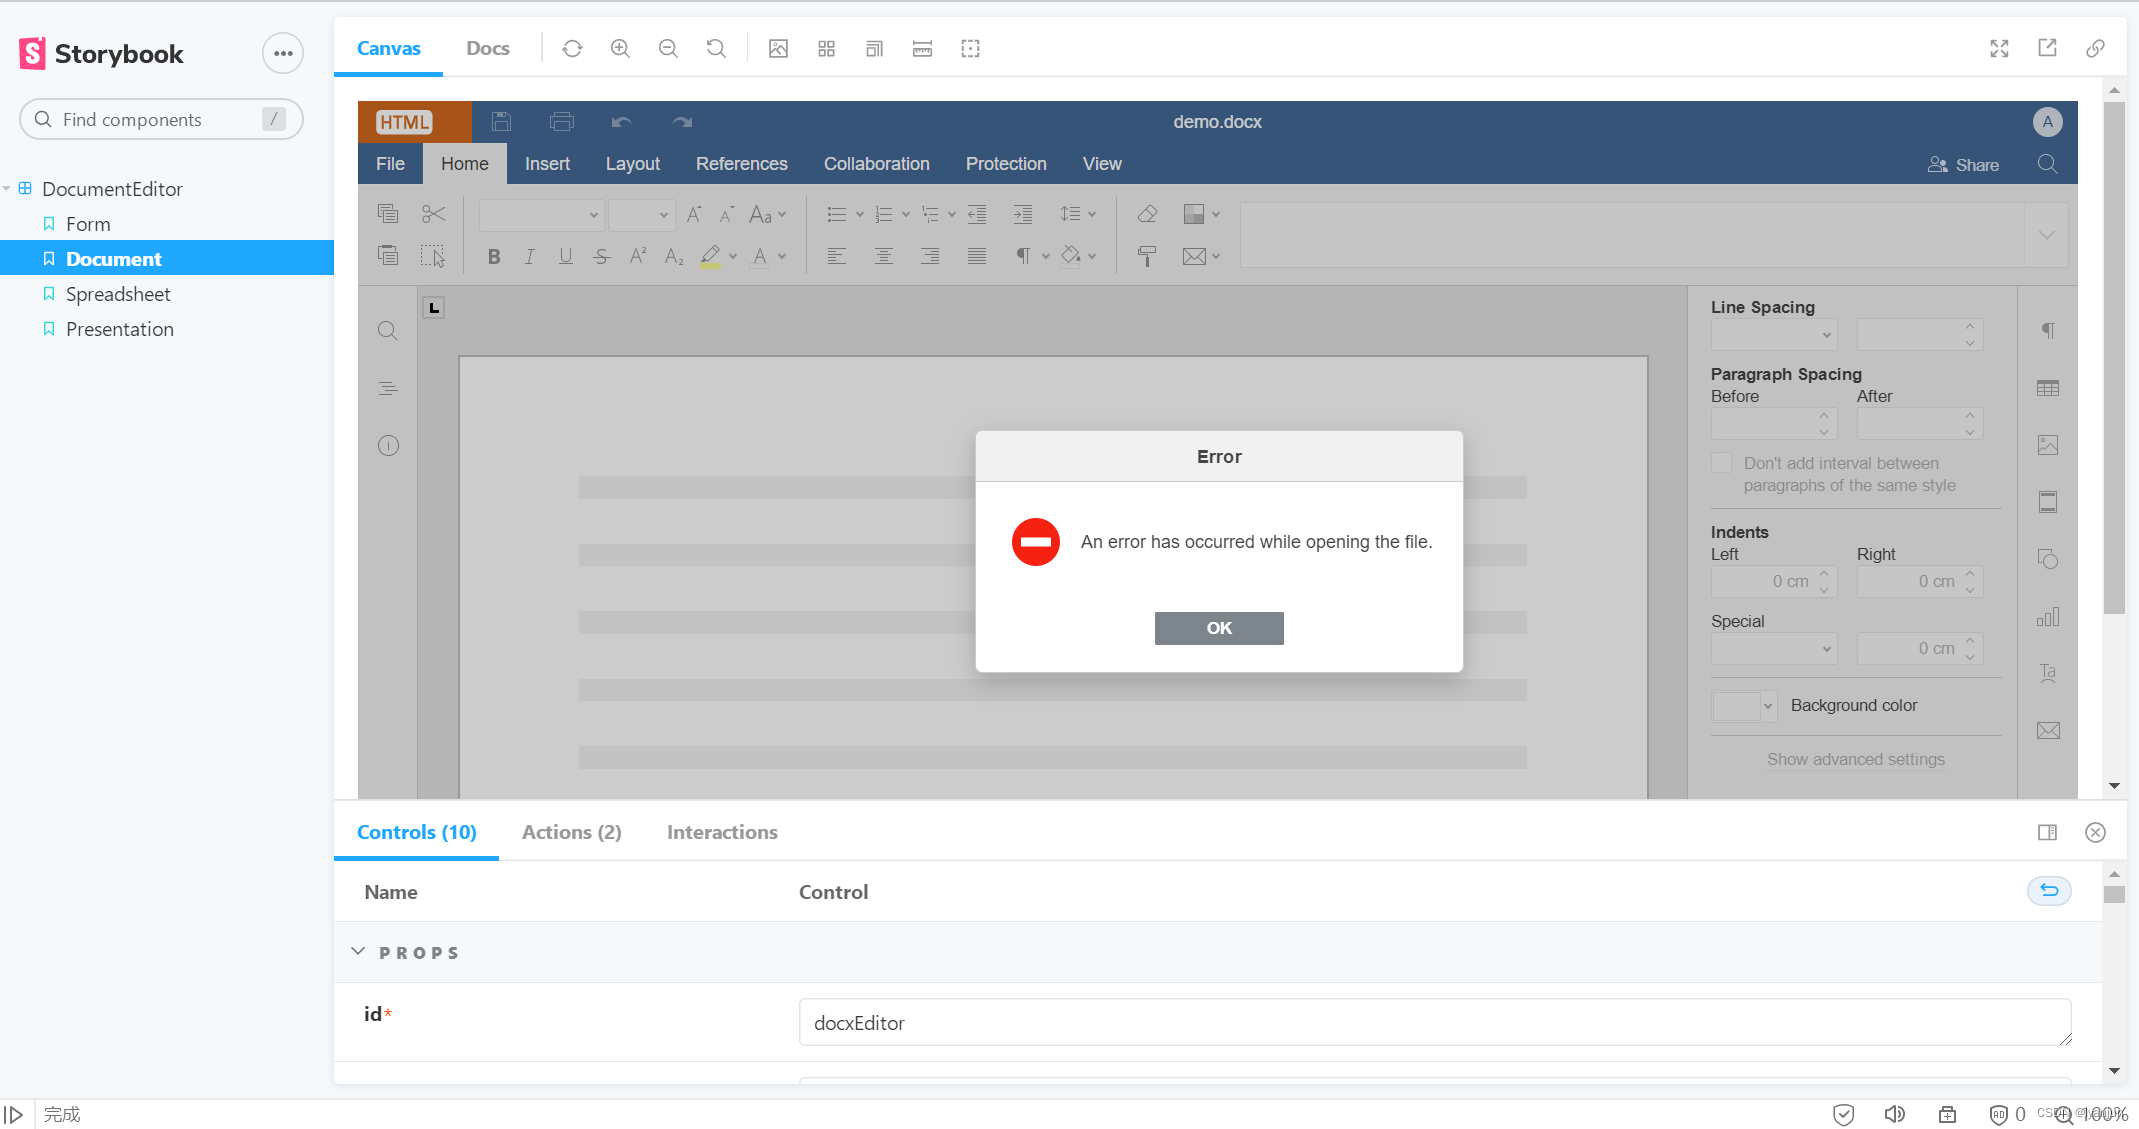
注意此处报错跟Nginx没有关系,目前来看Nginx并不是必须的。怀疑只是在Docker部署的时候占一个前台进程。目前是转换服务报异常提示缺少动态库。
经排查确实没有,所以打算升级动态库,参考下面三个连接,升级动态库,主要参考第一个,升级动态库后最好重启一下。
- 编译动态库看这里 https://www.jianshu.com/p/cedbdf0b6bca
- 下载资源慢看这里 https://blog.csdn.net/qq_29695701/article/details/115182856
- 升级动态库补充说明 https://blog.csdn.net/davidhopper/article/details/79681695
升级动态库后重新启动服务,看看能不能正常加载。目前来看一切正常
虽然界面加载看起来没有问题,其实还是有问题的。比如文件修改后保存失败,调用文档格式转换失败。需要补充初始化的操作,切换目录回到解压后的根目录,然后执行初始化命令:
当前目录结构
[root@test documentserver]# pwd
/usr/local/nginx/html/documentserver
[root@test documentserver]# ll
总用量 20
drwxr-xr-x. 39 root root 4096 2月  23 13:56 core-fonts
drwxr-xr-x. 50 root root 4096 2月  23 13:56 dictionaries
drwxr-xr-x.  4 root root   31 2月  23 13:56 document-templates
drwxr-xr-x.  2 root root 8192 2月  27 09:04 fonts
drwxr-xr-x.  7 root root   68 2月  23 13:53 sdkjs
drwxr-xr-x. 14 root root  234 2月  23 13:56 sdkjs-plugins
drwxr-xr-x. 12 root root  199 2月  23 14:04 server
drwxrwxrwx.  4 root root   32 2月  19 22:58 web-apps
LD_LIBRARY_PATH=${PWD}/server/FileConverter/bin server/tools/allfontsgen \--input="${PWD}/core-fonts" \--allfonts-web="${PWD}/sdkjs/common/AllFonts.js" \--allfonts="${PWD}/server/FileConverter/bin/AllFonts.js" \--images="${PWD}/sdkjs/common/Images" \--selection="${PWD}/server/FileConverter/bin/font_selection.bin" \--output-web='fonts' \--use-system="true"
LD_LIBRARY_PATH=${PWD}/server/FileConverter/bin server/tools/allthemesgen \--converter-dir="${PWD}/server/FileConverter/bin"\--src="${PWD}/sdkjs/slide/themes"\--output="${PWD}/sdkjs/common/Images"
随后重新启动,这时服务就正常了。文件保存和文档格式转换就可以正常使用了。Ubuntu部署顺便也验证了(验证版本16.04和20.04),跟Centos7的区别就是不用更新动态库,部署起来更方便。
配置Nginx
到这步其实可配可不配,配了Nginx就是代理了8000端口,让你访问的时候直接调80端口。经验证编译结果其实可以不用放在Nginx目录下。因为除了接口转发OnlyOffice服务跟Nginx并没有设么关系。
首先切换目录到Nginx配置文件的目录中/usr/local/nginx/conf,这里我创建了一个目录为custom用来存放配置。
[root@test conf]# pwd
/usr/local/nginx/conf
[root@test conf]# ll
总用量 68
drwxr-xr-x. 2 root root   34 2月  24 11:09 custom
-rw-r--r--. 1 root root 1077 2月  24 09:45 fastcgi.conf
-rw-r--r--. 1 root root 1077 2月  24 09:45 fastcgi.conf.default
-rw-r--r--. 1 root root 1007 2月  24 09:45 fastcgi_params
-rw-r--r--. 1 root root 1007 2月  24 09:45 fastcgi_params.default
-rw-r--r--. 1 root root 2837 2月  24 09:45 koi-utf
-rw-r--r--. 1 root root 2223 2月  24 09:45 koi-win
-rw-r--r--. 1 root root 5349 2月  24 09:45 mime.types
-rw-r--r--. 1 root root 5349 2月  24 09:45 mime.types.default
-rw-r--r--. 1 root root 2710 2月  24 11:04 nginx.conf
-rw-r--r--. 1 root root 2656 2月  24 09:45 nginx.conf.default
-rw-r--r--. 1 root root  636 2月  24 09:45 scgi_params
-rw-r--r--. 1 root root  636 2月  24 09:45 scgi_params.default
-rw-r--r--. 1 root root  664 2月  24 09:45 uwsgi_params
-rw-r--r--. 1 root root  664 2月  24 09:45 uwsgi_params.default
-rw-r--r--. 1 root root 3610 2月  24 09:45 win-utf
切换目录到custom中,创建名为*.conf的配置文件
[root@test conf]# cd custom/
[root@test custom]# ll
总用量 4
-rw-r--r--. 1 root root 763 2月  24 11:09 document_server.conf
配置内容如下,其实就是官网提供的配置
map $http_host $this_host {"" $host;default $http_host;
}
map $http_x_forwarded_proto $the_scheme {default $http_x_forwarded_proto;"" $scheme;
}
map $http_x_forwarded_host $the_host {default $http_x_forwarded_host;"" $this_host;
}
map $http_upgrade $proxy_connection {default upgrade;"" close;
}
proxy_set_header Host $http_host;
proxy_set_header Upgrade $http_upgrade;
proxy_set_header Connection $proxy_connection;
proxy_set_header X-Forwarded-Host $the_host;
proxy_set_header X-Forwarded-Proto $the_scheme;
server {listen 0.0.0.0:80;listen [::]:80 default_server;server_tokens off;rewrite ^\/OfficeWeb(\/apps\/.*)$ /web-apps$1 redirect;location / {proxy_pass http://localhost:8000;proxy_http_version 1.1;}
}
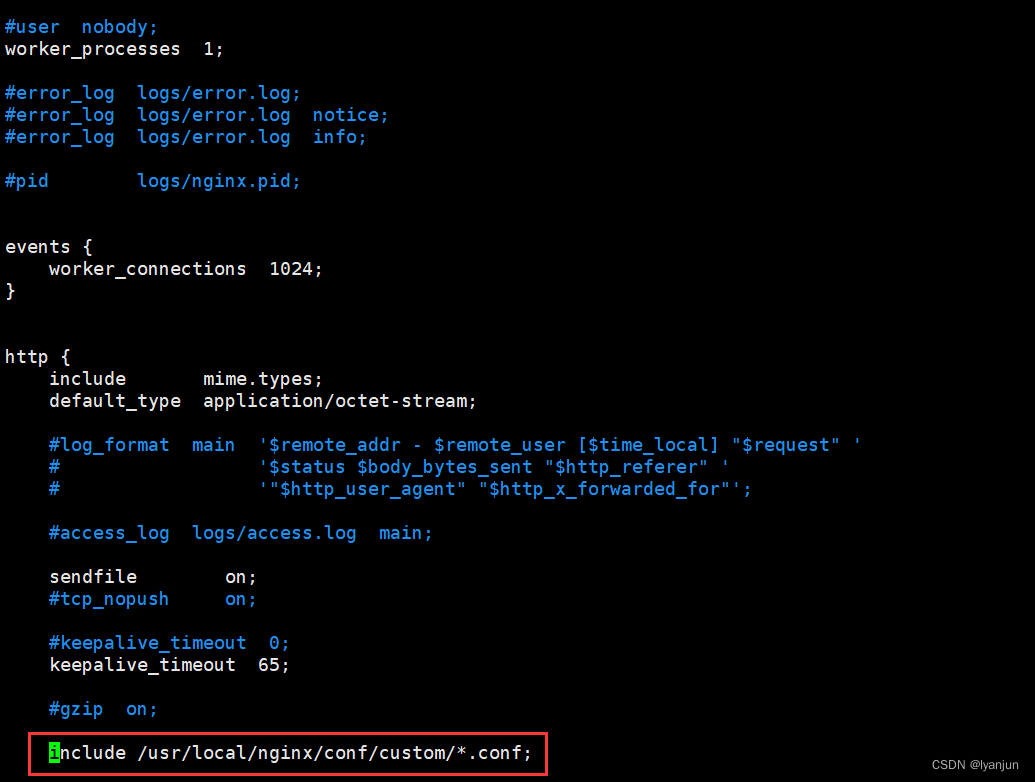
切换目录回到/usr/local/nginx/conf,修改下nginx.conf配置文件,添加如下配置
include /usr/local/nginx/conf/custom/*.conf;
最后重新加载Nginx配置,使配置立即生效:
[root@test conf]# systemctl reload nginx
最终结果就是192.168.95.131:8000和192.168.95.131:80都可以正常访问。
相关文章:
OnlyOffice验证(二)在Centos7上部署OnlyOffice编译结果
在Centos7上部署OnlyOffice编译结果 此处将尝试将OnlyOffice验证(一)DocumentServer编译验证的结果部署到Centos7上。并且使用其它服务器现有的RabbitMq和Mysql。 安装Nginx 先安装Nginx需要的依赖环境: yum install openssl* -y yum insta…...

6.补充和总结【Java面试第三季】
6.补充和总结【Java面试第三季】前言推荐6.补充和总结69_总结闲聊回顾和总结继续学习最后前言 2023-2-4 19:08:01 以下内容源自 【尚硅谷Java大厂面试题第3季,跳槽必刷题目必扫技术盲点(周阳主讲)-哔哩哔哩】 仅供学习交流使用 推荐 Jav…...

基于ssm框架大学生社团管理系统(源码+数据库+文档)
一、项目简介 本项目是一套基于ssm框架大学生社团管理系统,主要针对计算机相关专业的正在做bishe的学生和需要项目实战练习的Java学习者。 包含:项目源码、数据库脚本等,该项目可以直接作为bishe使用。 项目都经过严格调试,确保可…...
vulnhub靶场NAPPING: 1.0.1教程
靶场搭建靶机下载地址:Napping: 1.0.1 ~ VulnHub直接解压双击ova文件即可使用软件:靶机VirtualBox,攻击机VMware攻击机:kali信息收集arp-scan -l上帝之眼直接来看看网站可以注册账号,那就先试试。注册完后登入哦。要输…...

Docker基本介绍
最近需要将项目做成一个web应用并部署到多台服务器上,于是就简单学习了一下docker,做一下小小的记录。 1、简单介绍一下docker 我们经常遇到这样一个问题,自己写的代码在自己的电脑上运行的很流畅,在其他人电脑上就各种bug&…...

可用于标记蛋白质216699-36-4,6-ROX,SE,6-羧基-X-罗丹明琥珀酰亚胺酯
一.6-ROX,SE产品描述:6-羧基-X-罗丹明琥珀酰亚胺酯(6-ROX,SE)是一种用于寡核苷酸标记和自动DNA测序的荧光染料,可用于标记蛋白质,寡核苷酸和其他含胺分子的伯胺(-NH2)。西…...

高数:极限的定义
目录 极限的定义: 数列极限的几何意义: 由极限的定义得出的极限的两个结论: 编辑 极限的第三个结论: 例题 方法1: 编辑 方法2: 编辑 方法3: 编辑 极限的定义: 如何理…...
大数据技术之Hadoop
第1章 Hadoop概述1.1 Hadoop是什么1.2 Hadoop发展历史(了解)1.3 Hadoop三大发行版本(了解)Hadoop三大发行版本:Apache、Cloudera、Hortonworks。Apache版本最原始(最基础)的版本,对于…...

一文带你搞懂Go语言函数选项模式,Go函数一等公民。
前言 通过这篇文章《为什么说Go的函数是”一等公民“》,我们了解到了什么是“一等公民”,以及都具备哪些特性,同时对函数的基本使用也更加深入。 本文重点介绍下Go设计模式之函数选项模式,它得益于Go的函数是“一等公民”&#…...
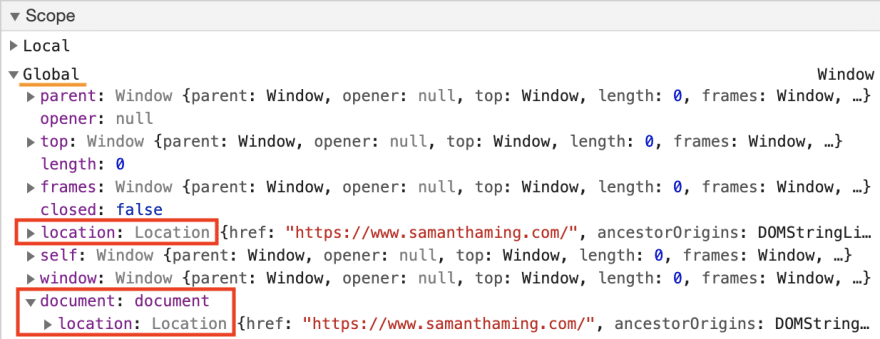
Window.location 详细介绍
如果你需要获取网站的 URL 信息,那么 window.location 对象就是为你准备的。使用它提供的属性来获取当前页面地址的信息,或使用其方法进行某些页面的重定向或刷新。 https://www.samanthaming.com/tidbits/?filterJS#2 window.location.origin → htt…...
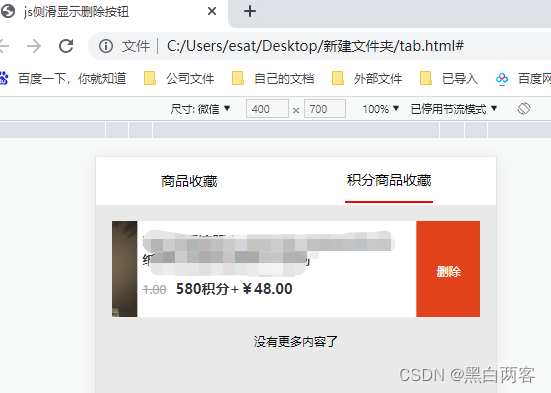
js侧滑显示删除按钮
效果图: <!DOCTYPE html> <html><head><meta charset"UTF-8"><meta name"viewport" content"widthdevice-width, initial-scale1.0, maximum-scale1.0, user-scalableno"><title>js侧滑显示删…...

Python - DIY - 使用dump取json某些键值对合成新的json文件
Python - Json处理前言:应用场景:基本工具:文件操作:打开文件:写文件:读文件:关闭文件并刷新缓冲区:Json字符串和字典转换:json.loads():json.dumps():Json文…...

深度剖析指针(中)——“C”
各位CSDN的uu们你们好呀,今天小雅兰的内容仍旧是深度剖析指针噢,在上一篇博客中,我已经写过了字符指针、数组指针、指针数组、数组传参和指针传参的知识点,那么这篇博客小雅兰会讲解一下函数指针、函数指针数组 、指向函数指针数组…...
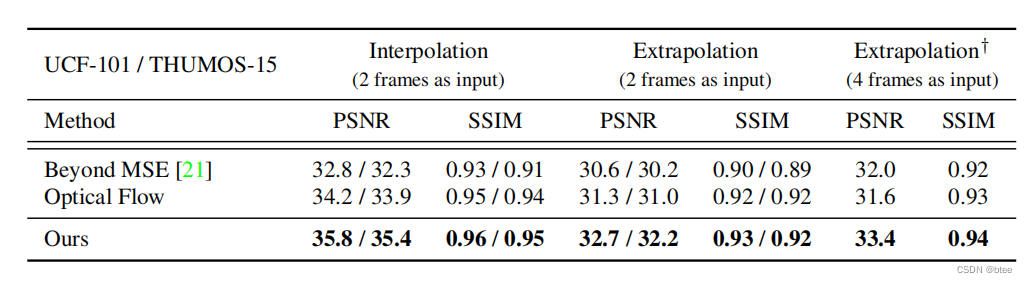
论文阅读 | Video Frame Synthesis using Deep Voxel Flow
前言: 视频帧生成方法(视频插帧/视频预测)ICCV2017 oral Video Frame Synthesis using Deep Voxel Flow 引言 当下进行视频帧合成的方法分为两种,第一种是光流法,光流准确的话效果好,光流不准确的话则生…...

我所理解的生活
诞生 人真正意义上的诞生应该是社会学意义上的,是一种意识到自我、自我与社会关系的存在,只有这种诞生,才是完整人生的基点,大千世界中,唯有人类以生活作为自己的存在方式,除人类以外,从无机界…...

debian 部署nginx https
我是flask 处理请求单进程, 差点意思 , 考虑先flask 在往下走 一:安装nginx 因为我是debian 系统,所以我的建议是直接 sudo apt-get install nginx 你也可以选择在官网下载, 但是我搭建ssl 的时候安装openssl非常的麻…...
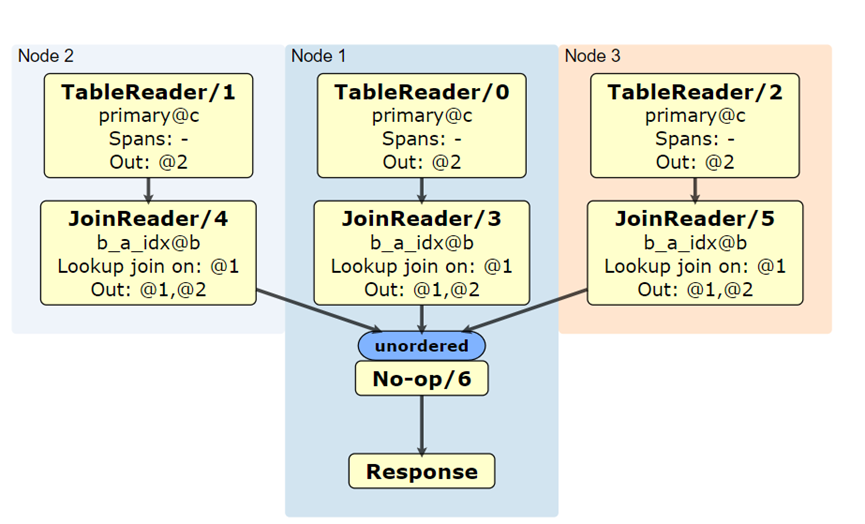
SQL 层功能改进 - lookupJoin 的优化
一、传统 join 算法lookupJoin 是 join 查询的一种,传统 join 算法为:1. 遍历 A 表,读取一条数据 r2. 遍历 B 表,对于每条数据,与 r 进行 join 操作3. 重复 1、2 操作,直到 A 表遍历完所有数据二、lookupJo…...

动态规划:鸣人的影分身
在火影忍者的世界里,令敌人捉摸不透是非常关键的。我们的主角漩涡鸣人所拥有的一个招数——多重影分身之术——就是一个很好的例子。影分身是由鸣人身体的查克拉能量制造的,使用的查克拉越多,制造出的影分身越强。针对不同的作战情况…...
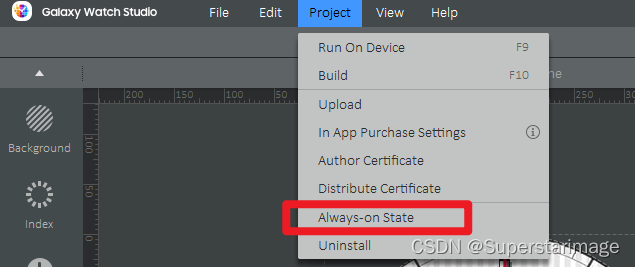
如何为三星active2手表安装自己DIY的表盘
一、步骤介绍 Step 1. 下载Galaxy watch studio; Step 2. 按照up主“隔壁张师傅2022”的文章进行安装。 二、安装流程简单说明: ① 电脑端官网下载并安装Galaxy Watch Designer或者Galaxy Watch Studio程序。 ② 关闭手表蓝牙连接,并打开调…...

Android 项目必备(四十二)-->Android 多窗口模式
简介 自由窗口模式: 该模式类似于常见的桌面操作系统, 应用界面的窗口可以自由的拖动和修改大小。 分屏模式 该模式可以在手机上使用, 该模式将屏幕一分为二, 同时显示两个应用界面。 画中画模式: 该模式主要用于TV, 在该模式下…...
RT-DTER最新创新改进系列:(购买资料的粉丝反馈涨点的TOP1模块)我们将BiFPN的加权双向融合之力,注入RT-DETR的端到端Transformer架构,创新与涨点的双丰收!!!!!!
RT-DTER最新创新改进系列:(购买资料的粉丝反馈涨点的TOP1模块)我们将BiFPN的加权双向融合之力,注入RT-DETR的端到端Transformer架构,创新与涨点的双丰收!! 购买相关资料后畅享一对一答疑&#…...
终极指南:3分钟掌握Translumo实时屏幕翻译工具,游戏外语学习两不误
终极指南:3分钟掌握Translumo实时屏幕翻译工具,游戏外语学习两不误 【免费下载链接】Translumo Advanced real-time screen translator for games, hardcoded subtitles in videos, static text and etc. 项目地址: https://gitcode.com/gh_mirrors/tr…...

Java AI开发实战:基于ai4j的低版本JDK大模型集成与Agent构建指南
1. 项目概述与定位如果你是一个Java开发者,最近想在自己的项目里集成大模型能力,或者想搞点AI Agent的自动化流程,大概率会面临一个选择难题:是用Spring AI,还是LangChain4j?前者对Spring Boot 3.x和Java 1…...

AI助手配置同步工具:解决多工具MCP服务器与指令文件统一管理难题
1. 项目概述与核心痛点如果你和我一样,日常开发中同时使用多个AI编程助手——比如主力用Claude Code,但偶尔也会切到Gemini CLI、Codex CLI、Cursor、Kimi CLI这些工具,去蹭蹭它们的免费额度或者体验下不同的模型能力——那你一定深有体会&am…...
:定义第一个类——成员变量与成员函数)
【c++面向对象编程】第2篇:类与对象(一):定义第一个类——成员变量与成员函数
目录 一、从一个日常需求开始 二、定义你的第一个类 三、访问修饰符:public、private、protected 举个例子,看看区别: 四、成员变量怎么声明? 五、成员函数:两种实现方式 方式一:类内实现(…...

KV缓存压缩技术:IsoQuant在大语言模型中的应用
1. KV缓存压缩的技术背景与挑战在大语言模型(LLM)的推理过程中,键值(KV)缓存的内存占用已成为制约长上下文处理能力的核心瓶颈。以典型的Llama-2 70B模型为例,当处理32k长度的上下文时,KV缓存需…...

告别马赛克!用html2canvas生成高清长图,我踩过的坑和最终方案
告别马赛克!用html2canvas生成高清长图,我踩过的坑和最终方案 去年接手一个电商活动页项目时,产品经理要求在H5页面底部添加"生成分享图"功能。本以为用html2canvas这个老牌库能轻松搞定,结果生成的图片模糊得像打了马赛…...

ARM9EJ-S处理器JTAG调试架构与实战技巧
1. ARM9EJ-S调试架构概述ARM9EJ-S处理器作为经典的嵌入式RISC核心,其调试子系统设计体现了ARM架构对硬件级诊断能力的重视。整个调试体系由三个关键部分组成:JTAG物理接口、TAP控制器状态机以及EmbeddedICE-RT逻辑单元。这种分层设计使得开发者能够通过标…...

12,Springboot3+vue3实现系统公告功能
做一个新的公告模块步骤如下 一, 后端 1, 创建系统公告表 CREATE TABLE `notice` (`id` int NOT NULL AUTO_INCREMENT COMMENT 主键ID,`title` varchar(255) COLLATE utf8mb4_unicode_ci DEFAULT NULL COMMENT 公告标题,`content` varchar(255) COLLATE utf8mb4_unicode_ci …...

85个实用UserScript脚本:提升浏览器效率与网页交互体验
1. 项目概述与核心价值如果你和我一样,是个重度浏览器用户,每天要在各种网页上处理信息、查找资料,那你肯定也遇到过这些烦心事:想快速回到页面顶部,得疯狂滚鼠标滚轮;想复制个链接,结果网页自作…...