yolo系列模型训练数据集全流程制作方法(附数据增强代码)
yolo系列的模型在目标检测领域里面受众非常广,也十分流行,但是在使用yolo进行目标检测训练的时候,往往要将VOC格式的数据集转化为yolo专属的数据集,而yolo的训练数据集制作方法呢,最常见的也是有两种,下面我们只讲述一种最常用的方法,也是我最常使用的。
1. voc转yolo格式
我最常使用的目标检测数据集为VOC格式,而它的格式一般如下所示:
- dataset|- annotations| |- image1.xml| |- image2.xml| |- ...||- images| |- image1.jpg| |- image2.jpg| |- ...
dataset是数据集的根目录。annotations目录包含每个图像对应的 XML 注释文件。images目录包含每个图像文件。
而我们要转换的yolo格式如下所示:
- dataset|- images| |- image1.jpg| |- image2.jpg| |- ...||- labels| |- image1.txt| |- image2.txt| |- ...
dataset是数据集的根目录。images目录包含每个图像文件,通常是以 .jpg 或 .png 等格式保存的图像文件。labels目录包含每个图像对应的标签文件,通常是以 .txt 格式保存的文本文件。
而 labels 里面的内容填写格式为下图所示:

通常,每行的格式为:class x_center y_center width height,其中class代表的是图片中目标所对应的类别,x_center, y_center是边界框的中心点坐标相对于图像宽度和高度的归一化值,width 和 height 是边界框的宽度和高度相对于图像宽度和高度的归一化值。
举例如下:

转换代码:
import xml.etree.ElementTree as ET
import pickle
import os
from os import listdir, getcwd
from os.path import joindef convert(size, box):x_center = (box[0] + box[1]) / 2.0y_center = (box[2] + box[3]) / 2.0x = x_center / size[0]y = y_center / size[1]w = (box[1] - box[0]) / size[0]h = (box[3] - box[2]) / size[1]return (x, y, w, h)def convert_annotation(xml_files_path, save_txt_files_path, classes):xml_files = os.listdir(xml_files_path)for xml_name in xml_files:xml_file = os.path.join(xml_files_path, xml_name)out_txt_path = os.path.join(save_txt_files_path, xml_name.split('.')[0] + '.txt')out_txt_f = open(out_txt_path, 'w')tree = ET.parse(xml_file)root = tree.getroot()size = root.find('size')w = int(size.find('width').text)h = int(size.find('height').text)for obj in root.iter('object'):#difficult = obj.find('difficult').textcls = obj.find('name').text#if cls not in classes or int(difficult) == 1:#continuecls_id = classes.index(cls)xmlbox = obj.find('bndbox')b = (float(xmlbox.find('xmin').text), float(xmlbox.find('xmax').text), float(xmlbox.find('ymin').text),float(xmlbox.find('ymax').text))# b=(xmin, xmax, ymin, ymax)# print(w, h, b)bb = convert((w, h), b)out_txt_f.write(str(cls_id) + " " + " ".join([str(a) for a in bb]) + '\n')if __name__ == "__main__":# 把forklift_pallet的voc的xml标签文件转化为yolo的txt标签文件# 1、需要转化的类别,这里我直接用数字代表类别,由于我是八类,所以从0到7classes = ['0', '1', '2', '3', '4', '5', '6', '7']# 2、voc格式的xml标签文件路径xml_files1 = 'annotations'# 3、转化为yolo格式的txt标签文件存储路径save_txt_files1 = 'labels'convert_annotation(xml_files1, save_txt_files1, classes)
上面代码中注释了一部分内容,比如difficult这一项,由于我xml文件里面没有difficult,所以就注释掉了,大家按照自己的需求进行使用即可。
划分数据集
在我们进行yolo目标检测模型训练之前,需要先将数据集进行合理的划分,比如说划分为训练集:验证集=8:2,或者训练集:验证集:测试集=7:2:1。不过我一般习惯只划分训练集和验证集,也就是按8:2的比例进行划分,代码如下所示:
import os
import shutil
import random# 定义数据集文件夹路径
dataset_path = 'dataset'
images_path = os.path.join(dataset_path, 'images')
labels_path = os.path.join(dataset_path, 'labels')# 定义划分后的文件夹路径
new_path = 'mydata'
train_path = os.path.join(new_path, 'train')
val_path = os.path.join(new_path, 'val')# 创建train和val文件夹
os.makedirs(os.path.join(train_path, 'images'), exist_ok=True)
os.makedirs(os.path.join(train_path, 'labels'), exist_ok=True)
os.makedirs(os.path.join(val_path, 'images'), exist_ok=True)
os.makedirs(os.path.join(val_path, 'labels'), exist_ok=True)# 获取所有图片文件的文件名
image_files = os.listdir(images_path)
# 随机打乱文件顺序
random.shuffle(image_files)# 定义验证集所占比例
val_split = 0.1
# 计算验证集大小
num_val = int(len(image_files) * val_split)# 将数据集按照比例划分到train和val文件夹中
for i, image_file in enumerate(image_files):src_image = os.path.join(images_path, image_file)src_label = os.path.join(labels_path, image_file.replace('.jpg', '.txt'))if i < num_val:dst_image = os.path.join(val_path, 'images', image_file)dst_label = os.path.join(val_path, 'labels', image_file.replace('.jpg', '.txt'))else:dst_image = os.path.join(train_path, 'images', image_file)dst_label = os.path.join(train_path, 'labels', image_file.replace('.jpg', '.txt'))shutil.copy(src_image, dst_image)shutil.copy(src_label, dst_label)
划分完成以后的文件夹格式为:
- mydata|- train| |- images| |- labels||- val| |- images| |- labels
images和labels分别是对应的数据集图片和txt标签。
数据增强
在我们参加一些目标检测类比赛的时候,往往会遇见比赛训练集不足的情况,这将极大程度上影响我们的模型精度,这时候可能就需要用到一些数据增强方法,如翻转、随机裁剪等等。当然,yolo系列的模型一般都自带有数据增强,但是我们也可以尝试训练前进行增强看看效果。
代码如下:
# -*- coding=utf-8 -*-import time
import random
import copy
import cv2
import os
import math
import numpy as np
from skimage.util import random_noise
from lxml import etree, objectify
import xml.etree.ElementTree as ET
import argparse# 显示图片
def show_pic(img, bboxes=None):'''输入:img:图像arraybboxes:图像的所有boudning box list, 格式为[[x_min, y_min, x_max, y_max]....]names:每个box对应的名称'''for i in range(len(bboxes)):bbox = bboxes[i]x_min = bbox[0]y_min = bbox[1]x_max = bbox[2]y_max = bbox[3]cv2.rectangle(img, (int(x_min), int(y_min)), (int(x_max), int(y_max)), (0, 255, 0), 3)cv2.namedWindow('pic', 0)  # 1表示原图cv2.moveWindow('pic', 0, 0)cv2.resizeWindow('pic', 1200, 800)  # 可视化的图片大小cv2.imshow('pic', img)cv2.waitKey(0)cv2.destroyAllWindows()# 图像均为cv2读取
class DataAugmentForObjectDetection():def __init__(self, rotation_rate=0.5, max_rotation_angle=5,crop_rate=0.5, shift_rate=0.5, change_light_rate=0.5,add_noise_rate=0.5, flip_rate=0.5,cutout_rate=0.5, cut_out_length=50, cut_out_holes=1, cut_out_threshold=0.5,is_addNoise=True, is_changeLight=True, is_cutout=True, is_rotate_img_bbox=True,is_crop_img_bboxes=True, is_shift_pic_bboxes=True, is_filp_pic_bboxes=True):# 配置各个操作的属性self.rotation_rate = rotation_rateself.max_rotation_angle = max_rotation_angleself.crop_rate = crop_rateself.shift_rate = shift_rateself.change_light_rate = change_light_rateself.add_noise_rate = add_noise_rateself.flip_rate = flip_rateself.cutout_rate = cutout_rateself.cut_out_length = cut_out_lengthself.cut_out_holes = cut_out_holesself.cut_out_threshold = cut_out_threshold# 是否使用某种增强方式self.is_addNoise = is_addNoiseself.is_changeLight = is_changeLightself.is_cutout = is_cutoutself.is_rotate_img_bbox = is_rotate_img_bboxself.is_crop_img_bboxes = is_crop_img_bboxesself.is_shift_pic_bboxes = is_shift_pic_bboxesself.is_filp_pic_bboxes = is_filp_pic_bboxes# ----1.加噪声---- #def _addNoise(self, img):'''输入:img:图像array输出:加噪声后的图像array,由于输出的像素是在[0,1]之间,所以得乘以255'''# return cv2.GaussianBlur(img, (11, 11), 0)return random_noise(img, mode='gaussian', seed=int(time.time()), clip=True) * 255# ---2.调整亮度--- #def _changeLight(self, img):alpha = random.uniform(0.35, 1)blank = np.zeros(img.shape, img.dtype)return cv2.addWeighted(img, alpha, blank, 1 - alpha, 0)# ---3.cutout--- #def _cutout(self, img, bboxes, length=100, n_holes=1, threshold=0.5):'''原版本:https://github.com/uoguelph-mlrg/Cutout/blob/master/util/cutout.pyRandomly mask out one or more patches from an image.Args:img : a 3D numpy array,(h,w,c)bboxes : 框的坐标n_holes (int): Number of patches to cut out of each image.length (int): The length (in pixels) of each square patch.'''def cal_iou(boxA, boxB):'''boxA, boxB为两个框,返回iouboxB为bouding box'''# determine the (x, y)-coordinates of the intersection rectanglexA = max(boxA[0], boxB[0])yA = max(boxA[1], boxB[1])xB = min(boxA[2], boxB[2])yB = min(boxA[3], boxB[3])if xB <= xA or yB <= yA:return 0.0# compute the area of intersection rectangleinterArea = (xB - xA + 1) * (yB - yA + 1)# compute the area of both the prediction and ground-truth# rectanglesboxAArea = (boxA[2] - boxA[0] + 1) * (boxA[3] - boxA[1] + 1)boxBArea = (boxB[2] - boxB[0] + 1) * (boxB[3] - boxB[1] + 1)iou = interArea / float(boxBArea)return iou# 得到h和wif img.ndim == 3:h, w, c = img.shapeelse:_, h, w, c = img.shapemask = np.ones((h, w, c), np.float32)for n in range(n_holes):chongdie = True  # 看切割的区域是否与box重叠太多while chongdie:y = np.random.randint(h)x = np.random.randint(w)y1 = np.clip(y - length // 2, 0,h)  # numpy.clip(a, a_min, a_max, out=None), clip这个函数将将数组中的元素限制在a_min, a_max之间,大于a_max的就使得它等于 a_max,小于a_min,的就使得它等于a_miny2 = np.clip(y + length // 2, 0, h)x1 = np.clip(x - length // 2, 0, w)x2 = np.clip(x + length // 2, 0, w)chongdie = Falsefor box in bboxes:if cal_iou([x1, y1, x2, y2], box) > threshold:chongdie = Truebreakmask[y1: y2, x1: x2, :] = 0.img = img * maskreturn img# ---4.旋转--- #def _rotate_img_bbox(self, img, bboxes, angle=5, scale=1.):'''参考:https://blog.csdn.net/u014540717/article/details/53301195crop_rate输入:img:图像array,(h,w,c)bboxes:该图像包含的所有boundingboxs,一个list,每个元素为[x_min, y_min, x_max, y_max],要确保是数值angle:旋转角度scale:默认1输出:rot_img:旋转后的图像arrayrot_bboxes:旋转后的boundingbox坐标list'''# 旋转图像w = img.shape[1]h = img.shape[0]# 角度变弧度rangle = np.deg2rad(angle)  # angle in radians# now calculate new image width and heightnw = (abs(np.sin(rangle) * h) + abs(np.cos(rangle) * w)) * scalenh = (abs(np.cos(rangle) * h) + abs(np.sin(rangle) * w)) * scale# ask OpenCV for the rotation matrixrot_mat = cv2.getRotationMatrix2D((nw * 0.5, nh * 0.5), angle, scale)# calculate the move from the old center to the new center combined# with the rotationrot_move = np.dot(rot_mat, np.array([(nw - w) * 0.5, (nh - h) * 0.5, 0]))# the move only affects the translation, so update the translationrot_mat[0, 2] += rot_move[0]rot_mat[1, 2] += rot_move[1]# 仿射变换rot_img = cv2.warpAffine(img, rot_mat, (int(math.ceil(nw)), int(math.ceil(nh))), flags=cv2.INTER_LANCZOS4)# 矫正bbox坐标# rot_mat是最终的旋转矩阵# 获取原始bbox的四个中点,然后将这四个点转换到旋转后的坐标系下rot_bboxes = list()for bbox in bboxes:xmin = bbox[0]ymin = bbox[1]xmax = bbox[2]ymax = bbox[3]point1 = np.dot(rot_mat, np.array([(xmin + xmax) / 2, ymin, 1]))point2 = np.dot(rot_mat, np.array([xmax, (ymin + ymax) / 2, 1]))point3 = np.dot(rot_mat, np.array([(xmin + xmax) / 2, ymax, 1]))point4 = np.dot(rot_mat, np.array([xmin, (ymin + ymax) / 2, 1]))# 合并np.arrayconcat = np.vstack((point1, point2, point3, point4))# 改变array类型concat = concat.astype(np.int32)# 得到旋转后的坐标rx, ry, rw, rh = cv2.boundingRect(concat)rx_min = rxry_min = ryrx_max = rx + rwry_max = ry + rh# 加入list中rot_bboxes.append([rx_min, ry_min, rx_max, ry_max])return rot_img, rot_bboxes# ---5.裁剪--- #def _crop_img_bboxes(self, img, bboxes):'''裁剪后的图片要包含所有的框输入:img:图像arraybboxes:该图像包含的所有boundingboxs,一个list,每个元素为[x_min, y_min, x_max, y_max],要确保是数值输出:crop_img:裁剪后的图像arraycrop_bboxes:裁剪后的bounding box的坐标list'''# 裁剪图像w = img.shape[1]h = img.shape[0]x_min = w  # 裁剪后的包含所有目标框的最小的框x_max = 0y_min = hy_max = 0for bbox in bboxes:x_min = min(x_min, bbox[0])y_min = min(y_min, bbox[1])x_max = max(x_max, bbox[2])y_max = max(y_max, bbox[3])d_to_left = x_min  # 包含所有目标框的最小框到左边的距离d_to_right = w - x_max  # 包含所有目标框的最小框到右边的距离d_to_top = y_min  # 包含所有目标框的最小框到顶端的距离d_to_bottom = h - y_max  # 包含所有目标框的最小框到底部的距离# 随机扩展这个最小框crop_x_min = int(x_min - random.uniform(0, d_to_left))crop_y_min = int(y_min - random.uniform(0, d_to_top))crop_x_max = int(x_max + random.uniform(0, d_to_right))crop_y_max = int(y_max + random.uniform(0, d_to_bottom))# 随机扩展这个最小框 , 防止别裁的太小# crop_x_min = int(x_min - random.uniform(d_to_left//2, d_to_left))# crop_y_min = int(y_min - random.uniform(d_to_top//2, d_to_top))# crop_x_max = int(x_max + random.uniform(d_to_right//2, d_to_right))# crop_y_max = int(y_max + random.uniform(d_to_bottom//2, d_to_bottom))# 确保不要越界crop_x_min = max(0, crop_x_min)crop_y_min = max(0, crop_y_min)crop_x_max = min(w, crop_x_max)crop_y_max = min(h, crop_y_max)crop_img = img[crop_y_min:crop_y_max, crop_x_min:crop_x_max]# 裁剪boundingbox# 裁剪后的boundingbox坐标计算crop_bboxes = list()for bbox in bboxes:crop_bboxes.append([bbox[0] - crop_x_min, bbox[1] - crop_y_min, bbox[2] - crop_x_min, bbox[3] - crop_y_min])return crop_img, crop_bboxes# ---6.平移--- #def _shift_pic_bboxes(self, img, bboxes):'''平移后的图片要包含所有的框输入:img:图像arraybboxes:该图像包含的所有boundingboxs,一个list,每个元素为[x_min, y_min, x_max, y_max],要确保是数值输出:shift_img:平移后的图像arrayshift_bboxes:平移后的bounding box的坐标list'''# 平移图像w = img.shape[1]h = img.shape[0]x_min = w  # 裁剪后的包含所有目标框的最小的框x_max = 0y_min = hy_max = 0for bbox in bboxes:x_min = min(x_min, bbox[0])y_min = min(y_min, bbox[1])x_max = max(x_max, bbox[2])y_max = max(y_max, bbox[3])d_to_left = x_min  # 包含所有目标框的最大左移动距离d_to_right = w - x_max  # 包含所有目标框的最大右移动距离d_to_top = y_min  # 包含所有目标框的最大上移动距离d_to_bottom = h - y_max  # 包含所有目标框的最大下移动距离x = random.uniform(-(d_to_left - 1) / 3, (d_to_right - 1) / 3)y = random.uniform(-(d_to_top - 1) / 3, (d_to_bottom - 1) / 3)M = np.float32([[1, 0, x], [0, 1, y]])  # x为向左或右移动的像素值,正为向右负为向左; y为向上或者向下移动的像素值,正为向下负为向上shift_img = cv2.warpAffine(img, M, (img.shape[1], img.shape[0]))#  平移boundingboxshift_bboxes = list()for bbox in bboxes:shift_bboxes.append([bbox[0] + x, bbox[1] + y, bbox[2] + x, bbox[3] + y])return shift_img, shift_bboxes# ---7.镜像--- #def _filp_pic_bboxes(self, img, bboxes):'''平移后的图片要包含所有的框输入:img:图像arraybboxes:该图像包含的所有boundingboxs,一个list,每个元素为[x_min, y_min, x_max, y_max],要确保是数值输出:flip_img:平移后的图像arrayflip_bboxes:平移后的bounding box的坐标list'''# 翻转图像flip_img = copy.deepcopy(img)h, w, _ = img.shapesed = random.random()if 0 < sed < 0.33:  # 0.33的概率水平翻转,0.33的概率垂直翻转,0.33是对角反转flip_img = cv2.flip(flip_img, 0)  # _flip_xinver = 0elif 0.33 < sed < 0.66:flip_img = cv2.flip(flip_img, 1)  # _flip_yinver = 1else:flip_img = cv2.flip(flip_img, -1)  # flip_x_yinver = -1# 调整boundingboxflip_bboxes = list()for box in bboxes:x_min = box[0]y_min = box[1]x_max = box[2]y_max = box[3]if inver == 0:# 0:垂直翻转flip_bboxes.append([x_min, h - y_max, x_max, h - y_min])elif inver == 1:# 1:水平翻转flip_bboxes.append([w - x_max, y_min, w - x_min, y_max])elif inver == -1:# -1:水平垂直翻转flip_bboxes.append([w - x_max, h - y_max, w - x_min, h - y_min])return flip_img, flip_bboxes# 图像增强方法def dataAugment(self, img, bboxes):'''图像增强输入:img:图像arraybboxes:该图像的所有框坐标输出:img:增强后的图像bboxes:增强后图片对应的box'''change_num = 0  # 改变的次数# print('------')while change_num < 1:  # 默认至少有一种数据增强生效if self.is_rotate_img_bbox:if random.random() > self.rotation_rate:  # 旋转change_num += 1angle = random.uniform(-self.max_rotation_angle, self.max_rotation_angle)scale = random.uniform(0.7, 0.8)img, bboxes = self._rotate_img_bbox(img, bboxes, angle, scale)if self.is_shift_pic_bboxes:if random.random() < self.shift_rate:  # 平移change_num += 1img, bboxes = self._shift_pic_bboxes(img, bboxes)if self.is_changeLight:if random.random() > self.change_light_rate:  # 改变亮度change_num += 1img = self._changeLight(img)if self.is_addNoise:if random.random() < self.add_noise_rate:  # 加噪声change_num += 1img = self._addNoise(img)if self.is_cutout:if random.random() < self.cutout_rate:  # cutoutchange_num += 1img = self._cutout(img, bboxes, length=self.cut_out_length, n_holes=self.cut_out_holes,threshold=self.cut_out_threshold)if self.is_filp_pic_bboxes:if random.random() < self.flip_rate:  # 翻转change_num += 1img, bboxes = self._filp_pic_bboxes(img, bboxes)return img, bboxes# xml解析工具
class ToolHelper():# 从xml文件中提取bounding box信息, 格式为[[x_min, y_min, x_max, y_max, name]]def parse_xml(self, path):'''输入:xml_path: xml的文件路径输出:从xml文件中提取bounding box信息, 格式为[[x_min, y_min, x_max, y_max, name]]'''tree = ET.parse(path)root = tree.getroot()objs = root.findall('object')coords = list()for ix, obj in enumerate(objs):name = obj.find('name').textbox = obj.find('bndbox')x_min = int(box[0].text)y_min = int(box[1].text)x_max = int(box[2].text)y_max = int(box[3].text)coords.append([x_min, y_min, x_max, y_max, name])return coords# 保存图片结果def save_img(self, file_name, save_folder, img):cv2.imwrite(os.path.join(save_folder, file_name), img)# 保持xml结果def save_xml(self, file_name, save_folder, img_info, height, width, channel, bboxs_info):''':param file_name:文件名:param save_folder:#保存的xml文件的结果:param height:图片的信息:param width:图片的宽度:param channel:通道:return:'''folder_name, img_name = img_info  # 得到图片的信息E = objectify.ElementMaker(annotate=False)anno_tree = E.annotation(E.folder(folder_name),E.filename(img_name),E.path(os.path.join(folder_name, img_name)),E.source(E.database('Unknown'),),E.size(E.width(width),E.height(height),E.depth(channel)),E.segmented(0),)labels, bboxs = bboxs_info  # 得到边框和标签信息for label, box in zip(labels, bboxs):anno_tree.append(E.object(E.name(label),E.pose('Unspecified'),E.truncated('0'),E.difficult('0'),E.bndbox(E.xmin(box[0]),E.ymin(box[1]),E.xmax(box[2]),E.ymax(box[3]))))etree.ElementTree(anno_tree).write(os.path.join(save_folder, file_name), pretty_print=True)if __name__ == '__main__':need_aug_num = 5  # 每张图片需要增强的次数is_endwidth_dot = True  # 文件是否以.jpg或者png结尾dataAug = DataAugmentForObjectDetection()  # 数据增强工具类toolhelper = ToolHelper()  # 工具# 获取相关参数parser = argparse.ArgumentParser()parser.add_argument('--source_img_path', type=str, default='images')parser.add_argument('--source_xml_path', type=str, default='Annotations')parser.add_argument('--save_img_path', type=str, default='enhance_images')parser.add_argument('--save_xml_path', type=str, default='enhance_Annotations')args = parser.parse_args()source_img_path = args.source_img_path  # 图片原始位置source_xml_path = args.source_xml_path  # xml的原始位置save_img_path = args.save_img_path  # 图片增强结果保存文件save_xml_path = args.save_xml_path  # xml增强结果保存文件# 如果保存文件夹不存在就创建if not os.path.exists(save_img_path):os.mkdir(save_img_path)if not os.path.exists(save_xml_path):os.mkdir(save_xml_path)for parent, _, files in os.walk(source_img_path):files.sort()for file in files:cnt = 0pic_path = os.path.join(parent, file)xml_path = os.path.join(source_xml_path, file[:-4] + '.xml')values = toolhelper.parse_xml(xml_path)  # 解析得到box信息,格式为[[x_min,y_min,x_max,y_max,name]]coords = [v[:4] for v in values]  # 得到框labels = [v[-1] for v in values]  # 对象的标签# 如果图片是有后缀的if is_endwidth_dot:# 找到文件的最后名字dot_index = file.rfind('.')_file_prefix = file[:dot_index]  # 文件名的前缀_file_suffix = file[dot_index:]  # 文件名的后缀img = cv2.imread(pic_path)# show_pic(img, coords)  # 显示原图while cnt < need_aug_num:  # 继续增强auged_img, auged_bboxes = dataAug.dataAugment(img, coords)auged_bboxes_int = np.array(auged_bboxes).astype(np.int32)height, width, channel = auged_img.shape  # 得到图片的属性img_name = '{}_{}{}'.format(_file_prefix, cnt + 1, _file_suffix)  # 图片保存的信息toolhelper.save_img(img_name, save_img_path,auged_img)  # 保存增强图片toolhelper.save_xml('{}_{}.xml'.format(_file_prefix, cnt + 1),save_xml_path, (save_img_path, img_name), height, width, channel,(labels, auged_bboxes_int))  # 保存xml文件# show_pic(auged_img, auged_bboxes)  # 强化后的图print(img_name)cnt += 1  # 继续增强下一张
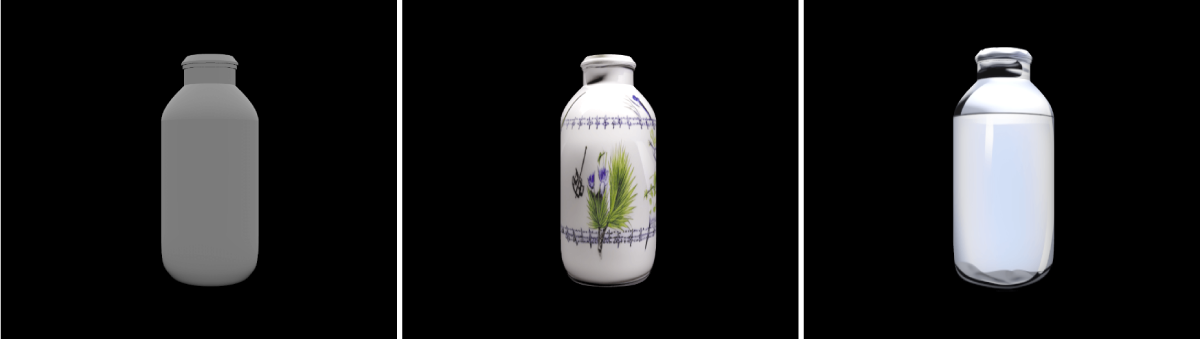
增强后的效果图如下所示:

详细实战使用操作请看:基于yolov8的车牌检测训练全流程
相关文章:
yolo系列模型训练数据集全流程制作方法(附数据增强代码)
yolo系列的模型在目标检测领域里面受众非常广,也十分流行,但是在使用yolo进行目标检测训练的时候,往往要将VOC格式的数据集转化为yolo专属的数据集,而yolo的训练数据集制作方法呢,最常见的也是有两种,下面我…...

4、FFmpeg命令行操作7
转封装(1) 保持编码格式: ffmpeg -i test.mp4 -vcodec copy -acodec copy test_copy.ts ffmpeg -i test.mp4 -codec copy test_copy2.ts 改变编码格式: ffmpeg -i test.mp4 -vcodec libx265 -acodec libmp3lame out_h265_mp3.mkv …...
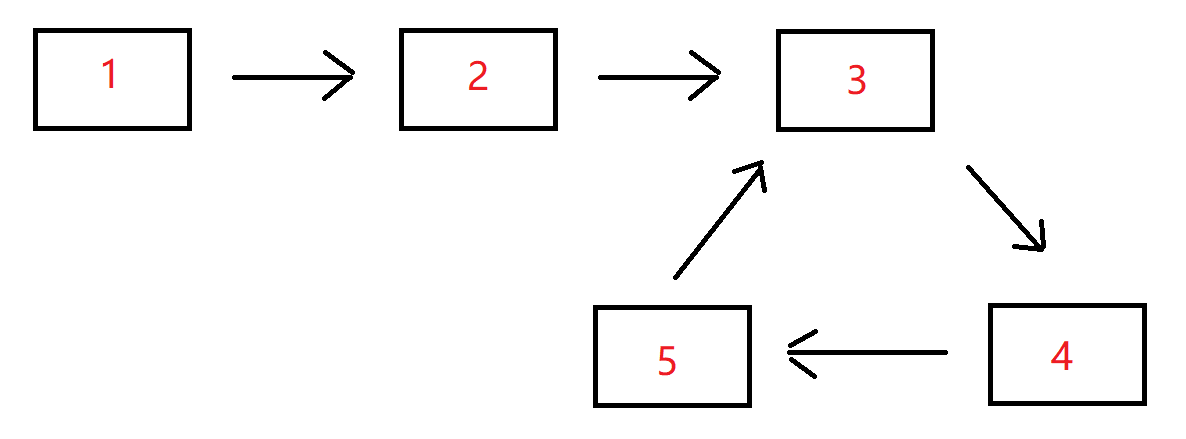
算法进阶——链表中环的入口节点
题目 给一个长度为n链表,若其中包含环,请找出该链表的环的入口结点,否则,返回null。 数据范围:1<结点值<10000 要求:空间复杂度O(1),时间复杂度O(n) 例如,输入{1,2},{3,4,5…...
WPA渗透-pyrit:batch-table加速attack_db模块加速_“attack_db”模块加速)
无线WiFi安全渗透与攻防(N.1)WPA渗透-pyrit:batch-table加速attack_db模块加速_“attack_db”模块加速
WPA渗透-pyrit:batch-table加速attack_db模块加速_“attack_db”模块加速 WPA渗透-pyrit:batch-table加速attack_db模块加速_“attack_db”模块加速1.渗透WIFI1.导入密码字典2.导入essid,破解完成记得删除3.批处理数据库,速度比较慢,耐心等待4.batch-table(批处理数据库)加…...
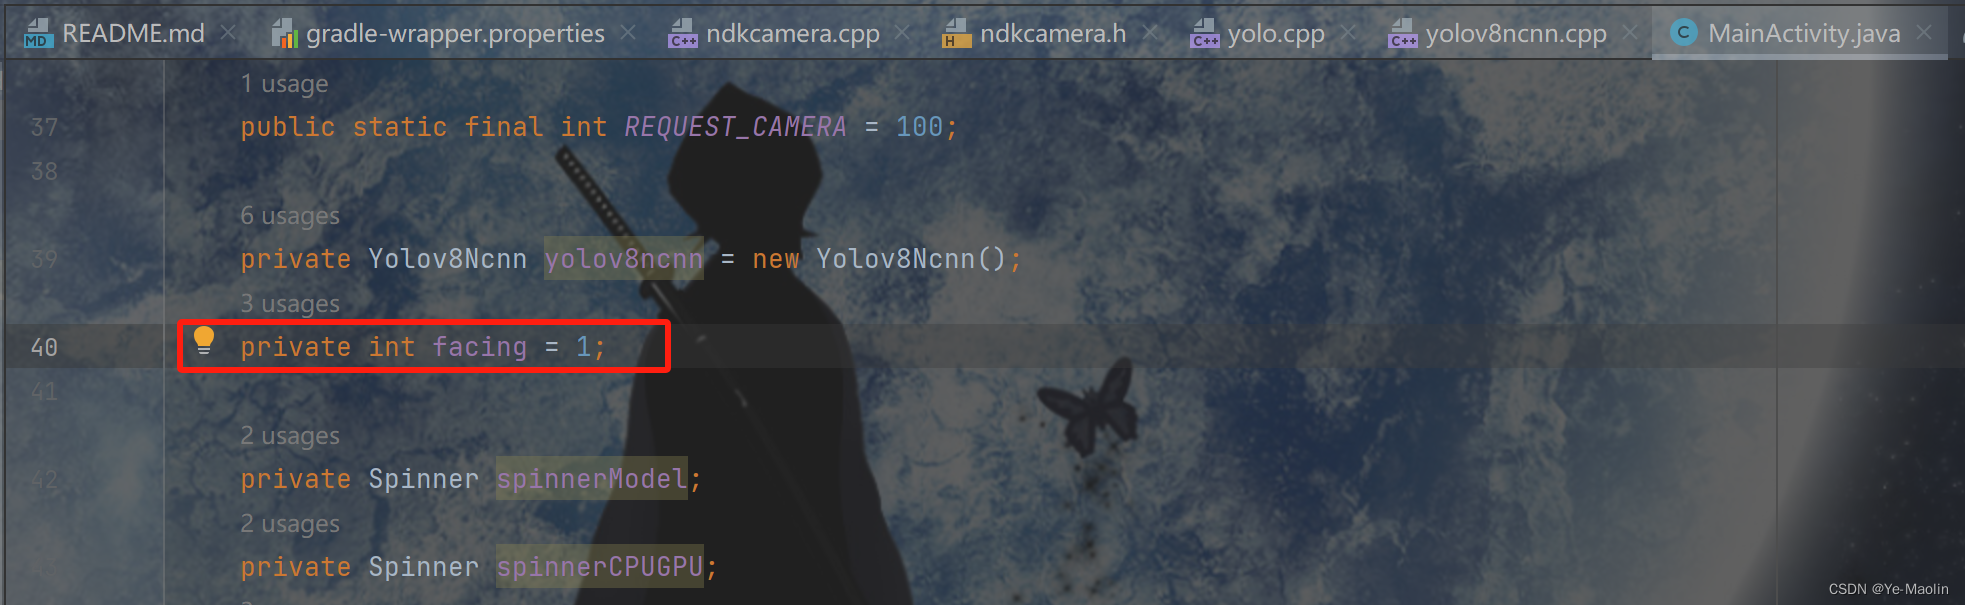
YOLOV8部署Android Studio安卓平台NCNN
下载Android Studio,配置安卓开发环境,这个过程比较漫长。 安装cmake,注意安装的是cmake3.10版本。 根据手机安卓版本选择相应的安卓版本,我的是红米K30Pro,安卓12。 使用腾讯开源的ncnn,这是一个为手机端极…...

【算法萌新闯力扣】:旋转字符串
力扣热题:796.旋转字符串 开篇 今天下午刷了6道力扣算法题,选了一道有多种解法的题目与大家分享。 题目链接:796.旋转字符串 题目描述 代码思路 完全按照题目的要求,利用StringBuffer中的方法对字符串进行旋转,寻找相同的一项 …...
可逆矩阵的性质
如果矩阵A可逆,那么它的逆矩阵也可逆,并且如果矩阵A可逆,假设是一个不为0的数,那么也可逆,并且如果矩阵A和都可逆,而且它们的阶数也相同,那么它们的乘积也是可逆的,并且如果矩阵A可逆…...

HIT 模式识别 手写汉字分类 Python实现
训练集数据 TrainSamples-400.csv,含 100 个不同汉字,每个汉字 400 个实例,每个实例均为 64*64 的二值图像; 训练集标注TrainSamples-400.csv,为 40000 个 0 到 99 间的整数,表示训练集中每个实例所属汉字类…...

GPT-4V-Act :一个多模态AI助手,能够像人类一样模拟通过鼠标和键盘进行网页浏览。
内容来源:xiaohuggg GPT-4V-Act :一个多模态AI助手,能够像人类一样模拟通过鼠标和键盘进行网页浏览。 它可以模拟人类浏览网页时的行为,如点击链接、填写表单、滚动页面等。 它通过视觉理解技术识别网页上的元素,就像…...

剪辑视频怎么把说话声音转成文字?
短视频已然成为了一种生活潮流,我们每天都在浏览各种短视频,或者用视频的形式记录生活,在制作视频的时候,字幕是一个很大的问题,给视频添加字幕可以更直观、更方便浏览。手动添加太费时间,下面就给大家分享…...

maven打包插件配置模板
主要有两类: 1、maven-shade-plugin 主要用于java程序编写的的打包 <build><plugins><plugin><groupId>org.apache.maven.plugins</groupId><artifactId>maven-shade-plugin</artifactId><version>3.2.4</ve…...
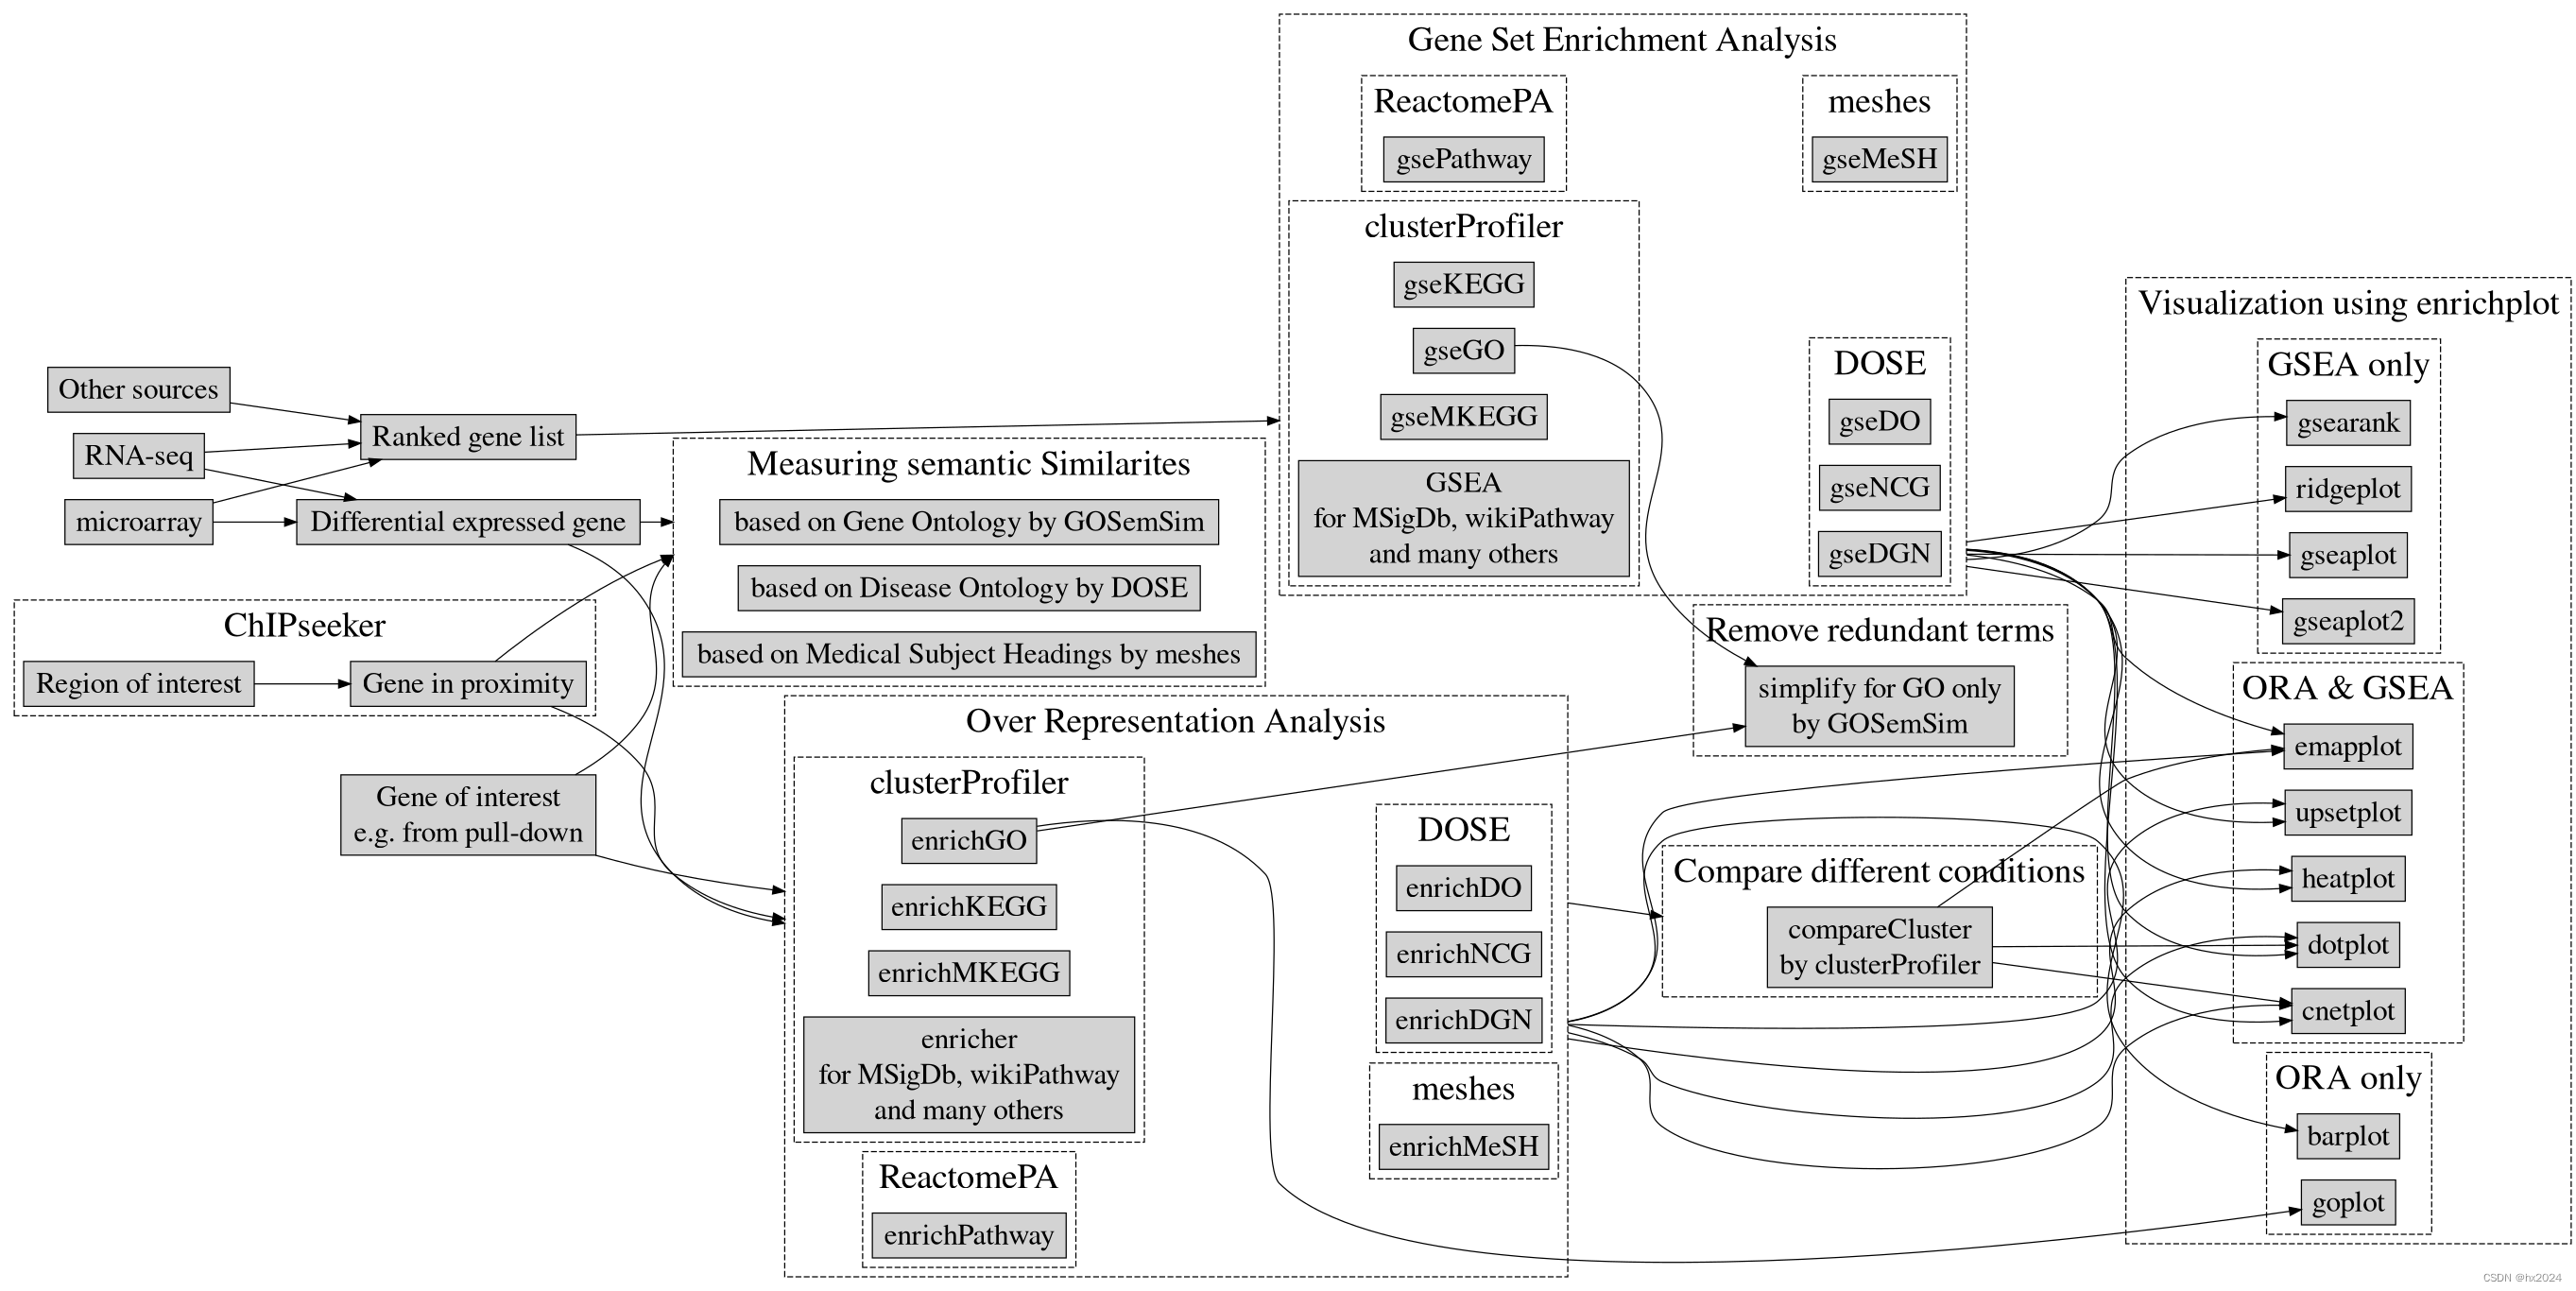
clusterProfiler包学习
📖 Introduction | Biomedical Knowledge Mining using GOSemSim and clusterProfiler (yulab-smu.top) 部分使用 #GO classificationlibrary(clusterProfiler) data(geneList, package"DOSE") gene <- names(geneList)[abs(geneList) > 2]# Entre…...
【Qt开发流程之】布局管理
介绍 一个界面呈现,如果要让用户有更好的观感,布局必不可少。 【Qt之布局】QVBoxLayout、QHBoxLayout、QGridLayout、QFormLayout介绍及使用 链接: https://blog.csdn.net/MrHHHHHH/article/details/133915208 qt布局类图: Qt布局是Qt图形…...
建筑可视化中的 3D 纹理
在线工具推荐: 三维数字孪生场景工具 - GLTF/GLB在线编辑器 - Three.js AI自动纹理化开发 - YOLO 虚幻合成数据生成器 - 3D模型在线转换 - 3D模型预览图生成服务 1、什么是 3D 纹理? 纹理是将二维图像添加到三维模型的技术艺术。虽然对物体进行纹…...
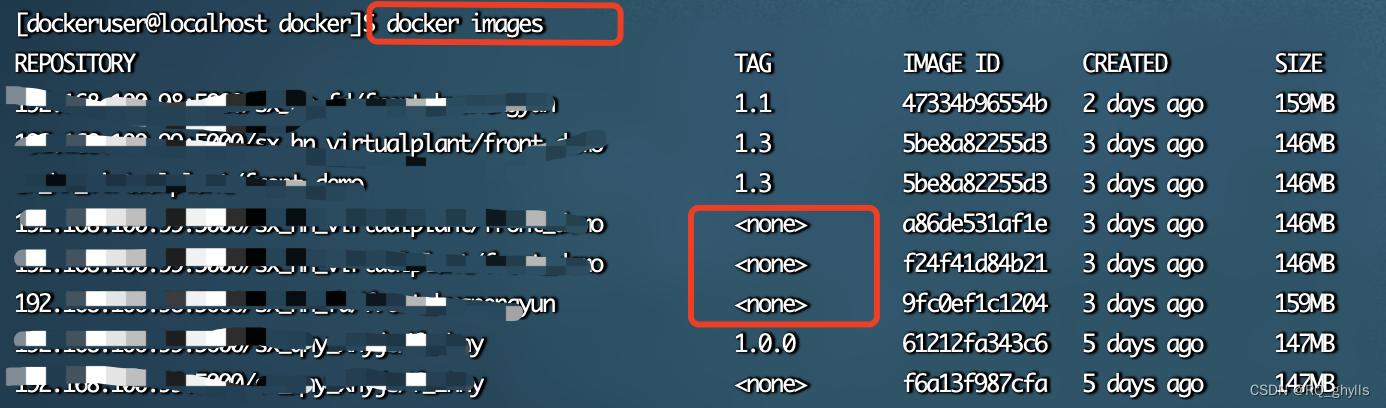
9.docker镜像Tag为none的原因
1.现象 使用docker images命令查看镜像列表,会发现存在许多标签为none的镜像: 2. 原因 docker镜像标签为none的原因如下: (1)构建或重新拉取同名同Tag的新镜像:构建或重新拉取同名同Tag的新镜像后&…...

HTML5学习系列之响应式图像
HTML5学习系列之响应式图像 前言响应式图像响应视图大小响应屏幕方向响应像素密度响应图像格式自适应像素比自适应视图宽 总结 前言 学习记录 响应式图像 响应视图大小 容器 srcset:图片地址,必需有。media:设置媒体查询。sizesÿ…...

基于数据库(MySQL)与缓存(Redis)实现分布式锁
分布式锁 分布式锁:分布式锁是在分布式的情况下实现互斥类型的一种锁 实现分布式锁需要满足的五个条件 可见性:多个进程都能看到结果互斥性:只允许一个持有锁的对象的进入临界资源可用性:无论何时都要保证锁服务的可用性&#x…...

2023年A特种设备相关管理(锅炉压力容器压力管道)证模拟考试题库及A特种设备相关管理(锅炉压力容器压力管道)理论考试试题
题库来源:安全生产模拟考试一点通公众号小程序 2023年A特种设备相关管理(锅炉压力容器压力管道)证模拟考试题库及A特种设备相关管理(锅炉压力容器压力管道)理论考试试题是由安全生产模拟考试一点通提供,A特…...

系统及其存储相关
1.区分系统(软件)和固件 1.1概念辨别 系统(软件software): 角色: 系统是计算机中的核心软件,提供基本的管理、控制和资源分配功能。它通常包括操作系统,负责管理硬件资源、提供用户…...
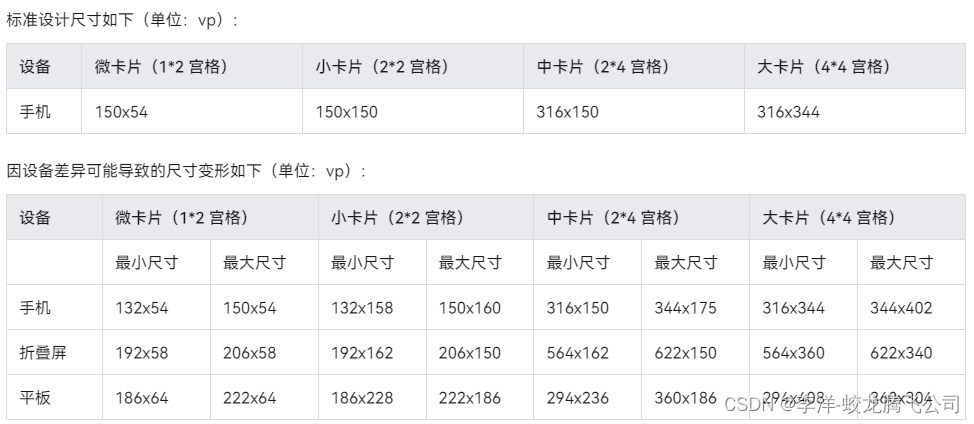
鸿蒙原生应用开发-折叠屏、平板设备服务卡片适配
一、多设备卡片适配原则 为不同尺寸的卡片提供不同的功能 在卡片开发过程中请考虑适配不同尺寸的设备,特别是在折叠屏和平板设备上,设备屏幕尺寸的变化直接影响了卡片内容的展示。请发挥想象力设计具有自适应能力的卡片,避免在卡片内容不做…...

Open Generative AI与Stable Diffusion对比:开源AI生成平台的5大优势
Open Generative AI与Stable Diffusion对比:开源AI生成平台的5大优势 【免费下载链接】Open-Generative-AI Open-source alternative to AI video platforms — Free AI image & video generation studio with 200 models (Flux, Midjourney, Kling, Sora, Veo)…...

Claude Desktop for Linux SSH助手集成:远程开发环境配置
Claude Desktop for Linux SSH助手集成:远程开发环境配置 【免费下载链接】claude-desktop-debian Claude Desktop for Linux 项目地址: https://gitcode.com/GitHub_Trending/cl/claude-desktop-debian Claude Desktop for Linux是一款专为Linux系统打造的A…...

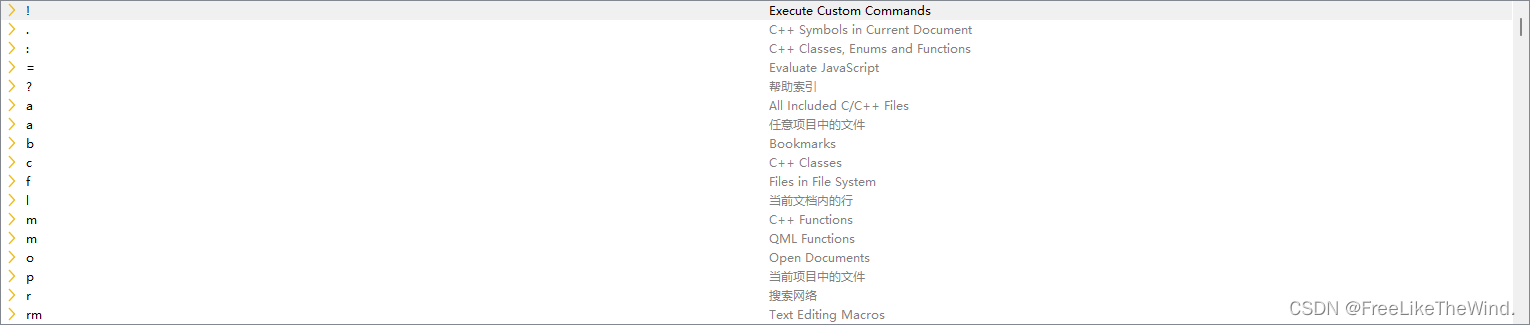
OpsKat v1.3.0 - SSH、数据库集中管理工具
平时操作服务器环境,经常要打开好几个工具来回切换,想着能不能直接跟 AI 说一句话就搞定,于是做了 OpsKat ,就算你不使用 AI 功能,常用的资产操作都集成在一起,也不用再在好几个工具之间跳了。举几个实际使…...

【Lovable前端开发实战指南】:20年专家亲授5个让团队抢着用的可维护性设计模式
更多请点击: https://kaifayun.com 第一章:Lovable前端开发的核心理念与可维护性本质 Lovable前端开发并非追求炫酷动效或技术堆砌,而是以人本设计为原点,将开发者体验(DX)与用户界面体验(UX&a…...

AI工程实践简报:如何用高质量信号提升技术决策效率
1. 项目概述:一份真正“够用”的AI资讯简报,到底长什么样?“This AI newsletter is all you need #38”——光看标题,你可能以为这又是一份泛泛而谈的行业 roundup,或是堆砌热点、浮于表面的“信息快餐”。但作为连续三…...

CLIP实战指南:零样本图文检索与跨模态应用落地
1. 这不是又一个“多模态模型”名词解释,而是你真正能用起来的CLIP实战指南如果你最近在做图像搜索、零样本分类、图文匹配、跨模态检索,或者哪怕只是想给自家图库自动打标签、给设计稿配文案、给电商商品图生成合规描述——那CLIP绝不是论文里那个高冷的…...

从“能读文档”到“能开会吵架”,技术人英语进阶路线图
在软件测试领域,英语能力早已不是简历上“通过CET-4”的一行小字,而是决定职业天花板的关键变量。对于测试从业者而言,英语学习存在一条隐秘却深刻的分水岭:左边是能借助翻译插件磕磕绊绊读完需求文档的“生存模式”,右…...

Go语言实现DCI架构:用角色扮演解耦对象行为与数据
1. 从“是什么”到“做什么”:DCI架构如何重塑对象行为建模在面向对象编程的世界里,我们总在试图用代码“复刻”现实。一个“人”是什么?我们定义一个People类,拥有姓名、年龄等属性。这个人能做什么?我们为People类添…...

成都制造企业供应链价格波动频繁,AI智能体该先预警哪些信号?
一、价格波动不是采购一个部门能扛住的问题很多制造企业谈供应链价格波动,第一反应是让采购去谈价、催报价、找替代供应商。但在真实经营里,价格风险很少只停留在采购单价上。铜、铝、钢材、塑料、电子元器件、包装材料、运费、汇率和供应商产能变化&…...

AIAgent 才是 Hermes Agent 的“总调度器”:run_agent.py 在系统里到底负责什么?
一、先给结论:AIAgent 不是“大模型”,而是“任务总控台”很多人第一次看 Hermes Agent,容易把核心误解成“调用某个大模型的代码”。但从官方文档和源码结构看,真正的核心不是模型本身,而是 run_agent.py 里的 AIAgen…...