s28.CentOS、Ubuntu、Rocky Linux系统初始化脚本v6版本
CentOS、Ubuntu、Rocky系统初始化脚本
Shell脚本源码地址:
Gitee:https://gitee.com/raymond9/shell
Github:https://github.com/raymond999999/shell
可以去上面的Gitee或Github仓库代码拉取脚本。
| 版本 | 功能 |
|---|---|
| v6版更新内容 | 1.由于CentOS 6和8官方已经停止支持,也就移除了其相关内容; |
| 2…分别有reset_v6_1版本(镜像仓库采用sed直接替换网址方式;修改ip地址采用nmcli命令方式)和reset_v6_2版本(镜像仓库和修改ip地址采用配置文件方式); | |
| 3.reset_v6_1添加了CentOS Stream 9用Perl语言更改镜像源的方法,优化了某些镜像仓库失效的bug,修改了某些bug。 | |
| v5版更新内容 | 1.优化了某些镜像仓库失效的bug; |
| 2.CentOS stream 9和Rocky 9修改ip的方式更改,做了相应的修改; | |
| 3.分别有reset_v5_1版本(镜像仓库采用sed直接替换网址方式;修改ip地址采用nmcli命令方式)和reset_v5_2版本(镜像仓库和修改ip地址采用配置文件方式); | |
| 4.把设置PS1、设置默认文本编辑器为vim和设置history格式单独分开; | |
| 5.修改了某些bug。 | |
| v4版更新内容 | 1.添加对CentOS stream 9、Rocky 9和Ubuntu 22.04系统的支持; |
| 2.添加Ubuntu 22.04修改IP地址和网关地址、双网卡更改IP地址; | |
| 3.添加禁用ctrl+alt+del重启功能; | |
| 4.修改了某些bug。 | |
| v3版更新内容 | 1.添加双网卡更改IP地址; |
| 2.添加设置系统时区。 | |
| v2版更新内容 | 1.添加对CentOS stream 8系统支持,添加了CentOS stream 8镜像仓库; |
| 2.由于CentOS 8已被废弃,修改成centos-vault的历史镜像仓库; | |
| 3.优化Ubuntu 20.04禁用swap不生效的问题。 | |
| v1版支持功能 | 1.支持CentOS 6/7/8、Ubuntu 18.04/20.04、Rocky 8系统; |
| 2.支持功能禁用SELinux、关闭防火墙、优化SSH、设置系统别名、设置vimrc配置文件、设置软件包仓库、Minimal安装建议安装软件、安装邮件服务并配置邮件、更改SSH端口号、修改网卡名、修改IP地址和网关地址、设置主机名、设置PS1和系统环境变量、禁用SWAP、优化内核参数、优化资源限制参数、Ubuntu设置root用户登录、Ubuntu卸载无用软件包。 |
下面是reset_v6_1脚本内容:
[root@rocky9 ~]# cat reset_v6_1.sh
#!/bin/bash
#
#***************************************************************************************************
#Author:        Raymond
#QQ:            88563128
#Date:          2023-11-15
#FileName:      reset_v6_1.sh
#URL:           raymond.blog.csdn.net
#Description:   reset for CentOS 7 & CentOS Stream 8/9 & Ubuntu 18.04/20.04/22.04 & Rocky 8/9
#Copyright (C): 2023 All rights reserved
#***************************************************************************************************
COLOR="echo -e \\033[01;31m"
END='\033[0m'os(){OS_ID=`sed -rn '/^NAME=/s@.*="([[:alpha:]]+).*"$@\1@p' /etc/os-release`OS_NAME=`sed -rn '/^NAME=/s@.*="([[:alpha:]]+) (.*)"$@\2@p' /etc/os-release`OS_RELEASE=`sed -rn '/^VERSION_ID=/s@.*="?([0-9.]+)"?@\1@p' /etc/os-release`OS_RELEASE_VERSION=`sed -rn '/^VERSION_ID=/s@.*="?([0-9]+)\.?.*"?@\1@p' /etc/os-release`
}disable_selinux(){if [ ${OS_ID} == "CentOS" -o ${OS_ID} == "Rocky" ];thenif [ `getenforce` == "Enforcing" ];thensed -ri.bak 's/^(SELINUX=).*/\1disabled/' /etc/selinux/config${COLOR}"${OS_ID} ${OS_RELEASE} SELinux已禁用,请重新启动系统后才能生效!"${END}else${COLOR}"${OS_ID} ${OS_RELEASE} SELinux已被禁用,不用设置!"${END}fielse${COLOR}"${OS_ID} ${OS_RELEASE} SELinux默认没有安装,不用设置!"${END}fi
}disable_firewall(){if [ ${OS_ID} == "CentOS" -o ${OS_ID} == "Rocky" ];thenrpm -q firewalld &> /dev/null && { systemctl disable --now firewalld &> /dev/null; ${COLOR}"${OS_ID} ${OS_RELEASE} Firewall防火墙已关闭!"${END}; } || ${COLOR}"${OS_ID} ${OS_RELEASE} iptables防火墙已关闭!"${END}elsedpkg -s ufw &> /dev/null && { systemctl disable --now ufw &> /dev/null; ${COLOR}"${OS_ID} ${OS_RELEASE} ufw防火墙已关闭!"${END}; } || ${COLOR}"${OS_ID} ${OS_RELEASE}  没有ufw防火墙服务,不用关闭!"${END}fi
}optimization_sshd(){if [ ${OS_ID} == "CentOS" -o ${OS_ID} == "Rocky" ];thensed -ri.bak -e 's/^#(UseDNS).*/\1 no/' -e 's/^(GSSAPIAuthentication).*/\1 no/' /etc/ssh/sshd_configelsesed -ri.bak -e 's/^#(UseDNS).*/\1 no/' -e 's/^#(GSSAPIAuthentication).*/\1 no/' /etc/ssh/sshd_configfisystemctl restart sshd${COLOR}"${OS_ID} ${OS_RELEASE} SSH已优化完成!"${END}
}set_centos_alias(){if [ ${OS_RELEASE_VERSION} == "7" -o ${OS_RELEASE_VERSION} == "8" ];thencat >>~/.bashrc <<-EOF
alias cdnet="cd /etc/sysconfig/network-scripts"
alias vie0="vim /etc/sysconfig/network-scripts/ifcfg-eth0"
alias vie1="vim /etc/sysconfig/network-scripts/ifcfg-eth1"
alias scandisk="echo '- - -' > /sys/class/scsi_host/host0/scan;echo '- - -' > /sys/class/scsi_host/host1/scan;echo '- - -' > /sys/class/scsi_host/host2/scan"
EOFelsecat >>~/.bashrc <<-EOF
alias cdnet="cd /etc/NetworkManager/system-connections"
alias vie0="vim /etc/NetworkManager/system-connections/eth0.nmconnection"
alias vie1="vim /etc/NetworkManager/system-connections/eth1.nmconnection"
alias scandisk="echo '- - -' > /sys/class/scsi_host/host0/scan;echo '- - -' > /sys/class/scsi_host/host1/scan;echo '- - -' > /sys/class/scsi_host/host2/scan"
EOFfi${COLOR}"${OS_ID} ${OS_RELEASE} 系统别名已设置成功,请重新登陆后生效!"${END}
}set_ubuntu_alias(){cat >>~/.bashrc <<-EOF
alias cdnet="cd /etc/netplan"
alias scandisk="echo '- - -' > /sys/class/scsi_host/host0/scan;echo '- - -' > /sys/class/scsi_host/host1/scan;echo '- - -' > /sys/class/scsi_host/host2/scan"
EOF${COLOR}"${OS_ID} ${OS_RELEASE} 系统别名已设置成功,请重新登陆后生效!"${END}
}set_alias(){if [ ${OS_ID} == "CentOS" -o ${OS_ID} == "Rocky" ];thenif grep -Eqi "(.*cdnet|.*vie0|.*vie1|.*scandisk)" ~/.bashrc;thensed -i -e '/.*cdnet/d'  -e '/.*vie0/d' -e '/.*vie1/d' -e '/.*scandisk/d' ~/.bashrcset_centos_aliaselseset_centos_aliasfifiif [ ${OS_ID} == "Ubuntu" ];thenif grep -Eqi "(.*cdnet|.*scandisk)" ~/.bashrc;thensed -i -e '/.*cdnet/d' -e '/.*scandisk/d' ~/.bashrcset_ubuntu_aliaselseset_ubuntu_aliasfifi
}set_vimrc(){read -p "请输入作者名: " AUTHORread -p "请输入QQ号: " QQread -p "请输入网址: " V_URLcat >~/.vimrc <<-EOF
set ts=4
set expandtab
set ignorecase
set cursorline
set autoindent
autocmd BufNewFile *.sh exec ":call SetTitle()"
func SetTitle()if expand("%:e") == 'sh'call setline(1,"#!/bin/bash")call setline(2,"#")call setline(3,"#**********************************************************************************************")call setline(4,"#Author:        ${AUTHOR}")call setline(5,"#QQ:            ${QQ}")call setline(6,"#Date:          ".strftime("%Y-%m-%d"))call setline(7,"#FileName:      ".expand("%"))call setline(8,"#URL:           ${V_URL}")call setline(9,"#Description:   The test script")call setline(10,"#Copyright (C): ".strftime("%Y")." All rights reserved")call setline(11,"#*********************************************************************************************")call setline(12,"")endif
endfunc
autocmd BufNewFile * normal G
EOF${COLOR}"${OS_ID} ${OS_RELEASE} vimrc设置完成,请重新系统启动才能生效!"${END}
}aliyun(){URL=mirrors.aliyun.com
}huawei(){URL=repo.huaweicloud.com
}tencent(){URL=mirrors.tencent.com
}tuna(){URL=mirrors.tuna.tsinghua.edu.cn
}netease(){URL=mirrors.163.com
}sohu(){URL=mirrors.sohu.com
}nju(){URL=mirrors.nju.edu.cn
}ustc(){URL=mirrors.ustc.edu.cn
}sjtu(){URL=mirrors.sjtug.sjtu.edu.cn
}set_yum_rocky8_9(){sed -i.bak -e 's|^mirrorlist=|#mirrorlist=|g' -e 's|^#baseurl=http://dl.rockylinux.org/$contentdir|baseurl=https://'${URL}'/rocky|g' /etc/yum.repos.d/[Rr]ocky*.repo${COLOR}"更新镜像源中,请稍等..."${END}dnf clean all &> /dev/nulldnf makecache &> /dev/null${COLOR}"${OS_ID} ${OS_RELEASE} YUM源设置完成!"${END}
}set_yum_rocky8_9_2(){sed -i.bak -e 's|^mirrorlist=|#mirrorlist=|g' -e 's|^#baseurl=http://dl.rockylinux.org/$contentdir|baseurl=https://'${URL}'/rockylinux|g' /etc/yum.repos.d/[Rr]ocky*.repo${COLOR}"更新镜像源中,请稍等..."${END}dnf clean all &> /dev/nulldnf makecache &> /dev/null${COLOR}"${OS_ID} ${OS_RELEASE} YUM源设置完成!"${END}
}set_yum_centos_stream9(){PERL_FILE=update_mirror.plif [ ! -e ${PERL_FILE} ];then${COLOR}"缺少${PERL_FILE}文件"${END}exitelse${COLOR}"${PERL_FILE}文件已准备好,继续后续配置!"${END}       firpm -q perl &> /dev/null || { ${COLOR}"安装perl工具,请稍等..."${END};yum -y install perl &> /dev/null; }perl ./update_mirror.pl /etc/yum.repos.d/centos*.repo${COLOR}"更新镜像源中,请稍等..."${END}dnf clean all &> /dev/nulldnf makecache &> /dev/null${COLOR}"${OS_ID} ${OS_RELEASE} YUM源设置完成!"${END}
}set_yum_centos_stream8(){sed -i.bak -e 's|^mirrorlist=|#mirrorlist=|g' -e 's|^#baseurl=http://mirror.centos.org/$contentdir|baseurl=https://'${URL}'/centos|g' /etc/yum.repos.d/CentOS-*.repo${COLOR}"更新镜像源中,请稍等..."${END}dnf clean all &> /dev/nulldnf makecache &> /dev/null${COLOR}"${OS_ID} ${OS_RELEASE} YUM源设置完成!"${END}
}set_epel_rocky_centos8_9(){rpm -q epel-release &> /dev/null || { ${COLOR}"安装epel-release工具,请稍等..."${END};yum -y install epel-release &> /dev/null; }sed -i.bak -e 's|^metalink=|#metalink=|g' -e 's|^#baseurl=https://download.example/pub/epel|baseurl=https://'${URL}'/epel|g' /etc/yum.repos.d/epel*.repoif [ ${OS_RELEASE_VERSION} == "9" ];thensed -i -e 's|^enabled=1|enabled=0|g' /etc/yum.repos.d/epel-cisco*.repofi${COLOR}"更新镜像源中,请稍等..."${END}dnf clean all &> /dev/nulldnf makecache &> /dev/null${COLOR}"${OS_ID} ${OS_RELEASE} EPEL源设置完成!"${END}
}set_epel_2_rocky_centos8_9(){rpm -q epel-release &> /dev/null || { ${COLOR}"安装epel-release工具,请稍等..."${END};yum -y install epel-release &> /dev/null; }sed -i.bak -e 's|^metalink=|#metalink=|g' -e 's|^#baseurl=https://download.example/pub/epel|baseurl=https://'${URL}'/fedora-epel|g' /etc/yum.repos.d/epel*.repoif [ ${OS_RELEASE_VERSION} == "9" ];thensed -i -e 's|^enabled=1|enabled=0|g' /etc/yum.repos.d/epel-cisco*.repofi${COLOR}"更新镜像源中,请稍等..."${END}dnf clean all &> /dev/nulldnf makecache &> /dev/null${COLOR}"${OS_ID} ${OS_RELEASE} EPEL源设置完成!"${END}
}set_epel_3_rocky_centos8_9(){rpm -q epel-release &> /dev/null || { ${COLOR}"安装epel-release工具,请稍等..."${END};yum -y install epel-release &> /dev/null; }sed -i.bak -e 's|^metalink=|#metalink=|g' -e 's|^#baseurl=https://download.example/pub/epel|baseurl=https://'${URL}'/fedora/epel|g' /etc/yum.repos.d/epel*.repoif [ ${OS_RELEASE_VERSION} == "9" ];thensed -i -e 's|^enabled=1|enabled=0|g' /etc/yum.repos.d/epel-cisco*.repofi${COLOR}"更新镜像源中,请稍等..."${END}dnf clean all &> /dev/nulldnf makecache &> /dev/null${COLOR}"${OS_ID} ${OS_RELEASE} EPEL源设置完成!"${END}
}set_yum_centos7(){sed -i.bak -e 's|^mirrorlist=|#mirrorlist=|g' -e 's|^#baseurl=http://mirror.centos.org|baseurl=https://'${URL}'|g' /etc/yum.repos.d/CentOS-*.repo${COLOR}"更新镜像源中,请稍等..."${END}yum clean all &> /dev/nullyum makecache &> /dev/null${COLOR}"${OS_ID} ${OS_RELEASE} YUM源设置完成!"${END}
}set_epel_centos7(){rpm -q epel-release &> /dev/null || { ${COLOR}"安装epel-release工具,请稍等..."${END};yum -y install epel-release &> /dev/null; }sed -i.bak -e 's!^metalink=!#metalink=!g' -e 's!^#baseurl=!baseurl=!g' -e 's!https\?://download\.fedoraproject\.org/pub/epel!https://'${URL}'/epel!g' -e 's!https\?://download\.example/pub/epel!https://'${URL}'/epel!g' /etc/yum.repos.d/epel*.repo${COLOR}"更新镜像源中,请稍等..."${END}yum clean all &> /dev/nullyum makecache &> /dev/null${COLOR}"${OS_ID} ${OS_RELEASE} EPEL源设置完成!"${END}
}set_epel_2_centos7(){rpm -q epel-release &> /dev/null || { ${COLOR}"安装epel-release工具,请稍等..."${END};yum -y install epel-release &> /dev/null; }sed -i.bak -e 's!^metalink=!#metalink=!g' -e 's!^#baseurl=!baseurl=!g' -e 's!https\?://download\.fedoraproject\.org/pub/epel!https://'${URL}'/fedora-epel!g' -e 's!https\?://download\.example/pub/epel!https://'${URL}'/fedora-epel!g' /etc/yum.repos.d/epel*.repo${COLOR}"更新镜像源中,请稍等..."${END}yum clean all &> /dev/nullyum makecache &> /dev/null${COLOR}"${OS_ID} ${OS_RELEASE} EPEL源设置完成!"${END}
}set_epel_3_centos7(){rpm -q epel-release &> /dev/null || { ${COLOR}"安装epel-release工具,请稍等..."${END};yum -y install epel-release &> /dev/null; }sed -i.bak -e 's!^metalink=!#metalink=!g' -e 's!^#baseurl=!baseurl=!g' -e 's!https\?://download\.fedoraproject\.org/pub/epel!https://'${URL}'/fedora/epel!g' -e 's!https\?://download\.example/pub/epel!https://'${URL}'/fedora/epel!g' /etc/yum.repos.d/epel*.repo${COLOR}"更新镜像源中,请稍等..."${END}yum clean all &> /dev/nullyum makecache &> /dev/null${COLOR}"${OS_ID} ${OS_RELEASE} EPEL源设置完成!"${END}
}rocky8_9_base_menu(){while true;doecho -e "\E[$[RANDOM%7+31];1m"cat <<-EOF
1)阿里镜像源
2)网易镜像源
3)搜狐镜像源
4)南京大学镜像源
5)中科大镜像源
6)上海交通大学镜像源
7)退出
EOFecho -e '\E[0m'read -p "请输入镜像源编号(1-7): " NUMcase ${NUM} in1)aliyunset_yum_rocky8_9_2;;2)neteaseset_yum_rocky8_9;;3)sohuset_yum_rocky8_9;;4)njuset_yum_rocky8_9;;5)ustcset_yum_rocky8_9;;6)sjtuset_yum_rocky8_9;;7)break;;*)${COLOR}"输入错误,请输入正确的数字(1-7)!"${END};;esacdone
}centos_stream9_base_menu(){${COLOR}"由于CentOS Stream 9镜像源是Perl语言实现的,在更改镜像源之前先确保把'update_mirror.pl'文件和reset脚本放在同一个目录下,否则后面程序会退出,默认的CentOS Stream 9镜像源设置的是阿里云,要修改镜像源,请去'update_mirror.pl'文件里修改url变量!"${END}sleep 10set_yum_centos_stream9
}centos_stream8_base_menu(){while true;doecho -e "\E[$[RANDOM%7+31];1m"cat <<-EOF
1)阿里镜像源
2)华为镜像源
3)腾讯镜像源
4)清华镜像源
5)网易镜像源
6)南京大学镜像源
7)中科大镜像源
8)退出
EOFecho -e '\E[0m'read -p "请输入镜像源编号(1-8): " NUMcase ${NUM} in1)aliyunset_yum_centos_stream8;;2)huaweiset_yum_centos_stream8;;3)tencentset_yum_centos_stream8;;4)tunaset_yum_centos_stream8;;5)neteaseset_yum_centos_stream8;;6)njuset_yum_centos_stream8;;7)ustcset_yum_centos_stream8;;8)break;;*)${COLOR}"输入错误,请输入正确的数字(1-8)!"${END};;esacdone
}centos7_base_menu(){while true;doecho -e "\E[$[RANDOM%7+31];1m"cat <<-EOF
1)阿里镜像源
2)华为镜像源
3)腾讯镜像源
4)清华镜像源
5)网易镜像源
6)南京大学镜像源
7)中科大镜像源
8)退出
EOFecho -e '\E[0m'read -p "请输入镜像源编号(1-8): " NUMcase ${NUM} in1)aliyunset_yum_centos7;;2)huaweiset_yum_centos7;;3)tencentset_yum_centos7;;4)tunaset_yum_centos7;;5)neteaseset_yum_centos7;;6)njuset_yum_centos7;;7)ustcset_yum_centos7;;8)break;;*)${COLOR}"输入错误,请输入正确的数字(1-8)!"${END};;esacdone
}rocky_centos8_9_epel_menu(){while true;doecho -e "\E[$[RANDOM%7+31];1m"cat <<-EOF
1)阿里镜像源
2)华为镜像源
3)腾讯镜像源
4)清华镜像源
5)搜狐镜像源
6)南京大学镜像源
7)中科大镜像源
8)上海交通大学镜像源
9)退出
EOFecho -e '\E[0m'read -p "请输入镜像源编号(1-9): " NUMcase ${NUM} in1)aliyunset_epel_rocky_centos8_9;;2)huaweiset_epel_rocky_centos8_9;;3)tencentset_epel_rocky_centos8_9;;4)tunaset_epel_rocky_centos8_9;;5)sohuset_epel_2_rocky_centos8_9;;6)njuset_epel_rocky_centos8_9;;7)ustcset_epel_rocky_centos8_9;;8)sjtuset_epel_3_rocky_centos8_9;;9)break;;*)${COLOR}"输入错误,请输入正确的数字(1-9)!"${END};;esacdone
}centos7_epel_menu(){while true;doecho -e "\E[$[RANDOM%7+31];1m"cat <<-EOF
1)阿里镜像源
2)华为镜像源
3)腾讯镜像源
4)清华镜像源
5)搜狐镜像源
6)南京大学镜像源
7)中科大镜像源
8)上海交通大学镜像源
9)退出
EOFecho -e '\E[0m'read -p "请输入镜像源编号(1-9): " NUMcase ${NUM} in1)aliyunset_epel_centos7;;2)huaweiset_epel_centos7;;3)tencentset_epel_centos7;;4)tunaset_epel_centos7;;5)sohuset_epel_2_centos7;;6)njuset_epel_centos7;;7)ustcset_epel_centos7;;8)sjtuset_epel_3_centos7;;9)break;;*)${COLOR}"输入错误,请输入正确的数字(1-9)!"${END};;esacdone
}rocky_menu(){while true;doecho -e "\E[$[RANDOM%7+31];1m"cat <<-EOF
1)base仓库
2)epel仓库
3)退出
EOFecho -e '\E[0m'read -p "请输入镜像源编号(1-3): " NUMcase ${NUM} in1)rocky8_9_base_menu;;2)rocky_centos8_9_epel_menu;;3)break;;*)${COLOR}"输入错误,请输入正确的数字(1-3)!"${END};;esacdone
}centos_menu(){while true;doecho -e "\E[$[RANDOM%7+31];1m"cat <<-EOF
1)base仓库
2)epel仓库
3)退出
EOFecho -e '\E[0m'read -p "请输入镜像源编号(1-3): " NUMcase ${NUM} in1)if [ ${OS_NAME} == "Stream" ];thenif [ ${OS_RELEASE_VERSION} == "8" ];thencentos_stream8_base_menuelsecentos_stream9_base_menufielsecentos7_base_menufi;;2)if [ ${OS_RELEASE_VERSION} == "8" -o ${OS_RELEASE_VERSION} == "9" ];thenrocky_centos8_9_epel_menuelsecentos7_epel_menufi;;3)break;;*)${COLOR}"输入错误,请输入正确的数字(1-3)!"${END};;esacdone
}set_apt(){OLD_URL=`sed -rn "s@^deb http://(.*)/ubuntu/? $(lsb_release -cs) main.*@\1@p" /etc/apt/sources.list`sed -i.bak 's/'${OLD_URL}'/'${URL}'/g' /etc/apt/sources.listif [ ${OS_RELEASE_VERSION} == "18" ];thenSEC_URL=`sed -rn "s@^deb http://(.*)/ubuntu $(lsb_release -cs)-security main.*@\1@p" /etc/apt/sources.list`sed -i.bak 's/'${SEC_URL}'/'${URL}'/g' /etc/apt/sources.listfi${COLOR}"更新镜像源中,请稍等..."${END}apt update &> /dev/null${COLOR}"${OS_ID} ${OS_RELEASE} APT源设置完成!"${END}
}apt_menu(){while true;doecho -e "\E[$[RANDOM%7+31];1m"cat <<-EOF
1)阿里镜像源
2)华为镜像源
3)腾讯镜像源
4)清华镜像源
5)网易镜像源
6)南京大学镜像源
7)中科大镜像源
8)上海交通大学镜像源
9)退出
EOFecho -e '\E[0m'read -p "请输入镜像源编号(1-9): " NUMcase ${NUM} in1)aliyunset_apt;;2)huaweiset_apt;;3)tencentset_apt;;4)tunaset_apt;;5)neteaseset_apt;;6)njuset_apt;;7)ustcset_apt;;8)sjtuset_apt;;9)break;;*)${COLOR}"输入错误,请输入正确的数字(1-9)!"${END};;esacdone
}set_mirror_repository(){if [ ${OS_ID} == "CentOS" ];thencentos_menuelif [ ${OS_ID} == "Rocky" ];thenrocky_menuelseapt_menufi
}centos_minimal_install(){${COLOR}'开始安装“Minimal安装建议安装软件包”,请稍等......'${END}yum -y install gcc make autoconf gcc-c++ glibc glibc-devel pcre pcre-devel openssl openssl-devel systemd-devel zlib-devel vim lrzsz tree tmux lsof tcpdump wget net-tools iotop bc bzip2 zip unzip nfs-utils man-pages &> /dev/null${COLOR}"${OS_ID} ${OS_RELEASE} Minimal安装建议安装软件包已安装完成!"${END}
}ubuntu_minimal_install(){${COLOR}'开始安装“Minimal安装建议安装软件包”,请稍等......'${END}apt -y install iproute2 ntpdate tcpdump telnet traceroute nfs-kernel-server nfs-common lrzsz tree openssl libssl-dev libpcre3 libpcre3-dev zlib1g-dev gcc openssh-server iotop unzip zip${COLOR}"${OS_ID} ${OS_RELEASE} Minimal安装建议安装软件包已安装完成!"${END}
}minimal_install(){if [ ${OS_ID} == "CentOS" -o ${OS_ID} == "Rocky" ] &> /dev/null;thencentos_minimal_installelseubuntu_minimal_installfi
}set_mail(){                                                                                                 if [ ${OS_ID} == "CentOS" -o ${OS_ID} == "Rocky" ];thenrpm -q postfix &> /dev/null || { yum -y install postfix &> /dev/null; systemctl enable --now postfix &> /dev/null; }rpm -q mailx &> /dev/null || yum -y install mailx &> /dev/nullelsedpkg -s mailutils &> /dev/null || apt -y install mailutilsfiread -p "请输入邮箱地址: " MAILread -p "请输入邮箱授权码: " AUTHSMTP=`echo ${MAIL} |awk -F"@" '{print $2}'`cat >~/.mailrc <<-EOF
set from=${MAIL}
set smtp=smtp.${SMTP}
set smtp-auth-user=${MAIL}
set smtp-auth-password=${AUTH}
set smtp-auth=login
set ssl-verify=ignore
EOF${COLOR}"${OS_ID} ${OS_RELEASE} 邮件设置完成,请重新登录后才能生效!"${END}
}set_sshd_port(){disable_selinuxdisable_firewallread -p "请输入端口号: " PORTsed -i 's/#Port 22/Port '${PORT}'/' /etc/ssh/sshd_config${COLOR}"${OS_ID} ${OS_RELEASE} 更改SSH端口号已完成,请重启系统后生效!"${END}
}set_centos_eth(){#修改网卡名称配置文件if grep -Eqi "(net\.ifnames|biosdevname)" /etc/default/grub;then${COLOR}"${OS_ID} ${OS_RELEASE} 网卡名配置文件已修改,不用修改!"${END}elsesed -ri.bak '/^GRUB_CMDLINE_LINUX=/s@"$@ net.ifnames=0 biosdevname=0"@' /etc/default/grubgrub2-mkconfig -o /boot/grub2/grub.cfg >& /dev/null${COLOR}"${OS_ID} ${OS_RELEASE} 网卡名已修改成功,请重新启动系统后才能生效!"${END}fi
}set_ubuntu_eth(){#修改网卡名称配置文件if grep -Eqi "(net\.ifnames|biosdevname)" /etc/default/grub;then${COLOR}"${OS_ID} ${OS_RELEASE} 网卡名配置文件已修改,不用修改!"${END}elsesed -ri.bak '/^GRUB_CMDLINE_LINUX=/s@"$@net.ifnames=0 biosdevname=0"@' /etc/default/grubgrub-mkconfig -o /boot/grub/grub.cfg >& /dev/null${COLOR}"${OS_ID} ${OS_RELEASE} 网卡名已修改成功,请重新启动系统后才能生效!"${END}fi
}set_eth(){if [ ${OS_ID} == "CentOS" -o ${OS_ID} == "Rocky" ];thenset_centos_ethelseset_ubuntu_ethfi
}check_ip(){local IP=$1VALID_CHECK=$(echo ${IP}|awk -F. '$1<=255&&$2<=255&&$3<=255&&$4<=255{print "yes"}')if echo ${IP}|grep -E "^[0-9]{1,3}\.[0-9]{1,3}\.[0-9]{1,3}\.[0-9]{1,3}$" >/dev/null; thenif [ ${VALID_CHECK} == "yes" ]; thenecho "IP ${IP}  available!"return 0elseecho "IP ${IP} not available!"return 1fielseecho "IP format error!"return 1fi
}set_centos_ip(){ETHNAME=`ip addr | awk -F"[ :]" '/^2/{print $3}'`while true; doread -p "请输入IP地址: " IPcheck_ip ${IP}[ $? -eq 0 ] && breakdoneread -p "请输入子网掩码位数: " C_PREFIXwhile true; doread -p "请输入网关地址: " GATEWAYcheck_ip ${GATEWAY}[ $? -eq 0 ] && breakdonenmcli connection add type ethernet con-name eth0 ifname eth0 ipv4.method manual ipv4.address "${IP}/${C_PREFIX}" ipv4.gateway "${GATEWAY}" ipv4.dns "223.5.5.5,180.76.76.76" autoconnect yes >& /dev/null${COLOR}"${OS_ID} ${OS_RELEASE} IP地址、网关地址和DNS已修改成功,10秒后,机器会自动重启!"${END}sleep 10nmcli connection delete ${ETHNAME} >& /dev/nullreboot
}set_ubuntu_ip(){while true; doread -p "请输入IP地址: " IPcheck_ip ${IP}[ $? -eq 0 ] && breakdoneread -p "请输入子网掩码位数: " U_PREFIXwhile true; doread -p "请输入网关地址: " GATEWAYcheck_ip ${GATEWAY}[ $? -eq 0 ] && breakdonecat > /etc/netplan/01-netcfg.yaml <<-EOF
network:version: 2renderer: networkdethernets:eth0:dhcp4: nodhcp6: noaddresses: [${IP}/${U_PREFIX}] gateway4: ${GATEWAY}nameservers:addresses: [223.5.5.5, 180.76.76.76]
EOF${COLOR}"${OS_ID} ${OS_RELEASE} IP地址、网关地址和DNS已修改成功,请重新启动系统后生效!"${END}
}set_ubuntu_22_ip(){while true; doread -p "请输入IP地址: " IPcheck_ip ${IP}[ $? -eq 0 ] && breakdoneread -p "请输入子网掩码位数: " U_PREFIXwhile true; doread -p "请输入网关地址: " GATEWAYcheck_ip ${GATEWAY}[ $? -eq 0 ] && breakdonecat > /etc/netplan/00-installer-config.yaml <<-EOF
network:version: 2renderer: networkdethernets:eth0:dhcp4: nodhcp6: noaddresses: [${IP}/${U_PREFIX}]routes:- to: defaultvia: ${GATEWAY}nameservers:addresses: [223.5.5.5, 180.76.76.76]
EOF${COLOR}"${OS_ID} ${OS_RELEASE} IP地址、网关地址和DNS已修改成功,请重新启动系统后生效!"${END}
}set_ip(){if [ ${OS_ID} == "CentOS" -o ${OS_ID} == "Rocky" ];thenset_centos_ipelif [ ${OS_RELEASE_VERSION} == "18" -o ${OS_RELEASE_VERSION} == "20" ];thenset_ubuntu_ip elseset_ubuntu_22_ipfi
}set_dual_centos_ip(){ETHNAME=`ip addr | awk -F"[ :]" '/^2/{print $3}'`ETHNAME2=`ip addr | awk -F"[ :]" '/^3/{print $3}'`while true; doread -p "请输入第一块网卡IP地址: " IPcheck_ip ${IP}[ $? -eq 0 ] && breakdoneread -p "请输入子网掩码位数: " C_PREFIXwhile true; doread -p "请输入网关地址: " GATEWAYcheck_ip ${GATEWAY}[ $? -eq 0 ] && breakdonenmcli connection add type ethernet con-name eth0 ifname eth0 ipv4.method manual ipv4.address "${IP}/${C_PREFIX}" ipv4.gateway "${GATEWAY}" ipv4.dns "223.5.5.5,180.76.76.76" autoconnect yes >& /dev/nullwhile true; doread -p "请输入第二块网卡IP地址: " IP2check_ip ${IP2}[ $? -eq 0 ] && breakdoneread -p "请输入子网掩码位数: " C_PREFIX2nmcli connection add type ethernet con-name eth1 ifname eth1 ipv4.method manual ipv4.address "${IP2}/${C_PREFIX2}" autoconnect yes >& /dev/null${COLOR}"${OS_ID} ${OS_RELEASE} IP地址、网关地址和DNS已修改成功,10秒后,机器会自动重启!"${END}sleep 10nmcli connection delete ${ETHNAME} >& /dev/null; nmcli connection delete ${ETHNAME2} >& /dev/nullreboot
}set_dual_ubuntu_ip(){while true; doread -p "请输入第一块网卡IP地址: " IPcheck_ip ${IP}[ $? -eq 0 ] && breakdoneread -p "请输入子网掩码位数: " U_PREFIXwhile true; doread -p "请输入网关地址: " GATEWAYcheck_ip ${GATEWAY}[ $? -eq 0 ] && breakdonewhile true; doread -p "请输入第二块网卡IP地址: " IP2check_ip ${IP2}[ $? -eq 0 ] && breakdoneread -p "请输入子网掩码位数: " U_PREFIX2cat > /etc/netplan/01-netcfg.yaml <<-EOF
network:version: 2renderer: networkdethernets:eth0:dhcp4: nodhcp6: noaddresses: [${IP}/${U_PREFIX}] gateway4: ${GATEWAY}nameservers:addresses: [223.5.5.5, 180.76.76.76]eth1:dhcp4: nodhcp6: noaddresses: [${IP2}/${U_PREFIX2}]
EOF${COLOR}"${OS_ID} ${OS_RELEASE} IP地址、网关地址和DNS已修改成功,请重新启动系统后生效!"${END}
}set_dual_ubuntu_22_ip(){while true; doread -p "请输入第一块网卡IP地址: " IPcheck_ip ${IP}[ $? -eq 0 ] && breakdoneread -p "请输入子网掩码位数: " U_PREFIXwhile true; doread -p "请输入网关地址: " GATEWAYcheck_ip ${GATEWAY}[ $? -eq 0 ] && breakdonewhile true; doread -p "请输入第二块网卡IP地址: " IP2check_ip ${IP2}[ $? -eq 0 ] && breakdoneread -p "请输入子网掩码位数: " U_PREFIX2cat > /etc/netplan/00-installer-config.yaml <<-EOF
network:version: 2renderer: networkdethernets:eth0:dhcp4: nodhcp6: noaddresses: [${IP}/${U_PREFIX}] routes:- to: defaultvia: ${GATEWAY}nameservers:addresses: [223.5.5.5, 180.76.76.76]eth1:dhcp4: nodhcp6: noaddresses: [${IP2}/${U_PREFIX2}]
EOF${COLOR}"${OS_ID} ${OS_RELEASE} IP地址、网关地址和DNS已修改成功,请重新启动系统后生效!"${END}
}set_dual_ip(){if [ ${OS_ID} == "CentOS" -o ${OS_ID} == "Rocky" ];thenset_dual_centos_ipelif [ ${OS_RELEASE_VERSION} == "18" -o ${OS_RELEASE_VERSION} == "20" ];thenset_dual_ubuntu_ip elseset_dual_ubuntu_22_ipfi
}set_hostname(){read -p "请输入主机名: " HOSThostnamectl set-hostname ${HOST}${COLOR}"${OS_ID} ${OS_RELEASE} 主机名设置成功,请重新登录生效!"${END}
}red(){P_COLOR=31
}green(){P_COLOR=32
}yellow(){P_COLOR=33
}blue(){P_COLOR=34
}violet(){P_COLOR=35
}cyan_blue(){P_COLOR=36
}random_color(){P_COLOR="$[RANDOM%7+31]"
}centos_ps1(){C_PS1=$(echo "PS1='\[\e[1;${P_COLOR}m\][\u@\h \W]\\$ \[\e[0m\]'" >> ~/.bashrc)
}ubuntu_ps1(){U_PS1=$(echo 'PS1="\[\e[1;'''${P_COLOR}'''m\]${debian_chroot:+($debian_chroot)}\u@\h:\w\\$ \[\e[0m\]"' >> ~/.bashrc)
}set_ps1_env(){if [ ${OS_ID} == "CentOS" -o ${OS_ID} == "Rocky" ];thenif grep -Eqi "^PS1" ~/.bashrc;thensed -i '/^PS1/d' ~/.bashrccentos_ps1elsecentos_ps1fifiif [ ${OS_ID} == "Ubuntu" ];thenif grep -Eqi "^PS1" ~/.bashrc;thensed -i '/^PS1/d' ~/.bashrcubuntu_ps1elseubuntu_ps1fifi
}set_ps1(){TIPS="${COLOR}${OS_ID} ${OS_RELEASE} PS1设置成功,请重新登录生效!${END}"while true;doecho -e "\E[$[RANDOM%7+31];1m"cat <<-EOF
1)31 红色
2)32 绿色
3)33 黄色
4)34 蓝色
5)35 紫色
6)36 青色
7)随机颜色
8)退出
EOFecho -e '\E[0m'read -p "请输入颜色编号(1-8): " NUMcase ${NUM} in1)redset_ps1_env${TIPS};;2)greenset_ps1_env${TIPS};;3)yellowset_ps1_env${TIPS};;4)blueset_ps1_env${TIPS};;5)violetset_ps1_env${TIPS};;6)cyan_blueset_ps1_env${TIPS};;7)random_colorset_ps1_env${TIPS};;8)break;;*)${COLOR}"输入错误,请输入正确的数字(1-8)!"${END};;esacdone
}set_vim(){echo "export EDITOR=vim" >> ~/.bashrc
}set_vim_env(){if grep -Eqi ".*EDITOR" ~/.bashrc;thensed -i '/.*EDITOR/d' ~/.bashrcset_vimelseset_vimfi${COLOR}"${OS_ID} ${OS_RELEASE} 默认文本编辑器设置成功,请重新登录生效!"${END}
}set_history(){echo 'export HISTTIMEFORMAT="%F %T "' >> ~/.bashrc
}set_history_env(){if grep -Eqi ".*HISTTIMEFORMAT" ~/.bashrc;thensed -i '/.*HISTTIMEFORMAT/d' ~/.bashrcset_historyelseset_historyfi${COLOR}"${OS_ID} ${OS_RELEASE} history格式设置成功,请重新登录生效!"${END}
}set_swap(){sed -ri 's/.*swap.*/#&/' /etc/fstabif [ ${OS_ID} == "Ubuntu" ];thenif [ ${OS_RELEASE_VERSION} == 20 -o ${OS_RELEASE_VERSION} == 22 ];thenSD_NAME=`lsblk|awk -F"[ └─]" '/SWAP/{printf $3}'`systemctl mask dev-${SD_NAME}.swap &> /dev/nullfifiswapoff -a${COLOR}"${OS_ID} ${OS_RELEASE} 禁用swap成功!"${END}
}set_kernel(){cat > /etc/sysctl.conf <<-EOF
# Controls source route verification
net.ipv4.conf.default.rp_filter = 1
net.ipv4.ip_nonlocal_bind = 1
net.ipv4.ip_forward = 1# Do not accept source routing
net.ipv4.conf.default.accept_source_route = 0# Controls the System Request debugging functionality of the kernel
kernel.sysrq = 0# Controls whether core dumps will append the PID to the core filename.
# Useful for debugging multi-threaded applications.
kernel.core_uses_pid = 1# Controls the use of TCP syncookies
net.ipv4.tcp_syncookies = 1# Disable netfilter on bridges.
net.bridge.bridge-nf-call-ip6tables = 0
net.bridge.bridge-nf-call-iptables = 0
net.bridge.bridge-nf-call-arptables = 0# Controls the default maxmimum size of a mesage queue
kernel.msgmnb = 65536# Controls the maximum size of a message, in bytes
kernel.msgmax = 65536# Controls the maximum shared segment size, in bytes
kernel.shmmax = 68719476736# Controls the maximum number of shared memory segments, in pages
kernel.shmall = 4294967296# TCP kernel paramater
net.ipv4.tcp_mem = 786432 1048576 1572864
net.ipv4.tcp_rmem = 4096        87380   4194304
net.ipv4.tcp_wmem = 4096        16384   4194304
net.ipv4.tcp_window_scaling = 1
net.ipv4.tcp_sack = 1# socket buffer
net.core.wmem_default = 8388608
net.core.rmem_default = 8388608
net.core.rmem_max = 16777216
net.core.wmem_max = 16777216
net.core.netdev_max_backlog = 262144
net.core.somaxconn = 20480
net.core.optmem_max = 81920# TCP conn
net.ipv4.tcp_max_syn_backlog = 262144
net.ipv4.tcp_syn_retries = 3
net.ipv4.tcp_retries1 = 3
net.ipv4.tcp_retries2 = 15# tcp conn reuse
net.ipv4.tcp_tw_reuse = 1
net.ipv4.tcp_tw_recycle = 0
net.ipv4.tcp_fin_timeout = 30
net.ipv4.tcp_timestamps = 0net.ipv4.tcp_max_tw_buckets = 20000
net.ipv4.tcp_max_orphans = 3276800
net.ipv4.tcp_synack_retries = 1
net.ipv4.tcp_syncookies = 1# keepalive conn
net.ipv4.tcp_keepalive_time = 300
net.ipv4.tcp_keepalive_intvl = 30
net.ipv4.tcp_keepalive_probes = 3
net.ipv4.ip_local_port_range = 10001    65000# swap
vm.overcommit_memory = 0
vm.swappiness = 10#net.ipv4.conf.eth1.rp_filter = 0
#net.ipv4.conf.lo.arp_ignore = 1
#net.ipv4.conf.lo.arp_announce = 2
#net.ipv4.conf.all.arp_ignore = 1
#net.ipv4.conf.all.arp_announce = 2
EOFsysctl -p &> /dev/null${COLOR}"${OS_ID} ${OS_RELEASE} 优化内核参数成功!"${END}
}set_limits(){cat >> /etc/security/limits.conf <<-EOF
root     soft   core     unlimited
root     hard   core     unlimited
root     soft   nproc    1000000
root     hard   nproc    1000000
root     soft   nofile   1000000
root     hard   nofile   1000000
root     soft   memlock  32000
root     hard   memlock  32000
root     soft   msgqueue 8192000
root     hard   msgqueue 8192000
EOF${COLOR}"${OS_ID} ${OS_RELEASE} 优化资源限制参数成功!"${END}
}set_localtime(){ln -sf /usr/share/zoneinfo/Asia/Shanghai /etc/localtimeecho 'Asia/Shanghai' >/etc/timezoneif [ ${OS_ID} == "Ubuntu" ];thencat >> /etc/default/locale <<-EOF
LC_TIME=en_DK.UTF-8
EOFfi${COLOR}"${OS_ID} ${OS_RELEASE} 系统时区已设置成功,请重启系统后生效!"${END}
}disable_restart(){if [ -f /usr/lib/systemd/system/ctrl-alt-del.target ];thencp /usr/lib/systemd/system/ctrl-alt-del.target{,.bak}rm -f /usr/lib/systemd/system/ctrl-alt-del.target${COLOR}"${OS_ID} ${OS_RELEASE} 禁用ctrl+alt+del重启处理成功!"${END}else${COLOR}"${OS_ID} ${OS_RELEASE} 禁用ctrl+alt+del已处理!"${END}fi
}set_root_login(){read -p "请输入密码: " PASSWORDecho ${PASSWORD} |sudo -S sed -ri 's@#(PermitRootLogin )prohibit-password@\1yes@' /etc/ssh/sshd_configsudo systemctl restart sshdsudo -S passwd root <<-EOF
${PASSWORD}
${PASSWORD}
EOF${COLOR}"${OS_ID} ${OS_RELEASE} root用户登录已设置完成,请重新登录后生效!"${END}
}ubuntu_remove(){apt purge ufw lxd lxd-client lxcfs liblxc-common${COLOR}"${OS_ID} ${OS_RELEASE} 无用软件包卸载完成!"${END}
}menu(){while true;doecho -e "\E[$[RANDOM%7+31];1m"cat <<-EOF
********************************************************************
*                           初始化脚本菜单                         *
* 1.禁用SELinux                    15.设置PS1(请进入选择颜色)      *
* 2.关闭防火墙                     16.设置默认文本编辑器为vim      *
* 3.优化SSH                        17.设置history格式              *
* 4.设置系统别名                   18.禁用SWAP                     *
* 5.1-4全设置                      19.优化内核参数                 *
* 6.设置vimrc配置文件              20.优化资源限制参数             *
* 7.设置镜像仓库                   21.设置系统时区                 *
* 8.Minimal安装建议安装软件        22.禁用ctrl+alt+del重启         *
* 9.安装邮件服务并配置邮件         23.Ubuntu设置root用户登录       *
* 10.更改SSH端口号                 24.Ubuntu卸载无用软件包         *
* 11.修改网卡名                    25.重启系统                     *
* 12.修改IP地址和网关地址(单网卡)  26.关机                         *
* 13.修改IP地址和网关地址(双网卡)  27.退出                         *
* 14.设置主机名                                                    *
********************************************************************
EOFecho -e '\E[0m'read -p "请选择相应的编号(1-27): " choicecase ${choice} in1)disable_selinux;;2)disable_firewall;;3)optimization_sshd;;4)set_alias;;5)disable_selinuxdisable_firewalloptimization_sshdset_alias;;6)set_vimrc;;7)set_mirror_repository;;8)minimal_install;;9)set_mail;;10)set_sshd_port;;11)set_eth;;12)set_ip;;13)set_dual_ip;;14)set_hostname;;15)set_ps1;;16)set_vim_env;;17)set_history_env;;18)set_swap;;19)set_kernel;;20)set_limits;;21)set_localtime;;22)disable_restart;;23)set_root_login;;24)ubuntu_remove;;25)reboot;;26)shutdown -h now;;27)break;;*)${COLOR}"输入错误,请输入正确的数字(1-27)!"${END};;esacdone
}main(){osmenu
}main
CentOS Stream 9修改镜像仓库需要下面的perl脚本。
[root@rocky9 ~]# cat update_mirror.pl
#!/usr/bin/perluse strict;
use warnings;
use autodie;# 要修改镜像源,请去修改url变量!
my $url = 'mirrors.aliyun.com';
my $mirrors = "https://$url/centos-stream";if (@ARGV < 1) {die "Usage: $0 <filename1> <filename2> ...\n";
}while (my $filename = shift @ARGV) {my $backup_filename = $filename . '.bak';rename $filename, $backup_filename;open my $input, "<", $backup_filename;open my $output, ">", $filename;while (<$input>) {s/^metalink/# metalink/;if (m/^name/) {my (undef, $repo, $arch) = split /-/;$repo =~ s/^\s+|\s+$//g;($arch = defined $arch ? lc($arch) : '') =~ s/^\s+|\s+$//g;if ($repo =~ /^Extras/) {$_ .= "baseurl=${mirrors}/SIGs/\$releasever-stream/extras" . ($arch eq 'source' ? "/${arch}/" : "/\$basearch/") . "extras-common\n";} else {$_ .= "baseurl=${mirrors}/\$releasever-stream/$repo" . ($arch eq 'source' ? "/" : "/\$basearch/") . ($arch ne '' ? "${arch}/tree/" : "os") . "\n";}}print $output $_;}
}
下面是reset_v6_2脚本内容:
[root@rocky9 ~]# cat reset_v6_2.sh
#!/bin/bash
#
#***************************************************************************************************
#Author:        Raymond
#QQ:            88563128
#Date:          2023-11-15
#FileName:      reset_v6_2.sh
#URL:           raymond.blog.csdn.net
#Description:   reset for CentOS 7 & CentOS Stream 8/9 & Ubuntu 18.04/20.04/22.04 & Rocky 8/9
#Copyright (C): 2023 All rights reserved
#***************************************************************************************************
COLOR="echo -e \\033[01;31m"
END='\033[0m'os(){OS_ID=`sed -rn '/^NAME=/s@.*="([[:alpha:]]+).*"$@\1@p' /etc/os-release`OS_NAME=`sed -rn '/^NAME=/s@.*="([[:alpha:]]+) (.*)"$@\2@p' /etc/os-release`OS_RELEASE=`sed -rn '/^VERSION_ID=/s@.*="?([0-9.]+)"?@\1@p' /etc/os-release`OS_RELEASE_VERSION=`sed -rn '/^VERSION_ID=/s@.*="?([0-9]+)\.?.*"?@\1@p' /etc/os-release`
}disable_selinux(){if [ ${OS_ID} == "CentOS" -o ${OS_ID} == "Rocky" ];thenif [ `getenforce` == "Enforcing" ];thensed -ri.bak 's/^(SELINUX=).*/\1disabled/' /etc/selinux/config${COLOR}"${OS_ID} ${OS_RELEASE} SELinux已禁用,请重新启动系统后才能生效!"${END}else${COLOR}"${OS_ID} ${OS_RELEASE} SELinux已被禁用,不用设置!"${END}fielse${COLOR}"${OS_ID} ${OS_RELEASE} SELinux默认没有安装,不用设置!"${END}fi
}disable_firewall(){if [ ${OS_ID} == "CentOS" -o ${OS_ID} == "Rocky" ];thenrpm -q firewalld &> /dev/null && { systemctl disable --now firewalld &> /dev/null; ${COLOR}"${OS_ID} ${OS_RELEASE} Firewall防火墙已关闭!"${END}; } || ${COLOR}"${OS_ID} ${OS_RELEASE} iptables防火墙已关闭!"${END}elsedpkg -s ufw &> /dev/null && { systemctl disable --now ufw &> /dev/null; ${COLOR}"${OS_ID} ${OS_RELEASE} ufw防火墙已关闭!"${END}; } || ${COLOR}"${OS_ID} ${OS_RELEASE}  没有ufw防火墙服务,不用关闭!"${END}fi
}optimization_sshd(){if [ ${OS_ID} == "CentOS" -o ${OS_ID} == "Rocky" ];thensed -ri.bak -e 's/^#(UseDNS).*/\1 no/' -e 's/^(GSSAPIAuthentication).*/\1 no/' /etc/ssh/sshd_configelsesed -ri.bak -e 's/^#(UseDNS).*/\1 no/' -e 's/^#(GSSAPIAuthentication).*/\1 no/' /etc/ssh/sshd_configfisystemctl restart sshd${COLOR}"${OS_ID} ${OS_RELEASE} SSH已优化完成!"${END}
}set_centos_alias(){if [ ${OS_RELEASE_VERSION} == "7" -o ${OS_RELEASE_VERSION} == "8" ];thencat >>~/.bashrc <<-EOF
alias cdnet="cd /etc/sysconfig/network-scripts"
alias vie0="vim /etc/sysconfig/network-scripts/ifcfg-eth0"
alias vie1="vim /etc/sysconfig/network-scripts/ifcfg-eth1"
alias scandisk="echo '- - -' > /sys/class/scsi_host/host0/scan;echo '- - -' > /sys/class/scsi_host/host1/scan;echo '- - -' > /sys/class/scsi_host/host2/scan"
EOFelsecat >>~/.bashrc <<-EOF
alias cdnet="cd /etc/NetworkManager/system-connections"
alias vie0="vim /etc/NetworkManager/system-connections/eth0.nmconnection"
alias vie1="vim /etc/NetworkManager/system-connections/eth1.nmconnection"
alias scandisk="echo '- - -' > /sys/class/scsi_host/host0/scan;echo '- - -' > /sys/class/scsi_host/host1/scan;echo '- - -' > /sys/class/scsi_host/host2/scan"
EOFfi${COLOR}"${OS_ID} ${OS_RELEASE} 系统别名已设置成功,请重新登陆后生效!"${END}
}set_ubuntu_alias(){cat >>~/.bashrc <<-EOF
alias cdnet="cd /etc/netplan"
alias scandisk="echo '- - -' > /sys/class/scsi_host/host0/scan;echo '- - -' > /sys/class/scsi_host/host1/scan;echo '- - -' > /sys/class/scsi_host/host2/scan"
EOF${COLOR}"${OS_ID} ${OS_RELEASE} 系统别名已设置成功,请重新登陆后生效!"${END}
}set_alias(){if [ ${OS_ID} == "CentOS" -o ${OS_ID} == "Rocky" ];thenif grep -Eqi "(.*cdnet|.*vie0|.*vie1|.*scandisk)" ~/.bashrc;thensed -i -e '/.*cdnet/d'  -e '/.*vie0/d' -e '/.*vie1/d' -e '/.*scandisk/d' ~/.bashrcset_centos_aliaselseset_centos_aliasfifiif [ ${OS_ID} == "Ubuntu" ];thenif grep -Eqi "(.*cdnet|.*scandisk)" ~/.bashrc;thensed -i -e '/.*cdnet/d' -e '/.*scandisk/d' ~/.bashrcset_ubuntu_aliaselseset_ubuntu_aliasfifi
}set_vimrc(){read -p "请输入作者名: " AUTHORread -p "请输入QQ号: " QQread -p "请输入网址: " V_URLcat >~/.vimrc <<-EOF
set ts=4
set expandtab
set ignorecase
set cursorline
set autoindent
autocmd BufNewFile *.sh exec ":call SetTitle()"
func SetTitle()if expand("%:e") == 'sh'call setline(1,"#!/bin/bash")call setline(2,"#")call setline(3,"#**********************************************************************************************")call setline(4,"#Author:        ${AUTHOR}")call setline(5,"#QQ:            ${QQ}")call setline(6,"#Date:          ".strftime("%Y-%m-%d"))call setline(7,"#FileName:      ".expand("%"))call setline(8,"#URL:           ${V_URL}")call setline(9,"#Description:   The test script")call setline(10,"#Copyright (C): ".strftime("%Y")." All rights reserved")call setline(11,"#*********************************************************************************************")call setline(12,"")endif
endfunc
autocmd BufNewFile * normal G
EOF${COLOR}"${OS_ID} ${OS_RELEASE} vimrc设置完成,请重新系统启动才能生效!"${END}
}aliyun(){URL=mirrors.aliyun.com
}huawei(){URL=repo.huaweicloud.com
}tencent(){URL=mirrors.tencent.com
}tuna(){URL=mirrors.tuna.tsinghua.edu.cn
}netease(){URL=mirrors.163.com
}sohu(){URL=mirrors.sohu.com
}nju(){URL=mirrors.nju.edu.cn
}ustc(){URL=mirrors.ustc.edu.cn
}sjtu(){URL=mirrors.sjtug.sjtu.edu.cn
}set_yum_rocky9(){[ -d /etc/yum.repos.d/backup ] || mkdir /etc/yum.repos.d/backup(ls -l /etc/yum.repos.d/ |grep -q repo) && mv /etc/yum.repos.d/*.repo /etc/yum.repos.d/backup || ${COLOR}"没有repo文件!"${END}cat > /etc/yum.repos.d/base.repo <<-EOF
[BaseOS]
name=BaseOS
baseurl=https://${URL}/rocky/\$releasever/BaseOS/\$basearch/os/
gpgcheck=1
gpgkey=file:///etc/pki/rpm-gpg/RPM-GPG-KEY-Rocky-\$releasever[AppStream]
name=AppStream
baseurl=https://${URL}/rocky/\$releasever/AppStream/\$basearch/os/
gpgcheck=1
gpgkey=file:///etc/pki/rpm-gpg/RPM-GPG-KEY-Rocky-\$releasever[extras]
name=extras
baseurl=https://${URL}/rocky/\$releasever/extras/\$basearch/os/
gpgcheck=1
gpgkey=file:///etc/pki/rpm-gpg/RPM-GPG-KEY-Rocky-\$releasever
EOF${COLOR}"更新镜像源中,请稍等..."${END}dnf clean all &> /dev/nulldnf makecache &> /dev/null${COLOR}"${OS_ID} ${OS_RELEASE} YUM源设置完成!"${END}
}set_yum_rocky9_2(){[ -d /etc/yum.repos.d/backup ] || mkdir /etc/yum.repos.d/backup(ls -l /etc/yum.repos.d/ |grep -q repo) && mv /etc/yum.repos.d/*.repo /etc/yum.repos.d/backup || ${COLOR}"没有repo文件!"${END}cat > /etc/yum.repos.d/base.repo <<-EOF
[BaseOS]
name=BaseOS
baseurl=https://${URL}/rockylinux/\$releasever/BaseOS/\$basearch/os/
gpgcheck=1
gpgkey=file:///etc/pki/rpm-gpg/RPM-GPG-KEY-Rocky-\$releasever[AppStream]
name=AppStream
baseurl=https://${URL}/rockylinux/\$releasever/AppStream/\$basearch/os/
gpgcheck=1
gpgkey=file:///etc/pki/rpm-gpg/RPM-GPG-KEY-Rocky-\$releasever[extras]
name=extras
baseurl=https://${URL}/rockylinux/\$releasever/extras/\$basearch/os/
gpgcheck=1
gpgkey=file:///etc/pki/rpm-gpg/RPM-GPG-KEY-Rocky-\$releasever
EOF${COLOR}"更新镜像源中,请稍等..."${END}dnf clean all &> /dev/nulldnf makecache &> /dev/null${COLOR}"${OS_ID} ${OS_RELEASE} YUM源设置完成!"${END}
}set_yum_rocky8(){[ -d /etc/yum.repos.d/backup ] || mkdir /etc/yum.repos.d/backup(ls -l /etc/yum.repos.d/ |grep -q repo) && mv /etc/yum.repos.d/*.repo /etc/yum.repos.d/backup || ${COLOR}"没有repo文件!"${END}cat > /etc/yum.repos.d/base.repo <<-EOF
[BaseOS]
name=BaseOS
baseurl=https://${URL}/rocky/\$releasever/BaseOS/\$basearch/os/
gpgcheck=1
gpgkey=file:///etc/pki/rpm-gpg/RPM-GPG-KEY-rockyofficial[AppStream]
name=AppStream
baseurl=https://${URL}/rocky/\$releasever/AppStream/\$basearch/os/
gpgcheck=1
gpgkey=file:///etc/pki/rpm-gpg/RPM-GPG-KEY-rockyofficial[extras]
name=extras
baseurl=https://${URL}/rocky/\$releasever/extras/\$basearch/os/
gpgcheck=1
gpgkey=file:///etc/pki/rpm-gpg/RPM-GPG-KEY-rockyofficial
EOF${COLOR}"更新镜像源中,请稍等..."${END}dnf clean all &> /dev/nulldnf makecache &> /dev/null${COLOR}"${OS_ID} ${OS_RELEASE} YUM源设置完成!"${END}
}set_yum_rocky8_2(){[ -d /etc/yum.repos.d/backup ] || mkdir /etc/yum.repos.d/backup(ls -l /etc/yum.repos.d/ |grep -q repo) && mv /etc/yum.repos.d/*.repo /etc/yum.repos.d/backup || ${COLOR}"没有repo文件!"${END}cat > /etc/yum.repos.d/base.repo <<-EOF
[BaseOS]
name=BaseOS
baseurl=https://${URL}/rockylinux/\$releasever/BaseOS/\$basearch/os/
gpgcheck=1
gpgkey=file:///etc/pki/rpm-gpg/RPM-GPG-KEY-rockyofficial[AppStream]
name=AppStream
baseurl=https://${URL}/rockylinux/\$releasever/AppStream/\$basearch/os/
gpgcheck=1
gpgkey=file:///etc/pki/rpm-gpg/RPM-GPG-KEY-rockyofficial[extras]
name=extras
baseurl=https://${URL}/rockylinux/\$releasever/extras/\$basearch/os/
gpgcheck=1
gpgkey=file:///etc/pki/rpm-gpg/RPM-GPG-KEY-rockyofficial
EOF${COLOR}"更新镜像源中,请稍等..."${END}dnf clean all &> /dev/nulldnf makecache &> /dev/null${COLOR}"${OS_ID} ${OS_RELEASE} YUM源设置完成!"${END}
}set_yum_centos_stream9(){[ -d /etc/yum.repos.d/backup ] || mkdir /etc/yum.repos.d/backup(ls -l /etc/yum.repos.d/ |grep -q repo) && mv /etc/yum.repos.d/*.repo /etc/yum.repos.d/backup || ${COLOR}"没有repo文件!"${END}cat > /etc/yum.repos.d/base.repo <<-EOF
[BaseOS]
name=BaseOS
baseurl=https://${URL}/centos-stream/\$stream/BaseOS/\$basearch/os/
gpgcheck=1
gpgkey=file:///etc/pki/rpm-gpg/RPM-GPG-KEY-centosofficial[AppStream]
name=AppStream
baseurl=https://${URL}/centos-stream/\$stream/AppStream/\$basearch/os/
gpgcheck=1
gpgkey=file:///etc/pki/rpm-gpg/RPM-GPG-KEY-centosofficial[extras-common]
name=extras-common
baseurl=https://${URL}/centos-stream/SIGs/\$stream/extras/\$basearch/extras-common/
gpgcheck=1
gpgkey=file:///etc/pki/rpm-gpg/RPM-GPG-KEY-centosofficial
EOF${COLOR}"更新镜像源中,请稍等..."${END}dnf clean all &> /dev/nulldnf makecache &> /dev/null${COLOR}"${OS_ID} ${OS_RELEASE} YUM源设置完成!"${END}
}set_yum_centos_stream8(){[ -d /etc/yum.repos.d/backup ] || mkdir /etc/yum.repos.d/backup(ls -l /etc/yum.repos.d/ |grep -q repo) && mv /etc/yum.repos.d/*.repo /etc/yum.repos.d/backup || ${COLOR}"没有repo文件!"${END}cat > /etc/yum.repos.d/base.repo <<-EOF
[BaseOS]
name=BaseOS
baseurl=https://${URL}/centos/\$stream/BaseOS/\$basearch/os/
gpgcheck=1
gpgkey=file:///etc/pki/rpm-gpg/RPM-GPG-KEY-centosofficial[AppStream]
name=AppStream
baseurl=https://${URL}/centos/\$stream/AppStream/\$basearch/os/
gpgcheck=1
gpgkey=file:///etc/pki/rpm-gpg/RPM-GPG-KEY-centosofficial[extras]
name=extras
baseurl=https://${URL}/centos/\$stream/extras/\$basearch/os/
gpgcheck=1
gpgkey=file:///etc/pki/rpm-gpg/RPM-GPG-KEY-centosofficial
EOF${COLOR}"更新镜像源中,请稍等..."${END}dnf clean all &> /dev/nulldnf makecache &> /dev/null${COLOR}"${OS_ID} ${OS_RELEASE} YUM源设置完成!"${END}
}set_epel_rocky_centos8_9(){cat > /etc/yum.repos.d/epel.repo <<-EOF
[epel]
name=epel
baseurl=https://${URL}/epel/\$releasever/Everything/\$basearch/
gpgcheck=1
gpgkey=https://${URL}/epel/RPM-GPG-KEY-EPEL-\$releasever
EOF${COLOR}"更新镜像源中,请稍等..."${END}dnf clean all &> /dev/nulldnf makecache &> /dev/null${COLOR}"${OS_ID} ${OS_RELEASE} EPEL源设置完成!"${END}
}set_epel_2_rocky_centos8_9(){cat > /etc/yum.repos.d/epel.repo <<-EOF
[epel]
name=epel
baseurl=https://${URL}/fedora-epel/\$releasever/Everything/\$basearch/
gpgcheck=1
gpgkey=https://${URL}/fedora-epel/RPM-GPG-KEY-EPEL-\$releasever
EOF${COLOR}"更新镜像源中,请稍等..."${END}dnf clean all &> /dev/nulldnf makecache &> /dev/null${COLOR}"${OS_ID} ${OS_RELEASE} EPEL源设置完成!"${END}
}set_epel_3_rocky_centos8_9(){cat > /etc/yum.repos.d/epel.repo <<-EOF
[epel]
name=epel
baseurl=https://${URL}/fedora/epel/\$releasever/Everything/\$basearch/
gpgcheck=1
gpgkey=https://${URL}/fedora/epel/RPM-GPG-KEY-EPEL-\$releasever
EOF${COLOR}"更新镜像源中,请稍等..."${END}dnf clean all &> /dev/nulldnf makecache &> /dev/null${COLOR}"${OS_ID} ${OS_RELEASE} EPEL源设置完成!"${END}
}set_yum_centos7(){    [ -d /etc/yum.repos.d/backup ] || mkdir /etc/yum.repos.d/backup(ls -l /etc/yum.repos.d/ |grep -q repo) && mv /etc/yum.repos.d/*.repo /etc/yum.repos.d/backup || ${COLOR}"没有repo文件!"${END}cat > /etc/yum.repos.d/base.repo <<-EOF
[base]
name=base
baseurl=https://${URL}/centos/\$releasever/os/\$basearch/
gpgcheck=1
gpgkey=file:///etc/pki/rpm-gpg/RPM-GPG-KEY-CentOS-\$releasever[extras]
name=extras
baseurl=https://${URL}/centos/\$releasever/extras/\$basearch/
gpgcheck=1
gpgkey=file:///etc/pki/rpm-gpg/RPM-GPG-KEY-CentOS-\$releasever[updates]
name=updates
baseurl=https://${URL}/centos/\$releasever/updates/\$basearch/
gpgcheck=1
gpgkey=file:///etc/pki/rpm-gpg/RPM-GPG-KEY-CentOS-\$releasever
EOF${COLOR}"更新镜像源中,请稍等..."${END}yum clean all &> /dev/nullyum makecache &> /dev/null${COLOR}"${OS_ID} ${OS_RELEASE} YUM源设置完成!"${END}
}set_epel_centos7(){cat > /etc/yum.repos.d/epel.repo <<-EOF
[epel]
name=epel
baseurl=https://${URL}/epel/\$releasever/\$basearch/
gpgcheck=1
gpgkey=https://${URL}/epel/RPM-GPG-KEY-EPEL-\$releasever
EOF${COLOR}"更新镜像源中,请稍等..."${END}yum clean all &> /dev/nullyum makecache &> /dev/null${COLOR}"${OS_ID} ${OS_RELEASE} EPEL源设置完成!"${END}
}set_epel_2_centos7(){cat > /etc/yum.repos.d/epel.repo <<-EOF
[epel]
name=epel
baseurl=https://${URL}/fedora-epel/\$releasever/\$basearch/
gpgcheck=1
gpgkey=https://${URL}/fedora-epel/RPM-GPG-KEY-EPEL-\$releasever
EOF${COLOR}"更新镜像源中,请稍等..."${END}yum clean all &> /dev/nullyum makecache &> /dev/null${COLOR}"${OS_ID} ${OS_RELEASE} EPEL源设置完成!"${END}
}set_epel_3_centos7(){cat > /etc/yum.repos.d/epel.repo <<-EOF
[epel]
name=epel
baseurl=https://${URL}/fedora/epel/\$releasever/\$basearch/
gpgcheck=1
gpgkey=https://${URL}/fedora/epel/RPM-GPG-KEY-EPEL-\$releasever
EOF${COLOR}"更新镜像源中,请稍等..."${END}yum clean all &> /dev/nullyum makecache &> /dev/null${COLOR}"${OS_ID} ${OS_RELEASE} EPEL源设置完成!"${END}
}rocky9_base_menu(){while true;doecho -e "\E[$[RANDOM%7+31];1m"cat <<-EOF
1)阿里镜像源
2)网易镜像源
3)搜狐镜像源
4)南京大学镜像源
5)中科大镜像源
6)上海交通大学镜像源
7)退出
EOFecho -e '\E[0m'read -p "请输入镜像源编号(1-7): " NUMcase ${NUM} in1)aliyunset_yum_rocky9_2;;2)neteaseset_yum_rocky9;;3)sohuset_yum_rocky9;;4)njuset_yum_rocky9;;5)ustcset_yum_rocky9;;6)sjtuset_yum_rocky9;;7)break;;*)${COLOR}"输入错误,请输入正确的数字(1-7)!"${END};;esacdone
}rocky8_base_menu(){while true;doecho -e "\E[$[RANDOM%7+31];1m"cat <<-EOF
1)阿里镜像源
2)网易镜像源
3)搜狐镜像源
4)南京大学镜像源
5)中科大镜像源
6)上海交通大学镜像源
7)退出
EOFecho -e '\E[0m'read -p "请输入镜像源编号(1-7): " NUMcase ${NUM} in1)aliyunset_yum_rocky8_2;;2)neteaseset_yum_rocky8;;3)sohuset_yum_rocky8;;4)njuset_yum_rocky8;;5)ustcset_yum_rocky8;;6)sjtuset_yum_rocky8;;7)break;;*)${COLOR}"输入错误,请输入正确的数字(1-7)!"${END};;esacdone
}centos_stream9_base_menu(){while true;doecho -e "\E[$[RANDOM%7+31];1m"cat <<-EOF
1)阿里镜像源
2)清华镜像源
3)南京大学镜像源
4)中科大镜像源
5)退出
EOFecho -e '\E[0m'read -p "请输入镜像源编号(1-5): " NUMcase ${NUM} in1)aliyunset_yum_centos_stream9;;2)tunaset_yum_centos_stream9;;3)njuset_yum_centos_stream9;;4)ustcset_yum_centos_stream9;;5)break;;*)${COLOR}"输入错误,请输入正确的数字(1-5)!"${END};;esacdone
}centos_stream8_base_menu(){while true;doecho -e "\E[$[RANDOM%7+31];1m"cat <<-EOF
1)阿里镜像源
2)华为镜像源
3)腾讯镜像源
4)清华镜像源
5)网易镜像源
6)南京大学镜像源
7)中科大镜像源
8)退出
EOFecho -e '\E[0m'read -p "请输入镜像源编号(1-8): " NUMcase ${NUM} in1)aliyunset_yum_centos_stream8;;2)huaweiset_yum_centos_stream8;;3)tencentset_yum_centos_stream8;;4)tunaset_yum_centos_stream8;;5)neteaseset_yum_centos_stream8;;6)njuset_yum_centos_stream8;;7)ustcset_yum_centos_stream8;;8)break;;*)${COLOR}"输入错误,请输入正确的数字(1-8)!"${END};;esacdone
}centos7_base_menu(){while true;doecho -e "\E[$[RANDOM%7+31];1m"cat <<-EOF
1)阿里镜像源
2)华为镜像源
3)腾讯镜像源
4)清华镜像源
5)网易镜像源
6)南京大学镜像源
7)中科大镜像源
8)退出
EOFecho -e '\E[0m'read -p "请输入镜像源编号(1-8): " NUMcase ${NUM} in1)aliyunset_yum_centos7;;2)huaweiset_yum_centos7;;3)tencentset_yum_centos7;;4)tunaset_yum_centos7;;5)neteaseset_yum_centos7;;6)njuset_yum_centos7;;7)ustcset_yum_centos7;;8)break;;*)${COLOR}"输入错误,请输入正确的数字(1-8)!"${END};;esacdone
}rocky_centos8_9_epel_menu(){while true;doecho -e "\E[$[RANDOM%7+31];1m"cat <<-EOF
1)阿里镜像源
2)华为镜像源
3)腾讯镜像源
4)清华镜像源
5)搜狐镜像源
6)南京大学镜像源
7)中科大镜像源
8)上海交通大学镜像源
9)退出
EOFecho -e '\E[0m'read -p "请输入镜像源编号(1-9): " NUMcase ${NUM} in1)aliyunset_epel_rocky_centos8_9;;2)huaweiset_epel_rocky_centos8_9;;3)tencentset_epel_rocky_centos8_9;;4)tunaset_epel_rocky_centos8_9;;5)sohuset_epel_2_rocky_centos8_9;;6)njuset_epel_rocky_centos8_9;;7)ustcset_epel_rocky_centos8_9;;8)sjtuset_epel_3_rocky_centos8_9;;9)break;;*)${COLOR}"输入错误,请输入正确的数字(1-9)!"${END};;esacdone
}centos7_epel_menu(){while true;doecho -e "\E[$[RANDOM%7+31];1m"cat <<-EOF
1)阿里镜像源
2)华为镜像源
3)腾讯镜像源
4)清华镜像源
5)搜狐镜像源
6)南京大学镜像源
7)中科大镜像源
8)上海交通大学镜像源
9)退出
EOFecho -e '\E[0m'read -p "请输入镜像源编号(1-9): " NUMcase ${NUM} in1)aliyunset_epel_centos7;;2)huaweiset_epel_centos7;;3)tencentset_epel_centos7;;4)tunaset_epel_centos7;;5)sohuset_epel_2_centos7;;6)njuset_epel_centos7;;7)ustcset_epel_centos7;;8)sjtuset_epel_3_centos7;;9)break;;*)${COLOR}"输入错误,请输入正确的数字(1-9)!"${END};;esacdone
}rocky_menu(){while true;doecho -e "\E[$[RANDOM%7+31];1m"cat <<-EOF
1)base仓库
2)epel仓库
3)退出
EOFecho -e '\E[0m'read -p "请输入镜像源编号(1-3): " NUMcase ${NUM} in1)if [ ${OS_RELEASE_VERSION} == "8" ];thenrocky8_base_menuelserocky9_base_menufi;;2)rocky_centos8_9_epel_menu;;3)break;;*)${COLOR}"输入错误,请输入正确的数字(1-3)!"${END};;esacdone
}centos_menu(){while true;doecho -e "\E[$[RANDOM%7+31];1m"cat <<-EOF
1)base仓库
2)epel仓库
3)退出
EOFecho -e '\E[0m'read -p "请输入镜像源编号(1-3): " NUMcase ${NUM} in1)if [ ${OS_NAME} == "Stream" ];thenif [ ${OS_RELEASE_VERSION} == "8" ];thencentos_stream8_base_menuelsecentos_stream9_base_menufielsecentos7_base_menufi;;2)if [ ${OS_RELEASE_VERSION} == "8" -o ${OS_RELEASE_VERSION} == "9" ];thenrocky_centos8_9_epel_menuelserocky_centos7_epel_menufi;;3)break;;*)${COLOR}"输入错误,请输入正确的数字(1-3)!"${END};;esacdone
}set_apt(){mv /etc/apt/sources.list /etc/apt/sources.list.bakcat > /etc/apt/sources.list <<-EOF
deb http://${URL}/ubuntu/ $(lsb_release -cs) main restricted universe multiverse
deb-src http://${URL}/ubuntu/ $(lsb_release -cs) main restricted universe multiversedeb http://${URL}/ubuntu/ $(lsb_release -cs)-security main restricted universe multiverse
deb-src http://${URL}/ubuntu/ $(lsb_release -cs)-security main restricted universe multiversedeb http://${URL}/ubuntu/ $(lsb_release -cs)-updates main restricted universe multiverse
deb-src http://${URL}/ubuntu/ $(lsb_release -cs)-updates main restricted universe multiversedeb http://${URL}/ubuntu/ $(lsb_release -cs)-proposed main restricted universe multiverse
deb-src http://${URL}/ubuntu/ $(lsb_release -cs)-proposed main restricted universe multiversedeb http://${URL}/ubuntu/ $(lsb_release -cs)-backports main restricted universe multiverse
deb-src http://${URL}/ubuntu/ $(lsb_release -cs)-backports main restricted universe multiverse
EOF${COLOR}"更新镜像源中,请稍等..."${END}apt update &> /dev/null${COLOR}"${OS_ID} ${OS_RELEASE} APT源设置完成!"${END}
}apt_menu(){while true;doecho -e "\E[$[RANDOM%7+31];1m"cat <<-EOF
1)阿里镜像源
2)华为镜像源
3)腾讯镜像源
4)清华镜像源
5)网易镜像源
6)南京大学镜像源
7)中科大镜像源
8)上海交通大学镜像源
9)退出
EOFecho -e '\E[0m'read -p "请输入镜像源编号(1-9): " NUMcase ${NUM} in1)aliyunset_apt;;2)huaweiset_apt;;3)tencentset_apt;;4)tunaset_apt;;5)neteaseset_apt;;6)njuset_apt;;7)ustcset_apt;;8)sjtuset_apt;;9)break;;*)${COLOR}"输入错误,请输入正确的数字(1-9)!"${END};;esacdone
}set_mirror_repository(){if [ ${OS_ID} == "CentOS" ];thencentos_menuelif [ ${OS_ID} == "Rocky" ];thenrocky_menuelseapt_menufi
}centos_minimal_install(){${COLOR}'开始安装“Minimal安装建议安装软件包”,请稍等......'${END}yum -y install gcc make autoconf gcc-c++ glibc glibc-devel pcre pcre-devel openssl openssl-devel systemd-devel zlib-devel vim lrzsz tree tmux lsof tcpdump wget net-tools iotop bc bzip2 zip unzip nfs-utils man-pages &> /dev/null${COLOR}"${OS_ID} ${OS_RELEASE} Minimal安装建议安装软件包已安装完成!"${END}
}ubuntu_minimal_install(){${COLOR}'开始安装“Minimal安装建议安装软件包”,请稍等......'${END}apt -y install iproute2 ntpdate tcpdump telnet traceroute nfs-kernel-server nfs-common lrzsz tree openssl libssl-dev libpcre3 libpcre3-dev zlib1g-dev gcc openssh-server iotop unzip zip${COLOR}"${OS_ID} ${OS_RELEASE} Minimal安装建议安装软件包已安装完成!"${END}
}minimal_install(){if [ ${OS_ID} == "CentOS" -o ${OS_ID} == "Rocky" ] &> /dev/null;thencentos_minimal_installelseubuntu_minimal_installfi
}set_mail(){                                                                                                 if [ ${OS_ID} == "CentOS" -o ${OS_ID} == "Rocky" ];thenrpm -q postfix &> /dev/null || { yum -y install postfix &> /dev/null; systemctl enable --now postfix &> /dev/null; }rpm -q mailx &> /dev/null || yum -y install mailx &> /dev/nullelsedpkg -s mailutils &> /dev/null || apt -y install mailutilsfiread -p "请输入邮箱地址: " MAILread -p "请输入邮箱授权码: " AUTHSMTP=`echo ${MAIL} |awk -F"@" '{print $2}'`cat >~/.mailrc <<-EOF
set from=${MAIL}
set smtp=smtp.${SMTP}
set smtp-auth-user=${MAIL}
set smtp-auth-password=${AUTH}
set smtp-auth=login
set ssl-verify=ignore
EOF${COLOR}"${OS_ID} ${OS_RELEASE} 邮件设置完成,请重新登录后才能生效!"${END}
}set_sshd_port(){disable_selinuxdisable_firewallread -p "请输入端口号: " PORTsed -i 's/#Port 22/Port '${PORT}'/' /etc/ssh/sshd_config${COLOR}"${OS_ID} ${OS_RELEASE} 更改SSH端口号已完成,请重启系统后生效!"${END}
}set_centos_eth(){ETHNAME=`ip addr | awk -F"[ :]" '/^2/{print $3}'`#修改网卡名称配置文件if grep -Eqi "(net\.ifnames|biosdevname)" /etc/default/grub;then${COLOR}"${OS_ID} ${OS_RELEASE} 网卡名配置文件已修改,不用修改!"${END}elsesed -ri.bak '/^GRUB_CMDLINE_LINUX=/s@"$@ net.ifnames=0 biosdevname=0"@' /etc/default/grubgrub2-mkconfig -o /boot/grub2/grub.cfg >& /dev/nullfi#修改网卡文件名if [ ${OS_RELEASE_VERSION} == "7" -o ${OS_RELEASE_VERSION} == "8" ];thenmv /etc/sysconfig/network-scripts/ifcfg-${ETHNAME} /etc/sysconfig/network-scripts/ifcfg-eth0elsemv /etc/NetworkManager/system-connections/${ETHNAME}.nmconnection /etc/NetworkManager/system-connections/eth0.nmconnectionfi${COLOR}"${OS_ID} ${OS_RELEASE} 网卡名已修改成功,请重新启动系统后才能生效!"${END}
}set_ubuntu_eth(){#修改网卡名称配置文件if grep -Eqi "(net\.ifnames|biosdevname)" /etc/default/grub;then${COLOR}"${OS_ID} ${OS_RELEASE} 网卡名配置文件已修改,不用修改!"${END}elsesed -ri.bak '/^GRUB_CMDLINE_LINUX=/s@"$@net.ifnames=0 biosdevname=0"@' /etc/default/grubgrub-mkconfig -o /boot/grub/grub.cfg >& /dev/null${COLOR}"${OS_ID} ${OS_RELEASE} 网卡名已修改成功,请重新启动系统后才能生效!"${END}fi
}set_eth(){if [ ${OS_ID} == "CentOS" -o ${OS_ID} == "Rocky" ];thenset_centos_ethelseset_ubuntu_ethfi
}check_ip(){local IP=$1VALID_CHECK=$(echo ${IP}|awk -F. '$1<=255&&$2<=255&&$3<=255&&$4<=255{print "yes"}')if echo ${IP}|grep -E "^[0-9]{1,3}\.[0-9]{1,3}\.[0-9]{1,3}\.[0-9]{1,3}$" >/dev/null; thenif [ ${VALID_CHECK} == "yes" ]; thenecho "IP ${IP}  available!"return 0elseecho "IP ${IP} not available!"return 1fielseecho "IP format error!"return 1fi
}set_centos_ip(){while true; doread -p "请输入IP地址: " IPcheck_ip ${IP}[ $? -eq 0 ] && breakdoneread -p "请输入子网掩码位数: " C_PREFIXwhile true; doread -p "请输入网关地址: " GATEWAYcheck_ip ${GATEWAY}[ $? -eq 0 ] && breakdonecat > /etc/sysconfig/network-scripts/ifcfg-eth0 <<-EOF
NAME=eth0
DEVICE=eth0
ONBOOT=yes
BOOTPROTO=none
TYPE=Ethernet
IPADDR=${IP}
PREFIX=${C_PREFIX}
GATEWAY=${GATEWAY}
DNS1=223.5.5.5
DNS2=180.76.76.76
EOF${COLOR}"${OS_ID} ${OS_RELEASE} IP地址、网关地址和DNS已修改成功,请重新启动系统后生效!"${END}
}set_centos_9_ip(){while true; doread -p "请输入IP地址: " IPcheck_ip ${IP}[ $? -eq 0 ] && breakdoneread -p "请输入子网掩码位数: " C_PREFIXwhile true; doread -p "请输入网关地址: " GATEWAYcheck_ip ${GATEWAY}[ $? -eq 0 ] && breakdonecat > /etc/NetworkManager/system-connections/eth0.nmconnection <<-EOF
[connection]
id=eth0
type=ethernet
interface-name=eth0[ethernet][ipv4]
address1=${IP}/${C_PREFIX},${GATEWAY}
dns=223.5.5.5;180.76.76.76;
method=manual[ipv6]
addr-gen-mode=default
method=auto[proxy]
EOF${COLOR}"${OS_ID} ${OS_RELEASE} IP地址、网关地址和DNS已修改成功,请重新启动系统后生效!"${END}
}set_ubuntu_ip(){while true; doread -p "请输入IP地址: " IPcheck_ip ${IP}[ $? -eq 0 ] && breakdoneread -p "请输入子网掩码位数: " U_PREFIXwhile true; doread -p "请输入网关地址: " GATEWAYcheck_ip ${GATEWAY}[ $? -eq 0 ] && breakdonecat > /etc/netplan/01-netcfg.yaml <<-EOF
network:version: 2renderer: networkdethernets:eth0:dhcp4: nodhcp6: noaddresses: [${IP}/${U_PREFIX}] gateway4: ${GATEWAY}nameservers:addresses: [223.5.5.5, 180.76.76.76]
EOF${COLOR}"${OS_ID} ${OS_RELEASE} IP地址、网关地址和DNS已修改成功,请重新启动系统后生效!"${END}
}set_ubuntu_22_ip(){while true; doread -p "请输入IP地址: " IPcheck_ip ${IP}[ $? -eq 0 ] && breakdoneread -p "请输入子网掩码位数: " U_PREFIXwhile true; doread -p "请输入网关地址: " GATEWAYcheck_ip ${GATEWAY}[ $? -eq 0 ] && breakdonecat > /etc/netplan/00-installer-config.yaml <<-EOF
network:version: 2renderer: networkdethernets:eth0:dhcp4: nodhcp6: noaddresses: [${IP}/${U_PREFIX}]routes:- to: defaultvia: ${GATEWAY}nameservers:addresses: [223.5.5.5, 180.76.76.76]
EOF${COLOR}"${OS_ID} ${OS_RELEASE} IP地址、网关地址和DNS已修改成功,请重新启动系统后生效!"${END}
}set_ip(){if [ ${OS_ID} == "CentOS" -o ${OS_ID} == "Rocky" ];thenif [ ${OS_RELEASE_VERSION} == "7" -o ${OS_RELEASE_VERSION} == "8" ];thenset_centos_ipelseset_centos_9_ipfielif [ ${OS_RELEASE_VERSION} == "18" -o ${OS_RELEASE_VERSION} == "20" ];thenset_dual_ubuntu_ip elseset_dual_ubuntu_22_ipfi
}set_dual_centos_ip(){while true; doread -p "请输入第一块网卡IP地址: " IPcheck_ip ${IP}[ $? -eq 0 ] && breakdoneread -p "请输入子网掩码位数: " C_PREFIXwhile true; doread -p "请输入网关地址: " GATEWAYcheck_ip ${GATEWAY}[ $? -eq 0 ] && breakdonecat > /etc/sysconfig/network-scripts/ifcfg-eth0 <<-EOF
NAME=eth0
DEVICE=eth0
ONBOOT=yes
BOOTPROTO=none
TYPE=Ethernet
IPADDR=${IP}
PREFIX=${C_PREFIX}
GATEWAY=${GATEWAY}
DNS1=223.5.5.5
DNS2=180.76.76.76
EOFwhile true; doread -p "请输入第二块网卡IP地址: " IP2check_ip ${IP2}[ $? -eq 0 ] && breakdoneread -p "请输入子网掩码位数: " C_PREFIX2cat > /etc/sysconfig/network-scripts/ifcfg-eth1 <<-EOF
NAME=eth1
DEVICE=eth1
ONBOOT=yes
BOOTPROTO=none
TYPE=Ethernet
IPADDR=${IP2}
PREFIX=${C_PREFIX2}
EOF${COLOR}"${OS_ID} ${OS_RELEASE} IP地址、网关地址和DNS已修改成功,请重新启动系统后生效!"${END}
}set_dual_centos_9_ip(){while true; doread -p "请输入第一块网卡IP地址: " IPcheck_ip ${IP}[ $? -eq 0 ] && breakdoneread -p "请输入子网掩码位数: " C_PREFIXwhile true; doread -p "请输入网关地址: " GATEWAYcheck_ip ${GATEWAY}[ $? -eq 0 ] && breakdonecat > /etc/NetworkManager/system-connections/eth0.nmconnection <<-EOF
[connection]
id=eth0
type=ethernet
interface-name=eth0[ethernet][ipv4]
address1=${IP}/${C_PREFIX},${GATEWAY}
dns=223.5.5.5;180.76.76.76;
method=manual[ipv6]
addr-gen-mode=default
method=auto[proxy]
EOFwhile true; doread -p "请输入第二块网卡IP地址: " IP2check_ip ${IP2}[ $? -eq 0 ] && breakdoneread -p "请输入子网掩码位数: " C_PREFIX2cat > /etc/NetworkManager/system-connections/eth1.nmconnection <<-EOF
[connection]
id=eth1
type=ethernet
interface-name=eth1[ethernet][ipv4]
address1=${IP2}/${C_PREFIX2}
method=manual[ipv6]
addr-gen-mode=default
method=auto[proxy]
EOFchmod 600 /etc/NetworkManager/system-connections/eth1.nmconnection${COLOR}"${OS_ID} ${OS_RELEASE} IP地址、网关地址和DNS已修改成功,请重新启动系统后生效!"${END}
}set_dual_ubuntu_ip(){while true; doread -p "请输入第一块网卡IP地址: " IPcheck_ip ${IP}[ $? -eq 0 ] && breakdoneread -p "请输入子网掩码位数: " U_PREFIXwhile true; doread -p "请输入网关地址: " GATEWAYcheck_ip ${GATEWAY}[ $? -eq 0 ] && breakdonewhile true; doread -p "请输入第二块网卡IP地址: " IP2check_ip ${IP2}[ $? -eq 0 ] && breakdoneread -p "请输入子网掩码位数: " U_PREFIX2cat > /etc/netplan/01-netcfg.yaml <<-EOF
network:version: 2renderer: networkdethernets:eth0:dhcp4: nodhcp6: noaddresses: [${IP}/${U_PREFIX}] gateway4: ${GATEWAY}nameservers:addresses: [223.5.5.5, 180.76.76.76]eth1:dhcp4: nodhcp6: noaddresses: [${IP2}/${U_PREFIX2}]
EOF${COLOR}"${OS_ID} ${OS_RELEASE} IP地址、网关地址和DNS已修改成功,请重新启动系统后生效!"${END}
}set_dual_ubuntu_22_ip(){while true; doread -p "请输入第一块网卡IP地址: " IPcheck_ip ${IP}[ $? -eq 0 ] && breakdoneread -p "请输入子网掩码位数: " U_PREFIXwhile true; doread -p "请输入网关地址: " GATEWAYcheck_ip ${GATEWAY}[ $? -eq 0 ] && breakdonewhile true; doread -p "请输入第二块网卡IP地址: " IP2check_ip ${IP2}[ $? -eq 0 ] && breakdoneread -p "请输入子网掩码位数: " U_PREFIX2cat > /etc/netplan/00-installer-config.yaml <<-EOF
network:version: 2renderer: networkdethernets:eth0:dhcp4: nodhcp6: noaddresses: [${IP}/${U_PREFIX}] routes:- to: defaultvia: ${GATEWAY}nameservers:addresses: [223.5.5.5, 180.76.76.76]eth1:dhcp4: nodhcp6: noaddresses: [${IP2}/${U_PREFIX2}]
EOF${COLOR}"${OS_ID} ${OS_RELEASE} IP地址、网关地址和DNS已修改成功,请重新启动系统后生效!"${END}
}set_dual_ip(){if [ ${OS_ID} == "CentOS" -o ${OS_ID} == "Rocky" ];thenif [ ${OS_RELEASE_VERSION} == "7" -o ${OS_RELEASE_VERSION} == "8" ];thenset_dual_centos_ipelseset_dual_centos_9_ipfielif [ ${OS_RELEASE_VERSION} == "18" -o ${OS_RELEASE_VERSION} == "20" ];thenset_dual_ubuntu_ip elseset_dual_ubuntu_22_ipfi
}set_hostname(){read -p "请输入主机名: " HOSThostnamectl set-hostname ${HOST}${COLOR}"${OS_ID} ${OS_RELEASE} 主机名设置成功,请重新登录生效!"${END}
}red(){P_COLOR=31
}green(){P_COLOR=32
}yellow(){P_COLOR=33
}blue(){P_COLOR=34
}violet(){P_COLOR=35
}cyan_blue(){P_COLOR=36
}random_color(){P_COLOR="$[RANDOM%7+31]"
}centos_ps1(){C_PS1=$(echo "PS1='\[\e[1;${P_COLOR}m\][\u@\h \W]\\$ \[\e[0m\]'" >> ~/.bashrc)
}ubuntu_ps1(){U_PS1=$(echo 'PS1="\[\e[1;'''${P_COLOR}'''m\]${debian_chroot:+($debian_chroot)}\u@\h:\w\\$ \[\e[0m\]"' >> ~/.bashrc)
}set_ps1_env(){if [ ${OS_ID} == "CentOS" -o ${OS_ID} == "Rocky" ];thenif grep -Eqi "^PS1" ~/.bashrc;thensed -i '/^PS1/d' ~/.bashrccentos_ps1elsecentos_ps1fifiif [ ${OS_ID} == "Ubuntu" ];thenif grep -Eqi "^PS1" ~/.bashrc;thensed -i '/^PS1/d' ~/.bashrcubuntu_ps1elseubuntu_ps1fifi
}set_ps1(){TIPS="${COLOR}${OS_ID} ${OS_RELEASE} PS1设置成功,请重新登录生效!${END}"while true;doecho -e "\E[$[RANDOM%7+31];1m"cat <<-EOF
1)31 红色
2)32 绿色
3)33 黄色
4)34 蓝色
5)35 紫色
6)36 青色
7)随机颜色
8)退出
EOFecho -e '\E[0m'read -p "请输入颜色编号(1-8): " NUMcase ${NUM} in1)redset_ps1_env${TIPS};;2)greenset_ps1_env${TIPS};;3)yellowset_ps1_env${TIPS};;4)blueset_ps1_env${TIPS};;5)violetset_ps1_env${TIPS};;6)cyan_blueset_ps1_env${TIPS};;7)random_colorset_ps1_env${TIPS};;8)break;;*)${COLOR}"输入错误,请输入正确的数字(1-8)!"${END};;esacdone
}set_vim(){echo "export EDITOR=vim" >> ~/.bashrc
}set_vim_env(){if grep -Eqi ".*EDITOR" ~/.bashrc;thensed -i '/.*EDITOR/d' ~/.bashrcset_vimelseset_vimfi${COLOR}"${OS_ID} ${OS_RELEASE} 默认文本编辑器设置成功,请重新登录生效!"${END}
}set_history(){echo 'export HISTTIMEFORMAT="%F %T "' >> ~/.bashrc
}set_history_env(){if grep -Eqi ".*HISTTIMEFORMAT" ~/.bashrc;thensed -i '/.*HISTTIMEFORMAT/d' ~/.bashrcset_historyelseset_historyfi${COLOR}"${OS_ID} ${OS_RELEASE} history格式设置成功,请重新登录生效!"${END}
}set_swap(){sed -ri 's/.*swap.*/#&/' /etc/fstabif [ ${OS_ID} == "Ubuntu" ];thenif [ ${OS_RELEASE_VERSION} == 20 -o ${OS_RELEASE_VERSION} == 22 ];thenSD_NAME=`lsblk|awk -F"[ └─]" '/SWAP/{printf $3}'`systemctl mask dev-${SD_NAME}.swap &> /dev/nullfifiswapoff -a${COLOR}"${OS_ID} ${OS_RELEASE} 禁用swap成功!"${END}
}set_kernel(){cat > /etc/sysctl.conf <<-EOF
# Controls source route verification
net.ipv4.conf.default.rp_filter = 1
net.ipv4.ip_nonlocal_bind = 1
net.ipv4.ip_forward = 1# Do not accept source routing
net.ipv4.conf.default.accept_source_route = 0# Controls the System Request debugging functionality of the kernel
kernel.sysrq = 0# Controls whether core dumps will append the PID to the core filename.
# Useful for debugging multi-threaded applications.
kernel.core_uses_pid = 1# Controls the use of TCP syncookies
net.ipv4.tcp_syncookies = 1# Disable netfilter on bridges.
net.bridge.bridge-nf-call-ip6tables = 0
net.bridge.bridge-nf-call-iptables = 0
net.bridge.bridge-nf-call-arptables = 0# Controls the default maxmimum size of a mesage queue
kernel.msgmnb = 65536# Controls the maximum size of a message, in bytes
kernel.msgmax = 65536# Controls the maximum shared segment size, in bytes
kernel.shmmax = 68719476736# Controls the maximum number of shared memory segments, in pages
kernel.shmall = 4294967296# TCP kernel paramater
net.ipv4.tcp_mem = 786432 1048576 1572864
net.ipv4.tcp_rmem = 4096        87380   4194304
net.ipv4.tcp_wmem = 4096        16384   4194304
net.ipv4.tcp_window_scaling = 1
net.ipv4.tcp_sack = 1# socket buffer
net.core.wmem_default = 8388608
net.core.rmem_default = 8388608
net.core.rmem_max = 16777216
net.core.wmem_max = 16777216
net.core.netdev_max_backlog = 262144
net.core.somaxconn = 20480
net.core.optmem_max = 81920# TCP conn
net.ipv4.tcp_max_syn_backlog = 262144
net.ipv4.tcp_syn_retries = 3
net.ipv4.tcp_retries1 = 3
net.ipv4.tcp_retries2 = 15# tcp conn reuse
net.ipv4.tcp_tw_reuse = 1
net.ipv4.tcp_tw_recycle = 0
net.ipv4.tcp_fin_timeout = 30
net.ipv4.tcp_timestamps = 0net.ipv4.tcp_max_tw_buckets = 20000
net.ipv4.tcp_max_orphans = 3276800
net.ipv4.tcp_synack_retries = 1
net.ipv4.tcp_syncookies = 1# keepalive conn
net.ipv4.tcp_keepalive_time = 300
net.ipv4.tcp_keepalive_intvl = 30
net.ipv4.tcp_keepalive_probes = 3
net.ipv4.ip_local_port_range = 10001    65000# swap
vm.overcommit_memory = 0
vm.swappiness = 10#net.ipv4.conf.eth1.rp_filter = 0
#net.ipv4.conf.lo.arp_ignore = 1
#net.ipv4.conf.lo.arp_announce = 2
#net.ipv4.conf.all.arp_ignore = 1
#net.ipv4.conf.all.arp_announce = 2
EOFsysctl -p &> /dev/null${COLOR}"${OS_ID} ${OS_RELEASE} 优化内核参数成功!"${END}
}set_limits(){cat >> /etc/security/limits.conf <<-EOF
root     soft   core     unlimited
root     hard   core     unlimited
root     soft   nproc    1000000
root     hard   nproc    1000000
root     soft   nofile   1000000
root     hard   nofile   1000000
root     soft   memlock  32000
root     hard   memlock  32000
root     soft   msgqueue 8192000
root     hard   msgqueue 8192000
EOF${COLOR}"${OS_ID} ${OS_RELEASE} 优化资源限制参数成功!"${END}
}set_localtime(){ln -sf /usr/share/zoneinfo/Asia/Shanghai /etc/localtimeecho 'Asia/Shanghai' >/etc/timezoneif [ ${OS_ID} == "Ubuntu" ];thencat >> /etc/default/locale <<-EOF
LC_TIME=en_DK.UTF-8
EOFfi${COLOR}"${OS_ID} ${OS_RELEASE} 系统时区已设置成功,请重启系统后生效!"${END}
}disable_restart(){if [ -f /usr/lib/systemd/system/ctrl-alt-del.target ];thencp /usr/lib/systemd/system/ctrl-alt-del.target{,.bak}rm -f /usr/lib/systemd/system/ctrl-alt-del.target${COLOR}"${OS_ID} ${OS_RELEASE} 禁用ctrl+alt+del重启处理成功!"${END}else${COLOR}"${OS_ID} ${OS_RELEASE} 禁用ctrl+alt+del已处理!"${END}fi
}set_root_login(){read -p "请输入密码: " PASSWORDecho ${PASSWORD} |sudo -S sed -ri 's@#(PermitRootLogin )prohibit-password@\1yes@' /etc/ssh/sshd_configsudo systemctl restart sshdsudo -S passwd root <<-EOF
${PASSWORD}
${PASSWORD}
EOF${COLOR}"${OS_ID} ${OS_RELEASE} root用户登录已设置完成,请重新登录后生效!"${END}
}ubuntu_remove(){apt purge ufw lxd lxd-client lxcfs liblxc-common${COLOR}"${OS_ID} ${OS_RELEASE} 无用软件包卸载完成!"${END}
}menu(){while true;doecho -e "\E[$[RANDOM%7+31];1m"cat <<-EOF
********************************************************************
*                           初始化脚本菜单                         *
* 1.禁用SELinux                    15.设置PS1(请进入选择颜色)      *
* 2.关闭防火墙                     16.设置默认文本编辑器为vim      *
* 3.优化SSH                        17.设置history格式              *
* 4.设置系统别名                   18.禁用SWAP                     *
* 5.1-4全设置                      19.优化内核参数                 *
* 6.设置vimrc配置文件              20.优化资源限制参数             *
* 7.设置镜像仓库                   21.设置系统时区                 *
* 8.Minimal安装建议安装软件        22.禁用ctrl+alt+del重启         *
* 9.安装邮件服务并配置邮件         23.Ubuntu设置root用户登录       *
* 10.更改SSH端口号                 24.Ubuntu卸载无用软件包         *
* 11.修改网卡名                    25.重启系统                     *
* 12.修改IP地址和网关地址(单网卡)  26.关机                         *
* 13.修改IP地址和网关地址(双网卡)  27.退出                         *
* 14.设置主机名                                                    *
********************************************************************
EOFecho -e '\E[0m'read -p "请选择相应的编号(1-27): " choicecase ${choice} in1)disable_selinux;;2)disable_firewall;;3)optimization_sshd;;4)set_alias;;5)disable_selinuxdisable_firewalloptimization_sshdset_alias;;6)set_vimrc;;7)set_mirror_repository;;8)minimal_install;;9)set_mail;;10)set_sshd_port;;11)set_eth;;12)set_ip;;13)set_dual_ip;;14)set_hostname;;15)set_ps1;;16)set_vim_env;;17)set_history_env;;18)set_swap;;19)set_kernel;;20)set_limits;;21)set_localtime;;22)disable_restart;;23)set_root_login;;24)ubuntu_remove;;25)reboot;;26)shutdown -h now;;27)break;;*)${COLOR}"输入错误,请输入正确的数字(1-27)!"${END};;esacdone
}main(){osmenu
}main
相关文章:

s28.CentOS、Ubuntu、Rocky Linux系统初始化脚本v6版本
CentOS、Ubuntu、Rocky系统初始化脚本 Shell脚本源码地址: Gitee:https://gitee.com/raymond9/shell Github:https://github.com/raymond999999/shell 可以去上面的Gitee或Github仓库代码拉取脚本。 版本功能v6版更新内容1.由于CentOS 6…...

go同步锁 sync mutex
goroutine http://127.0.0.1:3999/concurrency/11 go tour 到此 就结束了. 继续 学习 可以 从 以下网站 文档 https://golang.org/doc/ https://golang.org/doc/code https://golang.org/doc/codewalk/functions/ 博客 https://go.dev/blog/ wiki 服务器教程 服务器…...

使用项目自动生成的dokcerfile第一次构建时把加载aps5.0失败无法找到加载的文件
第一次构建初始化项目自带的dockerfile,内容如下: #See https://aka.ms/containerfastmode to understand how Visual Studio uses this Dockerfile to build your images for faster debugging.#FROM mcr.microsoft.com/dotnet/aspnet:5.0-buster-slim AS base #WORKDIR /a…...
ACREL DC energy meter Application in Indonesia
安科瑞 华楠 Abstract: This article introduces the application of Acrel DC meters in base station in Indonesia.The device is measuring current,voltage and energy together with hall current sensor. 1.Project Overview This company is located in Indonesia a…...
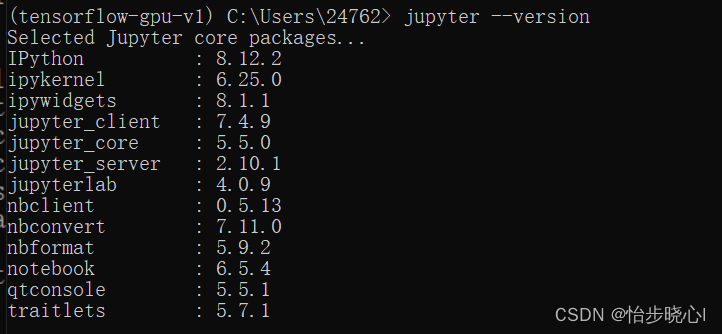
报错!Jupyter notebook 500 : Internal Server Error
Jupyter notebook 报错 500 : Internal Server Error 问题背景 tensorflow-gpu环境,为跑特定代码专门开了一个环境,使用conda安装了Jupyter notebook,能够在浏览器打开Jupyter notebook,但是notebook打开ipynb会报错。 问题分析…...

2023.11.21使用<button>元素来触发form表单和数据提交
2023.11.21使用<button>元素来触发form表单和数据提交 除了使用<input>中的submit方式进行form表单和数据提交,还可以使用button方式,两种方式视使用场景,各有优点。 方法一:可以将<button>放…...
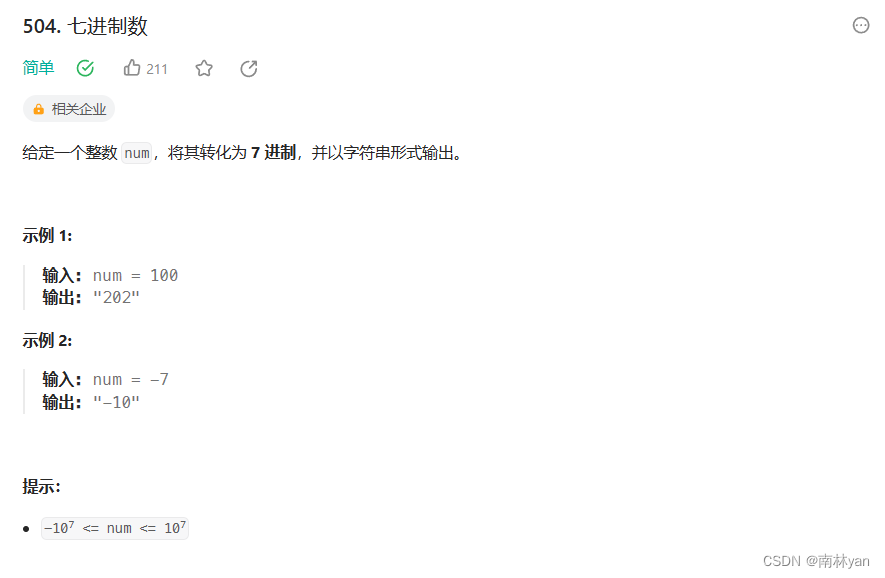
leetcode:504. 七进制数
一、题目: 链接: 504. 七进制数 - 力扣(LeetCode) 函数原型: char* convertToBase7(int num) 二、思路 本题要将十进制数转换为二进制数,只要将十进制num数模7再除7,直到num等于0 每次将模7的结…...

centos安装指定版本docker
centos7安装指定版本的docker 官方文档 https://docs.docker.com/engine/install/centos/ 1、卸载旧版本 $ sudo yum remove docker \docker-client \docker-client-latest \docker-common \docker-latest \docker-latest-logrotate \docker-logrotate \docker-engine2、设…...
PPT幻灯片里的图片,批量提取
之前分享过如何将PPT文件导出成图片,今天继续分享PPT技巧,如何提取出PPT文件里面的图片。 首先,我们将PPT文件的后缀名,修改为rar,将文件改为压缩包文件 然后我们将压缩包文件进行解压 最好是以文件夹的形式解压出来…...

《Fine-Grained Image Analysis with Deep Learning: A Survey》阅读笔记
论文标题 《Fine-Grained Image Analysis with Deep Learning: A Survey》 作者 魏秀参,南京理工大学 初读 摘要 与上篇综述相同: 细粒度图像分析(FGIA)的任务是分析从属类别的视觉对象。 细粒度性质引起的类间小变化和类内…...

【网络安全】伪装IP网络攻击的识别方法
随着互联网的普及和数字化进程的加速,网络攻击事件屡见不鲜。其中,伪装IP的网络攻击是一种较为常见的攻击方式。为了保护网络安全,我们需要了解如何识别和防范这种攻击。 一、伪装IP网络攻击的概念 伪装IP网络攻击是指攻击者通过篡改、伪造I…...

redis非关系型数据库
1.redis redis:开源的,使用c语言编写的NQL数据库 redis:基于内存运行,支持持久化(数据恢复)。采用的就是key-value(键值对)的存储形式,目前在分布式架构中,…...
)
LeetCode 0053. 最大子数组和:DP 或 递归(线段树入门题?)
【LetMeFly】53.最大子数组和:DP 或 递归 力扣题目链接:https://leetcode.cn/problems/maximum-subarray/ 给你一个整数数组 nums ,请你找出一个具有最大和的连续子数组(子数组最少包含一个元素),返回其最…...

二十三种设计模式全面解析-解密职责链模式:请求处理的设计艺术
当我们构建软件系统时,经常会遇到需要处理各种不同类型请求的情况。有时,请求的处理逻辑可能相当复杂,需要按照一定的规则和条件进行处理。在本文中,我们将深入探讨职责链模式在请求处理中的应用。职责链模式通过将请求发送者和接…...

【linux】安装telnet
Telnet Telnet协议是TCP/IP协议族中的一员,是Internet远程登录服务的标准协议和主要方式。它为用户提供了在本地计算机上完成远程主机工作的能力。在终端使用者的电脑上使用telnet程序,用它连接到服务器。终端使用者可以在telnet程序中输入命令…...

深入探索 PaddlePaddle 中的计算图
**引言** 计算图是深度学习平台 PaddlePaddle 的核心组件之一,它提供了一种图形化的方式来表示和执行深度学习模型。通过了解和理解 PaddlePaddle 中的计算图,我们可以更好地理解深度学习的工作原理,并且能够更加灵活和高效地构建和训练复杂…...

西南科技大学814考研一
C语言基础 字节大小 char:1 字节 unsigned char:1 字节 short:2 字节 unsigned short:2 字节 int:通常为 4 字节(32 位平台)或 8 字节(64 位平台) unsigned int&#x…...

【网络编程】简述TCP通信程序,三次握手,四次挥手
文章目录 🎄TCP通信程序⭐打印字符串✨中文乱码问题🎈解决方法 🌺TCP三次握手🌺TCP四次挥手🛸其他 🎊专栏【网络编程】 🍔喜欢的诗句:更喜岷山千里雪 三军过后尽开颜。 🎆…...
 使用介绍 5 -- Trace32 ELF 文件加载介绍】)
【ARM Trace32(劳特巴赫) 使用介绍 5 -- Trace32 ELF 文件加载介绍】
请阅读【ARM Coresight SoC-400/SoC-600 专栏导读】 文章目录 1.1 Trace32 加载符号表1.1.1 ELF 文件加载1.1.2 其它格式文件加载1.1.3 多个 ELF 的加载1.2 Trace32 UEFI 配置1.2.1 x86 32-BIT1.2.2 x86 64-BIT1.2.3 ARM1.1 Trace32 加载符号表 劳特巴赫 TRACE32 可以显示目标…...
Linux(4):Linux文件与目录管理
目录与路径 相对路径在进行软件或软件安装时非常有用,更加方便。利用相对路径的写法必须要确认目前的路径才能正确的去到想要去的目录。 绝对路径的正确度要比相对路径好,因此,在写程序(shell scripts)来管理系统的条…...

合肥全屋定制,真的能满足我的独特需求吗?
在合肥,全屋定制大概率能满足您的独特需求,但这并非绝对,关键在于您的具体要求、预算以及选择的品牌。✅ 合肥市场能满足的“独特需求”个性化风格与功能设计合肥的定制品牌已相当成熟,能够承接各种个性化需求,而非简单…...

5分钟掌握RePKG:Wallpaper Engine资源提取与格式转换的终极秘籍
5分钟掌握RePKG:Wallpaper Engine资源提取与格式转换的终极秘籍 【免费下载链接】repkg Wallpaper engine PKG extractor/TEX to image converter 项目地址: https://gitcode.com/gh_mirrors/re/repkg 你是否曾经面对Wallpaper Engine中的PKG资源包感到无从下…...

开发容器实战:用Dev Containers统一团队开发环境,告别配置地狱
1. 项目概述与核心价值 最近在折腾一个跨平台协作的项目,团队里有人用 Mac,有人用 Windows,还有人用 Linux 桌面,开发环境配置起来简直是“八仙过海,各显神通”,但结果往往是“一地鸡毛”。一个依赖版本不…...

Google Authenticator停更引发恐慌?自建TOTP动态口令系统其实没那么难,附技术实现方案
摘要:2023年,Google Authenticator推出账号同步功能,将TOTP密钥同步到Google账号云端,引发了安全社区的广泛争议——密钥上云意味着什么?企业级场景中,依赖第三方应用管理关键认证密钥本身就是隐患。本文讲…...

2026年DLL修复工具深度测评:免费解决DLL缺失的可行方案
电脑运行办公软件、打开大型游戏时,经常弹出XXX.dll 缺失、无法找到入口点、无法加载动态链接库等报错窗口?相信绝大多数 Windows 用户都遇到过这种糟心情况:好好的程序突然打不开,游戏双击没任何反应,重装软件不起作用…...

白嫖使用 Claude Opus 4.7 一个月,新手保姆级教程
挖槽,最近亚马逊做了一次大善人,为它自家的 Kiro 做拉新活动,新注册账号可以直接获得一个月的 Kiro Pro 会员,价值 20 美刀。 教程非常详细,所以有点长,想看最短流程版的可以直接划到文章末尾。 Kiro 是什…...

2025终极指南:Cursor Free VIP破解工具如何帮你免费解锁AI编程助手所有功能
2025终极指南:Cursor Free VIP破解工具如何帮你免费解锁AI编程助手所有功能 【免费下载链接】cursor-free-vip [Support 0.45](Multi Language 多语言)自动注册 Cursor Ai ,自动重置机器ID , 免费升级使用Pro 功能: Yo…...

Doccano自动标注实战:我用它3天搞定了一个NER项目的数据标注
Doccano自动标注实战:我用它3天搞定了一个NER项目的数据标注 1. 项目背景与挑战 上个月接到了一个从新闻文本中抽取公司名和职位的NER任务,标注量约5000条。作为独立开发者,既没有专业标注团队,也没有充足预算购买商业标注服务。传…...

5D动感影院|打造沉浸式体验的新一代互动影院解决方案
随着数字技术与沉浸式体验的不断发展,传统影院已经无法完全满足现代观众对互动性与真实感的需求。在这一背景下,5D动感影院应运而生,凭借多维度感官融合技术,为观众带来前所未有的沉浸式观影体验。作为集视觉、听觉、触觉及环境特…...

dojo.md:从提示词工程到技能工程,打造稳定可靠的AI智能体
1. 项目概述:为什么你的AI助手在演示时很聪明,一上线就“翻车”? 你有没有过这样的经历?精心调教了一个AI助手,让它帮你写邮件、处理客服问题或者生成广告文案,在测试环境里它对答如流,表现堪称…...