UEC++ day7
敌人NPC机制
敌人机制分析与需求
- 新建一个character类来作为敌人,直接建蓝图设置骨骼网格,因为敌人可能多种就不规定死,然后这个敌人肯定需要两个触发器,一个用于大范围巡逻,一个用于是否达到主角近点进行攻击
- 注意我们要避免摄像机被敌人阻挡
- BaseEnemy.h
// Fill out your copyright notice in the Description page of Project Settings.#pragma once#include "CoreMinimal.h"
#include "GameFramework/Character.h"
#include "BaseEnemy.generated.h"UCLASS()
class UEGAME_API ABaseEnemy : public ACharacter
{GENERATED_BODY()public:// Sets default values for this character's propertiesABaseEnemy();UPROPERTY(VisibleAnywhere, BlueprintReadOnly, Category = "AI")class USphereComponent* ChaseVolume;UPROPERTY(VisibleAnywhere, BlueprintReadOnly, Category = "AI")USphereComponent* AttackVolume;
protected:// Called when the game starts or when spawnedvirtual void BeginPlay() override;public:	// Called every framevirtual void Tick(float DeltaTime) override;// Called to bind functionality to inputvirtual void SetupPlayerInputComponent(class UInputComponent* PlayerInputComponent) override;UFUNCTION()virtual void OnChaseVolumeOverlapBegin(UPrimitiveComponent* OverlappedComponent, AActor* OtherActor, UPrimitiveComponent* OtherComp, int32 OtherBodyIndex, bool bFromSweep, const FHitResult& SweepResult);UFUNCTION()virtual void OnChaseVolumeOverlapEnd(UPrimitiveComponent* OverlappedComponent, AActor* OtherActor, UPrimitiveComponent* OtherComp, int32 OtherBodyIndex);UFUNCTION()virtual void OnAttackVolumeOverlapBegin(UPrimitiveComponent* OverlappedComponent, AActor* OtherActor, UPrimitiveComponent* OtherComp, int32 OtherBodyIndex, bool bFromSweep, const FHitResult& SweepResult);UFUNCTION()virtual void OnAttackVolumeOverlapEnd(UPrimitiveComponent* OverlappedComponent, AActor* OtherActor, UPrimitiveComponent* OtherComp, int32 OtherBodyIndex);
};
- BaseEnemy.cpp
// Fill out your copyright notice in the Description page of Project Settings.#include "BaseEnemy.h"
#include "Components/SphereComponent.h"
#include "Components/SkeletalMeshComponent.h"
#include "Components/CapsuleComponent.h"
// Sets default values
ABaseEnemy::ABaseEnemy()
{// Set this character to call Tick() every frame.  You can turn this off to improve performance if you don't need it.PrimaryActorTick.bCanEverTick = true;//避免摄像机被敌人给阻挡GetMesh()->SetCollisionResponseToChannel(ECollisionChannel::ECC_Camera, ECollisionResponse::ECR_Ignore);GetCapsuleComponent()->SetCollisionResponseToChannel(ECollisionChannel::ECC_Camera, ECollisionResponse::ECR_Ignore);ChaseVolume = CreateDefaultSubobject<USphereComponent>(TEXT("ChaseVolume"));ChaseVolume->SetupAttachment(GetRootComponent());ChaseVolume->InitSphereRadius(800.f);ChaseVolume->SetCollisionObjectType(ECollisionChannel::ECC_WorldDynamic);ChaseVolume->SetCollisionResponseToAllChannels(ECollisionResponse::ECR_Ignore);ChaseVolume->SetCollisionResponseToChannel(ECollisionChannel::ECC_Pawn, ECollisionResponse::ECR_Overlap);AttackVolume = CreateDefaultSubobject<USphereComponent>(TEXT("AttackVolume"));AttackVolume->SetupAttachment(GetRootComponent());AttackVolume->InitSphereRadius(100.f);AttackVolume->SetCollisionObjectType(ECollisionChannel::ECC_WorldDynamic);AttackVolume->SetCollisionResponseToAllChannels(ECollisionResponse::ECR_Ignore);AttackVolume->SetCollisionResponseToChannel(ECollisionChannel::ECC_Pawn, ECollisionResponse::ECR_Overlap);
}// Called when the game starts or when spawned
void ABaseEnemy::BeginPlay()
{Super::BeginPlay();ChaseVolume->OnComponentBeginOverlap.AddDynamic(this, &ABaseEnemy::OnChaseVolumeOverlapBegin);ChaseVolume->OnComponentEndOverlap.AddDynamic(this, &ABaseEnemy::OnChaseVolumeOverlapEnd);AttackVolume->OnComponentBeginOverlap.AddDynamic(this, &ABaseEnemy::OnAttackVolumeOverlapBegin);AttackVolume->OnComponentEndOverlap.AddDynamic(this, &ABaseEnemy::OnAttackVolumeOverlapEnd);}// Called every frame
void ABaseEnemy::Tick(float DeltaTime)
{Super::Tick(DeltaTime);}// Called to bind functionality to input
void ABaseEnemy::SetupPlayerInputComponent(UInputComponent* PlayerInputComponent)
{Super::SetupPlayerInputComponent(PlayerInputComponent);}void ABaseEnemy::OnChaseVolumeOverlapBegin(UPrimitiveComponent* OverlappedComponent, AActor* OtherActor, UPrimitiveComponent* OtherComp, int32 OtherBodyIndex, bool bFromSweep, const FHitResult& SweepResult)
{
}void ABaseEnemy::OnChaseVolumeOverlapEnd(UPrimitiveComponent* OverlappedComponent, AActor* OtherActor, UPrimitiveComponent* OtherComp, int32 OtherBodyIndex)
{
}void ABaseEnemy::OnAttackVolumeOverlapBegin(UPrimitiveComponent* OverlappedComponent, AActor* OtherActor, UPrimitiveComponent* OtherComp, int32 OtherBodyIndex, bool bFromSweep, const FHitResult& SweepResult)
{
}void ABaseEnemy::OnAttackVolumeOverlapEnd(UPrimitiveComponent* OverlappedComponent, AActor* OtherActor, UPrimitiveComponent* OtherComp, int32 OtherBodyIndex)
{
}
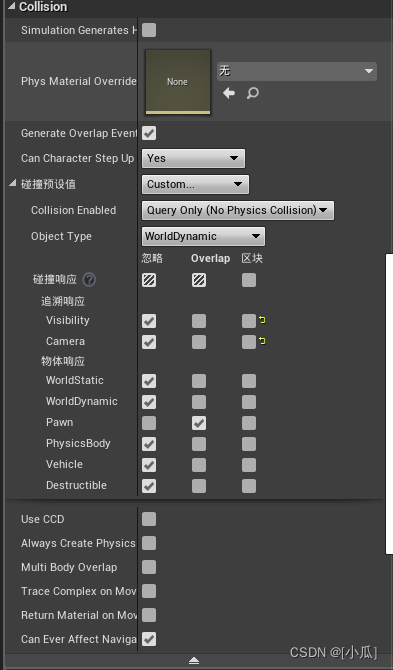
- 注意虚幻的visibility与camera默认是block
部署导航网格
++ Nav Mesh Bounds Volume:导航网格

- Nav Modifier Volume:修改导航网格
添加AI模块与创建敌人移动状态枚举
- 有些组件的使用是需要添加依赖项的就像之前的UMG需要添加到自己的工程目录下的
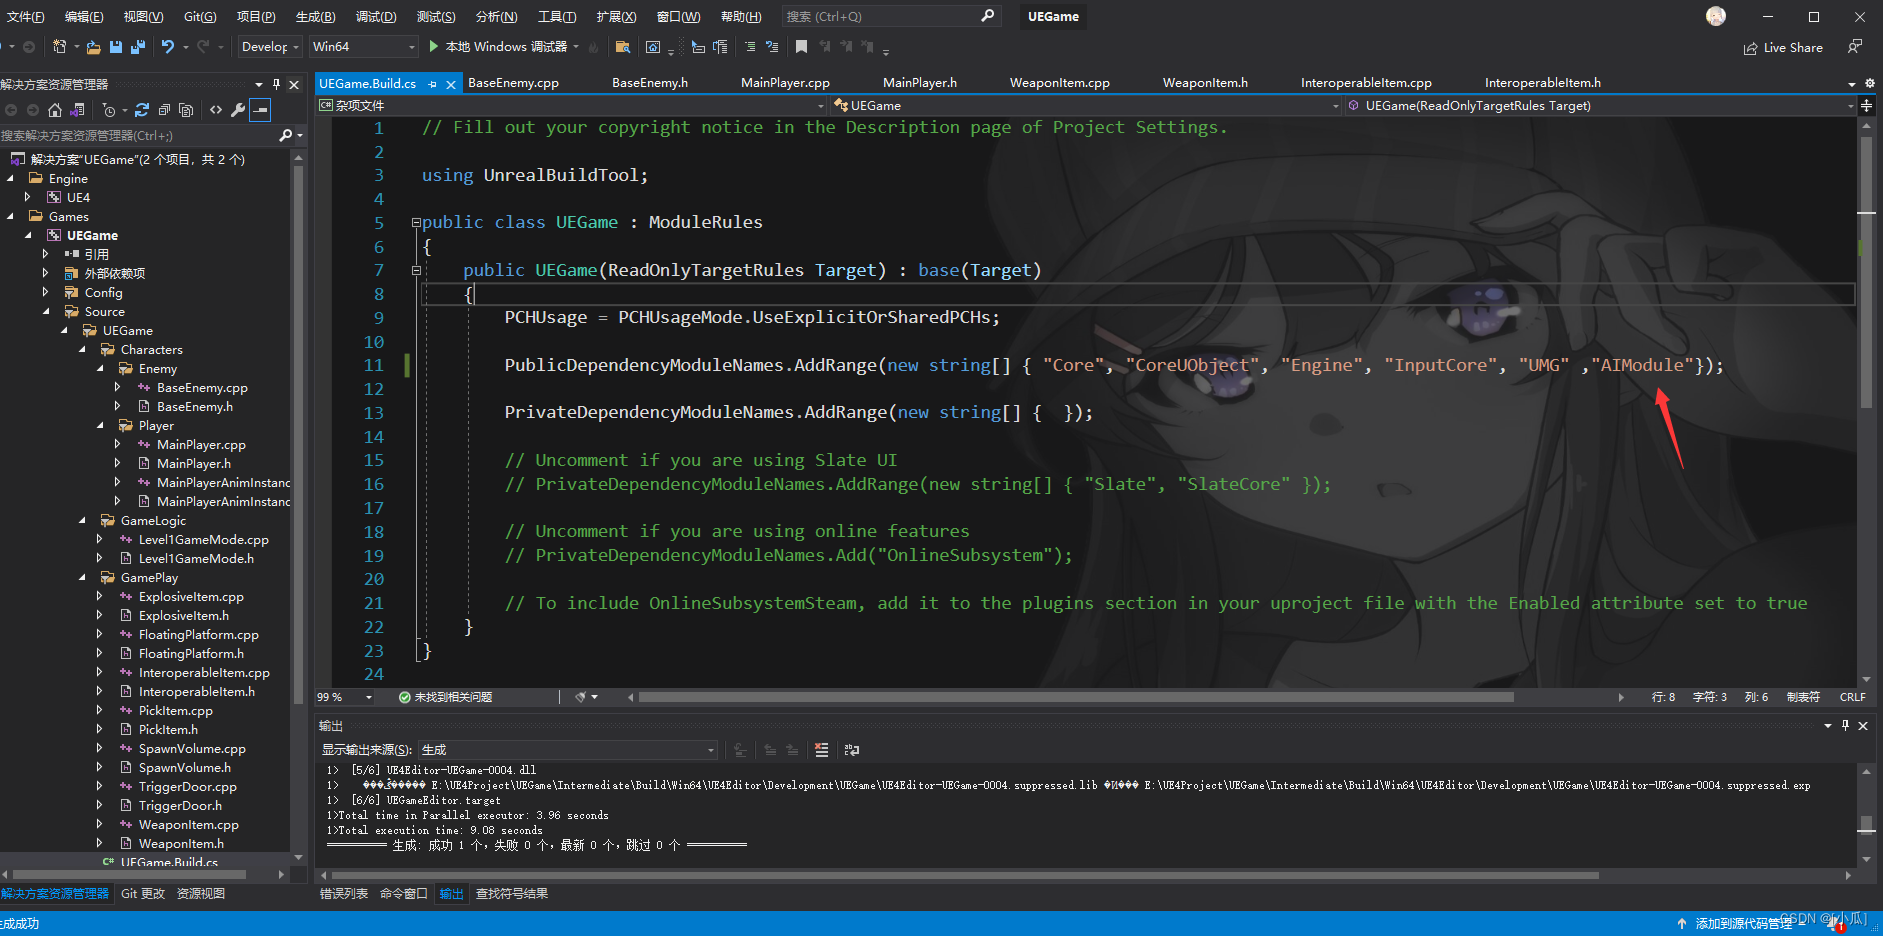
工程名.Build.cs里面,调用AI的模块就需要添加AIModule
- 添加敌人移动状态枚举变量与接近主角的函数
UENUM(BlueprintType)
enum class EEnemyMovementStatus :uint8
{EEMS_Idle			UMETA(DisplayName="Idle"),EEMS_MoveToTarget	UMETA(DisPlayName="MoveToTarget"),EEMS_Attacking		UMETA(DisPlayName="Attacking"),EEMS_Dead			UMETA(DisPlayName="Dead")
};//--------------------------------------------------------------UPROPERTY(VisibleAnywhere, BlueprintReadOnly, Category = "Enemy Stats")EEnemyMovementStatus EnemyMovementStatus;
//--------------------------------------------------------------void MoveToTarget(class AMainPlayer* Player);
获取AIController并持有敌人
- AAIcontroller* AIController所需头文件:
#include "AIController.h" - 声明AAIController类的指针
UPROPERTY(VisibleAnywhere, BlueprintReadOnly, Category = "AI")
class AAIController* AIController;
- 设置持有属性
// Sets default values
ABaseEnemy::ABaseEnemy()
{// Set this character to call Tick() every frame.  You can turn this off to improve performance if you don't need it.PrimaryActorTick.bCanEverTick = true;
//-----------------省略----------------------------------------------//设置持有属性AutoPossessAI = EAutoPossessAI::PlacedInWorldOrSpawned;//初始化默认移动状态EnemyMovementStatus = EEnemyMovementStatus::EEMS_Idle;
}
- 获取到Controller属性
// Called when the game starts or when spawned
void ABaseEnemy::BeginPlay()
{Super::BeginPlay();
//-----------------省略----------------------------------------------	//拿到ControllerAIController = Cast<AAIController>(GetController());
}
调用MoveTo去追逐Player
- 逻辑(一):首先在追逐事件中去判断是不是Player如果是就调用追逐函数MoveToTarget
void ABaseEnemy::OnChaseVolumeOverlapBegin(UPrimitiveComponent* OverlappedComponent, AActor* OtherActor, UPrimitiveComponent* OtherComp, int32 OtherBodyIndex, bool bFromSweep, const FHitResult& SweepResult)
{if (OtherActor){AMainPlayer* Player = Cast<AMainPlayer>(OtherActor);if (Player){MoveToTarget(Player);}}
}
- 逻辑(二):MoveToTarget函数中,首先将敌人的枚举移动状态变换为EEMS_MoveToTarget,然后判断AIController是否获取成功,成功就去调用MoveTo去追逐主角
FAIMoveRequest 是UE中的一个结构体,主要用于指定人工智能(AI)代理的移动请求。其内部包含了一系列参数,如目标位置、到达速度、抵达距离、是否允许短路等等,这些参数都可以用来控制 AI 代理的移动行为。
当调用 AAIController::MoveTo() 或者 AAIController::SimpleMoveTo() 等函数时,会创建并返回一个 FAIMoveRequest 结构体实例。然后你可以设置它的参数,并将它传递给 AAIController::UpdateMoveStatus() 函数,从而让 AI 代理按照你的要求进行移动。
总的来说,FAIMoveRequest 提供了一种方便的方式来指定和调整 AI 代理的移动请求,使得 AI 的行为更加灵活多样。FAIMoveRequest MoveRequest; MoveRequest.SetGoalActor(Player);//设置移动请求目标 MoveRequest.SetAcceptanceRadius(10.f); //设置移动半径在UE中,FNavPathSharedPtr NavPath 表示一个智能指针,用于存储和管理导航路径。智能指针是一个类模板,可以自动管理所指向对象的生命周期,避免了因忘记释放内存而导致的内存泄漏问题。
具体来说,FNavPathSharedPtr 是一个 shared_ptr 类型的智能指针,它指向的是一个 FNavPath 对象。FNavPath 是 Unreal Engine 中的一个类,用于表示从起点到终点的一条导航路径。
因此,在虚幻引擎中,NavPath 可以用来保存和操作导航路径。例如,可以使用它来获取路径的距离、方向等信息,或者更新路径以适应场景的变化。FNavPathSharedPtr NavPath;//会返回路径- 调用MoveTo去追逐主角
void ABaseEnemy::MoveToTarget(AMainPlayer* Player)
{EnemyMovementStatus = EEnemyMovementStatus::EEMS_MoveToTarget;if (AIController){FAIMoveRequest MoveRequest;MoveRequest.SetGoalActor(Player);//设置移动请求目标MoveRequest.SetAcceptanceRadius(10.f);	//设置移动半径FNavPathSharedPtr NavPath;//会返回路径AIController->MoveTo(MoveRequest, &NavPath);}
}
- 逻辑(三):当主角出了追逐移动事件就停止移动
void ABaseEnemy::OnChaseVolumeOverlapEnd(UPrimitiveComponent* OverlappedComponent, AActor* OtherActor, UPrimitiveComponent* OtherComp, int32 OtherBodyIndex)
{if (OtherActor){AMainPlayer* Player = Cast<AMainPlayer>(OtherActor);if (Player){if (AIController){//停止移动AIController->StopMovement();}}}
}
创建敌人动画蓝图
- 基本与创建MainPlayer动画蓝图差不多
- EnemyAnimInstance,h
// Fill out your copyright notice in the Description page of Project Settings.#pragma once#include "CoreMinimal.h"
#include "Animation/AnimInstance.h"
#include "EnemyAnimInstance.generated.h"/*** */
UCLASS()
class UEGAME_API UEnemyAnimInstance : public UAnimInstance
{GENERATED_BODY()
public:UPROPERTY(VisibleAnywhere, BlueprintReadOnly, Category = "Animation Properties")float Speed;UPROPERTY(VisibleAnywhere, BlueprintReadOnly, Category = "Animation Properties")class ABaseEnemy* Enemy;virtual void NativeInitializeAnimation() override;UFUNCTION(BlueprintCallable, Category = "Animaion Properties")void UpDataAnimationProperties();
};
- EnemyAnimInstance.cpp
// Fill out your copyright notice in the Description page of Project Settings.#include "EnemyAnimInstance.h"
#include "Animation/AnimInstance.h"
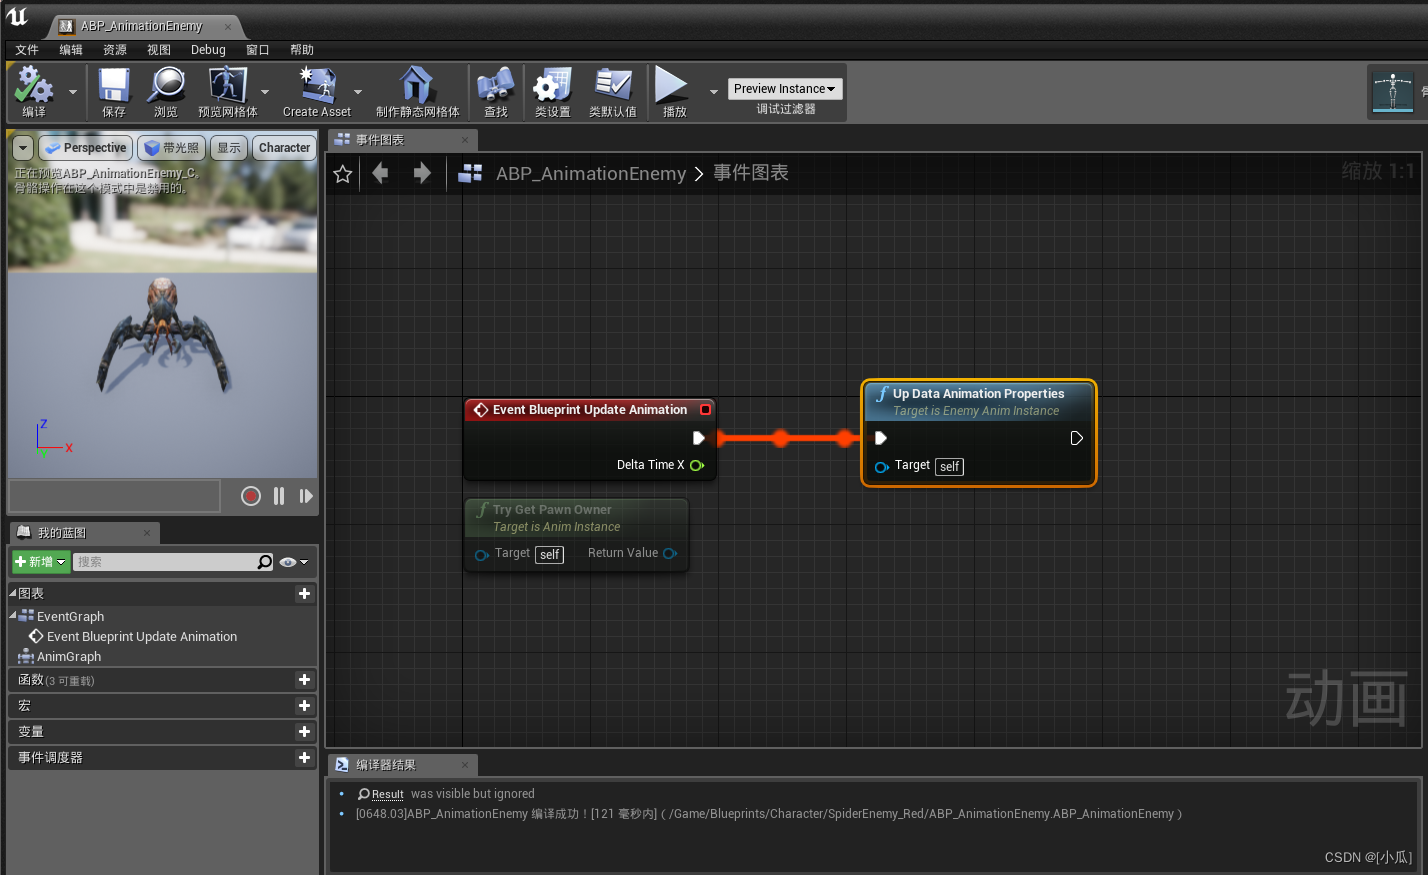
#include "Characters/Enemy/BaseEnemy.h"void UEnemyAnimInstance::NativeInitializeAnimation()
{Enemy = Cast<ABaseEnemy>(TryGetPawnOwner());
}void UEnemyAnimInstance::UpDataAnimationProperties()
{if (Enemy){Enemy = Cast<ABaseEnemy>(TryGetPawnOwner());}if (Enemy){FVector SpeedVector = Enemy->GetVelocity();FVector PlanarSpeed = FVector(SpeedVector.X, SpeedVector.Y, 0.f);Speed = PlanarSpeed.Size();}
}
- 创建动画蓝图

敌人行走的混合空间
- 基本和当时创建Player的混合空间差不多

- 编写动画蓝图

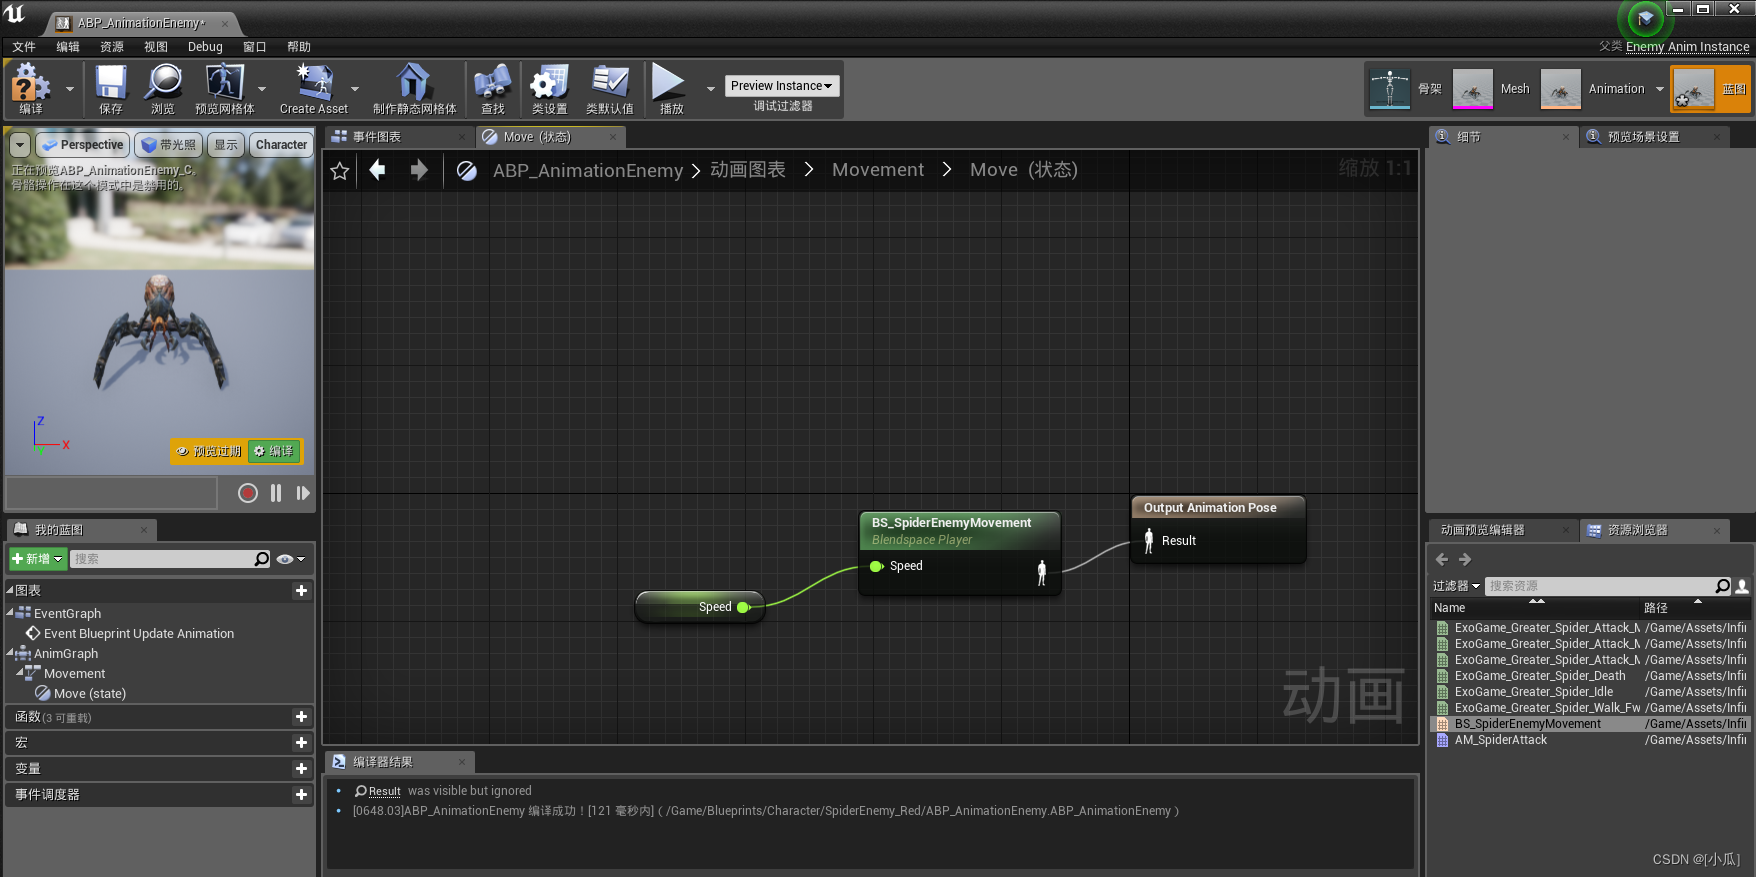
- 然后设置到蓝图上即可

创建蒙太奇以及攻击编码
- 创建蒙太奇
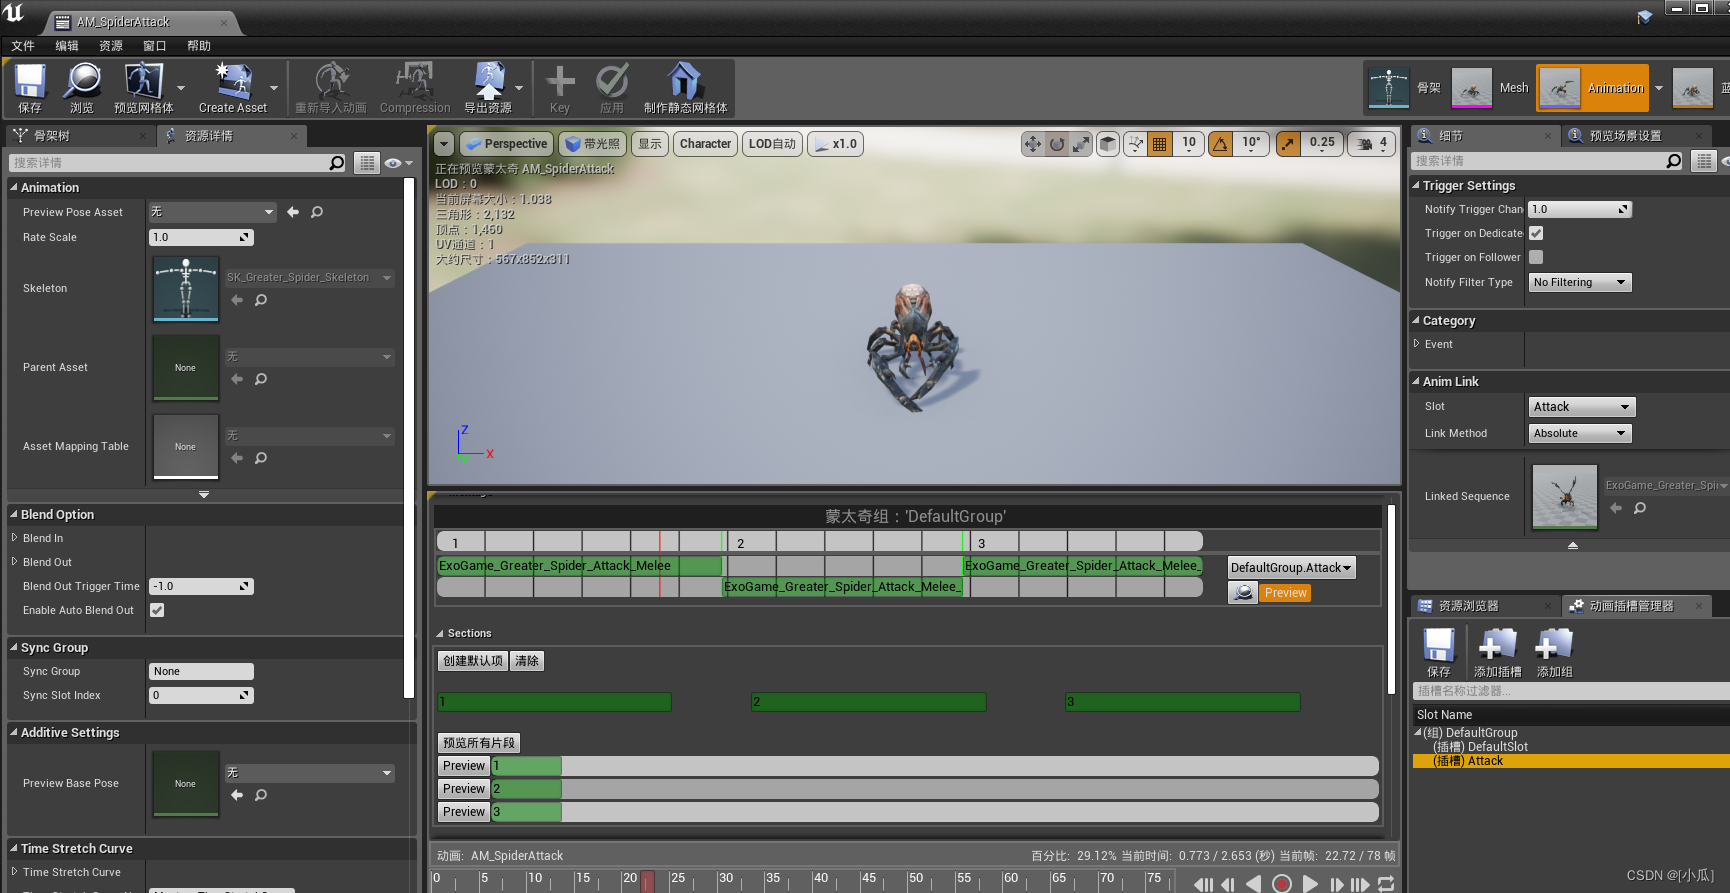
- 攻击逻辑:老规矩引用一个bool变量用于检测是否在攻击范围,新建Montage引用后续方便调用Montage功能,与两个函数用来攻击和攻击结束的逻辑编写,攻击结束要在蓝图中调用加上反射,在重叠事件中写是否检测到主角进入攻击范围如果是就执行攻击函数,攻击函数中首先关闭移动,然后判断是不是正在攻击(默认肯定没有攻击,所以判断完要设定为正在攻击),然后获取AnimInstance进行片段播放,攻击结束函数逻辑就先把状态变为待机状态,然后判断是否在攻击范围bool变量,如果为真就继续执行攻击函数形成闭环,最后离开了重叠事件范围就先把bool检测攻击变为false,判断攻击状态是否结束,如果结束就继续执行追逐主角函数,可能这个逻辑会导致bug,所以我们把追逐主角的函数MoveToTarget添加反射到时候在蓝图中完善
- 需要的变量与函数
	UPROPERTY(VisibleAnywhere, BlueprintReadOnly, Category = "Attack")bool bAttackVolumeOverlap;UPROPERTY(EditAnywhere, BlueprintReadWrite, Category = "Attack")class UAnimMontage* AttackMontage;UFUNCTION(BlueprintCallable)
void MoveToTarget(class AMainPlayer* Player);
void AttackBegin();
UFUNCTION(BlueprintCallable)
void AttackEnd();
- 函数逻辑
void ABaseEnemy::OnChaseVolumeOverlapBegin(UPrimitiveComponent* OverlappedComponent, AActor* OtherActor, UPrimitiveComponent* OtherComp, int32 OtherBodyIndex, bool bFromSweep, const FHitResult& SweepResult)
{if (OtherActor){AMainPlayer* Player = Cast<AMainPlayer>(OtherActor);if (Player){MoveToTarget(Player);}}
}void ABaseEnemy::OnChaseVolumeOverlapEnd(UPrimitiveComponent* OverlappedComponent, AActor* OtherActor, UPrimitiveComponent* OtherComp, int32 OtherBodyIndex)
{if (OtherActor){AMainPlayer* Player = Cast<AMainPlayer>(OtherActor);if (Player){if (AIController){//停止移动AIController->StopMovement();}}}
}void ABaseEnemy::OnAttackVolumeOverlapBegin(UPrimitiveComponent* OverlappedComponent, AActor* OtherActor, UPrimitiveComponent* OtherComp, int32 OtherBodyIndex, bool bFromSweep, const FHitResult& SweepResult)
{if (OtherActor){AMainPlayer* Player = Cast<AMainPlayer>(OtherActor);if (Player){bAttackVolumeOverlap = true;AttackBegin();}}
}void ABaseEnemy::OnAttackVolumeOverlapEnd(UPrimitiveComponent* OverlappedComponent, AActor* OtherActor, UPrimitiveComponent* OtherComp, int32 OtherBodyIndex)
{if (OtherActor){AMainPlayer* Player = Cast<AMainPlayer>(OtherActor);if (Player){bAttackVolumeOverlap = false;if (EnemyMovementStatus!=EEnemyMovementStatus::EEMS_Attacking){MoveToTarget(Player);}}}
}void ABaseEnemy::MoveToTarget(AMainPlayer* Player)
{EnemyMovementStatus = EEnemyMovementStatus::EEMS_MoveToTarget;if (AIController){FAIMoveRequest MoveRequest;MoveRequest.SetGoalActor(Player);//设置移动请求目标MoveRequest.SetAcceptanceRadius(10.f);	//设置移动半径FNavPathSharedPtr NavPath;//会返回路径AIController->MoveTo(MoveRequest, &NavPath);}
}void ABaseEnemy::AttackBegin()
{//攻击中关闭移动if (AIController){AIController->StopMovement();}if (EnemyMovementStatus != EEnemyMovementStatus::EEMS_Attacking){EnemyMovementStatus = EEnemyMovementStatus::EEMS_Attacking;UAnimInstance* AnimInstance = GetMesh()->GetAnimInstance();if (AnimInstance && AttackMontage){float PlayRate = FMath::RandRange(0.9f, 1.1f);FString SectionName = FString::FromInt(FMath::RandRange(1, 3));AnimInstance->Montage_Play(AttackMontage, PlayRate);AnimInstance->Montage_JumpToSection(FName(*SectionName), AttackMontage);}}
}void ABaseEnemy::AttackEnd()
{EnemyMovementStatus = EEnemyMovementStatus::EEMS_Idle;if (bAttackVolumeOverlap){AttackBegin();}
}
攻击动画的编写以及连续追逐
- 首先把Montage的攻击通知加上,然后在动画蓝图里面添加蒙太奇
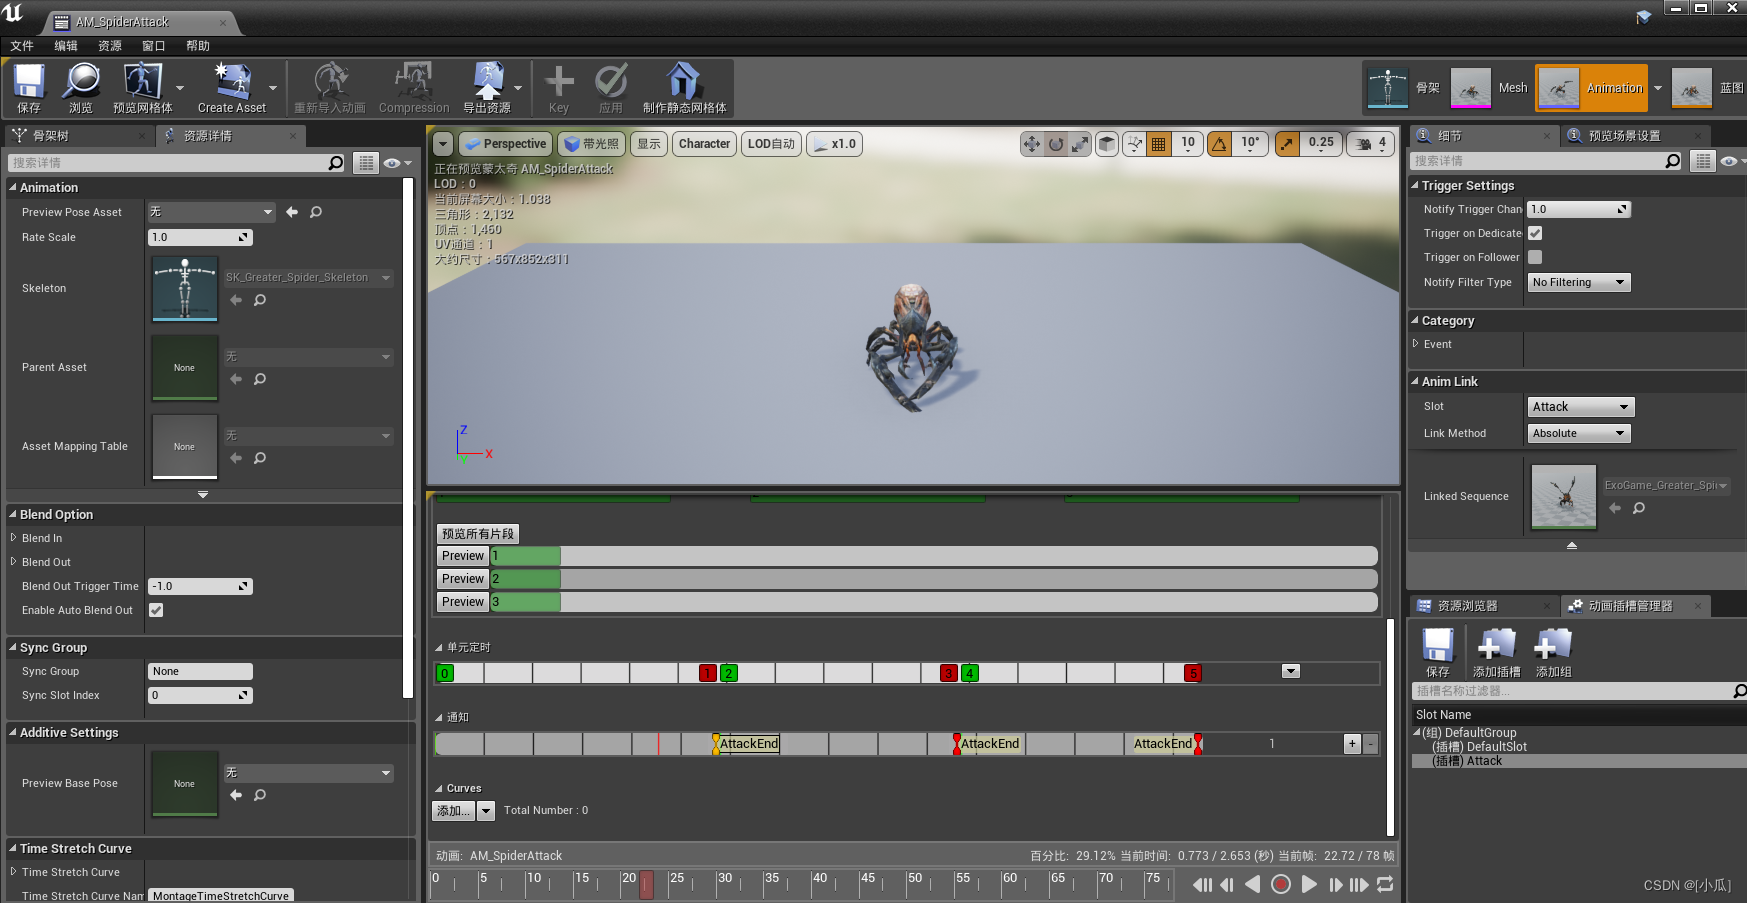
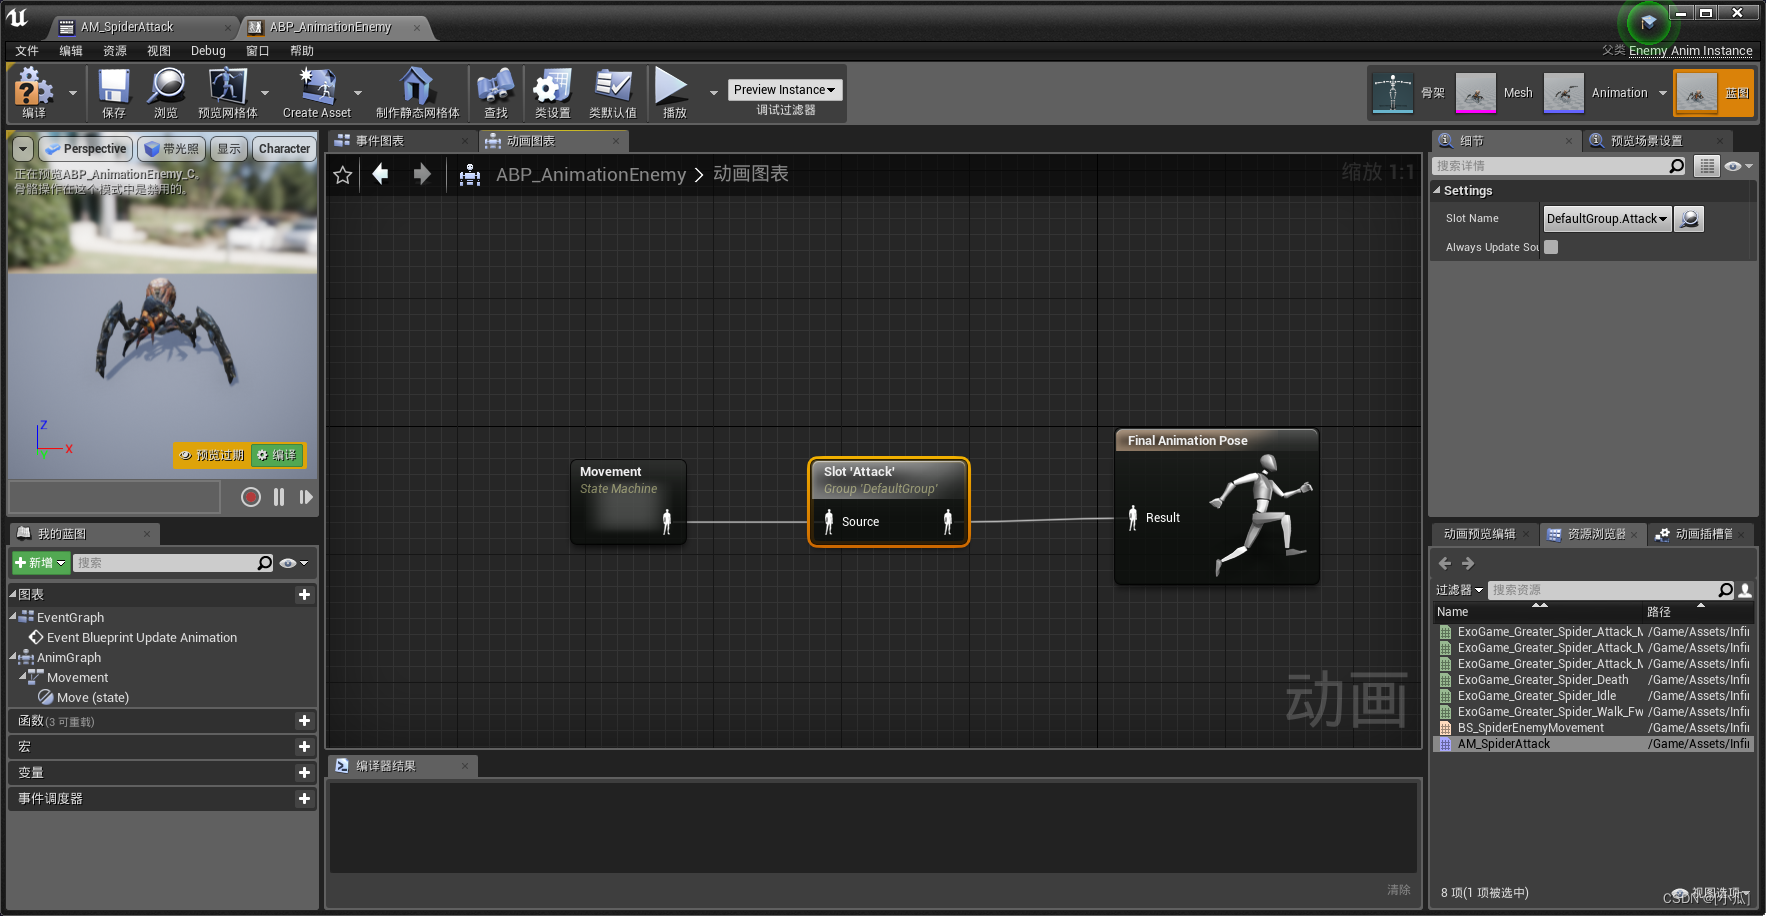
- 然后在事件图表里面进行编辑,调用通知AttackEnd事件执行AttackEnd函数,然后进行判断主角离开了攻击重叠事件的判断,如果离开了,就又继续执行追逐主角函数

敌人更新攻击目标
- 思想:近点跟随,谁离得近就先攻击谁
- 在MainPlayer中新建一个敌人类的指针引用与一个模版敌人类,一个更新攻击目标的函数
	UPROPERTY(VisibleAnywhere, BlueprintReadOnly, Category = "Attack")class ABaseEnemy* AttackTarget;UPROPERTY(EditAnywhere, BlueprintReadWrite, Category = "Attack")TSubclassOf<ABaseEnemy> EnemyFilter;
//-----------------------------------------------------------------
void UpdataAttackTarget();
- 定义一个模版敌人类就是因为要使用这个函数
GetOverlappingActors:它能够获取与指定组件相交的所有 Actors 列表,在使用时记得加上敌人类头文件,避免不知道EnemyFilter
void AMainPlayer::UpdataAttackTarget()
{TArray<AActor*> OVerlappingActors;GetOverlappingActors(OVerlappingActors,EnemyFilter);
}
- 在返回的相交所有Actor列表里面进行选择最近的那个,逻辑是:遍历OverlapingActors数组进行比较,近的就替换远的。新建一个用于交换的敌人类引用,新建一个最小范围,然后获取当前位置,然后开始变量数组,将数组里面的单位全部转换为敌人类,判断敌人是否存在是否死亡,如果存在无死亡就当前距离主角的位置记录下来,如果距离主角位置小于最小范围那么就将距离主角位置赋值最小范围,将当前敌人类给交换敌人的引用,循环结束就将当前距离主角位置赋值给AttackTarget
void AMainPlayer::UpdataAttackTarget()
{TArray<AActor*> OVerlappingActors;GetOverlappingActors(OVerlappingActors,EnemyFilter);//判断列表里面是否为空,为空就无攻击目标if (OVerlappingActors.Num() == 0){AttackTarget = nullptr;return;}ABaseEnemy* ClosestDistance = nullptr;float MinDistance = 1000.f;FVector Loation = GetActorLocation();for (auto Actor : OVerlappingActors){ABaseEnemy* Enemy = Cast<ABaseEnemy>(Actor);if (Enemy && Enemy->EnemyMovementStatus != EEnemyMovementStatus::EEMS_Dead){float DistanceToActor = (Enemy->GetActorLocation() - Loation).Size();//记录当前位置Enemy距离MainPlayer位置if (DistanceToActor < MinDistance){MinDistance = DistanceToActor;ClosestDistance = Enemy;}}}AttackTarget = ClosestDistance;
}
- 然后在BaseEnemy类的攻击碰撞事件中调用此函数
void ABaseEnemy::OnAttackVolumeOverlapBegin(UPrimitiveComponent* OverlappedComponent, AActor* OtherActor, UPrimitiveComponent* OtherComp, int32 OtherBodyIndex, bool bFromSweep, const FHitResult& SweepResult)
{if (OtherActor){AMainPlayer* Player = Cast<AMainPlayer>(OtherActor);if (Player){Player->UpdataAttackTarget();bAttackVolumeOverlap = true;AttackBegin();}}
}
玩家自动面向攻击目标
- 采用插值的思想方法,当我们需要攻击转向时就进行插值转向
- 在MainPlayer类中新建一个插值速度变量与一个bool是否进行插值变量并赋初值
UPROPERTY(EditAnywhere, BlueprintReadWrite, Category = "Attack")float InterpSpeed;UPROPERTY(VisibleAnywhere, BlueprintReadWrite, Category = "Attack")bool bInterpToEnemy;InterpSpeed = 15.f;
bInterpToEnemy = false;
- 然后在攻击函数中将bool插值变量赋为true,攻击结束函数中设为false
void AMainPlayer::AttackBegin()
{if (!bIsAttacking){bIsAttacking = true;bInterpToEnemy = true;//拿到动画UAnimInstance* AnimInstance = GetMesh()->GetAnimInstance();if (AnimInstance && AttackMontage){float PlayRate = FMath::RandRange(1.25f, 1.75f);FString SectionName = FString::FromInt(FMath::RandRange(1, 2));//指定片段播放AnimInstance->Montage_Play(AttackMontage, PlayRate);AnimInstance->Montage_JumpToSection(FName(*SectionName), AttackMontage);}}
}void AMainPlayer::AttackEnd()
{bIsAttacking = false;bInterpToEnemy = false;//形成闭环if (bAttackKeyDown){AttackKeyDown();}
}
- 然后去Tick里面进行转向逻辑编写,使用RInterpTo要头文件:#include “Kismet/KismetMathLibrary.h”
//进行转向插值if (bInterpToEnemy && AttackTarget){//只需要AttackTarget的Yaw转向FRotator LookAtYaw(0.f, UKismetMathLibrary::FindLookAtRotation(GetActorLocation(), AttackTarget->GetActorLocation()).Yaw, 0.f);FRotator InterpRotation = FMath::RInterpTo(GetActorRotation(), LookAtYaw, DeltaTime, InterpSpeed);SetActorRotation(InterpRotation);}
- 将Enemy给过滤器,必须是C++类
敌人自动面向玩家攻击目标
- 基本与玩家面向攻击目标的编写差不多
	UPROPERTY(EditAnywhere, BlueprintReadWrite, Category = "Attack")float InterpSpeed;UPROPERTY(VisibleAnywhere, BlueprintReadWrite, Category = "Attack")bool bInterpToPlayer;InterpSpeed = 15.f;
bInterpToPlayer = false;
- 然后在攻击函数中将bool插值变量赋为true,攻击结束函数中设为false
void ABaseEnemy::AttackBegin()
{//攻击中关闭移动if (AIController){AIController->StopMovement();}if (EnemyMovementStatus != EEnemyMovementStatus::EEMS_Attacking){EnemyMovementStatus = EEnemyMovementStatus::EEMS_Attacking;bInterpToPlayer = true;UAnimInstance* AnimInstance = GetMesh()->GetAnimInstance();if (AnimInstance && AttackMontage){float PlayRate = FMath::RandRange(0.9f, 1.1f);FString SectionName = FString::FromInt(FMath::RandRange(1, 3));AnimInstance->Montage_Play(AttackMontage, PlayRate);AnimInstance->Montage_JumpToSection(FName(*SectionName), AttackMontage);}}
}void ABaseEnemy::AttackEnd()
{EnemyMovementStatus = EEnemyMovementStatus::EEMS_Idle;bInterpToPlayer = false;if (bAttackVolumeOverlap){AttackBegin();}
}
- 然后去Tick里面进行转向逻辑编写,注意的事FindLookAtRotation中的目标位置是Player,得去获取位置,获取位置要加头文件:
#include "Kismet/GameplayStatics.h",使用RInterpTo也要头文件:#include "Kismet/KismetMathLibrary.h"
void ABaseEnemy::Tick(float DeltaTime)
{Super::Tick(DeltaTime);if (bInterpToPlayer){FRotator LookYaw(0.f, UKismetMathLibrary::FindLookAtRotation(GetActorLocation(), UGameplayStatics::GetPlayerPawn(this, 0)->GetActorLocation()).Yaw, 0.f);FRotator InterpRotation = FMath::RInterpTo(GetActorRotation(), LookYaw, DeltaTime, InterpSpeed);SetActorRotation(InterpRotation);}
}
BaseEnemy.h
// Fill out your copyright notice in the Description page of Project Settings.#pragma once#include "CoreMinimal.h"
#include "GameFramework/Character.h"
#include "BaseEnemy.generated.h"UENUM(BlueprintType)
enum class EEnemyMovementStatus :uint8
{EEMS_Idle			UMETA(DisplayName="Idle"),EEMS_MoveToTarget	UMETA(DisPlayName="MoveToTarget"),EEMS_Attacking		UMETA(DisPlayName="Attacking"),EEMS_Dead			UMETA(DisPlayName="Dead")
};UCLASS()
class UEGAME_API ABaseEnemy : public ACharacter
{GENERATED_BODY()public:// Sets default values for this character's propertiesABaseEnemy();UPROPERTY(VisibleAnywhere, BlueprintReadOnly, Category = "AI")class USphereComponent* ChaseVolume;UPROPERTY(VisibleAnywhere, BlueprintReadOnly, Category = "AI")USphereComponent* AttackVolume;UPROPERTY(VisibleAnywhere, BlueprintReadOnly, Category = "AI")class AAIController* AIController;UPROPERTY(VisibleAnywhere, BlueprintReadOnly, Category = "Enemy Stats")EEnemyMovementStatus EnemyMovementStatus;UPROPERTY(VisibleAnywhere, BlueprintReadOnly, Category = "Attack")bool bAttackVolumeOverlap;UPROPERTY(EditAnywhere, BlueprintReadWrite, Category = "Attack")class UAnimMontage* AttackMontage;UPROPERTY(EditAnywhere, BlueprintReadWrite, Category = "Attack")float InterpSpeed;UPROPERTY(VisibleAnywhere, BlueprintReadWrite, Category = "Attack")bool bInterpToPlayer;
protected:// Called when the game starts or when spawnedvirtual void BeginPlay() override;public:	// Called every framevirtual void Tick(float DeltaTime) override;// Called to bind functionality to inputvirtual void SetupPlayerInputComponent(class UInputComponent* PlayerInputComponent) override;UFUNCTION()virtual void OnChaseVolumeOverlapBegin(UPrimitiveComponent* OverlappedComponent, AActor* OtherActor, UPrimitiveComponent* OtherComp, int32 OtherBodyIndex, bool bFromSweep, const FHitResult& SweepResult);UFUNCTION()virtual void OnChaseVolumeOverlapEnd(UPrimitiveComponent* OverlappedComponent, AActor* OtherActor, UPrimitiveComponent* OtherComp, int32 OtherBodyIndex);UFUNCTION()virtual void OnAttackVolumeOverlapBegin(UPrimitiveComponent* OverlappedComponent, AActor* OtherActor, UPrimitiveComponent* OtherComp, int32 OtherBodyIndex, bool bFromSweep, const FHitResult& SweepResult);UFUNCTION()virtual void OnAttackVolumeOverlapEnd(UPrimitiveComponent* OverlappedComponent, AActor* OtherActor, UPrimitiveComponent* OtherComp, int32 OtherBodyIndex);UFUNCTION(BlueprintCallable)void MoveToTarget(class AMainPlayer* Player);void AttackBegin();UFUNCTION(BlueprintCallable)void AttackEnd();
};
BaseEnemy.cpp
// Fill out your copyright notice in the Description page of Project Settings.#include "BaseEnemy.h"
#include "Components/SphereComponent.h"
#include "Components/SkeletalMeshComponent.h"
#include "Components/CapsuleComponent.h"
#include "AIController.h"
#include "Characters/Player/MainPlayer.h"
#include "Animation/AnimInstance.h"
#include "Kismet/KismetMathLibrary.h"
#include "Kismet/GameplayStatics.h"
// Sets default values
ABaseEnemy::ABaseEnemy()
{// Set this character to call Tick() every frame.  You can turn this off to improve performance if you don't need it.PrimaryActorTick.bCanEverTick = true;ChaseVolume = CreateDefaultSubobject<USphereComponent>(TEXT("ChaseVolume"));ChaseVolume->SetupAttachment(GetRootComponent());ChaseVolume->InitSphereRadius(800.f);ChaseVolume->SetCollisionObjectType(ECollisionChannel::ECC_WorldDynamic);ChaseVolume->SetCollisionResponseToAllChannels(ECollisionResponse::ECR_Ignore);ChaseVolume->SetCollisionResponseToChannel(ECollisionChannel::ECC_Pawn, ECollisionResponse::ECR_Overlap);AttackVolume = CreateDefaultSubobject<USphereComponent>(TEXT("AttackVolume"));AttackVolume->SetupAttachment(GetRootComponent());AttackVolume->InitSphereRadius(100.f);AttackVolume->SetCollisionObjectType(ECollisionChannel::ECC_WorldDynamic);AttackVolume->SetCollisionResponseToAllChannels(ECollisionResponse::ECR_Ignore);AttackVolume->SetCollisionResponseToChannel(ECollisionChannel::ECC_Pawn, ECollisionResponse::ECR_Overlap);//避免摄像机被敌人给阻挡GetMesh()->SetCollisionResponseToChannel(ECollisionChannel::ECC_Camera, ECollisionResponse::ECR_Ignore);GetCapsuleComponent()->SetCollisionResponseToChannel(ECollisionChannel::ECC_Camera, ECollisionResponse::ECR_Ignore);//设置持有属性AutoPossessAI = EAutoPossessAI::PlacedInWorldOrSpawned;//初始化默认移动状态EnemyMovementStatus = EEnemyMovementStatus::EEMS_Idle;InterpSpeed = 15.f;bInterpToPlayer = false;
}// Called when the game starts or when spawned
void ABaseEnemy::BeginPlay()
{Super::BeginPlay();ChaseVolume->OnComponentBeginOverlap.AddDynamic(this, &ABaseEnemy::OnChaseVolumeOverlapBegin);ChaseVolume->OnComponentEndOverlap.AddDynamic(this, &ABaseEnemy::OnChaseVolumeOverlapEnd);AttackVolume->OnComponentBeginOverlap.AddDynamic(this, &ABaseEnemy::OnAttackVolumeOverlapBegin);AttackVolume->OnComponentEndOverlap.AddDynamic(this, &ABaseEnemy::OnAttackVolumeOverlapEnd);//拿到ControllerAIController = Cast<AAIController>(GetController());
}// Called every frame
void ABaseEnemy::Tick(float DeltaTime)
{Super::Tick(DeltaTime);if (bInterpToPlayer){FRotator LookYaw(0.f, UKismetMathLibrary::FindLookAtRotation(GetActorLocation(), UGameplayStatics::GetPlayerPawn(this, 0)->GetActorLocation()).Yaw, 0.f);FRotator InterpRotation = FMath::RInterpTo(GetActorRotation(), LookYaw, DeltaTime, InterpSpeed);SetActorRotation(InterpRotation);}
}// Called to bind functionality to input
void ABaseEnemy::SetupPlayerInputComponent(UInputComponent* PlayerInputComponent)
{Super::SetupPlayerInputComponent(PlayerInputComponent);}void ABaseEnemy::OnChaseVolumeOverlapBegin(UPrimitiveComponent* OverlappedComponent, AActor* OtherActor, UPrimitiveComponent* OtherComp, int32 OtherBodyIndex, bool bFromSweep, const FHitResult& SweepResult)
{if (OtherActor){AMainPlayer* Player = Cast<AMainPlayer>(OtherActor);if (Player){MoveToTarget(Player);}}
}void ABaseEnemy::OnChaseVolumeOverlapEnd(UPrimitiveComponent* OverlappedComponent, AActor* OtherActor, UPrimitiveComponent* OtherComp, int32 OtherBodyIndex)
{if (OtherActor){AMainPlayer* Player = Cast<AMainPlayer>(OtherActor);if (Player){if (AIController){//停止移动AIController->StopMovement();}}}
}void ABaseEnemy::OnAttackVolumeOverlapBegin(UPrimitiveComponent* OverlappedComponent, AActor* OtherActor, UPrimitiveComponent* OtherComp, int32 OtherBodyIndex, bool bFromSweep, const FHitResult& SweepResult)
{if (OtherActor){AMainPlayer* Player = Cast<AMainPlayer>(OtherActor);if (Player){Player->UpdataAttackTarget();bAttackVolumeOverlap = true;AttackBegin();}}
}void ABaseEnemy::OnAttackVolumeOverlapEnd(UPrimitiveComponent* OverlappedComponent, AActor* OtherActor, UPrimitiveComponent* OtherComp, int32 OtherBodyIndex)
{if (OtherActor){AMainPlayer* Player = Cast<AMainPlayer>(OtherActor);if (Player){bAttackVolumeOverlap = false;if (EnemyMovementStatus!=EEnemyMovementStatus::EEMS_Attacking){MoveToTarget(Player);}}}
}void ABaseEnemy::MoveToTarget(AMainPlayer* Player)
{EnemyMovementStatus = EEnemyMovementStatus::EEMS_MoveToTarget;if (AIController){FAIMoveRequest MoveRequest;MoveRequest.SetGoalActor(Player);//设置移动请求目标MoveRequest.SetAcceptanceRadius(10.f);	//设置移动半径FNavPathSharedPtr NavPath;//会返回路径AIController->MoveTo(MoveRequest, &NavPath);}
}void ABaseEnemy::AttackBegin()
{//攻击中关闭移动if (AIController){AIController->StopMovement();}if (EnemyMovementStatus != EEnemyMovementStatus::EEMS_Attacking){EnemyMovementStatus = EEnemyMovementStatus::EEMS_Attacking;bInterpToPlayer = true;UAnimInstance* AnimInstance = GetMesh()->GetAnimInstance();if (AnimInstance && AttackMontage){float PlayRate = FMath::RandRange(0.9f, 1.1f);FString SectionName = FString::FromInt(FMath::RandRange(1, 3));AnimInstance->Montage_Play(AttackMontage, PlayRate);AnimInstance->Montage_JumpToSection(FName(*SectionName), AttackMontage);}}
}void ABaseEnemy::AttackEnd()
{EnemyMovementStatus = EEnemyMovementStatus::EEMS_Idle;bInterpToPlayer = false;if (bAttackVolumeOverlap){AttackBegin();}
}
MainPlayer.h
// Fill out your copyright notice in the Description page of Project Settings.#pragma once#include "CoreMinimal.h"
#include "GameFramework/Character.h"
#include "MainPlayer.generated.h"//声明移动状态枚举
UENUM(BlueprintType)
enum class EPlayerMovementStatus :uint8
{EPMS_Normal UMETA(DisplayName = "Normal"),EPMS_Sprinting UMETA(DisplayName = "Sprinting"),EPMS_Dead UMETA(DisplayName = "Dead")
};UENUM(BlueprintType)
enum class EPlayerStaminaStatus :uint8
{EPSS_Normal UMETA(DisplayName = "Normal"),EPSS_Exhausted UMETA(DisplayName = "Exhausted"),EPSS_ExhaustedRecovering UMETA(DisplayName = "ExhaustedRecovering")
};UCLASS()
class UEGAME_API AMainPlayer : public ACharacter
{GENERATED_BODY()public:// Sets default values for this character's propertiesAMainPlayer();//新建一个SpringArmUPROPERTY(visibleAnywhere,BlueprintReadOnly)class USpringArmComponent* SpringArm;//新建一个CameraUPROPERTY(visibleAnywhere, BlueprintReadOnly)class UCameraComponent* FollowCamera;float BaseTurnRate;		//使用键盘X转向的速率float BaseLookUpRate;	//使用键盘Y转向的速率//主角状态UPROPERTY(EditDefaultsOnly, BlueprintReadOnly, Category = "Playe State")float Health;UPROPERTY(EditAnywhere, BlueprintReadOnly, Category = "Playe State")float MaxHealth;UPROPERTY(EditDefaultsOnly, BlueprintReadOnly, Category = "Playe State")float Stamina;UPROPERTY(EditAnywhere, BlueprintReadOnly, Category = "Playe State")float MaxStamina;UPROPERTY(EditAnywhere, BlueprintReadWrite, Category = "Playe State")float StaminaConsumeRate;UPROPERTY(EditAnywhere, BlueprintReadWrite, Category = "Playe State", meta = (ClampMin = 0, ClampMax = 1))float ExhaustedStamina;UPROPERTY(EditAnywhere, BlueprintReadOnly, Category = "Playe State")int Coins;UPROPERTY(EditAnywhere, BlueprintReadWrite, Category = "Player State")float RunningSpeed;UPROPERTY(EditAnywhere, BlueprintReadWrite, Category = "Player State")float SprintSpeed;UPROPERTY(VisibleAnywhere,BlueprintReadWrite,Category="Player State")EPlayerMovementStatus MovementStatus;UPROPERTY(VisibleAnywhere,BlueprintReadWrite,Category="Player State")EPlayerStaminaStatus StaminaStatus;bool bLeftShiftDown;//检测是否持剑UPROPERTY(VisibleAnywhere, BlueprintReadOnly, Category = "Weapon")bool bIsWeapon;//正在装备的武器UPROPERTY(VisibleAnywhere, BlueprintReadOnly, Category = "Weapon")class AWeaponItem* EquipWeapon;//正在重叠的武器UPROPERTY(VisibleAnywhere, BlueprintReadOnly, Category = "Weapon")AWeaponItem* OverlapWeapon;bool bAttackKeyDown;//是否按下攻击键UPROPERTY(VisibleAnywhere, BlueprintReadOnly, Category = "Animation")bool bIsAttacking;UPROPERTY(EditDefaultsOnly, BlueprintReadOnly, Category = "Animation")class UAnimMontage* AttackMontage;UPROPERTY(VisibleAnywhere, BlueprintReadOnly, Category = "Attack")class ABaseEnemy* AttackTarget;UPROPERTY(EditAnywhere, BlueprintReadWrite, Category = "Attack")TSubclassOf<ABaseEnemy> EnemyFilter;UPROPERTY(EditAnywhere, BlueprintReadWrite, Category = "Attack")float InterpSpeed;UPROPERTY(VisibleAnywhere, BlueprintReadWrite, Category = "Attack")bool bInterpToEnemy;
protected:// Called when the game starts or when spawnedvirtual void BeginPlay() override;public:	// Called every framevirtual void Tick(float DeltaTime) override;// Called to bind functionality to inputvirtual void SetupPlayerInputComponent(class UInputComponent* PlayerInputComponent) override;//重新Character类中的Jump方法void Jump() override;void MoveForward(float value);void MoveRight(float value);void Turn(float Value);void LookUp(float Value);void TurnRate(float Rate);void LookUpRate(float Rate);//改变状态UFUNCTION(BlueprintCallable,Category="Player|State")void AddHealth(float value);UFUNCTION(BlueprintCallable, Category = "Player|State")void AddStamina(float value);UFUNCTION(BlueprintCallable, Category = "Player|State")void AddCoin(float value);//重写TakeDamage方法float TakeDamage(float Damage, struct FDamageEvent const& DamageEvent, AController* EventInstigator, AActor* DamageCauser) override;//短小精悍FORCEINLINE void LeftShiftDown() { bLeftShiftDown = true; }FORCEINLINE void LeftShiftUp() { bLeftShiftDown = false; }void SetMovementStatus(EPlayerMovementStatus Status);void InteractKeyDown();void AttackKeyDown();FORCEINLINE void AttackKeyUp() { bAttackKeyDown = false; }void AttackBegin();UFUNCTION(BlueprintCallable)void AttackEnd();void UpdataAttackTarget();
};
MainPlayer.cpp
// Fill out your copyright notice in the Description page of Project Settings.#include "MainPlayer.h"
#include "GameFramework/SpringArmComponent.h"
#include "Camera/CameraComponent.h"
#include "Components/CapsuleComponent.h"
#include "Components/InputComponent.h"
#include "GameFramework/PlayerController.h"
#include "GameFramework/CharacterMovementComponent.h"
#include "GamePlay/WeaponItem.h"
#include "Animation/AnimInstance.h"
#include "Characters/Enemy/BaseEnemy.h"
#include "Kismet/KismetMathLibrary.h"
// Sets default values
AMainPlayer::AMainPlayer()
{// Set this character to call Tick() every frame.  You can turn this off to improve performance if you don't need it.PrimaryActorTick.bCanEverTick = true;SpringArm = CreateDefaultSubobject<USpringArmComponent>(TEXT("SpringArm"));SpringArm->SetupAttachment(GetRootComponent());//设置SPringArm无碰撞臂长SpringArm->TargetArmLength = 600.f;SpringArm->bUsePawnControlRotation = true;//硬编码SpringArm继承controlller旋转为真FollowCamera = CreateDefaultSubobject<UCameraComponent>(TEXT("FollowCamera"));FollowCamera->SetupAttachment(SpringArm, NAME_None);FollowCamera->bUsePawnControlRotation = false;//硬编码FollowCamera继承controlller旋转为假//设置胶囊体的默认宽高GetCapsuleComponent()->SetCapsuleSize(35.f, 100.f);//对Character的Pawn进行硬编码bUseControllerRotationPitch = false;bUseControllerRotationYaw = false;bUseControllerRotationRoll = false;//硬编码orient Rotation to Movement,给个默认转向速率GetCharacterMovement()->bOrientRotationToMovement = true;GetCharacterMovement()->RotationRate = FRotator(0.f, 500.f, 0.f);//设置跳跃初始值与在空中的坠落时横向运动控制量GetCharacterMovement()->JumpZVelocity = 400.f;GetCharacterMovement()->AirControl = 0.15f;//给键盘控制转向的速率变量赋初值BaseTurnRate = 21.f;BaseLookUpRate = 21.f;//初始化角色状态MaxHealth = 100.f;Health = MaxHealth;MaxStamina = 200.f;Stamina = MaxStamina;StaminaConsumeRate = 20.f;ExhaustedStamina = 0.167f;Coins = 0;RunningSpeed = 600.f;SprintSpeed = 900.f;MovementStatus = EPlayerMovementStatus::EPMS_Normal;StaminaStatus = EPlayerStaminaStatus::EPSS_Normal;//默认没有按下shiftbLeftShiftDown = false;InterpSpeed = 15.f;bInterpToEnemy = false;
}// Called when the game starts or when spawned
void AMainPlayer::BeginPlay()
{Super::BeginPlay();
}// Called every frame
void AMainPlayer::Tick(float DeltaTime)
{Super::Tick(DeltaTime);switch (StaminaStatus){case EPlayerStaminaStatus::EPSS_Normal://当Shift按下if (bLeftShiftDown){if (Stamina - StaminaConsumeRate * DeltaTime <= MaxStamina * ExhaustedStamina){StaminaStatus = EPlayerStaminaStatus::EPSS_Exhausted;}//无论是不是精疲力尽状态都要减去当前帧冲刺消耗的耐力Stamina -= StaminaConsumeRate * DeltaTime;SetMovementStatus(EPlayerMovementStatus::EPMS_Sprinting);}else{//当Shift没有按下,恢复耐力Stamina = FMath::Clamp(Stamina + StaminaConsumeRate * DeltaTime, 0.f, MaxStamina);SetMovementStatus(EPlayerMovementStatus::EPMS_Normal);}break;case EPlayerStaminaStatus::EPSS_Exhausted:if (bLeftShiftDown){//如果耐力已经为0if (Stamina - StaminaConsumeRate * DeltaTime <= 0.f){//么我们需要内部编码把shift抬起,此时StaminaStatus状态转换为ExhaustedRecovering状态,然后设置移动状态为NormalLeftShiftUp();StaminaStatus = EPlayerStaminaStatus::EPSS_ExhaustedRecovering;	SetMovementStatus(EPlayerMovementStatus::EPMS_Normal);}else{Stamina -= StaminaConsumeRate * DeltaTime;}}else{StaminaStatus = EPlayerStaminaStatus::EPSS_ExhaustedRecovering;Stamina = FMath::Clamp(Stamina + StaminaConsumeRate * DeltaTime, 0.f, MaxStamina);SetMovementStatus(EPlayerMovementStatus::EPMS_Normal);}break;case EPlayerStaminaStatus::EPSS_ExhaustedRecovering://当恢复大于疲劳区时,StaminaStatus状态为Normalif (Stamina + StaminaConsumeRate * DeltaTime >= MaxStamina * ExhaustedStamina){StaminaStatus = EPlayerStaminaStatus::EPSS_Normal;}//这状态值肯定是加定了Stamina += StaminaConsumeRate * DeltaTime;//抬起shiftLeftShiftUp();SetMovementStatus(EPlayerMovementStatus::EPMS_Normal);break;default:break;}//进行转向插值if (bInterpToEnemy && AttackTarget){//只需要AttackTarget的Yaw转向FRotator LookAtYaw(0.f, UKismetMathLibrary::FindLookAtRotation(GetActorLocation(), AttackTarget->GetActorLocation()).Yaw, 0.f);FRotator InterpRotation = FMath::RInterpTo(GetActorRotation(), LookAtYaw, DeltaTime, InterpSpeed);SetActorRotation(InterpRotation);}
}// Called to bind functionality to input
void AMainPlayer::SetupPlayerInputComponent(UInputComponent* PlayerInputComponent)
{Super::SetupPlayerInputComponent(PlayerInputComponent);//检查PlayerInputComponent指针,check函数只能在这使用check(PlayerInputComponent);//绑定跳跃轴映射事件PlayerInputComponent->BindAction("Jump", IE_Pressed, this, &AMainPlayer::Jump);//按下空格PlayerInputComponent->BindAction("Jump", IE_Released, this, &ACharacter::StopJumping);//抬起空格PlayerInputComponent->BindAction("Sprint", IE_Pressed, this, &AMainPlayer::LeftShiftDown);//按下shiftPlayerInputComponent->BindAction("Sprint", IE_Released, this, &AMainPlayer::LeftShiftUp);//抬起shift//拾取剑PlayerInputComponent->BindAction("Interact", IE_Pressed, this, &AMainPlayer::InteractKeyDown);//按下F//攻击PlayerInputComponent->BindAction("Attack", IE_Pressed, this, &AMainPlayer::AttackKeyDown);PlayerInputComponent->BindAction("Attack", IE_Released, this, &AMainPlayer::AttackKeyUp);//绑定移动轴映射事件PlayerInputComponent->BindAxis("MoveForward", this, &AMainPlayer::MoveForward);PlayerInputComponent->BindAxis("MoveRight", this, &AMainPlayer::MoveRight);//绑定Controller控制器去管理视角旋转PlayerInputComponent->BindAxis("Turn", this, &AMainPlayer::Turn);PlayerInputComponent->BindAxis("LookUp", this, &AMainPlayer::LookUp);//绑定键盘鼠标轴映射事件PlayerInputComponent->BindAxis("TurnRate", this, &AMainPlayer::TurnRate);PlayerInputComponent->BindAxis("LookUpRate", this, &AMainPlayer::LookUpRate);}void AMainPlayer::Jump()
{//继承父类的方法Super::Jump();
}void AMainPlayer::MoveForward(float value)
{if (Controller != nullptr && value != 0.f && !(bIsAttacking)){//获取到Control旋转FRotator Rotation = Controller->GetControlRotation();//转向只关注水平Yaw方向,因此置0防止影响FRotator YowRotation = FRotator(0.0f, Rotation.Yaw, 0.0f);//获取相机(鼠标控制器的朝向),并且朝这个轴的方向移动FVector Direction = FRotationMatrix(YowRotation).GetUnitAxis(EAxis::X);AddMovementInput(Direction, value);}}void AMainPlayer::MoveRight(float value)
{if (Controller != nullptr && value != 0.f && !(bIsAttacking)){//获取到Controller旋转FRotator Rotation = Controller->GetControlRotation();//转向只关注水平Yaw方向,因此置0防止影响FRotator YowRotation = FRotator(0.0f, Rotation.Yaw, 0.0f);//获取相机(鼠标控制器的朝向),并且朝这个轴的方向移动FVector Direction = FRotationMatrix(YowRotation).GetUnitAxis(EAxis::Y);AddMovementInput(Direction, value);}
}void AMainPlayer::Turn(float Value)
{if (Value != 0.f){AddControllerYawInput(Value);}}void AMainPlayer::LookUp(float Value)
{//UE_LOG(LogTemp, Warning, TEXT("%f"), GetControlRotation().Pitch);//控制视角if (GetControlRotation().Pitch < 270.f && GetControlRotation().Pitch >180.f && Value > 0.f){return;}else if (GetControlRotation().Pitch < 180.f && GetControlRotation().Pitch >45.f && Value < 0.f){return;}AddControllerPitchInput(Value);
}void AMainPlayer::TurnRate(float Rate)
{//要乘以一个DeltaTime这样就可以避免高帧底帧差值问题float Value = Rate * BaseTurnRate * GetWorld()->GetDeltaSeconds();if (Value != 0.f){AddControllerYawInput(Value);}
}void AMainPlayer::LookUpRate(float Rate)
{//要乘以一个DeltaTime这样就可以避免高帧底帧差值问题float Value = Rate * BaseLookUpRate * GetWorld()->GetDeltaSeconds();//控制视角if (GetControlRotation().Pitch < 270.f && GetControlRotation().Pitch >180.f && Value > 0.f){return;}else if (GetControlRotation().Pitch < 180.f && GetControlRotation().Pitch >45.f && Value < 0.f){return;}AddControllerPitchInput(Value);}void AMainPlayer::AddHealth(float value)
{Health = FMath::Clamp(Health + value, 0.f, MaxHealth);
}void AMainPlayer::AddStamina(float value)
{Stamina = FMath::Clamp(Stamina + value, 0.f, MaxStamina);
}void AMainPlayer::AddCoin(float value)
{Coins += value;
}float AMainPlayer::TakeDamage(float Damage, FDamageEvent const& DamageEvent, AController* EventInstigator, AActor* DamageCauser)
{if (Health - Damage <= 0.f){Health = FMath::Clamp(Health - Damage, 0.f, MaxHealth);//TODO Die();}else{Health -= Damage;}return Health;
}void AMainPlayer::SetMovementStatus(EPlayerMovementStatus Status)
{MovementStatus = Status;//切换状态的时候改变移动速度switch (MovementStatus){case EPlayerMovementStatus::EPMS_Sprinting:GetCharacterMovement()->MaxWalkSpeed = SprintSpeed;break;default:GetCharacterMovement()->MaxWalkSpeed = RunningSpeed;break;}
}void AMainPlayer::InteractKeyDown()
{if (OverlapWeapon){if (EquipWeapon){//交换武器EquipWeapon->UnEuip(this);OverlapWeapon->Equip(this);}else{//装备武器OverlapWeapon->Equip(this);}}else{if (EquipWeapon){//卸载武器EquipWeapon->UnEuip(this);}}
}void AMainPlayer::AttackKeyDown()
{bAttackKeyDown = true;if (bIsWeapon){AttackBegin();}}void AMainPlayer::AttackBegin()
{if (!bIsAttacking){bIsAttacking = true;bInterpToEnemy = true;//拿到动画UAnimInstance* AnimInstance = GetMesh()->GetAnimInstance();if (AnimInstance && AttackMontage){float PlayRate = FMath::RandRange(1.25f, 1.75f);FString SectionName = FString::FromInt(FMath::RandRange(1, 2));//指定片段播放AnimInstance->Montage_Play(AttackMontage, PlayRate);AnimInstance->Montage_JumpToSection(FName(*SectionName), AttackMontage);}}
}void AMainPlayer::AttackEnd()
{bIsAttacking = false;bInterpToEnemy = false;//形成闭环if (bAttackKeyDown){AttackKeyDown();}
}void AMainPlayer::UpdataAttackTarget()
{TArray<AActor*> OVerlappingActors;GetOverlappingActors(OVerlappingActors,EnemyFilter);//判断列表里面是否为空,为空就无攻击目标if (OVerlappingActors.Num() == 0){AttackTarget = nullptr;return;}ABaseEnemy* ClosestDistance = nullptr;float MinDistance = 1000.f;FVector Loation = GetActorLocation();for (auto Actor : OVerlappingActors){ABaseEnemy* Enemy = Cast<ABaseEnemy>(Actor);if (Enemy && Enemy->EnemyMovementStatus != EEnemyMovementStatus::EEMS_Dead){float DistanceToActor = (Enemy->GetActorLocation() - Loation).Size();//记录当前位置Enemy距离MainPlayer位置if (DistanceToActor < MinDistance){MinDistance = DistanceToActor;ClosestDistance = Enemy;}}}AttackTarget = ClosestDistance;
}
相关文章:
UEC++ day7
敌人NPC机制 敌人机制分析与需求 新建一个character类来作为敌人,直接建蓝图设置骨骼网格,因为敌人可能多种就不规定死,然后这个敌人肯定需要两个触发器,一个用于大范围巡逻,一个用于是否达到主角近点进行攻击 注意我…...
win11,安装python,pip,和opencv
1,安装python 在应用商店,输入python,下载安装 2,安装pip 在cmd中,输入pip install SomePackage,安装某一个版本的pip 3,安装opencv 在cmd中,输入 pip3 install opencv-contrib-python -i https://pyp…...
:kafka消息发送与消费)
kafka入门(一):kafka消息发送与消费
kafka的基础概念 Producer (消息生产者) 向主题发布消息的客户端应用程序称为生产者(Producer),生产者用于持续不断的向某个主题发送消息。 Consumer (消息消费者) 订阅主题消息的客户端程序称为消费者(Consumer),消费者用于处理生产者产生的消息。 Co…...

CMap数据库筛选化学药物
数据库clue.io 文献链接:连接图谱:使用基因表达特征连接小分子、基因和疾病 |科学 (science.org) 基本模式:利用CMap将差异基因列表与数据库参考数据集比对;根据差异表达基因在参考基因表达谱富集情况得到一个相关性分数&#…...
连接数据库)
mysql命令行(mysql-client)连接数据库
有时项目连接不上数据库,报错鉴权失败,先用mysql工具连接下,容易发现问题。 直接输入mysql看是否已安装,如果没有就安装下。 yum -y install mysql-client; 这个名称一直记不准,有时记为mysql-cli,结果发现…...
sklearn中的TfidfTransformer和gensim中的TfidfModel的区别
sklearn.feature_extraction.text.TfidfTransformer 和 gensim.models.TfidfModel 都是用于计算文本数据的 TF-IDF 值的工具。它们的主要区别在于实现方式和输入数据的格式。 1、实现方式和输入数据格式: TfidfTransformer 是 scikit-learn 中的一个类,…...

spring注解
spring注解 Configuration 用于标注配置类Bean 结合Configuration(full mode)使用或结合Component(light mode)使用。可以导入第三方组件,入方法有参数默认从IOC容器中获取,可以指定initMethod和destroyMethod 指定初…...

SpringCloud实用篇02
SpringCloud实用篇02 0.学习目标 1.Nacos配置管理 Nacos除了可以做注册中心,同样可以做配置管理来使用。 1.1.统一配置管理 当微服务部署的实例越来越多,达到数十、数百时,逐个修改微服务配置就会让人抓狂,而且很容易出错。我…...

Nginx快速入门教程,域名转发、负载均衡
1.Nginx简介 Nginx是⽬前最流⾏的Web服务器, 最开始是由⼀个叫做igor的俄罗斯的程序员开发的, 2019年3⽉11⽇被美国的F5公司以6.7亿美元的价格收购, 现在Nginx是F5公司旗下的⼀款产品了。 2.Nginx的版本 Nginx开源版本主要分为两种&#x…...

ElasticSearch之健康状态
参考Cluster health API。 命令样例,如下: curl -X GET "https://localhost:9200/_cluster/health?wait_for_statusyellow&timeout50s&pretty" --cacert $ES_HOME/config/certs/http_ca.crt -u "elastic:ohCxPHQBEs5*lo7F9&qu…...
java io流中为什么使用缓冲流就能加快文件读写速度
FileInputStream的read方法底层确实是通过调用JDK层面的read方法,并且这个JDK层面的read方法底层是使用C语言编写的,以实现高效的文件读取功能。但是它会涉及多次内核态与操作系统交互。当我们使用FileInputStream的read方法读取文件时,首先会…...
【鸿蒙最新全套教程】<HarmonyOS第一课>1、运行Hello World
下载与安装DevEco Studio 在HarmonyOS应用开发学习之前,需要进行一些准备工作,首先需要完成开发工具DevEco Studio的下载与安装以及环境配置。 进入DevEco Studio下载官网,单击“立即下载”进入下载页面。 DevEco Studio提供了Windows版本和…...
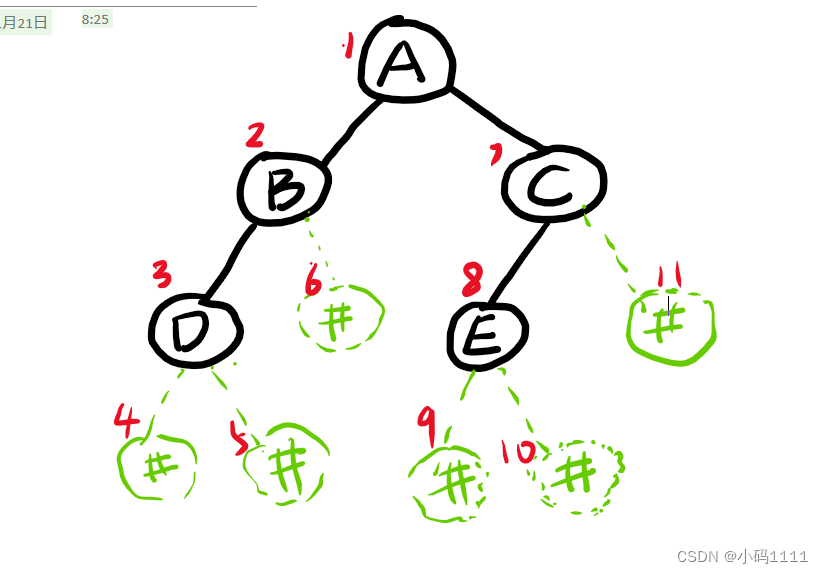
求二叉树中指定节点所在的层数(可运行)
运行环境.cpp 我这里设置的是查字符e的层数,大家可以在main函数里改成自己想查的字符。(输入的字符一定是自己树里有的)。 如果没有输出结果,一定是建树错误!!!!!&…...
Ubuntu18 Opencv3.4.12 viz 3D显示安装、编译、移植
Opencv3.*主模块默认包括两个3D库 calib3d用于相机校准和三维重建 ,viz用于三维图像显示,其中viz是cmake选配。 参考: https://docs.opencv.org/3.4.12/index.html 下载linux版本的源码 sources。 查看cmake apt list --installed | grep…...

EPSon打印机更换色带
1、打印机色带拆装视频 打印机色带更换 2、色带盒四周有多个卡扣,需从右到左依次轻微用力掰开,使盖板与盒体脱离,注意不要掰断卡扣。 3、如何将色带放入打印机色带盒? A、色带放入盒体时不可打乱打结,以免卡带&#x…...
电脑游戏录屏软件,记录游戏高光时刻
电脑游戏录制是游戏爱好者分享游戏乐趣、技巧和成就的绝佳方式,此时,一款好用的录屏软件就显得尤为重要。本文将为大家介绍三款电脑游戏录屏软件,通过对这三款软件的分步骤详细介绍,让大家更加了解它们的特点及使用方法。 电脑游戏…...

Hadoop性能调优建议
一、服务器配置 1. BIOS配置: 关闭smmu/关闭cpu预取/performance策略 2. 硬盘优化 raid0 打卡cache /jbod scheduler/sector_size/read_ahead_kb 3. 网卡优化 rx_buff/ring_buffer/lro/中断绑核/驱动升级 4. 内存插法:要用均衡插法…...
算法的奥秘:常见的六种算法(算法导论笔记2)
算法的奥秘:种类、特性及应用详解(算法导论笔记1) 上期总结算法的种类和大致介绍,这一期主要讲常见的六种算法详解以及演示。 排序算法: 排序算法是一类用于对一组数据元素进行排序的算法。根据不同的排序方式和时间复…...

Python算法——树的路径和算法
Python算法——树的路径和算法 树的路径和算法是一种在树结构中寻找从根节点到叶节点的所有路径,其路径上的节点值之和等于给定目标值的算法。这种算法可以用Python语言实现,本文将介绍如何使用Python编写树的路径和算法,并给出一些示例代码…...

数据结构之链表练习与习题详细解析
个人主页:点我进入主页 专栏分类:C语言初阶 C语言程序设计————KTV C语言小游戏 C语言进阶 C语言刷题 数据结构初阶 欢迎大家点赞,评论,收藏。 一起努力,一起奔赴大厂。 目录 1.前言 2.习题解…...

Newton入门到精通:10个项目实战案例带你掌握核心技能
Newton入门到精通:10个项目实战案例带你掌握核心技能 【免费下载链接】newton An open-source, GPU-accelerated physics simulation engine built upon NVIDIA Warp, specifically targeting roboticists and simulation researchers. 项目地址: https://gitcode…...

手机号逆向查询QQ号:终极实用指南与5分钟快速上手
手机号逆向查询QQ号:终极实用指南与5分钟快速上手 【免费下载链接】phone2qq 项目地址: https://gitcode.com/gh_mirrors/ph/phone2qq 你是否曾因忘记QQ号而无法登录?或者需要验证朋友手机号对应的QQ身份?手机号查QQ工具正是为解决这…...

本地部署AI智能体工作台kern:统一记忆与自生成仪表盘实战
1. 项目概述:一个真正为你干活的智能体工作台如果你和我一样,对市面上那些“聊天机器人”式的AI助手感到厌倦,觉得它们更像是需要你不断喂指令、记性还不太好的实习生,那么这个项目可能会让你眼前一亮。kern-ai不是一个聊天界面&a…...

嵌入式实时调度器SST的极简设计与优化实践
1. 嵌入式实时调度器SST的设计哲学在资源受限的嵌入式环境中,实时调度器的设计往往面临一个根本性矛盾:功能完备性与资源消耗之间的权衡。传统RTOS解决方案如FreeRTOS或uC/OS虽然功能强大,但对于某些8位或16位微控制器而言,其内存…...

AI智能体运行时安全治理:为OpenClaw安装主动式安全刹车
1. 项目概述:为AI智能体装上“安全刹车”在AI智能体(Agent)技术,特别是像OpenClaw这类具备自主执行能力的AI助手日益普及的今天,一个核心的挑战也随之浮出水面:如何确保它在执行任务时不会“越界”…...

车载光通信芯片:行业现状、技术卡点与国产化实情
在汽车电子行业,我们正处于一个临界点。随着 EEA(电子电气架构)从分布式向中央计算迈进,传统的屏蔽双绞线在带宽、减重和 EMI(电磁干扰)上已经快走到头了。车载光通信不是什么新鲜概念,但现在&a…...

Archon项目实战:用AppImage打包Windows游戏,实现Linux原生体验
1. 项目概述与核心价值最近在折腾一些老游戏或者特定平台的游戏时,经常遇到一个头疼的问题:游戏本身是好的,但要么因为系统兼容性(比如老游戏在新系统上跑不起来),要么因为平台限制(比如某些游戏…...

LaunchedEffect 的执行机制与实践
Jetpack Compose 技术说明:LaunchedEffect 的执行机制与实践 1. 核心概念 LaunchedEffect 是 Compose 中最常用的副作用(Side-Effect)API。它允许开发者在组件的生命周期内启动一个协程,用于处理非 UI 渲染相关的逻辑(…...

私有化部署ChatGPT Web应用:从架构解析到实战部署指南
1. 项目概述与核心价值最近在折腾一个挺有意思的开源项目,叫“ChatGPTwebV15”。这名字听起来有点技术范儿,但说白了,就是一个让你能自己部署、完全掌控的类ChatGPT网页应用。它基于OpenAI的API,但把整个交互界面、对话管理、甚至…...

Twinny:免费离线的AI代码补全工具部署与调优指南
1. 项目概述:当AI代码助手遇上本地化如果你是一名开发者,最近可能已经对GitHub Copilot、Cursor这类AI编程助手产生了依赖。它们确实能极大地提升编码效率,但随之而来的,是每月不菲的订阅费用、对网络环境的依赖,以及将…...