【MetaLearning】有关Pytorch的元学习库higher的基本用法
【MetaLearning】有关Pytorch的元学习库higher的基本用法
文章目录
- 【MetaLearning】有关Pytorch的元学习库higher的基本用法
- 1. 基本介绍
- 2. Toy Example
- Reference
1. 基本介绍
higher.innerloop_ctx是higher库的上下文管理器,用于创建内部循环(inner loop)的上下文,内部循环通常用于元学习场景,其中在模型参数更新的内部循环中进行一些额外的操作。
这个上下文管理器主要有五个参数:(详细请参考官方库说明)
higher.innerloop_ctx(model, opt, device=None, copy_initial_weights=True, override=None, track_higher_grads=True)
- 第一个参数
model是需要进行内部循环的模型,通常是你的元模型- 第二个参数
opt是优化器,这是你用来更新模型参数的优化器- 第三个参数
copy_initial_weights是一个布尔值,用于指定是否在每个内部循环之前复制初始权重,如果设置为True则表示在每个内部循环之前都会将模型的初始权重进行复制,以确保每个内部循环都从相同的初始权重开始。如果设置为False,则所有的内部循环共享相同的权重模型。- 第四个参数
override是一个字典,例如override={'lr':lr_tensor, "momentum': momentum_tensor},用于指定在内部循环期间覆盖优化器的参数,比如在这里示例中,lr_tensor和momentum_tensor是张量,用于指定内部循环期间覆盖的学习率和动量。- 第五个参数
track_higher_grads是一个布尔值,用于跟踪更高阶的梯度,如果是True,则内部循环中计算的梯度将被跟踪以支持高阶的梯度计算,如果设置为False,则不会跟踪高阶梯度。
在with语句块中,通过(fmodel, diffopt)获取内部循环的上下文。fmodel表示内部循环中的模型,diffopt表示内部循环中的优化器,在这个上下文中,你可以执行内部循环的计算和参数更新。
下面给出一个基本的使用示例,演示如何使用higher.innerloop_ctx,使用higher库需要习惯下列的转变
从通常使用pytorch的用法
model = MyModel()
opt = torch.optim.Adam(model.parameters())for xs, ys in data:opt.zero_grad()logits = model(xs)loss = loss_function(logits, ys)loss.backward()opt.step()
转变到
model = MyModel()
opt = torch.optim.Adam(model.parameters())with higher.innerloop_ctx(model, opt) as (fmodel, diffopt):for xs, ys in data:logits = fmodel(xs)  # modified `params` can also be passed as a kwargloss = loss_function(logits, ys)  # no need to call loss.backwards()diffopt.step(loss)  # note that `step` must take `loss` as an argument!,这一步相当于使用了loss.backward()和opt.step()# At the end of your inner loop you can obtain these e.g. ...grad_of_grads = torch.autograd.grad(meta_loss_fn(fmodel.parameters()), fmodel.parameters(time=0))
训练模型和执行diffopt.step 来更新fmodel之间的区别在于,fmodel不会像原始部分中的opt.step()那样就地更新参数。 相反,每次调用 diffopt.step时都会以这样的方式创建新版本的参数,即fmodel将在下一步中使用新的参数,但所有以前的参数仍会保留。
运行的原理是什么呢?举个例子,fmodel从fmodel.parameters(time=0)开始迭代(这里的time=0表示就是第0次迭代),当我们调用diffopt.stepN次之后,我们可以使用fmodel.parameters(time=i)来访问,其中i可以取到1到N,并且我们仍然可以访问fmodel.parameters(time=0),这个结果和迭代之前是一样的,这是为什么呢?
因为fmodel的创建依赖于参数copy_initial_weights,如果copy_initial_weights=True,那么fmodel.parameters(time=0)是从原模型clone’d别且是detach’ed(即是从原模型克隆过来并且进行分离计算图了),如果copy_initial_weights=False,那么只是进行了clone’d并没有detach‘ed。
放一段原文在这里方便大家理解
I.e. fmodel starts with only fmodel.parameters(time=0) available, but after you called diffopt.step N times you can ask fmodel to give you fmodel.parameters(time=i) for any i up to N inclusive. Notice that fmodel.parameters(time=0) doesn’t change in this process at all, just every time fmodel is applied to some input it will use the latest version of parameters it currently has.
Now, what exactly is fmodel.parameters(time=0)? It is created here and depends on copy_initial_weights. If copy_initial_weights==True then fmodel.parameters(time=0) are clone’d and detach’ed parameters of model. Otherwise they are only clone’d, but not detach’ed!
That means that when we do meta-optimization step, the original model’s parameters will actually accumulate gradients if and only if copy_initial_weights==False. And in MAML we want to optimize model’s starting weights so we actually do need to get gradients from meta-optimization step.
2. Toy Example
import torch
import torch.nn as nn
import torch.optim as optim
import higher
import numpy as npnp.random.seed(1)
torch.manual_seed(3)
N = 100
actual_multiplier = 3.5
meta_lr = 0.00001
loops = 5 # how many iterations in the inner loop we want to dox = torch.tensor(np.random.random((N,1)), dtype=torch.float64) # features for inner training loop
y = x * actual_multiplier # target for inner training loop
model = nn.Linear(1, 1, bias=False).double() # simplest possible model - multiple input x by weight w without bias
meta_opt = optim.SGD(model.parameters(), lr=meta_lr, momentum=0.)def run_inner_loop_once(model, verbose, copy_initial_weights):lr_tensor = torch.tensor([0.3], requires_grad=True)momentum_tensor = torch.tensor([0.5], requires_grad=True)opt = optim.SGD(model.parameters(), lr=0.3, momentum=0.5)with higher.innerloop_ctx(model, opt, copy_initial_weights=copy_initial_weights, override={'lr': lr_tensor, 'momentum': momentum_tensor}) as (fmodel, diffopt):for j in range(loops):if verbose:print('Starting inner loop step j=={0}'.format(j))print('    Representation of fmodel.parameters(time={0}): {1}'.format(j, str(list(fmodel.parameters(time=j)))))print('    Notice that fmodel.parameters() is same as fmodel.parameters(time={0}): {1}'.format(j, (list(fmodel.parameters())[0] is list(fmodel.parameters(time=j))[0])))out = fmodel(x)if verbose:print('    Notice how `out` is `x` multiplied by the latest version of weight: {0:.4} * {1:.4} == {2:.4}'.format(x[0,0].item(), list(fmodel.parameters())[0].item(), out[0].item()))loss = ((out - y)**2).mean()diffopt.step(loss)if verbose:# after all inner training let's see all steps' parameter tensorsprint()print("Let's print all intermediate parameters versions after inner loop is done:")for j in range(loops+1):print('    For j=={0} parameter is: {1}'.format(j, str(list(fmodel.parameters(time=j)))))print()# let's imagine now that our meta-learning optimization is trying to check how far we got in the end from the actual_multiplierweight_learned_after_full_inner_loop = list(fmodel.parameters())[0]meta_loss = (weight_learned_after_full_inner_loop - actual_multiplier)**2print('  Final meta-loss: {0}'.format(meta_loss.item()))meta_loss.backward() # will only propagate gradient to original model parameter's `grad` if copy_initial_weight=Falseif verbose:print('  Gradient of final loss we got for lr and momentum: {0} and {1}'.format(lr_tensor.grad, momentum_tensor.grad))print('  If you change number of iterations "loops" to much larger number final loss will be stable and the values above will be smaller')return meta_loss.item()print('=================== Run Inner Loop First Time (copy_initial_weights=True) =================\n')
meta_loss_val1 = run_inner_loop_once(model, verbose=True, copy_initial_weights=True)
print("\nLet's see if we got any gradient for initial model parameters: {0}\n".format(list(model.parameters())[0].grad))print('=================== Run Inner Loop Second Time (copy_initial_weights=False) =================\n')
meta_loss_val2 = run_inner_loop_once(model, verbose=False, copy_initial_weights=False)
print("\nLet's see if we got any gradient for initial model parameters: {0}\n".format(list(model.parameters())[0].grad))print('=================== Run Inner Loop Third Time (copy_initial_weights=False) =================\n')
final_meta_gradient = list(model.parameters())[0].grad.item()
# Now let's double-check `higher` library is actually doing what it promised to do, not just giving us
# a bunch of hand-wavy statements and difficult to read code.
# We will do a simple SGD step using meta_opt changing initial weight for the training and see how meta loss changed
meta_opt.step()
meta_opt.zero_grad()
meta_step = - meta_lr * final_meta_gradient # how much meta_opt actually shifted inital weight value
# before we run inner loop third time, we update the meta parameter firstly.
meta_loss_val3 = run_inner_loop_once(model, verbose=False, copy_initial_weights=False)meta_loss_gradient_approximation = (meta_loss_val3 - meta_loss_val2) / meta_stepprint()
print('Side-by-side meta_loss_gradient_approximation and gradient computed by `higher` lib: {0:.4} VS {1:.4}'.format(meta_loss_gradient_approximation, final_meta_gradient))
结果如下
=================== Run Inner Loop First Time (copy_initial_weights=True) =================Starting inner loop step j==0Representation of fmodel.parameters(time=0): [tensor([[-0.9915]], dtype=torch.float64, requires_grad=True)]Notice that fmodel.parameters() is same as fmodel.parameters(time=0): TrueNotice how `out` is `x` multiplied by the latest version of weight: 0.417 * -0.9915 == -0.4135
Starting inner loop step j==1Representation of fmodel.parameters(time=1): [tensor([[-0.1217]], dtype=torch.float64, grad_fn=<AddBackward0>)]Notice that fmodel.parameters() is same as fmodel.parameters(time=1): TrueNotice how `out` is `x` multiplied by the latest version of weight: 0.417 * -0.1217 == -0.05075
Starting inner loop step j==2Representation of fmodel.parameters(time=2): [tensor([[1.0145]], dtype=torch.float64, grad_fn=<AddBackward0>)]Notice that fmodel.parameters() is same as fmodel.parameters(time=2): TrueNotice how `out` is `x` multiplied by the latest version of weight: 0.417 * 1.015 == 0.4231
Starting inner loop step j==3Representation of fmodel.parameters(time=3): [tensor([[2.0640]], dtype=torch.float64, grad_fn=<AddBackward0>)]Notice that fmodel.parameters() is same as fmodel.parameters(time=3): TrueNotice how `out` is `x` multiplied by the latest version of weight: 0.417 * 2.064 == 0.8607
Starting inner loop step j==4Representation of fmodel.parameters(time=4): [tensor([[2.8668]], dtype=torch.float64, grad_fn=<AddBackward0>)]Notice that fmodel.parameters() is same as fmodel.parameters(time=4): TrueNotice how `out` is `x` multiplied by the latest version of weight: 0.417 * 2.867 == 1.196Let's print all intermediate parameters versions after inner loop is done:For j==0 parameter is: [tensor([[-0.9915]], dtype=torch.float64, requires_grad=True)]For j==1 parameter is: [tensor([[-0.1217]], dtype=torch.float64, grad_fn=<AddBackward0>)]For j==2 parameter is: [tensor([[1.0145]], dtype=torch.float64, grad_fn=<AddBackward0>)]For j==3 parameter is: [tensor([[2.0640]], dtype=torch.float64, grad_fn=<AddBackward0>)]For j==4 parameter is: [tensor([[2.8668]], dtype=torch.float64, grad_fn=<AddBackward0>)]For j==5 parameter is: [tensor([[3.3908]], dtype=torch.float64, grad_fn=<AddBackward0>)]Final meta-loss: 0.011927987982895929Gradient of final loss we got for lr and momentum: tensor([-1.6295]) and tensor([-0.9496])If you change number of iterations "loops" to much larger number final loss will be stable and the values above will be smallerLet's see if we got any gradient for initial model parameters: None=================== Run Inner Loop Second Time (copy_initial_weights=False) =================Final meta-loss: 0.011927987982895929Let's see if we got any gradient for initial model parameters: tensor([[-0.0053]], dtype=torch.float64)=================== Run Inner Loop Third Time (copy_initial_weights=False) =================Final meta-loss: 0.01192798770078706Side-by-side meta_loss_gradient_approximation and gradient computed by `higher` lib: -0.005311 VS -0.005311
Reference
Parper: Generalized Inner Loop Meta-Learning
What does the copy_initial_weights documentation mean in the higher library for Pytorch?
相关文章:

【MetaLearning】有关Pytorch的元学习库higher的基本用法
【MetaLearning】有关Pytorch的元学习库higher的基本用法 文章目录 【MetaLearning】有关Pytorch的元学习库higher的基本用法1. 基本介绍2. Toy ExampleReference 1. 基本介绍 higher.innerloop_ctx是higher库的上下文管理器,用于创建内部循环(inner lo…...
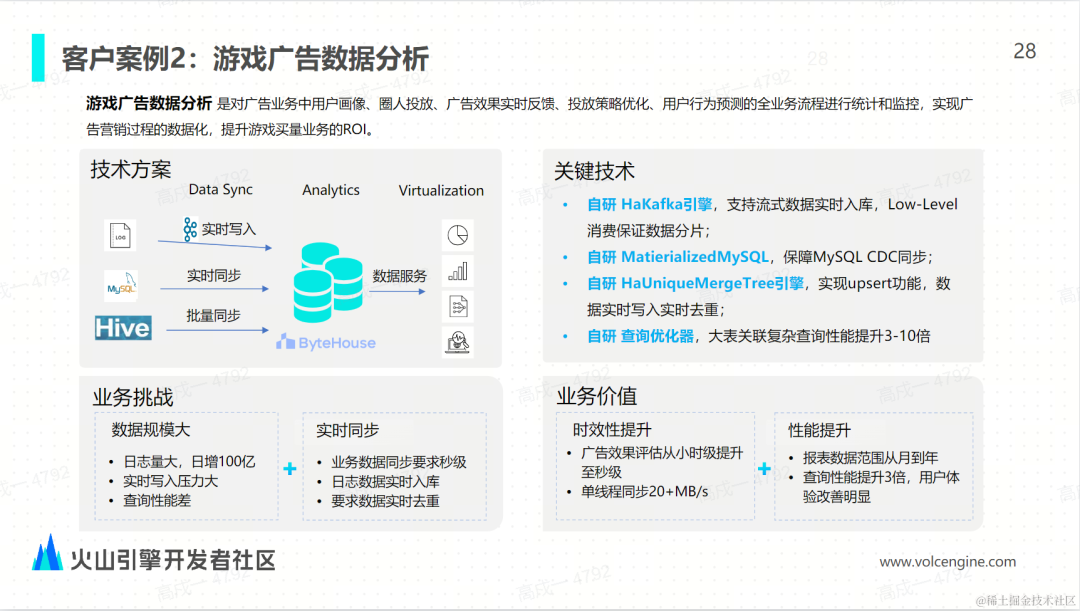
火山引擎 ByteHouse 的增强型数据导入技术实践
作为企业数字化建设的必备要素,易用的数据引擎能帮助企业提升数据使用效率,更好提升数据应用价值,夯实数字化建设基础。 数据导入是衡量OLAP引擎性能及易用性的重要标准之一,高效的数据导入能力能够加速数据实时处理和分析的效率。…...
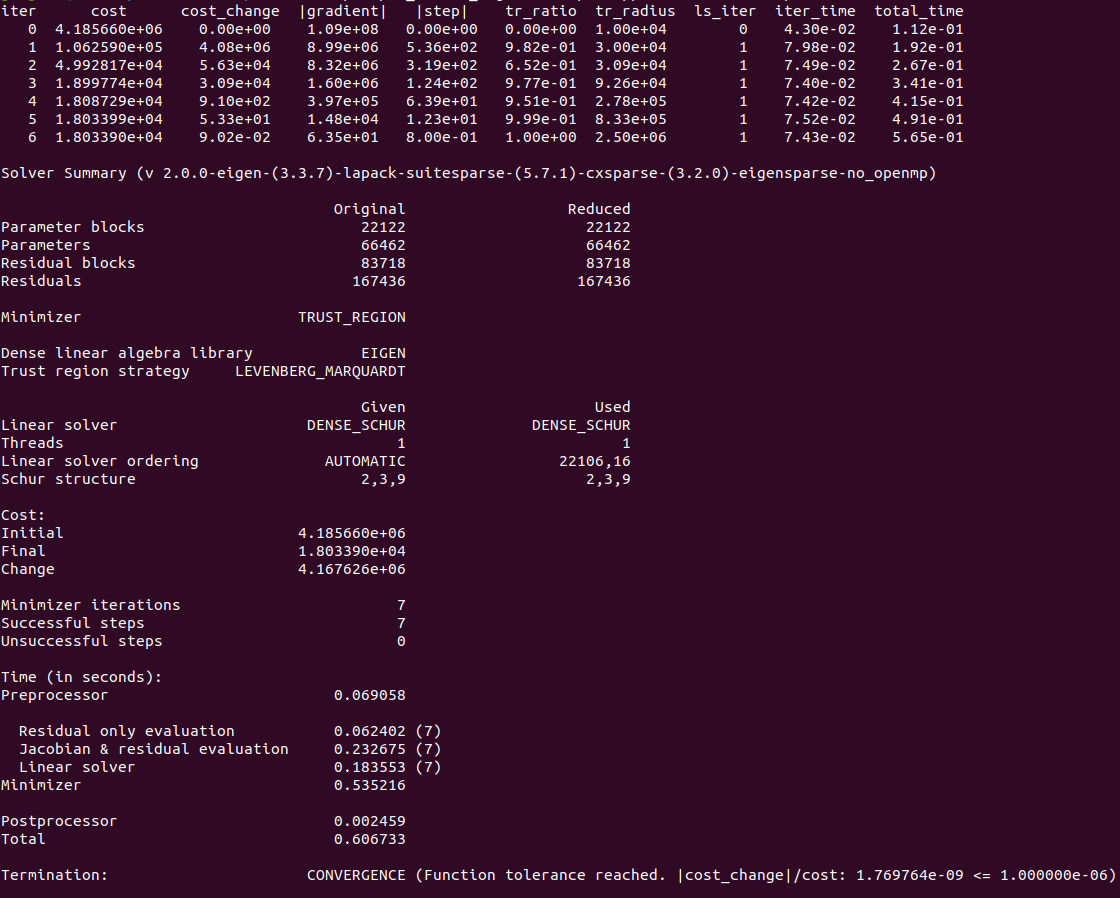
依赖库:Ceres-solver-2.0.0安装
依赖库:Ceres-solver-2.0.0安装 前言安装ceres-solver-2.0.0验证 前言 Ceres Solver是谷歌开源的C非线性优化库,能够解决有约束或无约束条件下的非线性最小二乘问题。2010年之后大量的运用在谷歌的产品开发中,尤其在谷歌开源的cartographer中…...

LeSS敏捷框架高效生产力实践
每个团队可能都有一套适合自己的敏捷方法,本文介绍了ResponseTap工程团队通过采用LeSS框架、引入准备周,从而提升迭代冲刺研发效能的实践。原文: LeSS Agile, More Productive — Part 1: Pain[1], LeSS Agile, More Productive — Part 2: Promise, LeS…...

matlab绘图函数plot和fplot的区别
一、背景 有的函数用plot画就会报错,显示数据必须为可转换为双精度值的数值、日期时间、持续时间、分类或数组。 如下图所示: 但用fplot函数就没有问题,因此这里记录一下两者的区别,如果使用不当,画出的图可能就是下…...
场景交互与场景漫游-对象选取(8-2)
对象选取示例的代码如程序清单8-11所示: /******************************************* 对象选取示例 *************************************/ // 对象选取事件处理器 class PickHandler :public osgGA::GUIEventHandler { public:PickHandler() :_mx(0.0f), _my…...

模拟Spring源码思想,手写源码,理解注解
1、BeanDefinition package com.csdn.myspring; import lombok.AllArgsConstructor; import lombok.Data; Data AllArgsConstructor public class BeanDefinition {private String beanName;private Class beanClass; }2、扫描包的工具类MyTools package com.csdn.myspring; im…...

各种LLM数据集包括SFT数据集
各种LLM数据集包括SFT数据集 数集介绍和 hf上的名字对话数据生成方法交通领域数据集SFT 的解释数集介绍和 hf上的名字 通用预训练数据集 SFT datasets SFT 数据集 50万条中文ChatGPT指令Belle数据集:BelleGroup/train_0.5M_CN 100万条中文ChatGPT指令Belle数据集:BelleGrou…...
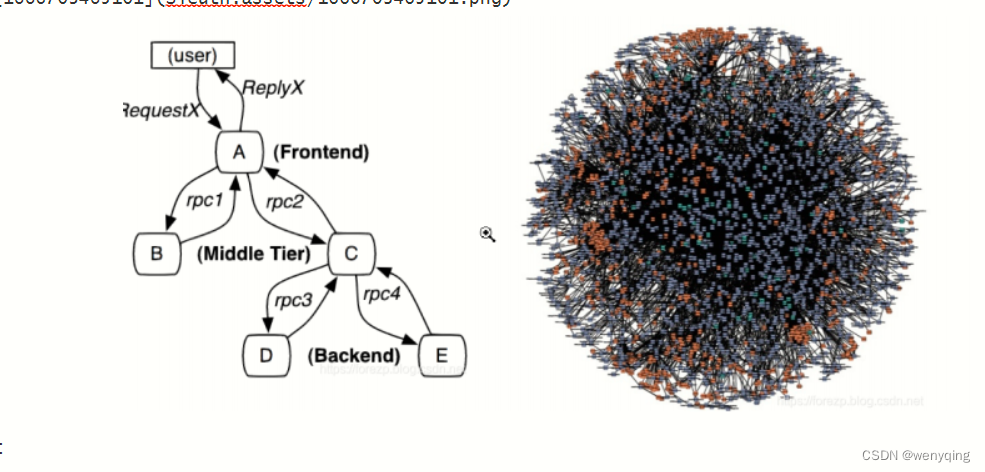
Sleuth
Sleuth 一 引言 随着服务的越来越多,对调⽤链的分析会越来越复杂。它们之间的调⽤关系也许如下图: 问题: 1:微服务之间的调⽤错综复杂,⽤户发送的请求经历那些服务,调⽤链不清楚,没有⼀ 个⾃…...

新手必看!!附源码!!STM32通用定时器输出PWM
一、什么是PWM? PWM(脉冲宽度调制)是一种用于控制电子设备的技术。它通过调整信号的脉冲宽度来控制电压的平均值。PWM常用于调节电机速度、控制LED亮度、产生模拟信号等应用。 二、PWM的原理 PWM的基本原理是通过以一定频率产生的脉冲信号࿰…...

静态文件鉴权
静态文件鉴权的解决方案 背景介绍 XX业务系统作为BXX业务系统的孪生姐妹系统,是对BXX受理业务的强力补充系统,他允许操作员拿着IPAD,和客户约定地点上门受理业务。 因一些业务的受理,按照最新的业务规章制度,需…...
计算机视觉与机器学习D1
计算机视觉简介 技术背景 了解人工智能方向、热点 目前人工智能的技术方向有: 1、计算机视觉——计算机视觉(CV)是指机器感知环境的能力;这一技术类别中的经典任务有图像形成、图像处理、图像提取和图像的三维推理。物体检测和人脸识别是其比较成功…...
生成验证码)
layui(2.8.18)生成验证码
<!DOCTYPE html> <html> <head><meta charset"utf-8"><title>登入</title><meta name"renderer" content"webkit"><meta http-equiv"X-UA-Compatible" content"IEedge,chrome1&quo…...
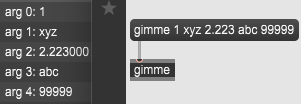
MAX/MSP SDK学习05:A_GIMME方法
今天终于将A_GIMME方法部分的描述看懂了,上周因为太赶时间加上这文档很抽象一直没看懂。也就那么一回事,记录一下。 A_GIMME方法用于接收多个参数。 ①内置消息选择器传递多个参数时一定要使用A_GIMME; ②自定义消息选择器传递多个参数时建…...
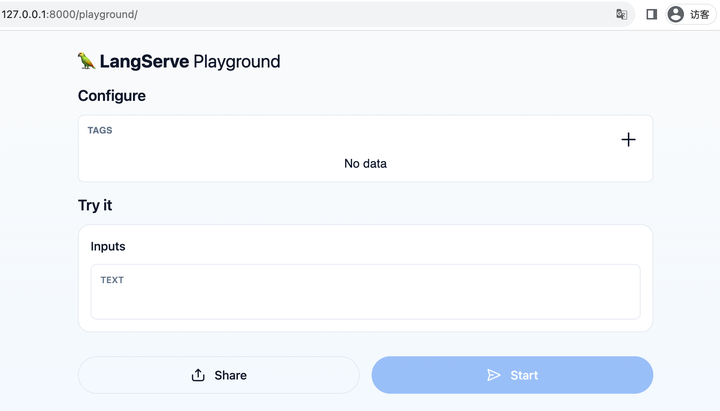
LangChain: 类似 Flask/FastAPI 之于 Django,LangServe 就是「LangChain 自己的 FastAPI」
原文:LangChain: 类似 Flask/FastAPI 之于 Django,LangServe 就是「LangChain 自己的 FastAPI」 - 知乎 说明:LangServe代替 langchainserver 成为新的langchain 部署工具 官网资料:🦜️🏓 LangServe | &…...

mmdet全教程
官方给的文档一言难尽,网上的教程又没有从大纲到源码的完整解读,计划年后开个系列记录一下...

1992-2021年省市县经过矫正的夜间灯光数据(GNLD、VIIRS)
1992-2021年省市县经过矫正的夜间灯光数据(GNLD、VIIRS) 1、时间:1992-2021年3月,其中1992-2013年为年度数据,2013-2021年3月为月度数据 2、来源:DMSP、VIIRS 3、范围:分区域汇总:…...

Guava的Retryer
Retryer类是Guava库中的一个重试工具类,它提供了一种在调用方法时自动重试的机制。Retryer类中的call()方法用于执行需要重试的方法,如果方法执行失败,则Retryer会根据配置的规则进行重试。Retryer类可以配置重试的次数、重试间隔时间、重试的…...

Docker实践笔记7:构建MySQL 8镜像
使用Docker构建MySQL 8镜像并运行容器 本教程将指导您使用Dockerfile构建和运行一个MySQL 8容器。让我们开始吧! 步骤1:创建Dockerfile 在您的项目根目录下创建一个名为Dockerfile的文件。以下是Dockerfile的示例内容: # 基于最新的MySQL…...

# 学习 Prolog 和 离散逻辑的16个等价公式:一趟有趣的逻辑之旅
Prolog 的语法很奇怪,需要一些时间来适应,所以我花了点时间,想用Prolot来学习和验证离散逻辑的16组等价公式。 1. 双重否定律 (Double Negation Law) A ⇔A 首先,我们来看看双重否定律。在 Prolog 中,我们可以这样验证它: fun1(A,Z):-memb…...
)
第111篇:低代码_无代码AI平台横评——普通人也能快速上手的造富工具(操作教程)
文章目录 前言 环境准备:选择你的“造富”武器 分步操作:打造你的“法律咨询AI助手” 第一步:部署与初始化Dify 第二步:配置AI模型(大脑) 第三步:喂养知识库(核心竞争力) 第四步:设计对话流程(Prompt工程可视化) 第五步:发布与测试 完整代码?不,是完整配置! 踩…...

为什么你的AI Agent总输出垃圾?因为你没装“技能插件”
最近三个月,我至少被问了20次同一个问题。“老师,我调了GPT-5,也用了Claude Code,为什么Agent做事还是乱七八糟?让它分析代码,它说一堆正确的废话。让它修Bug,它改出三个新Bug。Prompt改了几十版…...

Windows系统VBE7INTL.DLL文件丢失无法启动程序解决
在使用电脑系统时经常会出现丢失找不到某些文件的情况,由于很多常用软件都是采用 Microsoft Visual Studio 编写的,所以这类软件的运行需要依赖微软Visual C运行库,比如像 QQ、迅雷、Adobe 软件等等,如果没有安装VC运行库或者安装…...

如何快速用Chinese-ERJ LaTeX模板搞定《经济研究》期刊论文格式
如何快速用Chinese-ERJ LaTeX模板搞定《经济研究》期刊论文格式 【免费下载链接】Chinese-ERJ 《经济研究》杂志 LaTeX 论文模板 - LaTeX Template for Economic Research Journal 项目地址: https://gitcode.com/gh_mirrors/ch/Chinese-ERJ 还在为《经济研究》期刊复杂…...

5个你必须掌握的TestDisk PhotoRec数据恢复实战技巧
5个你必须掌握的TestDisk & PhotoRec数据恢复实战技巧 【免费下载链接】testdisk TestDisk & PhotoRec 项目地址: https://gitcode.com/gh_mirrors/te/testdisk 你是否曾经因为误删分区而心跳加速?或者因为格式化硬盘而冷汗直流?别担心&a…...

Plane.dev与Figma架构对比:权威多人在线后端的演进之路
Plane.dev与Figma架构对比:权威多人在线后端的演进之路 【免费下载链接】plane A distributed system for running WebSocket services at scale. 项目地址: https://gitcode.com/gh_mirrors/pla/plane 在当今实时协作应用爆发的时代,分布式WebSo…...

ROS机器人视觉实战:用USB摄像头和OpenCV实现一个简易的‘挥手检测’Demo
ROS机器人视觉实战:用USB摄像头和OpenCV实现挥手检测 想象一下,当你走进实验室,机器人通过摄像头识别到你的挥手动作,立即启动迎宾程序——这种充满未来感的交互,其实用ROS和OpenCV就能轻松实现。本文将带你从零构建一…...

在 Simulink 中实现一个具备“自适应”能力的智能电机驱动器
目录 🎯 一、 核心目标与系统架构 系统整体架构图 🛠️ 二、 手把手建模步骤 第一步:搭建被控对象 (The Plant) 第二步:定义强化学习环境 (Define Environment) 第三步:选择并配置智能体 (Select Agent) 第四步:训练智能体 (Training) 第五步:部署与验证 (Dep…...
Transformer模型模式崩溃问题分析与优化实践
1. 项目背景与问题定义最近在调试一个基于Transformer架构的生成式模型时,遇到了一个有趣的现象:当模型生成长文本时,会反复输出某些固定短语组合。比如每次生成故事结局都是"从此过上了幸福生活",生成产品描述总会包含…...

AI视频生成:如何用链式流程实现角色一致的长视频叙事
1. 项目概述:用AI视频生成技术,讲一个24秒的连贯故事 如果你对AI生成视频的印象还停留在“输入一句话,得到一个几秒钟的随机片段”,那么这个项目可能会改变你的看法。 Veo3-Chain 的核心目标,是解决当前AI视频生成领…...