竞赛选题 行人重识别(person reid) - 机器视觉 深度学习 opencv python
文章目录
- 0 前言
- 1 技术背景
- 2 技术介绍
- 3 重识别技术实现
- 3.1 数据集
- 3.2 Person REID
- 3.2.1 算法原理
- 3.2.2 算法流程图
- 4 实现效果
- 5 部分代码
- 6 最后
0 前言
🔥 优质竞赛项目系列,今天要分享的是
🚩 深度学习行人重识别(person reid)系统
该项目较为新颖,适合作为竞赛课题方向,学长非常推荐!
🥇学长这里给一个题目综合评分(每项满分5分)
- 难度系数:3分
- 工作量:3分
- 创新点:5分
🧿 更多资料, 项目分享:
https://gitee.com/dancheng-senior/postgraduate
1 技术背景
行人重识别技术,是智能视频监控系统的关键技术之一,其研宄是针对特定目标行人的视频检索识别问题。行人再识别是一种自动的目标判定识别技术,它综合地运用了计算机视觉技术、机器学习、视频处理、图像分析、模式识别等多种相关技术于监控系统中,其主要描述的是在多个无重叠视域的摄像头监控环境之下,通过相关算法判断在某个镜头下出现过的感兴趣的目标人物是否在其他摄像头下再次出现。
2 技术介绍
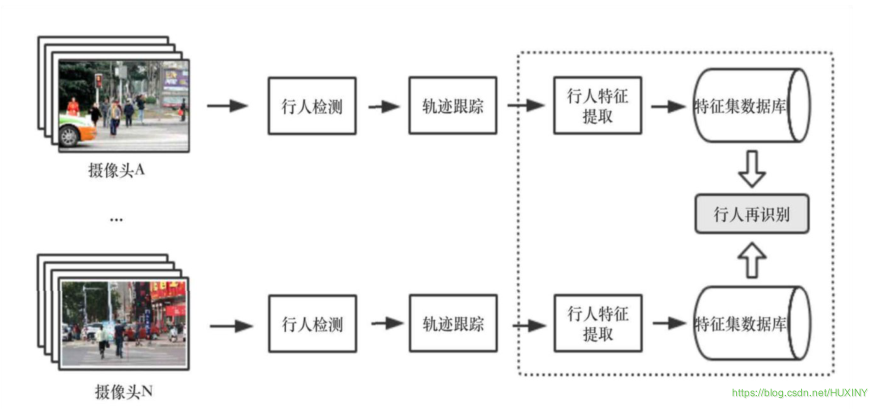
在视频监控系统中,行人再识别任务的整体框架如下图所示:
—个监控系统由多个视域不相交的监控摄像头组成,摄像机的位置可以随时更改,同时也可以随时增加或减少摄像机。不两监控摄像头所摄取的画面、视角等各不相同。在这样的监控系统中,对行人的动向监测是,至关重要的。
对行人的监控主要基于以下三个基本的模块:
-
行人检测:
行人检测的目标是在图片中定位到行人的具体位置。这一步骤仅涉及到对于静止的单张图片的处理,而没有动态的处理,没有时间序列上的相关分析。 -
行人轨迹跟踪:
行人轨迹跟踪的主要任务是在一段时间内提供目标任务的位置移动信息。与行人检测不同,轨迹跟踪与时间序列紧密相关。行人轨迹跟踪是在行人检测的基础上进行的。 -
行人再识别:
行人再识别任务的目标是在没有相重合视域的摄像头或摄像机网络内的不同背景下的许多行人中中识别某个特定行人。行人再识别的
在此基础上,用训练出的模型进行学习从而判断得出某个摄像头下的行人与另一摄像头下的目标人物为同一个人。在智能视频监控系统中的行人再识别任务具有非常广阔的应用前景。行人再识别的应用与行人检测、目标跟踪、行人行为分析、敏感事件检测等等都有着紧密的联系,这些分析处理技术对于公安部门的刑侦工作和城市安防建设工作有着重要的意义。
3 重识别技术实现
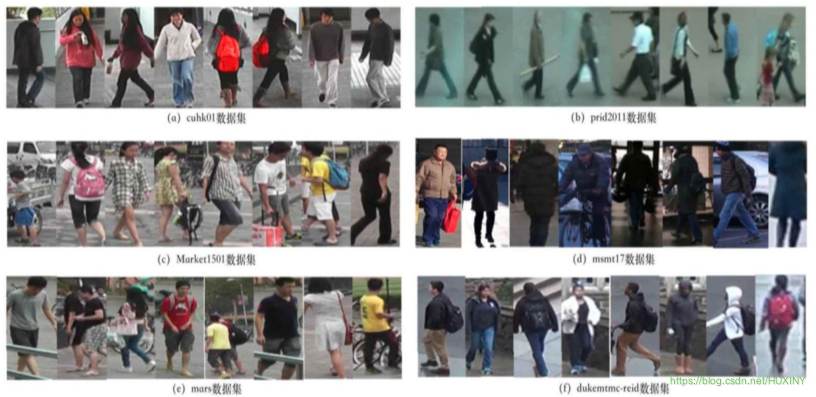
3.1 数据集
目前行人再识别的研究需要大量的行人数据集。行人再识别的数据集主要是通过在不同区域假设无重叠视域的多个摄像头来采集拍摄有行人图像的视频,然后对视频提取帧,对于视频帧图像采用人工标注或算法识别的方式进行人体检测及标注来完成的。行人再识别数据集中包含了跨背景、跨时间、不同拍摄角度下、各种不同姿势的行人图片,如下图所示。
3.2 Person REID
3.2.1 算法原理
给定N个不同的行人从不同的拍摄视角的无重叠视域摄像机捕获的图像集合,行人再识别的任务是学习一个模型,该模型可以尽可能减小行人姿势和背景、光照等因素带来的影响,从而更好地对行人进行整体上的描述,更准确地对不同行人图像之间的相似度进行衡量。
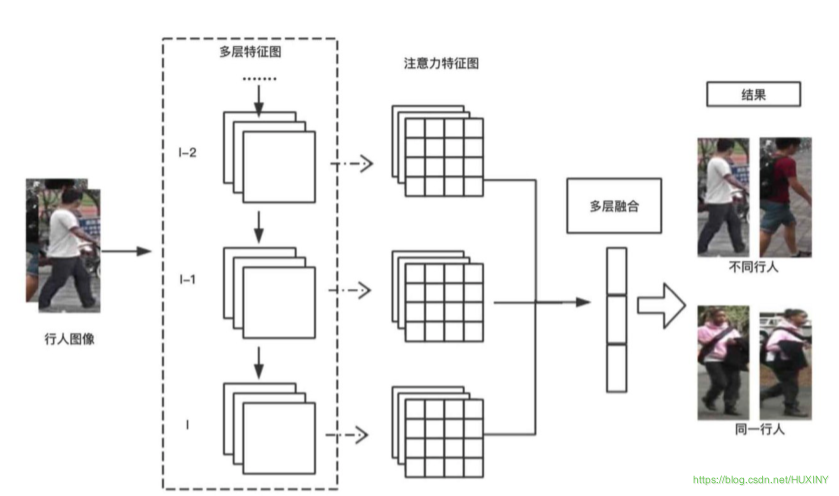
我这里使用注意力相关的特征的卷积神经网络。该基础卷积神经网络架构可以由任何卷积神经网络模型代替,例如,VGG-19,ResNet-101。
该算法的核心模块在于注意力学习模型。
3.2.2 算法流程图
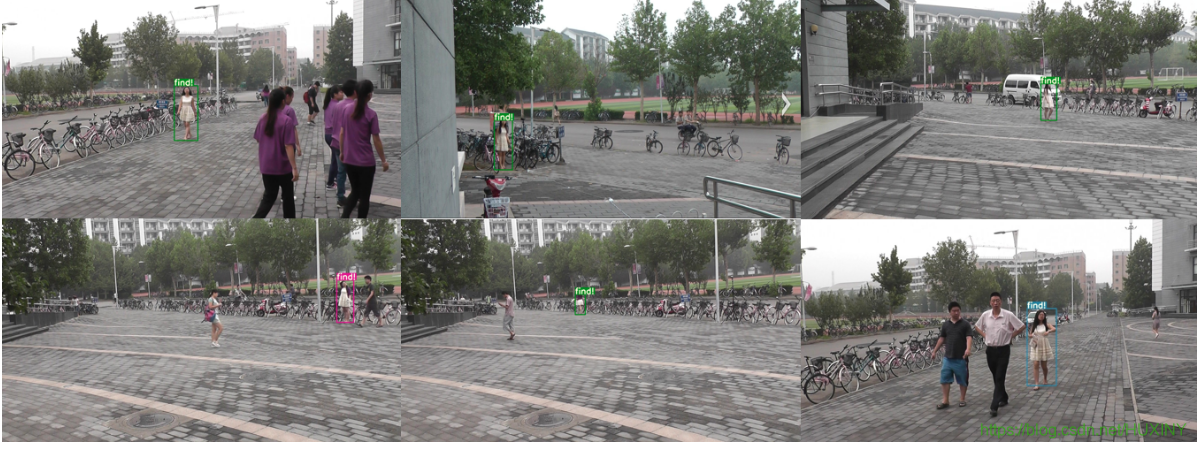
4 实现效果
在多行人场景下,对特定行人进行寻找
5 部分代码
import argparseimport timefrom sys import platformfrom models import *from utils.datasets import *from utils.utils import *from reid.data import make_data_loaderfrom reid.data.transforms import build_transformsfrom reid.modeling import build_modelfrom reid.config import cfg as reidCfgdef detect(cfg,data,weights,images='data/samples', # input folderoutput='output', # output folderfourcc='mp4v', # video codecimg_size=416,conf_thres=0.5,nms_thres=0.5,dist_thres=1.0,save_txt=False,save_images=True):# Initializedevice = torch_utils.select_device(force_cpu=False)torch.backends.cudnn.benchmark = False # set False for reproducible resultsif os.path.exists(output):shutil.rmtree(output) # delete output folderos.makedirs(output) # make new output folder############# 行人重识别模型初始化 #############query_loader, num_query = make_data_loader(reidCfg)reidModel = build_model(reidCfg, num_classes=10126)reidModel.load_param(reidCfg.TEST.WEIGHT)reidModel.to(device).eval()query_feats = []query_pids = []for i, batch in enumerate(query_loader):with torch.no_grad():img, pid, camid = batchimg = img.to(device)feat = reidModel(img) # 一共2张待查询图片,每张图片特征向量2048 torch.Size([2, 2048])query_feats.append(feat)query_pids.extend(np.asarray(pid)) # extend() 函数用于在列表末尾一次性追加另一个序列中的多个值(用新列表扩展原来的列表)。query_feats = torch.cat(query_feats, dim=0) # torch.Size([2, 2048])print("The query feature is normalized")query_feats = torch.nn.functional.normalize(query_feats, dim=1, p=2) # 计算出查询图片的特征向量############# 行人检测模型初始化 #############model = Darknet(cfg, img_size)# Load weightsif weights.endswith('.pt'): # pytorch formatmodel.load_state_dict(torch.load(weights, map_location=device)['model'])else: # darknet format_ = load_darknet_weights(model, weights)# Eval modemodel.to(device).eval()# Half precisionopt.half = opt.half and device.type != 'cpu' # half precision only supported on CUDAif opt.half:model.half()# Set Dataloadervid_path, vid_writer = None, Noneif opt.webcam:save_images = Falsedataloader = LoadWebcam(img_size=img_size, half=opt.half)else:dataloader = LoadImages(images, img_size=img_size, half=opt.half)# Get classes and colors# parse_data_cfg(data)['names']:得到类别名称文件路径 names=data/coco.namesclasses = load_classes(parse_data_cfg(data)['names']) # 得到类别名列表: ['person', 'bicycle'...]colors = [[random.randint(0, 255) for _ in range(3)] for _ in range(len(classes))] # 对于每种类别随机使用一种颜色画框# Run inferencet0 = time.time()for i, (path, img, im0, vid_cap) in enumerate(dataloader):t = time.time()# if i < 500 or i % 5 == 0:# continuesave_path = str(Path(output) / Path(path).name) # 保存的路径# Get detections shape: (3, 416, 320)img = torch.from_numpy(img).unsqueeze(0).to(device) # torch.Size([1, 3, 416, 320])pred, _ = model(img) # 经过处理的网络预测,和原始的det = non_max_suppression(pred.float(), conf_thres, nms_thres)[0] # torch.Size([5, 7])if det is not None and len(det) > 0:# Rescale boxes from 416 to true image size 映射到原图det[:, :4] = scale_coords(img.shape[2:], det[:, :4], im0.shape).round()# Print results to screen image 1/3 data\samples\000493.jpg: 288x416 5 persons, Done. (0.869s)print('%gx%g ' % img.shape[2:], end='') # print image size '288x416'for c in det[:, -1].unique(): # 对图片的所有类进行遍历循环n = (det[:, -1] == c).sum() # 得到了当前类别的个数,也可以用来统计数目if classes[int(c)] == 'person':print('%g %ss' % (n, classes[int(c)]), end=', ') # 打印个数和类别'5 persons'# Draw bounding boxes and labels of detections# (x1y1x2y2, obj_conf, class_conf, class_pred)count = 0gallery_img = []gallery_loc = []for *xyxy, conf, cls_conf, cls in det: # 对于最后的预测框进行遍历# *xyxy: 对于原图来说的左上角右下角坐标: [tensor(349.), tensor(26.), tensor(468.), tensor(341.)]if save_txt: # Write to filewith open(save_path + '.txt', 'a') as file:file.write(('%g ' * 6 + '\n') % (*xyxy, cls, conf))# Add bbox to the imagelabel = '%s %.2f' % (classes[int(cls)], conf) # 'person 1.00'if classes[int(cls)] == 'person':#plot_one_bo x(xyxy, im0, label=label, color=colors[int(cls)])xmin = int(xyxy[0])ymin = int(xyxy[1])xmax = int(xyxy[2])ymax = int(xyxy[3])w = xmax - xmin # 233h = ymax - ymin # 602# 如果检测到的行人太小了,感觉意义也不大# 这里需要根据实际情况稍微设置下if w*h > 500:gallery_loc.append((xmin, ymin, xmax, ymax))crop_img = im0[ymin:ymax, xmin:xmax] # HWC (602, 233, 3)crop_img = Image.fromarray(cv2.cvtColor(crop_img, cv2.COLOR_BGR2RGB)) # PIL: (233, 602)crop_img = build_transforms(reidCfg)(crop_img).unsqueeze(0) # torch.Size([1, 3, 256, 128])gallery_img.append(crop_img)if gallery_img:gallery_img = torch.cat(gallery_img, dim=0) # torch.Size([7, 3, 256, 128])gallery_img = gallery_img.to(device)gallery_feats = reidModel(gallery_img) # torch.Size([7, 2048])print("The gallery feature is normalized")gallery_feats = torch.nn.functional.normalize(gallery_feats, dim=1, p=2) # 计算出查询图片的特征向量# m: 2# n: 7m, n = query_feats.shape[0], gallery_feats.shape[0]distmat = torch.pow(query_feats, 2).sum(dim=1, keepdim=True).expand(m, n) + \torch.pow(gallery_feats, 2).sum(dim=1, keepdim=True).expand(n, m).t()# out=(beta∗M)+(alpha∗mat1@mat2)# qf^2 + gf^2 - 2 * qf@gf.t()# distmat - 2 * qf@gf.t()# distmat: qf^2 + gf^2# qf: torch.Size([2, 2048])# gf: torch.Size([7, 2048])distmat.addmm_(1, -2, query_feats, gallery_feats.t())# distmat = (qf - gf)^2# distmat = np.array([[1.79536, 2.00926, 0.52790, 1.98851, 2.15138, 1.75929, 1.99410],# [1.78843, 1.96036, 0.53674, 1.98929, 1.99490, 1.84878, 1.98575]])distmat = distmat.cpu().numpy() # : (3, 12)distmat = distmat.sum(axis=0) / len(query_feats) # 平均一下query中同一行人的多个结果index = distmat.argmin()if distmat[index] < dist_thres:print('距离:%s'%distmat[index])plot_one_box(gallery_loc[index], im0, label='find!', color=colors[int(cls)])# cv2.imshow('person search', im0)# cv2.waitKey()print('Done. (%.3fs)' % (time.time() - t))if opt.webcam: # Show live webcamcv2.imshow(weights, im0)if save_images: # Save image with detectionsif dataloader.mode == 'images':cv2.imwrite(save_path, im0)else:if vid_path != save_path: # new videovid_path = save_pathif isinstance(vid_writer, cv2.VideoWriter):vid_writer.release() # release previous video writerfps = vid_cap.get(cv2.CAP_PROP_FPS)width = int(vid_cap.get(cv2.CAP_PROP_FRAME_WIDTH))height = int(vid_cap.get(cv2.CAP_PROP_FRAME_HEIGHT))vid_writer = cv2.VideoWriter(save_path, cv2.VideoWriter_fourcc(*fourcc), fps, (width, height))vid_writer.write(im0)if save_images:print('Results saved to %s' % os.getcwd() + os.sep + output)if platform == 'darwin': # macosos.system('open ' + output + ' ' + save_path)print('Done. (%.3fs)' % (time.time() - t0))if __name__ == '__main__':parser = argparse.ArgumentParser()parser.add_argument('--cfg', type=str, default='cfg/yolov3.cfg', help="模型配置文件路径")parser.add_argument('--data', type=str, default='data/coco.data', help="数据集配置文件所在路径")parser.add_argument('--weights', type=str, default='weights/yolov3.weights', help='模型权重文件路径')parser.add_argument('--images', type=str, default='data/samples', help='需要进行检测的图片文件夹')parser.add_argument('-q', '--query', default=r'query', help='查询图片的读取路径.')parser.add_argument('--img-size', type=int, default=416, help='输入分辨率大小')parser.add_argument('--conf-thres', type=float, default=0.1, help='物体置信度阈值')parser.add_argument('--nms-thres', type=float, default=0.4, help='NMS阈值')parser.add_argument('--dist_thres', type=float, default=1.0, help='行人图片距离阈值,小于这个距离,就认为是该行人')parser.add_argument('--fourcc', type=str, default='mp4v', help='fourcc output video codec (verify ffmpeg support)')parser.add_argument('--output', type=str, default='output', help='检测后的图片或视频保存的路径')parser.add_argument('--half', default=False, help='是否采用半精度FP16进行推理')parser.add_argument('--webcam', default=False, help='是否使用摄像头进行检测')opt = parser.parse_args()print(opt)with torch.no_grad():detect(opt.cfg,opt.data,opt.weights,images=opt.images,img_size=opt.img_size,conf_thres=opt.conf_thres,nms_thres=opt.nms_thres,dist_thres=opt.dist_thres,fourcc=opt.fourcc,output=opt.output)6 最后
🧿 更多资料, 项目分享:
https://gitee.com/dancheng-senior/postgraduate
相关文章:
竞赛选题 行人重识别(person reid) - 机器视觉 深度学习 opencv python
文章目录 0 前言1 技术背景2 技术介绍3 重识别技术实现3.1 数据集3.2 Person REID3.2.1 算法原理3.2.2 算法流程图 4 实现效果5 部分代码6 最后 0 前言 🔥 优质竞赛项目系列,今天要分享的是 🚩 深度学习行人重识别(person reid)系统 该项目…...
解决vue中引入天地图显示不全问题,设置setTimeout即可解决!
index.html中引入天地图api <script type"text/javascript" src"https://api.tianditu.gov.cn/api?v4.0&tk你的key"></script>map.vue中初始化天地图 //初始化天地图 initTMap() {const T window.T;// 3.初始化地图对象this.tMap new…...
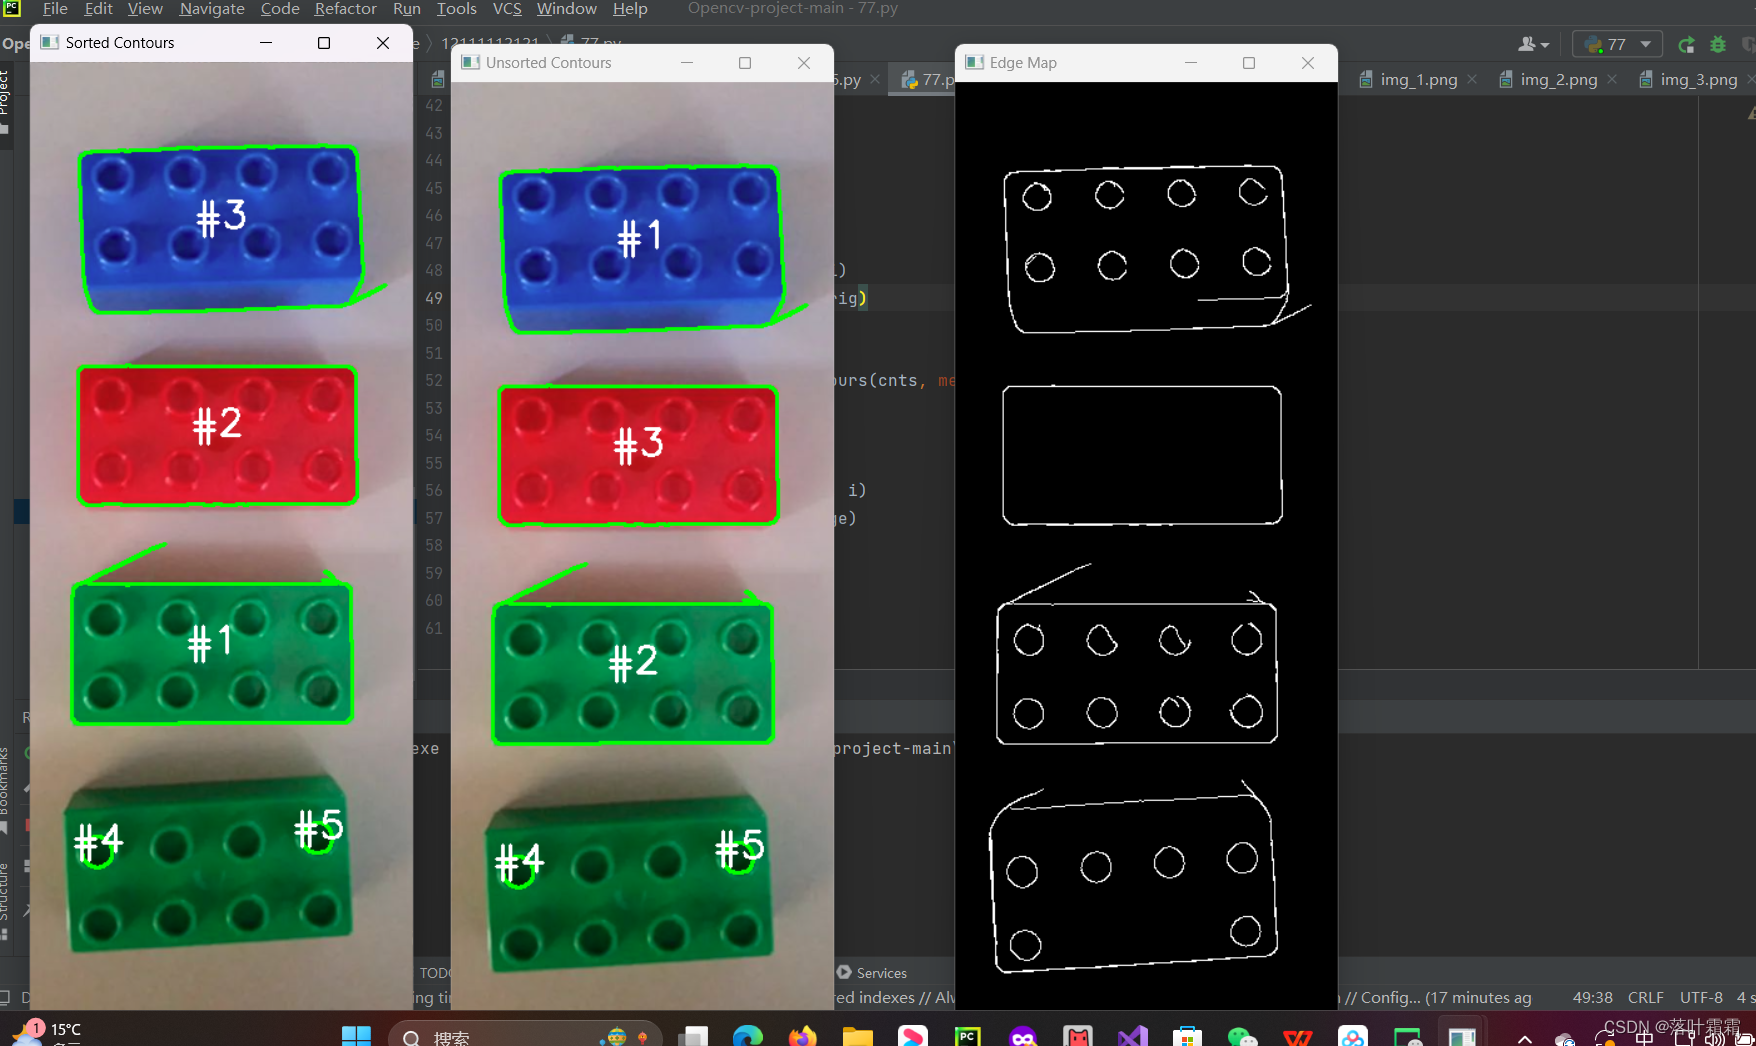
【OpenCV实现图像:使用OpenCV进行物体轮廓排序】
文章目录 概要读取图像获取轮廓轮廓排序小结 概要 在图像处理中,经常需要进行与物体轮廓相关的操作,比如计算目标轮廓的周长、面积等。为了获取目标轮廓的信息,通常使用OpenCV的findContours函数。然而,一旦获得轮廓信息后&#…...

【8】Spring Boot 3 集成组件:安全组件 spring security【官网概念篇】
目录 【8】Spring Boot 3 集成组件:安全组件 spring securitySpring Security 简介先决条件引入依赖身份验证密码存储密码存储历史DelegatingPasswordEncoder密码存储格式密码加解密类自定义密码存储 体系结构 ArchitectureServlet 过滤器DelegatingFilterProxyFilt…...
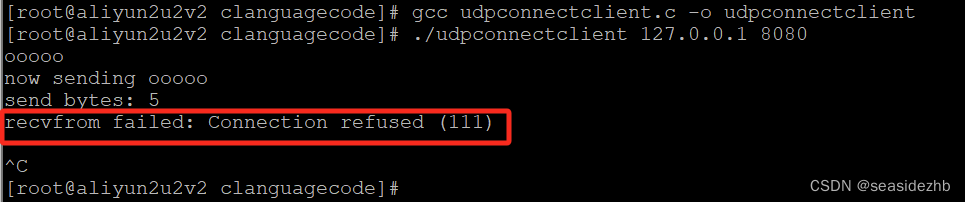
UDP中connect的作用
udpclientNoConnect.c里边的内容如下: #include<stdio.h> #include<stdlib.h> #include<string.h> #include<unistd.h> #include<arpa/inet.h> #include<sys/socket.h> #include <errno.h> #include <syslog.h…...

Go使用开源库go-excelize操作Excel文件
以下是一个示例代码,读取一个 Excel 文件并打印其中的所有单元格值: package mainimport ("fmt""github.com/30x/go-excelize" )func main() {// 打开 Excel 文件f, err : excelize.OpenFile("yourfile.xlsx")if err ! n…...

软件测试个人求职简历该怎么写,模板在这里
1、个人资料 姓名:xxx性别:x 手机号码:138888888xx邮箱:xxx 学历:本科专业:电子商务 英语:四级当前工作:测试工程师 从业时间:4年期望薪资:面议 求职意向软件…...
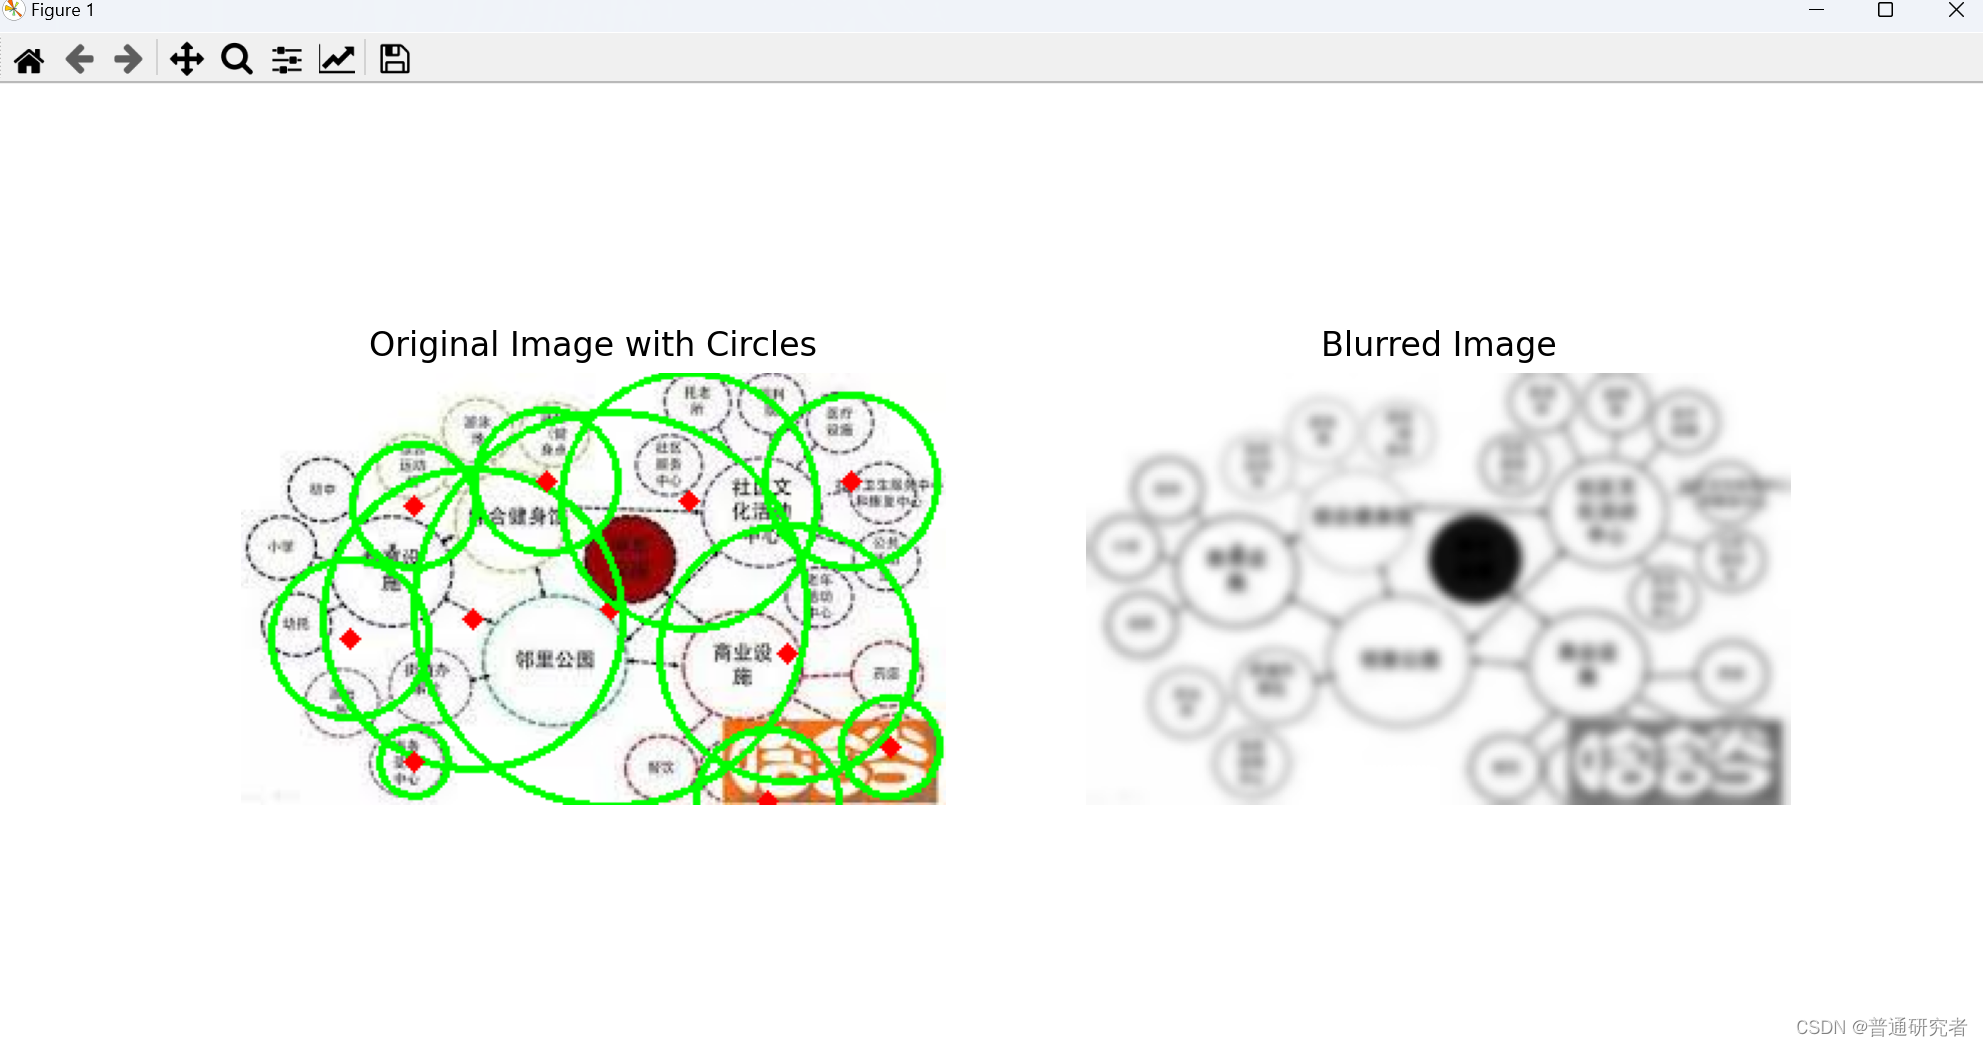
opencv-Hough 圆环变换
Hough 圆环变换(Hough Circle Transform)是一种用于在图像中检测圆环的技术。与 Hough 直线变换类似,它通过在参数空间中表示图像中的圆环,将圆环检测问题转换为参数空间的累加问题。OpenCV 提供了 cv2.HoughCircles() 函数来执行…...
福州大学《嵌入式系统综合设计》实验五:图像裁剪及尺寸变换
一、实验目的 在深度学习中,往往需要从一张大图中裁剪出一张张小图,以便适应网络输入图像的尺寸,这可以通过bmcv_image_crop函数实现。 实践中,经常需要对输入图像的尺寸进行调整,以适用于网络输入图片尺寸࿰…...
LLM之Prompt(二):清华提出Prompt 对齐优化技术BPO
论文题目:《Black-Box Prompt Optimization: Aligning Large Language Models without Model Training》 论文链接:https://arxiv.org/abs/2311.04155 github地址:https://github.com/thu-coai/BPO BPO背景介绍 最近,大型语言模…...
chatglm3部署使用
chatglm3部署使用 1.部署2.使用3.接入微信4.vue前端 1.部署 1.首先去github下载chatglm3代码。Huggingface下载模型一直失败,所以用阿里的魔塔社区下载。 git clone https://github.com/THUDM/ChatGLM3.git git clone https://www.modelscope.cn/ZhipuAI/chatglm3…...

Android扫码ZXing
1. 获取权限 请注意动态申请及重写申请结果返回方法。 <uses-permission android:name"android.permission.CAMERA"/> 2. 添加依赖 //Gradle Scripts -> build.gradle(Module:app) implementation com.google.zxing:core:3.4.1 implementation com.jour…...
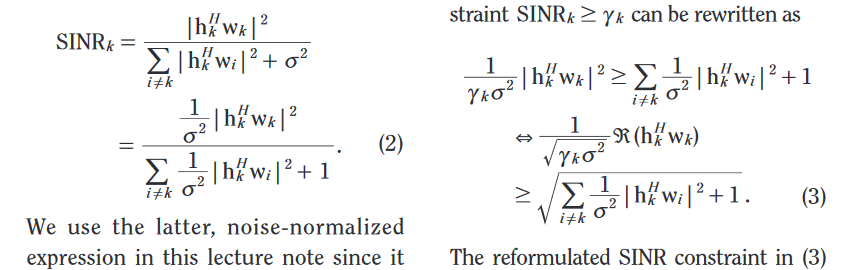
求解Beamforming-SOCP(CVX求解)
时间:2023年11月23日14:00:16: 直接上代码(辛苦两天才改出来的) clear all; K 4; %user number N4; %base station number var1e-9; H []; %initialize H matrix for i1:Kh 1/sqrt(2*K)*mvnrnd(zeros(N,1),eye(N),1)1i/sqrt(2*…...

解决Vue项目的runtime-only转为runtime-compiler
我们在vue.config.js中添加上 runtimeCompiler: true,然后再将main.js入口文件中的Vue实例改为以下即可 //修改前 new Vue({router,store,render: (h) > h(App) }).$mount(#app) //修改后 new Vue({el:#app,router,store, components:{App}, template:<App/>})...

hash模式和history模式
在Vue Router中,有两种路由模式可供选择:hash模式和history模式。它们各自有一些优点和缺点,下面是它们的简要介绍: hash模式的原理是通过hashchange事件,通过监听hash变化来驱动界面变化。它的url中有 # 号 1、监听…...

聊聊logback的LevelFilter
序 本文主要研究一下logback的LevelFilter AbstractMatcherFilter ch/qos/logback/core/filter/AbstractMatcherFilter.java public abstract class AbstractMatcherFilter<E> extends Filter<E> {protected FilterReply onMatch FilterReply.NEUTRAL;protect…...
mysql 行转列 GROUP_CONCAT 试验
1.概要 很多时候需要用到行专列的方式做数据分析。比如对通讯数据的采集 数据采集结果如下: 变量值采集周期131251132272 我想要看的结果 变量1变量2采集周期351372 就是我想看到相关数据的周期变化情况。 2.试验 2.1创建数据如下(表名 tb5&…...
HarmonyOS元服务开发实战—端云一体化开发
还记得我第一次接触arkui还是在22年的9月份,当时arkui还在一个比较初试的阶段。时隔一年再见方舟框架,它已经发生了令人瞩目的变化,不得不说华为方舟框架在更新迭代的速度已经遥遥领先。新的功能和性能优化让这个框架更加强大和灵活ÿ…...

【搭环境】装Python3.8 open3d
先装Python3.8 方法一试了找不到Python3.8的库,所以用方法二装上了。 Python3加入环境变量 更改Python默认指向 open3d需要Python3.6以上,最好用Ubuntu18版本,我用的16版本。。...
【C语言】深入解开指针(四)
🌈write in front :🔍个人主页 : 啊森要自信的主页 ✏️真正相信奇迹的家伙,本身和奇迹一样了不起啊! 欢迎大家关注🔍点赞👍收藏⭐️留言📝>希望看完我的文章对你有小小的帮助&am…...

大语言模型在文档合规审计中的实践与优化
1. 项目背景与核心价值文档安全与合规管理一直是企业数字化转型中的痛点。传统基于规则的关键词过滤和权限管控系统,在面对海量非结构化文档时往往力不从心。我在为某金融机构做数据治理咨询时,亲眼见过合规团队需要人工抽查上万份合同文件,不…...

Qwen3-4B-Thinking-Gemini-Distill行业落地:教育科技公司AI助教系统集成实践
Qwen3-4B-Thinking-Gemini-Distill行业落地:教育科技公司AI助教系统集成实践 1. 模型概述与教育场景价值 Qwen3-4B-Thinking-2507-Gemini-Distill是一款专为教育场景优化的AI推理模型,基于阿里千问3官方思考版(Qwen3-4B-Thinking-2507&…...

三维风场可视化:如何让气象数据在数字地球上“流动“起来
三维风场可视化:如何让气象数据在数字地球上"流动"起来 【免费下载链接】cesium-wind wind layer of cesium 项目地址: https://gitcode.com/gh_mirrors/ce/cesium-wind 在气象学与地理信息系统的交叉领域,有一个令人着迷的技术挑战&am…...
 | 《YOLOv12实战:从入门到深度优化》专栏导读与完整目录导航(持续更新中))
置顶必读(1) | 《YOLOv12实战:从入门到深度优化》专栏导读与完整目录导航(持续更新中)
🏆 本文收录于 《YOLOv12实战:从入门到深度优化》 专栏。 本专栏系统梳理并持续复现 YOLOv12 官方特性、Attention-Centric 架构、R-ELAN、Area Attention 等核心创新,内容坚持 严格贴合官方文档 深度原理拆解 工程落地导向,不仅…...
保姆级配置指南)
别再为Keil的printf发愁了!三种方法(含MicroLIB和半主机)保姆级配置指南
Keil环境下printf调试全攻略:从MicroLIB到自定义实现的深度解析 第一次在Keil MDK中尝试使用printf函数输出调试信息时,那种期待与现实的落差感至今记忆犹新。编译通过,程序运行,但串口助手却一片空白——这几乎是每个嵌入式开发者…...

【2025必学核心能力】:PHP 8.9 Error Handling精准管控——ZEND引擎级错误分流技术首次公开
更多请点击: https://intelliparadigm.com 第一章:PHP 8.9错误处理范式革命:从全局捕获到ZEND级精准分流 PHP 8.9 引入了全新的 zend_error_dispatcher 机制,允许开发者在 Zend Engine 层直接注册错误分流回调,绕过传…...

芬兰语NLP基准测试FinBench v2的技术解析与应用
1. 芬兰语NLP基准测试概述自然语言处理(NLP)基准测试是评估模型性能的关键工具,特别是在低资源语言场景下。芬兰语作为乌拉尔语系的代表语言,其复杂的语法结构和丰富的形态变化为NLP研究提供了独特挑战。FinBench v2是目前最全面的芬兰语评估套件&#x…...

HaoMD:基于Tauri 2与AI的下一代高性能Markdown编辑器深度解析
1. 项目概述:为什么我们需要另一个Markdown编辑器? 如果你和我一样,是个常年与文字、代码和文档打交道的人,那么你的电脑里大概率已经躺了好几个Markdown编辑器:可能是轻量级的Typora,功能强大的VS Code&a…...

【Tidyverse 2.0性能革命】:3大底层引擎升级如何让自动化报告提速470%?
更多请点击: https://intelliparadigm.com 第一章:Tidyverse 2.0性能革命的全景认知 Tidyverse 2.0 并非简单版本迭代,而是一场以底层引擎重构为核心的性能范式跃迁。其核心驱动力来自 vctrs 0.6 与 pillar 1.9 的深度协同,以及 …...
)
构建生产级AI聊天机器人:PHP 9.0异步HTTP/2流式调用OpenAI + 自研RAG缓存层(仅需23行核心代码)
更多请点击: https://intelliparadigm.com 第一章:PHP 9.0异步编程与AI聊天机器人高级开发技巧 PHP 9.0 引入了原生协程(Native Coroutines)与 async/await 语法支持,彻底重构了异步 I/O 模型。开发者无需依赖 ReactP…...