SpringBoot——嵌入式 Servlet容器
一、如何定制和修改Servlet容器的相关配置
前言: SpringBoot在Web环境下,默认使用的是Tomact作为嵌入式的Servlet容器;

【1】修改和server相关的配置(ServerProperties实现了EmbeddedServletContainerCustomizer)例如:修改端口号
#通用的Servlet容器设置:修改端口号
server:port: 8081tomcat:  #设置Tomact的相关属性,例如编码格式uri-encoding: utf-8
☞ 我们也可以进入port所属的对象中,发现其他可修改的参数等等,如下:
@ConfigurationProperties(prefix = "server",ignoreUnknownFields = true
)
public class ServerProperties implements EmbeddedServletContainerCustomizer, EnvironmentAware, Ordered {private Integer port;private InetAddress address;private String contextPath;private String displayName = "application";......
【2】编写一个EmbeddedServletContainerCustomizer:嵌入式的 Servlet容器的定制器,来修改 Servlet容器的配置。其实1中的 ServerProperties也是实现了 EmbeddedServletContainerCustomizer。xxxCustomizer 帮组我们进行定制配置。
@Configuration
public class MyMvcConfig extends WebMvcConfigurerAdapter {@Beanpublic EmbeddedServletContainerCustomizer embeddedServletContainerCustomizer(){return new EmbeddedServletContainerCustomizer() {@Overridepublic void customize(ConfigurableEmbeddedServletContainer container) {container.setPort(8082);}};}
二、注册Servlet三大组件【Servlet、Filter、Listener】
由于SpringBoot默认是以 jar包的方式启动嵌入的Servlet容器来启动SpringBoot的web应用,没有web.xml文件。注册三大组件的方式如下:
【1】通过 ServletRegistrationBean注册自定义的Servlet。
//首先创建一个Servlet
public class MyServlet extends HttpServlet {@Overrideprotected void doGet(HttpServletRequest req, HttpServletResponse resp) throws ServletException, IOException {super.doGet(req, resp);}@Overrideprotected void doPost(HttpServletRequest req, HttpServletResponse resp) throws ServletException, IOException {resp.getWriter().write("Hello MyServlet");super.doPost(req, resp);}
}//将创建的Servlet通过配置类注入到容器中,两个是不同的类。
@Configuration
public class MyMvcConfig extends WebMvcConfigurerAdapter {@Beanpublic ServletRegistrationBean myServlet(){ServletRegistrationBean registrationBean = new ServletRegistrationBean(new MyServlet(), "/myServlet");return registrationBean;}
【2】通过 FilterRegistrationBean 注册拦截器 Filter。
//自定义一个filter实现servlet.Filter接口
public class myFilter implements Filter {@Overridepublic void init(FilterConfig filterConfig) throws ServletException {}@Overridepublic void doFilter(ServletRequest servletRequest, ServletResponse servletResponse, FilterChain filterChain) throws IOException, ServletException {System.out.printf("myFilter");filterChain.doFilter(servletRequest,servletResponse);}@Overridepublic void destroy() {}
}//通过配置类注入自定义的Filter
@Configuration
public class MyMvcConfig extends WebMvcConfigurerAdapter {@Beanpublic FilterRegistrationBean myFilter(){FilterRegistrationBean registrationBean = new FilterRegistrationBean();registrationBean.setFilter(new myFilter());registrationBean.setUrlPatterns(Arrays.asList("/hello","/myFilter"));return registrationBean;}
【3】通过`ServletListenerRegistrationBean`注册自定义的`Listener`。
```java
//创建自定义的Listener监听
public class myListener implements ServletContextListener {@Overridepublic void contextInitialized(ServletContextEvent servletContextEvent) {System.out.printf("服务启动");}@Overridepublic void contextDestroyed(ServletContextEvent servletContextEvent) {System.out.printf("服务销毁");}
}//通过配置类注入自定义的listener
@Configuration
public class MyMvcConfig extends WebMvcConfigurerAdapter {public ServletListenerRegistrationBean myListener(){ServletListenerRegistrationBean<MyListener> servletListenerRegistrationBean = new ServletListenerRegistrationBean<>(new MyListener());return servletListenerRegistrationBean;}
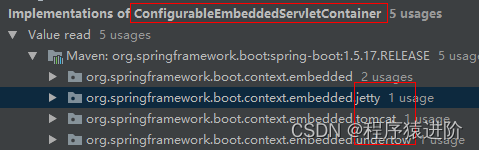
三、使用其他 Servlet容器:Jetty(长连接引用)、Undertow(不支持JSP)
【1】我们在定制嵌入式的Servlet容器时,会传入ConfigurableEmbeddedServletContainer类,我们通过Ctrl+T查看此可配置嵌入式类容器中可以配置Tomcat、Jetty和Undertow。
//ConfigurableEmbeddedServletContainer
@Bean
public EmbeddedServletContainerCustomizer embeddedServletContainerCustomizer(){return new EmbeddedServletContainerCustomizer() {@Overridepublic void customize(ConfigurableEmbeddedServletContainer container) {container.setPort(8082);}};
}
【2】默认使用Tomcat,因为starter-web引入的是Tomcat的starter。我们排除Tomcat的依赖,引入Jetty的依赖即可。
<dependency><groupId>org.springframework.boot</groupId><artifactId>spring-boot-starter-web</artifactId><exclusions><exclusion><artifactId>spring-boot-starter-tomcat</artifactId><groupId>org.springframework.boot</groupId></exclusion></exclusions>
</dependency><dependency><artifactId>spring-boot-starter-Jetty</artifactId><groupId>org.springframework.boot</groupId>
</dependency>
四、嵌入式 Servlet容器自动配置原理
【1】EmbeddedServletContainerAutoConfiguration类主要用来自动配置嵌入式的Servlet容器。
@AutoConfigureOrder(-2147483648)
@Configuration
@ConditionalOnWebApplication//导入BeanPostProcessorsRegistrar:后置处理器:在bean初始化前后,执行(刚创建完对象,还没属性赋值)初始化工作.//给容器中导入一些组件,导入了embeddedServletContainerCustomizerBeanPostProcessor
@Import({EmbeddedServletContainerAutoConfiguration.BeanPostProcessorsRegistrar.class})
public class EmbeddedServletContainerAutoConfiguration {@Configuration@ConditionalOnClass({Servlet.class, Tomcat.class})//判断当前Servlet中是否引入的Tomcat依赖@ConditionalOnMissingBean(value = {EmbeddedServletContainerFactory.class},search = SearchStrategy.CURRENT)//判断当前容器中,没有用户自定义的EmbeddedServletContainerFactory嵌入式的Servlet容器工厂,//作用:创建嵌入式的servlet容器。public static class EmbeddedTomcat {public EmbeddedTomcat() {}@Beanpublic TomcatEmbeddedServletContainerFactory tomcatEmbeddedServletContainerFactory() {return new TomcatEmbeddedServletContainerFactory();}}@Configuration@ConditionalOnClass({Servlet.class, Undertow.class, SslClientAuthMode.class})@ConditionalOnMissingBean(value = {EmbeddedServletContainerFactory.class},search = SearchStrategy.CURRENT)public static class EmbeddedUndertow {public EmbeddedUndertow() {}@Beanpublic UndertowEmbeddedServletContainerFactory undertowEmbeddedServletContainerFactory() {return new UndertowEmbeddedServletContainerFactory();}}@Configuration@ConditionalOnClass({Servlet.class, Server.class, Loader.class, WebAppContext.class})@ConditionalOnMissingBean(value = {EmbeddedServletContainerFactory.class},search = SearchStrategy.CURRENT)public static class EmbeddedJetty {public EmbeddedJetty() {}@Beanpublic JettyEmbeddedServletContainerFactory jettyEmbeddedServletContainerFactory() {return new JettyEmbeddedServletContainerFactory();}}
}
【2】嵌入式的容器工厂:EmbeddedServletContainerFactory,用来创建嵌入式的Servlet容器。
public interface EmbeddedServletContainerFactory {//获取嵌入式的Servlet容器EmbeddedServletContainer getEmbeddedServletContainer(ServletContextInitializer... var1);
}
☛ SpringBoot 再带了三种嵌入式的容器工厂,如下:

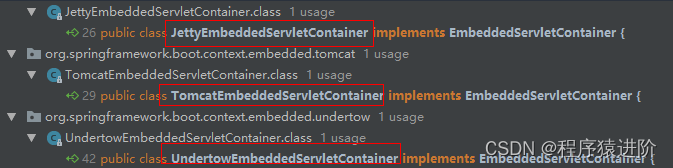
【3】EmbeddedServletContainer:嵌入式的容器,SpringBoot 为我们提供了三种不同的嵌入式容器,与工厂相互对应,如下:
【4】我们进入工厂类 TomcatEmbeddedServletContainerFactory发现,其实也是创建一个 Tomcat并配置其基本属性。
public EmbeddedServletContainer getEmbeddedServletContainer(ServletContextInitializer... initializers) {//创建TomcatTomcat tomcat = new Tomcat();//配置Tomcat的基本环境File baseDir = this.baseDirectory != null?this.baseDirectory:this.createTempDir("tomcat");tomcat.setBaseDir(baseDir.getAbsolutePath());Connector connector = new Connector(this.protocol);tomcat.getService().addConnector(connector);this.customizeConnector(connector);tomcat.setConnector(connector);tomcat.getHost().setAutoDeploy(false);this.configureEngine(tomcat.getEngine());Iterator var5 = this.additionalTomcatConnectors.iterator();while(var5.hasNext()) {Connector additionalConnector = (Connector)var5.next();tomcat.getService().addConnector(additionalConnector);}this.prepareContext(tomcat.getHost(), initializers);//将配置好的Tomcat传入,并启动Tomcat,Tomcat.start()return this.getTomcatEmbeddedServletContainer(tomcat);
}
【5】用户自定义的Servlet容器配置类和SpringBoot默认的ServerProperties配置类,都实现了EmbeddedServletContainerCustomizer接口。到底是怎么实现的哪?其实是SpringBoot自动配置类中引入了后置处理器,如下:
//与用户自定义的Servlet容器实现的接口名很类似,有一定的命名规则。
embeddedServletContainerCustomizerBeanPostProcessor
☛ 进入后置处理器类中,重点看如下代码:
//初始化之前执行
public Object postProcessBeforeInitialization(Object bean, String beanName) throws BeansException {//如果当前初始化的是当前ConfigurableEmbeddedServletContainer类型的组件if(bean instanceof ConfigurableEmbeddedServletContainer) {this.postProcessBeforeInitialization((ConfigurableEmbeddedServletContainer)bean);}return bean;
}//上面的postProcessBeforeInitialization方法:
private void postProcessBeforeInitialization(ConfigurableEmbeddedServletContainer bean) {Iterator var2 = this.getCustomizers().iterator();while(var2.hasNext()) {//获取所有的定制器,调用每一个定制器的customize方法来给servlet属性赋值。EmbeddedServletContainerCustomizer customizer = (EmbeddedServletContainerCustomizer)var2.next();customizer.customize(bean);}private Collection<EmbeddedServletContainerCustomizer> getCustomizers() {if(this.customizers == null) {//this.beanFactory.xx表示从容器中获取XXCustomizer自定义类型的组件this.customizers = new ArrayList(this.beanFactory.getBeansOfType(EmbeddedServletContainerCustomizer.class, false, false).values());Collections.sort(this.customizers, AnnotationAwareOrderComparator.INSTANCE);this.customizers = Collections.unmodifiableList(this.customizers);}return this.customizers;
}
整理下步骤:
【1】SpringBoot根据pom.xml中导入的依赖,给容器中添加其对应的嵌入式的服务容器工厂类,例如默认的Tomcat工厂:EmbeddedServletContainerFactory【TomcatEmbeddedServletContainerFactory】
【2】给容器中某个组件要创建对象就会触发后置处理器EmbeddedServletContainerCustomizerBeanPostProcessor,只要是嵌入式的Servlet容器工厂,后置处理器就会工作(默认的ServerProperties也是实现了此类接口的,所以肯定存在相关配置类)
【3】后置处理器从容器中获取所有的EmbeddedServletContainerCustomizer,调用定制器的定制方法。
五、嵌入式Servlet容器启动原理
根据上述的流程,我们要研究Servlet容器的启动原理。其实就是研究什么时候创建嵌入式的容器工厂和何时获取嵌入式的容器并启动Tomcat。获取嵌入式的Servlet容器工厂的过程(在new TomcatEmbeddedServletContainerFactory()时打一个断电,查看过程):
【1】SpringBoot 应用启动运行 run() 方法。
【2】this.refreshContext(context) 方法:用来初始化 IOC容器,既创建 IOC容器对象并初始化IOC容器中的每一个组件。
protected ConfigurableApplicationContext createApplicationContext() {Class<?> contextClass = this.applicationContextClass;if(contextClass == null) {try {//判断是不是web环境,是Web环境引入AnnotationConfigEmbeddedWebApplicationContext,否则引入AnnotationConfigApplicationContextcontextClass = Class.forName(this.webEnvironment?"org.springframework.boot.context.embedded.AnnotationConfigEmbeddedWebApplicationContext":"org.springframework.context.annotation.AnnotationConfigApplicationContext");} catch (ClassNotFoundException var3) {throw new IllegalStateException("Unable create a default ApplicationContext, please specify an ApplicationContextClass", var3);}}return (ConfigurableApplicationContext)BeanUtils.instantiate(contextClass);
}
【3】this.refresh(context):刷新刚才创建好的IOC容器。
【4】this.onRefresh():web的IoC容器重写了onRefresh()方法。
protected void onRefresh() {super.onRefresh();try {//重点是创建了嵌入式的Servlet容器this.createEmbeddedServletContainer();} catch (Throwable var2) {throw new ApplicationContextException("Unable to start embedded container", var2);}
}
【5】this.createEmbeddedServletContainer():web的IOC容器会创建嵌入式的Servlet容器。
private void createEmbeddedServletContainer() {EmbeddedServletContainer localContainer = this.embeddedServletContainer;ServletContext localServletContext = this.getServletContext();if(localContainer == null && localServletContext == null) {// 1、获取嵌入式的Servlet嵌入式的工厂EmbeddedServletContainerFactory containerFactory = this.getEmbeddedServletContainerFactory();this.embeddedServletContainer = containerFactory.getEmbeddedServletContainer(new ServletContextInitializer[]{this.getSelfInitializer()});}
}
【6】获取嵌入式工厂后,便可从容器中获取EmbeddedServletContainerFactory的组件tomcatEmbeddedServletContainerFactory来创建Tomcat对象,后置处理器就会触发获取所有的定制器来确定Servlet容器的相关配置。
【7】通过嵌入式工厂获取嵌入式容器,如下:
this.embeddedServletContainer = containerFactory.getEmbeddedServletContainer(new ServletContextInitializer[]{this.getSelfInitializer()});
● 嵌入式的Servlet容器创建并启动对象:
public EmbeddedServletContainer getEmbeddedServletContainer(ServletContextInitializer... initializers) {//创建对象Tomcat tomcat = new Tomcat();//启动对象this.tomcat.start();
● 先启动嵌入式的Servlet容器,再将IOC容器中剩下没有创建的对象进行初始化,如下:
    this.onRefresh();//启动完嵌入式容器后,后续还有其他对象的初始化工作this.registerListeners();this.finishBeanFactoryInitialization(beanFactory);this.finishRefresh();
} catch (BeansException var9) {
六、使用外置的Servlet容器
嵌入式Servlet容器的缺点: 默认不支持JSP、优化和定制比较复杂。外置Servlet容器:安装外部的Tomcat,步骤如下:
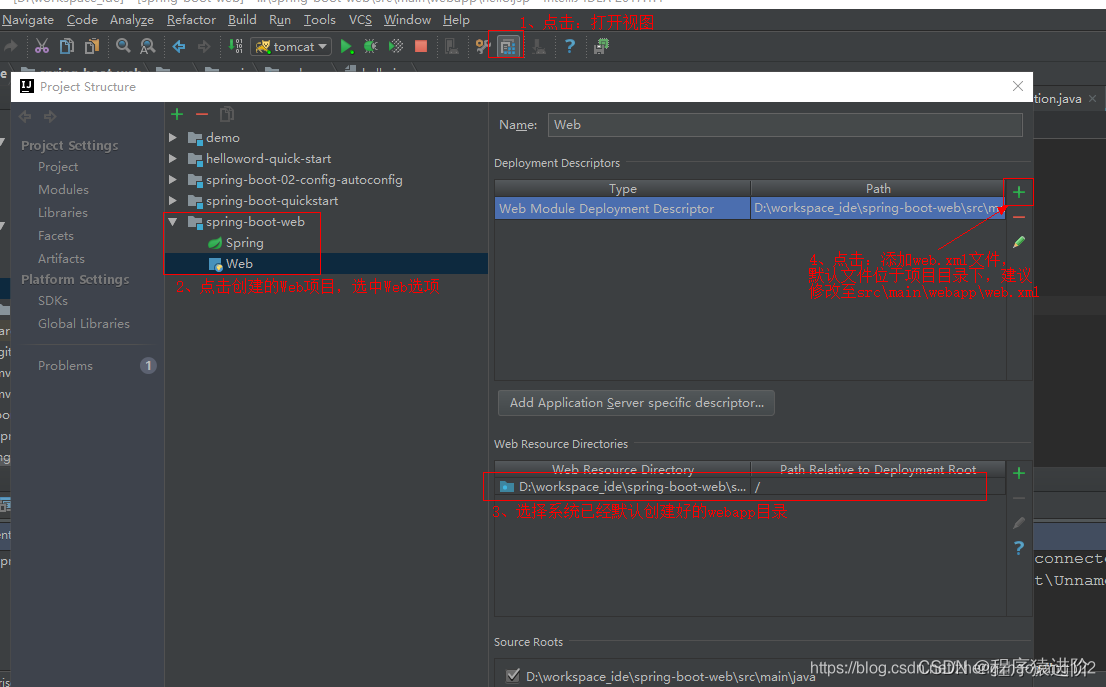
1)、必须创建一个war项目,需要手动创建目录(利用Idea快速创建)如下:
2)、将嵌入式的Tomcat指定为provide(Idea创建完后,会自动帮我们完成,但我们需要了解)
<dependency><groupId>org.springframework.boot</groupId><artifactId>spring-boot-starter-tomcat</artifactId><scope>provided</scope>
</dependency>
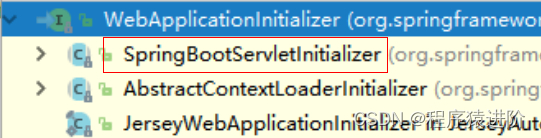
3)、需要编写一个SpringBootServletInitializer的子类,并调用configure方法:
public class ServletInitializer extends SpringBootServletInitializer {@Overrideprotected SpringApplicationBuilder configure(SpringApplicationBuilder application) {return application.sources(SpringBootWebApplication.class);}
}
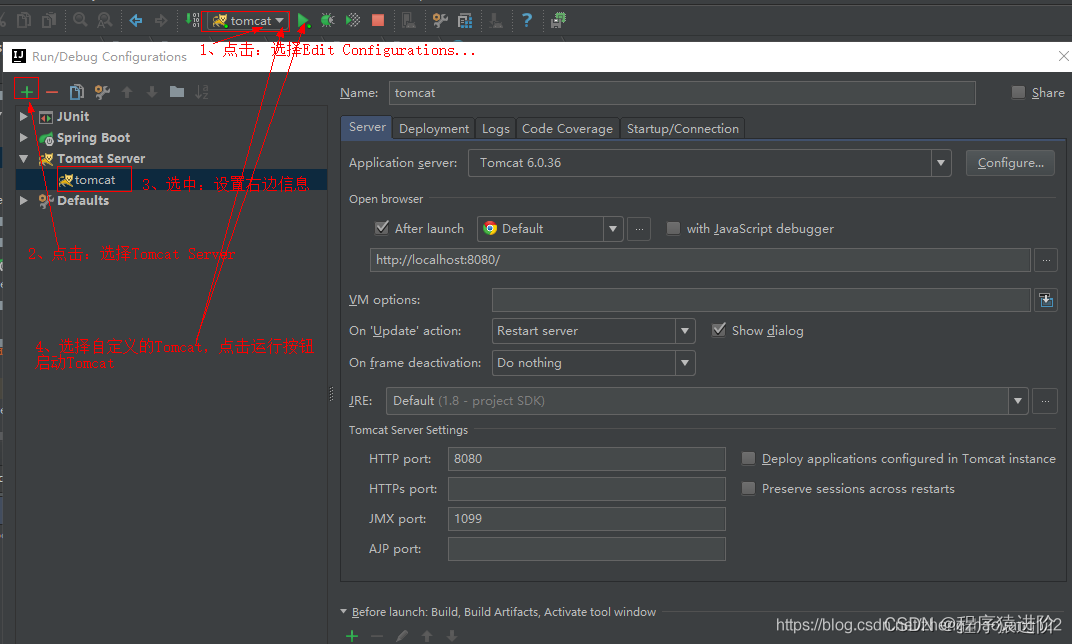
4)、配置本地的Tomcat,并启动Tomcat即可。(此项目运行run()方法是不能启动项目的):需要设置名称和本地Tomcat的路径即可使用外部Servlet。
七、外置服务器的使用原理
☞ jar包:执行SpringBoot主类的main方法,启动并初始化IOC容器且创建嵌入式的Servlet容器。
☞ war包:启动服务器后调用SpringBootServletInitializer中的configure()方法,加载我们的SpringBoot应用并启动。
Servlet3.0规则:
1)、服务器启动后,会创建当前web应用中包含的每个jar内的ServletContainerInitializer实例。
2)、ServletContainerInitializer的实现放在jar包的META-INF/services文件夹下(javax.servlet.ServletContainerInitializer:内容就是ServletContainerInitializer的全类名)
3)、可以使用@handlesTypes注解,在应用启动时加载我们需要的类。
流程:
1)、启动Tomcat后,获取servlet.ServletContainerInitializer文件如下:其中的内容同下:
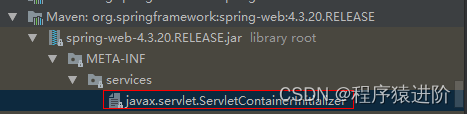
#文件中的内容
org.springframework.web.SpringServletContainerInitializer
2)、进入SpringServletContainerInitializer发现此类将@HandlesTypes({WebApplicationInitializer.class})标注的所有这个类型的类都传入到onStartup方法中的Set<Class<?>>,并为这些类创建实例。
@HandlesTypes({WebApplicationInitializer.class})
public class SpringServletContainerInitializer implements ServletContainerInitializer {//onStartup方法,用来实例化感兴趣的对象public void onStartup(Set<Class<?>> webAppInitializerClasses, ServletContext servletContext) throws ServletException {if(webAppInitializerClasses != null) {var4 = webAppInitializerClasses.iterator();while(var4.hasNext()) {Class<?> waiClass = (Class)var4.next();if(!waiClass.isInterface() && !Modifier.isAbstract(waiClass.getModifiers()) && WebApplicationInitializer.class.isAssignableFrom(waiClass)) {try {//实例化initializers.add((WebApplicationInitializer)waiClass.newInstance());} catch (Throwable var7) {throw new ServletException("Failed to instantiate WebApplicationInitializer class", var7);}}}}
3)、每一个WebApplicationInitializer都调用自己的onStartup()方法。
while(var4.hasNext()) {WebApplicationInitializer initializer = (WebApplicationInitializer)var4.next();//onStartup()方法initializer.onStartup(servletContext);}
4)、WebApplicationInitializer只是一个接口,其实现类主要有以下三个:SpringBootServletInitalizer正是SpringBoot给我们创建好的启动类,会被创建对象,并启动自身的onStartup()方法。
5)、执行onStartup()方法时,会调用createRootApplicationContext()方法来创建容器
public void onStartup(ServletContext servletContext) throws ServletException {this.logger = LogFactory.getLog(this.getClass());//创建容器WebApplicationContext rootAppContext = this.createRootApplicationContext(servletContext);if(rootAppContext != null) {servletContext.addListener(new ContextLoaderListener(rootAppContext) {public void contextInitialized(ServletContextEvent event) {}});//容器的具体调用实现protected WebApplicationContext createRootApplicationContext(ServletContext servletContext) {//创建Spring应用的构建器SpringApplicationBuilder builder = this.createSpringApplicationBuilder();//设置主类builder.main(this.getClass());//创建一些环境ApplicationContext parent = this.getExistingRootWebApplicationContext(servletContext);if(parent != null) {this.logger.info("Root context already created (using as parent).");servletContext.setAttribute(WebApplicationContext.ROOT_WEB_APPLICATION_CONTEXT_ATTRIBUTE, (Object)null);builder.initializers(new ApplicationContextInitializer[]{new ParentContextApplicationContextInitializer(parent)});}builder.initializers(new ApplicationContextInitializer[]{new ServletContextApplicationContextInitializer(servletContext)});builder.contextClass(AnnotationConfigServletWebServerApplicationContext.class);//重要:子类中重写了此方法,子类出入了应用的主程序类builder = this.configure(builder);builder.listeners(new ApplicationListener[]{new SpringBootServletInitializer.WebEnvironmentPropertySourceInitializer(servletContext, null)});//使用build()创建一个Spring应用SpringApplication application = builder.build();if(application.getAllSources().isEmpty() && AnnotationUtils.findAnnotation(this.getClass(), Configuration.class) != null) {application.addPrimarySources(Collections.singleton(this.getClass()));}Assert.state(!application.getAllSources().isEmpty(), "No SpringApplication sources have been defined. Either override the configure method or add an @Configuration annotation");if(this.registerErrorPageFilter) {application.addPrimarySources(Collections.singleton(ErrorPageFilterConfiguration.class));}//启动应用return this.run(application);}
6)、执行应用的run()方法,来启动Spring应用并创建IOC容器。
public ConfigurableApplicationContext run(String... args) {StopWatch stopWatch = new StopWatch();stopWatch.start();ConfigurableApplicationContext context = null;Collection<SpringBootExceptionReporter> exceptionReporters = new ArrayList();this.configureHeadlessProperty();SpringApplicationRunListeners listeners = this.getRunListeners(args);listeners.starting();Collection exceptionReporters;try {ApplicationArguments applicationArguments = new DefaultApplicationArguments(args);ConfigurableEnvironment environment = this.prepareEnvironment(listeners, applicationArguments);this.configureIgnoreBeanInfo(environment);Banner printedBanner = this.printBanner(environment);context = this.createApplicationContext();exceptionReporters = this.getSpringFactoriesInstances(SpringBootExceptionReporter.class, new Class[]{ConfigurableApplicationContext.class}, new Object[]{context});this.prepareContext(context, environment, listeners, applicationArguments, printedBanner);//刷新IOC容器this.refreshContext(context);this.afterRefresh(context, applicationArguments);stopWatch.stop();if(this.logStartupInfo) {(new StartupInfoLogger(this.mainApplicationClass)).logStarted(this.getApplicationLog(), stopWatch);}listeners.started(context);this.callRunners(context, applicationArguments);} catch (Throwable var10) {this.handleRunFailure(context, var10, exceptionReporters, listeners);throw new IllegalStateException(var10);}try {listeners.running(context);return context;} catch (Throwable var9) {this.handleRunFailure(context, var9, exceptionReporters, (SpringApplicationRunListeners)null);throw new IllegalStateException(var9);}
}
相关文章:
SpringBoot——嵌入式 Servlet容器
一、如何定制和修改Servlet容器的相关配置 前言: SpringBoot在Web环境下,默认使用的是Tomact作为嵌入式的Servlet容器; 【1】修改和server相关的配置(ServerProperties实现了EmbeddedServletContainerCustomizer)例如…...

王炸升级!PartyRock 10分钟构建 AI 应用
前言 一年一度的亚马逊云科技的 re:Invent 可谓是全球云计算、科技圈的狂欢,每次都能带来一些最前沿的方向标,这次也不例外。在看完一些 keynote 和介绍之后,我也去亲自体验了一些最近发布的内容。其中让我感受最深刻的无疑是 PartyRock 了。…...
文件管理和操作工具Path Finder mac功能介绍
Path Finder mac是一款Mac平台上的文件管理和操作工具,提供了比Finder更丰富的功能和更直观的用户界面。它可以帮助用户更高效地浏览、复制、移动、删除和管理文件,以及进行各种高级操作。 Path Finder mac软件功能 - 文件浏览:可以快速浏览文…...

转换 pytorch 格式模型为 caffe格式模型 pth2caffemodel
基于 GitHub xxradon/PytorchToCaffe 源码,修改 example\resnet_pytorch_2_caffe.py 如下 import os import sys sys.path.insert(0, .)import torch from torch.autograd import Variable from torchvision.models import resnet import pytorch_to_caffe"&q…...
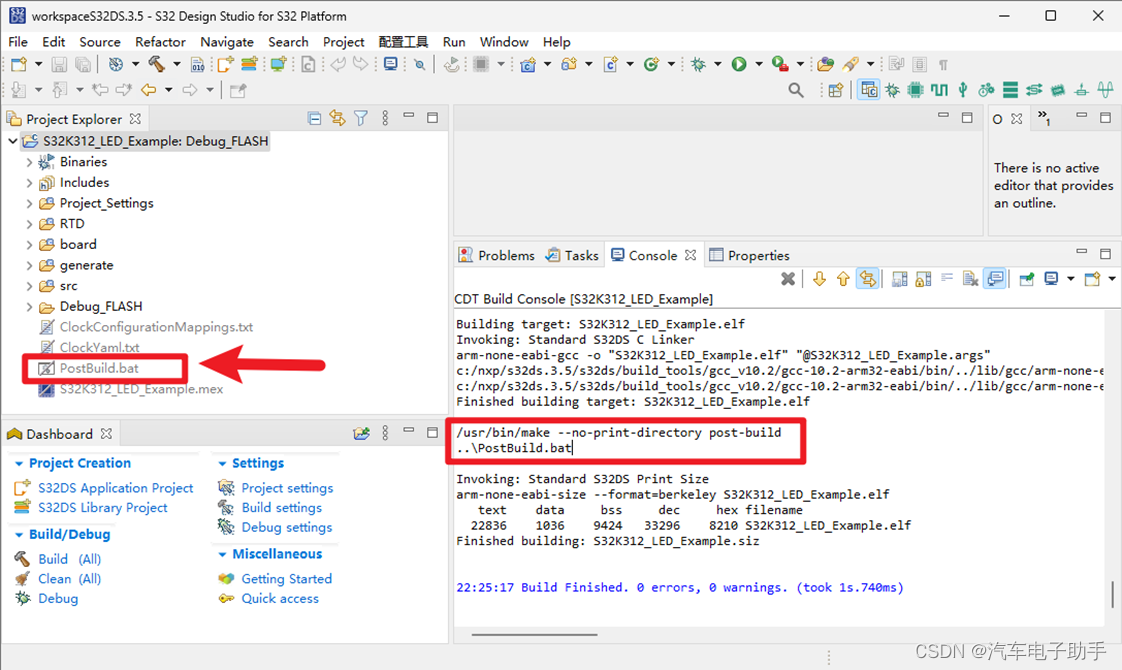
【S32DS RTD实战】-1.3-S32K3工程生成S19,BIN,Hex文件,以及Post-build steps的妙用
目录 1 方法一:逐个生成Motorola S-record(s19,srec…),Intel HEX,Bin文件 1.1 生成Motorola S-record(s19,srec…)文件 1.2 生成Intel HEX文件 1.3 生成Bin文件 2 …...

Java工程找不到javax.xml.bind.annotation包
文章目录 问题解决方法参考 问题 最近Java工程找不到javax.xml.bind.annotation包,进行了解决。 解决方法 参考 stackoverflow: package javax.xml.bind.annotation does not exist error javax.xml.bind这个库从Java 11版本就被移除了,缺失了这个包…...

【C语言】网络字节序和主机字节序
网络字节序和主机字节序是计算机中字节的两种排序方式,它们主要用于解决不同计算机之间数据通信的问题。 一、网络字节序 也被称为大端字节序,是一种标准的字节序。在网络通信中,如果两台主机的字节序不同,可能会导致数据解释的二…...
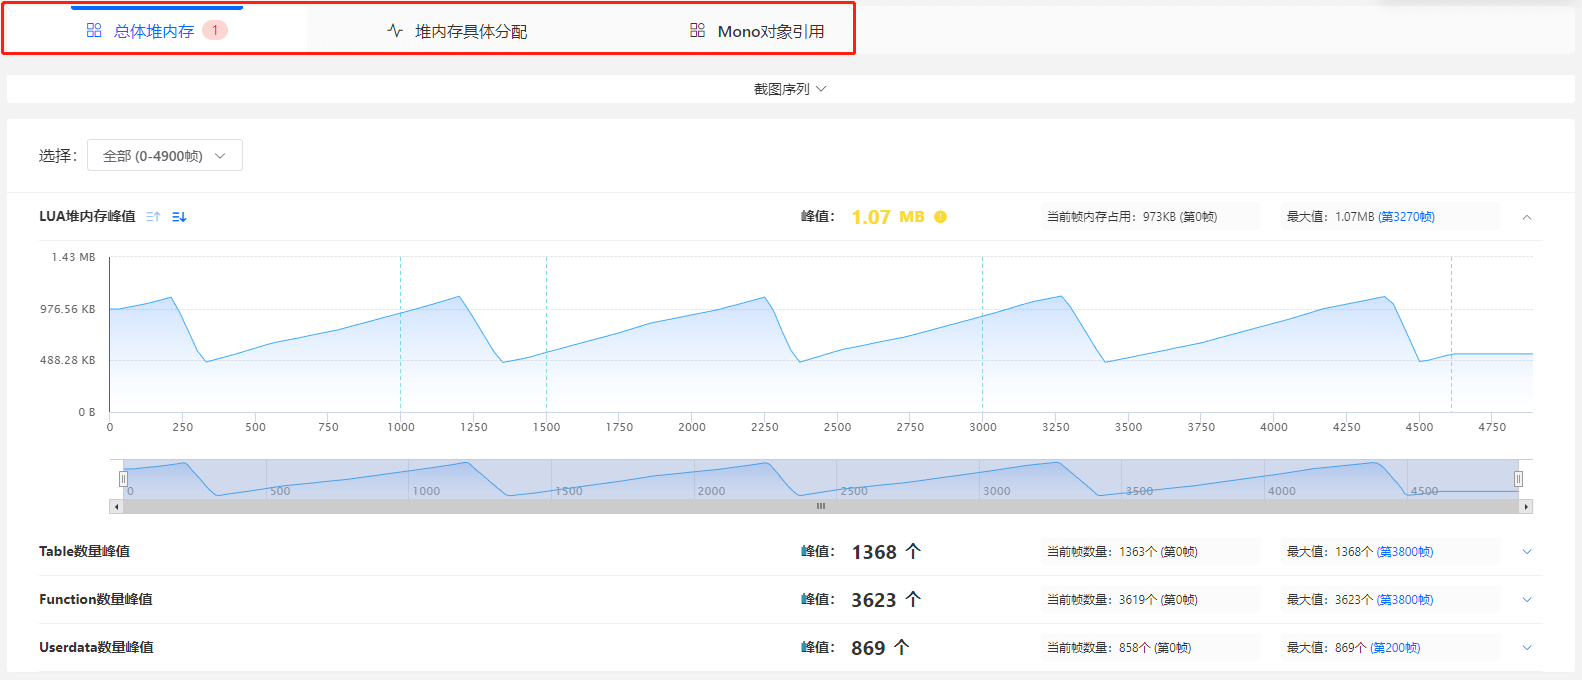
极简模式,助力宏观数据监控
随着UWA GOT Online采样的参数越来越多样化,为了提升开发者的使用体验,我们最新推出了三种预设数据采集方案:极简模式、CPU模式、内存模式。该更新旨在降低多数据采集对数据准确性的干扰,同时也为大家提供更精准且有针对性的数据指…...
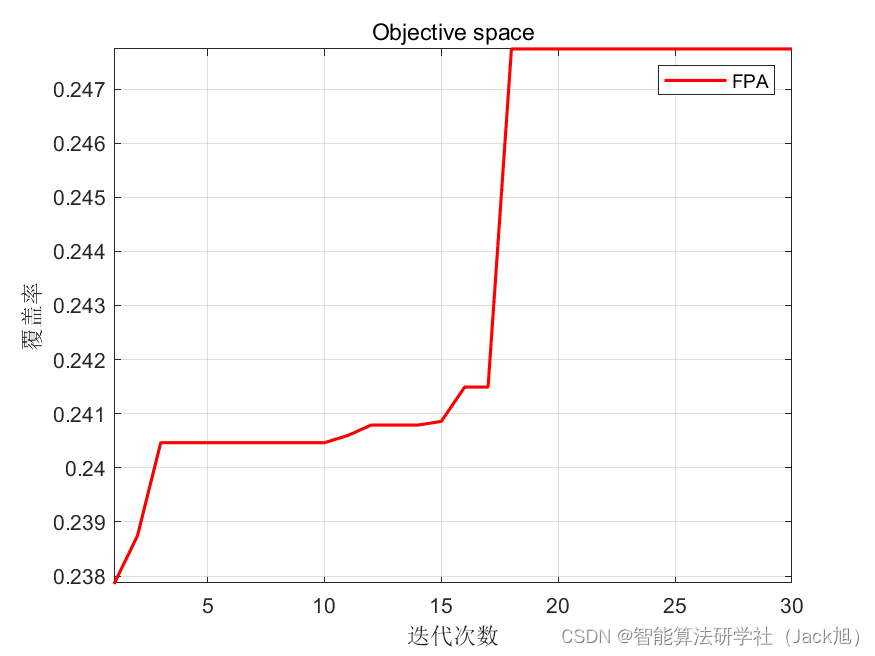
智能优化算法应用:基于花授粉算法3D无线传感器网络(WSN)覆盖优化 - 附代码
智能优化算法应用:基于花授粉算法3D无线传感器网络(WSN)覆盖优化 - 附代码 文章目录 智能优化算法应用:基于花授粉算法3D无线传感器网络(WSN)覆盖优化 - 附代码1.无线传感网络节点模型2.覆盖数学模型及分析3.花授粉算法4.实验参数设定5.算法结果6.参考文…...
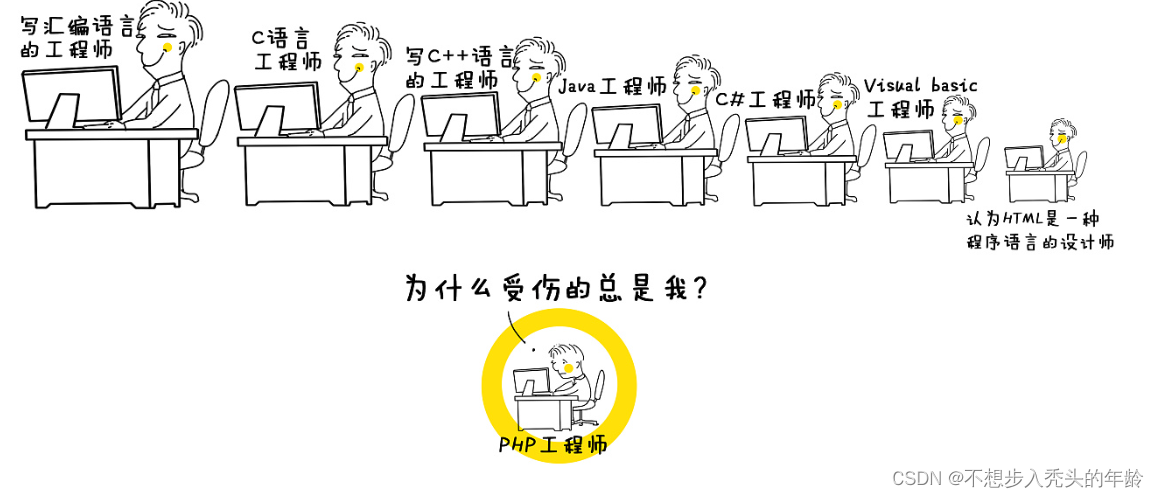
IT圈的“鄙视链”大揭秘:从Java到Go,编程语言之战!
目录 编辑 Java程序员: 自信满满的领头羊 C语言程序员: 严肃的技术守护者 汇编语言程序员: 古老的传承者 Go语言程序员: 新晋的潜力股 结语: 编程语言,相互鄙视中求共存 我的其他博客 在IT圈…...
)
【C++】算法库(复制操作、交换操作、变换操作)
C算法库 文章目录 C算法库复制操作copy , copy_ifcopy_ncopy_backward 交换操作swapswap_rangesiter_swap 变换操作transformreplacereplace_copy replace_copy_if 算法库提供大量用途的函数(例如查找、排序、计数、操作),它们在元素范围上操…...
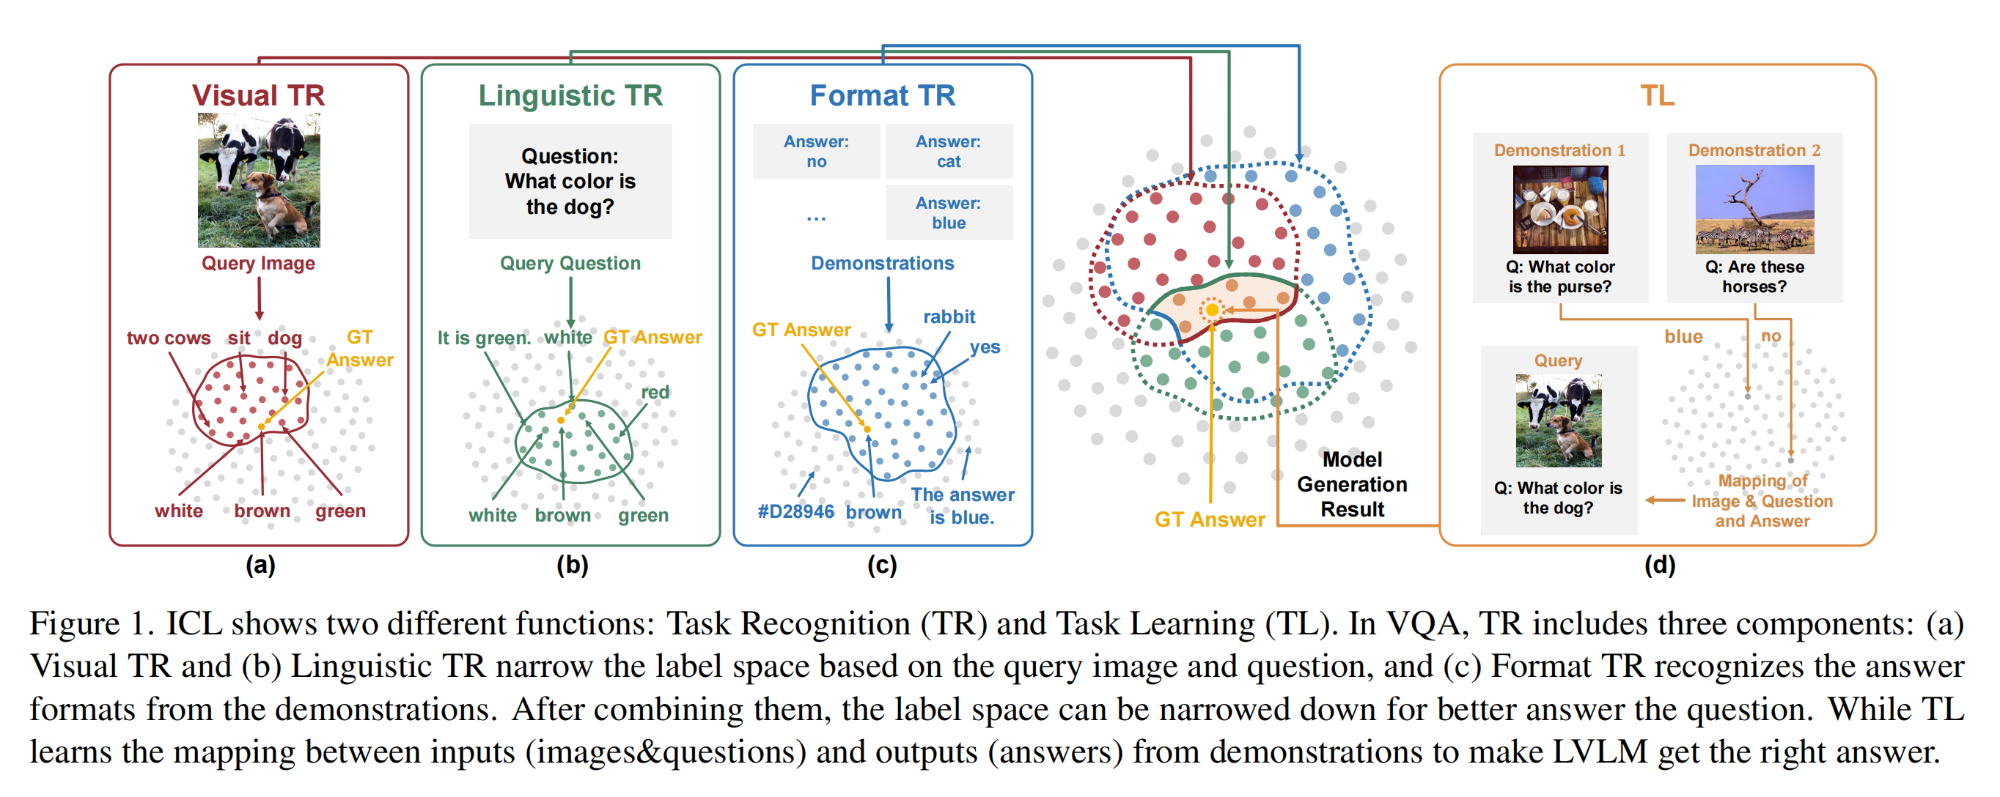
CV计算机视觉每日开源代码Paper with code速览-2023.12.6
点击计算机视觉,关注更多CV干货 论文已打包,点击进入—>下载界面 点击加入—>CV计算机视觉交流群 1.【基础网络架构:Transformer】Rejuvenating image-GPT as Strong Visual Representation Learners 论文地址:https://a…...
)
面试经典150题(1-2)
leetcode 150道题 计划花两个月时候刷完,今天完成了两道(1-2)150: (88. 合并两个有序数组)题目描述: 给你两个按 非递减顺序 排列的整数数组 nums1 和 nums2,另有两个整数 m 和 n ,分别表示 n…...
MySQL使用教程
数据构成了我们日益数字化的社会基础。想象一下,从移动应用和银行系统到搜索引擎,再到如 ChatGPT 这样的先进人工智能聊天机器人,这些工具若没有数据支撑,将寸步难行。你有没有好奇过这些海量数据都存放在哪里呢?答案正…...

微服务学习:Ribbon实现客户端负载均衡,将请求分发到多个服务提供者
Ribbon是Netflix开源的一个基于HTTP和TCP客户端负载均衡器。它主要用于在微服务架构中实现客户端负载均衡,将请求分发到多个服务提供者上,从而实现高可用性和扩展性。 Ribbon的主要特点包括: 客户端负载均衡:Ribbon是一个客户端负…...
孩子还是有一颗网安梦——Bandit通关教程:Level0
🕵️♂️ 专栏《解密游戏-Bandit》 🌐 游戏官网: Bandit游戏 🎮 游戏简介: Bandit游戏专为网络安全初学者设计,通过一系列级别挑战玩家,从Level0开始,逐步学习基础命令行和安全概念…...

读excel文件,借助openpyxl工具
读excel文件,借助openpyxl工具 import osimport requestsos.environ["http_proxy"] "http://127.0.0.1:7890" os.environ["https_proxy"] "http://127.0.0.1:7890"base_url "https://testnet.starscan.io/explore…...

ubuntu16.04升级openssl
Ubuntu16.04 默认带的openssl版本为1.0.2 查看:openssl version 1.下载openssl wget https://www.openssl.org/source/openssl-1.1.1.tar.gz 编译安装 tar xvf openssl-1.1.1.tar.gz cd openssl-1.1.1 ./config make sudo make install sudo ldconfig 删除旧版本 su…...

【力扣100】56.合并区间
添加链接描述 class Solution:def merge(self, intervals: List[List[int]]) -> List[List[int]]:# 队列,每次加进来两个元素:1.不包含:第一个元素出去,并放入result;2.包含:合并nlen(intervals)result…...

重磅!2023中国高校计算机大赛-人工智能创意赛结果出炉
目录 中国计算机大赛-人工智能创意赛现场C4-AI大赛颁奖及留影800个AI应用?这届大学生真能“搞事情”AI原生时代,百度要再培养500万大模型人才 中国计算机大赛-人工智能创意赛现场 12月8日,杭州,一位“白发老人”突然摔倒在地&…...

18年产品经理生涯精华:从交付到规划,项目管理、解决方案、业务理解深度解析!
本期访谈只有1位老师,大海老师,18年工作经验,从干交付,到项目管理,再到资深技术专家、解决方案专家,目前做的更多的是业务规划、产品规划,是从一线实战走到真正的专家层面,老师分享的…...

Wan2.2-I2V-A14B多场景应用:文旅宣传/电商主图/社交媒体动态生成
Wan2.2-I2V-A14B多场景应用:文旅宣传/电商主图/社交媒体动态生成 1. 开箱即用的视频创作利器 想象一下,你只需要输入一段文字描述,就能自动生成一段高清视频。这就是Wan2.2-I2V-A14B文生视频模型带来的革命性体验。无论你是文旅行业的宣传人…...
)
终极指南:如何使用Ohm构建JavaScript解释器(10个完整步骤)
终极指南:如何使用Ohm构建JavaScript解释器(10个完整步骤) 【免费下载链接】ohm A library and language for building parsers, interpreters, compilers, etc. 项目地址: https://gitcode.com/gh_mirrors/oh/ohm Ohm是一个强大的解析…...

革命性WebAssembly运行时wasmer-go:让Go语言轻松运行WebAssembly模块
革命性WebAssembly运行时wasmer-go:让Go语言轻松运行WebAssembly模块 【免费下载链接】wasmer-go 🐹🕸️ WebAssembly runtime for Go 项目地址: https://gitcode.com/gh_mirrors/wa/wasmer-go wasmer-go是一个革命性的WebAssembly运行…...

开源工具Wand-Enhancer功能增强技术解析与实战指南
开源工具Wand-Enhancer功能增强技术解析与实战指南 【免费下载链接】Wand-Enhancer Advanced UX and interoperability extension for Wand (WeMod) app 项目地址: https://gitcode.com/gh_mirrors/we/Wand-Enhancer 一、问题定位:WeMod功能增强的核心挑战 …...

数据科学家稳健统计系列第一部分:稳健的中心趋势度量以及...
原文:towardsdatascience.com/robust-statistics-for-data-scientists-part-1-resilient-measures-of-central-tendency-and-67e5a60b8bf1 https://github.com/OpenDocCN/towardsdatascience-blog-zh-2024/raw/master/docs/img/cf43c75d8b50af4d9c13df54abeccde8.pn…...

面向对象分析模型深入分析
面向对象分析模型深入分析 面向对象分析(Object-Oriented Analysis, OOA)是系统分析师在需求阶段的核心工作方法。它强调从问题域中的客观实体出发,以“对象”为基本单元建立业务模型,而不是从功能或数据流出发。下面从核心概念、三大模型、建模流程到实战案例进行全面解析…...

第 2 章 控制流 知识点精讲
2.1 布尔值核心知识点布尔值是表示真假的两种状态,是控制流的基础。True:表示真、成立、肯定。False:表示假、不成立、否定。关键特性布尔值是 Python 的基本数据类型之一,类型为 bool。它们是关键字,必须大写。在数值…...

OpenClaw+Qwen3-4B创意助手:自动生成营销文案与设计建议
OpenClawQwen3-4B创意助手:自动生成营销文案与设计建议 1. 为什么需要个人创意助手? 去年夏天,我接手了一个小型咖啡品牌的社交媒体运营工作。每天需要产出5-6条不同风格的文案,还要设计配套的视觉方案。连续两周后,…...

重新定义CAD文件格式解析:LibreDWG如何打破专有格式的技术垄断
重新定义CAD文件格式解析:LibreDWG如何打破专有格式的技术垄断 【免费下载链接】libredwg Official mirror of libredwg. With CI hooks and nightly releases. PRs ok 项目地址: https://gitcode.com/gh_mirrors/li/libredwg 在工程设计和建筑行业的数字化转…...