利用Pytorch预训练模型进行图像分类
Use Pre-trained models for Image Classification.
# This post is rectified on the base of https://learnopencv.com/pytorch-for-beginners-image-classification-using-pre-trained-models/# And we have re-orginaized the code script.
预训练模型(Pre-trained models)是在ImageNet等大型基准数据集上训练的神经网络模型。深度学习社区从这些开源模型中受益匪浅。此外,预训练模型也是计算机视觉研究取得快速进展的一个重要因素。其他研究人员和从业人员可以使用这些最先进的模型,而不是从头开始重新训练。
# Here are some examples of classic pre-trained models.

在详细介绍如何使用预训练模型进行图像分类之前,我们先来看看有哪些预训练模型。我们将以 AlexNet 和 ResNet101 为例进行讨论。这两个网络都在 ImageNet 数据集上训练过。
ImageNet 数据集拥有超过 1400 万张由斯坦福大学维护的图像。它被广泛用于各种与图像相关的深度学习项目。这些图像属于不同的类别或标签。预训练模型(如 AlexNet 和 ResNet101)的目的是将图像作为输入并预测其类别。
这里的 "预训练 "是指,深度学习架构 AlexNet 和 ResNet101 已经在某个(庞大的)数据集上进行过训练,因此带有由此产生的权重和偏差。架构与权重和偏置之间的区别应该非常明显,因为我们将在下一节看到,TorchVision 同时拥有架构和预训练模型。
1.1 Model Inference Process
由于我们将重点讨论如何使用预先训练好的模型来预测输入的类别(标签),因此我们也来讨论一下其中涉及的过程。这个过程被称为模型推理。整个过程包括以下主要步骤:
(1) 读取输入图像;
(2) 对图像进行转换;例如resize、center crop、normalization等;
(3) 前向传递:使用预训练的模型权重来获得输出向量,而输出向量中的每个元素都描述了模型对于输入图像属于特定类别的置信度预测结果;
(4) 预测结果:基于获得的置信度分数,显示预测结果。
1.2 Loading Pre-Trained Network using TorchVision
# [Optinal Step]
# %pip install torchvision
# Load necessary packages.
from PIL import Image
import torch
import torchvision
from torchvision import models
from torchvision import transformsprint(torch.__version__)
print(torchvision.__version__)
2.0.0
0.15.0
# Check the different models and architectures available to us.
dir(models)
['AlexNet','AlexNet_Weights','ConvNeXt','ConvNeXt_Base_Weights','ConvNeXt_Large_Weights','ConvNeXt_Small_Weights','ConvNeXt_Tiny_Weights','DenseNet','DenseNet121_Weights','DenseNet161_Weights','DenseNet169_Weights','DenseNet201_Weights','EfficientNet','EfficientNet_B0_Weights','EfficientNet_B1_Weights','EfficientNet_B2_Weights','EfficientNet_B3_Weights','EfficientNet_B4_Weights','EfficientNet_B5_Weights','EfficientNet_B6_Weights','EfficientNet_B7_Weights','EfficientNet_V2_L_Weights','EfficientNet_V2_M_Weights','EfficientNet_V2_S_Weights','GoogLeNet','GoogLeNetOutputs','GoogLeNet_Weights','Inception3','InceptionOutputs','Inception_V3_Weights','MNASNet','MNASNet0_5_Weights','MNASNet0_75_Weights','MNASNet1_0_Weights','MNASNet1_3_Weights','MaxVit','MaxVit_T_Weights','MobileNetV2','MobileNetV3','MobileNet_V2_Weights','MobileNet_V3_Large_Weights','MobileNet_V3_Small_Weights','RegNet','RegNet_X_16GF_Weights','RegNet_X_1_6GF_Weights','RegNet_X_32GF_Weights','RegNet_X_3_2GF_Weights','RegNet_X_400MF_Weights','RegNet_X_800MF_Weights','RegNet_X_8GF_Weights','RegNet_Y_128GF_Weights','RegNet_Y_16GF_Weights','RegNet_Y_1_6GF_Weights','RegNet_Y_32GF_Weights','RegNet_Y_3_2GF_Weights','RegNet_Y_400MF_Weights','RegNet_Y_800MF_Weights','RegNet_Y_8GF_Weights','ResNeXt101_32X8D_Weights','ResNeXt101_64X4D_Weights','ResNeXt50_32X4D_Weights','ResNet','ResNet101_Weights','ResNet152_Weights','ResNet18_Weights','ResNet34_Weights','ResNet50_Weights','ShuffleNetV2','ShuffleNet_V2_X0_5_Weights','ShuffleNet_V2_X1_0_Weights','ShuffleNet_V2_X1_5_Weights','ShuffleNet_V2_X2_0_Weights','SqueezeNet','SqueezeNet1_0_Weights','SqueezeNet1_1_Weights','SwinTransformer','Swin_B_Weights','Swin_S_Weights','Swin_T_Weights','Swin_V2_B_Weights','Swin_V2_S_Weights','Swin_V2_T_Weights','VGG','VGG11_BN_Weights','VGG11_Weights','VGG13_BN_Weights','VGG13_Weights','VGG16_BN_Weights','VGG16_Weights','VGG19_BN_Weights','VGG19_Weights','ViT_B_16_Weights','ViT_B_32_Weights','ViT_H_14_Weights','ViT_L_16_Weights','ViT_L_32_Weights','VisionTransformer','Weights','WeightsEnum','Wide_ResNet101_2_Weights','Wide_ResNet50_2_Weights','_GoogLeNetOutputs','_InceptionOutputs','__builtins__','__cached__','__doc__','__file__','__loader__','__name__','__package__','__path__','__spec__','_api','_meta','_utils','alexnet','convnext','convnext_base','convnext_large','convnext_small','convnext_tiny','densenet','densenet121','densenet161','densenet169','densenet201','detection','efficientnet','efficientnet_b0','efficientnet_b1','efficientnet_b2','efficientnet_b3','efficientnet_b4','efficientnet_b5','efficientnet_b6','efficientnet_b7','efficientnet_v2_l','efficientnet_v2_m','efficientnet_v2_s','get_model','get_model_builder','get_model_weights','get_weight','googlenet','inception','inception_v3','list_models','maxvit','maxvit_t','mnasnet','mnasnet0_5','mnasnet0_75','mnasnet1_0','mnasnet1_3','mobilenet','mobilenet_v2','mobilenet_v3_large','mobilenet_v3_small','mobilenetv2','mobilenetv3','optical_flow','quantization','regnet','regnet_x_16gf','regnet_x_1_6gf','regnet_x_32gf','regnet_x_3_2gf','regnet_x_400mf','regnet_x_800mf','regnet_x_8gf','regnet_y_128gf','regnet_y_16gf','regnet_y_1_6gf','regnet_y_32gf','regnet_y_3_2gf','regnet_y_400mf','regnet_y_800mf','regnet_y_8gf','resnet','resnet101','resnet152','resnet18','resnet34','resnet50','resnext101_32x8d','resnext101_64x4d','resnext50_32x4d','segmentation','shufflenet_v2_x0_5','shufflenet_v2_x1_0','shufflenet_v2_x1_5','shufflenet_v2_x2_0','shufflenetv2','squeezenet','squeezenet1_0','squeezenet1_1','swin_b','swin_s','swin_t','swin_transformer','swin_v2_b','swin_v2_s','swin_v2_t','vgg','vgg11','vgg11_bn','vgg13','vgg13_bn','vgg16','vgg16_bn','vgg19','vgg19_bn','video','vision_transformer','vit_b_16','vit_b_32','vit_h_14','vit_l_16','vit_l_32','wide_resnet101_2','wide_resnet50_2']
以AlexNet为例,我们可以看到还有一个名称为alexnet的条目。其中,大写的名称是Python类(AlexNet),而alexnet是一个便于操作的函数(convenience function),用于从AlexNet类返回实例化的模型。
这些方便函数也可以有不同的参数集,例如:densenet121、densenet161、densenet169以及densenet201,都是DenseNet的实例,但层数分别为121,161,169和201.
1.3. Using AlexNet for Image Classification
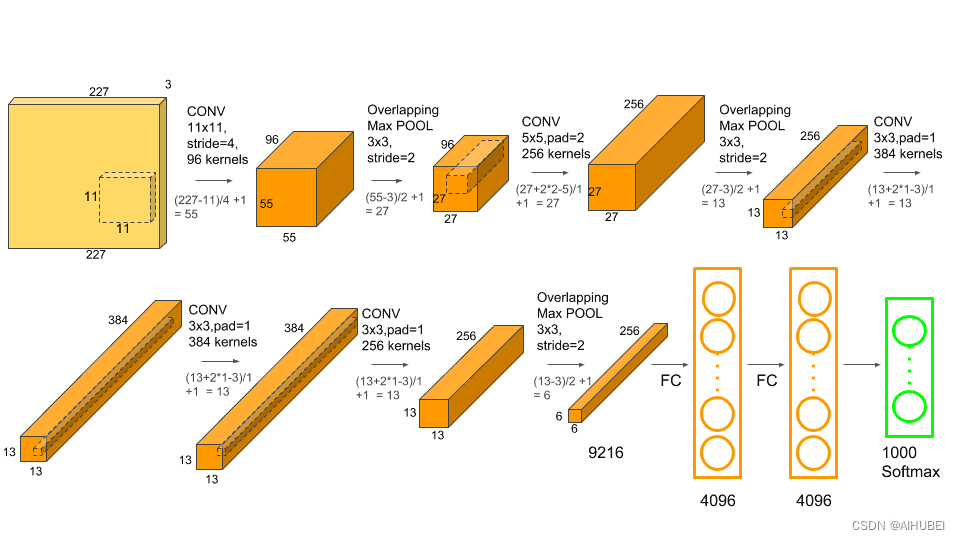
AlexnetNet是图像识别领域早期的一个突破性网络结构,相关文章可以参考Understanding Alexnet。该网络架构如下:
Step 1: Load the pre-trained model
# Create an instance of the network.
alexnet = models.alexnet(pretrained=True)
/home/wsl_ubuntu/anaconda3/envs/xy_trans/lib/python3.8/site-packages/torchvision/models/_utils.py:208: UserWarning: The parameter 'pretrained' is deprecated since 0.13 and may be removed in the future, please use 'weights' instead.warnings.warn(
/home/wsl_ubuntu/anaconda3/envs/xy_trans/lib/python3.8/site-packages/torchvision/models/_utils.py:223: UserWarning: Arguments other than a weight enum or `None` for 'weights' are deprecated since 0.13 and may be removed in the future. The current behavior is equivalent to passing `weights=AlexNet_Weights.IMAGENET1K_V1`. You can also use `weights=AlexNet_Weights.DEFAULT` to get the most up-to-date weights.warnings.warn(msg)
# Note: Pytorch模型的扩展名通常为.pt或.pth
# Check the model details.
print(alexnet)
AlexNet((features): Sequential((0): Conv2d(3, 64, kernel_size=(11, 11), stride=(4, 4), padding=(2, 2))(1): ReLU(inplace=True)(2): MaxPool2d(kernel_size=3, stride=2, padding=0, dilation=1, ceil_mode=False)(3): Conv2d(64, 192, kernel_size=(5, 5), stride=(1, 1), padding=(2, 2))(4): ReLU(inplace=True)(5): MaxPool2d(kernel_size=3, stride=2, padding=0, dilation=1, ceil_mode=False)(6): Conv2d(192, 384, kernel_size=(3, 3), stride=(1, 1), padding=(1, 1))(7): ReLU(inplace=True)(8): Conv2d(384, 256, kernel_size=(3, 3), stride=(1, 1), padding=(1, 1))(9): ReLU(inplace=True)(10): Conv2d(256, 256, kernel_size=(3, 3), stride=(1, 1), padding=(1, 1))(11): ReLU(inplace=True)(12): MaxPool2d(kernel_size=3, stride=2, padding=0, dilation=1, ceil_mode=False))(avgpool): AdaptiveAvgPool2d(output_size=(6, 6))(classifier): Sequential((0): Dropout(p=0.5, inplace=False)(1): Linear(in_features=9216, out_features=4096, bias=True)(2): ReLU(inplace=True)(3): Dropout(p=0.5, inplace=False)(4): Linear(in_features=4096, out_features=4096, bias=True)(5): ReLU(inplace=True)(6): Linear(in_features=4096, out_features=1000, bias=True))
)
Step 2: Specify image transformations
# Use transforms to compose all the data transformations.
transform = transforms.Compose([transforms.Resize(256), transforms.CenterCrop(224),transforms.ToTensor(),transforms.Normalize(mean=[0.485, 0.456, 0.406],std=[0.229, 0.224, 0.225])])     # Three numbers for RGB Channels.
# transforms.Resize: Resize the input images to 256x256 pixels.
# transforms.CenterCrop: Crop the image to 224×224 pixels about the center.
# transforms.Normalize: Normalize the image by setting its mean and standard deviation to the specified values.
# transforms.ToTensor: Convert the image to Pytorch tensor datatype.
Step 3: Load the input image and pre-process it.
# Download image
# !wget https://upload.wikimedia.org/wikipedia/commons/2/26/YellowLabradorLooking_new.jpg -O dog.jpg
img = Image.open("./dog.jpg")
img

# Pre-process the image.
trans_img = transform(img)img_batch = torch.unsqueeze(trans_img, 0)
Step 4: Model Inference
# Set the model to eval model.
alexnet.eval()out = alexnet(img_batch)
print(out.shape)
torch.Size([1, 1000])
# Download classes text file
!wget https://raw.githubusercontent.com/Lasagne/Recipes/master/examples/resnet50/imagenet_classes.txt
--2023-12-14 21:30:09--  https://raw.githubusercontent.com/Lasagne/Recipes/master/examples/resnet50/imagenet_classes.txt
Resolving raw.githubusercontent.com (raw.githubusercontent.com)... 0.0.0.0, ::
Connecting to raw.githubusercontent.com (raw.githubusercontent.com)|0.0.0.0|:443... failed: Connection refused.
Connecting to raw.githubusercontent.com (raw.githubusercontent.com)|::|:443... failed: Connection refused.
# Load labels.
with open('imagenet_classes.txt') as f:classes = [line.strip() for line in f.readlines()]
# Find out the maximum score.
_, index = torch.max(out, 1)
percentage = torch.nn.functional.softmax(out, dim=1)[0] * 100
print(classes[index[0]], percentage[index[0]].item())
Labrador retriever 41.58513259887695
# The model predicts the image to be of a Labrador Retriever with a 41.58% confidence.
_, indices = torch.sort(out, descending=True)
[(classes[idx], percentage[idx].item()) for idx in indices[0][:5]]
[('Labrador retriever', 41.58513259887695),('golden retriever', 16.59164810180664),('Saluki, gazelle hound', 16.286897659301758),('whippet', 2.8539111614227295),('Ibizan hound, Ibizan Podenco', 2.39247727394104)]
1.4. Using ResNet for Image Classification
# Load the resnet101 model.
resnet = models.resnet101(pretrained=True)# Set the model to eval mode.
resnet.eval()# carry out model inference.
out = resnet(img_batch)# Print the top 5 classes predicted by the model.
_, indices = torch.sort(out, descending=True)
percentage = torch.nn.functional.softmax(out, dim=1)[0] * 100
[(classes[idx], percentage[idx].item()) for idx in indices[0][:5]]
Downloading: "https://download.pytorch.org/models/resnet101-63fe2227.pth" to /home/wsl_ubuntu/.cache/torch/hub/checkpoints/resnet101-63fe2227.pth
100%|██████████| 171M/171M [00:51<00:00, 3.47MB/s] [('Labrador retriever', 48.255577087402344),('dingo, warrigal, warragal, Canis dingo', 7.900773048400879),('golden retriever', 6.91691780090332),('Eskimo dog, husky', 3.6434390544891357),('bull mastiff', 3.046128273010254)]
相关文章:
利用Pytorch预训练模型进行图像分类
Use Pre-trained models for Image Classification. # This post is rectified on the base of https://learnopencv.com/pytorch-for-beginners-image-classification-using-pre-trained-models/# And we have re-orginaized the code script.预训练模型(Pre-trained models)…...

MSF学习
之前的渗透测试中 其实很少用到 cs msf 但是在实际内网的时候 可以发现 msf cs 都是很好用的 所以现在我来学习一下 msf的使用方法 kali自带msf https://www.cnblogs.com/bmjoker/p/10051014.html 使用 msfconsole 启动即可 首先就是最正常的木马生成 所以这里其实只需…...
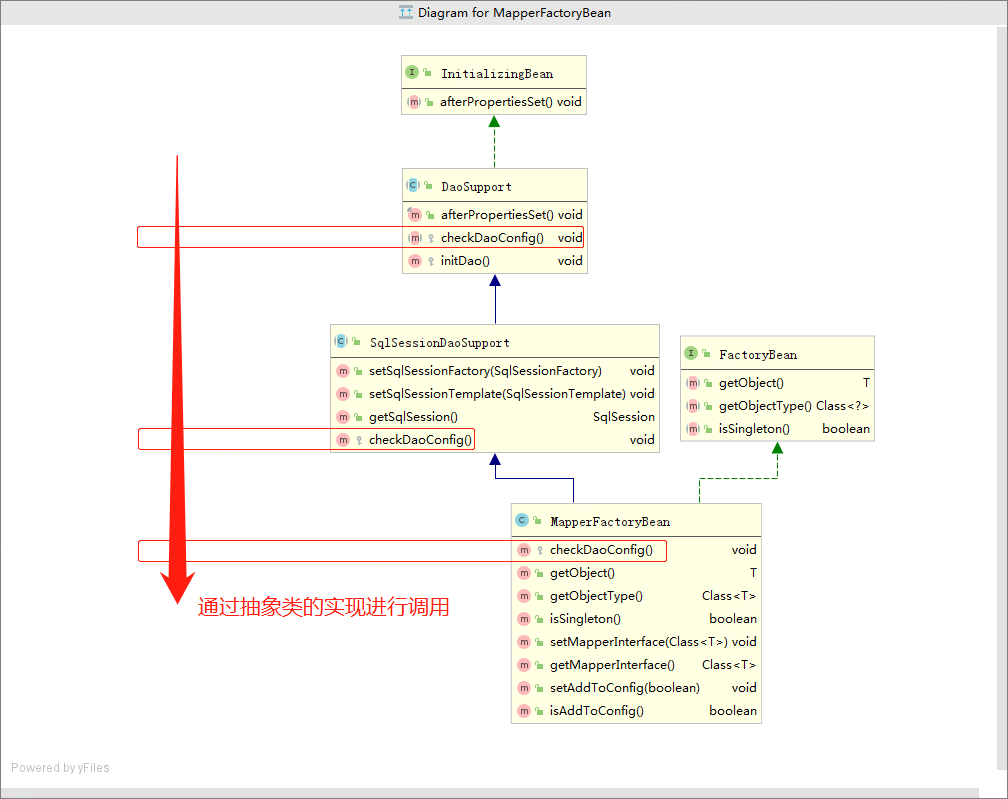
Mybatis与Spring结合深探——MapperFactoryBean的奥秘
文章目录 前言MapperFactoryBean的工作原理底层实现剖析MapperFactoryBean的checkDaoConfig()方法总结 MapperFactoryBean的getObject()方法 思考联想后续 系列相关相关文章究竟FactoryBean是什么?深入理解Spring的工厂神器超硬核解析Mybatis动态代理原理࿰…...
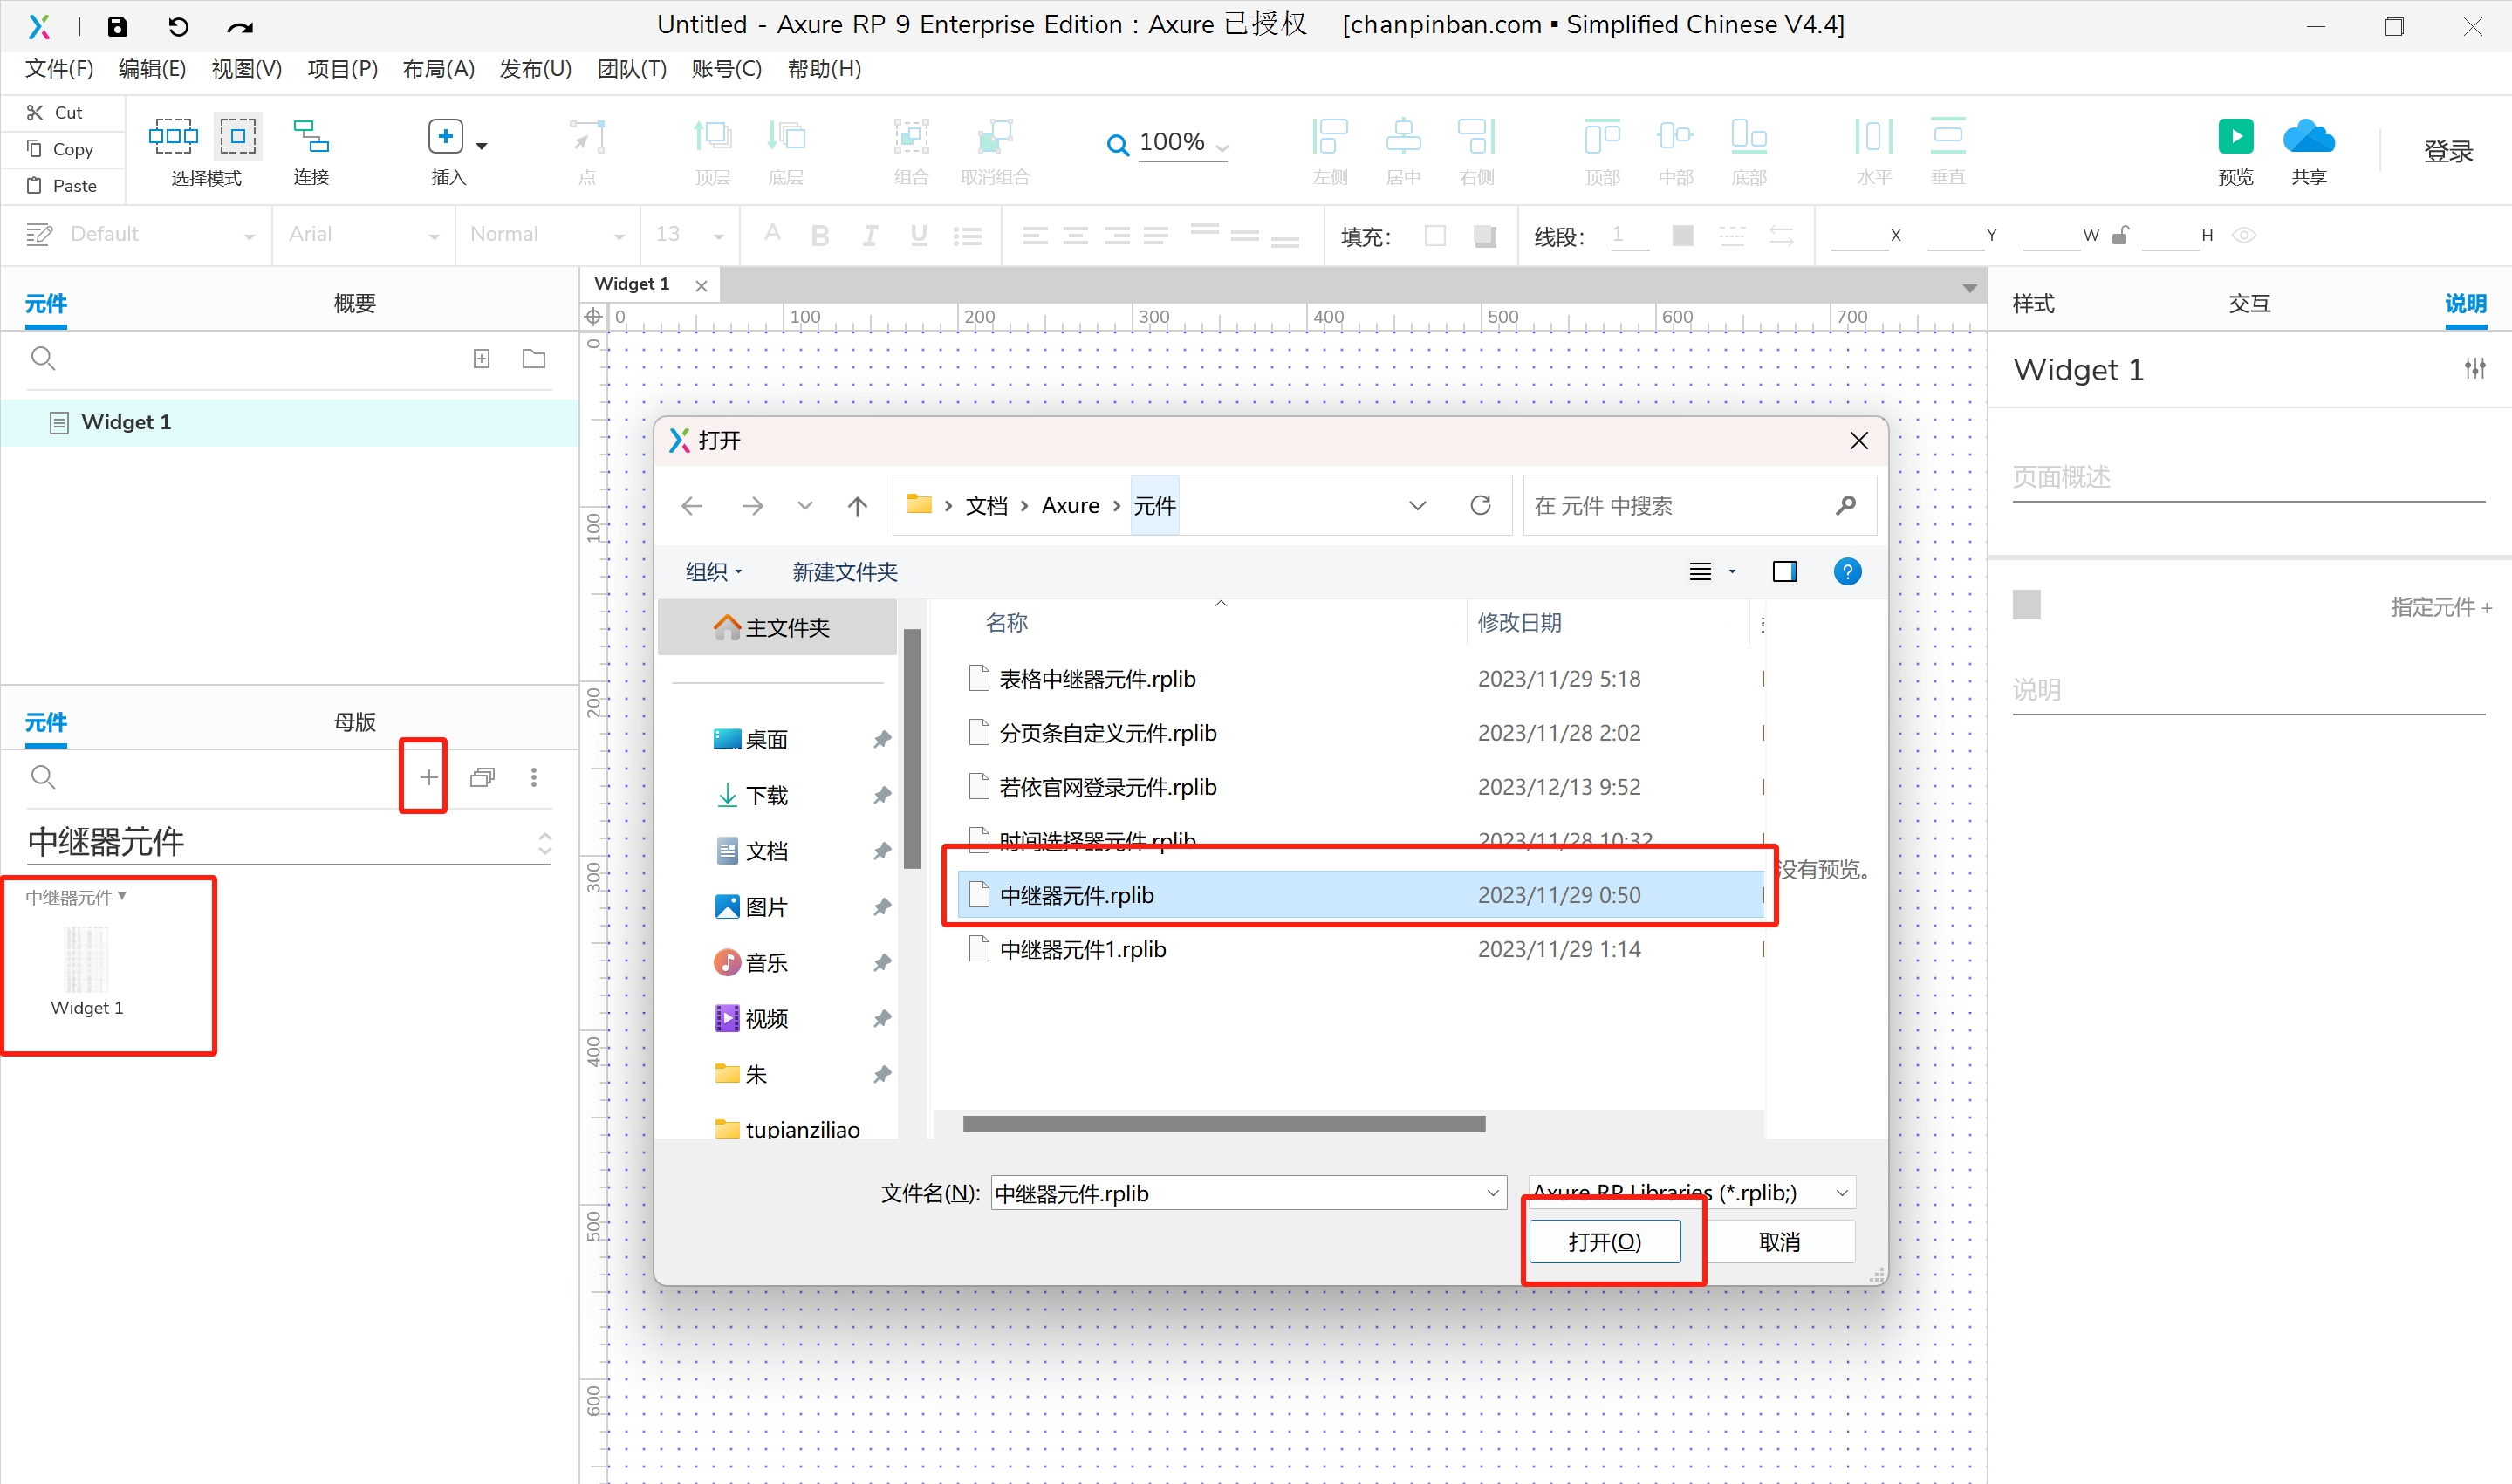
processon使用及流程图和泳道图的绘画(登录界面流程图,门诊流程图绘制门诊泳道图,住院泳道图,OA会议泳道图),Axure自定义元件
目录 一.processon图形的使用场景介绍 二.流程图绘画 三.泳道图的绘画 1.绘制门诊流程图绘制门诊泳道图 2. 绘制住院泳道图编辑 3.绘制药库采购入库流程图 4.绘制OA会议泳道图 四.Axure自定义元件 1.Axure载入元件库 一.processon图形的使用场景介绍 二.流程图绘画 示例&…...

【虹科干货】关于JSON数据库
文章速览: 什么是JSON什么是JSON数据库JSON数据库的显著优势关于JSON数据库的Q&A 如何理解JSON数据库?作为NoSQL数据库的一种类型,JSON数据库有哪些优势呢?JSON数据库如何运作,它为应用程序开发者带来了哪些价值呢…...
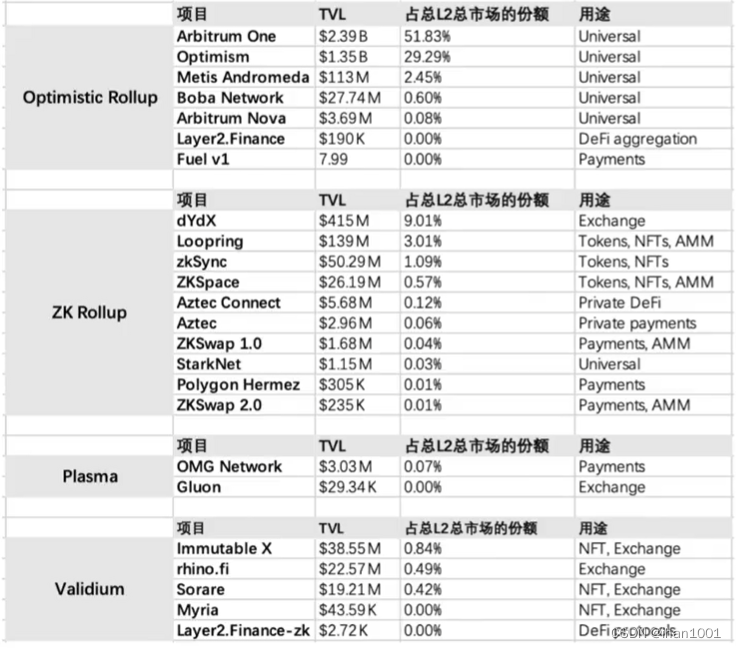
区块链的可拓展性研究【03】扩容整理
为什么扩容:在layer1上,交易速度慢,燃料价格高 扩容的目的:在保证去中心化和安全性的前提下,提升交易速度,更快确定交易,提升交易吞吐量(提升每秒交易量) 目前方案有&…...

golang学习笔记——互斥锁sync.Mutex、计数器sync.WaitGroup、读写锁sync.RWMutex
文章目录 互斥锁: sync.Mutexsync.WaitGroup 计数器例子func (*WaitGroup) Addfunc (*WaitGroup) Donefunc (*WaitGroup) Wait 读写互斥锁参考资料 临界区总是需要通过同步机制进行保护的,否则就会产生竞态条件,导致数据不一致。 互斥锁&…...

MFC 加载本地文件设置图标
基于单文件/多文件版 1、在CMainFrame中设置 int CMainFrame::OnCreate(LPCREATESTRUCT lpCreateStruct) {//...........// 从本地文件加载图标HICON hIcon (HICON)::LoadImage(NULL, L"./vip.ico", IMAGE_ICON, 0, 0, LR_LOADFROMFILE);if (hIcon){ // 设置窗口图…...

飞天使-linux操作的一些技巧与知识点6-ansible结合jinja2使用,可规范化进行自动化管控
文章目录 在议playbook虚拟环境中安装ansibleplaybook 结合变量的一些演示普通的vars_files 变量,在同级目录创建目录使用host_vars 定义变量group_vars定义变量根据不同系统操作不同版本传递多个外置变量举例几个不同的示例factswhenloophandlers 与 notifytags 任…...
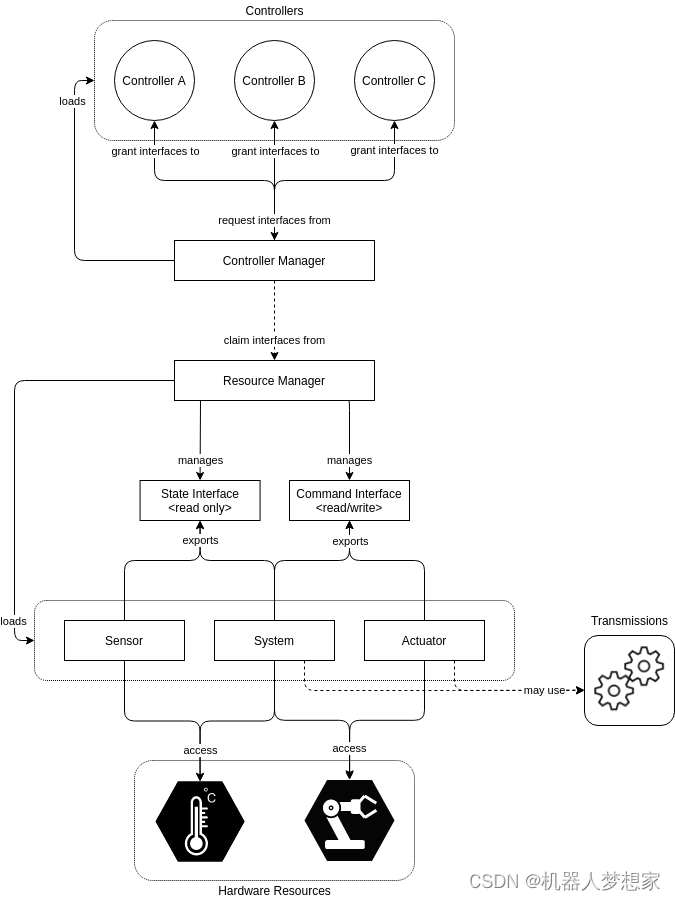
ROS2 Control分析讲解
ROS2 Control 文章目录 前言简述组成安装 框架Controller ManagerResource ManagerControllersUser Interfaces Hardware ComponentsURDF中的硬件描述机器人运行框架 总结 前言 ros2_control是一个使用(ROS 2)进行机器人(实时)控…...

Java TCP(一对一)聊天简易版
客户端 import java.io.*; import java.net.Socket; import java.util.Date; import javax.swing.*;public class MyClient {private JFrame jf;private JButton jBsend;private JTextArea jTAcontent;private JTextField jText;private JLabel JLcontent;private Date data;p…...

2.4 C语言之运算符
2.4 C语言之运算符 一、算术运算符二、关系运算符三、逻辑运算符四、自增自减运算符五、按位运算符六、赋值运算符七、条件表达式八、运算符优先级与求值次序 一、算术运算符 二元算术运算符包括:(加)、-(减)、*(乘)、/(除)、%(取模) 整数除法会截断结果中的小数部…...

做题笔记:SQL Sever 方式做牛客SQL的题目--SQL157
----SQL157 平均播放进度大于60%的视频类别 计算各类视频的平均播放进度,将进度大于60%的类别输出。 注: 播放进度播放时长视频时长*100%,当播放时长大于视频时长时,播放进度均记为100%。 结果保留两位小数,并按播放进…...

微信小程序map视野发生改变时切换定位点
<!--地图--> <view><map id"myMap" style"width: 100%; height: 300px;" latitude"{{latitude}}" longitude"{{longitude}}"scale"{{scale}}" markers"{{markers}}" controls"{{controls}}&q…...

javaweb搭配ajax和json
ajax一般用来前端界面与后端界面交互使用。数据格式一般使用json,优点是便于对象与字符串的转化。 1.不适用json对象封装。 jsp: <script>$.ajax({url: "/LoginServlet",data: {"name":name, "pwd":password},dataType: &qu…...
VS2022 将项目打包,导出为exe运行
我有一个在 VS2022 上开发的程序,基于.net 6框架, 想打包成 .exe程序,以在另一个没有安装VS的机器上运行,另一个机器是Win7系统,上面安装了.net 6框架。 虽然网上很多教程,需要安装Project Installer,配置A…...

【Py/Java/C++三种语言OD2023C卷真题】20天拿下华为OD笔试【DP】2023C-分班【欧弟算法】全网注释最详细分类最全的华为OD真题题解
文章目录 题目描述与示例题目描述输入描述输出描述示例一输入输出 示例二输入输出 解题思路代码PythonJavaC时空复杂度 华为OD算法/大厂面试高频题算法练习冲刺训练 题目描述与示例 题目描述 幼儿园两个班的小朋友在排队时混在了一起,每位小朋友都知道自己是否与前…...

pr模板哪个网站好?免费Pr模板视频素材下载网站 Prmuban.com
pr模板哪个网站好?哪里可以下载免费的pr模板视频素材,PR模板网(Prmuban.com)影视后期制作模板视频剪辑素材资源网站。 包含PR模板、PR插件、PR预设、MOGRT、LUT、转场特效、音乐素材、音效素材等,更好的剪辑师必备资源…...

【论文阅读】LoRA: Low-Rank Adaptation of Large Language Models
code:GitHub - microsoft/LoRA: Code for loralib, an implementation of "LoRA: Low-Rank Adaptation of Large Language Models" 做法: 把预训练LLMs里面的参数权重给冻结;向transformer架构中的每一层,注入可训练的…...

MybatisPlus的分页插件
PaginationInnerInterceptor 此插件是核心插件,目前代理了 Executor#query 和 Executor#update 和 StatementHandler#prepare 方法。 在SpringBoot环境中配置方式如下: /*** author giserDev* description 配置分页插件、方言、mapper包扫描等* date 2023-12-13 …...

3分钟上手RePKG:轻松提取Wallpaper Engine壁纸资源的终极指南
3分钟上手RePKG:轻松提取Wallpaper Engine壁纸资源的终极指南 【免费下载链接】repkg Wallpaper engine PKG extractor/TEX to image converter 项目地址: https://gitcode.com/gh_mirrors/re/repkg 你是否曾经遇到过这样的困扰?在Wallpaper Engi…...

多数人支持!微软或把 Xbox 重新品牌化为 XBOX,回归最初形式
Xbox 品牌重塑:从民意调查到账号更名微软 Xbox 首席执行官阿莎夏尔马在 X(原推特)上发起民意调查,询问粉丝微软应使用 Xbox 还是 XBOX,结果多数人支持 XBOX,随后公司将其 X 账号更名。不过,Xbox…...

终极指南:如何在英雄联盟国服免费解锁所有皮肤?R3nzSkin国服特供版完全解析
终极指南:如何在英雄联盟国服免费解锁所有皮肤?R3nzSkin国服特供版完全解析 【免费下载链接】R3nzSkin-For-China-Server Skin changer for League of Legends (LOL) 项目地址: https://gitcode.com/gh_mirrors/r3/R3nzSkin-For-China-Server 还在…...

陕西省ICPC省赛总结
个人反思 我个人感觉还是练的少,学的不够系统。具体反应到题上,表现在看到题没有思路,并且也不知道这道题用到什么算法思想,导致拿的书和本子几乎用不上。其次是思考不够深入,我的队友都能进行深入的思考,但…...

编写程序统计婚恋交友消费,相处长处度数据,分析理性婚恋模式,减少年轻人恋爱高频无谓消费。
构建一个婚恋交友消费与相处时长统计分析、理性婚恋模式识别的商务智能示例项目,去营销化、中立化,仅用于学习与工程实践参考。一、实际应用场景描述在当代年轻人的婚恋与社交生活中,存在一种普遍现象:- 约会高度依赖“消费型场景…...

基于ChatGPT与飞书开放平台构建企业级智能聊天机器人实践指南
1. 项目概述:当ChatGPT遇上飞书,打造你的专属智能工作伙伴 最近在折腾一个挺有意思的项目,叫“chatgpt-for-chatbot-feishu”。简单来说,这就是一个桥梁,一个能让OpenAI的ChatGPT模型,直接接入到飞书&…...
)
腾讯云秒杀活动是什么?2026年最新参与指南(附抢购技巧)
腾讯云秒杀活动是什么?怎么参与?本文将详细解析腾讯云秒杀活动规则、参与入口、抢购技巧及备选方案,助力大家低成本开启云端之旅! 一、活动介绍 腾讯云秒杀活动是腾讯云官方推出的限量限时抢购活动,主打高性价比的轻量…...

树莓派BlueZ源码编译安装与蓝牙协议栈深度配置指南
1. 项目概述与背景 如果你手头有一块树莓派,并且想用它来玩点物联网或者智能硬件项目,蓝牙功能几乎是绕不开的一环。无论是连接一个BLE温湿度传感器读取数据,还是控制一个蓝牙音箱,底层都需要一个稳定、功能完整的蓝牙协议栈来支…...

大模型涌现能力:从原理到工程实践的探索与分类
1. 项目概述:从“玄学”到“科学”的涌现能力探索最近和几个做模型研发的朋友聊天,大家不约而同地提到了一个词:“涌现能力”。这个词听起来有点玄乎,像是某种不可预测的“魔法”,但当我们深入讨论时,发现它…...

Chrome QRCode插件终极指南:如何在3分钟内实现跨设备无缝内容同步
Chrome QRCode插件终极指南:如何在3分钟内实现跨设备无缝内容同步 【免费下载链接】chrome-qrcode :zap: A Chrome plugin to Genrate QRCode of URL / Text, or Decode the QRcode in website. 一个Chrome浏览器插件,用于生成当前URL或者选中内容的二维…...