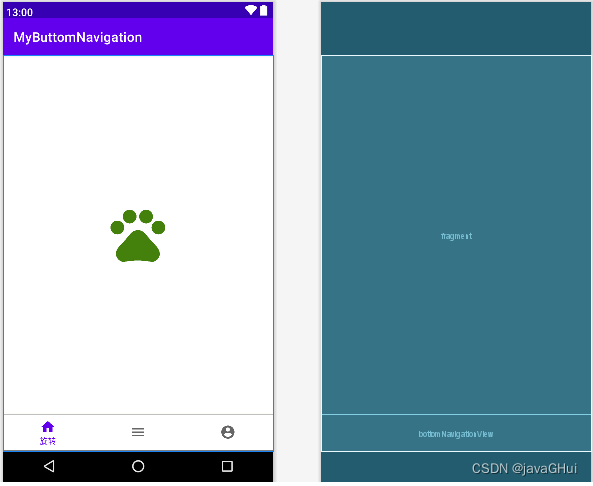
Android : BottomNavigation底部导航_简单应用
示例图:
1.先创建底部导航需要的图片
res → New → Vector Asset 创建三个矢量图
图片1 baseline_home.xml
<vector android:height="24dp" android:tint="#000000"android:viewportHeight="24" android:viewportWidth="24"android:width="24dp" xmlns:android="http://schemas.android.com/apk/res/android"><path android:fillColor="@android:color/white" android:pathData="M10,20v-6h4v6h5v-8h3L12,3 2,12h3v8z"/>
</vector>
图片2 baseline_menu.xml
<vector android:height="24dp" android:tint="#000000"android:viewportHeight="24" android:viewportWidth="24"android:width="24dp" xmlns:android="http://schemas.android.com/apk/res/android"><path android:fillColor="@android:color/white" android:pathData="M3,18h18v-2L3,16v2zM3,13h18v-2L3,11v2zM3,6v2h18L21,6L3,6z"/>
</vector>
图片3 baseline_author.xml
<vector android:height="24dp" android:tint="#000000"android:viewportHeight="24" android:viewportWidth="24"android:width="24dp" xmlns:android="http://schemas.android.com/apk/res/android"><path android:fillColor="@android:color/white" android:pathData="M12,2C6.48,2 2,6.48 2,12s4.48,10 10,10 10,-4.48 10,-10S17.52,2 12,2zM12,5c1.66,0 3,1.34 3,3s-1.34,3 -3,3 -3,-1.34 -3,-3 1.34,-3 3,-3zM12,19.2c-2.5,0 -4.71,-1.28 -6,-3.22 0.03,-1.99 4,-3.08 6,-3.08 1.99,0 5.97,1.09 6,3.08 -1.29,1.94 -3.5,3.22 -6,3.22z"/>
</vector>
图片4 用于操作的图片 baseline_img.xml
<vector android:height="50dp" android:tint="#44800C"android:viewportHeight="24" android:viewportWidth="24"android:width="50dp" xmlns:android="http://schemas.android.com/apk/res/android"><path android:fillColor="@android:color/white" android:pathData="M4.5,9.5m-2.5,0a2.5,2.5 0,1 1,5 0a2.5,2.5 0,1 1,-5 0"/><path android:fillColor="@android:color/white" android:pathData="M9,5.5m-2.5,0a2.5,2.5 0,1 1,5 0a2.5,2.5 0,1 1,-5 0"/><path android:fillColor="@android:color/white" android:pathData="M15,5.5m-2.5,0a2.5,2.5 0,1 1,5 0a2.5,2.5 0,1 1,-5 0"/><path android:fillColor="@android:color/white" android:pathData="M19.5,9.5m-2.5,0a2.5,2.5 0,1 1,5 0a2.5,2.5 0,1 1,-5 0"/><path android:fillColor="@android:color/white" android:pathData="M17.34,14.86c-0.87,-1.02 -1.6,-1.89 -2.48,-2.91 -0.46,-0.54 -1.05,-1.08 -1.75,-1.32 -0.11,-0.04 -0.22,-0.07 -0.33,-0.09 -0.25,-0.04 -0.52,-0.04 -0.78,-0.04s-0.53,0 -0.79,0.05c-0.11,0.02 -0.22,0.05 -0.33,0.09 -0.7,0.24 -1.28,0.78 -1.75,1.32 -0.87,1.02 -1.6,1.89 -2.48,2.91 -1.31,1.31 -2.92,2.76 -2.62,4.79 0.29,1.02 1.02,2.03 2.33,2.32 0.73,0.15 3.06,-0.44 5.54,-0.44h0.18c2.48,0 4.81,0.58 5.54,0.44 1.31,-0.29 2.04,-1.31 2.33,-2.32 0.31,-2.04 -1.3,-3.49 -2.61,-4.8z"/>
</vector>
2.创建 menu 文件 my_menu.xml
res → New → Android Resource File 类型选择 Menu
<?xml version="1.0" encoding="utf-8"?>
<menu xmlns:android="http://schemas.android.com/apk/res/android"><itemandroid:id="@+id/homeFragment"android:icon="@drawable/baseline_home"android:title="旋转" /><itemandroid:id="@+id/menuFragment"android:icon="@drawable/baseline_menu"android:title="缩放" /><itemandroid:id="@+id/authorFragment"android:icon="@drawable/baseline_author"android:title="移动" />
</menu>
3.创建3个Fragment 页面
res → New → Fragment → Fragment(with ViewModel)
创建了6个文件
HomeFragment.java HomeViewModel.java 布局文件: fragment_home.xml
MenuFragment.java MenuViewModel.java 布局文件 : fragment_menu.xml
AuthorFragment.java AuthorViewModel.java 布局文件:fragment_author.xml
往布局中添加操作的图片
fragment_home.xml:
<?xml version="1.0" encoding="utf-8"?>
<FrameLayout xmlns:android="http://schemas.android.com/apk/res/android"xmlns:app="http://schemas.android.com/apk/res-auto"xmlns:tools="http://schemas.android.com/tools"android:layout_width="match_parent"android:layout_height="match_parent"tools:context=".HomeFragment"><ImageViewandroid:id="@+id/imageView"android:layout_width="100dp"android:layout_height="100dp"android:layout_gravity="center"android:src="@drawable/baseline_img" />
</FrameLayout>
fragment_menu.xml
<?xml version="1.0" encoding="utf-8"?>
<FrameLayout xmlns:android="http://schemas.android.com/apk/res/android"xmlns:app="http://schemas.android.com/apk/res-auto"xmlns:tools="http://schemas.android.com/tools"android:layout_width="match_parent"android:layout_height="match_parent"tools:context=".MenuFragment"><ImageViewandroid:id="@+id/imageView"android:layout_width="100dp"android:layout_height="100dp"android:layout_gravity="center"android:src="@drawable/baseline_img" />
</FrameLayout>
fragment_author.xml
<?xml version="1.0" encoding="utf-8"?>
<FrameLayout xmlns:android="http://schemas.android.com/apk/res/android"xmlns:app="http://schemas.android.com/apk/res-auto"xmlns:tools="http://schemas.android.com/tools"android:layout_width="match_parent"android:layout_height="match_parent"tools:context=".AuthorFragment"><ImageViewandroid:id="@+id/imageView"android:layout_width="100dp"android:layout_height="100dp"android:layout_gravity="center"android:src="@drawable/baseline_img" />
</FrameLayout>
4.创建Navigation 导航文件 my_Navigation.xml
res → New → Android Resource File 类型选择 Navigation
<?xml version="1.0" encoding="utf-8"?>
<navigation xmlns:android="http://schemas.android.com/apk/res/android"xmlns:app="http://schemas.android.com/apk/res-auto"xmlns:tools="http://schemas.android.com/tools"android:id="@+id/my_navigation"app:startDestination="@id/homeFragment"><!-- 注意 这里的id 和 Menu  my_menu.xml文件中的id  相对应 才可点击跳转到对应的页面--><fragmentandroid:id="@+id/homeFragment"android:name="com.example.mybuttomnavigation.HomeFragment"android:label="旋转"tools:layout="@layout/fragment_home" /><fragmentandroid:id="@+id/menuFragment"android:name="com.example.mybuttomnavigation.MenuFragment"android:label="缩放"tools:layout="@layout/fragment_menu" /><fragmentandroid:id="@+id/authorFragment"android:name="com.example.mybuttomnavigation.AuthorFragment"android:label="移动"tools:layout="@layout/fragment_author" />
</navigation>
5.在主布局添加 底部导航(BottomNavigationView) 和 跳转的页面(NavHostFragment)
activity_main.xml
<?xml version="1.0" encoding="utf-8"?>
<androidx.constraintlayout.widget.ConstraintLayout xmlns:android="http://schemas.android.com/apk/res/android"xmlns:app="http://schemas.android.com/apk/res-auto"xmlns:tools="http://schemas.android.com/tools"android:layout_width="match_parent"android:layout_height="match_parent"tools:context=".MainActivity"><com.google.android.material.bottomnavigation.BottomNavigationViewandroid:id="@+id/bottomNavigationView"android:layout_width="match_parent"android:layout_height="0dp"android:foregroundTint="#4700FF"android:outlineAmbientShadowColor="#FFEB3B"app:itemRippleColor="#ff0000ff"app:labelVisibilityMode="selected"app:layout_constraintBottom_toBottomOf="parent"app:layout_constraintEnd_toEndOf="parent"app:layout_constraintHorizontal_bias="0.0"app:layout_constraintStart_toStartOf="parent"app:menu="@menu/my_menu"></com.google.android.material.bottomnavigation.BottomNavigationView><!-- 注意事项 :默认选的是androidx.fragment.app.FragmentContainerView手动改成 fragment--><fragmentandroid:id="@+id/fragment"android:name="androidx.navigation.fragment.NavHostFragment"android:layout_width="match_parent"android:layout_height="0dp"app:defaultNavHost="true"app:layout_constraintBottom_toTopOf="@+id/bottomNavigationView"app:layout_constraintEnd_toEndOf="parent"app:layout_constraintHorizontal_bias="0.0"app:layout_constraintStart_toStartOf="parent"app:layout_constraintTop_toTopOf="parent"app:layout_constraintVertical_bias="0.017"app:navGraph="@navigation/my_navigation" /></androidx.constraintlayout.widget.ConstraintLayout>
6. 设置主题样式 默认是没有导航栏的
values 目录下 colors.xml
<?xml version="1.0" encoding="utf-8"?>
<resources><color name="purple_200">#FFBB86FC</color><color name="purple_500">#FF6200EE</color><color name="purple_700">#FF3700B3</color><color name="teal_200">#FF03DAC5</color><color name="teal_700">#FF018786</color><color name="black">#FF000000</color><color name="white">#FFFFFFFF</color>
</resources>
themes.xml
<resources xmlns:tools="http://schemas.android.com/tools"><!-- Base application theme. --><style name="Base.Theme.MyApplication" parent="Theme.Material3.DayNight.NoActionBar"><!-- Customize your light theme here. --><!-- <item name="colorPrimary">@color/my_light_primary</item> --></style><style name="Theme.MyApplication" parent="Theme.MaterialComponents.DayNight.DarkActionBar"><!-- Primary brand color. --><item name="colorPrimary">@color/purple_500</item><item name="colorPrimaryVariant">@color/purple_700</item><item name="colorOnPrimary">@color/white</item><!-- Secondary brand color. --><item name="colorSecondary">@color/teal_200</item><item name="colorSecondaryVariant">@color/teal_700</item><item name="colorOnSecondary">@color/black</item><!-- Status bar color. --><item name="android:statusBarColor">?attr/colorPrimaryVariant</item><!-- Customize your theme here. --></style>
</resources>
7. MainActivity.java
package com.example.mybuttomnavigation;import android.os.Bundle;import androidx.appcompat.app.AppCompatActivity;
import androidx.navigation.NavController;
import androidx.navigation.Navigation;
import androidx.navigation.ui.AppBarConfiguration;
import androidx.navigation.ui.NavigationUI;import com.google.android.material.bottomnavigation.BottomNavigationView;public class MainActivity extends AppCompatActivity {// 底部导航private BottomNavigationView bottomNavigationView;@Overrideprotected void onCreate(Bundle savedInstanceState) {super.onCreate(savedInstanceState);setContentView(R.layout.activity_main);bottomNavigationView = findViewById(R.id.bottomNavigationView);//导航NavController navController = Navigation.findNavController(this, R.id.fragment);//设置顶部导航AppBarConfiguration configuration = new AppBarConfiguration.Builder(//带返回箭头 ←
//                navController.getGraph()//不带箭头的 ←bottomNavigationView.getMenu()// 或者这样写 ←不带箭头
//                R.id.menuFragment,R.id.authorFragment,R.id.homeFragment).build();//装配顶部导航NavigationUI.setupActionBarWithNavController(this, navController, configuration);NavigationUI.setupWithNavController(bottomNavigationView, navController);}
}
经过上面这些步骤已经可以跳转了
8.设置动画
旋转:HomeFragment.java
package com.example.mybuttomnavigation;import android.animation.ObjectAnimator;
import android.os.Bundle;
import android.view.LayoutInflater;
import android.view.View;
import android.view.ViewGroup;
import android.widget.ImageView;import androidx.annotation.NonNull;
import androidx.annotation.Nullable;
import androidx.fragment.app.Fragment;
import androidx.lifecycle.ViewModelProvider;public class HomeFragment extends Fragment {private HomeViewModel mViewModel;private ImageView imageView;public static HomeFragment newInstance() {return new HomeFragment();}@Overridepublic View onCreateView(@NonNull LayoutInflater inflater, @Nullable ViewGroup container,@Nullable Bundle savedInstanceState) {View view = inflater.inflate(R.layout.fragment_home, container, false);imageView = view.findViewById(R.id.imageView);return view;}@Overridepublic void onActivityCreated(@Nullable Bundle savedInstanceState) {super.onActivityCreated(savedInstanceState);mViewModel = new ViewModelProvider(this).get(HomeViewModel.class);imageView.setRotation(mViewModel.startAnimation);// TODO: Use the ViewModel/**设置动画** alpha(透明度)* scaleX(X轴缩放)* scaleY(Y轴缩放)* rotation(旋转)* translationX(X轴平移)* translationY(Y轴平移)* */ObjectAnimator objectAnimator = ObjectAnimator.ofFloat(imageView, "rotation", 0.0f);//点击事件imageView.setOnClickListener(new View.OnClickListener() {@Overridepublic void onClick(View v) {// 判断动画是在运动 objectAnimator.isRunning() 在运动//!objectAnimator.isRunning()取反//重新设置旋转角度              当前的角度  旋转到 当前的角度+100,objectAnimator.setFloatValues(imageView.getRotation(), imageView.getRotation() + 100);mViewModel.startAnimation += 100;objectAnimator.start();}});}}
HomeViewModel.java
package com.example.mybuttomnavigation;import androidx.lifecycle.ViewModel;public class HomeViewModel extends ViewModel {// TODO: Implement the ViewModelfloat startAnimation = 0;
}
缩放:MenuFragment.java
package com.example.mybuttomnavigation;import android.animation.ObjectAnimator;
import android.os.Bundle;
import android.view.LayoutInflater;
import android.view.View;
import android.view.ViewGroup;
import android.widget.ImageView;import androidx.annotation.NonNull;
import androidx.annotation.Nullable;
import androidx.fragment.app.Fragment;
import androidx.lifecycle.ViewModelProvider;public class MenuFragment extends Fragment {private MenuViewModel mViewModel;private ImageView imageView;public static MenuFragment newInstance() {return new MenuFragment();}@Overridepublic View onCreateView(@NonNull LayoutInflater inflater, @Nullable ViewGroup container,@Nullable Bundle savedInstanceState) {View view = inflater.inflate(R.layout.fragment_menu, container, false);imageView = view.findViewById(R.id.imageView);return view;}@Overridepublic void onActivityCreated(@Nullable Bundle savedInstanceState) {super.onActivityCreated(savedInstanceState);mViewModel = new ViewModelProvider(this).get(MenuViewModel.class);imageView.setScaleX(mViewModel.scaleFactor);imageView.setScaleY(mViewModel.scaleFactor);// TODO: Use the ViewModel/**设置动画** alpha(透明度)* scaleX(X轴缩放)* scaleY(Y轴缩放)* rotation(旋转)* translationX(X轴平移)* translationY(Y轴平移)* */ObjectAnimator objectAnimatorX = ObjectAnimator.ofFloat(imageView, "scaleX", 0);ObjectAnimator objectAnimatorY = ObjectAnimator.ofFloat(imageView, "scaleY", 0);objectAnimatorX.setDuration(500);objectAnimatorY.setDuration(500);//点击事件imageView.setOnClickListener(new View.OnClickListener() {@Overridepublic void onClick(View v) {// 判断动画是在运动 objectAnimator.isRunning() 在运动//!objectAnimator.isRunning()取反//重新设置缩放            objectAnimatorX.setFloatValues(imageView.getScaleX() + 0.1f);objectAnimatorY.setFloatValues(imageView.getScaleY() + 0.1f);mViewModel.scaleFactor += 0.1;objectAnimatorX.start();objectAnimatorY.start();}});}}
MenuViewModel.java
package com.example.mybuttomnavigation;import androidx.lifecycle.ViewModel;public class MenuViewModel extends ViewModel {// TODO: Implement the ViewModelfloat scaleFactor = 1 ;
}
平移:AuthorFragment.java
package com.example.mybuttomnavigation;import android.animation.ObjectAnimator;
import android.os.Bundle;
import android.view.LayoutInflater;
import android.view.View;
import android.view.ViewGroup;
import android.widget.ImageView;import androidx.annotation.NonNull;
import androidx.annotation.Nullable;
import androidx.fragment.app.Fragment;
import androidx.lifecycle.ViewModelProvider;import java.util.Random;public class AuthorFragment extends Fragment {private AuthorViewModel mViewModel;public ImageView imageView;public static AuthorFragment newInstance() {return new AuthorFragment();}@Overridepublic View onCreateView(@NonNull LayoutInflater inflater, @Nullable ViewGroup container,@Nullable Bundle savedInstanceState) {View view = inflater.inflate(R.layout.fragment_author, container, false);imageView = view.findViewById(R.id.imageView);return view;}@Overridepublic void onActivityCreated(@Nullable Bundle savedInstanceState) {super.onActivityCreated(savedInstanceState);mViewModel = new ViewModelProvider(this).get(AuthorViewModel.class);// TODO: Use the ViewModelimageView.setX(imageView.getX() + mViewModel.mark);// TODO: Use the ViewModel/**设置动画** alpha(透明度)* scaleX(X轴缩放)* scaleY(Y轴缩放)* rotation(旋转)* translationX(X轴平移)* translationY(Y轴平移)* */ObjectAnimator objectAnimatorX = ObjectAnimator.ofFloat(imageView, "x", 0);//设置动画500毫秒objectAnimatorX.setDuration(500);//点击事件imageView.setOnClickListener(new View.OnClickListener() {@Overridepublic void onClick(View v) {// 判断动画是在运动 objectAnimator.isRunning() 在运动//!objectAnimator.isRunning()取反float dx = new Random().nextBoolean() ? 100 : -100;//重新设置缩放            = 当前值 移动到 , 当前值 + dxobjectAnimatorX.setFloatValues(imageView.getScaleX(), imageView.getScaleX() + dx);mViewModel.mark += dx;objectAnimatorX.start();}});}}
AuthorViewModel.java
package com.example.mybuttomnavigation;import androidx.lifecycle.ViewModel;public class AuthorViewModel extends ViewModel {// TODO: Implement the ViewModelfloat mark = 0;
}
相关文章:
Android : BottomNavigation底部导航_简单应用
示例图: 1.先创建底部导航需要的图片 res → New → Vector Asset 创建三个矢量图 图片1 baseline_home.xml <vector android:height"24dp" android:tint"#000000"android:viewportHeight"24" android:viewportWidth"24…...
基于ssm培训学校教学管理平台论文
摘 要 社会的进步,教育行业发展迅速,人们对教育越来越重视,在当今网络普及的情况下,教学管理模式也开始逐渐网络化,学校开始网络教学管理模式。 本文研究的培训学校教学管理平台基于SSM框架,采用Java技术和…...

关于嵌入式开发的一些信息汇总:C标准、芯片架构、编译器、MISRA-C
关于嵌入式开发的一些信息汇总:C标准、芯片架构、编译器、MISRA-C 关于C标准芯片架构是什么?架构对芯片有什么作用?arm架构X86架构mips架构小结 编译器LLVM是什么?前端在干什么?后端在干什么? MISRA C的诞生…...

java实现局域网内视频投屏播放(二)爬虫
代码链接 视频播放原理 大多视频网站使用的是m3u8,m3u8其实不是一个真正的视频文件,而是一个视频播放列表(playlist)。它是一种文本文件,里面记录了一系列的视频片段(segment)的网络地址。这些…...

a标签的target属性
<a> 标签的 target 属性规定在何处打开链接文档。 最常用的两个值是: _self : 在当前窗口打开被链接文档 _blank:在新窗口打开被链接文档 就是常见浏览网页打开链接的方式...
无mac在线申请hbuilderx打包ios证书的方法
hbuilderx是一个跨平台的开发工具,可以开发android和ios的app应用。打包hbuilderx应用需要hbuilderx打包证书。但是很多使用hbuilderx开发的程序员,并没有mac电脑,而申请ios的证书,hbuilderx官网的教程却是需要mac电脑的ÿ…...
[css] flex wrap 九宫格布局
<div class"box"><ul class"box-inner"><li>九宫格1</li><li>九宫格2</li><li>九宫格3</li><li>九宫格4</li><li>九宫格5</li><li>九宫格6</li><li>九宫格7&l…...

云上丝绸之路| 云轴科技ZStack成功实践精选(西北)
古有“丝绸之路” 今有丝绸之路经济带 丝路焕发新生,数智助力经济 云轴科技ZStack用“云”护航千行百业 沿丝绸之路,领略西北数字化。 古丝绸之路起点-陕西 集历史与现代交融,不仅拥有悠久的历史文化积淀,而且现代化、数字化发…...

Java8 IfPresent 与 forEach 的组合操作
一、需求背景 Java8的Optional接口是我们经常使用的一个接口,尤其是对对象进行判空的时候,需要经常使用到IfPresent()。 但是,如果是对List进行判空、循环的话,就稍显繁杂了,因为几乎每次对List进行操作的时候&a…...
WebGL+Three.js入门与实战——给画布换颜色、绘制一个点、三维坐标系
个人简介 👀个人主页: 前端杂货铺 🙋♂️学习方向: 主攻前端方向,正逐渐往全干发展 📃个人状态: 研发工程师,现效力于中国工业软件事业 🚀人生格言: 积跬步…...

SystemServer 进程启动过程
首语 SystemServer进程主要用于启动系统服务,诸如AMS、WMS、PMS都是由它来创建的。在系统的名称为"system_server",Android核心服务都是它启动,它是非常重要。 Zygote处理SystemServer进程 在 Zygote启动过程 文章中分析我们知道…...

Java EE 多线程之 JUC
文章目录 1. Callable 接口2. ReentrantLock3. 信号量4. CountDownLatch JUC这里就是指(java.util.concurrent) concurrent 就是并发的意思 这个包里的内容,主要就是一些多线程相关的组件 1. Callable 接口 Callable 也是一种创建线程的方式…...
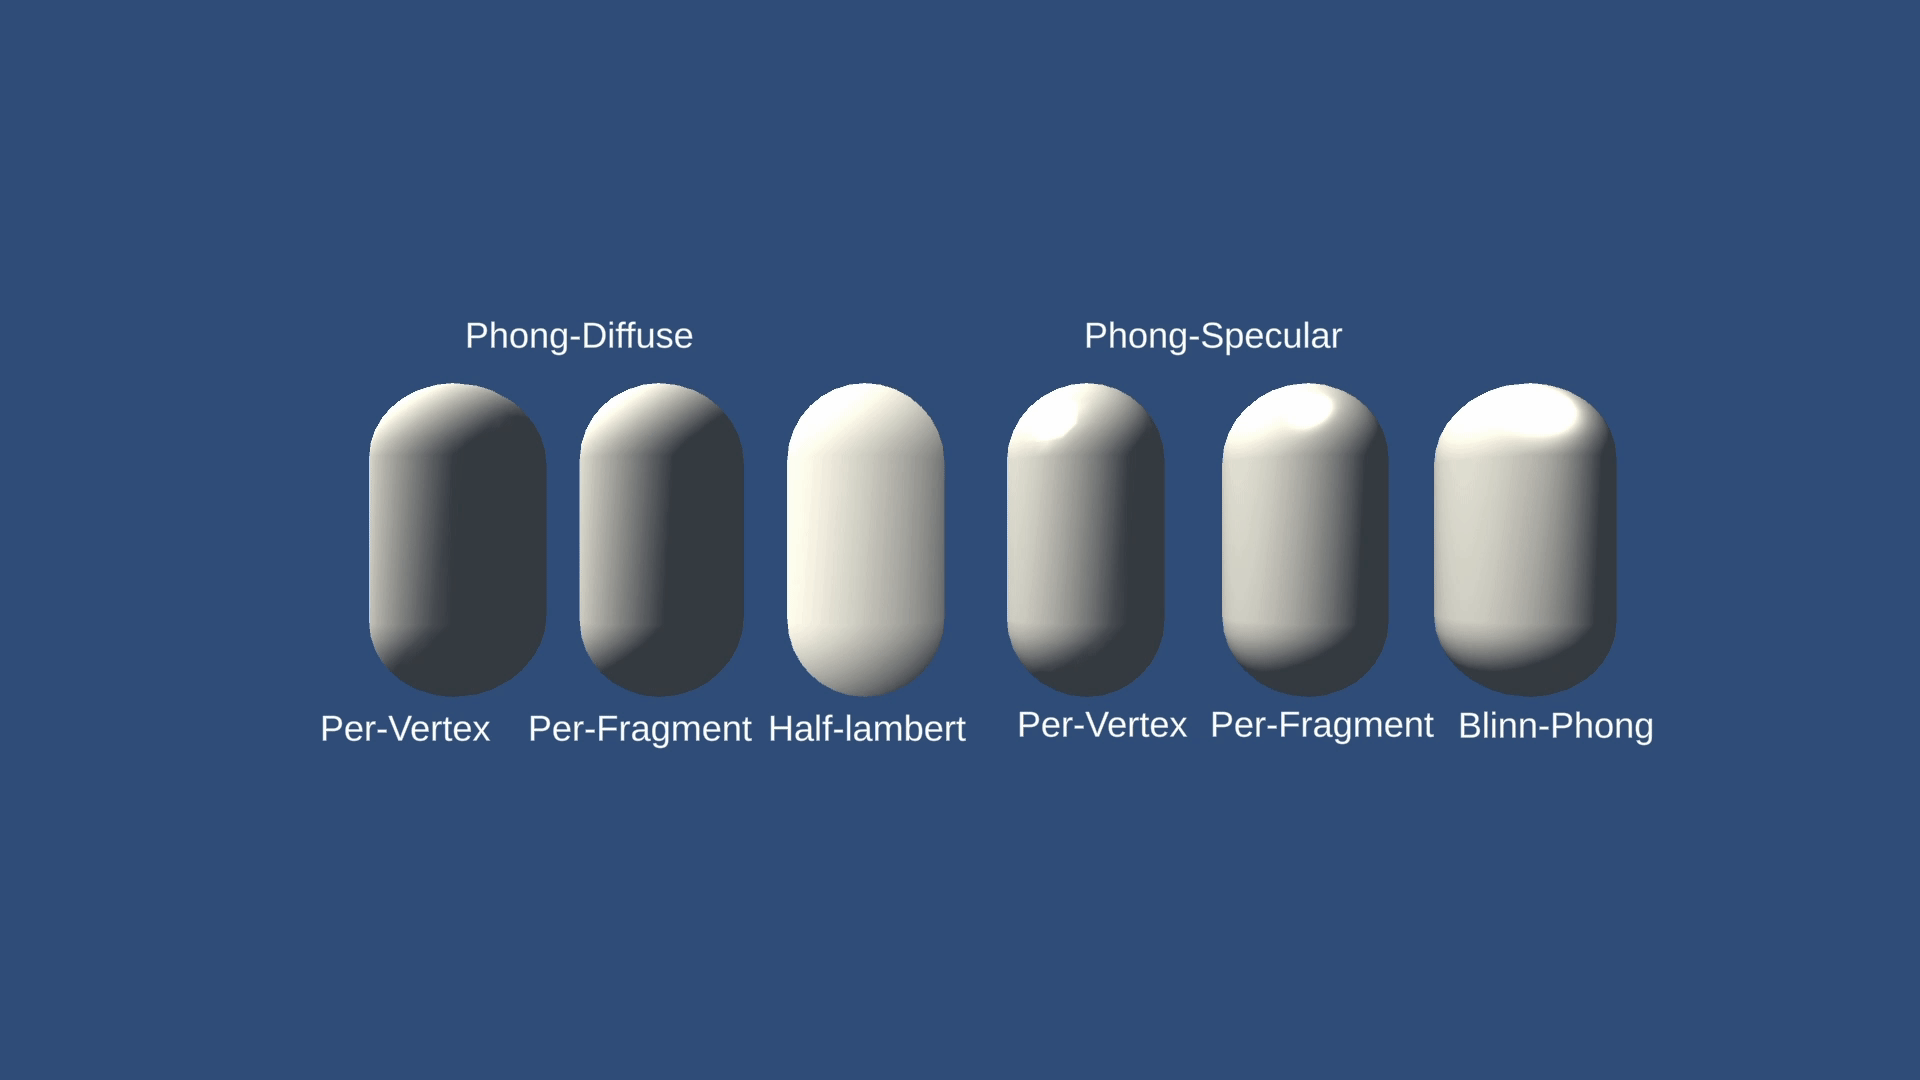
Unity光照模型实践
光照作为3D渲染中最重要的部分之一,如何去模拟真实环境的光照是重要的研究内容,但是现实环境光照过于复杂,有很多经典好用的光照模型去近似真实光照。 根据基础的Phong模型 最终某个点的结果为 环境光Ambient 漫反射光Diffuse 高光Specula…...

从0创建并部署一个网页到服务器
创建一个页面 1 下载node.js 下载VScode 2 在Windows下找一个路径新建一个文件夹 例如:D:\study_project\PersonalWeb 3 VSCodee中打开文件夹 4 Windows下 管理员身份打开命令提示符,执行npm install -g vue/cli 5 VSCode下打开终端,执…...

Ubuntu 22.04 安装 OCI CLI
Ubuntu 22.04 安装 OCI CLI 安装命令 安装命令 wget https://codeload.github.com/oracle/oci-cli/zip/master -O oci-cli.zip pip install oci-cli.zip完结!...

K8S的安装工具
kubectl Kubernetes 命令行工具 kubectl, 让你可以对 Kubernetes 集群运行命令。 你可以使用 kubectl 来部署应用、监测和管理集群资源以及查看日志。 有关更多信息,包括 kubectl 操作的完整列表,请参见 kubectl参考文件。 kubectl 可安装在…...
vue中哪些数组的方法可以做到响应式
Vue2 中为什么直接通过数组的索引修改元素是不会触发视图更新 vue2 为什么不直接监听数组 Vue2 对于数组提供了一些变异方法 重写数组方法源码分析 定义拦截器将拦截器挂载到数组上面收集依赖 扩展:理解Vue2如何解决数组和对象的响应式问题 对复杂对象的处理 复杂对…...
软考科目如何选择?
软考科目繁多,让许多学弟学妹感到困惑,不知道该选择哪个科目。以下是一些建议,可以根据个人实际需求选择备考的科目。 1、初级是可选的 软考初级非常简单,适合刚刚入门学习的朋友报考。对于一些有基础的朋友,建议直接…...

羊大师解读,血压波动
羊大师解读,血压波动 血压是身体健康的一个重要指标,但有时候我们会发现血压存在着波动的情况。血压波动的原因有很多,包括生活方式、遗传因素、药物影响等等。本文小编羊大师将为大家详细介绍血压波动的原因,以及预防和管理血压…...

关于充值!购买的流量卡第一次在哪充值?这个问题你想过吗?
手机套餐太贵、物联卡体验又不好,而官网申请的流量卡又都是定向流量,所以,运营商推出的只能线上申请的大流量卡一时之间便成了大家关注的焦点。 在流量卡的使用过程中,申请是免费的,快递是免费的,但…...

什么是大模型:概念、分类与当前主流模型全梳理
什么是大模型? 大模型,通常指的是参数规模很大、训练数据很多、具备较强通用能力的人工智能模型。它之所以叫“大”,通常体现在几个方面: 第一,参数量大。 从早期的几千万、几亿参数,发展到几十亿、上百亿&…...

除了卸载浏览器,ADB还能帮你清理哪些OPPO手机预装软件?附完整包名清单
深度优化OPPO手机:ADB卸载非必要预装应用全指南 对于追求系统纯净度的OPPO手机用户而言,预装应用往往占据宝贵存储空间并消耗后台资源。本文将系统介绍如何利用Android Debug Bridge(ADB)工具精准管理ColorOS系统中的各类预装组件…...

如何在10分钟内搭建AI与Figma双向通信系统:TalkToFigma MCP完整指南
如何在10分钟内搭建AI与Figma双向通信系统:TalkToFigma MCP完整指南 【免费下载链接】cursor-talk-to-figma-mcp TalkToFigma: MCP integration between AI Agent (Cursor, Claude Code) and Figma, allowing Agentic AI to communicate with Figma for reading des…...

基于BMapGL与MapVGL,实战城市人流热力图可视化
1. 从零开始搭建热力图开发环境 第一次接触百度地图GL版开发时,我也被各种配置搞得晕头转向。现在把完整的环境搭建流程梳理出来,帮你避开我踩过的那些坑。BMapGL作为百度地图的WebGL版本,相比传统API渲染效率提升明显,特别适合数…...

别再死记硬背了!我用700多页图解八股文,帮你把Java面试考点画成故事
用视觉叙事重构Java面试:700页图解背后的认知科学实践 翻开任何一本Java面试指南,你大概率会看到密密麻麻的文字罗列——"JVM内存结构分为哪几部分?""Synchronized和ReentrantLock有什么区别?"这些被称为&quo…...

昇腾平台上的异构编程
昇腾平台作为国产化 AI 算力核心底座,采用CPUNPU 异构计算架构,异构编程是充分释放昇腾硬件算力、实现高性能计算与 AI 推理融合加速的关键技术。异构编程指在同一计算任务中,协同调度通用处理器(CPU)与神经网络处理器…...

录音转文字app免费版有哪些?2026年免费录音转文字app排行榜实测对比
做语音采访、课程记录或会议纪要的时候,经常卡在两个问题上:一是转写完的文字错漏太多得反复修改,二是处理一堆音频文件特别耗时间。微信里有个叫提词匠的小程序在这类需求里效率比较高,下面会重点拆解它,同时对比几个…...

家庭Kubernetes集群实践:从硬件选型到GitOps自动化部署
1. 项目概述:从个人服务器到家庭集群的进化如果你和我一样,是个喜欢在家里折腾点技术玩意儿的爱好者,从一台树莓派跑点小服务,到后来升级成一台小主机,再到后来发现服务越来越多,备份、高可用、资源隔离这些…...

Linux入门篇之RK3588基于Buildroot系统下安装交叉编译器
一、交叉编译器 交叉编译器是一种能够在一种计算机平台上生成另一种平台可执行代码的编译器。例如,在x86架构的PC上编译出运行于ARM架构嵌入式设备的程序。与本地编译器不同,交叉编译器的编译环境和运行环境是分离的。 二、为什么需要交叉编译器&#…...
)
51单片机断电记忆功能实现:用AT24C02做个简易电子计数器(含完整代码)
51单片机断电记忆功能实战:基于AT24C02的智能计数器开发指南 在嵌入式系统开发中,数据持久化存储是一个常见但至关重要的需求。想象一下,当你精心设计的计数器设备在断电后丢失所有记录,或者每次重启都需要重新配置参数࿰…...