Android Jetpack之用Room+ViewModel+LiveData实现增删改查数据(createFromAsset())
文章目录
- 一、Room简介
- 二、用Room+ViewModel+LiveData增删改查数据
- 三、下载源码
一、Room简介
Room是Google推出的数据库框架,是一个 ORM (Object Relational Mapping)对象关系映射数据库、其底层还是对SQLite的封装。
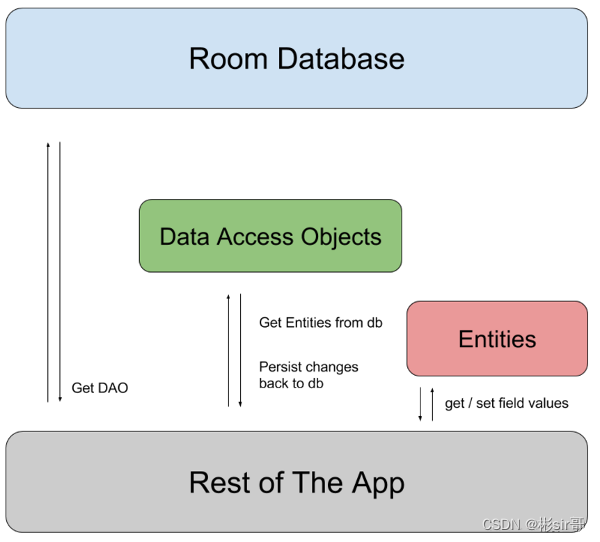
Room包含三个主要组件:
- 数据库类(
DataBase),用于保存数据库并作为应用持久性数据底层连接的主要访问点。 - 数据实体(
Entity),用于表示应用的数据库中的表。 - 数据访问对象 (
DAO),提供您的应用可用于查询、更新、插入和删除数据库中的数据的方法。
@Entity表结构实体@PrimaryKey主键@ColumnInfo列/字段信息
二、用Room+ViewModel+LiveData增删改查数据
用 Entity、Dao、Database 操作数据库
数据库的每个表,都对应一个Entity,一个Dao(Dao负责增删改查操作)
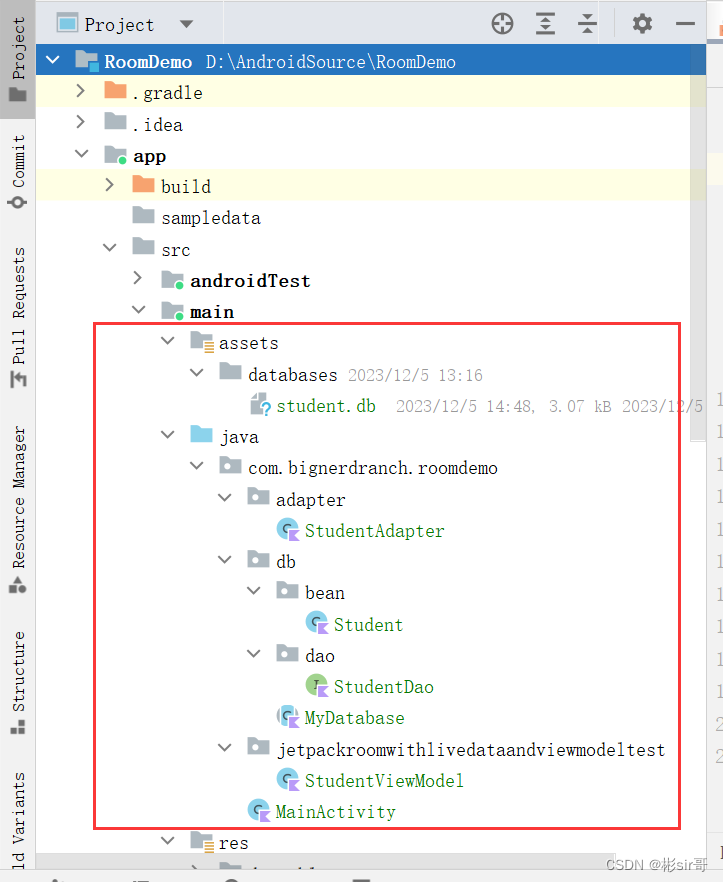
项目RoomDemo,如下图:
在build.gradle添加如下依赖:
plugins {id 'com.android.application'id 'kotlin-android'id 'kotlin-android-extensions'id 'kotlin-kapt'
}dependencies {def room_version = "2.3.0"implementation "androidx.room:room-runtime:$room_version"annotationProcessor "androidx.room:room-compiler:$room_version"kapt "androidx.room:room-compiler:$room_version"
}
首先,创建一个数据表Student。先创建包名,在com.bignerdranch.roomdemo下创建一个db包,db下创建bean包,bean包下创建Student类。
package com.bignerdranch.roomdemo.db.beanimport androidx.room.ColumnInfo
import androidx.room.Entity
import androidx.room.Ignore
import androidx.room.PrimaryKey
import org.jetbrains.annotations.NotNull@Entity(tableName = "student")
class Student {@NotNull@PrimaryKey(autoGenerate = true)@ColumnInfo(name = "id", typeAffinity = ColumnInfo.INTEGER)var id = 0@NotNull@ColumnInfo(name = "name", typeAffinity = ColumnInfo.TEXT)var name: String@NotNull@ColumnInfo(name = "age", typeAffinity = ColumnInfo.TEXT)var age: String/*** Room会使用这个构造器来存储数据,也就是当你从表中得到Student对象时候,Room会使用这个构造器*/constructor(id: Int, name: String, age: String) {this.id = idthis.name = namethis.age = age}/*** 由于Room只能识别和使用一个构造器,如果希望定义多个构造器,你可以使用Ignore标签,让Room忽略这个构造器* 同样,@Ignore标签还可用于字段,使用@Ignore标签标记过的字段,Room不会持久化该字段的数据*/@Ignoreconstructor(name: String, age: String) {this.name = namethis.age = age}
}
这个@Entity就是表示数据库中的表,Student类对应就是Student表,@PrimaryKey表示主键,这里是id,autoGenerate = true 是自增,@NonNull表示不为空。 @ColumnInfo表示表中的列名,name = "name"表示列名的值。
下面在db包下新建一个dao包,创建StudentDao,里面的代码如下:
package com.bignerdranch.roomdemo.db.daoimport androidx.lifecycle.LiveData
import androidx.room.*
import com.bignerdranch.roomdemo.db.bean.Student@Dao
interface StudentDao {@Insertfun insertStudent(student: Student?)@Deletefun deleteStudent(student: Student?)@Updatefun updateStudent(student: Student?)@Query("SELECT * FROM student")fun getStudentList(): LiveData<List<Student?>?>? //希望监听学生表的变化,为其加上LiveData@Query("SELECT * FROM student WHERE id = :id")fun getStudentById(id: Int): Student?
}
StudentDao是一个接口,主要是定义了一些方法,通过注解在编译的时候会生成实现类。
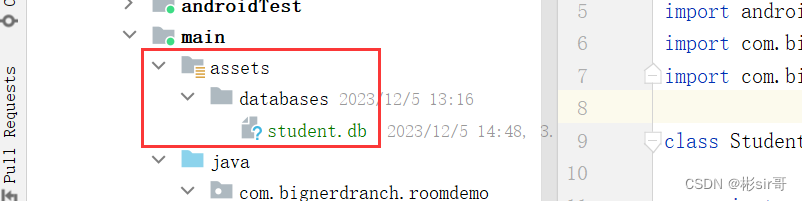
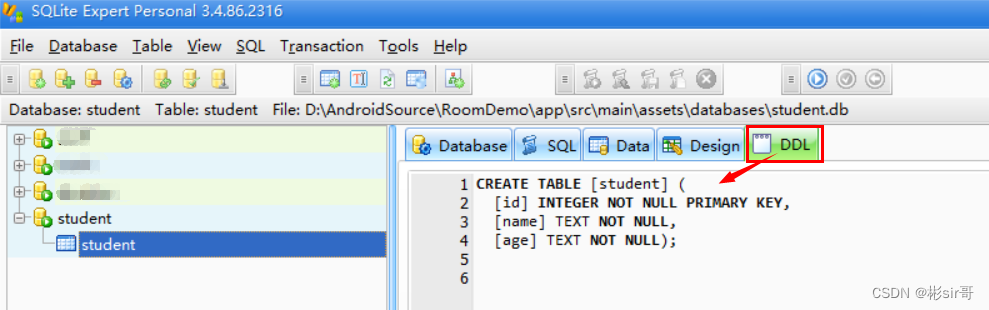
然后,新建main/assets/databases,并在其中放置student.db文件,其位置如下:
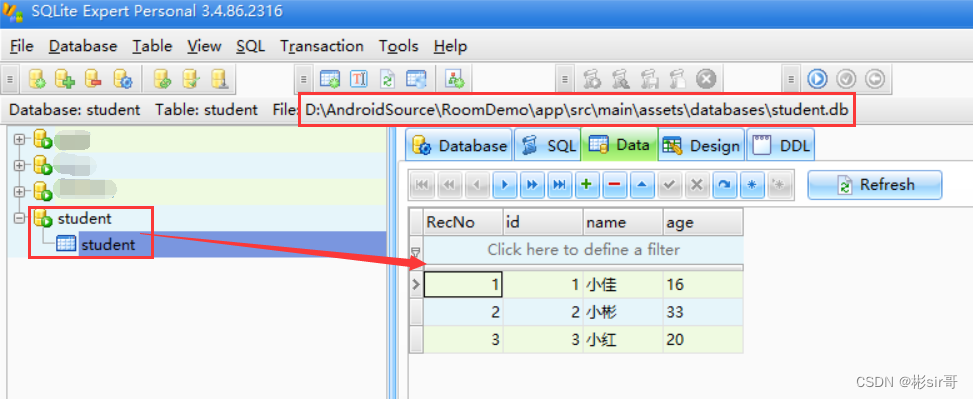
用SQLite软件导入students.db文件,如下图:
然后,在MyDatabase.kt中,用createFromAsset()方法从assets/database/students.db创建Room数据库,下面是数据库的创建,在db包下新建一个MyDatabase类,继承RoomDatabase,代码如下:
package com.bignerdranch.roomdemo.dbimport android.content.Context
import android.util.Log
import androidx.room.Database
import androidx.room.Room
import androidx.room.RoomDatabase
import androidx.room.migration.Migration
import androidx.sqlite.db.SupportSQLiteDatabase
import com.bignerdranch.roomdemo.db.bean.Student
import com.bignerdranch.roomdemo.db.dao.StudentDao@Database(entities = [Student::class], exportSchema = false, version = 1)
abstract class MyDatabase() : RoomDatabase() {abstract fun studentDao(): StudentDao?companion object {private val DATABASE_NAME = "my_db"private var databaseInstance: MyDatabase? = null@Synchronized //已同步fun getInstance(context: Context): MyDatabase? {if (databaseInstance == null) {databaseInstance = Room.databaseBuilder(context.applicationContext,MyDatabase::class.java,DATABASE_NAME).createFromAsset("databases/student.db").fallbackToDestructiveMigration()
//                    .addMigrations(MIGRATION_1_2, MIGRATION_2_3, MIGRATION_1_3, MIGRATION_3_4).build()}return databaseInstance}val MIGRATION_1_2: Migration = object : Migration(1, 2) {override fun migrate(database: SupportSQLiteDatabase) {//do somethingLog.d("MyDatabase", "MIGRATION_1_2")}}private val MIGRATION_2_3: Migration = object : Migration(2, 3) {override fun migrate(database: SupportSQLiteDatabase) {//do somethingLog.d("MyDatabase", "MIGRATION_2_3")}}private val MIGRATION_1_3: Migration = object : Migration(1, 3) {override fun migrate(database: SupportSQLiteDatabase) {//do somethingLog.d("MyDatabase", "MIGRATION_1_3")}}val MIGRATION_3_4: Migration = object : Migration(3, 4) {override fun migrate(database: SupportSQLiteDatabase) {Log.d("MyDatabase", "MIGRATION_3_4")database.execSQL("CREATE TABLE temp_Student (" +"id INTEGER PRIMARY KEY NOT NULL," +"name TEXT," +"age TEXT)")database.execSQL("INSERT INTO temp_Student (id, name, age) " +"SELECT id, name, age FROM Student")database.execSQL("DROP TABLE Student")database.execSQL("ALTER TABLE temp_Student RENAME TO Student")}}}
}
这里的@Database注解表示这个类是用来操作数据库的,entities = [Student::class]表示当前数据库中的表,只有一个Student表,多的表用应用逗号隔开。version = 1表示数据库的版本,可以做数据库的升级操作。createFromAsset()是Room库中提供的。
注意这是一个抽象类,在编译时Room会帮助构建实现类。
现在运行一下,手机或者模拟器都可以。然后什么都不用去做。
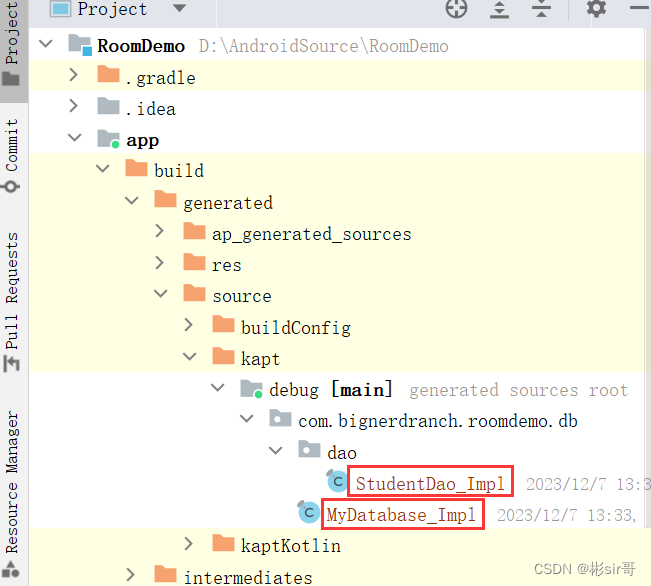
可以查看到,MyDatabase和StudentDao的实现类都自动生成了。
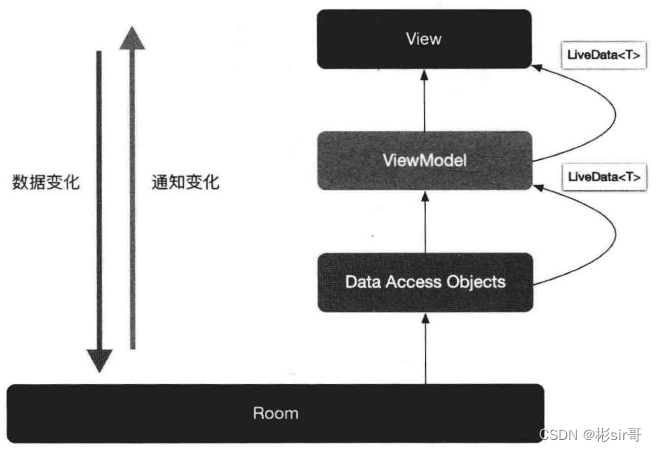
ViewModel内:通过 Room.Database查到LiveData数据,在外部监听LiveData
当 Room变化时,通过ViewModel内的LiveData通知页面数据的变化,架构如下:
新建StudentViewModel类,该类继承自AndroidViewModel,其中有Database和LiveData,代码如下:
package com.bignerdranch.roomdemo.jetpackroomwithlivedataandviewmodeltestimport android.app.Application
import androidx.lifecycle.AndroidViewModel
import androidx.lifecycle.LiveData
import com.bignerdranch.roomdemo.db.MyDatabase
import com.bignerdranch.roomdemo.db.bean.Studentclass StudentViewModel(application: Application) : AndroidViewModel(application) {private val myDatabase: MyDatabase?val liveDataStudent: LiveData<List<Student?>?>?init {myDatabase = MyDatabase.getInstance(application)liveDataStudent = myDatabase!!.studentDao()!!.getStudentList()}}
表操作无非就是那么几个,增删改查,但是为了更直观的显示结果,需要对UI做一些改动。
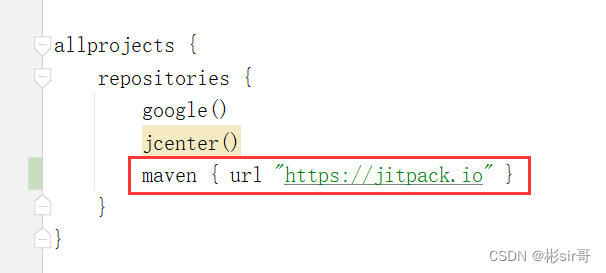
在工程的build.gradle中增加repositories闭包中增加jitpack库。
然后在app的build.gradle中的dependencies{}比包中增加
implementation 'com.github.CymChad:BaseRecyclerViewAdapterHelper:3.0.6'
1. 修改布局
Sync一下,下面修改一下页面的布局文件activity_main.xml
<?xml version="1.0" encoding="utf-8"?>
<LinearLayout xmlns:android="http://schemas.android.com/apk/res/android"android:layout_width="match_parent"android:layout_height="match_parent"android:orientation="vertical"><Buttonandroid:id="@+id/btnInsertStudent"android:layout_width="wrap_content"android:layout_height="wrap_content"android:layout_gravity="center_horizontal"android:layout_margin="12dp"android:text="Add a Student"android:textAllCaps="false" /><androidx.recyclerview.widget.RecyclerViewandroid:id="@+id/recyclerView"android:layout_width="match_parent"android:layout_height="wrap_content" />
</LinearLayout>
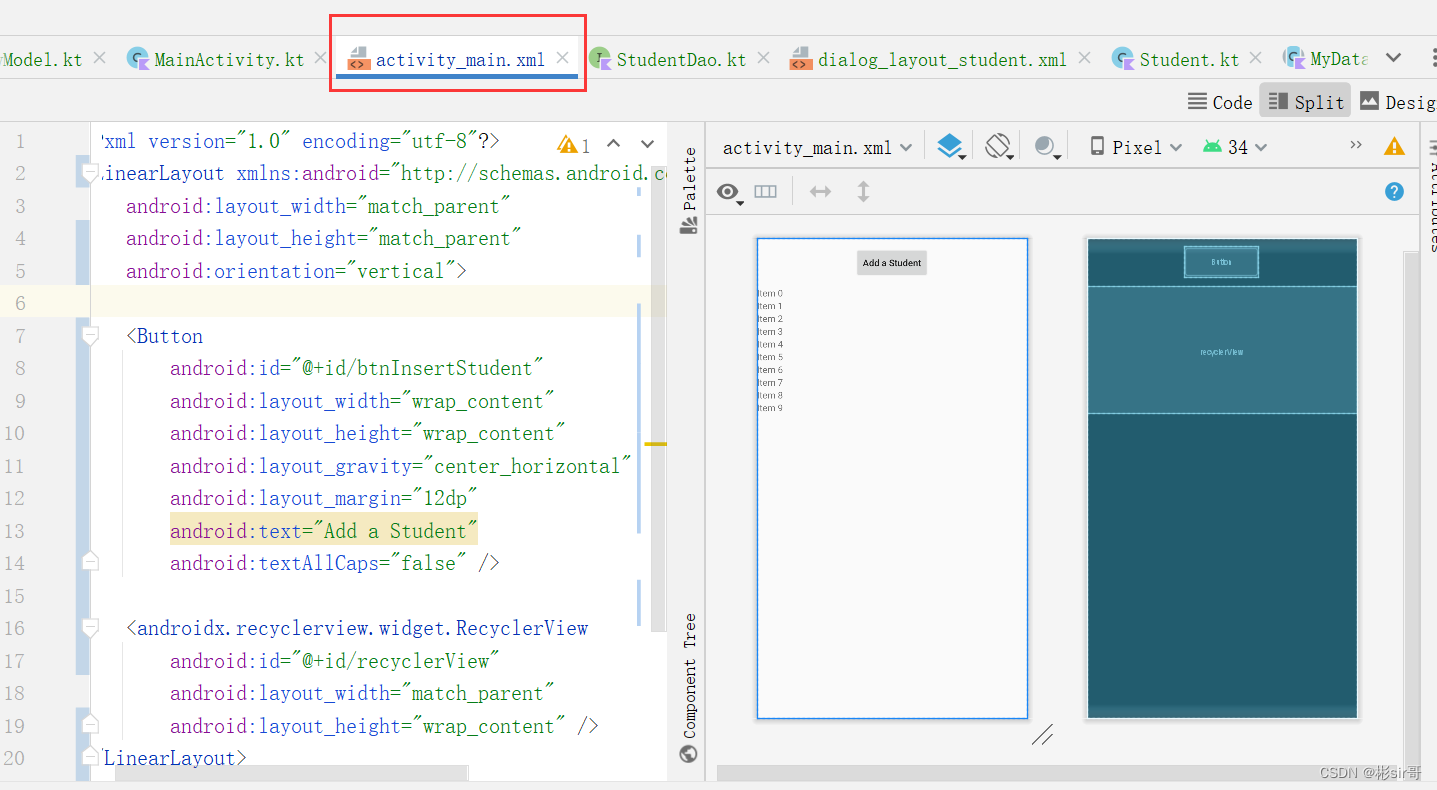
这里就是一个按钮和一个列表,下面创建列表的item布局
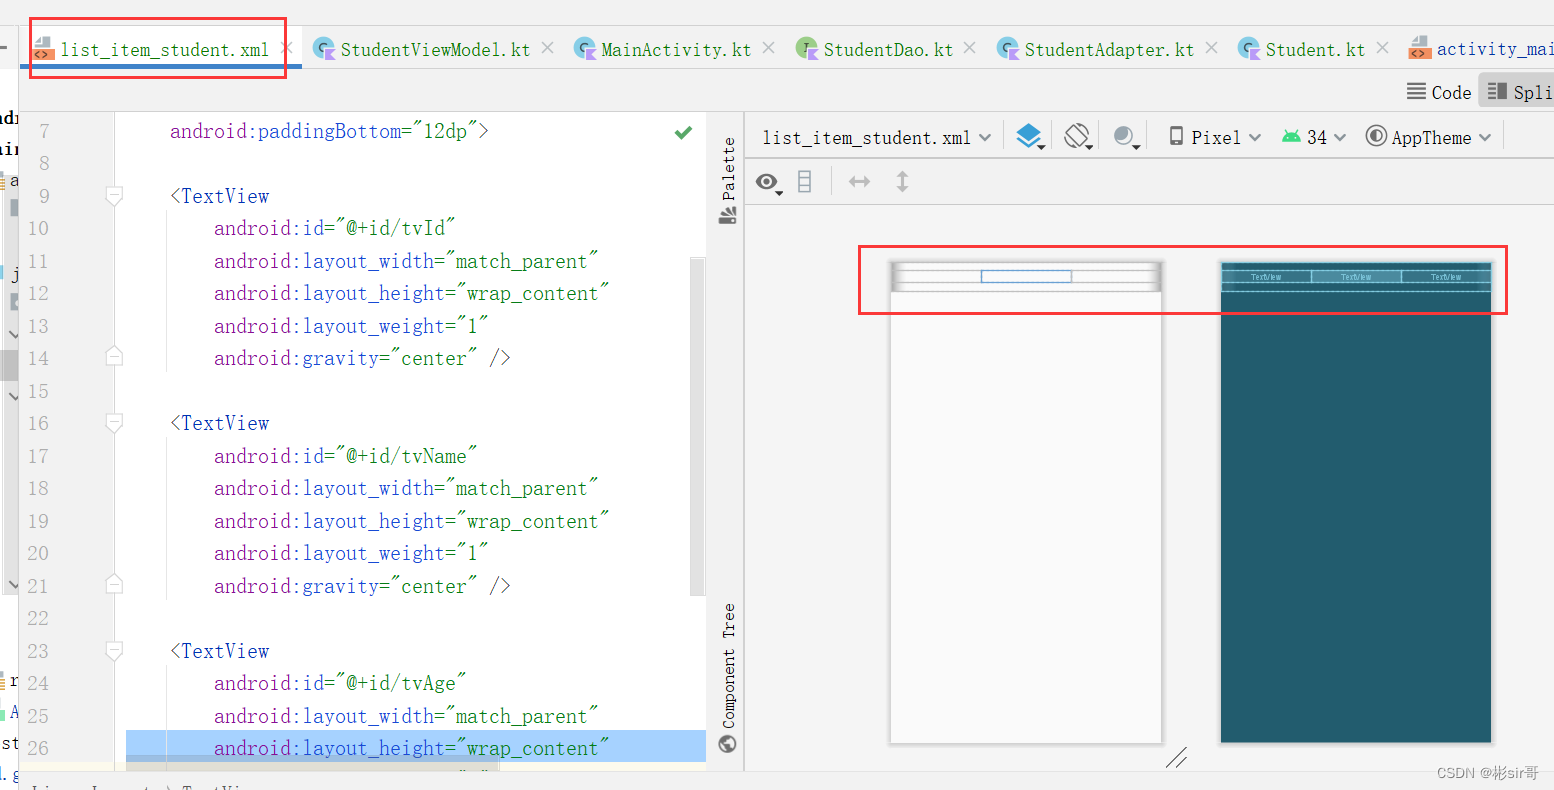
在layout下新建一个list_item_student.xml布局,代码如下:
<?xml version="1.0" encoding="utf-8"?>
<LinearLayout xmlns:android="http://schemas.android.com/apk/res/android"android:layout_width="match_parent"android:layout_height="wrap_content"android:orientation="horizontal"android:paddingTop="12dp"android:paddingBottom="12dp"><TextViewandroid:id="@+id/tvId"android:layout_width="match_parent"android:layout_height="wrap_content"android:layout_weight="1"android:gravity="center" /><TextViewandroid:id="@+id/tvName"android:layout_width="match_parent"android:layout_height="wrap_content"android:layout_weight="1"android:gravity="center" /><TextViewandroid:id="@+id/tvAge"android:layout_width="match_parent"android:layout_height="wrap_content"android:layout_weight="1"android:gravity="center" /></LinearLayout>
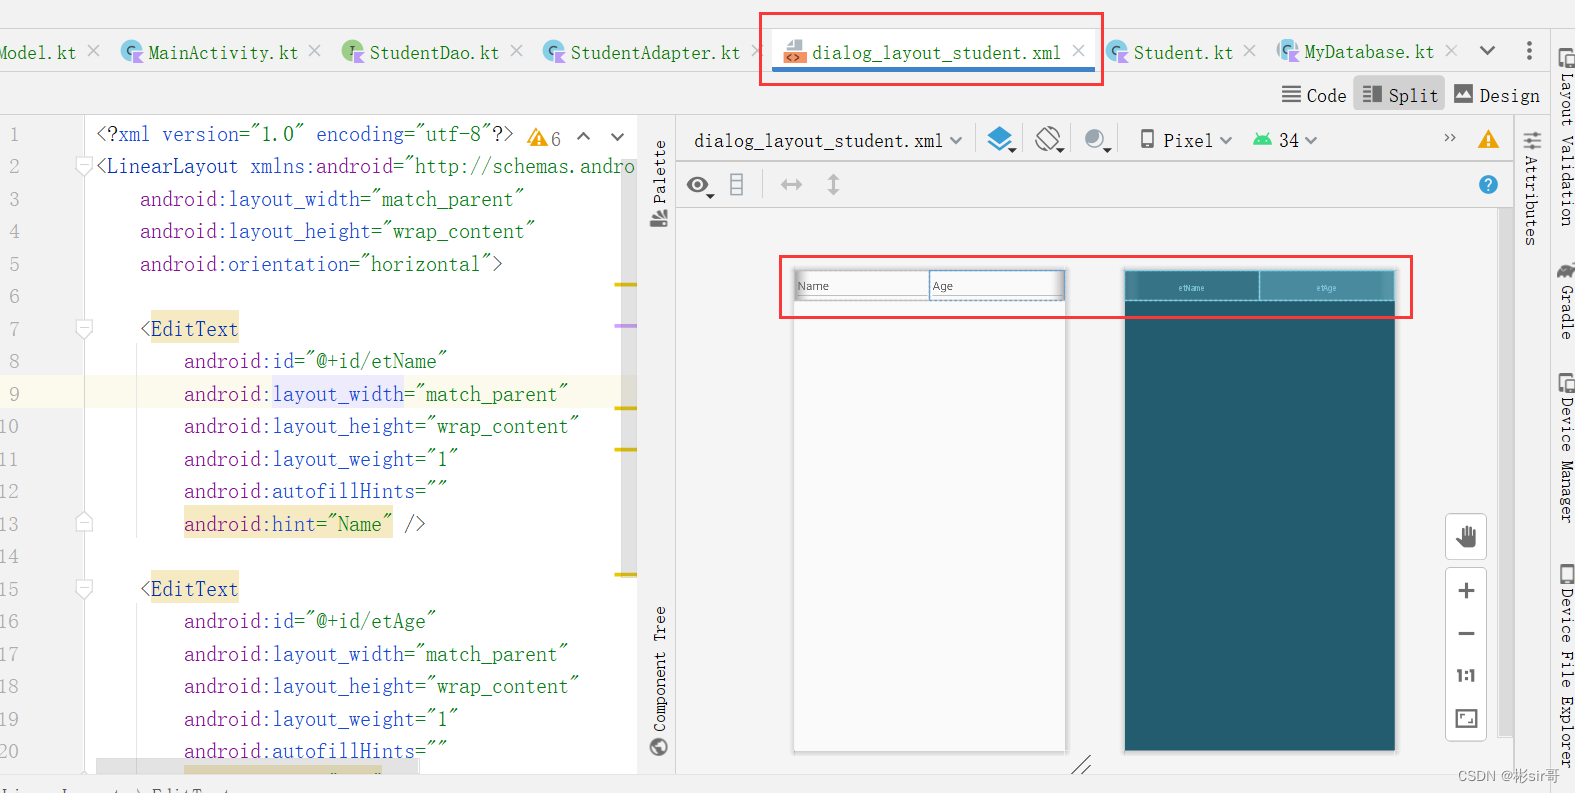
新建dialog_layout_student.xml,布局如下:
<?xml version="1.0" encoding="utf-8"?>
<LinearLayout xmlns:android="http://schemas.android.com/apk/res/android"android:layout_width="match_parent"android:layout_height="wrap_content"android:orientation="horizontal"><EditTextandroid:id="@+id/etName"android:layout_width="match_parent"android:layout_height="wrap_content"android:layout_weight="1"android:autofillHints=""android:hint="Name" /><EditTextandroid:id="@+id/etAge"android:layout_width="match_parent"android:layout_height="wrap_content"android:layout_weight="1"android:autofillHints=""android:hint="Age" /></LinearLayout>
在com.bignerdranch.roomdemo下新建一个adapter包,包下新建StudentAdapter类,作为列表数据的适配器。代码如下:
2. 列表适配器
package com.bignerdranch.roomdemo.adapterimport com.bignerdranch.roomdemo.R
import com.bignerdranch.roomdemo.db.bean.Student
import com.chad.library.adapter.base.BaseQuickAdapter
import com.chad.library.adapter.base.viewholder.BaseViewHolder
import kotlinx.android.synthetic.main.list_item_student.view.*class StudentAdapter(layoutResId: Int = R.layout.list_item_student) :BaseQuickAdapter<Student, BaseViewHolder>(layoutResId) {override fun convert(holder: BaseViewHolder, item: Student) {holder.itemView.run {tvId.text = item.id.toString()tvName.text = item.nametvAge.text = item.age}}
}
然后,在MainActivity中初始化List,实例化StudentViewModel并监听其LiveData的变化,代码如下:
package com.bignerdranch.roomdemoimport android.content.DialogInterface
import android.os.AsyncTask
import android.os.Bundle
import android.text.TextUtils
import android.view.View
import android.widget.EditText
import android.widget.Toast
import androidx.appcompat.app.AlertDialog
import androidx.appcompat.app.AppCompatActivity
import androidx.lifecycle.ViewModelProvider
import androidx.recyclerview.widget.LinearLayoutManager
import com.bignerdranch.roomdemo.adapter.StudentAdapter
import com.bignerdranch.roomdemo.db.MyDatabase
import com.bignerdranch.roomdemo.db.bean.Student
import com.bignerdranch.roomdemo.jetpackroomwithlivedataandviewmodeltest.StudentViewModel
import com.chad.library.adapter.base.BaseQuickAdapter
import com.chad.library.adapter.base.listener.OnItemLongClickListener
import kotlinx.android.synthetic.main.activity_main.recyclerView/**** @date*/
class MainActivity : AppCompatActivity(), OnItemLongClickListener {private val mStudentAdapter by lazy {StudentAdapter().apply {setOnItemLongClickListener(this@MainActivity)}}private var myDatabase: MyDatabase? = nullprivate var studentList: MutableList<Student>? = nulloverride fun onCreate(savedInstanceState: Bundle?) {super.onCreate(savedInstanceState)setContentView(R.layout.activity_main)findViewById<View>(R.id.btnInsertStudent).setOnClickListener {openAddStudentDialog()}studentList = ArrayList()val layoutManager = LinearLayoutManager(this@MainActivity)layoutManager.orientation = LinearLayoutManager.VERTICALrecyclerView.layoutManager = layoutManagerrecyclerView.adapter = mStudentAdapter
//        mStudentAdapter.setList(studentList)myDatabase = MyDatabase.getInstance(this)val studentViewModel: StudentViewModel =ViewModelProvider(this)[StudentViewModel::class.java]studentViewModel.liveDataStudent!!.observe(this) { students ->(studentList as ArrayList<Student?>).clear()(studentList as ArrayList<Student?>).addAll(students!!)
//            studentAdapter2!!.notifyDataSetChanged()mStudentAdapter.setList(studentList)mStudentAdapter.notifyDataSetChanged()}}private fun updateOrDeleteDialog(student: Student?) {val options = arrayOf("更新", "删除")AlertDialog.Builder(this@MainActivity).setTitle("").setItems(options) { _, which ->if (which == 0) {openUpdateStudentDialog(student)} else if (which == 1) {if (student != null) {DeleteStudentTask(student).execute()}}}.show()}private fun openAddStudentDialog() {val customView: View = this.layoutInflater.inflate(R.layout.dialog_layout_student, null)val etName = customView.findViewById<EditText>(R.id.etName)val etAge = customView.findViewById<EditText>(R.id.etAge)val builder = AlertDialog.Builder(this@MainActivity)val dialog = builder.create()dialog.setTitle("Add Student")dialog.setButton(DialogInterface.BUTTON_POSITIVE, "OK") { dialog, which ->if (TextUtils.isEmpty(etName.text.toString()) || TextUtils.isEmpty(etAge.text.toString())) {Toast.makeText(this@MainActivity, "输入不能为空", Toast.LENGTH_SHORT).show()} else {InsertStudentTask(etName.text.toString(), etAge.text.toString()).execute()}}dialog.setButton(DialogInterface.BUTTON_NEGATIVE,"CANCEL") { dialog, which -> dialog.dismiss() }dialog.setView(customView)dialog.show()}private fun openUpdateStudentDialog(student: Student?) {if (student == null) {return}val customView: View = this.layoutInflater.inflate(R.layout.dialog_layout_student, null)val etName = customView.findViewById<EditText>(R.id.etName)val etAge = customView.findViewById<EditText>(R.id.etAge)etName.setText(student.name)etAge.setText(student.age)val builder = AlertDialog.Builder(this@MainActivity)val dialog = builder.create()dialog.setTitle("Update Student")dialog.setButton(DialogInterface.BUTTON_POSITIVE, "OK") { dialog, which ->if (TextUtils.isEmpty(etName.text.toString()) || TextUtils.isEmpty(etAge.text.toString())) {Toast.makeText(this@MainActivity, "输入不能为空", Toast.LENGTH_SHORT).show()} else {UpdateStudentTask(student.id,etName.text.toString(),etAge.text.toString()).execute()}}dialog.setButton(DialogInterface.BUTTON_NEGATIVE,"CANCEL") { dialog, which -> dialog.dismiss() }dialog.setView(customView)dialog.show()}private inner class InsertStudentTask(var name: String, var age: String) :AsyncTask<Void?, Void?, Void?>() {override fun doInBackground(vararg params: Void?): Void? {myDatabase!!.studentDao()!!.insertStudent(Student(name, age))return null}}private inner class UpdateStudentTask(var id: Int, var name: String, var age: String) :AsyncTask<Void?, Void?, Void?>() {override fun doInBackground(vararg params: Void?): Void? {myDatabase!!.studentDao()!!.updateStudent(Student(id, name, age))return null}}private inner class DeleteStudentTask(var student: Student) : AsyncTask<Void?, Void?, Void?>() {override fun doInBackground(vararg params: Void?): Void? {myDatabase!!.studentDao()!!.deleteStudent(student)return null}}override fun onItemLongClick(adapter: BaseQuickAdapter<*, *>,view: View,position: Int): Boolean {updateOrDeleteDialog((studentList as ArrayList<Student?>)[position])return true}
}
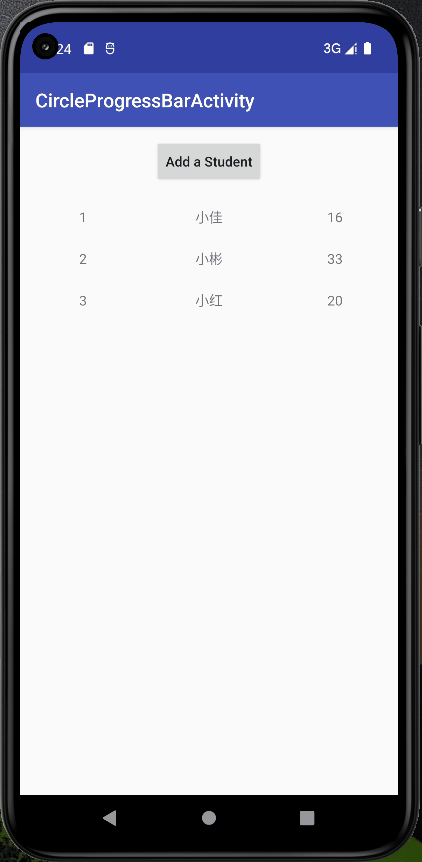
运行后,当LiveData数据变化时,更新UI即可,而不需要每次增删改后都必须用QueryStudentTask() 来手动查询一次数据库,简化了系统,效果如下:
三、下载源码
下载源码github地址:https://github.com/caobin10/RoomDemo
相关文章:
Android Jetpack之用Room+ViewModel+LiveData实现增删改查数据(createFromAsset())
文章目录 一、Room简介二、用RoomViewModelLiveData增删改查数据三、下载源码 一、Room简介 Room是Google推出的数据库框架,是一个 ORM (Object Relational Mapping)对象关系映射数据库、其底层还是对SQLite的封装。 Room包含三个主要组件: 数据库类&…...
 语句-读取的数据进行排序)
MySQL ORDER BY(排序) 语句-读取的数据进行排序
MySQL ORDER BY(排序) 语句 我们知道从 MySQL 表中使用 SELECT 语句来读取数据。 如果我们需要对读取的数据进行排序,我们就可以使用 MySQL 的 ORDER BY 子句来设定你想按哪个字段哪种方式来进行排序,再返回搜索结果。 MySQL ORDER BY(排序) 语句可以…...
【ES】es介绍
倒排索引(Inverted Index)和正排索引(Forward Index) 正排索引是一种以文档为单位的索引结构,它将文档中的每个单词或词组与其所在的文档进行映射关系的建立。正排索引通常用于快速检索指定文档的内容,可以…...

07.kubernetes客户端部署
kubernetes 客户端部署 主要是配置 kubectl 完成以下两个操作: 首先是要实现通过命令行连接到Kubernetes的apiserver然后就是创建必要的 ClusterRoleBinding 实现 kubelet bootstrapping CSR 的自动验签kubelet bootstrapping主要涉及以下两个问题,官方文档已经给出详细的介…...
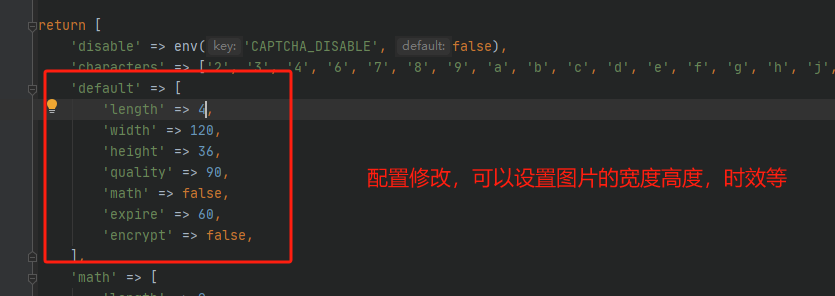
laravel5.8中实现验证码组件的安装和验证
本篇文章主要讲解使用laravel5.8自带的验证码库实现验证码验证的效果教程。通过本教程你可以快速接入到自己的项目中开发相应的验证功能。 作者:任聪聪 (rccblogs.com) 日期:2023年12月17日 实际效果 安装步骤 步骤一、输入命令 composer require mews…...
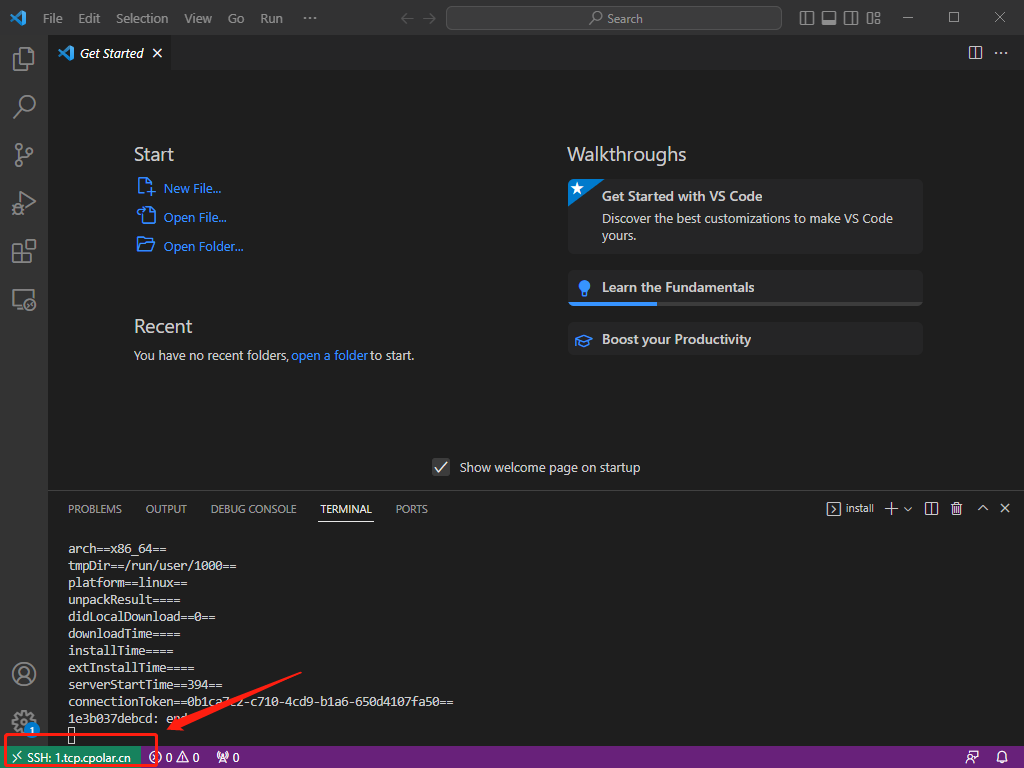
使用VScode通过内网穿透在公网环境下远程连接进行开发
文章目录 前言1、安装OpenSSH2、vscode配置ssh3. 局域网测试连接远程服务器4. 公网远程连接4.1 ubuntu安装cpolar内网穿透4.2 创建隧道映射4.3 测试公网远程连接 5. 配置固定TCP端口地址5.1 保留一个固定TCP端口地址5.2 配置固定TCP端口地址5.3 测试固定公网地址远程 前言 远程…...
常用的 linux 命令
常用的 linux 命令 1.从其他机器拷贝文件夹2.查看哪个程序在用特定端口3.实时监控日志文件内容4.查看指定用户拥有的进程5.查看磁盘空间使用情况6.文件搜索which(whereis) 显示系统命令所在目录find 查找任何文件或目录1) 根据文件名称查找2)…...
[论文阅读笔记28] 对比学习在多目标跟踪中的应用
这次做一篇2D多目标跟踪中使用对比学习的一些方法. 对比学习通过以最大化正负样本特征距离, 最小化正样本特征距离的方式来实现半监督或无监督训练. 这可以给训练MOT的外观特征网络提供一些启示. 使用对比学习做MOT的鼻祖应该是QDTrack, 本篇博客对QDTrack及其后续工作做一个总…...

Ubuntu 下播放语音提示
目录 一、安装语音库 二、生成音频文件 三、语音播放代码 一、安装语音库 sudo apt update apt-get install libasound2-dev二、生成音频文件 # 文字生成 MP3网地:https://www.text-to-speech.cn/# MP3 转 WAV网址:https://www.aconvert.com/cn/aud…...

ubuntu 用户管理
ubuntu 用户管理 用户组管理用户管理VNC 远程桌面参考 用户组管理 # 查看所有组信息 cat /etc/group # 查看当前用户所在组 groups # 添加用户组 sudo groupadd uav# 添加ostest用户到 uav 用户组 需要注销并重新登录 sudo gpasswd -a ostest uav sudo usermod -aG uav ostes…...
轻舟已过万重山,鸿蒙4.0程序员危机
现在是2023年末。自从华为推出的鸿蒙系统到现在已经有4年多。之前的鸿蒙系统只是基于Android套壳,因为这也也被无数人瞧不起,自从华为秋季发布会后,宣布鸿蒙4.0问世。不再兼容Android,华为做独立的系统终于打了翻身仗。 鸿蒙系统…...

【Pytorch】学习记录分享6——PyTorch经典网络 ResNet与手写体识别
【Pytorch】学习记录分享5——PyTorch经典网络 ResNet 1. ResNet (残差网络)基础知识2. 感受野3. 手写体数字识别3. 0 数据集(训练与测试集)3. 1 数据加载3. 2 函数实现:3. 3 训练及其测试: 1. ResNet &…...

Flink1.17实战教程(第三篇:时间和窗口)
系列文章目录 Flink1.17实战教程(第一篇:概念、部署、架构) Flink1.17实战教程(第二篇:DataStream API) Flink1.17实战教程(第三篇:时间和窗口) Flink1.17实战教程&…...
CSS 纵向扩展动画
上干货 <template><!-- mouseenter"startAnimation" 表示在鼠标进入元素时触发 startAnimation 方法。mouseleave"stopAnimation" 表示在鼠标离开元素时触发 stopAnimation 方法。 --><!-- 容器元素 --><div class"container&q…...

Android 12 Token 机制
一、前言 在 android framework 框架中 activity 和 window 是相互关联的,而他们的管理者 AMS 和 WMS 是怎么来实现这种关联关系的,答案就是通过 token。 首先大家需要了解一下 LayoutParams,当然属性很多,简单了解即可…...

TCP与UDP是流式传输协议吗?
TCP(传输控制协议)和UDP(用户数据报协议)是两种主要的传输层协议,它们用于在网络中传输数据。它们不是流式传输协议,而是提供了不同的数据传输特性: 1. TCP(传输控制协议࿰…...

61 贪心算法解救生艇问题
问题描述:第i个人的体重为peaple[i],每个船可以承载的最大重量为limit。每艘船最多可以同时载两人,但条件是这些人的重量之和最多为limit,返回载到每一个人多虚的最小船数,(保证每个人被船载)。 贪心算法求解:先将数组…...
C#高级 01.Net多线程
一.基本概念 1.什么是线程? 线程是操作系统中能独立运行的最小单位,也是程序中能并发执行的一段指令序列线程是进程的一部分,一个进程可以包含多个线程,这些线程共享进程资源进程有线程入口,也可以创建更多的线程 2.…...

Java---泛型讲解
文章目录 1. 泛型类2. 泛型方法3. 泛型接口4. 类型通配符5. 可变参数6. 可变参数的使用 1. 泛型类 1. 格式:修饰符 class 类名 <类型>{ }。例如:public class Generic <T>{ }。 2. 代码块举例: public class Generic <T>{…...
【论文阅读笔记】SegVol: Universal and Interactive Volumetric Medical Image Segmentation
Du Y, Bai F, Huang T, et al. SegVol: Universal and Interactive Volumetric Medical Image Segmentation[J]. arXiv preprint arXiv:2311.13385, 2023.[代码开源] 【论文概述】 本文思路借鉴于自然图像分割领域的SAM,介绍了一种名为SegVol的先进医学图像分割模型…...

Synopsys ICC 2016环境变量配置详解:从.bashrc编辑到license启动的保姆级步骤
Synopsys ICC 2016环境变量配置全流程实战指南 当你第一次打开Synopsys ICC 2016却遭遇"Command not found"时,90%的问题都源于环境变量配置不当。作为芯片设计领域的工业级工具链,正确的环境配置不仅是运行的先决条件,更是后续所有…...

用STM32F103和继电器DIY智能家居:低成本改造台灯/风扇的保姆级教程
用STM32F103和继电器DIY智能家居:低成本改造台灯/风扇的保姆级教程 智能家居的概念早已不再遥不可及,借助STM32F103这样的低成本微控制器和简单的继电器模块,任何人都能将普通家电升级为智能设备。本文将手把手教你如何将一个普通台灯或风扇改…...

Perplexity法律文献搜索实战指南:7步构建精准检索式,避开90%的无效结果
更多请点击: https://codechina.net 第一章:Perplexity法律文献搜索实战指南:7步构建精准检索式,避开90%的无效结果 Perplexity 作为面向专业研究者的AI搜索工具,在法律文献检索中展现出远超通用搜索引擎的语义理解与…...
)
教育工作者速看!Perplexity学术搜索正在悄然替代Google Scholar(2024教育AI搜索白皮书首发)
更多请点击: https://codechina.net 第一章:教育工作者为何需要重新定义学术搜索范式 在数字学术资源呈指数级增长的今天,传统基于关键词匹配与单一数据库检索的学术搜索方式,已难以支撑教育工作者开展跨学科教学设计、证据本位课…...

RK3562核心板开发指南:从硬件设计到AI部署的全流程解析
1. 项目概述:从一颗芯片到一套完整的开发资源最近在嵌入式圈子里,RK3562这颗芯片的热度持续攀升。作为瑞芯微面向中高端AIoT和工业应用推出的新一代处理器,它凭借其均衡的CPU/GPU/NPU性能和出色的能效比,吸引了不少开发者的目光。…...

避开HAL库:STM32F103寄存器级PWM移相全桥配置避坑指南
STM32F103寄存器级PWM移相全桥实战:从原理到避坑指南 在嵌入式开发领域,许多工程师习惯使用HAL库或标准库进行STM32开发,这确实能提高开发效率。但当项目对时序精度、资源占用或性能有极致要求时,直接操作寄存器往往能带来更优的效…...

ME_PURCHDOC_POSTED
创建采购订单时常用的保存增强ME_PROCESS_PO_CUST~POST里是没有订单号的可以使用ME_PURCHDOC_POSTED来做相关处理...

DragGAN交互式图像编辑:基于GAN潜空间优化的点驱动形变技术详解
1. 项目概述:交互式生成对抗网络的直观革命最近在AIGC的圈子里,一个名为“DragGAN”的研究项目火了。它实现的效果非常直观且震撼:你上传一张由生成对抗网络(GAN)生成的图片,比如一只狮子、一辆汽车或一张人…...

CANape测量启动报错“存储空间不足”的系统性排查与解决方案
1. 问题现象与根源剖析如果你是一名汽车电子工程师,或者从事车辆标定、诊断与测试工作,那么CANape这个软件对你来说,就像吃饭用的筷子一样熟悉。它强大的测量、标定和诊断功能,是我们在开发过程中不可或缺的利器。然而,…...

御坂翻译器:3分钟开启你的日语游戏无障碍之旅
御坂翻译器:3分钟开启你的日语游戏无障碍之旅 【免费下载链接】MisakaTranslator 御坂翻译器—Galgame/文字游戏/漫画多语种实时机翻工具 项目地址: https://gitcode.com/gh_mirrors/mi/MisakaTranslator 你是否曾经因为语言障碍而错过了那些精彩的日系游戏剧…...