从私有Git仓库的搭建到命令的使用及部署再到分支管理
一、版本控制系统/版本控制器
1. 版本控制系统:
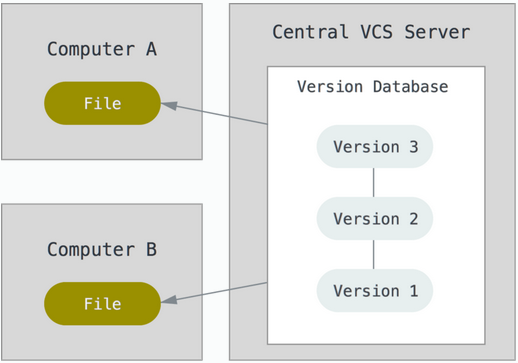
git 分布式 —没有中心代码库,所有机器之间的地位同等(每台机器上都有相同的代码)

svn 集中管理的 —有中心代码库,其他都是客户端
2.git与svn介绍
1.git属于分布式版本控制系统
客户端并不只提取最新版本的文件,而是把原始的代码仓库完整地克隆下来。
优点:
a.由于任何人每次提取操作,实际上都是一次对代码仓库的完整备份,因此近乎所有的操作都可以在本地执行,速度就是相当的快,并且可以在网络断开的时候操作仍然不受影响,可以频繁的进行提交更新,等到有网络的时候再上传到远程的仓库就可以了。
b.git的分支模型,相当的轻量级,被称为“必杀技”。缺点:
a.每个开发人员都拥有所有的代码,不利于核心代码的保密(如果有重要代码需要保密,则不建议使用git)
2.svn属于集中式的版本控制系统
有一个单一的集中管理的服务器,保存所有文件的修订版本,而协同工作的成员通过客户端连接到这台服务器,进行文件上传和更新。优点:
a.使用简单,比较符合我们的常规思维
b.同步代码比较简单,只要一步操作即可。缺点:
a.丢失数据的风险:最显而易见的,由于集中化的特点,如果版本库的服务器磁盘发生故障等,你不能保证所有的数据已经有人提取出来了,最坏的情况是彻底的丢失整个项目的所有历史更改记录。
b.网络中断的情况下,协作就无法进行了,因为无法连接服务器进行上传和更新。
面试题:Git和SVN的区别?
3.git 相关概念—纯命令行
工作区
版本库
暂存区
HEAD
版本号
版本日志
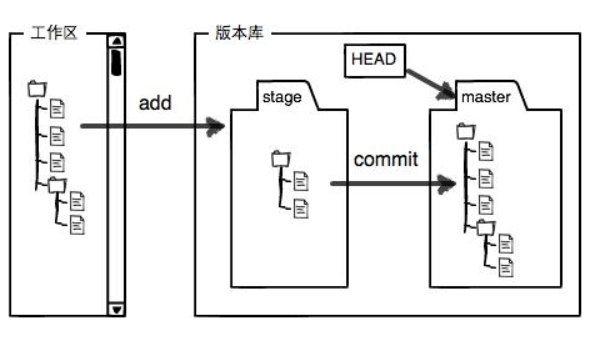
1.工作区(Working Directory)
存放git版本仓库的目录就是工作区(放源代码的地方)2.暂存区:
Git的版本库里存了很多东西,其中最重要的就是称为stage(或者叫index)的暂存区,(会将代码添加到缓存区,没有问题之后在提交到版本库)3.版本库(Repository)
工作区有一个隐藏目录.git,这个不算工作区,而是Git的版本库。4.HEAD:指向你最近一次提交后的结果。(现在是哪个版本,头就会指向这个版本)

1.添加文件到暂存区:
创建两个文件add到stage:
#git add 文件名
或者
#git add *
从暂存区(stage)提交到当前master分支的HEAD:
git commit -m “版本描述信息” #提交暂存区里的修改到版本库的分支
版本号:最核心用的是id号。每个版本都会有一个id号,也就是commit id,
查看版本号:
版本号可以通过版本日志查看
commit完成的功能类似快照,可以使用git log查看每次的commit记录
[root@vm20 gittest]# git log
commit fbecfa3d04ae5038aa11bf55942e46c840077ace                  //id号
二、git部署
环境:git-server 192.168.246.214 充当中心代码仓库服务器client 192.168.246.213所有机器关闭防火墙和selinux安装:所有机器都安装[root@git-server ~]# yum install -y git[root@git-server ~]# git --version git version 1.8.3.1准备:因为Git是分布式版本控制系统,所以,每个机器都必须注册:你的名字和Email地址。注意git config命令的--global参数,用了这个参数,表示你这台机器上所有的Git仓库都会使用这个配置。所有的机器都添加,只要邮箱和用户不一样就可以。 # git config --global user.email "soho@163.com" ----设置邮箱# git config --global user.name "soho" ----加添用户# cat /root/.gitconfig# git config --global color.ui true #语法高亮# git config --list #查看全局配置
1、git使用
创建版本库:
1.创建一个空目录**:**在中心服务器上创建
[root@git-server ~]# mkdir /git-test
[root@git-server ~]# useradd git   #创建一个git用户用来运行git
[root@git-server ~]# passwd git  #给用户设置密码git
[root@git-server ~]# cd /git-test/
2.通过git init命令把这个目录变成Git可以管理的仓库:
第1种情况:可以改代码,还能上传到别人的机器,别人也能从你这里下载但是别人不能上传代码到你的机器上。第2种情况:只是为了上传代码用,别人从这台机器上下载代码也可以上传代码到这台机器上,经常用于核心代码库。
创建裸库: 适用于作为远程中心仓库使用
创建裸库才可以从别处push(传)代码过来,使用–bare参数------裸
git init --bare 库名字
创建一裸库:
[root@git-server git-test]# git init --bare testgit
Initialized empty Git repository in /git-test/testgit/
[root@git-server ~]# chown git.git /git-test -R  #修改权限
2.仓库创建完成后查看库目录:
[root@git-server git-test]# cd testgit/
[root@git-server testgit]# ls
branches  config  description  HEAD  hooks  info  objects  refs
1.客户端
1.配置免密登录
[root@client ~]# ssh-keygen    #生成秘钥
[root@client ~]# ssh-copy-id -i git@192.168.246.214   #将秘钥传输到git服务器中的git用户
2.克隆git仓库
[root@client ~]# yum install -y git
[root@client ~]# git clone git@192.168.246.214:/git-test/testgit/
Cloning into 'testgit'...
warning: You appear to have cloned an empty repository.
[root@client ~]# ls  #查看仓库已经克隆下来了
anaconda-ks.cfg    testgit
1.创建文件模拟代码提交到仓库
1.在testgit目录下创建一个测试文件test.txt
[root@client ~]# cd testgit/
[root@client testgit]# vim test.txt   #随便写点东西2.把文件添加到暂存区:使用 "git add" 建立跟踪
[root@client testgit]# git add test.txt
注: 这里可以使用 git add * 或者 git add -A3.提交文件到仓库分支:
[root@client testgit]# git commit -m "test1"
[master (root-commit) 2b51ff9] test11 file changed, 2 insertions(+)create mode 100644 test.txt-m:描述4.查看git状态:
[root@client testgit]# git status
# On branch master   #分支位于master
5.修改文件后再此查看状态:
[root@client testgit]# echo '1122334' >> test.txt
[root@client testgit]# git status
# 位于分支 master
# 尚未暂存以备提交的变更:
#   (使用 "git add <file>..." 更新要提交的内容)
#   (使用 "git checkout -- <file>..." 丢弃工作区的改动)
#
#	修改:      readme.txt
#
修改尚未加入提交(使用 "git add" 和/或 "git commit "
6.先add
[root@client testgit]# git add -A
8.再次提交commit:
[root@client testgit]# git commit  -m "add2"
[master 73bf688] add21 file changed, 1 insertion(+)[root@client testgit]# git status
# On branch master
nothing to commit, working directory clean
2、版本回退
已经提交了不合适的修改到版本库时,想要撤销本次提交,使用版本回退,不过前提是没有推送到远程库。
查看现在的版本:
[root@client testgit]# git log
显示的哪个版本在第一个就是当前使用的版本。
版本回退(切换):
在Git中,上一个版本就是HEAD^,当然往上100个版本写100个比较容易数不过来,所以写成HEAD~100(一般使用id号来恢复)
回到上一个版本
[root@client testgit]# git reset --hard HEAD^
HEAD is now at 0126755 test1
2.回到指定的版本(根据版本号):
[root@client testgit]# git reset --hard dd66ff
HEAD is now at dd66ff9 add2
==========================================================
注:消失的ID号:
回到早期的版本后再查看git log会发现最近的版本消失,可以使用reflog查看消失的版本ID,用于回退到消失的版本
[root@vm20 gittest]# git reflog
2a85982 HEAD@{0}: reset: moving to 2a859821a2385e136fe83f3a206b287eb0eb8c18
f5bc8c1 HEAD@{1}: commit: test-version2
2a85982 HEAD@{2}: commit (initial): test-version1[root@git-client testgit]# git reset --hard f5bc8c1
3、删除文件
从工作区删除test.txt,并且从版本库一起删除
++++++++++++++++++++++++++++++++++++++++++++++++++++++++++++++++++++++++++++++
工作区:
[root@client testgit]# touch test.txt
[root@client testgit]# git status
# On branch master
# Untracked files:
#   (use "git add <file>..." to include in what will be committed)
#
#       qf.txt
nothing added to commit but untracked files present (use "git add" to track)
[root@client testgit]# rm -rf test.txt  未添加到暂存区,可直接删除
[root@client testgit]# git status
# On branch master
nothing to commit, working directory clean+++++++++++++++++++++++++++++++++++++++++++++++++++++++++++++++++++++++++++++++
已从工作区提交到暂存区:
第一种方法
[root@client testgit]# touch test.txt
[root@client testgit]# git status
# On branch master
#
# Initial commit
#
# Untracked files:
#   (use "git add <file>..." to include in what will be committed)
#
#       test.txt
nothing added to commit but untracked files present (use "git add" to track)[root@client testgit]# git add test.txt
[root@client testgit]# git status
# On branch master
#
# Initial commit
#
# Changes to be committed:
#   (use "git rm --cached <file>..." to unstage)
#
#       new file:   test.txt
#[root@client testgit]#  git rm --cache test.txt #从暂存区移除
rm 'test.txt'
[root@client testgit]# ls
test.txt
[root@client testgit]# git status
# On branch master
#
# Initial commit
#
# Untracked files:
#   (use "git add <file>..." to include in what will be committed)
#
#       test.txt
nothing added to commit but untracked files present (use "git add" to track)
[root@client testgit]# rm -rf test.txt
[root@client testgit]# git status
# On branch master
#
# Initial commit
#
nothing to commit (create/copy files and use "git add" to track)第二种方法:
[root@client testgit]# touch  b.txt
[root@client testgit]# git add b.txt
[root@client testgit]# git status
# On branch master
#
# Initial commit
#
# Changes to be committed:
#   (use "git rm --cached <file>..." to unstage)
#
#       new file:   b.txt
#
[root@client testgit]# git rm -f b.txt
rm 'b.txt'
[root@client testgit]# ls
[root@client testgit]# git status
# On branch master
#
# Initial commit
#
nothing to commit (create/copy files and use "git add" to track)+++++++++++++++++++++++++++++++++++++++++++++++++++++++++++++++++++++++++++++++
直接在暂存区rm掉文件,如何解决
[root@client testgit]# touch c.txt
[root@client testgit]# git add c.txt
[root@client testgit]# ls
c.txt
[root@client testgit]# git status
# On branch master
#
# Initial commit
#
# Changes to be committed:
#   (use "git rm --cached <file>..." to unstage)
#
#       new file:   c.txt
#
[root@client testgit]# rm -rf c.txt
[root@client testgit]# git status
# On branch master
#
# Initial commit
#
# Changes to be committed:
#   (use "git rm --cached <file>..." to unstage)
#
#       new file:   c.txt
#
# Changes not staged for commit:
#   (use "git add/rm <file>..." to update what will be committed)
#   (use "git checkout -- <file>..." to discard changes in working directory)
#
#       deleted:    c.txt
#
[root@client testgit]# git rm --cache c.txt
rm 'c.txt'
[root@client testgit]# ls
[root@client testgit]# git status
# On branch master
#
# Initial commit
#
nothing to commit (create/copy files and use "git add" to track)
[root@client testgit]#
+++++++++++++++++++++++++++++++++++++++++++++++++++++++++++++++++++++++++++++++++++++++++
4、修改文件
暂存区修改名称
[root@client testgit]# touch  a.txt
[root@client testgit]# git status
# On branch master
# Untracked files:
#   (use "git add <file>..." to include in what will be committed)
#
#       a.txt
nothing added to commit but untracked files present (use "git add" to track)
[root@client testgit]# git add a.txt
[root@client testgit]# git status
# On branch master
# Changes to be committed:
#   (use "git reset HEAD <file>..." to unstage)
#
#       new file:   a.txt
#
[root@client testgit]# git mv a.txt  d.txt
[root@client testgit]# git status
# On branch master
# Changes to be committed:
#   (use "git reset HEAD <file>..." to unstage)
#
#       new file:   d.txt
#
[root@client testgit]# ls
d.txt  test.txt
[root@client testgit]# git rm --cache d.txt
[root@client testgit]# rm -rf d.txt
5、将代码上传到仓库的master分支
[root@client testgit]# vi a.txt   #创建一个新文件
hello world
[root@client testgit]# git add a.txt
[root@client testgit]# git commit -m "add"
[root@client testgit]# git push origin master   #上传到中心仓库master分支
Counting objects: 11, done.
Compressing objects: 100% (4/4), done.
Writing objects: 100% (11/11), 828 bytes | 0 bytes/s, done.
Total 11 (delta 0), reused 0 (delta 0)
To git@192.168.246.214:/git-test/testgit/* [new branch]      master -> master
测试:
在客户端将仓库删除掉然后在克隆下来查看仓库中是否有文件
[root@client testgit]# cd
[root@client ~]# rm -rf testgit/
[root@client ~]# git clone git@192.168.246.214:/git-test/testgit/
Cloning into 'testgit'...
remote: Counting objects: 11, done.
remote: Compressing objects: 100% (4/4), done.
remote: Total 11 (delta 0), reused 0 (delta 0)
Receiving objects: 100% (11/11), done.
[root@client ~]# cd testgit/
[root@client testgit]# ls
a.txt
[root@client testgit]# cat a.txt
hello world
三、创建分支并合并分支
每次提交,Git都把它们串成一条时间线,这条时间线就是一个分支。截止到目前,只有一条时间线,在Git里,这个分支叫主分支,即master分支。HEAD严格来说不是指向提交,而是指向master,master才是指向提交的,所以,HEAD指向的就是当前分支。
在客户端操作:
[root@client ~]# git clone git@192.168.246.214:/git-test/testgit/
[root@client testgit]# git status
# On branch master   #当前所在为master分支
#
# Initial commit
#
nothing to commit (create/copy files and use "git add" to track)
注意:刚创建的git仓库默认的master分支要在第一次commit之后才会真正建立。然后先git add .添加所有项目文件到本地仓库缓存,再git commit -m "init commit"提交到本地仓库,之后就可以随心所欲地创建或切换分支了。
创建分支:
[root@client testgit]# git branch dev   #创建分支。
[root@client testgit]# git branch    #查看分支。*在哪里就表示当前是哪个分支dev
* master
切换分支:
[root@client testgit]# git checkout dev
Switched to branch 'dev'
[root@client testgit]# git branch
* devmaster
在dev分支创建一个文件;
[root@client testgit]# vi test.txt
[root@client testgit]# git add test.txt
[root@client testgit]# git commit -m "add dev"
[dev f855bdf] add dev1 file changed, 1 insertion(+)create mode 100644 test.txt
现在,dev分支的工作完成,我们就可以切换回master分支:[root@client testgit]# git checkout master
Switched to branch 'master'
切换回master分支后,再查看一个test.txt文件,刚才添加的内容不见了!因为那个提交是在dev分支上,而master分支此刻的提交点并没有变:
[root@client testgit]# ls
a.txt
现在,我们把dev分支的工作成果合并到master分支上:
[root@client testgit]# git merge dev
Updating 40833e0..f855bdf
Fast-forwardtest.txt | 1 +1 file changed, 1 insertion(+)create mode 100644 test.txt
[root@client testgit]# ls
a.txt  test.txt
现在已经将dev分支的内容合并到master上。确认没有问题上传到远程仓库:
[root@client testgit]# git push origin master
git merge命令用于合并指定分支到当前分支。合并后,再查看test.txt的内容,就可以看到,和dev分支的最新提交是完全一样的。
合并完成后,就可以放心地删除dev分支了:
[root@client testgit]# git branch -d dev
Deleted branch dev (was f855bdf).
删除后,查看branch,就只剩下master分支了:
[root@client testgit]# git branch
* master
部署gitlab服务
准备环境: 关闭防火墙和selinux
192.168.246.214 #gitlab服务器
1.配置yum源
[root@git-server ~]# cd /etc/yum.repos.d/
[root@git-server yum.repos.d]# vi gitlab-ce.repo
[gitlab-ce]
name=Gitlab CE Repository
baseurl=https://mirrors.tuna.tsinghua.edu.cn/gitlab-ce/yum/el$releasever
gpgcheck=0
enabled=1
安装相关依赖
[root@git-server yum.repos.d]# yum install -y postfix curl policycoreutils-python openssh-server
[root@git-server yum.repos.d]# systemctl enable sshd
[root@git-server yum.repos.d]# systemctl start sshd
安装postfix
[root@git-server yum.repos.d]# yum install postfix  -y   #安装邮箱
[root@git-server yum.repos.d]# systemctl enable postfix
[root@git-server yum.repos.d]# systemctl start postfix
[root@git-server yum.repos.d]# yum install -y gitlab-ce  #将会安装gitlab最新版本
配置gitlab登录链接
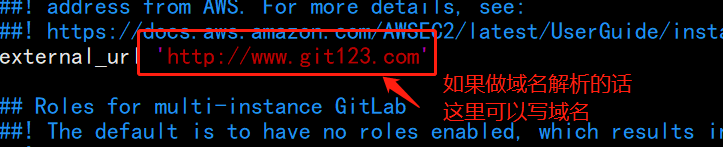
[root@git-server ~]# vim /etc/gitlab/gitlab.rb
1.# 添加对外的域名(gitlab.papamk.com请添加A记录指向本服务器的公网IP):将原来的修改为
external_url 'http://192.168.246.214'
2.设置地区
gitlab_rails['time_zone'] = 'Asia/Shanghai'

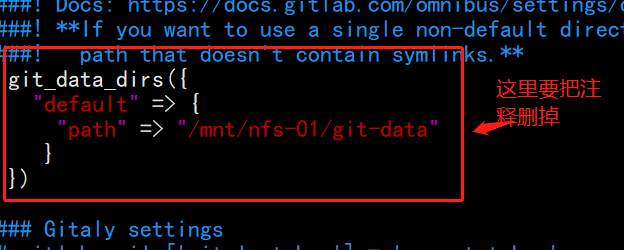
将数据路径的注释去掉,可以更改

开启ssh服务:

初始化Gitlab:
[root@git-server ~]# gitlab-ctl reconfigure #重新加载,需要等很长时间
…

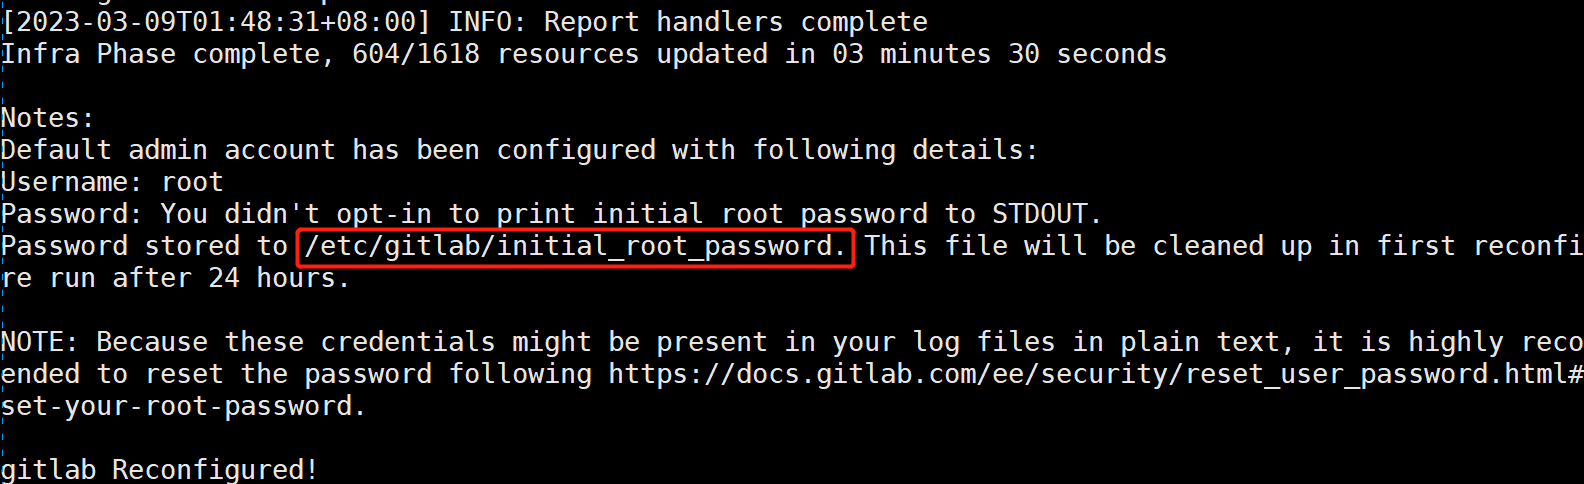
…
启动Gitlab服务:
[root@git-server ~]# gitlab-ctl start #启动

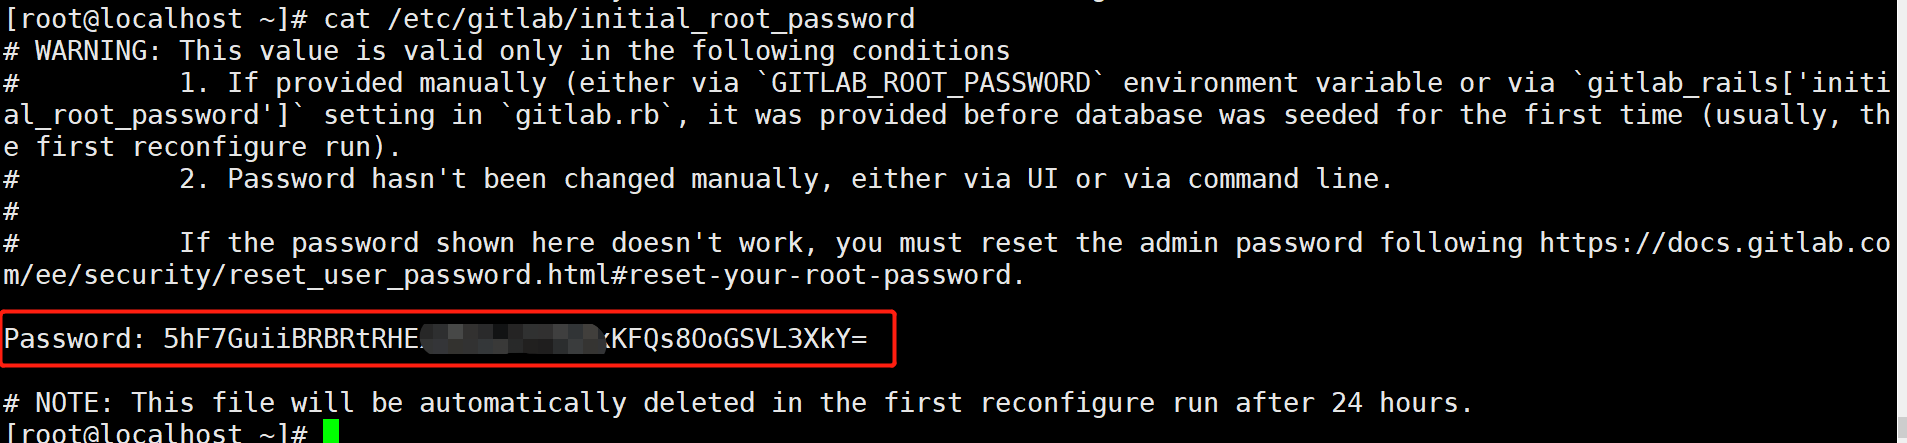
在gitlab14版本以上,会有默认的root用户,密码存在/etc/gitlab/initial_root_password
Gitlab 设置 HTTPS 方式
如果想要以上的 https 方式正常生效使用,则需要把 letsencrypt 自动生成证书的配置打开,这样在执行重
新让配置生效命令 (gitlab-ctl reconfigure) 的时候会自动给域名生成免费的证书并自动在 gitlab 自带的nginx 中加上相关的跳转配置,都是全自动的,非常方便。
letsencrypt['enable'] = true
letsencrypt['contact_emails'] = ['caryyu@qq.com']     # 这应该是一组要添加为联系人的电子邮件地址
测试访问:http://192.168.246.214
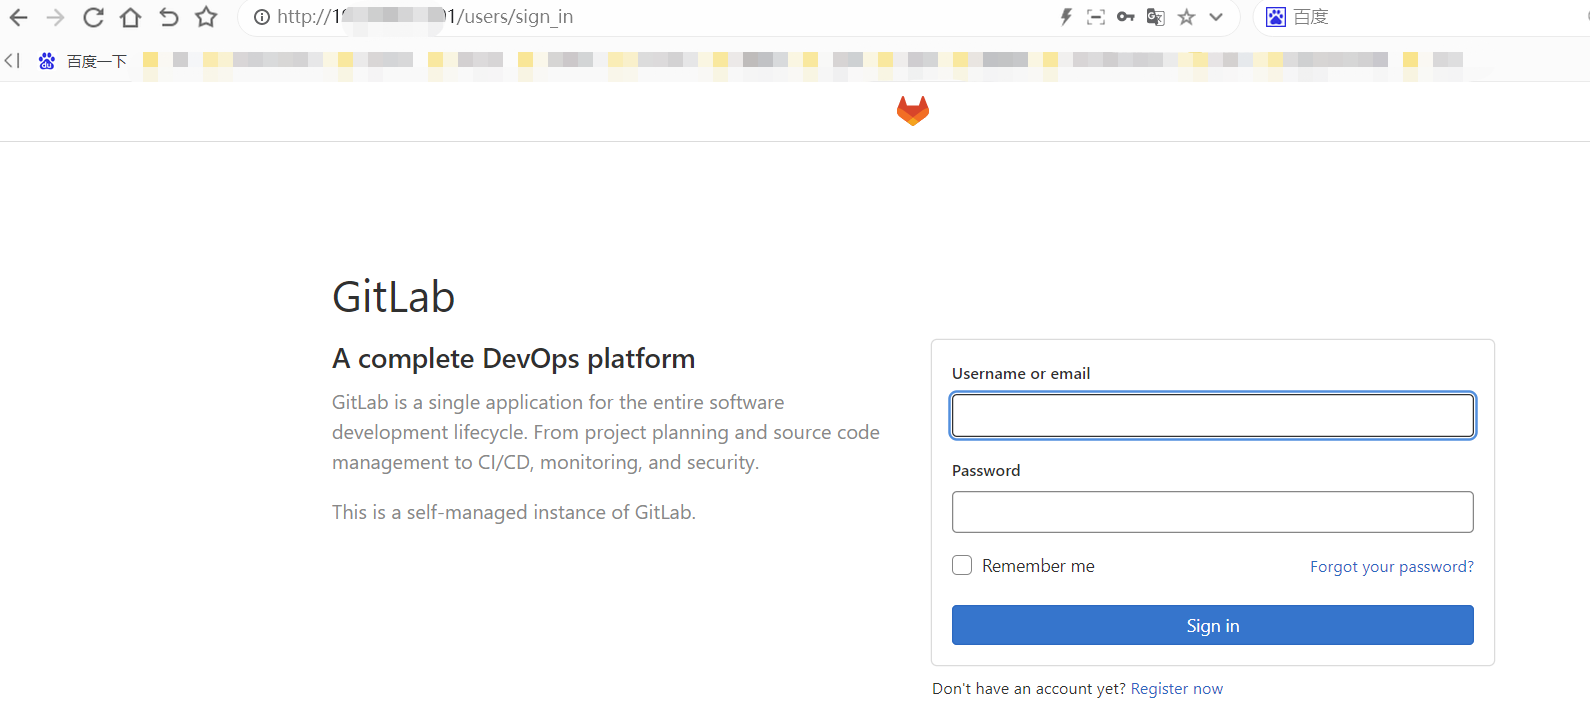
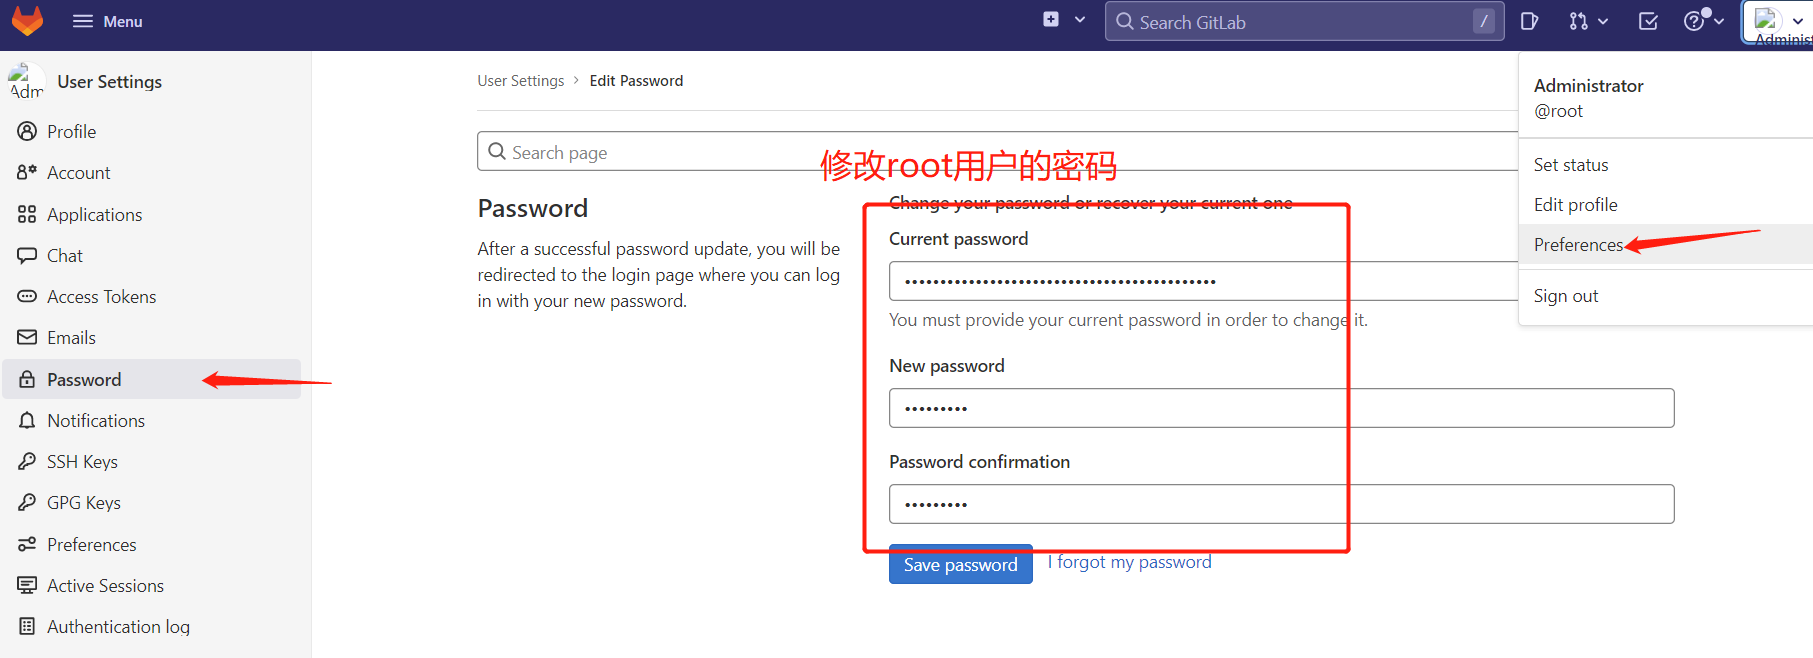
用户为:root
密码:本人设置的密码是12345678


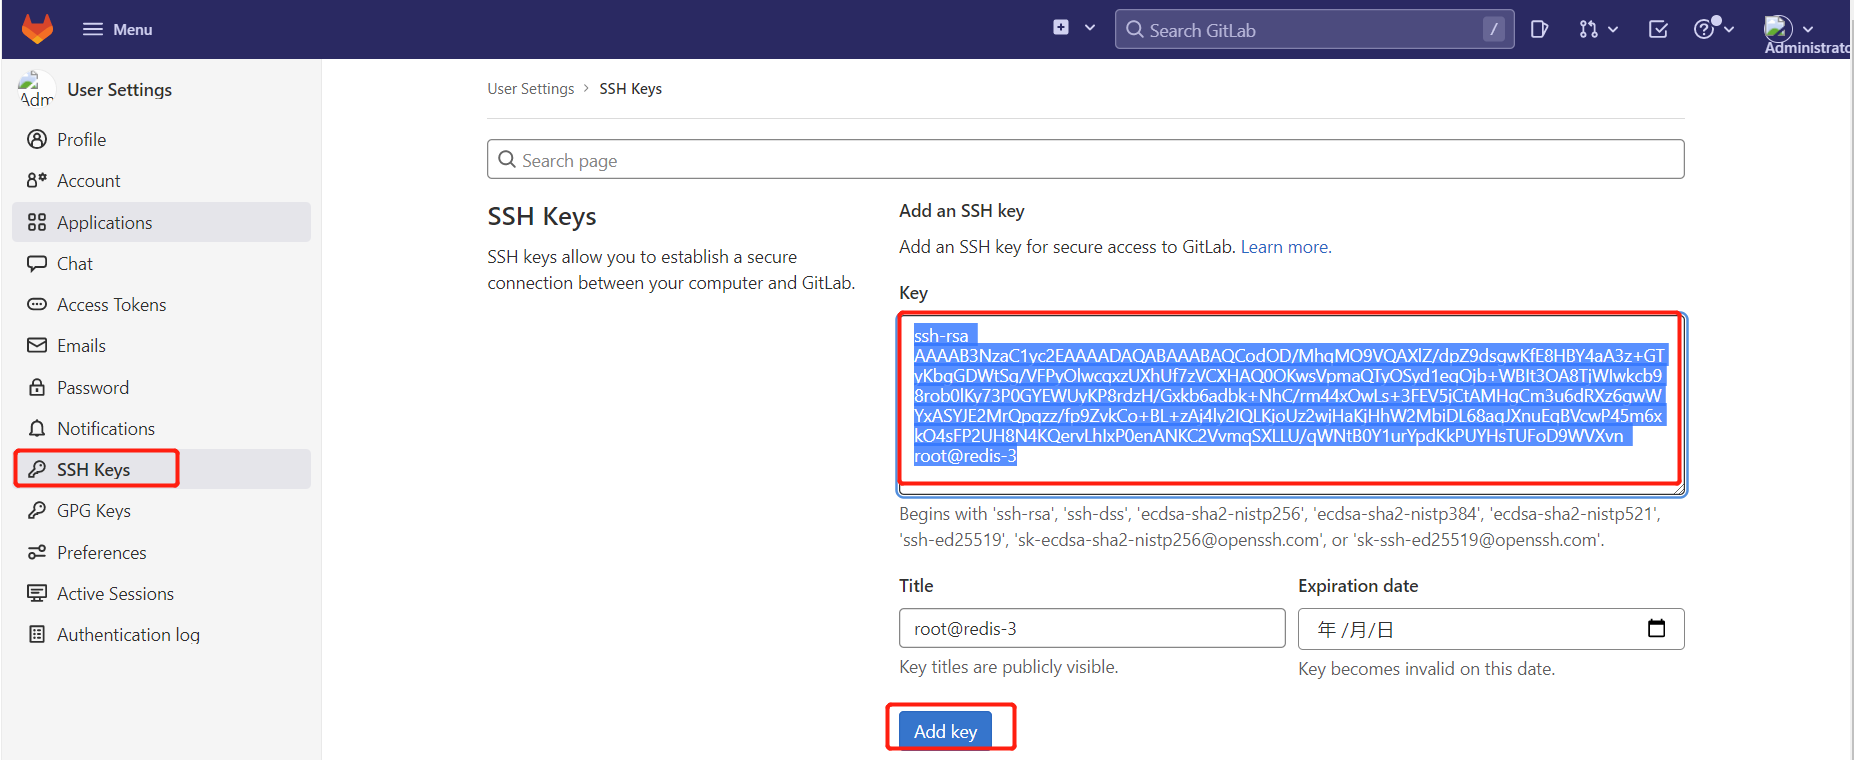
需要创建秘钥

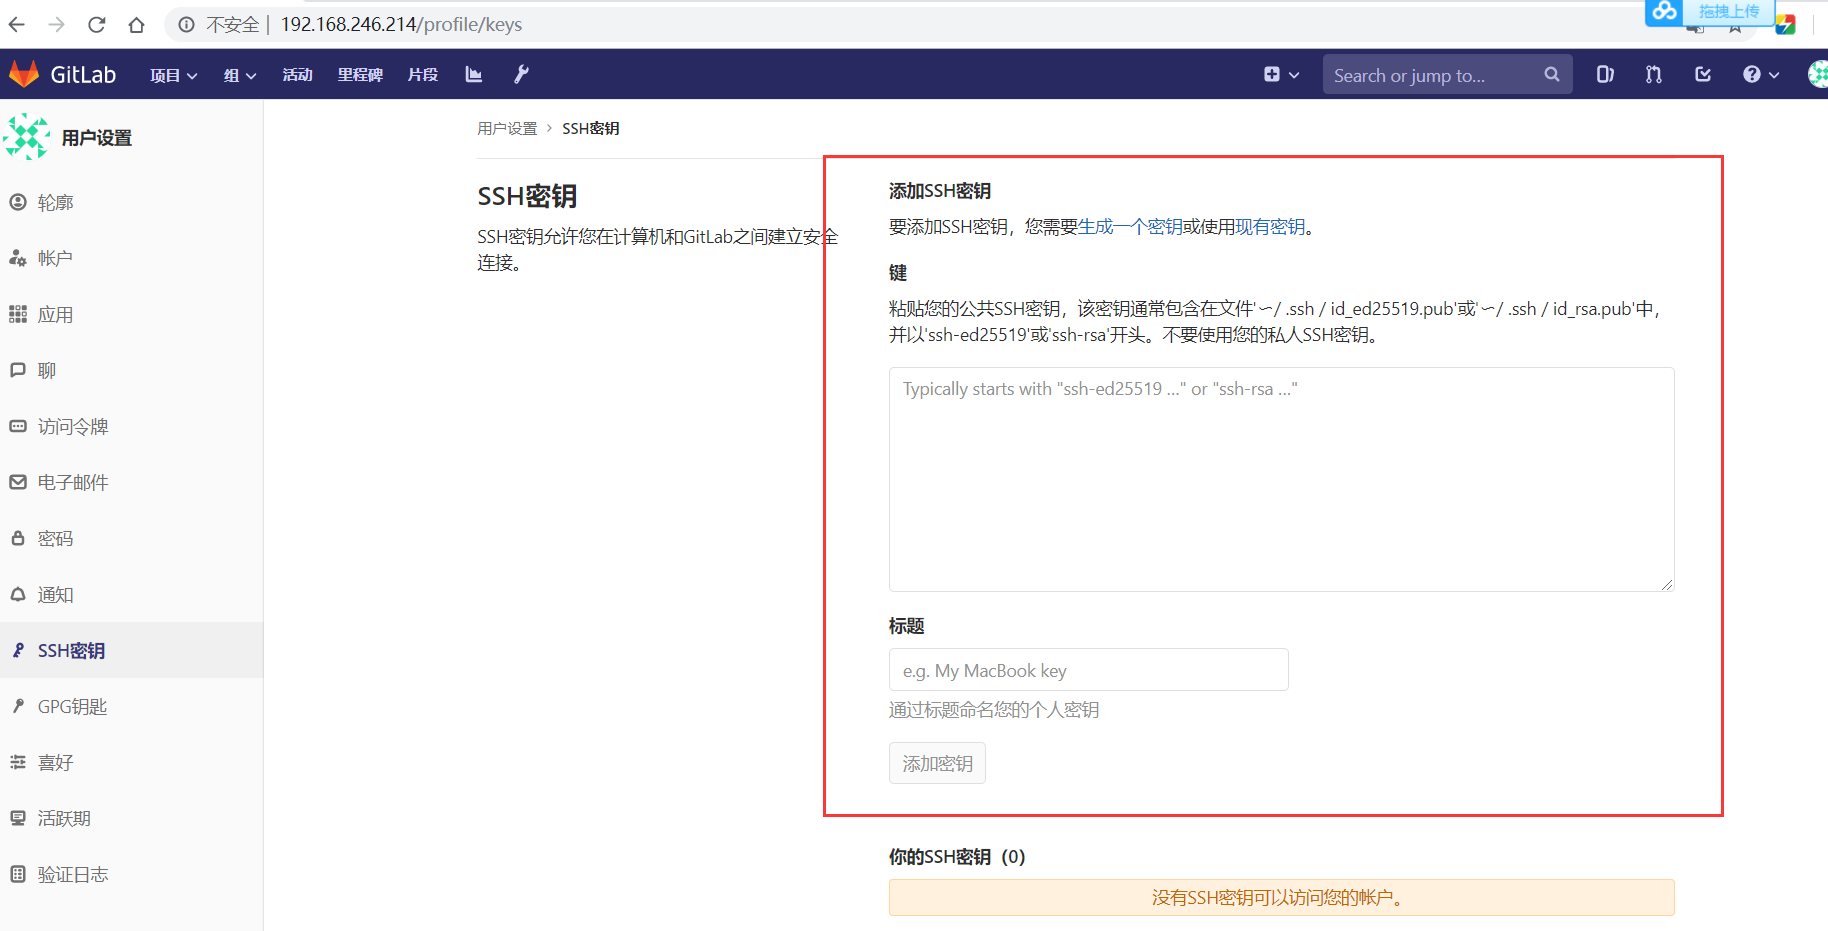
[root@client ~]# ssh-keygen
[root@client ~]# cd .ssh/
[root@client .ssh]# ls
[root@client .ssh]# cat id_rsa.pub
ssh-rsa AAAAB3NzaC1yc2EAAAADAQABAAABAQC0HeO8gaua13h9HCJK5RXVc/cjet9DpLYq2dqmQ0LXfP0Vwj6YjKxu7lE1i/4Y2cmu5lDe8bG22aikyaW38Fnz0bkGfEurdVZii/KCiHBz2lXS1ocuAdloJT4wnc2MUjh/gwc4FuNkWdYvpbMLXSSHIVjv8vB9YbHlPMTMy5N89kMwMmta5C87/8fBO5VtGijgGOueywM+xAzovlfoJbprV/ZBKkhiskSKz4fHyoGFGwllX3kMkNR/soGF5XXA+/99iO3UqSaloF0UzfUCgqfMfMVB5zDHGIB6uTrMe6ccfKp9gnVyD7m4Zmk7MwouBwAfMLIiHmvekBGXqb1YCTgJ root@client


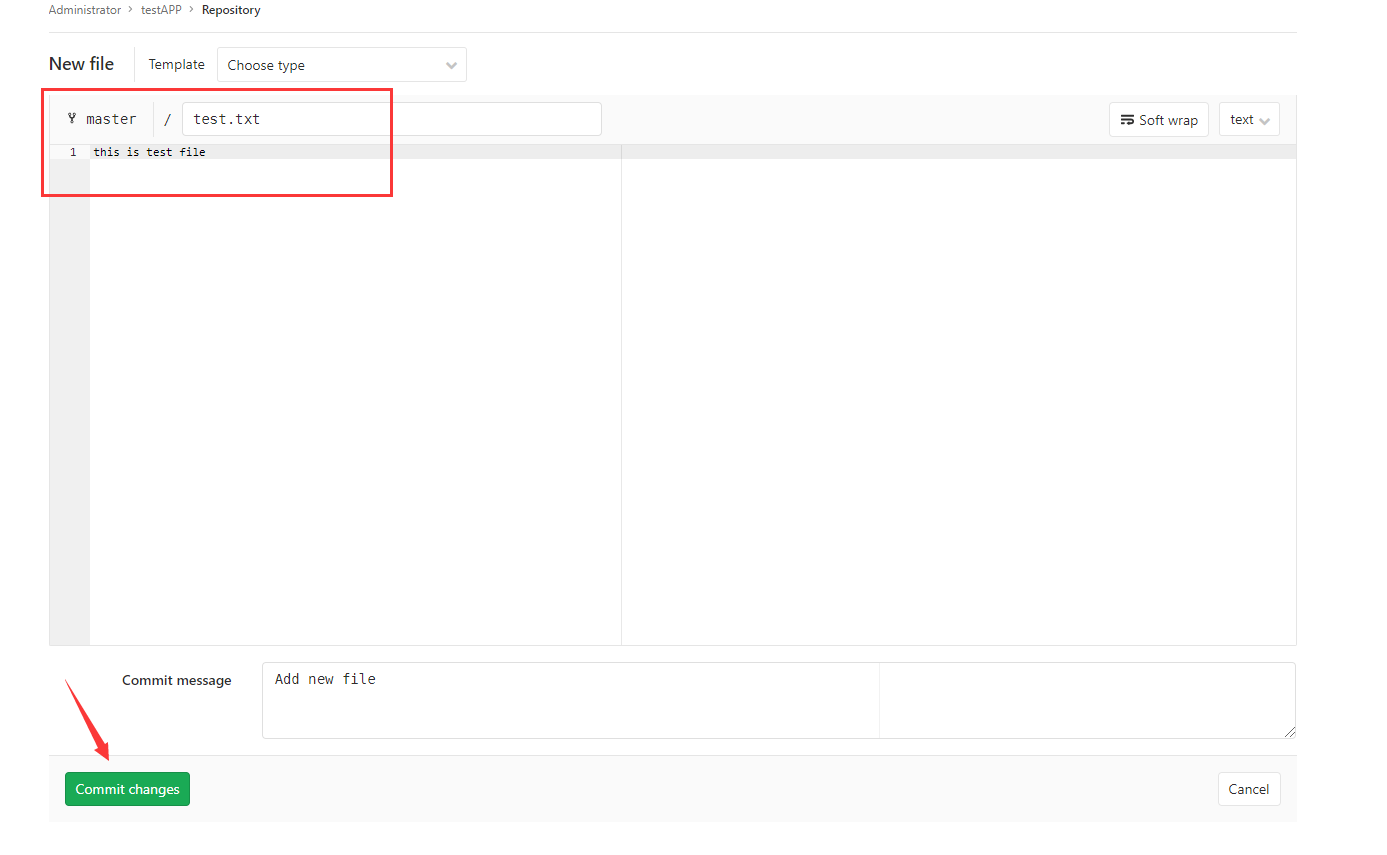
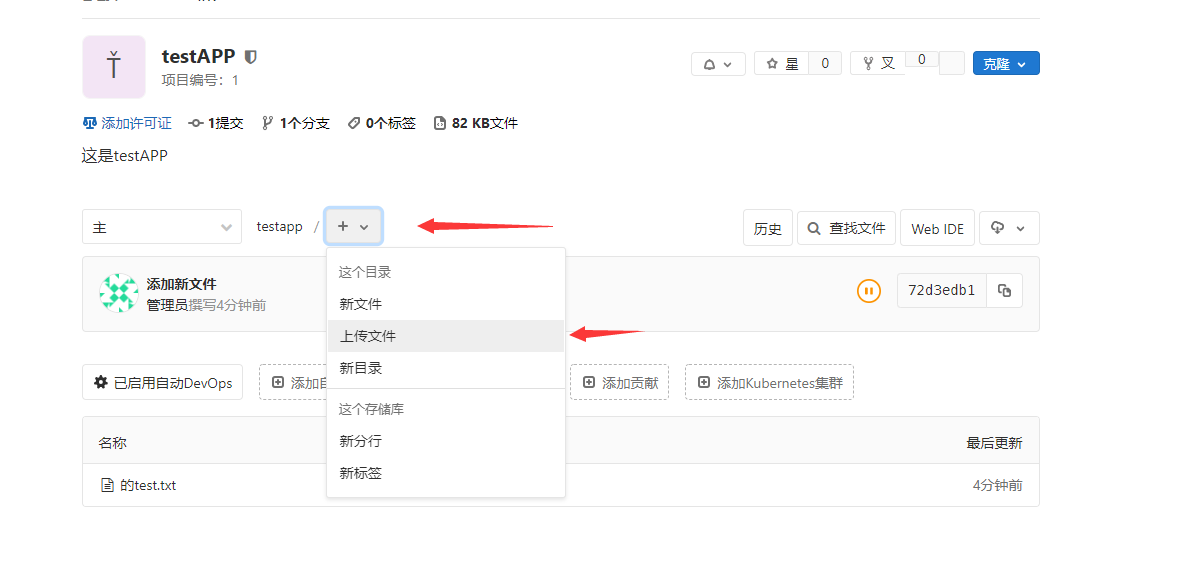
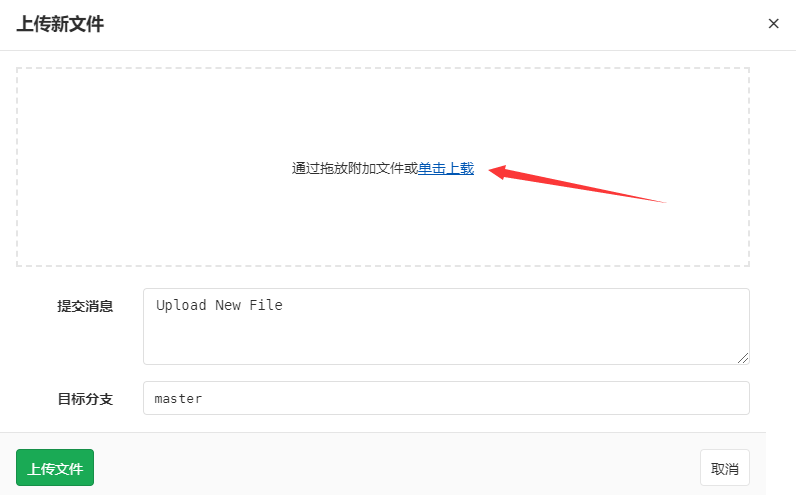
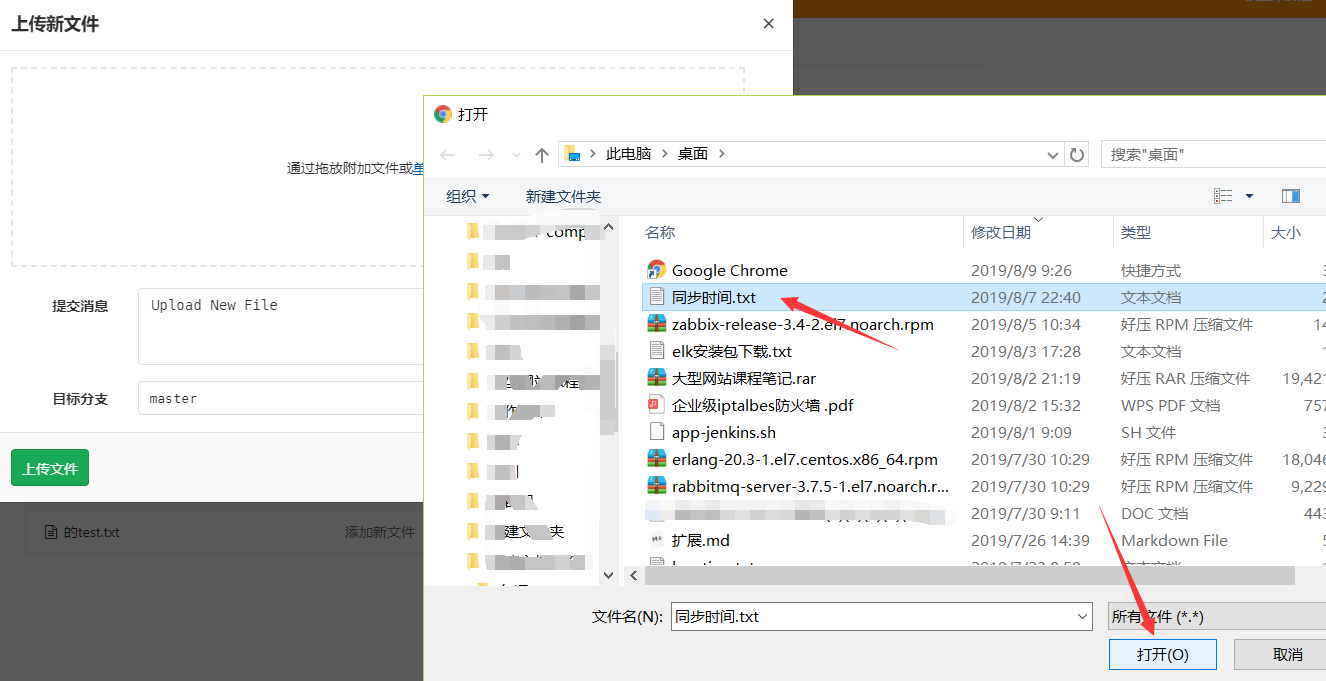
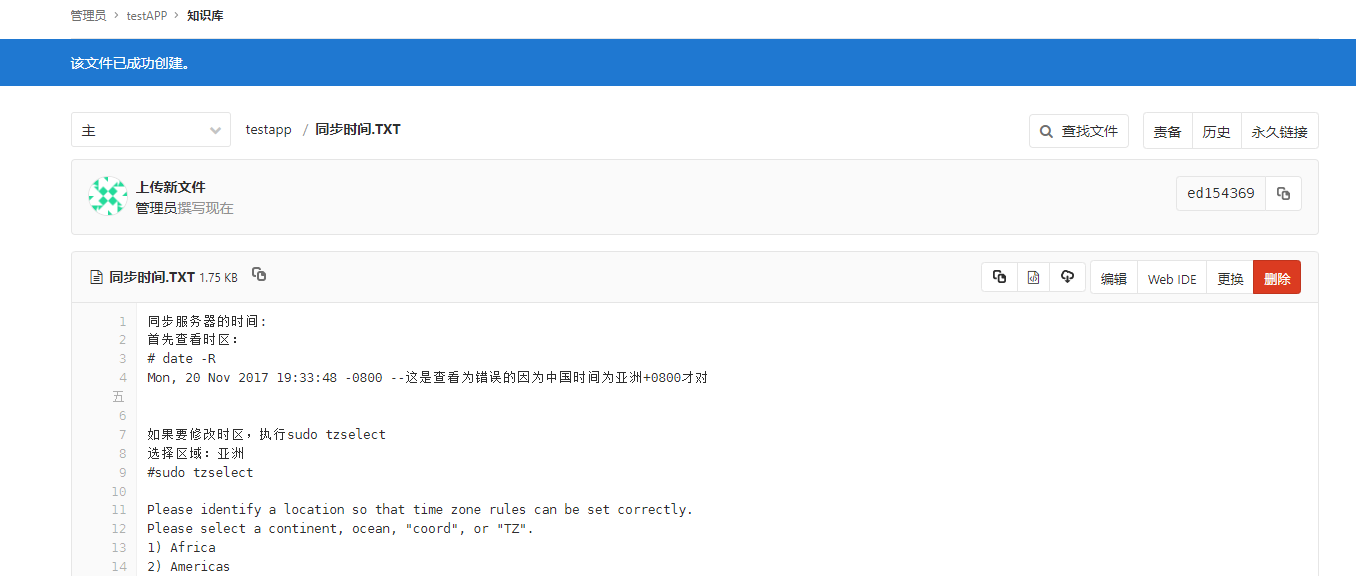
创建一个文件:
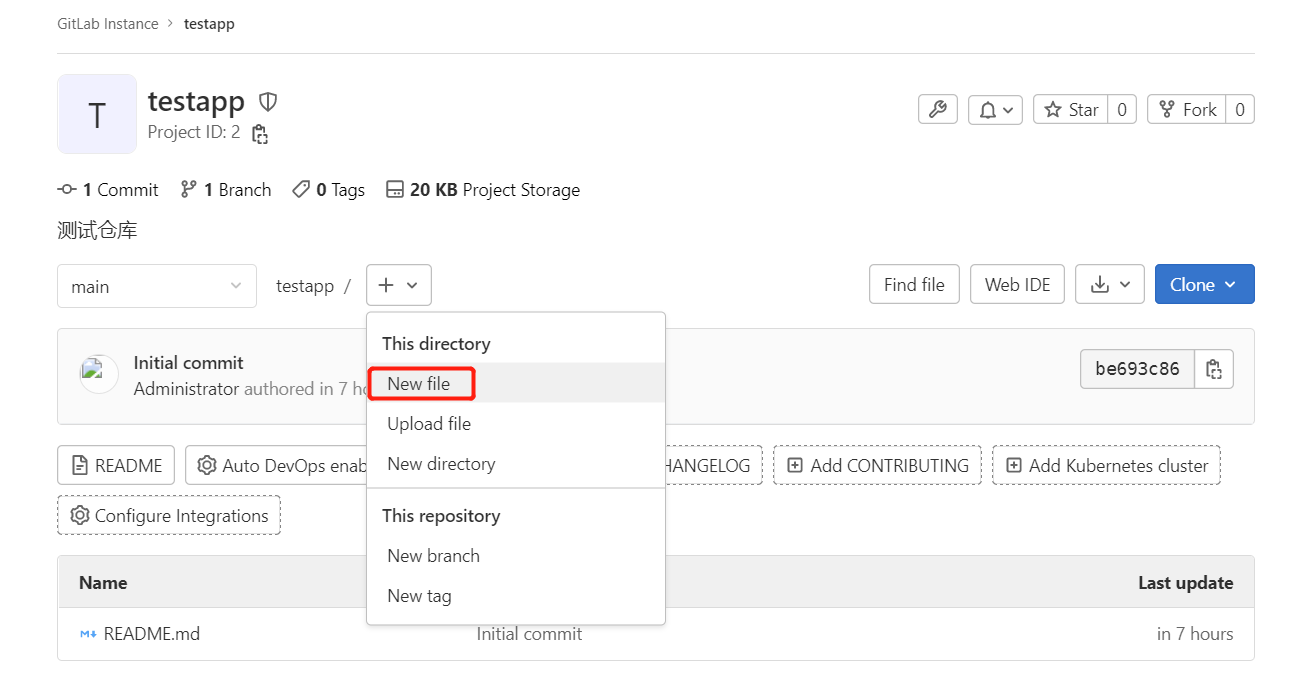
1.newfile:先新建一个文件。
2.uploadfile:再上传即可。

上传一个文件:


新建普通用户

新添加的用户创建成功!
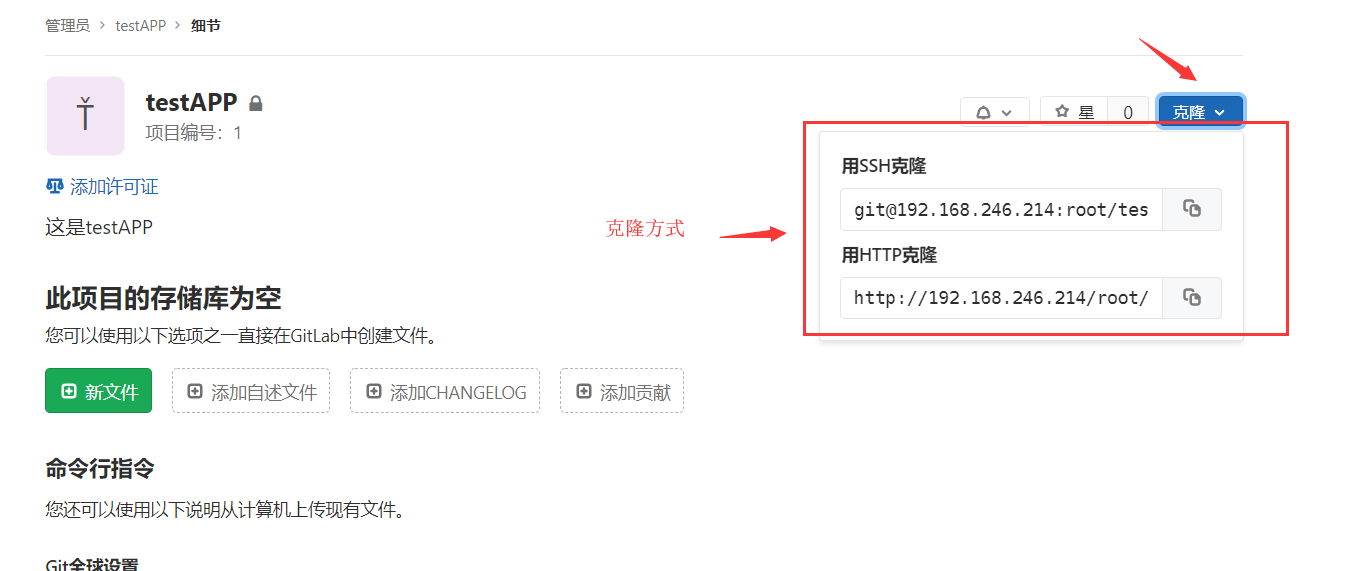
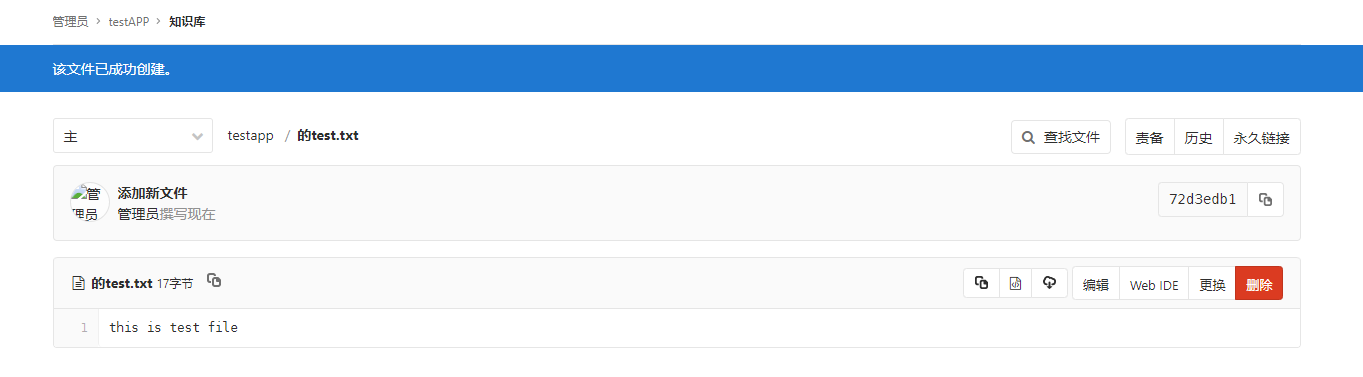
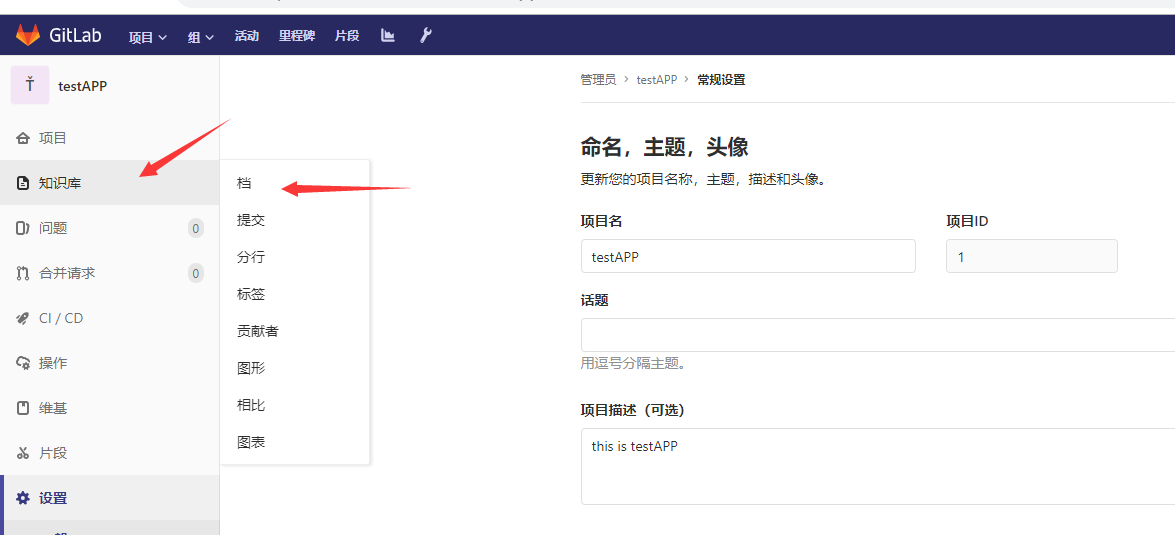
Gitlab新建文件
在git客户端
ssh方式拉取代码
查看客户端的公钥
[root@client ~]# cat /root/.ssh/id_rsa.pub
ssh-rsa AAAAB3NzaC1yc2EAAAADAQABAAABAQCodOD/MhqMO9VQAXlZ/dpZ9dsgwKfE8HBY4aA3z+GTyKbgGDWtSg/VFPyOlwcqxzUXhUf7zVCXHAQ0OKwsVpmaQTyOSyd1eqOjb+WBIt3OA8TjWIwkcb98rob0lKy73P0GYEWUyKP8rdzH/Gxkb6adbk+NhC/rm44xOwLs+3FEV5jCtAMHgCm3u6dRXz6gwWYxASYJE2MrQpqzz/fp9ZvkCo+BL+zAj4ly2IQLKjoUz2wjHaKjHhW2MbiDL68aqJXnuEqBVcwP45m6xkO4sFP2UH8N4KQervLhIxP0enANKC2VvmqSXLLU/qWNtB0Y1urYpdKkPUYHsTUFoD9WVXvn root@redis-3
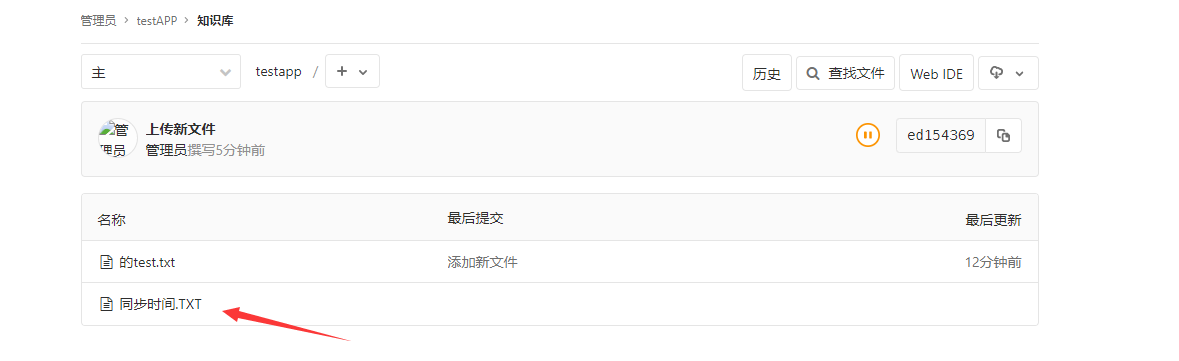
[root@client ~]# git clone git@192.168.246.214:root/testapp.git
Cloning into 'testapp'...
remote: Enumerating objects: 6, done.
remote: Counting objects: 100% (6/6), done.
remote: Compressing objects: 100% (4/4), done.
remote: Total 6 (delta 0), reused 0 (delta 0)
Receiving objects: 100% (6/6), done.
[root@client ~]# ls
testapp
[root@client ~]# cd testapp/
[root@client testapp]# ls
test.txt  同步时间.txt
[root@client testapp]#
http方式拉取代码
[root@client ~]# rm -rf testgit/
[root@client ~]# git clone http://192.168.246.214/root/testapp.git
Cloning into 'testapp'...
Username for 'http://192.168.246.214': root
Password for 'http://root@192.168.246.214':12345678  #为自己设置的密码
remote: Enumerating objects: 6, done.
remote: Counting objects: 100% (6/6), done.
remote: Compressing objects: 100% (4/4), done.
remote: Total 6 (delta 0), reused 0 (delta 0)
Unpacking objects: 100% (6/6), done.
[root@client ~]# ls
testapp
提交代码到gitlab仓库
[root@client testapp]# vim update.txt
1000phone
[root@client testapp]# git add .
[root@client testapp]# git commit -m "update_version1"
[master 091798d] update_version11 file changed, 2 insertions(+)create mode 100644 update.txt[root@nginx-server testapp2]# git push origin main
Username for 'http://192.168.62.166': root
Password for 'http://root@192.168.62.166':
Counting objects: 4, done.
Compressing objects: 100% (2/2), done.
Writing objects: 100% (3/3), 307 bytes | 0 bytes/s, done.
Total 3 (delta 0), reused 0 (delta 0)
To http://192.168.62.166/root/testapp2.git201f479..091798d  master -> master
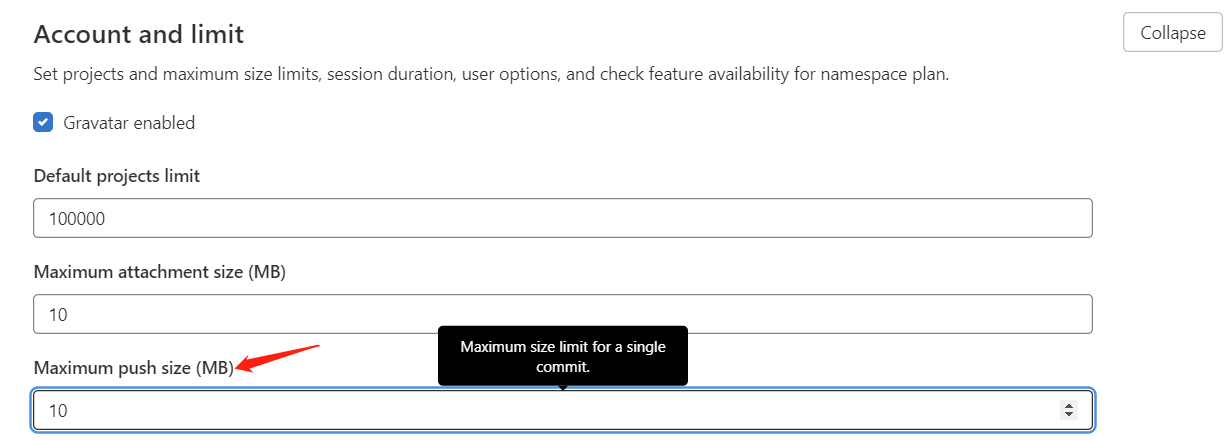
调整上传文件的大小
默认是10M,可根据情况调整
拓展:
1.cat /proc/swaps 查看swap分区是否启动(无)
2.创建 :
dd if=/dev/zero of=/data/swap bs=512 count=8388616
创建swap大小为bs*count=4294971392(4G);
/data/swap目录若无则找/mnt/swap
3.通过mkswap命令将上述空间制作成swap分区:
mkswap /data/swap
4.查看内核参数vm.swappiness中的数值是否为0,如果为0则根据实际需要调		 整成60:
查看: cat /proc/sys/vm/swappiness
设置: sysctl -w vm.swappiness=60
若想永久修改,则编辑/etc/sysctl.conf文件,改文件中有vm.swappiness变量配置,默认为0
5.启用分区:
swapon /data/swap
echo “/data/swap swap swap defaults 0 0” >> /etc/fstab
6.再次使用cat /proc/swaps 查看swap分区是否启动
tag版本推送
[root@git-client testweb]# vim e.txt
hello eee
[root@git-client testweb]# git add *
[root@git-client testweb]# git commit -m "new e.txt"
[root@git-client testweb]# git tag -a "v1.1" -m "new e.txt"
[root@git-client testweb]# git push origin v1.1

分支版本推送
[root@git-client testweb]# git branch dev
[root@git-client testweb]# git branchdev
* master
[root@git-client testweb]# git checkout dev
Switched to branch 'dev'
[root@git-client testweb]# ls
b.txt  c.txt  d.txt
[root@git-client testweb]# vim dev.txt
[root@git-client testweb]# git add *
[root@git-client testweb]# git commit -m "new dev branch"
[dev 6c3fea1] new dev branch1 file changed, 1 insertion(+)create mode 100644 dev.txt
[root@git-client testweb]# git push origin dev
Gitlab 备份与恢复
1、查看系统版本和软件版本
[root@git-server ~]# cat /etc/redhat-release
CentOS Linux release 7.4.1708 (Core)[root@git-server ~]# cat /opt/gitlab/embedded/service/gitlab-rails/VERSION
8.15.4
2、数据备份
打开/etc/gitlab/gitlab.rb配置文件,查看一个和备份相关的配置项:
[root@git-server backups]# vim /etc/gitlab/gitlab.rb
gitlab_rails['backup_path'] = "/var/opt/gitlab/backups"	#备份的路径
gitlab_rails['backup_archive_permissions'] = 0644		#备份文件的默认权限
gitlab_rails['backup_keep_time'] = 604800				#保留时长,秒为单位
设置备份保留时长,防止每天执行备份,肯定有目录被爆满的风险,打开/etc/gitlab/gitlab.rb配置文件,找到如下配置
该项定义了默认备份出文件的路径,可以通过修改该配置,并执行 gitlab-ctl reconfigure 或者 gitlab-ctl restart 重启服务生效。
[root@git-server backups]# gitlab-ctl reconfigure
或者
[root@git-server backups]# gitlab-ctl  restart
执行备份命令进行备份
[root@git-server backups]# /opt/gitlab/bin/gitlab-rake gitlab:backup:create

也可以添加到 crontab 中定时执行:
0 2 * * * /opt/gitlab/bin/gitlab-rake gitlab:backup:create
可以到/var/opt/gitlab/backups找到备份包,解压查看,会发现备份的还是比较全面的,数据库、repositories、build、upload等分类还是比较清晰的。
备份完成,会在备份目录中生成一个当天日期的tar包。
[root@git-server ~]# ll /var/opt/gitlab/backups/

3、数据恢复
特别注意:
- 备份目录和gitlab.rb中定义的备份目录必须一致
- GitLab的版本和备份文件中的版本必须一致,否则还原时会报错。
在恢复之前,可以删除一个文件,以便查看效果
执行恢复操作:
[root@git-server ~]# cd /var/opt/gitlab/backups
[root@git-server  backups]# /opt/gitlab/bin/gitlab-rake gitlab:backup:restore BACKUP=/var/opt/gitlab/backups/1678342140_2023_03_09_15.1.0
注意恢复文件的名称


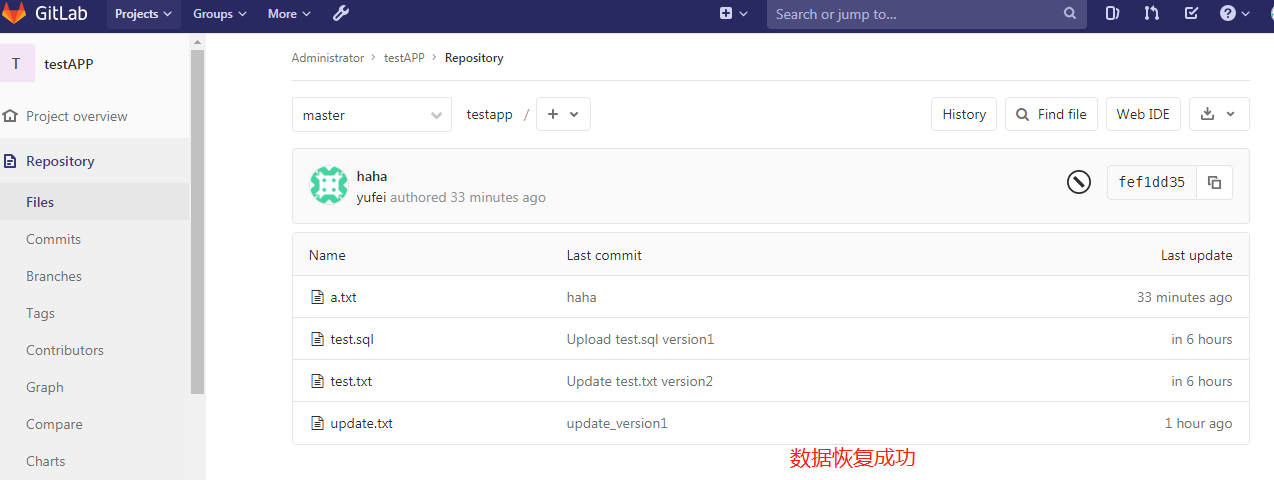
恢复完成后,启动刚刚的两个服务,或者重启所有服务,再打开浏览器进行访问,发现数据和之前的一致:
注意:通过备份文件恢复gitlab必须保证两台主机的gitlab版本一致,否则会提示版本不匹配
查看gitlab端,可以看到数据恢复成功
Gitlab配置邮箱
[root@gitlab-server ~]# vim /etc/gitlab/gitlab.rb
QOOJRFWGOZBHQMSQ

[root@gitlab-server ~]# gitlab-ctl reconfigure
或者
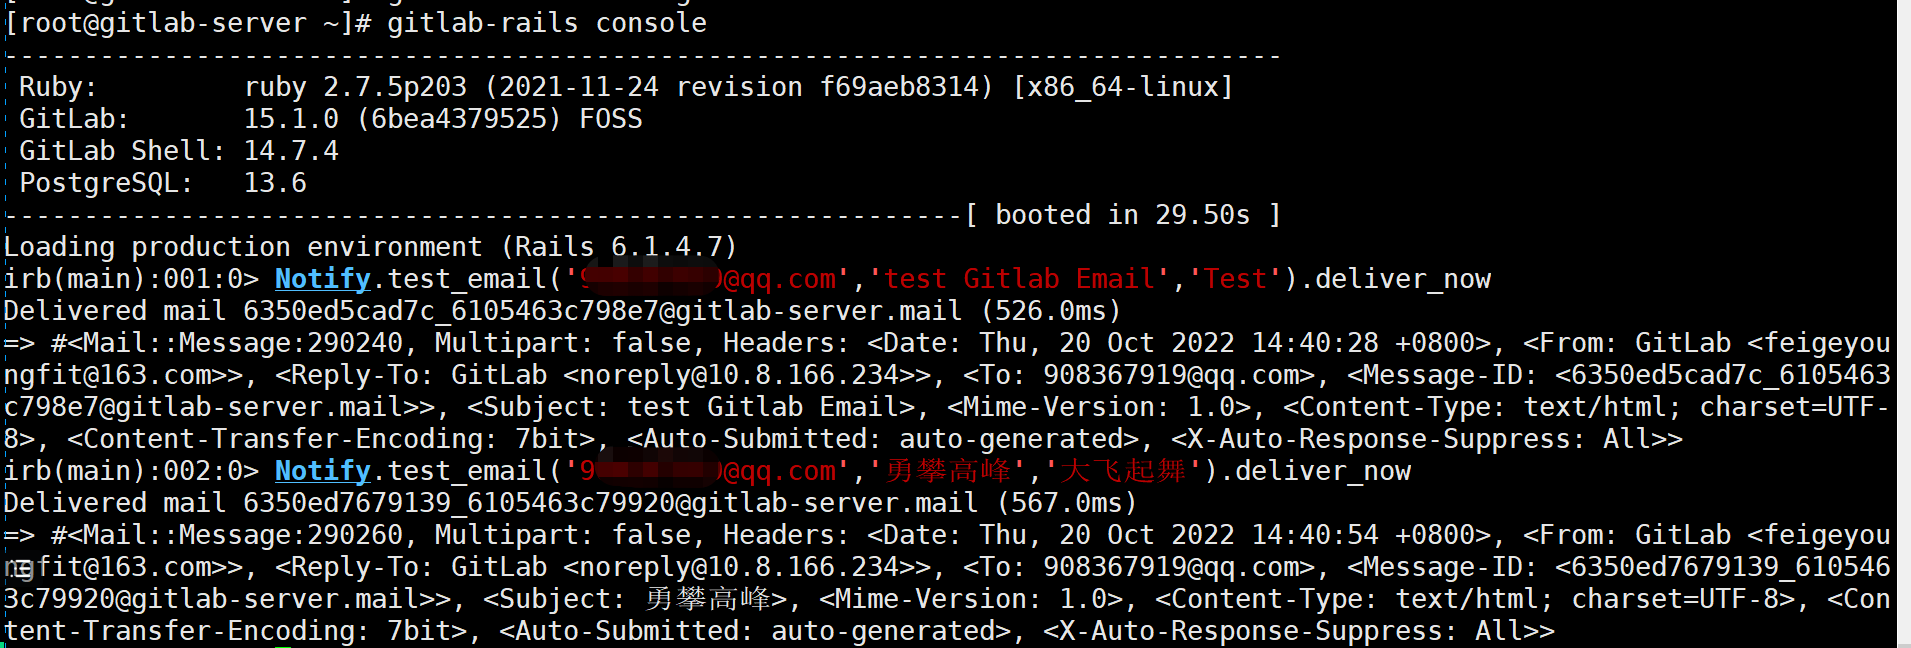
[root@gitlab-server ~]# gitlab-ctl restart[root@gitlab ~]# gitlab-rails console
irb(main):001:0> Notify.test_email('XXXXXX@gmail.com','test Gitlab Email','Test').deliver_now #输入收件人的邮箱
Delivered mail 610835daa71d5_21d35a645978a@sage.novalocal.mail (40062.2ms)=> #<Mail::Message:173540, Multipart: false, Headers: <Date: Mon, 02 Aug 2021 18:13:46 +0000>, <From: GitLab <xxxxxx@qq.com>>, <Reply-To: GitLab <noreply@xx.xx.4.62>>, <To: xxxxxxx@gmail.com>, <Message-ID: <610835daa71d5_21d35a645978a@sage.novalocal.mail>>, <Subject: test Gitlab Email>, <Mime-Version: 1.0>, <Content-Type: text/html; charset=UTF-8>, <Content-Transfer-Encoding: 7bit>, <Auto-Submitted: auto-generated>, <X-Auto-Response-Suppress: All>> #出现这段报文就说明配置成功
Gitlab配置https方式访问
配置ssl证书
我们可以配置私有CA,也可以在阿里云官网上面购买域名之后获取SSL证书
创建私有CA证书
首先在一台服务器上安装一些需要用到的应用
1、检查安装openssl
[root@www ~]# rpm -qa|grep openssl
openssl098e-0.9.8e-29.el7.centos.3.x86_64
openssl-libs-1.0.2k-25.el7_9.x86_64
xmlsec1-openssl-1.2.20-7.el7_4.x86_64
openssl-devel-1.0.2k-25.el7_9.x86_64
openssl-1.0.2k-25.el7_9.x86_64
如果未安装
[root@www ~]#yum install openssl openssl-devel -y
创建所需要的文件
根CA服务器:因为只有 CA 服务器的角色,所以用到的目录只有/etc/pki/CA
网站服务器:只是证书申请者的角色,所以用到的目录只有/etc/pki/tls
[root@www ~]#cd /etc/pki/CA/
[root@www CA]# ls
certs  crl  newcerts  private
[root@www CA]# touch index.txt   #创建生成证书索引数据库文件
[root@www CA]# ls
certs  crl  index.txt  newcerts  private
[root@www CA]# echo 01 > serial   #指定第一个颁发证书的序列号
[root@www CA]# ls
certs  crl  index.txt  newcerts  private  serial
[root@www CA]#
2、创建密钥
在根CA服务器上创建密钥,密钥的位置必须为/etc/pki/CA/private/cakey.pem,这个是openssl.cnf中中指定的路径,只要与配置文件中指定的匹配即可。
[root@www CA]# (umask 066; openssl genrsa -out private/cakey.pem 2048)
Generating RSA private key, 2048 bit long modulus
...........+++
...............+++
e is 65537 (0x10001)
3、生成自签名证书
根CA自签名证书,根CA是最顶级的认证机构,没有人能够认证他,所以只能自己认证自己生成自签名证书。
[root@www CA]# openssl req -new -x509 -key /etc/pki/CA/private/cakey.pem -days 7300 -out /etc/pki/CA/cacert.pem -days 7300
You are about to be asked to enter information that will be incorporated
into your certificate request.
What you are about to enter is what is called a Distinguished Name or a DN.
There are quite a few fields but you can leave some blank
For some fields there will be a default value,
If you enter '.', the field will be left blank.
-----
Country Name (2 letter code) [XX]:CN
State or Province Name (full name) []:BEIJING
Locality Name (eg, city) [Default City]:BEIJING
Organization Name (eg, company) [Default Company Ltd]:CA
Organizational Unit Name (eg, section) []:OPT
Common Name (eg, your name or your server's hostname) []:ca.qf.com
Email Address []:
[root@www CA]# ls
cacert.pem  certs  crl  index.txt  newcerts  private  serial
客户端(gitlab服务器)CA证书申请域名
1、安装openssl
[root@gitlab ~]# yum install openssl openssl-devel -y
2、客户端生成密钥文件
[root@gitlab ~]# (umask 066; openssl genrsa -out /etc/pki/tls/private/www.git123.com.key 2048)
Generating RSA private key, 2048 bit long modulus
..............................+++
..........+++
e is 65537 (0x10001)
[root@gitlab ~]# cd /etc/pki/tls/private/
[root@gitlab private]# ls
www.git123.com.key
[root@gitlab private]#
3、客户端用私钥加密生成证书请求
[root@gitlab private]# ls ../
cert.pem  certs  misc  openssl.cnf  private
[root@gitlab private]# openssl req -new -key /etc/pki/tls/private/www.qf.com.key -days 365 -out /etc/pki/tls/www.qf.com.csr
You are about to be asked to enter information that will be incorporated
into your certificate request.
What you are about to enter is what is called a Distinguished Name or a DN.
There are quite a few fields but you can leave some blank
For some fields there will be a default value,
If you enter '.', the field will be left blank.
-----
Country Name (2 letter code) [XX]:CN
State or Province Name (full name) []:BEIJING
Locality Name (eg, city) [Default City]:BEIJING
Organization Name (eg, company) [Default Company Ltd]:QF
Organizational Unit Name (eg, section) []:OPT
Common Name (eg, your name or your server's hostname) []:www.git123.com
Email Address []:Please enter the following 'extra' attributes
to be sent with your certificate request
A challenge password []:
An optional company name []:
[root@gitlab private]# ls ../
cert.pem  certs  misc  openssl.cnf  private  www.git123.com.csr
[root@gitlab private]#
4、CA 签署证书(在ca服务器上面操作)
[root@www ~]# vim /etc/pki/tls/openssl.cnf
policy          = policy_match82 83 # For the CA policy84 [ policy_match ]85 countryName             = match86 stateOrProvinceName     = match87 organizationName        = supplied88 organizationalUnitName  = optional89 commonName              = supplied90 emailAddress            = optional
CA签署证书
[root@www ~]# openssl ca -in /etc/pki/CA/private/www.git123.com.csr -out /etc/pki/CA/certs/www.git123.com.crt -days 365
Using configuration from /etc/pki/tls/openssl.cnf
Check that the request matches the signature
Signature ok
Certificate Details:Serial Number: 1 (0x1)ValidityNot Before: Jul  3 10:12:23 2019 GMTNot After : Jul  2 10:12:23 2020 GMTSubject:countryName               = CNstateOrProvinceName       = BEIJINGorganizationName          = QForganizationalUnitName    = OPTcommonName                = www.qf.comX509v3 extensions:X509v3 Basic Constraints: CA:FALSENetscape Comment: OpenSSL Generated CertificateX509v3 Subject Key Identifier: E3:AC:1A:55:2B:28:B9:80:DC:9C:C2:13:70:53:27:AD:3D:44:8F:D3X509v3 Authority Key Identifier: keyid:5D:2A:81:B2:E7:8D:D8:88:E5:7B:94:CA:75:65:9C:82:2B:A9:B2:3CCertificate is to be certified until Jul  2 10:12:23 2020 GMT (365 days)
Sign the certificate? [y/n]:y1 out of 1 certificate requests certified, commit? [y/n]y
Write out database with 1 new entries
Data Base Updated
查看证书的信息
[root@www ~]# openssl x509 -in /etc/pki/CA/certs/www.qf.com.crt -noout -subject
subject= /C=CN/ST=BEIJING/O=QF/OU=OPT/CN=www.git123.com
将生成的证书发放给请求客户端(Gitlab服务器)
[root@www ~]# cd /etc/pki/CA/certs/
[root@www certs]# scp www.git123.com.ctr 10.8.156.42:/etc/pki/CA/certs/
Gitlab中修改配置

在gitlab前面配置Nginx做转发
首先把gitlab内部nginx的端口修改一下
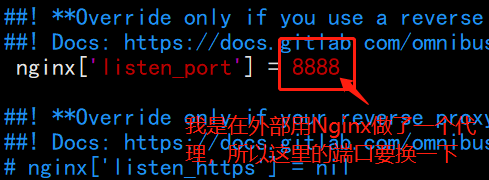
vim /etc/nginx/conf.d/default.conf
upstream  git{server  127.0.0.1:8888;
}server {listen 443 ssl;server_name www.git123.com;ssl_certificate                                 /etc/pki/CA/certs/www.git123.com.crt;ssl_certificate_key                            /etc/pki/tls/private/www.git123.com.key;ssl_session_timeout 5m;ssl_ciphers ECDHE-RSA-AES128-GCM-SHA256:ECDHE:ECDH:AES:HIGH:!NULL:!aNULL:!MD5:!ADH:!RC4;ssl_protocols TLSv1 TLSv1.1 TLSv1.2;ssl_prefer_server_ciphers on;location / {client_max_body_size 50m;proxy_redirect off;proxy_set_header Host $host;proxy_set_header X-Real-IP $remote_addr;proxy_set_header X-Forwarded-For $proxy_add_x_forwarded_for;proxy_pass http://git;index index.html index.htm;}
}server{listen 80;server_name www.git123.com;rewrite ^(.*)$ https://$host$1 permanent;location / {return 301 https://www.git123.com:443$request_uri;}
}
Github 远程仓库
1、github.com 注册账户
2、在github上创建仓库
本人账户:
用户名:youngfityu
邮箱: 908367919@qq.com
密码: ***


3、客户端生成本地ssh key
[root@localhost ~]# ssh-keygen -t rsa -C 'meteor@163.com' # 邮箱要与github上注册的相同
Generating public/private rsa key pair.
Enter file in which to save the key (/root/.ssh/id_rsa):
Enter passphrase (empty for no passphrase):
Enter same passphrase again:
Your identification has been saved in /root/.ssh/id_rsa.
Your public key has been saved in /root/.ssh/id_rsa.pub.
The key fingerprint is:
SHA256:RiE6UR1BtzV5avyE2uz6TNPsVHa2D2eHprghrJEkd/g meteor@163.com
The key's randomart image is:
+---[RSA 2048]----+
|    ..oo=o. o.   |
|     o ..o o...  |
|    o   . .. +   |
|     . o    = .  |
|    . + S  = o  =|
|     + *  . oo.=o|
|      o E ..o B.+|
|       o . =.* +o|
|      .   +++ . .|
+----[SHA256]-----+
[root@localhost ~]#
[root@localhost ~]# cat .ssh/id_rsa.pub
ssh-rsa AAAAB3NzaC1yc2EAAAADAQABAAABAQDVThfq4brrlsPGtAknVB0TLPx+7Dd3qlxTbSIrUOsGC5Y8JuNqVTlIntZB4oNj8cSQrWvec9CKm0a8o7WwaJIiqpxurz+YpQHP2KbapftKIxsX4hPf/z+p0El1U6arQa35/xmNsq+cJLH/bDdRG+EMDhuCBmjVZOlLj/hEdeIT6s56AnnCkaWoF+sq58KCF7Tk54jRbs/YiyE4SN7FuA70r+07sA/uj0+lmuk4E190KtQUELhjX/E9stivlqiRhxnKvVUqXDywsjfM8Rtvbi4Fg9R8Wt9fpd4QwnWksYUoR5qZJFYXO4hSZrUnSMruPK14xXjDJcFDcP2eHIzKgLD1 meteor@163.com
4、复制以上的公钥,在github 中添加ssh key


创建好库之后,在库里创建几个文件,方便测试
5、测试:拉取github仓库
[root@localhost ~]# yum install git
[root@localhost ~]# git config --global user.name 'meteor_by'
[root@localhost ~]# git config --global user.email 'meteor@163.com'
[root@localhost tmp]# cd /tmp[root@localhost tmp]# git clone git@github.com:youngfit/youngfit.git
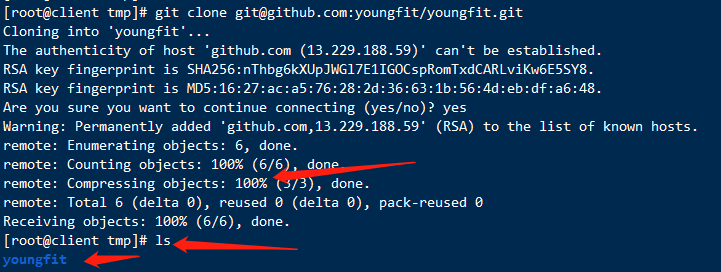
7、在本地添加远程仓库,并推送至github仓库
[root@localhost tmp]# cd /tmp/youngfit/
[root@localhost youngfit]# ls
qf.txt  README.md
[root@localhost youngfit]# cat qf.txt
this is 2002 test file
[root@client youngfit]# ls
qf.txt  README.md
[root@localhost youngfit]# vim a.txt
[root@localhost youngfit]# git add .
[root@localhost youngfit]# git commit -m "yufei"
[master 0f6a3de] yufei1 file changed, 2 insertions(+)create mode 100644 a.txt
[root@client youngfit]# git push origin master
Counting objects: 4, done.
Compressing objects: 100% (2/2), done.
Writing objects: 100% (3/3), 288 bytes | 0 bytes/s, done.
Total 3 (delta 0), reused 0 (delta 0)
To git@github.com:youngfit/youngfit.gitba8225d..0f6a3de  master -> master
去github界面查看

8、连接远程仓库方法
#[root@localhost testapp]# git remote -v
#origin git@github.com:meteor/python1804.git (fetch)
#origin git@github.com:meteor/python1804.git (push)
#[root@localhost python1804]#
#[root@localhost python1804]# git remote rm origin (如果连接远程的方式不是ssh,可以删除重新添加)
#[root@localhost ~]# git remote add origin git@github.com:meteor/python1804.git
#或
#git remote add origin https://github.com/meteor/python1804.git
#git push -u origin master[root@client youngfit]# git remote -v
origin git@github.com:youngfit/youngfit.git (fetch)
origin git@github.com:youngfit/youngfit.git (push)
[root@client youngfit]# git remote rm origin
[root@client youngfit]# git remote add origin git@192.168.62.131:root/testapp.git
[root@client youngfit]# ls
a.txt qf.txt README.md
[root@client youngfit]# pwd[root@client ~]# cd /root/testapp/
[root@client testapp]# ls
test.sql test.txt update.txt
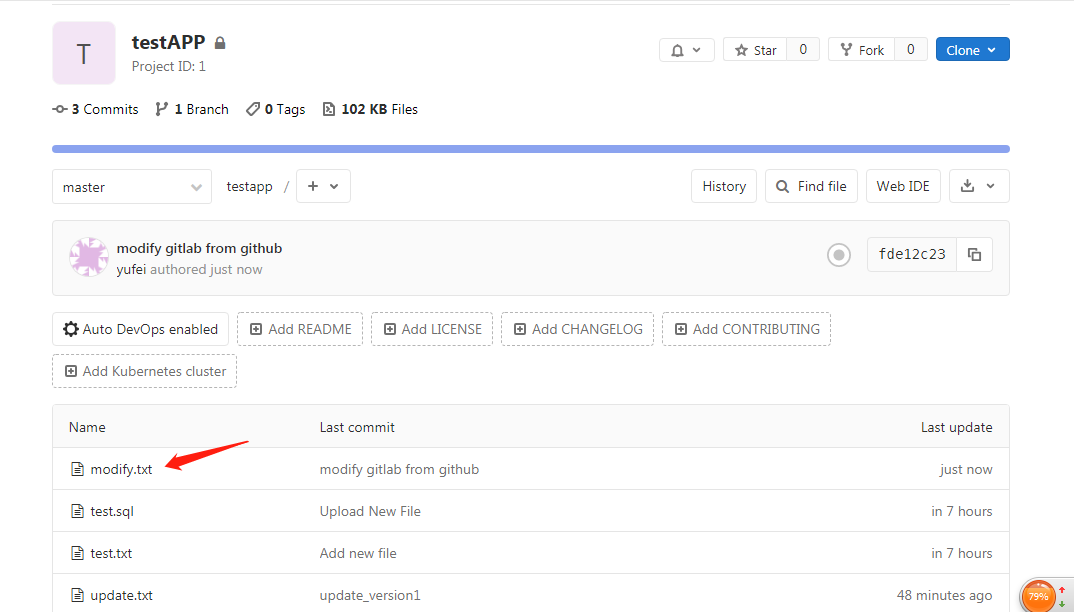
[root@client testapp]# vim modify.txt
[root@client testapp]# git add .
[root@client testapp]# git commit -m "modify gitlab from github"
[master fde12c2] modify gitlab from github1 file changed, 1 insertion(+)create mode 100644 modify.txt[root@client testapp]# git push origin master
Username for 'http://192.168.62.131': root
Password for 'http://root@192.168.62.131':
Counting objects: 4, done.
Compressing objects: 100% (2/2), done.
Writing objects: 100% (3/3), 337 bytes | 0 bytes/s, done.
Total 3 (delta 0), reused 0 (delta 0)
To http://192.168.62.131/root/testapp.git23bae45..fde12c2 master -> master
去自己部署的gitlab上查看
相关文章:
从私有Git仓库的搭建到命令的使用及部署再到分支管理
一、版本控制系统/版本控制器 1. 版本控制系统: git 分布式 —没有中心代码库,所有机器之间的地位同等(每台机器上都有相同的代码) svn 集中管理的 —有中心代码库,其他都是客户端 2.git与svn介绍 1.git属于分布…...
mysql基础-常用函数汇总
目录 1. 查询技巧 2. 时间函数 2.1 now() 2.2 current_date() 2.3 时间差timestampdiff()与datediff() 2.4 其他时间函数 3. 字符函数 3.1 截取函数 3.2 分割函数 3.3 left与right函数 3.4 其他函数 4. 数字函数 5. …...

COCO数据格式的json文件内容
COCO(Common Objects in Context)数据集现在有3种标注类型:object instances(目标实例), object keypoints(目标上的关键点), 和image captions(看图说话),使用JSON文件存储,包含了对图像中目标的边界框、类别标签、分割掩码等信息。 COCO标注文件是一个包含多个字…...

AI-数学-高中-3.二次函数的根的分布问题的解题方法
原作者学习视频:二次】3二次函数根分布问题(中档)_哔哩哔哩_bilibili 一、伟达定理(根与0比较的二次函数) 示例: 二、画图法: 1.开口方向的确定,有的示例可能存在向上、下两种情况…...

golang中gorm使用
前言 记录下go语言操作mysql数据库,选用gorm,gorm是一个流行的对象关系映射(ORM)库,用于简化与数据库的交互。 接入步骤 安装gorm:首先,你需要使用Go模块来安装gorm。在终端中运行以下命令&…...

centoss7安装mysql详细教程
【MySQL系列】在Centos7环境安装MySQL_centos7安装mysql-CSDN博客 【MySQL系列】在Centos7环境安装MySQL_centos7安装mysql-CSDN博客 【MySQL系列】在Centos7环境安装MySQL_centos7安装mysql-CSDN博客...

SpringBoot-拓展
邮件 依赖 <groupId>org.springframework.boot</groupId> <artifactId>spring-boot-starter-mail</artifactId>配置 spring.mail.username邮箱 spring.mail.password授权码 spring.mail.hostsmtp.qq.com # 开启加密验证 spring.mail.properties.mai…...
用于查询性能预测的计划结构深度神经网络模型--大数据计算基础大作业
用于查询性能预测的计划结构深度神经网络模型 论文阅读和复现 24.【X1.1】 在关系数据库查询优化领域,对查询时间的估计准确性直接决定了查询优化结果,进而影响到数据库整体的查询效率。但由于数据库自身的复杂性,查询时间受到数据分布、数据…...

MySQL5.7用于控制副本服务器的 SQL 语句
官网地址:MySQL :: MySQL 5.7 Reference Manual :: 13.4.2 SQL Statements for Controlling Replica Servers 欢迎关注留言,我是收集整理小能手,工具翻译,仅供参考,笔芯笔芯. MySQL 5.7 参考手册 / ... / CHANGE M…...

stable diffusion 人物高级提示词(四)朝向、画面范围、远近、焦距、机位、拍摄角度
一、朝向 英文中文front view正面Profile view / from side侧面half-front view半正面Back view背面(quarter front view:1.5)四分之一正面 prompt/英文中文翻译looking at the camera看向镜头facing the camera面对镜头turned towards the camera转向镜头looking away from …...
C#.Net学习笔记——设计模式六大原则
***************基础介绍*************** 1、单一职责原则 2、里氏替换原则 3、依赖倒置原则 4、接口隔离原则 5、迪米特法原则 6、开闭原则 一、单一职责原则 举例:类T负责两个不同的职责:职责P1,职责P2。当由于职责P1需求发生改变而需要修…...

go 修改postgresql的配置参数
postgresql.conf与postgresql.auto.conf的区别 postgresql.auto.conf的优先级高于postgresql.conf,如果一个参数同时存在postgresql.auto.conf和postgresql.conf里面,系统会先读postgresql.auto.conf的参数配置。 使用alter system set修改的是postgres…...

解决word图片格式错乱、回车图片不跟着换行的问题
解决word图片格式错乱、回车图片不跟着换行的问题 1.解决方法。 先设置为嵌入型 但是设置的话会出现下面的问题。图片显示不全。 进一步设置对应的行间距,原先设置的是固定值,需要改为1.5倍行距的形式,也就是说不能设置成固定值就可以。...
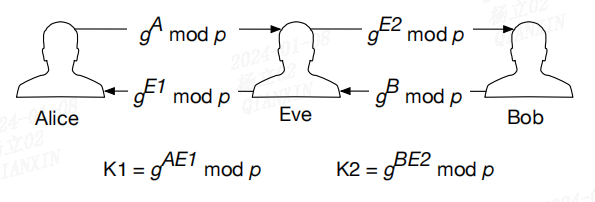
密码学(二)
文章目录 前言一、Certificate Authorities二、Key Agreement Protocols 前言 本文来自 Intel SGX Explained 请参考:密码学(一) 一、Certificate Authorities 非对称密钥密码学中的公钥和私钥假设每个参与方都拥有其他参与方的正确公钥。…...

mysql进阶-视图
目录 1. 用途 2. 语法 2.1 创建或替换视图 2.2 修改视图 2.3 查看视图: 2.4 删除视图: 3. 其他 3.1 操作视图 3.2 迁移数据库 1. 用途 视图可以理解为一个复杂查询的简称,它可以帮助我们简化查询,主要用于报表查询:例如…...

力扣-34. 在排序数组中查找元素的第一个和最后一个位置
文章目录 力扣题目代码 力扣题目 给你一个按照非递减顺序排列的整数数组 nums,和一个目标值 target。请你找出给定目标值在数组中的开始位置和结束位置。 如果数组中不存在目标值 target,返回 [-1, -1]。 你必须设计并实现时间复杂度为 O(log n) 的算…...
Cesium笔记 初始化 使用Vue-Cesium 组件
参考 A Vue 3 based component library of CesiumJS for developers | Vue for CesiumVue for Cesium, a Vue 3.x based component library of CesiumJS for GISerhttps://zouyaoji.top/vue-cesium/#/zh-CN/component/quickstart...
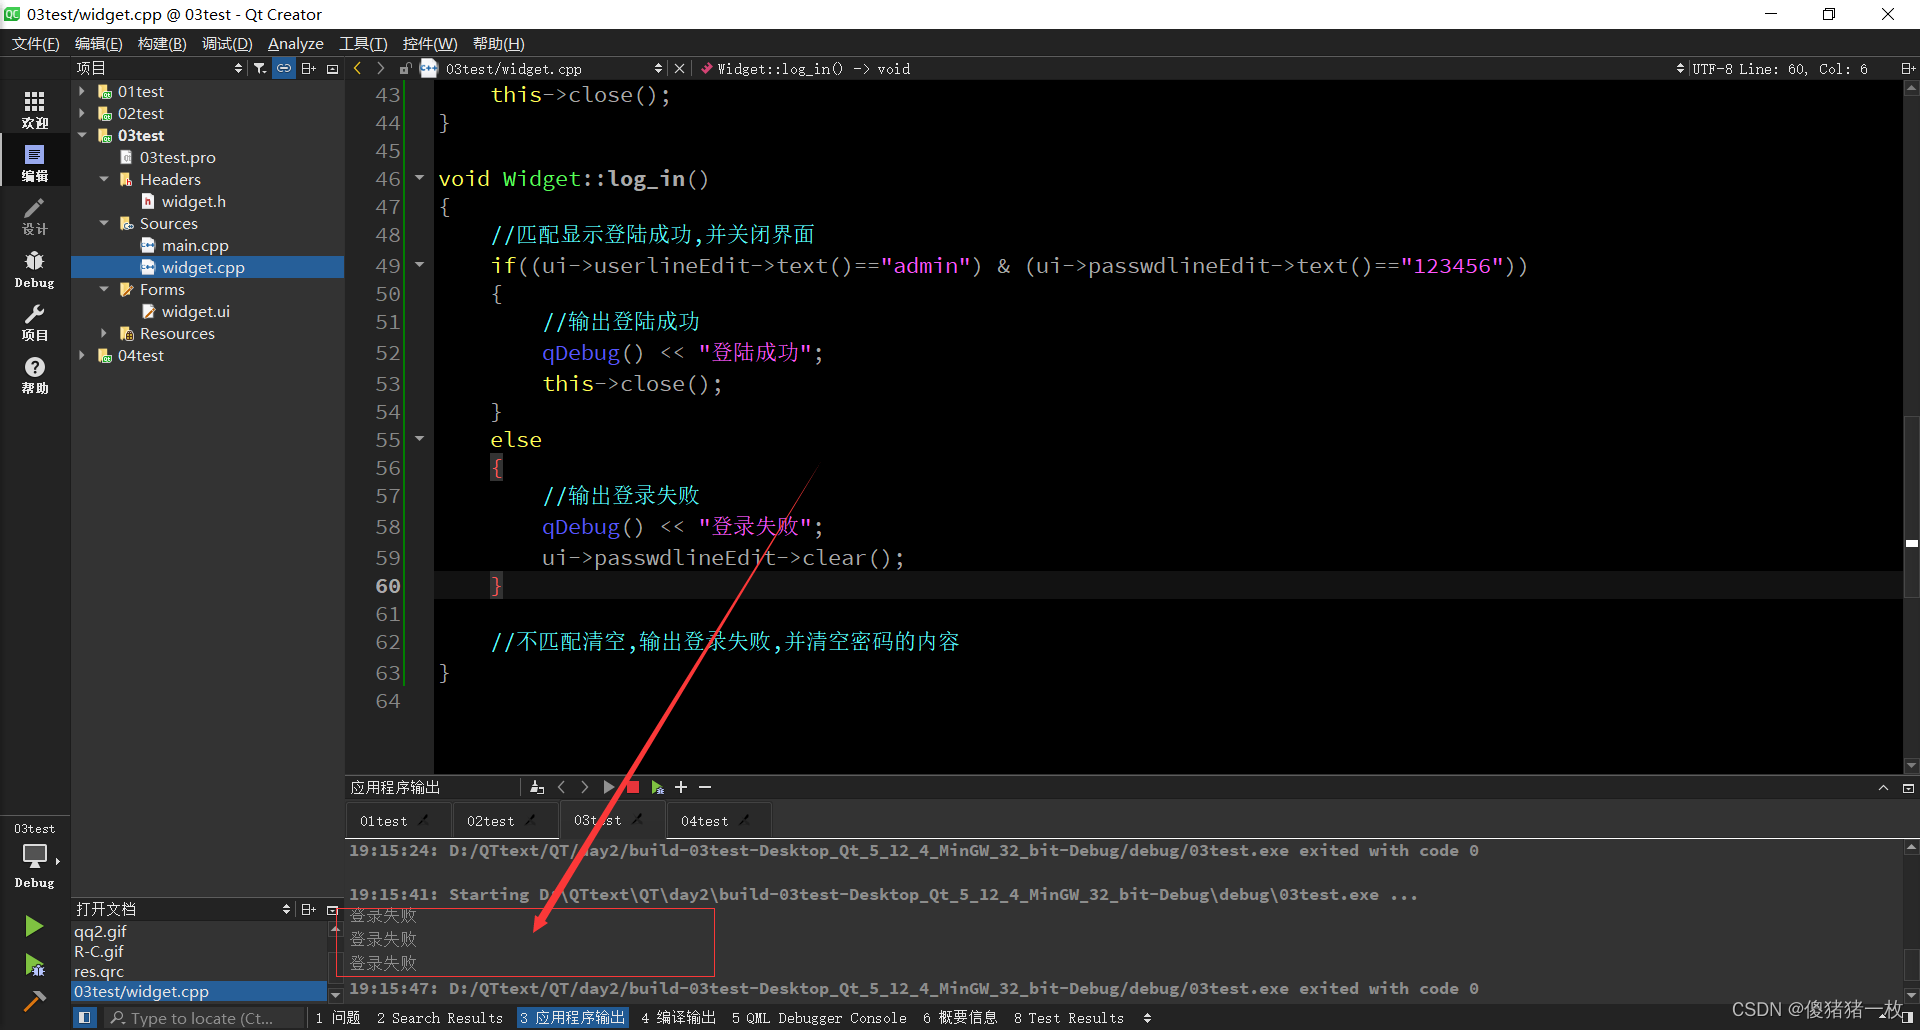
QTday2作业
思维导图: 使用手动连接,将登录框中的取消按钮使用qt4版本的连接到自定义的槽函数中,在自定义的槽函数中调用关闭函数; 将登录按钮使用qt5版本的连接到自定义的槽函数中,在槽函数中判断u界面上输入的账号是否为"admin",…...
scVI与MultiVI
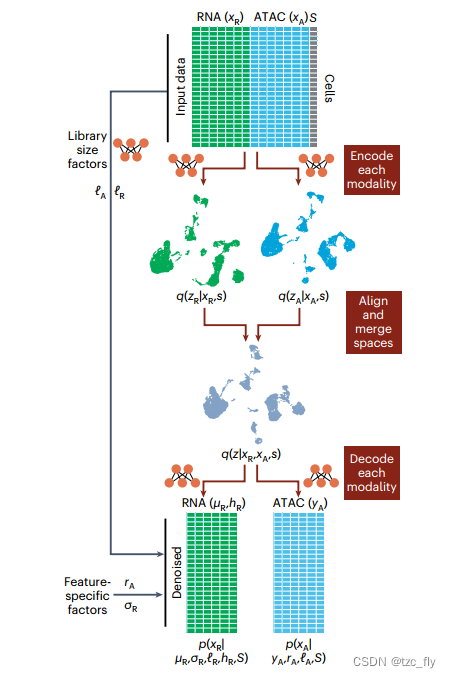
scVI:https://docs.scvi-tools.org/en/stable/user_guide/models/scvi.html MultiVI:https://docs.scvi-tools.org/en/stable/user_guide/models/multivi.html 目录 scVI生成推理任务 MultiVI生成推理 scVI single cell variational inference提出了一个…...
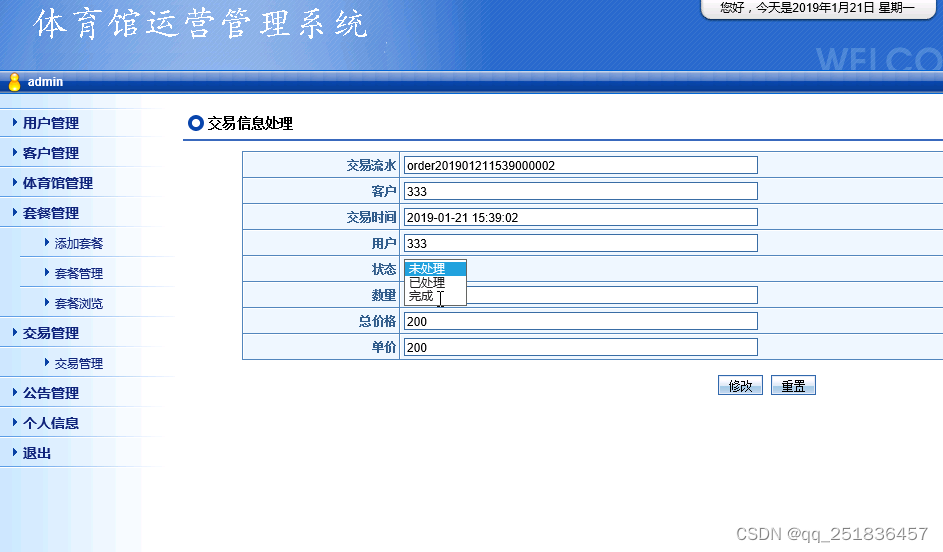
java Servlet体育馆运营管理系统myeclipse开发mysql数据库网页mvc模式java编程计算机网页设计
一、源码特点 JSP 体育馆运营管理系统是一套完善的java web信息管理系统,对理解JSP java编程开发语言有帮助,系统采用serlvetdaobean,系统具有完整的源代码和数据库,系统主要采用 B/S模式开发。 java Servlet体育馆运营管理系…...

Lumi Diary:基于OpenClaw Skill的本地AI记忆伴侣设计与实践
1. 项目概述:一个住在你设备里的记忆精灵如果你和我一样,对把生活点滴交给云端总有点不放心,但又渴望有一个能懂你、能帮你把碎片记忆编织成故事的伙伴,那么 Lumi Diary 的出现,可能正是时候。这不是又一个需要你手动打…...
)
【2026社工】初级社会工作者历年真题及答案PDF电子版(2010-2025年)
2026年初级社会工作者职业水平考试安排 考试时间: 2026年5月23日 考试科目与形式 科目名称考试形式社会工作实务闭卷笔试社会工作综合能力闭卷笔试 备考资源说明 提供2010-2025年完整历年真题及解析,覆盖全部考试科目,具体功能如下&#…...

航拍UAV电力电缆巡检检测数据集_数据集第10027期
航拍UAV电力电缆巡检检测数据集_数据集第10027期 项目简介 面向无人机电力巡检场景的开源目标检测数据集,聚焦电力电缆识别任务,可用于电力线检测、植被与电力线安全距离监测等场景,助力电力巡检智能化。 数据集核心信息 数据规模:…...

如何快速掌握Blender精确建模:CAD_Sketcher完整实战指南
如何快速掌握Blender精确建模:CAD_Sketcher完整实战指南 【免费下载链接】CAD_Sketcher Constraint-based geometry sketcher for blender 项目地址: https://gitcode.com/gh_mirrors/ca/CAD_Sketcher 你是否曾经希望在Blender中创建精确的工程图纸ÿ…...

构建企业级日志监控系统:Visual Syslog Server技术架构深度解析
构建企业级日志监控系统:Visual Syslog Server技术架构深度解析 【免费下载链接】visualsyslog Syslog Server for Windows with a graphical user interface 项目地址: https://gitcode.com/gh_mirrors/vi/visualsyslog 在当今复杂的IT基础设施环境中&#…...

普遍认为赠送福利越多客户留存越高,编程统计福利投入,客户留存数据过度福利,会造成客户贪婪流失率上升。
“福利投入强度与客户留存的非线性关系分析” 为主题。一、实际应用场景描述(Business Context)在 SaaS、电商、会员制平台、在线教育等商业场景中,赠送福利(优惠券、积分、试用权益、赠品等)被广泛用于:- …...

文心一言深度解析:国产多模态大模型的破局之路
文心一言深度解析:国产多模态大模型的破局之路 引言 在ChatGPT引爆全球AI热潮的背景下,国产大模型如何突围?百度推出的文心一言(ERNIE Bot)作为中国AI产业的一面旗帜,凭借其在多模态理解与生成、中文场景深…...
)
别再折腾源码编译了!Ubuntu 20.04下用apt-get一键安装Asterisk PBX(附SIP账号配置详解)
别再折腾源码编译了!Ubuntu 20.04下用apt-get一键安装Asterisk PBX(附SIP账号配置详解) 如果你正在寻找一种快速搭建企业级电话系统的方法,那么Asterisk PBX绝对值得考虑。作为开源PBX领域的标杆,Asterisk提供了完整的…...

如何用Figma-to-JSON解决设计开发协作难题:4个实用场景详解
如何用Figma-to-JSON解决设计开发协作难题:4个实用场景详解 【免费下载链接】figma-to-json 💾 Read/Write Figma Files as JSON 项目地址: https://gitcode.com/gh_mirrors/fi/figma-to-json 在当今快速迭代的产品开发环境中,设计师与…...

PiliPlus:如何用第三方B站客户端解锁终极观影体验?
PiliPlus:如何用第三方B站客户端解锁终极观影体验? 【免费下载链接】PiliPlus PiliPlus 项目地址: https://gitcode.com/gh_mirrors/pi/PiliPlus 你是否厌倦了官方B站客户端的广告轰炸?是否想要更纯净、更流畅的观影体验?P…...