Docker本地私有仓库搭建配置指导
一、说明
因内网主机需要拉取镜像进行Docker应用,因此需要一台带外主机作为内网私有仓库来提供内外其他docker业务主机使用。参考架构如下:

相关资源:加密、Distribution registry、Create and Configure Docker Registry、Registry部署、Distribution Registry v2 authentication、docker-registry
二、部署配置
注:不要在已有业务的生产环境主机搭建,因为过程需要重启docker,这对生产来说是不可被接受的;Docker 配置文件的默认位置如下:
Linux:/etc/docker/daemon.json
macOS:/Library/Preferences/com.docker.docker/daemon.json
Windows:C:\ProgramData\Docker\config\daemon.json
环境变量:export DOCKER_CONFIG=/home/my/docker/config
2.1、Docker基础环境部署
#因在带外主机上部署,直接yum即可
yum install yum-utils -y  #yum-config-manager依赖
--------------------------------------------------------------------------------------------------------------------------
Total                                                                                     1.4 MB/s | 1.3 MB  00:00:00
Running transaction check
Running transaction test
Transaction test succeeded
Running transactionInstalling : python-kitchen-1.1.1-5.el7.noarch                                                                      1/5 Updating   : libxml2-2.9.1-6.el7_9.6.x86_64                                                                         2/5 Installing : libxml2-python-2.9.1-6.el7_9.6.x86_64                                                                  3/5 Installing : yum-utils-1.1.31-54.el7_8.noarch                                                                       4/5 Cleanup    : libxml2-2.9.1-6.el7_2.3.x86_64                                                                         5/5 Verifying  : libxml2-2.9.1-6.el7_9.6.x86_64                                                                         1/5 Verifying  : python-kitchen-1.1.1-5.el7.noarch                                                                      2/5 Verifying  : yum-utils-1.1.31-54.el7_8.noarch                                                                       3/5 Verifying  : libxml2-python-2.9.1-6.el7_9.6.x86_64                                                                  4/5 Verifying  : libxml2-2.9.1-6.el7_2.3.x86_64                                                                         5/5 Installed:yum-utils.noarch 0:1.1.31-54.el7_8                                                                                      Dependency Installed:libxml2-python.x86_64 0:2.9.1-6.el7_9.6                       python-kitchen.noarch 0:1.1.1-5.el7                      Dependency Updated:libxml2.x86_64 0:2.9.1-6.el7_9.6                                                                                        Complete!yum-config-manager --add-repo http://mirrors.aliyun.com/docker-ce/linux/centos/docker-ce.repoLoaded plugins: fastestmirror, versionlock
adding repo from: http://mirrors.aliyun.com/docker-ce/linux/centos/docker-ce.repo
grabbing file http://mirrors.aliyun.com/docker-ce/linux/centos/docker-ce.repo to /etc/yum.repos.d/docker-ce.repo
repo saved to /etc/yum.repos.d/docker-ce.repo#基础包(可忽略)yum install -y  wget net-tools nfs-utils lrzsz gcc gcc-c++ make cmake libxml2-devel openssl-devel curl curl-devel unzip sudo ntp libaio-devel wget vim ncurses-devel autoconf automake zlib-devel  python-devel epel-release openssh-server socat  ipvsadm conntrack ntpdate  telnet#安装依赖
yum install -y device-mapper-persistent-data lvm2
……
Updated:device-mapper-persistent-data.x86_64 0:0.8.5-3.el7_9.2                  lvm2.x86_64 7:2.02.187-6.el7_9.5                 Dependency Updated:device-mapper.x86_64 7:1.02.170-6.el7_9.5                      device-mapper-event.x86_64 7:1.02.170-6.el7_9.5          device-mapper-event-libs.x86_64 7:1.02.170-6.el7_9.5           device-mapper-libs.x86_64 7:1.02.170-6.el7_9.5           lvm2-libs.x86_64 7:2.02.187-6.el7_9.5                         Complete!#安装docker环境,
yum install docker-ce docker-ce-cli containerd.io -y
#或
yum install -y docker-ce-23.0.1-1.el7 docker-ce-cli-23.0.1-1.el7 containerd.io docker-buildx-plugin docker-compose-plugin  #前三个必安装,推荐安装1.11.2以上版本的容器引擎客户端#创建用户
usermod  -aG docker $(USER)
#启动
systemctl start docker
systemctl status docker  #输出如下● docker.service - Docker Application Container EngineLoaded: loaded (/usr/lib/systemd/system/docker.service; disabled; vendor preset: disabled)Active: active (running) since Tue 2024-01-16 17:48:54 CST; 5s agoDocs: https://docs.docker.comMain PID: 4549 (dockerd)Memory: 25.0MCGroup: /system.slice/docker.service└─4549 /usr/bin/dockerd -H fd:// --containerd=/run/containerd/containerd.sockJan 16 17:48:52 Desktopvideo systemd[1]: Starting Docker Application Container Engine...
Jan 16 17:48:52 Desktopvideo dockerd[4549]: time="2024-01-16T17:48:52.895562767+08:00" level=info msg="Starting up"
Jan 16 17:48:53 Desktopvideo dockerd[4549]: time="2024-01-16T17:48:53.034501644+08:00" level=info msg="Loading...art."
Jan 16 17:48:53 Desktopvideo dockerd[4549]: time="2024-01-16T17:48:53.894486165+08:00" level=info msg="Loading...one."
Jan 16 17:48:53 Desktopvideo dockerd[4549]: time="2024-01-16T17:48:53.994229637+08:00" level=info msg="Docker ...4.0.7
Jan 16 17:48:53 Desktopvideo dockerd[4549]: time="2024-01-16T17:48:53.994411964+08:00" level=info msg="Daemon ...tion"
Jan 16 17:48:54 Desktopvideo dockerd[4549]: time="2024-01-16T17:48:54.145085504+08:00" level=info msg="API lis...sock"
Jan 16 17:48:54 Desktopvideo systemd[1]: Started Docker Application Container Engine.Hint: Some lines were ellipsized, use -l to show in full.#配置开机自启
systemctl enable docker  #输出如下Created symlink from /etc/systemd/system/multi-user.target.wants/docker.service to /usr/lib/systemd/system/docker.service#验证
docker version   #输出如下Client: Docker Engine - CommunityVersion:           24.0.7API version:       1.43Go version:        go1.20.10Git commit:        afdd53bBuilt:             Thu Oct 26 09:11:35 2023OS/Arch:           linux/amd64Context:           defaultServer: Docker Engine - CommunityEngine:Version:          24.0.7API version:      1.43 (minimum version 1.12)Go version:       go1.20.10Git commit:       311b9ffBuilt:            Thu Oct 26 09:10:36 2023OS/Arch:          linux/amd64Experimental:     falsecontainerd:Version:          1.6.27GitCommit:        a1496014c916f9e62104b33d1bb5bd03b0858e59runc:Version:          1.1.11GitCommit:        v1.1.11-0-g4bccb38docker-init:Version:          0.19.0GitCommit:        de40ad0
===============================
docker run hello-world   #验证,第一次会下载,然后再输出Hello from Docker!Unable to find image 'hello-world:latest' locally
latest: Pulling from library/hello-world
c1ec31eb5944: Pull complete
Digest: sha256:4bd78111b6914a99dbc560e6a20eab57ff6655aea4a80c50b0c5491968cbc2e6
Status: Downloaded newer image for hello-world:latestHello from Docker!
This message shows that your installation appears to be working correctly.To generate this message, Docker took the following steps:1. The Docker client contacted the Docker daemon.2. The Docker daemon pulled the "hello-world" image from the Docker Hub.(amd64)3. The Docker daemon created a new container from that image which runs theexecutable that produces the output you are currently reading.4. The Docker daemon streamed that output to the Docker client, which sent itto your terminal.To try something more ambitious, you can run an Ubuntu container with:$ docker run -it ubuntu bashShare images, automate workflows, and more with a free Docker ID:https://hub.docker.com/For more examples and ideas, visit:https://docs.docker.com/get-started/docker history docker.io/hello-world  #输出如下IMAGE          CREATED        CREATED BY                SIZE      COMMENT
d2c94e258dcb   8 months ago   CMD ["/hello"]            0B        buildkit.dockerfile.v0
<missing>      8 months ago   COPY hello / # buildkit   13.3kB    buildkit.dockerfile.v0docker info  #输出如下
Client: Docker Engine - CommunityVersion:    24.0.7Context:    defaultDebug Mode: falsePlugins:buildx: Docker Buildx (Docker Inc.)Version:  v0.11.2Path:     /usr/libexec/docker/cli-plugins/docker-buildxcompose: Docker Compose (Docker Inc.)Version:  v2.21.0Path:     /usr/libexec/docker/cli-plugins/docker-composeServer:Containers: 2Running: 0Paused: 0Stopped: 2Images: 1Server Version: 24.0.7Storage Driver: overlay2Backing Filesystem: extfsSupports d_type: trueUsing metacopy: falseNative Overlay Diff: trueuserxattr: falseLogging Driver: json-fileCgroup Driver: cgroupfsCgroup Version: 1Plugins:Volume: localNetwork: bridge host ipvlan macvlan null overlayLog: awslogs fluentd gcplogs gelf journald json-file local logentries splunk syslogSwarm: inactiveRuntimes: io.containerd.runc.v2 runc  #这里Default Runtime: runcInit Binary: docker-initcontainerd version: a1496014c916f9e62104b33d1bb5bd03b0858e59runc version: v1.1.11-0-g4bccb38init version: de40ad0Security Options:seccompProfile: builtinKernel Version: 3.10.0-693.21.1.el7.x86_64Operating System: CentOS Linux 7 (Core)OSType: linuxArchitecture: x86_64CPUs: 4Total Memory: 15.51GiBName: DesktopvideoID: 07c30337-2af0-4f9f-bb63-fc5e0af01a76Docker Root Dir: /var/lib/docker  #默认位置Debug Mode: falseExperimental: falseInsecure Registries:127.0.0.0/8Live Restore Enabled: false
2.2、配置
注:安装完docker后会生成一个docker0的网卡和br-x开头的网桥,从外部访问容器内部时只需要访问宿主机的地址和对应的容器映射的地址,访问的数据包到宿主机上后经过ip包解析后通过目的port和iptables的规则会将数据包由eth0网卡转发至网桥上的docker0上进行下一步路由。所以如果容器的宿主机上的ip_forward未打开,那么该宿主机上的容器则不能被其他宿主机访问;net.bridge.bridge-nf-call-iptables用于转发是因默认情况下,从容器发送到默认网桥的流量,不会被转发到外部。
#开启包转发功能和修改内核参数
modprobe br_netfilter  #用于linux iptables/netfilter通过和linux bridge功能联动,以实现透明防火墙功能,它也称桥接模式防火墙(Bridge Firewall),也就是在网桥设备上加入防火墙功能,否则下面内核参数启用时会报错
echo "modprobe br_netfilter" >> /etc/profilecat > /etc/sysctl.d/docker.conf <<EOF
net.bridge.bridge-nf-call-ip6tables = 1
net.bridge.bridge-nf-call-iptables = 1
net.ipv4.ip_forward = 1
EOF
#应用生效
sysctl -p /etc/sysctl.d/docker.conf#拉取仓库镜像
docker pull distribution/registry   #输出如下Using default tag: latest
latest: Pulling from distribution/registry
90f4dba627d6: Pull complete
6ca70669e0c7: Pull complete
8afccc587e11: Pull complete
5d5d4c33684a: Pull complete
6865c91bf9e0: Pull complete
24ec77c4f34d: Pull complete
d998fd3ae604: Pull complete
9ae2aa709472: Pull complete
dfbbb717df56: Pull complete
9f9a21385c8d: Pull complete
30cb17477211: Pull complete
Digest: sha256:910528144c2dcbfbf1ee85b9b3c8b8312ef4222e61e7d6282b0b17d6e363611c
Status: Downloaded newer image for distribution/registry:latest
docker.io/distribution/registry:latest
docker images |grep registry  #验证
distribution/registry   latest    71b9fde93b3f   5 years ago    299MB#使用registry镜像搭建一个私有仓库,名称建议小写;默认情况下,Registry存放镜像的目录是/var/lib/registry目录下,这样如果容器被删除,则存放于容器中的镜像也会丢失,所以我们一般情况下会使用-v参数指定本地持久的路径,映射或挂载到容器的/var/lib/registry下,其中registry目录会自动创建docker run -d -v /data/docker/registry:/var/lib/registry -p 5000:5000 --restart=always --name myhub distribution/registrydocker ps -a|grep regis  #验证
b7715545dda9   distribution/registry   "registry serve /etc…"   14 seconds ago   Up 11 seconds               0.0.0.0:5000->5000/tcp, :::5000->5000/tcp   myhubcurl http://localhost:5000/v2/_catalog
{"repositories":[]}
2.3、构建私有仓库
1)私有仓库因外联公网,可以直接从hub下载镜像,然后执行docker load -i xx.tar进行上传到本地仓库,也可直接pull
docker images  #验证本地仓库已有镜像,这里就用hello-world测试,你可自行pull其他镜像,比如busybox,它是一个集成了一百多个最常用Linux命令和工具的工具箱,更多参看:www.busybox.netREPOSITORY              TAG       IMAGE ID       CREATED        SIZE
hello-world             latest    d2c94e258dcb   8 months ago   13.3kB
distribution/registry   latest    71b9fde93b3f   5 years ago    299MB#修改镜像标签为你的私有仓库镜像
#语法: docker  tag 原镜像名:标签 私有仓库地址/新镜像名:标签,如果不写镜像标签,默认是:latest
#docker tag <public-image-name> <your-registry-address>/<image-name>
docker tag hello-world 172.1.18.9:5000/hello-world:v1docker images  #验证REPOSITORY                     TAG       IMAGE ID       CREATED        SIZE
172.1.18.9:5000/hello-world    v1        d2c94e258dcb   8 months ago   13.3kB
hello-world                    latest    d2c94e258dcb   8 months ago   13.3kB
distribution/registry          latest    71b9fde93b3f   5 years ago    299MB#修改私有仓库本地配置文件
vim /etc/docker/deamon.json  #添加如下
{"insecure-registries":["172.1.18.9:5000"]
}
#完成后,重启docker
systemctl restart dockerdocker info    #验证,输出如下即可
……
Insecure Registries:172.1.18.9:5000127.0.0.0/8#将172.1.18.9:5000/hello-world:v1 push到私有仓库里
docker push 172.1.18.9:5000/hello-world:v1   #输出如下The push refers to repository [172.1.18.9:5000/hello-world]
ac28800ec8bb: Pushed
v1: digest: sha256:d37ada95d47ad12224c205a938129de52345828b4fa27b03a98825d1e2e7 size: 524#验证
curl -S http://172.16.18.9:5000/v2/_catalog  #如下所示,已经可见刚才上传的镜像了,当然客户端也可验证
{"repositories":["hello-world"]}
2)启动registry-web
由于官方的registry只是提供了api,没有一个图形化界面供显示和操作,所以我们可以利用第三方提供的镜像启动一个图形化页面。进入容器的工作目录(/var/lib/docker/containers//), 创建config.yml文件(容器的配置文件),配置:
docker inspect <container-id> | grep "ConfigPath"  #查看指定容器去配置文件cd /var/lib/docker/b7715545dda975dd41b4d571d329e8edb34c07f236e03f144b1c68e552fc8ec4/
ls  #输出如下b7715545dda975dd41b4d571d329e8edb34c07f236e03f144b1c68e552fc8ec4-json.log
checkpoints
config.v2.json
hostconfig.json
hostname
hosts
mounts
resolv.conf
resolv.conf.hash#创建config.yml文件,配置:
registry:# Docker registry urlurl: http://172.1.18.9:5000/v2# Docker registry fqdnname: localhost:5000# To allow image delete, should be falsereadonly: falseauth:# Disable authenticationenabled: false#拉取web容器,找一个stars多的
docker pull hyper/docker-registry-web
#启动容器
mkdir -p /etc/docker/container/conf/
docker run -d -p 18080:18080 --name my-registry-web --restart=always  -v $(pwd)/config.yml:/etc/docker/container/conf/config.yml:ro  hyper/docker-registry-web#验证
docker inspect --format '{{ .NetworkSettings.IPAddress }}' registry_id
curl -XGET http://localhost:5000/v2/_catalog
curl -s -XGET localhost:5000/v2/_catalog
curl -XGET http://localhost:5000/v2/hello-world/tags/list  #输出如下
{"name":"hello-world","tags":["v1"]}
#删除镜像:DELETE /v2/<name>/manifests/<reference>(镜像对应sha256值)
curl -I -X DELETE http://localhost:5000/v2/hello-world/manifests/sha256:48c7f9c92844bbbb5d0a101392f7c2a7949e40f8ea90c8b3bc396879d95e897e#报错
024-01-17 04:21:29,399 [http-bio-8080-exec-1] ERROR web.RepositoryController  - Can't access registry: _catalog?n=100
org.springframework.web.client.ResourceAccessException: I/O error on GET request for "http://localhost:5000/v2/_catalog?n=100":Connection refused; nested exception is java.net.ConnectException: Connection refusedat grails.plugins.rest.client.RestBuilder.invokeRestTemplate(RestBuilder.groovy:312)at docker.registry.web.CustomRestBuilder.request(CustomRestBuilder.groovy:22)at docker.registry.web.RestService.requestInternal(RestService.groovy:70)at docker.registry.web.RestService.request(RestService.groovy:63)at docker.registry.web.RestService.get(RestService.groovy:42)at docker.registry.web.RepositoryController.index(RepositoryController.groovy:29)at grails.plugin.cache.web.filter.PageFragmentCachingFilter.doFilter(PageFragmentCachingFilter.java:198)at grails.plugin.cache.web.filter.AbstractFilter.doFilter(AbstractFilter.java:63)at grails.plugin.springsecurity.web.filter.GrailsAnonymousAuthenticationFilter.doFilter(GrailsAnonymousAuthenticationFilter.java:53)at grails.plugin.springsecurity.web.authentication.logout.MutableLogoutFilter.doFilter(MutableLogoutFilter.java:62)at grails.plugin.springsecurity.web.SecurityRequestHolderFilter.doFilter(SecurityRequestHolderFilter.java:59)at java.util.concurrent.ThreadPoolExecutor.runWorker(ThreadPoolExecutor.java:1145)at java.util.concurrent.ThreadPoolExecutor$Worker.run(ThreadPoolExecutor.java:615)at java.lang.Thread.run(Thread.java:745)
Caused by: java.net.ConnectException: Connection refusedat java.net.AbstractPlainSocketImpl.doConnect(AbstractPlainSocketImpl.java:339)at java.net.AbstractPlainSocketImpl.connectToAddress(AbstractPlainSocketImpl.java:200)at java.net.AbstractPlainSocketImpl.connect(AbstractPlainSocketImpl.java:182)at java.net.SocksSocketImpl.connect(SocksSocketImpl.java:392)at java.net.Socket.connect(Socket.java:579)at java.net.Socket.connect(Socket.java:528)... 14 more
现场遇到了报错:

#源命令
docker run -d -p 8080:8080 --name my-registry-web --restart=always  -v $(pwd)/config.yml:/etc/docker/container/conf/config.yml:ro  hyper/docker-registry-web
#修改
docker run -d -p 8080:8080 --restart=always --name my-registry-web --link myhub -e REGISTRY_URL=http://172.1.18.9:5000/v2 -e REGISTRY_NAME=localhost:5000 hyper/docker-registry-web


3)设置http访问的私有镜像仓库容器
docker从1.3.X之后,与docker registry交互默认使用的是https,修改docker启动配置文件,在启动docker server时增加启动参数为默认使用http访问。可通过修改启动服务来,修改docker启动时的仓库访问
cp /usr/lib/systemd/system/docker.service /usr/lib/systemd/system/docker.service.bak
修改docker.service
vim /usr/lib/systemd/system/docker.service #找到 ExecStart的行,修改成下面这样
ExecStart=/usr/bin/dockerd -H fd:// --containerd=/run/containerd/containerd.sock --insecure-registry localhost:5000
#或
ExecStart=/usr/bin/dockerd $OPTIONS \$DOCKER_STORAGE_OPTIONS \$DOCKER_NETWORK_OPTIONS \$INSECURE_REGISTRY \--insecure-registry localhost:5000
注意上面的不要与配置文件冲突了,二选一,否则报错:
6 dockerd[1011290]: unable to configure the Docker daemon with file /etc/docker/daemon.json: the following directives are specified both as a flag and in the configuration file: insecure-registries: (from flag: [172.1.18.9:5000], from file: [172.1.18.9:5000])4)设置https访问的私有镜像仓库容器

yum -y install httpd-tools  #安装加密工具
cd /etc/docker/
mkdir certs
#生产自签证书,跟ssh配置一样
openssl req -newkey rsa:4096 -nodes -sha256 -keyout certs/registry.key -x509 -days 365 -out certs/registry.crt  #类似如下
Generating a 4096 bit RSA private key
......................................++
...........++
writing new private key to 'certs/registry.key'
-----
You are about to be asked to enter information that will be incorporated
into your certificate request.
What you are about to enter is what is called a Distinguished Name or a DN.
There are quite a few fields but you can leave some blank
For some fields there will be a default value,
If you enter '.', the field will be left blank.
-----
Country Name (2 letter code) [XX]:CN
State or Province Name (full name) []:beijing
Locality Name (eg, city) [Default City]:
Organization Name (eg, company) [Default Company Ltd]:
Organizational Unit Name (eg, section) []:
Common Name (eg, your name or your server's hostname) []:localhost
Email Address []:
#生成鉴权密码文件:username和password替换成对应的用户名和密码,B强制密码加密;b在命令中输入密码,不提示输入密码;n不更新密钥文件
docker run --entrypoint htpasswd registry -Bbn username password  > auth/htpasswd#启动registry容器
docker run -d -p 5000:5000 --restart=always --name localhost \
-v `pwd`/auth:/auth \
-e "REGISTRY_AUTH=htpasswd" \
-e "REGISTRY_AUTH_HTPASSWD_REALM=Registry Realm" \
-e REGISTRY_AUTH_HTPASSWD_PATH=/auth/htpasswd \
-v `pwd`/certs:/certs \
-e REGISTRY_HTTP_TLS_CERTIFICATE=/certs/registry.crt \
-e REGISTRY_HTTP_TLS_KEY=/certs/registry.key \
-v /opt/data/registry:/var/lib/registry \
-v /usr/local/docker/config.yml:/etc/docker/registry/config.yml registry#如果不启用密码
docker run -d -p 5000:5000 --restart=always --name localhost \
-v `pwd`/etc/docker/certs:/certs \
-e REGISTRY_HTTP_TLS_CERTIFICATE=/etc/docker/certs/registry.crt \
-e REGISTRY_HTTP_TLS_KEY=/etc/docker/certs/registry.key \
-v /data/registry:/var/lib/registry \
-v /var/lib/docker/containers/config.yml:/etc/docker/registry/config.yml registry#客户端侧
mkdir -p /etc/docker/certs.d/
#从私有仓库服务器将证书拷贝到client中, client不安装证书的话,进行pull/push操作,会出现x509: certificate signed by unknown authority的报错。
scp  ……
#client重启Docker Daemon
2.4、Docker内网客户端侧配置
1)修改docker配置文件(没有的新建即可):/etc/docker/deamon.json,指定docker镜像加速结点为:上文建立的私有仓库的地址
{"insecure-registries":["172.1.18.9:5000"],"registry-mirrors": ["http://hub-mirror.c.163.com","https://docker.mirrors.ustc.edu.cn","https://cr.console.aliyun.com","https://hub.daocloud.io","https://5ufvppm7.mirror.aliyuncs.com","https://6iuzoxz4.mirror.aliyuncs.com","http://192.168.1.12:8080"  #可只写这一项]
}
完成后,重启docker:systemctl restart docker
docker info  #验证,输出如下Containers: 0Running: 0Paused: 0Stopped: 0
Images: 0
Server Version: 18.09.0
Storage Driver: overlay2Backing Filesystem: extfsSupports d_type: trueNative Overlay Diff: true
Logging Driver: json-file
Cgroup Driver: cgroupfs
Hugetlb Pagesize: 2MB, 1GB, 2MB, 1GB (default is 2MB)
Plugins:Volume: localNetwork: bridge host macvlan null overlayLog: awslogs fluentd gcplogs gelf journald json-file local logentries splunk syslog
Swarm: inactive
Runtimes: runc
Default Runtime: runc
Init Binary: docker-init
containerd version: 5dd35b83aeab1780082734b68e92a3991d3f8eee
runc version: 1f4c5ce0be8a1bfc8486bbcb7e84e92848366c93
init version: N/A (expected: )
Security Options:seccompProfile: default
Kernel Version: 5.10.0-60.70.0.94.oe2203.bclinux.x86_64
Operating System: BigCloud Enterprise Linux For Euler 22.10 LTS
OSType: linux
Architecture: x86_64
CPUs: 4
Total Memory: 14.88GiB
Name: ygcg-manger206
ID: WTZ5:5RCE:ZOOP:7FPP:ZWCS:PY2F:P54Q:P5HP:W6MN:DRC3:2AM4:ATPX
Docker Root Dir: /var/lib/docker
Debug Mode (client): false
Debug Mode (server): false
Registry: https://index.docker.io/v1/
Labels:
Experimental: false
Insecure Registries:172.1.18.9:5000127.0.0.0/8
Registry Mirrors:http://hub-mirror.c.163.com/https://docker.mirrors.ustc.edu.cn/https://cr.console.aliyun.com/https://hub.daocloud.io/https://5ufvppm7.mirror.aliyuncs.com/
Live Restore Enabled: true
2)验证使用
目前无法再客户端使用 docker search host:5000/registry进行查询
# 目前无法用docker search
#下面是一个网络示例,可列出私有仓库的镜像脚本
#!/usr/bin/env python
#-*- coding:utf-8 -*-import requests
import json
import traceback
import sysrepo_ip = sys.argv[1]
repo_port = sys.argv[2]def getImagesNames(repo_ip,repo_port):docker_images = []try:url = "http://" + repo_ip + ":" + repo_port + "/v2/_catalog"res =requests.get(url).content.strip()res_dic = json.loads(res)images_type = res_dic['repositories']for i in images_type:url2 = "http://" + repo_ip + ":" + repo_port +"/v2/" + str(i) + "/tags/list"res2 =requests.get(url2).content.strip()res_dic2 = json.loads(res2)name = res_dic2['name']tags = res_dic2['tags']if tags != None:for tag in tags:docker_name = str(repo_ip) + ":" + repo_port + "/" + name + ":" + tagdocker_images.append(docker_name)print(docker_name)except:traceback.print_exc()return docker_imagesgetImagesNames(repo_ip, repo_port)
#shell脚本
#!/bin/bash
file=$(mktemp)
curl -s $1:5000/v2/_catalog | jq | egrep -v '\{|\}|\[|]' | awk -F\" '{print $2}' > $file
while read aa ; do
tag=($(curl -s $1:5000/v2/$aa/tags/list | jq | egrep -v '\{|\}|\[|]|name' | awk -F\" '{print $2}')) for i in ${tag[*]} ; doecho $1:5000/${aa}:$i done
done < $file
rm -rf $file#查看是,执行
python list_private_images.py ip:5000#容器镜像删除后垃圾回收
docker exec -ti myhub sh
registry garbage-collect /etc/docker/registry/config.yml #删除镜像仓库的脚本
#!/usr/bin/env python
"""
Usage:
Shut down your registry service to avoid race conditions and possible data loss
and then run the command with an image repo like this:
delete_docker_registry_image.py --image awesomeimage --dry-run
"""
import argparse
import json
import logging
import os
import sys
import shutil
import glob
logger = logging.getLogger(__name__)
def del_empty_dirs(s_dir, top_level):"""recursively delete empty directories"""b_empty = Truefor s_target in os.listdir(s_dir):s_path = os.path.join(s_dir, s_target)if os.path.isdir(s_path):if not del_empty_dirs(s_path, False):b_empty = Falseelse:b_empty = Falseif b_empty:logger.debug("Deleting empty directory '%s'", s_dir)if not top_level:os.rmdir(s_dir)return b_empty
def get_layers_from_blob(path):"""parse json blob and get set of layer digests"""try:with open(path, "r") as blob:data_raw = blob.read()data = json.loads(data_raw)if data["schemaVersion"] == 1:result = set([entry["blobSum"].split(":")[1] for entry in data["fsLayers"]])else:result = set([entry["digest"].split(":")[1] for entry in data["layers"]])if "config" in data:result.add(data["config"]["digest"].split(":")[1])return resultexcept Exception as error:logger.critical("Failed to read layers from blob:%s", error)return set()
def get_digest_from_blob(path):"""parse file and get digest"""try:with open(path, "r") as blob:return blob.read().split(":")[1]except Exception as error:logger.critical("Failed to read digest from blob:%s", error)return ""
def get_links(path, _filter=None):"""recursively walk `path` and parse every link inside"""result = []for root, _, files in os.walk(path):for each in files:if each == "link":filepath = os.path.join(root, each)if not _filter or _filter in filepath:result.append(get_digest_from_blob(filepath))return result
class RegistryCleanerError(Exception):pass
class RegistryCleaner(object):"""Clean registry"""def __init__(self, registry_data_dir, dry_run=False):self.registry_data_dir = registry_data_dirif not os.path.isdir(self.registry_data_dir):raise RegistryCleanerError("No repositories directory found inside " \"REGISTRY_DATA_DIR '{0}'.".format(self.registry_data_dir))self.dry_run = dry_rundef _delete_layer(self, repo, digest):"""remove blob directory from filesystem"""path = os.path.join(self.registry_data_dir, "repositories", repo, "_layers/sha256", digest)self._delete_dir(path)def _delete_blob(self, digest):"""remove blob directory from filesystem"""path = os.path.join(self.registry_data_dir, "blobs/sha256", digest[0:2], digest)self._delete_dir(path)def _blob_path_for_revision(self, digest):"""where we can find the blob that contains the json describing this digest"""return os.path.join(self.registry_data_dir, "blobs/sha256",digest[0:2], digest, "data")def _blob_path_for_revision_is_missing(self, digest):"""for each revision, there should be a blob describing it"""return not os.path.isfile(self._blob_path_for_revision(digest))def _get_layers_from_blob(self, digest):"""get layers from blob by digest"""return get_layers_from_blob(self._blob_path_for_revision(digest))def _delete_dir(self, path):"""remove directory from filesystem"""if self.dry_run:logger.info("DRY_RUN: would have deleted %s", path)else:logger.info("Deleting %s", path)try:shutil.rmtree(path)except Exception as error:logger.critical("Failed to delete directory:%s", error)def _delete_from_tag_index_for_revision(self, repo, digest):"""delete revision from tag indexes"""paths = glob.glob(os.path.join(self.registry_data_dir, "repositories", repo,"_manifests/tags/*/index/sha256", digest))for path in paths:self._delete_dir(path)def _delete_revisions(self, repo, revisions, blobs_to_keep=None):"""delete revisions from list of directories"""if blobs_to_keep is None:blobs_to_keep = []for revision_dir in revisions:digests = get_links(revision_dir)for digest in digests:self._delete_from_tag_index_for_revision(repo, digest)if digest not in blobs_to_keep:self._delete_blob(digest)self._delete_dir(revision_dir)def _get_tags(self, repo):"""get all tags for given repository"""path = os.path.join(self.registry_data_dir, "repositories", repo, "_manifests/tags")if not os.path.isdir(path):logger.critical("No repository '%s' found in repositories directory %s",repo, self.registry_data_dir)return Noneresult = []for each in os.listdir(path):filepath = os.path.join(path, each)if os.path.isdir(filepath):result.append(each)return resultdef _get_repositories(self):"""get all repository repos"""result = []root = os.path.join(self.registry_data_dir, "repositories")for each in os.listdir(root):filepath = os.path.join(root, each)if os.path.isdir(filepath):inside = os.listdir(filepath)if "_layers" in inside:result.append(each)else:for inner in inside:result.append(os.path.join(each, inner))return resultdef _get_all_links(self, except_repo=""):"""get links for every repository"""result = []repositories = self._get_repositories()for repo in [r for r in repositories if r != except_repo]:path = os.path.join(self.registry_data_dir, "repositories", repo)for link in get_links(path):result.append(link)return resultdef prune(self):"""delete all empty directories in registry_data_dir"""del_empty_dirs(self.registry_data_dir, True)def _layer_in_same_repo(self, repo, tag, layer):"""check if layer is found in other tags of same repository"""for other_tag in [t for t in self._get_tags(repo) if t != tag]:path = os.path.join(self.registry_data_dir, "repositories", repo,"_manifests/tags", other_tag, "current/link")manifest = get_digest_from_blob(path)try:layers = self._get_layers_from_blob(manifest)if layer in layers:return Trueexcept IOError:if self._blob_path_for_revision_is_missing(manifest):logger.warn("Blob for digest %s does not exist. Deleting tag manifest: %s", manifest, other_tag)tag_dir = os.path.join(self.registry_data_dir, "repositories", repo,"_manifests/tags", other_tag)self._delete_dir(tag_dir)else:raisereturn Falsedef _manifest_in_same_repo(self, repo, tag, manifest):"""check if manifest is found in other tags of same repository"""for other_tag in [t for t in self._get_tags(repo) if t != tag]:path = os.path.join(self.registry_data_dir, "repositories", repo,"_manifests/tags", other_tag, "current/link")other_manifest = get_digest_from_blob(path)if other_manifest == manifest:return Truereturn Falsedef delete_entire_repository(self, repo):"""delete all blobs for given repository repo"""logger.debug("Deleting entire repository '%s'", repo)repo_dir = os.path.join(self.registry_data_dir, "repositories", repo)if not os.path.isdir(repo_dir):raise RegistryCleanerError("No repository '{0}' found in repositories ""directory {1}/repositories".format(repo, self.registry_data_dir))links = set(get_links(repo_dir))all_links_but_current = set(self._get_all_links(except_repo=repo))for layer in links:if layer in all_links_but_current:logger.debug("Blob found in another repository. Not deleting: %s", layer)else:self._delete_blob(layer)self._delete_dir(repo_dir)def delete_repository_tag(self, repo, tag):"""delete all blobs only for given tag of repository"""logger.debug("Deleting repository '%s' with tag '%s'", repo, tag)tag_dir = os.path.join(self.registry_data_dir, "repositories", repo, "_manifests/tags", tag)if not os.path.isdir(tag_dir):raise RegistryCleanerError("No repository '{0}' tag '{1}' found in repositories ""directory {2}/repositories".format(repo, tag, self.registry_data_dir))manifests_for_tag = set(get_links(tag_dir))revisions_to_delete = []blobs_to_keep = []layers = []all_links_not_in_current_repo = set(self._get_all_links(except_repo=repo))for manifest in manifests_for_tag:logger.debug("Looking up filesystem layers for manifest digest %s", manifest)if self._manifest_in_same_repo(repo, tag, manifest):logger.debug("Not deleting since we found another tag using manifest: %s", manifest)continueelse:revisions_to_delete.append(os.path.join(self.registry_data_dir, "repositories", repo,"_manifests/revisions/sha256", manifest))if manifest in all_links_not_in_current_repo:logger.debug("Not deleting the blob data since we found another repo using manifest: %s", manifest)blobs_to_keep.append(manifest)layers.extend(self._get_layers_from_blob(manifest))layers_uniq = set(layers)for layer in layers_uniq:if self._layer_in_same_repo(repo, tag, layer):logger.debug("Not deleting since we found another tag using digest: %s", layer)continueself._delete_layer(repo, layer)if layer in all_links_not_in_current_repo:logger.debug("Blob found in another repository. Not deleting: %s", layer)else:self._delete_blob(layer)self._delete_revisions(repo, revisions_to_delete, blobs_to_keep)self._delete_dir(tag_dir)def delete_untagged(self, repo):"""delete all untagged data from repo"""logger.debug("Deleting utagged data from repository '%s'", repo)repositories_dir = os.path.join(self.registry_data_dir, "repositories")repo_dir = os.path.join(repositories_dir, repo)if not os.path.isdir(repo_dir):raise RegistryCleanerError("No repository '{0}' found in repositories ""directory {1}/repositories".format(repo, self.registry_data_dir))tagged_links = set(get_links(repositories_dir, _filter="current"))layers_to_protect = []for link in tagged_links:layers_to_protect.extend(self._get_layers_from_blob(link))unique_layers_to_protect = set(layers_to_protect)for layer in unique_layers_to_protect:logger.debug("layer_to_protect: %s", layer)tagged_revisions = set(get_links(repo_dir, _filter="current"))revisions_to_delete = []layers_to_delete = []dir_for_revisions = os.path.join(repo_dir, "_manifests/revisions/sha256")for rev in os.listdir(dir_for_revisions):if rev not in tagged_revisions:revisions_to_delete.append(os.path.join(dir_for_revisions, rev))for layer in self._get_layers_from_blob(rev):if layer not in unique_layers_to_protect:layers_to_delete.append(layer)unique_layers_to_delete = set(layers_to_delete)self._delete_revisions(repo, revisions_to_delete)for layer in unique_layers_to_delete:self._delete_blob(layer)self._delete_layer(repo, layer)def get_tag_count(self, repo):logger.debug("Get tag count of repository '%s'", repo)repo_dir = os.path.join(self.registry_data_dir, "repositories", repo)tags_dir = os.path.join(repo_dir, "_manifests/tags")if os.path.isdir(tags_dir):tags = os.listdir(tags_dir)return len(tags)else:logger.info("Tags directory does not exist: '%s'", tags_dir)return -1
def main():"""cli entrypoint"""parser = argparse.ArgumentParser(description="Cleanup docker registry")parser.add_argument("-i", "--image",dest="image",required=True,help="Docker image to cleanup")parser.add_argument("-v", "--verbose",dest="verbose",action="store_true",help="verbose")parser.add_argument("-n", "--dry-run",dest="dry_run",action="store_true",help="Dry run")parser.add_argument("-f", "--force",dest="force",action="store_true",help="Force delete (deprecated)")parser.add_argument("-p", "--prune",dest="prune",action="store_true",help="Prune")parser.add_argument("-u", "--untagged",dest="untagged",action="store_true",help="Delete all untagged blobs for image")args = parser.parse_args()handler = logging.StreamHandler()handler.setFormatter(logging.Formatter(u'%(levelname)-8s [%(asctime)s]  %(message)s'))logger.addHandler(handler)if args.verbose:logger.setLevel(logging.DEBUG)else:logger.setLevel(logging.INFO)# make sure not to log before logging is setup. that'll hose your logging config.if args.force:logger.info("You supplied the force switch, which is deprecated. It has no effect now, and the script defaults to doing what used to be only happen when force was true")splitted = args.image.split(":")if len(splitted) == 2:image = splitted[0]tag = splitted[1]else:image = args.imagetag = Noneif 'REGISTRY_DATA_DIR' in os.environ:registry_data_dir = os.environ['REGISTRY_DATA_DIR']else:registry_data_dir = "/opt/registry_data/docker/registry/v2"try:cleaner = RegistryCleaner(registry_data_dir, dry_run=args.dry_run)if args.untagged:cleaner.delete_untagged(image)else:if tag:tag_count = cleaner.get_tag_count(image)if tag_count == 1:cleaner.delete_entire_repository(image)else:cleaner.delete_repository_tag(image, tag)else:cleaner.delete_entire_repository(image)if args.prune:cleaner.prune()except RegistryCleanerError as error:logger.fatal(error)sys.exit(1)
if __name__ == "__main__":main()
#删除执行
./delete_docker_registry_image -i localhost:5000/registry:latest
3)也可再内网仓库上导出镜像为tar包然后复制到内网docker主机上使用
docker save -o hello-world.tar hello-world  #导出
#导入
docker load -i hello-world.tar
三、附录
1)容器重启策略回顾
–restart=always重启策略:
no:默认策略,容器退出不重启
on-failure:容器非正常退出重启容器
on-failure:3:容器非正常退出最多重启4次容器
always:退出总是重启容器
unless-stopped:在容器退出时总是重启容器,但是不考虑在Docker守护进程启动时就已经停止了的容器
2)使用Harbor 构建私有仓库
Harbor 是 VMware 公司开源的企业级 Docker Registry 项目,其目标是帮助用户迅速搭建一个企业级的 Docker Registry 服务。Harbor以 Docker 公司开源的 Registry 为基础,提供了图形管理 UI 、基于角色的访问控制(Role Based AccessControl,RBAC) 、AD/LDAP 集成、以及审计日志(Auditlogging) 、管理界面、自我注册、镜像复制等企业用户需求的功能,同时还原生支持中文。更多参见:官网

Harbor 的每个组件都是以 Docker 容器的形式构建的,使用 docker-compose 来对它进行部署。用于部署 Harbor 的 docker-compose 模板位于 harbor/docker-compose.yml。
Harbor 在架构上主要有 Proxy、Registry、Core services、Database(Harbor-db)、Log collector(Harbor-log)、Job services 六个组件。

①Proxy: 是一个 nginx 的前端代理,Harbor 的 Registry、UI、Token 服务等组件,都处在 nginx 反向代理后边。 该代理将来自浏览器、docker clients 的请求转发到后端不同的服务上。
②Registry: 负责储存 Docker 镜像,并处理 Docker push/pull 命令。由于要对用户进行访问控制,即不同用户对 Docker 镜像 有不同的读写权限,Registry 会指向一个 Token 服务,强制用户的每次 Docker pull/push 请求都要携带一个合法的 Token, Registry 会通过公钥对 Token 进行解密验证。
③Core services: Harbor的核心功能,主要提供以下3个服务: 1)UI(harbor-ui): 提供图形化界面,帮助用户管理 Registry 上的镜像(image), 并对用户进行授权。 2)WebHook:为了及时获取Registry上image 状态变化的情况,在Registry 上配置 Webhook,把状态变化传递给 UI 模块。 3)Token 服务:负责根据用户权限给每个 Docker push/pull 命令签发 Token。Docker 客户端向 Registry 服务发起的请求, 如果不包含 Token,会被重定向到 Token 服务,获得 Token 后再重新向 Registry 进行请求。
④Database(harbor-db):为core services提供数据库服务,负责储存用户权限、审计日志、Docker 镜像分组信息等数据。
⑤Job services: 主要用于镜像复制,本地镜像可以被同步到远程 Harbor 实例上。
⑥Log collector(harbor-log): 负责收集其他组件的日志到一个地方。
Harbor的特性如下:
①、基于角色控制:用户和仓库都是基于项目进行组织的,而用户在项目中可以拥有不同的权限。
②、基于镜像的复制策略:镜像可以在多个Harbor实例之间进行复制(同步)。
③、支持 LDAP/AD:Harbor 可以集成企业内部已有的 AD/LDAP(类似数据库的一张表),用于对已经存在的用户认证和管理。
④、镜像删除和垃圾回收:镜像可以被删除,也可以回收镜像占用的空间。
⑤、图形化用户界面:用户可以通过浏览器来浏览,搜索镜像仓库以及对项目进行管理。
⑥、审计管理:所有针对镜像仓库的操作都可以被记录追溯,用于审计管理。
⑦、支持 RESTful API:RESTful API 提供给管理员对于 Harbor 更多的操控, 使得与其它管理软件集成变得更容易。
⑧、Harbor和docker registry的关系:Harbor实质上是对docker registry做了封装,扩展了自己的业务模板。
相关文章:
Docker本地私有仓库搭建配置指导
一、说明 因内网主机需要拉取镜像进行Docker应用,因此需要一台带外主机作为内网私有仓库来提供内外其他docker业务主机使用。参考架构如下: 相关资源:加密、Distribution registry、Create and Configure Docker Registry、Registry部署、D…...
python 通过定时任务执行pytest case
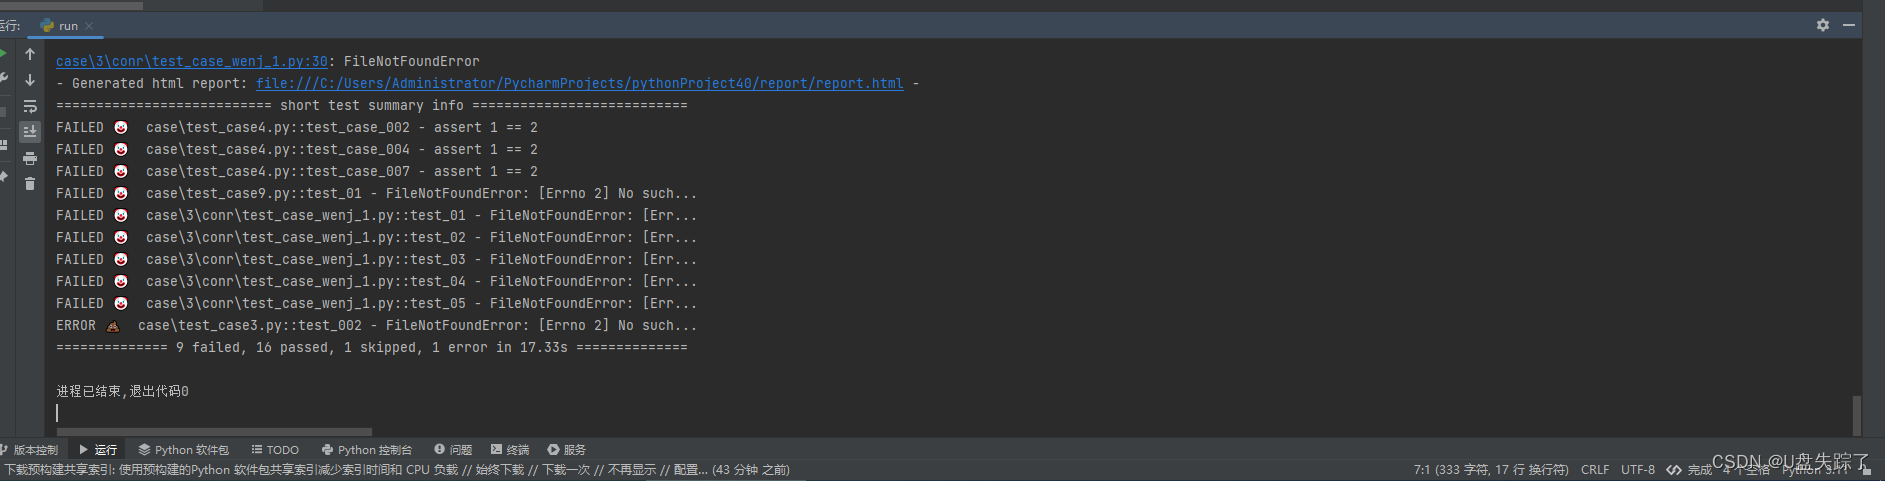
这段Python代码使用了schedule库来安排一个任务,在每天的22:50时运行。这个任务执行一个命令来运行pytest,并生成一个报告。 代码开始时将job_done变量设为False,然后运行预定的任务。一旦任务完成,将job_done设置为True并跳出循…...

算法面试题:合并两个有序链表
描述:给定两个按非递减顺序排列的链表,合并两个链表,并将结果按非递减顺序排列。 例如: # 链表 1: 1 -> 2 -> 4 # 链表 2: 1 -> 3 -> 4合并后的链表应该是:1 -> 1 -> 2 -> 3 -> 4 -> 4 …...

LaWGPT安装和使用教程的复现版本【细节满满】
文章目录 前言一、下载和部署1.1 下载1.2 环境安装1.3 模型推理 总结 前言 LaWGPT 是一系列基于中文法律知识的开源大语言模型。该系列模型在通用中文基座模型(如 Chinese-LLaMA、ChatGLM等)的基础上扩充法律领域专有词表、大规模中文法律语料预训练&am…...

西门子博途用SCL语言写的入栈出栈
1.用户登录 #pragma code ("useadmin.dll") #include "PWRT_api.h" #pragma code() PWRTLogin(1) 2.用户退出 #pragma code ("useadmin.dll") #include "PWRT_api.h" #pragma code() PWRTLogout(); 3.画面跳转 SetPictureName("P…...

密码产品推介 | 沃通安全电子签章系统(ES-1)
产品介绍 沃通安全电子签章系统(ES-1)是一款基于密码技术、完全自主研发的商用密码产品,严格遵循国家密码管理局制定的相关标准,可为企业和个人提供安全、合规的电子签章功能服务。产品的主要用途是为各类文书、合同、表单等电子…...

蓝桥杯真题(Python)每日练Day1
说明:在CSP认证的基础上(可以看看本人CSP打卡系列的博客)备赛2024蓝桥杯(Python),本人专业:大数据与数据科学 因此对python要求熟练掌握,通过练习蓝桥杯既能熟悉语法又能锻炼算法和思…...
IDEA怎么用Devtools热部署
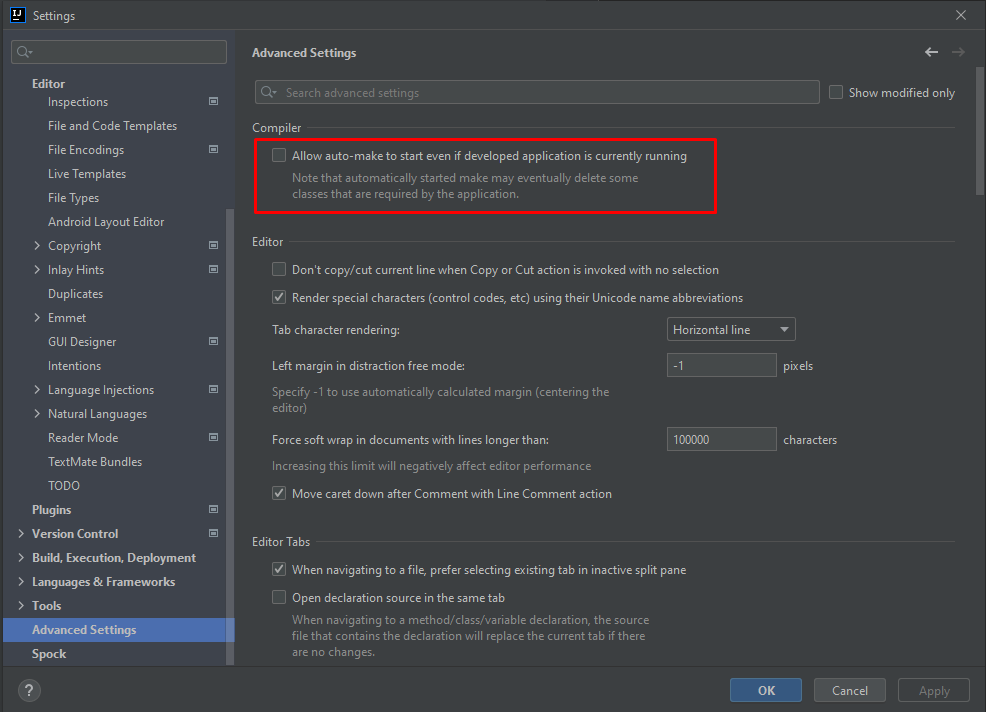
IDEA怎么用Devtools热部署 大家知道在项目开发过程中,有时候会改动代码逻辑或者修改数据结构,为了能使改动的代码生效,往往需要重启应用查看改变效果,这样会相当耗费时间。 重启应用其实就是重新编译生成新的Class文件࿰…...

boost.circular_buffer的使用和介绍
C 文章目录 C 很多时候,我们需要在内存中记录最近一段时间的数据,如操作记录等。由于这部分数据记录在内存中,因此并不能无限递增,一般有容量限制,超过后就将最开始的数据移除掉。在stl中并没有这样的数据结构…...
深入理解Java中的ThreadLocal
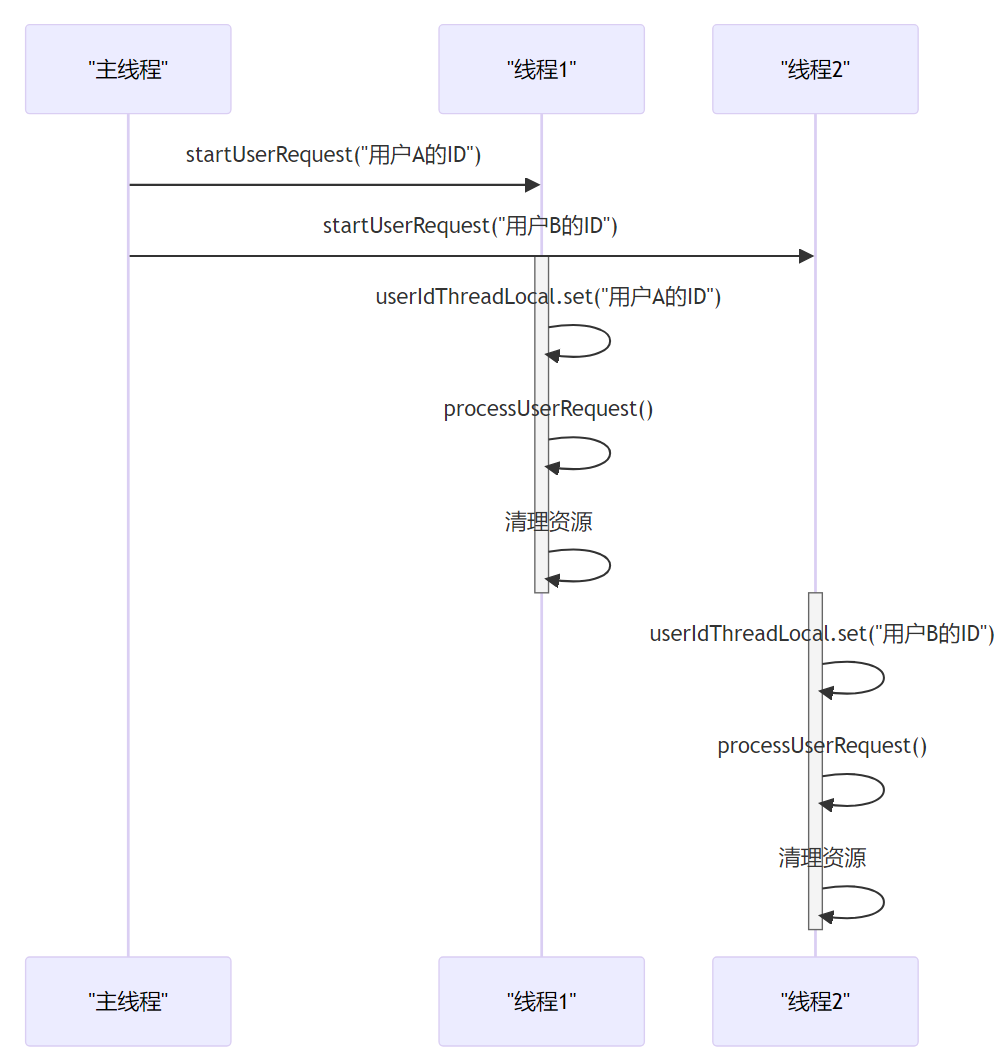
第1章:引言 大家好,我是小黑。今天咱们来聊聊ThreadLocal。首先,让咱们先搞清楚,ThreadLocal是个什么玩意儿。简单说,ThreadLocal可以让咱们在每个线程中创建一个变量的“私有副本”。这就意味着,每个线程…...

【重点】【DP】300. 最长递增子序列
题目 更好的方法是耐心排序,参见《算法小抄》的内容!!! 法1:DP 基础解法必须掌握!!! class Solution {public int lengthOfLIS(int[] nums) {if (nums null || nums.length 0) …...
使用freessl为网站获取https证书及配置详细步骤
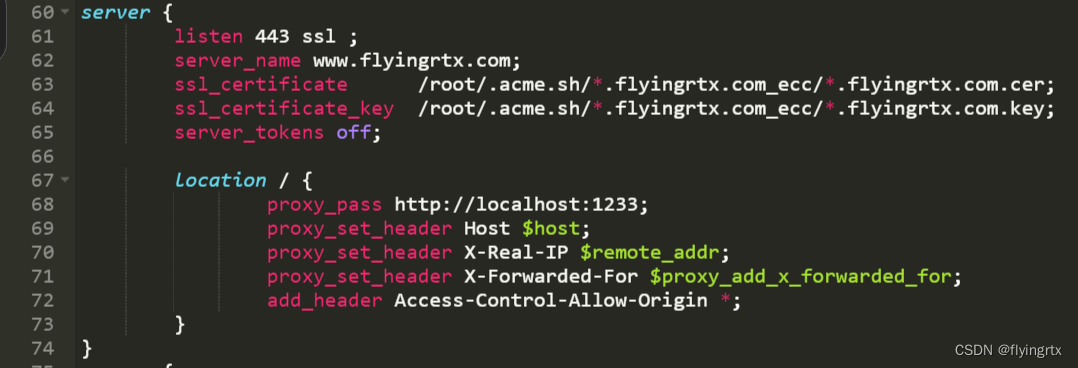
文章目录 一、进入freessl网站二、修改域名解析记录三、创建证书四、配置证书五、服务启动 一、进入freessl网站 首先进入freessl网站,需要注册一个账号 freessl网站 进入网站后填写自己的域名 接下来要求进行DCV配置 二、修改域名解析记录 到域名管理处编辑域名…...
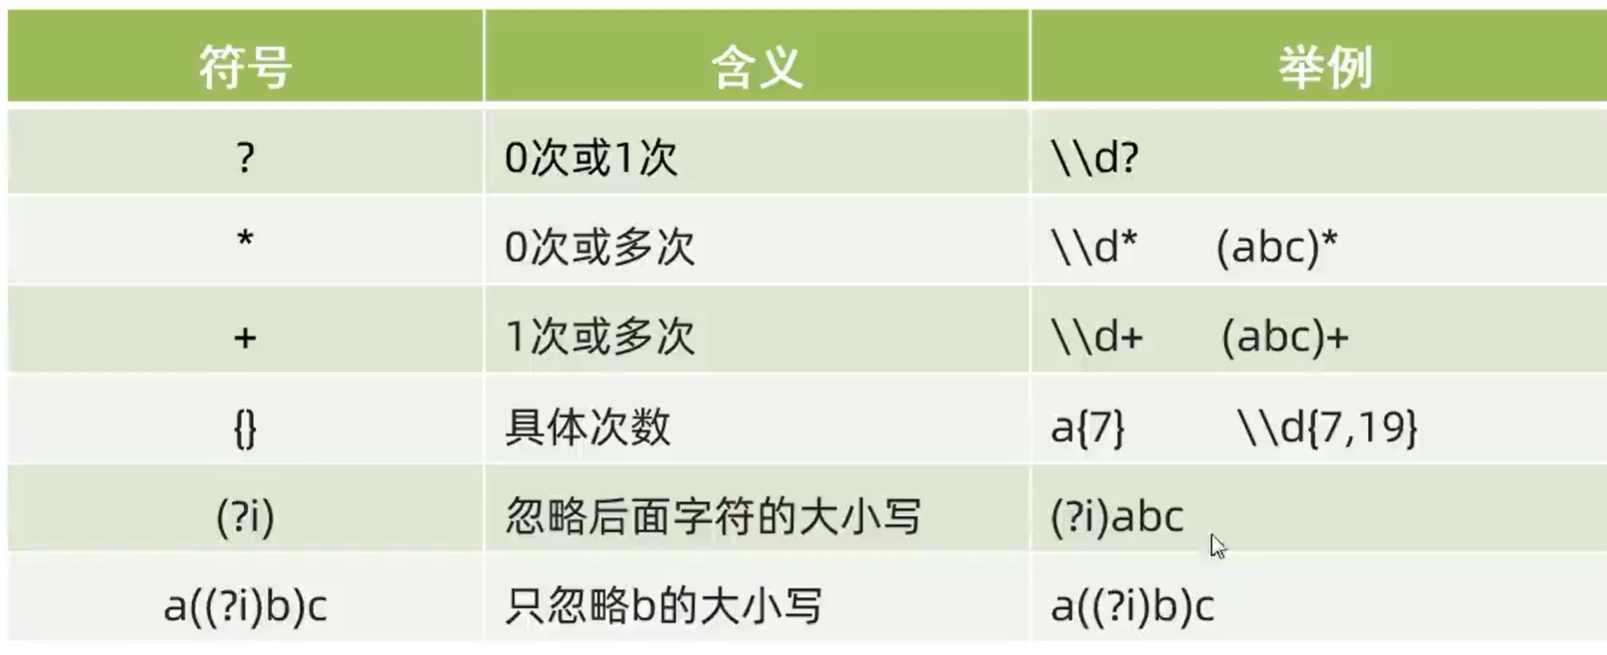
Java-初识正则表达式 以及 练习
目录 什么是正则表达式? 1. 正则表达式---字符类(一个大括号匹配一个字符): 2. 正则表达式---预字符类(也是匹配一个字符): 正则表达式---数量词 (可以匹配多个字符)…...

【Flutter 问题系列第 80 篇】TextField 输入框组件限制可输入的最大长度后,输入的内容中包含表情符号时,获取输入的内容数还是会超出限制的问题
这是【Flutter 问题系列第 80 篇】,如果觉得有用的话,欢迎关注专栏。 博文当前所用 Flutter SDK:3.10.5、Dart SDK:3.0.5 一:问题描述 在输入用户名称、简介等内容时,一般我们都会限制输入框内最大可输入…...

漏洞检测和评估【网站子域扫描工具02】
上一篇:爬取目标网站的域名和子域名【网站子域扫描工具01】 在Python中,有一些流行的漏洞扫描库可以对子域进行漏洞扫描和评估,比如Nmap、Sublist3r等。 1.端口扫描 以下是一个简单的示例代码,展示了如何使用Nmap进行基本的端口扫…...
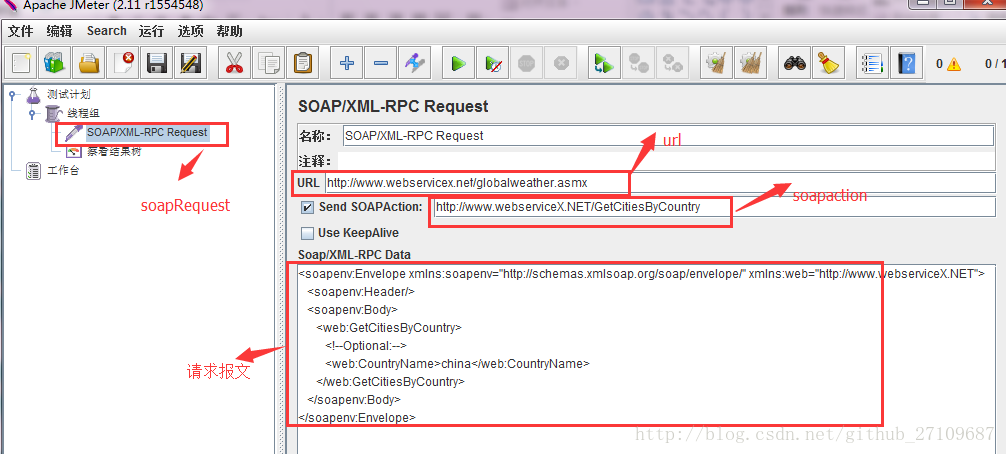
压力测试+接口测试(工具jmeter)
jmeter是apache公司基于java开发的一款开源压力测试工具,体积小,功能全,使用方便,是一个比较轻量级的测试工具,使用起来非常简单。因 为jmeter是java开发的,所以运行的时候必须先要安装jdk才可以。jmeter是…...

LeetCode 46 全排列
题目描述 全排列 给定一个不含重复数字的数组 nums ,返回其 所有可能的全排列 。你可以 按任意顺序 返回答案。 示例 1: 输入:nums [1,2,3] 输出:[[1,2,3],[1,3,2],[2,1,3],[2,3,1],[3,1,2],[3,2,1]]示例 2: 输入…...
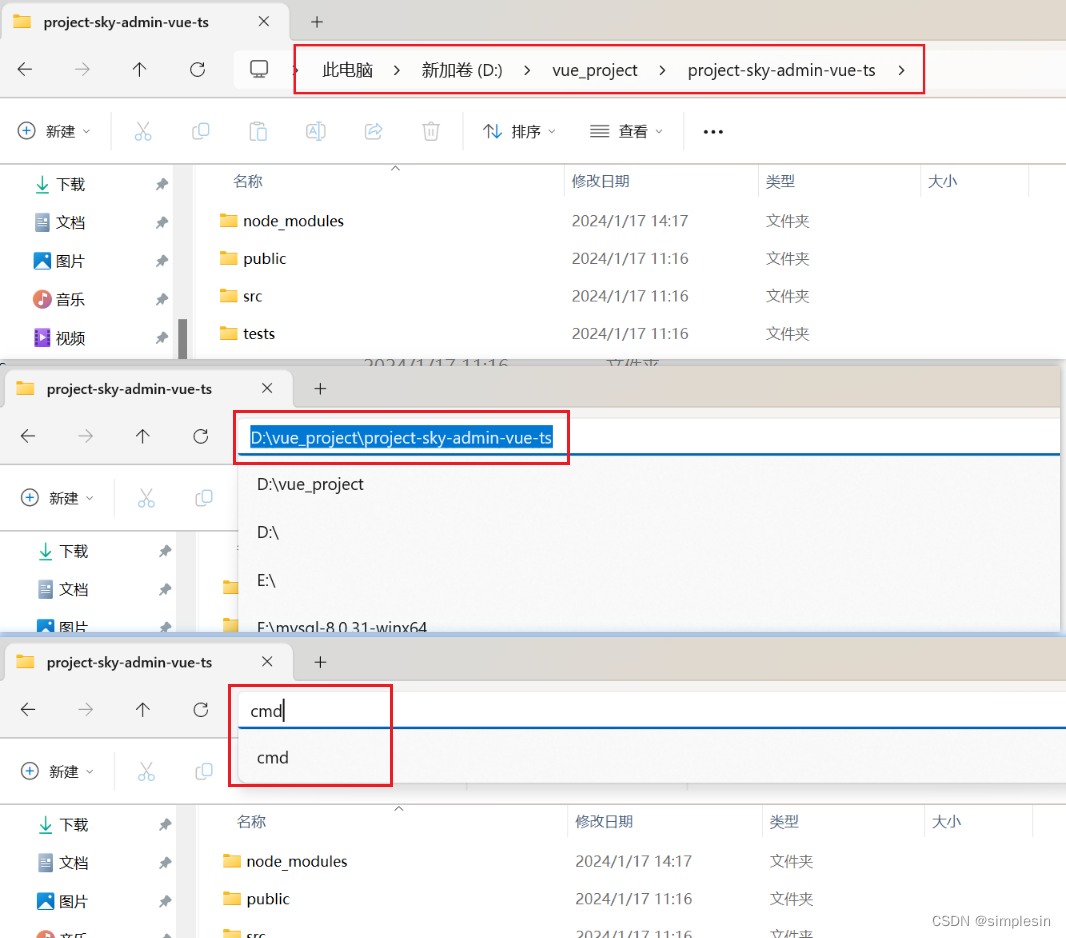
npm install 无反应 npm run serve 无反应
说明情况:其实最开始我就是发现我跟着黑马的苍穹外卖的前端day2的环境搭建做的时候,到这一步出现了问题,无论我怎么 npm install 和 npm run serve 都没有像黑马一样有很多东西进行加载,因此我换了一种方法 1.在这个文件夹下cmd …...
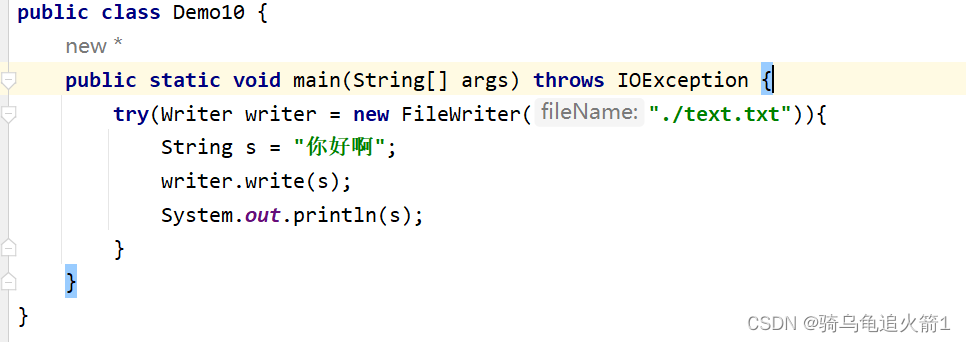
JAVAEE初阶 文件IO(二)
文件IO 一. 文件流1.1 字节流 inputStream(1) try with resources方法 1.2 read方法(1) 第一个read方法(2) 第二个read方法(3) read的第三个方法 1.3 字节流 OutoutStream1.4 字符流(1) reader(2) writer 一. 文件流 1.1 字节流 inputStream 在字节流中,我们使用inputStream和…...

Golang 三数之和+ 四数之和 leetcode15、18 双指针法
文章目录 三数之和 leetcode15map记录 失败!超出限制双指针法 四数之和 leetcode18 三数之和 leetcode15 知识补充: map的key值必须是可以比较运算的类型,不可以是函数、map、slice map记录 失败!超出限制 //得到结果后再去重 失…...

YimMenu技术深度探索:现代GTA V菜单框架的安全架构与扩展机制
YimMenu技术深度探索:现代GTA V菜单框架的安全架构与扩展机制 【免费下载链接】YimMenu YimMenu, a GTA V menu protecting against a wide ranges of the public crashes and improving the overall experience. 项目地址: https://gitcode.com/GitHub_Trending/…...

科梁信息冲刺港股:年营收6亿 利润9303万 桑苏明控制41%股权
雷递网 雷建平 5月20日上海科梁信息科技股份有限公司(简称:“科梁信息”)日前递交招股书,准备在港交所上市。年营收6亿 利润9303万科梁信息成立于2007年,是一家数字能源科技公司,致力于为新型电力系统与高端…...

UMI 采集技术落地应用 核数聚助力人形机器人快速迭代
在具身智能从实验室走向产业落地的关键期,数据饥渴已成为行业公认的核心瓶颈。传统真机遥操作采集成本高、效率低、泛化性差,仿真数据又存在物理真实性不足的问题。此时,UMI(Universal Manipulation Interface,通用操作…...

3分钟学会B站缓存视频转换:m4s转MP4完整指南
3分钟学会B站缓存视频转换:m4s转MP4完整指南 【免费下载链接】m4s-converter 一个跨平台小工具,将bilibili缓存的m4s格式音视频文件合并成mp4 项目地址: https://gitcode.com/gh_mirrors/m4/m4s-converter 你是否遇到过这样的困扰?在B…...

嵌入式PID温度控制:从算法原理到C语言工程实现
1. 项目概述与核心思路最近在做一个智能热水器的嵌入式控制项目,核心任务就是让水温能又快又稳地达到我们设定的目标值。这听起来简单,但实际做起来,水温系统有惯性、有延迟,加热功率和环境散热也在实时变化,想实现精准…...

阿里云服务器上fastText安装踩坑记:从C++11报错到模型量化压缩的完整避坑指南
阿里云ECS实战:fastText从编译报错到模型量化的全流程解决方案 当你在阿里云ECS上部署fastText模型时,是否遇到过那个令人头疼的"C11编译错误"?这仅仅是开始——内存占用过高、磁盘空间不足、推理速度慢等问题会接踵而至。本文将带…...
:92%的学习者不知道的5个隐藏功能与3倍提效配置)
Perplexity语言学习资源深度测评(2024Q2最新版):92%的学习者不知道的5个隐藏功能与3倍提效配置
更多请点击: https://intelliparadigm.com 第一章:Perplexity语言学习资源概览与核心价值定位 Perplexity 作为一款以“实时、可溯源、推理驱动”为设计哲学的AI问答工具,正迅速成为语言学习者构建语境化知识体系的关键基础设施。它并非传统…...

从STM32F405到AT32F435:手把手教你给AocodaRC飞控换‘芯’并刷入BetaFlight固件
从STM32F405到AT32F435:国产芯片飞控改造全流程实战 对于追求极致性能的无人机玩家而言,飞控系统的硬件升级永远是绕不开的话题。当雅特力AT32F435这颗国产芯片以更高的主频、更大的Flash容量和更丰富的外设资源进入视野时,很多飞手已经按捺不…...

搞懂专业代剪辑,才能看懂好视频背后的逻辑
为什么你拍的素材总剪不出‘电影感’? 你是否也经历过这样的困扰:婚礼当天拍了上百G的高清素材,回家却剪不出那支朋友圈点赞破百的高光快剪;或是为新品拍摄了完整开箱视频,上传后播放量寥寥?问题往往不在拍…...

卡尔曼滤波在目标跟踪中的应用:原理、建模与工程调参实战
1. 项目概述:从“猜”到“算”的跟踪艺术在目标跟踪这个领域,无论是自动驾驶中预测前车的轨迹,还是无人机锁定移动的物体,亦或是视频监控里框住一个行走的人,我们核心要解决的都是一个问题:如何在充满噪声和…...