09前后端分离+SSM整合的小案例
- 前端的Node = 后端的Tomcat,是前端程序的容器。
- 前端的npm = 后端的maven
1. 导入前端项目
node版本:16.16.0
-
配置阿里镜像
npm config set registry https://registry.npmjs.org/
-
更新npm版本
npm install -g npm@9.6.6
-
用vscode打开解压后的项目 , 右上角toggle panel打开命令行
-
npm依赖下载命令
npm install
即可下载所有需要的依赖 -
npm run dev //运行测试.
2. 后端项目
- 数据库脚本:
CREATE TABLE schedule (id INT NOT NULL AUTO_INCREMENT,title VARCHAR(255) NOT NULL,completed BOOLEAN NOT NULL,PRIMARY KEY (id)
);INSERT INTO schedule (title, completed)
VALUES('学习java', true),('学习Python', false),('学习C++', true),('学习JavaScript', false),('学习HTML5', true),('学习CSS3', false),('学习Vue.js', true),('学习React', false),('学习Angular', true),('学习Node.js', false),('学习Express', true),('学习Koa', false),('学习MongoDB', true),('学习MySQL', false),('学习Redis', true),('学习Git', false),('学习Docker', true),('学习Kubernetes', false),('学习AWS', true),('学习Azure', false);
- 新建一个module,转web项目. 先写配置类
因为涉及了数据库, 还要写连接池的配置类 , 但是将数据库连接池和mapper的配置写到一起 . 总计还是4个配置类 , Controller放到Web容器 , Service/mapper+连接池/数据源 放到root容器.
此外,还要一个初始化IoC容器的初始化类
把上节的四个复制粘贴即可
controller
package com.sunsplanter.config;import org.springframework.context.annotation.ComponentScan;
import org.springframework.context.annotation.Configuration;
import org.springframework.web.servlet.config.annotation.*;/*** projectName: com.atguigu.config** 1.实现Springmvc组件声明标准化接口WebMvcConfigurer 提供了各种组件对应的方法* 2.添加配置类注解@Configuration* 3.添加mvc复合功能开关@EnableWebMvc* 4.添加controller层扫描注解* 5.开启默认处理器,支持静态资源处理*/
@Configuration
@EnableWebMvc
@ComponentScan("com.sunsplanter.controller")
public class WebMvcJavaConfig implements WebMvcConfigurer {//开启静态资源@Overridepublic void configureDefaultServletHandling(DefaultServletHandlerConfigurer configurer) {configurer.enable();}//jsp视图解析器前后缀@Overridepublic void configureViewResolvers(ViewResolverRegistry registry) {registry.jsp("WEB-INF/views","jsp");}//拦截器,指明包含的路径排除的路径@Overridepublic void addInterceptors(InterceptorRegistry registry) {//registry.addInterceptor((new 拦截器的类).addPathPatterns().excludePathPatterns)}
}
service
package com.sunsplanter.config;import org.springframework.context.annotation.Bean;import org.springframework.context.annotation.ComponentScan;import org.springframework.context.annotation.Configuration;import org.springframework.context.annotation.EnableAspectJAutoProxy;import org.springframework.jdbc.datasource.DataSourceTransactionManager;import org.springframework.transaction.annotation.EnableTransactionManagement;import javax.sql.DataSource;/*** 1. 声明@Configuration注解,代表配置类* 2. 声明@EnableTransactionManagement注解,开启事务注解支持* 3. 声明@EnableAspectJAutoProxy注解,开启aspect aop注解支持.@Before/@After/@Around* 4. 声明@ComponentScan组件扫描* 5. 声明式事务管理. 1.实现对应的事务管理器(DataSourceTransactionManager) 2.开启事务注解支持*/@EnableTransactionManagement@EnableAspectJAutoProxy@Configuration@ComponentScan("com.sunsplanter.service")public class ServiceJavaConfig {//@Bean//IoC容器自动将property中的dataSource注入此中public DataSourceTransactionManager transactionManager(DataSource dataSource){DataSourceTransactionManager transactionManager = new DataSourceTransactionManager();transactionManager.setDataSource(dataSource);return transactionManager;}}
mapper
package com.sunsplanter.config;import com.github.pagehelper.PageInterceptor;
import org.apache.ibatis.logging.slf4j.Slf4jImpl;
import org.apache.ibatis.session.AutoMappingBehavior;
import org.mybatis.spring.SqlSessionFactoryBean;
import org.mybatis.spring.mapper.MapperScannerConfigurer;
import org.springframework.context.annotation.Bean;
import org.springframework.context.annotation.Configuration;import javax.sql.DataSource;
import java.util.Properties;/*** description: 持久层配置和Druid和Mybatis配置 使用一个配置文件*/
@Configuration
public class MapperJavaConfig {/*** 配置SqlSessionFactoryBean,指定连接池对象和外部配置文件即可* @param dataSource 需要注入连接池对象* @return 工厂Bean*/@Beanpublic SqlSessionFactoryBean sqlSessionFactoryBean(DataSource dataSource){//实例化SqlSessionFactory工厂SqlSessionFactoryBean sqlSessionFactoryBean = new SqlSessionFactoryBean();//设置连接池sqlSessionFactoryBean.setDataSource(dataSource);//settings [包裹到一个configuration对象,切记别倒错包]org.apache.ibatis.session.Configuration configuration = new org.apache.ibatis.session.Configuration();configuration.setMapUnderscoreToCamelCase(true);configuration.setLogImpl(Slf4jImpl.class);configuration.setAutoMappingBehavior(AutoMappingBehavior.FULL);sqlSessionFactoryBean.setConfiguration(configuration);//typeAliasessqlSessionFactoryBean.setTypeAliasesPackage("com.atguigu.pojo");//分页插件配置PageInterceptor pageInterceptor = new PageInterceptor();Properties properties = new Properties();properties.setProperty("helperDialect","mysql");pageInterceptor.setProperties(properties);sqlSessionFactoryBean.addPlugins(pageInterceptor);return sqlSessionFactoryBean;}/*** 配置Mapper实例扫描工厂,配置 <mapper <package 对应接口和mapperxml文件所在的包* @return*/@Beanpublic MapperScannerConfigurer mapperScannerConfigurer(){MapperScannerConfigurer mapperScannerConfigurer = new MapperScannerConfigurer();//设置mapper接口和xml文件所在的共同包mapperScannerConfigurer.setBasePackage("com.atguigu.mapper");return mapperScannerConfigurer;}}
数据源配置类 , 从properties中取
package com.sunsplanter.config;import com.alibaba.druid.pool.DruidDataSource;
import org.springframework.beans.factory.annotation.Value;
import org.springframework.context.annotation.Bean;
import org.springframework.context.annotation.Configuration;
import org.springframework.context.annotation.PropertySource;
import javax.sql.DataSource;@Configuration
@PropertySource("classpath:jdbc.properties")
public class DataSourceJavaConfig {@Value("${jdbc.user}")private String user;@Value("${jdbc.password}")private String password;@Value("${jdbc.url}")private String url;@Value("${jdbc.driver}")private String driver;//数据库连接池配置@Beanpublic DataSource dataSource(){DruidDataSource dataSource = new DruidDataSource();dataSource.setUsername(user);dataSource.setPassword(password);dataSource.setUrl(url);dataSource.setDriverClassName(driver);return dataSource;}}
初始化类:
package com.sunsplanter.config;import org.springframework.web.servlet.support.AbstractAnnotationConfigDispatcherServletInitializer;public class SpringIoCInit extends AbstractAnnotationConfigDispatcherServletInitializer {//指定root容器对应的配置类 , 即下面两层@Overrideprotected Class<?>[] getRootConfigClasses() {return new Class<?>[] {MapperJavaConfig.class, ServiceJavaConfig.class, DataSourceJavaConfig.class };}//指定web容器对应的配置类@Overrideprotected Class<?>[] getServletConfigClasses() {return new Class<?>[] { WebMvcJavaConfig.class };}//指定dispatcherServlet处理路径,通常为 /@Overrideprotected String[] getServletMappings() {return new String[] { "/" };}}
- 实体类
/*** description: 任务实体类*/
@Data
public class Schedule {private Integer id;private String title;private Boolean completed;
}
- 准备 R(返回结果类)
package com.sunsplanter.utilspublic class R {private int code = 200; //200成功状态码private boolean flag = true; //返回状态private Object data;  //返回具体数据public  static R ok(Object data){R r = new R();r.data = data;return r;}public static R  fail(Object data){R r = new R();r.code = 500; //错误码r.flag = false; //错误状态r.data = data;return r;}public int getCode() {return code;}public void setCode(int code) {this.code = code;}public boolean isFlag() {return flag;}public void setFlag(boolean flag) {this.flag = flag;}public Object getData() {return data;}public void setData(Object data) {this.data = data;}
}
- 准备 PageBean
package com.sunsplanter.utils@Data
@NoArgsConstructor
@AllArgsConstructor
public class PageBean<T> {private int currentPage;   // 当前页码private int pageSize;      // 每页显示的数据量private long total;    // 总数据条数private List<T> data;      // 当前页的数据集合
}
开始实现功能:
3.1 . 查询全部功能实现
/*
需求说明查询全部数据页数据
请求urischedule/{pageSize}/{currentPage}
请求方式 get
响应的json{"code":200,"flag":true,"data":{//本页数据data:[{id:1,title:'学习java',completed:true},{id:2,title:'学习html',completed:true},{id:3,title:'学习css',completed:true},{id:4,title:'学习js',completed:true},{id:5,title:'学习vue',completed:true}], //分页参数pageSize:5, // 每页数据条数 页大小total:0 ,   // 总记录数currentPage:1 // 当前页码}}
*/
- controller层 .
/*@CrossOrigin 注释在带注释的控制器方法上启用跨源请求*/
@CrossOrigin
//get请求方式
@RequestMapping("schedule")
@RestController
public class ScheduleController
{//控制层只做两件事:接收参数,返回结果 , 因此先声明一个业务层对象@Autowiredprivate ScheduleService scheduleService;//路径传参,用大括号括起来, 从形参中传@GetMapping("/{pageSize}/{currentPage}")public R showList(@PathVariable(name = "pageSize") int pageSize, @PathVariable(name = "currentPage") int currentPage){PageBean<Schedule> pageBean = scheduleService.findByPage(pageSize,currentPage);return  R.ok(pageBean);}
}
- service
@Slf4j
@Service
public class ScheduleServiceImpl  implements ScheduleService {@Autowiredprivate ScheduleMapper scheduleMapper;/*** 分页数据查询,返回分页pageBean** @param pageSize* @param currentPage* @return*/@Override
//调用mapper对象执行查询语句,结果封装进实体对象的列表中-->public PageBean<Schedule> findByPage(int pageSize, int currentPage) {//1.设置分页参数PageHelper.startPage(currentPage,pageSize);//2.数据库查询List<Schedule> list = scheduleMapper.queryPage();//3.结果获取PageInfo<Schedule> pageInfo = new PageInfo<>(list);//4.pageBean封装PageBean<Schedule> pageBean = new PageBean<>(pageInfo.getPageNum(),pageInfo.getPageSize(),pageInfo.getTotal(),pageInfo.getList());log.info("分页查询结果:{}",pageBean);return pageBean;}}
-
mapper
mapper接口
public interface ScheduleMapper {List<Schedule> queryPage();
}
mapperxml文件
<?xml version="1.0" encoding="UTF-8" ?>
<!DOCTYPE mapperPUBLIC "-//mybatis.org//DTD Mapper 3.0//EN""https://mybatis.org/dtd/mybatis-3-mapper.dtd">
<!-- namespace等于mapper接口类的全限定名,这样实现对应 -->
<mapper namespace="com.atguigu.mapper.ScheduleMapper"><select id="queryPage" resultType="schedule">select * from schedule</select>
</mapper>
相关文章:

09前后端分离+SSM整合的小案例
前端的Node 后端的Tomcat,是前端程序的容器。前端的npm 后端的maven 1. 导入前端项目 node版本:16.16.0 配置阿里镜像 npm config set registry https://registry.npmjs.org/ 更新npm版本 npm install -g npm9.6.6 用vscode打开解压后的项目 , 右上角…...

模仿ProTable创建ProTable组件
不多说废话直接上代码 父组件 // index.jsx/*** description 此ProTable是根据ProComponents里的ProTable模仿封装的简易版本* */ import React, { forwardRef, useCallback, useEffect, useImperativeHandle, useState } from react import { Card, Table } from antd import…...
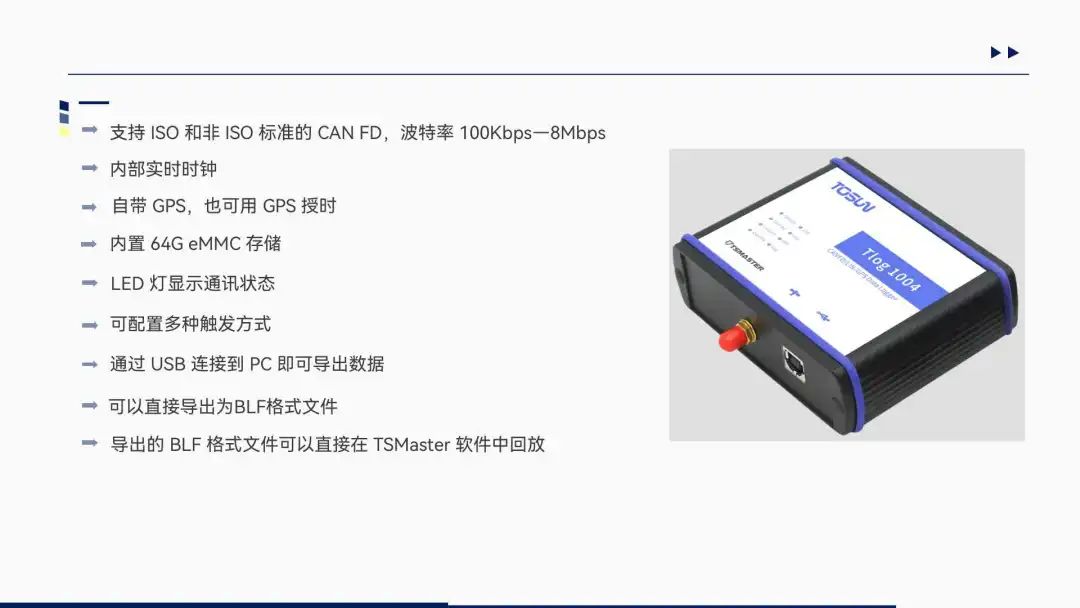
新品发布 | 多通道总线记录仪TLog1004,是你期待的吗?
新品发布 2024年1月12日,同星智能又发布一款多通道 CAN (FD)总线、LIN 总线接口logger设备,此款产品在TLog1002基础上进行了升级,同时内置 3 路数字输入和 2 路数字输出,便于多种信号测量和系统集成。可以满…...

Double数据类型保留3位小数
Double scrapGrn scrapQty * Double.parseDouble(lot.getCnvrsnFctr()) / 1000 ; // 保留3位小数 DecimalFormat decimalFormat new DecimalFormat("#.###"); String scrapGrnStr decimalFormat.format(scrapGrn); 345.12344 处理后 为 345.123 34…...
08- OpenCV:形态学操作(膨胀与腐蚀 、提取水平与垂直线)
目录 前言 一、膨胀(Dilation)与 腐蚀(Erosion) 二、形态学操作 1、开操作(Opening) 2、闭操作(Closing) 3、形态学梯度(Morphological Gradient) 4、…...
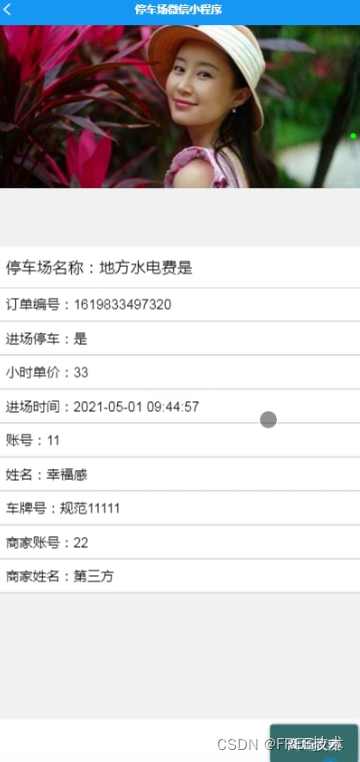
基于JavaWeb+SSM+Vue停车场微信小程序系统的设计和实现
基于JavaWebSSMVue停车场微信小程序系统的设计和实现 滑到文末获取源码Lun文目录前言主要技术系统设计功能截图订阅经典源码专栏Java项目精品实战案例《500套》 源码获取 滑到文末获取源码 Lun文目录 目录 1系统概述 1 1.1 研究背景 1 1.2研究目的 1 1.3系统设计思想 1 2相关…...

VUE---自定义指令
自定义指令:自己定义的指令,可以封装一些dom操作,扩展额外功能。可分为全局注册与 局部注册。 全局注册(main.js中注册): Vue.directive(指令名称,{ bind(ele,binding) {}, // 只执…...
 漏洞)
开发安全之:Cross-Site Scripting (XSS) 漏洞
近期,我会结合研发云陆续发布开发安全相关的文章,欢迎大家关注! Overview echo json_encode($arr):向一个 Web 浏览器发送了未验证的数据,从而导致该浏览器执行恶意代码。 Details Cross-Site Scripting (XSS) 漏洞…...

代码随想录算法训练营第二十四天| 77. 组合
77.组合 public List<List<Integer>> combine(int n, int k) {if (n < k) {return null;}List<List<Integer>> list new ArrayList<>();List<Integer> path new ArrayList<>();backSource(n, path, list, k);return list;}pu…...

虚拟歌姬学习:DiffSinger,让GitHub下载快的方法!
《三分钟上手DiffSinger》系列 ——基础篇https://www.bilibili.com/video/BV1ug4y1S7Dk/?spm_id_from333.337.search-card.all.click&vd_source124076d7d88eee393a1d8bf6fc787efa 下载DiffSinger 建议用edge浏览器还有steam,有时只是慢,但是还是…...

What is `StringEscapeUtils.escapeHtml4` does?
StringEscapeUtils.escapeHtml4 作用是将特殊字符转换为它们对应的HTML实体形式,从而防止这些字符在网页中被解析为HTML标签或脚本,有助于防止跨站脚本攻击(XSS, Cross-Site Scripting) 依赖 <!--org.apache.commons.text.St…...

Dubbo 的心脏:理解和应用多种协议【十三】
欢迎来到我的博客,代码的世界里,每一行都是一个故事 Dubbo 的心脏:理解和应用多种协议【十三】 前言<dubbo:protocol> 基础<dubbo:protocol> 的定义和作用微服务中协议的重要性支持的协议类型配置示例 配置基本配置参数高级配置选…...

操作系统实验报告
目录 目录 实验一 一、实验结果 实验二 使用信号量实现进程互斥与同步 一、实验结果 1. 使用信号量实现有限缓冲区的生产者和消费者问题 2. 使用信号量实现读进程具有优先权的读者和写者问题 实验三 死锁和预防 一、实验要求 二、实验内容 三、实验结果 实验四 内…...

IPv6--ACL6(IPv6访问控制列表--基本ACL6配置)
ACL基本原理 ACL由一系列规则组成,通过将报文与ACL规则进行匹配,设备可以过滤出特定的报文。 ACL的组成 ACL编号: 在网络设备上配置ACL时,每个ACL都需要分配一个编号,称为ACL编号,用来标识ACL。不同分类的ACL编号范围不同,这个后面具体讲。 规则: 前面提到了,一个AC…...
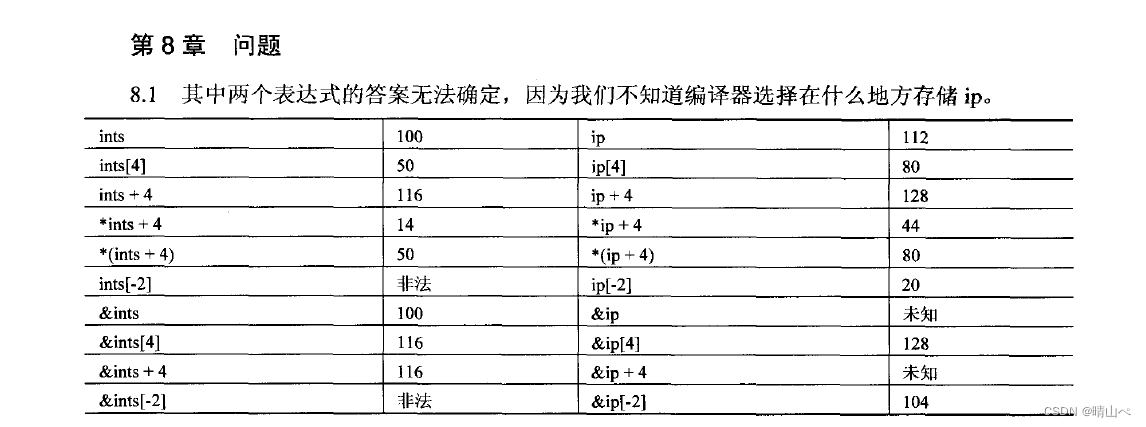
C和指针课后答案
提示:文章写完后,目录可以自动生成,如何生成可参考右边的帮助文档 文章目录 前言一、pandas是什么?二、使用步骤 1.引入库2.读入数据总结 前言 第八章课后答案 提示:以下是本篇文章正文内容,下面案例可供参…...

C语言——大头记单词
归纳编程学习的感悟, 记录奋斗路上的点滴, 希望能帮到一样刻苦的你! 如有不足欢迎指正! 共同学习交流! 🌎欢迎各位→点赞 👍 收藏⭐ 留言📝 每一发奋努力的背后,必有加…...

根据自己修改后的容器制作镜像并上传docker hub
要将自己的镜像上传到Docker Hub,可以按照以下步骤进行操作: 首先,确保已经在本地构建好了需要上传的 Docker 镜像。如果还没有构建,可以使用 docker build 命令来创建镜像。 登录到 Docker Hub 账号。打开终端或命令提示符&…...

Maven 基础安装配置及使用
大家好我是苏麟 , 今天聊聊Maven . Maven Maven , 是Apache公司下基于Java开发的开源项目 . 我们构建一个项目需要用到很多第三方的类库,需要引入大量的jar包。一个项目Jar包的数量之多往往让我们瞠目结舌,并且Jar包之间的关系错综复杂,一…...
redis 持久化机制
client redis[内存] -----> 内存数据- 数据持久化-->磁盘 Redis官方提供了两种不同的持久化方法来将数据存储到硬盘里面分别是: RDB 快照(Snapshot) AOF (Append Only File) 只追加日志文件 1 快照(Snapshot) 1. 特点 这种方式可以将某一时刻的所有数据都写入硬盘中…...
MySQL(视图,存储函数,存储过程)
作业1: 作业实现: 首先创建学生表,课程表,以及学生选课表。 CREATE TABLE Student (Sno INT PRIMARY KEY,Sname VARCHAR(20) NOT NULL,Ssex CHAR(1) CHECK (Ssex IN (男, 女)),Sage INT,SDept VARCHAR(20) DEFAULT 计算机 );CRE…...

别再死记硬背了!COBOL中COMP、COMP-3、COMP-5数据类型的区别与实战赋值避坑指南
COBOL数值类型实战手册:COMP家族的内存布局与精准赋值策略 在金融核心系统维护中,我曾目睹过因COMP-3类型使用不当导致整月利息计算误差达六位数的生产事故。这种"古董级"数据类型的独特设计,至今仍在每秒处理数百万交易的银行系统…...
)
DeepSeek v3.2.1核心模块异常日志分析(生产环境未公开的5个堆栈陷阱)
更多请点击: https://kaifayun.com 第一章:DeepSeek v3.2.1核心模块异常日志分析(生产环境未公开的5个堆栈陷阱) 在高并发场景下,DeepSeek v3.2.1 的 model-router 与 kv-cache-sync 模块频繁触发非预期 panic&#x…...

从审稿人到作者:我审了10篇论文后,总结出的5个投稿避坑指南和3个加分项
从审稿人到作者:10篇论文审阅经验提炼的5大避坑策略与3个关键加分项 第一次收到审稿邀请时,我正对着自己第三篇被拒的论文修改意见发呆。这种身份错位带来的震撼,让我开始系统记录审稿笔记——如今这些笔记已形成超过2万字的"审稿人思维…...
)
阿里云ECS新手避坑指南:搞定校园网、安全组和SSH端口映射(附XShell连接测试)
阿里云ECS新手全流程配置手册:从安全组到SSH连接的深度实践 第一次接触云服务器时,那种既兴奋又忐忑的心情我至今记忆犹新。看着控制台里各种陌生的术语和选项,明明按照教程一步步操作却总是卡在连接阶段,这种经历想必不少技术爱好…...

光猫拨号下,如何把二级路由器变成‘透明网桥’?一个设置让NAS、打印机全屋可见
光猫拨号下的家庭网络优化:二级路由器透明化实战指南 家里NAS里的电影在客厅电视上死活刷不出来?书房电脑找不到卧室的无线打印机?这些问题往往源于家庭网络中多台路由器形成的"局域网套娃"。本文将手把手教你如何将二级路由器转化…...

抖音视频批量下载神器:3分钟学会无水印批量下载技巧
抖音视频批量下载神器:3分钟学会无水印批量下载技巧 【免费下载链接】douyin-downloader A practical Douyin downloader for both single-item and profile batch downloads, with progress display, retries, SQLite deduplication, and browser fallback support…...

避坑指南:iMX6ULL上RTL8723BU模块的WiFi延迟与蓝牙扫描问题分析与优化
iMX6ULL平台RTL8723BU模块WiFi/蓝牙深度调优实战 当iMX6ULL开发板遇上RTL8723BU这款高性价比的WiFi蓝牙二合一模块,不少开发者会发现:虽然基础功能能跑通,但实际应用中WiFi延迟飙高、蓝牙设备扫描不稳定等问题频频出现。这就像买了一辆能启动…...

毕业设计 基于python的答题卡识别评分系统
文章目录 0 简介课题简介什么是机器视觉实现步骤详细设计图片读取canny边缘检测四点变换 划出区域处理选择题区域提取选项轮廓判断选项 读取正确结果 最后 0 简介 今天学长向大家分享一个毕业设计项目 毕业设计 基于python的答题卡识别评分系统 项目运行效果: 毕…...

7分钟掌握中国行政区划数据:从零到实战的完整指南
7分钟掌握中国行政区划数据:从零到实战的完整指南 【免费下载链接】Administrative-divisions-of-China 中华人民共和国行政区划:省级(省份)、 地级(城市)、 县级(区县)、 乡级&…...

【Perplexity文学研究黄金配置】:1个提示词模板+2个权威元数据过滤器+4类文学体裁专属指令集
更多请点击: https://codechina.net 第一章:Perplexity文学作品查询 Perplexity 是一款以实时网络检索与引用溯源为特色的 AI 助手,其在人文领域尤其适用于文学研究场景。不同于传统大模型的静态知识库,Perplexity 在响应用户查询…...